nokia 3710 fold user guide - vodafone nz · about maps 57 nokia map loader 58 about gps 58 gps...
TRANSCRIPT

Nokia 3710 fold User Guide
4444444Issue 1
CyanCyan MagentaMagentaYellowYellow BlackBlack

Contents
Safety 4
Get started 5Keys and parts 5Insert the SIM card and battery 6Insert and remove the memorycard 7Charge the battery 8GSM antenna 9Accessories 9
Switch it on 11About your device 11Network services 11Access codes 12Switch the device on and off 13Home screen 13Navigate the menus 15Lock the keys 16Functions without a SIM card 16Flight profile 17
Support and updates 18Support 18My Nokia 18Download content 18Software updates using your PC 19
Software updates over the air 19Restore factory settings 20
Make it your device 21Basic settings 21Personalise your device 23Connect 25Network provider services 28
Stay in touch 30Make calls 30Text and messages 34Mail and Instant Messaging 38
Image and video 44Capture images 44Record video clips 45Camera and video settings 45Gallery 45Print images 47Share images and video clipsonline 47Memory card 48
Entertainment 49Listen to music 49Web 53Games and applications 56
Maps 57
2 Contents
www.nokia.com/support
CyanCyan MagentaMagentaYellowYellow BlackBlack
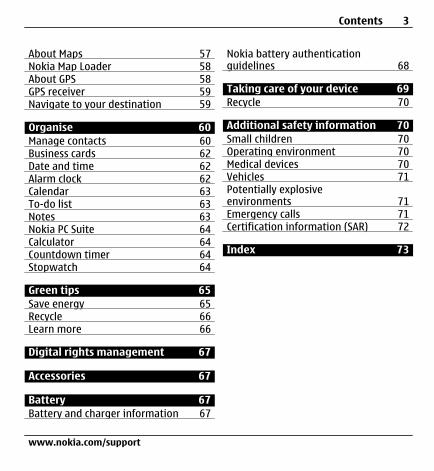
About Maps 57Nokia Map Loader 58About GPS 58GPS receiver 59Navigate to your destination 59
Organise 60Manage contacts 60Business cards 62Date and time 62Alarm clock 62Calendar 63To-do list 63Notes 63Nokia PC Suite 64Calculator 64Countdown timer 64Stopwatch 64
Green tips 65Save energy 65Recycle 66Learn more 66
Digital rights management 67
Accessories 67
Battery 67Battery and charger information 67
Nokia battery authenticationguidelines 68
Taking care of your device 69Recycle 70
Additional safety information 70Small children 70Operating environment 70Medical devices 70Vehicles 71Potentially explosiveenvironments 71Emergency calls 71Certification information (SAR) 72
Index 73
Contents 3
www.nokia.com/support
CyanCyan MagentaMagentaYellowYellow BlackBlack

Safety
Read these simple guidelines. Notfollowing them may be dangerous orillegal. Read the complete user guide forfurther information.
SWITCH ON SAFELYDo not switch the device onwhen wireless phone use isprohibited or when it maycause interference or danger.
ROAD SAFETY COMES FIRSTObey all local laws. Alwayskeep your hands free tooperate the vehicle whiledriving. Your firstconsideration while drivingshould be road safety.
INTERFERENCEAll wireless devices may besusceptible to interference,which could affectperformance.
SWITCH OFF IN RESTRICTED AREASFollow any restrictions.Switch the device off inaircraft, near medicalequipment, fuel, chemicals,or blasting areas.
QUALIFIED SERVICEOnly qualified personnel mayinstall or repair this product.
ACCESSORIES AND BATTERIESUse only approvedaccessories and batteries. Donot connect incompatibleproducts.
WATER-RESISTANCEYour device is not water-resistant. Keep it dry.
4 Safety
www.nokia.com/support
CyanCyan MagentaMagentaYellowYellow BlackBlack
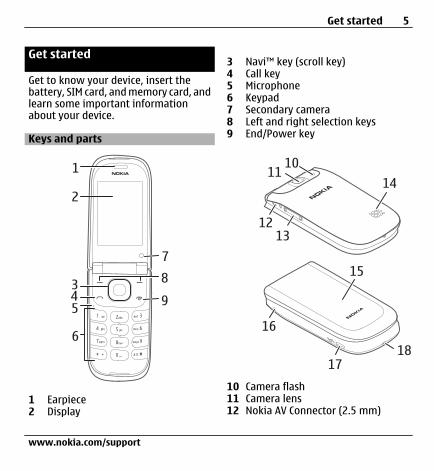
Get started
Get to know your device, insert thebattery, SIM card, and memory card, andlearn some important informationabout your device.
Keys and parts
1 Earpiece2 Display
3 Navi™ key (scroll key)4 Call key5 Microphone6 Keypad7 Secondary camera8 Left and right selection keys9 End/Power key
10 Camera flash11 Camera lens12 Nokia AV Connector (2.5 mm)
Get started 5
www.nokia.com/support
CyanCyan MagentaMagentaYellowYellow BlackBlack

13 Volume keys14 Loudspeaker15 Hidden display16 Charger connector17 Micro USB cable connector18 Wrist strap eyelet
Insert the SIM card and batteryNote: Switch off the power anddisconnect the charger and any otherdevice before removing the covers.Avoid touching electronic componentswhile changing the covers. Always storeand use the device with the coversattached.
The SIM card and its contacts can beeasily damaged by scratches orbending, so be careful when handling,inserting, or removing the card.
1 Open the back cover, and remove it.
2 Remove the battery.
3 Open the SIM card holder. Insert theSIM card into the holder with thebevelled corner facing down andthe contact surface area facingtoward the contacts of the device.The side with the bevelled cornerfits below the rim of the device.Close the SIM card holder.
6 Get started
www.nokia.com/support
CyanCyan MagentaMagentaYellowYellow BlackBlack

4 Line up the battery contacts, andinsert the battery.
5 Place the battery cover on thedevice, that the hooks at the upperpart of the cover are aligned withthe corresponding recesses on thedevice. Slide the back cover to closeit.
Insert and remove the memory card
Use only compatible microSD cardsapproved by Nokia for use with thisdevice. Nokia uses approved industrystandards for memory cards, but somebrands may not be fully compatible withthis device. Incompatible cards maydamage the card and the device andcorrupt data stored on the card.
Your device supports microSD cardswith a capacity of up to 8 GB. The size ofa single file must not exceed 2 GB.
Insert the memory card
Get started 7
www.nokia.com/support
CyanCyan MagentaMagentaYellowYellow BlackBlack
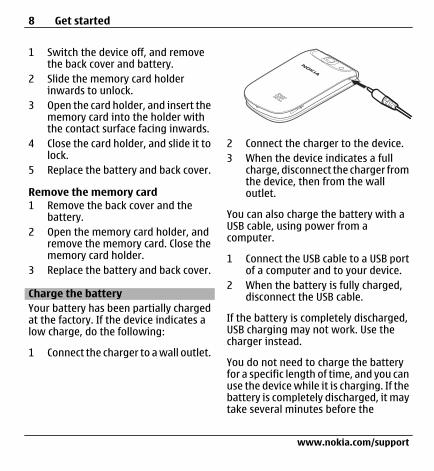
1 Switch the device off, and removethe back cover and battery.
2 Slide the memory card holderinwards to unlock.
3 Open the card holder, and insert thememory card into the holder withthe contact surface facing inwards.
4 Close the card holder, and slide it tolock.
5 Replace the battery and back cover.
Remove the memory card1 Remove the back cover and the
battery.2 Open the memory card holder, and
remove the memory card. Close thememory card holder.
3 Replace the battery and back cover.
Charge the batteryYour battery has been partially chargedat the factory. If the device indicates alow charge, do the following:
1 Connect the charger to a wall outlet.
2 Connect the charger to the device.3 When the device indicates a full
charge, disconnect the charger fromthe device, then from the walloutlet.
You can also charge the battery with aUSB cable, using power from acomputer.
1 Connect the USB cable to a USB portof a computer and to your device.
2 When the battery is fully charged,disconnect the USB cable.
If the battery is completely discharged,USB charging may not work. Use thecharger instead.
You do not need to charge the batteryfor a specific length of time, and you canuse the device while it is charging. If thebattery is completely discharged, it maytake several minutes before the
8 Get started
www.nokia.com/support
CyanCyan MagentaMagentaYellowYellow BlackBlack

charging indicator appears on thedisplay or before any calls can be made.
Charging the device while listening tothe radio may affect the quality ofreception.
GSM antenna
Your device may have internal andexternal antennas. Avoid touching theantenna area unnecessarily while theantenna is transmitting or receiving.Contact with antennas affects thecommunication quality and may causea higher power level during operationand may reduce the battery life.
The figure shows the GSM antenna areamarked in grey.
AccessoriesConnect a USB cable
Headset
Warning:When you use the headset, your abilityto hear outside sounds may be affected.Do not use the headset where it canendanger your safety.
When connecting any external device orany headset, other than those approvedby Nokia for use with this device, to theNokia AV Connector, pay specialattention to volume levels.
Get started 9
www.nokia.com/support
CyanCyan MagentaMagentaYellowYellow BlackBlack
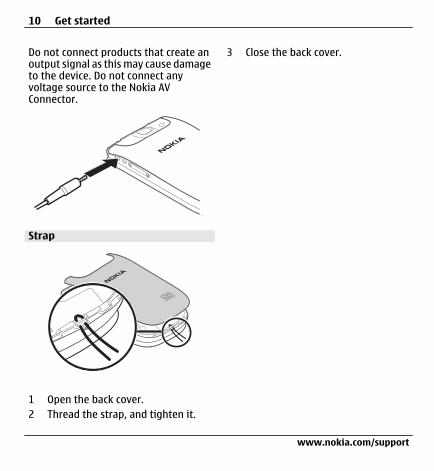
Do not connect products that create anoutput signal as this may cause damageto the device. Do not connect anyvoltage source to the Nokia AVConnector.
Strap
1 Open the back cover.2 Thread the strap, and tighten it.
3 Close the back cover.
10 Get started
www.nokia.com/support
CyanCyan MagentaMagentaYellowYellow BlackBlack

Switch it on
Learn how to switch on your device, andhow to use the basic functions.
About your deviceThe wireless device described in thisguide is approved for use on the GSM850, 900, 1800, 1900 and WCDMA 900,1700-2100, 2100 MHz networks. Contactyour service provider for moreinformation about networks.
Your device may have preinstalledbookmarks and links for third-partyinternet sites and may allow you toaccess third-party sites. These are notaffiliated with Nokia, and Nokia doesnot endorse or assume liability forthem. If you access such sites, takeprecautions for security or content.
Warning:To use any features in this device, otherthan the alarm clock, the device must beswitched on. Do not switch the deviceon when wireless device use may causeinterference or danger.
When using this device, obey all lawsand respect local customs, privacy and
legitimate rights of others, includingcopyrights. Copyright protection mayprevent some images, music, and othercontent from being copied, modified, ortransferred.
Make back-up copies or keep a writtenrecord of all important informationstored in your device.
When connecting to any other device,read its user guide for detailed safetyinstructions. Do not connectincompatible products.
The images in this guide may differ fromyour device display.
Refer to the user guide for otherimportant information about yourdevice.
Network servicesTo use the device you must have servicefrom a wireless service provider. Somefeatures are not available on allnetworks; other features may requirethat you make specific arrangementswith your service provider to use them.Network services involve transmissionof data. Check with your service providerfor details about fees in your home
Switch it on 11
www.nokia.com/support
CyanCyan MagentaMagentaYellowYellow BlackBlack

network and when roaming on othernetworks. Your service provider canexplain what charges will apply.
Your service provider may haverequested that certain features bedisabled or not activated in your device.If so, these features will not appear onyour device menu. Your device may alsohave customized items such as menunames, menu order, and icons.
Access codesTo set how your device uses the accesscodes and security settings, selectMenu > Settings and Security >Access codes.
• The security code helps to protectyour device against unauthoriseduse. The preset code is 12345. Youcan change the code and set thedevice to request the code. Someoperations require the securitycode regardless of the settings, forexample, if you want to restore thefactory settings. Keep the codesecret and in a safe place separatefrom your device. If you forget thecode and your device is locked, yourdevice will require service andadditional charges may apply. For
more information, contact a NokiaCare point or your device dealer.
• The PIN (UPIN) code, supplied withthe SIM (USIM) card, helps to protectthe card against unauthorised use.
• The PIN2 (UPIN2) code, suppliedwith some SIM (USIM) cards, isrequired to access certain services.
• PUK (UPUK) and PUK2 (UPUK2) codesmay be supplied with the SIM (USIM)card. If you enter the PIN codeincorrectly three times insuccession, you are asked for thePUK code. If the codes are notsupplied, contact your serviceprovider.
• The barring password is requiredwhen using the call barring serviceto restrict calls to and from yourdevice (network service).
• To view or change the securitymodule settings for the browser,select Menu > Settings andSecurity > Security module.
12 Switch it on
www.nokia.com/support
CyanCyan MagentaMagentaYellowYellow BlackBlack

Switch the device on and off
Switch on and offPress and hold the power key.
Enter the PIN codeIf requested , enter the PIN code(displayed as ****).
Set the time and dateIf requested, enter the time and date.
Basic setupWhen you switch on your device for thefirst time, a setup wizard will guide youthrough basic settings.
You may be prompted to get theconfiguration settings from your serviceprovider (network service). For moreinformation, contact your serviceprovider.
Home screenWhen the device is ready for use, andyou have not entered any characters,the device is in the home screen.
Switch it on 13
www.nokia.com/support
CyanCyan MagentaMagentaYellowYellow BlackBlack
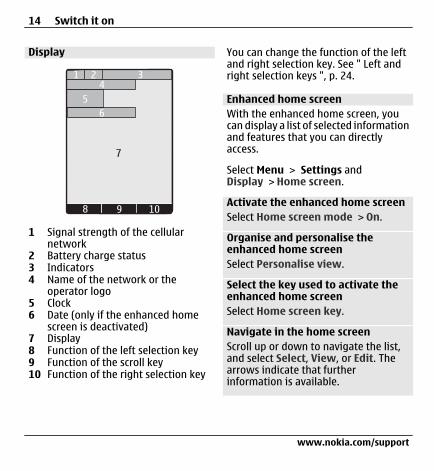
Display
7
6
10
1 Signal strength of the cellularnetwork
2 Battery charge status3 Indicators4 Name of the network or the
operator logo5 Clock6 Date (only if the enhanced home
screen is deactivated)7 Display8 Function of the left selection key9 Function of the scroll key10 Function of the right selection key
You can change the function of the leftand right selection key. See " Left andright selection keys ", p. 24.
Enhanced home screenWith the enhanced home screen, youcan display a list of selected informationand features that you can directlyaccess.
Select Menu > Settings andDisplay > Home screen.
Activate the enhanced home screenSelect Home screen mode > On.
Organise and personalise theenhanced home screenSelect Personalise view.
Select the key used to activate theenhanced home screenSelect Home screen key.
Navigate in the home screenScroll up or down to navigate the list,and select Select, View, or Edit. Thearrows indicate that furtherinformation is available.
14 Switch it on
www.nokia.com/support
CyanCyan MagentaMagentaYellowYellow BlackBlack

Stop navigatingSelect Exit.
ShortcutsWhen your device is in the home screen,you can use shortcuts.
List missed, received, and dialledcallsPress the call key. To make a call, scrollto the number or name, and press thecall key.
Open the web browserPress and hold 0.
Call the voice mailboxPress and hold 1.
Use other keys as shortcutsSee "Dialling shortcuts", p. 31.
Indicators
You have unread messages.You have unsent, cancelled, orfailed messages.The keypad is locked.
The device does not ring forincoming calls or textmessages.An alarm is set.
/ The device is registered to theGPRS or EGPRS network.
/ A GPRS or EGPRS connection isopen.
/ The GPRS or EGPRS connection issuspended (on hold).Bluetooth connectivity isactivated.A GPS signal is available.No GPS signal available.If you have two phone lines, thesecond line is in use.All incoming calls are divertedto another number.Calls are limited to a closed usergroup.The currently active profile istimed.A headset is connected to thedevice.The device is connected toanother device, using a USBcable.
Navigate the menusThe device offers a range of functionsthat are grouped into menus.
Switch it on 15
www.nokia.com/support
CyanCyan MagentaMagentaYellowYellow BlackBlack

1 To access the menu, select Menu.2 Scroll through the menu, and select
an option (for example, Settings).3 If the selected menu contains
further submenus, select one (forexample, Call).
4 Select the setting of your choice.5 To return to the previous menu
level, select Back.To exit the menu, select Exit.
Change the menu viewSelect Options > Main menu view.Scroll right, and select from theavailable options.
Rearrange the menuSelect Options > Organise. Scroll to themenu item to be moved, and selectMove. Scroll to where you want to movethe menu item, and select OK. To savethe change, select Done > Yes.
Lock the keysLock the keypad to prevent accidentalkeypresses.
Lock the keypadSelect Menu, and press * within 3.5seconds.
Unlock the keypadSelect Unlock, and press * within 1.5seconds. If requested, enter the lockcode.
Answer a call when the keypad islockedPress the call key. When you end orreject a call, the keypad locksautomatically.
Further features are Automatickeyguard and Security keyguard. See"Phone settings", p. 21.
When the device or keypad is locked,calls may be possible to the officialemergency number programmed intoyour device.
Functions without a SIM card Some functions of your device may beused without inserting a SIM card, suchas Organiser functions and games.Some functions appear dimmed in themenus and cannot be used.
16 Switch it on
www.nokia.com/support
CyanCyan MagentaMagentaYellowYellow BlackBlack
Flight profileIn radio sensitive environments, whereyou are asked not to use your device,you can still access your calendar,contacts list, and offline games byactivating the flight profile.
indicates that the flight profile isactive.
Activate the flight profileSelect Menu > Settings > Profilesand Flight > Activate or Personalise.
Deactivate the flight profileSelect any other profile.
Warning:With the Flight profile you cannot makeor receive any calls, includingemergency calls, or use other featuresthat require network coverage. To makecalls, you must first activate the phonefunction by changing profiles. If thedevice has been locked, enter the lockcode.
If you need to make an emergency callwhile the device is locked and in theFlight profile, you may be also able toenter an official emergency numberprogrammed in your device in the lockcode field and select 'Call'. The devicewill confirm that you are about to exitFlight profile to start an emergency call.
Switch it on 17
www.nokia.com/support
CyanCyan MagentaMagentaYellowYellow BlackBlack
Support and updates
Nokia helps you in many ways to gainthe most benefit from your device.
SupportWhen you want to learn more abouthow to use your product or you areunsure how your device shouldfunction, see the user guide or see thesupport pages at www.nokia.com/support or your local Nokia website, orwith a mobile device,www.nokia.mobi/support.
If this does not resolve your issue, doone of the following:
• Restart the device: switch off thedevice, and remove the battery.After about a minute, replace thebattery, and switch on the device.
• Restore the original factory settingsas explained in the user guide.
• Update your device softwareregularly for optimum performanceand possible new features, asexplained in the user guide.
If your issue remains unsolved, contactNokia for repair options. See
www.nokia.com/repair. Before sendingyour device for repair, always back upthe data in your device.
My NokiaSelect Menu > Applications >Extras > Collection > My Nokia.
My Nokia is a free service that regularlysends you text messages containingtips, tricks, and support for your Nokiadevice. It also allows you to browse theMy Nokia site where you can find detailsabout Nokia devices and downloadtones, graphics, games, andapplications.
To use the My Nokia service, it must beavailable in your country and supportedby your service provider. You must signup to use the service. Call charges applywhen you send messages to sign up orunsubscribe. For terms and conditions,see the documentation supplied withyour device, or www.nokia.com/mynokia.
Download contentYou may be able to download newcontent (for example, themes) to yourdevice (network service).
18 Support and updates
www.nokia.com/support
CyanCyan MagentaMagentaYellowYellow BlackBlack
Important: Use only services that youtrust and that offer adequate securityand protection against harmfulsoftware.
For the availability of different servicesand pricing, contact your serviceprovider.
Software updates using your PCSoftware updates may include newfeatures and enhanced functions thatwere not available at the time ofpurchase of your device. Updating thesoftware may also improve the deviceperformance.
Nokia Software Updater is a PCapplication that enables you to updateyour device software. To update yourdevice software, you need a compatiblePC, broadband internet access, and acompatible USB data cable to connectyour device to the PC.
To get more information, to check therelease notes for the latest softwareversions, and to download the NokiaSoftware Updater application, seewww.nokia.com/softwareupdate oryour local Nokia website.
To update the device software, do thefollowing:
1 Download and install the NokiaSoftware Updater application toyour PC.
2 Connect your device to the PC usinga USB data cable, and open theNokia Software Updaterapplication. The Nokia SoftwareUpdater application guides you toback up your files, update thesoftware, and restore your files.
Software updates over the airYour service provider may send devicesoftware updates over the air directly toyour device (network service). Thisoption may not be available, dependingon your device.
Downloading software updates mayinvolve the transmission of largeamounts of data (network service).
Make sure that the device battery hasenough power, or connect the chargerbefore starting the update.
Support and updates 19
www.nokia.com/support
CyanCyan MagentaMagentaYellowYellow BlackBlack
Warning:If you install a software update, youcannot use the device, even to makeemergency calls, until the installation iscompleted and the device is restarted.Be sure to back up data before acceptinginstallation of an update.
Request a software update1 Select Menu > Settings and
Phone > Phone updates torequest available software updatesfrom your service provider.
2 Select Current sw details to displaythe current software version andcheck whether an update is needed.
3 Select Downl. phone sw todownload and install a softwareupdate. Follow the instructions.
4 If the installation was cancelledafter the download, select Installsw update to start the installation.
The software update may take severalminutes. If there are problems with theinstallation, contact your serviceprovider.
Restore factory settingsTo restore the device back to the factorysettings, select Menu > Settings >Rest. fact. sett. and from the following:Settings only — Reset all preferencesettings without deleting any personaldata.All — Reset all preference settings, anddelete all personal data, such ascontacts, messages, media files, andactivation keys.
20 Support and updates
www.nokia.com/support
CyanCyan MagentaMagentaYellowYellow BlackBlack
Make it your device
Set up your device, personalise it, andconnect it in several ways.
Basic settingsPhone settingsSelect Menu > Settings and Phone.
Select from the following:Language settings — To set thelanguage of your device, select Phonelanguage and a language. To set thelanguage of your device according tothe information on the SIM card, selectPhone language > Automatic.Memory status — View the memoryconsumption.Automatic keyguard — Set thekeypad to lock automatically after apreset time delay when the device is inthe home screen and no function hasbeen used.Security keyguard — Set the device toprompt for the security code to unlockthe keypad.Voice recognition — Set up voicecommands, or start voice recognitiontraining.
Flight query — Set the device toprompt for the flight profile when youswitch the device on. In the flightprofile, all radio connections are closed.Phone updates — Allow softwareupdates from your service provider(network service). The available optionsmay vary. Network mode — To use GSM and(when available) 3G networks, selectDual mode. This option is not availableduring an active call.Operator selection — Manually selectwhich network to use.Help text activation — Set the deviceto display help text.Start-up tone — Play a tone when youswitch the device on.Fold close handling — Select thebehaviour of the device when the fold isclosed.Confirm SIM actions — Accessadditional network services from yourSIM card. This option may not beavailable, depending on your SIM card.
Security settingsSelect Menu > Settings and Security.
Make it your device 21
www.nokia.com/support
CyanCyan MagentaMagentaYellowYellow BlackBlack
When security features that restrict callsare in use (such as call barring, closeduser group, and fixed dialling), calls maybe possible to the official emergencynumber programmed into your device.Call barring and call diverting cannot beactive at the same time.
Select from the following:
PIN code request or UPIN coderequest — Set the device to request forthe PIN or UPIN code every time thedevice is switched on. Some SIM cardsdo not allow the code request to bedeactivated.Call barring service — Restrictincoming calls to and outgoing callsfrom your device (network service). Abarring password is required.Fixed dialling — Restrict youroutgoing calls to selected phonenumbers if supported by your SIM card.When fixed dialling is activated, GPRSconnections are not possible exceptwhile sending text messages over aGPRS connection. In this case, therecipient’s phone number and themessage centre number must beincluded in the fixed dialling list.
Closed user group — Define a group ofpeople whom you can call and who cancall you (network service).Security level — To request thesecurity code whenever a new SIM cardis inserted into the device, selectPhone.Access codes — Change the securitycode, PIN code, UPIN code, PIN2 code, orbarring password.PIN2 code request — Set the device torequest the PIN2 code when using aspecific device feature protected by thePIN2 code. Some SIM cards do not allowthe code request to be deactivated. Thisoption may not be available dependingon your SIM card. For details, contactyour service provider.Code in use — Display and select thetype of PIN code to be used.Auth. certificates or Usercertificates — View the list of theauthority or user certificates availableon your device.Security module — View Sec. moduledetails, activate Module PIN request,or change the module PIN and signingPIN.
22 Make it your device
www.nokia.com/support
CyanCyan MagentaMagentaYellowYellow BlackBlack
Personalise your deviceGive your device a personal touch withringing tones, display backgrounds, andthemes. Add shortcuts for yourpreferred features, and attachenhancements.
ProfilesYour device has several profiles, whichyou can customise.
Select Menu > Settings and Profiles.
Select the desired profile and from thefollowing:Activate — Activate the profile.Personalise — Modify profile settings.Timed — Set the profile to be active fora certain period of time. When the timeset for the profile expires, the previousprofile that was not timed becomesactive.
ThemesWith themes, you can personalise yourdevice.
Select Menu > Settings and Themes.
Select a themeSelect Select theme > Themes and atheme.
Download more themesSelectTheme downld..
TonesYou can modify the tone settings of thecurrently active profile.
Select Menu > Settings and Tones.You can find the same settings in theProfiles menu.
LightsYou can activate or deactivate lighteffects associated with different devicefunctions.
Select Menu > Settings and Lights.
DisplaySelect Menu > Settings and Display.
Select from the following:Wallpaper — Add a background imageto the home screen.
Make it your device 23
www.nokia.com/support
CyanCyan MagentaMagentaYellowYellow BlackBlack

Home screen — Activate, organise,and personalise the home screen.Home scr. font col. — Select the fontcolour for the home screen.Navigat. key icons — Display the scrollkey icons in the home screen.Notification details — Display detailsin missed call and messagenotifications.Fold animation — Display ananimation when you open or close thefold.Main menu view — Select the layoutof the main menu.Font size — Set the font size formessaging, contacts, and web pages.Operator logo — Display the logo ofthe currently selected operator.Cell info display — Display the cellidentity, if available from the network.
My shortcutsWith personal shortcuts, you get quickaccess to frequently used functions ofyour device. Select Menu > Settingsand My shortcuts.
Left and right selection keys To change the function assigned to theleft or right selection key, select Leftselection key or Right selection key,and the desired function.
In the home screen , if the left selectionkey is Go to, to add, remove, orreorganise functions, select Go to >Options > Select options orOrganise.
Other shortcuts Select from the following:Navigation key — Assign otherfunctions from a predefined list to thescroll key.Home screen key — Select themovement of the scroll key to activatethe home screen.
Assign dialling shortcutsCreate shortcuts by assigning phonenumbers to the number keys 3-9.
1 Select Menu > Contacts > Speeddials, and scroll to a number key.
2 Select Assign, or, if a number hasalready been assigned to the key,select Options > Change.
24 Make it your device
www.nokia.com/support
CyanCyan MagentaMagentaYellowYellow BlackBlack

3 Enter a number or search for acontact.
Voice commandsYou can use voice commands to makephone calls, launch applications, andactivate profiles. Voice commands arelanguage-dependent.
Select Menu > Settings and Phone.
Set the languageSelect Language settings > Phonelanguage and the language.
Train voice recognition to your voiceSelect Voice recognition > Voicetraining.
Activate a voice command for afunctionSelect Menu > Settings > Phone >Voice recognition > Voicecommands, a feature, and the function.
indicates that the voice command isactivated. If is not displayed, selectAdd.
Play an activated voice commandSelect Play.
Use voice commandsSee "Voice dialling", p. 32.
Rename or deactivate a voicecommandScroll to a function, and selectOptions > Edit or Remove.
Activate or deactivate all voicecommandsSelect Options > Add all or Removeall.
ConnectYour device provides several features toconnect to other devices to transmit andreceive data.
Bluetooth wireless technologyWith Bluetooth wireless technology,you can connect your device, using radiowaves, to a compatible Bluetoothdevice within 10 metres (32 feet).
Select Menu > Settings >Connectivity > Bluetooth.
This device is compliant with BluetoothSpecification 2.1 + EDR supporting thefollowing profiles: SIM access, objectpush, file transfer, headset, handsfree,
Make it your device 25
www.nokia.com/support
CyanCyan MagentaMagentaYellowYellow BlackBlack

generic access, serial port, genericobject exchange, dial-up networking,device ID, phonebook access, servicediscovery application, advanced audiodistribution, audio video remotecontrol, and generic audio/videodistribution. To ensure interoperabilitybetween other devices supportingBluetooth technology, use Nokiaapproved accessories for this model.Check with the manufacturers of otherdevices to determine their compatibilitywith this device.
Features using Bluetooth technologyincrease the demand on battery powerand reduce the battery life.
Set up a Bluetooth connection1 Select My phone's name, and enter
a name for your device.2 To activate Bluetooth connectivity,
select Bluetooth > On. indicates that Bluetoothconnectivity is active.
3 To connect your device to an audioaccessory, select Conn. to audioacc. and the accessory.
4 To pair your device with anyBluetooth device in range, select
Paired devices > Add newdevice.
5 Scroll to a found device, and selectAdd.
6 Agree on a passcode (up to 16characters) with the user of theother device and enter the passcodeon your device. To establish theconnection, enter the passcode onthe other device, when requested.
Operating the device in hidden mode isa safer way to avoid malicious software.Do not accept Bluetooth connectivityfrom sources you do not trust.Alternatively, switch off the Bluetoothfunction. This does not affect otherfunctions of the device.
Connect your PC to the internetYou can use Bluetooth technology toconnect your compatible PC to theinternet without the PC Suite software.Your device must be able to connect tothe internet (network service), and yourPC must support Bluetooth technology.After connecting to the network accesspoint (NAP) service of the device, andpairing with your PC, your deviceautomatically opens a packet dataconnection to the internet.
26 Make it your device
www.nokia.com/support
CyanCyan MagentaMagentaYellowYellow BlackBlack
USB data cableYou can use the USB data cable totransfer data between your device anda compatible PC or a printer supportingPictBridge.
Select USB modeTo activate the device for data transferor image printing, connect the USB datacable, and select from the following:PC Suite — Use Nokia PC Suite on yourPC.Printing & media — Use your devicewith a PictBridge compatible printer orwith a compatible PC.Data storage — Connect to a PC thatdoes not have Nokia software, and useyour device as data storage
Change USB modeSelect Menu > Settings >Connectivity > USB data cable and thedesired USB mode.
Connect a USB deviceYou can connect a USB storage device(for example, a memory stick) to yourdevice and browse the file system andtransfer files.
1 Connect a compatible adapter cableto the USB port of your device.
2 Connect the USB storage to theadapter cable.
3 Select Menu > Gallery and the USBdevice.
Not all USB storage devices aresupported, depending on their powerconsumption.
Synchronisation and backupSelect Menu > Settings > Sync &backup > Synchronisation and fromthe following:Synchronisation — Create a backup ofyour personal data to a Nokia server.Before you start a backup, you need toset up your My Nokia account. SelectConnect, and you will be guidedthrough the process.Phone switch — Synchronise or copyselected data between your device andanother device using Bluetoothtechnology.Create backup — Create a backup ofselected data.Restore backup — Select a storedbackup file, and restore data to thedevice. Select Options > Details for
Make it your device 27
www.nokia.com/support
CyanCyan MagentaMagentaYellowYellow BlackBlack

information about the selected backupfile.Data transfer — Synchronise or copyselected data between your device andanother device, PC, or network server(network service).
Packet dataGeneral packet radio service (GPRS) is anetwork service that allows mobiledevices to send and receive data over aninternet protocol (IP) based network.
Select Menu > Settings andConnectivity > Packet data > Packetdata conn..
Select from following:When needed — Establish the packetdata connection only when anapplication needs it. The connection isclosed when the application is closed.Always online — Automaticallyconnect to a packet data network whenyou switch the device on.
You can use your device as a modem byconnecting it to a compatible PC. Fordetails, see the Nokia PC Suitedocumentation.
Network provider servicesYour network provider provides severaladditional services you may want touse. For some of these services, chargesmay apply.
Operator menuAccess a portal to services provided byyour network operator. The operatorcan update this menu with a servicemessage. For more information, contactyour network operator.
SIM servicesYour SIM card may provide additionalservices. You can access this menu onlyif it is supported by your SIM card. Thename and contents of the menu dependon the available services.
Accessing these services may involvesending messages or making a phonecall for which you may be charged.
Position logThe network may send you a positionrequest (network service). To subscribeand agree upon the delivery ofpositioning information, contact yourservice provider.
28 Make it your device
www.nokia.com/support
CyanCyan MagentaMagentaYellowYellow BlackBlack
Accept or reject an incoming positionrequestSelect Accept or Reject.
View the latest position requestsSelect Menu > Log > Positioning andPosition log.
If you miss the request, the deviceautomatically accepts or rejects itaccording to what you have agreed withyour service provider.
Info messages, SIM messages, andservice commandsSelect Menu > Messaging and More.
View info messagesSelect Info messages. You can receivemessages on various topics from yourservice provider (network service). Formore information, contact your serviceprovider.
Send service commandsSelect Serv. commands. Servicecommands allow you to write and sendservice requests (USSD commands) toyour service provider, such as activation
commands for network services. Fordetails, contact your service provider.
View SIM messagesSelect Menu > Messaging andOptions > SIM messages. SIMmessages are specific text messagesthat are saved to your SIM card. You cancopy or move those messages from theSIM to the device memory, but not viceversa.
Configuration settingsYou can configure your device withsettings that are required for certainservices. You may receive these settingsas a configuration message from yourservice provider.
Select Menu > Settings.
Select Configuration and from thefollowing:
Default config. sett. — View theservice providers saved in the device,and set a default service provider.Act. def. in all apps. — Activate thedefault configuration settings forsupported applications.
Make it your device 29
www.nokia.com/support
CyanCyan MagentaMagentaYellowYellow BlackBlack

Preferred access pt. — View the savedaccess points.Device mgr. settings — Allow orprevent the device from receivingsoftware updates. This option may notbe available, depending on your device.Personal settings — Add manuallynew personal accounts for variousservices, and activate or delete them. Toadd a new personal account, selectAdd or Options > Add new. Select theservice type, and enter the requiredparameters. To activate a personalaccount, scroll to the account, and selectOptions > Activate.
Stay in touch
Learn how to make calls, write text,send messages, and use the mailfunctionality of your device.
Make callsMake a voice call
Dial a number manuallyEnter the phone number, including thearea code, and press the call key.For international calls, press * twice forthe international prefix (the + characterreplaces the international access code),enter the country code, the area codewithout the leading 0, if necessary, andthe phone number.
Redial a numberTo access the list of dialled numbers, inthe home screen , press the call key.Select a number or name, and press thecall key.
Call a contactSelect Menu > Contacts and Names.Select a contact, and press the call key.
30 Stay in touch
www.nokia.com/support
CyanCyan MagentaMagentaYellowYellow BlackBlack

Handle voice callsTo handle calls with the fold, selectMenu > Settings and Call > Answ. onfold open.
Answer an incoming callPress the call key, or open the fold.
End a callPress the end key, or close the fold.
Mute the ringing toneSelect Silence.When the fold is closed, press a volumekey.
Reject an incoming callPress the end key.When the fold is closed, press and holda volume key.
Adjust the volume in a callUse the volume keys.
Make a video callIn a video call, the video recorded withthe front camera on your device isshown to the video call recipient. Tomake a video call, you must have a USIMcard and be connected to a WCDMA
network. For availability andsubscription to video call services,contact your service provider. The videocall can be made to a compatible deviceor an ISDN client between two parties.Video calls cannot be made whileanother voice, video, or data call isactive.
1 To start a video call, enter the phonenumber, including the area code.
2 Press and hold the call key, or selectOptions > Video call.Starting a video call may take awhile. If the call is not successful,you are asked to try making a voicecall or to send a message instead.
3 To end the call, press the end key.
Dialling shortcutsYou can assign phone numbers to thenumber keys 3-9.
1 Select Menu > Contacts > Speeddials, and scroll to a number key.
2 Select Assign, or, if a number hasalready been assigned to the key,select Options > Change.
3 Enter a number or search for acontact.
Stay in touch 31
www.nokia.com/support
CyanCyan MagentaMagentaYellowYellow BlackBlack
4 To activate one key dialling, selectMenu > Settings and Call >Speed dialling > On
Use a dialling shortcutPress a number key, then the call key.
Use one key diallingPress and hold a number key.
Voice diallingMake a phone call by saying the namethat is saved in Contacts.
As voice commands are language-dependent, before voice dialling, selectMenu > Settings and Phone >Language settings > Phonelanguage, and your language.
Note: Using voice tags may be difficultin a noisy environment or during anemergency, so you should not rely solelyupon voice dialling in all circumstances.
1 In the home screen, press and holdthe right selection key. A short tonesounds, and Speak after the toneis displayed.
2 Say the name of the contact youwant to dial. If the voice recognition
is successful, a list of proposedmatches is displayed. The deviceplays the voice command of the firstmatch on the list. If it is not thecorrect command, scroll to anotherentry.
Options during a callMany of the options that you can useduring a call are network services. Foravailability, contact your serviceprovider.
Activate options during a callSelect Options.
Some of the network options are Hold,New call, Add to conference, End allcalls, and the following:
Send DTMF — Send tone strings.Swap — Switch between the active calland the call on hold.Transfer — Connect a call on hold to anactive call and disconnect yourself.Conference — Make a conference call.Private call — Start a privatediscussion in a conference call.
32 Stay in touch
www.nokia.com/support
CyanCyan MagentaMagentaYellowYellow BlackBlack
Voice messagesThe voice mailbox is a network serviceto which you may need to subscribe. Formore information, contact your serviceprovider.
Call your voice mailboxPress and hold 1.
Edit your voice mailbox numberSelect Menu > Messaging > More >Voice messages and Voice mailboxno..
Video messagesThe video mailbox is a network serviceto which you may need to subscribe. Formore information, contact your serviceprovider.
Call your video mailboxPress and hold 2.
Edit your video mailbox numberSelect Menu > Messaging andMore > Video messages > Videomailbox no..
Call log To view details of your calls, messages,data, and synchronisation, selectMenu > Log and the desired item.
Note: The actual invoice for calls andservices from your service provider mayvary, depending on network features,rounding off for billing, taxes, and soforth.
Call settingsSelect Menu > Settings and Call andfrom the following:Call divert — Divert your incoming calls(network service). You may not be ableto divert your calls if some call barringfunctions are active. Anykey answer — Answer anincoming call by briefly pressing anykey, except the power key, the left andright selection keys, or the end key.Automatic redial — The device redialsthe number automatically if a call fails.The device tries to call the number 10times.Video-voice redial — The deviceautomatically makes a voice call to thesame number to which a video call hasfailed.
Stay in touch 33
www.nokia.com/support
CyanCyan MagentaMagentaYellowYellow BlackBlack

Voice clarity — Improve speechintelligibility, especially in noisyenvironments.Speed dialling — Dial the names andphone numbers assigned to the numberkeys (2-9) by pressing and holding thecorresponding number key.Call waiting — The network notifiesyou of an incoming call while you havea call in progress (network service).Call dur. display — Display theduration of the call in progress.Summary after call — Briefly displaythe approximate duration after eachcall.Send my caller ID — Show your phonenumber to the person you are calling(network service). To use the settingagreed upon with your service provider,select Set by network.Outgoing call line — Select the phoneline for making calls, if your SIM cardsupports multiple phone lines (networkservice).Answ. on fold open — Answer or enda call by opening or closing the fold.
Text and messagesWrite text, and create messages andnotes.
Write textText input modesTo enter text, for example, when writingmessages, you can use traditional orpredictive text input.
, , and indicate the charactercases. indicates number mode.
Switch between text input modesPress and hold Options. Not alllanguages are supported by predictivetext input.
Switch between character casesPress #.
Switch between letter and numbermodesPress and hold #.
Set the writing languageSelect Options > Writing language.
34 Stay in touch
www.nokia.com/support
CyanCyan MagentaMagentaYellowYellow BlackBlack
Traditional text input
Write a wordPress a number key, 2-9, repeatedlyuntil the desired character is displayed.The available characters depend on theselected writing language. If the nextletter you want to enter is located on thesame key as the present one, wait untilthe cursor is displayed, and enter theletter.
Insert common punctuation marksPress 1 repeatedly.
Insert special charactersPress *, and select a character from thelist.
Insert a spacePress 0.
Predictive text inputPredictive text input is based on a built-in dictionary to which you can also addnew words.
Write a wordPress number keys, 2-9. Press each keyonly once for one letter.
Confirm a wordScroll right, or press 0 to add a space.
Select the correct wordIf the proposed word is not correct,press * repeatedly, and select thedesired word from the list.
Add a word to the dictionaryIf the ? character is displayed after theword, the word you intended to write isnot in the dictionary. To add the wordto the dictionary, select Spell. Enter theword using traditional text input, andselect Save.
Write a compound wordWrite the first part of the word, andscroll right to confirm it. Write the nextpart of the word, and confirm again.
Text and multimedia messagesYou can create a message and optionallyattach, for example, a picture. Yourdevice automatically changes a textmessage to a multimedia messagewhen a file is attached.
Stay in touch 35
www.nokia.com/support
CyanCyan MagentaMagentaYellowYellow BlackBlack

Text messagesYour device supports text messagesbeyond the limit for a single message.Longer messages are sent as two ormore messages. Your service providermay charge accordingly. Characterswith accents, other marks, or somelanguage options take more space, andlimit the number of characters that canbe sent in a single message.
The total number of characters left andthe number of messages needed forsending are displayed.
To send messages, the correct messagecentre number must be stored in yourdevice. Normally, this number is set bydefault through your SIM card.
1 To set the number manually, selectMenu > Messaging and More >Message settings > Textmessages > Message centre.
2 Enter the name and the numbersupplied by the service provider.
Multimedia messagesA multimedia message can contain text,pictures, and sound or video clips.
Only devices that have compatiblefeatures can receive and displaymultimedia messages. The appearanceof a message may vary depending onthe receiving device.
The wireless network may limit the sizeof MMS messages. If the inserted pictureexceeds this limit, the device may makeit smaller so that it can be sent by MMS.
Important: Exercise caution whenopening messages. Messages maycontain malicious software orotherwise be harmful to your device orPC.
For availability and subscription to themultimedia messaging service (MMS),contact your service provider.
Create a message 1 Select Menu > Messaging and
Create message.2 Write your message.
To insert a special character or asmiley, select Options > Insertsymbol.To attach an object to the message,select Options > Insert object. Themessage type changes
36 Stay in touch
www.nokia.com/support
CyanCyan MagentaMagentaYellowYellow BlackBlack

automatically to multimediamessage.
3 To add recipients, select Send toand a recipient.To enter a phone number or mailaddress manually, select Numberor e-mail. Enter a phone number,or select E-mail and enter a mailaddress.
4 Select Send.
Multimedia messages are indicatedwith an icon at the top of the display.
Service providers may charge differentlydepending on the message type. Fordetails, contact your service provider.
Read a message and replyImportant: Exercise caution whenopening messages. Messages maycontain malicious software orotherwise be harmful to your device orPC.
Read a received messageSelect View.
Reply to a messageSelect Reply.
Read several received messagesSelect Menu > Messaging and Inbox,and the desired message.
Send and organise messagesTo send a message, select Send.
Note: The message sent icon or text onyour device screen does not indicatethat the message is received at theintended destination.
If message sending is interrupted, thedevice tries to resend the message a fewtimes. If these attempts fail, themessage is marked as failed in the Sentitems folder.
The device saves received messages inthe Inbox folder. Organise yourmessages in the Saved items folder.
To add, rename, or delete a folder, selectMenu > Messaging and More >Archive > Options.
Flash messagesFlash messages are text messages thatare instantly displayed upon reception.
Select Menu > Messaging.
Stay in touch 37
www.nokia.com/support
CyanCyan MagentaMagentaYellowYellow BlackBlack
1 Select More > Other messages >Flash message.
2 Write your message.3 Select Send to and a contact.
Nokia Xpress audio messages Create and send audio messages usingMMS in a convenient way.
Select Menu > Messaging.
1 Select More > Other messages >Audio message. The voice recorderopens.
2 To record your message, select .3 To stop recording, select .4 Select Send to and a contact.
Message settingsSelect Menu > Messaging andMore > Msg. settings.
Select from the following:
General settings — Save copies of sentmessages in your device, overwrite oldmessages if the message memorybecomes full, and set up otherpreferences related to messages.
Text messages — Allow deliveryreports, set up message centres for SMSand SMS mail, select the type ofcharacter support, and set up otherpreferences related to text messages.Multimedia msgs. — Allow deliveryreports, set up the appearance ofmultimedia messages, allow thereception of multimedia messages andadvertisements, and set up otherpreferences related to multimediamessages.E-mail messages — Allow mailreception, set the image size in mail,and set up other preferences related tomail.Service messages — Activate servicemessages, and set up preferencesrelated to service messages.
Mail and Instant MessagingSet up your device to send and receivemails from your mail account or to chatin your instant messaging (IM)community.
Your device may support the NokiaMessaging Service (NMS) or the classicNokia Mail and Nokia IM, depending onyour country. To see which messaging
38 Stay in touch
www.nokia.com/support
CyanCyan MagentaMagentaYellowYellow BlackBlack

system is in use select Menu >Messaging > More > E-mail.
If appears on top ofthe display, the Nokia Messaging Serviceis in use. See "Nokia Messaging IM",p. 39 and "Nokia Messaging Mail",p. 41.
Otherwise, see "Nokia IM", p. 42 and"Nokia Mail", p. 42.
Nokia Messaging IMWith instant messaging (IM) you canchat with other online users using yourdevice.
You can use your already existingaccount with an IM community that issupported by your device.
If you are not registered to a IM service,you can create an IM account with asupported IM service, using yourcomputer or your device. The menusmay vary depending on the IM service.
IM servicesSign in to an existing IM account1 Select Menu > Messaging >
More > IMs.
2 Select an IM service.3 Enter your account ID and
password.4 Follow the instructions on the
display.
Create a new Nokia accountTo create a Nokia account, whichincludes mail and IM services, using yourPC, visit www.ovi.com. To create anaccount using your device, do thefollowing:
1 Select Menu > Messaging >More > E-mail.
2 Follow the instructions on thedisplay.
Use IM services simultaneously1 To return to the IM main view, select
Home from within any IM service.2 Select an IM service, and sign in.3 To switch between IM services, in
the contacts list view, scroll left orright.
Exchange messagesSelect Menu > Messaging > More >IMs.
Stay in touch 39
www.nokia.com/support
CyanCyan MagentaMagentaYellowYellow BlackBlack
Send an IM1 Select an IM service.2 Select a contact from the contacts
list.Each conversation is on a tab in theconversation view.
3 Enter your message in the text boxat the bottom of the display.
4 Select Send.
Receiving messagesWhen a new message arrives in yourcurrent conversation, the messageappears at the end of the chat history.When a new message arrives foranother conversation, thecorresponding conversation tab flashes.To switch between conversations, dothe following:
1 Scroll up to the conversation tabs.2 Scroll left or right to open a
conversation.
When a new message arrives fromanother community, it is indicated atthe top or bottom corner.
Scroll up, and select Switch or Select.
Notification settingsEven when you are not using theapplication, you are notified of newmessages. To modify notificationsettings, do the following:
1 In the IM main view, selectOptions > IM settings.
2 Select a notification type and Save.
Leave the IM applicationWhen you exit the Instant messaging(IM) application, you remain signed in toIM services. Your sessions remain activefor a period of time, according to yourservice subscription. When the IMapplication is running in thebackground, you can open otherapplications, and return to using IMwithout signing in again.
Close the IM windowGo to the IM main view, and select Exit.
Sign out from IMSelect Options > Sign Out.All conversations are closed.
40 Stay in touch
www.nokia.com/support
CyanCyan MagentaMagentaYellowYellow BlackBlack
Nokia Messaging MailAccess your mail accounts fromdifferent providers with your mobiledevice to read, write, and send mail.
Before you can use mail, you must havean mail account. If you do not havealready an mail account, create it in Ovi.The menus may vary depending on themail provider.
Set up mailYou can sign in to an existing mailaccount or set up a new Ovi Mailaccount.
Select Menu > Messaging > More >E-mail.
Sign in to your mail account1 Select your mail service provider.2 Enter your account ID and
password.3 Select Remember password to
disable the password query whenyou access your mail account.
4 Select Sign In.
To sign in to an additional mail account,select Add account.
Set up Ovi MailIf you do not already have a mailaccount, you can create a Nokia account,which includes the Ovi Mail service.
1 Select Get Ovi Mail.2 Follow the instructions on the
display.
Once you have created your new Nokiaaccount, you can sign in to the Ovi Mailservice and start sending and receivingmail. You can also use the account tosign into other Ovi services, such as IM.For more information, seewww.ovi.com.
Read, create, and send mailSelect Menu > Messaging > More >E-mail and a mail account.
Read mail and reply1 Select a mail and Open.2 Use the scroll key to see the entire
mail.3 To reply to or forward a mail, select
Options.
View and save attachmentsMails with attachments, for example,pictures, are marked with a paperclip
Stay in touch 41
www.nokia.com/support
CyanCyan MagentaMagentaYellowYellow BlackBlack

icon. Some attachments may not becompatible with your device, andcannot be displayed on your device.
1 Expand the attachment list.2 Select an attachment and View.3 To save the attachment to your
device, select Save.
Create and send a mail1 Select Options > Compose.2 Enter the recipient’s mail address,
the subject, and your message.3 To attach a file to the mail, select
Options > Attach file.4 To capture an image to attach to the
mail, select Options > Attach newimage.
5 To send the mail, select Send.
Close the mail applicationSelect Sign Out.
Access IM from your mail accountSome mail service providers allow youto access your instant messagingaccount directly from your mail account.
To sign in to your provider's instantmessaging service when writing a mail,select Options and your IM service.
Nokia IMWith the instant messaging (IM)network service, you can send short textmessages to online users. You mustsubscribe to a service and register withthe IM service you want to use. Foravailability, pricing, and instructions,contact your service provider. Themenus may vary depending on your IMservice provider.
To connect to the service, selectMenu > Messaging > IMs, and followthe instructions.
Nokia MailAccess your mail account with yourdevice to read, write, and send mail.This mail application is different fromthe SMS mail function.
Before you can use mail, you must havean mail account from an mail serviceprovider. For availability and the correctsettings, contact your mail serviceprovider. You may receive the mailconfiguration settings as aconfiguration message.
42 Stay in touch
www.nokia.com/support
CyanCyan MagentaMagentaYellowYellow BlackBlack

Mail setup wizardThe mail setup wizard opensautomatically if no mail settings aredefined in the device. To open the setupwizard, to add an additional mailaccount, select Menu > Messagingand the existing mail account. SelectOptions > Add mailbox. Follow theinstructions.
Write and send a mailYou may write your mail beforeconnecting to the mail service.
1 Select Menu > Messaging andCreate message > E-mailmessage.
2 Enter the recipient’s mail address,the subject, and the mail message.To attach a file, select Options >Insert.
3 If more than one mail account isdefined, select the account fromwhich you want to send the mail.
4 Select Send.
Read a mail and replyImportant: Exercise caution whenopening messages. Messages maycontain malicious software or
otherwise be harmful to your device orPC.
Select Menu > Messaging.
Download mail headersSelect your mail account.
Download a mail and its attachmentsSelect a mail and Open or Retrieve.
Reply to or forward a mailSelect Options > Reply or Forward.
Disconnect from your mail accountSelect Options > Disconnect. Theconnection to the mail accountautomatically ends after some timewithout activity.
New mail notificationsYour device can automatically checkyour mail account at set intervals, andissue a notification when new mail isreceived.
Select Menu > Messaging.
1 Select Msg. settings > E-mailsettings > Edit mailboxes.
Stay in touch 43
www.nokia.com/support
CyanCyan MagentaMagentaYellowYellow BlackBlack

2 Select your mail account,Downloading sett., and thefollowing options:
Update interval — Set how oftenyour device checks your mailaccount for new mail.Automatic retrieval — Retrievenew mail automatically from yourmail account.
3 To enable new mail notification,select Msg. settings > E-mailsettings > New e-mail notif..
Image and video
Capture images
Activate the cameraSelect Menu > Applications >Camera; or, if in video mode, scroll leftor right.
Zoom in or outIn image mode, scroll up and down, oruse the volume keys.
Capture an imageSelect Capture.Images are saved in Gallery.
Activate the camera flashTo set the device to use the flashautomatically if the lighting conditionsrequire it, select Options > Flash >Automatic. To set the device to alwaysuse the flash, select Flash on.
Keep a safe distance when using theflash. Do not use the flash on people oranimals at close range. Do not cover theflash while taking a picture.
44 Image and video
www.nokia.com/support
CyanCyan MagentaMagentaYellowYellow BlackBlack

Display images after captureSelect Options > Settings > Photopreview time and the preview time.
End the image preview manuallySelect Back.
Your device supports an image captureresolution of up to 1536x2048 pixels.
Record video clips
Activate video modeSelect Menu > Applications andVideo camera, or, if in image mode,scroll left or right.
Start recordingSelect Record.
Pause or resume recordingSelect Pause or Continue.
Stop recordingSelect Stop.
Video clips are saved in Gallery.
Camera and video settingsSelect Menu > Applications >Camera.
In image or video mode, selectOptions and from the following:Self-timer — Use the self-timer.Effects — Apply different effects (forexample, greyscale and false colour) tothe captured image.White balance — Adapt the camera tothe current light conditions.Landscape format or Portraitformat — Select the orientation of thecamera.Settings — Modify other camera andvideo settings, and select where to saveimages and video clips.
GalleryManage images, video clips, music files,themes, graphics, tones, recordings,and received files. These files are storedin the device memory or on a memorycard and may be arranged in folders.
PhotosView images and play video clips withthe Photos application.
Image and video 45
www.nokia.com/support
CyanCyan MagentaMagentaYellowYellow BlackBlack

Select Menu > Gallery > Photos.
Select from the following:
All photos — View images in athumbnail grid. You can sort images bydate, name, or size.Timeline — View images in the orderthey were captured.Albums — Sort images into albums.You can create, rename and removealbums. If you remove an album, theimages inside the album are not deletedfrom the memory.
Rotate an imageSelect Options > Landscape mode orPortrait mode.
View a slide showA slide show uses the images of thecurrently selected folder or album.
1 Select All photos, Timeline, orAlbums.
2 Select Options > Slide show.3 Select Start slide show.
Edit imagesYou can, for example, rotate, flip, crop,and adjust the brightness, contrast, andcolours of images.
1 Select an image in All photos,Timeline, or Albums.
2 Select Options > Edit photo.3 Select an editing option, and use
the scroll key to change the settingsor values.
Music and videosYour device includes a media player forplaying songs and video clips. Music andvideo files stored in the music folder inthe device memory or on the memorycard are automatically detected andadded to the video or music library.
Select Menu > Gallery and Music &videos.
Select from the following:Videos — List all available video clips.All songs — List all available songs. Youcan sort songs by artist, album, or genre,for example.
46 Image and video
www.nokia.com/support
CyanCyan MagentaMagentaYellowYellow BlackBlack
Manage folders and filesTo manage folders and files in Gallery,select Menu > Gallery.
View a list of foldersSelect All content.
View a list of files in a folderSelect a folder and Open.
View the folders of the memory cardwhen moving a fileScroll to the memory card, and scrollright.
Print imagesYour device supports Nokia XpressPrint,allowing you to print images in the JPEGfile format.
1 Connect your device to a compatibleprinter, using a USB data cable, or,if supported by the printer,Bluetooth connectivity.
2 Select an image from Gallery andOptions > Print.
Share images and video clips onlineShare images and video clips incompatible online sharing services onthe web.
To use online sharing, you mustsubscribe to an online sharing service(network service).
1 Select Menu > Gallery > Photosand a file.
2 Select Options > Send > Uploadto web.
3 Select an online sharing service, andfollow the instructions on thedisplay.
You may also mark several images orvideo clips and upload them together tothe online sharing service.
You can view uploads on the internetpages of the online sharing service onyour device.
For more information on online sharingand compatible service providers, seethe Nokia product support pages or yourlocal Nokia website.
Image and video 47
www.nokia.com/support
CyanCyan MagentaMagentaYellowYellow BlackBlack
Memory cardUse a memory card to store yourmultimedia files, such as video clips,songs, sound files, images, andmessaging data.
Select Menu > Gallery > Allcontent > Memory card.
Some of the folders in Gallery thatcontain content used by your device (forexample, Themes) can be stored on thememory card.
If your memory card has not been pre-formatted, you need to format it. Whenyou format a memory card, all data onthe card is permanently deleted.
Format the memory cardSelect Options > Mem. cardoptions > Format memory card >Yes. When formatting is complete,enter a name for the memory card.
Protect the memory card with apasswordSelect Options > Mem. cardoptions > Set password. Thepassword is stored in your device, soyou only have to enter the password
when attempting to use the memorycard in another device.
Remove the memory card passwordSelect Options > Mem. cardoptions > Delete password.
Check the memory consumptionSelect Options > Details. The memoryconsumption of different data groups,and the amount of available memory toinstall new software, is displayed.
48 Image and video
www.nokia.com/support
CyanCyan MagentaMagentaYellowYellow BlackBlack

Entertainment
Listen to musicListen to music with the music player orradio, and record sounds or voice withthe voice recorder. Download musicfrom the internet, or transfer musicfrom your PC.
Warning:Continuous exposure to high volumemay damage your hearing. Listen tomusic at a moderate level, and do nothold the device near your ear when theloudspeaker is in use.
Media playerTo open the media player, selectMenu > Applications > Mediaplayer.
Music menuAccess your music and video files storedin the device memory or on the memorycard, download music or video clipsfrom the web, or view compatible videostreams from a network server(network service).
Select Menu > Applications > Mediaplayer.
Play a media fileSelect a file from the available foldersand Play.
Download files from the webSelect Options > Downloads and adownload site.
Update the music library afteradding filesSelect Options > Update library.
Create a playlist1 Select Playlists > Create playlist,
and enter the name of the playlist.2 Add music or video clips from the
displayed lists.3 To store the playlist, select Done.
Configure a streaming serviceYou may receive the streaming settingsas a configuration message from theservice provider. You can also enter thesettings manually.
Entertainment 49
www.nokia.com/support
CyanCyan MagentaMagentaYellowYellow BlackBlack

1 Select Options > Downloads >Streaming settings >Configuration.
2 Select a service provider, Default,or Personal config. for streaming.
3 Select Account and a streamingservice account from the activeconfiguration settings.
Play songs
Operate the media playerUse the scroll key according to thevirtual keys on the display.
Adjust the volumeUse the volume keys.
Start playingSelect .
Pause playingSelect .
Skip to the next songSelect .
Skip to the previous songSelect twice.
Fast-forward the current songSelect and hold .
Rewind the current songSelect and hold .
Switch to the music menuSelect .
Switch to the current playlistSelect .
Leave the media player playing inthe backgroundPress the end key.
Stop the media playerPress and hold the end key.
Change the media player lookYour device provides several themes tochange the look of the media player.
Select Menu > Applications > Mediaplayer and Go to Media pl. >Options > Settings > Media playertheme and the desired theme.
The virtual keys may change dependingon the theme.
50 Entertainment
www.nokia.com/support
CyanCyan MagentaMagentaYellowYellow BlackBlack
Transfer music from a computerYou can transfer music to your device inthe following ways:
• Use Nokia Music to transfer, rip,burn, and play new music on yourPC and mobile device. Download thePC software fromwww.music.nokia.com/download.
• Use PC Suite to connect your deviceto your PC using Bluetoothconnectivity or a compatible USBdata cable, and use the Nokia MusicManager. To use a USB data cable,select PC Suite as the connectionmode.
• Connect your device to your PCusing Bluetooth connectivity or acompatible USB data cable, andcopy music files to the devicememory. To use a USB data cable,select Data storage as theconnection mode.
• Use Windows Media Player. Connecta compatible USB data cable, andselect Printing & media as theconnection mode.
RadioThe FM radio depends on an antennaother than the wireless device antenna.
A compatible headset or accessoryneeds to be attached to the device forthe FM radio to function properly.
Select Menu > Applications >Radio.
Tune in to radio stations1 To start the search, press and hold
the scroll key left or right. To changethe radio frequency in 0.05 MHzsteps, briefly press the scroll key leftor right.
2 To save a station to a memorylocation, select Options > Savestation.
3 To enter the name of the radiostation, select Options >Stations > Options > Rename.
Select Options and from the following:Search all stations — Searchautomatically for the available stationsat your location.Set frequency — Enter the frequencyof a radio station.Station directory — Access a websitewith a list of radio stations.Stations — List, rename, or deletesaved stations.
Entertainment 51
www.nokia.com/support
CyanCyan MagentaMagentaYellowYellow BlackBlack
Use the virtual keys on the displayUse the scroll key.
Change stationsScroll up or down, or press the numberkey that corresponds to the number ofthe station in the station list.
Adjust the volumeUse the volume keys.
Set the radio to play in thebackgroundBriefly press the end key.
Close the radioPress and hold the end key.
Radio settingsSelect Menu > Applications >Radio.
Select Options > Settings and from thefollowing:
RDS — Display information from theradio data system, such as the name ofthe station.Auto-frequency — Allow the device toautomatically switch to a frequency
with better reception (available whenRDS is activated).Play via — Listen using the headset orthe loudspeaker.Output — Switch between stereo andmono output.Radio theme — Select the look of theradio.
Voice recorderRecord speech, sound, or an active call,and save the recordings in Gallery.
Select Menu > Applications > Voicerecorder.
The recorder cannot be used when adata call or GPRS connection is active.
To use the graphical keys , , or ,scroll left or right.
Start recordingSelect , or, during a call, selectOptions > Record. While recording acall, all parties to the call hear a faintbeeping.
Pause recordingSelect .
52 Entertainment
www.nokia.com/support
CyanCyan MagentaMagentaYellowYellow BlackBlack
Stop recordingSelect . The recording is saved in theRecordings folder in Gallery.
To play or send the last recording, toaccess the list of recordings, or to selectthe memory and the folder to store therecordings, select Options and theappropriate option.
EqualiserAdjust the sound when using the mediaplayer.
Select Menu > Applications >Equaliser.
Activate a predefined equaliser setScroll to a set, and select Activate.
Create a new equaliser set1 Select one of the last two sets in the
list and Options > Edit.2 Use the scroll key to adjust the
sound controls.3 To save the settings and enter a
name for the set, select Save andOptions > Rename.
Web You can access various internet serviceswith your device browser (networkservice). The appearance of the internetpages may vary due to screen size. Youmay not be able to see all the details onthe internet pages.
Important: Use only services that youtrust and that offer adequate securityand protection against harmfulsoftware.
For the availability of these services,pricing, and instructions, contact yourservice provider.
You may receive the configurationsettings required for browsing as aconfiguration message from yourservice provider.
Select Menu > Internet.
To set up the service, select Websettings > Configuration sett., aconfiguration, and an account.
Browse the webSelect Menu > Internet.
Entertainment 53
www.nokia.com/support
CyanCyan MagentaMagentaYellowYellow BlackBlack
Open the home pageSelect Home; or in the home screen,press and hold 0.
Select a bookmarkSelect Bookmarks.
Enter a web addressSelect Go to address, enter the address,and select OK.
Select the last visited web addressSelect Last web addr..
Search the webIf you search for the first time, select asearch provider. Then select Search,enter the search terms, and selectSearch.
Change the search providerSelect Options > Change provider.
After you connect to the service, you canstart browsing its pages. The function ofthe device keys may vary in differentservices. Follow the instructions. Formore information, contact your serviceprovider.
Web uploadsOn the web page of your online sharingservice, you can view uploaded imagesand video clips and modify settings(network service).
Select Menu > Internet and Webuploads.
Open an online sharing serviceSelect an online sharing service and alink offered by the service.
Modify settingsWhen an online sharing service is open,select Options > Settings.
Browser settingsWhile browsing the web, selectOptions > Settings and from thefollowing:Display — Select the font size, whetherimages are displayed, and how the textis displayed.General — Select the encoding type forthe contents, whether web addressesare sent as Unicode (UTF-8), andwhether JavaScript™ is enabled.
The available options may vary.
54 Entertainment
www.nokia.com/support
CyanCyan MagentaMagentaYellowYellow BlackBlack

Cache memoryA cache is a memory location that isused to store data temporarily. If youhave tried to access or have accessedconfidential information requiringpasswords, empty the cache after eachuse. The information or services youhave accessed are stored in the cache.
A cookie is data that a site saves in thecache memory of your device. Cookiesare saved until you clear the cachememory.
Clear the cacheWhile browsing, select Options >Tools > Clear the cache.
Allow or prevent cookiesSelect Menu > Internet and Websettings > Security > Cookies.
Browser securitySecurity features may be required forsome services, such as banking servicesor online shopping. For suchconnections you need securitycertificates and possibly a securitymodule, which may be available on yourSIM card. For more information, contactyour service provider.
To view or modify the security modulesettings, or to view a list of authority oruser certificates downloaded to yourdevice, select Menu > Settings andSecurity > Security module, Auth.certificates, or User certificates.
Important: Even if the use ofcertificates makes the risks involved inremote connections and softwareinstallation considerably smaller, theymust be used correctly in order tobenefit from increased security. Theexistence of a certificate does not offerany protection by itself; the certificatemanager must contain correct,authentic, or trusted certificates forincreased security to be available.Certificates have a restricted lifetime. If"Expired certificate" or "Certificate notvalid yet" is shown, even if thecertificate should be valid, check thatthe current date and time in your deviceare correct.
Before changing any certificate settings,you must make sure that you really trustthe owner of the certificate and that thecertificate really belongs to the listedowner.
Entertainment 55
www.nokia.com/support
CyanCyan MagentaMagentaYellowYellow BlackBlack
Games and applicationsYou can manage applications andgames. Your device may have somegames or applications installed. Thesefiles are stored in the device memory oran attached memory card and may bearranged in folders.
Open an applicationSelect Menu > Applications >Extras.
Open a game or applicationSelect Games, Collection, or Memorycard.
Scroll to a game or application, andselect Open.
Set sounds, lights, and shakes for agameSelect Options > Applicationsettings.
Download an applicationYour device supports J2ME™ Javaapplications. Ensure that theapplication is compatible with yourdevice before downloading it.
Important: Only install and useapplications and other software fromtrusted sources, such as applicationsthat are Symbian Signed or have passedthe Java Verified™ testing.
You can download new applications andgames directly or using your PC.
Download directlySelect Menu > Applications >Extras and Options > Downloads >App. downloads or Gamedownloads; the list of availablebookmarks is shown.
Download using your PCDownload applications and games toyour PC and use PC Suite to install themon your device.
For the availability of different servicesand pricing, contact your serviceprovider.
56 Entertainment
www.nokia.com/support
CyanCyan MagentaMagentaYellowYellow BlackBlack

Maps
With Maps, you can browse maps fordifferent cities and countries, search foraddresses and different points ofinterest, plan routes from one locationto another, see your current location onthe map if you have a GPS connection,and save locations and send them tocompatible devices. You can alsopurchase a licence for a navigationservice with voice guidance. This serviceis not available for all countries orregions.
About MapsIf there are maps available in yourdevice or on an inserted memory card,you can browse them without aninternet connection. When you browseto an area which is not covered by themaps already downloaded in yourdevice, a map for the area isautomatically downloaded through theinternet. You may be prompted to selectan access point to use with the internetconnection.
Downloading maps may involve thetransmission of large amounts of datathrough your service provider's
network. Contact your service providerfor information about datatransmission charges.
You can also use the Nokia Map LoaderPC software to download maps to yourdevice. To install Nokia Map Loader on acompatible PC, see www.nokia.com/maps.
Select Menu > Applications > Mapsand from the following:Last map — Open the map that wasdisplayed last.Find address — Search for a specificaddress.Saved locations — Find a location youhave saved on your device.Rec. locations — View the locationsyou have browsed.Current position — View your currentlocation, if a GPS connection is available.Plan route — Plan a route.Extra services — Purchase a license fornavigation.Settings — Define the settings.
Almost all digital cartography isinaccurate and incomplete to someextent. Never rely solely on the
Maps 57
www.nokia.com/support
CyanCyan MagentaMagentaYellowYellow BlackBlack

cartography that you download for usein this device.
Nokia Map LoaderWith the Nokia Map Loader applicationfor PC, you can download maps andvoice guidance files from the internet. Amemory card with sufficient space mustbe inserted in your device. You must usethe Maps application and browse mapsat least once before using Nokia MapLoader, as Nokia Map Loader uses theMaps history information to checkwhich version of the maps to download.
To install Nokia Map loader, visitwww.nokia.com/maps, and follow theinstructions.
Download maps with Nokia MapLoader1 Connect your device to the
computer with a compatible USBdata cable or Bluetooth connection.If you use a data cable, select PCSuite as the USB connectionmethod.
2 Open Nokia Map Loader on thecomputer.
3 Select a continent and a country orregion.
4 Select the maps or services, anddownload and install them to yourdevice.
On the Service tab of Nokia Map Loader,you can purchase navigation and trafficinformation licences, travel guides, anddownload maps.
About GPSThe Global Positioning System (GPS) isoperated by the government of theUnited States, which is solelyresponsible for its accuracy andmaintenance. The accuracy of locationdata can be affected by adjustments toGPS satellites made by the United Statesgovernment and is subject to changewith the United States Department ofDefense civil GPS policy and the FederalRadionavigation Plan. Accuracy can alsobe affected by poor satellite geometry.Availability and quality of GPS signalsmay be affected by your location,buildings, natural obstacles, andweather conditions. GPS signals maynot be available inside buildings orunderground and may be impaired bymaterials such as concrete and metal.
GPS should not be used for preciselocation measurement, and you should
58 Maps
www.nokia.com/support
CyanCyan MagentaMagentaYellowYellow BlackBlack

never rely solely on location data fromthe GPS receiver and cellular radionetworks for positioning or navigation.
The trip meter has limited accuracy, androunding errors may occur. Accuracy canalso be affected by availability andquality of GPS signals.
GPS receiverYour device has an internal GPS receiver.For the best signal from the satellites,place your device in a position with anunobstructed view to the sky.
You can use GPS to support the Mapsapplication. Find out your location, ormeasure distances and plotcoordinates.
Navigate to your destination
You can upgrade Maps to a fullnavigation system to be used by car andby foot. You need a regional licence forthe full navigation system. The carnavigation is fully voice-guided withtwo and three-dimensional map views.Pedestrian navigation is limited to aspeed of 30 km/h (18.6 miles/h) andprovides no voice guidance. Thenavigation service is not available for allcountries and regions. For details, seeyour local Nokia website.
Purchase a licence for navigationSelect Extra services. The licence isregion-specific and can be used only inthe selected area.
Navigate to the destination1 Select Plan route, and create a
route.2 Select Options > Show route >
Options > Start navigation.3 Accept the displayed disclaimer.4 Select the language for voice
guidance, if prompted.
If you deviate from the set route, thedevice automatically plans a new route.
Maps 59
www.nokia.com/support
CyanCyan MagentaMagentaYellowYellow BlackBlack

Repeat the voice guidanceSelect Repeat.
Silence the voice guidanceSelect Options > Mute audio.
Stop navigatingSelect Stop.
Navigate on footSelect Settings > Routing settings >Route selection > On foot. Thisoptimises the routes you create fornavigation on foot.
Organise
Let your phone help you to organiseyour life.
Manage contactsSave names, phone numbers, andaddresses as contacts in the device andon the SIM card.
Select Menu > Contacts.
Select the memory to use for contactsThe device memory can save contactswith additional details, such asalternative phone numbers. You canalso save an image, a tone, or a videoclip for a limited number of contacts.
The SIM card memory can save nameswith one phone number attached tothem. The contacts saved in the SIM cardmemory are indicated with .
1 Select More > Settings > Memoryin use to select the SIM card, thedevice memory, or both for yourcontacts.
2 Select Phone and SIM to recallcontacts from both memories.
60 Organise
www.nokia.com/support
CyanCyan MagentaMagentaYellowYellow BlackBlack
When you save contacts, they aresaved in the device memory.
Handle contacts
Search for a contactSelect Names.Scroll through the list of contacts, orenter the first characters of the contact'sname.
Save a name and phone numberSelect Menu > Contacts and Addnew.
Add and edit detailsSelect Names, a contact, and Details >Options > Add detail.
Delete a detailSelect Names, a contact, and Details.Select a detail and Options > Delete.
Delete a contactSelect Names, a contact, andOptions > Delete contact.
Delete all contactsSelect More > Del. all contacts > Fromphone mem. or From SIM card.
Copy or move contacts between thedevice and SIM card memories
Copy single contactsSelect Names > Options > More >Marking options > Mark. Mark thecontacts you want to copy or move, andselect Options > Copy marked orMove marked.
Copy all contactsSelect More > Copy contacts or Movecontacts.
Create a contact groupArrange contacts into caller groups withdifferent ringing tones and groupimages.
1 Select More > Groups.2 Select Add or Options > Add new
group to create a new group.3 Enter the group name, optionally
select an image and a ringing tone,and select Save.
4 Select the group and View > Add toadd contacts to the group.
Organise 61
www.nokia.com/support
CyanCyan MagentaMagentaYellowYellow BlackBlack
Business cardsYou can send and receive a person’scontact information from a compatibledevice that supports the vCard standard.
Select Menu > Contacts and Names.
Send a business cardSelect a contact, Details > Options >Send business card, and the sendingtype.
Save a received business cardSelect Show > Save.
Date and time
Modify date and time settingsSelect Menu > Settings and Date andtime.
Change the time zone whentravellingSelect Menu > Settings and Date andtime > Date & time settings > Timezone:, and scroll left or right to selectthe time zone of your location.
The time and date are set according tothe time zone and enable your device to
display the correct sending time ofreceived text or multimedia messages.
For example, GMT -5 denotes the timezone for New York (USA), 5 hours westof Greenwich, London (UK).
Alarm clockYou can set an alarm to sound at adesired time.
Set the alarm1 Select Menu > Applications >
Alarm clock.2 Set the alarm, and enter the alarm
time.3 To issue an alarm on selected days
of the week, select Repeat: > Onand the days.
4 Select the alarm tone. If you selectthe radio as the alarm tone, connectthe headset to the device.
5 Set the length of the snooze time-out period, and select Save.
Stop the alarmSelect Stop. If you let the alarm soundfor a minute or select Snooze, the alarmstops for the length of the snooze time-out period, then resumes.
62 Organise
www.nokia.com/support
CyanCyan MagentaMagentaYellowYellow BlackBlack

CalendarSelect Menu > Calendar.
The current day is framed. If there areany notes set for the day, the day is inbold type.
Make a calendar noteScroll to the date, and select Options >Make a note. Select the note type, andfill in the fields.
View the day notesSelect View.
View a weekSelect Options > Week view.
Delete all notes in the calendarSelect Options > Delete notes > Allnotes.
Delete old notes automatically aftera specified timeSelect Options > Settings > Auto-delete notes.
Edit settings related to the date andtimeSelect Options > Settings.
To-do listYou can save a note for a task you mustdo.
Select Menu > Applications > To-dolist.
Add a noteIf no note is added, select Add;otherwise, select Options > Add. Fill inthe fields, and select Save.
View a noteSelect a note and View.
NotesSelect Menu > Applications >Notes.
Add a noteIf no note is added, select Add;otherwise, select Options > Make anote. Write the note, and select Save.
Send a noteSelect Options > Send note and thesending type.
Organise 63
www.nokia.com/support
CyanCyan MagentaMagentaYellowYellow BlackBlack

Nokia PC SuiteWith Nokia PC Suite, you can manageyour music and synchronise contacts,calendar entries, notes, and to-do notesbetween your device and a compatiblePC or a remote internet server (networkservice). For more information, and todownload PC Suite, visitwww.nokia.com/support.
CalculatorYour device provides a standard, ascientific, and a loan calculator.
Select Menu > Applications >Calculator.
Select Options to select the calculatortype or to view the operatinginstructions.
This calculator has limited accuracy andis designed for simple calculations.
Countdown timerSelect Menu > Applications >Countd. timer.
Normal timer1 Select Normal timer, enter a time,
and write a note that is displayedwhen the time expires.
2 Select Start.
Interval timerTo have an interval timer with up to 10intervals started, do the following:
1 Select Interval timer.2 Select Start timer > Start.
To select how the interval timer shouldstart the next period, select Settings >Cont. to next period.
StopwatchYou can measure time, takeintermediate times, or take lap timesusing the stopwatch.
Select Menu > Applications >Stopwatch and from the following:Split timing — Take intermediatetimes. To reset the time without savingit, select Options > Reset.Lap timing — Take lap times.Continue — View the timing that youhave set to the background.Show last — View the most recentlymeasured time if the stopwatch is notreset
64 Organise
www.nokia.com/support
CyanCyan MagentaMagentaYellowYellow BlackBlack

View times or Delete times — View ordelete the saved times
To set the stopwatch timing to thebackground, press the end key.
Green tips
Here are tips on how you can contributeto protecting the environment.
Save energyWhen you have fully charged the batteryand disconnected the charger from thedevice, unplug the charger from the walloutlet.
You do not need to charge your batteryso often if you do the following:
• Close and disable applications,services, and connections when notin use.
• Decrease the brightness of thescreen.
• Set the device to enter the powersaver mode after the minimumperiod of inactivity, if available inyour device.
• Disable unnecessary sounds, suchas keypad and ringing tones.
Green tips 65
www.nokia.com/support
CyanCyan MagentaMagentaYellowYellow BlackBlack

RecycleMost of the materials in a Nokia phoneare recyclable. Check how to recycleyour Nokia products atwww.nokia.com/werecycle, or with amobile device, www.nokia.mobi/werecycle.
Recycle packaging and user guides atyour local recycling scheme.
Learn moreFor more information on theenvironmental attributes of yourdevice, see www.nokia.com/ecodeclaration.
66 Green tips
www.nokia.com/support
CyanCyan MagentaMagentaYellowYellow BlackBlack

Digital rights managementContent owners may use different types of digital rightsmanagement (DRM) technologies to protect theirintellectual property, including copyrights. This deviceuses various types of DRM software to access DRM-protected content. With this device you can access contentprotected with WMDRM 10, OMA DRM 1.0, OMA DRM 1.0forward lock, and OMA DRM 2.0. If certain DRM softwarefails to protect the content, content owners may ask thatsuch DRM software's ability to access new DRM-protectedcontent be revoked. Revocation may also prevent renewalof such DRM-protected content already in your device.Revocation of such DRM software does not affect the useof content protected with other types of DRM or the use ofnon-DRM-protected content.
Digital rights management (DRM) protected contentcomes with an associated licence that defines your rightsto use the content.
If your device has OMA DRM-protected content, to back upboth the licence and the content, use the backup featureof Nokia PC Suite.
Other transfer methods may not transfer the licence whichneed to be restored with the content for you to be able tocontinue the use of OMA DRM-protected content after thedevice memory is formatted. You may also need to restorethe licence in case the files on your device get corrupted.
If your device has WMDRM-protected content, both thelicence and the content will be lost if the device memoryis formatted. You may also lose the licence and the contentif the files on your device get corrupted. Losing the licenceor the content may limit your ability to use the samecontent on your device again. For more information,contact your service provider.
Some licence may be connected to a specific SIM card, andthe protected content can be accessed only if the SIM cardis inserted in the device.
Accessories
Warning:Use only batteries, chargers, and accessories approved byNokia for use with this particular model. The use of anyother types may invalidate any approval or warranty, andmay be dangerous. In particular, use of unapprovedchargers or batteries may present a risk of fire, explosion,leakage, or other hazard.
For availability of approved accessories, please check withyour dealer. When you disconnect the power cord of anyaccessory, grasp and pull the plug, not the cord.
BatteryBattery and charger informationYour device is powered by a rechargeable battery. Thebattery intended for use with this device is BL-4S. Nokiamay make additional battery models available for thisdevice. This device is intended for use when supplied withpower from the following chargers: AC-8. The exactcharger model number may vary depending on the typeof plug. The plug variant is identified by one of thefollowing: E, EB, X, AR, U, A, C, K, or UB.
The battery can be charged and discharged hundreds oftimes, but it will eventually wear out. When the talk andstandby times are noticeably shorter than normal, replacethe battery. Use only Nokia approved batteries, andrecharge your battery only with Nokia approved chargersdesignated for this device.
If a battery is being used for the first time or if the batteryhas not been used for a prolonged period, it may benecessary to connect the charger, then disconnect and
Digital rights management 67
www.nokia.com/support
CyanCyan MagentaMagentaYellowYellow BlackBlack

reconnect it to begin charging the battery. If the batteryis completely discharged, it may take several minutesbefore the charging indicator appears on the display orbefore any calls can be made.
Safe removal. Always switch the device off and disconnectthe charger before removing the battery.
Proper charging. Unplug the charger from the electricalplug and the device when not in use. Do not leave a fullycharged battery connected to a charger, sinceovercharging may shorten its lifetime. If left unused, a fullycharged battery will lose its charge over time.
Avoid extreme temperatures. Always try to keep thebattery between 15°C and 25°C (59°F and 77°F). Extremetemperatures reduce the capacity and lifetime of thebattery. A device with a hot or cold battery may not worktemporarily. Battery performance is particularly limited intemperatures well below freezing.
Do not short-circuit. Accidental short-circuiting can occurwhen a metallic object such as a coin, clip, or pen causesdirect connection of the positive (+) and negative (-)terminals of the battery. (These look like metal strips onthe battery.) This might happen, for example, when youcarry a spare battery in your pocket or purse. Short-circuiting the terminals may damage the battery or theconnecting object.
Disposal. Do not dispose of batteries in a fire as they mayexplode. Dispose of batteries according to localregulations. Please recycle when possible. Do not disposeas household waste.
Leak. Do not dismantle, cut, open, crush, bend, puncture,or shred cells or batteries. In the event of a battery leak,prevent battery liquid contact with skin or eyes. If thishappens, flush the affected areas immediately with water,or seek medical help.
Damage. Do not modify, remanufacture, attempt to insertforeign objects into the battery, or immerse or expose itto water or other liquids. Batteries may explode ifdamaged.
Correct use. Use the battery only for its intended purpose.Improper battery use may result in a fire, explosion, orother hazard. If the device or battery is dropped, especiallyon a hard surface, and you believe the battery has beendamaged, take it to a service centre for inspection beforecontinuing to use it. Never use any charger or battery thatis damaged. Keep your battery out of the reach of smallchildren.
Nokia battery authentication guidelinesAlways use original Nokia batteries for your safety. Tocheck that you are getting an original Nokia battery,purchase it from a Nokia authorised service centre ordealer, and inspect the hologram label using the followingsteps:
Authenticate hologram1 When you look at the hologram on the label, you
should see the Nokia connecting hands symbol fromone angle and the Nokia Original Enhancementslogo when looking from another angle.
68 Battery
www.nokia.com/support
CyanCyan MagentaMagentaYellowYellow BlackBlack

2 When you angle the hologram left, right, down andup, you should see 1, 2, 3 and 4 dots on each siderespectively.
Successful completion of the steps is not a total assuranceof the authenticity of the battery. If you cannot confirmauthenticity or if you have any reason to believe that yourNokia battery with the hologram on the label is not anauthentic Nokia battery, you should refrain from using it,and take it to the nearest Nokia authorised service centreor dealer for assistance.
To find out more about original Nokia batteries, seewww.nokia.com/battery.
Taking care of your deviceYour device is a product of superior design andcraftsmanship and should be treated with care. Thefollowing suggestions will help you protect your warrantycoverage.
• Keep the device dry. Precipitation, humidity, and alltypes of liquids or moisture can contain mineralsthat will corrode electronic circuits. If your devicedoes get wet, remove the battery, and allow thedevice to dry completely before replacing it.
• Do not use or store the device in dusty, dirty areas.Its moving parts and electronic components can bedamaged.
• Do not store the device in high or cold temperature.High temperatures can shorten the life of electronicdevices, damage batteries, and warp or melt certainplastics. When the device warms to its normaltemperature from a cold temperature, moisture canform inside the device and damage electronic circuitboards.
• Do not attempt to open the device other than asinstructed in this guide.
• Do not drop, knock, or shake the device. Roughhandling can break internal circuit boards and finemechanics.
• Do not use harsh chemicals, cleaning solvents, orstrong detergents to clean the device. Only use asoft, clean, dry cloth to clean the surface of thedevice.
• Do not paint the device. Paint can clog the movingparts and prevent proper operation.
• Use only the supplied or an approved replacementantenna. Unauthorised antennas, modifications, orattachments could damage the device and mayviolate regulations governing radio devices.
• Use chargers indoors.• Backup all data you want to keep, such as contacts
and calendar notes.• To reset the device from time to time for optimum
performance, power off the device and remove thebattery.
These suggestions apply equally to your device, battery,charger, or any accessory.
Taking care of your device 69
www.nokia.com/support
CyanCyan MagentaMagentaYellowYellow BlackBlack

RecycleAlways return your used electronic products, batteries,and packaging materials to dedicated collection points.This way you help prevent uncontrolled waste disposaland promote the recycling of materials. Check productenvironmental information and how to recycle your Nokiaproducts at www.nokia.com/werecycle, or nokia.mobi/werecycle.
The crossed-out wheeled-bin symbol on your product,battery, literature, or packaging reminds you that allelectrical and electronic products, batteries, andaccumulators must be taken to separate collection at theend of their working life. This requirement applies in theEuropean Union. Do not dispose of these products asunsorted municipal waste. For more environmentalinformation, see the product Eco-Declarations atwww.nokia.com/environment.
Additional safety informationThe surface of this device is nickel-free.
Small childrenYour device and its accessories are not toys. They maycontain small parts. Keep them out of the reach of smallchildren.
Operating environmentThis device meets RF exposure guidelines in the normaluse position at the ear or at least 1.5 centimetres (5/8inch)away from the body. Any carry case, belt clip, orholder for body-worn operation should not contain metaland should position the device the above-stated distancefrom your body.
To send data files or messages requires a qualityconnection to the network. Data files or messages may bedelayed until such a connection is available. Follow theseparation distance instructions until the transmission iscompleted.
Medical devicesOperation of radio transmitting equipment, includingwireless phones, may interfere with the function ofinadequately protected medical devices. Consult aphysician or the manufacturer of the medical device todetermine whether they are adequately shielded fromexternal RF energy. Switch off your device whenregulations posted instruct you to do so. Hospitals orhealth care facilities may use equipment sensitive toexternal RF energy.
Implanted medical devicesManufacturers of medical devices recommend a minimumseparation of 15.3 centimetres (6 inches) between awireless device and an implanted medical device, such asa pacemaker or implanted cardioverter defibrillator, toavoid potential interference with the medical device.Persons who have such devices should:
• Always keep the wireless device more than 15.3centimetres (6 inches) from the medical device.
• Not carry the wireless device in a breast pocket.• Hold the wireless device to the ear opposite the
medical device.• Turn the wireless device off if there is any reason to
suspect that interference is taking place.• Follow the manufacturer directions for the
implanted medical device.
If you have any questions about using your wireless devicewith an implanted medical device, consult your healthcare provider.
70 Additional safety information
www.nokia.com/support
CyanCyan MagentaMagentaYellowYellow BlackBlack

Hearing aidsSome digital wireless devices may interfere with somehearing aids.
VehiclesRF signals may affect improperly installed or inadequatelyshielded electronic systems in motor vehicles such aselectronic fuel injection, electronic antilock braking,electronic speed control, and air bag systems. For moreinformation, check with the manufacturer of your vehicleor its equipment.
Only qualified personnel should service the device orinstall the device in a vehicle. Faulty installation or servicemay be dangerous and may invalidate your warranty.Check regularly that all wireless device equipment in yourvehicle is mounted and operating properly. Do not storeor carry flammable liquids, gases, or explosive materialsin the same compartment as the device, its parts, oraccessories. Remember that air bags inflate with greatforce. Do not place your device or accessories in the air bagdeployment area.
Switch off your device before boarding an aircraft. The useof wireless teledevices in an aircraft may be dangerous tothe operation of the aircraft and may be illegal.
Potentially explosive environmentsSwitch off your device in any area with a potentiallyexplosive atmosphere. Obey all posted instructions. Sparksin such areas could cause an explosion or fire resulting inbodily injury or death. Switch off the device at refuellingpoints such as near gas pumps at service stations. Observerestrictions in fuel depots, storage, and distribution areas;chemical plants; or where blasting operations are inprogress. Areas with a potentially explosive atmosphereare often, but not always, clearly marked. They includeareas where you would be advised to turn off your vehicleengine, below deck on boats, chemical transfer or storagefacilities and where the air contains chemicals or particles
such as grain, dust, or metal powders. You should checkwith the manufacturers of vehicles using liquefiedpetroleum gas (such as propane or butane) to determineif this device can be safely used in their vicinity.
Emergency callsImportant: This device operates using radio signals,wireless networks, landline networks, and user-programmed functions. If your device supports voice callsover the internet (internet calls), activate both the internetcalls and the cellular phone. The device may attempt tomake emergency calls over both the cellular networks andthrough your internet call provider if both are activated.Connections in all conditions cannot be guaranteed. Youshould never rely solely on any wireless device foressential communications like medical emergencies.
To make an emergency call:
1 If the device is not on, switch it on. Check foradequate signal strength. Depending on yourdevice, you may also need to complete thefollowing:
• Insert a SIM card if your device uses one.• Remove certain call restrictions you have
activated in your device.• Change your profile from Offline or Flight
profile to an active profile.2 Press the end key as many times as needed to clear
the display and ready the device for calls.3 Enter the official emergency number for your
present location. Emergency numbers vary bylocation.
4 Press the call key.
When making an emergency call, give all the necessaryinformation as accurately as possible. Your wireless device
Additional safety information 71
www.nokia.com/support
CyanCyan MagentaMagentaYellowYellow BlackBlack

may be the only means of communication at the scene ofan accident. Do not end the call until given permission todo so.
Certification information (SAR)This mobile device meets guidelines for exposure toradio waves.
Your mobile device is a radio transmitter and receiver. Itis designed not to exceed the limits for exposure to radiowaves recommended by international guidelines. Theseguidelines were developed by the independent scientificorganisation ICNIRP and include safety margins designedto assure the protection of all persons, regardless of ageand health.
The exposure guidelines for mobile devices employ a unitof measurement known as the Specific Absorption Rate orSAR. The SAR limit stated in the ICNIRP guidelines is 2.0watts/kilogram (W/kg) averaged over 10 grams of tissue.Tests for SAR are conducted using standard operatingpositions with the device transmitting at its highestcertified power level in all tested frequency bands. Theactual SAR level of an operating device can be below themaximum value because the device is designed to use onlythe power required to reach the network. That amountchanges depending on a number of factors such as howclose you are to a network base station.
The highest SAR value under the ICNIRP guidelines for useof the device at the ear is 0.95 W/kg.
Use of device accessories may result in different SARvalues. SAR values may vary depending on nationalreporting and testing requirements and the networkband. Additional SAR information may be provided underproduct information at www.nokia.com.
72 Additional safety information
www.nokia.com/support
CyanCyan MagentaMagentaYellowYellow BlackBlack
Index
Symbols/Numerics3G 21
Aaccess codes 12answering calls 31anykey answer 33applications 56audio messages 38
Bbacking up data 27barring password 12battery 6, 8battery charge level indicator 14Bluetooth 25browser 53browser security 55browser settings 54business cards 62
Ccable connection 27cache memory 55calculator 64call 30
call divert 33call log 33call waiting 34caller id 34camera 44camera settings 45chat services (IM) 42configuration 29contacts 60cookies 55
Ddate and time 62dial 30dialling 31dialling shortcuts 24, 31digital rights 67display settings 23, 54downloads 18
Ee-mail 41, 42e-mail, attachments 41e-mail, creating 41e-mail, reading and replying to 41equaliser 53
Ffactory settings, restoring 20
Index 73
www.nokia.com/support
CyanCyan MagentaMagentaYellowYellow BlackBlack

file management 47flash messages 37flight profile 17, 21
Ggames 56GPRS (general packet radioservice) 28GPS (global positioning system) 58,59
Hhandsfree 32headset 9help application 21home screen 14, 24
IIM 39IM (instant messaging) 39, 40, 42images 44, 45in-call timer 34indicators 15info messages 29instant messaging 39internet 53
Kkeyguard 16, 21
keypad lock 16keys 5, 24
Llanguage settings 21lights 23location information 28loudspeaker 32
Mmail 41, 42, 43mail setup 41Maps 57maps 57, 58, 59media player 46, 49, 50memory 48memory card 7message centre number 36message sending 37message settings 38messages 36, 37modem 28music 51music player 49, 50My Nokia 18
Nnavigation 15Nokia Map Loader 58
74 Index
www.nokia.com/support
CyanCyan MagentaMagentaYellowYellow BlackBlack

Nokia support information 18notes 63
Ooffline profile 16online sharing service 54operator menu 28
Ppacket data connection 28PC Suite 64phonebook 60photographs 44PictBridge 27PIN 12position log 28printing 47profiles 23PUK 12
Rradio 51, 52redial 30, 33rejecting calls 31restoring data 27restoring settings 20
Sscreen settings 23
scrolling 15security code 12security module 12security settings 21service commands 29sharing, online 47, 54shortcuts 15, 24signal strength indicator 14SIM card 6, 16, 28SIM messages 29software updates 19, 21speed dialling 24, 31, 34status indicators 14stopwatch 64strap 10support resources 18switching device on/off 13synchronisation 27
Ttext input 34, 35text messages 36themes 23time and date 62to-do list 63tones 21, 23transferring, files 51
Index 75
www.nokia.com/support
CyanCyan MagentaMagentaYellowYellow BlackBlack
Uupdates— device software 19UPIN 12USB cable connection 9, 27USB connection 27
Vvideo 45video call 31video messages 33voice clarity 34voice commands 25voice dialling 32voice messages 33voice recorder 52
Wwallpaper 23web 53write text 34
76 Index
www.nokia.com/support
CyanCyan MagentaMagentaYellowYellow BlackBlack
DECLARATION OF CONFORMITY
0434Hereby, NOKIA CORPORATION declares that this RM-509product is in compliance with the essential requirementsand other relevant provisions of Directive 1999/5/EC. Acopy of the Declaration of Conformity can be found atwww.nokia.com/phones/declaration_of_conformity/.
© 2009 Nokia. All rights reserved.
Nokia, Nokia Connecting People, Ovi, Nokia Xpress print,Nokia Xpress audio messaging, and Navi are trademarksor registered trademarks of Nokia Corporation. Nokia tuneis a sound mark of Nokia Corporation. Other product andcompany names mentioned herein may be trademarks ortradenames of their respective owners.
Portions of the Nokia Maps software are ©1996-2009 TheFreeType Project. All rights reserved.
Reproduction, transfer, distribution, or storage of part orall of the contents in this document in any form withoutthe prior written permission of Nokia is prohibited. Nokiaoperates a policy of continuous development. Nokiareserves the right to make changes and improvements toany of the products described in this document withoutprior notice.
Includes RSA BSAFE cryptographic or security protocolsoftware from RSA Security.
Java and all Java-based marks are trademarks or registeredtrademarks of Sun Microsystems, Inc.
This product is licensed under the MPEG-4 Visual PatentPortfolio License (i) for personal and noncommercial usein connection with information which has been encodedin compliance with the MPEG-4 Visual Standard by aconsumer engaged in a personal and noncommercialactivity and (ii) for use in connection with MPEG-4 videoprovided by a licensed video provider. No license isgranted or shall be implied for any other use. Additionalinformation, including that related to promotional,internal, and commercial uses, may be obtained fromMPEG LA, LLC. See http://www.mpegla.com.
TO THE MAXIMUM EXTENT PERMITTED BY APPLICABLE LAW,UNDER NO CIRCUMSTANCES SHALL NOKIA OR ANY OF ITSLICENSORS BE RESPONSIBLE FOR ANY LOSS OF DATA ORINCOME OR ANY SPECIAL, INCIDENTAL, CONSEQUENTIAL ORINDIRECT DAMAGES HOWSOEVER CAUSED.
THE CONTENTS OF THIS DOCUMENT ARE PROVIDED "AS IS".EXCEPT AS REQUIRED BY APPLICABLE LAW, NO WARRANTIESOF ANY KIND, EITHER EXPRESS OR IMPLIED, INCLUDING, BUTNOT LIMITED TO, THE IMPLIED WARRANTIES OFMERCHANTABILITY AND FITNESS FOR A PARTICULARPURPOSE, ARE MADE IN RELATION TO THE ACCURACY,RELIABILITY OR CONTENTS OF THIS DOCUMENT. NOKIARESERVES THE RIGHT TO REVISE THIS DOCUMENT ORWITHDRAW IT AT ANY TIME WITHOUT PRIOR NOTICE.The availability of particular products and applicationsand services for these products may vary by region. Pleasecheck with your Nokia dealer for details and availability of
77
CyanCyan MagentaMagentaYellowYellow BlackBlack

language options. This device may contain commodities,technology or software subject to export laws andregulations from the US and other countries. Diversioncontrary to law is prohibited.
FCC/INDUSTRY CANADA NOTICEYour device may cause TV or radio interference (forexample, when using a telephone in close proximity toreceiving equipment). The FCC or Industry Canada canrequire you to stop using your telephone if suchinterference cannot be eliminated. If you requireassistance, contact your local service facility. This devicecomplies with part 15 of the FCC rules. Operation is subjectto the following two conditions: (1) This device may notcause harmful interference, and (2) this device mustaccept any interference received, including interferencethat may cause undesired operation. Any changes ormodifications not expressly approved by Nokia could voidthe user's authority to operate this equipment.
Model number: 3710a-1
4444444/Issue 1 EN
78
CyanCyan MagentaMagentaYellowYellow BlackBlack