noah select owner's manual
TRANSCRIPT
Noah Select OWNER’S MANUAL
Version 1.1.2.2
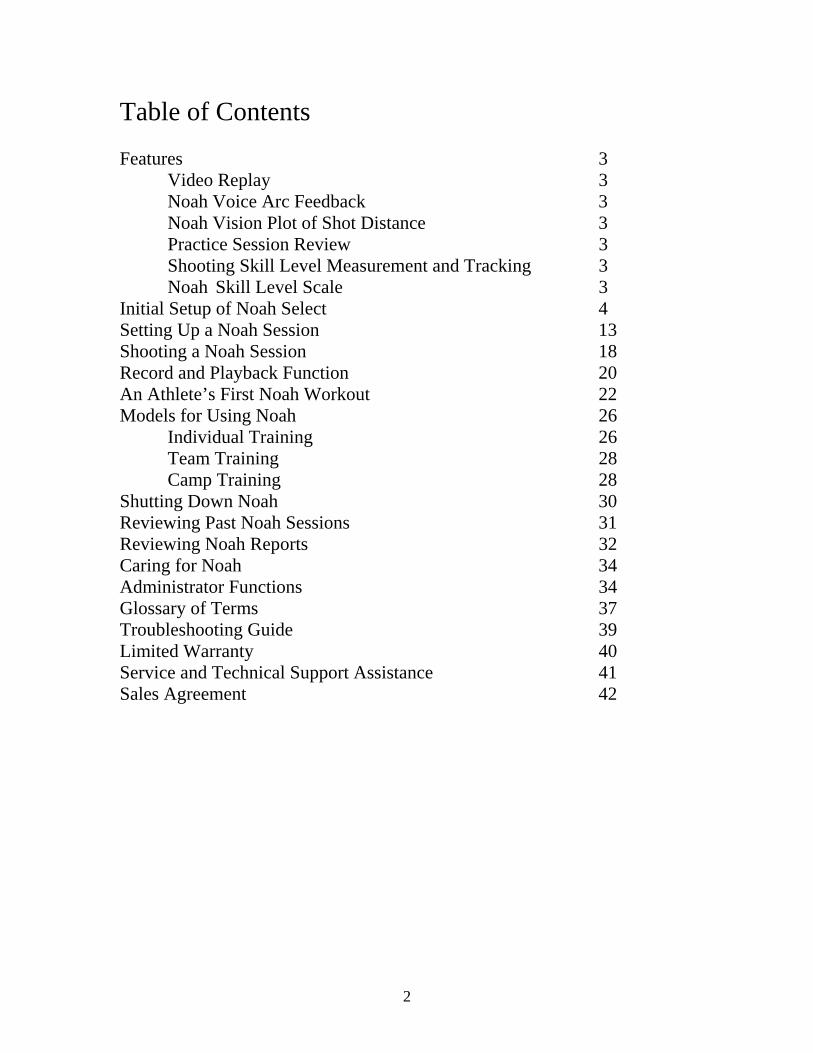
Table of Contents Features 3
Video Replay 3 Noah Voice Arc Feedback 3 Noah Vision Plot of Shot Distance 3 Practice Session Review 3 Shooting Skill Level Measurement and Tracking 3 Noah Skill Level Scale 3
Initial Setup of Noah Select 4 Setting Up a Noah Session 13 Shooting a Noah Session 18 Record and Playback Function 20 An Athlete’s First Noah Workout 22 Models for Using Noah 26 Individual Training 26
Team Training 28 Camp Training 28
Shutting Down Noah 30 Reviewing Past Noah Sessions 31 Reviewing Noah Reports 32 Caring for Noah 34 Administrator Functions 34 Glossary of Terms 37 Troubleshooting Guide 39 Limited Warranty 40 Service and Technical Support Assistance 41 Sales Agreement 42
2

Features Video Replay: Noah Select records video that shows the athlete their current biomechanical technique through instant video replay and frame-by-frame review. This feature can be used for foot work, shoulder-hand alignment, ball position or follow-through review for all kinds of shots. Noah Voice Arc Feedback: Noah Select gives instant Noah Voice verbal feedback on arc, allowing the athlete to quickly learn the correct, most forgiving arc. This feature can be used for free-throws, short jump shots, hook shots and 3-point shots. Noah Vision Plot of Shot Distance: At the end of a practice session, the Noah Select plots the arcs for all shots taken during the session. Shots that go the correct distance are drawn in green. Shots that fall short are drawn in blue. Shots that go long are drawn in red. Practice Session Review: Noah Select provides easy to read reports so the coach can see how many Noah practice sessions have been completed by each athlete. The coach can also see the results of each individual practice session. Shooting Skill Level Measurement and Tracking: Noah Select measures and tracks consistency skill level improvement from practice session to practice session. This feature benefits even the best athletes and enables an ever increasing shooting percentage. Noah Skill Level Scale: Skill levels go from Builder I at the bottom through Master IV at the top. The higher the athlete’s score is shown on this bar, the better their ability to repeat the same arc every time they shoot the ball. Less than 1% of basketball shooters achieve the Master Noah Skill level. The chart on the right shows the Typical Noah Skill Level for middle school through the NBA.
3

Noah Skill Levels
Shooting Skill Level
Noah Skill Level
Current Noah Record
Master II
NBA Average Expert III
Division 1
College Average
Expert II
High School Average
Maker IV
Middle School
Average Maker I
Typical Skill Levels
Initial Setup of Noah Select
1. Unpack the boxes and assure that these pieces are present: a. Noah Select frame
Frame
4

b. Noah Select camera pod
Camera Pod
c. Allen wrench d. Laptop computer (may be user provided)
5

2. Place the camera pod into the frame:
a. Remove four Allen screws and remove pod compartment panel.
4 Allen Screws Pod Compartment Panel b. Place camera pod into frame in the right side of the opening
with the camera facing toward the gray front of Noah Select frame. Slide the camera pod over to the center and assure that the alignment poles on the frame fit into the round base of the camera pod.
Place into Right Side Slide to Center
c. Reach through the frame access hole, which is below the laptop
tray, and screw the wing bolt into the round base of the camera pod until it is snug. It is recommended that you take a pair of pliers and tighten this wing nut snuggly to prevent it from loosening over time.
6
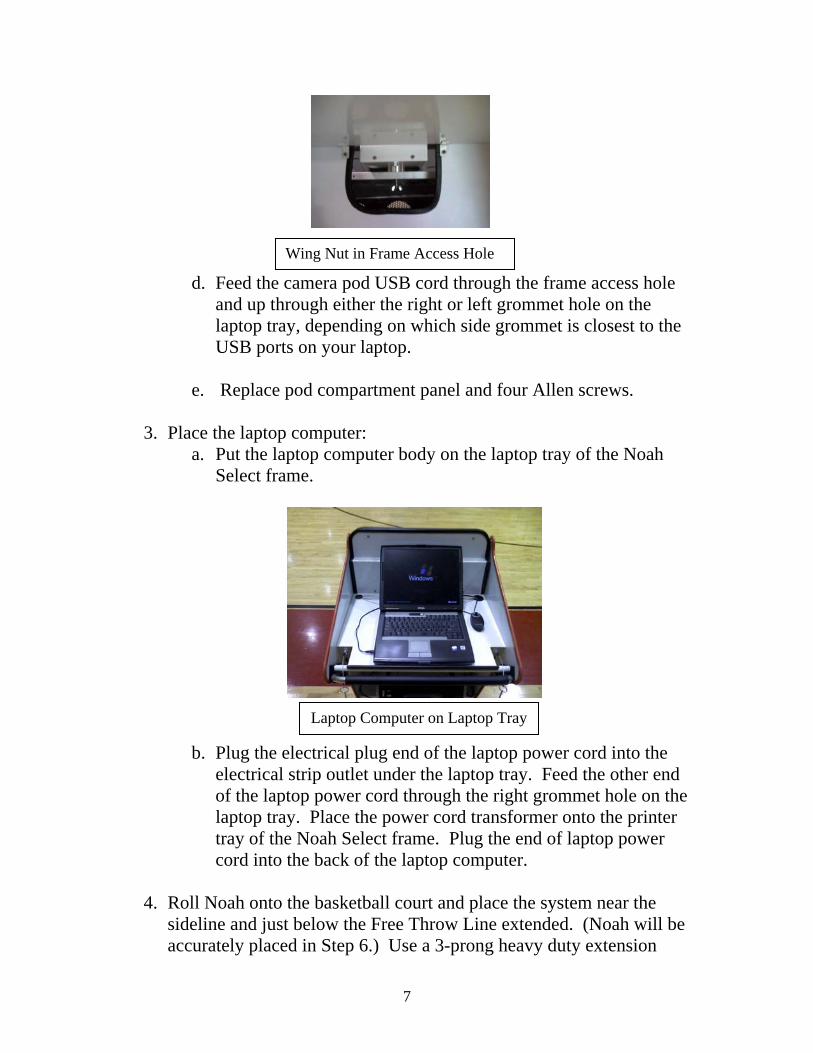
d. Feed the camera pod USB cord through the frame access hole and up through either the right or left grommet hole on the laptop tray, depending on which side grommet is closest to the USB ports on your laptop.
Wing Nut in Frame Access Hole
e. Replace pod compartment panel and four Allen screws.
3. Place the laptop computer:
a. Put the laptop computer body on the laptop tray of the Noah Select frame.
Laptop Computer on Laptop Tray
b. Plug the electrical plug end of the laptop power cord into the electrical strip outlet under the laptop tray. Feed the other end of the laptop power cord through the right grommet hole on the laptop tray. Place the power cord transformer onto the printer tray of the Noah Select frame. Plug the end of laptop power cord into the back of the laptop computer.
4. Roll Noah onto the basketball court and place the system near the
sideline and just below the Free Throw Line extended. (Noah will be accurately placed in Step 6.) Use a 3-prong heavy duty extension
7

cord to connect the receptacle on the lower right side of the Noah Select frame to an electrical outlet. Make sure the plug is inserted all the way into the Noah Frame.
Noah Electrical Receptacle 5. Connect the laptop computer:
a. Plug camera pod USB cord into any of the USB ports on the laptop computer.
b. Plug speaker cable into the speaker port on the laptop computer.
There is a headset icon next to the speaker port.
c. Turn on the power of the laptop computer.
d. If laptop computer has been provided by Noah Basketball, then software is pre-loaded and system will come up on the Noah Main Screen. If laptop computer is provided by the user, the Software installation should have already taken place. If you plan to use your own laptop and the Software has not yet been installed, please stop at this point and call 1-888-TRY-NOAH for assistance.
6. Position Noah as shown in Step 1 on the PLACE NOAH BESIDE
COURT laptop screen (See Figure 1.) For a basket that does not have court markings, click on the “single court” tab on the screen. If the system is being used in an extremely bright facility or if the system is being used outdoors, check on the Bright/Outdoor button at the bottom left of the screen. You can also adjust the brightness by moving the brightness slider to maximize picture clarity.
8

Figure 1
7. Click on “How do I mark the court?” (See Figure 2.) Follow instructions. In future sessions, the user can save time by moving Noah Select to the marked positions on the court. You can place tape on the floor or mark your floor with a permanent magic marker. Once the floor is marked, you can easily roll the system up to the line on the floor and begin using Noah. You may choose to draw 2 short lines just behind the Noah Tires as opposed to drawing the U around the tires. (See Figure 3.)
9

Figure 2
Figure 3
10

8. Complete steps 2 and 3 on the PLACE NOAH BESIDE COURT
laptop screen. Click “Done”. You can also click the grid checkbox (See Figure 4.) to help you complete step 3. The grid does not have to line up with any particular court lines. You just use the grid to assure that you have the system square with the court.
Figure 4
9. Complete instructions on SETUP HOOP LOCATION laptop screen
(See Figure 5.) Depending on how Noah Select is viewing the basket, select Right to Left or select Left to Right as the Shot Direction. The hoop should now be visible in the Position the Hoop picture on the right side of the laptop screen. Click on the Adjust Hoop arrows to place the oval hoop template line directly on top of the picture of the hoop. IMPORTANT: The oval hoop template must be directly on top of the picture of the hoop in order for Noah to give accurate feedback on basketball shots. Click “Done” once you have properly located the hoop.
11
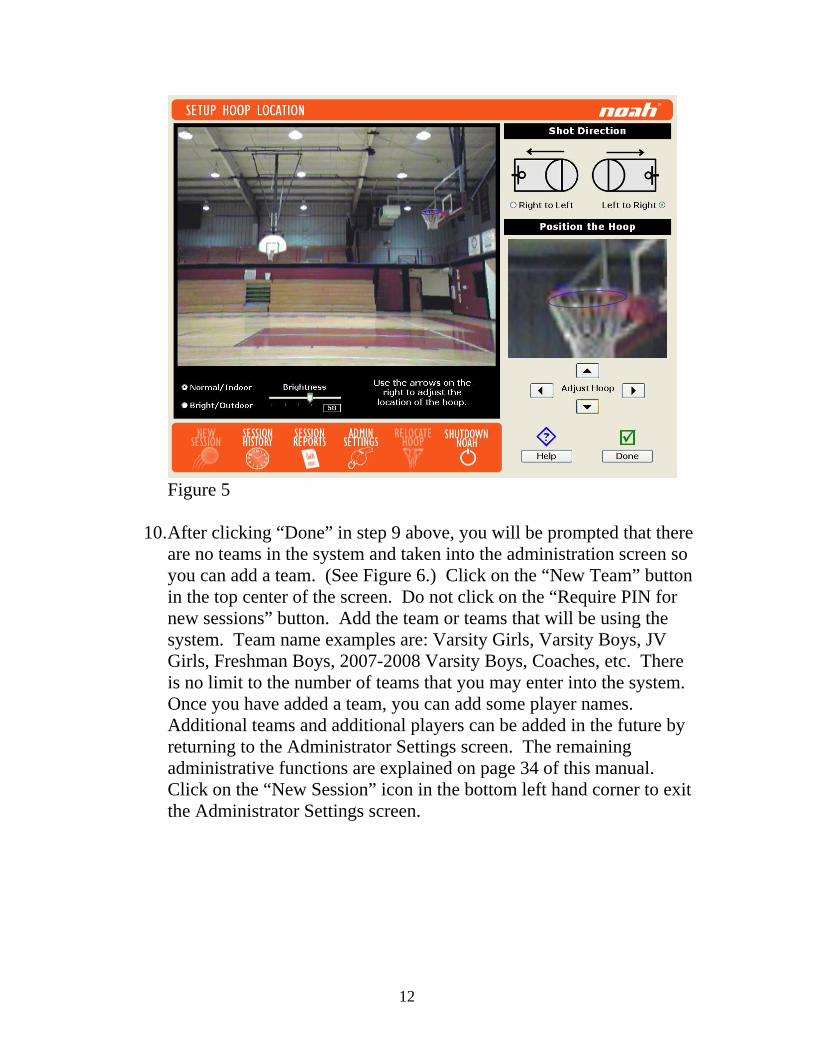
Figure 5
10. After clicking “Done” in step 9 above, you will be prompted that there
are no teams in the system and taken into the administration screen so you can add a team. (See Figure 6.) Click on the “New Team” button in the top center of the screen. Do not click on the “Require PIN for new sessions” button. Add the team or teams that will be using the system. Team name examples are: Varsity Girls, Varsity Boys, JV Girls, Freshman Boys, 2007-2008 Varsity Boys, Coaches, etc. There is no limit to the number of teams that you may enter into the system. Once you have added a team, you can add some player names. Additional teams and additional players can be added in the future by returning to the Administrator Settings screen. The remaining administrative functions are explained on page 34 of this manual. Click on the “New Session” icon in the bottom left hand corner to exit the Administrator Settings screen.
12

Figure 6 Setting Up a Noah Session
1. Roll Noah Select into the marked Noah position on the basketball court. Use a 3-prong heavy duty extension cord to connect the receptacle on the right side of the Noah Select frame to an electrical outlet at the court.
2. Turn on the power of the laptop computer. Wait for the PLACE
NOAH BESIDE COURT screen to appear.
3. Follow instructions on PLACE NOAH BESIDE COURT screen. Click “Done.”
4. Follow instructions on SETUP HOOP LOCATION screen to place
the oval hoop template line directly on top of the picture of the hoop. Click “Done”. IMPORTANT: The oval hoop template must be directly on top of the picture of the hoop in order for Noah to give accurate feedback on basketball shots. After Clicking “Done” you will be taken to the START NEW SHOOTING Screen.
13
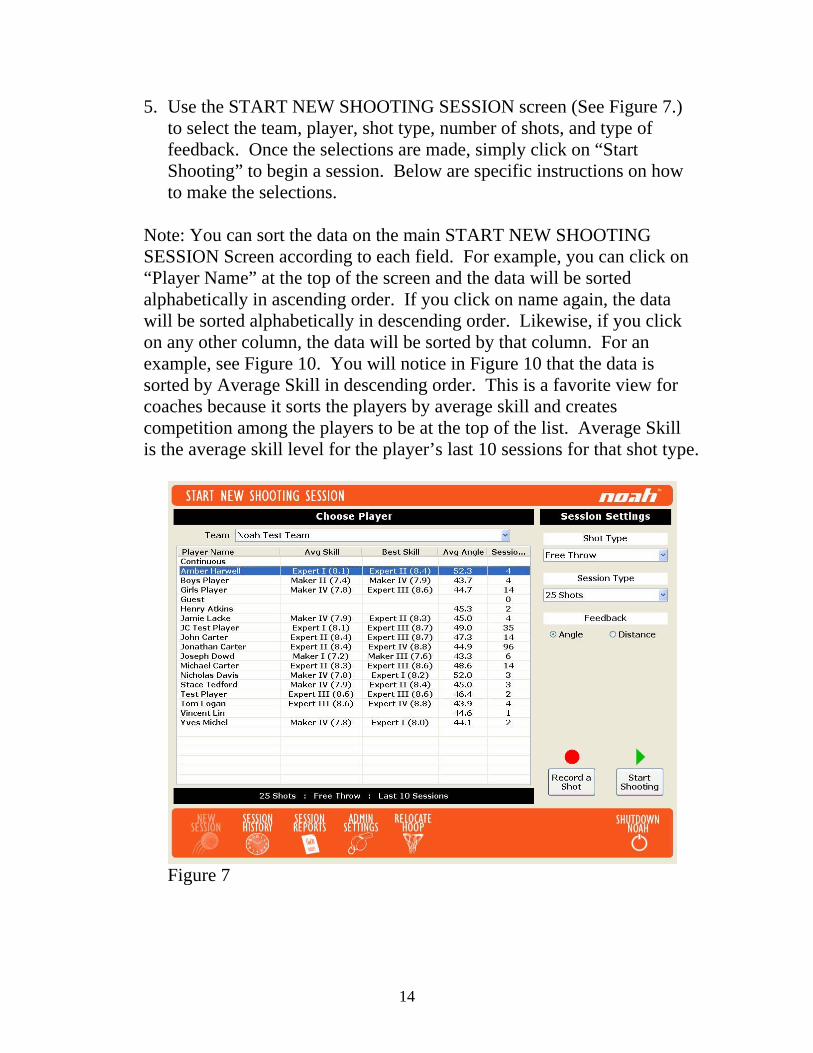
5. Use the START NEW SHOOTING SESSION screen (See Figure 7.) to select the team, player, shot type, number of shots, and type of feedback. Once the selections are made, simply click on “Start Shooting” to begin a session. Below are specific instructions on how to make the selections.
Note: You can sort the data on the main START NEW SHOOTING SESSION Screen according to each field. For example, you can click on “Player Name” at the top of the screen and the data will be sorted alphabetically in ascending order. If you click on name again, the data will be sorted alphabetically in descending order. Likewise, if you click on any other column, the data will be sorted by that column. For an example, see Figure 10. You will notice in Figure 10 that the data is sorted by Average Skill in descending order. This is a favorite view for coaches because it sorts the players by average skill and creates competition among the players to be at the top of the list. Average Skill is the average skill level for the player’s last 10 sessions for that shot type.
Figure 7
14

a. Use Team pull-down menu to choose the shooter’s team. (See Figure 8.)
Figure 8
b. Click on the shooter’s name from the list of team members. This screen also gives the shooter’s average skill level, the shooter’s highest skill level, the shooter’s average arc angle and the number of session this shooter has completed. Choosing “Guest” will allow a visiting shooter to do a session without entering their name into the system database. The Guest data is deleted each time the system is turned off, so if you want the data to be saved you must have the player shoot under a name in the system. Choosing “Continuous” will allow any shooter to shoot any type of “straight ahead” shot and receive Noah Voice verbal feedback for an unlimited number of shots.
c. Use the Shot Type pull-down menu to choose the type of shot
for the practice session. (See Figure 9.) Free Throw and 3-Point are already set on the Noah software and cannot be modified. Other shot types, for example 6 Foot Hook and 15 Foot Jumper, can be named by using the Modify Shot Type in
15

the Administrator Functions section on page 34 of this operating manual.
Figure 9
d. Use the Session Type pull-down menu to choose the number of
shots in the Noah practice session. (See Figure 10.) The choices are 5 Shots, 10 Shots, 25 Shots, 25 Shots No Feedback and 50 Shots. 25 Shots and 50 Shots are typical sessions, providing Noah Voice feedback after every shot and providing a Noah Vision arc plot and skill level at the end of the session. 5 Shots and 10 Shots will provide Noah Voice feedback after every shot and will provide a Noah Vision arc plot at the end of the session, but will not provide a skill level. 25 Shots No Feedback is a unique session with a very important purpose. This session should be used the first time for each shot type an athlete shoots with Noah to identify the shooter’s natural arc prior to beginning Noah training. This initial session is discussed further in the “An Athlete’s First Noah Workout” Section on page 22.
16

Figure 10
e. Click on either Angle or Distance feedback. (See Figure 7.) Angle feedback will always be the default setting and is the type of training most used by Noah users. The number spoken by Noah is the angle at which the ball enters the hoop. Distance feedback is the position of the center of the ball as it enters the 18 inch hoop. Noah Voice speaks “too short” when the center of the ball is short of the rim, “too long” when the center of the ball is beyond the rim and the numbers “1” to “18” for positions inside the rim. Distance Training is typically used when a player has developed a consistent arc in the acceptable angle range of 43-50 degrees, but still struggles getting the ball to the center of the basket. Distance feedback in these cases is extremely valuable. These cases are rare, however, and that the vast majority of basketball players need to train on angle. For further information on Distance and Angle Training, see the section titled “An Athlete’s First Noah Workout” on page 22 and also the section titled “Glossary of Terms” on page 37.
17

f. Click on “Start Shooting” to begin the session. The Shooting
Session in Progress screen appears. (See Figure 11.)
Figure 11
Shooting a Noah Session
1. The athlete begins shooting the Noah session and receives Noah Voice feedback after every shot. On the screen, Noah briefly flashes the arc angle after every shot. Noah will also update the shot number and session statistics after every shot. Important: Noah is designed for straight on shooting such as free throw line or top of the key. When shooting from the wing or baseline, Noah Voice will speak a number that is not the true arc so Noah should be paused when taking these other shots. (See letter “g” below.)
2. During the session, there are additional items that can be controlled
from the screen although these are usually not required.
18

a. Select Normal/Indoor for environments where the primary lighting is artificial light. Select Bright/Outdoor for environments where the primary lighting is sunlight, including skylights, bright windows, outdoor courts, or gyms with extremely bright lighting.
b. Move the Brightness slider to give the clearest view of the
basket.
c. Click the Record Shot button to initiate the instant video replay function. See description on page 20 labeled Record and Playback Function.
d. Move the Volume slider to put the speaker sound at the desired
level. The volume may also be changed using the Master Volume Control which is located on the right side of the laptop tray.
Master Volume Control
e. Click the Mute square to temporarily silence the speakers. f. Click the Say Shot square to have Noah Voice speak the shot
number in advance of the arc number. This is particularly helpful when shooting a 25 Shot No Feedback session when the athlete wants to know how many shots remain in the session.
g. Click the Pause button to temporarily stop Noah from
measuring shots and giving Noah Voice feedback. This is useful when a practice session includes wing shots and baseline
19

shots that cannot be accurately measured by Noah. When Noah is paused, a Run button will appear. Click the Run button to restart Noah at the point where the session was paused.
h. Click the Stop button to end the session prior to session completion. A stopped session will not be saved in the Noah database for reports or session history.
Record and Playback Function
1. An individual shot can be recorded for playback at anytime from the main START NEW SHOOTING SESSION Screen by clicking on the “Record Shot” button. After clicking on “Record Shot”, you will see Figure 12 on the screen. Also, during a Noah Session, the shooter can click the “Record” button before taking a shot to initiate the record and playback function. Noah records the next shot taken, says “Your shot is recorded” and presents the RECORD A SHOT screen. (See Figure 13.)
Figure 12
20

2. Click the “Instant Replay” button to observe shot mechanics for the entire shot at normal speed.
3. Use the “Frame by Frame” slider to review each phase of the shot.
The shot video can also be moved frame by frame by using the left and right arrows on the laptop. The shooter can review the shot mechanics as many times as he or she wants. Once you leave this screen, this video is deleted and cannot be accessed again.
4. Click the “Record Again” button to record a new shot.
5. Click the “Resume Session” button to return to the Noah shooting
session that was in progress.
Figure 13 Note: The record and playback function can provide helpful feedback on any type of straight ahead shot. One often used application is recording a jump shot off the dribble. Example: 1) Have a player get the ball at the high wing opposite of the Noah System. 2) Have them get in the triple threat position. 3) Have them “rip” the ball and take 1 or 2 hard dribbles toward the Free Throw Line and shoot a jump shot. There are enough video frames that you can see the entire shot from the triple threat position all the way to the shot
21

reaching the basket. This allows you to not only look at the shot, but also other details such as: triple threat form, the rip form, footwork, shoulders square, release point, etc. An Athlete’s First Noah Workout A shooter’s initial workout with Noah is important because it allows the shooter to set their target arc and teaches the shooter how to benefit from the Noah Voice feedback. The coach and shooter should allow 20 minutes for this initial workout.
1. Use the START NEW SHOOTING SESSION screen (See Figure 7.) to select the team and the player name. Set the session settings at “Free Throw”, “25 Shots No Feedback”.
2. Shooter takes their normal free throw shot and has a rebounder keep
track of the number of shots made. Noah does not give audible Noah Voice feedback, but is recording information from each shot.
3. The 25 shot session is over when Noah says “Your session is
complete. Please enter the number of shots made.” The shooter enters the number of shots made on the laptop screen. Once you enter the number of shots made, you can either click “OK” or simply press enter.
4. The Completed Session screen appears on the laptop. (See Figure 14.)
22

Figure 14
5. The shooter and coach look at the Average Angle. If the average angle is between 43 and 50 degrees, the athlete is probably shooting an acceptable angle and their target angle in the future will likely be the Average Angle given on the screen at the end of this initial session. Extensive research and player testing has proven that the best, most forgiving angle for making shots is between 43 and 50 degrees. If the angle is very much below 43 degrees, the available space to “wedge” the ball into the hoop gets so small that it is very difficult, if not impossible, to make a good percentage of shots. If the angle is very much over 50 degrees, it is very difficult, if not impossible, to control the ball and achieve the same distance consistently, causing a low shooting percentage. In some cases, even though a player has an average angle between 43 and 50 degrees, the coach may still choose to change the target angle to one that helps achieve the proper distance more consistently. See #6 below for further details. For average angles outside the 43 to 50 range, the coach and shooter will likely decide to select a target angle other than the Average Angle. Once an athlete’s target angle is determined, it is very important that the athlete focus on hitting this target angle with each shot, building strong repeatable muscle memory. The Target Angle is entered into the
23

Noah System using the process explained in the Administrator Functions on page 34, #3. This is an important step, so feel free to call Noah Basketball at 1-888-TRY-NOAH for additional assistance.
6. The shooter and coach should next look at the Average Distance. An
ideal average distance is 10” to 12”. If the average distance is below 10” then the shooter should seek to shoot the ball longer in future sessions. If the average distance is above 12”, then the shooter should seek to shoot the ball shorter in future sessions. Distance is also shown visually by looking at the Noah Vision arc plots. Blue arcs are short shots; green and yellow arcs are correct length; red arcs are long shots. In two special cases, a player may change their target angle to achieve correct distance. In the first case, a player that shoots the ball consistently flat (less than 43 degree angle) and long (greater than 12”), can increase their target angle by a few degrees and see their distance number decrease to the perfect distance of 10” to 12”. In the second case, a player that shoots the ball consistently high (greater than 50 degree angle) and short (less than 10”), can decrease their target angle by a few degrees and see their distance number increase to the perfect distance of 10” to 12”.
7. Once the athlete’s target angle is determined, it is very important to
enter this target angle into the Noah system so Noah can remind the athlete of their target angle prior to all future practice sessions. The method for entering the target angle into the Noah system is explained in the Administrator Functions section of this manual on page 34, #3.
8. The shooter and coach look at the Skill Level. Skill Level represents
the athlete’s ability to demonstrate strong muscle memory by repeating the same shot angle and distance every time. A Master IV is a perfect arc (angle and distance) consistency and would be represented in Noah Vision by 25 shots showing as a single green line on the screen. Noah has never measured a Master III or Master IV skill level. The best shooters today have a skill level of Master II. Typical professional and college shooters have skill levels in the Expert Range. Noah allows athletes to more rapidly move up the skill level scale by providing the Noah Voice verbal feedback after every shot.
9. Use the Start New Shooting Session screen to identify the team and the player name. Set the session settings at “Free Throw”, “25 Shots”
24

and “Angle”. After each shot, Noah now gives audible Noah Voice angle feedback. The shooter should try to hit their target angle number on each shot.
10. At the end of the session, the shooter should note their Average Angle,
Average Distance and Skill Level. a. The Average Angle should be the same as the shooter’s Target
Angle. If the Average Angle is different from the Target Angle, then the shooter should focus more attention on hitting their target angle in future Noah feedback sessions.
b. The Average Distance should be between 10” and 12”. If the Average Distance is not in this range, then the shooter should focus on adjusting their distance in future Noah sessions.
c. The Skill Level will improve as the shooter practices with Noah. The way to improve Skill Level is to improve muscle memory by shooting at the athlete’s appropriate Target Angle to achieve a distance score of between 10” and 12”.
Note: Definitions for angle, distance, consistency, and skill level can be viewed by clicking on “learn about your angle, distance, consistency, and skill level values” in the bottom right hand corner of the completed session screen. (See Figure 15.)
25

Figure 15
Models for Using Noah Noah can be used in many different ways to help shooters perform at a higher level. This manual will cover individual, team and camp training: Individual Training
1. Instruction Model - For a shooter who is learning a new shot or currently has a very inconsistent shot, Noah will provide valuable Noah Voice feedback on arc. The coach and shooter decide what arc is the target angle for the particular shot (FT, 3 pointer, etc.) the player is training. The shooter and coach concentrate on the correct shooting mechanics and can check the results through the audible Noah Voice arc feedback and by reviewing the Noah Vision results for each training session. Often, the Skill Level will be low in early sessions, but the shooter will usually observe rapid improvement in their skill level and percent made. For the Instruction Model, shooters will
26

receive the best Noah results if they practice with Noah 3 to 7 days per week, and shoot at least four 25 shot sessions per training session.
2. Improvement Model - For a shooter that already has an established
shot with correct shooting mechanics, Noah will provide a way to continually improve the shot consistency while at the same time preventing the shot from drifting over the course of a season or a career. This assures that the shooter is regularly practicing the same shot rather than unlearning valuable muscle memory by at times practicing a slightly different shot. In the Improvement Model, the shooter determines the target angle for the shot by completing a “25 Shot No Feedback” session as outlined in the “Athlete’s First Noah Workout” section on page 22. Then on a regular basis (2 or 3 times per week), the shooter completes 3 to 4 Noah Voice feedback sessions with Noah to train the muscle memory on that target angle. At the end of the Noah session, the Average Angle should closely match the shooter’s Target Angle. With ongoing Noah practice, the Skill Level should continue to increase toward the Master level. For the Improvement Model, shooters will receive the best Noah results if they have at least 3 practice sessions with Noah each week. The improvement model is typically used in the off-season and in some cases in-season, if there is shooting slump. (See #3 below.) The improvement model is also ideal for players recovering from an injury to assure that they recapture their original shot.
3. Slump Prevention Model - For advanced shooters that have been
training with Noah for a long period of time, Noah provides an opportunity for players to keep their shot in “tune” with minimal Noah time. These advanced shooters (Master or Expert Skill Level) must know their personal target angle. In the Slump Prevention Model, these shooters use the Noah system in Continuous Mode. Each player shoots 6 shots prior to every practice to assure that he is shooting at his personal target angle. This pre-practice shooting can be completed in one minute per player, so it does not disrupt the normal practice. If a player has a bad shooting game, they should return to the Improvement Model immediately to reestablish their shot at their target angle prior to the next game. (See #2 above.) The Slump Prevention Model is typically used in-season.
27
Team Training
1. Before Practice - When each member of the team has memorized their personal target angle, then Noah can easily be used in team practices. Have Noah set in Continuous Mode. When Noah is not being used, hit the “Pause” button so that numbers do not continue to be called out. Ideally, the Noah basket would be used for players to each shoot six shots with Noah Voice feedback, focusing on achieving their target angle. With a rebounding partner, 2 people can shoot their shots in total of one minute, so a 12 person team can complete the Noah warm-up in 6 minutes. When each pair is done with their shots, they move to another basket. Players need to be reminded that Noah shots must be taken straight on from the basket to get accurate feedback. Also, Noah Voice feedback is only helpful when the player has their own personal target angle number memorized. By doing this short Noah warm-up, the players are more likely to repeat their target angle during all shots of the practice, even when there is no Noah feedback.
2. During Practice - Ideal drills for Noah are partner shooting and timed
shooting. During these drills, one pair of athletes is assigned to the Noah basket and Noah is set in Continuous Mode. The athletes at the Noah basket run the shooting drills the same as the other baskets except that all shots are taken straight on from the basket. Any length shot can be taken with Noah in Continuous Mode. Players need to be shooting for the target angle that they have memorized. By using Noah regularly, the players are more likely to repeat their target angle during all shots of the practice, even when there is no Noah Voice feedback.
3. After Practice - When there are no events scheduled in the gym,
athletes can shoot on Noah after practice when their legs and arms are tired. They can then shoot in Continuous Mode or shoot a “25 Shot” session under their own name. With a rebounder, a 25 shot session takes about 2 minutes.
Camp Training
1. Noah as a Camp Station - In the Administrative Functions section, enable the Camp Mode. Each camper shoots a 10 shot session on Noah. About 50-60 campers can shoot on Noah each hour. Print the
28

Noah Vision session report immediately, writing the camper’s name on each printout. To generate revenue, place all the printed Noah Vision arc plots in the concession stand and allow the campers to buy them. (A typical selling price is $10.) This approach allows all campers to work with Noah without paying an extra fee.
2. Noah at Camp Break Time - In the Administrative Functions section,
enable the Camp Mode. Allow campers that have purchased a Noah Ticket to shoot a 10 shot session on Noah. About 50-60 campers can shoot on Noah per hour. Have Noah available for campers to use in a central place during free time, for example just after lunch and after dinner. If there is a camp bank, campers can buy a Noah Ticket at the bank. (A typical price is $10.) During break time, campers bring the Noah ticket to the manager running the Noah system and get in line to shoot. After shooting campers receive their Noah Vision printout immediately and will typically sit around and compare their plot with those of their friends. An upside to this approach is you will have several players shoot more than one session.
3. Noah at a Planned Time - This approach is most useful for small
camps with less than 100 campers. During the week, announce that campers will have the opportunity to shoot with Noah after the last day of camp, and that campers wanting to use Noah should bring $10 (or whatever you decide to charge) at that time. It is also good to demonstrate the system several times during camp and show the campers the Noah Vision printout they will be receiving. An upside to this approach is that many of the parents will also pay to shoot on Noah and then have fun discussing the results with their sons or daughters. Just after camp is over on the last day, have the kids that want to shoot on Noah line up along the baseline at the appropriate hoop. It also works great to announce during the awards ceremony that everyone that wants to shoot on Noah needs to stay after for their Noah Session. Many of the parents are at the Awards ceremony making this an ideal time to mention the Noah sessions. Prior to beginning the Noah session, go to the Administrative Functions section to enable the Camp Mode. Each camper shoots a 10 shot session on Noah, allowing about 50-60 campers to shoot on Noah each hour.
29

Shutting Down Noah When all Noah practice sessions have been completed for the day, Noah is shut down in the following way:
1. Click the “NEW SESSION” icon to get to the main START NEW SHOOTING SESSION Screen.
2. Click the “SHUTDOWN NOAH” icon. 3. Click “Yes” in the “Are you sure you want to turn off Noah Select?”
pop-up window. (See Figure 16.) 4. Wait for the laptop computer to completely turn off. 5. Unplug the extension cord from Noah and store the cord. 6. Roll Noah to its storage location.
Figure 16
30

Reviewing Past Noah Sessions In its database, Noah stores each shooting session that has been recorded under a player’s name. Noah will not store a shooting session that has been recorded under “Guest” or under “Continuous”. To recall a previous Noah Vision session from the database, follow the following sequence:
1. Click on the “SESSION HISTORY” icon to bring up the SHOOTING SESSION HISTORY screen. (See Figure 17.)
2. Use the pull-down menus to select the appropriate team, player, shot type and number of shots.
3. Select “Last 10”, “All” or “Range”. If “Range” is chosen, then use pull-down menus to select the date range of interest.
4. In the Choose Session area, click the left arrow or right arrow to locate the past session of interest.
5. To print the past session, click “PRINT SESSION”.
Figure 17
31
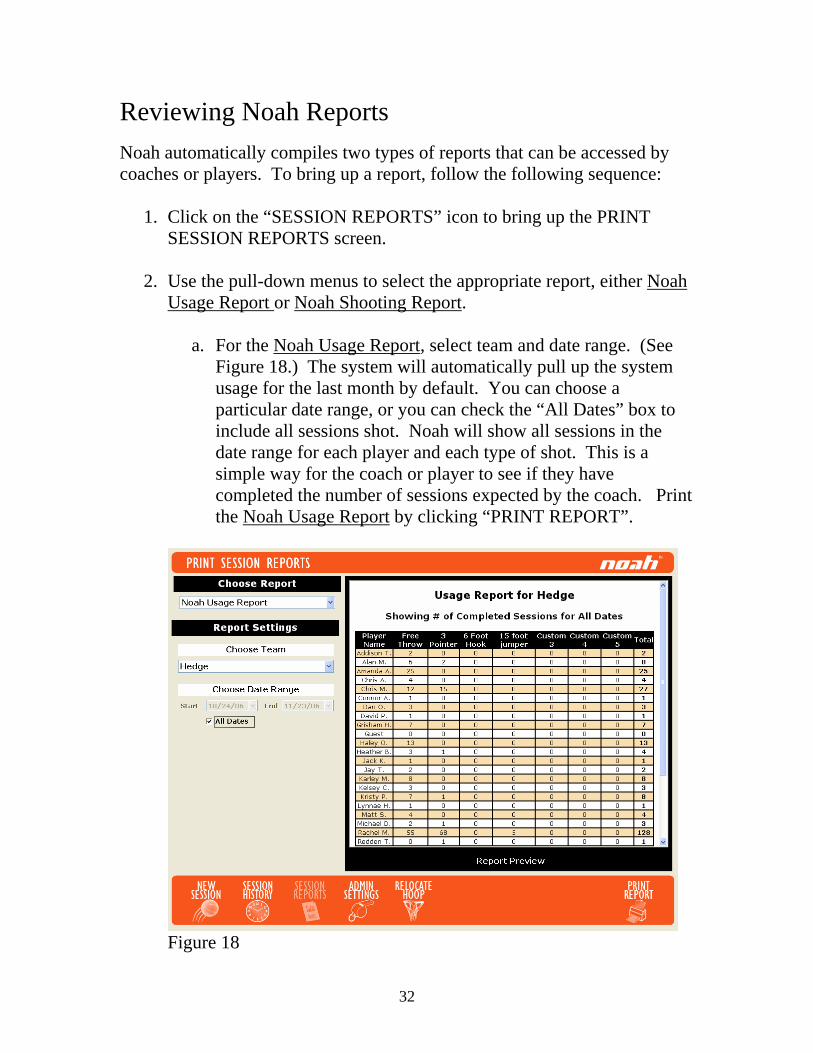
Reviewing Noah Reports Noah automatically compiles two types of reports that can be accessed by coaches or players. To bring up a report, follow the following sequence:
1. Click on the “SESSION REPORTS” icon to bring up the PRINT SESSION REPORTS screen.
2. Use the pull-down menus to select the appropriate report, either Noah
Usage Report or Noah Shooting Report.
a. For the Noah Usage Report, select team and date range. (See Figure 18.) The system will automatically pull up the system usage for the last month by default. You can choose a particular date range, or you can check the “All Dates” box to include all sessions shot. Noah will show all sessions in the date range for each player and each type of shot. This is a simple way for the coach or player to see if they have completed the number of sessions expected by the coach. Print the Noah Usage Report by clicking “PRINT REPORT”.
Figure 18
32

b. For the Noah Shooting Report, use the pull down menus to select the team, player, type of shot and date range. (See Figure 19.) The report will only show the sessions with 25 or 50 shots. Average Angle, Percent Made per Session and Arc Consistency (comparable to Skill Level) are shown. This is a simple way for the coach or player to see improvement on a particular shot over time. If the player is practicing correctly, the Average Angle should always be near the player’s target angle. The Percent Made is the number reported at the time of the session. The Arc Consistency is the numerical value for the Skill Level. (Master is 9 to 10, Expert is 8 to 9, Maker is 7 to 8, Shooter is 5 to 7 and Builder is less than 5). Disciplined shooters will see the percent made and arc consistency scores improve over time. Print the Noah Shooting Report by clicking “PRINT REPORT”.
Figure 19
33

Caring for Noah With minimal maintenance, Noah will provide trouble-free practice sessions for many years.
• Store Noah in a dry temperature controlled place where the laptop screen and lens are protected.
• Periodically check the air pressure in the two Noah tires that are just underneath the laptop tray.
Administrator Functions One coach, manager or player is typically designated the administrator for the team. This administrator performs special functions such as adding and deleting teams, adding and deleting player names, modifying shot types and adding target angles for each player. The administrator also has access to advanced settings that should not be changed without checking with Noah Basketball. To enter ADMIN SETTINGS use the following sequence:
1. Click on the “ADMIN SETTINGS” icon to bring up the “Enter the Admin Password” window. (If you are the administrator and do not know the admin password, email [email protected] to request the password.) Enter the password and click “OK”.
2. To modify teams, click “New Team”, “Modify Team” or “Delete
Team” as appropriate. (See Figure 20.) Follow the on screen instructions.
3. To modify players, click “New Player”, “Modify Player” or “Delete
Player” as appropriate. (See Figure 20.) Follow the on screen instructions. IMPORTANT: Adding a player’s target angle is accomplished within the Modify Player screen.
4. Noah allows the administrator to change shot types based upon the
coach’s preference. (Free Throw and 3 Pointer are set at the factory and cannot be modified.) Some typical modified shot types include Pro 3-point, 18 Foot Jumper, 15 Foot Jumper or 6 Foot Hook. These modified shot types do not change the way Noah measures the angle and distance of a shot. They merely provide additional categories
34

within the Noah database that can be tracked in Session History or Session Reports. To modify shot types, click on a line other than Free Throw and 3 Pointer. Then click on “Modify Shot”. (See Figure 20.) Follow the on screen instructions.
5. Noah allows the administrator to change other settings such as require
password to shutdown, print to default printer and recommend baseline session. (See Figure 20.) Click on appropriate box to enable any of these features. When Recommend Baseline Session is checked, a pop-up window will appear whenever a player starts a new session until that player has shot a 25 shot no feedback session. If “Print to default printer” is checked the system will automatically print 1 copy directly to the default printer. In other words, there will be no windows prompt asking what printer you want to use, how many copies, etc. You would typically “un-check” this box only if you want to take your laptop to connect to another printer in your office or home. The system does not have to be connected to the camera and Noah frame for you to be able to print. You can start the system up as normal without the camera plugged in and the system will stop to tell you that the camera was not recognized. You click on “continue” and can then access reports and session history for viewing and printing.
6. Noah allows the administrator to put the system into Camp Mode.
Camp Mode allows the system to report a Skill Level for a 10 shot session. This is often used at camps when it is useful to have 60 shooters per hour do a Noah session. (See Figure 20.) Click on “Enable” to turn on the camp mode. Camp mode is automatically disabled each time the system is turned off.
7. Noah allows the administrator to update the Noah software. Prior to
updating the software, the administrator should make sure that the Noah laptop is connected to the internet. This could be through cable modem, wireless connectivity (if your laptop is equipped with wireless), DSL, dial-up connection, etc. Please confirm that the laptop is connected to the internet by trying to bring up any website. Then follow the on-screen instructions to update via the internet. Call 1-888-TRY-NOAH if there are any questions.
8. Noah allows the administrator to save the Noah log files to a CD for
troubleshooting. Go to the Administrator Setting screen (Figure 20)
35

and click on “Save Noah Data”. Then follow the on-screen instructions. These log files can then be emailed to Noah support personnel at [email protected].
9. Noah allows the administrator to change passwords. Noah Basketball
does not recommend changing passwords.
10. Noah allows the administrator to close the Noah application. This step may be required when installing a printer on the Noah system. Go to the Administrator Setting screen (Figure 20) and click on “Close Application”. When application is closed you will be taken directly to the Windows Desktop.
Figure 20.
11. Noah allows the administrator to change the camera settings. This step may be required when installing Noah on an unusually configured court or driveway. Go to the Administrator Setting screen (Figure 20) and click on “Advanced Settings”. The Noah Select Advanced Setting screen appears. (See Figure 21.) Noah Basketball suggests that the administrator contact 1-888-TRY-NOAH before reconfiguring this screen.
36
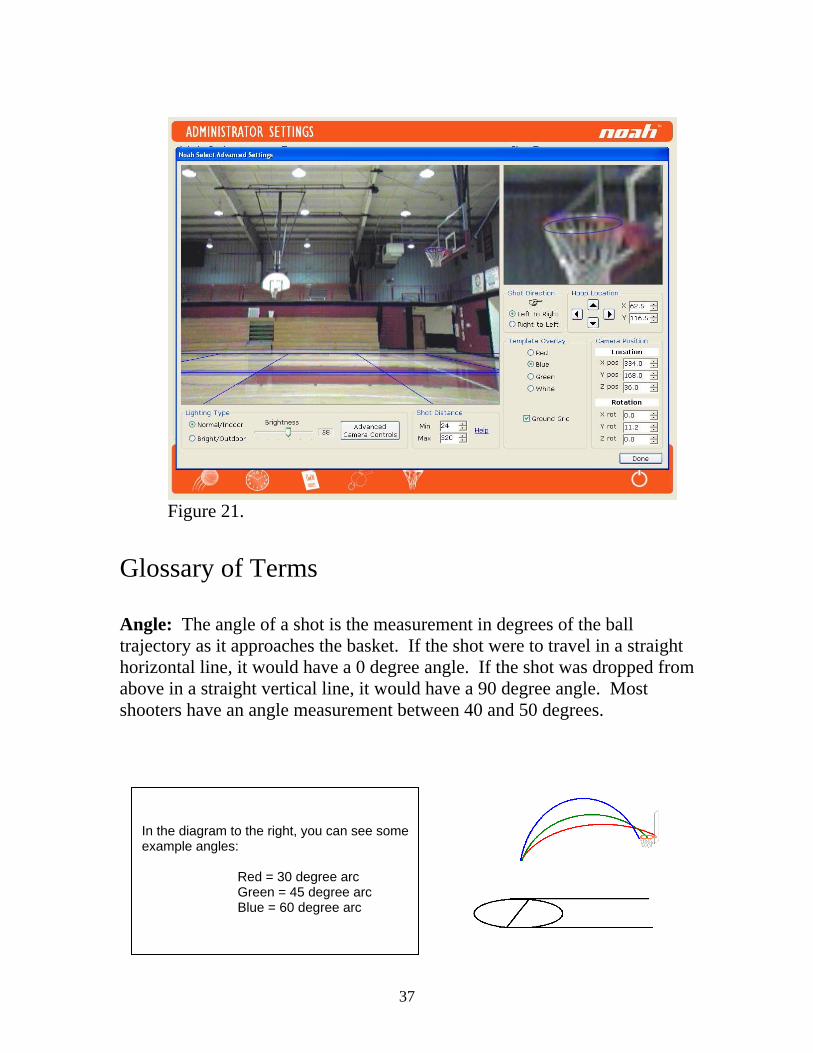
Figure 21.
Glossary of Terms Angle: The angle of a shot is the measurement in degrees of the ball trajectory as it approaches the basket. If the shot were to travel in a straight horizontal line, it would have a 0 degree angle. If the shot was dropped from above in a straight vertical line, it would have a 90 degree angle. Most shooters have an angle measurement between 40 and 50 degrees.
In the diagram to the right, you can see some example angles:
Red = 30 degree arc Green = 45 degree arc Blue = 60 degree arc
37

Average Angle: Average angle is the mean of the angle of all the shots taken in the session. It is calculated by adding together all the angles during the session and dividing by the number of shots. Average Distance: Average distance is the mean of the distance of all the shots taken in the session. It is calculated by adding together all the distances during the session and dividing by the number of shots. Arc Consistency (Skill Level): Noah determines a shooter’s skill level based on how consistent their arc is. A shooter’s arc consistency is a measurement of how well a shooter can shoot the same angle and distance for each shot. For example, if a shooter shot the same angle for every shot, his angle consistency would be 10.0. Likewise, if each shot is the same distance in relation to the hoop, his distance consistency would be 10.0. The average of a shooter’s angle consistency and distance consistency determines their arc consistency. Most good shooters will have an arc consistency between 8.0 and 9.0 and thus fall in the Expert skill level. Great shooters with an arc consistency above 9.0 will fall in the Master skill level. Distance: The distance of a shot is the measurement in inches with relation to the front of the rim as the ball approaches the basket. If the ball hits the rim exactly on the front-center of the rim, the distance of the shot would be 0 inches. If the ball hits exactly on the back-center of the rim, the distance of the shot would be 18 inches since the rim is 18 inches in diameter. Minimum and Maximum Angle: Noah keeps track of the angle for the flattest and highest shot during the session and lists these on the screen as the minimum and maximum angle. Minimum and Maximum Distance: Noah keeps track of the distance for the shortest and longest shot during the session and lists these on the screen as the minimum and maximum distance. Noah Vision: Noah observes each shot taken in a session and then shows the arcs of all shots in the Noah Vision session report. Noah Voice: Noah gives Noah Voice verbal feedback after every shot taken during a feedback session.
38
Range of Angle: Noah keeps track of the angle for the flattest and highest shot during the session. The range of angle is the highest angle minus the flattest angle. Range of Distance: Noah keeps track of the distance for the shortest and longest shot during the session. The range of distance is the longest distance minus the shortest distance. Skill Level (Arc Consistency): Noah determines a shooter’s skill level based on how consistent their arc is. A shooter’s arc consistency is a measurement of how well a shooter can shoot the same angle and distance for each shot. For example, if a shooter shot the same angle for every shot, his angle consistency would be 10.0. Likewise, if each shot is the same distance in relation to the hoop, his distance consistency would be 10.0. The average of a shooter’s angle consistency and distance consistency determines their arc consistency. Most good shooters will have an arc consistency between 8.0 and 9.0 and thus fall in the Expert skill level. Great shooters with an arc consistency above 9.0 will fall in the Master skill level. Troubleshooting Guide
• Noah does not have power. Make sure the power cord is plugged into the wall outlet and into the lower right side of the Noah frame. If the system still does not have power, you should check with maintenance personnel to see if the wall outlet is working properly. In many cases, plugs are disabled in the gym area.
• Noah Voice sound is too loud or too quiet. Turn the master volume
control dial that is located on the laptop tray up or down. Also, you can move the Volume slider on the laptop screen while in a session to a comfortable level. It is recommended that you adjust the master volume control first.
• There is no sound. If there is no sound at all, check the following
items in this order 1) Is there power to the frame? 2) Has the audio cord that runs from the master volume dial on the laptop tray been plugged into the laptop correctly? Make sure the audio cord is plugged into the speaker outlet rather than the microphone outlet. 3) Are you shooting on No Feedback? – If you are shooting on No
39

Feedback you will not get Noah Voice verbal feedback after each shot. 4) Has the Mute button been clicked? 5) Has your laptop volume control been turned all the way down or muted? 6) Has the speaker system become unplugged? – It should be plugged into the power strip beneath the laptop tray. 7) Has the power switch on the speaker system been turned off? – You can access the speaker system by taking a knee while behind the system and looking down next to the floor to see speaker controls. –You should also check all wires while you are here to make sure they are all still connected properly. 8) Has the power strip been turned off? – The power strip below the laptop tray has an “on/off” switch.
• Noah does not give an audible Noah Voice angle number after a shot
during a 25 Shot No Feedback session. This is normal. Noah does not give audible Noah Voice arc feedback for shots during a No Feedback session, but is still recording arc data in its memory.
• Noah does not show a Skill Level at the end of a session. Noah will
only show a skill level at the end of a session that has at least 25 shots.
• Noah is running sluggishly and is missing shots. Make sure your laptop power cord is connected. On some model laptops, the system will not perform correctly without the power supply being connected.
Limited Warranty Pillar Vision, Inc. will provide parts to replace defective parts without charge for one (1) year from the date of the original purchase order. Limits and Exclusions: This warranty is extended only to the original purchaser. This warranty is not extended to any other person or transferee. This warranty is void and of no effect if any serial numbers on the product are altered, replaced, defaced, missing or if service was attempted by an unauthorized service provider.
40

This warranty only covers failures due to defects in material or workmanship which occur during normal use. It does not cover damage which occurs in shipment, or failures which are caused by repairs, alterations or product not supplied by Pillar Visions, Inc., or damage which results from accident, misuse, abuse, mishandling, misapplication, alteration, faulty installation, improper maintenance, commercial use, or damage which results from fire, flood, lightning or other acts of God. Pillar Vision, Inc. and its representatives or agents shall in no event be liable for any general, indirect or consequential damages arising out of or occasioned by the use of or the inability to use this product. This warranty is made in lieu of all other warranties, express or implied, and of all other liabilities on the part of Pillar Vision, all other warranties including the warranty of merchantability, and fitness for a particular purpose, are hereby disclaimed by Pillar Vision and its representatives in the United States. This limited warranty gives you specific legal rights. You may have other rights that vary from state to state. If, at any time during the warranty period, you are unable to obtain satisfaction with the repair of this product, please contact Pillar Vision, Inc. Attention: Pillar Vision, Inc. reserves the right to modify any design of this product without prior notice. Service and Technical Support Assistance For service or technical support, contact Noah Basketball at [email protected] or at 1-888-TRY-NOAH.
41