nhanes home urine collection manual 2013
TRANSCRIPT

Home Urine Collection
August 2013

TABLE OF CONTENTS
Chapter Page
1 HOME URINE COLLECTION ...................................................................... 1-1
1.1 Background ......................................................................................... 1-1
2 EQUIPMENT AND SUPPLIES ...................................................................... 2-1
2.1 Description of Examination Room in the MEC .................................. 2-1 2.2 Description of Equipment and Supplies ............................................. 2-2
2.2.1 Equipment ........................................................................... 2-2 2.2.2 Supplies ............................................................................... 2-2
2.3 Start of Stand Procedures .................................................................... 2-4
2.3.1 Room Setup Procedures ...................................................... 2-4 2.3.2 Inventory Management ....................................................... 2-4
2.4 Inventory Management during the Stand ............................................ 2-5 2.5 End of Stand Procedures ..................................................................... 2-5 2.6 Urine Collection Kit Storage .............................................................. 2-6
3 MEC PROTOCOL ........................................................................................... 3-1
3.1 Overview ............................................................................................. 3-1 3.2 Eligibility Criteria ............................................................................... 3-2 3.3 Pre-Examination Procedures ............................................................... 3-2 3.4 Recruiting the Participant to Accept the Home Collection ................. 3-3 3.5 Examination Procedures ..................................................................... 3-4
3.5.1 Procedures When the SP Agrees to Take a Kit ................... 3-4 3.5.2 Labeling the Kits ................................................................. 3-10 3.5.3 Urine Collection and Shipping Instructions ........................ 3-13
3.6 Packing the Urine Collection Kit for the SP to Take Home ............... 3-18 3.7 Final Steps .......................................................................................... 3-18 3.8 Coding Not Done Exams .................................................................... 3-20
4 USPS LABEL PRINTING UTILITY .............................................................. 4-1
4.1 Warehouse Responsibility .................................................................. 4-1 4.2 USPS Label Utility ............................................................................. 4-1
iii
TABLE OF CONTENTS (Continued)
Chapter Page
5 FIELD FOLLOW-UP MANAGEMENT SYSTEM PROTOCOL ................. 5-1
5.1 Overview ............................................................................................. 5-1 5.2 Supplies and Equipment ..................................................................... 5-2 5.3 Log-on to the FFMS ........................................................................... 5-3 5.4 Access the HUC Module .................................................................... 5-5 5.5 Appointment Manager ........................................................................ 5-5 5.6 Call History ......................................................................................... 5-8 5.7 Reports ................................................................................................ 5-11
5.7.1 Reminder Postcard .............................................................. 5-12 5.7.2 HUC Response Rate Report ................................................ 5-14 5.7.3 Check Status Report ............................................................ 5-16
5.8 Supervisor ........................................................................................... 5-17
5.8.1 Appointment Monitoring Report ......................................... 5-17 5.8.2 HUC Module Security ......................................................... 5-21
6 CHECK PROTOCOL ...................................................................................... 6-1
6.1 Overview ............................................................................................. 6-1
7 TRACKING AND DELIVERY STATUS ...................................................... 7-1
7.1 Overview ............................................................................................. 7-1 7.2 Email Sent Weekly to Analysis Lab ................................................... 7-3
List of Appendixes
Appendix
A “What To Do” Urine Collection and Shipping Instructions English and Spanish ............................................................................................................. A-1
B Kit Labeling Instructions ................................................................................. B-1
C Talking Points English and Spanish ................................................................ C-1
D Inventory of Home Urine Collection Supplies ................................................ D-1
E Reminder Postcards English and Spanish ........................................................ E-1
iv

TABLE OF CONTENTS (Continued)
List of Exhibits
Exhibits
2-1 HUC Exam Room ............................................................................................ 2-1
2-2 Confidentiality label ........................................................................................ 2-5
3-1 Home Urine Collection exam screen ............................................................... 3-5
3-2 HUC Screen—SP answers “Yes.” ................................................................... 3-6
3-3 USPS shipping label tracking number bar code .............................................. 3-7
3-4 USPS tracking numbers scanned into ISIS ...................................................... 3-8
3-5 Hard-stop edit .................................................................................................. 3-9
3-6 Dymo label examples ....................................................................................... 3-10
3-7 Shipping label and bar code linkage ................................................................ 3-11
3-8 Image label placement ..................................................................................... 3-12
3-9 Reprint labels ................................................................................................... 3-12
3-10 Evening Label on Styrofoam Lid ..................................................................... 3-15
3-11 Morning Label on Styrofoam Lid .................................................................... 3-17
3-12 Status Screen - Complete ................................................................................. 3-19
3-13 Status Screen – Not Done comments ............................................................... 3-20
3-14 Comment codes ................................................................................................ 3-21
4-1 Shipment Tracking Label Maker blank ........................................................... 4-2
4-2 Shipment Tracking Label Maker completed .................................................... 4-3
4-3 Sample shipping label ...................................................................................... 4-4
5-1 FFMS connect to nhprodweb window ............................................................. 5-4
5-2 FFMS Log-in screen ........................................................................................ 5-4
v
TABLE OF CONTENTS (Continued)
List of Exhibits
Exhibits
5-3 System default opening screen ......................................................................... 5-5
5-4 HUC Appointment Manager button ................................................................. 5-5
5-5 Appointment Manager HUC screen ................................................................. 5-6
5-6 Day opening tab ............................................................................................... 5-6
5-7 Appointments by month screen ....................................................................... 5-7
5-8 Appointment status legend ............................................................................... 5-7
5-9 HUC Call History search screen ...................................................................... 5-8
5-10 Call History screen ........................................................................................... 5-9
5-11 Example of contact attempts ............................................................................ 5-10
5-12 Contact status codes ......................................................................................... 5-10
5-13 HUC Reports screen and links ......................................................................... 5-12
5-14 HUC Reminder Postcard screen ...................................................................... 5-13
5-15 Response Rate Report first screen ................................................................... 5-14
5-16 Response Rate Report multiple stands selected ............................................... 5-14
5-17 HUC Response Rate Report example .............................................................. 5-15
5-18 Check Status Report search screen .................................................................. 5-16
5-19 Check Status Report example .......................................................................... 5-16
5-20 Supervisor main screen .................................................................................... 5-17
5-21 Appointment Monitoring Report – select criteria ............................................ 5-18
5-22 Appointment Monitoring Report example ....................................................... 5-19
5-23 Appointment Status change options ................................................................. 5-19
vi

TABLE OF CONTENTS (Continued)
List of Exhibits
Exhibits
5-24 Appointment Status reason options ................................................................. 5-20
5-25 Call History displays at bottom of SPs window .............................................. 5-20
5-26 HUC Module security screen ........................................................................... 5-21
5-27 HUC Module security - assign menus ............................................................. 5-22
5-28 HUC Module security - available menus ......................................................... 5-23
5-29 HUC Security Module – assign supervisor status ............................................ 5-24
6-1 English letter – check enclosure ...................................................................... 6-2
6-2 Spanish letter – check enclosure ...................................................................... 6-3
7-1 Sample tracking email ..................................................................................... 7-1
7-2 Example Status Dispatched to Sort Facility ..................................................... 7-2
7-3 Example Status Depart USPS Sort Facility ..................................................... 7-2
7-4 Example Status Delivered ................................................................................ 7-3
7-5 Example emailed file sent to analysis lab ........................................................ 7-4
vii

1. HOME URINE COLLECTION
1.1 Background
Heart disease and stroke are the leading causes of death in the United States. Too much sodium can increase blood pressure as well as the risk of heart attack and stroke. The Dietary Guidelines for Americans recommends an intake of ≤2,300 mg of sodium per day for adults in general. The recommendation for individuals in the following population groups however, is <1,500 mg of sodium per day:
Individuals 51 years of age or older;
African Americans;
Individuals with high blood pressure;
Individuals with diabetes; and
Individuals with chronic kidney disease.1,2
Americans eat on average about 3,300 mg of sodium a day.2 The 1,500 mg recommendation applies to about half of the U.S. population overall and the majority of adults. Eating less sodium can help prevent, or control, high blood pressure.1 The Federal Government is improving data collection on sodium, including the amount of sodium people consume, and their knowledge, behaviors and health outcomes.2
Home Urine Collection allows modeling of 24-hour sodium intake based on equations developed from the 2011 NHANES Urine Calibration Study. This study collected 24-hour urine specimens where each void was collected separately. A specimen from the first morning void plus a specimen from the morning, afternoon, and evening was tested for sodium along with a specimen from the 24-hour collection. Preliminary results of modeling the results from this study indicate the combination of the first morning void, plus the prior evening’s void, best predicts the 24-hour excretion of sodium. A home urine collection of the first morning void and the prior evening’s void will allow an alternative and less burdensome data collection modality to estimate sodium intake if 24-hour urine collection fails to be feasible on the NHANES.
The 2013 Home Urine Collection component of NHANES is sponsored by the CDC National Center for Health Statistics (NCHS).
1 http://www.cdc.gov/salt/. 2
1-1
http://www.cdc.gov/VitalSigns/pdf/2012-02-vitalsigns.pdf.

2. EQUIPMENT AND SUPPLIES
2.1 Description of Examination Room in the MEC
The Home Urine Collection component examination room is located in trailer 3 of the MEC. The room is equipped with a desk, a shelf above the desk, storage bins on the wall, a tech chair, and an SP chair. The HUC room has a storage area behind the curtain where kits and extra supplies are stored. Exhibit 2-1 shows the exam room.
Exhibit 2-1. HUC Exam Room
2-1

2.2 Description of Equipment and Supplies
The following equipment and supplies have been provided for the Home Urine Collection component of NHANES.
2.2.1 Equipment
Dymo label printer.
2.2.2 Supplies
Consumable supplies include:
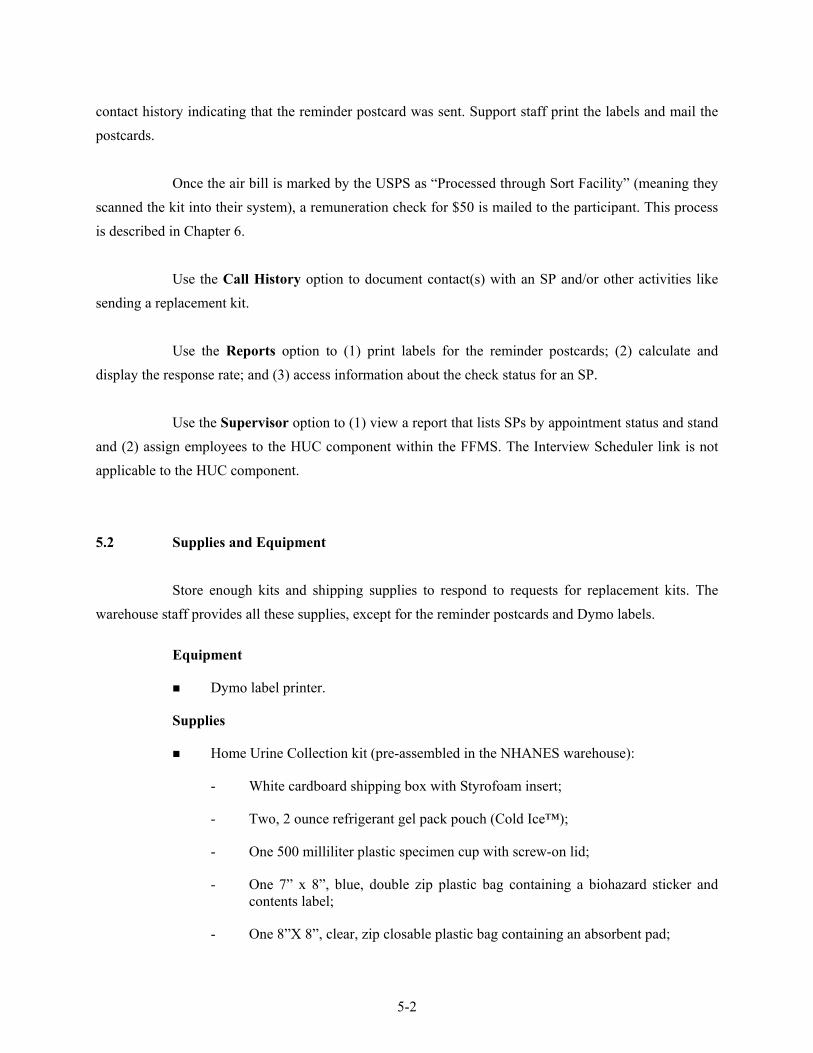
Home Urine Collection kit (pre-assembled in the NHANES warehouse):
-
-
-
-
-
-
-
White cardboard shipping box with Styrofoam insert;
Two, 2-ounce Refrigerant gel pack pouch (Cold Ice™);
One 500 milliliter plastic specimen cup with screw on lid;
One 7” x 8,” blue, double zip plastic bag containing a biohazard sticker and contents label;
One 8”X 8,” clear, zip closable plastic bag containing an absorbent pad;
Two strips of packing tape; and
Temperature monitoring strip (affixed to the inside lid of Styrofoam container).
10” x 13” zip closable plastic bag;
Preprinted Avery USPS shipping labels;
Metered USPS postage stamps;
Hard-copy color “WHAT TO DO Urine Collection and Shipping Instructions” (Appendix A) in English and Spanish.
Permanent markers, heavy point;
Dymo labels—1” x 2⅛,”;
Jumbo paper clips;
2-2

Poly tote hand bag with handle 20" x 20" x 5";
Confidentiality label English;
Confidentiality label Spanish;
Sani Cloth towelettes;
7” Twist Ties;
Temperature monitoring strips (extras/replacements);
Purell hand soap;
SORTKWIK finger moistener; and
¾” Scotch tape.
Non-Consumable supplies include:
Metal footstool;
E-Z Fold stepstool - 12" black;
Scissors;
Tape dispenser; and
Temperature monitor strip storage box w /lid.
Non-inventoried items:
Wall aid – “Label the Kit” summary (Appendix B);
Wall aid - Laminated hard-copy “Talking Points” English and Spanish (Appendix C); and
Container of extra HUC kit supplies.
2-3

2.3 Start of Stand Procedures
2.3.1 Room Setup Procedures
At the beginning of the stand, these procedures are followed to prepare the room and supplies for use. The FES will connect the computer, keyboard, mouse, dymo printer, and bar code wand.
1. Place the tech and SP chair in the upright position.
2. Clean the area (i.e., wipe countertop).
3. Remove supplies from the storage shelves and bin, including the HUC display samples and place them on the counter top. Store the extra supplies on the shelves and/or storage bin.
2.3.2 Inventory Management
The HUC component is managed by the health technologists. The par level for the component’s supplies is set at the levels shown in Appendix D. A mid-stand inventory request for consumable supplies may be necessary to complete the stand.
2.3.2.1 Start of Stand Procedures
At the start of a stand, you will receive cases of kits that have each been pre-labeled at the warehouse as moon kits and cases of kits that have been pre-labeled at the warehouse as sun kits. On each sun and moon kit, there is an informational label located on the outside of the lid of the Styrofoam insert inside the cardboard shipping box. The label is affixed to the lid at the warehouse. This label contains space for the SP to write the date and time of the specimen collection and information about their collection (Section 3.5.3).
At the start of a stand, and as necessary on a weekly basis, MEC examiners make up a set number (as determined by the health tech in charge of the component) of HUC packets and tote bags. To make a packet, attach a stamp to three preprinted Avery USPS shipping labels. Put the three stamped shipping labels and one “WHAT TO DO Urine Collection and Shipping Instructions” sheet in a 10” x 13” clear Ziploc bag. These packets will be stored in a wall bin for easy access during exams. Next, apply a
2-4

confidentially label (Exhibit 2-2) to the upper middle area of each tote bag. Fold each tote bag and stack them in a bin in groups of 25.
Exhibit 2-2. Confidentiality label
2.4 Inventory Management during the Stand
During the stand, store the stamps in the safe at the coordinator's station. When it is time to make more packets each week, the tech should ask the MEC manager for stamps. Toward the end of the stand, track how many additional packets will be needed to complete the stand. Avoid putting postage on shipping labels that will not be used.
If a mid-stand inventory request for consumable supplies is required to complete the stand, request what you think is needed plus a little cushion. Try to avoid over ordering since stamps and shipping labels are printed as needed and often cannot be used at another stand. An emergency shipment can be sent during the last 2 weeks of a stand if necessary. Please allow 3 days to receive the shipment since stamps and shipping labels are printed on demand.
2.5 End of Stand Procedures
At the end of every stand, discard unused preprinted Avery shipping labels. Count any unused stamps and return them to the warehouse via the "transfer inventory to warehouse inventory
2-5

sheet." Count the remaining kits as part of the end of stand inventory process and leave them onboard the MEC to continue onto the next MEC site.
NOTE: Kits cannot be stored in the Audiometry room during transit.
2.6 Urine Collection Kit Storage
A limited number of urine collection kits are shipped from the warehouse with the start of stand supplies. Each kit contains a temperature sensing strip and therefore cannot be stored in the belly compartments. Store the kits in the Audiometry room (not in the booth) and at the designated off-site space. At mid-stand inventory, submit a request for the number of supplies needed for the rest of the stand.
2-6

3. MEC PROTOCOL
3.1 Overview
The purpose of the Home Urine Collection is to collect and store urine specimens for potential future testing to estimate the daily intake of sodium. Participants do not receive any results.
All primary sample persons (SPs) aged 20 - 69 years old who have consented to future research, are not pregnant, and have vessel 45 marked as filled in the urine processing module of the Laboratory Subsystem, are eligible for the home urine collection exam. The participant is asked to take kits home and collect the first morning void and a void from the prior evening (collected between 5:30 p.m. and bedtime). The participant is instructed to collect a full void both times and mail it to the contract lab as soon as possible - ideally within 14 days after the MEC exam. However, if they cannot collect it within 14 days, then they are asked to collect and ship it at their earliest convenience. The kits contain instructions on how to collect and mail the urine specimen to the testing laboratory. Each participant who agrees to participate will take home three kits even though only two samples are required. Since most people urinate more in the morning, the SP is provided with two morning kits. One of the morning kits is for overflow only. Most people only need to use one morning kit.
The contents of each kit are assembled at the warehouse and placed inside the shipping box. All other supplies are sent to the field individually and are assembled in the MEC as needed.
In the MEC, the examiner opens the kits, explains the contents, and provides verbal, written, and visual instructions to reinforce the procedures. A self-addressed, stamped shipping box containing a U.S. Postal Service (USPS) Priority Mail shipping label is provided. The tracking number on the shipping label is used to track the urine shipment to the contract laboratory. This process is described in Chapter 7.
Most MEC examination staff members, including the MEC manager, are trained to perform HUC. Exceptions are the lab staff, coordinator, and physician. The exam takes place in trailer #3.
3-1

3.2 Eligibility Criteria
All primary SPs aged 20 - 69 years old are eligible for the Home Urine Collection (HUC) component. There are no safety exclusion criteria for HUC. The coordinator is only able to assign an SP to the HUC component if the SP has consented to future research, is not pregnant, has submitted a urine specimen and (1) the urine specimen volume is sufficient to fulfill the SPs urine processing protocol; or (2) the urine specimen volume is not sufficient to fulfill the SPs protocol, but the lab has enough urine to process vessel no. 45. If the SP submitted a small quantity of urine, but vessel no. 45 has not been processed by the MEC laboratory staff, the coordinator will not be able to assign the SP to HUC.
When the examiner attempts to recruit an SP who does not speak English and the examiner does not speak the language of the SP, a translator who does speak the language of the SP assists the examiner. The interpreter stays with the examiner and the SP for the entire examination.
The successful recruitment of the SP is an important aspect of this examination. Recruitment requires careful patience on the part of the examiner. Encourage the SP to accept the kits and follow through with the collection and shipment of the home specimen. To assist the examiner, talking points (Appendix C) and labeling summary (Appendix B) documents have been developed.
3.3 Pre-Examination Procedures
The Home Urine Collection ISIS application allows the examiner to (1) record that the participant consented to take kits; (2) scan the USPS tracking bar code into the system; and (3) print the labels for the kits.
Using the standard ISIS format, open the HUC application and log the SP into the exam by scanning the bar code on the SP ID bracelet or manually typing the SP ID when the SP arrives in the examination room. The HUC application only consists of two screens: one exam screen and the section status screen. Once the exam screen appears, recruit the SP to participate in the component.
3-2

3.4 Recruiting the Participant to Accept the Home Collection
Invite the SP to participate in the home urine collection with the assistance of the following talking points:
English:
I would like to invite you to participate in a Home Urine Collection exam.
We want to collect urine samples and store them for future studies. Examples include the analysis of how much salt you eat and how much iodine you get in your diet.
I will ask you to collect two urine samples from home and then mail them directly to the laboratory.
I will provide you with the urine collection kits, pre-addressed postage-paid shipping boxes, and detailed instructions to make it a very easy process for you.
You will need to take the samples to the post office to mail it. When you mail the samples, we will send you a check for $50.00.
Would you like to participate in this exam?
Spanish:
Deseo invitarle a participar en un examen en el cual usted mismo recolectará unas muestras de su orina en su hogar.
Queremos recolectar muestras de orina para guardarlas para futuros estudios. Algunos ejemplos incluyen el análisis sobre cuánta sal usted consume y cuánto yodo hay en su dieta.
Le voy a pedir que recolecte dos muestras de su orina en su hogar y que las mande por correo directamente al laboratorio.
Le daré los materiales para recolectar las muestras de su orina, unas cajas de envío con nuestra dirección y con franqueo pre-pagado y también las instrucciones detalladas para que el proceso sea muy fácil para usted.
Usted tendrá que llevar las muestras a la Oficina de Correos para enviarlas. Cuando envíe las muestras, le mandaremos un cheque por $50.00.
¿Le gustaría participar en este examen?
3-3

If an SP initially refuses the component, ask questions to determine the reason for the refusal and try to address any of their specific concerns. Provide reassurance and encouragement. Show the SP the urine collection kits and describe the procedures. If he or she still refuses, code the exam as an SP refusal (Section 3.8).
3.5 Examination Procedures
3.5.1 Procedures When the SP Agrees to Take a Kit
Conveying clear and concise specimen collection instructions and shipping procedures is essential to the response rate and to specimen integrity. Once the SP agrees to participate in the home urine component, you will need:
One moon urine collection kit
Two sun urine collection kits
One pre-assembled packet that contains:
-
-
One “WHAT TO DO: Urine Collection and Shipping Instructions”
Three stamped USPS shipping labels
Two tote bags that have the confidentiality label already applied
Exhibit 3-1 illustrates the Home Urine Collection exam screen. It includes one drop-down list and three text boxes. Access the ISIS application drop-down box adjacent to the question, “Did the SP take a kit home with them?” The drop-down box options are either “Yes” or “No.” If No is selected, the reason must be identified on the Section Status screen.
3-4
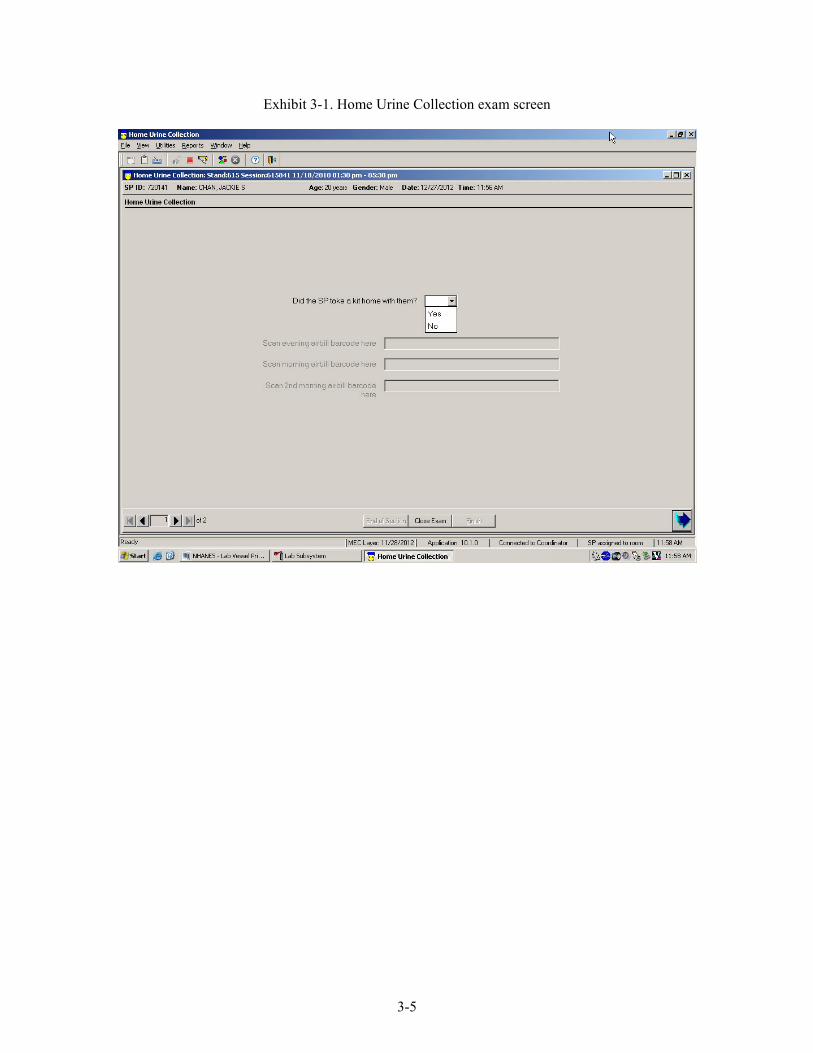
Exhibit 3-1. Home Urine Collection exam screen
3-5
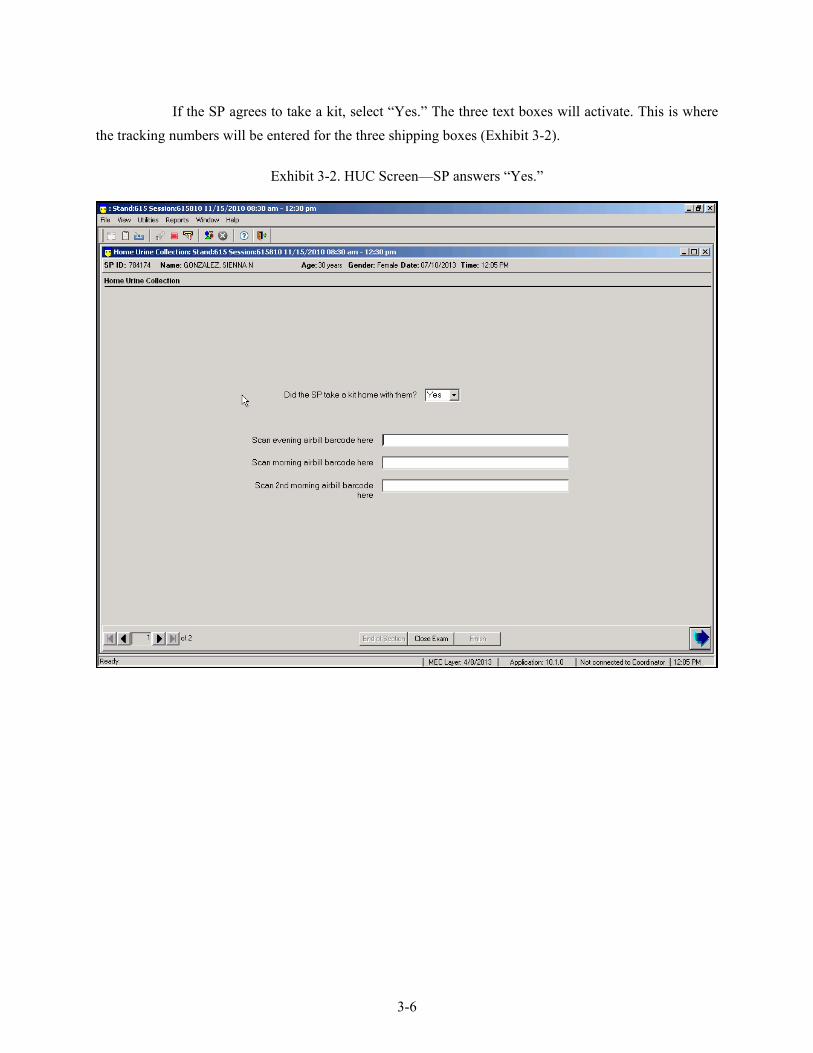
If the SP agrees to take a kit, select “Yes.” The three text boxes will activate. This is where the tracking numbers will be entered for the three shipping boxes (Exhibit 3-2).
Exhibit 3-2. HUC Screen—SP answers “Yes.”
3-6

Use the bar code wand to scan the USPS bar codes into the text box. Exhibit 3-3 illustrates the shipping label’s tracking bar code.
Exhibit 3-3. USPS shipping label tracking bar code
Scan Shipping Label Bar code
You will have three USPS labels in the pre-assembled packet. Exhibit 3-4 shows the tracking numbers once the bar code has been scanned into ISIS.
3-7
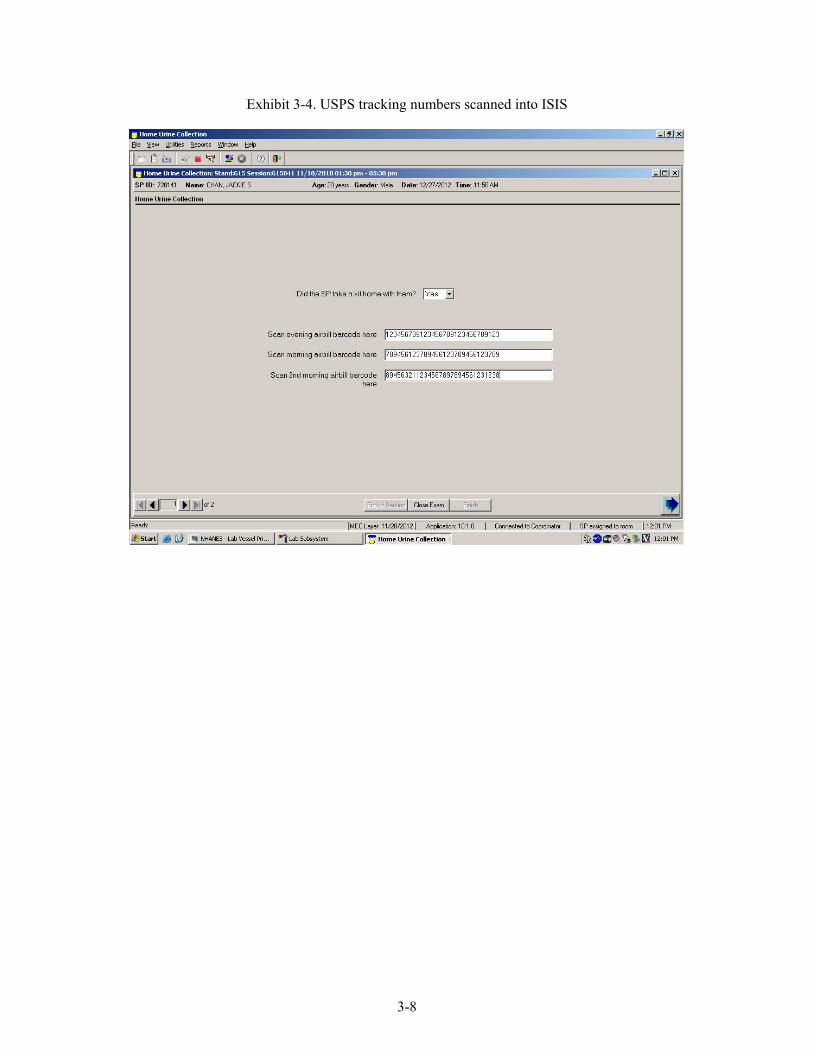
Exhibit 3-4. USPS tracking numbers scanned into ISIS
3-8

All USPS tracking numbers contain 30 numerals. If the tracking number field does not contain the requisite number of characters, a hard-edit stop (Exhibit 3-5) will alert the examiner to review the field and the application will not advance to the next screen.
Exhibit 3-5. Hard-edit stop
When a hard edit occurs, delete the tracking number entry, and re-scan the bar code. If the bar code on the envelope cannot be scanned, set this label aside and retrieve another. Return the label to the warehouse with an explanation that the bar code is not able to be scanned.
Notice in Exhibit 3-4 that the text beside each data entry field indicates what kit the tracking number will be linked to. Before the kits and shipping labels are scanned, they are not assigned to anything. Once the shipping labels are scanned however, it is important to keep track of the order in which the labels are scanned. The first label scanned will be linked to the evening kit. The second label scanned will be linked to the first morning kit and the third label scanned will be linked to the 2nd morning/overflow kit.
Once the tracking number on the USPS label is scanned, it also becomes linked to the bar code labels that go on the specimen cups that will print out later. This is described in detail in Section 3.5.2. After scanning the shipping labels, apply the first shipping label scanned to the moon box, the second shipping label scanned to one of the two sun boxes (it doesn’t matter which one), and the third shipping label scanned to the remaining sun box. It is still important to keep the boxes in order.
3-9

3.5.2 Labeling the Kits
Experience has demonstrated that SPs tend to write their name somewhere on the kit. To assist the SP, a specimen cup identification system using computer-generated images has been developed to assure that the SP is using the correct specimen cup.
When the USPS bar codes have been successfully scanned into the application, select the arrow in the bottom right corner to launch the section status screen and print the labels.
Do not close the section status screen. Leave this final screen open while you explain the collection and shipping process to the SP.
When the screen is advanced to the section status screen, the Dymo printer will automatically print 10 labels. Three of the labels contain the SP ID number and bar code. The other seven labels containing matching pictorial (picture stickers) images will print using the household data to ensure that no two SPs in the dwelling unit are given the same picture image. An example of these two label types is illustrated in Exhibit 3-6. It is important to note that under no circumstance should the specimen cup display any identifiable SP personal information, including the age, first name, last name, or initials.
Exhibit 3-6. Dymo label examples
When the labels print, it is important to remember that each bar code label is linked to a specific shipping label. You will need to put the bar code label on a specific cup according to how you applied the shipping labels to the kits (Exhibit 3-7).
3-10

Exhibit 3-7. Shipping label and bar code linkage
Apply the bar code sticker ending in 157 with the moon picture to the moon cup. Apply the bar code sticker ending in 158 with the sun picture to the sun cup that’s in the box that has the USPS label that was scanned in the first morning data field. The bar code sticker ending in 159 with the sun picture should be applied to the sun cup that’s in the box that has the USPS label that was scanned in the second morning data field.
NOTE: The labels are not waterproof. Please put a piece of scotch tape over each bar code label. The tape will preserve the bar code if the cup leaks during transit.
You do not need to explain this linkage to the SP. Only ask them to put the moon cup back in the moon box and the sun cup back in a sun box. There are back-end procedures in place to handle situations where the SP inadvertently puts the sun cup in the wrong sun box.
Apply one picture sticker to the large tote bag beside the confidentiality label. Apply a picture sticker to each of the specimen cups beside the SP ID label on the side of the specimen cup. (Do NOT place the picture sticker on the lid of the specimen cup.) Apply a picture sticker to the bottom of each shipping box. Exhibit 3-8 illustrates the label placement. There is a wall card in the HUC room that details how to label the kits (Appendix B).
3-11

Exhibit 3-8. Image label placement
To reprint a label set, use the back navigation arrow to move back to the first Home Urine Collection screen and then advance the screen forward again.
A pop-up box (Exhibit 3-9) displays asking if you want to print another label set. Select “Yes” to reprint the labels or “No” to move forward without reprinting the labels.
Exhibit 3-9. Reprint labels
3-12

3.5.3 Urine Collection and Shipping Instructions
Present the urine collection and shipping instructions at the same time the kit is being labeled. The “WHAT TO DO” instruction document (Appendix A) contains all of the information the SP needs to successfully understand the procedure and collect and ship the sample. Follow this guideline and talking points as you explain the procedures to the SP:
Show the SP the “WHAT TO DO, Urine Collection and Shipping Instructions.”
Collection and shipping instructions are included in the kit you are taking home.
If you have any questions, call the toll-free telephone number on the instructions.
General Overview:
Collect two urine samples – one in the evening between 5:30 p.m. and bedtime and one the following morning.
Collect your urine sample as soon as possible and ideally within the next 14 days. However, if you cannot collect it within 14 days, then please collect and ship it at your earliest convenience. [EXAMINER: ASK FEMALE SPS NOT TO COLLECT THE SAMPLES DURING THEIR PERIOD.]
[NOTE: Tell all female SPs, regardless of age, about collecting samples during their period. If an SP collects the evening sample and starts her period overnight, she should throw the sample away and call the toll-free number to request another kit.]
Whenever possible, collect the evening sample when you will be able to mail it the next day along with the morning sample.
When you get home, place the ice packs in the freezer overnight or for at least 6 hours. Freeze the ice packs flat.
Label the parts of the kit and show the SP his or her unique picture sticker.
This is your special sticker. If other members in your home participate, they will have a different sticker.
[NOTE: As you open each kit to label the cup and explain the contents, remove the ice packs and leave them on the counter. The ice packs will be put in a bag together at the end of the exam as explained in Section 3.6.]
3-13

Show the SP the difference between the evening and morning cups. Evening Collection:
Urinate (pee) once into the cup with the sticker of the moon in the evening between 5:30 p.m. and bedtime.
Urinate a full void (until your bladder is empty).
Screw the lid on the specimen cup tightly and package it in the shipping box immediately.
Place the cup in the small blue Ziploc bag. Squeeze the air out of the bag and seal it.
Put the sealed Ziploc bag in the larger clear Ziploc bag. Squeeze the air out of the bag and seal it.
Put two of the frozen ice packs in the box – one on the bottom and one on the side.
Put the sample in the Styrofoam box with the moon symbol.
Put the Styrofoam lid on the package.
On the label on top of the Styrofoam container, write the date and time and answer the questions. [EXAMINER: GO OVER THE LABEL WITH THE SP.]
Exhibit 3-10. Evening Label on Styrofoam Lid
3-14

[NOTE: When answering the questions at the bottom of the label, “missing” covers all reasons why the entire void may not be in the cup (i.e., spills, too much for the cup to hold).]
Close the box with the tape provided.
Store the urine inside the Styrofoam container with the frozen ice pack overnight until you collect the specimen in the morning.
Morning Collection:
The following morning, when you first wake up, urinate (pee) the first void into the cup with the sticker of the sun.
Urinate in the cup until your bladder is empty. You are only collecting one sample that contains a full morning void. If that one sample fits in one cup, throw the other kit away. However, if you fill the first cup and you still need to go more, stop mid-stream and finish in the second morning cup.
If you do not use the second cup with a sun on it, throw it away. Do not mail back an empty cup.
Screw the lid on the specimen cup tightly.
If you used two cups, package each cup separately.
EXAMINER: REVIEW PACKAGING INSTRUCTIONS
EXAMINER: GO OVER THE LABEL WITH THE SP. POINT OUT THAT THIS LABEL IS SLIGHTLY DIFFERENT FROM THE LABEL ON THE EVENING KIT.
–
Please mark whether or not you are returning one or two morning cups on the label. If you use two morning cups, mark “2 cups” on both boxes.
3-15

Exhibit 3-11. Morning Label on Styrofoam Lid
Mail the samples:
Take the packages inside the Post Office and hand it to a teller or, take the packages inside the Post Office and put it in the large priority mail-drop box. (The large priority drop box is usually located near the self-serve kiosk.
If the urine specimen has not been received by the laboratory in 14 days, then a reminder postcard will be sent to you. If you have already sent your urine then ignore this postcard.
Do not mail the large outer plastic bag with your name on it to the laboratory.
We will send you a check for $50.00 as soon as you ship the package.
3-16

3.6 Packing the Urine Collection Kit for the SP to Take Home
After explaining the collection procedures and answering any questions that the SP may have, pack the urine collection kits using the following procedures.
1. Place the “WHAT TO DO Urine Collection and Shipping Instructions” and ice packs into the 10” x 13” Ziploc bag and seal the plastic bag.
2. SPs carry their kits home in a tote bag that we provide them. Two bags will be required for the three kits per SP.
3. Write the SP’s first and last name at the top of the tote bag that has the SP’s special picture sticker.
4. Place the two morning kits in one bag together. Place the moon kit and the 10” x 13” Ziploc bag containing the “WHAT TO DO Urine Collection and Shipping Instructions” and ice packs in the other tote bag.
5. Using a twist tie, tie one handle from each bag together. Make sure that the bag with the SP’s name is facing out so the coordinator can easily identify who the bag belongs to.
3.7 Final Steps
After you package the kits, click “Finish” on the status screen to release the SP from the component. Exhibit 3-12 illustrates the HUC status screen.
3-17
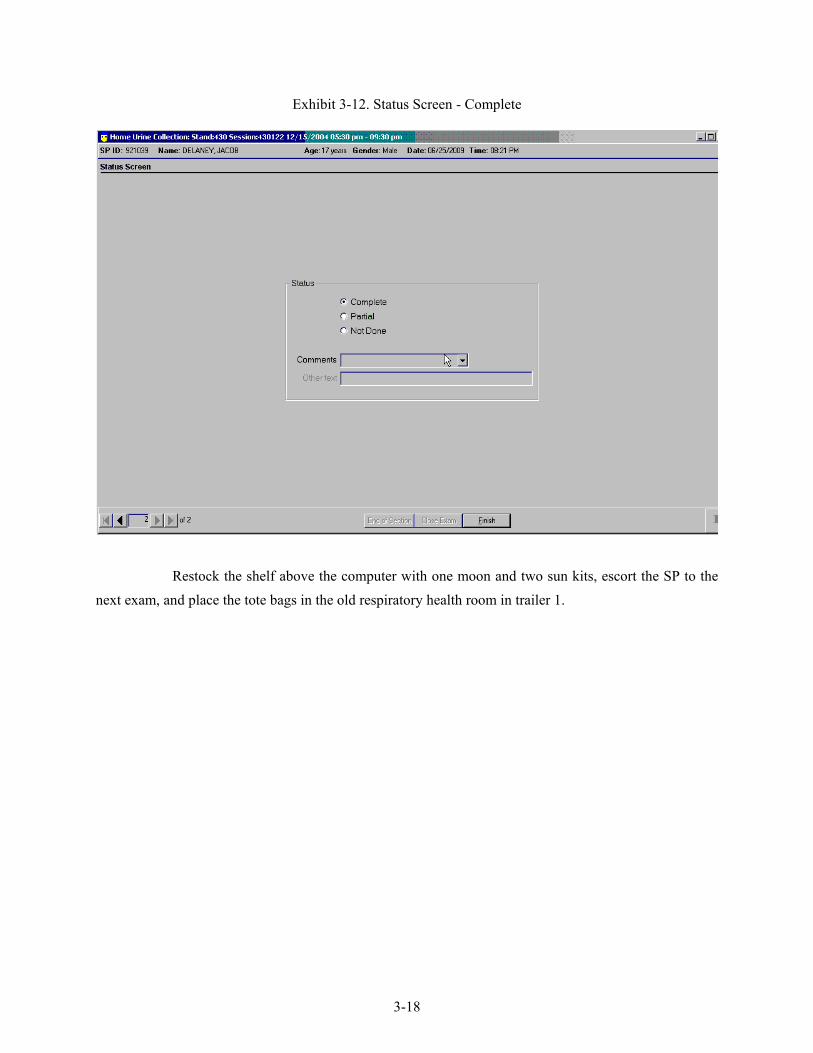
Exhibit 3-12. Status Screen - Complete
Restock the shelf above the computer with one moon and two sun kits, escort the SP to the next exam, and place the tote bags in the old respiratory health room in trailer 1.
3-18

3.8 Coding Not Done Exams
Choose and enter the appropriate comment code when the HUC section status is Not Done. Exhibit 3-13 illustrates the Not Done comment text box and Exhibit 3-14 lists all the possible comment codes and their intended use.
Exhibit 3-13. Status Screen – Not Done comments
To record a comment in the Comment text box, click on the drop-down list, use the scroll bar to view all choices and select the desired choice.
3-19

Exhibit 3-14. Comment codes
Comment code Use when: Safety exclusion Not applicable. SP refusal The SP refuses to take a kit home. No time Not applicable. Physical limitation Not applicable. Communication problem
SP is unable to understand and follow the instructions for the component due to cognitive impairment or other problem, and is unable to complete the test.
Equipment failure Not applicable. Language Barrier SP is unable to understand and follow the instructions for the component due
to language and interpreting difficulties, and is unable to complete the test. SP ill/emergency The SP became ill or an emergency occurred and the test was not performed on
the SP. Interrupted An exam is interrupted, usually for a MEC-wide emergency, and cannot be
completed by the SP. Other, specify If the above reason for a status code of Not Done is not explained by one of the
comment codes, the examiner must choose Other, specify and record a comment in the text field.
When finished, select the bright blue arrow in the bottom right corner or select [Enter].
3-20

4. USPS LABEL PRINTING UTILITY
4.1 Warehouse Responsibility
Warehouse staff members prepare the HUC kits. This includes printing the USPS shipping labels. The shipping label routes the kit from the SP to the contract laboratory. The label contains a tracking number which is used to track the shipment from the SP’s home to the analysis laboratory. The kits, stamps, and shipping labels are sent to the field individually and are assembled in the MEC as needed.
4.2 USPS Label Utility
The purpose of the USPS Label Printing Utility is to provide the warehouse staff with an easy way to print USPS mailing labels when preparing the HUC kits.
To print the USPS shipping labels, click on the USPS Label Generation icon on the desktop. The application screen is illustrated in Exhibit 4-1.
4-1

Select a Return Address (this is the Westat Mailing Address) and Destination Address (this is the address of the Contract Lab) by selecting a choice from the two “saved” drop-down lists.
Exhibit 4-1. Shipment Tracking Label Maker blank
4-2
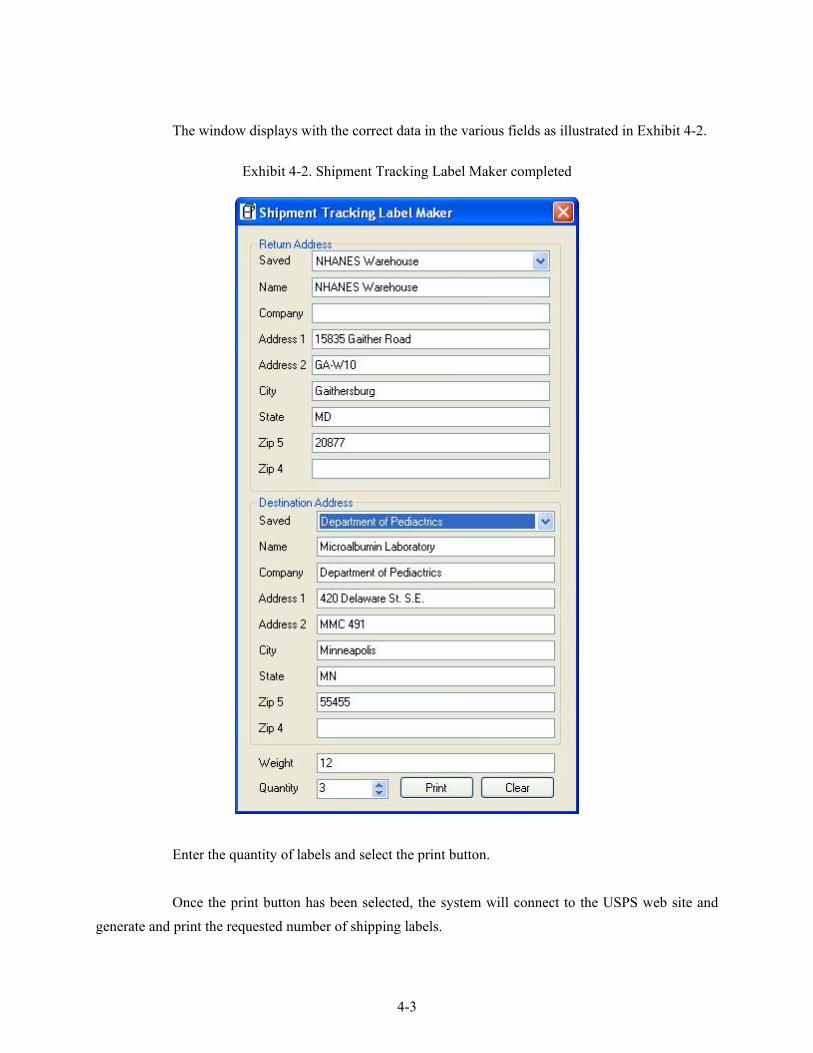
The window displays with the correct data in the various fields as illustrated in Exhibit 4-2.
Exhibit 4-2. Shipment Tracking Label Maker completed
Enter the quantity of labels and select the print button.
Once the print button has been selected, the system will connect to the USPS web site and generate and print the requested number of shipping labels.
4-3

A sample shipping label is illustrated in Exhibit 4-3.
Exhibit 4-3. Sample shipping label
4-4
5. FIELD FOLLOW-UP MANAGEMENT SYSTEM PROTOCOL
5.1 Overview
The HUC module in the FFMS (Field Follow-up Management System) supports the tracking and management of the HUC component. A HUC appointment is created daily at the end of the MEC sessions for each eligible HUC participant.
If the SP does not agree to take a kit or does not receive the component, the appointment status is set to Final Non-Response (FNR) with a comment of “Primary Appt. Not Complete.”
If the SP agrees to take a kit, the appointment status is set to “Scheduled, Tentative.”
− A nightly procedure creates a PF appointment record for 14 days following the MEC Exam appointment. The PF Appointment Status is set to “Scheduled, Tentative.”
Once the mailperson scans the kit into the USPS system showing that the kit was picked up, the PF appointment is set to “Scheduled, Firm.”
− “Scheduled, Firm” records get checks processed.
If 14 days have elapsed since the SP was initially given the kit and there is no tracking activity, then the PF appointment is “Not Scheduled, Broken.”
− A nightly procedure looks to see if there are appointments that are “Scheduled, Tentative” and 14 days past their appointment date and then marks the record as broken which triggers the reminder postcard.
Once the USPS system marks the air bill as “receipted,” meaning they delivered it, the PF appointment status is “Complete.”
− This triggers the creation of efiles that are emailed to the laboratory, as well as the expectations of data to be received back.
If after 30 days the air bill has not been marked as “delivered,” then the PF appointment status is marked as FNR (Final Non-Response), SP refusal.
− A nightly procedure looks for all records where the status is “Scheduled, Tentative” and >30 days past MEC appt. and marks them as FNR.
If the participant has not sent the sample to the lab within 14 days from the day he or she was recruited in the MEC, then the FFMS generates a reminder postcard list and updates the FFMS
5-1
contact history indicating that the reminder postcard was sent. Support staff print the labels and mail the postcards.
Once the air bill is marked by the USPS as “Processed through Sort Facility” (meaning they scanned the kit into their system), a remuneration check for $50 is mailed to the participant. This process is described in Chapter 6.
Use the Call History option to document contact(s) with an SP and/or other activities like sending a replacement kit.
Use the Reports option to (1) print labels for the reminder postcards; (2) calculate and display the response rate; and (3) access information about the check status for an SP.
Use the Supervisor option to (1) view a report that lists SPs by appointment status and stand and (2) assign employees to the HUC component within the FFMS. The Interview Scheduler link is not applicable to the HUC component.
5.2 Supplies and Equipment
Store enough kits and shipping supplies to respond to requests for replacement kits. The warehouse staff provides all these supplies, except for the reminder postcards and Dymo labels.
Equipment
Dymo label printer.
Supplies
Home Urine Collection kit (pre-assembled in the NHANES warehouse):
-
-
-
-
-
White cardboard shipping box with Styrofoam insert;
Two, 2 ounce refrigerant gel pack pouch (Cold Ice™);
One 500 milliliter plastic specimen cup with screw-on lid;
One 7” x 8”, blue, double zip plastic bag containing a biohazard sticker and contents label;
One 8”X 8”, clear, zip closable plastic bag containing an absorbent pad;
5-2

-
-
Two strips of packing tape; and
Temperature monitoring strip (affixed to the inside lid of Styrofoam container).
10” x 13” zip closable plastic bag;
Preprinted Avery USPS shipping labels;
Metered USPS postage stamps;
Hard-copy color “WHAT TO DO Urine Collection and Shipping Instructions” (Appendix A) in English and Spanish.
Permanent markers, heavy point;
Dymo labels—1” x 2⅛”;
Poly tote hand bag with handle 20" x 20" x 5";
Confidentiality label, English;
Confidentiality label, Spanish;
12” x 12” x 24” shipping box; and
Reminder postcard (Appendix E) in English and Spanish.
Reminder postcards are printed once per year, so notify the component person when it is time to reorder; allow 6-weeks lead time. The Dymo labels are printed by ISIS as needed. The tracking numbers on the Avery USPS shipping labels expire over time and are printed by the warehouse as needed. The cost of postage varies by location and is printed by the warehouse as needed.
5.3 Log-on to the FFMS
To launch the FFMS, click on the FFMS icon on the desktop. The first screen is the Connect to nhprodweb screen, shown below. Enter the User name and Password and then select the OK button to move forward to the login screen or the Cancel button to exit. Exhibit 5-1 illustrates the Log-on window.
5-3
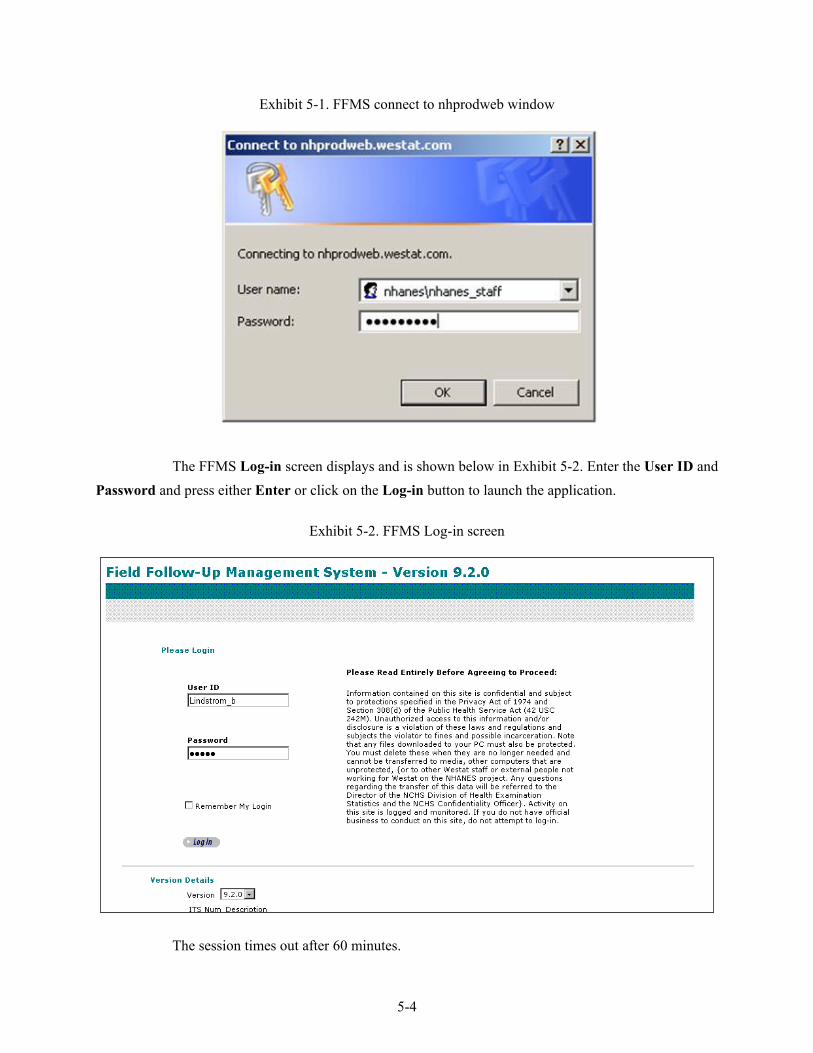
Exhibit 5-1. FFMS connect to nhprodweb window
The FFMS Log-in screen displays and is shown below in Exhibit 5-2. Enter the User ID and Password and press either Enter or click on the Log-in button to launch the application.
Exhibit 5-2. FFMS Log-in screen
The session times out after 60 minutes.
5-4

5.4 Access the HUC Module
After logging in, the system defaults to the Dietary Appointment Manager screen. Select the HUC header (far right) to access to the HUC module. Exhibit 5-3 illustrates the default opening screen.
Exhibit 5-3. System default opening screen
5.5 Appointment Manager
The Appointment Manager module is designed to track scheduled appointments. However, this functionality is not necessary for the HUC component. It is useful to look at these data by day, week, or month to get a sense of the number of SPs by appointment type.
Select the HUC Appointment Manager button as shown below in Exhibit 5-4.
Exhibit 5-4. HUC Appointment Manager button
The HUC Appointment Manager screen displays and it is shown below in Exhibit 5-5.
5-5

Exhibit 5-5. Appointment Manager HUC screen
Interviewer Filter Appt. Status Filter
The screen will open to the Day tab. Day and Week tabs list all SPs who are scheduled and their appointment status. If there are no appointments, then the screen will include only the statement, “There are no appointments for ‘today’s date,’ for the given criteria.” Exhibit 5-6 illustrates the Day opening tab screen.
Exhibit 5-6. Day opening tab
The appointment list includes a default time of 9:00 AM, SP ID, SP name, SP age, appointment status, and Rem:.
Select the Month tab to view a monthly calendar of all appointments by appointment type. Exhibit 5-7 is an example of the appointments by month screen. Use the links on the right and left side of the teal top border to go to the previous or next month.
5-6
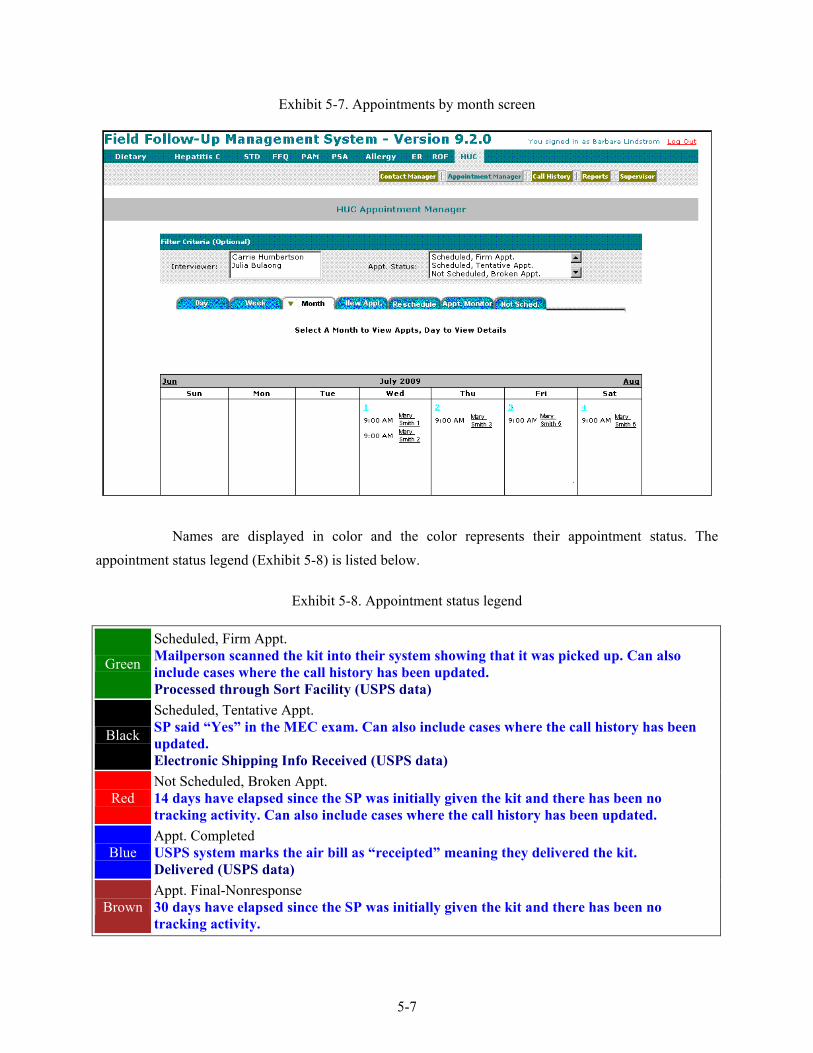
Exhibit 5-7. Appointments by month screen
Names are displayed in color and the color represents their appointment status. The appointment status legend (Exhibit 5-8) is listed below.
Exhibit 5-8. Appointment status legend
Green
Scheduled, Firm Appt. Mailperson scanned the kit into their system showing that it was picked up. Can also include cases where the call history has been updated. Processed through Sort Facility (USPS data)
Black
Scheduled, Tentative Appt. SP said “Yes” in the MEC exam. Can also include cases where the call history has been updated. Electronic Shipping Info Received (USPS data)
Red Not Scheduled, Broken Appt. 14 days have elapsed since the SP was initially given the kit and there has been no tracking activity. Can also include cases where the call history has been updated.
Blue Appt. Completed USPS system marks the air bill as “receipted” meaning they delivered the kit. Delivered (USPS data)
Brown Appt. Final-Nonresponse 30 days have elapsed since the SP was initially given the kit and there has been no tracking activity.
5-7

5.6 Call History
Document all contacts with an SP. To access the call history, click on his or her underlined name on the monthly appointment schedule or select the Call History button on the top of the module. If the link on the monthly calendar in Appointment Manager is selected, then the Call History screen for that SP displays.
If the Call History button on the top of the module is selected, then only blank text fields for SP ID, Last Name, and First name display. Enter the relevant information and select the Search button to access the call history for that SP. Exhibit 5-9 is an example of the HUC Call History search screen.
Exhibit 5-9. HUC Call History search screen
This module tracks the date and time of each call and the contact code if contact was unsuccessful.
Once the search criteria have been successfully entered and the search executed, the Call History screen displays. The screen displays the history of the calls for the SP identified on the Call Information screen. An example of the Call History screen is illustrated in Exhibit 5-10.
5-8

Exhibit 5-10. Call History screen
The features of this screen include:
Search Criteria bar. Use this feature to access information about another SP. Enter the SP ID or the first and last name in the search criteria boxes at the top of the screen.
Contact Information box. This top box provides contact information specific to the SP. It includes current appointment date and time, initial exam date, current appointment status and last update date, phone number, location, comments, age, gender, language, and appointment status for all components (C = complete, S = scheduled [either tentative or firm], B = broken, FNR = Final non-response).
Record Call History table. This table lists the history of call attempts for the SP. Record all contacts by marking Contact Made with SP, Yes or No, and Reschedule Appointment, Yes or No, and recording Contact Status and Other, Reasons.
Update Call Info button. This button updates the contact status information, after it has been entered into the FFMS (described below).
5-9
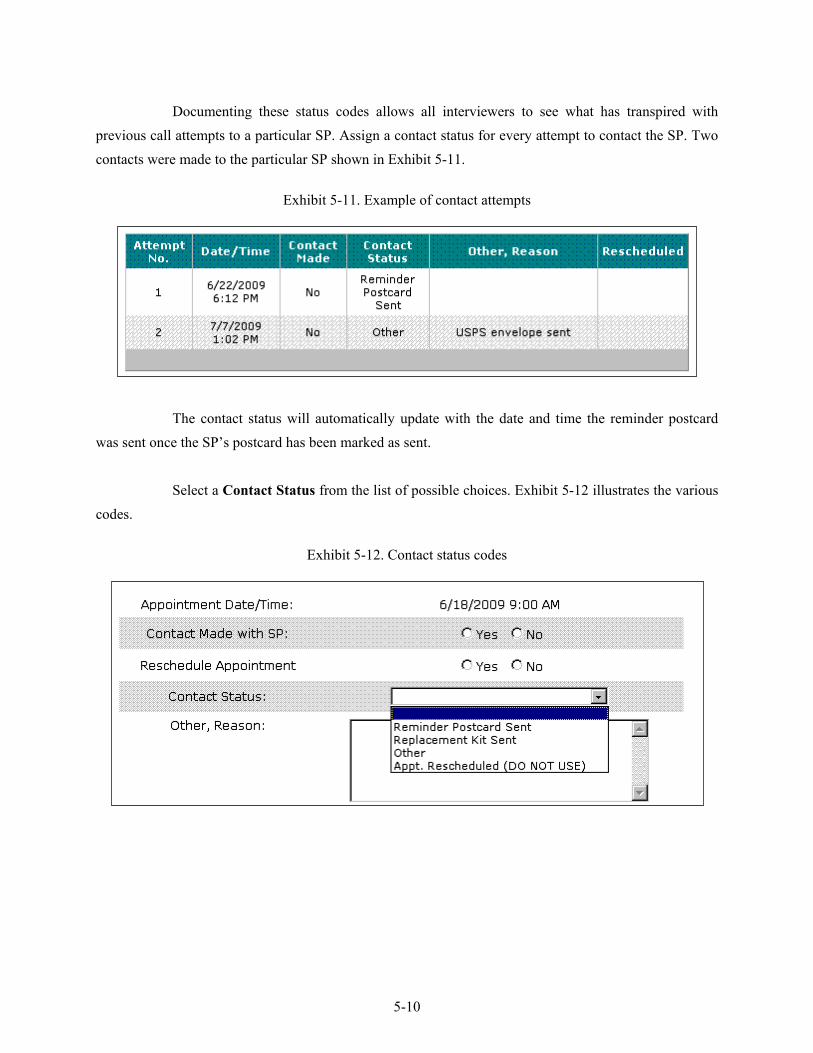
Documenting these status codes allows all interviewers to see what has transpired with previous call attempts to a particular SP. Assign a contact status for every attempt to contact the SP. Two contacts were made to the particular SP shown in Exhibit 5-11.
Exhibit 5-11. Example of contact attempts
The contact status will automatically update with the date and time the reminder postcard was sent once the SP’s postcard has been marked as sent.
Select a Contact Status from the list of possible choices. Exhibit 5-12 illustrates the various codes.
Exhibit 5-12. Contact status codes
5-10

The contact codes are described below.
Reminder Postcard Sent – The contact status will automatically update with the date and time the reminder postcard was sent once the SP’s postcard has been marked as sent.
Replacement Kit Sent – Select this option when a replacement kit has been sent.
Other – If none of the above contact codes applies, select “Other” and type in the reason.
Appt. Rescheduled (DO NOT USE) – This choice is not applicable to the HUC.
After entering the information, select the Update Call Info button before exiting the module.
The button is highlighted in pink and is located above the updated information.
5.7 Reports
Use the Reports functionality to print labels for the reminder postcards, run the HUC Response Rate Report, and investigate the status of a particular payment check. Exhibit 5-13 illustrates the Reports screen and links.
5-11

Exhibit 5-13. HUC Reports screen and links
To access one of the three options, click on the desired link.
5.7.1 Reminder Postcard
At least daily, access the Reminder Postcard list, print labels, and mail the postcards. Select the Reminder Postcard link to access this functionality. Exhibit 5-14 illustrates the HUC Reminder postcard screen.
5-12

Exhibit 5-14. HUC Reminder Postcard screen
The Reminder Postcard screen includes buttons for Print Label(s), and Mark Postcards as Mailed, a check box for Print All, and columns for SP ID, Name (first, last), Age, Stand number, Initial Exam date, Language, and a checkbox for Generate Label.
To individually mark each SP, check each Generate Label checkbox or, to print labels for all SPs in the list, select the Print All checkbox.
Use the language displayed for each SP to select the correct English or Spanish postcard. Affix the label to the postcard and mail the postcard through Westat’s routine mail system.
5-13

5.7.2 HUC Response Rate Report
Select the HUC Response Rate Report link to access this functionality. The first screen is illustrated in Exhibit 5-15.
Exhibit 5-15. Response Rate Report first screen
The Response Rate Report includes a Select Stand(s) filter. Select or highlight the stand or stands. To select more than one stand, hold down the Ctrl key and click on the desired stands. Exhibit 5-16 illustrates an example where multiple stands were selected.
Exhibit 5-16. Response Rate Report multiple stands selected
Once the stands have been selected, click on the Filter button to generate the report.
Exhibit 5-17 is an example of a HUC Response Rate Report.
5-14

Exhibit 5-17. HUC Response Rate Report example
The report breaks down the response rate by number and percent for the following age groups: All ages, 6-11, 12-19, 20-49, 50-69, 70-74, and 75+. It includes the following data:
SP eligible for MEC urine collection by:
−
−
SPs eligible – no urine collected
SPs eligible – no vessel 45 collected
SPs eligible for home urine collection (SP eligible for MEC Urine Collection minus SPs eligible – no urine collected and SPs eligible – no vessel 45 collected)
SPs with Not Done HUC status
SPs provided home urine collection kit
−
−
−
−
−
−
−
−
Samples outstanding ≤ to 10 days
Samples outstanding > 10 days
– – Broken appointments with reminder postcard sent
Samples in transit
Samples received by contract lab
The number of SPs that return the evening void.
The number of SPs that return 1 container for their morning void.
The number of SPs that return 2 containers for their morning void.
Samples marked as Final Non-Response
5-15
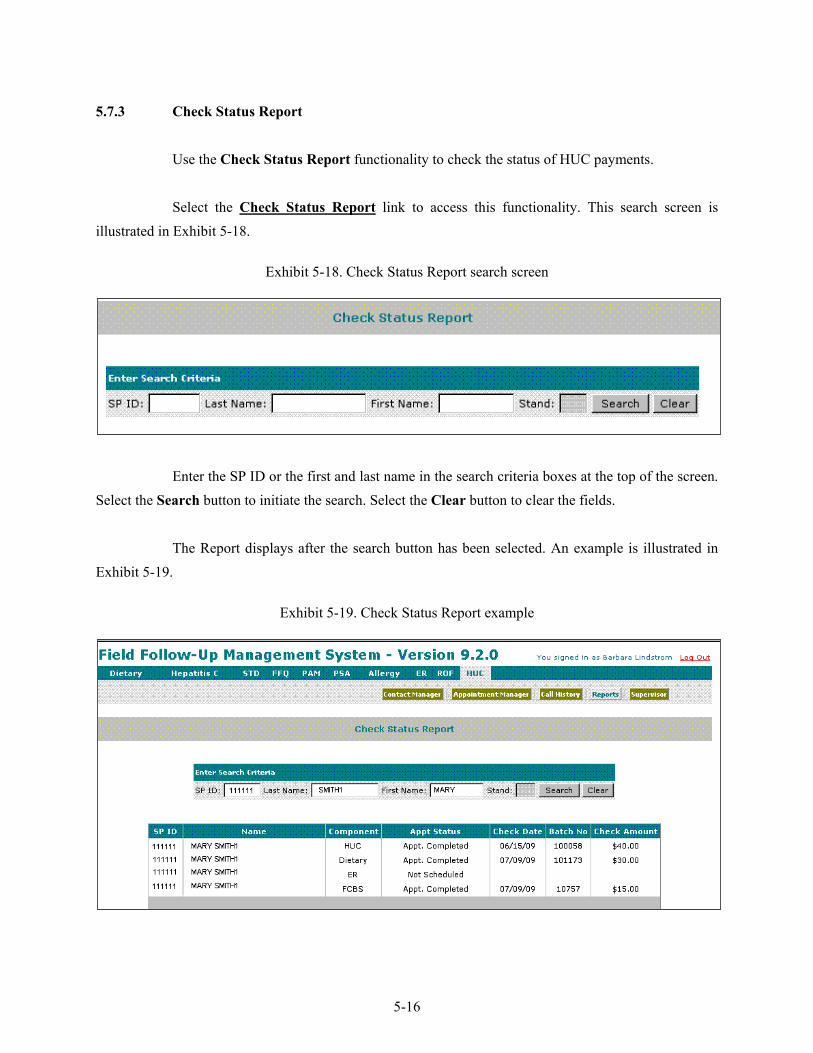
5.7.3 Check Status Report
Use the Check Status Report functionality to check the status of HUC payments.
Select the Check Status Report link to access this functionality. This search screen is illustrated in Exhibit 5-18.
Exhibit 5-18. Check Status Report search screen
Enter the SP ID or the first and last name in the search criteria boxes at the top of the screen. Select the Search button to initiate the search. Select the Clear button to clear the fields.
The Report displays after the search button has been selected. An example is illustrated in Exhibit 5-19.
Exhibit 5-19. Check Status Report example
5-16
The screen includes the SP ID, Name, Component, Appt Status, Check Date, Batch No, and Check Amount.
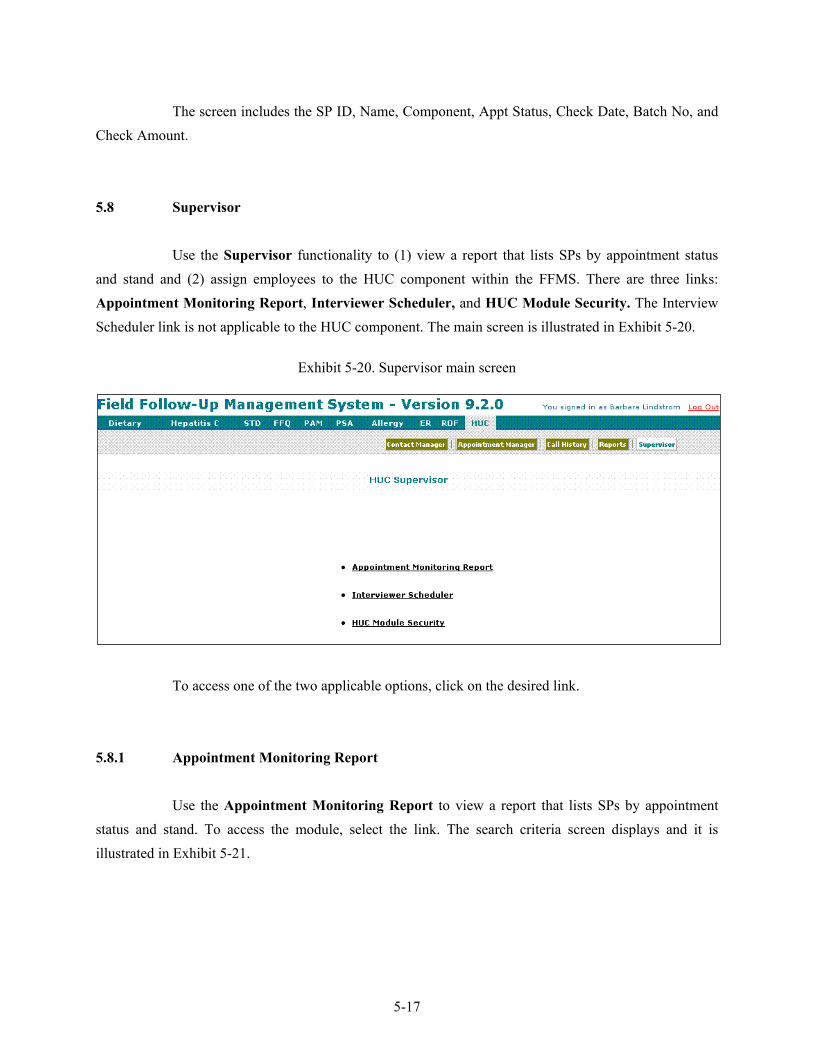
5.8 Supervisor
Use the Supervisor functionality to (1) view a report that lists SPs by appointment status and stand and (2) assign employees to the HUC component within the FFMS. There are three links: Appointment Monitoring Report, Interviewer Scheduler, and HUC Module Security. The Interview Scheduler link is not applicable to the HUC component. The main screen is illustrated in Exhibit 5-20.
Exhibit 5-20. Supervisor main screen
To access one of the two applicable options, click on the desired link.
5.8.1 Appointment Monitoring Report
Use the Appointment Monitoring Report to view a report that lists SPs by appointment status and stand. To access the module, select the link. The search criteria screen displays and it is illustrated in Exhibit 5-21.
5-17
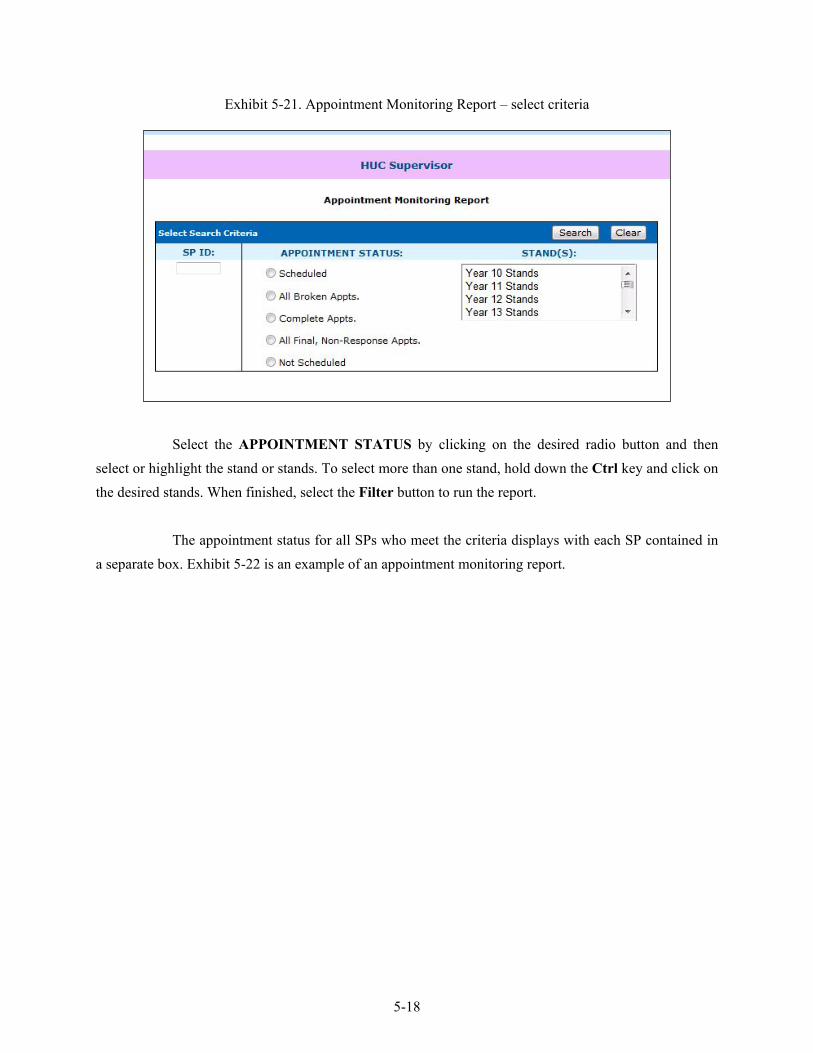
Exhibit 5-21. Appointment Monitoring Report – select criteria
Select the APPOINTMENT STATUS by clicking on the desired radio button and then select or highlight the stand or stands. To select more than one stand, hold down the Ctrl key and click on the desired stands. When finished, select the Filter button to run the report.
The appointment status for all SPs who meet the criteria displays with each SP contained in a separate box. Exhibit 5-22 is an example of an appointment monitoring report.
5-18

Exhibit 5-22. Appointment Monitoring Report example
The criteria box remains on the top of the screen. The teal header includes the SP ID, Name, age, initial exam date, current appointment date, and stand number. The lower section includes text boxes for Appt Status, Reason, and Other Text.
Change the appointment status, reason, and/or enter free text. Exhibit 5-23 shows the appointment status change options.
Exhibit 5-23. Appointment Status change options
To change the appointment status, select or highlight the correct choice from the drop-down list.
5-19
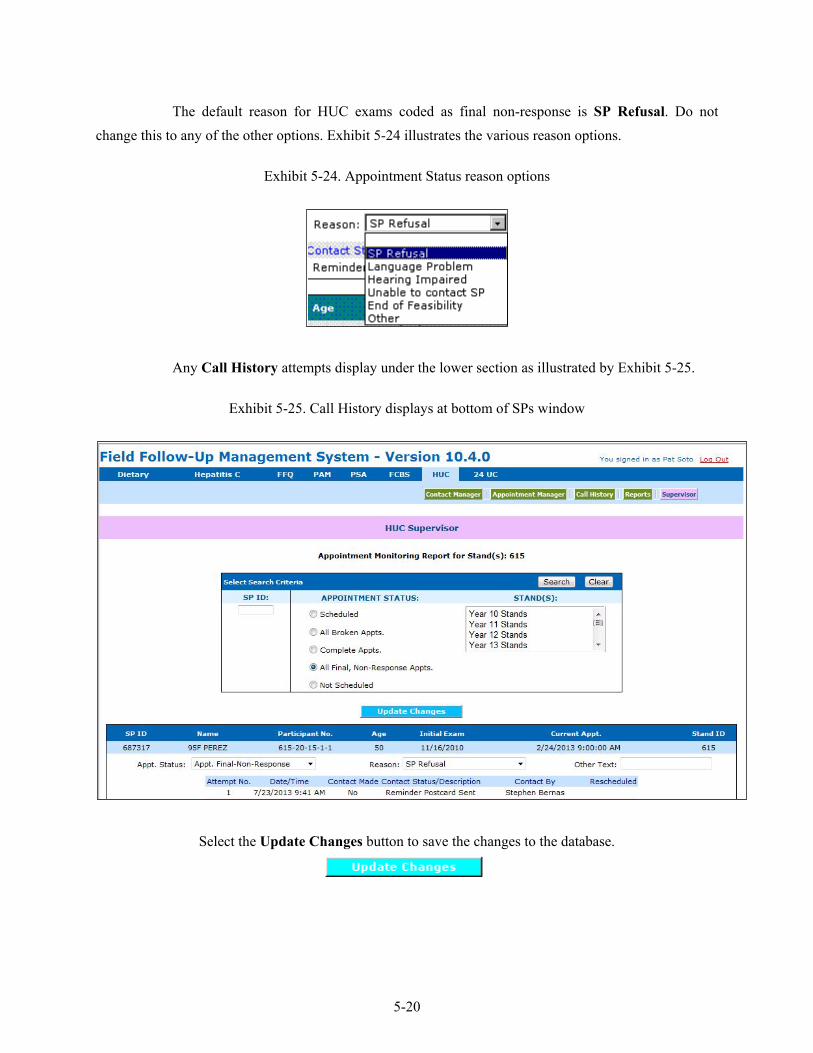
The default reason for HUC exams coded as final non-response is SP Refusal. Do not change this to any of the other options. Exhibit 5-24 illustrates the various reason options.
Exhibit 5-24. Appointment Status reason options
Any Call History attempts display under the lower section as illustrated by Exhibit 5-25.
Exhibit 5-25. Call History displays at bottom of SPs window
Select the Update Changes button to save the changes to the database.
5-20
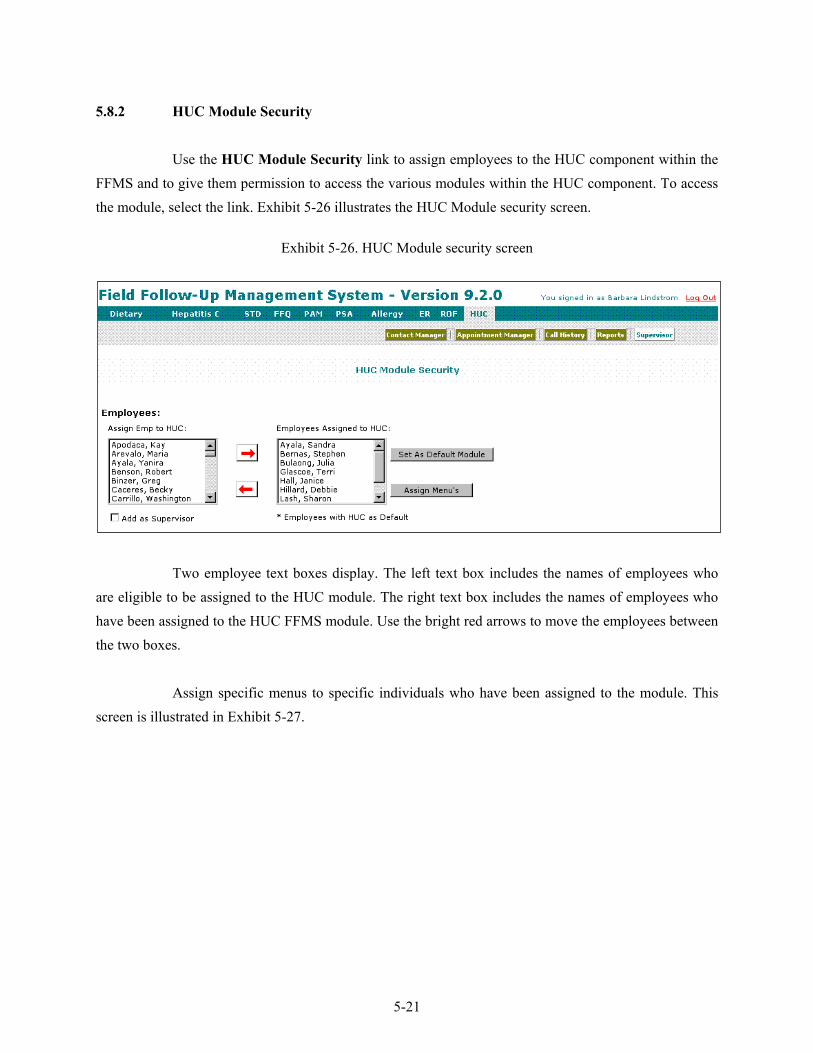
5.8.2 HUC Module Security
Use the HUC Module Security link to assign employees to the HUC component within the FFMS and to give them permission to access the various modules within the HUC component. To access the module, select the link. Exhibit 5-26 illustrates the HUC Module security screen.
Exhibit 5-26. HUC Module security screen
Two employee text boxes display. The left text box includes the names of employees who are eligible to be assigned to the HUC module. The right text box includes the names of employees who have been assigned to the HUC FFMS module. Use the bright red arrows to move the employees between the two boxes.
Assign specific menus to specific individuals who have been assigned to the module. This screen is illustrated in Exhibit 5-27.
5-21

Exhibit 5-27. HUC Module security - assign menus
To assign specific menus to specific individuals select or highlight the employee from the right box and then select the Assign Menu’s button. The menu options text boxes display. These additional text boxes are illustrated in Exhibit 5-28.
5-22

Exhibit 5-28. HUC Module security - available menus
To move one or more of the menu options from one box to the other, click on the bright red arrow.
To designate someone as a supervisor, highlight the name and add a checkmark to the Add as Supervisor checkbox. This option is illustrated in Exhibit 5-29.
5-23

Exhibit 5-29. HUC Security Module – assign supervisor status
Use the Set as Default Module button to set the module that is displayed when the application opens. However, if the application is opened in the same browser window that it was opened in previously, meaning logged out and back in without closing the window, then the application remembers the module that was displayed when logging out regardless of the default.
5-24
6. CHECK PROTOCOL
6.1 Overview
Remuneration checks for $50 are generated once the USPS scans one of the three kits associated with an SP into the USPS system. The PF appointment is “Scheduled, Firm.” The ISIS check application is used to send check information to Westat accounting for the generation of checks to respondents who sent in their urine sample.
The check application generates a unique batch ID each time it generates a group of checks. The check extraction application first determines the list of participants who need checks. Then the check application retrieves the name of the participant from the nh_person table along with the address. The check is mailed from the same address sources used by the HUC kit generation page. This information is placed in the Access database specified by Accounting and emailed to them. Accounting then cuts the necessary checks. The SP ID and check batch number appear in the memo field of each check for tracking purposes.
The email to Accounting is generated and checks are mailed twice a week, on Tuesday and Friday. The home office dietary phone staff are responsible for mailing the checks. They place the check in an envelope with a letter (Exhibits 6-1 and 6-2) and mail the checks.
6-1

Exhibit 6-1. English letter – check enclosure
Dear Participant: Thank you for participating in the National Health and Nutrition Examination Survey (NHANES) by sending us your urine collection kits. Enclosed is a check for $50 as a token of appreciation. If additional family members also received urine kits, they will receive their check once we receive their kits. Thank you once again for taking part in this important study. If you have any questions regarding this payment, please call 1-888-458-4762 Monday through Friday between the hours of 8:00 AM and 4:30 PM Eastern Time. Sincerely, Sarah C. Zweig Study Manager Enclosure
6-2

Exhibit 6-2. Spanish letter – check enclosure
Estimado(a) participante: Gracias por participar en la Encuesta Nacional de Examen de Salud y Nutrición (NHANES) al mandarnos los materiales de su muestra de orina. Adjunto hay un cheque por $50 dólares como muestra de agradecimiento. Si otros familiares también recibieron materiales para una muestra de orina, ellos recibirán su cheque una vez que nosotros recibamos sus materiales. Gracias nuevamente por participar en este importante estudio. Si desea hacer alguna pregunta relacionada con este pago, por favor llame al 1-888-458-4762 de lunes a viernes entre las 8:00 de la mañana y las 4:30 de la tarde, hora del Este. Atentamente, Sarah C. Zweig Administradora del estudio Se adjunta cheque
6-3
7. TRACKING AND DELIVERY STATUS
7.1 Overview
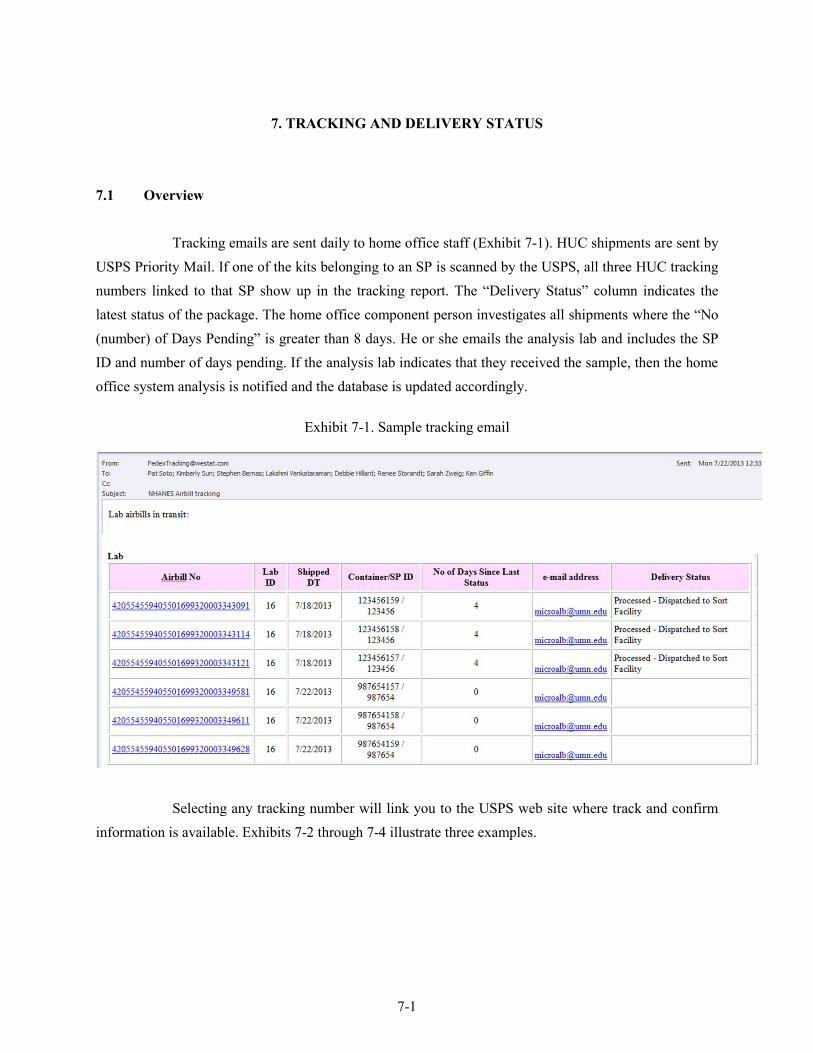
Tracking emails are sent daily to home office staff (Exhibit 7-1). HUC shipments are sent by USPS Priority Mail. If one of the kits belonging to an SP is scanned by the USPS, all three HUC tracking numbers linked to that SP show up in the tracking report. The “Delivery Status” column indicates the latest status of the package. The home office component person investigates all shipments where the “No (number) of Days Pending” is greater than 8 days. He or she emails the analysis lab and includes the SP ID and number of days pending. If the analysis lab indicates that they received the sample, then the home office system analysis is notified and the database is updated accordingly.
Exhibit 7-1. Sample tracking email
Selecting any tracking number will link you to the USPS web site where track and confirm information is available. Exhibits 7-2 through 7-4 illustrate three examples.
7-1

Exhibit 7-2. Example Status Dispatched to Sort Facility
Exhibit 7-3. Example Status Depart USPS Sort Facility
7-2
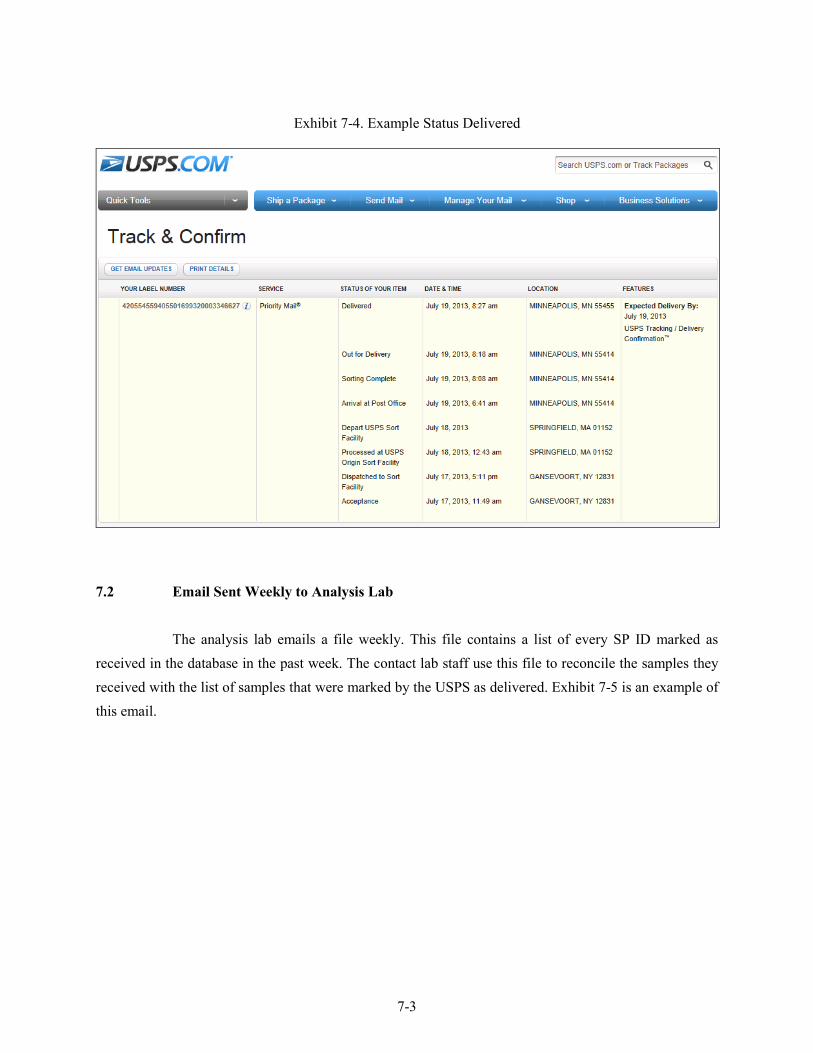
Exhibit 7-4. Example Status Delivered
7.2 Email Sent Weekly to Analysis Lab
The analysis lab emails a file weekly. This file contains a list of every SP ID marked as received in the database in the past week. The contact lab staff use this file to reconcile the samples they received with the list of samples that were marked by the USPS as delivered. Exhibit 7-5 is an example of this email.
7-3

Exhibit 7-5. Example emailed file sent to analysis lab
No action is required.
7-4

Appendix A
“What To Do” Urine Collection and Shipping Instructions
English and Spanish

“WHAT TO DO” Urine Collection and Shipping Instructions
Collect one evening and one morning urine sample and ship it to the laboratory using these instructions. Collect your urine samples as soon as possible - ideally within the next 14 days. However, if you cannot collect it within 14 days then please collect and ship it at your earliest convenience. We will send you a check for $50.00 as soon as you ship the packages.
The bag you received in the mobile examination center includes: •
•
•
Large tote bag with a confidentiality statement, your name written on the bag, and your personal picture sticker
“WHAT TO DO” Urine Collection and Shipping Instructions sheet
The home urine collection kits
Your Personal Picture Sticker: Your picture sticker is unique to you and it is found on:
•
•
•
The large tote bag with your name written on it
Your urine collection cups
The bottom of your shipping boxes
The picture sticker identifies your kits from kits assigned to other people in your household. When collecting and shipping your urine, make sure you use the collection cups and shipping boxes marked with your unique picture sticker.
Home Urine Collection Kit Contents: A. Cardboard shipping box with postage-paid label
B. Styrofoam container inside the shipping box
C. Temperature monitoring strip
D. Ice packs
E. Plastic urine collection cup with your picture sticker
F. Small blue Ziploc bag
G. Larger clear Ziploc bag
3/13/2013 A-1 Home Urine Collection Instructions

Kit Preparation: 1. Remove the ice packs from your large tote bag and place them in
the freezer compartment of your home freezer for at least 6 hours before you collect your samples. Freeze the ice packs flat.
2. When you are ready to collect your sample, remove the correct kit(s) from the large tote bag that has your name and picture symbol on it.
•
•
For the evening sample, remove the kit with a picture of a moon on the outside of the box.
For the morning sample, remove the two kits with a sun on the outside of the box.
3. Open the white cardboard box(es).
4. Remove the Styrofoam lid(s).
5. Remove the collection cup from the box.
Collect the Evening Urine Sample: Evening Sample: Collect the sample between 5:30 p.m. and bedtime. Pick an evening when you will be able to collect the second sample on the following morning.
1. Before you collect your urine, verify that the picture sticker on the cup matches the picture sticker on the tote bag.
2. When collecting the evening sample, make sure you are using the evening cup with a picture of the moon on it.
3. Urinate (pee) into the collection cup until you have emptied your bladder.
4. Screw the cap on the urine cup tightly and wipe off the outside of the cup.
5. On the label located on the top of the Styrofoam container, write the date and time you collected the urine and answer the questions.
Collect the Morning Urine Sample: Morning Sample: Collect one sample when you first wake up for the day. Collect it the morning after you collect the evening sample.
Whenever possible, mail all samples (morning and evening samples) on the same day you collect the morning sample.
1. Before you collect your urine, verify that the picture sticker on the cup matches the picture sticker on the tote bag that has your name written on it.
2. You will need the morning cups that have a picture of a sun on it.
3. Urinate (pee) into the collection cup until you have emptied your bladder. If you think you will have more urine than the cup can hold, stop midstream and finish the collection in the second cup morning cup.
4. Only collect one morning sample. If all of your urine fits in one cup, throw the second cup away.
5. Screw the cap on the urine cup tightly and wipe off the outside of the cup.
6. On the label located on the top of the lid of the container, write the date and
3/13/2013 A-2 Home Urine Collection Instructions

time you collected the urine and answer the questions. (If you needed to use two cups, mark “2 cups” on both labels.)
Pack the Urine Samples: Pack each sample in its shipping container with two ice packs immediately after collection, even if you do not mail the package until later in the day.
Discard these instructions and the large bag with your name on it. Do not add additional packaging.
1. Before packing the samples, double-check the sun and moon symbols on the cup, Styrofoam container lid, and bottom of the shipping box to make sure they match.
2. If you used two morning cups, each cup will be packaged separately.
3. Place the urine cup into the small blue Ziploc bag.
4. Push the air out of the Ziploc bag and seal it.
5. Place the sealed Ziploc bag in the larger clear Ziploc bag. Push the air out of the bag and seal it.
6. Place the sample into the Styrofoam shipping box. Remember to match the moon or sun symbol on your cup with the moon or sun symbol on your box.
7. Place two of the frozen ice packs from your freezer into the box – one on the bottom and one on the side.
8. Place the Styrofoam lid onto the top of the container inside the box.
9. Verify that the picture sticker on the bottom of the shipping box matches the picture sticker on the tote bag that has your name written on it.
3/13/2013 A-3 Home Urine Collection Instructions
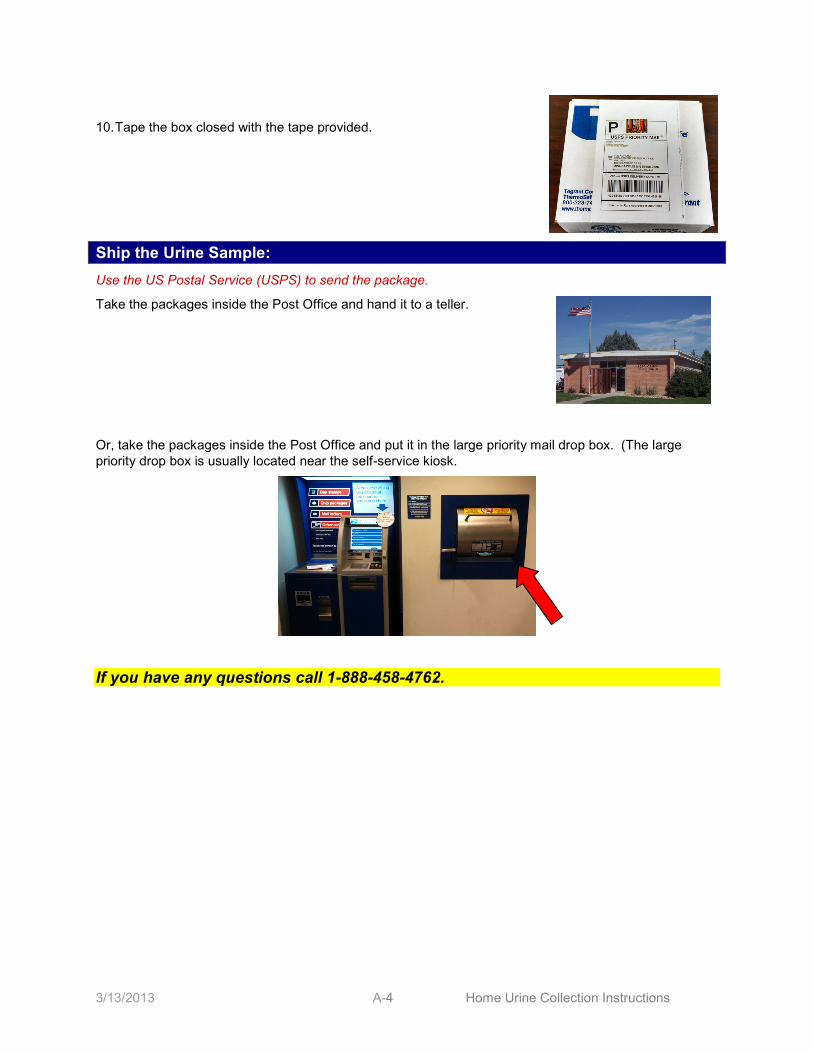
10. Tape the box closed with the tape provided.
Ship the Urine Sample: Use the US Postal Service (USPS) to send the package.
Take the packages inside the Post Office and hand it to a teller.
Or, take the packages inside the Post Office and put it in the large priority mail drop box. (The large priority drop box is usually located near the self-service kiosk.
If you have any questions call 1-888-458-4762.
3/13/2013 A-4 Home Urine Collection Instructions

“QUÉ HACER” Instrucciones para recolección y envío de la muestra de orina
Recolecte una muestra de orina por la noche y una por la mañana y use estas instrucciones para enviarlas al laboratorio. Tome sus muestras de orina tan pronto como sea posible – lo ideal es dentro de los próximos 14 días. Sin embargo, si no puede tomar las muestras dentro de los 14 días siguientes, entonces tómelas y envíelas tan pronto como pueda. Le mandaremos un cheque por $50.00 dólares tan pronto como envíe los paquetes.
La bolsa que recibió en el centro móvil de examen incluye: • Una bolsa grande con una declaración de confidencialidad, su nombre escrito en la bolsa y una
calcomanía impresa con un símbolo elegido únicamente para usted.
• Hoja “QUÉ HACER” Instrucciones para recolección y envío de las muestras de orina
• Materiales para tomar las muestras de orina en el hogar
Calcomanía con su símbolo personal: El símbolo impreso en la calcomanía es únicamente para usted y se encuentra en:
• La bolsa grande que lleva su nombre escrito
• Sus envases para las muestras de orina
• La caja de envío para devolver los materiales
El símbolo distingue sus materiales de los materiales asignados a otras personas de su hogar. Cuando tome y envíe su muestra de orina, asegúrese de usar los envases para la muestra y las cajas marcadas con el símbolo asignado únicamente para usted.
Los materiales para tomar la muestra de orina en el hogar contienen: A. Caja de cartón para envío, con
etiqueta de franqueo prepagado B. Caja de poliestireno dentro de la
caja de envío C. Cinta para monitorear la
temperatura D. Bolsas de hielo-gel refrigerante E. Envase de plástico para poner la
muestra, marcado con su símbolo.
F. Bolsa pequeña con cierre azul (Ziploc)
G. Bolsa grande transparente con cierre (Ziploc)
3/14/2013 A-5 Home Urine Collection Instructions

Preparación de los materiales: 1. Saque las bolsas de hielo-gel refrigerante de su bolsa grande y
póngalas en el congelador de su casa por al menos 6 horas antes de recolectar la muestra. Las bolsas de hielo-gel refrigerante deben ponerse planas y horizontalmente en el congelador.
2. Cuando esté listo para recolectar su muestra, saque de la bolsa grande los materiales que llevan su nombre y su símbolo.
• Para recolectar la muestra de orina en la noche, saque el envase que tiene la imagen de la luna afuera de la caja.
• Para recolectar la muestra en la mañana, saque los dos envases que tienen la imagen del sol afuera de la caja.
3. Abra la(s) caja(s) de cartón blanco.
4. Saque la(s) tapa(s) de poliestireno.
5. Saque de la caja el envase para la muestra de orina.
Recolección de la muestra de orina en la noche: Muestra de la noche: Recolecte la muestra entre las 5.30 de la tarde y la hora de dormir. Escoja una noche en la que pueda recolectar la segunda muestra a la mañana siguiente.
1. Antes de tomar la muestra de orina, verifique que el envase lleva el mismo símbolo de la bolsa.
2. Cuando recolecte la muestra de la noche, asegúrese de usar el envase para la noche el cual tiene una imagen de la luna.
3. Orine dentro del envase de plástico hasta que haya vaciado la vejiga.
4. Ajuste bien y apriete la tapa del envase de plástico y limpie la parte de afuera del envase.
5. En la etiqueta que está en la tapa de la caja de poliestireno, anote la fecha y la hora en que se tomó la muestra y conteste las preguntas.
Recolección de la muestra de orina en la mañana: Muestra de la mañana: Recolecte una muestra cuando recién se levante. Recolecte la orina la mañana después de haber recolectado la muestra de la noche.
Cuando le sea posible, envíe sus muestras (la de la mañana y la de la noche) el mismo día que recolectó la muestra de la mañana.
1. Antes de recolectar la muestra, verifique que el símbolo del envase es igual al símbolo que aparece en la bolsa con su nombre.
2. Necesitará los envases de la mañana que tienen la figura del sol. 3. Orine dentro del envase de plástico hasta que haya vaciado la vejiga. Si
tiene mucha orina y cree que el envase se podría desbordar, detenga el flujo de orina y use el segundo envase de la mañana para terminar de recolectar la muestra.
4. Recolecte únicamente una muestra. Si usa únicamente un envase para recolectar toda la orina, bote el otro envase.
5. Ajuste bien y apriete la tapa del envase de plástico y limpie la parte de afuera del envase.
6. En la etiqueta que está en la tapa del envase, anote la fecha y la hora en que recolectó la muestra y conteste las preguntas. (Si necesita usar los dos envases, escriba “2 cups” en ambas etiquetas.)
3/14/2013 A-6 Home Urine Collection Instructions
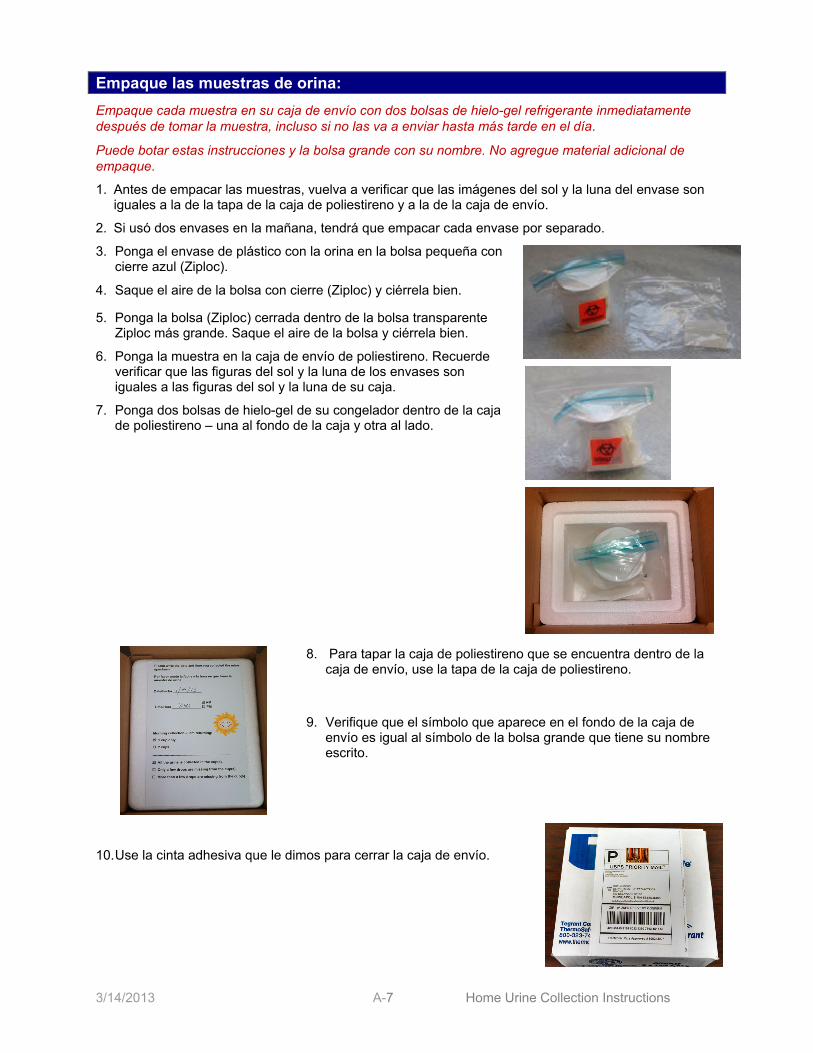
Empaque las muestras de orina: Empaque cada muestra en su caja de envío con dos bolsas de hielo-gel refrigerante inmediatamente después de tomar la muestra, incluso si no las va a enviar hasta más tarde en el día.
Puede botar estas instrucciones y la bolsa grande con su nombre. No agregue material adicional de empaque.
1. Antes de empacar las muestras, vuelva a verificar que las imágenes del sol y la luna del envase son iguales a la de la tapa de la caja de poliestireno y a la de la caja de envío.
2. Si usó dos envases en la mañana, tendrá que empacar cada envase por separado.
3. Ponga el envase de plástico con la orina en la bolsa pequeña con cierre azul (Ziploc).
4. Saque el aire de la bolsa con cierre (Ziploc) y ciérrela bien.
5. Ponga la bolsa (Ziploc) cerrada dentro de la bolsa transparente Ziploc más grande. Saque el aire de la bolsa y ciérrela bien.
6. Ponga la muestra en la caja de envío de poliestireno. Recuerde verificar que las figuras del sol y la luna de los envases son iguales a las figuras del sol y la luna de su caja.
7. Ponga dos bolsas de hielo-gel de su congelador dentro de la caja de poliestireno – una al fondo de la caja y otra al lado.
8. Para tapar la caja de poliestireno que se encuentra dentro de la caja de envío, use la tapa de la caja de poliestireno.
9. Verifique que el símbolo que aparece en el fondo de la caja de envío es igual al símbolo de la bolsa grande que tiene su nombre escrito.
10. Use la cinta adhesiva que le dimos para cerrar la caja de envío.
3/14/2013 A-7 Home Urine Collection Instructions
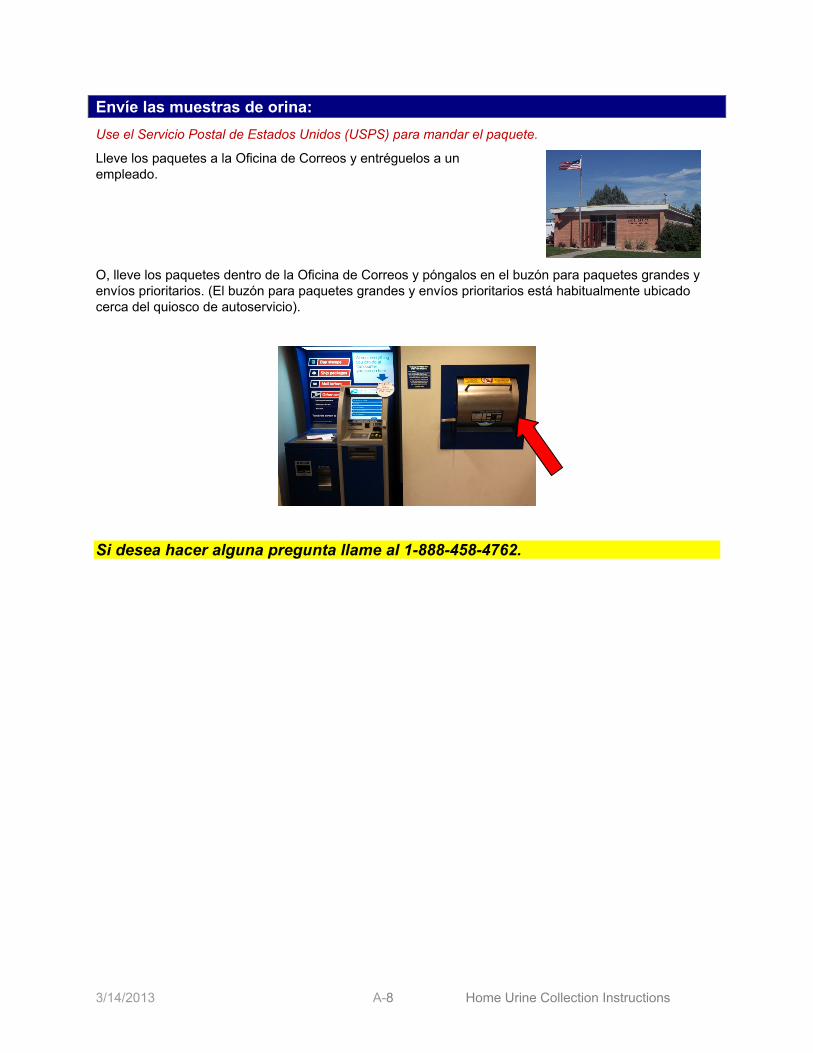
Envíe las muestras de orina: Use el Servicio Postal de Estados Unidos (USPS) para mandar el paquete.
Lleve los paquetes a la Oficina de Correos y entréguelos a un empleado.
O, lleve los paquetes dentro de la Oficina de Correos y póngalos en el buzón para paquetes grandes y envíos prioritarios. (El buzón para paquetes grandes y envíos prioritarios está habitualmente ubicado cerca del quiosco de autoservicio).
Si desea hacer alguna pregunta llame al 1-888-458-4762.
3/14/2013 A-8 Home Urine Collection Instructions

Appendix B
Kit Labeling Instructions

Participant Unique Symbol: (Located on cup, bottom of shipping box, tote bag)
Evening Barcode: (Located on evening cup)
Morning Barcode: (Located on morning cups)
Evening Kit Moon Sticker: (Located on cup, top of Styrofoam lid,
bottom of shipping box)
Morning Kit Sun Sticker: (Located on cup, top of Styrofoam lid,
bottom of shipping box)
2/26/13 B-1
LABELING THE KIT
The kits will be prelabeled with sun and moon stickers. Before beginning the exam, you will need one evening kit and two morning kits. The printer will print 3 barcode stickers and 7 SP specific picture stickers.
Open each urine collection kit. Confirm that the temperature monitoring strip is affixed to the inside lid of the Styrofoam shipping container.
On each cup, apply an SP picture sticker and a Dymo barcode label to the center of each specimen cup. Place the stickers side-by-side. [REMEMBER TO MATCH THE SUN AND MOON STICKERS.]
On the bottom of each shipping box, apply an SP picture sticker.
On the large plastic tote bag:
-
-
-
Apply the appropriate language confidentiality label to the large plastic tote bag if necessary.
Write the SP’s name with permanent black marker. NOTE: This is the only location on the kit where the SP name is identified.
Apply one SP picture sticker beside the confidentiality label.
2/26/13 B-2

Appendix C
Talking Points English and Spanish

Talking Points
Show the SP the “WHAT TO DO, Urine Collection and Shipping Instructions.”
Collection and shipping instructions are included in the kit you are taking home. If you have any questions, call the toll-free telephone number on the instructions.
General Overview:
Collect two urine samples – one in the evening between 5:30 p.m. and bedtime and one the following morning. Collect your urine sample as soon as possible and ideally within the next 14 days. However, if you cannot collect it within 14 days then please collect and ship it at your earliest convenience. [EXAMINER: ASK FEMALE SPS NOT TO COLLECT THE SAMPLES DURING HER PERIOD.] Whenever possible, collect the evening sample when you will be able to mail it the next day along with the morning sample. When you get home, place the ice packs in the freezer overnight or for at least 6 hours. Freeze the ice packs flat.
Label the parts of the kit and show the SP their unique picture sticker. This is your special sticker. If other members in your home participate, they will have a
different sticker.
Show the SP the difference between the evening and morning cups. Evening Collection:
Urinate (pee) once into the cup with the sticker of the moon in the evening between 5:30 and bedtime. Urinate a full void (until your bladder is empty). Screw the lid on the specimen cup tightly and package it in the shipping box immediately. Place the cup in the small blue Ziploc bag. Squeeze the air out of the bag and seal it. Put the sealed Ziploc bag in the larger clear Ziploc bag. Squeeze the air out of the bag and seal it. Put two of the frozen ice packs in the box – one on the bottom and one on the side. Put the sample in the Styrofoam box with the moon symbol. Put the Styrofoam lid on the package. On the label on top of the Styrofoam container, write the date and time and answer the questions. [EXAMINER: GO OVER THE LABEL WITH THE SP.] Close the box with the tape provided. Store the urine inside the Styrofoam container with the frozen ice pack overnight until you collect the specimen in the morning.
3/13/13 C-1
Talking Points
Morning Collection:
The following morning, when you first wake up, urinate (pee) into the cup with the sticker of the sun. Urinate in the cup until your bladder is empty. You are only collecting one sample that contains a full morning void. If that one sample fits in one cup, throw the other kit away. However, if you fill the first cup and you still need to go more, stop mid-stream and finish in the second morning cup. If you do not use the second cup with a sun on it, throw it away. Do not mail back an empty cup. Screw the lid on the specimen cup tightly. If you used two cups, package each cup separately. EXAMINER: REVIEW PACKAGING INSTRUCTIONS EXAMINER: GO OVER THE LABEL WITH THE SP.
- If you use two morning cups, mark “2 cups” on both boxes.
Mail the samples: Take the packages inside the Post Office and hand it to a teller or, take the packages inside the Post Office and put it in the large priority mail drop box. (The large priority drop box is usually located near the self-serve kiosk.
If the urine specimen has not been received by the laboratory in 14 days, then a reminder postcard will be sent to you. If you have already sent your urine then ignore this postcard.
Do not mail the large outer plastic bag with your name on it to the laboratory.
We will send you a check for $50.00 as soon as you ship the package.
3/13/13 C-2
Talking Points
Muéstrele a la persona a quien le da la muestra, las páginas “QUÉ HACER, Instrucciones para recolección y envío de muestras de orina”.
Las instrucciones para la recolección y el envío de las muestras están incluidas en el paquete de materiales que usted se llevará a su hogar.
Si tiene alguna pregunta, llame a la línea gratuita que se encuentra en las instrucciones.
Información general:
Recolecte dos muestras de orina – una en la noche entre las 5:30 de la tarde y la hora de dormir, y la otra a la mañana siguiente. Recolecte la muestra de orina tan pronto como sea posible; lo ideal es dentro de los próximos 14 días. Sin embargo, si no puede tomar las muestras dentro de los siguientes 14 días, entonces tómelas y envíelas tan pronto como pueda. [EXAMINADOR: PIDA A LAS MUJERES PARTICIPANTES NO RECOLECTAR LA MUESTRA DURANTE SU PERIODO.] Cuando sea posible, recolecte la muestra de la noche únicamente cuando pueda enviarla al día siguiente junto con la muestra de la mañana. Cuando llegue a casa, ponga las bolsas de hielo gel refrigerante en el congelador de su casa por la noche o al menos 6 horas antes de recolectar la muestra. Congele las bolsas de hielo gel refrigerante planas y horizontalmente.
Marque las partes del paquete de materiales para tomar las muestras y muéstrele a la persona a quien da la muestra (SP) la etiqueta con su imagen única.
Este es su símbolo especial. Si hay otros miembros de su hogar que también están participando, tendrán otro símbolo único para cada uno de ellos.
Muéstrele a la persona a quien da la muestra las diferencias entre los envases de recolección de la mañana y los de la noche. Muestra de la noche:
t
y
l
Orine una vez en el envase con el símbolo de la luna en la noche entre las 5:30 de la arde y la hora de dormir
Orine hasta que haya vaciado la vejiga. Cierre y apriete bien la tapa del envase y empáquela inmediatamente en la caja para el envío. Ponga el envase en la bolsa pequeña con cierre azul (Ziploc). Saque el aire de la bolsa ciérrela bien.
Ponga la bolsa cerrada (Ziploc) dentro de la bolsa Ziploc más grande. Saque el aire de a bolsa y ciérrela bien. Ponga dos bolsas de hielo gel refrigerante en la caja – una al fondo y otra al lado. Ponga la muestra dentro la caja de envío de poliestireno con el símbolo de la luna. Tape la caja de poliestireno. Apunte la fecha, hora y conteste las preguntas de la etiqueta que está encima de la caja de poliestireno. [EXAMINADOR: EXPLÍQUELE A LA PERSONA A QUIEN DA LA MUESTRA LA INFORMACIÓN QUE TIENE QUE PONER EN LA ETIQUETA] Use la cinta adhesiva que le dimos para cerrar la caja. Guarde la muestra de orina junto con la bolsa de hielo gel refrigerante dentro de la caja de poliestireno durante la noche, hasta que recolecte la muestra de orina de la mañana.
3/14/13 C-3

Talking Points
Muestra de la mañana:
A la mañana siguiente, cuando recién se levante, orine en el envase con el símbolo del sol. Orine hasta que haya vaciado la vejiga. Debe recolectar únicamente una muestra que contenga todo el contenido de orina de su vejiga. Si la muestra cabe en un solo envase, bote el otro envase. Sin embargo, si llena el primer envase, pero todavía tiene más orina, detenga el flujo de orina y use el segundo envase de la mañana para terminar de recolectar la orina. Si no usa el segundo envase con el símbolo del sol, bótelo. No envíe ningún envase vacío. Cierre y apriete bien la tapa del envase de muestra. Si usa dos envases, empáquelos por separado. EXAMINADOR: REVISE LAS INSTRUCCIONES DE EMPAQUE EXAMINADOR: EXPLÍQUELE A LA PERSONA A QUIEN DA LA MUESTRA, LA INFORMACIÓN QUE TIENE QUE PONER EN LA ETIQUETA Si usa dos envases para la mañana, escriba “2 cups” en ambas cajas.
Envíe las muestras: Lleve los paquetes a de la Oficina de Correos y entréguelos al cartero o, póngalos en el buzón para paquetes grandes y envíos prioritarios. (El buzón para paquetes grandes y envíos prioritarios está habitualmente ubicado cerca del quiosco de autoservicio).
Si el laboratorio no recibe las muestras en 14 días, se le enviará una tarjeta para recordárselo. Si usted ya ha enviado su muestra de orina, ignore esa tarjeta.
No envíe al laboratorio la bolsa plástica exterior con su nombre.
Le mandaremos un cheque por $50.00 dólares tan pronto como envíe el paquete.
3/14/13 C-4
Appendix D
Inventory of Home Urine Collection Supplies

Home Urine Collection
Consumable
Part # Description Par Unit Count
EXAM SUPPLIES
ConLab-Eng Confidential Label - English - White Handle Bag Label 1 box
ConLab-Span Confidential Label - Spanish - White Handle Bag Label 1 box GOJ-9639
12CT Handsoap-Waterless (Purell) 1 bottle
HUK -MOON Home Urine Kit - MOON 120 each
HUK - SUN Home Urine Kit - SUN 240 each HUC-IS-
Eng/Span Instruction Sheet - Eng/Span Combo - Stapled Packet 180 each
S-596 Mini-Grip Bag 10" x 13" - Zip-Lock Bag, Clear 4 bundle
AVE 5126 Online Shipping Label - Half Sheet - 5 1/2" x 8 1/2" 360 each
12-23W Poly Tote Hand Bag - White - 20 x 20 x 5 2 case
TM0103-C Temperature Monitoring Strip - Range C: 54-65C 20 each
06-66997 Towelettes, Sani-Cloth (Cleaner) 1 bottle
26-32 Twist Tie - 7" White (Trashbag Tie) 1 box Postage Stamp USPS Postage Stamp - Single Stamp 360 each
OFFICE SUPPLIES 107708 Dymo Costar Label (1" x 2 1/8") - 500 labels per roll 4 box
AVE 08888 Magic Markers, Black 2 each
UNV72220BX Paper Clip, Jumbo 2 box 84417-10053 SORTKWIK - Finger Moistener - 3/8 ounce container 2 bottle
MMM 62003/4X1296 Tape, 3/4" Scotch 2 roll
COMPONENT TOOLS
53382 Compressed Air Spray Can - 10 Oz. 3M Dust Remover 1 bottle
MEC SUPPLIES PC221670 Tissues - Facial 2 box
* Expired Lot
D-1

Home Urine Collection
Non-Consumable
Part # Description Par Unit Count
OFFICE SUPPLIES
MMM C38-BK Tape Dispenser, Scotch 1 each
COMPONENT TOOLS 14783415 E-Z Fold Step Stool - 12" Black 1 each
ML4042 Footstool - Metal 1 each
08-952 Scissors - Lister bandage (5 1/2 " Stainless Steel) 1 each
30.60 Temperature Strip Storage Box w/ Lid - 250mL 1 each
* Expired Lot
D-2

Appendix E
Reminder Postcards English and Spanish

1600 Research Blvd.
E-1

1600 Research Blvd.
E-2