nextgen user personalization demonstration this demonstration reviews some options the user has to...
TRANSCRIPT

NEXTGENUSER PERSONALIZATION
DEMONSTRATIONThis demonstration reviews some options the user has to modify things in NextGen to meet personal preferences and speed along your documentation.
This has been prepared for EHR 5.7 and KBM 8.1, but you may see some screen shots of earlier versions in the background when they are not germane to the point being illustrated. Subsequent updates may display cosmetic and functional changes.
Use the keyboard or mouse to pause, review, and resume as necessary.

User Preferences
There are several initial preferences you’ll want to set up on the Tools menu.

NextGen provides many opportunities for the user to personalize the appearance and functionality of the program, enhancing efficiency and simplifying data entry.
First, we’ll look at some of the initial user preferences. What follows are some general recommendations. Some details will differ among specialties, and may depend upon whether the user is a provider, nurse, or front office staff.
Click Tools|Preferences.
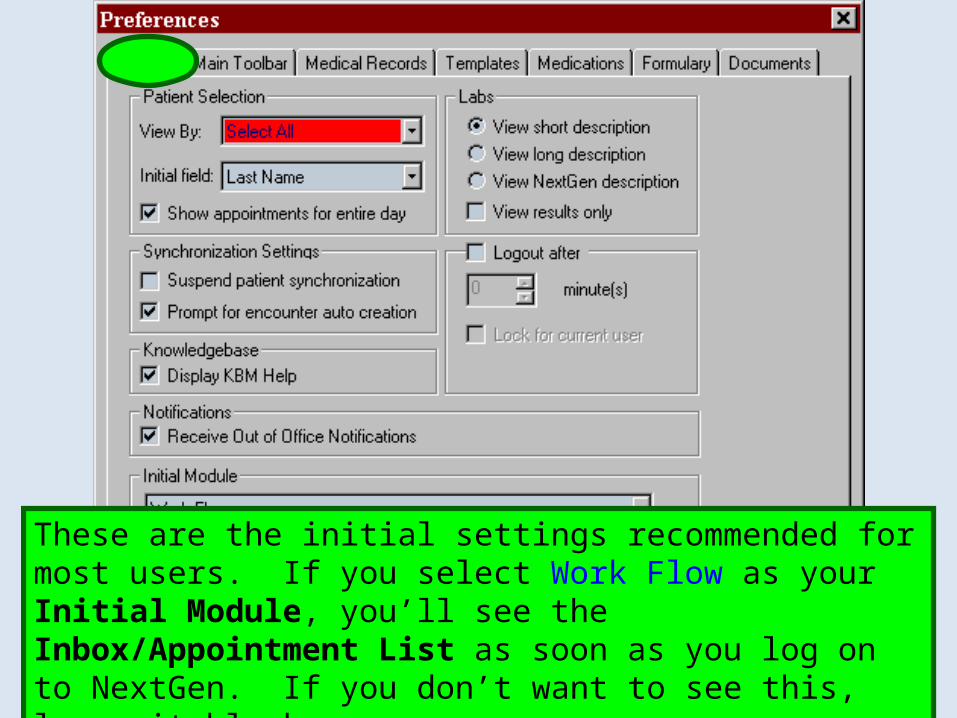
These are the initial settings recommended for most users. If you select Work Flow as your Initial Module, you’ll see the Inbox/Appointment List as soon as you log on to NextGen. If you don’t want to see this, leave it blank.

These are the stock settings, but also click Encounter Display.

These are the stock settings, but also click the Remarks checkbox if it is not already selected.

Under Display Order, click on the individual items, and use the < and > buttons to move items left or right.
The recommended display order is:{Date/Time} {Remarks} {Provider} {Location}.

Users who work in only one location should click the location selection icon to pick the location from the ensuing popup. Those who work in multiple locations should leave this blank, though you may choose to select Default to last selected, especially if you often work in the same location several days in a row.

Providers should select themselves as the Provider. (Clicking this button will give you a popup to select provider.)Other staff, such as nurses, may leave this blank, though you may choose to select Default to last selected, especially if you often work with the same provider several days in a row.

Preferred Templates will vary among specialties and users. Recommendations will be made by the EHR team as you begin to use NextGen.

These are recommended initial settings for everyone.
Also click DUR.(Drug Utilization Review.)
Note you can select a default printer for prescriptions. Since most clinics will have a designated printer for prescriptions, selecting it here can save you a few clicks whenever you have to print a prescription (e.g., a controlled substance).

Drug interaction warnings in NextGen can be intrusive, running the risk of warning fatigue. We recommend setting all of the warning levels to the lowest setting—Level 1.
The 1st tab, Override Reason needs no entries.The other tabs are:Interaction Display LevelCondition Interaction Display LevelPediatric Precautions Display LevelGeriatric Precautions Display LevelAllergy Interaction Display Level

These are the recommended settings. While Formulary Search could be useful as a default, our practices have a large number of uninsured patients, and Alabama Medicaid does not yet provide online formulary information. Consequently, the most efficient setting for most of our users will be to clear this checkbox.

These are the stock settings.When done, click OK to apply your selections.

You can modify the appearance of the toolbar at the top of the program window. Text and Icons allow a few modifications. To select the icons you wish to have on the top toolbar, click Tools|Top Toolbar|Customize. (You can also reach this by right-clicking on the toolbar itself.)

Use the Add and Remove buttons to move buttons to and from your toolbar. You can rearrange them on your toolbar with the Move Up and Move Down buttons.In this example, note that I’ve placed several buttons that are on the History Bar “tic tack toe” board on my toolbar so they’ll always be easy to get to directly.

HPI
You can define one or more HPI presets for a number of different chief complaints, to use as your standard starting points in various clinical situations.

In this example, we’ll open the Diarrhea-HPI popup & make several selections that we’ll use as our standard diarrhea HPI starting point.Next, click the Save icon.

Type a name for your preset. If it is specific to age or gender, include that in the name. You may also want to include your initials.
Leave the other selections as they are, and click Save & Close.
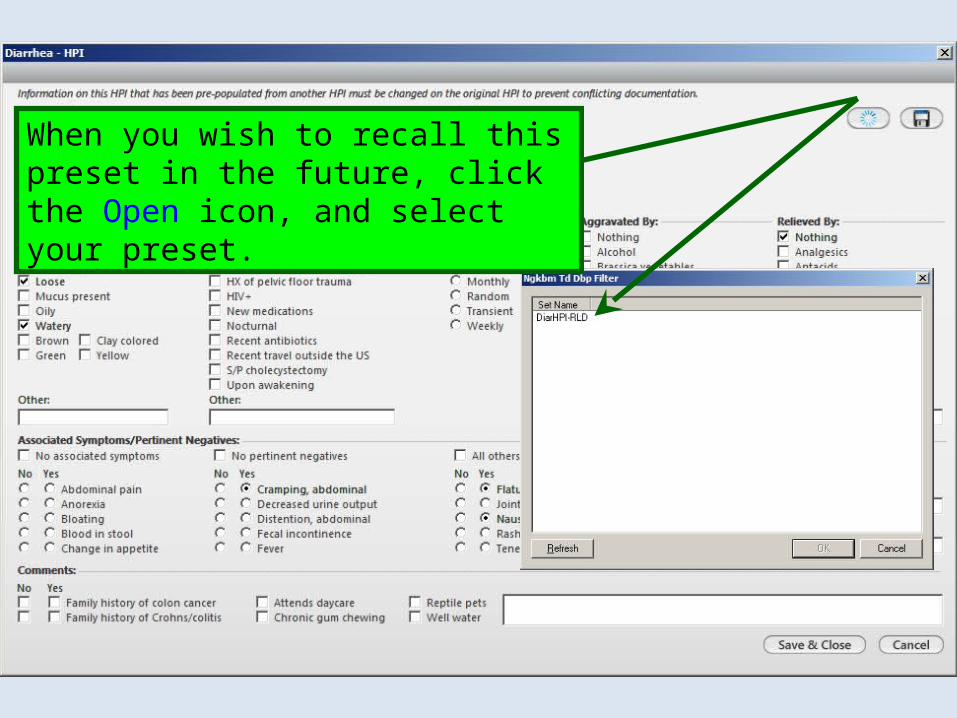
When you wish to recall this preset in the future, click the Open icon, and select your preset.

Suppose you later decide you’d like to make some changes to this HPI & re-save it. Make the changes you want, then click the Save icon.

You could save another version with a different name if you liked, but let’s say you’d like to replace the one that already exists. Unfortunately, if you try to save it again with the same name, you get this error message.

But you can Delete the existing version.
After doing that, re-type the name & save it again as before.

Here’s another handy thing to note about HPI popups (as well as ROS & PE popups, which we’ll discuss below). Say you’ve got dozens of bullets & boxes checked, & you’d just like to remove all of these checks & start over with a clean slate. Rather than unchecking everything one at a time, just right-click anywhere on the popup & choose Clear. All entries will be removed, & you can start over.
Some tips on HPI presets
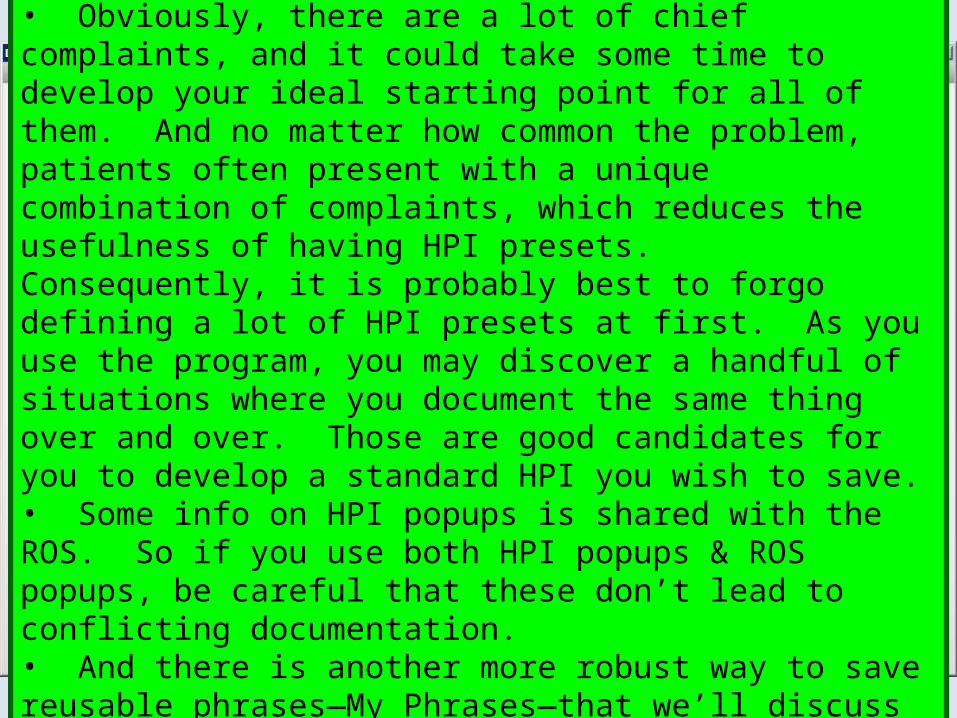
• Obviously, there are a lot of chief complaints, and it could take some time to develop your ideal starting point for all of them. And no matter how common the problem, patients often present with a unique combination of complaints, which reduces the usefulness of having HPI presets. Consequently, it is probably best to forgo defining a lot of HPI presets at first. As you use the program, you may discover a handful of situations where you document the same thing over and over. Those are good candidates for you to develop a standard HPI you wish to save.• Some info on HPI popups is shared with the ROS. So if you use both HPI popups & ROS popups, be careful that these don’t lead to conflicting documentation.• And there is another more robust way to save reusable phrases—My Phrases—that we’ll discuss later. You may wish to use that rather than fretting too much over HPI presets.

Review of Systems
You can define one or more Review of Systems presets to use as your standard starting points in various clinical situations.

As illustrated for the HPI above, you can save Review of Systems presets. Here we’ve opened the one-screen ROS-Female popup & made some entries.The save process is the same as above.

Remember that each heading will take you to a more detailed ROS for that system. Here we’ll click on Neurological.

You can also save preset versions of the system-specific ROS as well.
And you can move to any other system you wish to document through the left-side navigation.

And here’s an even neater trick. Say you’ve entered your personalized negative ROS, using a combination of the one-page ROS & several system’s ROS popups.On the SOAP tab, click the Save icon you see under the Review of Systems section:

These are the “Full” ROS presets. Note that Save All Templates is selected. Give this a new name indicating that it is a full ROS preset
Then click Save & Close.

Now you can recall this full ROS preset directly from the SOAP tab; you can view all your documentation here, too, allowing you to directly change any 1-2 times you need to.
This is a really powerful tool, & a big step forward from previous versions.

Some tips on ROS presets
• Note the difference between having your own default normal ROS compared to just choosing “All negative,” “All others negative,” “Globally normal,” etc: you only include items you normally mention, rather than a “scorched earth” laundry list of items that may not be pertinent to the visit or patient type.
• Some info on HPI popups is shared with the ROS. So if you use both HPI popups & ROS popups, be careful that these don’t lead to conflicting documentation.
Physical Exam
You can define several Physical Exam presets to use as your standard starting points in various clinical situations.

Analogous to the ROS demonstration above, you can save Physical Exam presets. You would often start with the One Page Exam.

You can document a general exam on one screen, & save that as a preset just like we did for the ROS above.
And also like above, you can click on any heading to open a more detailed exam for each system, & save presets for those.
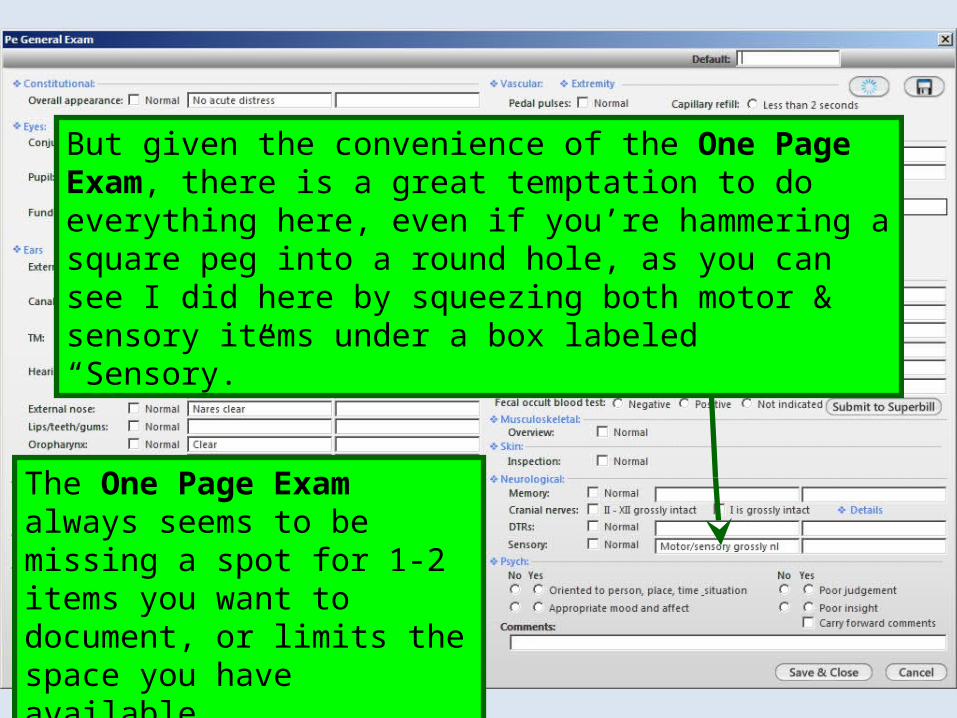
But given the convenience of the One Page Exam, there is a great temptation to do everything here, even if you’re hammering a square peg into a round hole, as you can see I did here by squeezing both motor & sensory items under a box labeled “Sensory.”
The One Page Exam always seems to be missing a spot for 1-2 items you want to document, or limits the space you have available.

This is where the “Full” preset save option really shines. Document however you deem fit on the One Page Exam & any addition system-specific exams as you like, then on the SOAP tab use the Save icon you see under the Physical Exam section to save all those entries as one preset.

Now you’re not limited to the boxes on the One Page Exam popup, & you can see your exam directly on the SOAP tab. Click on any specific item to change 1-2 findings.
You might want to save several normal exams, divided by age or gender, or whether they are brief or complete. You might save a different normal exam for diabetics that includes a monofilament exam, which you probably wouldn’t mention for most non-diabetics. You might even save some abnormal exams as a starting point for common conditions.
This is a very valuable workflow improvement compared to earlier versions of NextGen.

Procedures
You can define several Procedure presets to use as your standard starting points in various clinical situations.

We’ll open the Joint aspiration/injection popup from the Procedures button at the bottom of the SOAP Tab. (You could also open the full Procedure Template from the Navigation Bar.)

Most procedure templates also allow the saving of presets.In this example, we’ve opened a Joint Injection/Aspiration template, and made several selections that we’ll use as a standard shoulder injection.Next, click the Save icon.

Type a name, then click Save & Close.

Procedure presets can be particularly handy when a specific procedure template isn’t available in NextGen. For example, here I’ve used the Generic Procedure template to create a preset for Nextplanon insertion. You need to know what the appropriate diagnosis & procedure codes are, but after you save this once, you never have to know them again.
Some tips on Procedure presets
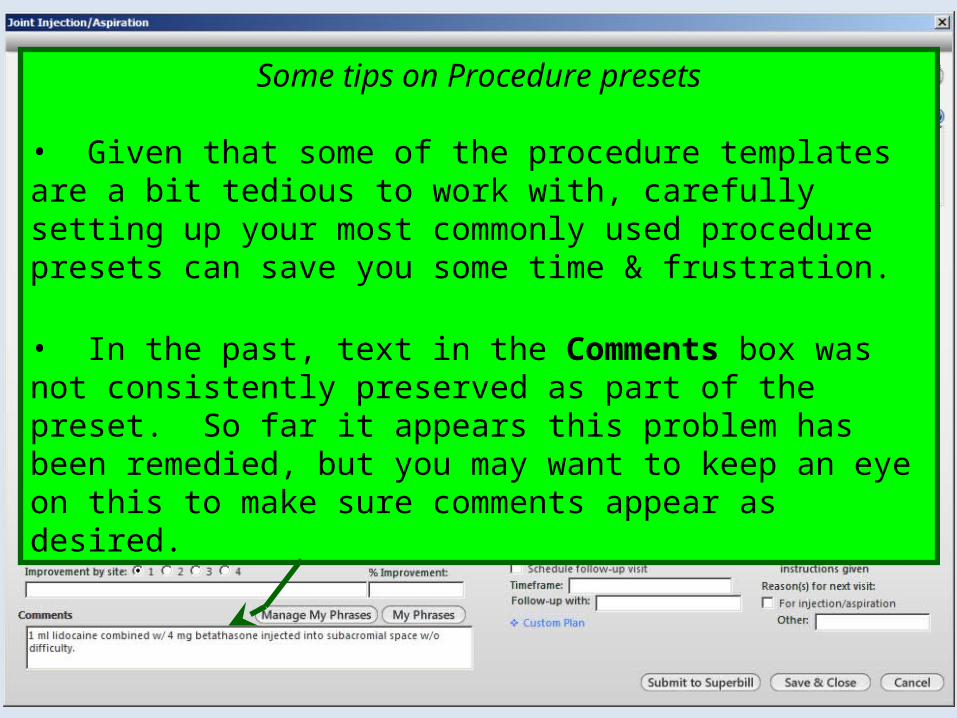
• Given that some of the procedure templates are a bit tedious to work with, carefully setting up your most commonly used procedure presets can save you some time & frustration.
• In the past, text in the Comments box was not consistently preserved as part of the preset. So far it appears this problem has been remedied, but you may want to keep an eye on this to make sure comments appear as desired.

My PlanYou can define several Plan presets to use as your standard starting points in various clinical situations.
Please Note:NextGen has given us conflicting guidance as to the role the My Plan template will have going forward. We’ll demonstrate some options you have here, but we haven’t emphasized this, so you can feel free to skip over this section if you like.

On the My Plan template, we see that the patient has been diagnosed with migraines.
Let’s create an order set for migraines.
Note that we’re actually creating an order set for a “category” of diagnoses—essentially a grouping of similar diagnoses. By doing this we’ll be able to use this order set when there is a diagnosis code for any variant of headaches.

Begin with Lab Orders. Note that there are some orders already pre-populated. Say we like Sed rate, C-Reactive Protein, & CBC, but we don’t think we’ll use Carbon Monoxide very often.
Click Cl (for Clear), & in the ensuing popup select item #4.
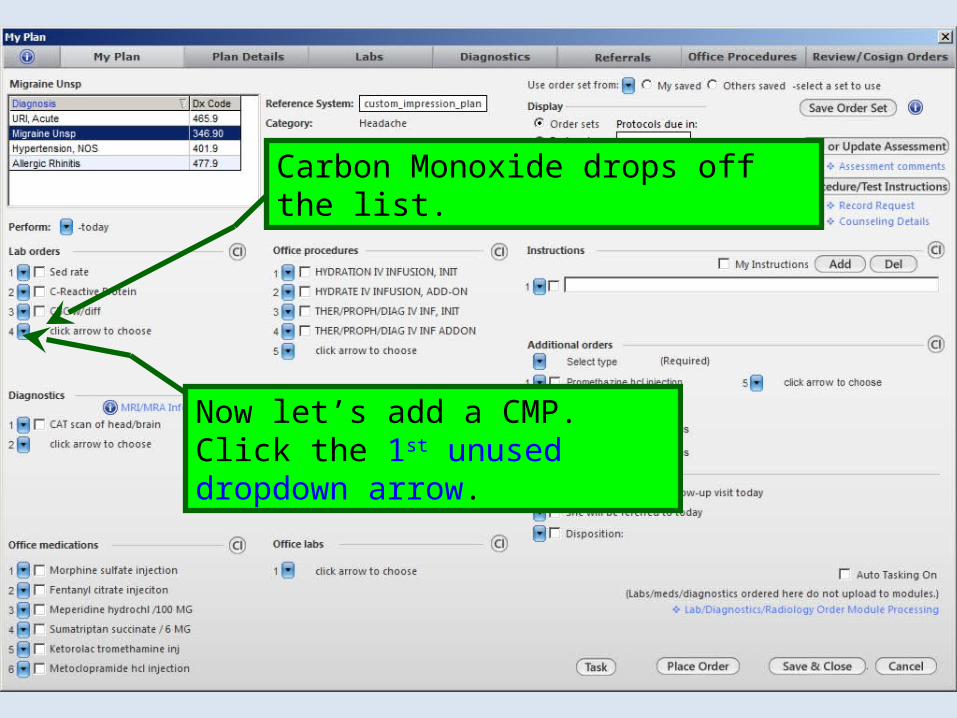
Carbon Monoxide drops off the list.
Now let’s add a CMP. Click the 1st unused dropdown arrow.

You’ll see a short list of orders that includes CMP. But if you didn’t see CMP, you could double-click ***See All*** to get a full list of tests.
Click anywhere in the list & type CMP.

The list scrolls down to CMP; double-click on it.

CMP is added to the list.
You could add some radiographic studies in a similar fashion.

Lab orders (and to a lesser extent Diagnostics) are the two headings we’ll make the most use of.)
Currently, the remaining sections aren’t really set up for use, since we have other ways in our work flow to order these items that are quicker and simpler. (As updates occur and we move to more specialties, we’ll continue to reevaluate use of these sections.)

You can also add a few brief instructions to your order set. In general, Plan Details, with the ability to save My Phrases, provides better functionality, and this is what we recommend. In addition, the setup of instructions here can be a bit confusing.
However, for those users who wish to use this feature, a brief explanation follows.

We want to start by populating “My Instructions,” a list of instructions you frequently use.In the first Instructions line, type Keep headache diary.
Click Add, and select 1 in the ensuing popup. Note that, while this is not made particularly clear, you are actually adding this to your list of “My Instructions.”

Delete or type over “Keep headache diary,” typing instead Take abortive med & lie down in dark, quiet room.
Again click Add, and select 1 in the ensuing popup.In a similar fashion, add other lines as desired.

When you’re done adding items to the “My Instructions” list, click the My Instructions box.
Then click in the 1st Instructions Space. When you click in this space with the My Instructions box checked, you’ll see your “My Instructions” list. Note that this includes several instructions I’ve added earlier.Double-click on Keep headache diary.

“Keep headache diary” appears in the 1st space, and a 2nd dropdown arrow appears.Click the 2nd dropdown arrow and double-click on Take abortive med… in the ensuing popup.
Continue this process until you have added all the instructions you desire.

Now note the Additional Orders section.You can add more orders even if you run out of space in one of the sections. Under Additional Orders, click the Select type dropdown arrow, and choose the instruction type. You can then add specific orders as demonstrated above.

Let’s say our order set is complete. To save it, click Save Order Set. (You won’t be prompted for a name or any further information.)

In the future, on any patient for whom you select a headache diagnosis, your order set will appear automatically.
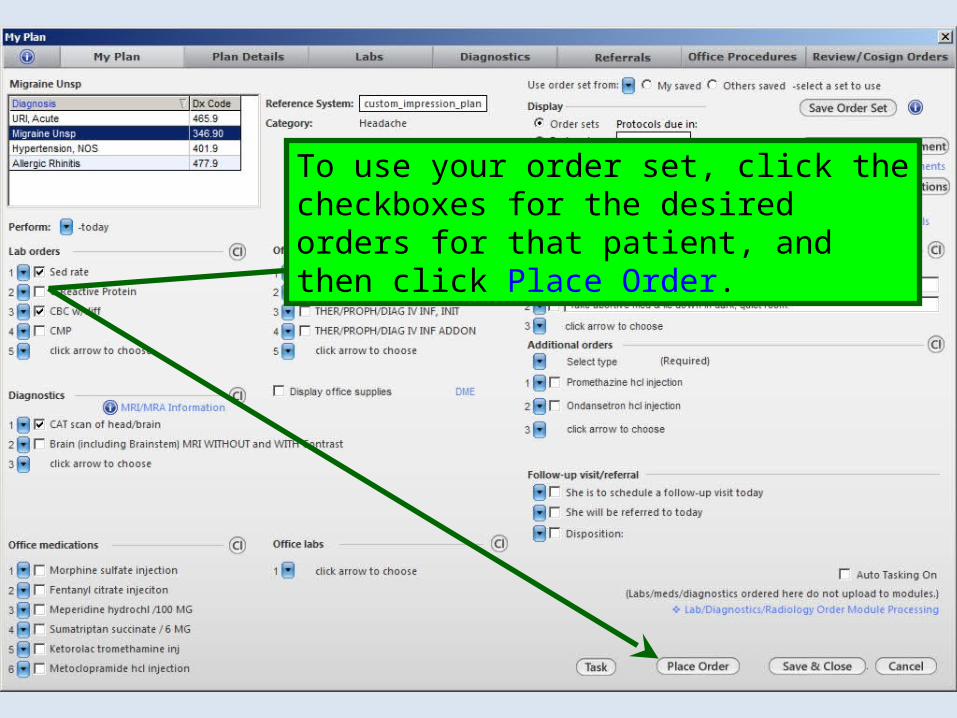
To use your order set, click the checkboxes for the desired orders for that patient, and then click Place Order.

By default you’re using order sets you’ve saved before (or are already pre-populated in the system). But you can also click Others saved to see a list of other providers in your practice who have saved order sets. You can then pick from their order sets instead.
You can make changes to your order sets on the fly. Add or remove orders, & just click Save Order Set again.

Plan Detail
You have a way to specify detailed plans and instructions, and re-use them in the future.

On the Plan Details tab you can type plans and instructions for your patient.

If you click Common Phrases, you’ll see a stock list of phrases that may be useful.

But the greatest value lies in My Phrases, which we’ll discuss in the next section.

My Phrases
You have the ability to establish and modify text, in your own words, that you can then use at multiple locations within NextGen.

Links to My Phrases appear at a few spots within the program, but the most prominent place is Plan Details.
Click Manage My Phrases.

Let’s add our first phrase, which will be instructions we commonly give allergic rhinitis patients.Click Add New or copy highlighted phrase.
Click in the My Phrase type box.In the ensuing popup, select Plan.

Click in the My Phrase summary box; think of this as the name of your phrase. We’ll type Allergic rhinitis.
Type your phrase. You have 1000 characters, so there is plenty of room to provide details for those things that you say a dozen times a week. When done, click Add.
These instructions will be included in the Patient Plan that you print for the patient at the end of the visit, so we’ll word them as if we’re speaking directly to the patient.

You can update your phrase...
or you can delete it.
You can also copy an existing phrase, modify it, and save it with a new name.

Since you have these editing options, you can begin creating and modifying My Phrases immediately, without worrying about getting them perfect on the first try.
This is important to note!
If you keep telling yourself you’ll find some time to sit down & create your perfect list of My Phrases, you’ll never do it, & you’ll never cover everything you’ll need them for.
Instead, the 1st time you realize you’re typing several lines of instructions about a problem there is any chance you’ll see again, save it as a My Phrase, no matter how good or bad you think it is. The next time you see a patient with that problem, modify/improve the phrase as appropriate for the next patient, & save those changes. By the time you buff it 2-3 times, you’ll have something pretty useful.

Back in Plan Details, to use your phrase, click the My Phrases button, then double-click the Allergic rhinitis phrase.

Plan Details is the place where My Phrases are of the greatest use, but there are other locations where they’re available, with further expansion anticipated.
One useful place you’ll find them is on the Generic Free Form HPI popup.

An even more handy place My Phrases appear is in the Reasons for Visit/HPI section of the SOAP tab, when you click the Comments button.

Some procedure templates also include My Phrases.

My List
You can save diagnoses you use frequently, & modify the description to read the way you’d like it to read. This is also handy for diagnoses that you perhaps don’t use often, but always seem to be hard to search for.

My List is available on the Add or Update Assessment popup.
Note the 726.10 diagnosis we’ve given to this patient. To add it to My List, select that diagnosis, then click the Add button under My List.

The diagnosis now appears in alphabetical order on My List. But this is awkwardly worded in ICD-ese, & you’d rather it just said “Shoulder tendonitis.”So double-click on it.
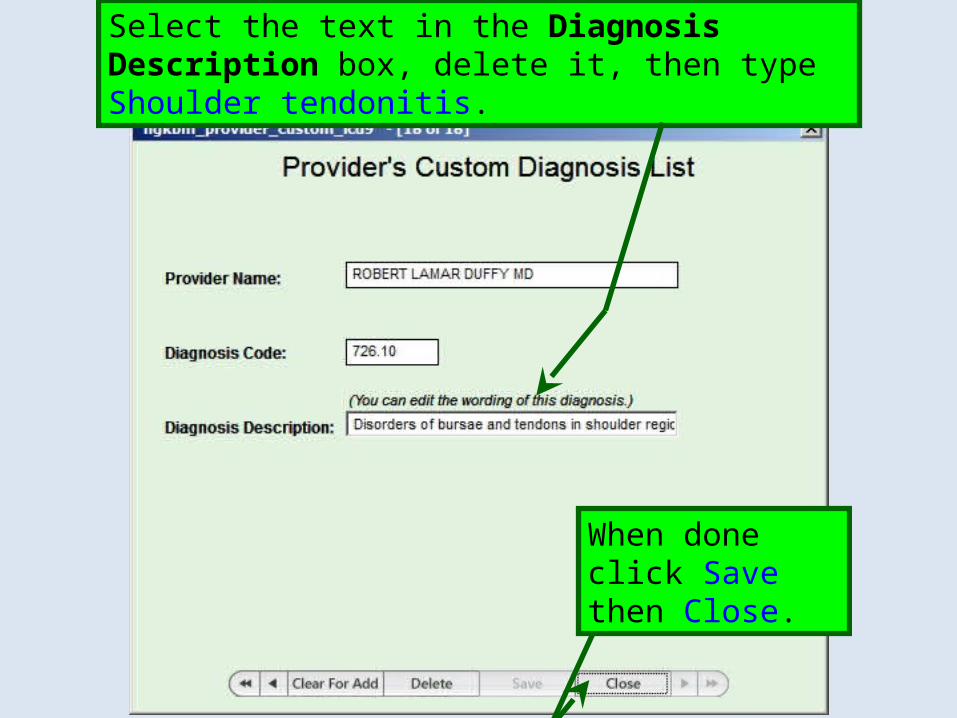
Select the text in the Diagnosis Description box, delete it, then type Shoulder tendonitis.
When done click Save then Close.

Shoulder tendonitis now appears on My List.
To add a diagnosis from My List to Today’s Assessments, just click on it; here we’ll click Hypothyroidism.
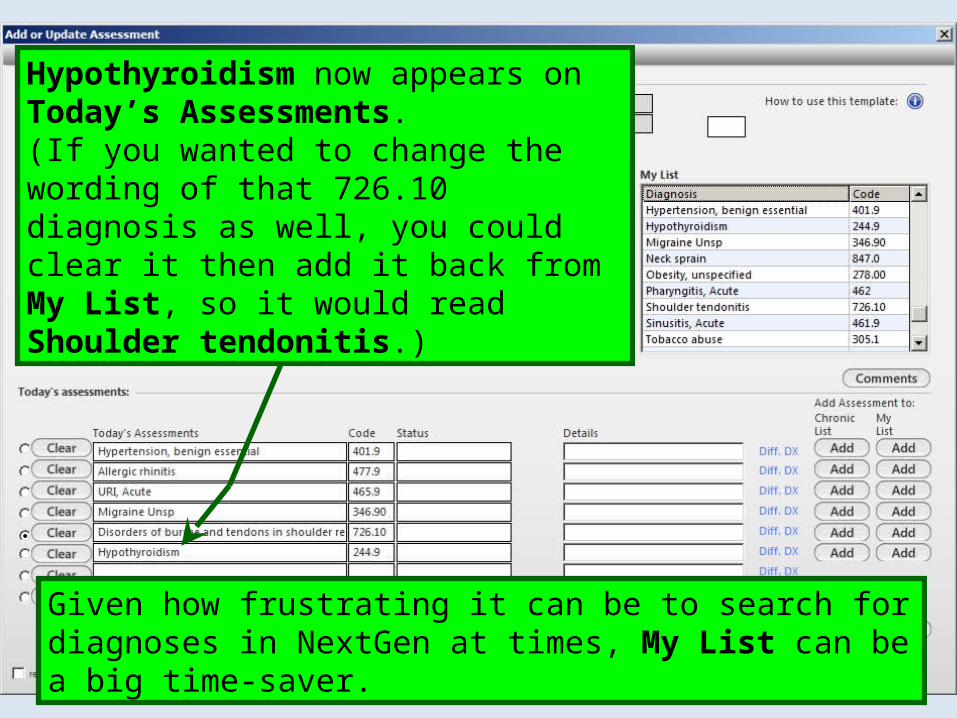
Hypothyroidism now appears on Today’s Assessments.(If you wanted to change the wording of that 726.10 diagnosis as well, you could clear it then add it back from My List, so it would read Shoulder tendonitis.)
Given how frustrating it can be to search for diagnoses in NextGen at times, My List can be a big time-saver.

This concludes theNextGen User Personalization
demonstration.
My mechanic told me he couldn’t repair my brakes, so he made my
horn louder.
R. Lamar Duffy, M.D.Associate ProfessorUniversity of South AlabamaCollege of MedicineDepartment of Family Medicine

This concludes theNextGen User Personalization
demonstration.
My mechanic told me he couldn’t repair my brakes, so he made my
horn louder.
R. Lamar Duffy, M.D.Associate ProfessorUniversity of South AlabamaCollege of MedicineDepartment of Family Medicine