nexpath telephony server user’s guide - p bx mechanic release 5 users g… · nexpath telephony...
TRANSCRIPT

NexPath Telephony ServerUser’s Guide
NexPath Corporation2988 Scott BoulevardSanta Clara, California 95054 PN3097, Rev. E(408) 235-8916 September 16, 1999

Copyright © 1997, 1998, 1999 NexPath CorporationSanta Clara, CA 95054
For Software Release 5.
All rights reserved. This product and related documentation are protected by copyright and distributed under licensesrestricting its use, copying, distribution, and decompilation. No part of this product or related documentation may bereproduced in any form by any means without prior written authorization of the NexPath Corporation.
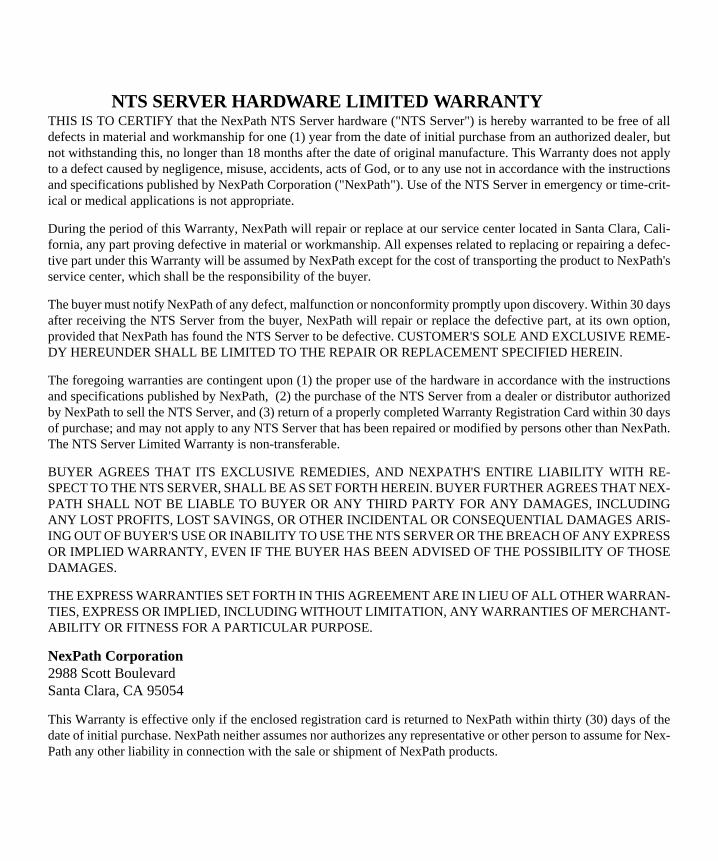
NTS SERVER HARDWARE LIMITED WARRANTYTHIS IS TO CERTIFY that the NexPath NTS Server hardware ("NTS Server") is hereby warranted to be free of alldefects in material and workmanship for one (1) year from the date of initial purchase from an authorized dealer, butnot withstanding this, no longer than 18 months after the date of original manufacture. This Warranty does not applyto a defect caused by negligence, misuse, accidents, acts of God, or to any use not in accordance with the instructionsand specifications published by NexPath Corporation ("NexPath"). Use of the NTS Server in emergency or time-crit-ical or medical applications is not appropriate.
During the period of this Warranty, NexPath will repair or replace at our service center located in Santa Clara, Cali-fornia, any part proving defective in material or workmanship. All expenses related to replacing or repairing a defec-tive part under this Warranty will be assumed by NexPath except for the cost of transporting the product to NexPath'sservice center, which shall be the responsibility of the buyer.
The buyer must notify NexPath of any defect, malfunction or nonconformity promptly upon discovery. Within 30 daysafter receiving the NTS Server from the buyer, NexPath will repair or replace the defective part, at its own option,provided that NexPath has found the NTS Server to be defective. CUSTOMER'S SOLE AND EXCLUSIVE REME-DY HEREUNDER SHALL BE LIMITED TO THE REPAIR OR REPLACEMENT SPECIFIED HEREIN.
The foregoing warranties are contingent upon (1) the proper use of the hardware in accordance with the instructionsand specifications published by NexPath, (2) the purchase of the NTS Server from a dealer or distributor authorizedby NexPath to sell the NTS Server, and (3) return of a properly completed Warranty Registration Card within 30 daysof purchase; and may not apply to any NTS Server that has been repaired or modified by persons other than NexPath.The NTS Server Limited Warranty is non-transferable.
BUYER AGREES THAT ITS EXCLUSIVE REMEDIES, AND NEXPATH'S ENTIRE LIABILITY WITH RE-SPECT TO THE NTS SERVER, SHALL BE AS SET FORTH HEREIN. BUYER FURTHER AGREES THAT NEX-PATH SHALL NOT BE LIABLE TO BUYER OR ANY THIRD PARTY FOR ANY DAMAGES, INCLUDINGANY LOST PROFITS, LOST SAVINGS, OR OTHER INCIDENTAL OR CONSEQUENTIAL DAMAGES ARIS-ING OUT OF BUYER'S USE OR INABILITY TO USE THE NTS SERVER OR THE BREACH OF ANY EXPRESSOR IMPLIED WARRANTY, EVEN IF THE BUYER HAS BEEN ADVISED OF THE POSSIBILITY OF THOSEDAMAGES.
THE EXPRESS WARRANTIES SET FORTH IN THIS AGREEMENT ARE IN LIEU OF ALL OTHER WARRAN-TIES, EXPRESS OR IMPLIED, INCLUDING WITHOUT LIMITATION, ANY WARRANTIES OF MERCHANT-ABILITY OR FITNESS FOR A PARTICULAR PURPOSE.
NexPath Corporation2988 Scott BoulevardSanta Clara, CA 95054
This Warranty is effective only if the enclosed registration card is returned to NexPath within thirty (30) days of thedate of initial purchase. NexPath neither assumes nor authorizes any representative or other person to assume for Nex-Path any other liability in connection with the sale or shipment of NexPath products.

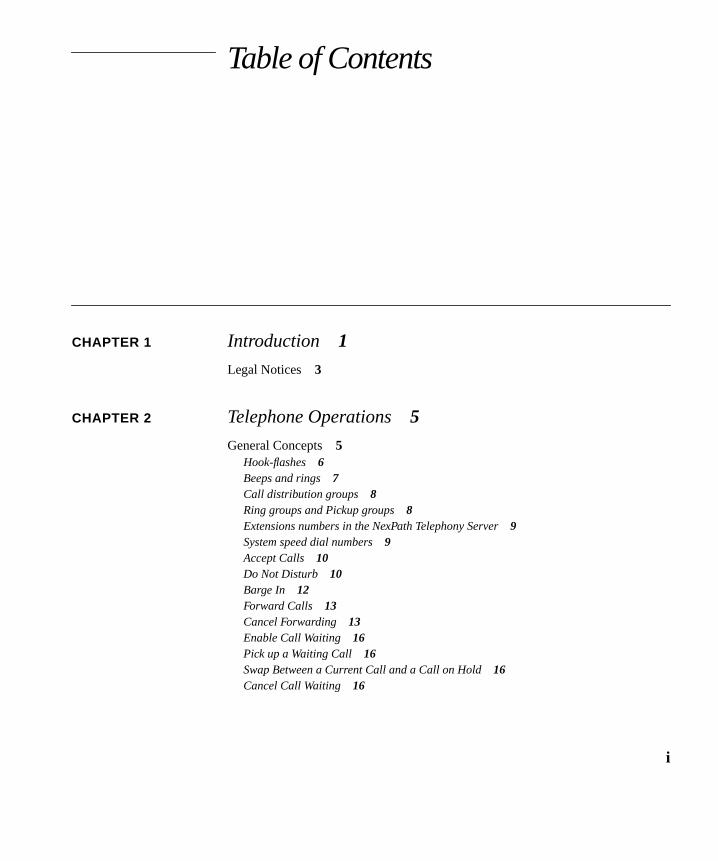
Table of Contents
CHAPTER 1 Introduction 1
Legal Notices 3
CHAPTER 2 Telephone Operations 5
General Concepts 5Hook-flashes 6Beeps and rings 7Call distribution groups 8Ring groups and Pickup groups 8Extensions numbers in the NexPath Telephony Server 9System speed dial numbers 9Accept Calls 10Do Not Disturb 10Barge In 12Forward Calls 13Cancel Forwarding 13Enable Call Waiting 16Pick up a Waiting Call 16Swap Between a Current Call and a Call on Hold 16Cancel Call Waiting 16
i
User’s Guide
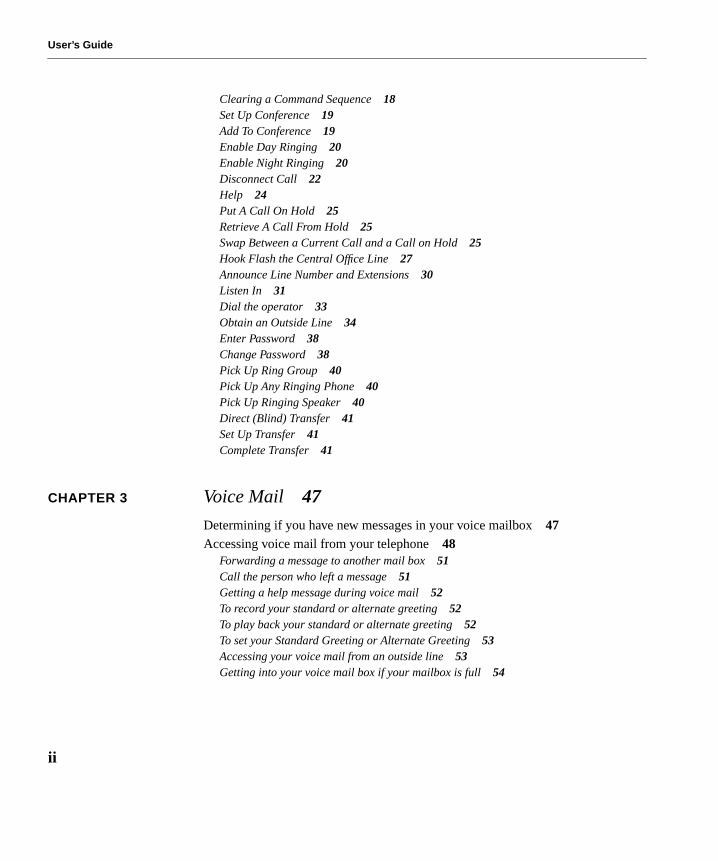
Clearing a Command Sequence 18Set Up Conference 19Add To Conference 19Enable Day Ringing 20Enable Night Ringing 20Disconnect Call 22Help 24Put A Call On Hold 25Retrieve A Call From Hold 25Swap Between a Current Call and a Call on Hold 25Hook Flash the Central Office Line 27Announce Line Number and Extensions 30Listen In 31Dial the operator 33Obtain an Outside Line 34Enter Password 38Change Password 38Pick Up Ring Group 40Pick Up Any Ringing Phone 40Pick Up Ringing Speaker 40Direct (Blind) Transfer 41Set Up Transfer 41Complete Transfer 41
CHAPTER 3 Voice Mail 47
Determining if you have new messages in your voice mailbox 47Accessing voice mail from your telephone 48
Forwarding a message to another mail box 51Call the person who left a message 51Getting a help message during voice mail 52To record your standard or alternate greeting 52To play back your standard or alternate greeting 52To set your Standard Greeting or Alternate Greeting 53Accessing your voice mail from an outside line 53Getting into your voice mail box if your mailbox is full 54
ii
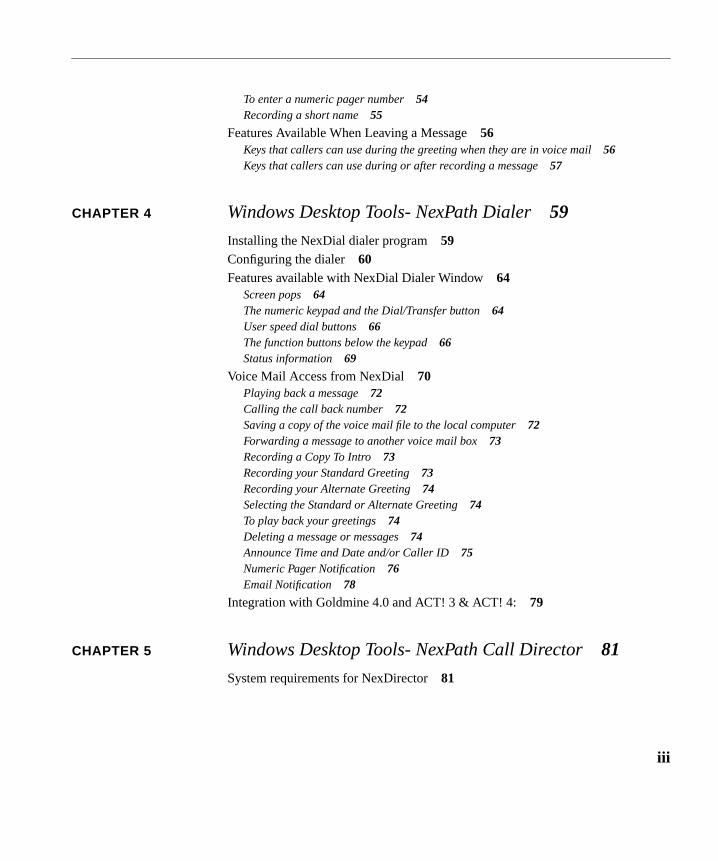
To enter a numeric pager number 54Recording a short name 55
Features Available When Leaving a Message 56Keys that callers can use during the greeting when they are in voice mail 56Keys that callers can use during or after recording a message 57
CHAPTER 4 Windows Desktop Tools- NexPath Dialer 59
Installing the NexDial dialer program 59Configuring the dialer 60Features available with NexDial Dialer Window 64
Screen pops 64The numeric keypad and the Dial/Transfer button 64User speed dial buttons 66The function buttons below the keypad 66Status information 69
Voice Mail Access from NexDial 70Playing back a message 72Calling the call back number 72Saving a copy of the voice mail file to the local computer 72Forwarding a message to another voice mail box 73Recording a Copy To Intro 73Recording your Standard Greeting 73Recording your Alternate Greeting 74Selecting the Standard or Alternate Greeting 74To play back your greetings 74Deleting a message or messages 74Announce Time and Date and/or Caller ID 75Numeric Pager Notification 76Email Notification 78
Integration with Goldmine 4.0 and ACT! 3 & ACT! 4: 79
CHAPTER 5 Windows Desktop Tools- NexPath Call Director 81
System requirements for NexDirector 81
iii
User’s Guide
Installing the NexDirector operator’s console program 82NTS Server Configuration Issues Related to NexDirector 83Features available with NexDirector: 85
CHAPTER 6 TelOper: the Web Browser Desktop Interface 89To control your phone from your computer 89
The Control page 92Selecting a voice mail box to monitor 93VM Barge-in 93Send to VM 93Hold 93Call Control 94Using the Ring Group button 95
The voice mail page 96Setting message, pager, and email parameters 98Dialing Method for Call Back 99Other Voice Mail Features 99
System Information 101Using the Phone Book page 103The View Log button 105The status information at the bottom of the Control page 108
CHAPTER 7 Installing the NexPath TAPI 2.1 Service Provider 109
Installing the NexPath TAPI 2.1 Telephony Service Provider (TSP) program 109Using the NexPath Telephony Service Provider (TSP) with other programs 113Uninstalling the NexPath TAPI Telephony Service Provider (TSP) 115
CHAPTER 8 Frequently asked questions 117
APPENDIX A Glossary 123
iv
CHAPTER 1 Introduction
Congratulations on your purchase of a NexPath Telephony Server! This revolutionary new solution to small-company phone systems allows you to have all the features and functions of the phone systems used by largecompanies, but at a fraction of what large systems cost.
In fact, in many ways the NexPath Telephony Server goes beyond the functionality of most large-companytelephone systems. The NexPath Telephony Server was the first web-enabled telephone system when it wasintroduced in late 1996. It has unique features not commonly found on larger systems, such as allowing youto perform functions like picking up a ringing phone from any other phone, checking and retrieving yourvoice mail from any desktop computer in the building or on the Internet, ring groups within call distributiongroups, and many other features that are unique to NexPath.
Note This manual, along with all other system manuals, are available on the NexPath Telephony Server inAdobe Acrobat format, if you have a web browser and your PC is connected to the LAN. The URL forthe list of manuals is http://<system name>/manuals/1. Other URLs that are useful are available on theNexPath Telephony Server at the URL http://<system name>/help/.
1. Replace <system name> with the name assigned your specific NexPath Telephony Server by your system administrator,or the IP address of the NexPath Telephony Server. If you use the IP address, you must put in the trailing “/”.
1
User’s Guide
The NexPath Telephony Server combines the following subsystems into a single, tightly integrated, easy-to-install, easy-to-maintain package:
• A complete switching system (PBX-like functions)
• Up to 136-line (outside+inside lines) capability.
• Functions such as call routing and switching can be performed using standard touch-tone codesfrom conventional telephones. No expensive, proprietary phones are necessary.
• High bandwidth (64 kilobits per second), all digital signal paths pass fax and modem signals trans-parently.
• Automatic fax detection
• An auto-attendant system
• Allows automated answering and routing of calls.
• Fully configurable, including custom messages and flexible numbering plans.
• Multiple auto-attendants with a different auto-attendant on each line if desired.
• A voice message recording and retrieval (i.e., voice mail) system
• Over 50 hours of voice mail and custom messages can be stored per system.
• Password protection provided for all voice mail access.
• Personal greetings can be recorded for each extension.
• 64 kilobits-per-second digitization, storage, and playback gives your messages unsurpassed clarity.
• 30 port simultaneous voice mail access capability.
• Support of the VMWI (FSK) voice mail waiting light.
• An Automatic Call Distribution (ACD) system
• Allows calls to be directed to a group, such as sales, rather than just to an individual.
• Multiple overlapping distribution groups with priority settings.
• Custom reassurance messages and hold music while the caller is waiting in the hold queue.
Other features include:
• Integrated TCP/IP LAN for network control and administration
• System administration is performed using standard Web browser (Netscape or Internet Explorer)software running on any desktop computer.
• Control of any extension can be performed either from a telephone, from the Windows programsNexDial or NexDirector, or from a Netscape Web browser software running on any desktop com-
2

Introduction
puter.
• Complete backup via LAN command, and retrieval of the backup file via ftp.
• A completely open network API (NexPath Simple Computer Telephony Protocol, N-SCTP) forcustom application development and 1st and 3rd party call control.
• Voice prompts and error messages available for all telephone operations
• A public address output for announcements and speaker ringing
• A music-on-hold input
• Multiple auto-attendants and ACD groups can be set up
• Call waiting and call forwarding
• A complete system activity log
• Ring groups, including ring groups in ACD groups
• Distinctive ringing
• Reminder rings
• Multiple hold stack
• Park orbits
• Barge-in to voice mail in progress
• Listen-in to voice mail in progress
• Caller-ID pass-through and decoding
• Power-failure bypass relays on all CO lines
• Multiple extension number assignment capability per line
• Numeric page upon receipt of voice mail
• System speed dial numbers
• Email notification upon receipt of voice mail.
Legal Notices
WARNING: The NexPath Telephony Server can be programmed to allow users, if the feature is enabledby the system administrator and a valid password is entered, to listen in to conversations without the partic-ipants knowledge. Listening in to a conversation without the consent of one or both parties may be a viola-
3
User’s Guide
tion of local, state, and federal privacy laws. It is the responsibility of the user of the NexPath TelephonyServer, when using features of the system, to assure that he or she is in compliance with all applicable laws.
WARNING: The NexPath Telephony Server includes a LAN based protocol, NexPath Simple ComputerTelephony Protocol (N-SCTP), that allows the system to be programmed to function as an Automatic Dialand Announce Device (ADAD). ADADs or similar devices that are used for commercial solicitation, orused without the consent of the called party, are prohibited by many local, state, and federal laws. It is theresponsibility of the user of the NexPath Telephony Server, when using features of the system, to assure thathe or she is in compliance with all applicable laws.
4
CHAPTER 2 Telephone Operations
The NexPath Telephony Server allows operations such placing calls on hold, transferring a call, and settingup conference calls to be controlled from any telephone connected to the system. This chapter describes theoperations available and how to control them. Note, though, that all of the operations described in this chap-ter can also be performed from a Windows 95/98/NT computer if the computer is connected to the NexPathTelephony Server through a TCP/IP network connection, and the program NexDial is installed. Some oper-ations are also available from NexDirector. Also, Windows and non-Windows machines connected to thenetwork and running Netscape Navigator 3.03 (and certain subsequent versions) can run TelOper, a web-based desktop call control program. See CHAPTER 4:Windows Desktop Tools- NexPath Dialer starting onpage 59 and CHAPTER 6:TelOper: the Web Browser Desktop Interface starting on page 89 for details.
Also, all voice mail operations can be performed from either a telephone or a computer. However, the keysequences described in this chapter for call control from a telephone will be unavailable while you areactively retrieving voice mail from a telephone. For details on voice mail operation, see CHAPTER 3:VoiceMail starting on page 47.
General Concepts
Below is a list of topics which are common to the commands described throughout the rest of this chapter.Please take the time to read this information before proceeding to the actual commands available in the Nex-Path Telephony Server.
5
User’s Guide
Hook-flashes
Hook-flashes are one of the more complicated operations needed in the NexPath Telephony Server. The rea-son we need them, though, is that if you press the keys on your telephone keypad while in the middle of anormal call, the NexPath Telephony Server simply passes these key presses on to the other party. This ishandy when the other party’s phone system can do something with them, such as route your call to an exten-sion within their building, but it makes it difficult to signal the NexPath Telephony Server that you want todo something special like put a call on hold once you are in the middle of a call.
Some telephone systems solve this problem by requiring that you use special keys on their proprietaryphones (sometimes misleadingly called digital phones). The problems with special phones are that they areexpensive, they only work on one system, they become obsolete quickly, and they often do not have other-wise commonly available features such as speed-dial.
On the NexPath Telephony Server, you can signal the system that you want to do something special like puta call on hold while in the middle of a call by performing a hook-flash, then entering the command sequencefor the operation desired. Hook-flashes are done by quickly depressing and releasing the hook switch1 onyour phone, or by pressing the flash key on your phone.
Note, though, that perfecting the art of performing hook-flashes using the hook-switch might take a littlepractice. You must depress the switch for long enough to make it obvious to the system that you want to sig-nal it but not so long that the system thinks you hung up. A valid hook-flash is accomplished by depressingthe telephone hook switch for an interval of greater than 50 milliseconds and less than 800 milliseconds (amillisecond is 1/1000ths of a second, so 800 milliseconds is a little over 3/4 of a second).
Some phones come with a button which performs the hook-flash function. Care must be used withtelephones that have this button, however, since they can issue a hook-flash for a full 3/4 of a second, whichis a fairly long time. If you begin entering other keys of a sequence before the pre-programmed flash timehas ended, many older phones will block the subsequent tones, and the NexPath Telephony Server will not“hear” these other keys and you will likely get an error message.
Test the telephones you are using, and, if the telephone does not queue the keys, make sure you have waiteduntil the preprogrammed flash time is over before pressing other keys. Or, better yet, if you have one of
1. The hook-switch is the switch that gets depressed by the handset when you hang up your phone.
Flash
6

Telephone Operations
these older phones, learn how to depress and release the hook-switch properly by hand instead of using the key1.
Note Many telephones are now being produced that properly queue other keypad keys after the the flash key,so that it can be depressed along with the other keys at any rate. In particular, the the flash key on theNortel 9316 (the flash key is called LINK on the Nortel phone) and the Panasonic KX-TSC50telephones works properly with the NexPath Telephony Server.
In this manual, we will designate a hook-flash with the symbol .
Beeps and rings
You will hear one short beep in your conversation if you are on the phone and you leave another call on holdfor too long2. You can use the Swap Hold sequence (i.e., performing a hook-flash followed bypressing the button on your telephone) to toggle between your existing call and the call on hold.
Note If you are not on the phone and you leave a call on hold too long, you will receive a short ring on yourphone, but when you pick up the phone, no one will be there. You can retrieve this call from hold usingthe Retrieve Call From Hold sequence .
Two short beeps in your conversation indicates that you have a call waiting. You can put the current call onhold and pick up the new call using the Pick up Waiting Call sequence . You can then use theSwap Hold sequence to toggle between the two. Note that if you are done with your current call,you can still use to pick up the incoming call. The pre-existing call you put on hold with the
will disappear when the person you were talking to hangs up.
1. If you program a sequence into a phone with speed-dial, and is programmed as one of the keys in the pro-grammed sequence, the phone will automatically wait until the end of its own flash time before issuing the other keys inthe sequence. Therefore, this 3/4 second blanking time is not a problem for flash sequences programmed into a speed-dialer.
2. This delay time is usually 45 seconds. However, the reminder ring delay time can be changed by your system administra-tor, and might be set differently for your system.
Flash
Flash
Flash
Flash **
* 1
Flash 3Flash *
Flash 3Flash 3
7
User’s Guide
You will hear three short beeps if you are on the phone and someone uses the barge-in sequence to break intoyour conversation.
Call distribution groups
Your system administrator may configure your system’s auto-attendant to support call distribution groups,that is, groups of extensions which represent entire departments, such as Sales or Marketing. When a callercalls in, they are given a message such as “Press 1 for Sales, 2 for technical support...”
When the caller presses one of these selections, the call is routed to the call distribution group defined for theselection, and each extension within the call distribution that is accepting calls (see Accept Calls on page 10)will ring in sequence. The exact ring sequence for the group and what happens if no one picks up the call isdetermined by the system administrator when the call distribution group is configured.
Ring groups and Pickup groups
Your system administrator can assign a ring group number to any group of physical telephone lines. Thisfunction is normally used so that a ringing phone can be picked up from another phone using the Pick UpGroup sequence , followed by the ring group number. It is also used to cause a group of phones to ringat the same time, so that any one of the phones can be answered to accept the call.
By factory default, ring group 0 is defined as all phones in the system except the PA speaker. This means thatyou can usually pick up any ringing phone in the building by entering .
Also by factory default, ring group 1 is defined as containing the telephone line which rings through yourcompany’s overhead PA speaker. Unless your system administrator has changed the definition of ring group1, you can pick up a call ringing over the overhead PA speaker by picking up any phone and pressing
.
Ring groups can also be assigned to extensions by the system administrator, so that when the extension num-ber is dialed, several telephones ring at the same time. Any one of the telephones can be answered to receivethe call; the first telephone in the ringing group of extensions that goes off hook gets the call, the others getdial tone.
* 0
* 0 0
* 0 1
8
Telephone Operations
Extensions numbers in the NexPath Telephony Server
There are eight different types of extensions in NexPath system:
1. Inside line extensions (default is 300-399)
2. Outside line extensions (default is 200-299)
3. Voice mailbox extensions (default is 500 -599 and 130-131)
4. Auto-attendant extensions (pre-configured as 120 (Day Program) and 121 (Night Program))
5. Park orbit extensions (default is 100 - 110)
6. Speed dial extensions (none predefined)
7. Public address extensions (special case of #2, default is 111).
8. Extensions that ring several phones at once (special case of #1, none predefined)
Any of these extensions types can be directly dialed from a telephone. The resulting function will be deter-mined by the system programming for that extension type, i.e., you will ring a phone, seize an outside line,enter voice mail, execute an auto-attendant program, etc.
The concept of extension numbers and their symmetric use throughout the system is a very powerful featureof the NexPath Telephony Server.
System speed dial numbers
Your system administrator can program the NexPath Telephony Server to recognized special three digitnumbers, called speed dial extensions, that translate to 7 or more digit off-site numbers. These can be usedfor convenient direct dialing, or for convenience in transferring calls.
Contact your system administrator to determine if any speed dial extensions have been configured for yoursystem.
9
User’s Guide
Accept Calls/Do Not Disturb
Accept Calls
Do Not Disturb
Whenever the NexPath Telephony Server is powered up, your extension will automatically be placed in theAccept Calls mode, which means that your phone will ring when someone calls you.
You can place your extension in the Do Not Disturb mode, though, during which calls made to your exten-sion will go directly to your voice mail or directly to the number you specify as a forwarding number with-out first ringing at your extension1. You may want to place your extension in the Do Not Disturb mode whenyou are in a meeting and do not want your phone to ring or when you are out to lunch and do not want some-one else to pick up your phone.
If your extension is part of a call distribution group and you place your phone in the Do Not Disturb mode,then calls to the distribution group (Sales, for example) will not ring at your phone, but instead will go on tothe next extension in the group. Calls placed by dialing your extension number directly, however, will berouted as described above.
To put your extension in the Do Not Disturb mode:
1. Pick up any phone or otherwise get an inside line dial tone.
2. Enter the Do Not Disturb sequence .
3. Enter your extension number.
4. If prompted, enter your password2, or a password with administrator privileges.
5. If your password was accepted, you will be notified that your extension has been placed in the Do NotDisturb mode.
6. Hang up.
1. If your extension has not been configured to support voice mail and you have not set up call-forwarding for your exten-sion, your phone will ring even if you place it in the Do Not Disturb mode.
2. You will not be asked for a password if you have already entered it once to enable some other command and you have nothung up since then.
* 8
* 9
* 9
10
Telephone Operations
To return your extension to the Accept Calls mode:
1. Pick up any phone or otherwise get an inside line dial tone.
2. Enter the Accept Calls sequence .
3. Enter the number of the extension you wish to change to Accepting Calls.
4. If prompted, enter your password1, or a password with administrator privileges.
5. If your password is accepted, you will be notified that your extension is now accepting calls.
6. Hang up.
Note There is no indication at your phone whether your extension is in the Accept Calls mode or the Do NotDisturb mode. If you want to be sure to receive calls, you can enter the Accept Calls sequence at anytime, even if your extension is already in the Accept Calls mode.
1. You will not be asked for a password if you entered it to enable some other command and have not hung up since then.
* 8
11
User’s Guide
Barge In
Barge In
Barge-in is the process of breaking into a conversation. To barge into your own voice mail extension, forexample, while someone is leaving you voice mail:
1. Pick up any phone or otherwise get an inside line dial tone.
2. Enter the Barge-in sequence .
3. Enter the number of your voice mail extension.
4. If prompted, enter your password1, or a password with administrator privileges.
5. If your password is accepted, you will be connected to the person currently leaving you a message.
Note If your phone is still ringing, you can usually pick up the call from any other telephone in the buildingby picking up a phone and entering the Pick Up Ring Group 0 sequence .
If your system administrator has given your account Barge-in/Listen-in permissions, you can also use thesequence described above to barge into other people’s conversations while they are on the phone. Checkwith your system administrator to see if you have barge-in permission. You do not need Barge-in/Listen-inpermission to barge-in to voice mail in progress in your own voice mail boxes.
Note When you barge into an existing conversation, the party at the extension number you barged into willhear three short beeps, indicating that someone is barging into his or her call.
WARNING: Barge-in permissions also allow Listen-in. Listening-in to a conversationwithout the consent of one or both parties may be a violation of local, state, and federalprivacy laws. It is the responsibility of the user of the NexPath Telephony Server, whenusing features of the system, to assure that they are in compliance with all applicablelaws.
1. You will not be asked for a password if you entered it to enable some other command and have not hung up since then.
# 2
# 2
* 0 0
12
Telephone Operations
Call Forwarding
Forward Calls
Cancel Forwarding
You can forward your calls to ring at any extension on the NexPath Telephony Server. To set up call-for-warding:
1. Pick up any phone or otherwise get an inside line dial tone.
2. Enter the Forward Calls sequence .
3. Enter your extension number.
4. Enter the number (either an extension or an off-site number) to which you want your calls forwarded, fol-lowed by the key, or wait four seconds.
5. If prompted, enter your password1, or a password with administrator privileges.
6. If your password was accepted, you will be notified that call-forwarding has been enabled, followed bythe announcement of the forwarded number (i.e., you can verify that the number you entered is correct).
7. Hang up.
Note You do not have to enter a 9 to seize an outside line, if you are forwarding your calls offsite. Thesystem automatically seizes an outside line if the number is seven or more digits. However, you mustenter a one if it is a long distance number. Outside calls that are forwarded offsite may have reducedquality and reduced audio levels.
When you enable call-forwarding for your extension, an incoming call will ring at your phone for 20 sec-onds before being forwarded2. The call will then ring at the forwarding extension for 20 more seconds. If,after this additional 20 seconds, no one has picked up the call and you have an exit extension (such as avoice mailbox extension) associated with your extension, the call will go to the exit extension. That is, thecall will eventually go to the exit extension of the original extension the caller dialed.
1. You will not be asked for a password if you have already entered it once to enable some other command and you have nothung up since then.
2. These are the factory-default forwarding and ringing delay times. Your system administrator can alter both of these times.
* 2
* 3
* 2
#
13
User’s Guide
If the extension is forwarded to a speed dial extension, and the speed dial number does not answer, the callwill go to the exit extension programmed in the speed dial extension configuration.
On the other hand, if you do not have an exit extension programmed, after the forwarding phone rings for itsadditional 20 seconds, the caller will be notified that there is no one to take the call and will be disconnected.
Calls that are forwarded offsite (not using speed dial extensions) are monitored by the NexPath TelephonyServer, and the system will attempt to determine if a caller has answered. If not, the call will go to the exitextension (such as voice mail), if the exit extension has been configured for the extension that was for-warded. However, the monitoring of the progress of calls to outside lines depends on the ability to detectcall progress sounds on the telephone line. This is not a precise process and it may not be successful in allcases. There can also be a delay before the call is connected.
Offsite forwarding will use Centrex or CLASS features (hook-flash transfers) if the CO line involved hasbeen designated as a Centrex or CLASS line.
Calls forwarded to a speed dial extension are handled differently. If an extension is forwarded to a speeddial number, then the call progress monitoring is handled as specified in the speed dial extension configura-tion. The system will not attempt to determine if the call connects unless so designated in the speed dialsetup. The exit extension as specified in the speed dial extension setup is used if the call fails to complete.
Speed dial extensions and exit extensions must be configured by your system administrator.
Note An extension can only be forwarded once.
Call forwarding for your extension will remain in effect until you cancel call forwarding. To cancel call for-warding:
1. Pick up any phone or otherwise get an inside line dial tone.
2. Enter the Cancel Forwarding sequence
3. Enter your extension number.
4. If prompted, enter your password1, or a password with administrator privileges.
5. If your password was accepted, you will be notified that call-forwarding has been cancelled.
1. You will not be asked for a password if you entered it to enable some other command and have not hung up since then.
* 3
14

Telephone Operations
6. Hang up.
15
User’s Guide
Call Waiting
Enable Call Waiting
Pick up a Waiting Call
Swap Between a Current Call and a Call on Hold
Cancel Call Waiting
When call-waiting is enabled for your extension, you will hear two beeps in your conversation when you areon the phone and a new call comes in1. When you hear these two beeps, you can decide whether to put yourcurrent caller on hold and take the new call, or continue talking to your current caller and, depending on howyou extension is set up, let the new caller go to either your voice mail, get forwarded, or be disconnected.
You can eliminate call-waiting beeps from your conversations by disabling call-waiting for your extension.
To enable call waiting at your extension:
1. Pick up any phone or otherwise get an inside line dial tone.
2. Enter the Enable Call Waiting sequence .
3. Enter your extension number.
4. If prompted, enter your password2 or a password with administrator privileges.
5. If your password was accepted, you will be notified that call-waiting has been enabled.
6. Hang up.
If you enable call waiting for your extension and you are on the phone when another call comes in, you willhear two short beeps in the middle of your existing call. You can press to put the current call onhold and answer the new call, or you can ignore the new call and let it go to your voice mail.
Note that if you pick up the incoming call, you can use the Swap Hold sequence to togglebetween the two calls.
1. Your caller will not hear these beeps, only you will.
2. You will not be asked for a password if you have already entered it once to enable some other command and you have nothung up since then.
* 4
Flash 3
Flash *
* 5
* 4
Flash 3
Flash *
16
Telephone Operations
To disable call waiting at your extension:
1. Pick up any phone or otherwise get an inside line dial tone.
2. Enter the Disable Call Waiting sequence .
3. Enter your extension number.
4. If prompted, enter your password1, or a password with administrator privileges.
5. If your password was accepted, you will be notified that call-waiting has been disabled.
6. Hang up.
The NexPath Telephony Server’s default configuration allows a phone to ring 20 seconds before being for-warded, or 20 seconds before being sent to voice mail or getting disconnected, though your system adminis-trator can alter these times. If you do not pick up a waiting call and you have set up call-forwarding for yourextension, a waiting call will forwarded after 20 seconds. If you do not have call-forwarding enabled but dohave a voice mailbox, then after 20 seconds the waiting call will go to your voice mailbox. If you have nei-ther call-forwarding enabled nor voice mail, then after the 20-second delay time has expired, the caller willbe notified that there is no one to take the call and the call will be disconnected.
1. You will not be asked for a password if you have already entered it once to enable some other command and you have nothung up since then.
* 5
17
User’s Guide
Clear
Clearing a Command Sequence
After getting an inside dial tone but before finishing a command sequence, you can get back to an inside dialtone by pressing the Clear sequence .
# #
# #
18

Telephone Operations
Conference Calls
Set Up Conference
Add To Conference
The NexPath Telephony Server can allow up to four parties to be conferenced on a single conference call,with the four parties being any combination of inside or outside lines.
To initiate a conference call:
1. Call your first party. This could be either an inside or an outside number.
2. Enter the Set up Conference sequence . This will put your current call on hold and request aconference circuit from the system. If a conference circuit is available, you will get an inside dial tone. Ifno conference circuits are available, you will receive an error message and be re-connected to your firstcall. Wait and try again later.
3. After getting a conference circuit and an inside dial tone, dial the number of the next party you wish toconference in. This can include making calls to parties on either inside or outside lines. If you cannot getyour second party, retrieve your first call from hold using and try again later.
4. Upon reaching your second party, enter the Add To Conference sequence . You, your firstparty, and your second party will all be talking to each other.
5. To add a fourth party to the conference, enter again. The first two callers will remain con-nected to each other, and you will receive an inside dial tone.
6. Dial the number of the next party you wish to conference in.
7. Upon reaching your third party, enter the Add To Conference sequence . You will be con-nected to all three callers.
8. You may hang up at any time and leave the conference active. The conference will end when no moreinside lines are involved in the call.
Note You can obtain a conference circuit before calling your first party by skipping step 1 above.
Flash 7
Flash 8
Flash 7
* 1
Flash 8
Flash 7
Flash 8
19
User’s Guide
Day Ringing/Night Ringing
Enable Day Ringing
Enable Night Ringing
The NexPath Telephony Server has two modes of operation that affect both the ringing of all extensions andthe auto-attendant: Day Mode (day ringing) and Night Mode (night ringing). Each extension can pro-grammed to ring at different lines or groups of lines when the system is switched from Day Mode to NightMode. For example, an extension may be programmed so that calls placed to it ring one particular phonewhen the system is in Day Mode, but ring all the phones in an entire ring group when the system is in Nightmode so that anyone left in the building can pick it up.
The auto-attendant may also have a Day Mode program and a Night Mode program. A different messageand set of choices may be presented to the caller depending on whether it is during regular business hours orafter hours. All of these features depend on the configuration and setup that is done by the system adminis-trator when the system is installed or configured.
To enable day ringing (and disable night ringing):
1. Pick up any phone or otherwise get an inside line dial tone.
2. Enter the Enable Day Ringing sequence .
3. If prompted, enter your password1, or a password with administrator privileges.
4. If your password was accepted, you will be notified that day ringing has been enabled.
5. Hang up.
To enable night ringing (and disable day ringing):
1. Pick up any phone or otherwise get an inside line dial tone.
2. Enter the Disable Day Ringing sequence .
3. If prompted, enter your password2.
1. You will not be asked for a password if you have already entered it once to enable some other command and you have nothung up since then.
2. You will not be asked for a password if you have already entered it once to enable some other command and you have nothung up since then.
# 0
# 1
# 0
# 1
20
Telephone Operations
4. If your password was accepted, you will be notified that day ringing has been disabled.
5. Hang up.
Note Your system can configured to switch automatically between Day mode and Night mode. See yoursystem administrator for details on whether or not your system is configured to do so.
21
User’s Guide
Disconnecting
Disconnect Call
You can disconnect from a call without hanging up. Once you have entered a password, you may want to dothis to avoid losing password protection or perhaps for other reasons. If your are using an inside extensionthat automatically seizes an outside line (sometimes called assumed dial nine), this sequence will disconnectfrom the outside line and return inside dial tone.
To disconnect from a call, or to disconnect from an outside line and obtain inside dial tone, without actuallyhanging up the phone:
1. Enter the Disconnect sequence .
2. You will receive an inside dial tone.
3. Enter a new command or the next number you want to dial.
Flash #
Flash #
22

Telephone Operations
Do Not Disturb
See Accept Calls/Do Not Disturb
23
User’s Guide
Help
Help
To get a summary of all commands listed here from your phone:
1. Pick up any phone or otherwise get an inside line dial tone.
2. Dial the Help sequence .
* *
* *
24
Telephone Operations
Hold
Put A Call On Hold
Retrieve A Call From Hold
Swap Between a Current Call and a Call on Hold
The NexPath Telephony Server can place up to three calls on hold at a time on any one extension. The callsare place on a stack, much like a stack of boxes or books. The last call placed on the stack usingis the first one retrieved when is entered. Calls place on hold at an extension can only be retrievedfrom that extension (private hold). If you want to place calls on hold to be retrieved from any extension, usepark orbits (public hold). See Park Orbits on page 36 for a detailed description.
Calls placed on hold using the above sequences, or placed into park orbits, receive hold music, if enabled forthe line and external hold music is supplied to the system.
To place a call on hold:
1. Enter the Put Call On Hold sequence . You will get an inside dial tone, and are free to call anew number, enter a command, or hang up.
Note If you inadvertently leave a call on hold and forget about it, you will get a short reminder ring every 45seconds1.
To retrieve the call most recently put on hold:
1. Pick up the phone or otherwise get an inside line dial tone at the phone where the call was put on hold.
2. Enter the Retrieve Call From Hold sequence . You will be connected to the call most recently put onhold.
1. This is the factory default value for the reminder ring delay time. Your system administrator can alter this time if desired.
Flash 1
* 1
Flash *
Flash 1* 1
Flash 1
* 1
25
User’s Guide
To swap your current call with the call most recently put on hold:
1. Enter the Swap Hold sequence . Your current call will go to the top of the hold stack, and youwill be connected with the most recent caller put on hold.
To get at a call on the hold stack when more than one call is on the stack:
1. Get an inside line. If you are on a call, you can hang up on this call without putting down the handset byentering . You can also transfer the current call using the Blind Transfer sequenceor the Set Up Transfer and Complete Transfer sequences and respectively.
2. Take the most recent call which was placed on hold off of hold by entering the Retrieve Call From Holdsequence .
3. Hang up or transfer this call.
4. Take the next call off of hold by entering the Retrieve Call From Hold sequence .
5. If necessary, hang up or transfer this call, and take the first call which was placed on hold off of hold byentering the Retrieve Call From Hold sequence .
6. When done, hang up.
Flash *
Flash # Flash 4Flash 5 Flash 6
* 1
* 1
* 1
26
Telephone Operations
Hook Flash the Central Office Line (Centrex and CLASSSM features)
Hook Flash the Central Office Line
You can send a hook flash to the central office line, rather than have the hook flash interpreted by the Nex-Path Telephony Server. This is only useful if you have Centrex lines or CLASSSM features, such as threeway calling, enabled on your outside lines.
Note The ability to hook flash a Central Office line can be enabled or disabled on a CO line by CO line basisin the NexPath Telephony Server. This feature must be enabled with the administration software inorder for the sequence to work. Otherwise the sequence is ignored.
To send a hook flash to the central office line (see the note above):
1. While connected to an outside (central office) line, enter . You should receive the signal fromthe central office that the sequence is recognized, usually three short beeps and then central office dialtone.
For example, to setup a three way call using CLASSSM features:
1. While connected to an outside (central office) line and talking to the first party, enter . Youshould receive the signal from the central office that the sequence is recognized: three short beeps andthen central office dial tone.
2. Dial the second party.
3. When you are connected, enter again. You should now have a three way call.
Note You must subscribe to CLASSSM features from your telephone company in order to use the three waycalling described above.
Flash 9
Flash 9
Flash 9
Flash 9
27
User’s Guide
Inside Lines
When you first pick up your phone, the dial tone you hear is an “inside line” dial tone. This is a dial tone pro-vided directly by the NexPath Telephony Server and not by the phone company. When you have an insideline, the NexPath Telephony Server is ready to accept both phone numbers to be dialed and the key pressesof the command sequences for the advanced operations described in this chapter and in the chapter VoiceMail starting on page 47.
Some notes: After getting an inside line dial tone, if you do not press any keys, you will get a dial tone time-out message after 90 seconds. Similarly, once you start dialing a phone number or command sequence, ifyou wait more than 15 seconds between digits, the system will give you a keypad dialing time-out messageand then return you to an inside line dial tone. Also, if you make a call to another inside line and get a busysignal and then forget to either hang up or otherwise disconnect from the call, you will get a busy signaltime-out message after 60 seconds1.
Often, the first thing you do after picking up your phone is dial to get an outside line. Once you do this,however, the NexPath Telephony Server stops trying to interpret all key presses except hook-flashes, asdescribed in the beginning of this chapter2. Not all commands start with hook-flashes, however, so it isimportant to know how to get back to inside line dial tone. The easiest method is to hang up for a second ortwo and then pick your handset again. Another way is to wait until the phone company decides that yourphone has been off-hook too long and disconnects you. This is similar to leaving a phone off-hook too longat home, but instead of hearing silence and then the loud “beep-beep-beep” that the phone company usuallyputs out, the NexPath Telephony Server detects this condition, hangs up the outside line, and returns you toan inside line dial tone. Yet another method is to disconnect from your current call is to use the Disconnectsequence .
Sometimes, it is desirable to get an inside dial tone from outside your facility, especially when you want tocheck your voice mail from home or from another facility. To get an inside line dial tone from outside yourbuilding:
1. Dial your company and wait for your system to pick up.
1. These are factory default times, and can all be altered by your system administrator.
2. If your system is configured to perform area code lockouts, the NexPath Telephony Server will also check that the insideline being used has permission to obtain an outside line, and that the area code being dialed is allowed for that line.
9
Flash #
28
Telephone Operations
2. During your company’s auto-attendant greeting, dial the number specifically set up by your systemadministrator to give you an inside dial tone.
If you do not know the correct number to dial during the auto-attendant answering sequence, you can stillget an inside dial tone by doing the following:
1. Dial your company and wait for your system to pick up.
2. During your company’s auto-attendant greeting, dial your own voice mail extension number.
3. When you hear your pre-recorded greeting, hit the key, then enter your password. You will be in voicemail at this point, and if your intention was to check your voice mail, then you are ready to press forPlay, for Pause, etc., as outlined in the chapter Voice Mail starting on page 47.
If, on the other hand, you really need an inside line dial tone to perform some other function such as enablingcall-forwarding for your extension or putting your system in Night Mode, then once you are in your voice
mail, press (at this point, is the Exit Voice Mail sequence), and you will get an inside dial tone.
Once you get an inside line dial tone from an outside line, you can perform all of the functions you wouldfrom inside the building EXCEPT pressing to get an outside line dial tone. This is done to prevent usersfrom dialing in from outside and then placing long-distance calls which get charged to the company.
#1
2
* *
9
29
User’s Guide
Line and Extension Numbers
Announce Line Number and Extensions
The Announce Line and Extension Number sequence is primarily of value when performing systemadministration of the NexPath Telephony Server. The system will announce the physical line number and allextension numbers associated with any telephone from which the sequence is entered.
can also used for performing system administration from a telephone. If you use and enter apassword with system administrative permissions and then press after the password is accepted, youwill get a list of all user numbers and their passwords (see the NexPath Telephony Server System Adminis-tration Guide for details on user numbers).
# 8
# 8
# 8 # 3# 8
30
Telephone Operations
Listen In
Listen In
Listen-in is the process of monitoring a conversation without notifying the participants. You can also listenin (screen) voice mail in progress.
To listen into your own voice mail extension, for example, while someone is leaving you voice mail:
1. Pick up any phone or otherwise get an inside line dial tone.
2. Enter the Listen-in sequence .
3. Enter the number of your voice mail extension.
4. If prompted, enter your password1, or a password with barge-in privileges.
5. If your password is accepted, you will be listening to the person currently leaving you a message.
6. If you want to Barge-in (take the call), enter . The voice mail recorded up to that point will besaved, the recording will terminate, and you will be connected to the caller.
If your system administrator has given your account Barge-in/Listen-in permissions, you can also use thesequence described above to listen into other people’s conversations while they are on the phone, for qualitycontrol and monitoring purposes. Check with your system administrator to see if you have Barge-in/Listen-in permission.
You do not need Barge-in/Listen-in privileges to listen in to voice mail in progress on your own voice mailboxes.
WARNING: Listening-in to a conversation without the consent of one or both partiesmay be a violation of local, state, and federal privacy laws. It is the responsibility of theuser of the NexPath Telephony Server, when using features of the system, to assure thatthey are in compliance with all applicable laws.
1. You will not be asked for a password if you entered it to enable some other command and have not hung up since then.
# 5
# 5
Flash
31

User’s Guide
Night ringing
See Day Ringing/Night Ringing
32
Telephone Operations
Operator
Dial the operator
To reach the operator from inside your company:
1. Pick up any phone or otherwise get an inside line dial tone.
2. Dial .
3. The operator’s phone will ring.
Your system administrator will set up a normal extension number as the operator’s extension. Dialingfrom an inside line is a shortcut for dialing this extension, though you can get the same result by dialing thefull extension number. Your system administrator can configure your system so that if the operator is busy ordoes not answer, your call will go to the auto-attendant.
Note Both inside and outside callers will get an entry error message if they try to dial (or, for that matter,any other number) while ringing an inside line. To get back to the operator, they will need to allowvoice mail to pick up, then press .
0
0
0
0
0
33
User’s Guide
Outside Lines
Obtain an Outside Line
You will get an inside dial tone when you lift your telephone handset unless your extension has been spe-cially set up otherwise. Once you have an inside line dial tone, to get an outside line:
1. Pick up any phone or otherwise get an inside line dial tone.
2. Dial .
Note You will get a busy signal if you dial and all of the outside lines connected to your system are busy.
Your NexPath Telephony Server can be programmed to block dialing specific area codes from specificphones or groups of phones. If you try to dial an area code that has been blocked on the phone you are using,you will be disconnected and hear an error message, then get an inside dial tone.
On the other hand, your system administrator can assign you your own set of area code lockouts and permis-sions. To override the area code lockouts on a particular phone with the area code permissions you have beenassigned personally:
1. Pick up any phone or otherwise get an inside line dial tone.
2. Enter . The system will ask you for your password.
3. Enter your password.
4. If your password was accepted, you will get a voice prompt and another inside dial tone.
5. Enter .
6. After receiving an outside dial tone, dial the long distance number desired.
Check with your system administrator to determine the area code lockouts and permissions in place in yoursystem.
Note Each extension can be programmed by your system administrator to seize a different group of outsidelines when is dialed.
9
9
9
# 3
9
9
34
Telephone Operations
Paging (Public Address)
If your system is connected to a PA system, your system administrator can configure one extension per cardas the paging extension1. When you dial this extension, you will be connected to the PA system and canmake announcements (For example, “Jim Williams, please dial 455.”).
To make an announcement:
1. Pick up any phone or otherwise get an inside line dial tone.
2. Dial the paging extension number.
3. Begin speaking.
4. Hang up when done.
1. The factory default number for the paging extension is 111. An external amplifier is required (not supplied).
35
User’s Guide
Park Orbits
Calls on the NexPath Telephony Server may be put on hold such that any caller can pick them up. This typeof public hold is called a park orbit. Park orbits are essentially a special type of extension, one which doesnot ring anywhere, and anyone can pick up.
Park orbits are useful in a company where a call must be put on hold, and a PA (Public Address) system isavailable to notify the called party to pick up the call. By putting the call in a park orbit, the called party cananswer the call anywhere in the building.
Calls in park orbits receive hold music, if enabled for the line and external hold music is supplied to the sys-tem.
A call is placed in a parking orbit in the same way that it is transferred to a regular inside line extension. Toput a call in a parking orbit:
1. While connected to the party, enter the Blind Transfer sequence .
2. Enter the desired park orbit extension number.
3. If your transfer was successful, you will hear a prompt telling you that the call was transferred and thecaller will be put on hold. If the park orbit you dialed is busy, you will get a busy tone and be reconnectedto your caller.
To announce that the call is on hold over the PA system:
1. Get an inside dial tone.
2. Dial the paging extension configured for your system (the factory default is extension 111).
3. Make your announcement.
4. Hang up.
To retrieve a call from park orbit:
1. Pick up any phone or otherwise get an inside line dial tone.
2. Dial the desired park orbit number.
Flash 4
36
Telephone Operations
Note Calls left in a park orbit too long will cause a reminder ring (a single, short ring) to be sent to theoriginating extension every 45 seconds1.
Your system administrator will reserve a specific set of consecutively-numbered extensions as park orbits2.
1. This is the factory default reminder ring delay time. Your system administrator can alter this time.
2. The factory default is to use extension numbers 100 to 110 as the system’s park orbits, though your system administratorcan alter this.
37
User’s Guide
Passwords
Enter Password
Change Password
Passwords are required for a number of the operations described in this chapter, as well as for accessingvoice mail. Each user is assigned a unique password. When you enter your password, you identify yourselfto the system. This allows the system to block unauthorized users from forwarding your calls, retrievingyour voice mail, for example.
Note The factory-default configuration is for all passwords to be four digits long.
Once you enter a password, the system will know who you are and you will remain “under password protec-tion” until you hang up. This means that any further operations you may want to perform which require apassword can be done without re-entering a password.
If you attempt to perform an operation which requires a password and you have not already “gone under”password protection, the system will prompt you for a password. If this happens, enter your password at theprompt to complete the operation. You will then be “under password protection” from then until you hang upthe phone.
In addition, you can also “go under password protection” by doing the following:
1. Pick up any phone or otherwise get an inside line dial tone.
2. Enter . The system will ask for a password.
3. Enter your password.
4. If your password was accepted, you will get a voice prompt and another inside dial tone.
5. Perform the operation desired. Note that, instead of hanging up, you can finish one operation and startanother by using the Disconnect sequence .
To change your password:
1. Pick up any phone or otherwise get an inside line dial tone.
2. Enter the Change Password sequence . The system will ask for the old password.
# 3
# 4
# 3
Flash #
# 4
38
Telephone Operations
3. Enter your old password. The system will ask for the new password
4. If the old password was valid and the new password was accepted, you will get a voice prompt saying thepassword has been changed.
Note Some passwords are reserved for system use only. You will get an error message if you attempt to usethe Change Password sequence to change your password to one of the reserved passwords.
Your system administrator is in charge of assigning all passwords and permissions. In addition to allowingyou to access your voice mail and perform basic telephone operations, your system administrator can assignyou permission to:
• Change the system mode from Day Mode to Night Mode and back again.
• Override the area code lockouts in place on a particular phone with your own set of area code permissionsand lockouts.
• Barge into or Listen into other people’s calls.
• Perform system administration functions.
Ask your system administrator about the password and permissions you have been assigned.
# 4
39
User’s Guide
Pick up
Pick Up Ring Group
Pick Up Any Ringing Phone
Pick Up Ringing Speaker
Your system administrator can group telephones together into ring groups (also called pickup groups). Seethe section entitled Ring groups and Pickup groups on page 8 for details.
To pick up a ringing phone within a ring group from a phone that is not ringing:
1. Pick up any phone or otherwise get an inside line dial tone.
2. Enter the Pick Up Ring Group sequence , followed by the single digit representing the ring group.You will be connected to the caller ringing the phone.
By factory default, ring group 0 is defined as the group of all extensions except the PA speaker. This meansthat to pick up any ringing phone in your building, you can:
1. Pick up any phone or otherwise get an inside line dial tone.
2. Enter . You will be connected to the caller ringing the phone.
Note Check with your system administrator to see how this ring group is defined for your system.
Also by factory default, ring group 1 is defined as containing the extension which rings over to the PA sys-tem. This means that, if you hear a ringing phone over your PA system (usually a system is configured sothat this happens for incoming calls when the system is in Night Mode), to answer it, you:
1. Pick up any phone or otherwise get an inside line dial tone.
2. Enter . You will be connected to the caller ringing the phone.
Note Check with your system administrator to see how this ring group is defined for your system.
* 0
* 0 0
* 0 1
* 0
* 0 0
* 0 1
40
Telephone Operations
Transferring Calls
Direct (Blind) Transfer
Set Up Transfer
Complete Transfer
A direct (or blind) transfer is when you transfer a call to another extension without first checking at thatextension to see if the party is available. Calls may be blind transferred to any extension, including parkorbits, voice mail extensions, or the operator.
To perform a direct (blind) transfer:
1. While connected to a caller, enter the Direct (Blind) Transfer sequence .
2. Enter the number of the extension to which the call is to be transferred.
3. If your transfer was successful, you will get a confirmation message, followed by an inside dial tone.
Note If you perform a blind transfer to an extension that has voice-mail but no one picks up, then after 20seconds the call will go to that extension’s voice mail. However, if you perform a blind transfer to anextension that does not have voice mail and no one picks up, then after 20 seconds the caller will benotified that no one is there to take the call and the call will be disconnected1.
4. If your call was unsuccessful (the extension dialed was invalid, for example), you will receive an errormessage and be reconnected to your call.
Another type of transfer is Transfer with Consultation. This type of transfer allows you to find the personyou want to transfer the call to and notify them that a call is coming.
To perform a Transfer with Consultation transfer:
1. While talking the caller, enter the Set Up Transfer sequence .
2. You will get an inside dial tone and the caller will be put on hold.
3. Dial an extension, or a succession of extensions, to locate the party you wish to contact.
1. These are the factory-default ring delay times; your system administrator can alter this time if desired.
Flash 4
Flash 5
Flash 6
Flash 4
Flash 5
41
User’s Guide
4. When you have the desired party on the line, enter the Complete Transfer sequence .
5. The two parties will be connected. You will be disconnected from the call and will hear an inside dialtone.
Note If you cannot reach the second party or the other party does not want the call, you can retrieve theoriginal caller from hold using the Retrieve Call From Hold sequence .
If you set up a transfer but do not complete it, and then forget that the party is on hold, you will get a shortreminder ring every 45 seconds1. You can retrieve a call from hold using .
If, after setting up a transfer using , you decide to make the call a conference call instead of com-pleting the transfer, you can use the Add to Conference sequence instead of the Complete Trans-fer sequence and you, the party you put on hold, and the person to whom you were going totransfer the call will be connected together.
1. This is the factory default reminder ring time, and can be altered by your system administrator.
Flash 6
* 1
* 1
Flash 5Flash 8
Flash 6
42

Telephone Operations
Summary of the keypad sequences
Accept Calls/Do Not Disturb
• Accept Calls
• Do Not Disturb
Barge-in (See also Listen-in)
Call Forwarding
• Forward Calls nnn..
• Cancel Call Forwarding
Call Waiting
• Enable Call Waiting
• Pick Up a Waiting Call
• Swap Between a Current Call and a Call on Hold
• Disable Call Waiting
Clearing a Command Sequence
Conference Calls
• Set Up Conference
• Add To Conference
Day Ringing/Night Ringing
• Enable Day Ringing
• Enable Night Ringing
Disconnect From a Call
Help
* 8
* 9
# 2
* 2 #
* 3
* 4
Flash 3
Flash *
* 5
# #
Flash 7
Flash 8
# 0
# 1
Flash #
* *
43
User’s Guide
Hold
• Put a Call On Hold
• Retrieve a Call From Hold
• Swap Between a Current Call and a Call on Hold
Hook Flash to Central Office Line (Centrex/CLASSSM)a
Inside Line (Disconnect from CO line)
Line and Extension Numbers
• Announce Line and Extension Numbers
Listen-in (Screen Voice Mail) See warning belowb
• Listen in to a call or voice mail in progress
• Barge-in after listening
Operator
• Dial the Operator
Outside Lines
• Obtain an Outside Line
Paging
• Default extension number for paging 111
Park Orbits
• Default park orbit extension numbers 100 - 110
• Transfer to a park orbit
Passwords
• Enter Password
• Change Password
Flash 1
* 1
Flash *Flash 9
Flash #
# 8
# 5
Flash
0
9
Flash 4
# 3
# 4
44
Telephone Operations
a. This feature must be enabled for the Central Office line you are using with Admin-Tool. See The NexPath Telephony Server System Administration Guide.
b. WARNING: Listening-in to a conversation without the consent of one or both par-ties may be a violation of local, state, and federal privacy laws. It is the responsibil-ity of the user of the NexPath Telephony Server, when using features of the system,to assure that they are in compliance with all applicable laws.
Pick Up
• Pick Up Ring Group
• Pick Up Any Ringing Phone
• Pick Up Ringing Speaker
Transferring Calls
• Direct (Blind) Transfer
• Set Up Transfer
• Complete Transfer
* 0
* 0 0
* 0 1
Flash 4
Flash 5
Flash 6
45

User’s Guide
46
CHAPTER 3 Voice Mail
The NexPath Telephony Server includes a complete integrated voice mail system, essentially allowing eachuser of the NexPath Telephony Server to have his or her own answering machine.
Each user can be assigned his or her own voice mailbox. Each voice mailbox can be associated with one (ormore) normal (voice) extensions and is assigned its own, unique extension number so that it can be dialeddirectly.
You can access your voice mail from any telephone either inside or outside your building by dialing yourvoice mail extension number, or, if the system is connected to a network, by accessing your voice mailboxfrom a computer. See Chapter 4: Windows Desktop Tools- NexPath Dialer starting on page 59 and Chapter6: TelOper: the Web Browser Desktop Interface starting on page 89 for details on accessing your voicemailbox from a LAN connected computer.
Determining if you have new messages in your voice mailbox
You have a new message or messages if you pick up your telephone and hear a “on-off-on” or “stutter” dialtone, for a few seconds, instead of the normal, steady dial tone.
If you have a telephone with a voice message light, one that is compatible with the VMWI or FSK signallingtechnique, then the voice message light will also be illuminated, indicating new messages.
47
User’s Guide
Accessing voice mail from your telephone
To get into your voice mailbox:
1. Pick up any telephone in the system.
2. Enter your voice mailbox extension number (as assigned to you by your system administrator).
3. During the playing of your greeting, press the key on your telephone.
4. Enter your password when prompted. If you make a mistake, you can press and start re-entering yourpassword, or press and return to your greeting.
5. If your password is accepted, you will be placed “in voice mail”, and the system will announce the num-ber of new and old messages in your mailbox, or tell you that there are no new messages. Note that, evenif the announcement says you have no new messages, you can still play any old messages in your mail-box by following the instructions presented below for playing back messages.
When you are “in voice mail”, there are two menus that you can access, the Main Menu and the MessageMenu. If you have unread messages, then you directly enter the Message Menu, as show in Figure 3-1
#
#*
48
Voice Mail
below. Or, if you press from the Main Menu, you will reach the Message Menu. When in the MessageMenu of voice mail, the buttons on your telephone will have the following meanings
Note The Forward to Group function (show in light grey) is not implemented in Software Release 5. It willbe implemented in a future release of the software.
When you press from the Main Menu, and there are messages in your voice mail box, then the first mes-sage will begin playing immediately.
FIGURE 3-1. Telephone keypad when in voice mail: Message Menu
1
2 3
5
BACK5 SECONDS
6
FORWARD5 SECONDS
7 8
PREVIOUSMESSAGE
9
NEXTMESSAGE
0DELETE
CURRENTMESSAGE
#
RETURN TOMAIN MENU
FORWARDMESSAGE
4
*
1PLAY
CURRENTMESSAGE
PAUSE/RESUME
FOWARDTO
GROUP
EXITVOICE MAIL
CALL PERSONWHO LEFTMESSAGE
MESSAGE MENU
1
49

User’s Guide
If you do not have any unread messages when you enter voice mail, or you press from the MessageMenu, you will be at the voice mail Main Menu. When in the Main Menu of voice mail, the buttons onyour telephone will have the following meanings:
Note While you are “in voice mail”, the buttons on your phone function will only perform the functionsdescribed above. The other telephone system control sequences described in Chapter 2: TelephoneOperations starting on page 5 are not functional while you are in this mode. You can exit voice mail atany time either by hanging up or by pressing the Exit Voice Mail key , at which time you will hear anannouncement that you are exiting voice mail and then an inside line dial tone.
Note The Add, Remove, and Send to Group functions (shown in light grey) are not implemented in SoftwareRelease 5. These functions will be implemented in a future release of the software.
FIGURE 3-2. Telephone keypad when in voice mail: Main Menu
#
MAIN MENU
2 3
5 6
7 8 9
0 #
4
*
1
CHANGEPAGER
NUMBER
EXITVOICE MAIL
SET NORMAL/ALTERNATEGREETING
PLAYGREETING
GO TOMESSAGE
MENU
RECORDGREETING
PLAYNAME
RECORDNAME
ADDGROUP
SENDMESSAGETO GROUP
REMOVEGROUP
HELP
*
50
Voice Mail
To play back the messages in your voice mailbox:
1. Get into voice mail for your extension, as described above.
2. If there are new messages, the first message will begin playing immediately. Otherwise, press the Playkey to begin playback of the first message in your mailbox. Message are sorted into two groups,unread messages, and messages that have been listened to. For each group, note that playback will startwith the oldest message in your mailbox for that group. The messages are played back oldest first fol-lowed by the next, and finally the most recent message (in each group). Once a message has been lis-tened to, it moves from the unread group to the listened-to group, and is placed in time order for thatgroup. The unread message group is played first, followed by the listened-to message group.
3. Use the keys on the telephone keypad as defined in the Message Menu diagram above (Figure 3-1) topause, resume, skip forward 5 seconds, jump back 5 seconds, delete, or proceed to the next or previousmessage.
Note After playback of the first message completes, the second message will not start playing until you pressthe Next key , or the delete key to delete the message. If you wait a few seconds after a messagehas completed, you will get a voice prompt to help you with the key assignments.
Forwarding a message to another mail box
While playing a message, or after a message has completed playing, you can forward the message to anothermailbox by pressing , and entering the mailbox extension number when prompted of the mailbox towhich to forward the message. The message will be prepended with your Short Name, or your extensionnumber, as described below in “Recording a short name” on page 55.
Call the person who left a message
Callers can enter a call back number by pressing then after leaving a message. You can dial the callback number of a person who left a message by pressing while the message is playing, or after the mes-sage has completed playing. Dialing the call back number will dial the number left by the caller, or will dialthe caller ID of the caller, if available. If the caller ID is dialed, then 11 digit calling is used, starting with a1 followed by the area code and number. Otherwise, the call back number is dialed exactly as entered by thecaller, with no other digits prepended.
You can return to voice mail after dialing the call back number by pressing the key.
1
9 0
4
1 73
#
51
User’s Guide
Getting a help message during voice mail
Whenever you are in the voice mail Message Menu or the Main Menu and you pause for a short time, thesystem will prompt you with a voice message explaining the meaning of the telephone keys with regards tovoice mail operations.
You can get help while your are in voice mail as follows:
• Enter the voice mail Main Menu and doing nothing for a few seconds.
• Touch the Pound key while in the Main Menu.
• Touch the Pound key while in the Message Menu.
• Pause a message (in the Message Menu) with the pause key and then wait a few seconds.
To record your standard or alternate greeting
1. Get into voice mail for your extension, as described above, and assure you are in the Main Menu by hit-ting .
2. Press the Record Greeting key .
3. Then press to record the standard greeting, or to record the alternate greeting.
4. Wait for the “record greeting” voice prompt.
5. Record your greeting.
6. After you have finished speaking, hit any key to end recording your greeting.
To play back your standard or alternate greeting
1. Get into voice mail for your extension, as described above, and assure you are in the Main Menu by hit-ting .
2. Press (the Play Greeting key)
3. Then press to play your standard greeting, or to play your alternate greeting.
#
#
2
#
4
1 2
#
3
1 2
52
Voice Mail
To set your Standard Greeting or Alternate Greeting
You can choose between two greetings for your voice mail box. This is useful if you have a regular dailygreeting and a different greeting when you are out of the office. The Set Normal/ Alternate greeting keytoggles between these modes. To set you standard or alternate greeting do the follow:
1. Get into voice mail for your extension, as described above, and assure you are in the Main Menu by hit-ting .
2. Press to toggle the greeting mode between standard and alternate. The system will announce the set-ting: Standard or Alternate. It will stay in this mode until you hit again from the Main Menu.
Accessing your voice mail from an outside line
To access your voice mailbox from outside your facility:
1. Dial your company and wait for your system to pick up.
2. During your company’s auto-attendant greeting, dial your voice mail extension number (as assigned byyour system administrator). Or, if your company phone is generally answered by a receptionist, have thereceptionist transfer you to your voice mail box extension.
3. During the playing of your greeting, press the key on your telephone.
4. Enter your password when prompted. If you make a mistake, you can press and start re-entering yourpassword, or press and return to your greeting.
5. If your password is accepted, you will be placed “in voice mail”, and the system will announce the num-ber of new and old messages in your mailbox, or tell you that there are no new messages. Note that, evenif the announcement says you have no new messages, you can still play any old messages in your mail-box by following the instructions presented above for playing back messages.
6. Use the telephone keypad as described in the diagrams on page 48 and page 50 to play back your mes-sages. Note that if you do not remember the key sequences available, you can wait short time and the sys-tem will announce them to you.
Note If you do not remember your voice mail extension number, you can dial your normal extension numberand wait for it to roll over to voice mail.
2
#
22
#
#*
53

User’s Guide
Getting into your voice mail box if your mailbox is full
If your voice mailbox is full and you try to access your voice mailbox from a telephone, you will get a, “Thisvoice mailbox is full” message. You can still get into your mailbox from your telephone, however, by first“going under password protection” as follows:
1. Pick up a phone, or otherwise get an inside line dial tone.
2. Enter . The system will ask you for your password.
3. Enter your password.
4. If your password is accepted, you will get a voice prompt and another inside line dial tone.
At this point, you are “under password protection” and you can enter your voice mail extension to get intoyour mailbox. Once in voice mail, all of your normal voice mail functions will be available, such as forPLAY, for DELETE CURRENT MESSAGE, etc. Removing some of the messages in your mailbox atthis time will eliminate the “mailbox full” problem.
You can also enter the , and then your password, during the announcement that the mail box is full.
Alternately, if you are connected to the NexPath Telephony Server over a network, you can use the NexDialor TelOper program to delete messages from your voice mailbox. You can also use NexDial or TelOper tocopy messages from your voice mailbox to a local computer for storage.
To enter a numeric pager number
You can program any voice mailbox to dial a numeric pager when a new voice mail message is received.The pager will be sent the caller ID of the person that left the message if you have caller ID enabled fromyour telco, and the caller ID is not blocked or unavailable from the call. In the event the caller ID is unavail-able, the extension number of the central office line that the call came in on is sent to the pager. In addition,the voice mail box number and the number of new messages is also sent to the pager.
To announce your numeric pager number do the following:
1. Get into voice mail for your extension, as described above, and assure you are in the main menu by hit-ting .
2. Press (the Change Pager Number key) either during or after the announcement of the number of mes-sages in your mailbox, to announce your pager number.
3. Press any key but or to return to the Main Menu in voice mail.
# 3
10
#
#
7
0 *
54
Voice Mail
To delete your current pager number, do the following:
1. Get into voice mail for your extension, as described above, and assure you are in the main menu by hit-ting .
2. Press (the Change Pager Number key) either during or after the announcement of the number of mes-sages in your mailbox.
3. Then enter to delete the current pager number and disable paging.
To enter a new pager number, do the following:
1. Get into voice mail for your extension, as described above, and assure you are in the main menu by hit-ting .
2. Press (the Change Pager Number key) either during or after the announcement of the number of mes-sages in your mailbox.
3. Then press to enter a new pager number, and terminate the entry with a key.
If your pager number is a long distance (10 digit) number, then you must precede it with a “1”. The systemdoes not automatically add a “1” to 10 digit numbers.
After pressing (the Change Pager Number key), all digits except or function as shown in Figure 3-2 on page 50, to return to the Main Menu in voice mail. After one of these digits is pressed, the digitsand resume their regular functions as show in the Figure.
The NexPath Telephony Server is compatible with numeric pagers that accept the entry immediately afteranswering the call. Pagers that have an attendant menu, or require additional PIN numbers to be entered, arenot compatible with the current release of the software.
Note Additional pager characteristics may be set using TelOper or NexDial.
Recording a short name
You should record a short name for your voice mail box, since this is the announcement that is prepended toany message that is copied (forwarded) to another voice mail box. Otherwise, the copied message will beidentified as “Extension 501” or the like.
#
7
0
#
7
* #
7 0 *0
*
55
User’s Guide
When you record your short name, it is copied to the file dial_nnn.au (nnn is the extension number, such as301) in the auto-attendant area, and is used by the Dial By Name auto-attendant to announce your extensionprior to transfer. All extensions that forward to this voice mail box will have the file dial_nnn.au updated bythe new short name recording.
To record a short name, do the following:
1. Get into voice mail for your extension, as described above, and assure you are in the Main Menu by hit-ting .
2. Press and begin speaking at the “recording” prompt. You have three seconds to say your name, andthen recording automatically stops.
3. You can play your short name by pressing (make sure you are in the Main Menu as described in #1).
Features Available When Leaving a Message
There are a number of features that are available when a caller is leaving voice mail. You may want to makethe caller aware of these capabilities in your greeting. The “Press 1” function operates differently dependingon whether the greeting is still in progress, or recording has begun. This is described below.
Keys that callers can use during the greeting when they are in voice mail
You may want to let callers know they can press the following buttons while listening to your greeting butbefore recording begins:
Go to the extension defined as the operator’s extension by your system administrator
Opt of out voice mail and go to the extension defined as the voice mail exit extensionby your system administrator (usually the top of the day auto-attendant)
Skip the rest of the greeting and go directly to record
#
6
5
0
1
*
56
Voice Mail
Keys that callers can use during or after recording a message
After recording begins, callers can press , and they will be prompted with the following choices: .
The system announces the menu of choices to assist the caller, after they press while in the recordingmode.
Go to the extension defined as the operator’s extension by your system administrator
Replay this message
Continue recording
Start over and re-record the message
Cancel delivery of this message
Enter a call back number
Opt of out voice mail and go to the extension defined as the voice mail exit extensionby your system administrator (usually the top of the day auto-attendant)
Exit voice mail and send the message
1
0
1
2
3
6
7
#
*
1
57

User’s Guide
58
CHAPTER 4 Windows Desktop Tools-NexPath Dialer
NexPath provides a network-based dialer application called NexDialTM for use on Win95/98 and WinNT4systems with the Release 5 software. NexDial is similar to Microsoft's dialer, but has the features of theNexPath system, such as hold, transfer, consultation transfer, conferencing, and includes voice mail access.There is also a Voice Mail indicator and a Do Not Disturb indicator.
The NexDial program interfaces to the NexPath system using the Nexpath API, a LAN-based Simple Com-puter Telephony Protocol (SCTP) that is more powerful and far easier to use than Microsoft TAPI. NexDialis the first commercial implementation of SCTP. SCTP is an emerging new standard for client-server com-puter telephony.
The NexDial program will run on any Win95/98 or WinNT 4.0 system with TCP/IP installed. You musthave TCP/IP installed and configured, and an IP address and/or a system name assigned to the NTS Server,in order for NexDial to be able to contact the NTS Server. See Connect the system to a network(optional) on page 18 in the chapter Installation of the System Administration Guide for details on con-necting the NexPath Telephony Server to a network.
Installing the NexDial dialer program
1. Insert the NexPath Telephony Server Release 5 CD-ROM in the Win95/98 or WinNT system fromwhich you want to run the dialer.
59

User’s Guide
2. Click on Start, then Run, then Browse and select the file setup.exe in the Release5\NexPathDialer sub-directory of the CD-ROM. Follow the prompts to install the program on your system.
Note If you are upgrading a previous version of NexDial, it is not necessary to uninstall the previous versionof NexDial. The Install program will copy your configuration data to the proper place in the WindowsRegistry, and label your current configuration Default as described in the steps below. The old versionof the NexDial executable will be overwritten with the new version.
Configuring the dialer
1. Once installed, start the NexDial program by clicking on Start, then Programs, then NexPath Dialer,then NexDial.
The NexDial Configuration Management window shown above will only appear if you have morethan one configuration defined. In situations where this is the first installation, there will not be anyconfigurations defined. In this event, click on Add, and a window will pop up prompting you for a con-figuration name. Enter a descriptive name, such as “Ext. 301” and click OK. The Configuration win-dow will then appear as show in Figure 4-2. You can then enter the system parameters as describedbelow.
FIGURE 4-1. Configuration Management Screen
60

Windows Desktop Tools- NexPath Dialer
Otherwise, if you have previously installed a version of the Dialer that did not have configuration man-agement, your previous entry will get converted to a configuration named “Default”.
The configuration management screen is used to manage multiple dialer windows on the same clientcomputer. This will allow you to have several dialer windows running, each logged into a differentextension, or, if necessary, different NexPath Servers.
FIGURE 4-2. Configuring setup parameters for NexDialTM
Optional voice mailboxes to monitor.
61
User’s Guide
2. To login to the NexPath Server, select the configuration that you want, and then click on Login.
3. You can always return to the Configuration Management window as follows: At the top of the NexDialwindow, click on Tools, then Configure. The NexDial Configuration window will appear.
4. If you are defining a new configuration, click inside the System Name box, then type in the systemname assigned to your NexPath Telephony Server. If your system name is not available from DNS(Domain Name Service), or in the \Windows\Hosts file, then you must type in the IP address of theNexPath Telephony Server instead.
5. Add your extension number and password to the boxes in this screen. The extension number is thenumber of the extension that you are controlling next to your computer. The password is a valid pass-word on the NTS Server. The password must be the password of a user that owns, or has permission tocontrol, the extension you have typed in the extension box. The owner of an extension has permissionto control it, and any user with administrative privileges has permission to control any extension. If youenter the password of a user that does not have permission to control this extension, you will get a con-nection error.
6. If desired, you can also specify the extension numbers of up to three voice mailboxes that will be moni-tored. If there is any unread voice mail in any of these voice mail boxes, an indicator will flash indicat-ing new messages. If you do not wish to be notified of any voice mail, these entries may be left empty.
7. The password you use must have access to voice mail boxes, in order for the voice mail window toallow access.
8. Click OK when done.
62

Windows Desktop Tools- NexPath Dialer
9. If you would like for the dialer to screen-pop upon an off-hook condition, or upon an incoming call, ordisplay the caller name instead of the caller number (Caller ID), these options can be selected under theTools->Options menu.
FIGURE 4-3. The Tools->Options menu in NexDial
63
User’s Guide
You can also select “Strip Service Codes” and “Strip Carrier Access Codes” to cause NexDial to pro-cess the dialed number display (Current Call in the bottom status area). Selecting these options willdelete codes like *82 or *10222 from the number that is displayed, for visual clarity.
You are now ready to use NexDial! To login to the NexPath Server, select the configuration that you want,and then click on Login.
Features available with NexDial Dialer Window
Screen pops
Whenever a call is ringing your extension, you can configure NexDial to de-iconify (i.e., screen-pop) andfocus to the top of your screen. You can then view the caller ID of the incoming call before you answer it,and you do not have to search for the application among the various windows you are using. You can alsoconfigure NexDial to screen-pop when you take your telephone off hook as well. This is set under theTools->Options menu.
Note The buttons listed below will be grayed out unless they are appropriate for the current state of your line.For example, Dial will be grayed out until you take your phone off-hook, and Hold will be grayed outuntil you’ve established a call. NexDial is designed to make calls with the telephone in the off- hookcondition. In the current software release, it does not place on-hook calls (the TAPI applications do,however. See the chapter Installing the NexPath TAPI 2.1 Service Provider starting on page 109for details on installing TAPI.)
Also, buttons will change names as appropriate to a line’s state. For example, the Dial button willchange to Transfer if you are on a call, since dialing would make no sense while in the middle of a call.
The numeric keypad and the Dial/Transfer button
The numeric keypad within NexDial can be used to enter a phone number. If you have dial tone, then thebutton below the Number to Dial box will say Dial, and can be pressed to dial that number.
64
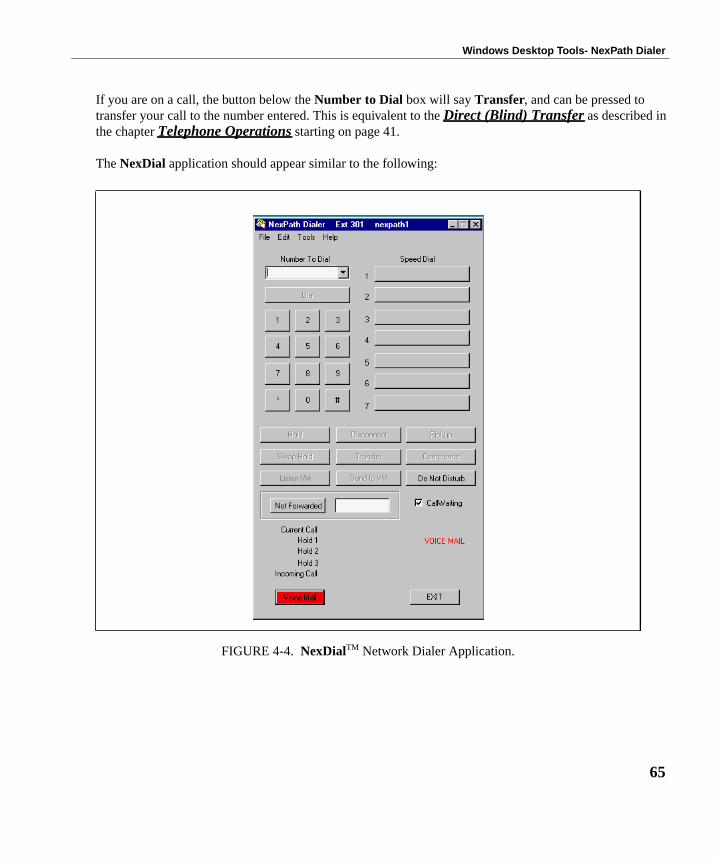
Windows Desktop Tools- NexPath Dialer
If you are on a call, the button below the Number to Dial box will say Transfer, and can be pressed totransfer your call to the number entered. This is equivalent to the Direct (Blind) Transfer as described inthe chapter Telephone Operations starting on page 41.
The NexDial application should appear similar to the following:
FIGURE 4-4. NexDialTM Network Dialer Application.
65
User’s Guide
User speed dial buttons
Up to seven user speed-dial numbers can be specified for use inside NexDial. Use Edit at the top of theNexDial window to set up the names and numbers to be associated with each speed dial box. Whenever youare off-hook and have dial tone, you can click on any speed dial box and that number will be dialed for you.When you are on a call, clicking one of the speed dial buttons will transfer your call to that number.
Note User speed dial buttons are not the same thing as system speed dial extensions, setup by the systemadministrator.
You can program a speed dial button to pickup a ring group, by entering the group number (a numberbetween 0 and 9) in the Speed Dial Number box, and clicking on the option box Group to pickup at the bot-tom of the Edit Speed Dial dialog window.
The function buttons below the keypad
The six buttons below the numeric keypad and the speed dial buttons allow complete call control from thedesktop. These buttons have the following functionality:
Hold If you are in the middle of a call:
• Pressing this button will push the current call onto the top of thehold stack. This means that, if no one is in Hold 1, then the currentcall will go into Hold 1. If there is already a call in Hold 1, though,and you press Hold, the call that was in Hold 1 will be pushed downto Hold 2, and the current call will go in Hold 1.
If you have inside line dial tone:
• This button will retrieve whatever call is currently in Hold 1, pullingany other calls in the hold stack up one level
Swap Hold Swaps your current call with any call in Hold 1.
Disconnect Disconnects your current call, giving you back an inside line dial tone.
66
Windows Desktop Tools- NexPath Dialer
Set up/Complete Transfer Will set up a transfer to the number listed in the Number to Dial box.That is, it will put the current call in hold, and give you back inside dialtone, allowing you to dial another number. When connected to this newnumber, the button will change to Complete Transfer. Click on Com-plete Transfer to transfer the call currently on hold to the party youjust dialed.
If the party you called doesn’t want the call, disconnect from the newparty using Disconnect, then try another number or use Hold toretrieve the first caller.
Pick up If you are in the middle of a call and have call-waiting enabled, youwill hear two beeps if a new call is received while you are off-hook.
Pressing Pick up will place your existing call on hold and pick up thewaiting call. You can then use swap hold to toggle between the twocalls.
Note: information on the incoming call will be displayed on the Incom-ing Call status line.
Set up/Add to Conference Pressing the Setup Transfer button puts the current caller on hold andreserves a conference circuit. After connecting to a second party, press-ing Add to Conference brings the first caller back from hold, and putsall three of you together in a conference call.
You can press Setup Conference again to place both parties on hold,then call another party and add them into the conference by pressingAdd to Conference again.
Listen/Barge VM Pressing the Listen VM will allow you to screen your voice mail whileit is in progress. You can listen without the caller’s knowledge, anddetermine if you want to take the call. After you press the listen but-ton, the button legend will change to Barge VM. Clicking it when it islabelled Barge VM will barge into the voice mail in progress, if acaller is currently leaving a voice mail message. The voice mail boxused is the first voice mail extension that was setup in the Tools->Con-figure screen.
67
User’s Guide
Send to VM Pressing the Send to VM button will send a ringing call, or a waitingcall, to the first voice mail extension that was setup in the Tools->Con-figure screen.
Call Waiting You can enable call waiting on your extension by checking the checkbox next to this legend. With call waiting enabled, while you are on acall, if another call comes in it will generate a “beep-beep” sound in thetelephone. The caller ID of the incoming call (if you subscribe to callerID from the telephone company) will be displayed on the IncomingCall status area at the bottom of the NexDial window. You can pickupthe waiting call by clicking the Pickup button, as described aboveunder Pickup. You can disable call waiting at your extension by click-ing on the Call Waiting check box until there is no check mark.
Do Not Disturb Pressing the Do Not Disturb button will toggle the extension on andoff line, i.e., will toggle the extension from Accept Calls to the Do NotDisturb mode. When in the Do Not Disturb mode, the red Do NotDisturb legend will appear in the lower right hand region, and the but-ton will be red. In this mode, all calls will either go directly to voicemail, or will go to the forwarded extension, or will ring busy. Theextension will also be removed from any call distribution group forwhich it has been configured. It will be returned to the call distributiongroup, and begin accepting calls, when in the Accept Calls mode (greybutton).
Not Forwarded/ Forward To To forward the extension to another number, enter the number in theedit box and click the adjacent button. It should turn red with ForwardTo on the button. Click the button again to cancel forwarding.
Voice Mail The voice mail button, located at the lower left hand corner of thescreen, will turn red if there is unread voice mail in one of the voicemail boxes setup in the Tools->Configure screen. When button isclicked, a separate voice mail window will pop-up that allows you toreview and manage your voice mail. See the next section Voice MailAccess from NexDial for details.
68
Windows Desktop Tools- NexPath Dialer
See Chapter 2, Telephone Operations for further information on using various telephone system call con-trol features.
Status information
Status information for your extension is shown below the ten buttons, including:
Current call Shows who called whom in the current call. For incoming calls fromoutside the building, Caller ID information is displayed if available.
Hold 1 Shows the same information as the Current Call line above, but showsit for the call placed at the top of the hold stack. This call can beretrieved by getting inside line dial tone and pressing the Hold button.
Hold 2 Shows the same information as the Current Call line above, but showsit for the call placed in the middle of the hold stack. Retrieving the callin Hold 1 and disconnecting from it will move a call from Hold 2 toHold 1.
Hold 3 Shows the same information as the Current Call line above, but showsit for the call placed in the bottom of the hold stack. Retrieving the callin Hold 1 and disconnecting from it will move a call from Hold 3 toHold 2.
Incoming call Shows either the extension number of an incoming call, or, if the calloriginated outside the building, Caller ID information if available. Youcan use this information to decide whether or not to take the call
Voice mail If you have new (unread) voice mail, the VOICE MAIL button willturn red in the lower left-hand corner of the NexDial window whilethere are unread voice mail messages. You can press this button to popup a separate window to review your voice mail messages.
Do Not Disturb The words Do Not Disturb will flash in red whenever your extensionis in the Do Not Disturb mode.
69
User’s Guide
Voice Mail Access from NexDial
By pressing the Voice Mail button at the lower left hand corner of the NexDial window, you will get a pop-up window that shows current voice mail and allows you to listen to messages (either on your computerusing multi-media or through the telephone), delete them, copy them to other mailboxes, etc.
The voice mail box that you are accessing is shown in the selector box at the top of the window. If yourpassword allows you access to other mailboxes, then they can also be viewed by changing the selector boxnext to the label Voice Mail Box. Otherwise, you may have access to only one voice mailbox.
70
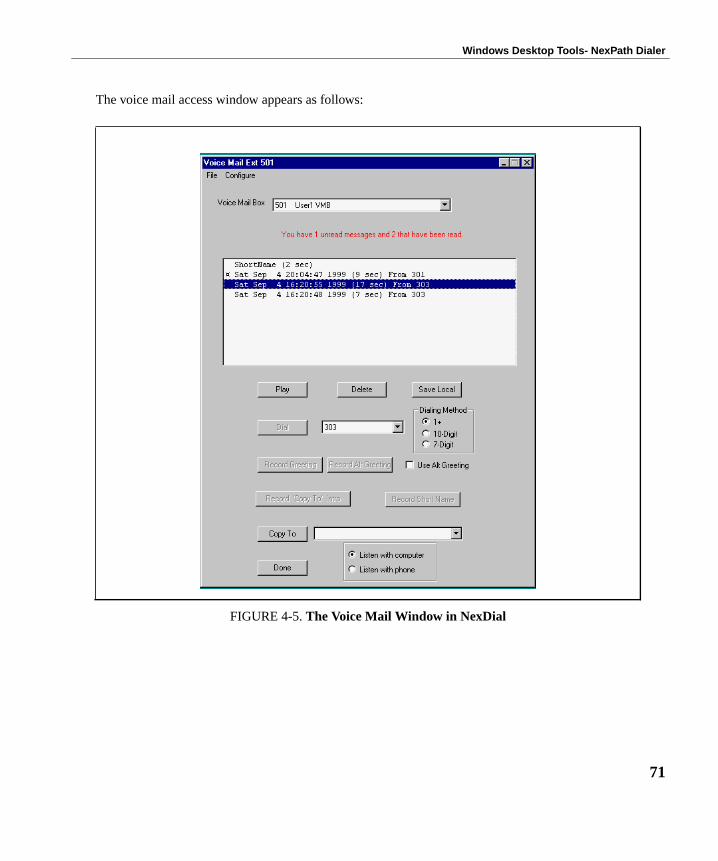
Windows Desktop Tools- NexPath Dialer
The voice mail access window appears as follows:
FIGURE 4-5. The Voice Mail Window in NexDial
71
User’s Guide
Playing back a message
To play a voice mail message on your computer, select the Listen with computer radio button at the bottomof the Voice Mail screen. Then select a message to play by clicking on it. Then click the Play button andthe audio player will pop-up and play the message on your computer’s multimedia system. You must havean audio card and speakers installed for this function to work.
If you do not have multimedia, or do not wish to listen with your computer, you can click on the Listen withphone radio button and select a file to play. Lift the telephone receiver of the extension NexDial is loggedinto, and click the Play button, You will hear the message being played on the telephone. Note that thestandard voice mail control buttons on the keypad do not work in this mode, and there is no method of start/stop/skip-ahead when you are playing the message over the telephone using your computer.
You can also play a message by double clicking it, rather than clicking on it and then clicking the Play but-ton.
Calling the call back number
You can dial the caller ID or callback number of the person that left the message, and select whether the callback should be a 1+, 10 digit, or 7 digit number to dial. For each voice message that is highlighted, the call-back number (if the caller left one), or the caller ID, is displayed near the center of the voice mail screen.You can dial the displayed number by clicking the Dial button next to the number. The extension that youlogged into from the main NexDial window must be off-hook to dial a number from the voice mail window.You can edit the call back number, if necessary, before clicking on Dial.
Saving a copy of the voice mail file to the local computer
You can save a copy of any voice mail message to you local PC by doing the following:
1. Select the message you would like to save by clicking on it.
2. Select File -> Save on the voice mail dialog box menu bar.
3. Pick the name and location to save the file using the pop-up file browser.
72
Windows Desktop Tools- NexPath Dialer
Forwarding a message to another voice mail box
You can forward (copy) a message to another mail box by doing the following:
1. Make sure you have recorded a Copy To Intro as described below (note that NexDial does not use theshort name voice announcement, but instead prepends the Copy To introduction message recordedusing NexDial or TelOper.
2. Select the message you would like to forward by clicking on it.
3. Select the voice mail box to which to copy the message, using the selector box by the Copy To button atthe lower portion of the Voice Mail dialog box.
4. Click on the Copy To button.
5. Confirm that you wish to forward the message by clicking OK on the pop-up confirmation box.
In the current version of the software, copying a message to another voice mail box with NexDial does nottrigger email notification at the destination voice mailbox.
Recording a Copy To Intro
NexDial does not use the Short Name for prepending voice mail messages copied to to other mail boxes.Instead, the Copy To Intro is used. To record the Copy To message, which will be prepended to any for-warded voice mail message, do the following:
1. Lift the telephone extension that NexDial is controlling
2. Click the Record Copy To Intro button on the NexDial Voice Mail window
3. Say your Copy To Introduction after the system message “Recording...”
4. You can hang up or hit any telephone keypad key to stop recording.
Recording your Standard Greeting
The NexPath voice mail system allows two greetings, a standard greeting and an alternate greeting. You canrecord your standard greeting from NexDial by doing the following:
1. Lift the telephone extension that NexDial is controlling
2. Click the Record Greeting button on the NexDial Voice Mail window
3. Record your standard greeting after the system announces “Recording...<beep>”
73
User’s Guide
4. You can hang up or hit any telephone keypad key to stop recording.
Recording your Alternate Greeting
To record your alternate greeting from NexDial, do the following:
1. Lift the telephone extension that NexDial is controlling
2. Click the Record Alt Greeting button on the NexDial Voice Mail window
3. Record your alternate greeting after the system announces “Recording...<beep>”
4. You can hang up or hit any telephone keypad key to stop recording.
Selecting the Standard or Alternate Greeting
If the check box next to the legend Use Alt Greeting is checked, then callers will be greeted with your alter-nate greeting when they enter this voice mail box. If the Use Alt Greeting box is not checked, then they willbe greeted with your standard greeting. You can click on the check box to check and un-check it.
To play back your greetings
In addition to any messages left by callers, the Voice Mail file browser also displays the files PersonalGreeting (your standard greeting), Alternate Personal Greeting, Intro To “Copy To’, and Short Name, if youhave recorded any of these. You can play the greetings back and listen to them in the same way you playany message. See “Playing back a message” on page 72 above.
Deleting a message or messages
To delete a message, click on it, then click the Delete button, and answer OK to the confirmation box.
You can delete more than one message at a time by highlighting multiple messages in the file display, bydragging the mouse and optionally using the Shift or Ctrl key in the standard manner of Windows.
74
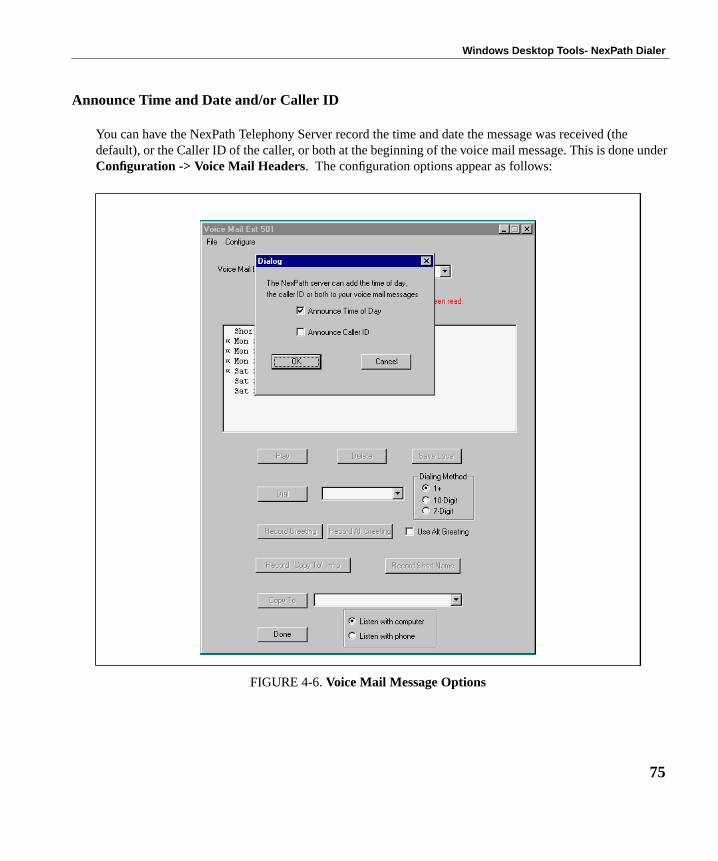
Windows Desktop Tools- NexPath Dialer
Announce Time and Date and/or Caller ID
You can have the NexPath Telephony Server record the time and date the message was received (thedefault), or the Caller ID of the caller, or both at the beginning of the voice mail message. This is done underConfiguration -> Voice Mail Headers. The configuration options appear as follows:
FIGURE 4-6. Voice Mail Message Options
75
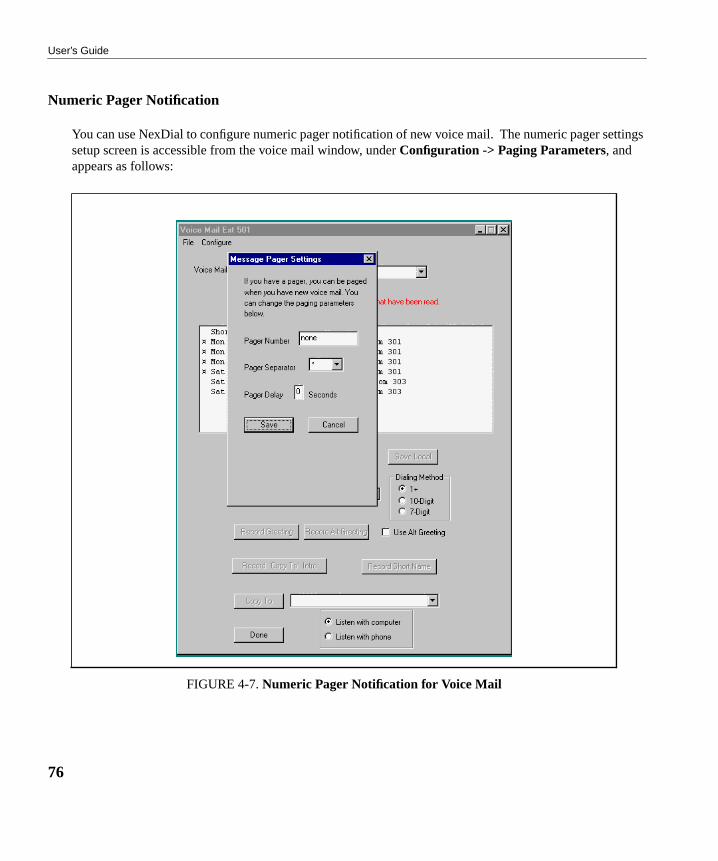
User’s Guide
Numeric Pager Notification
You can use NexDial to configure numeric pager notification of new voice mail. The numeric pager settingssetup screen is accessible from the voice mail window, under Configuration -> Paging Parameters, andappears as follows:
FIGURE 4-7. Numeric Pager Notification for Voice Mail
76
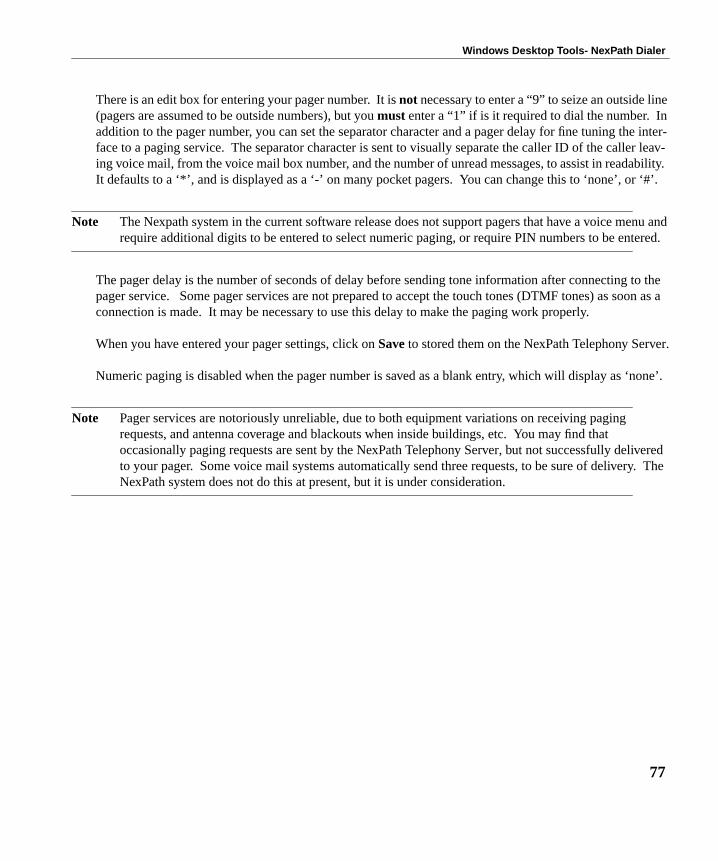
Windows Desktop Tools- NexPath Dialer
There is an edit box for entering your pager number. It is not necessary to enter a “9” to seize an outside line(pagers are assumed to be outside numbers), but you must enter a “1” if is it required to dial the number. Inaddition to the pager number, you can set the separator character and a pager delay for fine tuning the inter-face to a paging service. The separator character is sent to visually separate the caller ID of the caller leav-ing voice mail, from the voice mail box number, and the number of unread messages, to assist in readability.It defaults to a ‘*’, and is displayed as a ‘-’ on many pocket pagers. You can change this to ‘none’, or ‘#’.
Note The Nexpath system in the current software release does not support pagers that have a voice menu andrequire additional digits to be entered to select numeric paging, or require PIN numbers to be entered.
The pager delay is the number of seconds of delay before sending tone information after connecting to thepager service. Some pager services are not prepared to accept the touch tones (DTMF tones) as soon as aconnection is made. It may be necessary to use this delay to make the paging work properly.
When you have entered your pager settings, click on Save to stored them on the NexPath Telephony Server.
Numeric paging is disabled when the pager number is saved as a blank entry, which will display as ‘none’.
Note Pager services are notoriously unreliable, due to both equipment variations on receiving pagingrequests, and antenna coverage and blackouts when inside buildings, etc. You may find thatoccasionally paging requests are sent by the NexPath Telephony Server, but not successfully deliveredto your pager. Some voice mail systems automatically send three requests, to be sure of delivery. TheNexPath system does not do this at present, but it is under consideration.
77
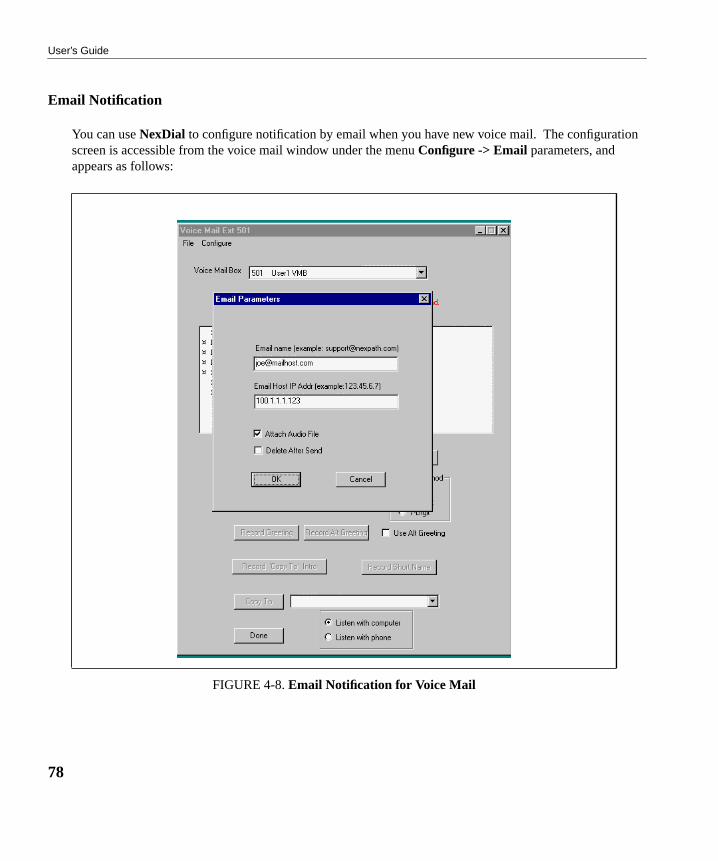
User’s Guide
Email Notification
You can use NexDial to configure notification by email when you have new voice mail. The configurationscreen is accessible from the voice mail window under the menu Configure -> Email parameters, andappears as follows:
FIGURE 4-8. Email Notification for Voice Mail
78

Windows Desktop Tools- NexPath Dialer
Note The Configure -> Email selection will be grayed out and will not be accessible if email notification hasnot been enabled for this voice mailbox. Contact your system administrator to enable email notificationfor your voice mailbox if the setup screen is not accessible. Enabling email notification must be done inAdminTool by an administrator.
Fill in your email address, and the IP address of your mail server. You can use the system name if DNS hasbeen enabled on the NexPath Telephony Server and you have DNS service. Unless you have the services ofa network expert, who is very familiar with DNS setup and mail hosts, you will have fewer configurationproblems if you use the IP address of your mail host.
Integration with Goldmine 4.0 and ACT! 3 & ACT! 4:
The NexDial program, when running, will contact Goldmine and ACT!, if they are also running, and initiatea database look-up based on the Caller ID. Goldmine will popup a dialog box informing the user that anincoming call is available, and indicate if it is found in the database. It allows the user to decide if the con-tact record should be accessed. ACT! does not pop-up a dialog box, but silently selects the contact record ifthe caller ID is found in the database.
Note Caller ID (number and/or name) must be subscribed to from your telephone company in order for it tobe available to the NexPath system and NexPath software programs. In most locations in NorthAmerica, it is not a standard feature but a special service only available as an extra monthly charge.Contact your local phone company for details.
NexDial must be running (it does not matter if it is iconified or not) for the caller ID look-up interface toGoldmine or ACT! to be functional.
To dial a call from Goldmine, ACT!, or Outlook, you must install the NexPath TAPI service provider, asdescribed in the chapter Installing the NexPath TAPI 2.1 Service Provider starting on page 109.
The NexDial caller ID interface to Goldmine and ACT! is provided since the caller ID interface from TAPIeither is non-functional or is not implemented by these programs.
79

User’s Guide
80
CHAPTER 5 Windows Desktop Tools-NexPath Call Director
Nexpath provides a network-based operator’s console application called NexDirectorTM for use on Win95/98 and WinNT systems with the Release 5 software. NexDirector allows a system wide view of the insidelines, outside lines, voice mail boxes, and park orbits.
The NexDirector program will run on any Win95/98 or WinNT 4.0 system with TCP/IP installed. Youmust have TCP/IP installed and configured, and a system name and/or IP address assigned to the NexPathTelephony Server, in order for NexDirector to be able to contact the NexPath Telephony Server.
System requirements for NexDirector
1. NexDirector is a large format screen. For best results, use a 17” or larger high resolution monitor withthe video card in the 1280 x 1024 mode. The 1024 x 768 mode is also acceptable if you are using thesmall fonts setting. In lower resolution modes, some of the buttons may be off screen.
2. The Release 5 version of NexDirector supports large and small fonts modes. If you are using largefonts, you must set your resolution to 1280 x 1024 or the NexDirector display will be too large for thescreen.
81
User’s Guide
Installing the NexDirector operator’s console program
Note If you are upgrading a previous version of NexDirector, it is not necessary to uninstall the previousversion before installing the new version. The old executable will be overwritten, and the registryentries created or copied automatically by the InstallShield program.
1. Insert the NexPath Telephony Server Release 5 CD-ROM in the Win95/98 or WinNT system fromwhich you want to run the dialer.
2. Click on Start, then Run, then Browse and select the file setup.exe in the 1998Release5\NexPathCall-Director subdirectory of the CD-ROM. Follow the prompts to install the program on your system.
3. Once installed, start the NexDirector program by clicking on Start, then Programs, then NexPathCall Director, then NexDirector.
4. A warning may also appear the first time you start NexDirector that it cannot establish a network con-nection. Click OK again. When NexDirector appears, click on Tools -> Configure, and set up thelogin and network parameters. Once you configure NexDirector, you should not get these messagesagain unless you have a network problem.
Note Anytime a new configuration is activated on the NexPath Telephony Server, the network connectionwill be terminated and restarted to all clients. This will cause an error box to pop-up on the clientsrunning NexDirector. Click Okay on this pop-up, and then either kill and restart NexDirector, orselect Tools -> Configure->Okay to re-login to the Server. Otherwise NexDirector will not bedisplaying current telephone system activity.
82
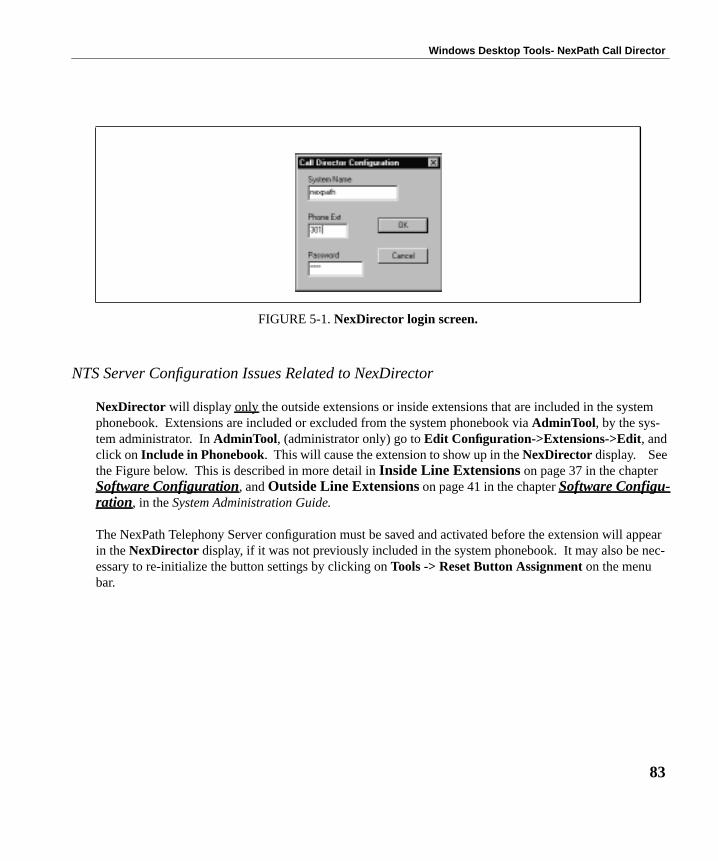
Windows Desktop Tools- NexPath Call Director
NTS Server Configuration Issues Related to NexDirector
NexDirector will display only the outside extensions or inside extensions that are included in the systemphonebook. Extensions are included or excluded from the system phonebook via AdminTool, by the sys-tem administrator. In AdminTool, (administrator only) go to Edit Configuration->Extensions->Edit, andclick on Include in Phonebook. This will cause the extension to show up in the NexDirector display. Seethe Figure below. This is described in more detail in Inside Line Extensions on page 37 in the chapterSoftware Configuration, and Outside Line Extensions on page 41 in the chapter Software Configu-ration, in the System Administration Guide.
The NexPath Telephony Server configuration must be saved and activated before the extension will appearin the NexDirector display, if it was not previously included in the system phonebook. It may also be nec-essary to re-initialize the button settings by clicking on Tools -> Reset Button Assignment on the menubar.
FIGURE 5-1. NexDirector login screen.
83
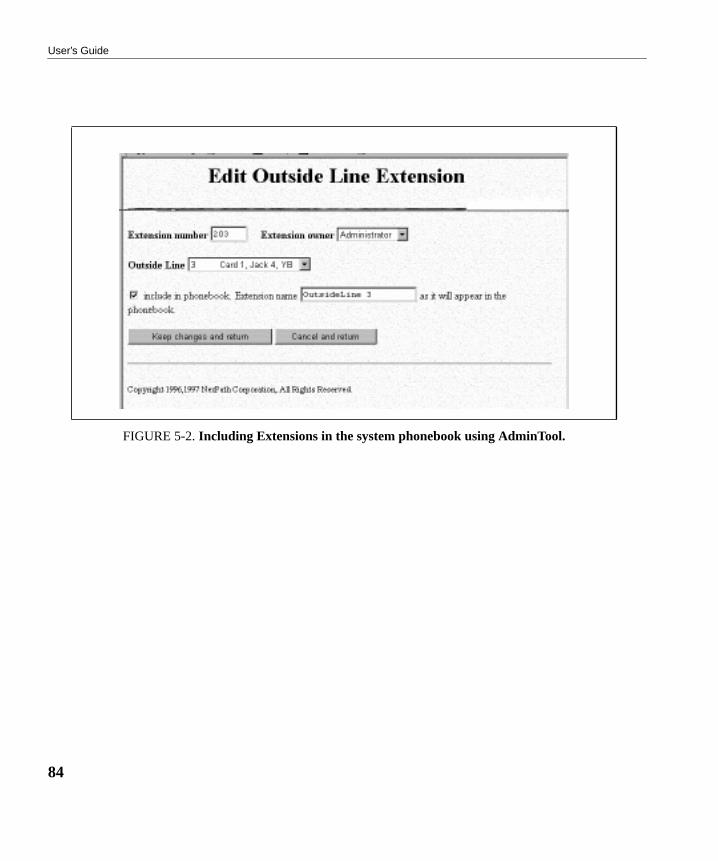
User’s Guide
FIGURE 5-2. Including Extensions in the system phonebook using AdminTool.
84
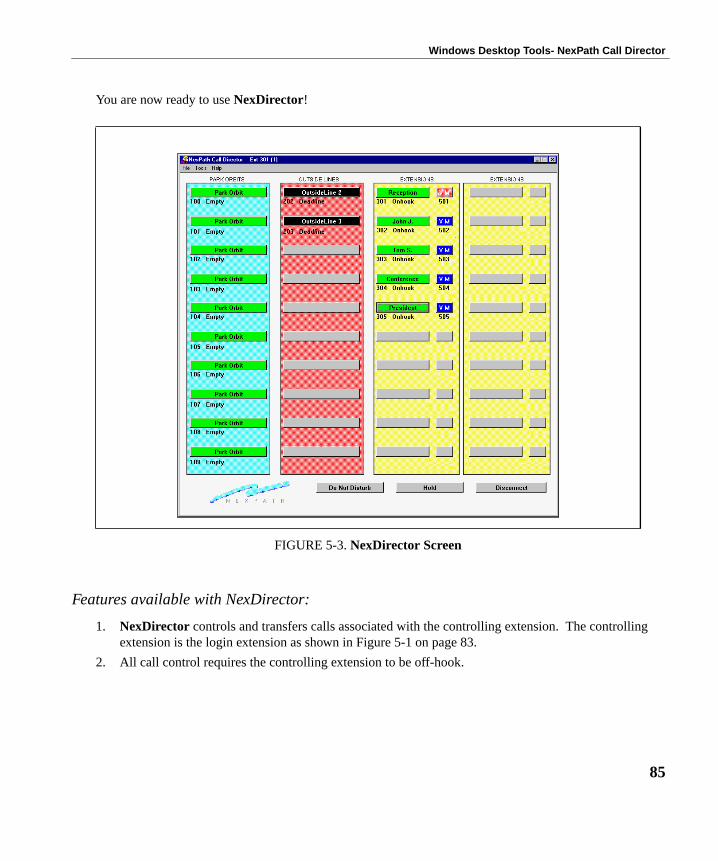
Windows Desktop Tools- NexPath Call Director
You are now ready to use NexDirector!
Features available with NexDirector:
1. NexDirector controls and transfers calls associated with the controlling extension. The controllingextension is the login extension as shown in Figure 5-1 on page 83.
2. All call control requires the controlling extension to be off-hook.
FIGURE 5-3. NexDirector Screen
85
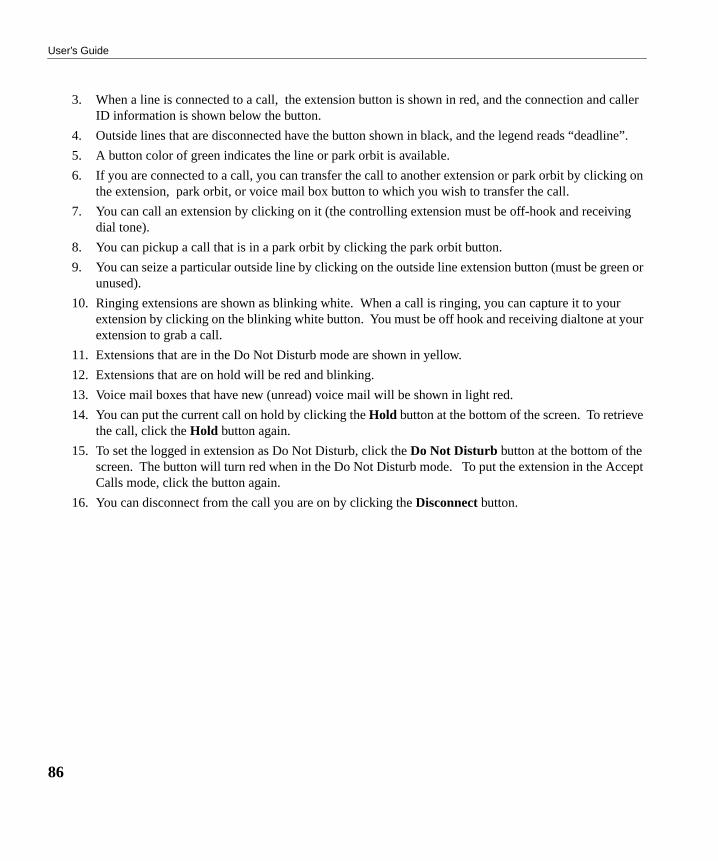
User’s Guide
3. When a line is connected to a call, the extension button is shown in red, and the connection and callerID information is shown below the button.
4. Outside lines that are disconnected have the button shown in black, and the legend reads “deadline”.
5. A button color of green indicates the line or park orbit is available.
6. If you are connected to a call, you can transfer the call to another extension or park orbit by clicking onthe extension, park orbit, or voice mail box button to which you wish to transfer the call.
7. You can call an extension by clicking on it (the controlling extension must be off-hook and receivingdial tone).
8. You can pickup a call that is in a park orbit by clicking the park orbit button.
9. You can seize a particular outside line by clicking on the outside line extension button (must be green orunused).
10. Ringing extensions are shown as blinking white. When a call is ringing, you can capture it to yourextension by clicking on the blinking white button. You must be off hook and receiving dialtone at yourextension to grab a call.
11. Extensions that are in the Do Not Disturb mode are shown in yellow.
12. Extensions that are on hold will be red and blinking.
13. Voice mail boxes that have new (unread) voice mail will be shown in light red.
14. You can put the current call on hold by clicking the Hold button at the bottom of the screen. To retrievethe call, click the Hold button again.
15. To set the logged in extension as Do Not Disturb, click the Do Not Disturb button at the bottom of thescreen. The button will turn red when in the Do Not Disturb mode. To put the extension in the AcceptCalls mode, click the button again.
16. You can disconnect from the call you are on by clicking the Disconnect button.
86

Windows Desktop Tools- NexPath Call Director
17. The extension buttons can be edited and positioned according to user preferences. To do this, doubleclick on a button and select from the list. To change the label, type in a new label in the pop-up edit boxthat appears when the button is double clicked. See Figure 5-4 below.
If you select an extension that is located on another button, it will be moved to this button. Buttons canbe disabled by selecting the item labelled UNUSED.
You can reset the button settings to the NexPath Telephony Server phonebook settings by selectingTools -> Reset Button Assignment, and confirming you want to do this in the popup confirmationbox.
FIGURE 5-4. Editing the extension buttons in NexDirector.
87
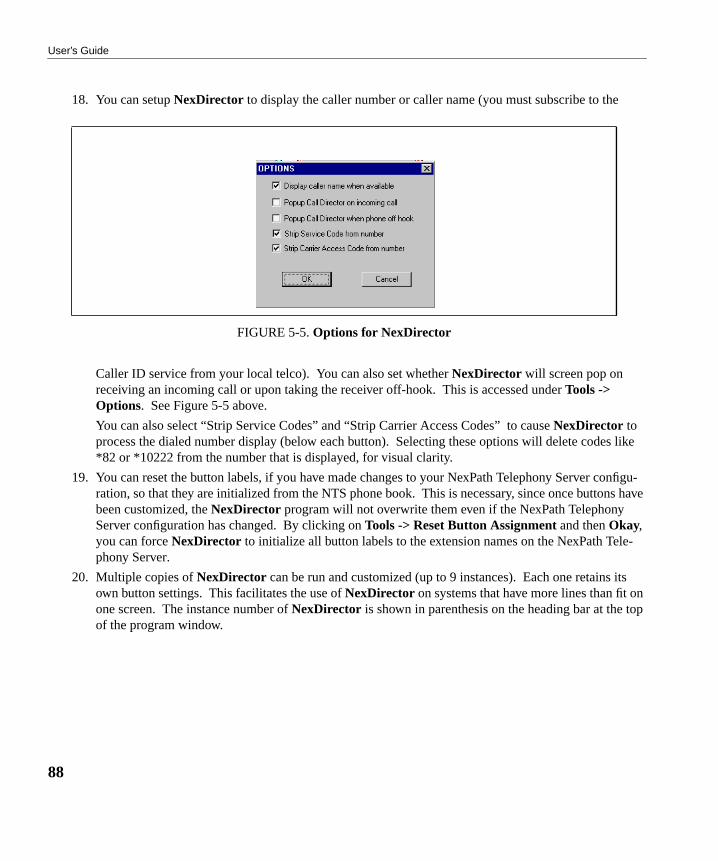
User’s Guide
18. You can setup NexDirector to display the caller number or caller name (you must subscribe to the
Caller ID service from your local telco). You can also set whether NexDirector will screen pop onreceiving an incoming call or upon taking the receiver off-hook. This is accessed under Tools ->Options. See Figure 5-5 above.
You can also select “Strip Service Codes” and “Strip Carrier Access Codes” to cause NexDirector toprocess the dialed number display (below each button). Selecting these options will delete codes like*82 or *10222 from the number that is displayed, for visual clarity.
19. You can reset the button labels, if you have made changes to your NexPath Telephony Server configu-ration, so that they are initialized from the NTS phone book. This is necessary, since once buttons havebeen customized, the NexDirector program will not overwrite them even if the NexPath TelephonyServer configuration has changed. By clicking on Tools -> Reset Button Assignment and then Okay,you can force NexDirector to initialize all button labels to the extension names on the NexPath Tele-phony Server.
20. Multiple copies of NexDirector can be run and customized (up to 9 instances). Each one retains itsown button settings. This facilitates the use of NexDirector on systems that have more lines than fit onone screen. The instance number of NexDirector is shown in parenthesis on the heading bar at the topof the program window.
FIGURE 5-5. Options for NexDirector
88
CHAPTER 6 TelOper: the Web BrowserDesktop Interface
In addition to the command sequences outlined in previous sections of this manual, and the NexDial andNexDirector Windows programs, you can control many of the functions of the NexPath Telephony Serverfrom your desktop computer using your web browser, if your computer meets the following criteria:
• Your computer is connected to the NexPath Telephony Server over a network which supports the TCP/IPprotocol.
• Your computer has Netscape Navigator 3.03 or Netscape Communicator 4.06, or Netscape 4.6 (or laterversion) installed.
The desktop web interface program is called TelOper.
Note TelOper is not compatible with Microsoft Internet Explorer (version 4 or 5) as of Release 5 of theNexPath Telephony Server software.
Talk to your system administrator about getting your computer to meet these criteria.
To control your phone from your computer
1. Start your Netscape Web Browser program.
89
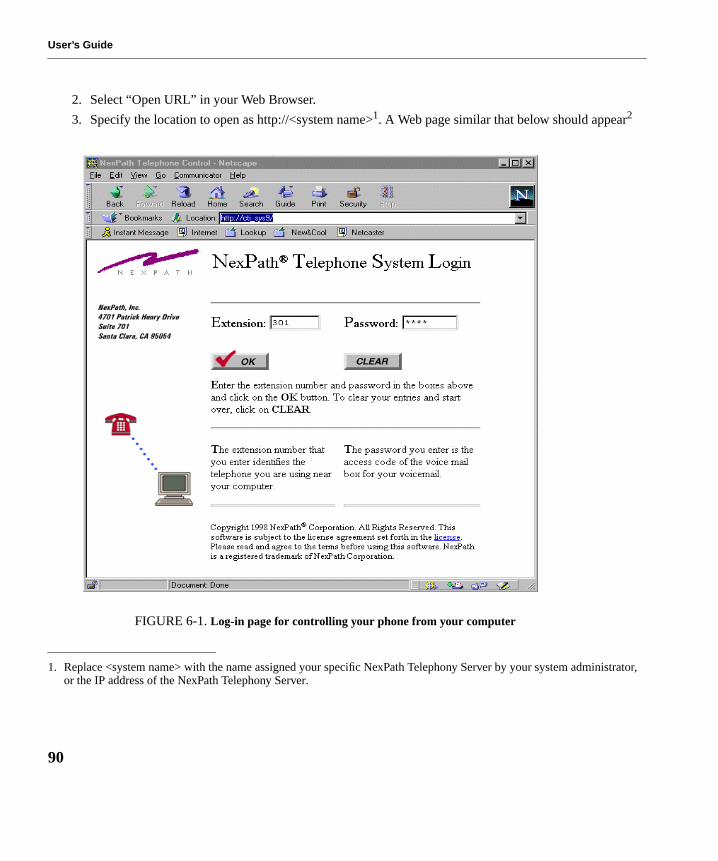
User’s Guide
2. Select “Open URL” in your Web Browser.
3. Specify the location to open as http://<system name>1. A Web page similar that below should appear2
1. Replace <system name> with the name assigned your specific NexPath Telephony Server by your system administrator,or the IP address of the NexPath Telephony Server.
FIGURE 6-1. Log-in page for controlling your phone from your computer
90
TelOper: the Web Browser Desktop Interface
As described in the log-in page, enter your extension number and password, then click the OK button.
Note Because of security concerns, if you are running a Web browser at someone else’s computer, you canstill log in to the NexPath Telephony Server using your extension number and password, but you willnot be able to perform any of the telephone-centric functions like dialing a number from the Webbrowser since your telephone is physically located elsewhere. You will, however, be able listen to yourvoice mail using the computer and copy messages to other users.
Note There are other URLs that can be used in the system, other than the call control page, some of which areonly available to system administrators. To get a list of these, go to the page at http://<system name>/help/. (The trailing “/” is required if you are using an IP address). This will list several links that youcan click on to navigate to other web pages in the NexPath Telephony Server. Administrationpasswords are required to view some of these links.
2. If this page does not appear, check that you have entered the proper URL and try again. If it still does not appear, consultyour system administrator.
91
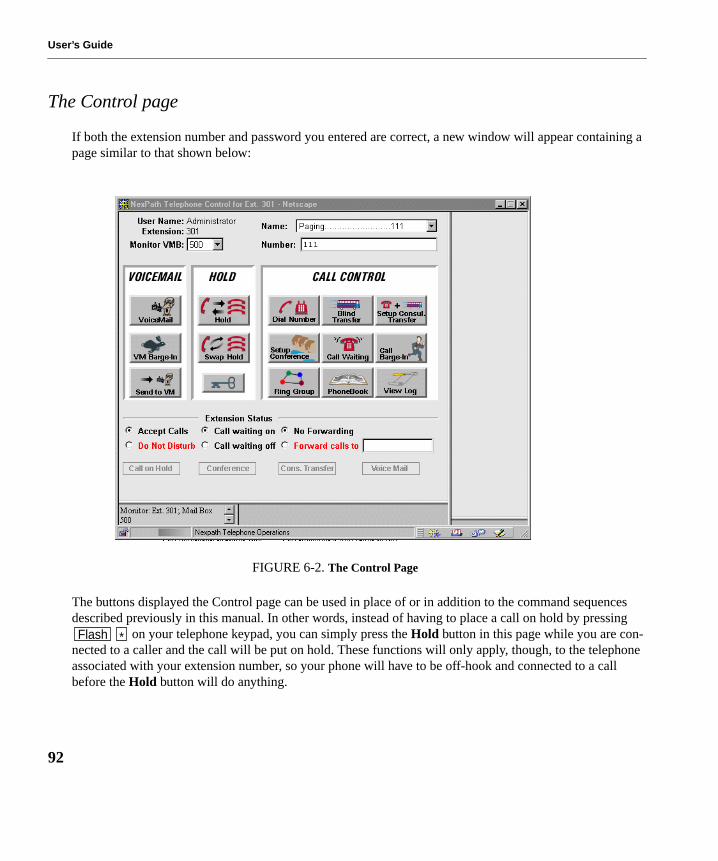
User’s Guide
The Control page
If both the extension number and password you entered are correct, a new window will appear containing apage similar to that shown below:
The buttons displayed the Control page can be used in place of or in addition to the command sequencesdescribed previously in this manual. In other words, instead of having to place a call on hold by pressing
on your telephone keypad, you can simply press the Hold button in this page while you are con-nected to a caller and the call will be put on hold. These functions will only apply, though, to the telephoneassociated with your extension number, so your phone will have to be off-hook and connected to a callbefore the Hold button will do anything.
FIGURE 6-2. The Control Page
Flash *
92
TelOper: the Web Browser Desktop Interface
Selecting a voice mail box to monitor
Your user name will be shown in the upper left corner of this page, along with your extension number.Below them is a pull-down list labelled Monitor VMB containing all voice mail mailboxes to which youhave access. There is an additional entry at the bottom labelled USER. The USER selection represents allvoice mail boxes that you own, and will activate monitoring of all of those mail boxes. For most people, thiswill be a list with only two entries, the user’s voice mail box and the USER entry, and both represent thesame thing. The voice mail mailbox selected from this pull-down list will be the one used by the voice mail,VM Barge-in, Send to VM, and Password buttons on this page. If you own more than one voice mail box,and you select USER, then the mail box selected by these functions will be the first one that you own in thelist. You can tell which voice mail boxes are being monitored by looking at the information in the statusframe in the lower left hand corner of the main screen.
VM Barge-in
If you miss picking up your phone before a call rolls over to voice mail, you can still connect to the callerwhile he or she is leaving you a message by clicking this button. Your phone must be off-hook for this but-ton to have any effect, though.
The Listen feature is not implemented at this time in TelOper.
Send to VM
If your telephone is ringing, and you do not wish to take the call right now, you can send it directly to voicemail by clicking on Send to VM (Send to Voice Mail) while it is ringing. It will immediately be transferredto your voice mail box instead of ringing until it rolls over to voice mail.
Hold
While you are on a call, you can click on the Hold button to put the caller on hold. Click again on the Holdbutton to bring the call back, or Swap Hold to simultaneously put a current conversation on hold andretrieve the call on hold.
93

User’s Guide
Note You can put up to three calls on hold simultaneously, but to retrieve them, you will have to take themoff hold in the last-in/first-out order. The hold system works like a stack of boxes, and so is called ahold stack. The last call put on the top of the hold stack is the first one that you get when you take a calloff of hold.
Call Control
In the upper right of the Control page is a pull-down list labelled Name which contains a list of all exten-sions available in your system. Below it is a fill-in box labelled Number. The buttons in the Call Controlarea (Dial Number, Blind Transfer, etc.) will use the number in the Number box as the phone number todial, transfer to, etc. The pull-down Name list, in turn, can be used as a convenient way of filling the Num-ber box.
Once you have filled in Number, you can click on the Dial button to dial it (or click Enter on your key-board). When your party picks up, Dial will turn to Disconnect, allowing you to hang up without releasingthe line, the same as if you used the Disconnect sequence (see Disconnecting on page 22 in thechapter Telephone Operations for details).
Note You can use the PhoneBook button in the Call Control area to both add numbers to the pull-downName list and to add speed-dial buttons to the browser frame area to the right of the Call Control area.
Other buttons on this page include:
• Blind Transfer. Select the extension from the Name list, then click this button to transfer a call to thatextension.
• Set up Consul. Transfer. To set up a transfer with consultation, click Set up Consul. Transfer. Thiswill put your current call on hold and give you inside dial tone. Dial the party to whom the call is to betransferred using either your telephone keypad or the Name list, Number box, and Dial button in thispage. Once connected, the Set up Consul. Transfer button will change to Complete Transfer. You canclick on Complete Transfer to complete the transfer, or From Hold to get the caller back if the party didnot answer or does not want the call.
• Set up Conference. To set up a conference, call your first party and tell them you are going to put themon hold while contacting the next party, then click on Set up Conference. Your party will be put on hold,and you will get an inside dial tone.
Flash #
94

TelOper: the Web Browser Desktop Interface
Dial the next party to be added to the call, using either your telephone keypad or the Name list, Numberbox, and Dial button in this page. Once connected, this button will change to Add to Conference. Clickon Add to Conference to bring your original caller into this new call. The button on this page willchange back to Set up Conference.
To add a fourth party to the call, click on Set up Conference again, then dial the fourth party and clickon Add to Conference after the call is established.
• Call Waiting. If you have call waiting enabled for your extension and you hear a “beep-beep” tone whilein the middle of a conversation, you can use this button to pick up the incoming call and place your cur-rent caller on hold. You can then use the Swap Hold button to transfer between the two.
• Call Barge-in. If you have barge-in privileges, you can select an extension from the Name list, then clickon this button to barge into an existing call on that extension.
Using the Ring Group button
This button can be used as an alternative to entering the Pick Up Ring Group command sequence fromyour telephone. See Pick up on page 40 in the chapter Telephone Operations for details on ring groups.Clicking on the Ring Group button brings up a page similar to the following:
To use this page, pick up your phone, select the pickup group you want to pick up from the pull-down list,then click on the Pick Up Group button.
FIGURE 6-3. A Ring Group page
* 0
95
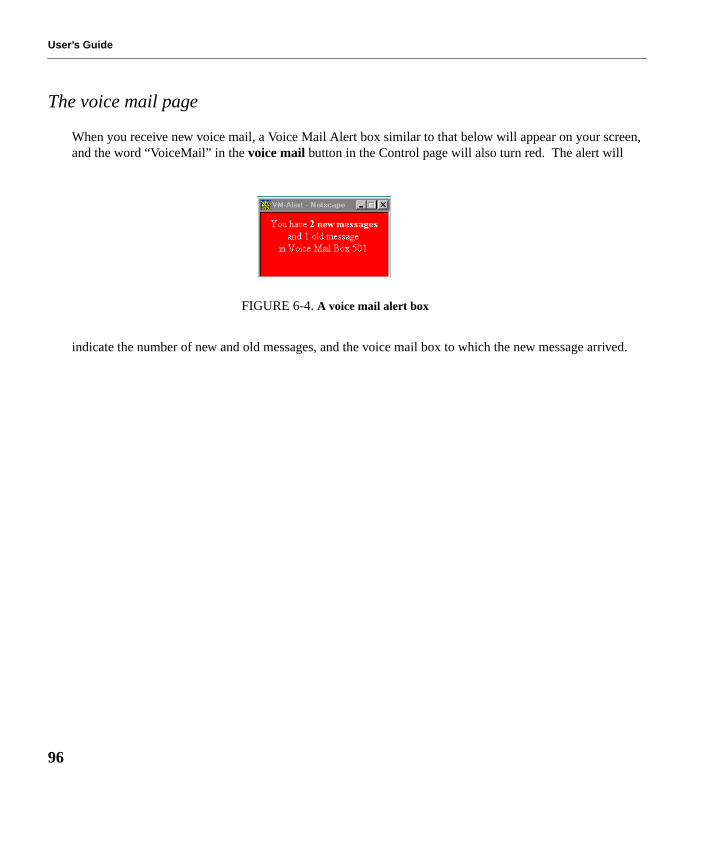
User’s Guide
The voice mail page
When you receive new voice mail, a Voice Mail Alert box similar to that below will appear on your screen,and the word “VoiceMail” in the voice mail button in the Control page will also turn red. The alert will
indicate the number of new and old messages, and the voice mail box to which the new message arrived.
FIGURE 6-4. A voice mail alert box
96
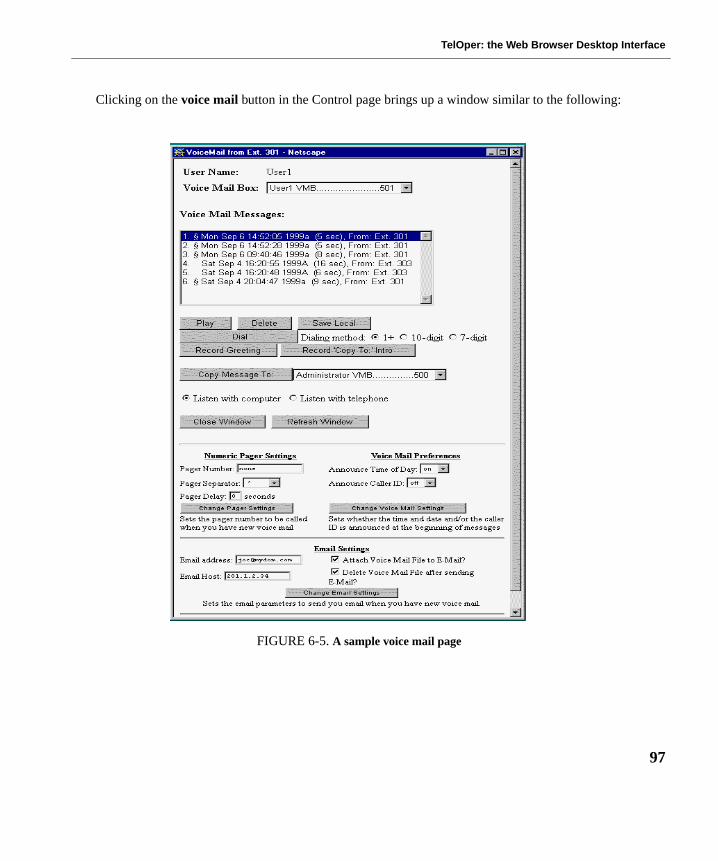
TelOper: the Web Browser Desktop Interface
Clicking on the voice mail button in the Control page brings up a window similar to the following:
FIGURE 6-5. A sample voice mail page
97
User’s Guide
Your user name is listed at the top of this window. Below it is a pull-down list of all voice mailboxes towhich you have access. For most people, this will be a list with only one entry, so clicking on it will notactually bring up any more entries.
Setting message, pager, and email parameters
At the bottom of the Voice Mail page, you can set whether you want a voice announced time and date at thebeginning of each voice mail message, or if you want the caller ID announced at the beginning of each mes-sage, or both. See Figure 6-5 above. Select Announce Time of Day (on or off) and Announce Caller ID (onor off). Then click on Change Voice Mail Settings to submit it to the NexPath Telephony Server. A confir-mation box will appear to ask if you are sure, and the voice mail window will refresh if the submit was suc-cessful. Note that the voice announcements are recorded as part of the message, so the settings only takeaffect on future voice mail messages.
Similarly, your numeric pager settings can be changed. In addition to the pager number, you can set the sep-arator character and a pager delay for fine tuning the interface to a paging service. The separator characterdefaults to a ‘*’, and is displayed as a ‘-’ on most pocket pagers. This assists in readability, to separate thecaller ID from the voice mail box number, and the number of unread messages currently in the mail box.You can change this to ‘none’, or ‘#’.
Note The Nexpath system in the current software release does not support pagers that have a voice menu andrequire additional digits to be entered to select numeric paging, or require PIN numbers to be entered.
The pager delay is the number of seconds of delay before sending tone information after connecting to thepager service. Some pager services are not prepared to accept the touch tones (DTMF tones) as soon as aconnection is made. It may be necessary to use this delay to make the paging work properly.
When the pager entry is blank or ‘none’, numeric paging is disabled.
Note Pager services are notoriously unreliable, due to both equipment variations on receiving pagingrequests, and antenna coverage and blackouts when inside buildings, etc. You may find thatoccasionally paging requests are sent by the NexPath Telephony Server, but not successfully deliveredto your pager. Some voice mail systems automatically send three requests, to be sure of delivery. TheNexPath system does not do this at present, but it is under consideration.
98
TelOper: the Web Browser Desktop Interface
You can use TelOper to configure notification by email when you have new voice mail. The parameters areentered at the bottom of the Voice Mail window.
Note The Email settings will not be accessible if email notification has not been enabled for this mail box.Contact your system administrator to enable email notification for your voice mail box if the setupparameters are not accessible. Enabling email notification must be done in AdminTool by anadministrator.
Fill in your email address, and the IP address of your mail server. You can use the system name if DNS hasbeen enabled on the NexPath Telephony Server and you have DNS service. Unless you have the services ofa network expert, who is very familiar with DNS setup and mail hosts, you will have fewer configurationproblems if you use the IP address.
Dialing Method for Call Back
You can select the method for dialing the person that left you a voice mail message. First, click on the mes-sage that has the caller ID you wish to re-dial, then click on the radio button for the method of dialing youwish to use. This may be 1+ dialing, where a ‘1’ will be prefixed to the 10 digit number, or 10-digit dialing,where the 10 digits will be dialed without a ‘1’, or 7 digit dialing, where the area code will be removed andjust the last seven digits dialed. Then lift your telephone from the receiver and click on Dial. See Figure 6-5 above. This setting has no effect when dialing inside extensions.
Other Voice Mail Features
Below the voice mailbox list is a window which lists your voice mail greeting (if you’ve recorded one), theintroductory message to be used with the “Copy Message to” command (explained in more detail below) ifyou’ve recorded one, and all voice mail messages currently in the selected mailbox. Each message in themailbox is identified by the time and date it was recorded, along with its length, and the telephone number ofthe caller (Caller ID) if available. New messages are identified with a § prefix. Message are listed in reversechronological order (i.e., newest messages are listed first).
To play back either a message, your greeting, or the “copy to” introductory message, use your mouse tohighlight an item in the listing window, then click the Play button. See below for details on selectingwhether the message will be played over your computer’s speakers or through a telephone.
99
User’s Guide
You can delete an item from this window by selecting it and then clicking on Delete. Only one message canbe deleted at a time.
To copy the audio file associated with an item in this window to a local drive, press Save Local. You maywant to save important voice mail messages on your local computer because you will eventually run out ofroom in your voice mailbox on the system1.
To review your voice mail greeting, click on the message entitled “Personal greeting” in the message win-dow and then click the Play button. You can re-record your greeting by clicking on the Record Greetingbutton and following the prompts.
You can copy a voice mail message from your mailbox to someone else’s. To copy a message, record anintroductory message using the Record Copy to: Intro button (if you have not already done so), then selectthe message you want to copy, use the pull-down list at the bottom of the screen to select the mailbox towhich you want to send the message, then press the Copy Message To: button. Your “copy to” intro mes-sage will automatically be added to the beginning of all copied messages, so you should record somethinglike, “This message was forwarded from <your name>’s mailbox.” You can record and re-record your “copyto” intro message as many times as you want, so theoretically it can be tailored for each user as each mes-sage is sent.
In the current version of the software, copying a voice mail message to another mail box using TelOper willnot trigger email notification for the destination mail box.
Note When recording your Copy to: Intro or your Greeting, you can terminate the recording by hitting anykey on the keypad, or by simply hanging up.
The check-boxes at the bottom of this screen allow you to select whether to playback of messages is per-formed through your computer or through your telephone. Playback through your computer uses thebrowser’s built-in audio playback capabilities, so this will only work if your computer and browser arealready able to play audio files.
Alternately, you can play messages over a telephone by clicking the Listen with telephone check-box. Thetelephone used will be the one associated with the extension you logged in with.
1. The amount of time you are allowed for messages in your mailbox is set by your system administrator.
100

TelOper: the Web Browser Desktop Interface
Normally, the NexPath Telephony Server updates this screen as soon as a new message is completed. If youthink you have a new voice mail message, but it does not appear in the list of messages, click the Reloadbutton at the bottom of the screen to update the screen contents. Alternately, you can close this window byclicking on the Close Window button at the bottom of the screen.
System Information
The button labelled with a key in the Control page is the System Information button. Clicking on it bringsup a window similar to the following:
FIGURE 6-6. The System Information page
101
User’s Guide
You can use this window to change your password. Additionally, if your account has been set up with per-mission to change the system from Day mode to Night mode and vice-versa, you can use the checkboxes inthe center of this page to change the system mode. See Day Ringing/Night Ringing on page 20 in the chapterTelephone Operations for details on these modes.
If you have system administrative privileges, you can also click on Show System Configuration and getdetailed information on the system’s current configuration, though you will not be able to make any changesto the system configuration from the window displayed. See the NexPath Telephony Server System Adminis-tration Guide for more details.
You can use the System Information Page to save your current settings. Click on the button Save CurrentSettings and your settings will be saved. The server will pop up a confirmation box if the operation was suc-cessful.
The following settings are currently saved to the server when the Save Current Settings button is clicked:
• Main Page: Monitor VMB selector box, Name selector box.
• Voice mail page: Voice mail box selector, Listen message radio button, Copy Message To selector box.
• Phonebook page: Name/number selector box.
102
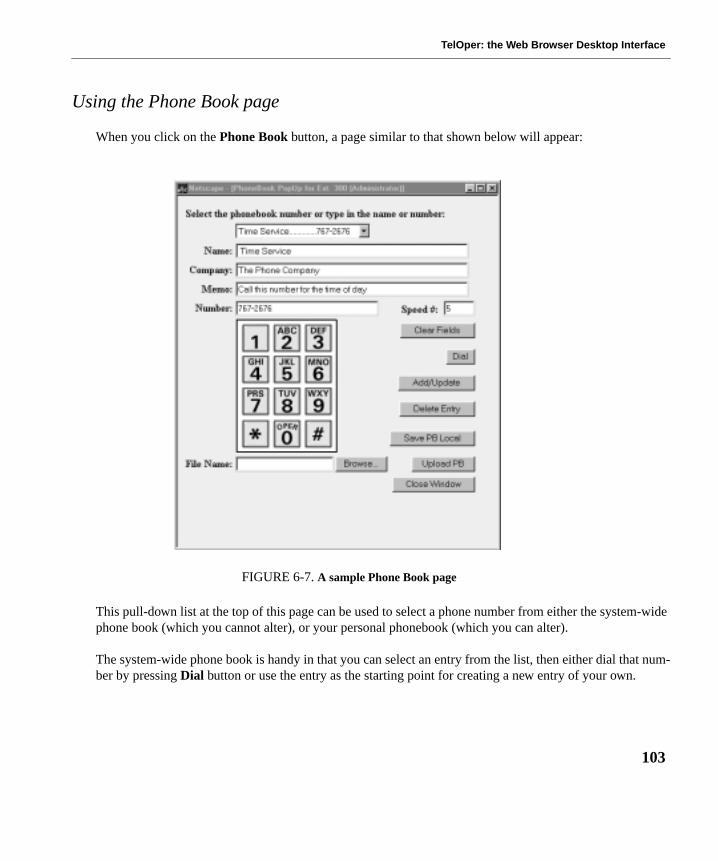
TelOper: the Web Browser Desktop Interface
Using the Phone Book page
When you click on the Phone Book button, a page similar to that shown below will appear:
This pull-down list at the top of this page can be used to select a phone number from either the system-widephone book (which you cannot alter), or your personal phonebook (which you can alter).
The system-wide phone book is handy in that you can select an entry from the list, then either dial that num-ber by pressing Dial button or use the entry as the starting point for creating a new entry of your own.
FIGURE 6-7. A sample Phone Book page
103
User’s Guide
To create an entry in your personal phonebook, fill in at least the Name and Number entry forms and thenclick on Add/Update1. Your entry will be added to your pull-down list. Note that you can enter values in theNumber field either from your keyboard or by clicking on the numbers displayed on the picture of a touch-tone keypad. Everything but numbers, commas, and the # and * characters will be ignored. The dialer willconvert each comma in an entry into a 1 second delay.
Also, entries which start with a 9 will cause an outside line to be seized, then all numbers after the 9 to bedialed. To add an entry for 911, for example, you will want to set the number to be dialed to 9,911. Thecomma between the nines gives the system time to seize the outside line.
Finally, any entry with seven or more digits will be assumed to be for an outside number, and the system willautomatically seize an outside line before dialing. No prefix of 9 is needed in this case, and if one is added, itwill be removed before the number is dialed. Only the first grouping before the first comma is analyzed todetermine if it is an inside or outside call.
For example, to seize the outside line that is associated with extension 203, then dial 555-1234, then waitfour seconds and enter #111, type the following: 203,555-1212,,,,#111. This will work the sameway whether it is in the phonebook, or typed in the Number entry box on the Control page.
To edit an entry in your personal phonebook, select it from the pull-down list, then make your changes andclick on Add/Update again.
Note Entries in the phonebook are arranged by name, so each name must be unique. For example, If youchange the name of the entry for Steve to Steve Sampson, then click on Add/Update, you will have twoentries, one for Steve and one for Steve Sampson. You can remove the extra entry by selecting it fromthe pull-down list, then clicking on Delete Entry.
You will receive an error message if you attempt to modify or delete entries from the system-wide phone-book.
By specifying a Speed number to be associated with an entry, you will create a speed-dial button back onyour Control page. The number you enter in the Speed # box determines the order in the list of buttons that
1. If you use an entry from the system-wide list as a starting point, you will need to change at least the Namefield before you will be able to save any modifications.
104
TelOper: the Web Browser Desktop Interface
the entry will be located. A one places the speed button at the top, larger numbers place it towards the bot-tom. To remove a speed-dial button from your Control page, select the entry associated with the speed-dialbutton as it appears in the phonebook, remove the speed dial number from it, then click on Add/Update.
It is possible that, over time, you may generate a long list of entries in your personal phonebook. If so, youcan make a copy of your personal phonebook to your computer by clicking on Save PB Local.
By applying a normal text editor to the file you saved, you can see that the personal phonebook file is a pipe-separated list, where “|” is the pipe character. You can edit or otherwise revise your personal phonebook file(perhaps by dumping the contents of an existing contact manager program such as Act! into the file), andthen copy the modified phonebook file back to the NexPath Telephony Server computer by using theUpload PB button. The File Name fill-in form and the Browse button can be used to select the personalphonebook file to be uploaded.
The View Log button
Another NexPath Telephony Server feature you can access only from a Web page is a review of all callsmade to and from your phone, including the time and date of each call, either the number you dialed or whothe call was from, and the duration of each call.
105
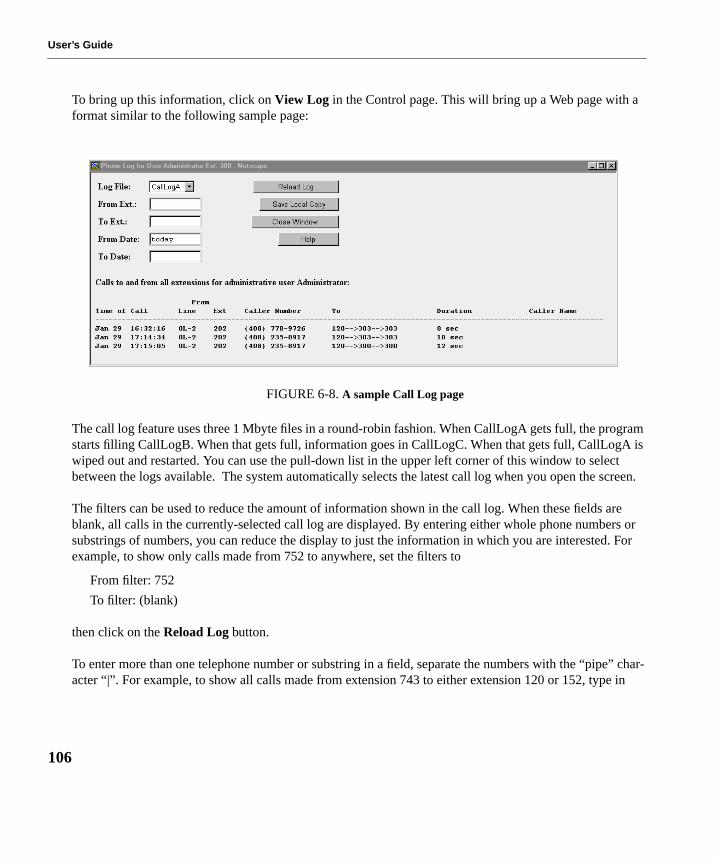
User’s Guide
To bring up this information, click on View Log in the Control page. This will bring up a Web page with aformat similar to the following sample page:
The call log feature uses three 1 Mbyte files in a round-robin fashion. When CallLogA gets full, the programstarts filling CallLogB. When that gets full, information goes in CallLogC. When that gets full, CallLogA iswiped out and restarted. You can use the pull-down list in the upper left corner of this window to selectbetween the logs available. The system automatically selects the latest call log when you open the screen.
The filters can be used to reduce the amount of information shown in the call log. When these fields areblank, all calls in the currently-selected call log are displayed. By entering either whole phone numbers orsubstrings of numbers, you can reduce the display to just the information in which you are interested. Forexample, to show only calls made from 752 to anywhere, set the filters to
From filter: 752
To filter: (blank)
then click on the Reload Log button.
To enter more than one telephone number or substring in a field, separate the numbers with the “pipe” char-acter “|”. For example, to show all calls made from extension 743 to either extension 120 or 152, type in
FIGURE 6-8. A sample Call Log page
106
TelOper: the Web Browser Desktop Interface
From filter: 743
To filter: 120 | 152
then click on the Reload Log button.
By default, the filters used on the call log are ANDed; that is, only entries which contain the informationspecified by both the filters simultaneously are shown. You can OR the two filters together, however, byadding the word “OR” anywhere in your “To filter” entry. For example, to list all calls made either to orfrom extension 743, type in
From filter: 743
To filter: OR 743
then click on the Reload Log button.
The From Date and To Date set the inclusive range of dates from which the log records are selected. Datescan be ‘Dec 4’ or ‘Jan 5’, or in the form ‘12/29’ or ‘11/30’. The keyword today is recognized as the currentday as determined by the NexPath Telephony Server.
A single entry such as ‘Dec’ or ‘12’ is assumed to be ‘12/1’ or ‘Dec 1’ in the From Date field, and ‘Dec 31’or ‘12/31’ in the To Date field. If the entire From Date field is left blank, then it is interpreted as the begin-ning of the file. If the To Date field is left blank, it defaults to today.
Unless you log in as the system administrator, you can only view calls made to and from your normal (pri-mary) extension number.
You can copy the information currently being viewed from your call log to a local computer by clicking onSave Local Copy. A pipe-separated text file (“|” is the pipe character) will be saved which can then beimported directly into Microsoft Excel or Microsoft Word. The field format can be determined with aheader row which is written as the first line in the file.
The Close Window button allows you to exit the View Log window altogether.
107

User’s Guide
The status information at the bottom of the Control page
At the bottom of the Control page are three columns of check-boxes and four status indicators showing yourextension’s current status.
The check-boxes in the leftmost column can be used to set your extension to the Accepting Calls mode orthe Do Not Disturb mode. See Accept Calls/Do Not Disturb on page 10 in the chapter Telephone Operationsfor details on these two modes of operation.
The check-boxes in the middle column can be used to enable or disable call-waiting for your extension. SeeCall Waiting on page 16 in the chapter Telephone Operations for details on call-waiting.
The rightmost column of check-boxes at the bottom of the control page can be used to enable or disable call-forwarding. The text box next to check-box labelled Forward calls to allows you to enter a number (eitheran extension or offsite number) to which to forward calls. If the number is seven digits or more, an outsideline is seized. Long distance numbers must be preceeded by a ‘1’.
Note You can only select one of the two check-boxes in any one column at a time.
Along the bottom of the page are four status indicators: Call on Hold, Conference, Cons. Transfer, andVoice Mail.
When you have a call on hold, the Call on Hold indicator will turn red and blink. Note that you can use theFrom Hold button to retrieve the call.
The Conference indicator will turn blue and blink when you initialize a conference circuit, and will remainblue until you leave the conference.
The Cons. Transfer indicator will turn green and blink when you initialize a transfer with consultation, andwill remain green until the call is successfully transferred or returned to you.
Finally, the Voice Mail button will turn red and blink when you have unread voice mail in your voice mail-box.
108
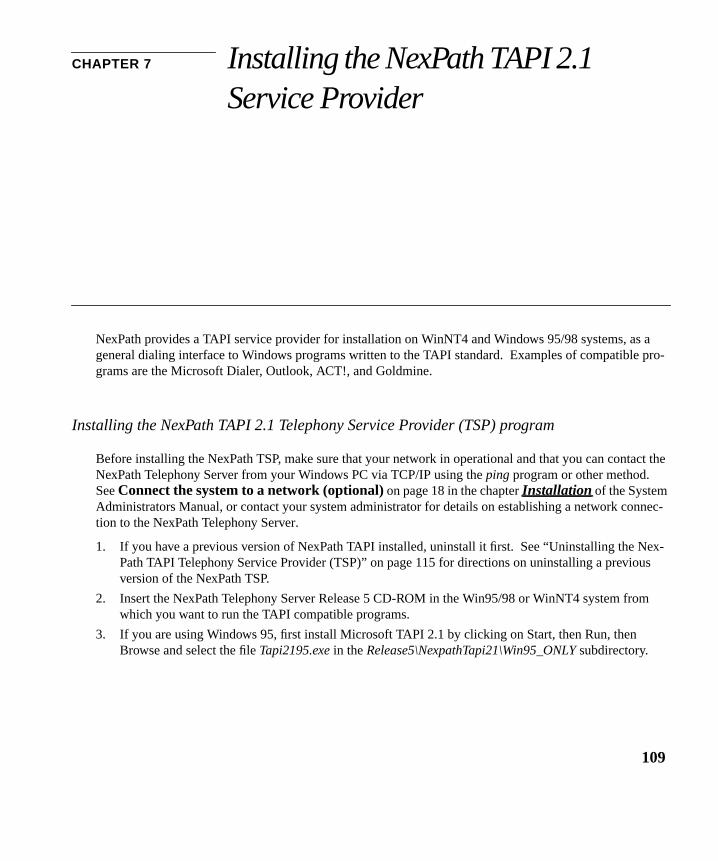
CHAPTER 7 Installing the NexPath TAPI 2.1Service Provider
NexPath provides a TAPI service provider for installation on WinNT4 and Windows 95/98 systems, as ageneral dialing interface to Windows programs written to the TAPI standard. Examples of compatible pro-grams are the Microsoft Dialer, Outlook, ACT!, and Goldmine.
Installing the NexPath TAPI 2.1 Telephony Service Provider (TSP) program
Before installing the NexPath TSP, make sure that your network in operational and that you can contact theNexPath Telephony Server from your Windows PC via TCP/IP using the ping program or other method.See Connect the system to a network (optional) on page 18 in the chapter Installation of the SystemAdministrators Manual, or contact your system administrator for details on establishing a network connec-tion to the NexPath Telephony Server.
1. If you have a previous version of NexPath TAPI installed, uninstall it first. See “Uninstalling the Nex-Path TAPI Telephony Service Provider (TSP)” on page 115 for directions on uninstalling a previousversion of the NexPath TSP.
2. Insert the NexPath Telephony Server Release 5 CD-ROM in the Win95/98 or WinNT4 system fromwhich you want to run the TAPI compatible programs.
3. If you are using Windows 95, first install Microsoft TAPI 2.1 by clicking on Start, then Run, thenBrowse and select the file Tapi2195.exe in the Release5\NexpathTapi21\Win95_ONLY subdirectory.
109

User’s Guide
Note WARNING: Do not run the Tapi2195.exe program on any system but Windows 95. Running thisprogram on NT (or Win98) will overwrite the Microsoft TAPI program with a version that will notwork.
4. Then install the NexPath TSP as follows. Click on Start, then Run, then Browse and select the filesetup.exe in the Release5\NexpathTapi21 subdirectory of the Release 5 CD-ROM. Follow the promptsto install the program on your system.
5. After the NexPath TSP is installed, you need to add it to the recognized service providers. Click onStart, then Settings, then Control Panel to bring up the Control Panel file viewer.
6. Locate the Telephony icon in the control panel and click on it, then select File -> Open to bring up theDialing Properties dialog box.
110
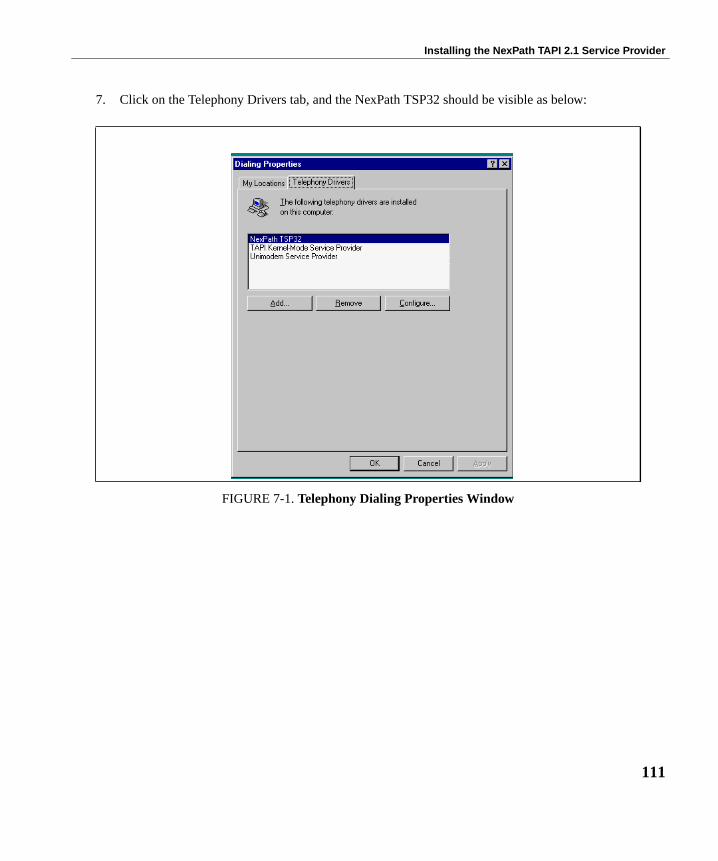
Installing the NexPath TAPI 2.1 Service Provider
7. Click on the Telephony Drivers tab, and the NexPath TSP32 should be visible as below:
FIGURE 7-1. Telephony Dialing Properties Window
111
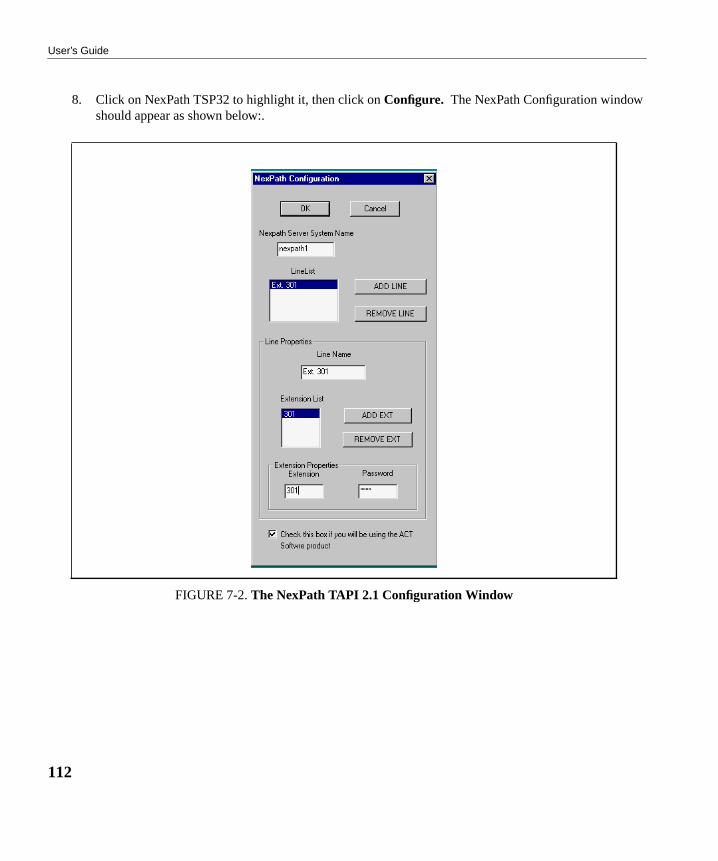
User’s Guide
8. Click on NexPath TSP32 to highlight it, then click on Configure. The NexPath Configuration windowshould appear as shown below:.
FIGURE 7-2. The NexPath TAPI 2.1 Configuration Window
112

Installing the NexPath TAPI 2.1 Service Provider
9. Fill in your system name (or IP address). (If you are using a system name, it must be in the hosts file orpublished in DNS for it to work. See Using your System Name rather than the IP Address onpage 20 in the chapter Installation or the System Administration Manual for details. Then click onAdd Line, click on the text area Line Name, and type in a descriptive text name, such as Ext. 301, foryour line (delete the NewLine text unless you want this to be your line name).
Note Take care to enter the information correctly in the NexPath configuration window. Errors (such asinvalid extensions or passwords) can cause the MS TAPI Server to repeatedly crash, making it verydifficult to recover.
Note The NexPath TSP can only be configured to connect to a single NexPath Telephony Server. However,it can be configured to support multiple extensions on a given NexPath system.
10. Then click on Add Ext, and click in the text area Extension Properties, delete the 0, and type in yourextension number, such as 301.
11. Click on the Password text box, and type in a valid NexPath system password, such as the default formailbox 501: 1001.
12. Click on the checkbox for ACT! if you are using ACT!.
13. Carefully check your settings and click on OK at the top and then Close to close the Dialing Propertieswindow.
14. If any settings are incorrect, or there is a problem with the network, there may be a long delay (60 sec-onds or more), and you will get a network or NexPath TSP error. The NexPath TSP contacts the Nex-Path Telephony Server via the LAN, so the LAN-TCP/IP interface must be functional for the TSP tofunction.
15. Installation is now complete. You are now ready to use Microsoft TAPI programs for dialing numbers.
Using the NexPath Telephony Service Provider (TSP) with other programs
Programs such as the Microsoft Dialer (Programs -> Accessories -> Phone Dialer on Win95 and NT),Outlook, Goldmine, and ACT! are TAPI compliant, so they allow calls to be dialed using these applicationswith the NexPath TSP installed. You should consult the documentation for these programs on how to selectthe address and line to work with the NexPath Telephony Server.
113
User’s Guide
For example, when you are running the Microsoft Phone Dialer, click on Tools -> Connect Using... tobring up the Connect Using dialog box. Select the line and extension in the Line and Address selectorboxes, respectively, that you configured above in the installation process, to configure the MS Phone Dialerto dial using the NexPath system. The display should appear as below:
Note that numbers are dialed with the telephone ON HOOK, for TAPI calls. This is different than callsplaced with NexDial, which are done off hook. The telephone extension that you configured for TAPI willring when the call is placed.
For outside calls, the call that is placed will roll over to voice mail (if voice mail is configured for this exten-sion) if the calling extension is not picked-up within the time-out time (usually 20 seconds).
For inside calls, the call will be disconnected if the calling extension is not picked-up within 10 seconds.
Note The Microsoft TAPI interface only supports ON HOOK dialing. It will not dial the telephone with theextension off hook.
FIGURE 7-3. Configuring the Microsoft Phone Dialer to use the NexPath Telephony Server TAPIinterface.
114
Installing the NexPath TAPI 2.1 Service Provider
Uninstalling the NexPath TAPI Telephony Service Provider (TSP)
To uninstall any version of the NexPath TSP, do the following:
1. Click on Start -> Settings -> Control Panel to bring up the Control Panel file viewer.
2. Click on Add/Remove Programs, then Select File -> Open (or double click) to bring up the Add/Remove Program Properties window.
3. Click on the Install/Uninstall tab, then locate NexPath TSP32 in the browser window, and click onAdd/Remove. Follow the prompts to remove the NexPath TSP32 program.
4. Next, remove the NexPath TSP from the service providers by opening the Telephony icon in the Con-trol Panel as described in Item 5-6 in the installation procedure above.
5. Click on NexPath TSP32 and then click on the Remove button. Click Yes at the prompt to remove itfrom the recognized service providers.
6. Next, using the Windows File Explorer, locate the Windows\System subdirectory, and delete the fileNexPathxx.tsp, where xx may or may not be present, or may be numbers such as 16 or 32. On WindowsNT4, this file is located in the directory WinNT\System32\.
7. Reboot your PC.
8. The NexPath TSP is now completely removed.
115

User’s Guide
116

CHAPTER 8 Frequently asked questions
Question: How do I put a caller on hold?
Answer: During your conversation, enter the Put Call on Hold sequence . The caller will beput on hold, and you will get an inside dial tone. You can hang up, call another party, what-ever...
To retrieve the call from hold, pick up your phone or otherwise get an inside dial tone, then usethe Retrieve Call from Hold sequence .
Question: How do I transfer a call?
Answer: You can:
• Do a blind transfer using , then enter the extension number to which you wish totransfer the call.
• Do a transfer with consultation by entering the Set Up Transfer sequence , whichwill put your caller on hold and give you an inside dial tone. At this point, dial the party youplan on transferring the call to and tell them that a call is coming, then complete the transferusing the Complete Transfer sequence . Note that if you can’t reach the secondparty, or they don’t want the call, you can retrieve the original caller by getting an insideline dial tone and using the Retrieve from Hold sequence .
Flash 1
* 1
Flash 4
Flash 5
Flash 6
* 1
117

User’s Guide
• You can put the caller in a park orbit using a the Blind Transfer sequence , thentransferring them to a park orbit (100, for example). You can then page the person you wantto have pick up the call by dialing the Paging extension 111 and announcing that so-and-sohas a call on 100. The other person just has to pick up any phone and dial 100 to pick up thecaller from the park orbit.
Question: Sometimes I’m in another person’s office when I hear my phone ring. How can I avoidhaving to run to my office to catch the call?
Answer: Pick up the phone closest to you and enter the Pick Up Ring Group 0 sequence .
Question: Late at night, I sometimes hear the phone ringing over our PA system. What is this, andhow to I pick up the call?
Answer: When your system is set to “night ringing”, incoming calls may be set to ring over the PA sys-tem so that anyone left in the building will hear it and be given the chance to answer. To pickup these calls, enter the Pick Up Ring Group 1 sequence .
Question: My phone occasionally rings with a short ring, but when I pick it up, no one is there.
Answer: You have a call waiting on hold or stuck in a park orbit. You can retrieve it by getting an insidedialtone at the phone which is giving the short rings and using the Retrieve From Holdsequence , or dialing the park orbit number, such as 100.
Question: I put a caller on hold, then started another conversation and accidentally put the secondcaller on hold also. How do I get back to the first caller?
Answer: You have to pick up your second caller from hold using , then either use the Swap Holdsequence to put the second caller on hold and retrieve the first caller, or finish yourcall with the second caller, hang up (or disconnect using ), then pick up and retrievethe first call from hold using .
Flash 4
* 0 0
* 0 1
* 1
* 1Flash *
Flash #* 1
118
Frequently asked questions
Question: When people call my extension, my phone doesn’t ring. Instead, their calls go to my voicemail. When I call them back, they say they heard my phone ring, but I didn’t pick up.What’s going on?
Answer: If your phone is equipped with a switch to turn the ringer on and off, check it and make surethat the ringer is turned on.
If the ringer is on but the phone still won’t ring, you may have your extension in the Do NotDisturb mode. Change the mode to Accept Calls as described on page 10.
Question: Sometimes, when I’m in the middle of a conversation, I hear two beeps. What does thismean?
Answer: This is the call-waiting indicator, meaning that another caller is calling. You can put your exist-ing call on hold and pick up the new call, or let the new call go to voice mail.
By the way, one beep would be a reminder that you have another call on hold, and three beepswould indicate that someone else has barged into your conversation by using the Barge Insequence .
Question: When I pick up my phone, I hear a beep-beep-beep tone then a steady dial tone. Whatdoes this mean?
Answer: This is known as a stutter dial tone. It indicates that you have new messages in your voicemailbox You can have more than one voice mail box causing a stutter dial tone on you exten-sion. See the next question for details.
Question: When I pick up my phone, I get a beep-beep-beep tone instead of a steady dial tone, butwhen I access my voice mailbox, there are no new messages.
Answer: The phone you are picking up may have more than one extension associated with it, and thenew message or messages indicated by the stutter dial tone may be for one of these other exten-sions. Use the Announce Line and Extension Numbers sequence to determine the physi-cal line number and all extension numbers associated with the telephone being used, then tryaccessing the voice mailboxes of any other extensions mentioned. For example, in the defaultconfiguration, Ext. 303 has both mailboxes 503 and 599 that cause stutter dial tones on its line.
# 2
# 8
119
User’s Guide
Question: Do I have to be at my computer to use the computer interface programs?
Answer: For dialing functions, you have to be able to lift the receiver. But you can control any phone ifyou have proper permissions. You can access the Web browser page, or NexDial or NexDi-rector, from any computer on your network, but will still need to log in using your usualextension number and password. Also, unless you have system administration privileges, noneof the operations that require a phone, such as listening to your voice mail over the phone orusing your speed-dialer to dial a number, will be accessible from any other phone but the oneon your desk.
Question: What do I do when I can’t dial “out” from the Web browser?
Answer: First, make sure you have a 9 at the beginning of your number, then a 1 before the area code ifone is present. If these are both present, then it’s possible that your problem is that you are notsuccessfully seizing an outside line.
The 9 at the beginning of your number causes the NexPath Telephony Server to seize an out-side line, wait one second, the dial the remaining digits. If the system is running slow (perhapsa lot of people are making conference calls), then it may take more than one second to seize anoutside line. Try adding one or two commas after the 9 at the beginning of the number (eachcomma creates an additional one second delay).
Question: I cannot get my web browser to properly log into the NexPath Telephony Server. Whatcould be wrong?
Answer: First, make sure you are using Netscape 3.03 or later or Communicator 4.04 or later browserversion. If you do not have DNS, you must enter the system name in the Windows HOSTS file(see next paragraph, or your system administrator), or you must use the IP address instead.JavaScript and cookies must be enabled in the browser. To be sure you have a good networkconnection, try pinging the NexPath Telephony Server. This can be done from a DOS win-dow, by typing the command ping followed by the system name or IP address. You shouldget a response. If you do not, either TCP/IP is not installed correctly, or the network cable isnot properly connected. Remember that the NexPath Telephony Server only uses the 10BaseTnetwork connector (RJ-45 phone jack style connector).
120
Frequently asked questions
The HOSTS file on Windows 95 is located at \Windows\Hosts. On Windows NT, it is locatedat Winnt\system32\drivers\etc\Hosts. Make sure you are not trying to use the HOSTS.SAMfile, or LMHOSTS. These will not work. The HOSTS file should contain at least two lines:
127.0.0.1 localhost
111.111.111.111 nexpath
Substitute your IP address for 111.111.111.111 and your NexPath system name for nexpath.
Also see Testing your network connection on page 20 in the chapter Installation of theSystem Administration Guide.
121

User’s Guide
122
APPENDIX A Glossary
Accept Calls mode Individual extensions can be placed in either an “Accept Calls” mode or a “DoNot Disturb” mode. The “Accept Calls” mode is the normal mode of operation.In comparison, when an extension is in “Do Not Disturb” mode, calls placed to itwill not ring the phone associated with the extension but instead will be sentdirectly to voice mail.
If the extension is part of a call distribution group, incoming calls will be routedpast any extensions which are in the “Do Not Disturb” mode and will go on tothe next extension in the group.
ACD Automated Call Distribution or Automatic Call Distribution. See call distribu-tion groups below.
auto-attendant An automated call-routing system for incoming calls which can be used eitherinstead of or in addition to a live operator. The auto-attendant is the system whichtells incoming callers, “Press 1 for Sales, 2 for...”
barge-in Breaking into an existing conversation or picking up a line after a caller hasalready started leaving voice mail
123
User’s Guide
call distribution group Groups of extensions can be grouped into a call distribution group. This functionis part of the auto-attendant function, and is normally used to allow callers to dialan entire department, such as sales, rather than just an individual. When the auto-attendant routes a call to a call distribution group, the phones associated with allextensions set to “Accept Calls” in the group will ring in sequence (one at a time)until either the call is picked up by someone or it times-out. If a call times-out,depending on how the auto-attendant is configured, the call is either sent to voicemail or the caller is given a message and disconnected. If at least one of theextensions in the group is busy, then the call will go into a waiting queue, wherereassurance messages are played, along with hold music if enabled, until either atime-out is reached or one of the group extensions becomes available.
Note that call distribution groups are not the same as ring groups. See ringgroups for the definition of a ring group.
call forwarding When call forwarding is enabled for an extension, callers dial one extension (forexample, 752) but the call rings and can be answered at another extension (forexample 805). The extension dialed (752) is the “forwarded” extension. Theextension where the call actually rings (805) is the “forwarding” extension. Notethat, in this example, if no one answers at the phone at extension 805, the callwill go to the voice mailbox of extension 752.
call waiting When call waiting is enabled for your extension, you will hear a short beep atyour end of the conversation if you are on the phone and another call comes in.
Note that, when you hear a call-waiting beep, you can simultaneously place yourcurrent call on hold and pick up the incoming call by entering the Pick Up Wait-
ing Call sequence .
You can then toggle between the calls using the Swap Hold sequence
.
Centrex Centrex lines are a type of central office line with special features. Centrex linesare standard analog loop start lines, but have different capabilities at the centraloffice. The only Centrex capability that is relevant for the NexPath TelephonyServer is the ability to transfer a call using hook-flash signalling, so that the Nex-Path Telephony Server can drop out of the call. Centrex lines are sometimesknown by different names in other parts of the US.
Flash 3
Flash *
124
CPC Calling party control, also known as line supervision or wink disconnect signal-ling. All of these terms refer to the brief interruption in the battery current on ananalog line, to indicate to connected equipment when a distant party has discon-nected. The CPC signal is required by the NexPath Telephony Server oninbound CO lines, to prevent calls that are in the auto-attendant or conferencedwith other CO lines, from becoming connected indefinitely even though the out-side party has hung up. Most if not all central offices in the US provide this sig-nal, but some channel banks (analog line conversion from T1 digital lines) donot. NexPath does not recommend connecting the NexPath Telephony Server tochannel bank or ISDN-to-analog equipment that does not provide the CPC sig-nal.
CPC Delay The CPC delay is the time from when the caller actually has disconnected, towhen the central office sends the CPC signal. The NexPath Telephony Serverhas a programmable CPC delay compensation adjustment, to compensate for thistime delay, to eliminate long periods of silence at the end of voice mail messages.This can be programmed by the system administrator. See the System Adminis-tration Guide for details. The CPC delay compensation is merely a fixed amountof time that is chopped off of the end of all voice mail messages. If you findvoice mail messages cut off at the end, the CPC delay compensation factor mayhave been set too large. Contact your system administrator.
Day mode Each extension can be assigned to ring at a different phone or group of phonesdepending on whether the system is in the Day mode or Night Mode. Usually,systems are configured so that calls placed to the operator ring at the operator’sphone when the system is in Day mode, but ring over the overhead PA speakerwhen the system is in Night Mode. Individual extensions may be similarly con-figured. Day and night mode can be changed from the telephone keypad andfrom the web application TelOper, as described in the Users Manual.
Do Not Disturb mode Individual extensions can be placed in either an “Accept Calls” mode or a “DoNot Disturb” mode. When an extension is in “Do Not Disturb” mode, callsplaced to it will not ring the phone but instead will be sent directly to voice mail.
If the extension is part of a call distribution group, incoming calls will be routedpast any extensions which are in the “Do Not Disturb” mode and will go on tothe next extension in the group.
extension number The number an outside caller dials to get to a specific person or department.Extension numbers are also used to access outside lines, ring groups, PA speak-ers, voice mail boxes, speed dial numbers, park orbits, and automated attendants.
125
User’s Guide
FSK Frequency Shift Keying, in this manual referring to the signalling technique forcontrol the voice mail light on compatible telephones, and the signalling tech-nique for communicating the caller ID of an inbound call.
hook-flash The hook-flash is used to communicate to the system that some sort of controlsequence will follow. It is accomplished by depressing the telephone hook switchfor an interval of greater than 50 milliseconds and less than 750 milliseconds (amillisecond is 1/1000ths of a second, so 750 milliseconds is 3/4 of a second).
Some telephones have a flash button that accomplishes this task.
Note that your telephone system distinguishes between a hang-up, which islonger than about three-quarters of a second, and a hook-flash, which is a shortdepression of the hook switch.
The symbol is used in this manual to indicate a hook-flash.
inside lines The physical lines which you will run within your building and connect yourtelephones, FAX machines, etc. Also called station lines or inside extensionlines. Designated by the NexPath Telephony Server as IL-1, IL-2, etc.
inside dial tone A dial tone provided by the NexPath Telephony Server rather than by the localtelephone company. Note that, depending on the dial tone provided by yourphone company, the tone of an inside dial tone and an outside dial tone may beindistinguishable from one another.
listen in Listening into an existing conversation or listening to a line after a caller hasalready started leaving voice mail (screening voice mail).
Night mode Each extension can be assigned to ring at a specific phone or group of phonesdepending on whether the system is in the Day mode or Night Mode. Usually,systems are configured so that calls placed to the operator ring at the operator’sphone when the system is in Day mode, but ring over the overhead PA speakerwhen the system is in Night Mode. Individual extensions may be similarly con-figured. Day and night mode can be changed from the telephone keypad andfrom the web application TelOper, as described in the Users Manual.
outside dial tone A dial tone the local telephone company. Note that, depending on the dial toneprovided by your phone company, the tone of an inside dial tone and an outsidedial tone may be indistinguishable from one another.
outside lines Sometimes called CO, for Central Office, lines, trunk lines, or telco lines. Allof these terms are synonymous, and refer to the physical lines which come intoyour building from the phone company.
park orbit A special way of putting a call on hold which allows anyone to pick the call upby dialing the number of the park orbit (a type of public hold).
Flash
126

password protection To insure that unauthorized people do not retrieve your voice mail, barge intoyour conversations, etc., many of the advanced features of the NexPath Tele-phony Server require that you enter a numerical password to identify yourself tothe system before the feature can be accessed.
physical lines The actual telephone lines connected to the NexPath Telephony Server.
pickup groups See ring groups below.
ring groups Groups of physical telephone lines can be assigned to a ring group, also called apickup group. This function is normally used so that a ringing phone can bepicked up from another (non-ringing) phone using the pick up group sequence
, followed by a single digit ring group number.
An extension can also be assigned to a ring group, so that when the extension isdialed, the group of phones will ring. The first extension picked up in the groupof ringing phones will get the call.
Note that ring groups are not the same as call distribution groups. See call distri-bution group above for the definition of a call distribution group.
Short Name This is the name that is recorded in a voice mai box, so that when a voice mailmessage is copied to another mail box, this name recording is prepended to themessage to identify who it is from. Also, the short name is used to identify allextensions that forward to the voice mail box where it is recorded, to identify theextensions in the dial by name auto-attendant.
system administrator This is the person in charge of administering the system, that is, adding orremoving users, assigning users extension numbers and passwords, and changingother system parameters as needed. Please refer to the NexPath Telephony ServerSystem Administration Guide for more details on what the system administratorcan and cannot do.
user In this manual, the term “user” is used to describe someone who has beenassigned an account on the system by the system administrator (i.e., someonewho has been assigned a password, an extension number, a voice mailbox, etc.).A particular user is identified by the system via his secret password.
VMWI Visual Mail Waiting Indicator, the light on compatible telephones that indicatesif there is unread voice mail. The VMWI standard for voice mail lights is alsocalled the FSK technique (see the FSK definition in this glossary), and refers to asignalling technique for controlling the voice mail light with low speed modem-like tones. Telephones that are caller ID compatible, that have a voice mail indi-cator, are almost universally VMWI compatible, since both signalling techniquesare in the same Bellcore standard.
* 0
127

User’s Guide
128
Index
AAccept Calls mode
defined 123enabling from a telephone 10enabling from NexDial 68enabling from NexDirector 86enabling from the desktop web interface
(TelOper) 108accessing voice mail
from an inside line 48from an outside line 53from NexDial 70from the web interface (TelOper) 93
ACDdefined 123
adding entries to the desktop web interface phonebook (TelOper) 104
adding to a conference callfrom a telephone 19, 42from NexDial 67from the web interface 95
announce line and extension numbers over atelephone 30
auto-attendant, defined 123
automated call distribution (ACD)defined 124
Bbandwidth of system 2barge-in
defined 123performed from a telephone 12performed from the web interface 95performing voice mail barge in from
NexDial 67performing voice mail barge-in from the web
interface (TelOper) 93beeps, described 7blind transfers
performing from a telephone 41performing from NexDial 64performing from the web interface 94
Ccall control
from the desktop using NexDial 66from the web interface (TelOper) 94
call distribution groups
129
User’s Guide
defined 124detailed description 8
call forwardingdefined 124enabling from a telephone 13enabling from NexDial 68enabling from the desktop web interface
(TelOper) 108call waiting
defined 124enabling from a telephone 16enabling from NexDial 68enabling from the desktop web interface
(TelOper) 108cancel call forwarding
from a telephone 14from NexDial 68from the web interface (TelOper) 108
Centrexdefined 124
change numeric pager numberfrom NexDial 77from the telephone 54from the web interface (TelOper) 98
changing a passwordfrom the web interface (TelOper) 102over a telephone 38
channel banksconnecting to the NexPath Telephony
Server 125clearing a command sequence when using a
telephone 18CO lines
defined 126completing a transfer
from a telephone 42from NexDial 67from the web interface (TelOper) 94
Control page, typical (TelOper) 92controlling your phone from a web browser 89copy to intro
130
use with NexDial 73use with web interface 100
copying a voice mail messageto a local computer using NexDial 72to a local computer using the web
interface 100CPC
defined 125CPC delay
defined 125current system configuration, displaying with the
web interface (TelOper) 101
DDay mode
defined 125enabling from a telephone 20enabling from the web interface (TelOper) 102
delete numeric pager numberfrom NexDial 77from the telephone 55
deleting a numeric pager numberfrom the web interface (TelOper) 98
deleting a voice mail messagefrom NexDial 74from the web interface (TelOper) 100
deleting an entry from the TelOper phone book(web interface) 104
determining if you have new voice mail messagesfrom your telephone 47
dial by namerecording your name announcement 55
dialing a numberfrom NexDial 64from the web interface (TelOper) 94
dialing a number from the computer-based phonebook in the web interface (TelOper) 103
dialing a voice mail call back numberfrom NexDial 72from the telephone keypad 51
direct transfersperforming from a telephone 41performing from NexDial 64performing from the web interface 94
disable numeric paging 54disabling call waiting
from a telephone 17from NexDial 68from the desktop web interface (TelOper) 108
disconnecting from a call without hanging upfrom a telephone 22from NexDial 66from NexDirector 86
Do Not Disturb modedefined 125enabling from a telephone 10enabling from NexDial 68enabling from NexDirector 86enabling from the desktop web interface
(TelOper) 108
Eentering a password when using a telephone 38extension numbers
announcing over a telephone 30defined 125
Fforward calls
enabling from a telephone 13enabling from NexDial 68enabling from the desktop web interface
(TelOper) 108forwarding a voice mail message
to another mail box using NexDial 73to another mail box using the telephone
keypad 51to another mail box using the web
interface 100FSK
defined 126
Ggreeting
recording using a telephone 52recording using NexDial 73recording using the web interface 100setting the standard or alternate greeting from
NexDial 74setting your standard or alternate greeting from
the telephone 53
Hhelp
announcing the command sequences over atelephone 24
announcing the use of the telephone keypadwhen in voice mail 52
holdperforming hold operations from NexDial 66performing hold operations from
NexDirector 86performing hold operations from the web
interface (TelOper) 93placing a call on hold from a telephone 25retrieving a call using a telephone 25swapping hold
from the web interface 93
on a telephone 26hook-flash
defined 126detailed description 6sending to a CO line 27
Iinitiating a conference
from a telephone 19from NexDial 67from the web interface 95
131
User’s Guide
inside dial tonedefined 126
inside linesdefined 126detailed description 28
Lline numbers, announcing over a telephone 30listen in
defined 126performed from a telephone 31screening voice mail from NexDial 67
logs, viewing the call logs from the desktop webinterface (TelOper) 105
Mmailbox full 54
NNexDial
Windows desktop call control application 59NexDirector
call director program (NexDir) 81Night mode
defined 126enabling from a telephone 20enabling from the web interface (TelOper) 102
numeric pagersetting up from the telephone 54setting up notification of new voice mail from
NexDial 76setting up notification of new voice mail from
the web interface (TelOper) 98
Oone beep or ring 7on-off-on dial tone 47operator
dialing from the voice mail greeting 56dialing the operator from a telephone 33
132
outside dial tonedefined 126
outside linesdefined 126detailed description 34
PPA system
making announcements through the 35picking up calls ringing over the 8
page upon receiving voice mailsetting up from NexDial 76setting up from the telephone 54setting up from the web interface (TelOper) 98
pagersetup numeric pager notification of new voice
mailfrom the telephone 54
from web interface (TelOper) 98paging (public address) from a telephone 35park orbits
defined 126detailed description 36
passwordsdefined 127detailed description 38
phone bookpage on the desktop web interface
(TelOper) 103physical lines
defined 127picking up a ring group
from a telephone 40from NexDial 66from the web interface (TelOper) 95
picking up a waiting callfrom a telephone 16from NexDial 67from the web interface (TelOper) 95
pickup groups
defined 127placing a call on hold
from a telephone 25from NexDial 66from NexDirector 86from the web interface (TelOper) 92
playing backyour mail box greeting from NexDial 74your mailbox greeting over a telephone 52your mailbox greeting using the web
interface 99
Rrecord a greeting
using a telephone 52using NexDial 73using the web interface 100
recording a copy to introfrom NexDial 73from web interface (TelOper) 100
recording your short name 55retrieving a call from hold
from a telephone 25from the web interface (TelOper) 93using NexDial 66using NexDirector 86
ring groupsdefined 127detailed description 8picking up from NexDial 66picking up using a telephone 40picking up using the web interface
(TelOper) 95rings 7
Sscreening voice mail
from NexDial 67from the telephone 31
sending a call to voice mail
from NexDial 68from the web interface (TelOper) 93
setting up a conference callfrom a telephone 19from NexDial 67from the web interface (TelOper) 94
setting up transfersfrom a telephone 41from NexDial 67from the web interface (TelOper) 94
short namedefined 127
speed dialusing buttons in NexDial 66
speed dial buttonson the desktop web interface (TelOper), adding
and deleting 104stutter dial tone 47summary of the keypad sequences used with a
telephone for call control 43swapping between a current call and a call on
holdfrom a telephone 16, 26from NexDial 66from the web interface 93
system administrator, defined 127system configuration, displaying via the web
interface (TelOper) 101
TTAPI
Installing the NexPath TAPI TSP 109NexPath TAPI Interface 109Uninstalling the NexPath TAPI TSP 115Using the NexPath TSP with other
programs 113telco lines
defined 126telephone keypad when in voice mail
(diagram) 49
133
User’s Guide
three beeps 8time and date announcement
setting from NexDial 75setting from web interface (TelOper) 98
transferring callsfrom a telephone 41using the web interface (TelOper) 94
trunk linesdefined 126
two beeps 7
UURL of phone system 90user, defined 127
Vviewing the call logs from the desktop web
interface (TelOper) 106VMWI
defined 127voice mail
accessing fromNexDial 70
the web interface (TelOper) 93accessing from an inside line 48accessing from an outside line 53alternate greeting 53announce time and/or date
setting from NexDial 75
setting from the web interface
(TelOper) 98deleting a message using NexDial 74deleting a message using the web
interface 100determining if you have new messages using
your telephone 47dialing a call back number from NexDial 72dialing a call back number from the keypad 51forwarding messages to other mail boxes
134
from NexDial 73
from the telephone 51
from the web interface (TelOper) 100help over telephone 52main menu 50message menu 49message sorting order 51playing back messages from the telephone 51playing back your greeting from a
telephone 52playing back your greeting using NexDial 74playing back your greeting using the web
interface 99recording a greeting
from a telephone 52
from NexDial 73
from the web interface 100recording your short name 55setting up numeric pager notification
from NexDial 76
from the telephone 54
from the web interface (TelOper) 98standard greeting 53use of telephone keypad when in 49
Voice Mail Alertbutton changes color in NexDirector 86pop-up on the web browser interface
(TelOper) 96red indicator on NexDial program 68
voice mailbox full 54