newborn hal user's guide hal® s3010 newborn hal is an interactive educational system developed...
TRANSCRIPT
Newborn HAL®
S3010
Newborn HAL is an interactive educational system
developed to assist a certified instructor. It is not a
substitute for a comprehensive understanding of the
subject matter and not intended for clinical decision
making.
User Guide 14.5.1
© Gaumard Scientific Company, 2014
All Rights Reserved
www.Gaumard.com

2 | User Guide | Newborn HAL |
| Newborn HAL | User Guide | 3
Contents Contents……………………………………………………………………………………..3
End User License Agreement…………………………………………………6
Care and Cautions……………………………………………………………………8
Overall Warnings………………………………………………………………………………………………………9
Electrical Therapy…………………………………………………………………………………………………..10
Getting Started………………………………………………………………………..11
Overview………………………………………………………………………………………………………………….12
Terminology…………………………………………………………………………………………………………….14
Equipment Set-up…………………………………………………………………..15
Control Table PC…………………………………………………………………………………………………...16
Newborn HAL Battery…………………………………………………………………………………………...16
Virtual Monitor………………………………………………………………………………………………………..18
Working with UNI………………………………………………………………..20
Initializing the Simulator……………………………………………………………………………………….21
UNI Interface………………………………………………………………………………………………………….25
Status / Details Controls………………………………………………………………………………………27
Modeling (Newborn/Premie)……………………………………………………………………………….31
Working with Newborn HAL……………………………………………..33
Airway……………………………………………………………………………………………………………………..35
Intubation…………………………………………………………………………………………………………..35
Airway Sounds…………………………………………………………………………………………………35
Breathing………………………………………………………………………………………………………………..35
4 | User Guide | Newborn HAL |
Breathing Pattern .................................................................................................... 35
Lung Sounds ........................................................................................................... 35
Bilateral Chest Rise ................................................................................................ 35
Pulmonary Ventilation ............................................................................................ 36
Cardiac ........................................................................................................................36
Heart Sounds .......................................................................................................... 36
Chest compressions ............................................................................................... 36
ECG Monitoring and Electrical Therapy .............................................................. 36
Circulation ...................................................................................................................37
Palpable Pulses ...................................................................................................... 37
Programmable Blood Pressure ............................................................................. 37
Connecting the Modified Cuff ................................................................................ 37
Intravenous Extremities ......................................................................................... 37
Filling the IV Vasculature ....................................................................................... 38
Intramuscular Injection Sites ................................................................................. 40
Intraosseous Access .............................................................................................. 40
Cephalic ......................................................................................................................41
Cyanosis .................................................................................................................. 41
Muscle Tone and Seizures .................................................................................... 41
Systemic ......................................................................................................................41
Catheterization ........................................................................................................ 41
Umbilical Cord (System S/N B0906424 or higher) ............................................. 41
Bowel Sounds (Systems S/N B0906424 or higher) ........................................... 42
Other ............................................................................................................................42
Temperature Probe Placement Detection ........................................................... 42
Vital Signs Monitor.................................................................................................. 42
Pro + (Optional) ...................................................................................................... 43
Appendix………………………………………………………………………………….44
More about Scenarios ...............................................................................................45
Factory Preset Scenarios ...................................................................................... 45
More about scenarios ................................................................................................58

| Newborn HAL | User Guide | 5
Troubleshooting ......................................................................................................... 61
Wireless Network ...................................................................................................... 67
Consumables, Replacements, and Optional Parts ............................................... 71
Warranty ..................................................................................................................... 73
Contact Us ................................................................................................................. 74

6 | User Guide | Newborn HAL |
End User License Agreement This is a legal agreement between you, the end user, and Gaumard Scientific Company, Inc.
(“Gaumard”). This software is protected by copyright laws and remains the sole property of
Gaumard. By installing the UNI (the "Software") media, you agree to be bound by the terms of this
agreement. If you do not agree to the terms of this agreement, promptly return the uninstalled
media and accompanying items to Gaumard at the address indicated below.
1. Grant of License. Gaumard hereby grants to you (an individual or institution) the right to install
and activate the Software on one computer for use with one Interactive patient simulator system.
The software may also be installed on any number of other computers at the same institution so
that students may access the learning resources. One copy of the software may be made for
backup purposes. You may not network this Software, or allow multiple users unless you
purchased a multi-user workstation license. Sharing this Software with other individuals or allowing
other individuals to view the contents of this Software is in violation of this license.
2. Copyright. The Software is owned by Gaumard and protected by United States copyright laws
and international treaty provisions. Therefore, you must treat this Software like any other
copyrighted material. You may not make this Software or copies thereof available in any manner or
form or use, copy or transfer the Software, in whole or in part, except as provided herein.
3. Other Restrictions. You may not rent or lease this Software to any other party. You may not alter,
merge, modify, adapt, reverse engineer, decompile or disassemble the software, or disclose the
contents of this Software to any other party.
4. Electronic Transmission of Software. If you received the Software by electronic transmission or
by Internet delivery, by installation of the Software, you acknowledge that you have read and
understand this license agreement and agree to be bound by its terms and conditions.
5. Term of Agreement. The term of this Agreement and the license granted to you pursuant hereto
shall commence upon installation of this Software. This Agreement and the license granted herein
may otherwise be terminated by Gaumard in the event that you are in breach of any provision of
this Agreement. In the event of termination, you agree to immediately return this Software,
accompanying items, and any copies thereof to Gaumard.
6. LIMITED WARRANTY
(A) THE CD-ROM MEDIA (THE "MEDIA") WHICH CONTAINS THIS SOFTWARE IS
WARRANTED, FOR A PERIOD OF 30 DAYS FROM THE DATE OF PURCHASE, TO BE FREE
FROM DEFECTS IN MATERIAL AND WORKMANSHIP. ELECTRONIC TRANSMISSION IS
WARRANTED TO BE FREE FROM DEFECTS AT THE MOMENT OF TRANSMISSION. YOUR
SOLE AND EXCLUSIVE REMEDY, AND GAUMARD'S SOLE LIABILITY, IS TO REPLACE THE
DEFECTIVE MEDIA OR TO REPEAT THE ELECTRONIC TRANSMISSION PROVIDED THAT
YOU NOTIFY GAUMARD IN WRITING OF SUCH DEFECT OR DEFECTIVE TRANSMISSION
AND RETURN THE DEFECTIVE MEDIA, IF ANY, DURING THE 30-DAY WARRANTY PERIOD.
(B) EXCEPT AND TO THE EXTENT EXPRESSLY PROVIDED IN PARAGRAPH (A), THE
SOFTWARE AND ACCOMPANYING WRITTEN MATERIALS ARE PROVIDED ON AN "AS IS"
BASIS, WITHOUT ANY WARRANTIES OF ANY KIND, INCLUDING, BUT NOT LIMITED TO, ANY
IMPLIED WARRANTIES OF MERCHANTABILITY OR FITNESS FOR ANY PARTICULAR
PURPOSE. NO ORAL OR WRITTEN INFORMATION OR ADVICE GIVEN BY GAUMARD, ITS
DEALERS, DISTRIBUTORS, AGENTS OR EMPLOYEES SHALL CREATE A WARRANTY OR IN
ANY WAY INCREASE THE SCOPE OF THIS WARRANTY, AND YOU MAY NOT RELY ON ANY
SUCH INFORMATION OR ADVICE. GAUMARD DOES NOT WARRANT, GUARANTEE, OR
| Newborn HAL | User Guide | 7
MAKE ANY REPRESENTATIONS REGARDING THE USE OR THE RESULTS OF USE, OF THE
SOFTWARE OR WRITTEN MATERIALS IN TERMS OF CORRECTNESS, ACCURACY,
RELIABILITY, CURRENTNESS, OR OTHERWISE, AND THE ENTIRE RISK AS TO THE
RESULTS AND PERFORMANCE OF THE SOFTWARE IS ASSUMED BY YOU. IF THE
SOFTWARE OR WRITTEN MATERIALS ARE DEFECTIVE, YOU AND NOT GAUMARD OR ITS
DEALERS, DISTRIBUTORS, AGENTS, OR EMPLOYEES, ASSUME THE ENTIRE COST OF ALL
NECESSARY SERVICING, REPAIR OR CORRECTION OTHER THAN EXPRESSLY
DESCRIBED ABOVE.
(C) NEITHER GAUMARD NOR ANYONE ELSE WHO HAS BEEN INVOLVED IN THE CREATION,
PRODUCTION OR DELIVERY OF THIS PRODUCT SHALL BE LIABLE FOR ANY DIRECT,
INDIRECT, CONSEQUENTIAL OR INCIDENTAL DAMAGES (INCLUDING DAMAGES FOR LOSS
OF BUSINESS PROFITS, BUSINESS INTERRUPTION, LOSS OF BUSINESS INFORMATION,
AND THE LIKE) ARISING OUT OF THE USE OR INABILITY TO USE SUCH PRODUCT OR
RELATED TO THIS AGREEMENT EVEN IF GAUMARD HAS BEEN ADVISED OF THE
POSSIBILITY OF SUCH DAMAGES. GAUMARD SHALL NOT BE LIABLE TO YOU FOR ANY
INDIRECT, SPECIAL, INCIDENTAL, OR CONSEQUENTIAL DAMAGES OR LOST PROFITS
ARISING OUT OF OR RELATED TO THIS AGREEMENT OR YOUR USE OF THE SOFTWARE
AND/OR THE RELATED DOCUMENTATION, EVEN IF GAUMARD HAS BEEN ADVISED OF THE
POSSIBILITY OF SUCH DAMAGES. IN NO EVENT SHALL GAUMARD'S LIABILITY HERE
UNDER, IF ANY, EXCEED THE PURCHASE PRICE PAID BY YOU FOR THE SOFTWARE.
ALL RIGHTS NOT EXPRESSLY GRANTED IN THIS LICENSE AGREEMENT ARE RESERVED
BY GAUMARD.
ACKNOWLEDGMENT
BY INSTALLATION OF THIS SOFTWARE, YOU ACKNOWLEDGE THAT YOU HAVE READ AND
UNDERSTAND THE FORE GOING AND THAT YOU AGREE TO BE BOUND BY ITS TERMS
AND CONDITIONS. YOU ALSO AGREE THAT THIS AGREEMENT IS THE COMPLETE AND
EXCLUSIVE STATEMENT OF AGREEMENT BETWEEN THE PARTIES AND SUPERSEDES ALL
PROPOSED OR PRIOR AGREEMENTS, ORAL OR WRITTEN, AND ANY OTHER
COMMUNICATIONS BETWEEN THE PARTIES RELATING TO THE LICENSE DESCRIBED
HEREIN.

8 | User Guide | Newborn HAL |
Care and Cautions

| Newborn HAL | User Guide | 9
Overall Warnings Remember that damage caused by
misuse is not covered by your
warranty. It is critical to understand
and comply with the following
guidelines. Additional warnings are
found throughout the documentation
If the simulator will not be used for
an extended period, re-charge the
battery at least once every 30 days
to prevent damage to the battery.
Do not attempt to intubate without
lubricating the airway adjunct with a
silicone oil lubricant (provided).
Failure to do so will make intubation
very difficult and is likely to result in
damage.
NEVER disconnect the
communications module while the
UNI software is running. The
software will halt, and the module
may be damaged.
When simulating drug administration
via endotracheal tube, providers
must use an empty syringe. Passing
liquids into the trachea or esophagus
may cause internal damage.
Newborn HAL should be cleaned
with a cloth dampened with diluted
liquid dishwashing soap. If medical
adhesives remain on the skin, clean
with alcohol wipes. DO NOT USE
“GOO GONE” as the citric acid in
the formula will cause pitting of the
various materials comprising your
simulator.
Store Newborn HAL in a cool, dry
place. Extended storage above 85
degrees Fahrenheit (29 Celsius) will
cause the simulator to soften and
slowly warp. It is acceptable to
operate Newborn HAL at an ambient
temperature of 95 degrees
Fahrenheit (35 Celsius).
Newborn HAL is "splash-proof" but
not water-proof. Do not submerge
or allow a large volume of fluid to
enter the interior of the simulator.
Do not expose the tablet computer
to water or excessive dust unless it
is protected by a rugged case
(available separately).
Mouth to mouth resuscitation without
a barrier device is not
recommended, as it will contaminate
the airway. Treat Newborn HAL with
the same precautions that would be
used with a real patient.
The use of needles larger than 22
gauge will reduce the lifetime of the
lower arms' skin and veins.
When the arm veins require
replacement, contact Gaumard to
arrange for a lower arm exchange.
Refer to the Consumables and
Replacement Parts section of this
guide, and contact customer service
for more information.
Do not inject fluids into the
intramuscular sites. Intramuscular
sites are for placement exercises
only.
Do not remove or replace the
umbilical cord while Newborn HAL is
in operation. Doing so will cause
damage to the system.
10 | User Guide | Newborn HAL |
Do not pull or carry the simulator by
the limbs. Handle Newborn HAL with
the same care as a human patient.
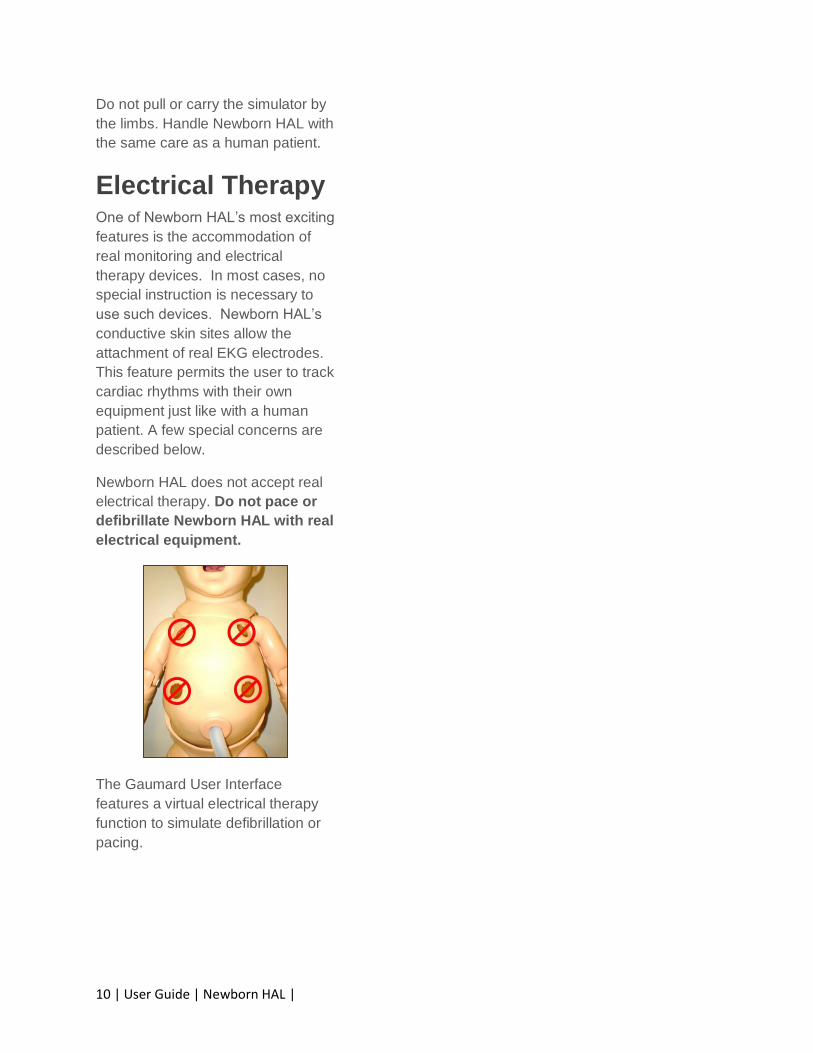
Electrical Therapy One of Newborn HAL’s most exciting
features is the accommodation of
real monitoring and electrical
therapy devices. In most cases, no
special instruction is necessary to
use such devices. Newborn HAL’s
conductive skin sites allow the
attachment of real EKG electrodes.
This feature permits the user to track
cardiac rhythms with their own
equipment just like with a human
patient. A few special concerns are
described below.
Newborn HAL does not accept real
electrical therapy. Do not pace or
defibrillate Newborn HAL with real
electrical equipment.
The Gaumard User Interface
features a virtual electrical therapy
function to simulate defibrillation or
pacing.

| Newborn HAL | User Guide | 11
Getting Started
12 | User Guide | Newborn HAL |
Overview
GENERAL
Tetherless and fully responsive
even while being transported
Powered from an internal
rechargeable battery or wall
outlet
Battery capable of 300
recharges
Simulator receives commands
from a wireless tablet PC and
operate at distances up to 300
feet
Option to operate automatically
using Automatic mode or
manually by the Instructor
Training Guide with both basic
and advanced interactive
scenarios
Use pre-programmed scenarios,
modify them or create your own
quickly and easily
Installation and training
worldwide
Simulation Made Easy TM
AIRWAY
Calibrate head flexion to obstruct
airflow and chest rise
Oral and nasal intubation
Use an ET tube or LMA
Sensors detect depth of
intubation
Unilateral chest rise with right
main stem intubation
Multiple upper airway sounds
synchronized with breathing
APPEARANCE
Color responds to hypoxic
events and interventions
(healthy, mild cyanosis, severe
cyanosis)
Forearms movements reveal
muscle tone (active, medium,
limp)
BREATHING
Control rate and depth of
respiration and observe chest
rise
Ventilation is measured and
logged
Select independent left and right
lung sounds
Chest rise and lung sounds are
synchronized with selectable
breathing patterns
Accommodates assisted
ventilation, including BVM and
mechanical support
Unilateral chest rise
CIRCULATION
Conductive skin regions allow for
ECG monitoring with real
equipment
Multiple heart rhythms, rates and
complications
Heart sounds include a normal
heart as well as atrial and
ventricular septal defects
Chest compressions are
measured and logged
Blood pressure can be taken
bilaterally using a cuff, palpation,
or auscultation
Blood pressure sounds audible
between systolic and diastolic
pressures
| Newborn HAL | User Guide | 13
Umbilical pulse and bilateral
brachial pulses operate
continuously
Pulse strengths vary with blood
pressure and pulses are
synchronized with ECG.
SIMULATOR
Physical size is 50th percentile
at 40 weeks gestational age
Interchangeable genitalia
Internal rechargeable NiMH
battery
Venous access
Bilateral IV training arms
Patent umbilicus
Intraosseous access at tibia
CONTROL
Wireless tablet PC with stylus
control
Communication modules are
FCC and CE Compliant
Communications module can be
used simultaneously with the
tablet computer's integrated
wireless (IEEE 802.11b)
networking device
ACCESSORIES
100-240 VAC Charger
Power supply
Battery Charger
Blood pressure cuff
Instructions
Carrying case
OTHER
One year limited warranty,
extended warranty to three years
Installation and training services
available
14 | User Guide | Newborn HAL |
Terminology It is wise to spend a moment
familiarizing yourself with some of
the terminology that will be used to
discuss simulation with the Newborn
HAL system.
Automatic Mode - In this mode, vital
signs respond automatically to
caregiver participation, instructor
specifications, and pharmacologic
intervention. The model used in this
operating mode was developed
based on physiologic principles.
Features unique to this mode
include: a comprehensive list of
drugs for easy administration, a drug
profile editor for adding new drugs or
editing existing ones, among other
things.
Facilitator - the person conducting
the simulation; an instructor or lab
staff member.
GUI - the Gaumard User Interface -
is the software application, used to
control the simulator and evaluate
care providers.
Palette - a collection of Palette
Items. Each profile has its own
palette.
Palette Item - Any full or partial set
of physiological parameters that
have been grouped and saved
together under a single name.
Profile - a unique Newborn HAL
software configuration, including
custom Palette, Scenarios, and
options. Each Profile acts as a
separate program, in that changes
made to one profile have no effect
on the others.
Provider - a person participating in
the simulation as a healthcare
provider.
Scenario - a saved sequence of
physiological states, like a "playlist."
Scenarios provide a level of
automation that unburdens the
facilitator and allows standardized
presentation of symptoms.
Scenario Item - a Palette Item that is
part of a scenario. Scenario Items
may also represent a fixed delay
period ("Wait") or a pause ("Wait
Indefinitely").
Stylus - a special pointing device for
the tablet computer. The stylus is the
fastest and easiest means of
controlling the Newborn HAL
software. See the Equipment Set-up
section of this guide for more
information on working with the
stylus.

| Newborn HAL | User Guide | 15
Equipment Set-up
16 | User Guide | Newborn HAL |
Newborn HAL
Battery Newborn HAL (S/N B1010788 or
higher) includes two separate power
adapters labeled “Newborn HAL
Charger” and “Newborn HAL Power
Supply”. Please review the use for
each adapter before using the
simulator for the first time.
BATTERY LIFE
Newborn HAL has a maximum
battery runtime of approximately 3
hrs. Total runtime is dependent on
the breathing rate, volumes,
seizures, and muscle tone.
The battery charge is displayed on
the software panel after the
connection with the simulator is
established. For more information
about the battery indicator, refer to
Working with UNI section.
WARNING:
Do not store the simulator with a
discharged battery. It is good
practice to re-charge the battery
at the end of every simulation
session.
If the simulator will not be used for
an extended period, re-charge the
battery at least once every 30 days.
Doing so will prevent a reduction of
the battery’s total charge capacity to
self-discharge.
CHARGING THE BATTERY
The simulator’s battery can only be
recharged using the “battery
charger”. In addition, the simulator
must be off or in standby. The
battery charger does not recharge
the battery while the simulator is in
use, nor does it keep the battery
from discharging.
Turn the simulator off and
connect the battery charger to
recharge the battery.
To charge the battery:
1. Close the UNI software to turn
the simulator off
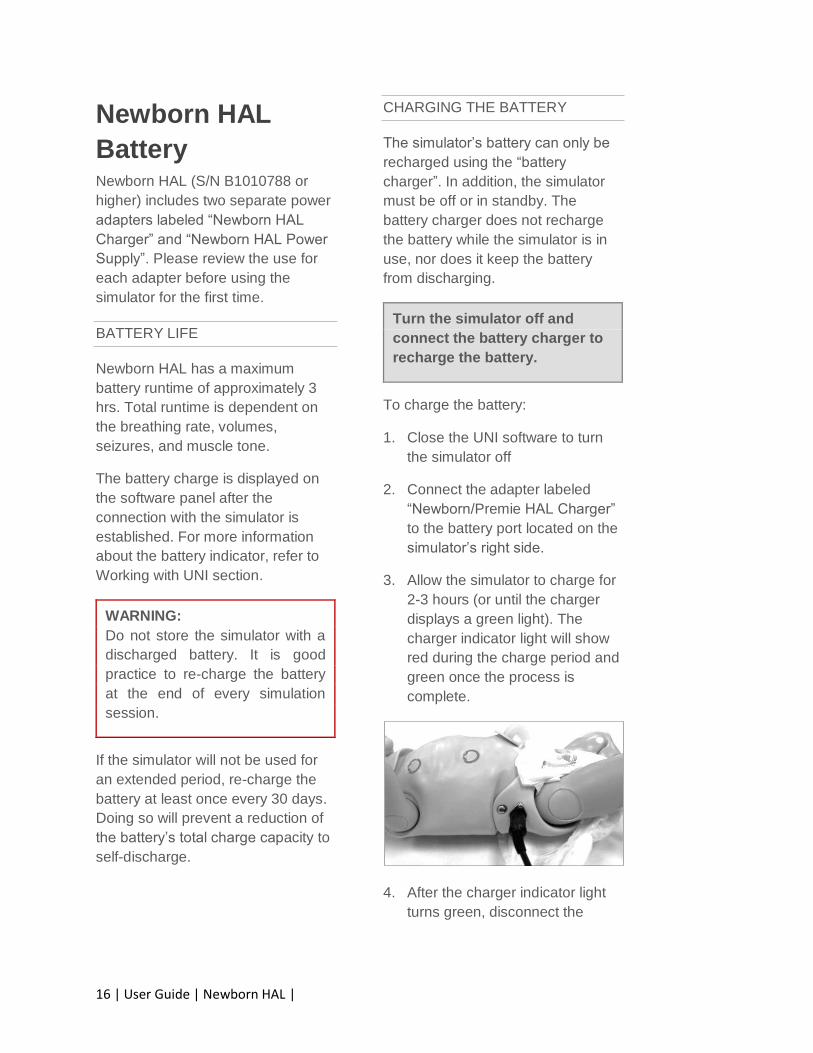
2. Connect the adapter labeled
“Newborn/Premie HAL Charger”
to the battery port located on the
simulator’s right side.
3. Allow the simulator to charge for
2-3 hours (or until the charger
displays a green light). The
charger indicator light will show
red during the charge period and
green once the process is
complete.
4. After the charger indicator light
turns green, disconnect the
| Newborn HAL | User Guide | 17
charger. The simulator is ready
for use.
Avoid using the simulator
while the battery charger is
connected. Please reference
the troubleshooting guide for
information on how to resolve
battery issues.
USING THE POWER SUPPLY
(SYSTEM S/N B1010788 OR
HIGHER)
The “power supply” adapter allows
the simulator to operate through long
simulations sessions by drawing
power from the wall outlet and not
battery reserve. Use the power
supply for simulation sessions
lasting 2 hours or more. If simulation
sessions are shorter than 2 hours,
use the simulator’s battery reserve.
The “power supply” adapter
will NOT re-charge the battery.
Avoid using the “power
supply” adapter when the
simulator’s battery is
completely depleted.
To operate the simulator from wall
power using the power adapter:
1. Fully recharge the simulator’s
battery using the “Battery
Charger” adapter.
2. Disconnect the “Charger” and
connect the “Power Supply”
adapter.
3. Activate the UNI software.
4. The UNI battery icon will display
a lightning icon when the power
supply is connected.
Please contact Gaumard for
information on the power
supply upgrade for earlier
Newborn HAL models.
Control Table PC The tablet PC is preloaded with the
UNI control software used by the
facilitator to initialize the simulator
and control the vital signs.
Before turning on the computer
for the first time, please review
the documentation included
with the product for important
care and warning information.
USING THE STYLUS
The tablet’s stylus is a pen-shaped
input used to interact with files and
programs.
Left click - tap the screen with
the pointer. Tap twice rapidly to
double-click.
Right click - tap and hold a
highlighted item or hold the
button near the pointer and tap
the item or text.
CALIBRATING THE STYLUS
As part of the initial setup process,
calibrate the stylus using the Tablet
and Pen calibration tool in the
Windows® control panel. Complete
the calibration process while holding
18 | User Guide | Newborn HAL |
the pen in a natural writing position
for greater accuracy during normal
use.
WIRELESS COMMUNICATION
USB MODULE
The controlling computer transmits
the startup and control commands to
simulator through the USB RF
communication module.
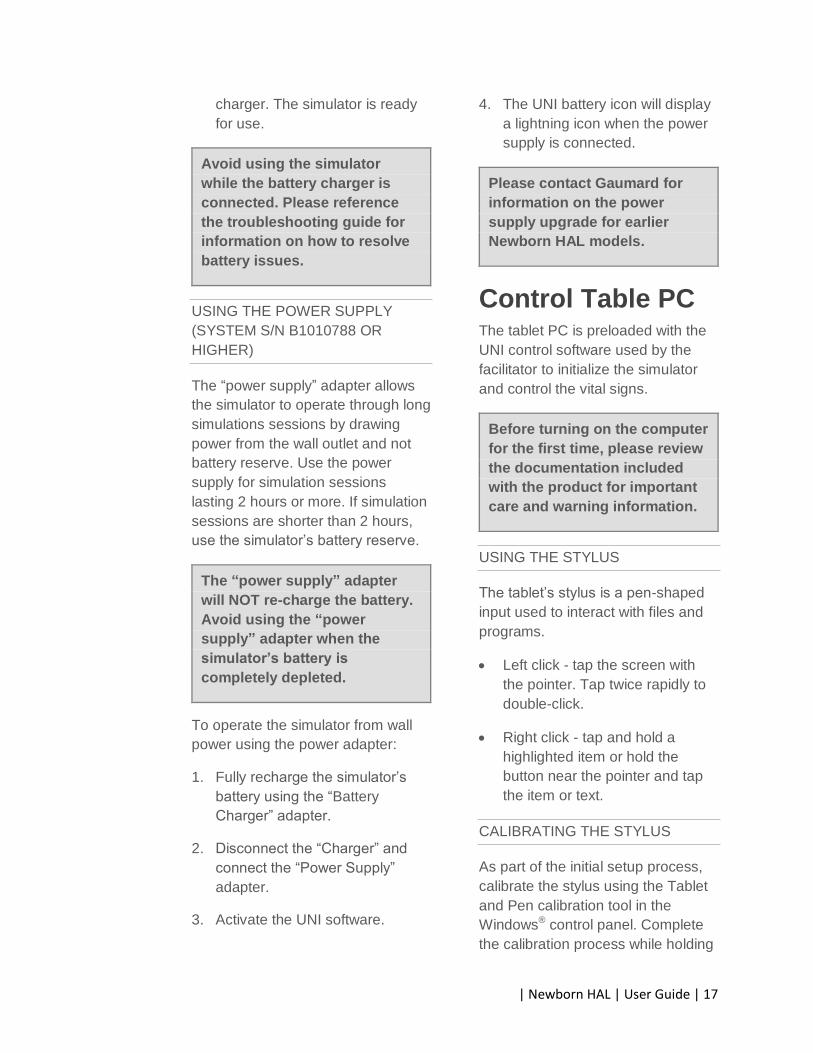
Connect the RF communication
module to an available USB port on
the tablet.
Secure the RF communication
module to the tablet or PRO+
computer using the Velcro patch.
The tablet is now ready to
communicate with the simulator
wirelessly. For information about the
signal strength indicator, go to
Working with UNI section
WARNING:
Never disconnect the
communications module while the
Newborn HAL software is
running. Doing so can seriously
damage the module.
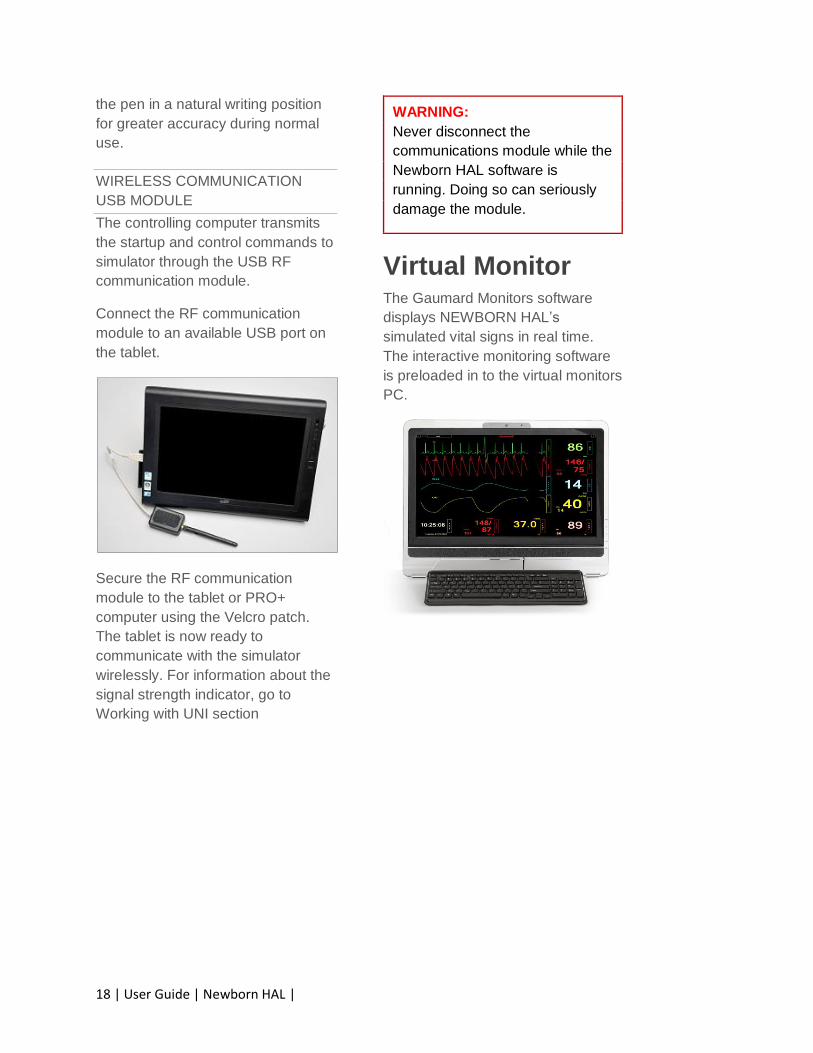
Virtual Monitor The Gaumard Monitors software
displays NEWBORN HAL’s
simulated vital signs in real time.
The interactive monitoring software
is preloaded in to the virtual monitors
PC.
| Newborn HAL | User Guide | 19
VIRTUAL MONITOR PC SETUP
Refer to the manufacturer’s
documentation included with the
virtual monitor system components
for important safety, installation, and
start-up information before turning
on the computer for the first time.
To setup the virtual monitor PC:
Place the all-in-one PC within 1.
line of sight of the controlling
computer
Connect the power supply 2.
Connect the USB keyboard and 3.
mouse receiver
Turn on the computer 4.
VIRTUAL MONITOR WIRELESS
CONNECTIVITY
The control PC and the all-in-one
virtual monitor PC automatically
establish a wireless link at startup.
The wireless connection allows the
Gaumard control software to
transmit the vital signs information to
the Gaumard Monitors software.
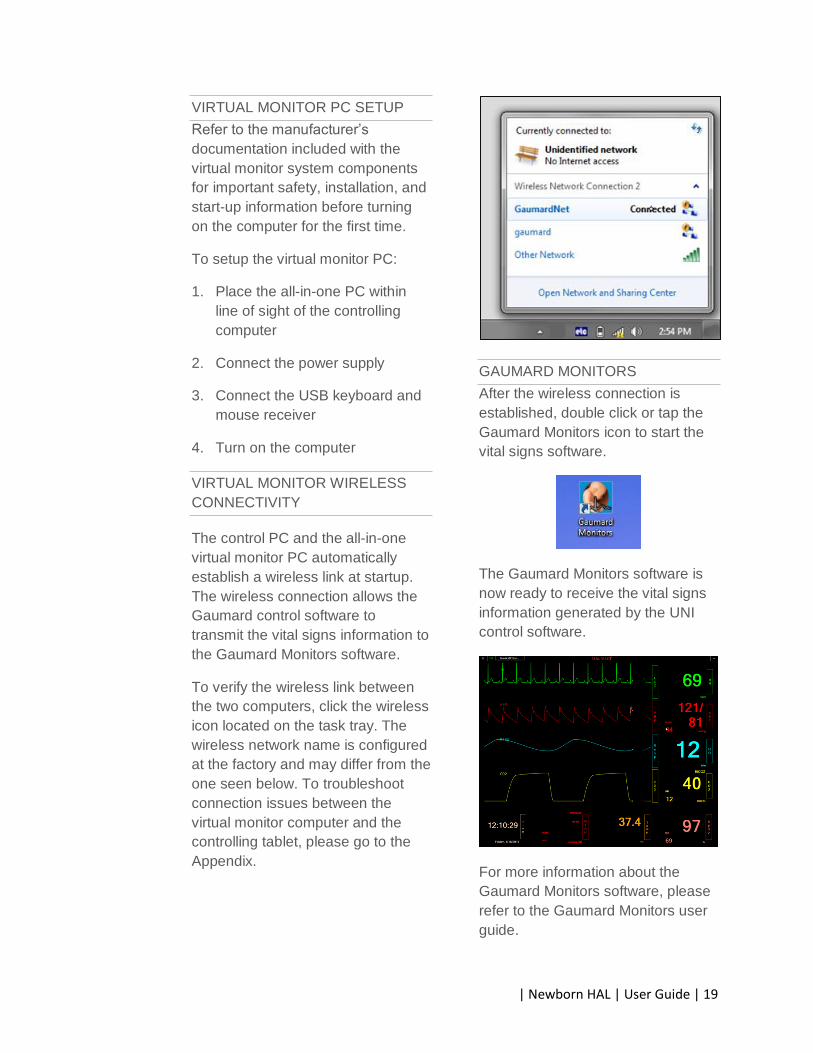
To verify the wireless link between
the two computers, click the wireless
icon located on the task tray. The
wireless network name is configured
at the factory and may differ from the
one seen below. To troubleshoot
connection issues between the
virtual monitor computer and the
controlling tablet, please go to the
Appendix.
GAUMARD MONITORS
After the wireless connection is
established, double click or tap the
Gaumard Monitors icon to start the
vital signs software.
The Gaumard Monitors software is
now ready to receive the vital signs
information generated by the UNI
control software.
For more information about the
Gaumard Monitors software, please
refer to the Gaumard Monitors user
guide.

20 | User Guide | Newborn HAL |
Working with UNI
| Newborn HAL | User Guide | 21
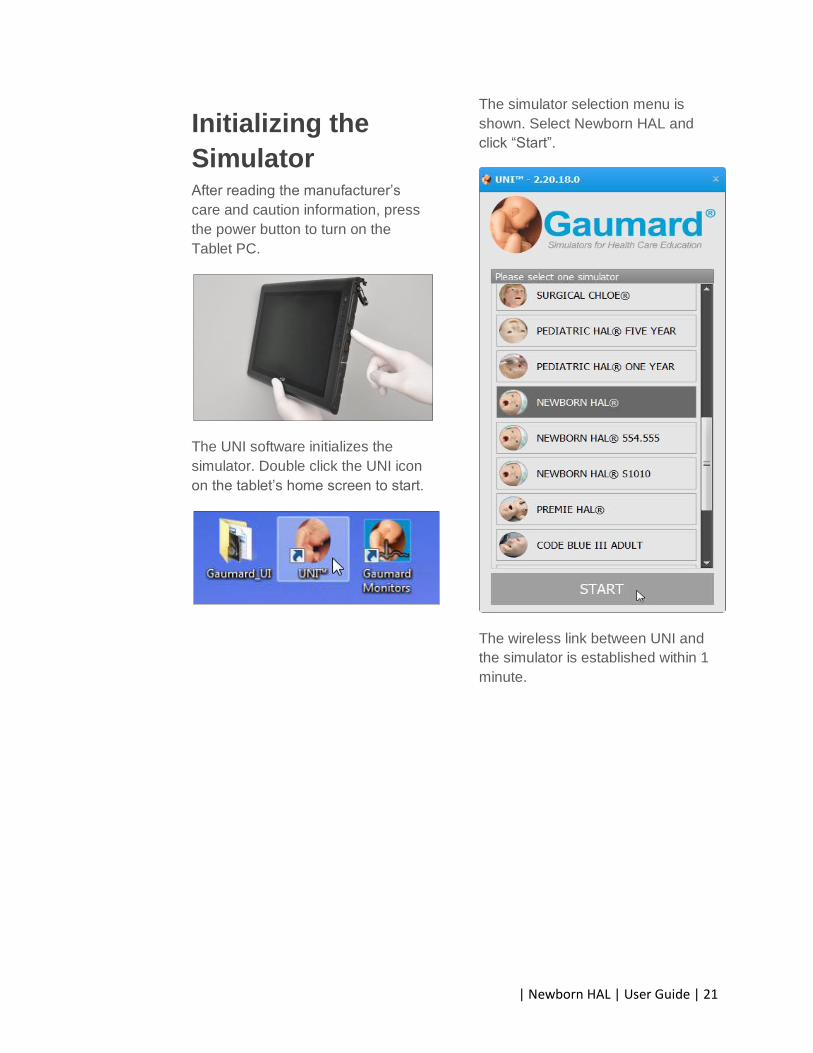
Initializing the
Simulator After reading the manufacturer’s
care and caution information, press
the power button to turn on the
Tablet PC.
The UNI software initializes the
simulator. Double click the UNI icon
on the tablet’s home screen to start.
The simulator selection menu is
shown. Select Newborn HAL and
click “Start”.
The wireless link between UNI and
the simulator is established within 1
minute.
22 | User Guide | Newborn HAL |
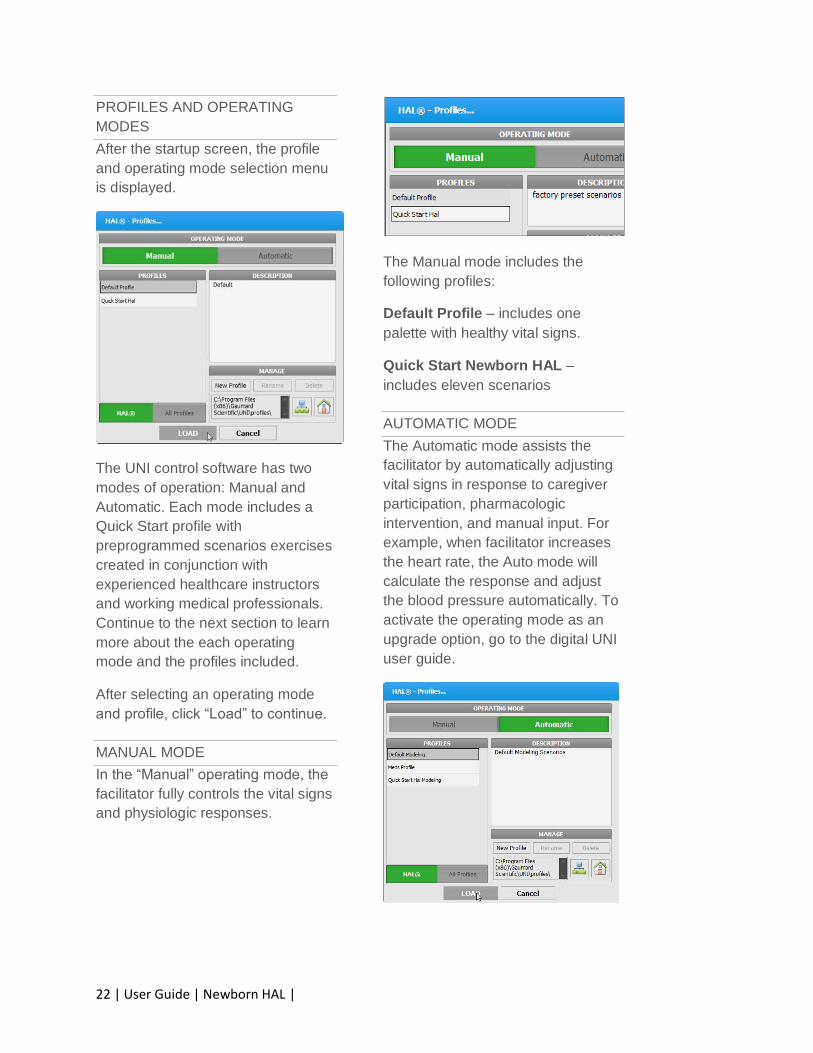
PROFILES AND OPERATING
MODES
After the startup screen, the profile
and operating mode selection menu
is displayed.
The UNI control software has two
modes of operation: Manual and
Automatic. Each mode includes a
Quick Start profile with
preprogrammed scenarios exercises
created in conjunction with
experienced healthcare instructors
and working medical professionals.
Continue to the next section to learn
more about the each operating
mode and the profiles included.
After selecting an operating mode
and profile, click “Load” to continue.
MANUAL MODE
In the “Manual” operating mode, the
facilitator fully controls the vital signs
and physiologic responses.
The Manual mode includes the
following profiles:
Default Profile – includes one
palette with healthy vital signs.
Quick Start Newborn HAL –
includes eleven scenarios
AUTOMATIC MODE
The Automatic mode assists the
facilitator by automatically adjusting
vital signs in response to caregiver
participation, pharmacologic
intervention, and manual input. For
example, when facilitator increases
the heart rate, the Auto mode will
calculate the response and adjust
the blood pressure automatically. To
activate the operating mode as an
upgrade option, go to the digital UNI
user guide.
| Newborn HAL | User Guide | 23
The Automatic mode includes the
following built-in profiles:
Default Modeling– includes one
palette with healthy vital signs.
Meds Profile – This profile includes
a library of pre-programmed drugs to
be used on simulations.
Quick Start Newborn Hal
Modeling – includes eight lineal
scenarios and one branching
scenario allowing instant simulation
of a wide range of conditions
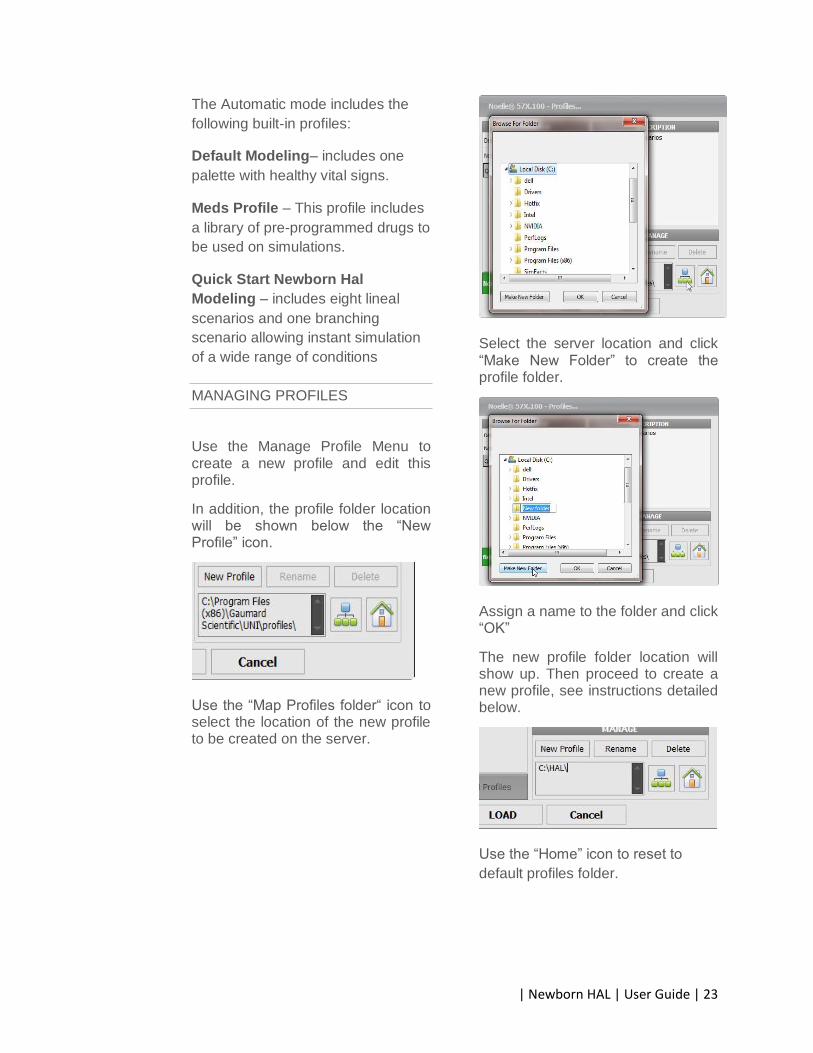
MANAGING PROFILES
Use the Manage Profile Menu to create a new profile and edit this profile.
In addition, the profile folder location will be shown below the “New Profile” icon.
Use the “Map Profiles folder“ icon to select the location of the new profile to be created on the server.
Select the server location and click “Make New Folder” to create the profile folder.
Assign a name to the folder and click “OK”
The new profile folder location will show up. Then proceed to create a new profile, see instructions detailed below.
Use the “Home” icon to reset to
default profiles folder.
24 | User Guide | Newborn HAL |
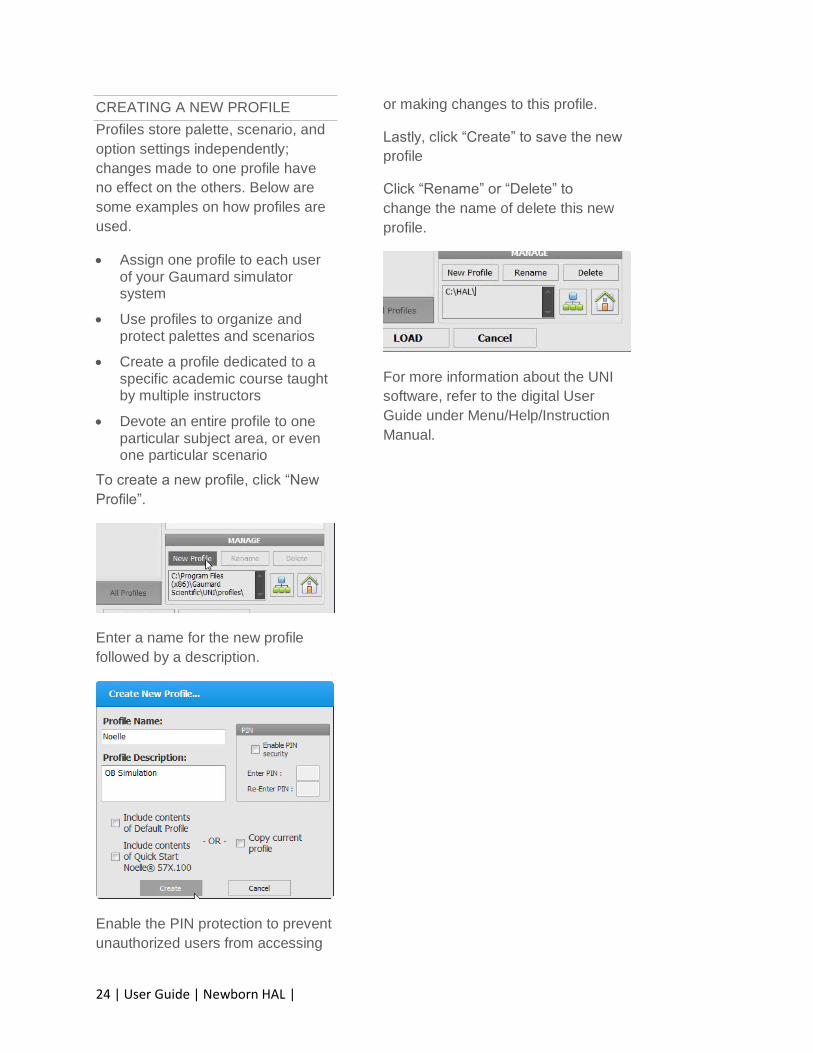
CREATING A NEW PROFILE
Profiles store palette, scenario, and
option settings independently;
changes made to one profile have
no effect on the others. Below are
some examples on how profiles are
used.
Assign one profile to each user of your Gaumard simulator system
Use profiles to organize and protect palettes and scenarios
Create a profile dedicated to a specific academic course taught by multiple instructors
Devote an entire profile to one particular subject area, or even one particular scenario
To create a new profile, click “New
Profile”.
Enter a name for the new profile
followed by a description.
Enable the PIN protection to prevent
unauthorized users from accessing
or making changes to this profile.
Lastly, click “Create” to save the new
profile
Click “Rename” or “Delete” to
change the name of delete this new
profile.
For more information about the UNI
software, refer to the digital User
Guide under Menu/Help/Instruction
Manual.
| Newborn HAL | User Guide | 25
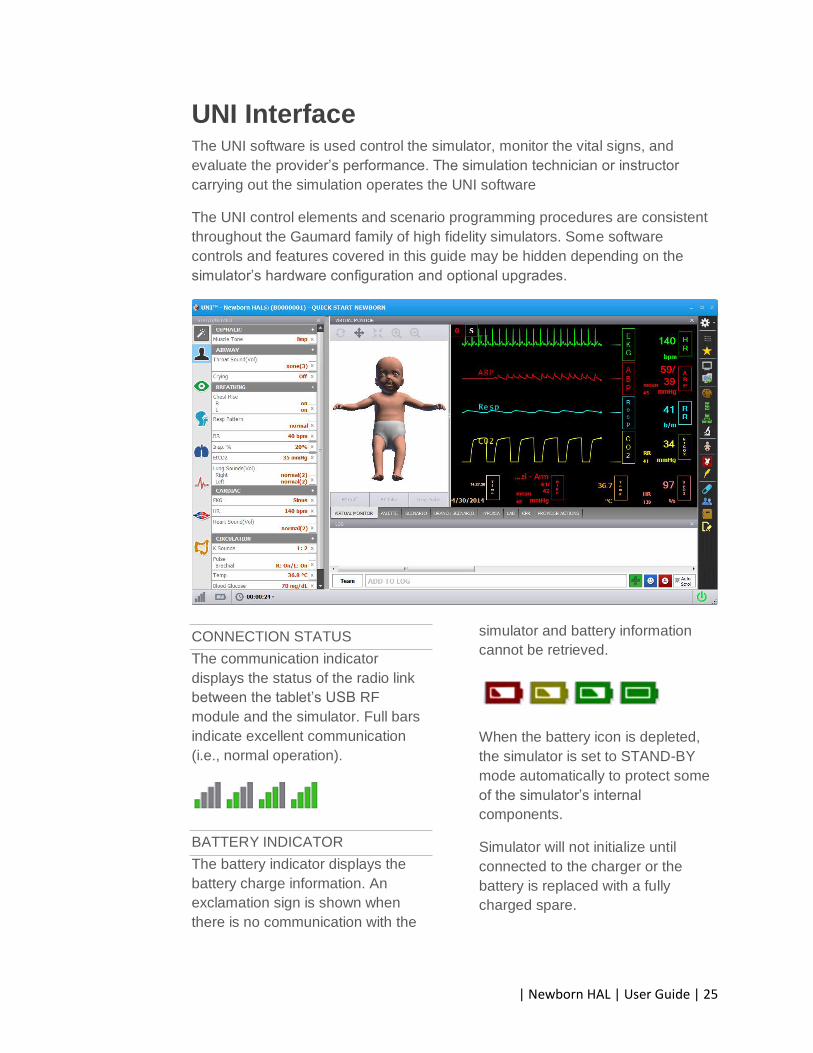
UNI Interface The UNI software is used control the simulator, monitor the vital signs, and
evaluate the provider’s performance. The simulation technician or instructor
carrying out the simulation operates the UNI software
The UNI control elements and scenario programming procedures are consistent
throughout the Gaumard family of high fidelity simulators. Some software
controls and features covered in this guide may be hidden depending on the
simulator’s hardware configuration and optional upgrades.
CONNECTION STATUS
The communication indicator
displays the status of the radio link
between the tablet’s USB RF
module and the simulator. Full bars
indicate excellent communication
(i.e., normal operation).
BATTERY INDICATOR
The battery indicator displays the
battery charge information. An
exclamation sign is shown when
there is no communication with the
simulator and battery information
cannot be retrieved.
When the battery icon is depleted,
the simulator is set to STAND-BY
mode automatically to protect some
of the simulator’s internal
components.
Simulator will not initialize until
connected to the charger or the
battery is replaced with a fully
charged spare.
26 | User Guide | Newborn HAL |
WARNING
Turn Simulator OFF before
replacing the battery. Failure to
do so could result in serious
damage to the system.
Feature Runtime
Internal Battery Approx. 3 hours
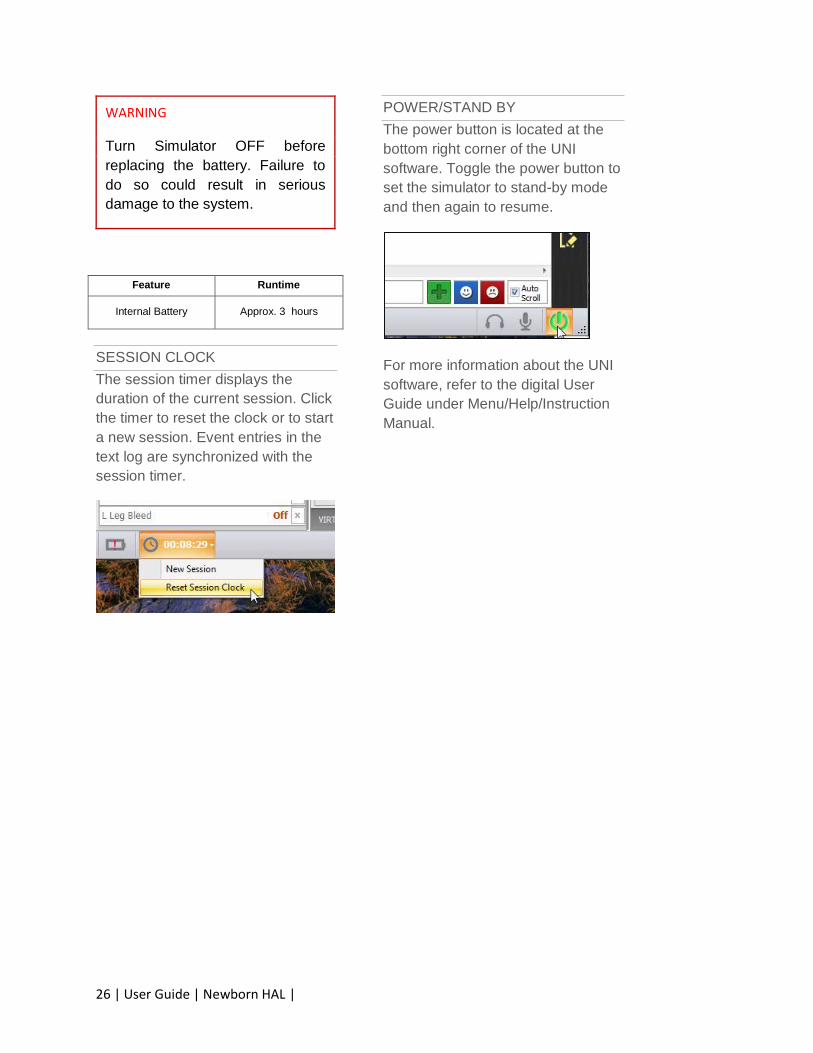
SESSION CLOCK
The session timer displays the
duration of the current session. Click
the timer to reset the clock or to start
a new session. Event entries in the
text log are synchronized with the
session timer.
POWER/STAND BY
The power button is located at the
bottom right corner of the UNI
software. Toggle the power button to
set the simulator to stand-by mode
and then again to resume.
For more information about the UNI
software, refer to the digital User
Guide under Menu/Help/Instruction
Manual.
| Newborn HAL | User Guide | 27
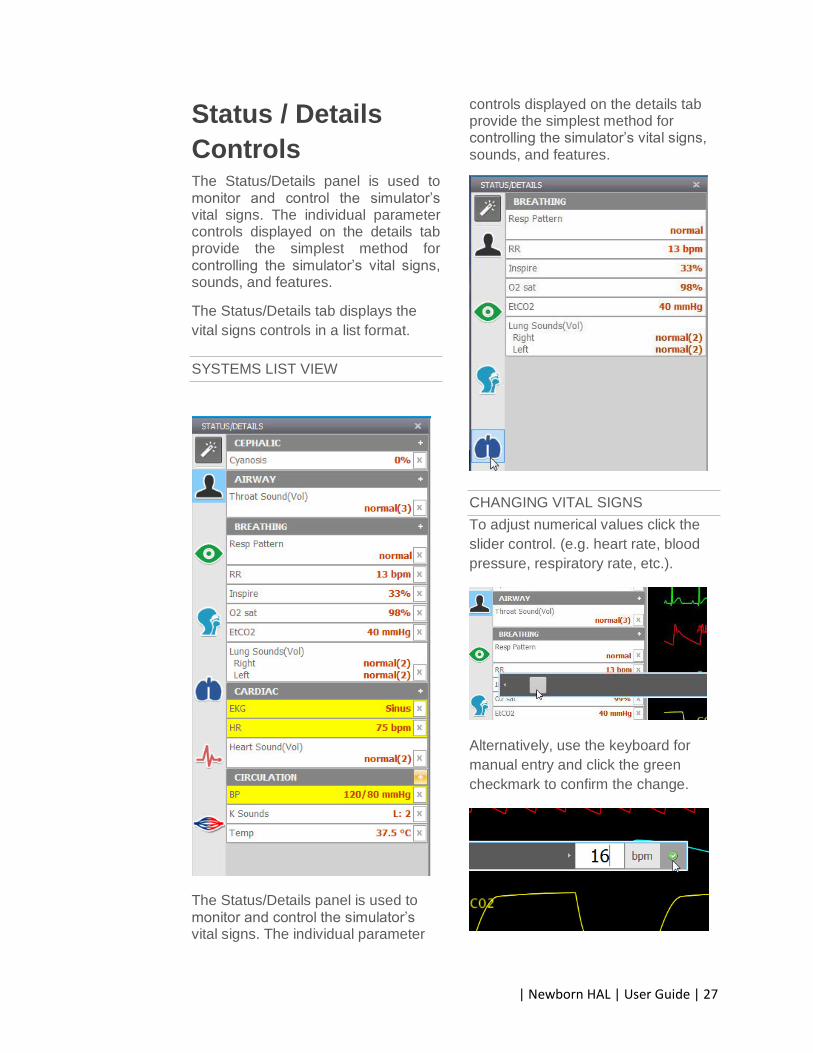
Status / Details
Controls The Status/Details panel is used to monitor and control the simulator’s vital signs. The individual parameter controls displayed on the details tab provide the simplest method for controlling the simulator’s vital signs, sounds, and features.
The Status/Details tab displays the
vital signs controls in a list format.
SYSTEMS LIST VIEW
The Status/Details panel is used to monitor and control the simulator’s vital signs. The individual parameter
controls displayed on the details tab provide the simplest method for controlling the simulator’s vital signs, sounds, and features.
CHANGING VITAL SIGNS
To adjust numerical values click the
slider control. (e.g. heart rate, blood
pressure, respiratory rate, etc.).
Alternatively, use the keyboard for
manual entry and click the green
checkmark to confirm the change.

28 | User Guide | Newborn HAL |
To change patterns, sounds, and
rhythms, click on the specific control
to display the library (e.g. EKG
rhythms, heart and lung sounds,
respiratory patterns, etc.)
Click the slider control below the
sound library to adjust the volume of
the sounds.
APPLYING CHANGES
No changes will be made to the simulator’s condition until the new settings are submitted using the “Apply” panel.
After the list of changes is created, click “NOW” to update the vital signs instantly. Alternatively, click a trending timer to update numerical vital sign parameters (e.g. heart rate, blood pressure) gradually.
Vital sign parameters can be edited or
removed using the edit and remove
parameter tabs
Enable the “instant apply” option and
click the control to change the vital
| Newborn HAL | User Guide | 29
sign to a new value without the need
to use “Apply” panel. Vital signs
undergoing change blink yellow.
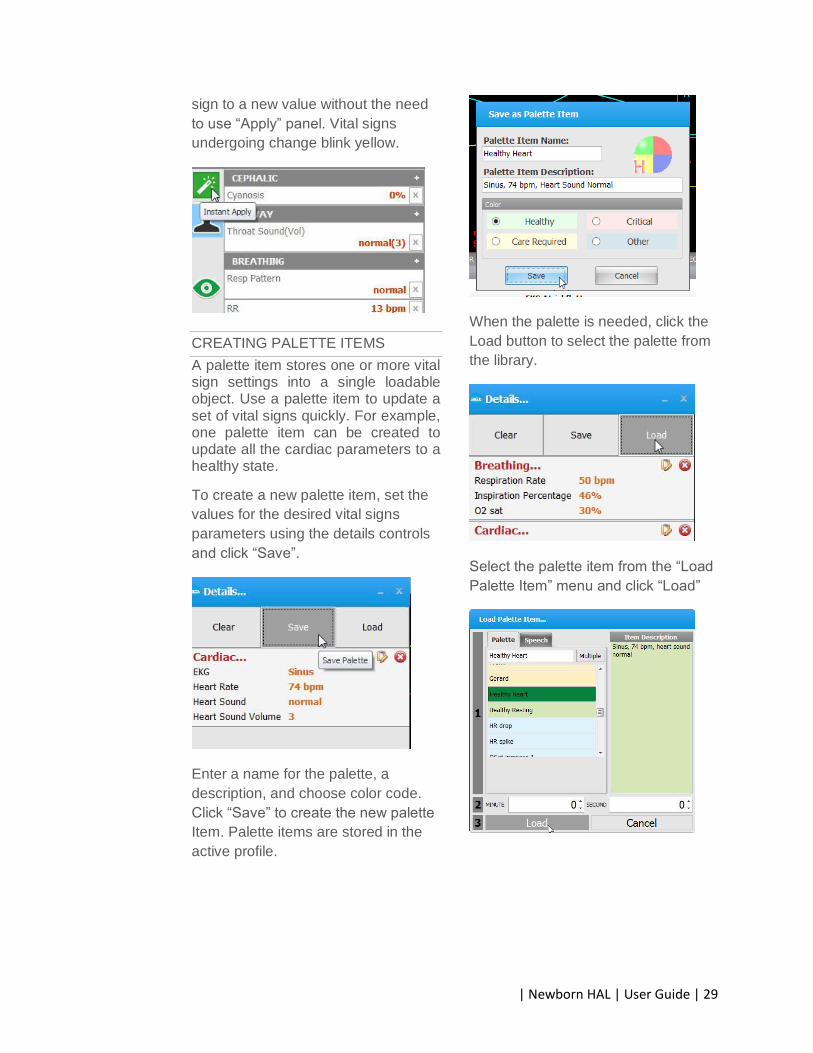
CREATING PALETTE ITEMS
A palette item stores one or more vital sign settings into a single loadable object. Use a palette item to update a set of vital signs quickly. For example, one palette item can be created to update all the cardiac parameters to a healthy state.
To create a new palette item, set the
values for the desired vital signs
parameters using the details controls
and click “Save”.
Enter a name for the palette, a
description, and choose color code.
Click “Save” to create the new palette
Item. Palette items are stored in the
active profile.
When the palette is needed, click the
Load button to select the palette from
the library.
Select the palette item from the “Load
Palette Item” menu and click “Load”
30 | User Guide | Newborn HAL |
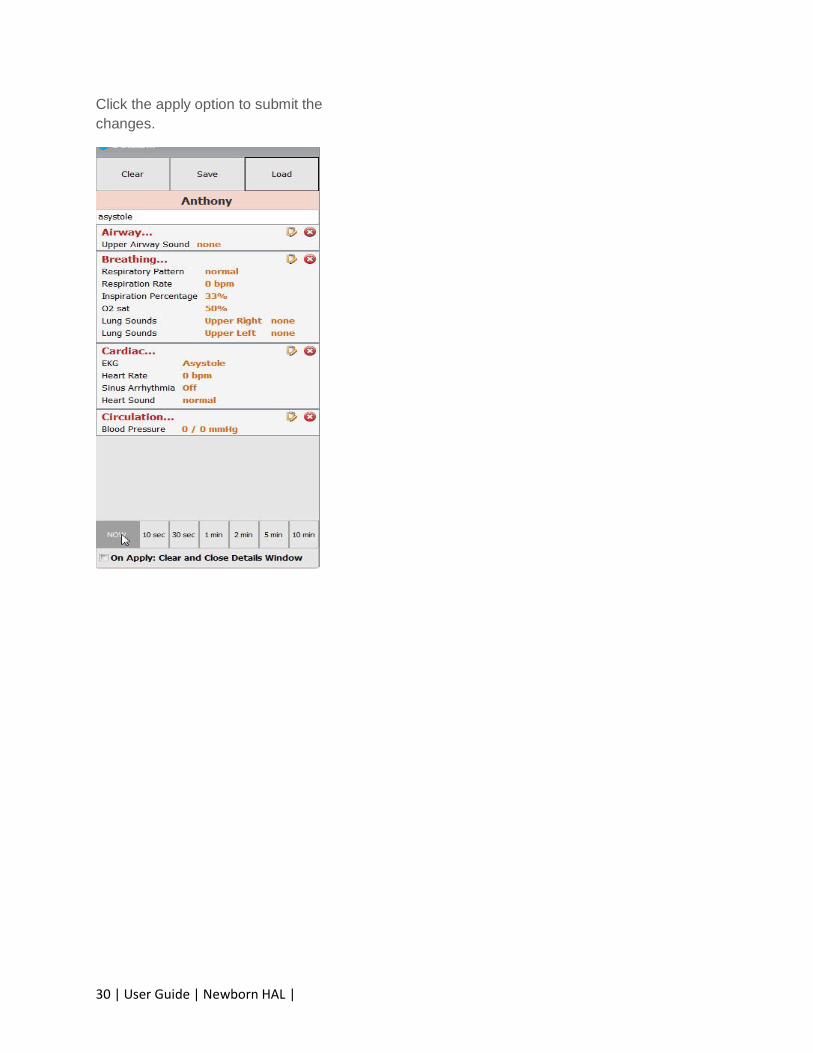
Click the apply option to submit the
changes.
| Newborn HAL | User Guide | 31
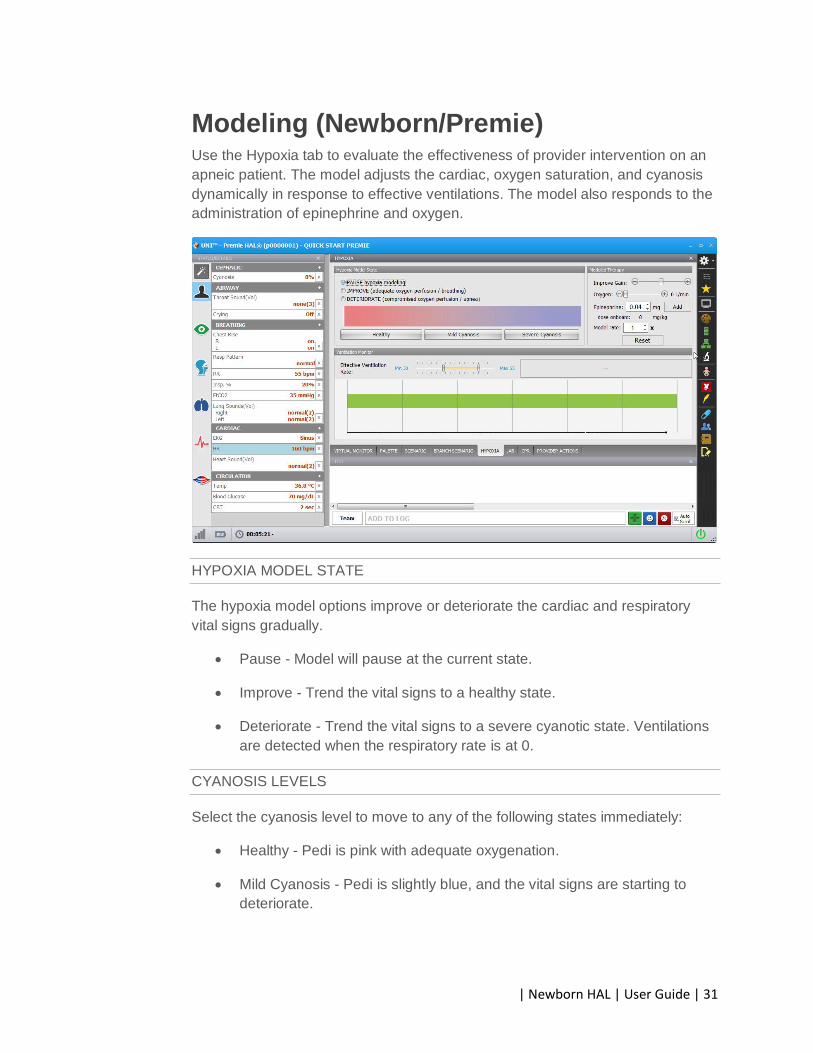
Modeling (Newborn/Premie) Use the Hypoxia tab to evaluate the effectiveness of provider intervention on an
apneic patient. The model adjusts the cardiac, oxygen saturation, and cyanosis
dynamically in response to effective ventilations. The model also responds to the
administration of epinephrine and oxygen.
HYPOXIA MODEL STATE
The hypoxia model options improve or deteriorate the cardiac and respiratory
vital signs gradually.
Pause - Model will pause at the current state.
Improve - Trend the vital signs to a healthy state.
Deteriorate - Trend the vital signs to a severe cyanotic state. Ventilations
are detected when the respiratory rate is at 0.
CYANOSIS LEVELS
Select the cyanosis level to move to any of the following states immediately:
Healthy - Pedi is pink with adequate oxygenation.
Mild Cyanosis - Pedi is slightly blue, and the vital signs are starting to
deteriorate.
32 | User Guide | Newborn HAL |
Severe Cyanosis - Pedi is blue, apneic, and vital signs are rapidly
worsening.
MODELED THERAPY
The modeled therapy menu provides additional intervention options.
Improve Gain - Adjust the slider to increase or decrease the cyanotic
response to ventilations.
Oxygen - Adjust the slider to administer oxygen to the fetus in liters per
minute.
Epinephrine - Administer epinephrine to the model. Set the epinephrine
dose and then click “add”. Administering epinephrine increases the heart
rate.
Reset - Click “Reset” to clear the oxygen flow and the epinephrine dose
onboard
| Newborn HAL | User Guide | 33
Working with
Newborn HAL
34 | User Guide | Newborn HAL |
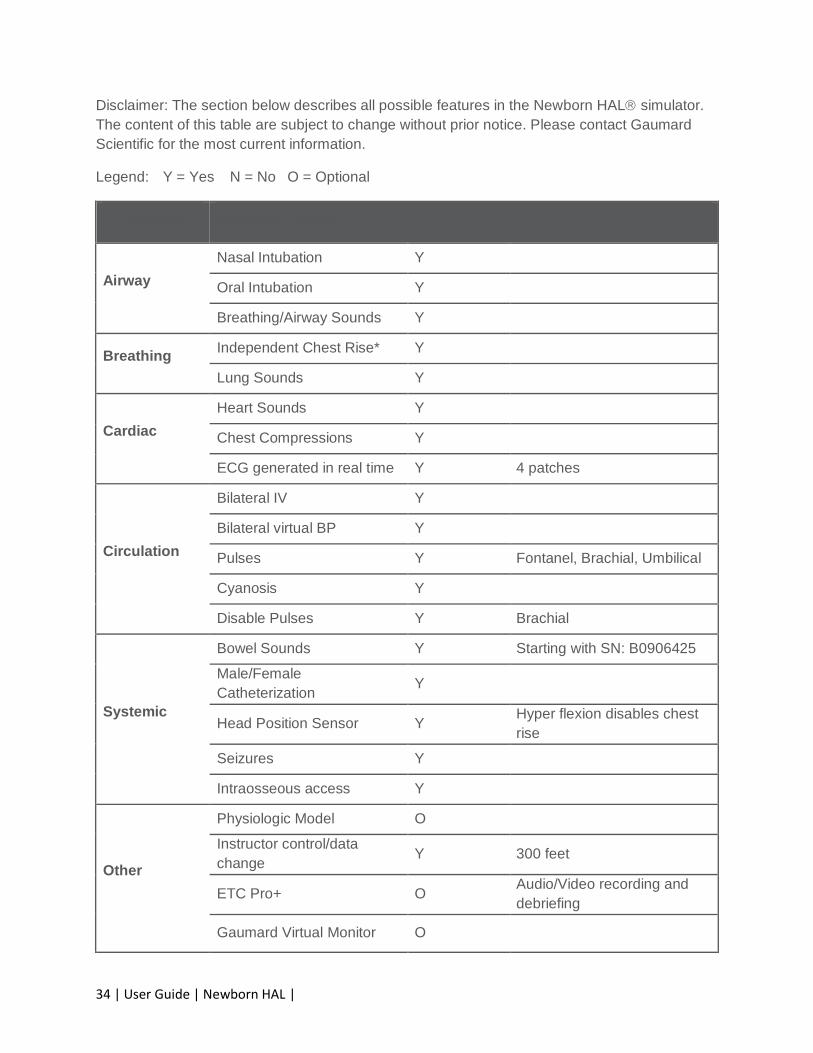
Disclaimer: The section below describes all possible features in the Newborn HAL simulator.
The content of this table are subject to change without prior notice. Please contact Gaumard
Scientific for the most current information.
Legend: Y = Yes N = No O = Optional
Category Simulator Feature
Airway
Nasal Intubation Y
Oral Intubation Y
Breathing/Airway Sounds Y
Breathing Independent Chest Rise* Y
Lung Sounds Y
Cardiac
Heart Sounds Y
Chest Compressions Y
ECG generated in real time Y 4 patches
Circulation
Bilateral IV Y
Bilateral virtual BP Y
Pulses Y Fontanel, Brachial, Umbilical
Cyanosis Y
Disable Pulses Y Brachial
Systemic
Bowel Sounds Y Starting with SN: B0906425
Male/Female
Catheterization Y
Head Position Sensor Y Hyper flexion disables chest
rise
Seizures Y
Intraosseous access Y
Other
Physiologic Model O
Instructor control/data
change Y 300 feet
ETC Pro+ O Audio/Video recording and
debriefing
Gaumard Virtual Monitor O

| Newborn HAL | User Guide | 35
Airway
INTUBATION
Newborn HAL’s airway can be
intubated orally using LMA or
endotracheal tubes and nasally
using a nasogastric tube.
Procedure Recommended
Device Size
Intubation (Blade
size)
Miller 0
LMA Size 1
Nasal Intubation 8 Fr catheter
Oral Intubation ETT 3.0 no cuff, 6
Fr suction catheter
Once intubated, sensors detect the
depth of the intubation tube. Should
the tube be inserted too deep, the
left lung is automatically disabled
realistically demonstrating right
mainstem intubation. Correcting the
tube position re-enables the left
lung.
Warning:
Always lubricate tubing, airway,
and nasal opening prior to
performing any nasal or oral
intubation. Failure to do so will
make intubation very difficult and
is likely to result in damage.
Do not insert liquids or spray
silicone oil into the mouth and
airway.
AIRWAY SOUNDS
HAL has multiple upper airway
sounds synchronized with his
breathing.
Breathing
BREATHING PATTERN
Control rate and depth of respiration
and choose independent quadrant
lung sounds synchronized with the
available breathing patterns.
LUNG SOUNDS
Listen to the lung sounds using a
stethoscope. Use the vital sign
parameter controls to change
between the available sound types.
Volume controls for the lung sounds
are located on the status panel.
BILATERAL CHEST RISE
Enable or disable the right or left
lung independently.
36 | User Guide | Newborn HAL |
PULMONARY VENTILATION
Ventilate using a BVM or a
mechanical ventilator. To display
chest rise during ventilation and
receive feedback on the CPR
window, set the lungs to the
“Enabled” state and the respiratory
rate to 0. For more information on
the CPR trainer, go to the digital
UNI User Guide under Software
Menu/Help/Instruction Manual.
Cardiac
HEART SOUNDS
Auscultate realistic heart sounds
synchronized to the heart rate and
heart rhythms.
CHEST COMPRESSIONS
During cardiac arrest, chest
compressions are measured and
logged. Use the CPR window to
assess CPR technique and
effectiveness by monitoring cadence
and depth in real time. For more
information on the CPR trainer, go
to digital UNI User Guide under
Software Menu/Help/Instruction
Manual.
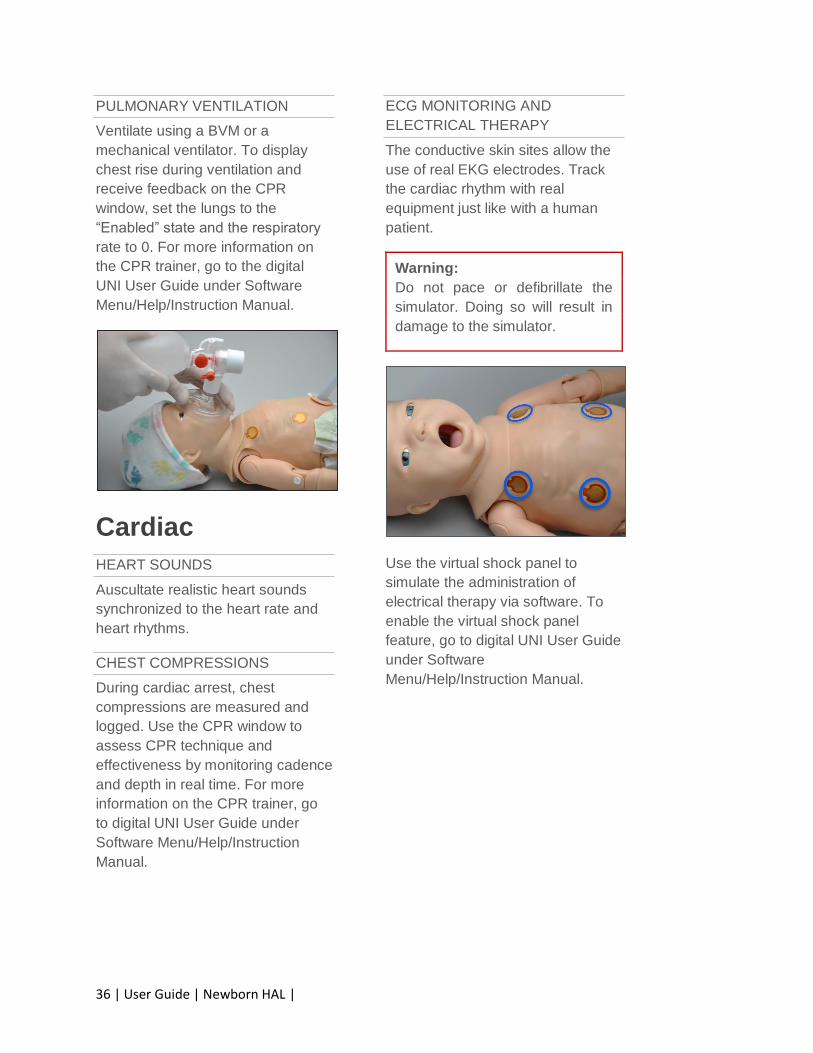
ECG MONITORING AND
ELECTRICAL THERAPY
The conductive skin sites allow the
use of real EKG electrodes. Track
the cardiac rhythm with real
equipment just like with a human
patient.
Warning:
Do not pace or defibrillate the
simulator. Doing so will result in
damage to the simulator.
Use the virtual shock panel to
simulate the administration of
electrical therapy via software. To
enable the virtual shock panel
feature, go to digital UNI User Guide
under Software
Menu/Help/Instruction Manual.
| Newborn HAL | User Guide | 37
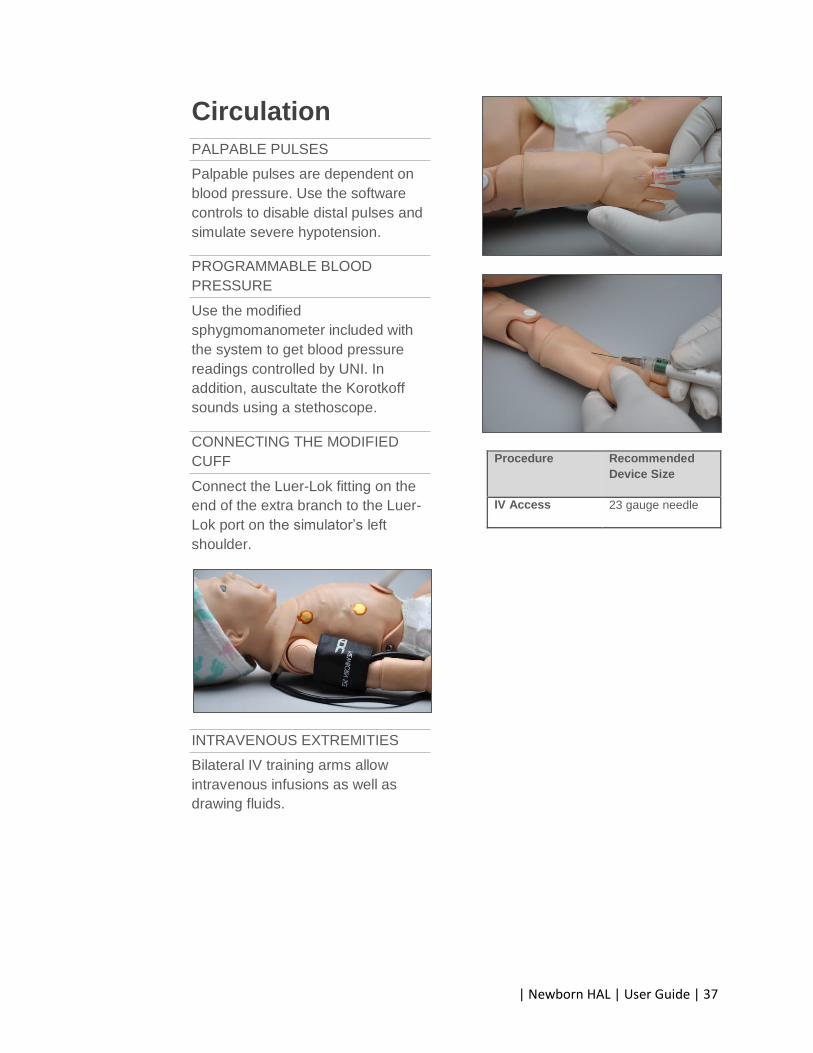
Circulation
PALPABLE PULSES
Palpable pulses are dependent on
blood pressure. Use the software
controls to disable distal pulses and
simulate severe hypotension.
PROGRAMMABLE BLOOD
PRESSURE
Use the modified
sphygmomanometer included with
the system to get blood pressure
readings controlled by UNI. In
addition, auscultate the Korotkoff
sounds using a stethoscope.
CONNECTING THE MODIFIED
CUFF
Connect the Luer-Lok fitting on the
end of the extra branch to the Luer-
Lok port on the simulator’s left
shoulder.
INTRAVENOUS EXTREMITIES
Bilateral IV training arms allow
intravenous infusions as well as
drawing fluids.
Procedure Recommended
Device Size
IV Access 23 gauge needle
38 | User Guide | Newborn HAL |
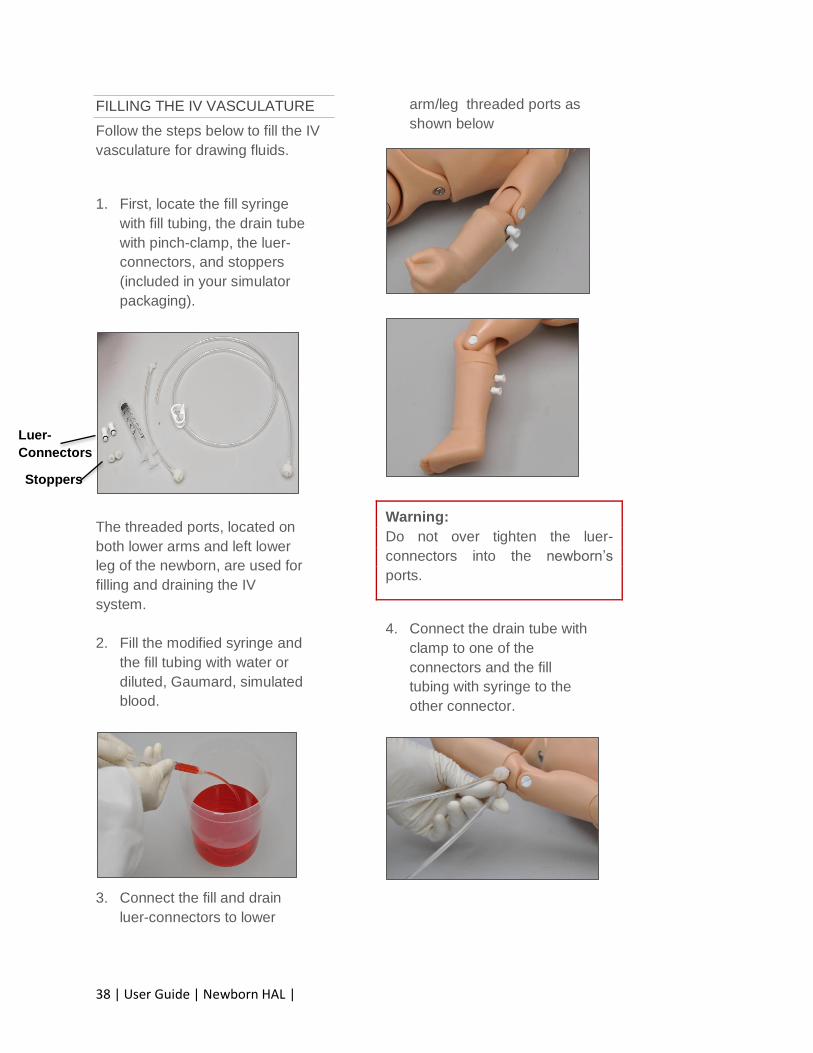
FILLING THE IV VASCULATURE
Follow the steps below to fill the IV
vasculature for drawing fluids.
1. First, locate the fill syringe
with fill tubing, the drain tube
with pinch-clamp, the luer-
connectors, and stoppers
(included in your simulator
packaging).
The threaded ports, located on
both lower arms and left lower
leg of the newborn, are used for
filling and draining the IV
system.
2. Fill the modified syringe and
the fill tubing with water or
diluted, Gaumard, simulated
blood.
3. Connect the fill and drain
luer-connectors to lower
arm/leg threaded ports as
shown below
Warning:
Do not over tighten the luer-
connectors into the newborn’s
ports.
4. Connect the drain tube with
clamp to one of the
connectors and the fill
tubing with syringe to the
other connector.
Luer-
Connectors
Stoppers
| Newborn HAL | User Guide | 39
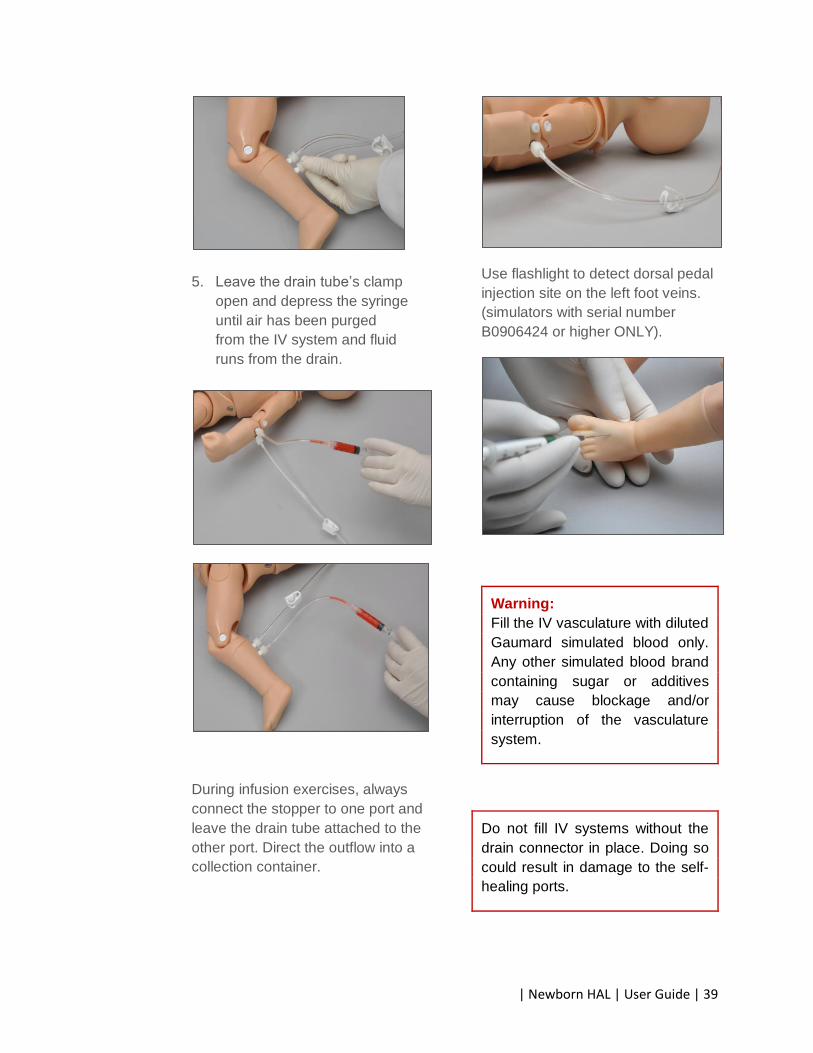
5. Leave the drain tube’s clamp
open and depress the syringe
until air has been purged
from the IV system and fluid
runs from the drain.
During infusion exercises, always
connect the stopper to one port and
leave the drain tube attached to the
other port. Direct the outflow into a
collection container.
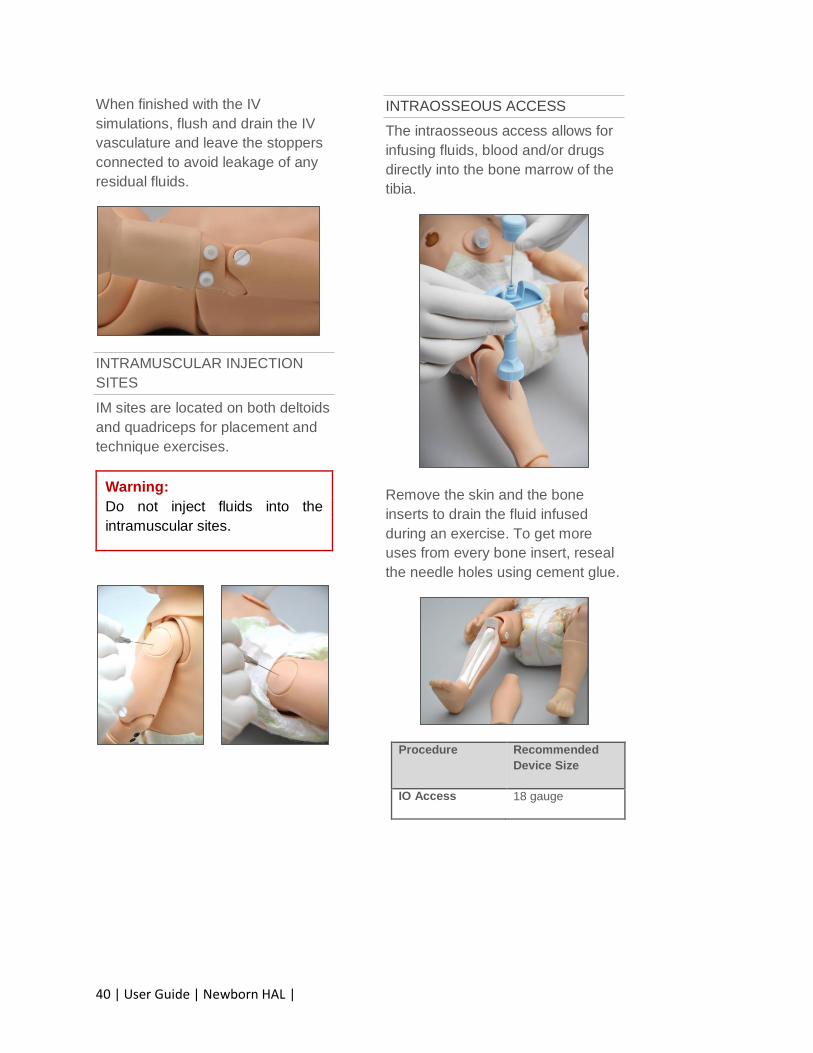
Use flashlight to detect dorsal pedal
injection site on the left foot veins.
(simulators with serial number
B0906424 or higher ONLY).
Warning:
Fill the IV vasculature with diluted
Gaumard simulated blood only.
Any other simulated blood brand
containing sugar or additives
may cause blockage and/or
interruption of the vasculature
system.
Do not fill IV systems without the
drain connector in place. Doing so
could result in damage to the self-
healing ports.
40 | User Guide | Newborn HAL |
When finished with the IV
simulations, flush and drain the IV
vasculature and leave the stoppers
connected to avoid leakage of any
residual fluids.
INTRAMUSCULAR INJECTION
SITES
IM sites are located on both deltoids
and quadriceps for placement and
technique exercises.
Warning:
Do not inject fluids into the
intramuscular sites.
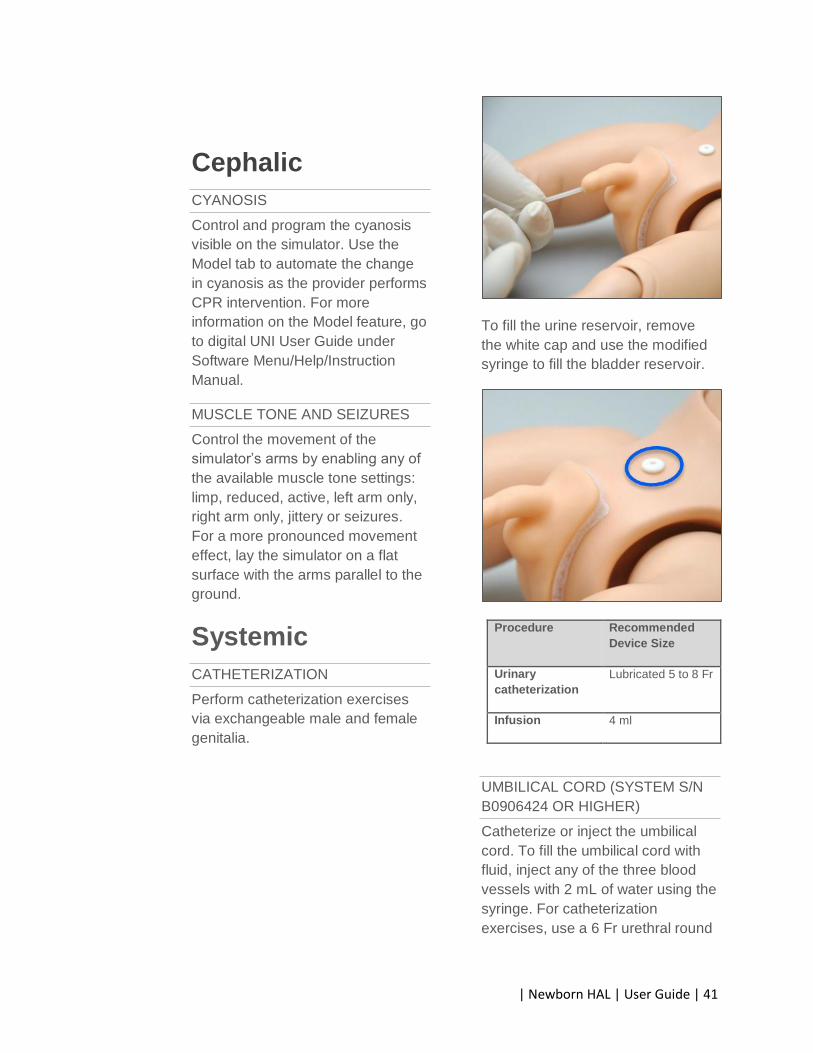
INTRAOSSEOUS ACCESS
The intraosseous access allows for
infusing fluids, blood and/or drugs
directly into the bone marrow of the
tibia.
Remove the skin and the bone
inserts to drain the fluid infused
during an exercise. To get more
uses from every bone insert, reseal
the needle holes using cement glue.
Procedure Recommended
Device Size
IO Access 18 gauge
| Newborn HAL | User Guide | 41
Cephalic
CYANOSIS
Control and program the cyanosis
visible on the simulator. Use the
Model tab to automate the change
in cyanosis as the provider performs
CPR intervention. For more
information on the Model feature, go
to digital UNI User Guide under
Software Menu/Help/Instruction
Manual.
MUSCLE TONE AND SEIZURES
Control the movement of the
simulator’s arms by enabling any of
the available muscle tone settings:
limp, reduced, active, left arm only,
right arm only, jittery or seizures.
For a more pronounced movement
effect, lay the simulator on a flat
surface with the arms parallel to the
ground.
Systemic
CATHETERIZATION
Perform catheterization exercises
via exchangeable male and female
genitalia.
To fill the urine reservoir, remove
the white cap and use the modified
syringe to fill the bladder reservoir.
Procedure Recommended
Device Size
Urinary
catheterization
Lubricated 5 to 8 Fr
Infusion 4 ml
UMBILICAL CORD (SYSTEM S/N
B0906424 OR HIGHER)
Catheterize or inject the umbilical
cord. To fill the umbilical cord with
fluid, inject any of the three blood
vessels with 2 mL of water using the
syringe. For catheterization
exercises, use a 6 Fr urethral round

42 | User Guide | Newborn HAL |
tip catheter lubricated with silicon
oil.
Procedure Recommended
Device Size
Umbilical Vein
Catheterization
Lubricated 6 Fr
urethral round tip
Infusion 2 ml
The replaceable umbilical cord can
be trimmed or cut. Before removing
or replacing the umbilical cord after
an exercise, turn off the simulator by
exiting the software (File>Exit), or
set the simulator on STAND-BY
mode. After the simulator is
powered down, the umbilical cord
can be safely unplugged. For
information about ordering
replacement umbilical cords, go to
the Appendix.
Warning:
Do not remove umbilical cord
while Newborn HAL is in
operation. Doing so will cause
damage to the system.
BOWEL SOUNDS (SYSTEMS S/N
B0906424 OR HIGHER)
Auscultate the abdomen for normal
and hyperactive bowel sounds.
Other
TEMPERATURE PROBE
PLACEMENT DETECTION
The temperature reading on the vital
signs monitor is displayed when a
temperature probe is placed on the
lower right quadrant of the
abdominal area.
To enable the temperature sensor
detection feature, go to
Setup>Options>Neonate features
Tab. Checkmark “Use temp. sensor”
and click OK to save. The log panel
detects the placement of the sensor.
VITAL SIGNS MONITOR
The virtual monitor touchscreen
display simulates the functionality of
a patient vital signs monitor. Users
| Newborn HAL | User Guide | 43
can customize the type of
waveforms and scalars displayed,
set alarms, and display lab reports,
x-rays, and other files for the
provider to access during
simulation.
For information on how to setup
Gaumard Monitors with GUI, please
refer to the help File included with
the Gaumard Monitors software.
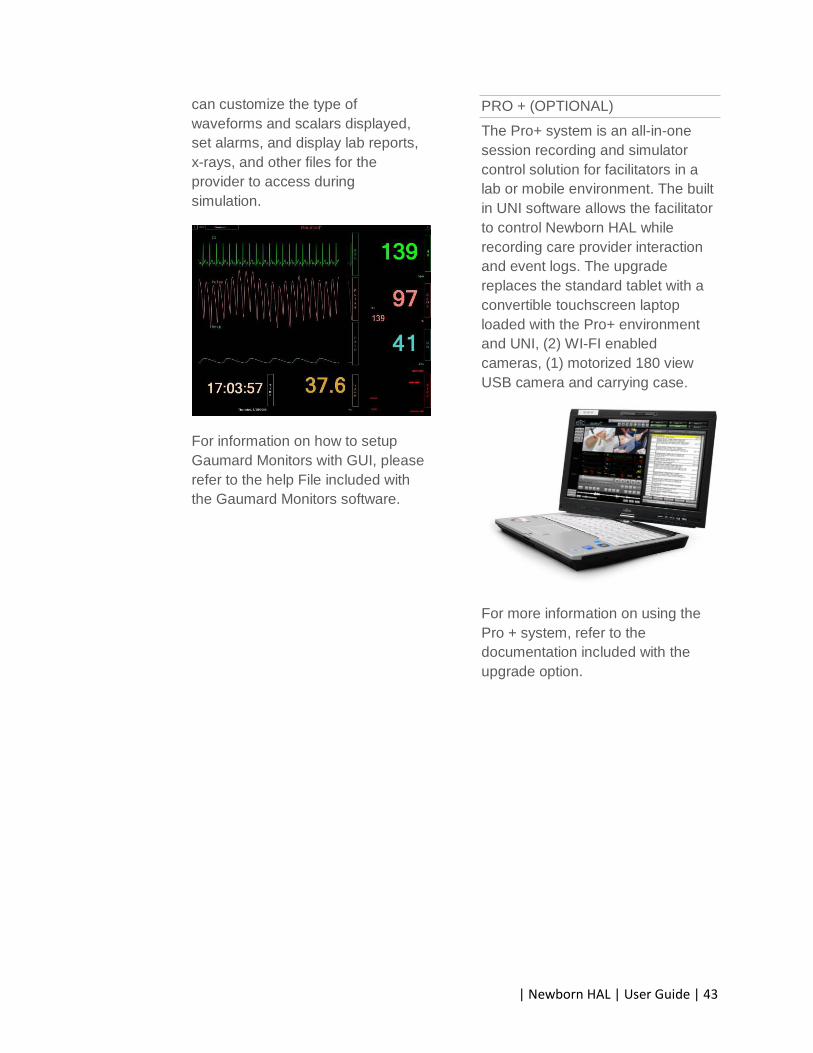
PRO + (OPTIONAL)
The Pro+ system is an all-in-one
session recording and simulator
control solution for facilitators in a
lab or mobile environment. The built
in UNI software allows the facilitator
to control Newborn HAL while
recording care provider interaction
and event logs. The upgrade
replaces the standard tablet with a
convertible touchscreen laptop
loaded with the Pro+ environment
and UNI, (2) WI-FI enabled
cameras, (1) motorized 180 view
USB camera and carrying case.
For more information on using the
Pro + system, refer to the
documentation included with the
upgrade option.

44 | User Guide | Newborn HAL |
Appendix

| Newborn HAL | User Guide | 45
More about Scenarios
Factory Preset Scenarios
Newborn Scenarios
Quick Start Newborn Profile MANUAL - LINEAR
1 Alice’s Baby
2 Asphyxia
3 Beth’s (Dona’s) Baby
4 Cynthia’s Baby
5 Elaine’s Baby
6 Francine’s Baby
7 Gloria’s Baby
8 Helen’s (Irene’s) Baby
9 MAS
10 RDS
11 TTN
46 | User Guide | Newborn HAL |
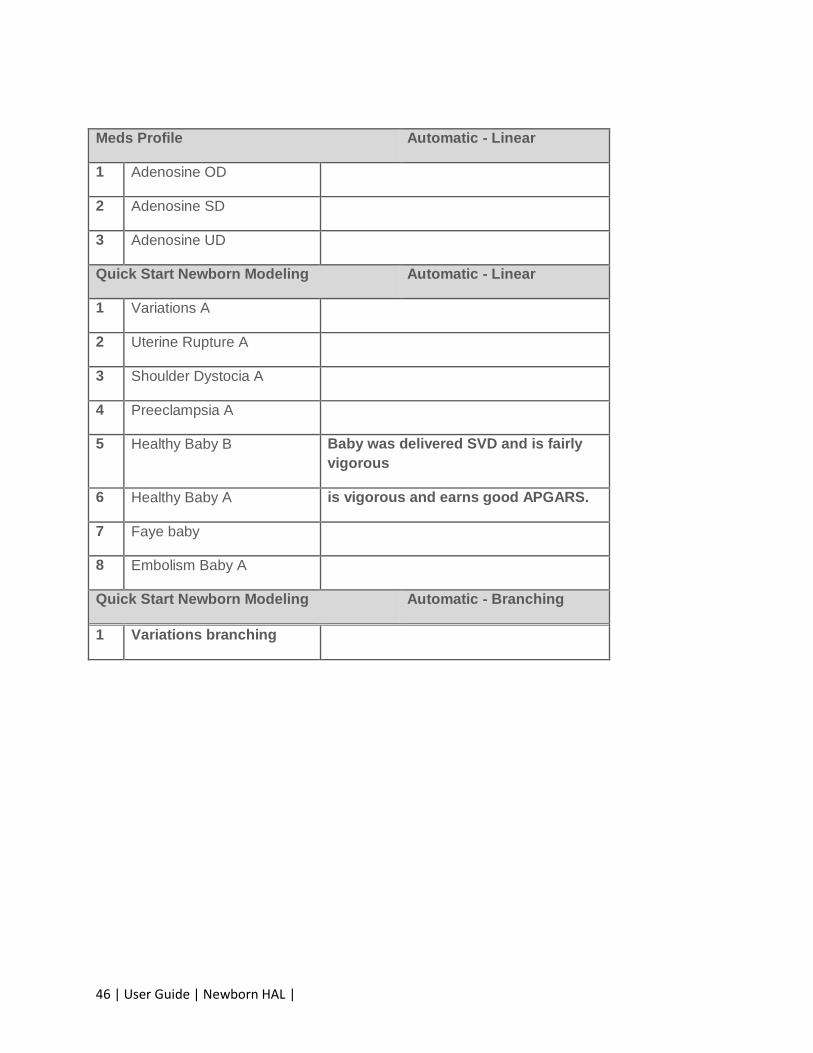
Meds Profile Automatic - Linear
1 Adenosine OD
2 Adenosine SD
3 Adenosine UD
Quick Start Newborn Modeling Automatic - Linear
1 Variations A
2 Uterine Rupture A
3 Shoulder Dystocia A
4 Preeclampsia A
5 Healthy Baby B Baby was delivered SVD and is fairly
vigorous
6 Healthy Baby A is vigorous and earns good APGARS.
7 Faye baby
8 Embolism Baby A
Quick Start Newborn Modeling Automatic - Branching
1 Variations branching
| Newborn HAL | User Guide | 47
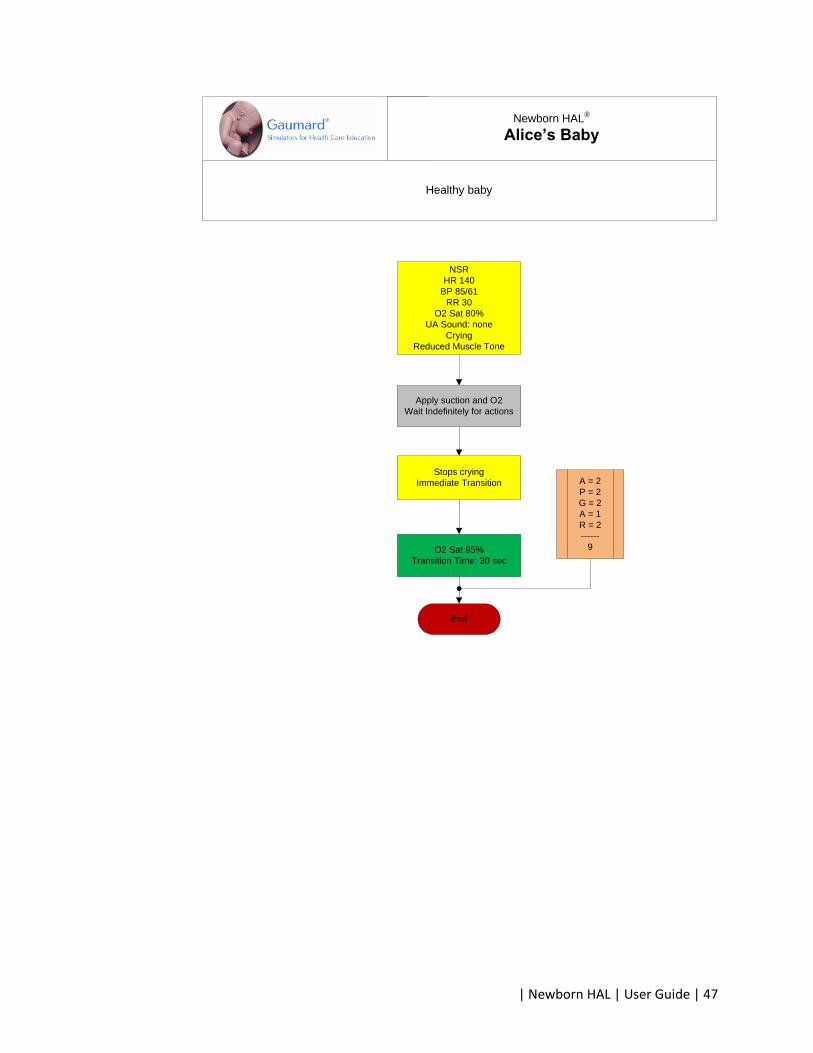
Newborn HAL®
Alice’s Baby
Healthy baby
NSR
HR 140
BP 85/61
RR 30
O2 Sat 80%
UA Sound: none
Crying
Reduced Muscle Tone
Stops crying
Immediate Transition
O2 Sat 95%
Transition Time: 30 sec
End
Apply suction and O2
Wait Indefinitely for actions
A = 2
P = 2
G = 2
A = 1
R = 2
------
9
48 | User Guide | Newborn HAL |
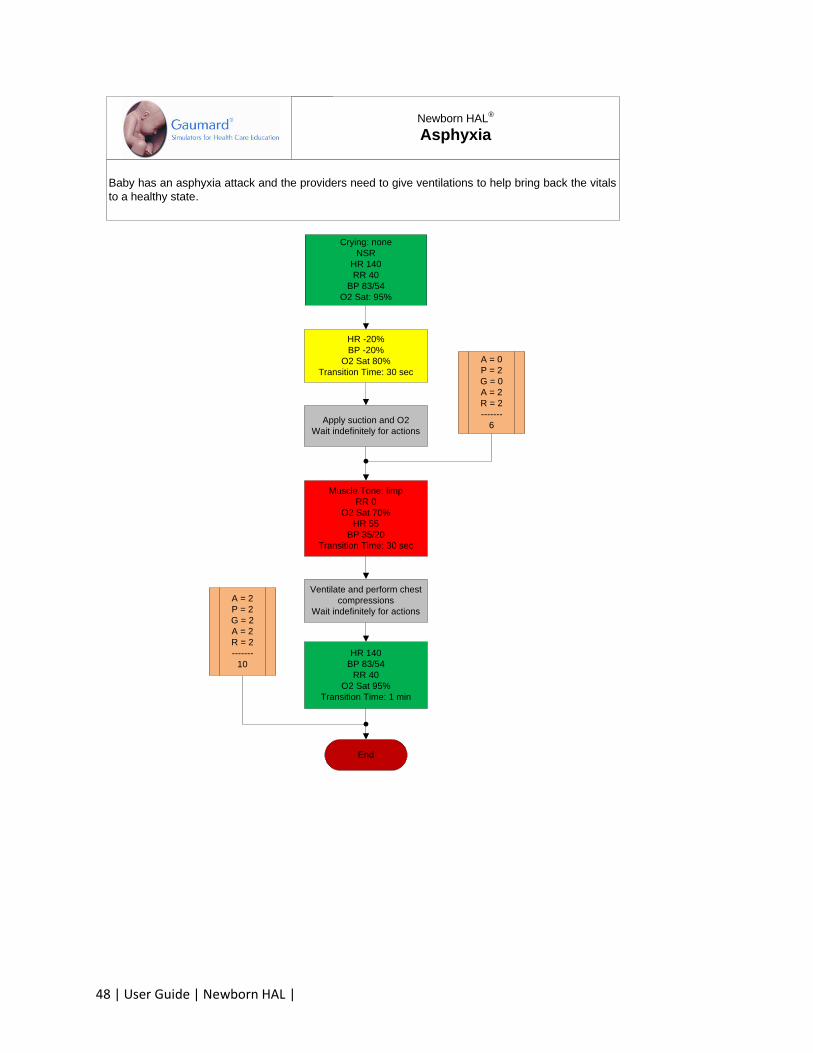
Newborn HAL®
Asphyxia
Baby has an asphyxia attack and the providers need to give ventilations to help bring back the vitals
to a healthy state.
Crying: none
NSR
HR 140
RR 40
BP 83/54
O2 Sat: 95%
HR -20%
BP -20%
O2 Sat 80%
Transition Time: 30 sec
Muscle Tone: limp
RR 0
O2 Sat 70%
HR 55
BP 35/20
Transition Time: 30 sec
Ventilate and perform chest
compressions
Wait indefinitely for actions
HR 140
BP 83/54
RR 40
O2 Sat 95%
Transition Time: 1 min
End
Apply suction and O2
Wait indefinitely for actions
A = 0
P = 2
G = 0
A = 2
R = 2
-------
6
A = 2
P = 2
G = 2
A = 2
R = 2
-------
10
| Newborn HAL | User Guide | 49
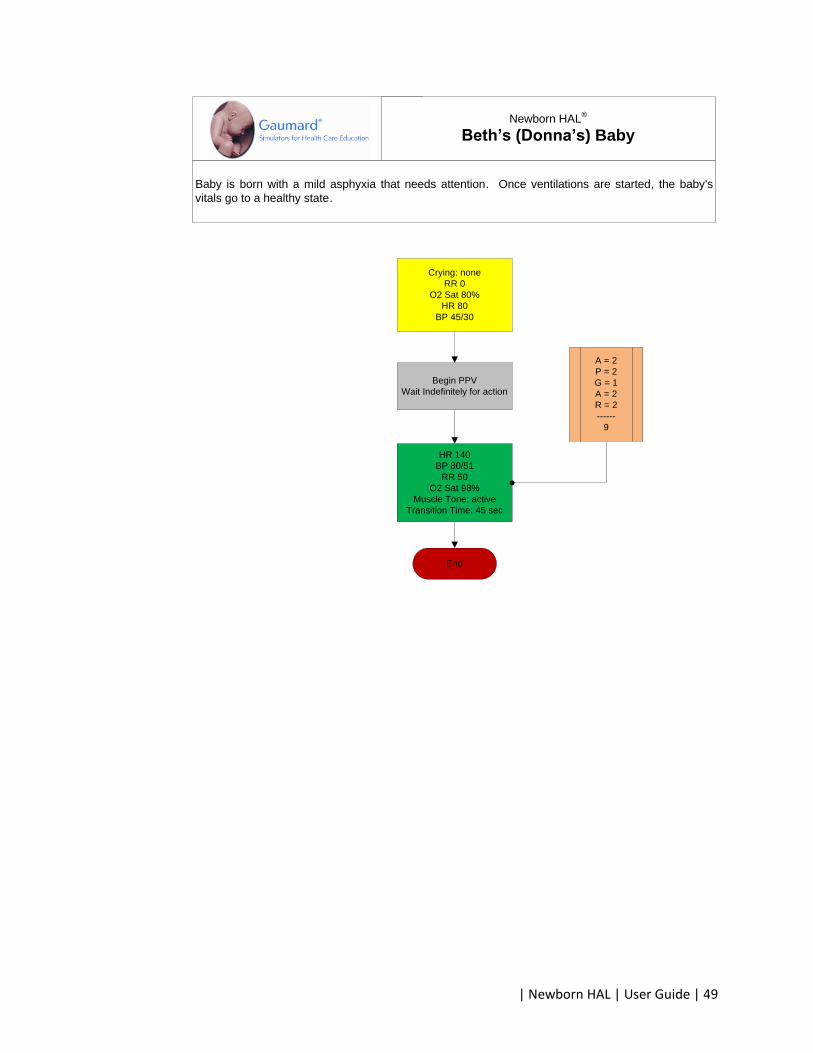
Newborn HAL®
Beth’s (Donna’s) Baby
Baby is born with a mild asphyxia that needs attention. Once ventilations are started, the baby's
vitals go to a healthy state.
Crying: none
RR 0
O2 Sat 80%
HR 80
BP 45/30
Begin PPV
Wait Indefinitely for action
HR 140
BP 80/51
RR 50
O2 Sat 98%
Muscle Tone: active
Transition Time: 45 sec
End
A = 2
P = 2
G = 1
A = 2
R = 2
------
9
50 | User Guide | Newborn HAL |
Newborn HAL®
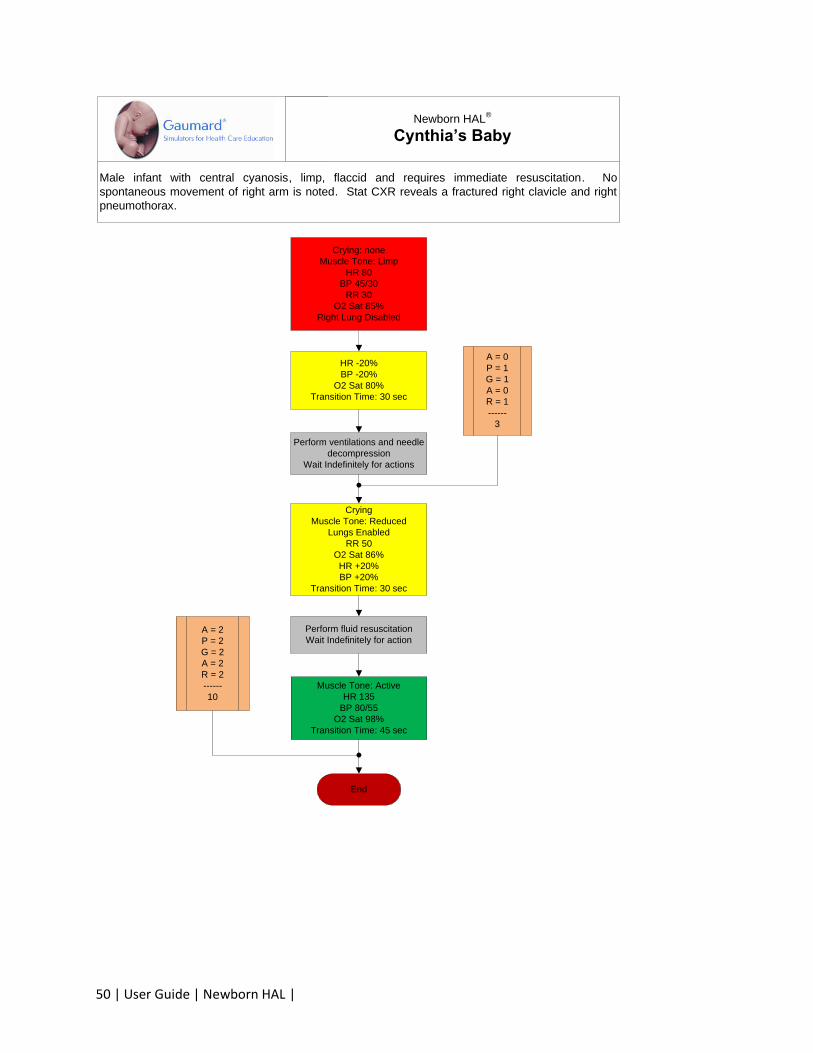
Cynthia’s Baby
Male infant with central cyanosis, limp, flaccid and requires immediate resuscitation. No
spontaneous movement of right arm is noted. Stat CXR reveals a fractured right clavicle and right
pneumothorax.
Crying: none
Muscle Tone: Limp
HR 80
BP 45/30
RR 30
O2 Sat 85%
Right Lung Disabled
HR -20%
BP -20%
O2 Sat 80%
Transition Time: 30 sec
Perform ventilations and needle
decompression
Wait Indefinitely for actions
Crying
Muscle Tone: Reduced
Lungs Enabled
RR 50
O2 Sat 86%
HR +20%
BP +20%
Transition Time: 30 sec
Perform fluid resuscitation
Wait Indefinitely for action
Muscle Tone: Active
HR 135
BP 80/55
O2 Sat 98%
Transition Time: 45 sec
End
A = 0
P = 1
G = 1
A = 0
R = 1
------
3
A = 2
P = 2
G = 2
A = 2
R = 2
------
10
| Newborn HAL | User Guide | 51
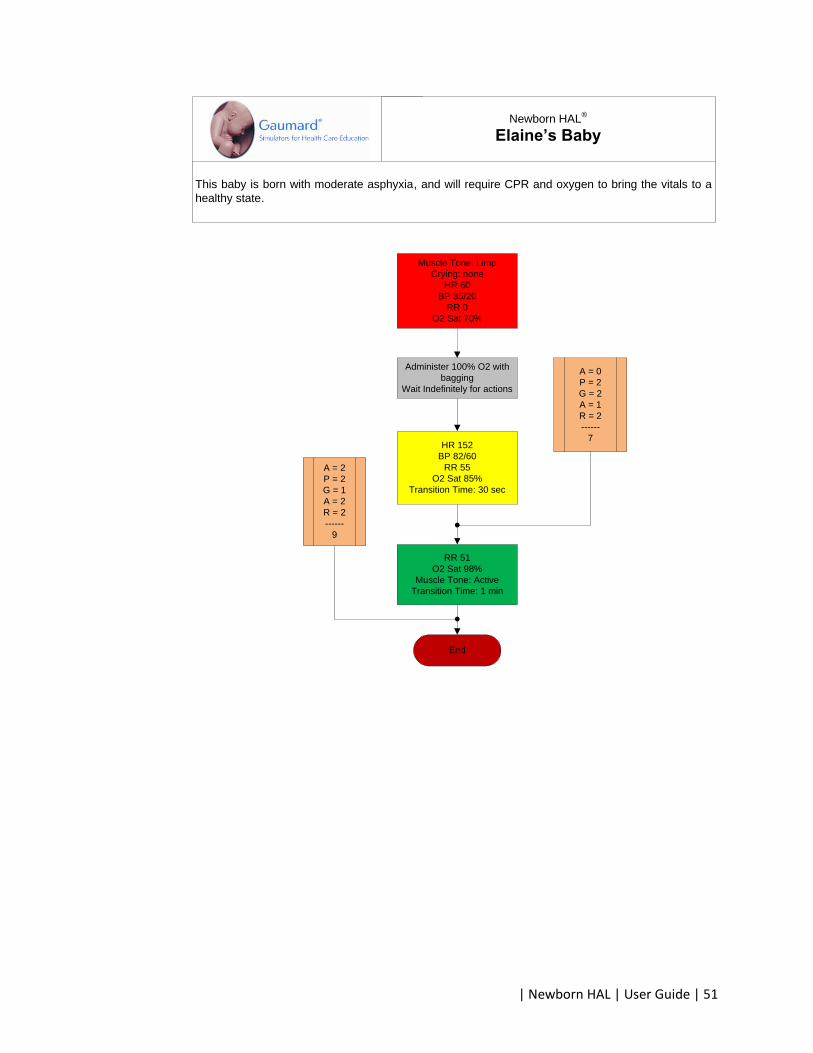
Newborn HAL®
Elaine’s Baby
This baby is born with moderate asphyxia, and will require CPR and oxygen to bring the vitals to a
healthy state.
Muscle Tone: Limp
Crying: none
HR 60
BP 35/20
RR 0
O2 Sat 70%
Administer 100% O2 with
bagging
Wait Indefinitely for actions
HR 152
BP 82/60
RR 55
O2 Sat 85%
Transition Time: 30 sec
RR 51
O2 Sat 98%
Muscle Tone: Active
Transition Time: 1 min
End
A = 0
P = 2
G = 2
A = 1
R = 2
------
7
A = 2
P = 2
G = 1
A = 2
R = 2
------
9
52 | User Guide | Newborn HAL |
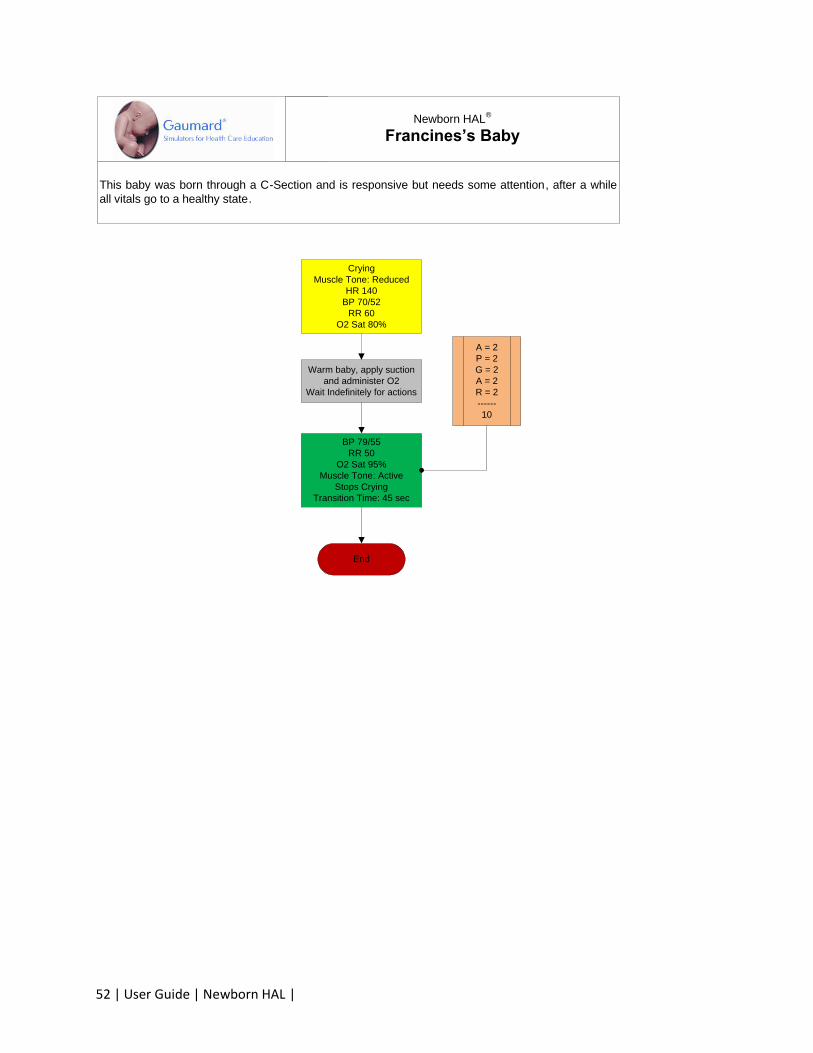
Newborn HAL®
Francines’s Baby
This baby was born through a C-Section and is responsive but needs some attention, after a while
all vitals go to a healthy state.
Crying
Muscle Tone: Reduced
HR 140
BP 70/52
RR 60
O2 Sat 80%
Warm baby, apply suction
and administer O2
Wait Indefinitely for actions
End
BP 79/55
RR 50
O2 Sat 95%
Muscle Tone: Active
Stops Crying
Transition Time: 45 sec
A = 2
P = 2
G = 2
A = 2
R = 2
------
10
| Newborn HAL | User Guide | 53
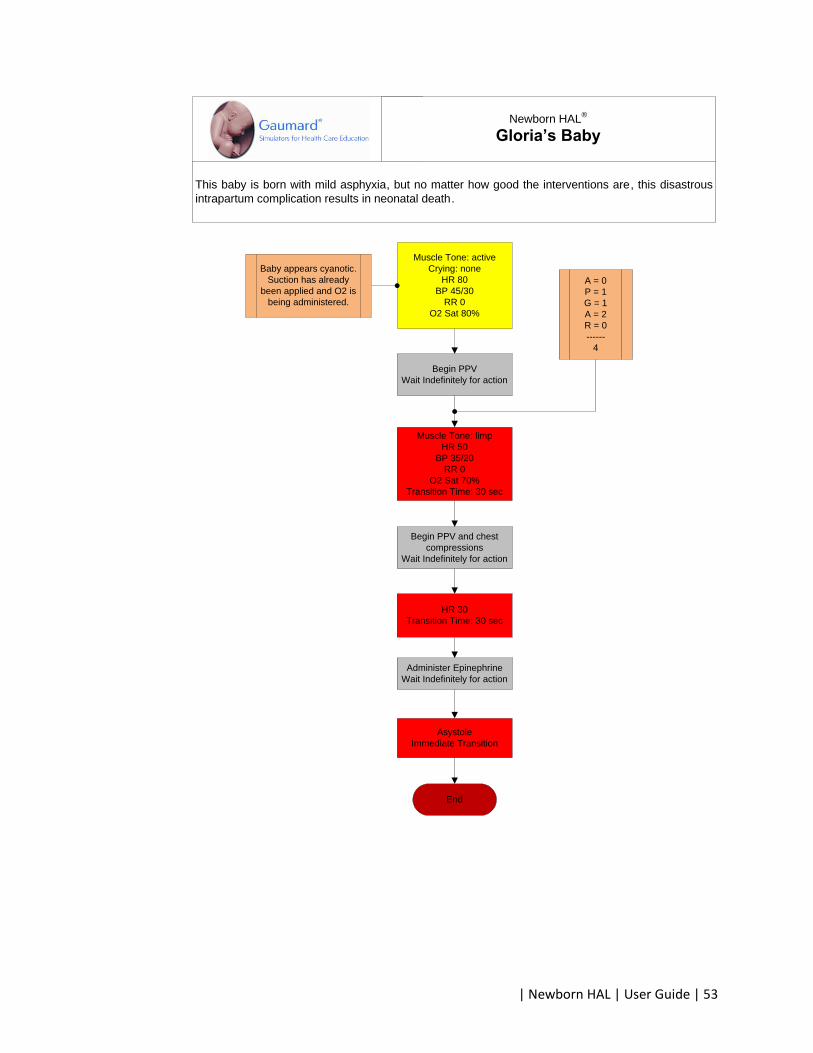
Newborn HAL®
Gloria’s Baby
This baby is born with mild asphyxia, but no matter how good the interventions are, this disastrous
intrapartum complication results in neonatal death.
Muscle Tone: active
Crying: none
HR 80
BP 45/30
RR 0
O2 Sat 80%
Begin PPV
Wait Indefinitely for action
Muscle Tone: limp
HR 50
BP 35/20
RR 0
O2 Sat 70%
Transition Time: 30 sec
Begin PPV and chest
compressions
Wait Indefinitely for action
HR 30
Transition Time: 30 sec
Asystole
Immediate Transition
End
Administer Epinephrine
Wait Indefinitely for action
Baby appears cyanotic.
Suction has already
been applied and O2 is
being administered.
A = 0
P = 1
G = 1
A = 2
R = 0
------
4
54 | User Guide | Newborn HAL |
Newborn HAL®
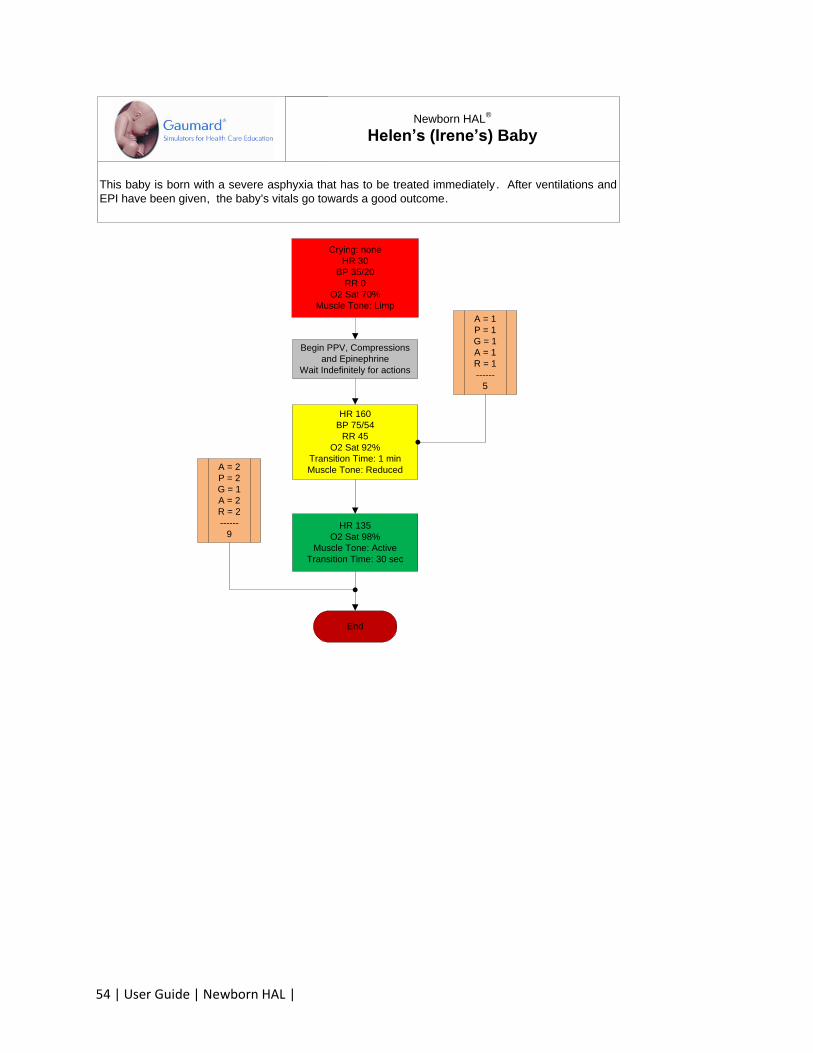
Helen’s (Irene’s) Baby
This baby is born with a severe asphyxia that has to be treated immediately . After ventilations and
EPI have been given, the baby's vitals go towards a good outcome.
Crying: none
HR 30
BP 35/20
RR 0
O2 Sat 70%
Muscle Tone: Limp
Begin PPV, Compressions
and Epinephrine
Wait Indefinitely for actions
HR 160
BP 75/54
RR 45
O2 Sat 92%
Transition Time: 1 min
Muscle Tone: Reduced
HR 135
O2 Sat 98%
Muscle Tone: Active
Transition Time: 30 sec
End
A = 1
P = 1
G = 1
A = 1
R = 1
------
5
A = 2
P = 2
G = 1
A = 2
R = 2
------
9
| Newborn HAL | User Guide | 55
Newborn HAL®
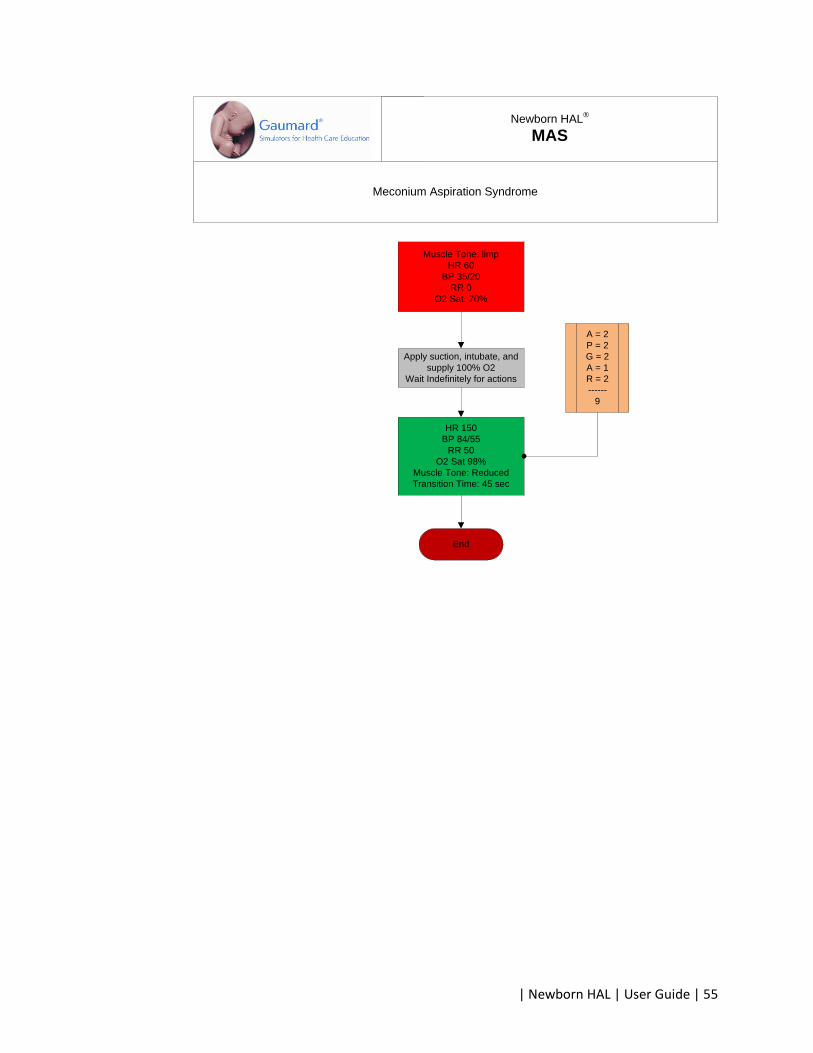
MAS
Meconium Aspiration Syndrome
Muscle Tone: limp
HR 60
BP 35/20
RR 0
O2 Sat. 70%
Apply suction, intubate, and
supply 100% O2
Wait Indefinitely for actions
HR 150
BP 84/55
RR 50
O2 Sat 98%
Muscle Tone: Reduced
Transition Time: 45 sec
End
A = 2
P = 2
G = 2
A = 1
R = 2
------
9
56 | User Guide | Newborn HAL |
Newborn HAL®
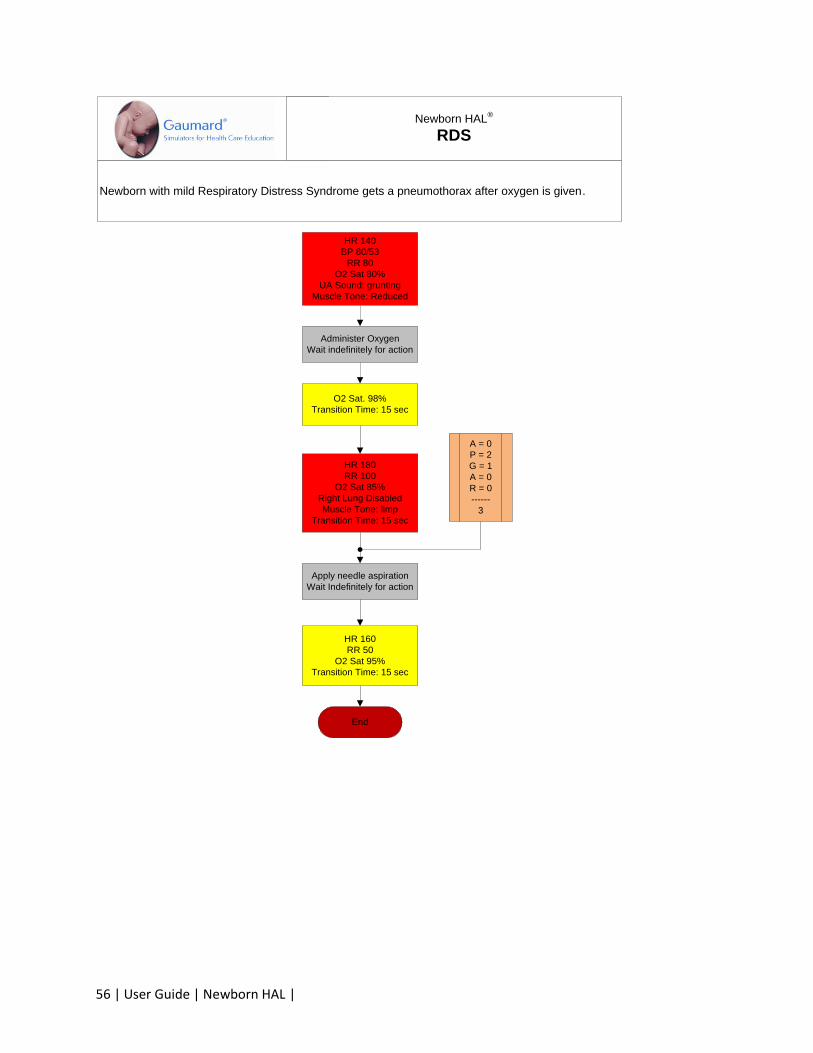
RDS
Newborn with mild Respiratory Distress Syndrome gets a pneumothorax after oxygen is given.
HR 140
BP 80/53
RR 80
O2 Sat 80%
UA Sound: grunting
Muscle Tone: Reduced
Administer Oxygen
Wait indefinitely for action
O2 Sat. 98%
Transition Time: 15 sec
HR 180
RR 100
O2 Sat 85%
Right Lung Disabled
Muscle Tone: limp
Transition Time: 15 sec
Apply needle aspiration
Wait Indefinitely for action
HR 160
RR 50
O2 Sat 95%
Transition Time: 15 sec
End
A = 0
P = 2
G = 1
A = 0
R = 0
------
3
| Newborn HAL | User Guide | 57
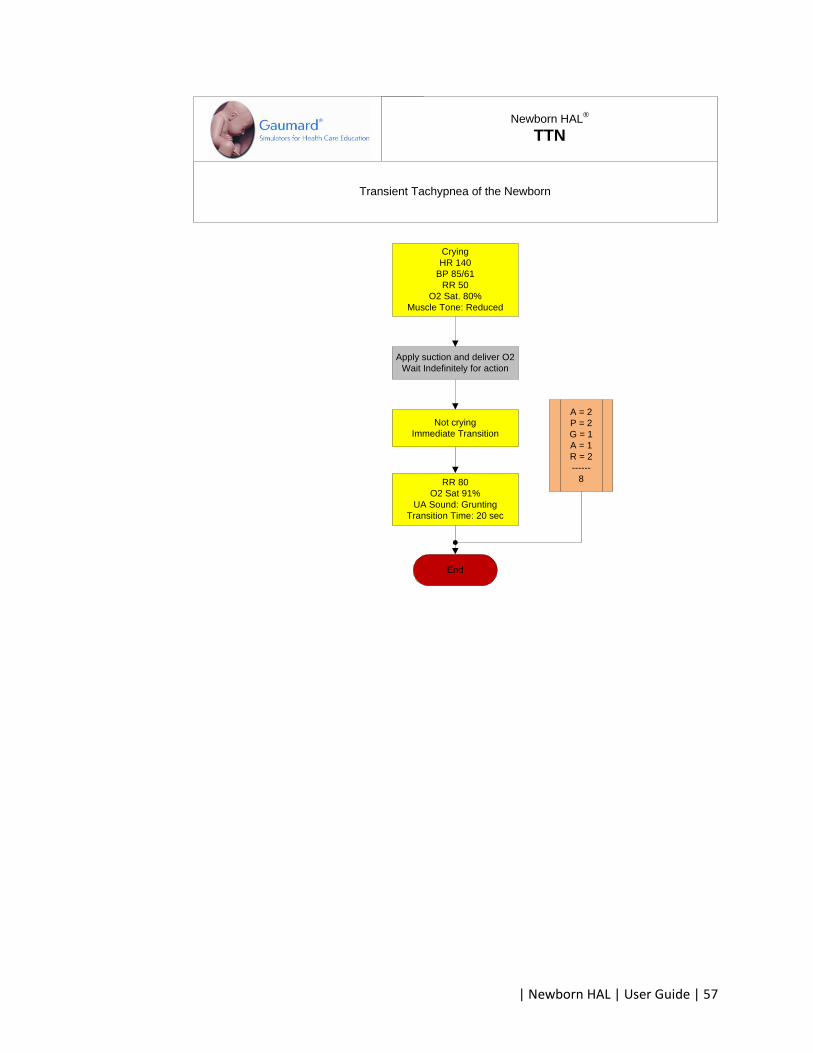
Newborn HAL®
TTN
Transient Tachypnea of the Newborn
Crying
HR 140
BP 85/61
RR 50
O2 Sat. 80%
Muscle Tone: Reduced
Apply suction and deliver O2
Wait Indefinitely for action
Not crying
Immediate Transition
RR 80
O2 Sat 91%
UA Sound: Grunting
Transition Time: 20 sec
End
A = 2
P = 2
G = 1
A = 1
R = 2
------
8
58 | User Guide | Newborn HAL |
More about scenarios
THINKING IN TERMS OF PALETTE ITEMS
As described previously, palette items represent complete or partial groups of
settings that have been stored as a single item. Applying partial states will hold
constant all settings that are left unspecified.
Not only does it take time to customize the palette, but a very large palette
becomes difficult to navigate. So, it is desirable to minimize the number of Palette
Items in each Profile. To accomplish this, an experienced facilitator tries to create
items that are as generally applicable as possible and can therefore be applied to
a wide range of scenarios. The key is to include only in your palette items the
settings that are directly related to the physiological event represented by that
palette item.
SMART SCENARIOS
After reading the Details, Palette, and Scenarios sections of this guide, it should
be clear how to build a scenario. You may have already tried building your own
or modifying some of the factory presets. The following four guidelines will refine
your ability to build the best possible scenarios.
1. How will the scenario begin?
The first thing to consider is the initial condition of the patient. Create a Palette
Item to describe this condition. Make sure that this first step in the scenario is a
complete state. That is, indicate some selection for each available setting on the
Status/Details panel. Remember that only the settings you specify will cause a
change in the simulator, and all other settings will remain constant. Therefore, by
starting with a complete state, the simulator’s condition will always be the same
when the scenario starts, regardless of what she was doing previously.
Likewise, the "transition duration" of the first step in the scenario should be zero,
indicating that changes are applied immediately.
There is one point that can cause confusion and warrants further explanation. It
UNIis an extension of the above discussion of partial states. The issue is best
illustrated through the following example:
Suppose that you are creating a Palette Item to start your scenario. In this case,
you have decided that the patient will be apneic. The question is, "How should
the lung sounds be set?"
Most people's first inclination is to set the lung sounds to "none.” This is incorrect,
despite apnea. Obviously, no lung sounds should be heard during apnea, but

| Newborn HAL | User Guide | 59
since you have already set respiratory rate to zero, none will be. (Sounds are
synchronized to the breathing cycle.)
What you are really setting here when you choose a lung sound is the condition
of the lungs, given respiratory drive. That is, if the patient's respiratory rate were
changed from zero, what sound would be heard? Assuming that the lungs
themselves are normal in this scenario, you would choose "normal" for the lung
sound setting.
Then, as the scenario progresses, if the patient starts breathing, there will be no
need to set the lung sound again. It will already be set. The same principle
applies to the heart sound and other settings.
2. Include notes to guide the facilitator during the simulation.
It is common for scenario designers, especially those who act as facilitators, to
neglect the importance of notes in the scenario. They think that they will
remember the learning objectives, patient history, and other details at the time
they are ready to conduct the simulation. They usually do not, especially when
revisiting a scenario months after creating it.
When you add "Wait" and "Wait Indefinitely" steps to a scenario, you have an
opportunity to edit the item description. Use this description field to hold notes to
the facilitator. Typically, scenario designers write notes in that space to indicate
what the provider(s) or facilitator should be doing at that point.
Further, when saving the scenario, you may edit the scenario description. This is
the best place to put patient history and any other longer notes and instructions.
3. Assume that providers will do the right thing.
Usually a scenario should be created with the assumption that the providers will
perform correctly. As long as they do, the scenario can be allowed to continue.
Naturally, preparation must be made for what might happen to the simulator
when providers deviate from expectations. The consequences of such deviations
can sometimes be included in the scenario, punctuated by "Wait Indefinitely"
items. In other cases, the simulation will require more direct control by the
facilitator via either the Palette or Status/Details panel.
4. Choose auto-response settings based on the scenario content and the
objectives.
As seen, auto-responses can be used to free the facilitators’ attention. They also
enhance realism by presenting instant reactions to the care providers. On the
other hand, sometimes it is not possible or desirable to determine the responses
before the simulation begins. Different environments and applications call for
different settings.
60 | User Guide | Newborn HAL |
Some teaching practices are best done with the auto-response settings in
Prompt mode. Responses must be triggered by a vigilant facilitator. Though it is
slower and requires more attention, the benefit of Prompt over other modes is
that the simulation can be allowed to go in any direction, and it will be possible to
choose the response on a case-by-case basis.
Other learning exercises require a higher degree of automation. For such
applications, most facilitators choose Auto mode for the auto-response settings.
The key issue is standardized timing of symptom presentation. A consistent,
repeatable simulation is essential for fair assessment of that care provider in
relation to others and for the broader interpretation of results in the context of
training validation studies.
When in doubt, it is best to choose Prompt mode, in which the facilitator will be
given direct control of the responses as events are detected
| Newborn HAL | User Guide | 61
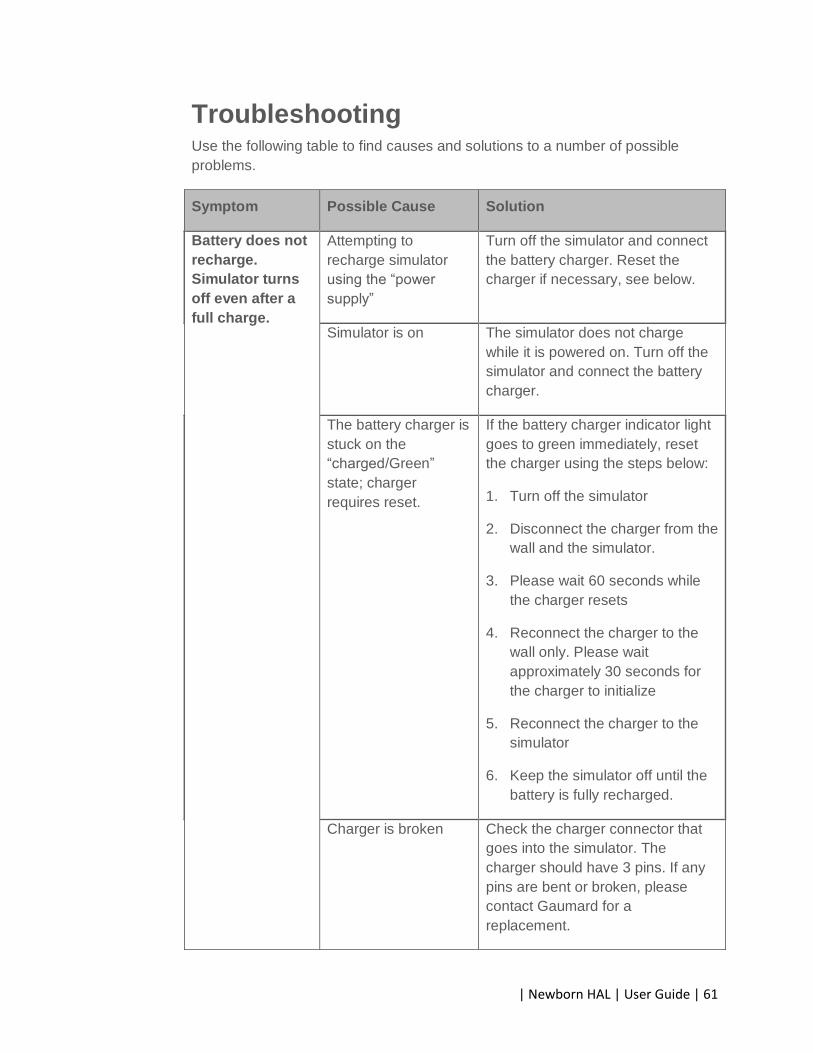
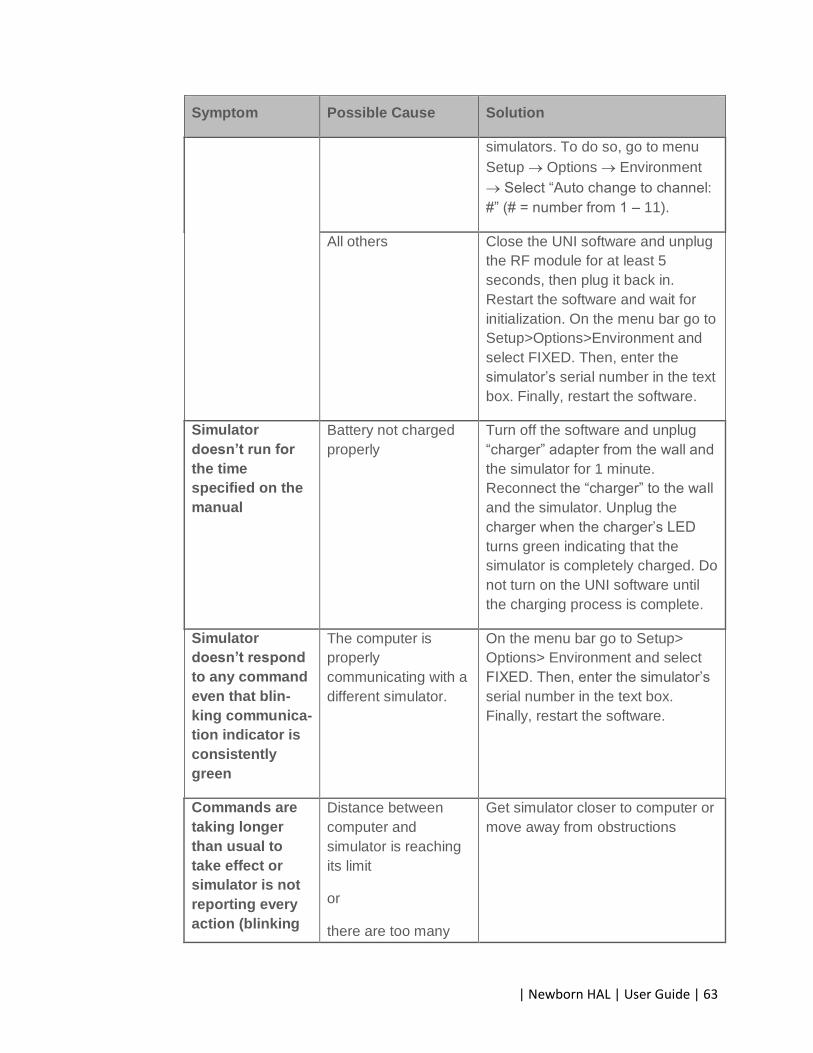
Troubleshooting Use the following table to find causes and solutions to a number of possible
problems.
Symptom Possible Cause Solution
Battery does not
recharge.
Simulator turns
off even after a
full charge.
Attempting to
recharge simulator
using the “power
supply”
Turn off the simulator and connect
the battery charger. Reset the
charger if necessary, see below.
Simulator is on The simulator does not charge
while it is powered on. Turn off the
simulator and connect the battery
charger.
The battery charger is
stuck on the
“charged/Green”
state; charger
requires reset.
If the battery charger indicator light
goes to green immediately, reset
the charger using the steps below:
1. Turn off the simulator
2. Disconnect the charger from the
wall and the simulator.
3. Please wait 60 seconds while
the charger resets
4. Reconnect the charger to the
wall only. Please wait
approximately 30 seconds for
the charger to initialize
5. Reconnect the charger to the
simulator
6. Keep the simulator off until the
battery is fully recharged.
Charger is broken Check the charger connector that
goes into the simulator. The
charger should have 3 pins. If any
pins are bent or broken, please
contact Gaumard for a
replacement.
62 | User Guide | Newborn HAL |
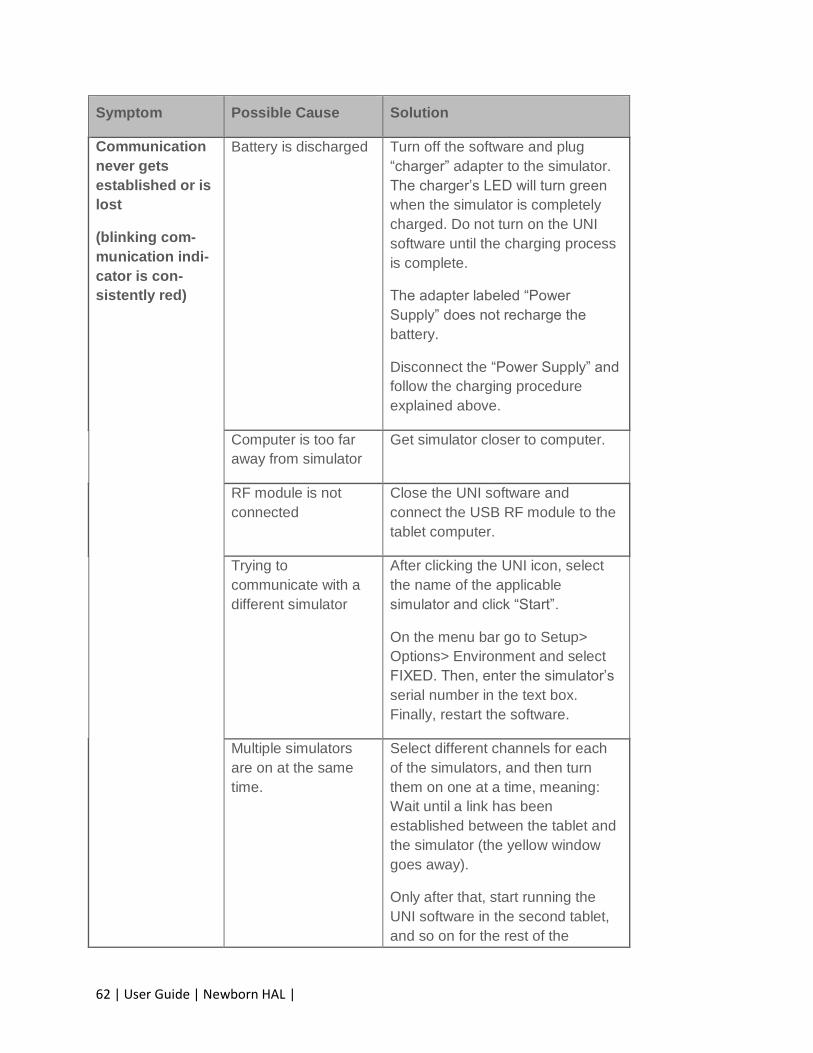
Symptom Possible Cause Solution
Communication
never gets
established or is
lost
(blinking com-
munication indi-
cator is con-
sistently red)
Battery is discharged Turn off the software and plug
“charger” adapter to the simulator.
The charger’s LED will turn green
when the simulator is completely
charged. Do not turn on the UNI
software until the charging process
is complete.
The adapter labeled “Power
Supply” does not recharge the
battery.
Disconnect the “Power Supply” and
follow the charging procedure
explained above.
Computer is too far
away from simulator
Get simulator closer to computer.
RF module is not
connected
Close the UNI software and
connect the USB RF module to the
tablet computer.
Trying to
communicate with a
different simulator
After clicking the UNI icon, select
the name of the applicable
simulator and click “Start”.
On the menu bar go to Setup>
Options> Environment and select
FIXED. Then, enter the simulator’s
serial number in the text box.
Finally, restart the software.
Multiple simulators
are on at the same
time.
Select different channels for each
of the simulators, and then turn
them on one at a time, meaning:
Wait until a link has been
established between the tablet and
the simulator (the yellow window
goes away).
Only after that, start running the
UNI software in the second tablet,
and so on for the rest of the
| Newborn HAL | User Guide | 63
Symptom Possible Cause Solution
simulators. To do so, go to menu
Setup Options Environment
Select “Auto change to channel:
#” (# = number from 1 – 11).
All others Close the UNI software and unplug
the RF module for at least 5
seconds, then plug it back in.
Restart the software and wait for
initialization. On the menu bar go to
Setup>Options>Environment and
select FIXED. Then, enter the
simulator’s serial number in the text
box. Finally, restart the software.
Simulator
doesn’t run for
the time
specified on the
manual
Battery not charged
properly
Turn off the software and unplug
“charger” adapter from the wall and
the simulator for 1 minute.
Reconnect the “charger” to the wall
and the simulator. Unplug the
charger when the charger’s LED
turns green indicating that the
simulator is completely charged. Do
not turn on the UNI software until
the charging process is complete.
Simulator
doesn’t respond
to any command
even that blin-
king communica-
tion indicator is
consistently
green
The computer is
properly
communicating with a
different simulator.
On the menu bar go to Setup>
Options> Environment and select
FIXED. Then, enter the simulator’s
serial number in the text box.
Finally, restart the software.
Commands are
taking longer
than usual to
take effect or
simulator is not
reporting every
action (blinking
Distance between
computer and
simulator is reaching
its limit
or
there are too many
Get simulator closer to computer or
move away from obstructions
64 | User Guide | Newborn HAL |
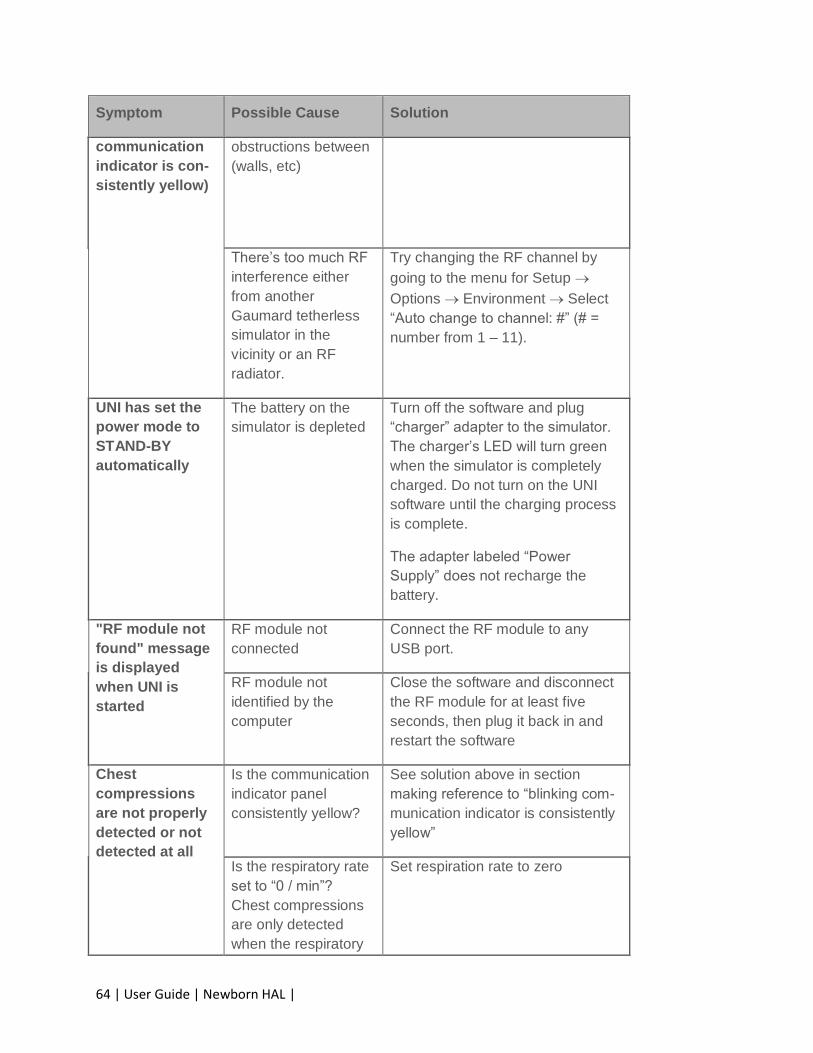
Symptom Possible Cause Solution
communication
indicator is con-
sistently yellow)
obstructions between
(walls, etc)
There’s too much RF
interference either
from another
Gaumard tetherless
simulator in the
vicinity or an RF
radiator.
Try changing the RF channel by
going to the menu for Setup
Options Environment Select
“Auto change to channel: #” (# =
number from 1 – 11).
UNI has set the
power mode to
STAND-BY
automatically
The battery on the
simulator is depleted
Turn off the software and plug
“charger” adapter to the simulator.
The charger’s LED will turn green
when the simulator is completely
charged. Do not turn on the UNI
software until the charging process
is complete.
The adapter labeled “Power
Supply” does not recharge the
battery.
"RF module not
found" message
is displayed
when UNI is
started
RF module not
connected
Connect the RF module to any
USB port.
RF module not
identified by the
computer
Close the software and disconnect
the RF module for at least five
seconds, then plug it back in and
restart the software
Chest
compressions
are not properly
detected or not
detected at all
Is the communication
indicator panel
consistently yellow?
See solution above in section
making reference to “blinking com-
munication indicator is consistently
yellow”
Is the respiratory rate
set to “0 / min”?
Chest compressions
are only detected
when the respiratory
Set respiration rate to zero
| Newborn HAL | User Guide | 65
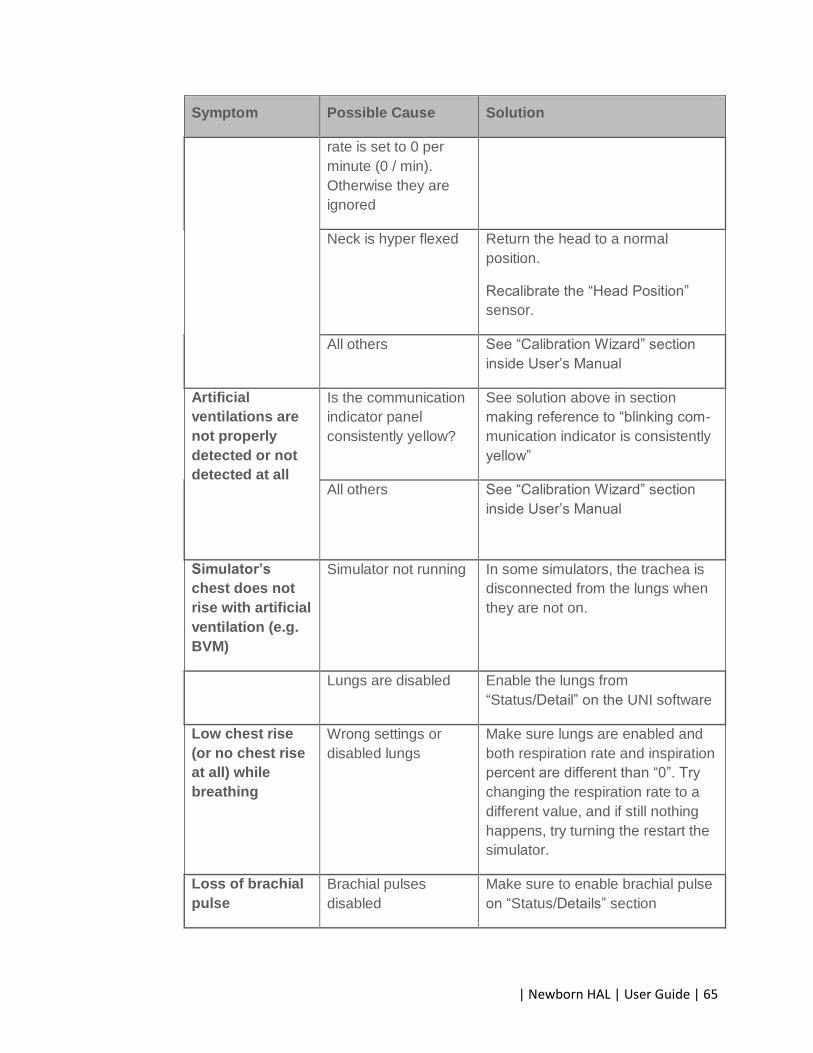
Symptom Possible Cause Solution
rate is set to 0 per
minute (0 / min).
Otherwise they are
ignored
Neck is hyper flexed Return the head to a normal
position.
Recalibrate the “Head Position”
sensor.
All others See “Calibration Wizard” section
inside User’s Manual
Artificial
ventilations are
not properly
detected or not
detected at all
Is the communication
indicator panel
consistently yellow?
See solution above in section
making reference to “blinking com-
munication indicator is consistently
yellow”
All others See “Calibration Wizard” section
inside User’s Manual
Simulator’s
chest does not
rise with artificial
ventilation (e.g.
BVM)
Simulator not running In some simulators, the trachea is
disconnected from the lungs when
they are not on.
Lungs are disabled Enable the lungs from
“Status/Detail” on the UNI software
Low chest rise
(or no chest rise
at all) while
breathing
Wrong settings or
disabled lungs
Make sure lungs are enabled and
both respiration rate and inspiration
percent are different than “0”. Try
changing the respiration rate to a
different value, and if still nothing
happens, try turning the restart the
simulator.
Loss of brachial
pulse
Brachial pulses
disabled
Make sure to enable brachial pulse
on “Status/Details” section
66 | User Guide | Newborn HAL |
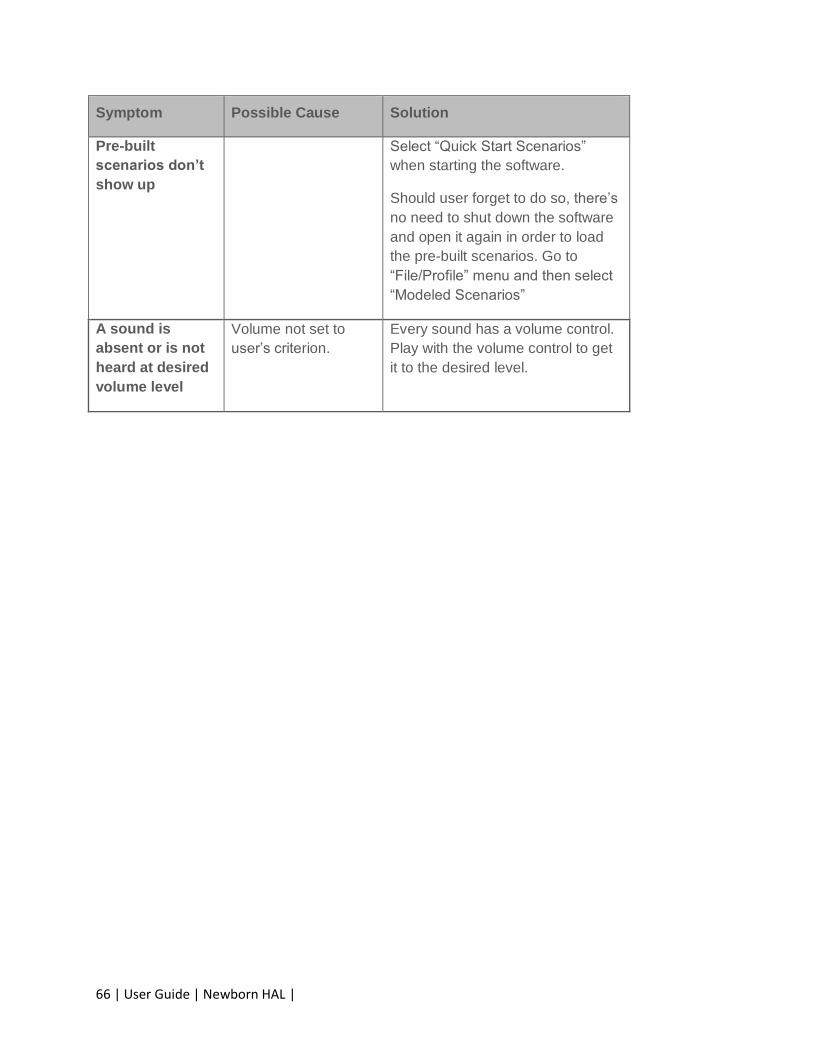
Symptom Possible Cause Solution
Pre-built
scenarios don’t
show up
Select “Quick Start Scenarios”
when starting the software.
Should user forget to do so, there’s
no need to shut down the software
and open it again in order to load
the pre-built scenarios. Go to
“File/Profile” menu and then select
“Modeled Scenarios”
A sound is
absent or is not
heard at desired
volume level
Volume not set to
user’s criterion.
Every sound has a volume control.
Play with the volume control to get
it to the desired level.
| Newborn HAL | User Guide | 67
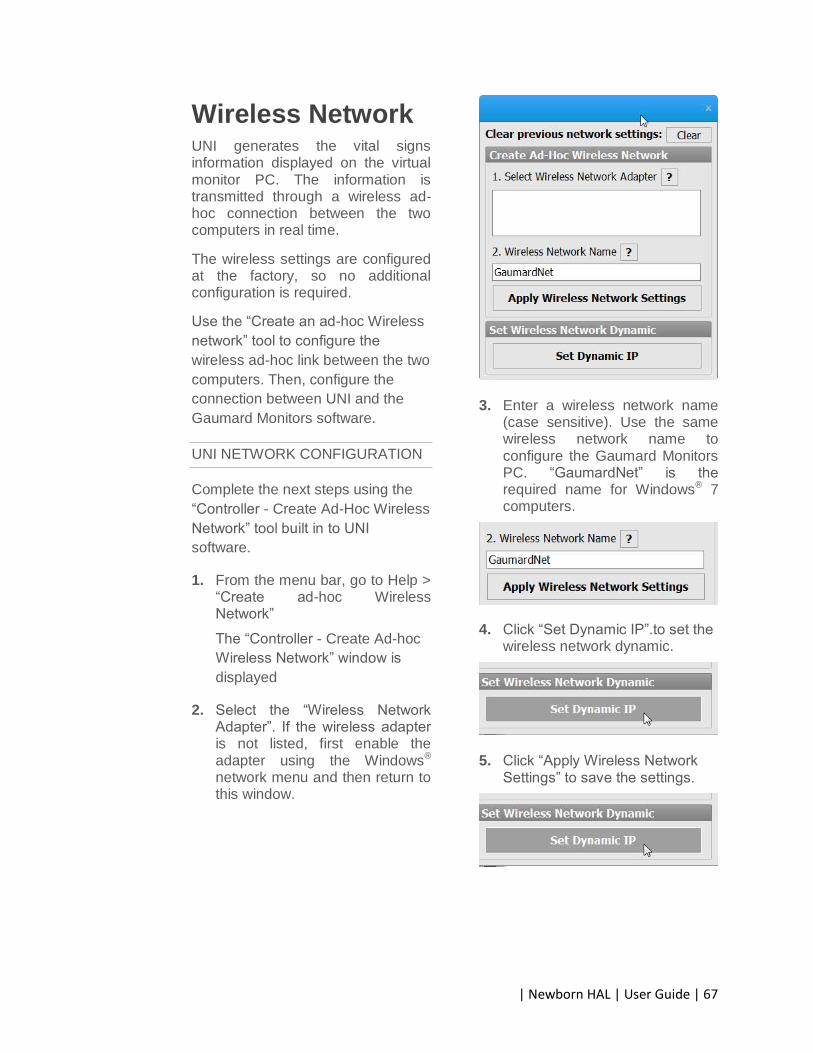
Wireless Network UNI generates the vital signs information displayed on the virtual monitor PC. The information is transmitted through a wireless ad-hoc connection between the two computers in real time.
The wireless settings are configured at the factory, so no additional configuration is required.
Use the “Create an ad-hoc Wireless
network” tool to configure the
wireless ad-hoc link between the two
computers. Then, configure the
connection between UNI and the
Gaumard Monitors software.
UNI NETWORK CONFIGURATION
Complete the next steps using the
“Controller - Create Ad-Hoc Wireless
Network” tool built in to UNI
software.
1. From the menu bar, go to Help > “Create ad-hoc Wireless Network”
The “Controller - Create Ad-hoc
Wireless Network” window is
displayed
2. Select the “Wireless Network Adapter”. If the wireless adapter is not listed, first enable the adapter using the Windows® network menu and then return to this window.
3. Enter a wireless network name (case sensitive). Use the same wireless network name to configure the Gaumard Monitors PC. “GaumardNet” is the required name for Windows® 7 computers.
4. Click “Set Dynamic IP”.to set the wireless network dynamic.
5. Click “Apply Wireless Network Settings” to save the settings.

68 | User Guide | Newborn HAL |
6. Restart the computer.
GAUMARD MONITORS NETWORK
CONFIGURATION
After the UNI control computer is configured, complete the next steps using the “Create an ad-hoc network tool” included in Gaumard Monitors software.
1. On the virtual monitor computer, click the Gaumard Monitors icon to start the vital signs software.
2. Click the V menu near the top left corner and select “Create Ad-Hoc Network”.
The “Virtual Monitor - Create ad-hoc
Wireless Network” window is
displayed.
3. Select “Wireless Network Adapter”. If the wireless adapter is not listed, first enable the adapter using the Windows® network menu and then return to this window.
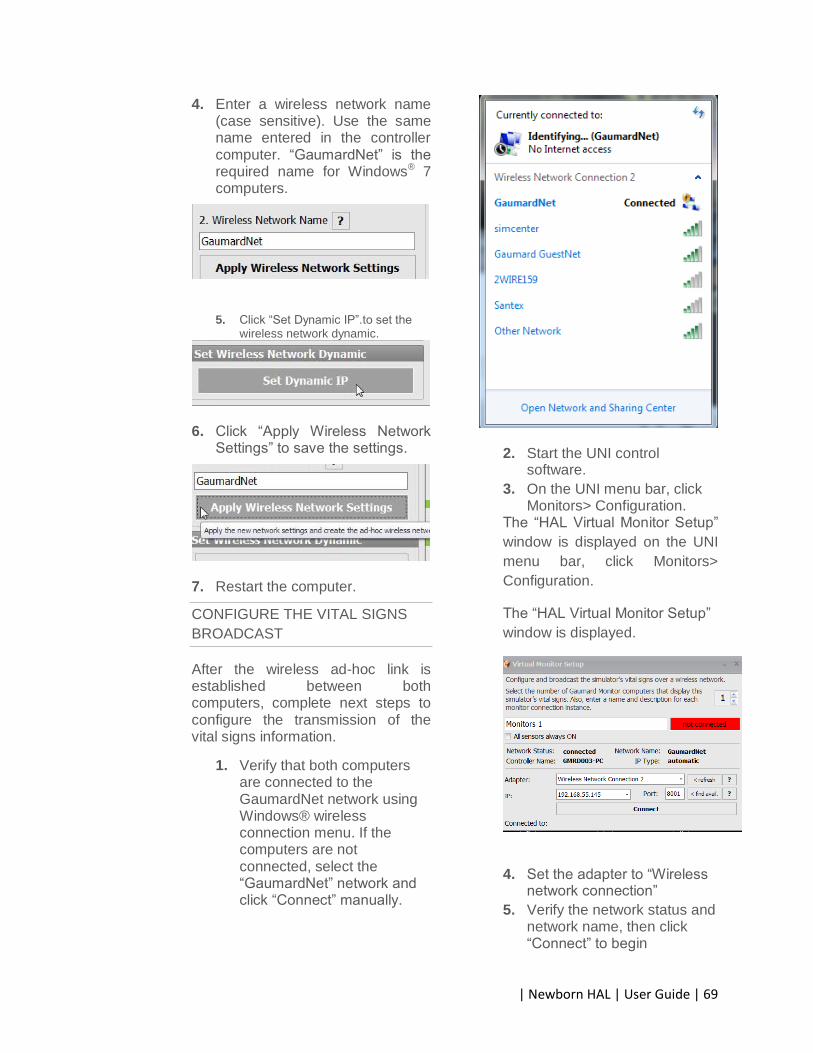
| Newborn HAL | User Guide | 69
4. Enter a wireless network name (case sensitive). Use the same name entered in the controller computer. “GaumardNet” is the required name for Windows® 7 computers.
5. Click “Set Dynamic IP”.to set the
wireless network dynamic.
6. Click “Apply Wireless Network Settings” to save the settings.
7. Restart the computer.
CONFIGURE THE VITAL SIGNS
BROADCAST
After the wireless ad-hoc link is established between both computers, complete next steps to configure the transmission of the vital signs information.
1. Verify that both computers are connected to the GaumardNet network using Windows® wireless connection menu. If the computers are not connected, select the “GaumardNet” network and click “Connect” manually.
2. Start the UNI control software.
3. On the UNI menu bar, click Monitors> Configuration.
The “HAL Virtual Monitor Setup”
window is displayed on the UNI
menu bar, click Monitors>
Configuration.
The “HAL Virtual Monitor Setup”
window is displayed.
4. Set the adapter to “Wireless
network connection”
5. Verify the network status and network name, then click “Connect” to begin
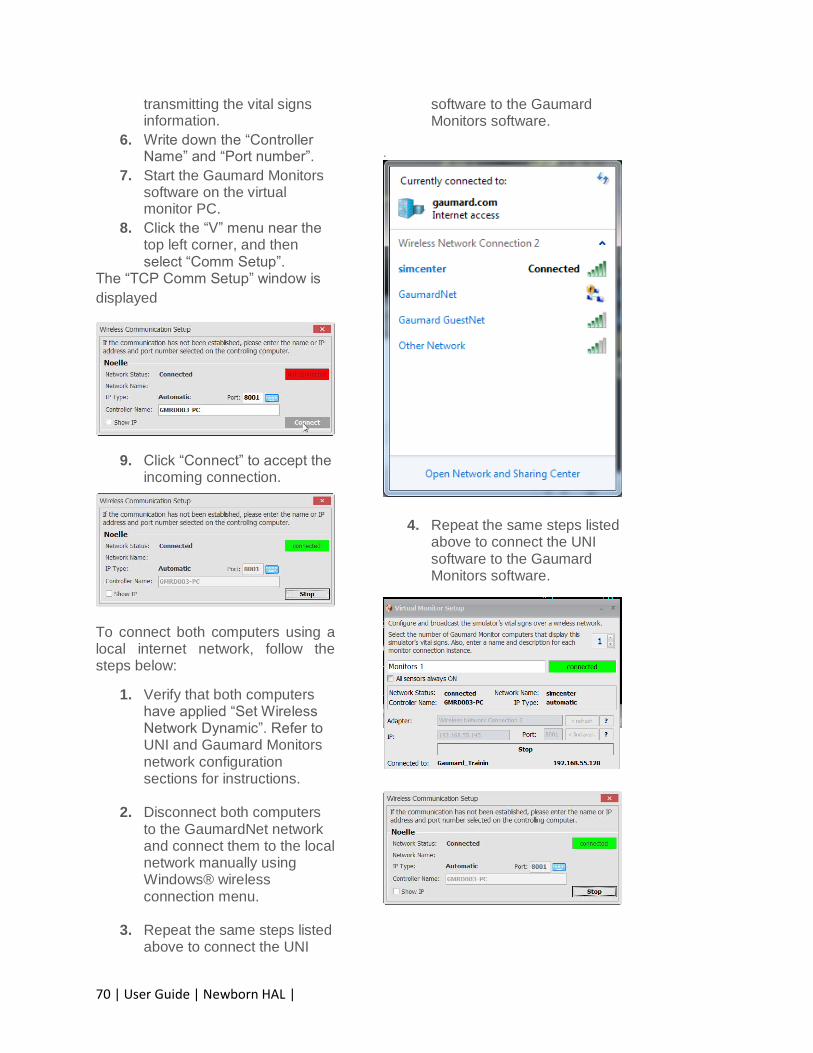
70 | User Guide | Newborn HAL |
transmitting the vital signs information.
6. Write down the “Controller Name” and “Port number”.
7. Start the Gaumard Monitors software on the virtual monitor PC.
8. Click the “V” menu near the top left corner, and then select “Comm Setup”.
The “TCP Comm Setup” window is
displayed
9. Click “Connect” to accept the incoming connection.
To connect both computers using a local internet network, follow the steps below:
1. Verify that both computers have applied “Set Wireless Network Dynamic”. Refer to UNI and Gaumard Monitors network configuration sections for instructions.
2. Disconnect both computers
to the GaumardNet network and connect them to the local network manually using Windows® wireless connection menu.
3. Repeat the same steps listed
above to connect the UNI
software to the Gaumard Monitors software.
.
4. Repeat the same steps listed above to connect the UNI software to the Gaumard Monitors software.

| Newborn HAL | User Guide | 71
Consumables, Replacements, and Optional Parts Contact Gaumard Scientific for a complete list of consumables and replacement parts and their
prices. C=Consumables; R=Replacements; A=Accessories; U=Upgrades; M = Factory Repair
ONLY
Item ID Name Typ
e
Description
S3010.001 A/C Virtual Monitor A 17" Touch Screen monitor and
desktop
S3010.002 D/C Virtual Monitor A D/C Powered 12" Touch Screen
Mobile Monitor with stylus
S3010.010 Battery C Rechargeable battery
S3010.011 Battery Charger R 100-240 V AC external battery
charger
S3010.013 Power Cord R
S3010.020 Umbilical Cord Kit C
S3010.023L
.L
Lower Left Arm C Lower left arm assembly
S3010.023R
.L
Lower Right Arm C Lower right arm assembly
S3010.027L
.L
Lower Left Leg Light color lower left leg. No IV
access.
S3010.027L
.R2.L
Lower Left Leg R Includes knee plastic connectors.
S3010.029R
.L
I/O Leg Skin Cover C Light color skin cover for right leg tibia
bone
S3010.031 I/O Tibia bones C I/O leg tibia reservoir bones
S3010.060 Simulator Transport Case R Soft storage and transport case
S3010.061 Simulator Transport Case A Hard storage and transport case
S3010.080 Simulated Blood C
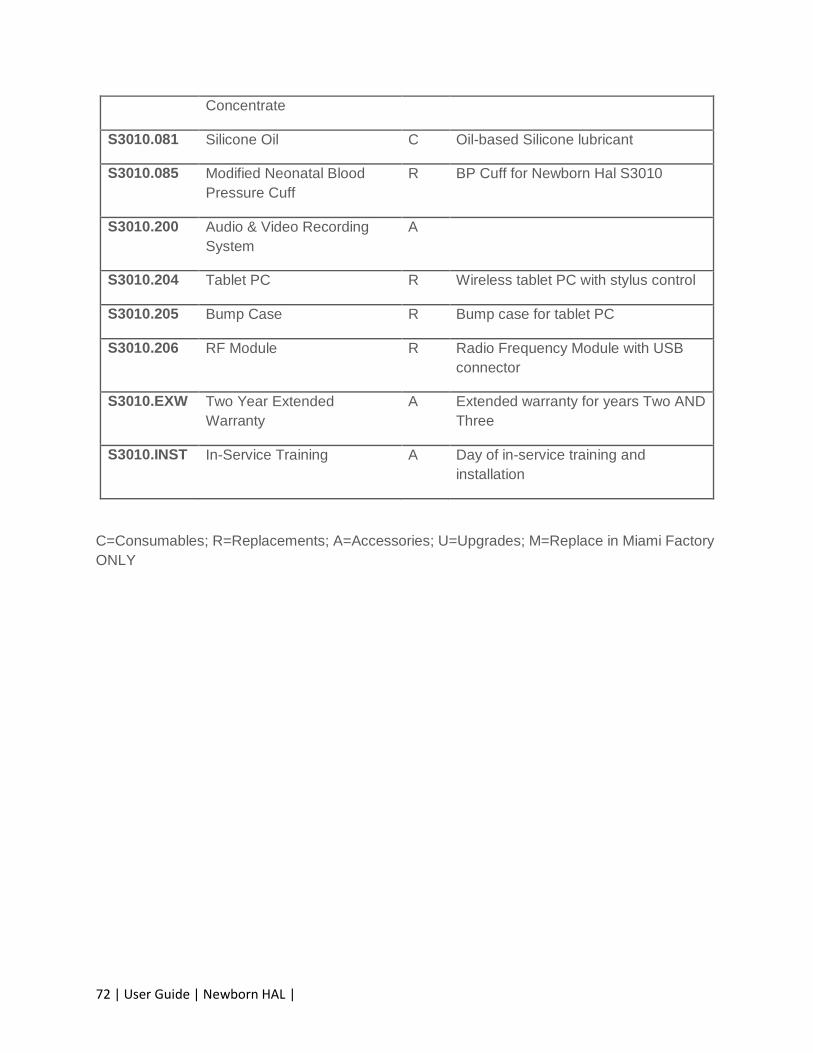
72 | User Guide | Newborn HAL |
Concentrate
S3010.081 Silicone Oil C Oil-based Silicone lubricant
S3010.085 Modified Neonatal Blood
Pressure Cuff
R BP Cuff for Newborn Hal S3010
S3010.200 Audio & Video Recording
System
A
S3010.204 Tablet PC R Wireless tablet PC with stylus control
S3010.205 Bump Case R Bump case for tablet PC
S3010.206 RF Module R Radio Frequency Module with USB
connector
S3010.EXW Two Year Extended
Warranty
A Extended warranty for years Two AND
Three
S3010.INST In-Service Training A Day of in-service training and
installation
C=Consumables; R=Replacements; A=Accessories; U=Upgrades; M=Replace in Miami Factory
ONLY

| Newborn HAL | User Guide | 73
Warranty EXCLUSIVE ONE-YEAR LIMITED WARRANTY
Gaumard warrants that if the accompanying Gaumard product proves to be defective in material or workmanship
within one year from the date on which the product is shipped from Gaumard to the customer, Gaumard will, at
Gaumard’s option, repair or replace the Gaumard product.
This limited warranty covers all defects in material and workmanship in the Gaumard product, except:
1. Damage resulting from accident, misuse, abuse, neglect, or unintended use of the Gaumard product;
2. Damage resulting from failure to properly maintain the Gaumard product in accordance with Gaumard product instructions, including failure to property clean the Gaumard product; and
3. Damage resulting from a repair or attempted repair of the Gaumard product by anyone other than Gaumard or a Gaumard representative.
This one-year limited warranty is the sole and exclusive warranty provided by Gaumard for the
accompanying Gaumard product, and Gaumard hereby explicitly disclaims the implied warranties of
merchantability, satisfactory quality, and fitness for a particular purpose. Except for the limited obligations
specifically set forth in this one-year limited warranty, Gaumard will not be liable for any direct, indirect, special,
incidental, or consequential damages, whether based on contract, tort, or any other legal theory regardless of
whether Gaumard has been advised of the possibilities of such damages. Some jurisdictions do not allow disclaimers
of implied warranties or the exclusion or limitation of consequential damages, so the above disclaimers and
exclusions may not apply and the first purchaser may have other legal rights.
This limited warranty applies only to the first purchaser of the product and is not transferable. Any
subsequent purchasers or users of the product acquire the product “as is” and this limited warranty does not apply.
This limited warranty applies only to the products manufactured and produced by Gaumard. This limited
warranty does not apply to any products provided along with the Gaumard product that are manufactured by third-
parties. For example, third-party products such as computers (desktop, laptop, tablet, or handheld) and monitors
(standard or touch-screen) are not covered by this limited warranty. Gaumard does not provide any warranty, express
or implied, with respect to any third-party products. Defects in third-party products are covered exclusively by the
warranty, if any, provided by the third-party.
Any waiver or amendment of this warranty must be in writing and signed by an officer of Gaumard. In the event of a
perceived defect in material or workmanship of the Gaumard product, the first purchaser must:
1. Contact Gaumard and request authorization to return the Gaumard product. Do NOT return the Gaumard product to Gaumard without prior authorization.
2. Upon receiving authorization from Gaumard, send the Gaumard product along with copies of (1) the original bill of sale or receipt and (2) this limited warranty document to Gaumard at 14700 SW 136 Street, Miami, FL, 33196-5691 USA.
3. If the necessary repairs to the Gaumard product are covered by this limited warranty, then the first purchaser will pay only the incidental expenses associated with the repair, including any shipping, handling, and related costs for sending the product to Gaumard and for sending the product back to the first purchaser. However, if the repairs are not covered by this limited warranty, then the first purchaser will be liable for all repair costs in addition to costs of shipping and handling.
EXTENDED WARRANTY
In addition to the standard one year of coverage, the following support plans are available:
Two-Year Extension (covers second and third years)
Call for pricing (USA only)

74 | User Guide | Newborn HAL |
Contact Us E-mail Technical Support: [email protected]
E-mail Sales and Customer Service: [email protected]
Phone:
Toll-free in the USA: (800) 882-6655
Worldwide: 01 (305) 971-3790
Fax: (305) 667-6085
Before contacting Tech Support you must:
1. Have the simulator’s Serial Number (located in the left leg under the IM site)
2. Access to the simulator and the control computer if troubleshooting is
needed.
Post: Gaumard Scientific
14700 SW 136 Street
Miami, FL 33196-5691
USA
Office hours: Monday-Friday, 8:30am - 4:30pm EST (GMT -4 Summer Time)
Gaumard®, NOELLE®, UNI™, and HAL® are trademarks of Gaumard Scientific
Company, Inc.
©Gaumard Scientific Company, 2014. All rights reserved.
All rights reserved.