new! scale maille earrings -...
TRANSCRIPT

step by step
Make your own CRYSTAL EAR CLIMBERS
pg. 22
stepbystepwire.comVol. 11 No. 5 Oct-Nov 2015
pg. 38
BONUS: Learn how to drill pebbles & sea glass
pg. 8
NEW!
ANNUAL CRYSTAL
ISSUE9 SPARKLING
PROJECTS
Upcycled EarringsRe-use vintage rhinestone buttons
BRACELET KIT
EARRINGSGet the kit! pg. 35
Scale Maille


t
®
PATENT PENDING
PATENTEDCOILING GIZMOS
Design wire jewelry with new dimension
Crank wire to make coiled springs & beads
Wire is soft tempered and is ideal for creating wire wrapped designs
Everything you need to start cutting metal sheet, large gauge wire, wood, and plastics
Give your designs a compelling textured look
Try diff erent stitches to create various patterns
Use these clever fi xed peg jigs to make your own wire clasps,
ear wires, and connectorsSAW FRAME WITH 36 BLADES
ALUMINUM WIRE
WIRE KNITTER TOOLFINDINGS FORMS
BRAID
FLAT COPPER WIRE
To fi nd an Artistic Wire/Beadalon retailer near you, please visit www.beadalon.com/store_locator.asp
3D BRACELET JIG™PATENT PENDING
Create trendy bangle bracelets, cuff bracelets, and curved components
CONETASTIC™
This ingenious tool makes beautiful wire cones and bead caps
The Largest Selection of Craft Wire and Wire Working Tools
WIRE STRAIGHTENER TOOLMake it easy to straighten wire
that has been worked
®
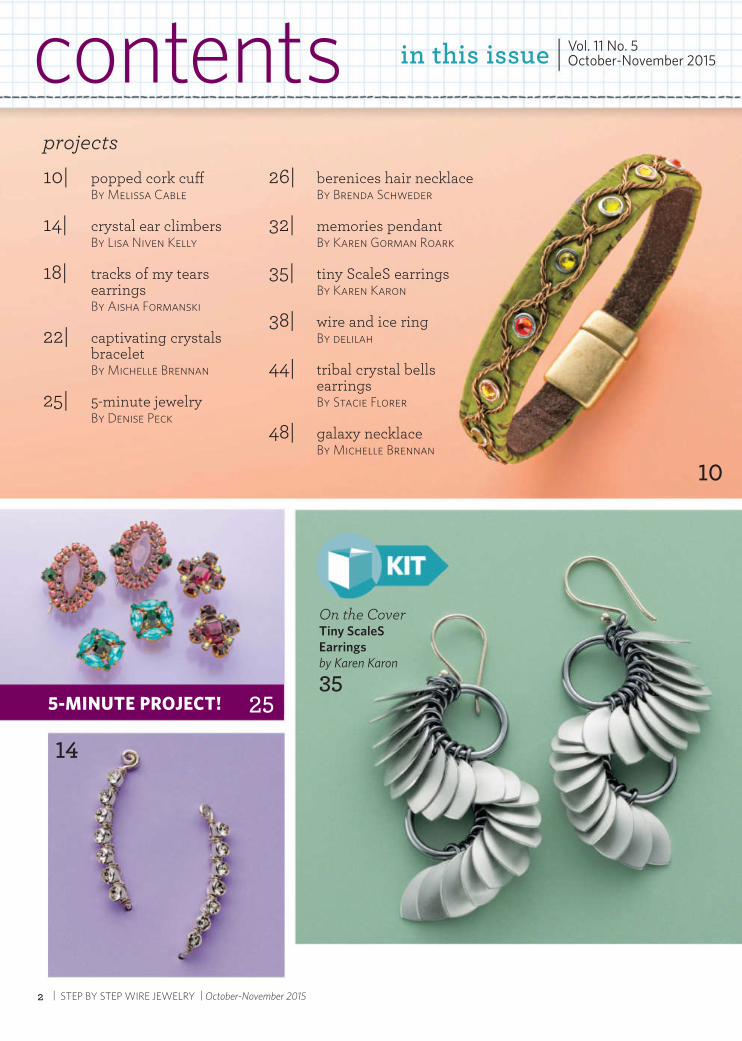
projects10| popped cork cuff By Melissa Cable 14| crystal ear climbers By Lisa Niven Kelly
18| tracks of my tears earrings By Aisha Formanski
22| captivating crystals bracelet By Michelle Brennan
25| 5-minute jewelry By Denise Peck
26| berenices hair necklace By Brenda Schweder
32| memories pendant By Karen Gorman Roark
35| tiny ScaleS earrings By Karen Karon
38| wire and ice ring By delilah
44| tribal crystal bells earrings By Stacie Florer
48| galaxy necklace By Michelle Brennan
14
10
On the CoverTiny ScaleS Earrings by Karen Karon
35
in this issue October-November 2015Vol. 11 No. 5contents
25
| STEP BY STEP WIRE JEWELRY | October-November 20152
5-MINUTE PROJECT!

features & departments 4| off the wire By Denise Peck, Editor-in-Chief
6| inspired by mother nature By Melissa Cable
9| color canvas: fabulous foliage By Heather Powers
31| meet the artists
47| spotlight By Sara Richardson
53| wire basics
advertising sections54| marketplace
55| advertisers index
38
44
32
18
captivating crystals braceletBy Michelle Brennan
22
www.jewelrymakingdaily.com | 3

SHARE IT ON SOCIAL
Post a pic of what you make with #SBSWJewelryMag
off th e wire
Shaking Things UpIt’s time to start planning for the holidays, and what better way than to make some fabulous sparkling jewelry – for yourself, for gifts, to sell. Our contributors for this special annual issue have included crystals in a chain maille bracelet, in a woven wire ring, in stamped metal earrings. Grab some crystals from your stash and make up some of these projects in your favorite colorways.
This crystal issue is a fun one for me, as I don’t often design with crystals. I’m more of a grunge sort of jewelry gal – lots of dark metal, rough stones, patina, even rusty metal. So these projects take me out of my comfort zone. Forcing yourself out of your usual design habits can be a terrifi c challenge. Grab some elements you wouldn’t ordinarily use and make something that speaks to you in ways you didn’t think could happen. It’s a particularly good way to jostle yourself out of a designer’s block, or a rut you’ve found yourself in. It even makes you see your usual materials in a diff erent light. I often work with materials from nature, like the ones Melissa Cable details in her feature on page 6. While I was working on this issue, I began to think about how unexpected it would be to add crystals to a piece using river stones. Or how about wiring some crystals onto drilled pieces of driftwood? Wow, I love that idea!
Whatever it is that speaks to you, when you’re designing jewelry, try shaking it up next time you’re at your bench, and see what fabulousness develops. Then share it with me at [email protected]. I would love to add a page in each issue of designs that came from pushing the envelope, or the metal, as the case may be! Why not start right now?!
step by step
jewelry EDITORIAL DIRECTOR Merle White EDITOR-IN-CHIEF Denise Peck ASSOCIATE EDITOR Mallory Leonard CONTRIBUTING EDITORS Sara Richardson Melissa Cable Heather Powers EDITOR, JEWELRYMAKINGDAILY.COM Tammy Jones PRODUCTS & PROMOTIONS EDITOR Lindsay Jarvis
_______________
ART DIRECTOR Amy Petriello GRAPHIC DESIGNER Katherine Hess PRODUCTION DESIGNER Nichole Mulder PHOTOGRAPHY Jim Lawson
_______________
ADVERTISING SALES MANAGER Marilyn Koponen [email protected] (877) 613-4613 ADVERTISING SALES MANAGER Stephanie Griess [email protected] (877) 613-4630 AD TRAFFICKER Cari Ullom CLASSIFIED ADVERTISING Tina Hickman
_______________
FOUNDER, CREATIVE DIRECTOR Linda Ligon VICE PRESIDENT, MEDIA SALES Michele Crockett BOOKS EDITORIAL DIRECTOR Vanessa Lyman CREATIVE DIRECTOR Larissa Davis SENIOR PRODUCTION MANAGER Nancy M. Pollock ECOMMERCE MARKETING DIRECTOR Evelyn Bridge DIRECTOR, MAGAZINE MARKETING & FULFILLMENT Mark Fleetwood
_______________
F+W MEDIA, INC.
CHAIRMAN & CEO David Nussbaum CHIEF OPERATING OFFICER & CFO James Ogle PRESIDENT Sara Domville CHIEF DIGITAL OFFICER Chad Phelps SENIOR VICE PRESIDENT, OPERATIONS Phil Graham VICE PRESIDENT, COMMUNICATIONS Stacie Berger
_______________
Step By Step Wire Jewelry (ISSN 1555-9939) is published bi-monthly by F+W Media/Interweave Press, 4868 Innovation Dr., Fort Collins, CO 80525-5576. (866) 949-1646. USPS #017-249. Periodicals postage paid at Fort Collins CO 80525, and additional mailing offices. All contents of this issue of Step By Step Wire Jewelry are copyrighted by F+W Media, Inc., 2014. All rights reserved. Projects and information are for inspiration and personal use only. Reproduction in whole or in part is prohibited, except by permission of the publisher. Subscription rate is $29.95/one year in the U.S., $36.95/one year in Canada, and $41.95/one year in international coun tries (surface delivery). U.S. funds only.
POSTMASTER: Please send address changes to Step by Step Wire Jewelry, P.O. Box 433289, Palm Coast, FL 32143.
Subscription Services: P.O. Box 433289, Palm Coast, FL 32143, [email protected], U.S. and Canada (866) 836-7865, International (386) 246-0105.
Retailers: If you are interested in carrying this magazine in your store, please contact us toll free at (800) 289-0963 or email [email protected] by Step Wire Jewelry magazine is not responsible for any liability arising from errors, omissions, or mistakes contained in the magazine, and readers should proceed cautiously, especially with respect to technical information, following all manufacturers’ instructions and precautions. Step by Step Wire Jewelry magazine does not recommend, approve, or endorse any of the advertisers, products, ser-vices, or views advertised in Step by Step Wire Jewelry magazine. Nor does Step by Step Wire Jewelry magazine evaluate the advertisers’ claims in any way.
_______________
VISIT US ON THE WEB:
stepbystepwire.com • interweave.com • fwmedia.com
Denise Peck, [email protected]
Did you know:After drilling a hole in a stone, if you use a round bur in your rotary tool to slightly slope the edges of the hole, it will help prevent chipping.
| STEP BY STEP WIRE JEWELRY | October-November 20154

www.jewelrymakingdaily.com | 5

By Melissa Cable
Mother Nature is a generous maker. From shells, stones and fossils, to wood and cork, the list of natural materials is plentiful. Enjoy the bounty she off ers!
Inspired by
I am fresh off a weeklong coastal road trip… two moms, four kids and a lot of patience. We came home with many treasures: rocks, shells, sticks, and a crab claw. Lucky for my kids, their mother is fascinated by natural materials and over the years has learned some tips for the care and use of Mother Nature’s gifts.
Seashells Cleaning empty seashells is as easy as using soap, water and a stiff brush. For harder to clean shells, a 50-50 solution of bleach and water will remove the brown scaly layer and brighten them. Rinse well and do not over soak or you risk losing color. When dry, polyurethane spray can add more shine to the shell.
I especially enjoy collecting shells that have holes. The holes appear more natural than ones I drill, and it forces me to fi nd interesting ways to display it. Most shells will need a hole drilled, however, so be sure to review the 1-2-3 section below for drilling tips for shells, stones and beach glass.
Stones and FossilsWhile we encourage you to drill your own treasured stones, pre-drilled beach and river stones are widely available from Etsy stores like StoneMe and are easy to incorporate into your wirework. Whether hanging from a jump ring on a chain or wire wrapped together, stones add an organic element to any design.
Besides simple river stones, I love rocks that are the result of interesting natural processes. Concretions, fossils and petrifi ed wood fall into this category. My most cherished rocks are limestone concretions I purchased from lapidary master Gary Wilson. These are sitting in my studio waiting for the right inspiration. Linda Larsen uses fossils and also takes advantage of pre-existing holes. She creates large custom tube rivets to connect things like ammonites to her metal work.
StoneMe on Etsy
Linda Larsen
| STEP BY STEP WIRE JEWELRY | October-November 20156

WoodI fi rst fell in love with wood jewelry when I saw the work of Seattle artist Aaron Barr (MCBARR – caption “Aaron Barr”). It began a period of experimentation with wood that included wood veneer from Woodcraft.com, face grain wood plugs from WidgetCo.com and fi nally driftwood courtesy of Mother Nature.
When using materials straight from nature you need to evict creepy-crawlies! Artist Tara Brannigan places all her natural items in a sealable plastic bag and freezes them for at least 72 hours. Insect eggs can survive freezing, however, so keep the bag sealed for a few weeks in case you need to repeat the process. You can also place wood in a 150–200 degree oven for two hours. Higher temperatures can crack or discolor the wood.
All wood, be it straight from nature or processed, should be sealed. Barr prefers Zinsser Bulls Eye Seal Coat, which is sandable and provides a smooth surface for fi nishing coats. After sealing, you can stain the wood if desired, and then apply a spar varnish, like Man O’ War. This will make your piece both waterproof and UV resistant, which Barr notes is important for certain woods that can fade over time.
Melissa Cable
Wood fi nishing supplies
CorkA relative of wood, cork is made from the bark of a tree. Formerly employed in the wine industry, I have a long-standing love of cork and am enjoying all the new products available. Lillypilly Designs has a collection of patterned cork veneers (as well as stone and wood veneers) and Fusionbeads.com has cork cord in two widths. There is even a new washable cork fabric from corkstore.com! Leather tools and hardware work perfectly on these products, making cold connections a breeze. Ready to work with cork? See Popped Cork Cuff on page? While we covered only a few of Mother Nature’s off erings, there’s a long list of other natural materials, from bone, quills and sand to leaves, seeds and grasses. Start collecting and you’ll be inspired, naturally.
Cork cord from Fusionbeads.com and cork veneers from Lillypilly Designs
Wood experiments
www.jewelrymakingdaily.com | 7

Drilling Holes 1-2-31. Tools and SuppliesSmall bowl with a small piece of wood inside (Linda Larsen uses a hockey puck). For shells, sea glass and stones use a Dremel or flex shaft with twist diamond drill bits for small holes or a hollow core diamond drill bit (often called hole saws) for larger holes.
2. Tips• Check for cracks that may break further when drilled.• To prevent cracking when using twist drill bits, make a small hole first and
work up to larger holes. • Safety first! Wear safety goggles and consider a mask in case dust
becomes airborne. Special holders are available for small items like pearls or use rubber tipped clamps to secure hard-to-hold objects. Do not submerge the electrical tool in the water, only the drill bit attached to it.
3. ProcessPlace the object on the wood in the bowl. Fill with water, covering the object to keep it cool and to capture dust when drilling. Hold the object firmly. Set the bit on the object and use the slowest speed to create a small divot to keep the drill bit in place. Increase the speed slightly and let the tool do the work. Do not press down. Fast speeds are dangerous and can crack your piece and dull your bits. Move the bit up and down slightly to allow water to flood the hole, removing drilled material. Continue drilling until the hole is complete.
| STEP BY STEP WIRE JEWELRY | October-November 20158

I love autumn, where every leaf becomes a fl ower and the world is set ablaze in color. My earring design was inspired by changing leaves I saw during a woodland walk on a nearby nature trail. I pulled together polymer clay leaves that glow in a berry hue and seed beads in analogous colors – those are the colors right next to each other on the color wheel, so they go together well. I tempered all this color with a neutral-colored stone that I felt captured the rustic feel of the leafy path. Copper wire complemented the palette.
Play with fi lters on your photos. Wouldn’t it be nice if leaves came in this amazing shade of pink? In truth, that color is the result of a little bit of Instagram magic. Photo apps with fi lters can create new color palettes that have a small hold in nature but go beyond what we see in the world around us. Experiment with layers of hues and altering color balances and saturations.
Pyrite beads add an earthy color.
Resources: Polymer clay beads: Humblebeads, humblebeads.com.
www.jewelrymakingdaily.com | 9
BY HEATHER POWERS
Fabulous FoliageCOLOR CANVAS:

By Melissa Cable
When I think of cork, I think of the “pop” when you open a bottle of champagne in honor of something wonderful. This project celebrates
autumn with pops of color surrounded by twisted vines.
popped cor k cuff
Chall enge YourselfSKILL LEVEL 3
| STEP BY STEP WIRE JEWELRY | October-November 201510

1a
3
4b
1b
2
4a
1. On the back of the leather, starting 1" from the end, use a Sharpie to mark every ½" on the cord until you have 12 marks. Use the 2.5mm leather hole punch to pierce holes on each mark along the center of the cord.
2. Using the second smallest hole on the sewing punch, pierce a hole 3mm away (just under ⅛ ") from each side of the larger holes.
3. On one end of the cord, pierce another hole with the sewing punch, approximately 6mm away (just under ¼") from the small hole. This will be the starting end. On the other end, increase the size of the hole punch by two sizes and pierce a hole approximately 6mm away (just under ¼") from the small hole. This will be the fi nishing end.
10mm Regaliz™ Portuguese Flat Cork Cord (other 10mm leather cord will work), 7�½ " 3mm Crystaletts, 12 (3 each of 4 colors) 20-gauge twisted wire*, 3' 10mm box clasp for fl at leather Chain-nose pliers Leather hole punch pliers with 2.5mm hole Sewing punch pliers Flush cutters Awl Cyanoacrylate glue, like Zap a Gap Ruler Sharpie (silver or gold for use on dark-colored cords) .025" OD tubing, small piece (suggested) Aileen’s spray adhesive and ultrasuede for backing (optional)
*If you are new to wirework, substitute one foot of untwisted 20-gauge wire to make this project even easier.
RESOURCES: Cork cord and clasp: FusionBeads, fusionbeads.com. Crystaletts: YadasiBeads, YadasiBeads.Etsy.com.
tools and supplies
4. Cut a 12" piece of 20g wire. (If you are new to wirework, weaving in tight spaces can result in kinked wire. Twisted wire is not forgiving, so use untwisted wire for this step if you are more comfortable with it). From the back of the cord, pass the wire up through the last hole on the starting end. Pull the wire through until you have a tail that’s slightly longer than the cord. Pass the wire down the adjacent small hole, and pull it through creating a small wire stitch.
TIP: To avoid kinks, place an awl in the loop of the wire as you pull it through. The wire will follow the round path of the awl. Pull the awl out when the wire is tight and then further tighten the wire.
www.jewelrymakingdaily.com | 11

5b
6b
6a
7
5. Leaving about a 1" tail, pass the wire up through the fi rst big hole. Thread on a Crystalett, and pass the wire back down the same big hole. Work slowly to avoid kinking the wire. Once the wire is through, and the Crystalett is seated fl at in the hole, use chain-nose pliers to make the Crystalett shank perpendicular to the wire. This will allow the wire to pull through straight and tight.
6. Repeat Steps 4–5 until all the wire and Crystaletts are stitched onto the cord. When creating each wire stitch, place a scrap piece of 20g wire under the stitch as you tighten it. That will assure there is room to weave wire through later. Leave the scrap wire there until you need it for the next stitch. When you’re fi nished stitching, trim the wire tail slightly longer than the cord.
7. Pass 2' of twisted wire through the wire stitch on the starting end, until it reaches the halfway point.
5a
OPTIONAL: Although the wire is neat and there are no sharp ends on the back, you can glue on a backing by applying Aileen’s spray adhesive to ultrasuede, and attaching it to the back of the cord.
| STEP BY STEP WIRE JEWELRY | October-November 201512

10
12
8 9
8. Place the ends of the wire under the next wire stitch, so that they come together from the opposite sides.
9. Place the tubing over the Crystalett, and gently pull the wires one at a time until they are formed around the tube. Angle the wires outward, so that they naturally cross. (You can do this without the tubing if you can create consistently-sized wire frames around each Crystalett).
11
EDITOR'S TIP: When using elements from nature in your work, you may want to use a spray sealant. Be aware that they come in two fi nishes - glossy and matte. Choose the one that will complement your design.
Find 10 fabulous designs with natural elements in
this must-have eBook!
bit.ly/ebook-nature-materials
10. At the point the wires cross, use chain-nose pliers to squeeze the wires and the stitch, creating a slight bend in the wires that will help them stay in place.
11. Repeat Steps 8–10 until all the Crystaletts have a wire frame around them. Do not pull the wires too hard, or you will distort the previous frame. On the last wire frame, pass the wires under the stitch and down the larger hole that was pierced on the fi nishing end. Place the tubing over the Crystalett, and tighten the wires as needed by pulling them from the back. Trim all the wire ends so that they are fl ush with the ends of the cord.
12. Use cyanoacrylate glue to attach the clasp to each end.
www.jewelrymakingdaily.com | 13

By Lisa Niven Kelly
Ear Climbers are climbing their way to the top of the trends chart. Using just wire, boy oh boy, you could make so many diff erent designs! In this article, I will show you how to wrap crystal cup chain on the ear climber to make a fun and blingy
conversation piece. Experiment with length and the design at the end of the wire. In these instructions, I show how to put a small spiral at the end, but you could also paddle out the end of the wire or just make a small loop. Soft wire works well for the
bulk of this earring, so that you can easily pinch the wire against your ear in the back.
crystal ear climbers
Chic and SimpleSKILL LEVEL 2
| STEP BY STEP WIRE JEWELRY | October-November 201514

1a
2c
4
1b
2b2a
3
1. Make a tiny kink at the end of a 4" piece of 20g wire, pinch it shut, and form a small spiral around it. Center the spiral atop the wire.
2. Take a section of the cup chain (this project uses a ¾" piece with 6 crystals on it) and lay it on the 20g wire. Use a 6" piece of 28g wire, and begin to wrap the cup chain onto the wire. Start in the middle of the chain, and start in the middle of the wire to help you keep a handle on it. Don’t worry about bein g perfectly spaced next to the spiral, you can always shift it down. Make 2 wraps in between each crystal, bring the wire over, and wrap over the next space between the crystals. Continue until you reach the last crystal, and make 2 wraps on the outside of that edge crystal. Repeat on the other side. Trim the tails, and gently push the whole wrapped cup chain section down to butt up against the spiral.
3mm crystal cup chain, 2" 20-gauge dead soft round sterling wire, 8" 28-gauge dead soft round sterling wire, 12" Chain-nose pliers Long round-nose pliers Flush cutters Wire rounder (to smooth out the end of the ear wires) Ruler Steel bench block (optional) Chasing hammer (optional)
RESOURCES: Wire and tools: Beaducation, beaducation.com. Crystal cup chain: FusionBeads, fusionbeads.com.
tools and supplies
3. Position the crystal cups to face the correct way. Insert (from the back) the tip of the chain-nose pliers, and squeeze each section of wraps (between the crystals) to set them in place. This will keep the crystals from shifting on the wire and facing the wrong way when you wear the earrings.
4. Position the tip of the chain-nose pliers at the end of the wire where it meets the end of the wrapped crystal section, and bend the wire back at a 90° angle.
www.jewelrymakingdaily.com | 15

5b
6
5c
7
5. Place the bent wire in the back of the jaws of the round-nose pliers (measures approximately 4mm), pull the wire up and over the pliers, and down toward the spiral end. Trim the back ear wire to the same length as the front. The shape of this ear wire is a bit odd, but it will help the back of the ear wire stay put against the back of your ear.
6. Use your hand to help shape the earring into a slight curve, so it will “climb” up your ear properly.
7. When wearing these, pull the ear wire out from the back a bit so you can insert it into your pierced hole, pull it up over the lobe, and pinch it down a bit it to keep it in place. These are so light, you won’t even know they are there!
5a
Tips from Lisa!TIP 1: For wirework, when buying in bulk, I always buy "soft" wire. It is easier to "harden" a wire (before or after shaping it) than it is to soften it.
TIP 2: Make sure to thoroughly clean a wirework piece with soap and water before oxidizing it. Any oils or gunk on your wire will act as a resist, and you won't get a fl uid oxidation on your piece.
Learn more from Lisa in her book and DVD
bit.ly/niven-kelly-stamped-metal-book
| STEP BY STEP WIRE JEWELRY | October-November 201516

www.jewelrymakingdaily.com | 17

By Aisha Formanski
Mixing metal, stamping and crystals creates the perfect amount of bling for these everyday earrings. But they’re elegant enough for a night on the town too!
tracks of my tears earrings
Chic and SimpleSKILL LEVEL 2
| STEP BY STEP WIRE JEWELRY | October-November 201518

1a
1b
2
1. Polish the two teardrop blanks with the Pro Polish Pad. Stamp the fi rst row of crescents around the inner teardrop. Add the second row by adding a crescent between each previously stamped crescent.
24-gauge sterling open teardrop blanks, 2 22-gauge 3mm ID sterling jump rings, 6 12mm Swarovski teardrop crystals, 2 Sterling ear wires with loop and 1.5mm ball end, or similar, 1 pair .5mm × 2.5mm crescent metal stamp Bench block 1 lb. brass mallet Nylon mallet Pro Polish Pads Screw down hole punch (1.6mm and 2.3mm holes) #2 metal fi le Chain-nose pliers, 2 pair Midas Black Max Oxidizer Solution Cotton swab Paper towel
RESOURCES: Blanks and tools: Beaducation, beaducation.com. Crescent metal stamp: 2 Moon Tools, 2MoonTools.etsy.com. Fretz nylon ended mallet: Otto Frei, ottofrei.com. Swarovski crystals: Beyond Beadery, beyondbeadery.com. Oxidizer solution, jump rings and ear wires: Rio Grande, riogrande.com.
tools and supplies
Find more valuable advice in Aisha's bestselling book,
New Directions in Punched Metal Jewelry!
TIP 1: If your design stamp has a round shank, it may be diffi cult to grip the stamp to create a good impression. Simply wrap a 2" strip of masking tape halfway down around the stamp's shank. Grip and stamp away!
TIP 2: Having a hard time placing your design stamp exactly where you want it? Polish the surface of the metal in the area you would like to stamp with a Pro Polish Pad. Hold the stamp above the metal, and use the refl ection of the stamp to place it exactly where you want it.
http://bit.ly/formanski-punched-metal
2. While you’re stamping the blank, it may begin to warp a bit. If this happens, place the blank with the stamped side down onto the bench block, and use the Pro Polish Pad to protect the face side of the blank. Give the blank a couple hits with a nylon mallet. Add additional rows of crescents until you fi ll the blank.
www.jewelrymakingdaily.com | 19

3. With a cotton swab, apply the oxidizer solution to the top surface of the stamped blanks. Once you’ve completely covered the surface, allow them to thoroughly dry. Use the Pro Polish Pad to rub off the excess patina from the top surface of the metal. This will buff the top surface of the blanks to a high shine, and leave the dark patina inside the stamped impressions.
4. Using the 2.3mm hole end of the screw down hole punch, punch a hole in the tops of both stamped blanks. Use the metal fi le to smooth any burrs left from the punch. This hole is large enough to accommodate the ear wires, and the jump rings attached to the crystals.
5
3a
43b
5. Attach a jump ring into one of the punched holes, and close the ring. Attach another jump ring to a crystal teardrop, and close the ring. Open a third jump ring, and before closing it, attach it to the other two jump rings. Attach the ear wires to the same hole as the fi rst jump ring added. Repeat Step 5 for the other earring.
| STEP BY STEP WIRE JEWELRY | October-November 201520

www.jewelrymakingdaily.com | 21

By Michelle Brennan
You can never have enough shiny things! Everyone knows how gorgeous Swarovski crystals are, but regular jump rings fade into the background when the two are combined in chain maille. By using square anodized
aluminum, both the crystals and the jump rings shine brilliantly. These supplies make up to an 8" bracelet.
captivating crystals br acelet
Chic and SimpleSKILL LEVEL 2
NOW AVAILABLE AS A KIT!
shop.jewelrymakingdaily.com/brennan-captivating-crystals
| STEP BY STEP WIRE JEWELRY | October-November 201522

1
3
4b
2a
2b
4a
1. Jump rings made from square wire are easier to manipulate than regular jump rings, since the fl at surface of chain-nose pliers sits perfectly on the fl at surface of the ring. Closing square wire jump rings requires a little more attention to detail to make sure that all edges of the wire line up properly. Open all the jump rings. Weave and close one small jump ring around the lobster clasp. Close a second small jump ring around the fi rst jump ring.
2. Close two large rings around the second small jump ring added in Step 1. Close two large rings around the fi rst two large rings you just added.
6mm Swarovski Pacifi c Opal bicones, 14 18-gauge (SWG) 5⁄32" ID square silver anodized aluminum jump rings, 31 (small) 18-gauge (SWG) ¼ " ID square silver anodized aluminum jump rings, 56 (large) 15mm stainless steel lobster clasp Chain-nose pliers, 2
RESOURCES: Jump Rings: HyperLynks, hyperlynks.ca.
tools and supplies
3. Pinch the fi rst pair of large jump rings (the fi rst pair added in Step 2) between your thumb and index fi nger, and allow the second pair of jump rings to fall to either side of the fi rst pair (i.e. one against your thumb and one against your index fi nger).
4. Using your fi ngernail or the tips of the pliers, gently nudge the fi rst pair of large jump rings open so that you create a four-sided “cage.” Gently place a bicone into the cage. The hole of the bicone must point up toward you, as shown.
Save time! GET THE KIT!
www.jewelrymakingdaily.com | 23

6a
76b
8
5. Carefully weave a small ring under the second pair of large jump rings to capture the bicone in the jump ring cage. Make sure to pull the large jump rings up toward the top of the bicone, to ensure that they are not stuck underneath the bicone.
6. Close the small jump ring. Weave and close a second small jump ring next to the fi rst one added in Step 5.
5 Our contributing editor, Sara Richardson, is a chain mailler
extraordinaire and has this useful chain
maille tip to share"Want to know if your jump rings are
closed properly? When you are rocking the ends of the jump rings back and
forth with the chain-nose or fl at-nose pliers, listen carefully for the small
'click,' and run your fi ngers around the ring to ensure there aren't any gaps!"
Try your hand at 10 fabulous chain
maille designs in this must-have eBook!
bit.ly/step-by-step-chain-maille-ebook
7. Repeat Steps 2– 6 to capture a second bicone, and continue to repeat Steps 2–6 until the bracelet has reached its desired length. To get the lobster clasp to line up properly with the end of the bracelet, the bracelet must contain an even number of bicones.
8. Once all the bicones have been added, weave and close one additional small jump ring around the fi nal pair of small jump rings for the other half of the clasp.
| STEP BY STEP WIRE JEWELRY | October-November 201524

fi ve-minute projectFast and Easy
Rhinestone shank buttons, 2 18- or 20-gauge sterling round wire, 6” Klay Resin Flush cutters Metal fi le or wire rounder Round-nose pliers Chain-nose pliers
RESOURCES: Buttons: Spirit Inc, spiritbeadsandbuttons.com.Klay Resin: Sherri Haab Designs, sherrihaab.com.
tools and supplies
button glam
1. Cut the wire in half and bend each piece in half over a small-barrel pen. Use a fi le or wire rounder to smooth all the ends.
2. Cut a small amount of clay from the log and mix thoroughly according to directions.
3. Stuff a small amount of clay into each button shank and push a wire through each until the ear wire curve is even with the top of the button. Allow the epoxy clay to dry thoroughly according to directions.
4. Using chain-nose pliers, bend the bottom wire up at 90 degrees, as shown.
5. Use round-nose pliers to bend the end of the bent-up wire over into a small hairpin curve.
6. Bend the tip of the long ear wire up slightly. If the ear wire loosens within the clay, add a drop of super glue to reinforce it.
1
4
5a
2
3
5b
By Denise Peck
Big, glamorous rhinestone jewelry is everywhere right now. And with Spirit Inc’s beautiful vintage rhinestone buttons, you can make your own on-trend earrings in minutes!
www.jewelrymakingdaily.com | 25

By Brenda Schweder
Queen Berenice II of Egypt off ered her beautiful long blonde locks to the goddess Aphrodite for the safe return of her warrior husband. Work up this simple but spectacular night-sky necklace named after the Coma Berenices constellation by creating multiple patterned wire lengths with cones and a simple
S-clasp on the Now That’s a Jig! It will be all the heavenly protection you need on that next special evening out! Supplies listed make an 18" necklace.
STEP BY STEP WIRE JEWELRY'S
2015 FEATURED ARTIST
Brenda Schweder
berenices hair necklace
Chall enge YourselfSKILL LEVEL 3
| STEP BY STEP WIRE JEWELRY | October-November 201526

1a
2b
4b
1b
2a
3
4a
1. Download the NTaJ! BerenicesHair necklace template, and print it onto printable vellum paper at 100%. Align the template on top of the JigBed. Punch the holes for the CornerTaks with the PatternPunchr, and screw them in. Punch the holes as per the pattern for the Patterned Wire Setup, and screw-in the MicroPegs.
26-gauge dark annealed steel wire, 23’ 20-gauge dark annealed steel wire, 3’ Crystaletts, blue, gunmetal, 30 2-ply Irish waxed linen, black, 10’ NTaJ! BerenicesHair vellum pattern template (download at Now-Thats-a-Jig.com) Now That’s a Jig! Starter Kit (jig bed, bracket, Starter Peg Pak, screwdriver) with StartrPegs 6�⅓ 2" MicroPegs ConeMakr: 3⁄16" NTaJ! Puncher & CornerTaks NTaJ! SwiveLok NTaJ! WireLiftr (optional) Ruler Heavy-duty fl ush cutters Steel Wool, 00 Round-nose pliers Chain-nose pliers Hammer Bench block Renaissance Wax & soft cloth
RESOURCES: Wire: Brenda Schweder, BrendaSchweder.Etsy.com. Crystaletts: Crystaletts, Crystaletts.com. Irish waxed linen: Royalwood, Ltd., RoyalwoodLtd.com. Now That’s a Jig! supplies: Now-That’s-a-Jig.com.
tools and supplies
2. Cut twelve 22" lengths of 26g wire, clean them all with steel wool, and seal them with Renaissance Wax. Set all but one aside. Working from right to left, and leaving a 4" tail, wrap the wire tightly counter-clockwise around the right-most MicroPeg. Make a tight twist against the peg, so that the short tail ends up on the left.
3. Lift the wrap off the peg, and put it back on the same peg with the tail facing to the right again. Continue with the long length, wrapping counter-clockwise around the second peg. Note: You are using the peg placement to form an irregularly-spaced pattern.
4. Take the fi rst wrap back off the right-most peg, and make a tight twist against the second peg, so that the fi rst wrap and the tail end up on the left side again. Put the second wrap back on the second peg and continue on, repeating this wrap-and-twist sequence to all six pegs.
www.jewelrymakingdaily.com | 27

6
8a
9
7
8b
10
5. Repeat this pattern—starting again by putting the last loop on the first loop of the same setup—until you create 18" of looped wire. End with another 4" tail, and cut flush. Repeat Steps 2–5 to create two each of 18", 18�½", 19", 19�½", 20" and 20�½" patterned wire lengths with 4" tails on both ends.
6. Line up all the lengths from shortest to longest, matching all the first loops. Then, in order to get the loops more randomly spaced, flip one of each of the lengths. Cut two 6" lengths of 26g wire, and insert one through all the loops.
7. Form a tight circle, and twist the ends of the short wire length tightly to join. Cut all the tails but two down to 1". Repeat on the other end with the second 6" wire.
8. Set the JigBed for the Cone Setup. Cut two 14" lengths of 20g wire, and set one length aside. Insert the remaining length through the ConeMakr, so about a ¼" extends out the other side. Bend the wire to a right angle as close to the hole as possible. Coil the wire around the cone, carefully and tightly to just below the tip, keeping any gaps between layers to a minimum.
9. Cut the ends flush at the bottom and the top, and remove it from the ConeMakr. Repeat Steps 8–9 to make another cone.
10. Cut three 3" lengths of 20g wire, and set two of them aside. With one length, make a wrapped loop on one end with round-nose pliers. Repeat to make another eye pin.
5
| STEP BY STEP WIRE JEWELRY | October-November 201528

14b
11b
12b
13b
12a
13a
14a
11. Set the JigBed for the Clasp Setup. Trap the third 3" length of wire between the SwiveLok and the ¼" peg, leaving a 1" tail at the bottom, and screw in tight. Wrap the bottom tail tightly, up and toward the top of the ⅛" peg; and the top tail down and counter-clockwise around the ⅛" peg.
12. Lift the wire up and off the JigBed, and cut the small loop just short of the intersection. Bend a jaunty angle to the hook end and trim any excess length. Harden and texture with a hammer and bench block, and file any burrs. Clean the eye pins and S-clasp with steel wool, and seal with Renaissance Wax.
13. Set the JigBed for the Wrapped Loop Setup. Pick up an eye pin, and slip it onto the two long tail wires on one end of the necklace. Hold the eye pin and the loop bundle near the Wrapped Loop Setup. Wrap laterally around the peg setup, and vertically around the neck of the eye, capturing the eye pin within this wrapped loop.
14. Feed the end of the eye pin up through the large opening of the cone, carefully fitting the remaining wire tails and the loop bundle neatly inside it. Create a wrapped loop immediately above the cone.
11a
www.jewelrymakingdaily.com | 29

15b
17a
18
16
17b
15. Further secure the cone in place by bending a right angle to the bottom tail of the cone, tucking it up and inside of the loop bundle. Harden and texture the loop. Repeat Steps 13-15 on the other side of the necklace.
16. Attach the small loop of the S-clasp to one end of the necklace.
15a
or without a wire jig, repetitive wire designs can be an eff ective tool for creating all kinds of jewelry. Janice Berkebile has designed several beautiful links to create some great chain. But use one link to make cool matching earrings, or a unique brooch. And of course, link some together for a necklace and bracelet.
bit.ly/berkebile-chain-making
17. Cut 30 pieces of Irish waxed linen at 4" each. Thread and center a Crystalett onto one linen length; and both ends through one loop of the necklace. Pull the Crystalett tight to the loop, and make an overhand knot.
18. Tie another overhand knot, capturing the neck of the loop for stability. (Note: Take the direction of the crystal into consideration when tightening). Trim close. Repeat Steps 17– 18, adding on a total of 30 Crystaletts, and trim all the waxed linen ends. TIP: Use a dress form to steady the necklace, and to orient the crystals to face correctly when worn.
| STEP BY STEP WIRE JEWELRY | October-November 201530

mee t th e artists
KAREN GORMAN ROARK is a blogger, crafter and designer living in Kansas City, MO, with her husband and three very curious cats. When not making jewelry she enjoys working on sewing,
knitting and DIY projects around the house.
LUMINITA VIRTINEANU is her real name, but she goes by delilah. She has been working with wire and stone continuously since 2010 and started creating tutorials a couple of years ago when
crafters showed interest in her designs. See more of her work at mssdelilah.etsy.com.
Jewelry designer and
author, KAREN KARON, has been
“connecting jump rings” since 2006. She teaches chain maille classes and workshops at Metalwerx School for Jewelry and Metal Arts (metalwerx.
com), at local venues, and also provides private chain maille instruction. In addition, Karen is a certified PMC (Precious Metal Clay) artisan. Karen has written articles for Art Jewelry, Bead Style and Step by Step Wire Jewelry magazines and is the author of two books on chain maille, Chain Maille Jewelry Workshop and Advanced Chain Maille Jewelry Workshop, both published by Interweave. Her chain maille jewelry is available from Alchemy 9.2.5 Contemporary Craft Gallery in Belmont, MA (alchemy925.com). She can be contacted via her website, karenkaron.com.
BRENDA SCHWEDER is an
artist, author, teacher,
creativity columnist, and
inventor of Now That’s a
Jig!, The Wire Bending
System that Sits Tight
and Stays Put! She’s
written Collaborate: Friends in the Making, Steel Wire Jewelry, and Junk to Jewelry and Vintage Redux. Her designs and
fashion jewelry forecasts have been published more
than 100 times in books and magazines. Visit her
websites at BrendaSchweder.com and Now-That’s-
a-Jig.com, and catch her on Etsy, Facebook, YouTube
and Pinterest.
LISA NIVEN KELLY is the founder and CEO of Beaducation.com. She is an award-winning artist, known for her innovative and intricate designs. Lisa is the author of the best-selling book Stamped
Metal Jewelry. For more than 20 years, Lisa has been sharing her love of beadwork and wirework by teaching students across the country. She was voted Top 10 Teacher by the editors and readers of Bead&Button Magazine.
STACIE FLORER currently works from her
studio in Asheville, NC,
where she fabricates
jewelry for commission,
wholesale, boutique, and
online sales. She is an
artBLISS instructor, and
shares what she has
learned about jewelry fabrication and design with
others in her studio. You can learn more about her
work, and contact her at staciefl orer.com.
MICHELLE BRENNAN is a
chainmaille artist,
designer, and along
with her husband,
co-owner of HyperLynks
Chainmaille near
Toronto, Ontario.
Michelle regularly
teaches chainmaille classes at different bead
stores and festivals across Ontario and will be
making her teaching debut this summer at Bead
Fest Philadelphia. Her line of intricate and unique
chainmaille patterns known as “The Chainmaille
Artisan Collection™” are sold as kits from bead
stores and distributors worldwide.
MELISSA CABLE is a regular contributor
to Step by Step Wire Jewelry magazine and is
the founder of the Create
Recklessly line of leather
tools and supplies. She
is the author of Beautiful Leather Jewelry, Metal
Jewelry in Bloom and Spotlight on Wire. She loves
to share her reckless creativity with students in
classrooms nationwide. She resides in the
Seattle, WA, area.
AISHA FORMANSKI has worked in the DIY jewelry and beading industry since 1994. Aisha’s first book Punched Metal Jewelry, 20 Clever and Easy Stamped Projects was published
by Interweave Press in Winter 2013. Her passion for creating jewelry inspired her to open her own business in 2010, Everthine Jewelry. She currently resides in Saint Paul, MN.
www.jewelrymakingdaily.com | 31

By Karen Gorman Roark
This pendant was designed to hold charms that remind me of some wonderful vacations I’ve been able to share with my husband. The charms
represent special destinations – the fl eur-de-lis reminds me of our trip to France, the cross represents our Portugal vacation, and the starfi sh
reminds me of our days on the sunny beaches of Mexico. Make your own memory keeper pendant!
memor ies pendant
Fast and EasySKILL LEVEL 1
| STEP BY STEP WIRE JEWELRY | October-November 201532

1
3
2a
2b
1. Pinch the 16g wire together in the middle so the ends cross, and bend one end of the wires straight up.
2. Holding the bent wire with round-nose pliers, bend the wire down and around the front of the pliers to form a loop. Then wrap the loop closed a couple times and trim the excess wire.
3. Holding the loop with chain-nose pliers, bring the other wire through the loop and wrap it around all the wires and the previous wraps several times. Trim off the excess wire.
16-gauge silver craft wire, 8" 28-gauge silver craft wire, 24" 3mm Swarovski bicones, 70 1% Delica twist hexagon beads, color: galvanized silver, 30 Charms Jump rings Round-nose pliers Chain-nose pliers Flush cutters
RESOURCES: Wire: Artistic Wire, artisticwire.com. Crystal Beads: Swarovski, swarovski.com. Delica beads: Fusion Beads, fusionbeads.com. Charms: Elements of Inspiration Charms by Nunn Design, nunndesign.com. Jump rings: Elements of Inspiration Findings by Nunn Design, nunndesign.com.
tools and supplies
4b
4a
4. Wrap about 1" of one end of the 28g wire around the frame wire, and begin to string on the Delica beads. When the Delica beads span the width of the pendant, wrap the wire 2–3 times around the other side of the frame to secure it in place.
www.jewelrymakingdaily.com | 33

65
5. String some crystals onto the wire, and stretch the wire across the pendant in the opposite direction. When the crystals span the width of the pendant, again wrap the wire 2–3 times around the frame to secure. Continue in the same manner, going back and forth until you have 7 rows of crystals. Add one more row of Delicas to the bottom. Finish by again wrapping the 28g wire 2–3 times to secure. Trim off the excess wire.
Love wire wrapping?Add a pair of nylon-jaw pliers to your jewelry tool box. They make straightening out bent wire a breeze, and are also useful for work hardening small lengths of wire.
Learn more about wire wrapping with Linda Chandler and Christine Ritchey
bit.ly/wire-wrapping-chandler-ritchey
6. Open a jump ring and attach a charm. Close the jump ring around the bottom of the pendant. Repeat for the rest of your charms. Use another jump ring to attach the pendant to your choice of cord or chain.
MIDWEST MAILLESpecializing in Argentium Sterling Silver, Silver Plated & Colored Enamel Jump Rings and Chain Maille Kits
MidwestMaille.com
| STEP BY STEP WIRE JEWELRY | October-November 201534

By Karen Karon
Tiny Scales are a new product on the market. Their size is well suited for small jewelry applications. The lightness of the anodized
aluminum makes these scales a great choice for earrings, allowing you to make large earring designs that are comfortable to wear.
These serpentine shaped, scale-covered earrings evoke the sinuous spine of a dragon and will surely attract lots of attention.
tiny ScaleS earrings
Chic and SimpleSKILL LEVEL 2
NOW AVAILABLE AS A KIT!
shop.jewelrymakingdaily.com/karon-tiny-scales
www.jewelrymakingdaily.com | 35

1
3
4b
2a
2b 4a
1. Open all the jump rings. Take two scales, and nest one scale behind the other, concave sides facing you. Weave one small jump ring through the two scales, close it, and position it to the right.
2. Weave another small jump ring through the two scales, close it, and position it to the left. The fi rst scale you added should be in the front, and the second scale should be in the back. Position the second scale by pushing it up.
3. Nest a third scale behind the second scale.
4. Weave one small jump ring through the second and third scales, close it, and position it to the right. Weave another small jump ring through the second and third scales, close it, and position it to the left.
12mm × 7.6mm anodized aluminum tiny scales, in frost color, 40 16-gauge (SWG) ⅜ " ID anodized aluminum jump rings, in black ice color, 4 (large) 20-gauge (AWG) 7⁄64" ID anodized aluminum jump rings, in black ice color, 80 (small) Sterling silver ear wires Chain-nose or fl at-nose pliers, 2 pair
RESOURCES: Tools/Findings: Rio Grande, riogrande.com. Jump Rings and Scales: The Ring Lord, theringlord.com
tools and supplies
Save time! GET THE KIT!
| STEP BY STEP WIRE JEWELRY | October-November 201536

5b
7
8b
6
8a
5. Position the third scale by pushing it up. Continue to add scales in this manner, until the strip is 20 scales long.
6. From the top of the linear scale strip, weave one large jump ring through 10 small jump rings on the right side of the strip. Close the large jump ring.
7. From the bottom of the linear scale strip, weave one large jump ring through 10 small jump rings on the left side of the strip. Close the large jump ring.
8. Weave one small jump ring (shown in red) through the top scale and the large jump ring at the top of the earring. Close the small jump ring. Weave one small jump ring (in orange) through the small jump ring you just added (red), and one ear wire. Make sure the front of the ear wire is aligned with the front of the earring. Close the small jump ring. Repeat Steps 1–8 for the other earring, ensuring you weave the large jump rings on the opposite sides of the strip to create a mirror image.
The tiny scales are miniature versions of the larger scales and are used in the same manner. As with the larger scales, the tiny scales have two distinct sides, the concave (sunken) side and the convex (domed) side. The concave side is usually considered to be the back side. The back side of the scale should face you while you work. Due to their smaller size, and the smaller size of the jump rings used to connect them, working with them is a bit more diffi cult. Using magnifi cation is recommended. An awl or a toothpick can be used to help you position the tiny scales and jump rings when weaving.
Get more expert tips and designs in Karen's two books.
bit.ly/karon-chain-maille-book
bit.ly/karon-advanced-chain-maille-book
5a
www.jewelrymakingdaily.com | 37
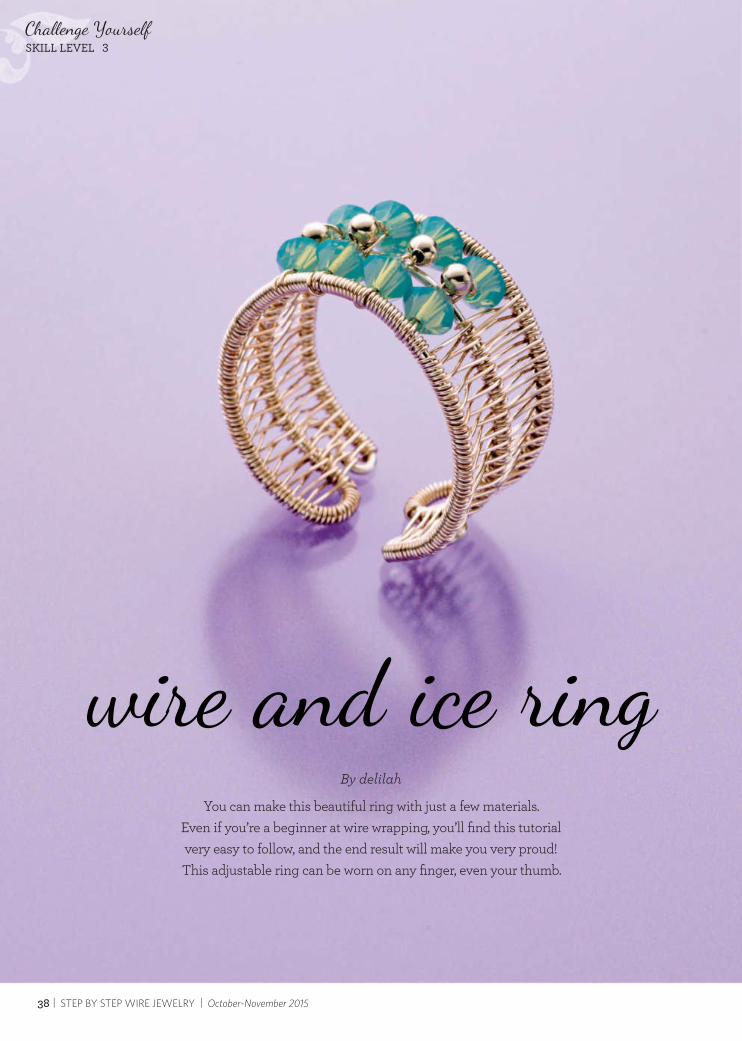
By delilah
You can make this beautiful ring with just a few materials. Even if you’re a beginner at wire wrapping, you’ll fi nd this tutorial very easy to follow, and the end result will make you very proud! This adjustable ring can be worn on any fi nger, even your thumb.
wire and ice ring
Chall enge YourselfSKILL LEVEL 3
| STEP BY STEP WIRE JEWELRY | October-November 201538

1a
3a 3c
1b
2
3b
1. Mark the 20g wire at 3 and using the base of the round-nose pliers, make a hairpin bend in the wire as shown. Make a second hairpin bend 2�½" from the fi rst bend, in the opposite direction.
2. Place 2 crystals between the wires as shown and make any adjustments to the bends so the crystals fi t between the wires. Trim any excess wire on the ends so all three parallel wires measure 2�½".
3. Using the 28g wire, leave a 5�½' tail and starting about an inch in from the end of the frame, make 6 wraps on the 20g bottom wire. Insert the 28g wire through a crystal and wrap the wire once around the middle 20g wire, add another crystal and wrap it once around the third 20g wire.
20-gauge silver-plated, copper, or craft wire, 9" 28-gauge silver-plated, copper, or craft wire, 10' 4mm Swarovski Pacifi c Opal bicones, 8 2mm silvertone metallic beads, 4 Round-nose pliers Flat-nose pliers Sharpie marker Flush cutters Ring mandrel
RESOURCES: Tools and wire: Rio Grande, riogrande.com. Crystals and beads: Fusion Beads, fusionbeads.com.
tools and supplies
EDITOR'S TIP: Whenever you're coiling and weaving wire, if you release the wire from your grip after each wrap, and then grasp it again, you will prevent the wire from twisting.
bit.ly/thompson-fi ne-art-wire-weaving
www.jewelrymakingdaily.com | 39

4b
5a
5c
4c
5b
6
4. After wrapping around the third 20g wire, thread the 28g wrapping wire back through the last crystal added. String on a metal bead and thread the wire back through the fi rst crystal.
5. Bring the 28g wire under the fi rst frame wire and make 10 more wraps. Repeat Steps 3–5 to add the second row of crystals.
6. Repeat Step 5 two more times so you have four rows of crystals and beads in between wraps. Ensure these rows are in the middle of the 20g base. Make 6 wraps on the lower wire, wrap once around the middle wire, and three times on the top wire.
4a
| STEP BY STEP WIRE JEWELRY | October-November 201540

7b
8b
9
7a
7. After three wraps up top, reverse the direction, and weave down in the same manner: one wrap on the middle wire, and three wraps on the lower wire. Continue like this until you complete weaving the frame.
8. When you reach the end of the frame, wrap the hairpin end, cut the wire, and with fl at-nose pliers tuck in the end of the wire, pressing it in carefully.
8a
10a
10c10b
9. On the other side of the crystals, using the 5�½' tail of wire, weave the 28g wrapping wire in the same manner, following Steps 7–8.
10. On one end of the 20g wire tails, make a tiny loop with the round-nose pliers, and bend it toward the wrapped wires as shown.
www.jewelrymakingdaily.com | 41

13b
13a12b
11a
11b 12a
11. Press the end against the wrapped wires. Repeat Steps 10–11 for the other end of the piece.
12. Bend the piece around the ring mandrel.
13. Use the remaining 28g wire to wrap in the gaps around the crystals. When you’re fi nished, cut the 28g wire, and press in the ends carefully between the wraps. Make sure the ends are well hidden, to avoid scratches when wearing the ring. Put the ring on your fi nger, and adjust it for a proper fi t.
| STEP BY STEP WIRE JEWELRY | October-November 201542

Following up their bestselling book Handcrafted Wire Findings, Denise Peck and Jane Dickerson bring jewelers more techniques and inspiration with Handcrafted Metal Findings! Featuring 30 step-by-step tutorials for metal fi ndings that require only basic jewelry-making skills, this book shows how to create great-looking jewelry components with ease. Projects include head pins, bead caps, bails, charms, connectors, cones, and more!
Available at InterweaveStore.combit.ly/handcrafted-fi ndings
IT’S NEVER BEEN SO EASY TO CREATE SPECTACULAR METAL FINDINGS
9781446306055 | $24.99 US / $27.99 CAN | 128 pages
30 CREATIVE JEWELRY COMPONENTS
HANDCRAFTEDmetal findings
Denise Peck & Jane Dickerson

By Stacie Florer
Using lightweight metal and wire, have fun making these tribal-inspired earrings! You can vary the design with diff erent metals, textures, fi nishes and crystals.
tribal crystal bell s earrings
STEP BY STEP WIRE JEWELRY'S2015 FEATURED ARTIST
Stacie Florer
Chic and SimpleSKILL LEVEL 2
| STEP BY STEP WIRE JEWELRY | October-November 201544

1
3b
5
2
3a
4
1. Cut the 12g wire in half. Using the Sharpie, mark ½" from the end of each wire, and fl atten to ⅛ ", as shown.
2. Texture the fl attened end of each with the end of a riveting hammer. File smooth the bottom edges of the chased portions.
3. Using the disc cutter, punch out 2 discs, measuring 7⁄16" each, from the sheet metal. Texture one of the discs using a stamp or hammer.
12-gauge brass wire, 2½" 14-gauge sterling wire, 4" 30-gauge sterling sheet metal, 3" × 3" 6mm Swarovski bicones, 2 Ear wires, 2 24-gauge headpins, 2 Round-nose pliers, small and large Flat-nose pliers Hole-punch pliers, 1.25mm Flush cutters Metal stamps Chasing hammer Riveting hammer Steel bench block Metal fi le Torch Fire block or annealing medium Quenching bowl Tweezers Copper tongs Pickle Disc cutter with 7⁄16" punch Fine- tipped Sharpie Liver of sulfur Steel wool, 0000 Tumbler Stainless steel shot
RESOURCES: Metal and tools: Rio Grande, riogrande.com. Pacifi c Opal Swarovski crystal bicones: FusionBeads, fusionbeads.com.
tools and supplies
4. Anneal the textured discs with the torch. Heat the discs until they glow red. Immediately quench them. Pickle, neutralize with baking soda, and rinse.
5. Using the small pair of round-nose pliers, place the textured disc about ⅓ " from the tips of the jaws, textured side out, and bend it around the jaws until it forms a cone. Ensure the opening of the cone will fi t over the 12g wire. Repeat with the smooth disc.
www.jewelrymakingdaily.com | 45

7
8b
10a
8a
9
10b
6. Slide both cones over the 12g wire, with the smooth one on top. Using a rawhide mallet, gently hammer the back of the discs so that they fi t snugly on the wire. The chased portion of the brass wire should be wide enough so that the cones do not slide off .
7. Chase the top of the wire so that it measures approximately ⅛ " in width, and texture with a riveting hammer if desired.
8. Using the small pair of round-nose pliers, form a simple loop by placing the wire about midway in the pliers. Break the neck so that the loop sits atop the wire like a lollipop. Mark the center on the bottom of the chased portion of the brass wire, and punch a 1.25mm hole with the hole punch pliers. Repeat Steps 3–8 for the second earring.
9. Create two large jump rings using the large round-nose pliers. Flush cut the ends, and close the rings with the fl at-nose pliers and chain-nose pliers. Chase them lightly with the chasing hammer, and set them aside.
10. String a bicone crystal onto each headpin. Thread a headpin through the hole on the end of each earring, and create a wrapped loop. Attach an ear wire to each earring using a jump ring. Patina the earrings with liver of sulfur. Remove excess color with 0000 steel wool, and tumble polish.
6
Get more fi nishing techniques
TIP: For a matte fi nish: Tumble polish to work-harden them, and then use medium plastic cones in the tumbler for about 20 minutes. If you do this, attach the bicone after tumbling. Tumble just as you do with steel shot…adding a little bit of water, and a drop of dishwashing detergent.
bit.ly/driggs-machine-fi nishing
Machine Finishing Jewelry DVD
by Helen Driggs
| STEP BY STEP WIRE JEWELRY | October-November 201546

www.jewelrymakingdaily.com | 47
1. Supillow to the rescue Does your back need a little TLC from all that jewelry making? Supillow is a unique support pillow that you can use on just about any part of your body, with a specially made insert to make it air adjustable for a custom fi t. Prop a Supillow behind your back, under your knee, as a head rest, under your heels, as a seat cushion, between your knees when sleeping, or under your arm to relieve pressure on your lower back. You’ll be glad you did! supillow.com
spotlight by Sara Richardson
2. New YUMMEEz from MyELEMENTSYUMMEEz are hand painted melamine beads from Pennsylvania
artist Yvonne Irvin, and covered with a durable matte texture coat. They are water proof, lightweight, and they’re all one-of-a-kind. Some
are even enhanced with vintage or Swarovski cabs...fun, colorful little wonders created from Yvonne’s heart, soul and hands. Sold in
strands interspersed with her other colorful plastic beads, or choose a graduated set of rounds, or individual focals. MyELEMENTS.Etsy.com
4. Catch-Free Crystal Cup Chain at A Grain of Sand
Looking to add crystal cup chain to your designs? Check out the great selection of Swarovski Catch-Free Cup Chain at A Grain of Sand! Guaranteed not to snag, and available in two fi nishes, gunmetal
and rose gold, and a wide variety of crystal colors. To help you with the perfect fi nish, get the coordinating cup chain connectors, and
corrugated bell bead caps. agrainofsand.com
3. JewelryTools.com Off ers Multi-Shape Punch and Cut LubeEuroTool’s fabulous new disc cutter is not discs! Finally, a multi-shape disc cutter off ering you 9 diff erent ½” shapes. Each shape is perfect for a post earring, or charms, or to solder to another piece of sheet. And it’s reasonably priced. No need to buy precut shapes when you add this to your studio. And if you’re using a disc cutter, EuroTool’s hi-tech lubrication is perfect for the cutting edges of the punches to make cutting even easier. Use it also when sawing, drilling or drawing wire to ensure cool, clean cuts. Cut Lube adheres to the tool surface, and is less aff ected by heat than oil. It makes cutting easier and more precise, and it adds life to all your cutting tools. JewelryTools.com

By Michelle Brennan
The Galaxy Necklace is a dazzling showcase of rich Swarovski rivoli units, encased within Steampunk-inspired orbitals. Experiment with both diff erent colors of rivolis and
rings to personalize this out-of-this-world showpiece!
galaxy necklace
Chall enge YourselfSKILL LEVEL 3
| STEP BY STEP WIRE JEWELRY | October-November 201548

1a
2b
1b
2a
3
1. Place a rubber ring around one spoke of the metal gear. While holding the rubber ring in place, use the chain-nose pliers to gently stretch the rubber ring so that it is wrapped around a total of four spokes in the gear.
2. Position the second rubber ring onto the gear two spokes over (moving clockwise around the gear) from the original position of the fi rst rubber ring. Once again, stretch the rubber ring so that it is wrapped around a total of four spokes.
3. Repeat Step 2. Note that the third rubber ring will be added to the gear in the same position where the fi rst rubber ring ended.
4. Gently set the crystal rivoli into the gear by nudging the rivoli underneath the three rubber rings. Without letting go of the rivoli, repeat Step 2 to add the fourth rubber ring, beginning two spokes over from the third ring.
14mm Swarovski Aqua Light Vitrail rivolis, 6 18-gauge SWG (1.2mm) ⅛ " ID bright aluminum jump rings, 60 18-gauge SWG (1.2mm) 5⁄32" ID bright aluminum jump rings, 290 18-gauge SWG (1.2mm) 3⁄16" ID bright aluminum jump rings, 26 18-gauge SWG (1.2mm) 3⁄16" ID black EPDM rubber rings, 36 14-gauge SWG (2.0mm) 1" (OD) welded stainless steel rings, 6 20mm metal 12-spike gears, 6 15mm stainless steel lobster clasp Chain-nose pliers, 2
RESOURCES: Jump rings, EPDM rings, metal gears: HyperLynks, hyperlynks.ca. Swarovski rivolis: That Bead Lady, thatbeadlady.com.
tools and supplies
started immediately on another beautiful
chain maille design withthis all-inclusive kit
for elfweave earringsby Karen Karon.
bit.ly/elfweave-earrings-collection
4a 4b
www.jewelrymakingdaily.com | 49

11b
6
8
10
7
9
11a
5. Repeat Step 2 to add a fifth rubber ring (shown in red). The end position of this rubber ring will be in the same position as where the first rubber ring was placed.
6. Gently remove the first part of the first rubber ring off of the gear, making sure that the entire rubber ring does not fall off of the gear (the second half of this rubber ring should be secure underneath the second rubber ring).
7. Repeat Step 2 to add the sixth and final rubber ring (shown in blue) to this “crystal-gear” unit. Note that this rubber ring will end in the same position where the first half of the first rubber ring is currently located.
8. Gently grab the first half of the first rubber ring and re-hook it back into its proper position. This will complete the overlapping pattern of rubber rings in the crystal-gear unit.
9. Open six ⅛" jump rings. Working from the back side of the crystal-gear unit, carefully weave and close one ⅛" ring underneath the intersection of two rubber rings.
10. Repeat Step 9 five more times to add ⅛" rings to the remainder of the crystal-gear unit.
11. Open five ⅛" jump rings. Weave and close an open ⅛" ring through one of the rings added in Step 10, and around the large stainless steel ring. Repeat this step four more times until five ⅛" rings have secured the crystal-gear unit to the large stainless steel ring.
5
| STEP BY STEP WIRE JEWELRY | October-November 201550

13
15
16b
14
16a
17
12. Open two 3⁄16" jump rings. Weave and close both rings through the final ⅛" ring of the crystal-gear unit, and the large stainless steel ring.
13. Repeat Steps 1–12 to create a second crystal-gear unit with one exception: connect the crystal-gear unit to the large stainless steel ring using only three ⅛" rings (skipping every other connection point) and six 3⁄16" rings (two rings each filling in every other connection point).
14. Repeat Steps 1–12 four more times with one exception: connect each of the crystal-gear units to the large stainless steel ring with four ⅛" rings and four 3⁄16" rings (two pairs across from each other).
15. Open four 5⁄32" jump rings. Moving back to the first crystal-gear unit created, weave and close two rings (shown in purple) around the pair of larger 3⁄16" rings currently attached to the large stainless steel ring.
16. Weave and close two 5⁄32" rings (shown in pink) around the two 5⁄32" rings. Repeat the same process on the five other crystal-gear units; that is, add four 5⁄32" (two pairs of two) around every pair of 3⁄16" rings. Open two 5⁄32" rings. Focusing once again on the first crystal-gear unit, and specifically on the four 5⁄32" rings that were just added, carefully fold back the final pair of rings (shown in pink) so that they surround the 3⁄16" rings.
17. Gently separate the first two 5⁄32" rings (shown in purple) so that a space exists between the four 5⁄32" rings. Weave an open 5⁄32" ring (shown in green) through the four rings. Do not close the ring.
12
www.jewelrymakingdaily.com | 51

22b
18b
20
21b
19
21a
22a
18. Pick up the second crystal-gear unit (the one with three pairs of 3⁄16" connectors around the large stainless steel ring) and fold back the second pair of 5⁄32" rings as explained in Step 16. Very carefully, without allowing the open 5⁄32" ring (shown in green) to slip out of place from the fi rst crystal-gear unit, continue to weave the open ring through the folded back rings of the second crystal-gear unit. Close the open ring to secure the connection between the two crystal gear units, and weave and close a second 5⁄32" ring (shown in gold) through the same two pairs of folded-back rings.
19. At this point, the second crystal-gear unit (shown with yellow rubber rings) will have two available pairs of 5⁄32" rings attached to it that will allow for connections to two more crystal-gear units. Using the directions outlined in Steps 17–18, connect the third and fourth crystal-gear units to the necklace.
20. Repeat Steps 17– 18 two more times to add the fi nal two crystal-gear units to the necklace.
21. To fi nish the necklace, create byzantine chains along both sides of the necklace with the remaining 5⁄32" rings. As you did previously, fold back the fi nal pair of rings on the last crystal-gear unit of the necklace, and weave and close two 5⁄32" rings (shown in green and pink) to secure the rings. To continue the pattern, add two rings to the two that were just added (the green and pink ones), add another two rings that get folded back, and add two more rings (shown in blue and gold) to secure the pattern.
22. To create a necklace of approximately 18", 120�5⁄32" rings are used on each side to build a byzantine chain. Add or subtract rings accordingly to adjust the size of the necklace. To fi nish the necklace, open the fi nal two 3⁄16" jump rings. Weave and close one ring around the lobster clasp and one byzantine chain, while the second ring is simply closed at the end of the second byzantine chain.
18a
| STEP BY STEP WIRE JEWELRY | October-November 201552

www.jewelrymakingdaily.com | 53
wire basics
1
3
2
wire
wra
pju
mp
rings
brio
lette
wra
pped
disc
“s” c
lasp
1
2
1 3
42
1 3
42
1 3 4
6 8
2
5 7
1
3
4
5
6
2
spira
l hoo
k 1
3
2
spira
ls

wire MARKETPLACE
| STEP BY STEP WIRE JEWELRY | October-November 201554
To be listed in “Wire Marketplace” please contact Tina Hickman at [email protected] or (970) 613-4697. The cost is $55 per issue.
Shop These Fine Retailers!Ca l i f o r n i a
Bead Inspirations—Alamedawww.beadinspirations.com
Best selection & prices of Vintaj brass. Gorgeous, quality beads, findings & unique kits. Focal gems & gem strands. Metal stamp-ing. Picture frame pendants by Nunn Designs & Tierracast. Czech glass, Swarovski crystals & pearls. Ranger Inks. Metalsmithing. Inspiring Classes. Friendly, knowledgeable staff. Shop online too.
1544 Park St. (510) 337-1203
Just Bead It!—Concordwww.justbeaditconcord.com
Beads to thread, wire, and just admire. All for beading to your heart’s desire. Family owned since 2003. Open Mon, Wed, Thu, and Fri 11–7; Sat 11–6; Sun 12–5.
2051 Harrison St., Ste. C (925) 682-6493
F l o r i d aBeads Etc.—Maitland (Orlando)
www.beadstoreorlando.comOrlando’s finest full service bead store is now offering wholesale prices on selected strands of gemstones. Large selection of seed beads, sterling, G–F, base metal, Swarovski, pearls, Czech, etc. Classes all levels. Customer service #1!
110 N. Orlando Ave. (New location) (407) 339-2323
BEADS!—Tampawww.eBeads.com
THE LARGEST SEED BEAD COLLECTION IN THE TAMPA BAY AREA! We stock 1,097 Delica colors, Tilas, Half Tilas, Cubes, Magatamas, Rounds, Berry Beads, and more! Czech glass, SuperDuos, Fire Polish, Tiles, and more! Gemstones, Freshwater Pearls, base metal findings, Swarovski Crystals, and lampwork beads. Classes by local and nationally known artists. Visit our website for hours and class schedule. [email protected]
12807 W. Hillsborough Ave., Ste. H (813) 258-3900
I l l i n o i sA Beadtiful Thing—Aurora
www.abeadtifulthing.comFulfill your need to bead at Aurora’s only bead store. We offer many classes in stitching, wire wrapping, and chainmaille. You will love our staff!!! Located behind Rush Copley Hospital on Montgomery Road. Open 6 days a week. Closed Monday. Come and stay for a while!
1649 Montgomery Rd. (630) 236-5913
Ka n s a sPlum Bazaar—Emporia
www.plumbazaar.comPlum crazy about our 30 colors of craft bead wire, round and flat aluminum jewelry wire. See our Bazaar of Plum Original jewelry designs. Mon–Sat 9:30–5:30. Sun by appointment.
615 Commercial (620) 342-6607
M a s s a c h u s e t t sBead Addiction—Walpolewww.bead-addiction.com
2000 sq ft of fabulous beads and beading supplies. We carry many name brands, including Czech glass, Kazuri, Lillypilly, Miyuki, Thunderpolish crystal, Swarovski, Fuseworks, TierraCast, Artistic wire. Huge tool selection and tons of wire choices. We also offer classes, Ladies Night Out, birthday parties, or any event you can think of. We are open Tue–Sun, closed on Mon-day. Check our website for hours and directions or call or email us at [email protected] .
2000 Main St. (508) 660-7984
M i c h i g a nMunro Crafts—Berkley www.munrocrafts.com
Great Prices and Discounts. Swarovski, Czech, pearls, wood, bone, glass, metal, acrylics, Sterling Silver, Silver Filled and Gold Filled beads and findings. Polymer Clay, Beadalon, craft supplies, charms, books, tools, beading supplies and classes. Please see our website for discount information. Email: [email protected].
3954 12 Mile Rd. (248) 544-1590
M i s s o u r iPlum Bazaar—Bransonwww.plumbazaar.com
Plum crazy about our 30 colors of craft bead wire, round and flat aluminum jewelry wire.See our Bazaar of Plum Original jew-elry designs. Open 7 days a week, year round, 9:30 am–5:30 pm. Plumbazaarbeads.com
123 E. Main St. (417) 337-PLUM(7586)
N e w J e r s e yJubili Beads & Yarns®—Collingswood
www.jubilibeadsandyarns.com Everything you need under one roof! Fabulous full-service source for Miyuki & Czech beads, crystals, yarns, supplies. Eight-torch lampworking studio, weaving, knitting, crocheting, PMC, & more! Repairs, custom jewelry, and parties. Contact us via email at [email protected].
713 Haddon Ave. (856) 858-7844
N e w Yo r kBEAD SHOP at Lady Jane Craft Center
—Queens (Ozone Park) www.ladyjanecraftcenter.com
Largest selection outside Manhattan. Classes, Swarovski, Pre-ciosa, Pearls, Thunder & Fire Polish, 1000’s of Semi-Precious Strands, Myuki, Delicas, TOHO, Hanks, Pendants, Cabochons, Donuts, Findings, Chain in all Metals & Finishes. Tools & Books. Open 7 Days. Belt Pkwy, Exit 17.
137-20 Crossbay Blvd. (718) 835-7651
N o r t h Ca r o l i n aAin’t Miss Bead Haven—Mooresville
www.aintmissbeadhaven.comWe are a full–service bead store offering classes, handmade jewelry, and beading supplies. Birthday and private parties, Wine & Bead Night, BYOB Socials (bring your own beads), & Girls Night Out. We offer a large variety of Vintage jewelry and components, Seed beads, Swarovski Crystals, Precious and semiprecious gemstones, Crystals strands, Sterling Silver, Silver filled, Gold–filled and Vermeil findings. Hours: Monday–Saturday 10 a.m.–6 p.m.; Email: [email protected]
152 N. Main St. (704) 746-9278
O h i oJUJU BEADZ – Findlay
www.jujubeadz.usSwarovski, Czech Glass, Semi Precious, Sterling Silver, Thai Silver, Seed Beads, Findings, Chain, Leather, Tools, Beading Books, Magazines, and Classes.
829 Tiffin Ave. (419) 422-4444
SAFIRE ROSE BEADS & THINGS—Madisonwww.safirerose.com
[email protected] hours 10AM-6PM Monday thru Saturday and Sunday 11AM-5PM. Family owned and operated full service bead store. Classes are free when materials purchased at our store. Projects for every budget.Parties for children and adults day or evenings.
50 W. Main St. (440) 428-9617
O r e g o nAzillion Beads—Bendwww.azillionbeads.net
“More beads than you can imagine!” New location in Bend. Over 2,000 sq. ft. of beads! [email protected]. Call for directions.
910 Harriman St., #100 (541) 617-8854
P e n n s y l v a n i aThe Bead Garden—Havertown
www.thebeadgarden.com Come play in our garden! We are a full-service, customer-friendly bead shop with a plethora of popular products and unique items. Offering a workshop environment during store hours, you are encouraged to walk in and create something or try a class if you are looking to gain more skills. Classes for all levels, parties, camps, repair services, special occasions jewelry. Knowledgeable staff that loves to help. Voted Main Line Times/Suburban Times, Best Bead Store/Best of the Main Line 2009. www.thebeadgarden.com
2122 Darby Rd. (610) 449-2699
Blue Santa Beads—Mediawww.bluesantabeads.com
An artistic venue that prides itself on a vast selection of beads and findings to encourage your creativity. Customers always come first and always return.1165 W. Baltimore Pike (610) 892-2740
Buttercup Beads—Audubonwww.buttercupbeads.com
Let your creativity blossom in our cozy country setting. Classes, Parties, oh-so-pretty sparkly things, and most of all, fun! One-stop shopping in an open workshop environment. Artisan/bead-addict owned and operated.
1123 Pawlings Rd. (484) 524-8231
Te x a sBeads Unlimited Inc.—Dallas
Your one stop bead shop in Dallas: Huge collection of Gem-stones, agates, pewter, findings, chain, Chinese crystal, pave beads, rhinestone findings, wood beads, tools, ceramics and sterling silver jewelry studded with semi-precious gem-stones. Spend over $300 or more (wholesale) and receive 50% off on selected items. Call us to be included for weekly sales at the shop. Email: [email protected]. Fax: (214) 749-04462454 Royal Ln. (214) 749-0444
W i s c o n s i nMeant to Bead—Sun Prairie
www.Meant-to-Bead.com Full–service bead shop. Featuring classes, large selection of beads, books, tools, etc. Specializing in PMC, semiprecious stone and lampwork and Czech glass beads. Mon–Fri 10–8; Sat 10–5; Sun 12–4. 1264 W. Main St. (608) 837-5900
Ca n a d aCapilano Rock & Gem —North Vancouver, BC
www.capilanorock.caStone beads, pearls, Swarovski, Czech glass, sterling silver/gold-filled findings and chains. Distributors for Grobet, EuroTool, Pepe Tools, Soft Flex, Beadalon, Lortone. Wholesale/retail. We are known for our great prices and friendly staff! Close to down-town Vancouver.1406 Pemberton Ave. (604) 987-5311
Country Beads—Vancouver, BC www.countrybeads.com
Semiprecious stones, freshwater pearls, sterling silver and gold findings, and beads. Chain by the foot, Swarovski crystals, Delicas, Czech fire–polished, and more. Books, tools, classes. Wholesale prices to public. A unique shopping experience! Now you can conveniently shop online at our new updated website www.countrybeads.com.2015 W. 4th Ave. (604) 730-8056

wire MARKETPLACE
www.jewelrymakingdaily.com | 55
classesG e o r g i a
William Holland School of Lapidary Arts —Young Harris
www.lapidaryschool.orgClasses in wire wrapping, chain making, beading, cabochons, silver, gold, glass beadmaking, channel, faceting, gem and min-eral ID, intarsia, glass fusing, opals, silver clay casting, jewelry repair, gem trees. April–October each year. Email [email protected].
PO Box 980 (706) 379-2126
advertisers indexAD Adornments 34Beadaholique 17Beadalon/Wire & Cable Specialties 1BeadFX 34Beaducation 17Blue Buddha Boutique 21C. G. M. Inc. 56, C3ChainWeavers 17Crystaletts/Horsman Ltd C2Fire Mountain Gems C4Helby Import/Beadsmith 8HyperLynks 21Interweave 43, 55Merchants Overseas 21Midwest Maille 34Monsterslayer, Inc. 21Now That’s a Jig Brenda Schweder 34Nunn Design 5Om Tara 17PJ Tool Jewelry 5Royalwood 21Weave Got Maille 5Xuron 21
O n l i n eA Grain of Sand
www.agrainofsand.comUnique collection of beads & findings. (704) 660-3125
Charm Factorywww.charmfactory.com
Affordable custom and stock sterling silver and lead–free pewter charms, beads, and more. Custom–engraved jewelry tags in a variety of metals. Order your sample today! (866) 867-5266
Lima Beadswww.LimaBeads.com
Get fresh beads fast at Lima Beads. Huge selection of gemstone beads, pendants, pearls, cubic zirconia, copper, brass, and more! 1⁄2 strands available. New beads every week. Check us out!
Want to drive more foot traffic
into your shop?
Try a Shop Directory Listing. Email Tina Hickman
at [email protected] or call 970-613-4697
The Missing Link: From Basic to Beautiful Wirework JewelryCindy Wimmer160 pages 8.5x10.25ISBN: 978-1-59668-707-3
Celebrate just how versatile wire links can be with this book packed with directions for creating jewelry-making fi ndings, innovative projects, and much more.
Expand your design horizon at: bit.ly/wimmer-missing


www.firemountaingems.com One Fire Mountain Way, DEPT C004 Grants Pass,
OR 97526-2373 1-800-355-2137
Fire Mountain Gems and Beads© 2015
America’s Favorite Beading and Jewelry Supply Company®
Go online to see over 120,000 HOT jewelry-making products and
order a Free catalog today
You supply the creativity,
we supply everything
else!®
Melissa Marie Woods, OHwww.melissamariewoods.com
Finalist, 2015 Metals Jewelry-Making Contest
Email-Only Offerswww.firemountaingems.com
Sign Up Today