new motor vehicle reporting system (mvrs) training presentation
TRANSCRIPT

NEW MOTOR VEHICLE REPORTING SYSTEM (MVRS) TRAINING PRESENTATION
MVRS Highlights
• Improved screen flow• Enhanced Causal factors. Incorporates Human
Factors Analysis and Classification System (HFACS)
• New module not used for entering:– Off-Road Vehicle mishaps (ATV, Dirt Bikes, etc)– Tactical Vehicle Mishaps
• Use previous WESS version for off-road and tactical vehicles

After WESS log-in, select this box to be redirected to the Motor Vehicle Reporting System.
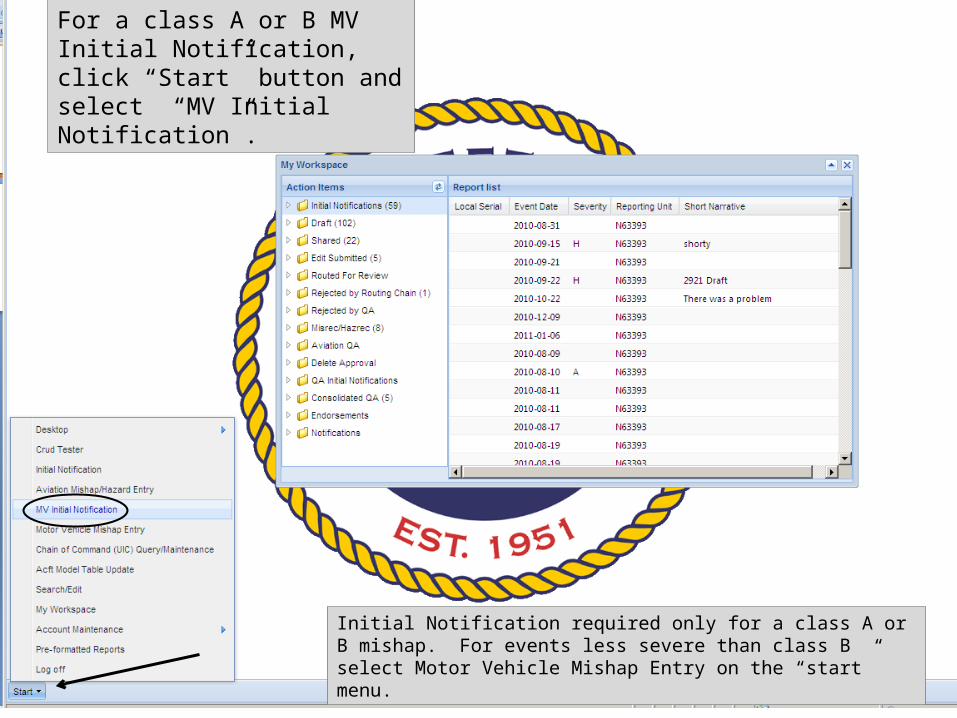
For a class A or B MV Initial Notification, click “Start” button and select “MV Initial Notification”.
Initial Notification required only for a class A or B mishap. For events less severe than class B select Motor Vehicle Mishap Entry on the “start” menu.

All boxes are required to have an entry
Choose 1:•Fatality•Perm Total Disability•Perm Partial Disability•3 or more hospitalizations•>200,000 govt prop damage
Auto populated from log-in information. User may edit if required
Auto populated from victims UIC
Enter victims UIC
Fatality/Injury Counts – Type in appropriate numbers
Hit submit after all data is entered
Class A/B Initial Notification

To update your class A/B initial notification and submit a final report or to modify reports that have not yet been submitted to NSC open draft folder.

To enter a new class C or D motor vehicle report click the start button then select Motor Vehicle Mishap Entry.

Type a very detailed narrative here.
Short narrative here. 100 character limit.
If yes you will need the damage cost.

WESS will auto-populate most of this from your log-in information. You can manually change if required.

Blue colored box allows multiple items for selection
Text entry
If traffic controls (e.g. stop sign) were involved, you may add them by clicking here. If none were involved in the mishap, you may skip this section.
Clear boxes allow only 1 item for selection

After selection of stop sign, answer traffic control function and whether the stop sign was visible. Then hit save.

Only appears if mishap occurred on govt installation.

This screen allows the user to designate other individuals who may access and update this report.

To input information concerning involved vehicles, select the “add” button. Each mishap must have at least 1 involved vehicle.

Selection of vehicle body type will determine whether you will see automobile specific or motorcycle specific questions for the remainder of the application.
Re-select the “add” button to enter an additional vehicle.

To input information concerning people, select the “add” button.

Rate, Pay Grade, NEC, Designator section
Match person with vehicle
If yes, you will need to provide the type of drug

If you selected “alcohol involved” in the general information screen (first screen), then at least one person in the event had to have used alcohol in the past 24 hours.
If no to alcohol in past 24 hrs, this will not appear.
If no to previous alcohol incidents, these questions will not appear.

For post-deployment mishaps, provide the date returned
If yes, unknown or N/A to deployed then follow-on questions will not appear.

For pre-deployment mishaps, provide the appropriate value

IF LEAVE/LIBERTY SELECTED, YOU WILL NEED THE DATES
If an automobile was selected for vehicle body type, seat belt PPE questions will appear instead.
THESE QUESTIONS WILL NOT APPEAR FOR PASSENGERS
If yes was selected then provide type of license.

If yes was selected then provide type of training.

Screen appears only for individuals affiliated with the government. Input as many of the data fields as possible. None are required in order to submit the report.

If checked you will be asked to enter the lost work, light/limited, or job transfer start/stop days. The three different types of lost time can not overlap.
If checked you will be asked a few additional questions about the medical treatment.
If yes you will be asked the transferring command UIC.
If yes to heat/cold, sharps or chemical injury you will be asked a few additional questions.
Scroll down for more injury questions.

Select add for each injured body part and BLS injury code.

This screen is not required for non-governmental individuals

This screen is not required for non-governmental individuals

Human Factors Analysis And Classification System (HFACS)
• HFACS replace previous causal factors• HFACS involve an unsafe act with preconditions for that
unsafe act– Unsafe act = “what happened”. Example – failed to yield right of
way– Precondition = “Why did unsafe act happen”. Example – fatigue
and slippery road surface• For the Motor Vehicle Reporting System, each factor will
have one unsafe act. For the selected unsafe act, the user will then add all applicable preconditions
• If the event involved more than one factor, additional unsafe acts may be added with the appropriate preconditions

Human Factors Analysis And Classification System (HFACS) Example
• Single car mishap. The driver was drunk and speeding.• Factor 1:
– Unsafe Act = Drunk-driving (BAC≥ .08%)– Preconditions for unsafe act
• Stress• Lack of sleep• Inappropriate peer pressure
• Factor 2:– Unsafe Act = Speeding 20-29 MPH over speed limit– Preconditions for unsafe act
• Complacency• Overconfidence• Misunderstood instructions
• Note: Each factor has ONE unsafe act with multiple preconditions

This page is used to enter HFACS (Human Factors Analysis Classification System). The list of HFACS is extensive. It is important to examine the entire list of HFACS before proceeding. Click the PDF to bring up a document that contains all HFACS and a brief explanation. Once you have an idea of the unsafe acts and preconditions you desire to use, click the green button to begin.

1: Click “Select Factor”.
2: Select ONE unsafe act. Click “+” to expand list. 3: Type narrative.
4: Select the person to whom this unsafe act applies.

Select all applicable preconditions that apply to the unsafe act. Remember, you may choose more than one precondition.

Repeat the same process if there additional factors to be entered. Select the appropriate factor, apply it to the appropriate person(s), then select all applicable preconditions.
After all factors have been entered, select the recommendations tab only if you have recommendations to enter. If none, you may proceed to the next page.

Each factor has to have at least one recommendation. Click the green button to begin. The recommendation is entered as text in the space provided.
You may apply the recommendation to more than 1 factor if required.

Click “validate” on bottom of page to begin validation.
This page shows a list of required fields that must be entered prior to submission. Click on green arrow to navigate to appropriate page to fix error.

If there are no validation errors, the report may be released to the Safety Center.

To extract a PDF copy of your report, you may click here at any time during mishap entry.

The routing function will allow you to send your report to another person or persons for review prior to release.
Type the name of the WESS account holder who will review your report in the search area.

Select the name, then use the arrow key to add him/her to the routing chain.

The person selected is now the first in the routing chain.

Multiple people may be added to the routing chain if desired. When ready to route the report, select “Route Report”.

Enter a brief note for the person in the routing chain then select “OK”.

The report will appear in this folder for the first person in the routing chain.

After reviewing the report, the individual may route it to the next person in the chain, or release it to the Safety Center. He may also reject the report back to the original drafter with desired changes.

If the report is rejected back to the original drafter, it will appear here.