network interface card firmware upgrades for uxim … interface card firmware upgrades . for uxim...
TRANSCRIPT
Network Interface Card Firmware Upgrades for UXIM and UXTM
Upgrade Procedures Guide
Albércorp 7775 West Oakland Park Blvd Sunrise, FL 33351 Tel: (954) 377-7101 www.alber.com 4200-127

4200–127 i Revision 1.1
Copyright and Disclaimer
Network Interface Card Firmware Upgrades for UXIM and UXTM Upgrade Procedures Guide Document Revision 1.1
Release Date 12/09/2015
Part Number 4200-127
Revision History
Revision Date of Change Description of Change By 1.00 07/15/15 Initial Release MS
1.1 12/09/15 Updated to include both version on one file MS/RG
Network Interface Card Firmware Upgrades for UXIM and UXTM Upgrade Procedures Guide, Part Number 4200-127
©2015 Albércorp. All rights reserved.
Albércorp, 7775 West Oakland Park Blvd Sunrise, FL 33351.
No part of this document may be reproduced or transmitted in any form or by any means, electronic or mechanical, including photocopying and recording for any purpose, without the express written permission of Albércorp.
Information in this document is subject to change without notice.
Trademarks
The first instances of registered trademarks or trademarks of Albércorp and other companies are annotated above using the ® and ™ symbols. For ease of reading, these symbols do not appear in the remainder of this document.
Printed in the United States of America.

4200–127 ii Revision 1.1
Albér Customer Service
Albér Customer Service is available Monday to Friday, 8:00AM to 4:30PM Eastern Time.
Telephone: (954) 377-7101 Email: [email protected] Website: www.alber.com
Corporate Office Address: Albércorp 7775 West Oakland Park Blvd Sunrise, FL 33351 USA

4200–127 iii Revision 1.1
Table of Contents
1. Check the Xport Network Card Version (Optional) ............................................................... 1
2. Upgrading the Firmware on the Xport-04 and Xport-05 Network Interface Card ................ 2

4200–127 iv Revision 1.1
List of Figures
Figure 1 – Accessing Telnet Card .................................................................................................. 1 Figure 2 – Verifying Telnet Card ................................................................................................... 1 Figure 3 – Connecting to the UXIM/UXTM to the Monitor Using USB ......................................... 2 Figure 4 – Connecting to the UXIM/UXTM to the Monitor using the Network Settings ............. 3 Figure 5 – Connecting to the UXIM/UXTM to the Monitor Using the TCP/IP Properties ............ 3 Figure 6 – Turning Windows Features on for the UXIM/UXTM Monitor ..................................... 4 Figure 7 – Setting Windows Features for the UXIM/UXTM to the Monitor ................................. 4 Figure 8 – Connecting to the UXIM/UXTM to the Monitor using TFTP Command Addresses ..... 5 Figure 9 – Setting up the Internet Protocol Version 4 TCP/IPv4 Properties to the UXIM/UXTM to the Monitor .............................................................................................................................. 6

Check the Xport Network Card Version (Optional)
4200–1XX 1 Revision 1.1
1. Check the Xport Network Card Version (Optional) Use this guide to upgrade the firmware in the following supported network cards:
• Xport-04 • Xport-05
To check the network card version, follow these steps: 1. Click Start, All Programs, Accessories, then Command Prompt. The Administrator Command
Prompt window appears. 2. Access the Telnet connection by entering C:\>telnet followed by the IP address (###.##.#.## ) of the
monitor and then type 9999; for example, C:\>telnet 192.168.1.2 9999 (If you do not know the IP Address of the network card, refer to section 2, steps 1 through 4 to set the IP Address.)
Figure 1 – Accessing Telnet Card
Note: Windows 7 and above does not come with Telnet installed by default. Telnet must be manually installed before proceeding. Refer to section 2, steps 5 through 8 to get it installed.
3. Check to verify that you have either a Xport-04 or Xport-05 network card. If you have a Xport-05 network card it will display CPK6802p1_XPT05. Otherwise if you have a Xport-04 card it will display CPK6802p1_XPTEX.
Figure 2 – Verifying Telnet Card
Upgrading the Firmware on the Xport-04 and Xport-05 Network Interface Card
4200–127 2 Revision 1.1
2. Upgrading the Firmware on the Xport-04 and Xport-05 Network Interface Card
The Xport-04 and Xport-05 network firmware upgrades are installed using TFTP commands. For ease of upgrades, these commands are executed from a batch file. Please contact your Alber service representative to obtain the latest upgrade files. Note: On this example, all required firmware files and “upload” batch file were copied to a folder named “UXIM/UXTMWebFirm” and the network address of the Xport device was set to: 192.168.1.2. A direct connection was made between the PC and Xport using a crossover network cable. To update the UXIM/UXTM network firmware, follow these steps: 1. Connect the computer and the UXIM/UXTM device using a USB cable.
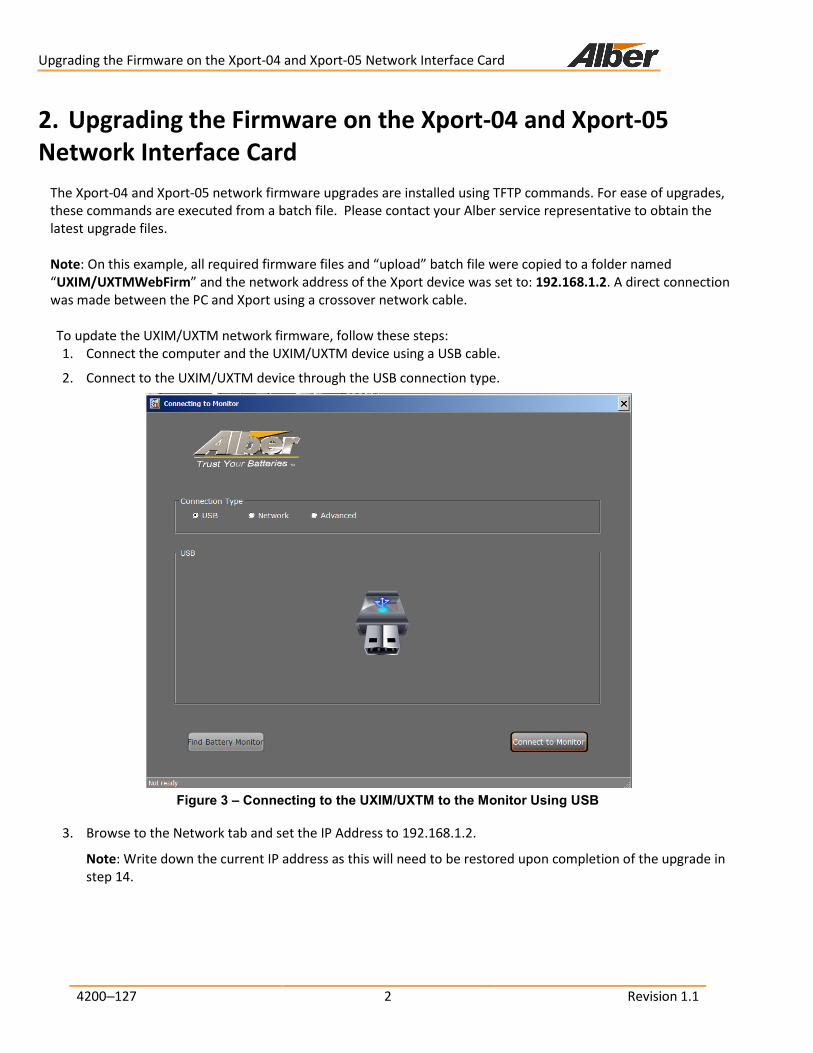
2. Connect to the UXIM/UXTM device through the USB connection type.
Figure 3 – Connecting to the UXIM/UXTM to the Monitor Using USB
3. Browse to the Network tab and set the IP Address to 192.168.1.2.
Note: Write down the current IP address as this will need to be restored upon completion of the upgrade in step 14.
Upgrading the Firmware on the Xport-04 and Xport-05 Network Interface Card
4200–127 3 Revision 1.1
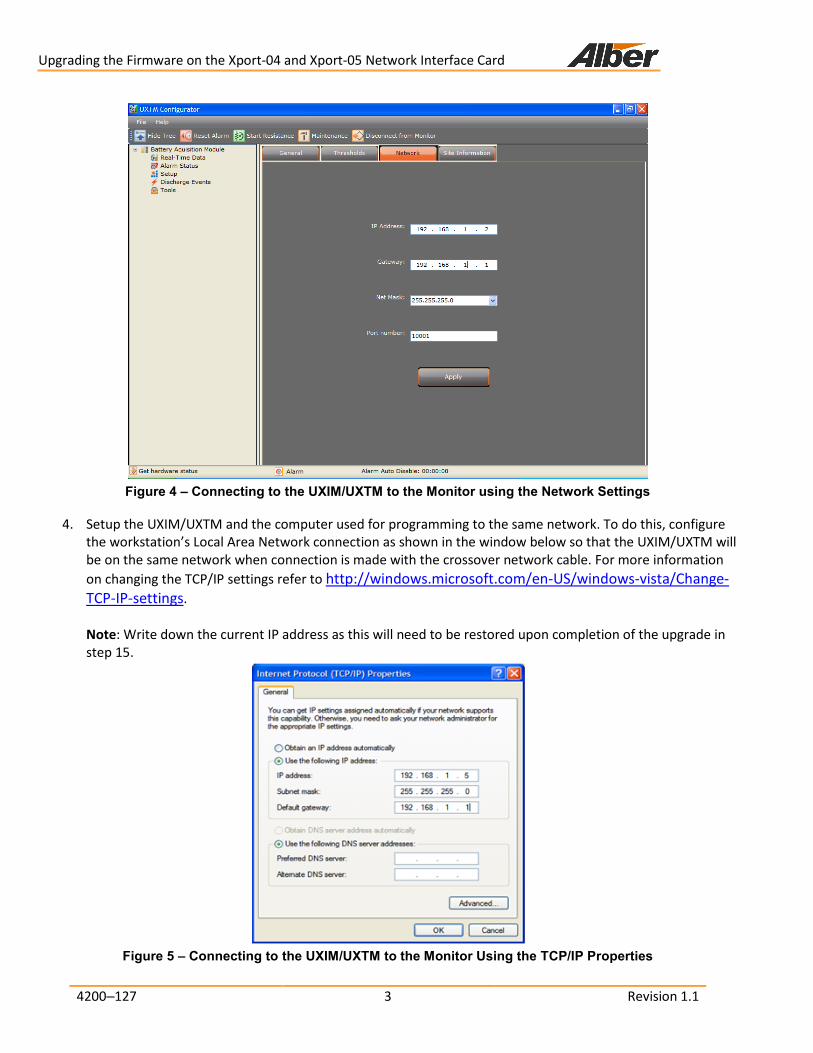
Figure 4 – Connecting to the UXIM/UXTM to the Monitor using the Network Settings
4. Setup the UXIM/UXTM and the computer used for programming to the same network. To do this, configure the workstation’s Local Area Network connection as shown in the window below so that the UXIM/UXTM will be on the same network when connection is made with the crossover network cable. For more information on changing the TCP/IP settings refer to http://windows.microsoft.com/en-US/windows-vista/Change-TCP-IP-settings. Note: Write down the current IP address as this will need to be restored upon completion of the upgrade in step 15.
Figure 5 – Connecting to the UXIM/UXTM to the Monitor Using the TCP/IP Properties

Upgrading the Firmware on the Xport-04 and Xport-05 Network Interface Card
4200–127 4 Revision 1.1
Windows 7 Users only (If not a Windows 7 user skip to step 10 in this procedure) For Windows 7 users, follow these steps to enable the TFTP client and Telnet client. 5. Go to Control Panel\All Control Panel Items and double click on the Programs and Features option 6. Click Turn Windows Features On or Off option in the left hand pane.
Figure 6 – Turning Windows Features on for the UXIM/UXTM Monitor
7. Place a check mark in the TFTP client and Telnet client option and click OK
Figure 7 – Setting Windows Features for the UXIM/UXTM to the Monitor
8. A window appears with a progress bar. Once this window disappears, the TFTP client and Telnet client has been installed.
9. Create a new folder called “UXIM/UXTMWebFirm” on the root of the C:\ directory and copy all the upgrade files to the folder just created.

Upgrading the Firmware on the Xport-04 and Xport-05 Network Interface Card
4200–127 5 Revision 1.1
10. Right click the Upload.bat file located at the UXIMUXTM folder in “C:\UXIM_UXTMWebFirm” and click Edit. It will open a notepad window displaying the upload TFTP commands. Change the IP Addresses from XXX.XXX.XXX.XXX to 192.168.1.2 (if you know the cards IP Address, enter that number) as shown on the figure on the next page.
Figure 8 – Connecting to the UXIM/UXTM to the Monitor using TFTP Command Addresses
11. On the workstation, open the Command Prompt window by typing cmd in the run command box and navigate to the folder containing the network card firmware and batch files, for example enter: C:\>cd UXIM/UXTMWebFirm
Note: The batch and firmware files must be in same folder location.
12. Type the name of the batch file “upload” and press Enter. The commands will be shown on the screen and the files will load with a “transfer successful” message as shown below.
C:\>cd UXIM/UXTMWebFirm C:\UXIM/UXTMWebFirm>upload C:\UXIM/UXTMWebFirm>TFTP -i 192.168.1.2 PUT web6.cob WEB6 Transfer successful: 26589 bytes in 3 second(s), 8863 bytes/s C:\UXIM/UXTMWebFirm>TFTP -i 192.168.1.2 PUT web4.cob WEB4 Transfer successful: 47194 bytes in 5 second(s), 9438 bytes/s C:\UXIM/UXTMWebFirm>TFTP -i 192.168.1.2 PUT web3.cob WEB3 Transfer successful: 60041 bytes in 7 second(s), 8577 bytes/s C:\UXIM/UXTMWebFirm>TFTP -i 192.168.1.2 PUT web2.cob WEB2 Transfer successful: 59536 bytes in 8 second(s), 7442 bytes/s C:\UXIM/UXTMWebFirm>TFTP -i 192.168.1.2 PUT web1.cob WEB1 Transfer successful: 59797 bytes in 7 second(s), 8542 bytes/s C:\UXIM/UXTMWebFirm>TFTP -i 192.168.1.2 PUT xptex.rom X5 Transfer successful: 131072 bytes in 15 second(s), 8738 bytes/s C:\UXIM/UXTMWebFirm>
Upgrading the Firmware on the Xport-04 and Xport-05 Network Interface Card
4200–127 6 Revision 1.1
13. Check the installation by establishing a browser connection to the IP address of the UXIM/UXTM set in step 3 and confirm that the Web page displays and the correct version appears in the UXIM/UXTM Unit Information window under Firmware Version. The upgrade is now complete.
14. When logging into the UXIM/UXTM Web application, you must to enter both a password and a user name where previously, only a password was required in the previous version. You must know the old password from when the prior upgrade/update was done. Important: The old password will remained intact and will not reset to the default password. The default user name is “admin” and the default password is “alber”.
Note: Check the firmware revision level by opening the Version.txt file in UXIM/UXTMWebFirm folder. This will give you the reference to the version number that is known prior to update. Or, check the version of the firmware in the UXIM/UXTM before performing the update. Verify that the Version changed on completion of the update.
15. Restore the UXIM/UXTM Network settings noted in step 3 on your system after the upgrade is complete.
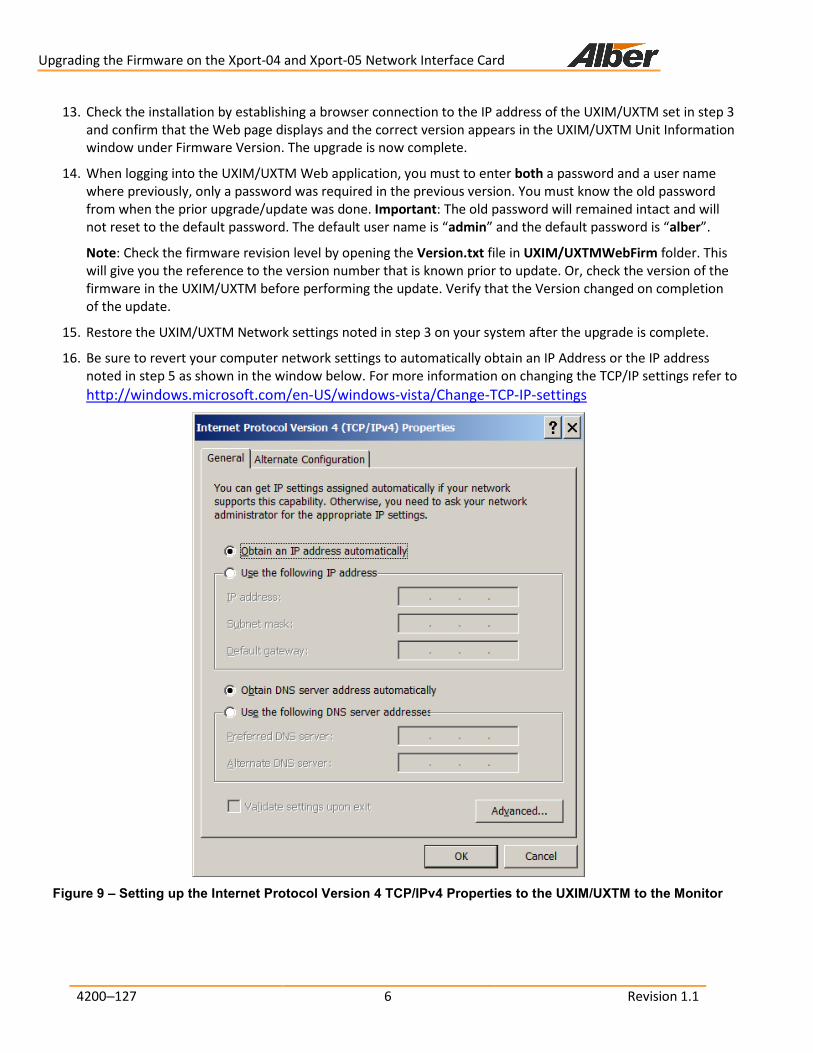
16. Be sure to revert your computer network settings to automatically obtain an IP Address or the IP address noted in step 5 as shown in the window below. For more information on changing the TCP/IP settings refer to http://windows.microsoft.com/en-US/windows-vista/Change-TCP-IP-settings
Figure 9 – Setting up the Internet Protocol Version 4 TCP/IPv4 Properties to the UXIM/UXTM to the Monitor