netspective authentication guide - netspective … · table of contents netspective authentication...
TRANSCRIPT
NetSpective Content Filter
Authentication Guide
Copyright © 2002-2012 by TeleMate.Net Software, LLC. All rights reserved
Although the author and publisher have made every effort to ensure that the information in this
document was correct at press time, the author and publisher do not assume and hereby disclaim any
liability to any party for any loss, damage, or disruption caused by errors or omissions, whether such
errors or omissions result from negligence, accident, or any other cause.
Printed in the United States of America
8.27.2013 version 4.01
TeleMate.Net Software 5555 Triangle Parkway Suite 150 Norcross, Georgia 30092 www.TeleMate.Net
Table of Contents
NetSpective Authentication Considerations ................................................................................................. 1
NetSpective Terms ........................................................................................................................................ 2
Users ......................................................................................................................................................... 2
Groups ....................................................................................................................................................... 2
Group Policy .............................................................................................................................................. 2
LDAP Sources ............................................................................................................................................ 3
Creating or Updating LDAP Sources ...................................................................................................... 3
Example Login DNs ................................................................................................................................ 4
Example Search Base ............................................................................................................................ 4
Integration with an Active Directory Forest ......................................................................................... 4
LDAP Lookup Precedence Order ........................................................................................................... 5
Authentication Methods ............................................................................................................................... 5
Public Policy .............................................................................................................................................. 6
Logon Agent .............................................................................................................................................. 6
Remote Agent ........................................................................................................................................... 7
Remote Agent Connection Settings ...................................................................................................... 8
Remote Agent Client Settings ............................................................................................................... 8
Remote Agent Connection Failure ........................................................................................................ 9
NetSpective Mobile Browser .................................................................................................................... 9
Mobile Browser Settings ....................................................................................................................... 9
Mobile Compatible Portal ....................................................................................................................... 11
Mobile Compatible Portal ................................................................................................................... 11
Mobile Compatible Portal with Pairing ............................................................................................... 12
Portal Authentication Methods .......................................................................................................... 12
LDAP Authentication ........................................................................................................................... 12
Windows NTLM Authentication .......................................................................................................... 13
Pairing Authentication ........................................................................................................................ 13
Portal Timeout .................................................................................................................................... 13
Pairing Allow Temporary Access ......................................................................................................... 13
Proxy or Session Based Authentication .............................................................................................. 14

Basic / LDAP ........................................................................................................................................ 14
NTLM (Windows Integrated) .............................................................................................................. 14
NetSpective Wi-Fi Agent ......................................................................................................................... 14
How the Wi-Fi agent works ................................................................................................................. 15
Use Case Scenario Examples ............................................................................................................... 16
End User Experience ........................................................................................................................... 16
Investment Cost .................................................................................................................................. 16
Deployment of the Wi-Fi Agent .......................................................................................................... 16
Deploying the NetSpective Logon Agent from Microsoft Active Directory 2008 ....................................... 16
WFLogon Command Line Parameters .................................................................................................... 22
Windows Sample Logon Script ................................................................................................................ 23
Configuring Internet Explorer for Single Sign-On Authentication using Group Policies ............................. 23
Deploying the NetSpective Terminal Server Agent .................................................................................... 26
The Configuration Utility ......................................................................................................................... 27
Windows Server 2003 / 2008 (x86-64) ................................................................................................... 27
Deploying the NetSpective Logon Agent for Mac OS X .............................................................................. 28
Setting up the ‘Default Configuration’ .................................................................................................... 29
Modifications to the ‘Default Configuration’ .......................................................................................... 30
Basic Logon Scripts in Novell Domains........................................................................................................ 31
Editing the Logon Script .......................................................................................................................... 32
Novell Sample Logon Script .................................................................................................................... 32
Deploying the NetSpective Remote Agent Client ....................................................................................... 33
Installing and Uninstalling the MSI Package for Windows...................................................................... 33
Deploying the Client Using Active Directory’s Group Policy Objects ...................................................... 34
Steps for creating a GPO with the GPMC ............................................................................................ 35
Steps for creating a GPO without the GPMC ...................................................................................... 37
Configuring the GPO ........................................................................................................................... 38
Installing and Uninstalling the PKG for Mac OS X ................................................................................... 39
Verifying Remote Agent Connectivity ..................................................................................................... 41
Deploying the NetSpective Mobile Portal for BYOD Initiatives .................................................................. 42
Configuring the Mobile Portal for LDAP Authentication ........................................................................ 42
Configuring the Mobile Portal for Windows NTLM Authentication ....................................................... 44

Configuring the Mobile Portal with Pairing ............................................................................................ 46

NETSPECTIVE AUTHENTICATION CONSIDERATIONS 1
NetSpective Authentication Considerations
To properly configure NetSpective and enforce Internet group policies, review the following topics. Careful consideration should be given to each during the initial deployment and as network changes occur.
Is NetSpective being deployed in a passive or proxy configuration?
Identify the network segment that NetSpective will monitor. Does the placement limit the control to a single policy?
Identify the types of network devices accessing the Internet for example: servers (Citrix/Terminal), desktops, laptops, tablets, and smart phones.
Determine whether mobile devices need to be controlled both on and off the network.
How are wireless access points authenticating users? Is their authentication method utilizing RADIUS?
Are network users required to authenticate into the network? If so what operating systems, directory services, and domains need to be considered?
Determine if Guests or unknown mobile devices need to be identified and if restricted levels of Internet access is required.
Has the network standardized on specific browsers? Has the administrator locked down the browsers connection setting?
The Authentication Guide is split into three sections: Terms, Authentication Methods, and Installing /
Configuration Methods. The guide is meant as an overview during the deployment of NetSpective and
in the configuration of network services to ensure user and group level filtering control.

NETSPECTIVE TERMS 2
NetSpective Terms To ensure the NetSpective is properly deployed, it is important to explain the terminology that will be used throughout the Authentication Guide, the user interface, and help system. The following explanation is not complete but is provided to establish a baseline during the deployment process. Review each term and continue to the ‘Use Case’ section of this guide for specific deployment examples.
Users
A user is simply a name that identifies an IP address, or IP address range, a VLAN, or a Location from or to which the Internet is accessed. NetSpective's Logon Agent, Remote Agent, Terminal Server Client and Authentication Portals automatically report user information to NetSpective when users log on. These users can be viewed and assigned to a group and an associated group policy for access enforcement.
The option to ‘Use as location’ can be designated at the user level as a method of treating this association as a physical location as in the case of a kiosk or media center. A location must have a single IP or a range of IPs. Locations have a higher precedence than a regular user when evaluating which group policy to enforce. For example, a NetSpective user, john.smith, is configured using dynamic IP and a location. Media Center is configured with a range of IPs. When John Smith logs onto a computer that is in the Media Center IP range, he will use the group policy for the group that contains the Media Center location. If John Smith logs into a computer outside that IP range he will use the group policy for group containing the NetSpective user john.smith.
The option to ‘Use with VLAN ID’ can be checked to associate the user with the specified VLAN ID for VLAN specific policy enforcement.
Users can be bridged to Directory Services including Microsoft Active Directory, Novell eDirectory, or Open Directory for automatic synchronization to group policies, as well as imported from delimited files or manually entered.
Groups
Users are assigned to a group either manually or by LDAP and each group has its own filtering policy. Each group's filtering policy can be customized to ignore, monitor, or block specific content categories at specific times of day. All unknown or unassigned users are assumed to be members of the Public Group and use its filtering policy. Often, administrators make the Public policy the most restrictive as a catch all for access attempts that circumvent authentication. The Exempt Group's policy, which can’t be changed, always ignores all policy enforcement and logging for reporting purposes.
Group Policy
Every group can have its own policy that can tailored to Block, Monitor, or Ignore internet activity based upon category, time of day, or day of week. Over 100 categories include Internet content that is objectionable in nature, contains mature content, deemed non-productive, as well as bandwidth intensive are provided for granular control. Additionally, protocol and peer-to-peer level control is provided for enhanced management of chat applications, remote logins, streaming media, and HTTPS access.
NETSPECTIVE TERMS 3
At a group policy level, categories chosen to be blocked or monitored can also be marked as abusive. If a user is blocked a certain number of times, that user will have his or her internet access locked down (disabled) for a specified duration of time. Alternatively, if the category is set to monitor, the user will be presented with your company's Internet usage policy and must accept or decline the terms of the policy. The user will be prompted again after a specified time out. Multiple levels of abuse options can be defined on a Group Level from the Group Properties page then assigned categories by category within the group policy.
Additionally, if the NetSpective is configured in Proxy Mode, category access can be prioritized using user-define priority settings. Prioritization levels can be associated at a group category level thus providing granular traffic shaping control.
LDAP Sources
LDAP sources are used to easily populate NetSpective with users or managers. LDAP sources support
bridging to Active Directory, eDirectory, or Open Directory as well as a combination of each as an
environment requires. After configuring a LDAP source, NetSpective groups can be configured to mirror
an Organizational Unit or Group available in that source.
Also, managers can be assigned to NetSpective and may use their LDAP password to log on. In the same
manor Users can be synchronized to groups, management privileges can be delegated to Managers
using an LDAP OU, Group, or individual user accounts.
Creating or Updating LDAP Sources
To add a new LDAP Source, click the Add button. To change a source, click on the name of the source
you would like to edit. Once the dialog has opened, enter the appropriate information.
Name – A name to identify the LDAP Source.
LDAP Type – The LDAP Type can either be Active Directory or eDirectory. The Disabled option
removes the LDAP Source as an option from group configuration.
IP or Hostname – The IP or Hostname of the LDAP server. A hostname requires NetSpective to
be configured to use a valid DNS Server.
Port – The port number specifies which TCP port is used to connect to the server. If the LDAP
server is not using its default port you should set it here. If port 636 is selected, the LDAP
connection will be made using LDAPS (secure LDAP over SSL); however, the remote certificate
will not be verified.
Login DN – The LDAP Distinguished Name of the user who will login and view the users and
groups defined in the LDAP tree. This user should have read-only access to the users and groups
in the tree and the users' group memberships. Using an Administrative account is not
recommended.
NETSPECTIVE TERMS 4
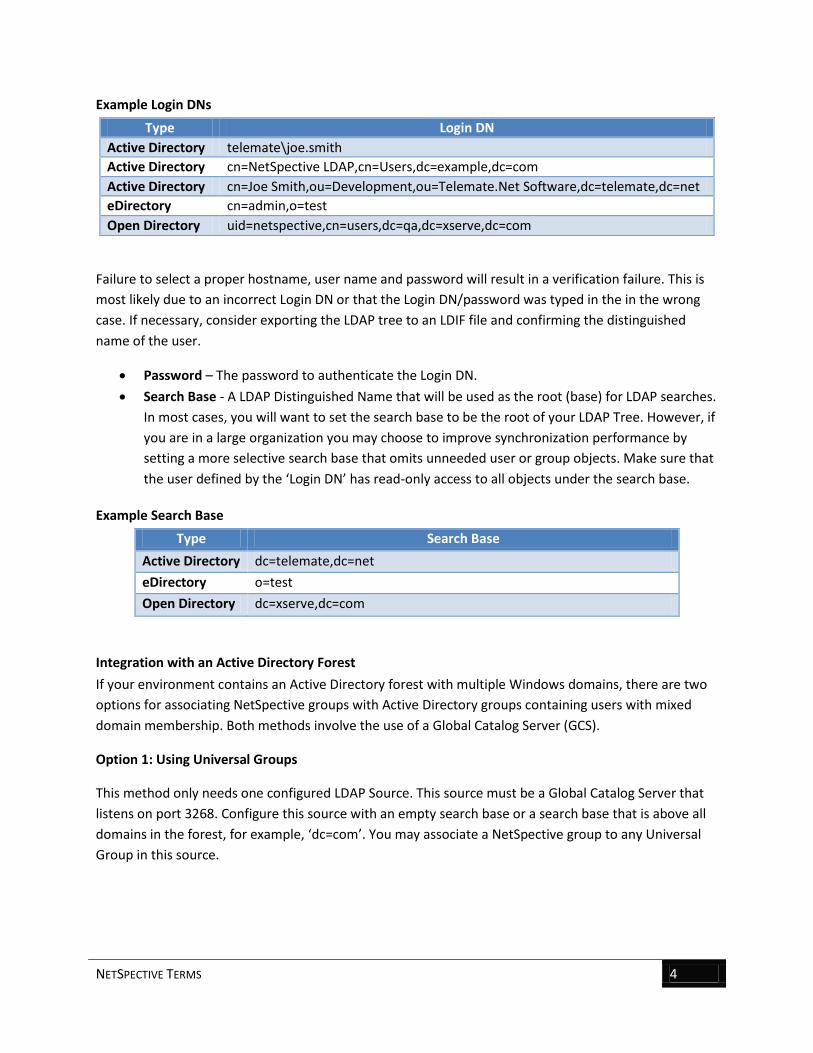
Example Login DNs
Type Login DN
Active Directory telemate\joe.smith
Active Directory cn=NetSpective LDAP,cn=Users,dc=example,dc=com
Active Directory cn=Joe Smith,ou=Development,ou=Telemate.Net Software,dc=telemate,dc=net
eDirectory cn=admin,o=test
Open Directory uid=netspective,cn=users,dc=qa,dc=xserve,dc=com
Failure to select a proper hostname, user name and password will result in a verification failure. This is
most likely due to an incorrect Login DN or that the Login DN/password was typed in the in the wrong
case. If necessary, consider exporting the LDAP tree to an LDIF file and confirming the distinguished
name of the user.
Password – The password to authenticate the Login DN.
Search Base - A LDAP Distinguished Name that will be used as the root (base) for LDAP searches.
In most cases, you will want to set the search base to be the root of your LDAP Tree. However, if
you are in a large organization you may choose to improve synchronization performance by
setting a more selective search base that omits unneeded user or group objects. Make sure that
the user defined by the ‘Login DN’ has read-only access to all objects under the search base.
Example Search Base
Type Search Base
Active Directory dc=telemate,dc=net
eDirectory o=test
Open Directory dc=xserve,dc=com
Integration with an Active Directory Forest
If your environment contains an Active Directory forest with multiple Windows domains, there are two
options for associating NetSpective groups with Active Directory groups containing users with mixed
domain membership. Both methods involve the use of a Global Catalog Server (GCS).
Option 1: Using Universal Groups
This method only needs one configured LDAP Source. This source must be a Global Catalog Server that
listens on port 3268. Configure this source with an empty search base or a search base that is above all
domains in the forest, for example, ‘dc=com’. You may associate a NetSpective group to any Universal
Group in this source.

AUTHENTICATION METHODS 5
Option 2: Using Non-Universal Groups
This method requires one LDAP source which is a Global Catalog Server, as described above in Option 1.
In addition, you must configure a regular Active Directory source (port 389) for each domain in the
forest. A source for each individual domain is required because a Global Catalog server does not contain
enough membership information for non-universal groups. You may associate a NetSpective group to
any group returned by the GCS source, universal or not.
LDAP Lookup Precedence Order
If multiple LDAP Sources are required, a precedence order can be established by the order they exist in
the LDAP Source list. The precedence order for associating users to groups is done alphabetically by the
LDAP Source name defined for each source.
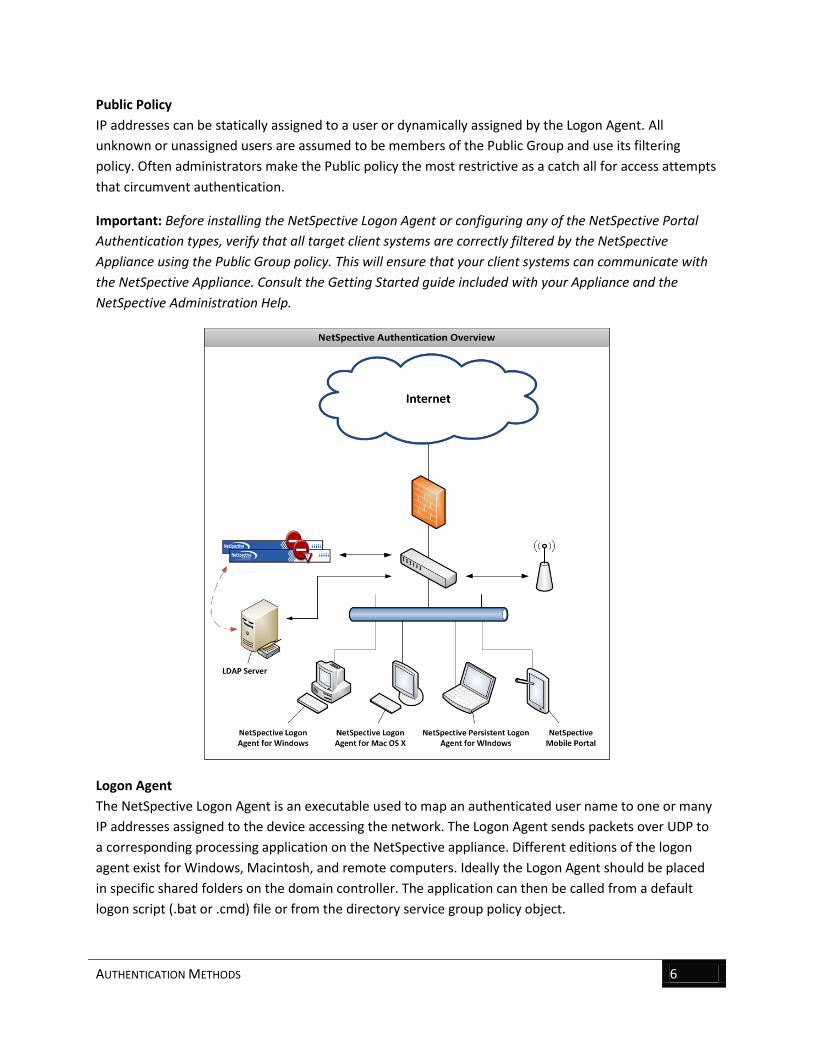
Authentication Methods Below is a flowchart depicting the order in which you should authenticate users.
AUTHENTICATION METHODS 6
Public Policy
IP addresses can be statically assigned to a user or dynamically assigned by the Logon Agent. All
unknown or unassigned users are assumed to be members of the Public Group and use its filtering
policy. Often administrators make the Public policy the most restrictive as a catch all for access attempts
that circumvent authentication.
Important: Before installing the NetSpective Logon Agent or configuring any of the NetSpective Portal
Authentication types, verify that all target client systems are correctly filtered by the NetSpective
Appliance using the Public Group policy. This will ensure that your client systems can communicate with
the NetSpective Appliance. Consult the Getting Started guide included with your Appliance and the
NetSpective Administration Help.
Logon Agent
The NetSpective Logon Agent is an executable used to map an authenticated user name to one or many
IP addresses assigned to the device accessing the network. The Logon Agent sends packets over UDP to
a corresponding processing application on the NetSpective appliance. Different editions of the logon
agent exist for Windows, Macintosh, and remote computers. Ideally the Logon Agent should be placed
in specific shared folders on the domain controller. The application can then be called from a default
logon script (.bat or .cmd) file or from the directory service group policy object.
AUTHENTICATION METHODS 7
The logon Agent has multiple modes of operation, each of which can be tailored using simple command
line arguments. Flexible options enable administrators to customize the behavior of the application
including executing and terminating immediately where NetSpective processes the information with
minimal overhead and no network burden generated by the application. Persistent modes of execution
also exist for dynamic handling of mobile devices in DHCP environments.
All Logon Agent and Remote Agents send packets over UDP to a corresponding NetSpective appliance.
Since NetSpective processes the information with minimal overhead, the network will not be burdened
with the traffic generated by the application.
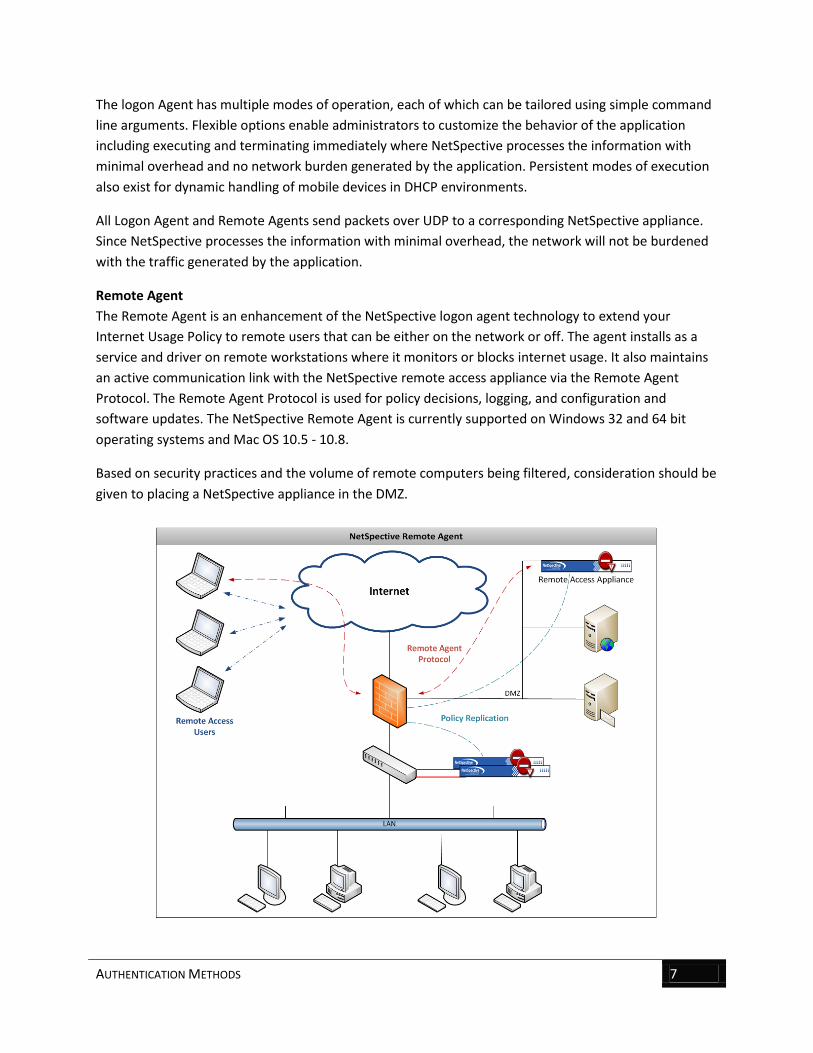
Remote Agent
The Remote Agent is an enhancement of the NetSpective logon agent technology to extend your
Internet Usage Policy to remote users that can be either on the network or off. The agent installs as a
service and driver on remote workstations where it monitors or blocks internet usage. It also maintains
an active communication link with the NetSpective remote access appliance via the Remote Agent
Protocol. The Remote Agent Protocol is used for policy decisions, logging, and configuration and
software updates. The NetSpective Remote Agent is currently supported on Windows 32 and 64 bit
operating systems and Mac OS 10.5 - 10.8.
Based on security practices and the volume of remote computers being filtered, consideration should be
given to placing a NetSpective appliance in the DMZ.
AUTHENTICATION METHODS 8
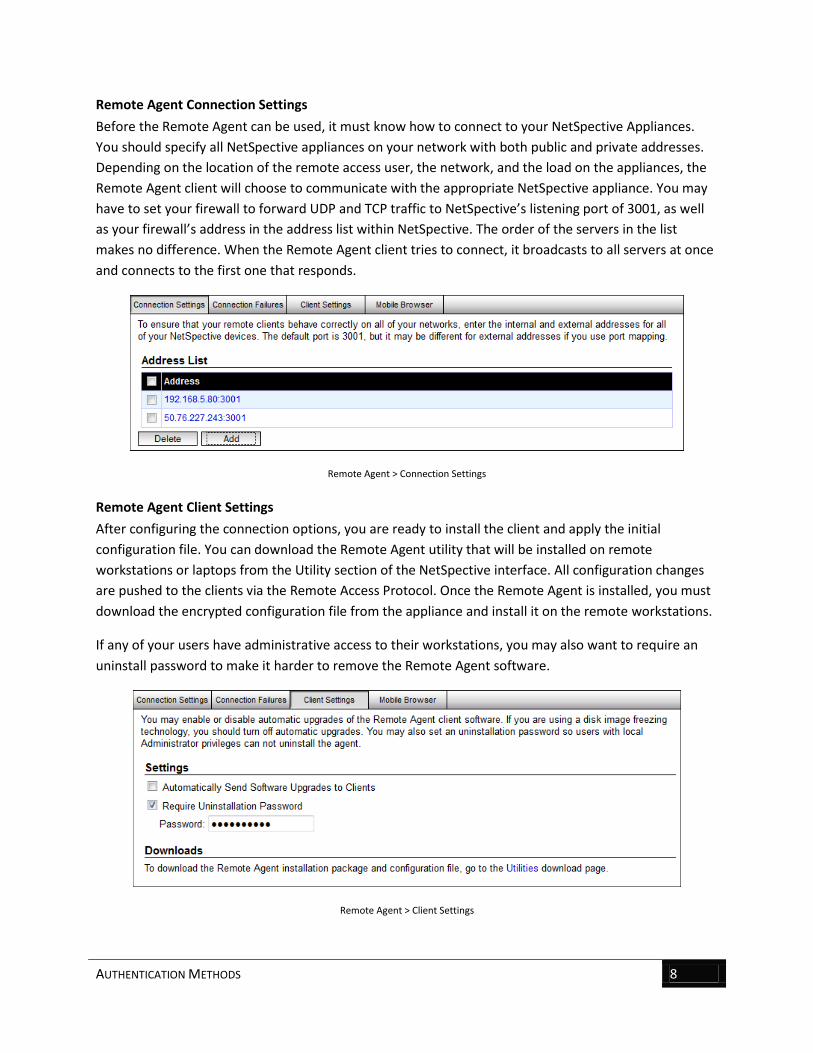
Remote Agent Connection Settings
Before the Remote Agent can be used, it must know how to connect to your NetSpective Appliances.
You should specify all NetSpective appliances on your network with both public and private addresses.
Depending on the location of the remote access user, the network, and the load on the appliances, the
Remote Agent client will choose to communicate with the appropriate NetSpective appliance. You may
have to set your firewall to forward UDP and TCP traffic to NetSpective’s listening port of 3001, as well
as your firewall’s address in the address list within NetSpective. The order of the servers in the list
makes no difference. When the Remote Agent client tries to connect, it broadcasts to all servers at once
and connects to the first one that responds.
Remote Agent > Connection Settings
Remote Agent Client Settings
After configuring the connection options, you are ready to install the client and apply the initial
configuration file. You can download the Remote Agent utility that will be installed on remote
workstations or laptops from the Utility section of the NetSpective interface. All configuration changes
are pushed to the clients via the Remote Access Protocol. Once the Remote Agent is installed, you must
download the encrypted configuration file from the appliance and install it on the remote workstations.
If any of your users have administrative access to their workstations, you may also want to require an
uninstall password to make it harder to remove the Remote Agent software.
Remote Agent > Client Settings

AUTHENTICATION METHODS 9
Remote Agent Connection Failure
Occasionally the Remote Agent client might not have access to the NetSpective appliance and will act in
an offline mode. This could happen when initially accessing the internet from a hotel or wireless
hotspot. You will need to set the behavior of the client when it is offline. You have the option to permit
all access to the internet or deny all accesses with the exception of notable websites that you specify.
You also have the option to enable a user initiated grace period when you choose to deny all, for access
situations where the user must hit an initial web page to activate their internet connection. When
offline, the Remote Agent will log the user’s activity and will report this activity to the NetSpective
appliance when it returns online.
Remote Agent > Connection Failure
NetSpective Mobile Browser
The NetSpective Mobile Browser app for iPads is available for free in the Apple App Store. The Mobile
Browser app allows you to monitor and filter internet content on an iPad device no matter where the
user takes it. We recommend that you use the Apple Configurator to install and configure the Mobile
Browser, as well as to lock down your iPad devices so that your users cannot run Safari, remove the
Mobile Browser app, or bypass it by installing another web browser.
Mobile Browser Settings
NetSpective allows you to choose an authentication method for the Mobile Browser to use for
identifying the user. You may choose to either use the device name (which can be specified in the Apple
Configurator) or to require the user to enter an LDAP login and password. If you choose LDAP
authentication, the login name and password entered by the user will be forwarded to your NetSpective
device via secure HTTP, which NetSpective will then validate using the LDAP sources you have
configured. If you choose LDAP authentication, we recommend that you change the ‘LDAP Logon
Prompt’, which is what users will see when they are asked to log on.
AUTHENTICATION METHODS 10
It is important to set the ‘Logon Agent Inactivity’ timeout appropriately. When the Mobile Browser app
is not active on an iPad, the operating system will not allow the mobile browser to keep a link open to
NetSpective due to the impact on battery life. When a filtered iPad is brought into school (or the office)
in the morning and grabs a new IP address on your wireless network, NetSpective will not know which
user has logged on until the Mobile Browser is opened. The inactivity timeout helps keep users from
having to re-open the Mobile Browser multiple times per day to re-establish the link. If your iPads are
configured to check email every 15 minutes, we recommend that you set this value higher, such as 20
minutes.
Some organizations need the Mobile Browser to treat certain file types as attachments (e.g. pdf, epub,
doc). In the Attachment File Types section, you can specify filename extensions or MIME types that you
want the mobile browser to open as attachments. By default, the Mobile Browser has its own settings to
allow your users to add up to 5 of their own file types (which your users can find in the iPad Settings
app). If you do not wish to allow users to specify their own, you can disable this feature in the browser
by unchecking the ‘Allow’ checkbox in that section.
Remote Agent > Mobile Browser
AUTHENTICATION METHODS 11
Mobile Compatible Portal
Mobile Compatible Portal is used to authenticate users from unknown IP addresses. You may configure
certain IP address ranges to use the portal by using the Authentication tab. The mobile compatible
portal's appearance is designed using HTML5 standards in order to optimize appearance on mobile
devices such as smart phones and tablets.
Filter Settings > Authentication

AUTHENTICATION METHODS 12
Mobile Compatible Portal with Pairing
Mobile Compatible Portal with Pairing is the same as the Mobile Compatible Portal, except that the
credentials supplied will be used to pair the mobile device to a user. Pairing is the association of a
mobile device with a NetSpective User for a specified amount of time. A token is generated by the
NetSpective and stored on the mobile device. The token is then used to identify the association between
the mobile device and the assigned user until the timeout period is reached, or to permanently pair as
configured.
Filter Settings > Authentication: Click on a Rule
Portal Authentication Methods
Portal based authentication can be leveraged as a ‘stop gap’ measure to ensure all users are
authenticated before accessing the Internet through a browser. The portal is designed to force users to
authenticate when no other means of authentication is compatible with the device.
LDAP Authentication
LDAP Authentication provides simple, encrypted HTTPS based authentication that should be compatible
with any modern browser. Users' passwords will be checked against any LDAP sources you have
configured. In addition, local NetSpective managers can authenticate using their NetSpective login name
and password.

AUTHENTICATION METHODS 13
Windows NTLM Authentication
Windows NTLM Authentication provides single sign on capabilities for Windows users. In addition, some
browsers, like Firefox, also support this method on other operating systems like Linux and Mac OS X. In
order to use Windows NTLM authentication, NetSpective must be joined to a Windows domain. If for
some reason a Windows integrated login fails, the user will be directed to the portal web page and will
be able to use his or her LDAP login if enabled.
When Windows Integrated Logon is selected, some users' browsers may require additional configuration
or the user may still be prompted for authentication. In Internet Explorer, the NetSpective device will
need to be added to the 'Local Intranet Sites'. In IE 7, to add a local intranet site go to Tools -> Internet
Options, then select the Security tab, select Local Intranet, click Sites and then select Advanced. In
Firefox, navigate to about:config. Then add the IP of the NetSpective device to network.automatic-ntlm-
auth.trusted-uris.
Note: If you require a detailed configuration guide for configuring Internet Explorer for single
sign-on authentication using group policies, you may reference ‘Configuring Internet Explorer
for Single Sign-On Authentication using Group Policies’ section of this guide.
Pairing Authentication
Enabling pairing will redirect end-users to a web page where they can request to be paired. Pairing is the
association of a mobile device with a NetSpective User for a specified amount of time. A token is
generated by the NetSpective and stored on the mobile device. The token is then used to identify the
association between the mobile device and the assigned user.
If Authentication is enabled, the authentication type must be one of the Mobile Compatible options in
order for Pairing to also be enabled. The option of a silent automatic pairing is also available for devices
where administrators do not wish to have users prompted when authentication is required. The option
can also be leveraged to create IP zone based pooling to a group policy.
Portal Timeout
When a user authenticates via the Portal, NetSpective will remember that IP address to user association
for a specified time. You may configure the timeout to be based on traffic inactivity or based on time
from last log on. You may also enter the number of minutes or hours that Portal logons will be kept
before timing out. Mobile Compatible Portal with Pairing timeout is limited to time from last log on.
Pairing Allow Temporary Access
Instead of having the end-user waiting for a manager to assign the device, temporary access can be
given. Granting temporary access will assign the device to a specified Group policy. Temporary Access
shall timeout after the configured time.
Temporary Access can be configured to not prompt the end-user but pair automatically. However, if Pair
is used in conjunction with Authenticate the end-user must be prompted since they will have a choice to
either login or pair.
AUTHENTICATION METHODS 14
Proxy or Session Based Authentication
Proxy or Session based authentication is only available in NetSpective devices in proxy mode.
NetSpective devices in proxy mode may also use session based authentication. You may configure
NetSpective to advertise multiple methods of session based authentication, and clients can choose to
use any method they support.
Basic / LDAP
This option provides simple, encrypted HTTPS based authentication that should be compatible
with any HTTP client. Users' passwords will be checked against any LDAP sources you have
configured. In addition, local NetSpective managers can authenticate using their NetSpective
login name and password.
NTLM (Windows Integrated)
This option provides single sign on capabilities for Windows users. In addition, some browsers
such as Firefox also support this method on other operating systems such as Linux and
Mac OS X.
Note: You must join NetSpective to a Windows domain to use NTLM Windows authentication.
NetSpective Wi-Fi Agent
The Wi-Fi Agent is intended to solve the needs of ISDs and school districts using multiple wireless zones
with a need for transparent authentication. If users already are authenticating through RADIUS, and are
receiving an IP address through the DHCP server, then the Wi-Fi Agent can be implemented. We can use
these sources to authenticate users in NetSpective for a transparent and secure login.

AUTHENTICATION METHODS 15
How the Wi-Fi agent works
Our goal is to gather the information we need so that we can to properly authenticate a user.
NetSpective requires a Username and IP Address for authentication. Here is how we’ll obtain it.
RADIUS Logs – Containing a MAC Address and IP Addresses.
DHCP Server Logs – Containing the Username and MAC Address.
Collector Pro is a piece of software developed by TeleMate.Net software. It is a flexible, Windows based application used to relay logs from one server to another in real time. Collector Pro is used to relay these logs to the Wi-Fi Agent. The Wi-Fi Agent will then correlate the MAC
Addresses from each log, to determine the Username and IP Address of each user. This will then be sent
to NetSpective so these users can be given a filtering policy.
DEPLOYING THE NETSPECTIVE LOGON AGENT FROM MICROSOFT ACTIVE DIRECTORY 2008 16
Use Case Scenario Examples
An organization may have various Wi-Fi zones:
Guest Wireless
o Devices incompatible with WPA2 Enterprise – Authenticated with
NetSpective Mobile Portal.
o Open Wi-Fi - Devices authenticating with a common password or a
Captive Portal System.
o Devices compatible with WPA2 Enterprise – Username and IP Address
authentication data is provided in the secure RADIUS logs.
Internal Wireless
o Devices compatible with WPA2 Enterprise – Username and MAC
Address is gathered from RADIUS logs.
End User Experience
The Wi-Fi Agent reduces the need for the NetSpective Mobile Portal. Users already authenticating
through RADIUS can be brought in with the Wi-Fi Agent. With the Wi-Fi Agent deployment, the end user
will never be prompted for NetSpective authentication and no software needs to be put on their device,
giving them a completely transparent experience.
Investment Cost
The Wi-Fi agent is a small, Windows based program. It can run on any type of Server or VM
environment. Log collection is done through the Collector Pro program, also lightweight and Windows
based. We simply require a non-dedicated Windows server or VM to run the process of gathering this
data and relaying it to NetSpective. Since both programs are lightweight and flexible, this can be used
with any existing servers or VMs in your environment.
Deployment of the Wi-Fi Agent
Since most customers have various Wi-Fi solutions, we require at minimum, a day of professional
services for this deployment. Once deployed, the agent runs quietly in the environment with no
necessary customer interaction.
Deploying the NetSpective Logon Agent from Microsoft Active Directory 2008 Active Directory relies on the Domain Name Service (DNS) to provide Group Policy access. This may
require installing DNS on the domain controller and configuring the client systems so that they use the
controller as their DNS server. Consult the appropriate documentation on Active Directory from
Microsoft for more details.
DEPLOYING THE NETSPECTIVE LOGON AGENT FROM MICROSOFT ACTIVE DIRECTORY 2008 17
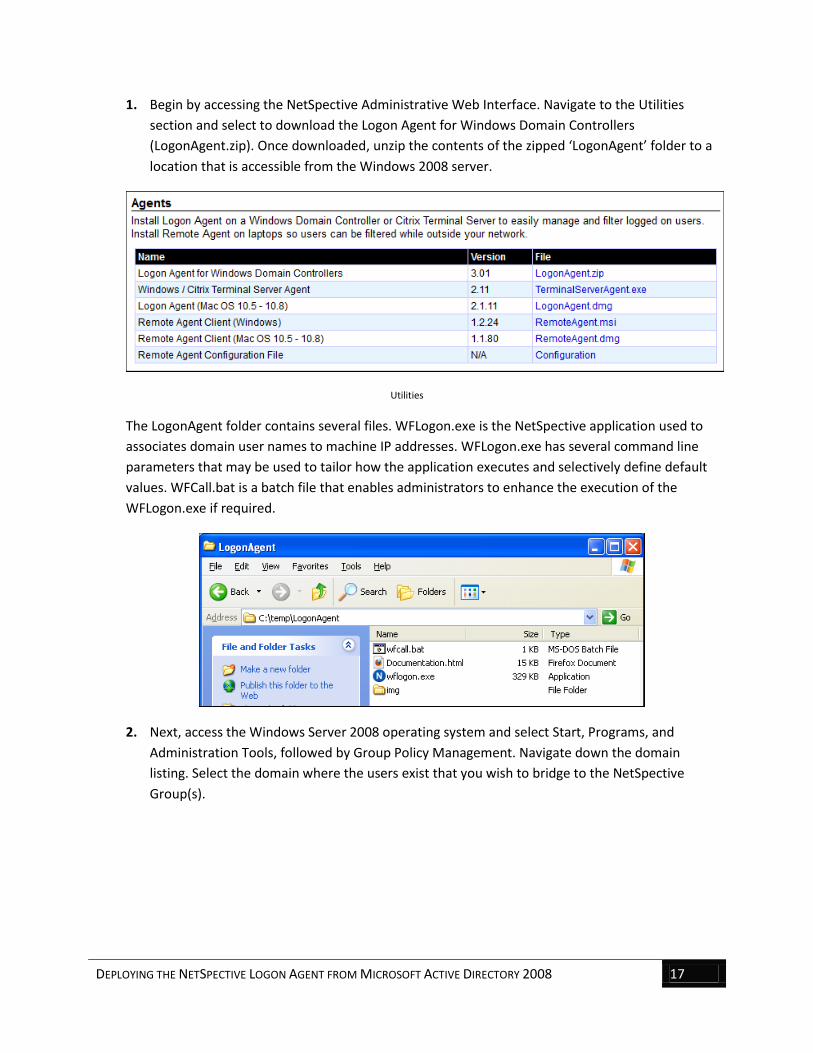
1. Begin by accessing the NetSpective Administrative Web Interface. Navigate to the Utilities
section and select to download the Logon Agent for Windows Domain Controllers
(LogonAgent.zip). Once downloaded, unzip the contents of the zipped ‘LogonAgent’ folder to a
location that is accessible from the Windows 2008 server.
Utilities
The LogonAgent folder contains several files. WFLogon.exe is the NetSpective application used to
associates domain user names to machine IP addresses. WFLogon.exe has several command line
parameters that may be used to tailor how the application executes and selectively define default
values. WFCall.bat is a batch file that enables administrators to enhance the execution of the
WFLogon.exe if required.
2. Next, access the Windows Server 2008 operating system and select Start, Programs, and
Administration Tools, followed by Group Policy Management. Navigate down the domain
listing. Select the domain where the users exist that you wish to bridge to the NetSpective
Group(s).

DEPLOYING THE NETSPECTIVE LOGON AGENT FROM MICROSOFT ACTIVE DIRECTORY 2008 18
3. Right click on the ‘Group Policy Objects’ (GPO) and select ‘New’.
4. On the New GPO dialog enter ‘NetSpective’ or a descriptive name representing your internal
naming conventions. ‘Source Starter GPO’ should remain as (none).

DEPLOYING THE NETSPECTIVE LOGON AGENT FROM MICROSOFT ACTIVE DIRECTORY 2008 19
5. Select the Group Policy Object tree items and navigate to the ’NetSpective’ group policy object.
Right click and select ‘Edit’.
6. Upon selecting Edit, the Group Policy Management Editor will open for the NetSpective GPO.
Navigate to ‘User Configuration’, ‘Windows Settings’, ‘Scripts (Logon/Logoff)’. Select ‘Logon’
script in the right pain of the editor.

DEPLOYING THE NETSPECTIVE LOGON AGENT FROM MICROSOFT ACTIVE DIRECTORY 2008 20
7. Select the Logon script. Right click or double click to display the logon script properties and
select the Add button.

DEPLOYING THE NETSPECTIVE LOGON AGENT FROM MICROSOFT ACTIVE DIRECTORY 2008 21
8. From the ‘Add a Script’ Dialog, select Browse. Next access the folder you unzipped the
LogonAgent.zip into from Step 1. Select and Copy both the WFLogon.exe and WFCall.bat into
the default folder the Browse opens to. This folder is the folder for the NetSpective GPO.
9. Select either the WFCall.bat or WFLogon.exe based on your requirements. Command line
parameters are explained below under ‘WFLogon Command Line Parameters’. Once defined
select OK to save. Continue the save process until you have returned to the NetSpective GPO in
the Group Policy Management dialog.

DEPLOYING THE NETSPECTIVE LOGON AGENT FROM MICROSOFT ACTIVE DIRECTORY 2008 22
10. Once you have returned to the NetSpective GPO, select the Detail tab to confirm (or set) the
GPO status to ‘Enabled’. Upon completion, exit the Group Policy Management.
11. Now all users accessing the network will automatically execute the NetSpective logon Script
executed based on the parameters provided.
WFLogon Command Line Parameters
All flags that can be used with the WFLogon.exe:
-p The Persistent flag instructs the WFLogon.exe to remain running in order to produce
instant notification to the NetSpective appliance when IP addresses change while a user
is logged into the network. This is ideal for wireless devices.
-s The Silent flag hides the persistent (-p parameter) application in the Windows systray
icon.
-v The Verbose flag logs execution and exceptions to the Windows Event Log.
-q The Quit flag, often referred to as the logoff flag, is used to perform a forced logoff or
disassociation of the LDAP User ID to an IP address. This flag should not be used in
conjunction with the persistent flag.
-u The Username flag is an optional setting used as a mechanism to ask the OS for the user
name.
-d The Domain flag is an optional setting used as a mechanism to ask the OS for the
domain name.

CONFIGURING INTERNET EXPLORER FOR SINGLE SIGN-ON AUTHENTICATION USING GROUP POLICIES 23
Windows Sample Logon Script
Please refer to the following example of a short logon script, which includes the required call to the
NetSpective Logon Agent.
REM Sample net logon script REM SMS calls for net boot, etc... REM CALL \\PDC01\NETLOGON\smsls.bat REM Add some basic network shares REM net use H: \\Server1\UserFiles REM net use K: \\Server2\Utilities REM Sync time with server REM net time \\PDC01 /set y REM add a call to NetSpective logon agent, located in this share REM use full UNC path REM use p for Persistent operation in Mobile DHCP environments START \\PDC01\NETLOGON\wflogon -p 10.0.30.1
Code can be copied and pasted. IP Addresses are examples only.
Note: If you are running multiple appliances in replication mode, the addresses of both appliances
should appear in the logon script.
Configuring Internet Explorer for Single Sign-On Authentication using Group
Policies
Internet Explorer enables network administrators to force single sign-on Directory integration. Below
are the steps required to on instruct IE to integration authentication with NetSpective by sharing zone
security setting.
CONFIGURING INTERNET EXPLORER FOR SINGLE SIGN-ON AUTHENTICATION USING GROUP POLICIES 24
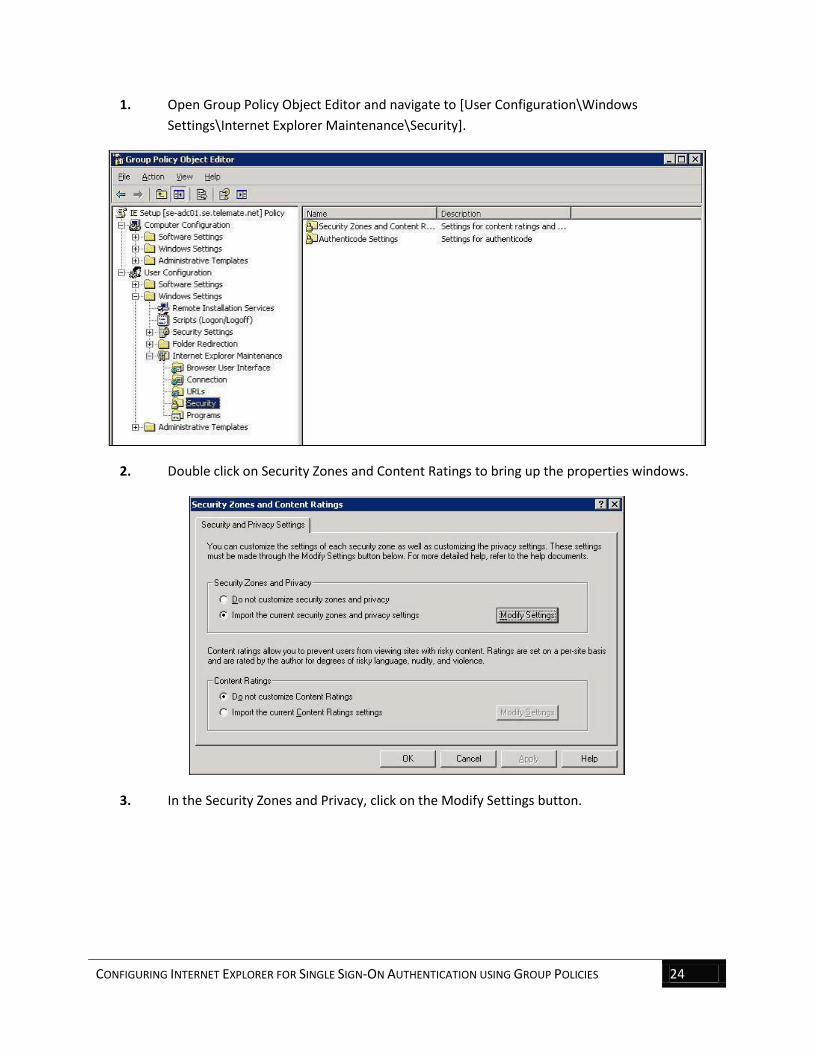
1. Open Group Policy Object Editor and navigate to [User Configuration\Windows
Settings\Internet Explorer Maintenance\Security].
2. Double click on Security Zones and Content Ratings to bring up the properties windows.
3. In the Security Zones and Privacy, click on the Modify Settings button.

CONFIGURING INTERNET EXPLORER FOR SINGLE SIGN-ON AUTHENTICATION USING GROUP POLICIES 25
4. In the Internet Properties window click on the Local intranet zone and then click on the Sites
button.
.
5. Type in the IP Address of your NetSpective appliance and click the Add button and then click
the Close button.
IP Addresses are examples only.
6. Next, on the Internet Properties Window, click the Custom Level button.

DEPLOYING THE NETSPECTIVE TERMINAL SERVER AGENT 26
7. Scroll down to the User Authentication section and set the Logon property to ‘Automatic
logon only in Intranet zone’. You may also select ‘Automatic logon with current username
and password’ instead, but this option may introduce some security concerns.
Note: In Firefox, navigate to about:config. Then add the IP of the NetSpective device to
network.automatic-ntlm-auth.trusted-uris.
Deploying the NetSpective Terminal Server Agent The NetSpective Terminal Server Agent can be found on the NetSpective appliance under Utilities. The
Terminal Server Agent consists of a configuration utility and a Winsock Layered Service Provider (LSP)
module. LSPs are used by anti-virus, anti-spam, and anti-spyware vendors to scan and block harmful
data in connections. The NetSpective LSP intercepts the initiation of TCP sessions to inform NetSpective
about connection ownership. Please install NetSpective Logon Agent for Terminal Server on every
Terminal Server in your network to provide personalized filtering policies for all of your users.
Note: If NetSpective is off-line or fails to respond, a terminal server user might experience a
three second delay when starting a network application. If the NetSpective device fails to
respond, the users will be subject to the group policy for the Terminal Server’s IP address.

DEPLOYING THE NETSPECTIVE TERMINAL SERVER AGENT 27
The Configuration Utility
This utility shows you what LSP's you currently have registered and allows you to register or unregister
the NetSpective LSP. You must also enter the IP addresses of all NetSpective devices monitoring the
current server’s connection to the internet. If you add, remove, or change the IP address of a
NetSpective device on your network, you need to run this utility to update the IP addresses. You are not
required to reboot after making this change. However, if you choose to register or unregister the
NetSpective LSP, it is necessary to reboot the server.
IP Addresses are examples only.
If you do encounter conflicts with another Layered Service Provider, we provide a command-line utility
for trouble-shooting, installing, and removing LSP's. By default, it is installed here:
Utility: \Program Files\NetSpective Logon Agent\LSPInstall.exe
Documentation: \Program Files\NetSpective Logon Agent\README.TXT
Windows Server 2003 / 2008 (x86-64)
The current release of NetSpective LSP supports both 32-bit and 64-bit applications.
DEPLOYING THE NETSPECTIVE LOGON AGENT FOR MAC OS X 28
Deploying the NetSpective Logon Agent for Mac OS X
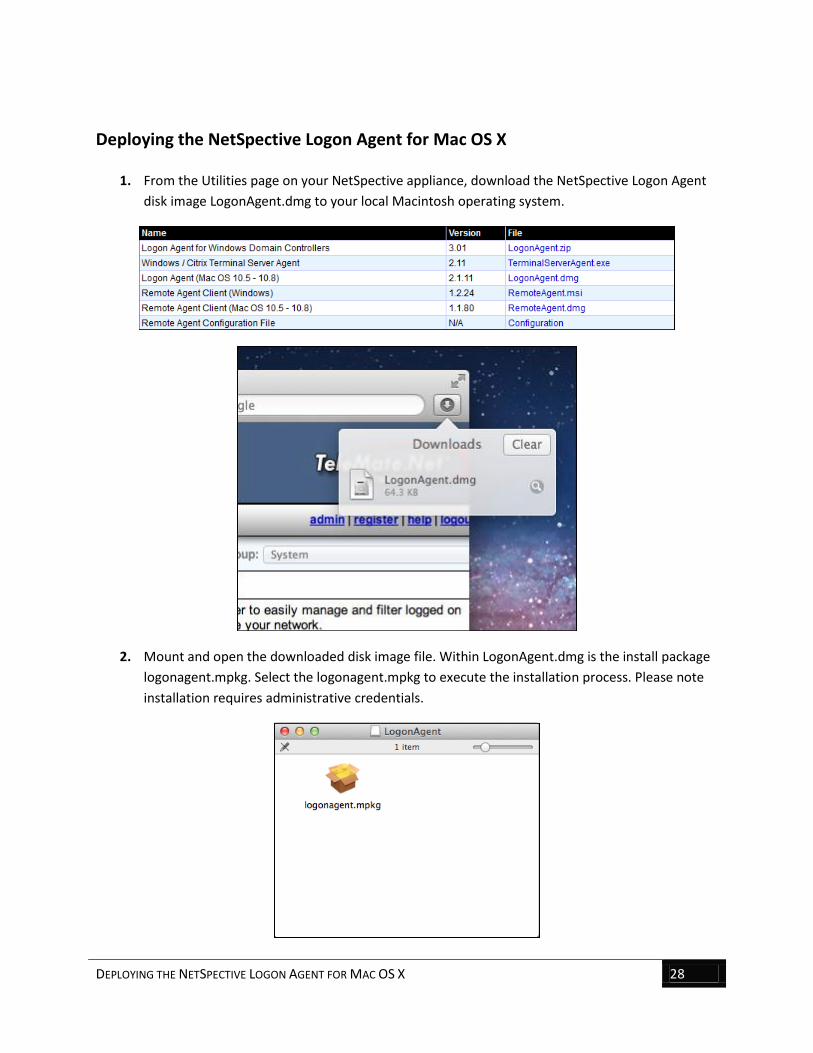
1. From the Utilities page on your NetSpective appliance, download the NetSpective Logon Agent
disk image LogonAgent.dmg to your local Macintosh operating system.
2. Mount and open the downloaded disk image file. Within LogonAgent.dmg is the install package
logonagent.mpkg. Select the logonagent.mpkg to execute the installation process. Please note
installation requires administrative credentials.
DEPLOYING THE NETSPECTIVE LOGON AGENT FOR MAC OS X 29
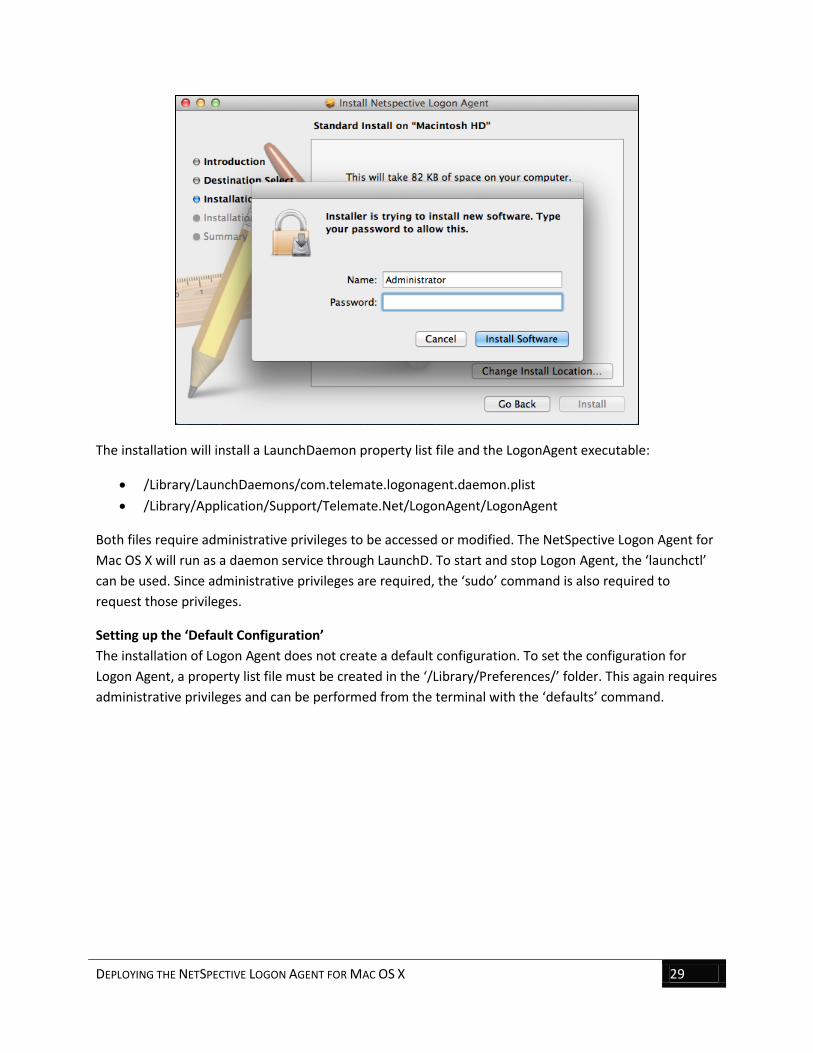
The installation will install a LaunchDaemon property list file and the LogonAgent executable:
/Library/LaunchDaemons/com.telemate.logonagent.daemon.plist
/Library/Application/Support/Telemate.Net/LogonAgent/LogonAgent
Both files require administrative privileges to be accessed or modified. The NetSpective Logon Agent for
Mac OS X will run as a daemon service through LaunchD. To start and stop Logon Agent, the ‘launchctl’
can be used. Since administrative privileges are required, the ‘sudo’ command is also required to
request those privileges.
Setting up the ‘Default Configuration’
The installation of Logon Agent does not create a default configuration. To set the configuration for
Logon Agent, a property list file must be created in the ‘/Library/Preferences/’ folder. This again requires
administrative privileges and can be performed from the terminal with the ‘defaults’ command.

DEPLOYING THE NETSPECTIVE LOGON AGENT FOR MAC OS X 30
Sample default Configuration for installing Logon Agent onto multiple Macintosh systems:
$ sudo defaults write /Library/Preferences/com.telemate.logonagent "address" -array '192.168.101.27' '192.168.101.28'
Code can be copied and pasted. IP Addresses are examples only.
Note: The ‘- array’ of IP Addresses are for broadcasting logons of User ID and IP address
associations to more than one NetSpective appliance.
$ sudo defaults write /Library/Preferences/com.telemate.logonagent "address" -array '192.168.101.27'
Code can be copied and pasted. IP Addresses are examples only.
Note: In this example the default configuration is broadcasting to a single NetSpective
appliance.
A simple script can be created to execute all steps required to configure and install the Logon Agent
from a central location. Below is an example:
$ sudo defaults write /Library/Preferences/com.telemate.logonagent "address" -array '192.168.101.27' sudo /usr/sbin/installer -verbose -pkg logonagent.mpkg -target /
Code can be copied and pasted. IP Addresses are examples only.
Modifications to the ‘Default Configuration’
The Logon Agent must be restarted each time the configuration is changed. This can be done by using
the above ‘launchctl’ load/unload commands or by restarting the machine.
Below depicts the command line syntax for manually starting and stopping the Logon Agent.
Stop Logon Agent:
$ sudo launchctl unload /Library/LaunchDaemons/com.telemate.logonagent.daemon.plist
Code can be copied and pasted.
Start Logon Agent:
$ sudo launchctl load /Library/LaunchDaemons/com.telemate.logonagent.daemon.plist
Code can be copied and pasted.
In an Active Directory domain the following command will force the logon agent to pull in the NetBIOS Domain name for each user by default.
$ sudo defaults write /Library/Preferences/com.telemate.logonagent "use_hostname" '1'

BASIC LOGON SCRIPTS IN NOVELL DOMAINS 31
However in domains such as Open Directory the NetBIOS Domain name does not exist. To address this,
the command should be changed to the following.
sudo defaults write /Library/Preferences/com.telemate.logonagent "use_hostname" '1'
Basic Logon Scripts in Novell Domains The NetSpective Logon Agent executable should be placed in a specific shared folder on the domain
server or somewhere on the network. The application can then be called from a logon script that can be
set up on the Novell Server. The logon script must set the environment variables WF_USERNAME and
WF_USERDOMAIN then execute the logon agent executable.
There are multiple ways to set up logon scripts on a Novell Domain. The logon scripts can be added on a
per User basis, using a Profile or at the Organizational Unit (OU). For example, to set up a logon script at
the OU, open the Novell ConsoleOne application. Navigate to the Novell directory until you find the OU
that the logon script will be added to. In order for the logon script to work, it must be added to the OU
that contains the users that are to be affected. Once the OU has been found, right click on the OU and
select properties. From the properties window select the login script tab and add the logon script. Check
your Novell documentation for more information on setting up logon scripts.
Edit the Container

BASIC LOGON SCRIPTS IN NOVELL DOMAINS 32
Adding the Logon Script
IP Addresses are examples only.
Note: NetSpective does not support all of the characters that are usable in Novell usernames.
The characters <>;:" do not work in NetSpective.
Editing the Logon Script
If all users share the same logon script (or a master script is available), edit the script so that it contains
the call to the Logon Agent as described in the previous sections. For multiple logon scripts, edit all
appropriate scripts. Refer to the following examples.
Novell Sample Logon Script
Please refer to the following example of a short Novell logon script, which includes the setting of the
environment variables WF_USERNAME and WF_USERDOMAIN and the required call to the NetSpective
Logon Agent. Note that the path for the executable may vary between domains.
REM Sample Novell logon script REM set environment variables REM DOS SET WF_USERNAME="%FULL_NAME.%LOGIN_CONTEXT" REM REM Call netspective logon agent REM START @NOVELLSERVER/SYS:\PUBLIC\wflogon32 -p 192.168.10.227
Code can be copied and pasted. IP Addresses are examples only.

DEPLOYING THE NETSPECTIVE REMOTE AGENT CLIENT 33
Deploying the NetSpective Remote Agent Client The client install consists of two steps: installing an MSI (Microsoft Installer) package and applying the
initial configuration file. After you apply the initial configuration file, each client will get configuration
updates automatically from the appliance. If you have moved the NetSpective appliance to another IP
address, the link may become broken and you may need to manually deploy the configuration update.
When you upgrade your NetSpective appliance to a new version, it may come with a new version of the
client. You do not need to worry about deploying the remote client software, as the appliance will
automatically update all clients when a new version becomes available.
Before the Remote Agent can be used, it must know how to connect to your NetSpective Appliances.
You should specify all NetSpective appliances on your network with both public and private addresses.
Depending on the location of the remote access user, the network, and the load on the appliances, the
Remote Agent client will choose to communicate with the appropriate NetSpective appliance. You may
have to set your firewall to forward UDP and TCP traffic to NetSpective’s listening port of 3001, as well
as your firewall’s address in the address list within NetSpective. The order of the servers in the list
makes no difference. When the Remote Agent client tries to connect, it broadcasts to all servers at once
and connects to the first one that responds.
Remote Agent > Connection Settings | IP Addresses are examples only.
Installing and Uninstalling the MSI Package for Windows
The MSI package requires no parameters to install, which makes it easy to deploy automatically using
software deployment services like SMS Server or Active Directory’s Group Policy Objects. It also requires
no parameters to uninstall (unless you decide to require an uninstall password).
To install the client silently from the command line:
msiexec.exe /i RoamingAgent.msi /quiet
To uninstall the client silently from the command line:
msiexec.exe /x RoamingAgent.msi /quiet
To uninstall the client silently with an uninstall password:
msiexec.exe /x RoamingAgent.msi /quiet PW=password

DEPLOYING THE NETSPECTIVE REMOTE AGENT CLIENT 34
The install/uninstall requires administrator access to the client machine, and Windows will display a
User Access Control (UAC) warning during the install (unless it is run as the local Administrator or
SYSTEM account). When the install/uninstall is complete, you must reboot the client machine. The act of
installing/uninstalling the driver may cause certain applications to become unstable if you do not
reboot.
Applying the Configuration File
The easiest way to apply the configuration file is to open it in Windows Explorer. The install maps its
filename extension (.nsconfig) to one of our program files (NSRemoteSetup.exe). Any user without
administrative access can apply the configuration update. If needed, you could email an .nsconfig file to
your users or instruct them to download it from a web site and apply it. Administrators can also apply
the configuration the by placing the .nsconfig file in the ‘%ProgramFiles%\NetSpective Remote
Agent\downloads’ folder.
Deploying the Client Using Active Directory’s Group Policy Objects
The client and its initial configuration can be deployed automatically to computers in a Windows domain
using Group Policy Objects (GPO’s). The best way to set up a GPO is to download Microsoft’s Group
Policy Management Console (GPMC) and install it on a domain controller. You can locate GPMC at
http://msdn.microsoft.com/en-
us/library/windows/desktop/aa814316%28v=vs.85%29.aspx. Microsoft also offers
information on the use of Group Policy for software deployment in Knowledge Base article
Q314934 at http://support.microsoft.com/kb/314934.
To limit the remote agent installation onto only the remote computers, you should group the remote
computers together in Active Directory so you can limit the new GPO to that group. There are two ways
to do this:
1. If you do not install the GPMC, the only way to limit the GPO is to create a new Organizational
Unit in Active Directory and move your remote computers into it. You can then create a new
GPO and assign it to that Organizational Unit.
2. If you do install the GPMC, you also have the option of applying a security filter to a GPO. This
allows you to create a new GPO, assign it to the entire domain, and restrict its access to specific
security groups and/or computers.
The most secure option is to use the GPMC and create a new security group just for your remote
computers. It is also the easiest to maintain. Only computers that need to install the client should have
access to the network share containing the setup files, the startup script for applying the initial
configuration, the GPO for pushing it, etc. The GPO is applied to computers, not users, so domain users
do not need access to the network share at all.
DEPLOYING THE NETSPECTIVE REMOTE AGENT CLIENT 35
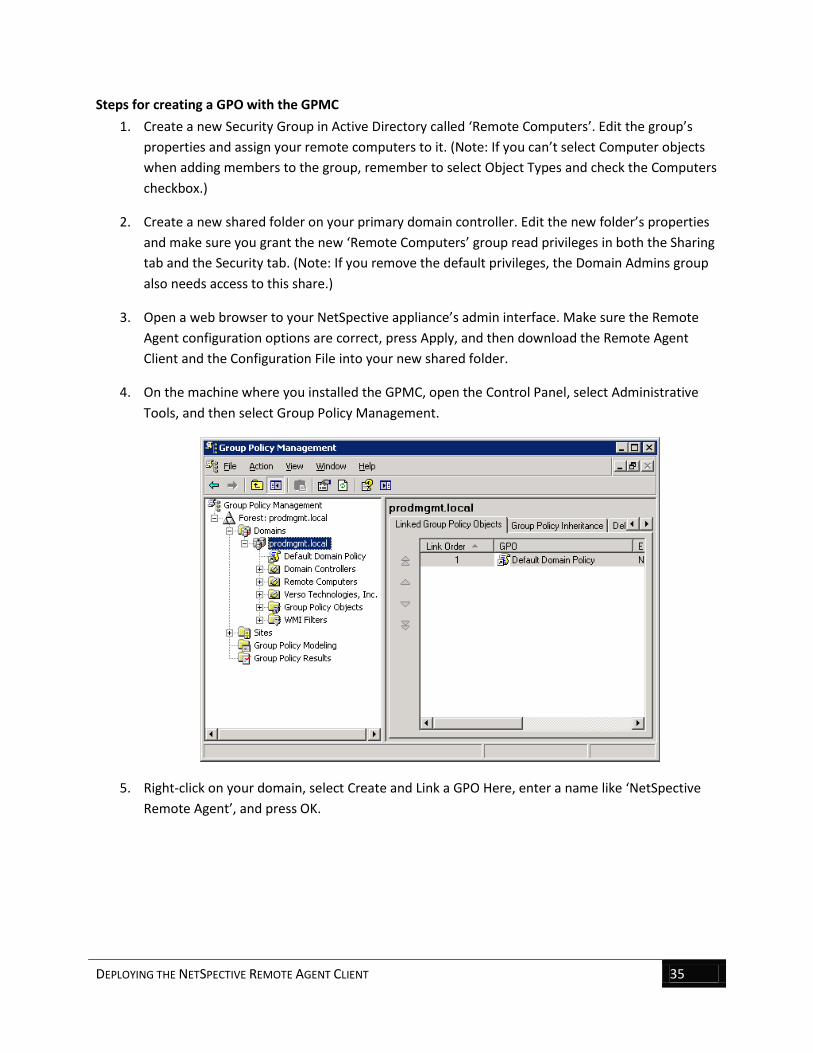
Steps for creating a GPO with the GPMC
1. Create a new Security Group in Active Directory called ‘Remote Computers’. Edit the group’s
properties and assign your remote computers to it. (Note: If you can’t select Computer objects
when adding members to the group, remember to select Object Types and check the Computers
checkbox.)
2. Create a new shared folder on your primary domain controller. Edit the new folder’s properties
and make sure you grant the new ‘Remote Computers’ group read privileges in both the Sharing
tab and the Security tab. (Note: If you remove the default privileges, the Domain Admins group
also needs access to this share.)
3. Open a web browser to your NetSpective appliance’s admin interface. Make sure the Remote
Agent configuration options are correct, press Apply, and then download the Remote Agent
Client and the Configuration File into your new shared folder.
4. On the machine where you installed the GPMC, open the Control Panel, select Administrative
Tools, and then select Group Policy Management.
5. Right-click on your domain, select Create and Link a GPO Here, enter a name like ‘NetSpective
Remote Agent’, and press OK.
DEPLOYING THE NETSPECTIVE REMOTE AGENT CLIENT 36
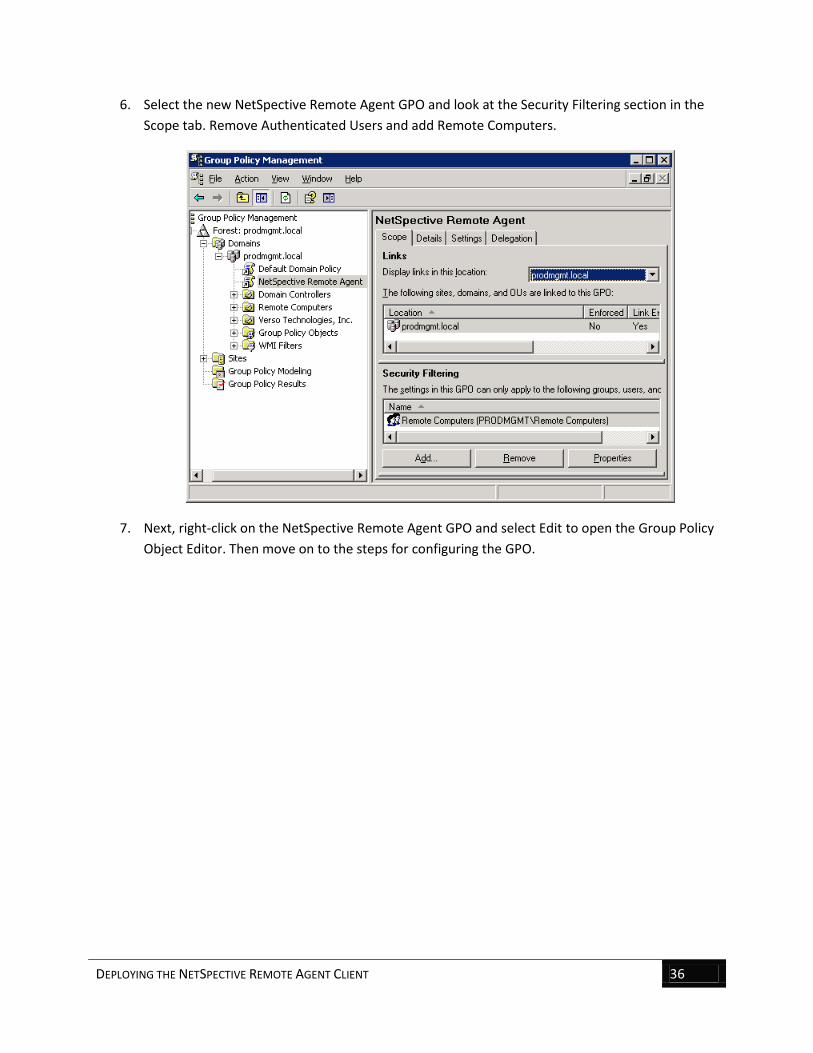
6. Select the new NetSpective Remote Agent GPO and look at the Security Filtering section in the
Scope tab. Remove Authenticated Users and add Remote Computers.
7. Next, right-click on the NetSpective Remote Agent GPO and select Edit to open the Group Policy
Object Editor. Then move on to the steps for configuring the GPO.

DEPLOYING THE NETSPECTIVE REMOTE AGENT CLIENT 37
Steps for creating a GPO without the GPMC
1. Create a new shared folder on your primary domain controller. Edit the new folder’s properties
and make sure you grant the ‘<DOMAIN>\Domain Computers’ group read privileges in both the
Sharing tab and the Security tab.
2. Open a web browser to your NetSpective appliance’s admin interface. Make sure the Remote
Agent configuration options are correct, press Apply, and then download the Remote Agent
Client and the Configuration File into your new shared folder.
3. Create a new Organizational Unit in Active Directory called Remote Computers. Find all
Computer objects you wish to install the Remote Agent on, and drag them into this
Organizational Unit.
4. Edit the properties of the Remote Computers Organizational Unit, select the Group Policy tab,
select New to create a new GPO, and set its name to NetSpective Remote Agent.
5. Select Properties, then Security, and Add. Then grant ‘<DOMAIN>\Domain Computers’ read
access to the GPO.
6. Select Edit to open the Group Policy Object Editor. Then move on to the steps for configuring
the GPO.

DEPLOYING THE NETSPECTIVE REMOTE AGENT CLIENT 38
Configuring the GPO
1. In the GPO Editor tree, open Computer Configuration and then Software Settings. Right-click on
Software Installation, select New, and then select Package.
2. In the Filename field, type in the full UNC path for the share you created (i.e. \\server\share)
and press Enter or Open. Then select RemoteAgent.msi, which you should have downloaded
into this folder in one of the steps above. (Note: You may also browse your Network
Neighborhood to find it, but you must not select it under the local drive.)
3. If you are prompted for a deployment method, select ‘Assigned’ and press OK. When you are
finished, it should be similar to this:
4. Now that you have configured the GPO to install the Remote Agent client automatically, you
must configure it to apply the configuration file. To do this, open and select Computer
Configuration, Windows Settings, and then Scripts (Startup/Shutdown).
5. Right-click on Startup and select Properties. Then select Show Files to open the default startup
script folder for this GPO, and create a new file named ‘startup.bat’. The batch file should similar
to this:
REM *** Apply NetSpective Remote Agent configuration *** SET AGENT_SETUP="%ProgramFiles%\NetSpective Remote Agent\NSRemoteSetup.exe" IF NOT EXIST %AgentSetup% GOTO NO_REMOTE_AGENT ECHO Applying NetSpective Remote Agent Configuration %AgentSetup% \\server\share\laptop.nsconfig /uilevel=2 :NO_REMOTE_AGENT
Code can be copied and pasted.
6. Select Add and pick startup.bat. Once you save it, this configuration file will be applied
automatically every time a computer assigned to this GPO reboots.

DEPLOYING THE NETSPECTIVE REMOTE AGENT CLIENT 39
If you are testing this in a lab and you want to force the software to be applied quickly to make sure it
works, open a DOS box on a target client machine and run ‘gpupdate /force’. This will force the client
machine to reload its group policies, at which point it should detect the new GPO and ask you to reboot
so it can be applied.
Installing and Uninstalling the PKG for Mac OS X
Much like the Windows Remote Agent, the client install consists of two steps: installing a PKG and
applying the initial configuration file. After you apply the initial configuration file, each client will get
configuration updates automatically from the appliance.
1. From the Utilities section of NetSpective, download the Remote Agent Client for Mac OS X, as
well as the Remote Agent Configuration File. Once both files have downloaded, open the
RemoteAgent.dmg file and double click on the RemoteAgent.pkg. You will need Administrative
access to proceed.
DEPLOYING THE NETSPECTIVE REMOTE AGENT CLIENT 40
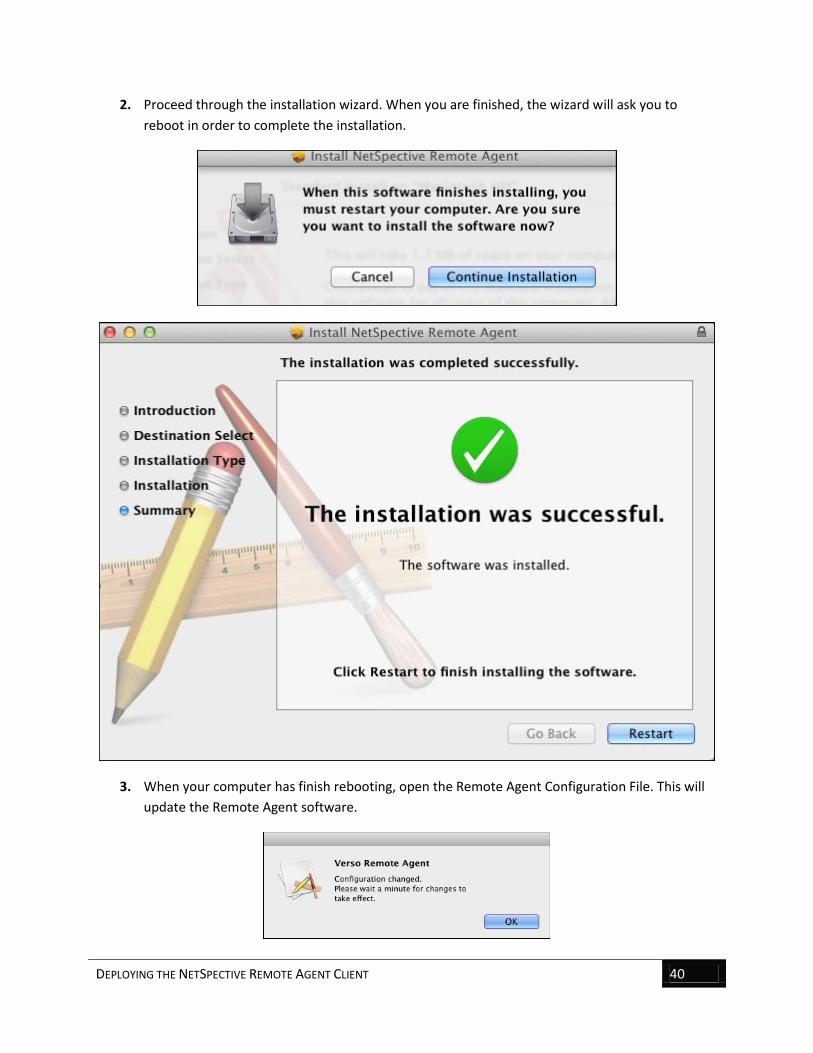
2. Proceed through the installation wizard. When you are finished, the wizard will ask you to
reboot in order to complete the installation.
3. When your computer has finish rebooting, open the Remote Agent Configuration File. This will
update the Remote Agent software.
DEPLOYING THE NETSPECTIVE REMOTE AGENT CLIENT 41
If you wish you uninstall the Mac Remote Agent manually, you can open a Terminal window on the
machine you wish to uninstall the Mac Remote Agent from and type in the uninstall command. You will
need Administrative privileges to proceed.
sudo /Library/Application \Support/Verso/RemoteAgent/bin/uninstall.sh –f
Verifying Remote Agent Connectivity
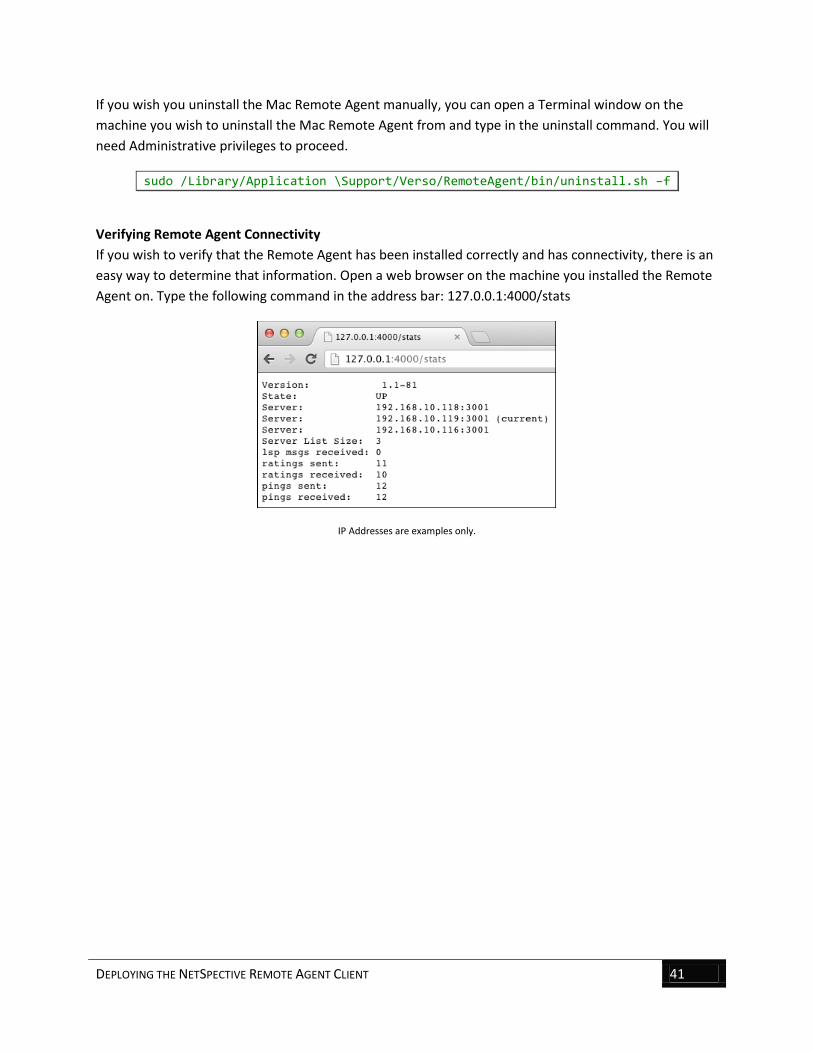
If you wish to verify that the Remote Agent has been installed correctly and has connectivity, there is an
easy way to determine that information. Open a web browser on the machine you installed the Remote
Agent on. Type the following command in the address bar: 127.0.0.1:4000/stats
IP Addresses are examples only.

DEPLOYING THE NETSPECTIVE MOBILE PORTAL FOR BYOD INITIATIVES 42
Deploying the NetSpective Mobile Portal for BYOD Initiatives The NetSpective Mobile Portal was designed with HTML5 to be web browser and operating system
independent, making it effective at filtering mobile devices. The Mobile Portal is configured by applying
a set of rules to an IP address range. This IP address range can typically be the range of your wireless
zone, where mobile devices are most likely going to try and connect to. The rules applied to this address
range are what will determine the behavior of the Mobile Portal and how users will interact with it.
Note: NetSpective will prioritize authentication methods starting with the most specific method
first. Your Logon Agent users, Remote Agent users, and Static IP addresses will not be affected
by the Mobile Portal settings and will not be asked to authenticate twice.
Configuring the Mobile Portal for LDAP Authentication
1. The Authentication section has a number of rules already set up. These rules are prioritized from
top to bottom. To create a new rule, click the Add button.
Filter Settings > Authentication | IP Addresses are examples only.
2. From the Authentication Rule window, you will see fields for Zone Name, Address, and Netmask.
Each field is required for portal authentication.
a. The ‘Zone Name’ is just the name to identify the Rule.
b. The ‘Address’ refers to the first IP address in the range of addresses that you wish to
apply the Mobile Portal to.
c. The ‘Netmask’ is the subnet mask for the IP address range given in the previous field.
3. Next, check the box for Authentication and select a method of authentication such as LDAP.
Users using LDAP will encounter a portal page where they much enter their LDAP credentials in
order to gain access to the web and be filtered.

DEPLOYING THE NETSPECTIVE MOBILE PORTAL FOR BYOD INITIATIVES 43
4. The Timeout feature is used to determine when to force users to authenticate again.
a. ‘Logon’ will force a user to authenticate when X minutes have passed since the last time
the user logged on.
b. ‘Inactivity’ will force a user to authenticate when the user has not made any access
attempts in X minutes.
IP Addresses are examples only.
5. Click OK to save these settings to the rule. From the Authentication Page, make sure your new
rule is at the top of the list by using the arrows on the far right. When you are finished, click the
Save icon in the upper left corner.

DEPLOYING THE NETSPECTIVE MOBILE PORTAL FOR BYOD INITIATIVES 44
IP Addresses are examples only.
Configuring the Mobile Portal for Windows NTLM Authentication
Configuring the Mobile Portal for Windows NTLM Authentication requires all of the same steps as LDAP
Authentication did. However there are a few extra steps that need to take place in order to enable
Windows NTLM.
1. In the Network section, add a valid entry to the DNS Servers section. When you are finished,
click the save icon in the upper left hand corner.
Device Settings > Network | IP Addresses are examples only.
2. Click on the Advanced tab, under the Windows Integration heading, click the Join button. This
will set up a trusted relationship between the NetSpective device and your domain. When you
are finished, click the save icon in the upper left hand corner.
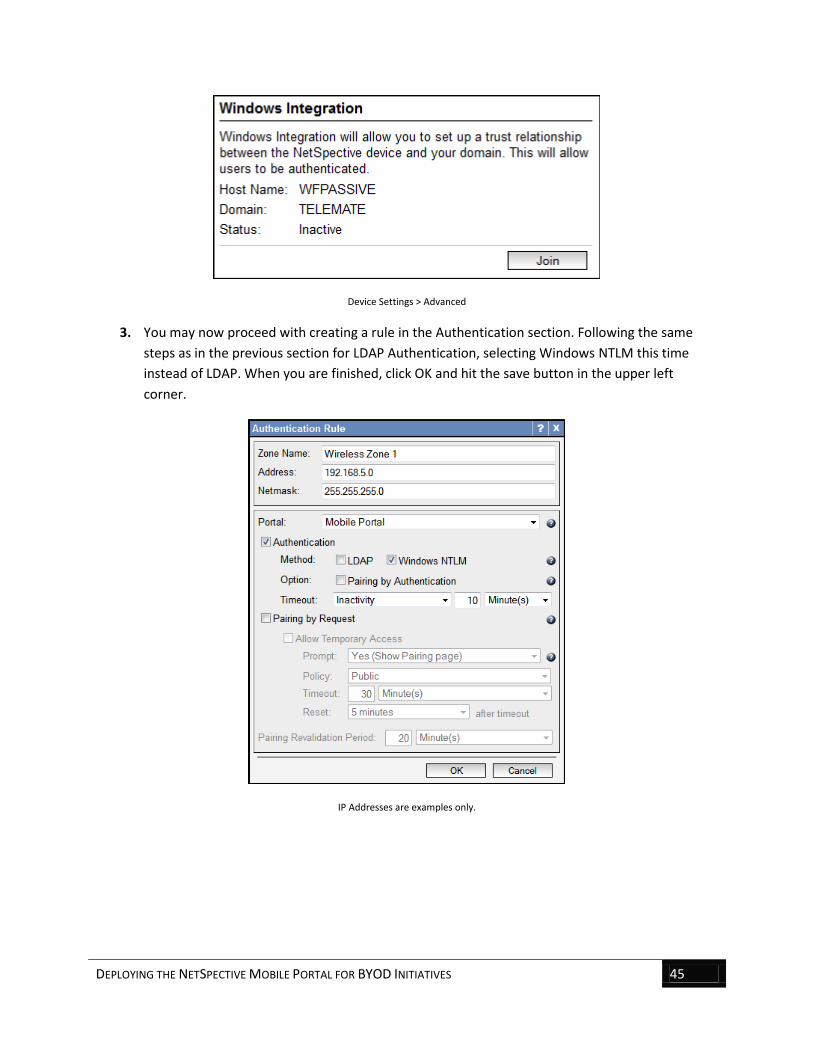
DEPLOYING THE NETSPECTIVE MOBILE PORTAL FOR BYOD INITIATIVES 45
Device Settings > Advanced
3. You may now proceed with creating a rule in the Authentication section. Following the same
steps as in the previous section for LDAP Authentication, selecting Windows NTLM this time
instead of LDAP. When you are finished, click OK and hit the save button in the upper left
corner.
IP Addresses are examples only.
DEPLOYING THE NETSPECTIVE MOBILE PORTAL FOR BYOD INITIATIVES 46
When Windows Integrated Logon is selected, some users' browsers may require additional configuration
or the user may still be prompted for authentication. In Internet Explorer, the NetSpective device will
need to be added to the 'Local Intranet Sites'. In IE 7, to add a local intranet site go to Tools -> Internet
Options, then select the Security tab, select Local Intranet, click Sites and then select Advanced. In
Firefox, navigate to about:config. Then add the IP of the NetSpective device to network.automatic-ntlm-
auth.trusted-uris. For more information see the Configuring Internet Explorer for Single Sign-On
Authentication using Group Policies section of this guide.
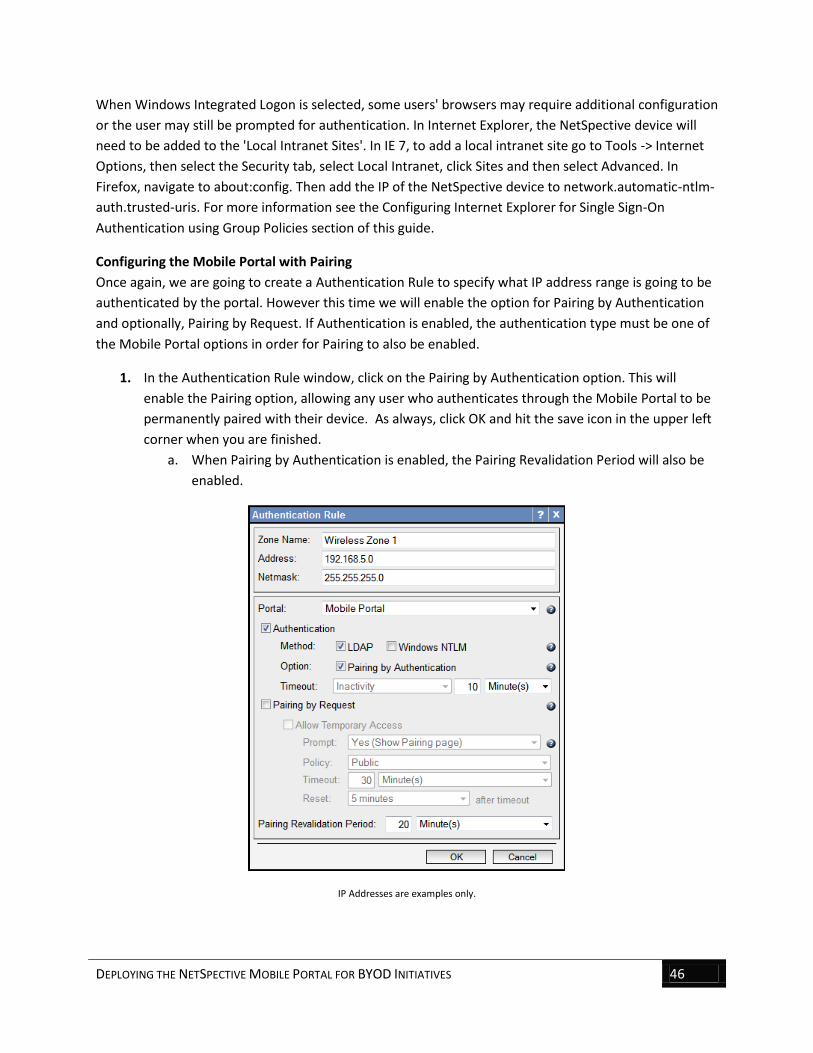
Configuring the Mobile Portal with Pairing
Once again, we are going to create a Authentication Rule to specify what IP address range is going to be
authenticated by the portal. However this time we will enable the option for Pairing by Authentication
and optionally, Pairing by Request. If Authentication is enabled, the authentication type must be one of
the Mobile Portal options in order for Pairing to also be enabled.
1. In the Authentication Rule window, click on the Pairing by Authentication option. This will
enable the Pairing option, allowing any user who authenticates through the Mobile Portal to be
permanently paired with their device. As always, click OK and hit the save icon in the upper left
corner when you are finished.
a. When Pairing by Authentication is enabled, the Pairing Revalidation Period will also be
enabled.
IP Addresses are examples only.

DEPLOYING THE NETSPECTIVE MOBILE PORTAL FOR BYOD INITIATIVES 47
Pair Revalidation Period
Paired devices that have been inactive for the configured time will be revalidated via the portal to
assure they have a proper pairing. This setting applies to authentication ranges that are configured for
either 'Pairing by Authentication' or 'Pairing by Request.'
Pairing by Request and Temporary Access
1. In the Authentication Rule window, instead of checking ‘Authentication’ or ‘Pairing by
Authentication’, you have the option of selecting Pairing by Request instead. By checking this
box, users in the address range specified in this rule will be allowed to pair by request. The
portal page will display a dialog box where the user can enter in any text they want to identify
who they are.
2. Once you have selected ‘Pairing by Request’, you will also be able to select Allow Temporary
Access as well. This will enable you to place users that have requested pairing to be given
temporary internet access. You can place them under the policy of your choice, ‘Timeout’
specifies how long the user will be given access for, and ‘Reset’ will prevent logins for the
amount of time specified.
a. The ‘Prompt’ option will only be accessible if you enable both ‘Authentication’ and
‘Pairing by Request’. The prompt option is for admins who plan on using both Windows
NTLM Authentication and Pairing by Request. Administrators can specify whether or not
they want the user to see the pairing page.
IP Addresses are examples only.

DEPLOYING THE NETSPECTIVE MOBILE PORTAL FOR BYOD INITIATIVES 48
3. All users authenticating with the ‘Mobile Portal with Pairing’ will appear in the Mobile Pairing
section of NetSpective. From here we can see a list of devices and other information such as
which authentication range the user is on, the user logged into each device, the group that
device is in, and when the pairing will expire.
4. Clicking on a device will open the Mobile Device window’s Properties tab. Here you can alter the
visible name of the device, add comments, change the period of time the user will be paired for,
and change who is paired with the selected device.
a. In the Mobile Device window, clicking on the History tab will show you all of the users
who have been associated with this device.