netcool/impact: dsa reference guide - ibm · dsa reference guide sc27 ... r egar ding ibm's...
TRANSCRIPT

Netcool/ImpactVersion 7.1.0.5
DSA Reference Guide
SC27-4919-05
IBM


Netcool/ImpactVersion 7.1.0.5
DSA Reference Guide
SC27-4919-05
IBM

NoteBefore using this information and the product it supports, read the information in “Notices”.
Edition notice
This edition applies to version 7.1.0.6 of IBM Tivoli Netcool/Impact and to all subsequent releases andmodifications until otherwise indicated in new editions.
References in content to IBM products, software, programs, services or associated technologies do not imply thatthey will be available in all countries in which IBM operates. Content, including any plans contained in content,may change at any time at IBM's sole discretion, based on market opportunities or other factors, and is notintended to be a commitment to future content, including product or feature availability, in any way. Statementsregarding IBM's future direction or intent are subject to change or withdrawal without notice and represent goalsand objectives only. Please refer to the developerWorks terms of use for more information.
© Copyright IBM Corporation 2006, 2016.US Government Users Restricted Rights – Use, duplication or disclosure restricted by GSA ADP Schedule Contractwith IBM Corp.
Contents
About this publication . . . . . . . . vIntended audience . . . . . . . . . . . . vPublications . . . . . . . . . . . . . . v
Netcool/Impact library . . . . . . . . . . vAccessing terminology online. . . . . . . . vAccessing publications online. . . . . . . . vOrdering publications . . . . . . . . . . vi
Accessibility . . . . . . . . . . . . . . viTivoli technical training . . . . . . . . . . viSupport for problem solving . . . . . . . . . vi
Obtaining fixes . . . . . . . . . . . . viReceiving weekly support updates . . . . . viiContacting IBM Software Support . . . . . . vii
Conventions used in this publication . . . . . . ixTypeface conventions . . . . . . . . . . ixPDF code examples with single quotation marks . xOperating system-dependent variables and paths x
Chapter 1. Managing DSAs . . . . . . 1
Chapter 2. Data source adapters (DSA) 3Categories of DSAs . . . . . . . . . . . . 3
Mediator DSAs . . . . . . . . . . . . 3Managing data models . . . . . . . . . . . 4Event readers . . . . . . . . . . . . . . 4Event listeners . . . . . . . . . . . . . . 4Policies . . . . . . . . . . . . . . . . 5Working with SQL database DSAs . . . . . . . 5
List of provided SQL database DSAs . . . . . 5Adding JDBC drivers and third-party JAR files tothe shared library. . . . . . . . . . . . 7Changing the character set encoding for thedatabase connection . . . . . . . . . . . 8SQL database data model . . . . . . . . . 8SQL database policies . . . . . . . . . . 9SQL database DSA failover . . . . . . . . 13
Chapter 3. Working with the UI dataprovider DSA . . . . . . . . . . . . 17UI data provider data model . . . . . . . . 17
UI data provider data sources . . . . . . . 17UI data provider data types . . . . . . . . 18Viewing data items for a UI data provider datatype . . . . . . . . . . . . . . . . 19Using the GetByFilter function to handle largedata sets . . . . . . . . . . . . . . 19
Retrieving data from a UI provider data source . . 22Creating custom schema values for outputparameters . . . . . . . . . . . . . 24
Clearing the UI Data Provider server cache with theUI data provider DSA . . . . . . . . . . . 25UI data provider operators . . . . . . . . . 26An example using the UI data provider to integratewith IBM Tivoli Monitoring . . . . . . . . . 26
Configuring Netcool/Impact to send messages toTivoli Monitoring Universal Message Console . . 27
Chapter 4. Working with the RESTfulAPI DSA . . . . . . . . . . . . . . 29RESTful DSA data model . . . . . . . . . . 29
RESTful DSA data source . . . . . . . . . 29Making requests to the RESTful data source . . . 31
Chapter 5. Working with the LDAP DSA 33LDAP DSA overview . . . . . . . . . . . 33Supported LDAP servers . . . . . . . . . . 33LDAP data model . . . . . . . . . . . . 33
LDAP data sources . . . . . . . . . . . 33LDAP data types . . . . . . . . . . . 34LDAP data items . . . . . . . . . . . 34
LDAP policies . . . . . . . . . . . . . 35Retrieving data from an LDAP data source . . . . 35Controlling the number of records returned from anLDAP server . . . . . . . . . . . . . . 36Changing how Impact handles referrals for LDAPDSA connections . . . . . . . . . . . . 36International character support . . . . . . . . 37
Chapter 6. Working with the webservices DSA . . . . . . . . . . . . 39Web services DSA overview . . . . . . . . . 39Compiling WSDL files . . . . . . . . . . . 39
Obtaining WSDL files . . . . . . . . . . 40Running the WSDL compiler script . . . . . 40Recompiling new and changed WSDL files . . . 41Enabling and disabling proxy settings usingWSInvokeDL . . . . . . . . . . . . . 41
Web services DSA functions . . . . . . . . . 42WSSetDefaultPKGName . . . . . . . . . 42WSNewObject . . . . . . . . . . . . 43WSNewSubObject . . . . . . . . . . . 43WSNewArray . . . . . . . . . . . . 44WSInvokeDL . . . . . . . . . . . . . 45WSNewEnum . . . . . . . . . . . . 48
Writing Web services DSA policies. . . . . . . 49Sending messages . . . . . . . . . . . 49Examples using web services DSA functions . . 50
Web services listener . . . . . . . . . . . 52Web services listener process . . . . . . . 52
Writing applications that call into Web services . . 57SOAP endpoint . . . . . . . . . . . . 57Authentication for the web services listener . . 58WSDL file . . . . . . . . . . . . . . 58
Creating policies by using the web services wizard 61Creating policies by using policy editor . . . . . 62Integrating with third-party web services . . . . 63
© Copyright IBM Corp. 2006, 2016 iii
||
Chapter 7. Web services security . . . 65Enabling web services security . . . . . . . . 65
Creating a web service policy using web servicesecurity. . . . . . . . . . . . . . . 66Example of Sample04_wss.xml . . . . . . . 69
User name token authentication . . . . . . . 70User name token authentication with a plain textpassword . . . . . . . . . . . . . . . 71Message integrity and non-repudiation withsignature . . . . . . . . . . . . . . . 71Encryption . . . . . . . . . . . . . . 72Sign and encrypt messages . . . . . . . . . 72
Chapter 8. Working with the JMS DSA 75Supported JMS providers . . . . . . . . . . 75Configuring JMS DSAs to send and receive JMSmessages . . . . . . . . . . . . . . . 75Setting up OpenJMS as the JMS provider . . . . 76JMS data source . . . . . . . . . . . . . 76
JMS data source configuration properties . . . 76Specifying more JNDI properties for the JMS datasource . . . . . . . . . . . . . . . 78
JMS message listener . . . . . . . . . . . 78JMS message listener service configurationproperties . . . . . . . . . . . . . . 79
Writing JMS DSA policies. . . . . . . . . . 80Sending messages to a JMS topic or queue . . . 80Retrieving JMS messages from a topic or queue 84
Connecting to WebSphere MQ and JMS DSA . . . 87Configuration option 1 . . . . . . . . . 87Configuration option 2 . . . . . . . . . 88
Connecting Netcool/Impact to WebSphere BusinessEvents . . . . . . . . . . . . . . . . 88
Configure Netcool/Impact for WebSphereBusiness Events integration . . . . . . . . 89Using the WebSphere Business Events integration 89
Chapter 9. Working with the XML DSA 91XML DSA overview . . . . . . . . . . . 91XML documents . . . . . . . . . . . . . 91XML DTD and XSD files . . . . . . . . . . 91XML data types . . . . . . . . . . . . . 91
Super data types . . . . . . . . . . . 91Element data types . . . . . . . . . . . 92
XML configuration files . . . . . . . . . . 92XML document and data type mapping . . . . . 92Creating XML data types . . . . . . . . . . 93Create data types scripts . . . . . . . . . . 94Data type mappings . . . . . . . . . . . 94
Setting up mappings for XML files and strings 95Setting up mappings for XML over HTTP . . . 96
Reading XML documents . . . . . . . . . . 97Retrieving the document data item . . . . . 97Retrieving the root level element data item . . . 98Retrieving child element data items . . . . . 99Accessing attribute values . . . . . . . . 100
Sample policies . . . . . . . . . . . . . 100XmlStringTestPolicy . . . . . . . . . . 100XmlFileTestPolicy . . . . . . . . . . . 101
XmlHttpTestPolicy. . . . . . . . . . . 101XmlXsdFileTestPolicy . . . . . . . . . . 102
Chapter 10. Working with the SNMPDSA . . . . . . . . . . . . . . . 103SNMP DSA overview. . . . . . . . . . . 103SNMP data model . . . . . . . . . . . . 103
SNMP data sources . . . . . . . . . . 103SNMP data types . . . . . . . . . . . 104
SNMP DSA process . . . . . . . . . . . 104Sending data to agents . . . . . . . . . 105Retrieving data from agents . . . . . . . 105Sending traps and notifications to managers . . 105Handling error conditions . . . . . . . . 105Handling timeouts . . . . . . . . . . 105
Installing MIB files . . . . . . . . . . . 106Working with SNMP data sources . . . . . . 106
Creating SNMP data sources . . . . . . . 106Editing SNMP data sources. . . . . . . . 107Deleting an SNMP data source . . . . . . 108
Working with SNMP data types . . . . . . . 108Creating SNMP data types . . . . . . . . 108Editing SNMP data types . . . . . . . . 110Deleting SNMP data types . . . . . . . . 110
SNMP policies . . . . . . . . . . . . . 110Setting packed OID data with standarddata-handling functions . . . . . . . . . 111Setting packed OID data with SNMP functions 114Retrieving packed OID data from SNMP agents 114Retrieving table data from SNMP agents . . . 117Sending SNMP traps and notifications . . . . 118
SNMP functions . . . . . . . . . . . . 119SNMPGetAction . . . . . . . . . . . 119SNMPGetNextAction . . . . . . . . . . 123SNMPSetAction . . . . . . . . . . . 127SnmpTrapAction . . . . . . . . . . . 130
Chapter 11. Working with the ITNMDSA . . . . . . . . . . . . . . . 133ITNM DSA overview . . . . . . . . . . . 133Setting up the DSA . . . . . . . . . . . 133
Editing the DSA properties file . . . . . . 134Running the ITNM event listener service for theDSA . . . . . . . . . . . . . . . 134
ITNM DSA data type. . . . . . . . . . . 135ExtraInfo field . . . . . . . . . . . . 136
Writing policies using the ITNM DSA . . . . . 136GetByFilter . . . . . . . . . . . . . 136Writing policies to receive events from ITNM 138
Sample policies . . . . . . . . . . . . . 139ITNMSampleListenerPolicy. . . . . . . . 139ITNMSamplePolicy . . . . . . . . . . 139
Appendix. Notices . . . . . . . . . 141Trademarks . . . . . . . . . . . . . . 143
Index . . . . . . . . . . . . . . . 145
iv Netcool/Impact: DSA Reference Guide

About this publication
The Netcool/Impact DSA Reference Guide contains information about Impact datasource adaptors (DSAs).
Intended audienceThis publication is for users who are responsible for creating Netcool/Impact datamodels and writing Netcool/Impact policies.
PublicationsThis section lists publications in the Netcool/Impact library and relateddocuments. The section also describes how to access Tivoli® publications onlineand how to order Tivoli publications.
Netcool/Impact libraryv Quick Start Guide, CN1LAML
Provides concise information about installing and running Netcool/Impact forthe first time.
v Administration Guide, SC27491805Provides information about installing, running and monitoring the product.
v Policy Reference Guide, SC27492105Contains complete description and reference information for the Impact PolicyLanguage (IPL).
v DSA Reference Guide, SC27491905Provides information about data source adaptors (DSAs).
v Operator View Guide, SC27492005Provides information about creating operator views.
v Solutions Guide, SC27492305Provides end-to-end information about using features of Netcool/Impact.
Accessing terminology onlineThe IBM® Terminology Web site consolidates the terminology from IBM productlibraries in one convenient location. You can access the Terminology Web site at thefollowing Web address:
http://www.ibm.com/software/globalization/terminology
Accessing publications onlinePublications are available from the following locations:v The Quick Start DVD contains the Quick Start Guide. Refer to the readme file on
the DVD for instructions on how to access the documentation.v IBM Knowledge Center web site at http://publib.boulder.ibm.com/infocenter/
tivihelp/v8r1/topic/com.ibm.netcoolimpact.doc6.1.1/welcome.html. IBM postspublications for all Tivoli products, as they become available and whenever theyare updated to the Tivoli Information Center Web site.
© Copyright IBM Corp. 2006, 2016 v
|
|
||
|
|
|
||
|
|
|
|
|
|

Note: If you print PDF documents on paper other than letter-sized paper, setthe option in the File → Print window that allows Adobe Reader to printletter-sized pages on your local paper.
v Tivoli Documentation Central at http://www.ibm.com/tivoli/documentation.You can access publications of the previous and current versions ofNetcool/Impact from Tivoli Documentation Central.
v The Netcool/Impact wiki contains additional short documents and additionalinformation and is available at https://www.ibm.com/developerworks/mydeveloperworks/wikis/home?lang=en#/wiki/Tivoli%20Netcool%20Impact.
Ordering publicationsYou can order many Tivoli publications online at http://www.elink.ibmlink.ibm.com/publications/servlet/pbi.wss.
You can also order by telephone by calling one of these numbers:v In the United States: 800-879-2755v In Canada: 800-426-4968
In other countries, contact your software account representative to order Tivolipublications. To locate the telephone number of your local representative, performthe following steps:1. Go to http://www.elink.ibmlink.ibm.com/publications/servlet/pbi.wss.2. Select your country from the list and click Go.3. Click About this site in the main panel to see an information page that
includes the telephone number of your local representative.
AccessibilityAccessibility features help users with a physical disability, such as restrictedmobility or limited vision, to use software products successfully. In this release, theNetcool/Impact console does not meet all the accessibility requirements.
Tivoli technical trainingFor Tivoli technical training information, refer to the following IBM TivoliEducation Web site at http://www.ibm.com/software/tivoli/education.
Support for problem solvingIf you have a problem with your IBM software, you want to resolve it quickly. Thissection describes the following options for obtaining support for IBM softwareproducts:v “Obtaining fixes”v “Receiving weekly support updates” on page viiv “Contacting IBM Software Support” on page vii
Obtaining fixesA product fix might be available to resolve your problem. To determine whichfixes are available for your Tivoli software product, follow these steps:1. Go to the IBM Software Support Web site at http://www.ibm.com/software/
support.2. Navigate to the Downloads page.
vi Netcool/Impact: DSA Reference Guide

3. Follow the instructions to locate the fix you want to download.4. If there is no Download heading for your product, supply a search term, error
code, or APAR number in the search field.
For more information about the types of fixes that are available, see the IBMSoftware Support Handbook at http://www14.software.ibm.com/webapp/set2/sas/f/handbook/home.html.
Receiving weekly support updatesTo receive weekly e-mail notifications about fixes and other software support news,follow these steps:1. Go to the IBM Software Support Web site at http://www.ibm.com/software/
support.2. Click the My IBM in the toobar. Click My technical support.3. If you have already registered for My technical support, sign in and skip to
the next step. If you have not registered, click register now. Complete theregistration form using your e-mail address as your IBM ID and click Submit.
4. The Edit profile tab is displayed.5. In the first list under Products, select Software. In the second list, select a
product category (for example, Systems and Asset Management). In the thirdlist, select a product sub-category (for example, Application Performance &Availability or Systems Performance). A list of applicable products isdisplayed.
6. Select the products for which you want to receive updates.7. Click Add products.8. After selecting all products that are of interest to you, click Subscribe to email
on the Edit profile tab.9. In the Documents list, select Software.
10. Select Please send these documents by weekly email.11. Update your e-mail address as needed.12. Select the types of documents you want to receive.13. Click Update.
If you experience problems with the My technical support feature, you can obtainhelp in one of the following ways:
OnlineSend an e-mail message to [email protected], describing your problem.
By phoneCall 1-800-IBM-4You (1-800-426-4409).
World Wide Registration Help deskFor word wide support information check the details in the following link:https://www.ibm.com/account/profile/us?page=reghelpdesk
Contacting IBM Software SupportBefore contacting IBM Software Support, your company must have an active IBMsoftware maintenance contract, and you must be authorized to submit problems toIBM. The type of software maintenance contract that you need depends on thetype of product you have:
About this publication vii

v For IBM distributed software products (including, but not limited to, Tivoli,Lotus®, and Rational® products, and DB2® and WebSphere® products that run onWindows or UNIX operating systems), enroll in Passport Advantage® in one ofthe following ways:
OnlineGo to the Passport Advantage Web site at http://www-306.ibm.com/software/howtobuy/passportadvantage/pao_customers.htm .
By phoneFor the phone number to call in your country, go to the IBM WorldwideIBM Registration Helpdesk Web site at https://www.ibm.com/account/profile/us?page=reghelpdesk.
v For customers with Subscription and Support (S & S) contracts, go to theSoftware Service Request Web site at https://techsupport.services.ibm.com/ssr/login.
v For customers with IBMLink, CATIA, Linux, OS/390®, iSeries, pSeries, zSeries,and other support agreements, go to the IBM Support Line Web site athttp://www.ibm.com/services/us/index.wss/so/its/a1000030/dt006.
v For IBM eServer™ software products (including, but not limited to, DB2 andWebSphere products that run in zSeries, pSeries, and iSeries environments), youcan purchase a software maintenance agreement by working directly with anIBM sales representative or an IBM Business Partner. For more informationabout support for eServer software products, go to the IBM Technical SupportAdvantage Web site at http://www.ibm.com/servers/eserver/techsupport.html.
If you are not sure what type of software maintenance contract you need, call1-800-IBMSERV (1-800-426-7378) in the United States. From other countries, go tothe contacts page of the IBM Software Support Handbook on the Web athttp://www14.software.ibm.com/webapp/set2/sas/f/handbook/home.html andclick the name of your geographic region for phone numbers of people whoprovide support for your location.
To contact IBM Software support, follow these steps:1. “Determining the business impact”2. “Describing problems and gathering information” on page ix3. “Submitting problems” on page ix
Determining the business impactWhen you report a problem to IBM, you are asked to supply a severity level. Usethe following criteria to understand and assess the business impact of the problemthat you are reporting:
Severity 1The problem has a critical business impact. You are unable to use theprogram, resulting in a critical impact on operations. This conditionrequires an immediate solution.
Severity 2The problem has a significant business impact. The program is usable, butit is severely limited.
Severity 3The problem has some business impact. The program is usable, but lesssignificant features (not critical to operations) are unavailable.
viii Netcool/Impact: DSA Reference Guide

Severity 4The problem has minimal business impact. The problem causes little impacton operations, or a reasonable circumvention to the problem wasimplemented.
Describing problems and gathering informationWhen describing a problem to IBM, be as specific as possible. Include all relevantbackground information so that IBM Software Support specialists can help yousolve the problem efficiently. To save time, know the answers to these questions:v Which software versions were you running when the problem occurred?v Do you have logs, traces, and messages that are related to the problem
symptoms? IBM Software Support is likely to ask for this information.v Can you re-create the problem? If so, what steps were performed to re-create the
problem?v Did you make any changes to the system? For example, did you make changes
to the hardware, operating system, networking software, and so on.v Are you currently using a workaround for the problem? If so, be prepared to
explain the workaround when you report the problem.
Submitting problemsYou can submit your problem to IBM Software Support in one of two ways:
OnlineClick Submit and track problems on the IBM Software Support site athttp://www.ibm.com/software/support/probsub.html. Type yourinformation into the appropriate problem submission form.
By phoneFor the phone number to call in your country, go to the contacts page ofthe IBM Software Support Handbook at http://www14.software.ibm.com/webapp/set2/sas/f/handbook/home.html and click the name of yourgeographic region.
If the problem you submit is for a software defect or for missing or inaccuratedocumentation, IBM Software Support creates an Authorized Program AnalysisReport (APAR). The APAR describes the problem in detail. Whenever possible,IBM Software Support provides a workaround that you can implement until theAPAR is resolved and a fix is delivered. IBM publishes resolved APARs on theSoftware Support Web site daily, so that other users who experience the sameproblem can benefit from the same resolution.
Conventions used in this publicationThis publication uses several conventions for special terms and actions, operatingsystem-dependent commands and paths, and margin graphics.
Typeface conventionsThis publication uses the following typeface conventions:
Bold
v Lowercase commands and mixed case commands that are otherwisedifficult to distinguish from surrounding text
v Interface controls (check boxes, push buttons, radio buttons, spinbuttons, fields, folders, icons, list boxes, items inside list boxes,
About this publication ix
multicolumn lists, containers, menu choices, menu names, tabs, propertysheets), labels (such as Tip:, and Operating system considerations:)
v Keywords and parameters in text
Italic
v Citations examples: titles of publications, diskettes, and CDsv Words defined in text (example: a nonswitched line is called a
point-to-point line)v Emphasis of words and letters (words as words example: "Use the word
that to introduce a restrictive clause."; letters as letters example: "TheLUN address must start with the letter L.")
v New terms in text (except in a definition list): a view is a frame in aworkspace that contains data.
v Variables and values you must provide: ... where myname represents....
Monospace
v Examples and code examplesv File names, programming keywords, and other elements that are difficult
to distinguish from surrounding textv Message text and prompts addressed to the userv Text that the user must typev Values for arguments or command options
PDF code examples with single quotation marksHow to resolve issues with PDF code examples with single quotation marks.
Throughout the documentation, there are code examples that you can copy andpaste into the product. In instances where code or policy examples that containsingle quotation marks are copied from the PDF documentation the code examplesdo not preserve the single quotation marks. You need to correct them manually. Toavoid this issue, copy and paste the code example content from the html version ofthe documentation.
Operating system-dependent variables and pathsThis publication uses the UNIX convention for specifying environment variablesand for directory notation.
When you use the Windows command line, replace the $variable with the%variable% for environment variables and replace each forward slash (/) with abackslash (\) in directory paths. The names of environment variables are notalways the same in the Windows and UNIX environments. For example, %TEMP%in Windows environments is equivalent to $TMPDIR in UNIX environments.
Note: If you are using the bash shell on a Windows system, you can use the UNIXconventions.v On UNIX systems, the default installation directory is /opt/IBM/tivoli/impact.v On Windows systems, the default installation directory is C:\Program
Files\IBM\Tivoli\impact.
Windows information, steps, and process are documented when they differ fromUNIX systems.
x Netcool/Impact: DSA Reference Guide

Chapter 1. Managing DSAs
DSAs are software components that are used to communicate with external datasources. DSAs broker information to and from SQL databases, LDAP servers, JMStopics and queues, and software systems that allow communication through webservices APIs. You also use DSAs to parse XML strings and documents,communicate with web servers through HTTP, and communicate with customapplications through Java APIs.
© Copyright IBM Corp. 2006, 2016 1

2 Netcool/Impact: DSA Reference Guide

Chapter 2. Data source adapters (DSA)
Data source adapters (DSA) are software components that are used tocommunicate with external data sources.
Categories of DSAsThere are the following categories of DSAs:
SQL database DSAsSQL database DSAs are used to access information stored in SQL databasedata sources. For more information about SQL database DSAs, see“Working with SQL database DSAs” on page 5.
LDAP DSAThe LDAP DSA are used to access information stored in an LDAP server.For more information about LDAP DSA, see Chapter 5, “Working with theLDAP DSA,” on page 33.
Mediator DSAsMediator DSAs are used to communicate with various third-partyapplications or generic data interfaces such as a Web services API, SNMP,or custom interfaces. For more information about Mediator DSAs, see“Mediator DSAs.”
Mediator DSAsMediator DSAs are used to communicate with various third-party applications orgeneric data interfaces such as a Web services API or custom interfaces.
Some Mediator DSAs are built in DSAs and do not require any additionalinstallation or configuration. Other Mediator DSAs require you to manually installand configure them.
Table 1 lists the provided built-in Mediator DSAs:
Table 1. Mediator DSAs
Mediator DSA For more information, see
Web services DSA Chapter 6, “Working with the web services DSA,” on page39
JMS DSA Chapter 8, “Working with the JMS DSA,” on page 75
XML DSA Chapter 9, “Working with the XML DSA,” on page 91
SNMP DSA Chapter 10, “Working with the SNMP DSA,” on page 103
ITNM DSA Chapter 11, “Working with the ITNM DSA,” on page 133
The following Mediator DSAs are provided but you must install and configurethem independently of the application:v Alcatel 5620 DSAv GE Smallworld DSA
© Copyright IBM Corp. 2006, 2016 3

Managing data modelsA data model is a model of the business data and metadata that is used in anNetcool/Impact solution.
DSA (Data Source Adapter) data models are sets of data sources, data types, anddata items that represent information that is managed by the internal datarepository or an external source of data. For each category of DSA, the data modelrepresents different structures and units of data that are stored or managed by theunderlying source. For example, for SQL database DSAs, data sources representdatabases; data types represent database tables; and data items represent rows in adatabase table.
The following DSAs; Web Services, SNMP, ITNM (Precision), and XML, store someof the configuration in the $IMPACT_HOME/dsa directory. In a clustered environment,the $IMPACT_HOME/dsa directory will be replicated in the secondary servers in acluster from the primary server during startup.
If you are changing these directories and configurations, it is best to make thesechanges on the primary server while the servers are down. When the changes arecomplete, start primary server followed by the secondary servers in the cluster.Some of the changes replicate in real time, for example if you use the Web Servicesand XML wizards. There is also a directory, $IMPACT_HOME/dsa/misc, where you canstore scripts and flat files for example, which will be replicated across the clusterduring startup of secondary servers that are retrieving this data from the primaryserver.
Event readersEvent readers are services that query a data source at intervals for events and thenrun a policy that is based on the incoming event data.
Two types of event readers are provided: standard event readers and databaseevent readers. Standard event readers query a Netcool/OMNIbus ObjectServerdatabase by using the ObjectServer DSA. Database event readers query otherrelational databases by using other types of SQL database DSAs.
The default event reader configuration is sufficient when you process an eventflow of around 500 events per second. To enrich the event flow at any time, adjustthe following parameters in the event processor properties file.impact.perftesteventreader.objectserver.maxtoreadperquery=2000impact.perftesteventreader.objectserver.polltime=1500 (polling inteval 1500ms)impact.perftesteventreader.maxqueuesize=4000
For more information about the event processor, see the Event processor commandsin the Administration Guide and Configuring the event processor service in the onlinehelp.
Event listenersEvent listeners are services that listen for incoming communication from anexternal data source through a DSA.
Event listeners are implemented by certain DSAs that provide the means forasynchronous exchange of data with the underlying sources of data. These DSAsinclude the database listener service for some SQL database DSAs (such as the
4 Netcool/Impact: DSA Reference Guide
Oracle DSA), OMNIbusEventListener for OMNIbus version 7.2 and later. They alsoinclude other listeners for Web services, JMS, and ITNM.
PoliciesDSA policies are policies that contain instructions for interacting with a data sourceusing a DSA. These policies contain calls to data-handling functions (such asGetByFilter) or DSA-specific functions that are instructions to send or retrieveinformation to and from the external data sources.
Working with SQL database DSAsSQL database DSAs (data source adapters) are used to retrieve information fromrelational databases.
SQL database DSAs are also used to retrieve information from other types of datasources (like Netcool/OMNIbus ObjectServers, character-delimited files), and datasources that provide a public interface through JDBC (Java™ DatabaseConnectivity). They are also used to add, modify, and delete information stored inthese data sources.
The SQL database DSAs are direct-mode DSAs that run in-process with the ImpactServer. SQL database DSAs are built in DSAs and do not require installation orconfiguration, but they require a JDBC driver to access data in the database. Onlythese SQL database DSAs have JDBC drivers provided automatically withNetcool/Impact:v DB2v Derbyv Informixv HSQLDBv ObjectServerv Oraclev PostgreSQL
Before you can use any other SQL database DSA, you must add its JDBC drivers tothe class path. For a detailed procedure, see “Adding JDBC drivers and third-partyJAR files to the shared library” on page 7.
You use SQL database DSAs by creating a data model, and writing policies. Formore information, see “SQL database data model” on page 8, and “SQL databasepolicies” on page 9.
List of provided SQL database DSAsThis topic provides a list, and a brief overview of SQL database DSAs.
For a list of the databases that are supported and a list of the JDBC drivers that arerequired or that come with Netcool/Impact see the System requirements page onthe Netcool/Impact wiki.
https://www.ibm.com/developerworks/community/wikis/home?lang=en#!/wiki/Tivoli%20Netcool%20Impact/page/Netcool%20%20Impact%207.1.%20system%20requirements.
Chapter 2. Data source adapters (DSA) 5
For information about how to add or update JDBC drivers see “Adding JDBCdrivers and third-party JAR files to the shared library” on page 7.
DB2 DSA
This DSA is used to retrieve, add, modify and delete information stored inDB2. It is also used to run DB2 database stored procedures.
Derby DSA
The Apache Derby database is used to store the underlying data that isused by the GUI reporting tools and Netcool/Impact solutions such asMaintenance Window Management.
The Apache Derby database is used to store other information that is usedby Netcool/Impact. For more information about Apache Derby, see thisURL, http://db.apache.org/derby/.
Flat File DSAYou use the Flat File DSA to read information in a character-delimited textfile.
You cannot use the Flat File DSA to write information to a text file. TheFlat File DSA supports only the "AND" operator in flat file data typequeries. You cannot use the "OR" operator to work with flat file data types.The flat file data source can be accessed like an SQL data source that usesstandard SQL commands in Netcool/Impact for example, DirectSQL.
Use an SQL database to run more complex queries. If you have to use theFlat File DSA, run multiple queries that do not require the use of the "OR"operator.
Restriction: The Flat File DSA is intended for use in demonstrating andtesting Netcool/Impact and for infrequently accessing small amounts ofdata that is stored in a text file. Use of text files and the Flat File DSA isnot an effective substitute for the use of a conventional relational databaseand an SQL database DSA. The Flat File DSA offers slower performancewhen compared to other DSAs.
Generic SQL DSA
This DSA is used to retrieve, add, modify and delete information stored inthe database. To use the Generic SQL DSA, you must specify its JDBCdriver in the Generic SQL data source configuration window.
HSQLDB DSAYou use the HSQL DSA to retrieve, add, modify and delete informationstored in a HSQL database.
Informix® DSA
This DSA is used to retrieve, add, modify and delete information stored inan Informix database.
MySQL DSA
This DSA is used to retrieve, add, modify, and delete information stored ina MySQL database.
MS-SQL Server DSA
This DSA is used to retrieve, add, modify, and delete information stored ina MS_SQL database. It is used to run MS-SQL Server stored procedures.
6 Netcool/Impact: DSA Reference Guide
ObjectServer DSAYou use the ObjectServer DSA to access information in theNetcool/OMNIbus ObjectServer.
ODBC DSAUse the ODBC DSA to access information in an ODBC database.
Oracle DSA
The Oracle DSA is used to retrieve, add, modify, and delete informationthat is stored an Oracle database. It is also used to run Oracle databasestored procedures.
PostgreSQL DSA
Netcool/Impact uses this DSA to retrieve, add, modify, and deleteinformation stored in a PostgreSQL database.
Sybase DSA
This DSA is used to retrieve, add, modify, and delete information stored ina Sybase database. It is also used to run Sybase stored procedures.
Adding JDBC drivers and third-party JAR files to the sharedlibrary
Use this procedure to add a JDBC driver or third-party Java archive (JAR) files tothe Netcool/Impact shared library.
About this taskv For a list of the JDBC drivers that are installed with Netcool/Impact see the
SPCR Prerequisites report for this release, see:https://www.ibm.com/developerworks/community/wikis/home?lang=en#!/wiki/Tivoli%20Netcool%20Impact/page/Overview%20and%20Planning.
v You must copy the required JDBC drivers to the $NCHOME/dsalib directory.v If you have an existing licensed version of a JDBC driver you can add it to the
$NCHOME/dsalib directory and restart the Impact Server. Netcool/Impact usesthat driver to establish connection to the target database.If you need any additional third-party .jar files for example, some JDBC drivers,you must download them from your vendor. You can also copy any third-partyJAR files that you require to the same directory. For example, if you havespecific Java classes that you want use with Java policy functions inNetcool/Impact, you add the JAR files to this directory.
Procedure1. Obtain the appropriate JDBC driver according to the DSA specification or the
third-party JAR files.2. Copy the JDBC driver or third-party JAR files to the $NCHOME/dsalib directory.
This directory is created during the installation, and might contain files.3. Restart the Impact Server.
What to do next
In a clustered configuration, you must repeat this procedure for each server in thecluster because files in the $NCHOME/dsalib directory are not replicated betweencluster members. Stop all the servers in the cluster while you perform thisprocedure.
Chapter 2. Data source adapters (DSA) 7

Changing the character set encoding for the databaseconnection
Use this procedure to change the default character set encoding (UTF-8) that isused in establishing a connection to the SQL database.
Procedure1. In the $NCHOME/etc directory, create a properties file for the DSA for which you
want to change the default character set encoding.The properties filename must have the following format:servername_drivermainclass.props
where servername is the name of your Impact Server, and drivermainclass is theclass name of the JDBC driver to connect to the SQL database.For example, you will create the NCI_org.gjt.mm.mysql.Driver.props file, if thename of your Impact Server is NCI, and if it is connecting to the MySQLdatabase.
Remember: You can get the drivermainclass values for other SQL databases,from their JDBC documenation.
2. Add a CHARSET=encoding property to the properties file.For example, CHARSET=EUC_JP.
3. Restart the Impact Server.
SQL database data modelAn SQL database data model is an abstract representation of data stored in anunderlying relational database or other data source that can be accessed throughJDBC.
SQL database data models consist of SQL database data sources, SQL databasedata types, and SQL database data items.
SQL database data sourcesAn SQL database data source represents a relational database or another source ofdata that can be accessed using an SQL database DSA.
A wide variety of commercial relational databases are supported, such as Oracle,Sybase, and Microsoft SQL Server. In addition, freely available databases likeMySQL, and PostgreSQL are also supported. The Netcool/OMNIbus ObjectServeris also supported as a SQL data source.
The configuration properties for the data source specify connection information forthe underlying source of data. Some examples of SQL database data sources are:v A DB2 databasev A MySQL databasev An application that provides a generic ODBC interfacev A character-delimited text file
You create SQL database data sources using the GUI. You must create one suchdata source for each database that you want to access. When you create an SQLdatabase data source, you need to specify such properties as the host name andport where the database server is running, and the name of the database. For theflat file DSA and other SQL database DSAs that do not connect to a databaseserver, you must specify additional configuration properties.
8 Netcool/Impact: DSA Reference Guide

Note that SQL database data sources are associated with databases rather thandatabase servers. For example, an Oracle database server can host one or a dozenindividual databases. Each SQL database data source can be associated with oneand only one database.
SQL database data typesAn SQL database data type represents a table in a relational database or a similarstructure that contains sets of data (like an Oracle view or a list of rows in acomma-delimited text file).
The configuration properties for the data type specify the structure and contents ofdata stored in the table. Some examples of SQL database data types are:v A DB2 database tablev A MySQL database tablev The contents of a character-delimited text file
Each SQL database data type contains a set of fields that correspond to columns inthe database table (or structured categories of data in other types of data sources).The data type can contain fields that represent all of the columns or a subset of thecolumns in the table.
You create SQL database data types using the GUI. You must create one such datatype for each database table that you want to access.
When you create an SQL database data type, you need to specify such propertiesas the table name and the names of the table columns that you want to include inthe data type. For the flat file DSA, you must specify additional configurationproperties.
SQL database data itemsAn SQL database data item represents a table row in a relational database oranother set of data (like a row in a comma-delimited text file).
You use the GUI to view, add, modify, and delete SQL database data items.Typically, however, you use the tools that are provided by the relational databaseserver (or other third-party tools) to manage the data in an underlying data source.
SQL database policiesSQL database DSA policies work with data stored in underlying relationaldatabases or other data sources that can be accessed using an SQL database DSA.
You can perform the following tasks by using a SQL database policy:v Retrieve data from an SQL database data sourcev Add data to an SQL database data sourcev Modify data stored in an SQL database data sourcev Delete data stored in an SQL database data sourcev Call database functionsv Call database stored procedures
Retrieving data from an SQL database data sourceThe Impact Policy Language (IPL) provides a set of functions that retrieve datafrom an SQL database data source based on different criteria.
Chapter 2. Data source adapters (DSA) 9
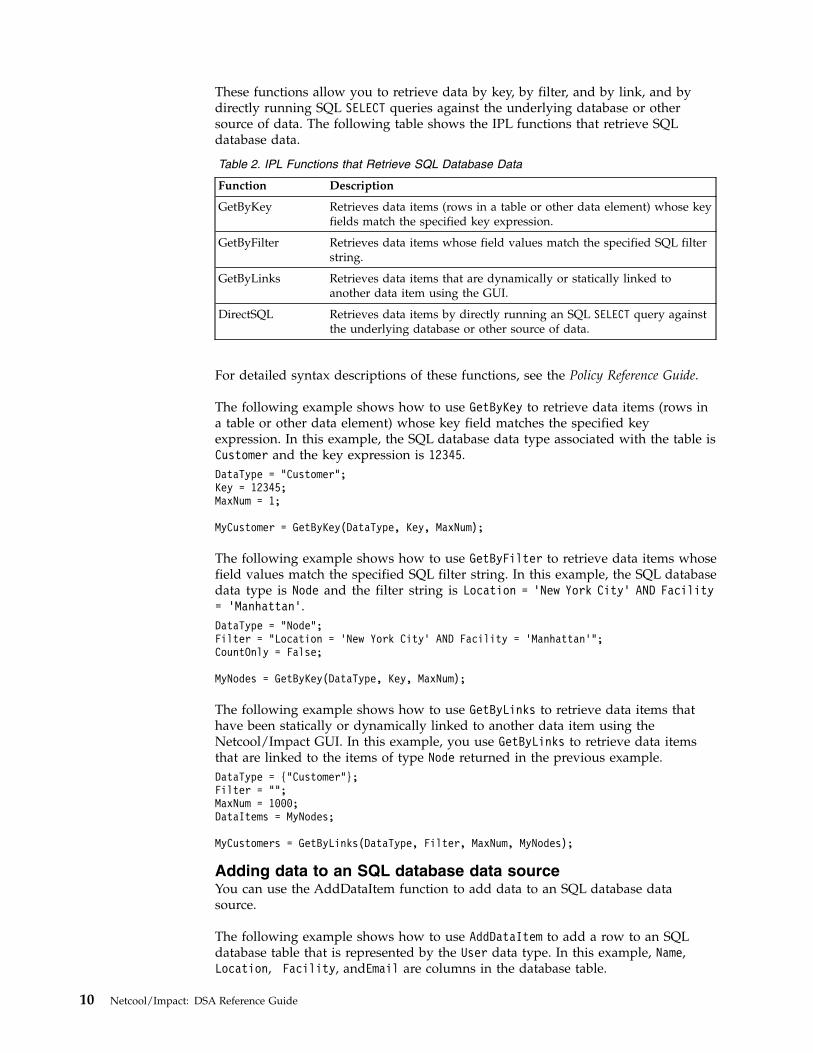
These functions allow you to retrieve data by key, by filter, and by link, and bydirectly running SQL SELECT queries against the underlying database or othersource of data. The following table shows the IPL functions that retrieve SQLdatabase data.
Table 2. IPL Functions that Retrieve SQL Database Data
Function Description
GetByKey Retrieves data items (rows in a table or other data element) whose keyfields match the specified key expression.
GetByFilter Retrieves data items whose field values match the specified SQL filterstring.
GetByLinks Retrieves data items that are dynamically or statically linked toanother data item using the GUI.
DirectSQL Retrieves data items by directly running an SQL SELECT query againstthe underlying database or other source of data.
For detailed syntax descriptions of these functions, see the Policy Reference Guide.
The following example shows how to use GetByKey to retrieve data items (rows ina table or other data element) whose key field matches the specified keyexpression. In this example, the SQL database data type associated with the table isCustomer and the key expression is 12345.DataType = "Customer";Key = 12345;MaxNum = 1;
MyCustomer = GetByKey(DataType, Key, MaxNum);
The following example shows how to use GetByFilter to retrieve data items whosefield values match the specified SQL filter string. In this example, the SQL databasedata type is Node and the filter string is Location = ’New York City’ AND Facility= ’Manhattan’.DataType = "Node";Filter = "Location = ’New York City’ AND Facility = ’Manhattan’";CountOnly = False;
MyNodes = GetByKey(DataType, Key, MaxNum);
The following example shows how to use GetByLinks to retrieve data items thathave been statically or dynamically linked to another data item using theNetcool/Impact GUI. In this example, you use GetByLinks to retrieve data itemsthat are linked to the items of type Node returned in the previous example.DataType = {"Customer"};Filter = "";MaxNum = 1000;DataItems = MyNodes;
MyCustomers = GetByLinks(DataType, Filter, MaxNum, MyNodes);
Adding data to an SQL database data sourceYou can use the AddDataItem function to add data to an SQL database datasource.
The following example shows how to use AddDataItem to add a row to an SQLdatabase table that is represented by the User data type. In this example, Name,Location, Facility, andEmail are columns in the database table.
10 Netcool/Impact: DSA Reference Guide
DataType = "User";
MyUser = NewObject();
MyUser.Name = "John Smith";MyUser.Location = "New York City";MyUser.Facility = "Manhattan";MyUser.Email = "[email protected]";
AddDataItem(DataType, MyUser);
For a detailed syntax description of this function, see the Policy Reference Guide.
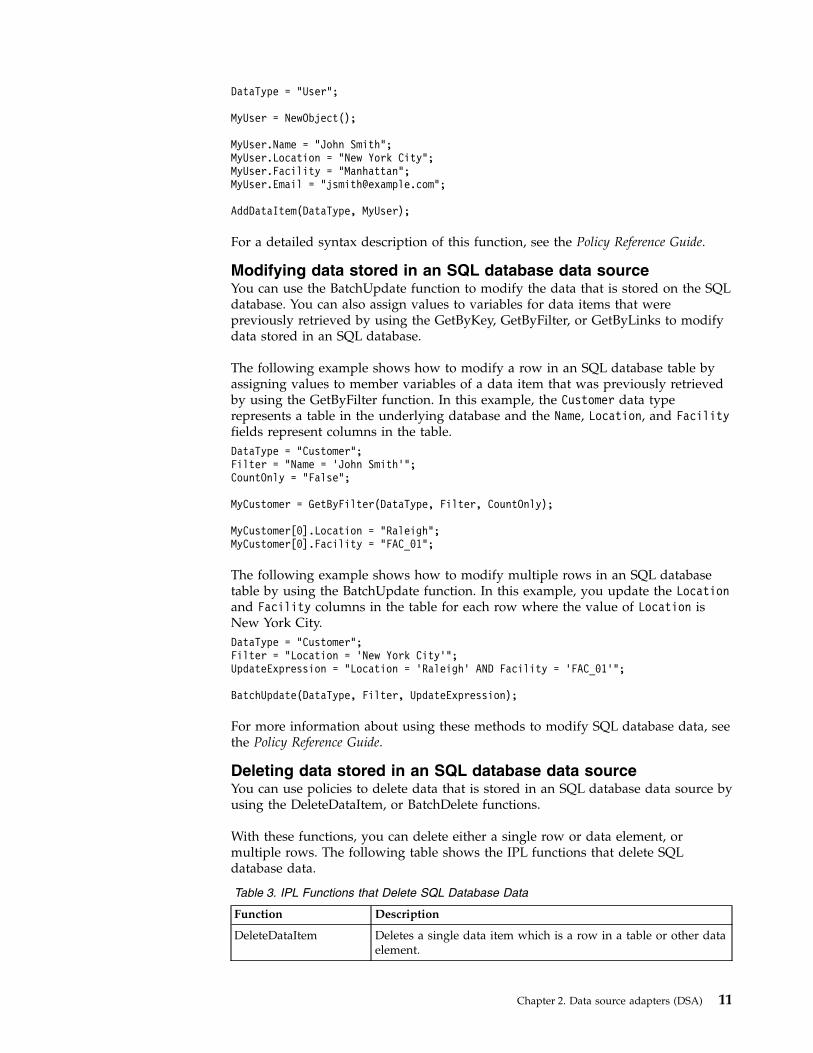
Modifying data stored in an SQL database data sourceYou can use the BatchUpdate function to modify the data that is stored on the SQLdatabase. You can also assign values to variables for data items that werepreviously retrieved by using the GetByKey, GetByFilter, or GetByLinks to modifydata stored in an SQL database.
The following example shows how to modify a row in an SQL database table byassigning values to member variables of a data item that was previously retrievedby using the GetByFilter function. In this example, the Customer data typerepresents a table in the underlying database and the Name, Location, and Facilityfields represent columns in the table.DataType = "Customer";Filter = "Name = ’John Smith’";CountOnly = "False";
MyCustomer = GetByFilter(DataType, Filter, CountOnly);
MyCustomer[0].Location = "Raleigh";MyCustomer[0].Facility = "FAC_01";
The following example shows how to modify multiple rows in an SQL databasetable by using the BatchUpdate function. In this example, you update the Locationand Facility columns in the table for each row where the value of Location isNew York City.DataType = "Customer";Filter = "Location = ’New York City’";UpdateExpression = "Location = ’Raleigh’ AND Facility = ’FAC_01’";
BatchUpdate(DataType, Filter, UpdateExpression);
For more information about using these methods to modify SQL database data, seethe Policy Reference Guide.
Deleting data stored in an SQL database data sourceYou can use policies to delete data that is stored in an SQL database data source byusing the DeleteDataItem, or BatchDelete functions.
With these functions, you can delete either a single row or data element, ormultiple rows. The following table shows the IPL functions that delete SQLdatabase data.
Table 3. IPL Functions that Delete SQL Database Data
Function Description
DeleteDataItem Deletes a single data item which is a row in a table or other dataelement.
Chapter 2. Data source adapters (DSA) 11

Table 3. IPL Functions that Delete SQL Database Data (continued)
Function Description
BatchDelete Deletes one or more data items whose field values match thespecified SQL filter string.
The following example shows how to delete a row in a database table by using theDeleteDataItem function. In this example, you first retrieve the data item thatrepresents the row by using the GetByKey function and then call DeleteDataItem.DataType = "Node";Key = "DB2_01";MaxNum = 1;
MyNode = GetByKey(DataType, Key, MaxNum);
DeleteDataItem(MyNode[0]);
The following example shows how to delete multiple rows from a database tableby using the BatchDelete function. In this example, you delete all rows from thetable that is represented by the User data type, where the value of the Locationcolumn is New York City.DataType = "User";Filter = "Location = ’New York City’";
BatchDelete(DataType, Filter, NULL);
For more information about using these functions to delete SQL database data, seethe Policy Reference Guide.
Calling database functionsYou can use the CallDBFunction to call any SQL function that is defined by thedatabase server.
SQL functions vary per database. For a list of functions that are supported by aspecific database server, see the documentation provided by the software vendor.
The following example shows how to call a database function named NOW() andreturn the results of the function for use in a policy.// Call CallDBFunction and pass the name of a data type, a filter// string and the function expression
DataType = "Server";Filter = "0 = 0";Metric = "NOW()";
DBTime = CallDBFunction(DataType, Filter, Metric);
For a detailed syntax description of the CallDBFunction function, see the PolicyReference Guide.
Calling database stored proceduresYou can use the CallStoredProcedure function to call Oracle, Sybase, DB2, and SQLServer database stored procedures.
The following example shows how to call a Sybase stored procedure namedGetCustomerByLocation. In this example, the Sybase database is represented by thedata source SYB_03.
12 Netcool/Impact: DSA Reference Guide

Sp_Parameter = NewObject();Sp_Parameter.CustType = "Platinum";Sp_Parameter.Location = "Mumbai";
DataSource = "SYB_03";ProcName = "GetCustomerByLocation";
MyResults = CallStoredProcedure(DataSource, ProcName, Sp_Parameter);
For a detailed syntax description of the CallStoredProcedure function, see thePolicy Reference Guide.
SQL database DSA failoverFailover is the process by which an SQL database DSA automatically connects to asecondary database server (or other data source) when the primary server becomesunavailable.
This feature ensures that Netcool/Impact can continue operations despite problemsaccessing one or the other server instance. You can configure failover separately foreach data source that connects to a database using an SQL Database DSA.
SQL database DSA failover modesStandard failover, failback, and disabled failover are supported failover modes forSQL database DSAs.
Standard failoverStandard failover is a configuration in which an SQL database DSAswitches to a secondary database server when the primary server becomesunavailable and then continues using the secondary until Netcool/Impactis restarted.
FailbackFailback is a configuration in which an SQL database DSA switches to asecondary database server when the primary server becomes unavailableand then tries to reconnect to the primary at intervals to determinewhether it has returned to availability.
Disabled failoverIf failover is disabled for an SQL database DSA the DSA reports an error toNetcool/Impact when the database server is unavailable and does notattempt to connect to a secondary server.
Standard failover:
Standard failover is a configuration in which an SQL database DSA switches to asecondary database server when the primary server becomes unavailable and thencontinues using the secondary until Netcool/Impact is restarted.
If the secondary server becomes unavailable, the SQL database DSA will attempt toresume connections to the original primary server.
Failback:
Failback is a configuration in which an SQL database DSA switches to a secondarydatabase server when the primary server becomes unavailable and then tries toreconnect to the primary at intervals to determine whether it has returned toavailability.
Chapter 2. Data source adapters (DSA) 13

If the primary server has become available, the DSA will resume connections usingthat server. If the primary has not become available, the DSA will continue to usethe secondary server. In a failback configuration, the SQL database DSA willalways attempt to reconnect to the primary server before making a connection tothe secondary.
Setting up DSA failoverYou set up failover when you create and configure an SQL database data source inthe GUI.
Procedure
You use the data source editor to select a failover configuration for the data sourceand to specify connection information for the primary and secondary databaseservers. For more information about creating and configuring SQL database datasources, see the online help.
DSA failover defaultsAn SQL database DSA determines that a database server is unavailable when itcannot connect to the database server, or when the database server returns an errormessage that is not related to SQL or stored procedure syntax.
Netcool/Impact provides a built-in list of errors messages that indicate that adatabase server has received an incorrectly formed SQL or stored procedure query.SQL database DSAs exclude these errors when determining whether a databaseserver is unavailable. This means that, by default, a DSA does not failover or failback when a syntax error occurs at the database level.
The following shows the built-in list of errors that Netcool/Impact excludes.
Table 4. SQL Database Error Messages for Failover
Database Error Codes
DB2 No default error codes
Derby No default error codes
GenericSQL No default error codes
HSQLDB No default error codes
Informix Error codes from -899 to -200 inclusive
MySQL Error codes 1047, 1048, 1051, 1052, 1054 to 1064 inclusive,1071, 1106 to 1111 inclusive, 1122, 1138, 1146, 1217, 1222
ObjectServer Error codes 667, 5555, 20000, 20001, 20002
ODBC No default error codes
Oracle Error codes 100, 900 to 999 inclusive, 17006
PostgreSQL SQL states 03000, 42000, 42601, 42602, 42622, 42701, 42702,42703, 42704, 42803, 42804, 42809, 42883, 42939, 42P01,42P02, 42P10, 42P18
SQL Server Error codes 105, 207, 208, 213, 229, 230, 260
Sybase Error codes 100 to 300 inclusive, 403, 404, 407, 413
For instructions in providing an alternate customized list, see “Customizing DSAfailover” on page 15.
14 Netcool/Impact: DSA Reference Guide
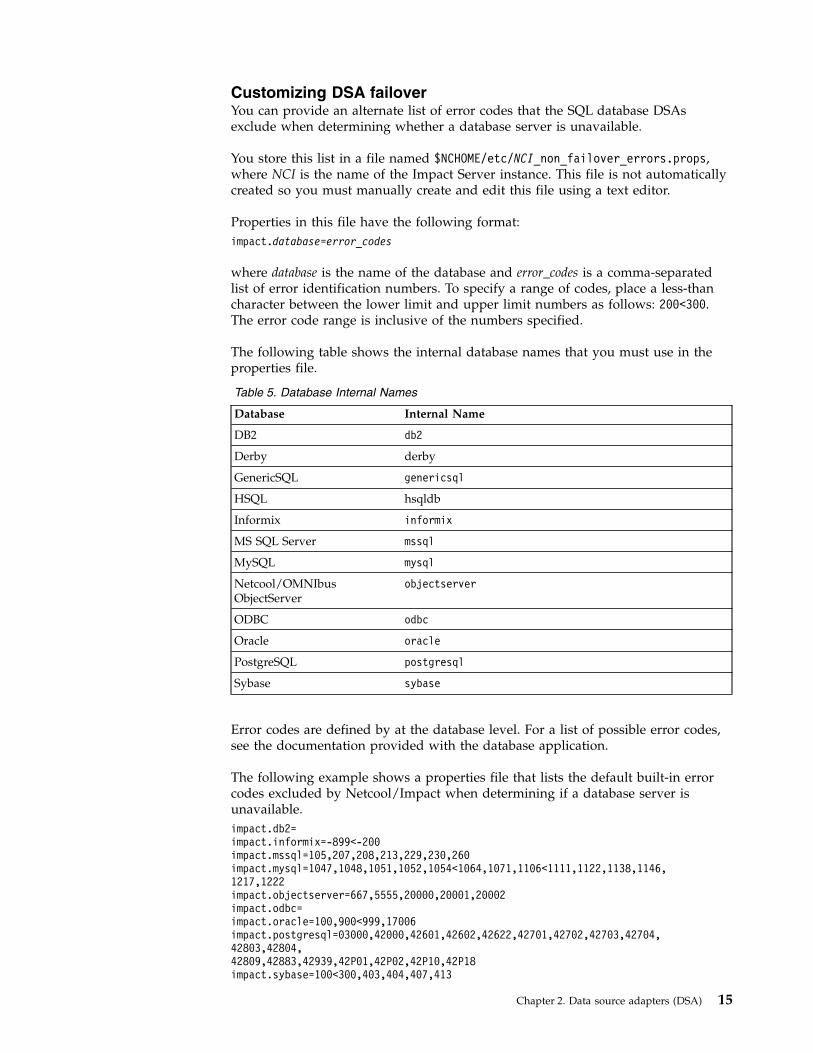
Customizing DSA failoverYou can provide an alternate list of error codes that the SQL database DSAsexclude when determining whether a database server is unavailable.
You store this list in a file named $NCHOME/etc/NCI_non_failover_errors.props,where NCI is the name of the Impact Server instance. This file is not automaticallycreated so you must manually create and edit this file using a text editor.
Properties in this file have the following format:impact.database=error_codes
where database is the name of the database and error_codes is a comma-separatedlist of error identification numbers. To specify a range of codes, place a less-thancharacter between the lower limit and upper limit numbers as follows: 200<300.The error code range is inclusive of the numbers specified.
The following table shows the internal database names that you must use in theproperties file.
Table 5. Database Internal Names
Database Internal Name
DB2 db2
Derby derby
GenericSQL genericsql
HSQL hsqldb
Informix informix
MS SQL Server mssql
MySQL mysql
Netcool/OMNIbusObjectServer
objectserver
ODBC odbc
Oracle oracle
PostgreSQL postgresql
Sybase sybase
Error codes are defined by at the database level. For a list of possible error codes,see the documentation provided with the database application.
The following example shows a properties file that lists the default built-in errorcodes excluded by Netcool/Impact when determining if a database server isunavailable.impact.db2=impact.informix=-899<-200impact.mssql=105,207,208,213,229,230,260impact.mysql=1047,1048,1051,1052,1054<1064,1071,1106<1111,1122,1138,1146,1217,1222impact.objectserver=667,5555,20000,20001,20002impact.odbc=impact.oracle=100,900<999,17006impact.postgresql=03000,42000,42601,42602,42622,42701,42702,42703,42704,42803,42804,42809,42883,42939,42P01,42P02,42P10,42P18impact.sybase=100<300,403,404,407,413
Chapter 2. Data source adapters (DSA) 15

Customizing ObjectServer DSA failbackWhen you create a new data source during the ObjectServer data sourceconfiguration, the failback mode is selected by default. Extra optionalcustomization is available for ObjectServer DSA to enhance its failback mechanismand to support failback for JDBC connections to ObjectServer DSAs.
Before you begin
The following information applies when you want to enable customized failbackby setting the property to be true.v Netcool/OMNIbus ObjectServer v7.3 or later must be installed. The ObjectServer
must support the new gateway mechanism to handle failback. Refer to theObjectServer documentation http://publib.boulder.ibm.com/infocenter/tivihelp/v8r1/index.jsp?topic=%2Fcom.ibm.tivoli.namomnibus.doc%2Fwelcome_ob.htm
v The Netcool/OMNIbus ObjectServer v7.3 and later use the value in the backupObjectServer to determine the primary ObjectServer and to update thecatalog.properties table with a property of PropName=’ActingPrimary’.
Procedurev To enable customized failback, in the $IMPACT_HOME/etc/
<ServerName>_server.props file, change the value forimpact.objectserver.failback.enabled from false to true.impact.objectserver.failback.enabled=true
Important: If you are running a cluster setup repeat this step for each server inthe cluster. You must also restart the server to implement these changes. Bydefault this property is disabled and the failback setup uses a ping mechanismlike other SQL DSAs.
v If the connection to the primary server and port hangs, you can change thevalue for the timeout, which by default is 20 seconds.– In the $IMPACT_HOME/etc/<ServerName>_server.props file, add the following
property impact.datasource.failback.tester.timeout=<# of milli seconds>.For example, if you want to change the timeout to 1 minute, set the value ofthe property to 60000 impact.datasource.failback.tester.timeout=60000
v Change the polling time, which checks whether the primary server is up. Bydefault, the polling time is 1 minute.– In the $IMPACT_HOME/etc/<ServerName>_server.props file, add the following
propertyimpact.objectserver.failback.pollinterval=<# of milli seconds>.For example, if you want to change the polling time to 10 seconds, set thevalue of the property to 10000impact.objectserver.failback.pollinterval=10000
v Determine which server is acting as the primary.– Go to the backup ObjectServer server.– Run the following query: SELECT Value from catalog.properties WHERE
PropName = 'ActingPrimary';
– If the value for PropName=’ActingPrimary’ is FALSE, then the primary server isin active.
– If the value for PropName=’ActingPrimary’ is TRUE, then the backup is actingas the primary server. This situation can occur when the ObjectServergateway is doing a resync with the primary server and the primary server isnot available to accept any connections.
16 Netcool/Impact: DSA Reference Guide

Chapter 3. Working with the UI data provider DSA
The UI data provider DSA is used to return results from any UI data provider
To set up a UI data provider DSA complete the following steps:v Create a UI data provider data sourcev Create a UI data provider data typev Create a policy that uses the GetByFilter functionv Run the policy to return the results from the selected UI data provider
UI data provider data modelA UI data provider data model is an abstract representation of data stored in anunderlying relational database or other data source that can be accessed through aUI data provider.
The UI data provider data model has the following elements:v UI data provider data sourcesv UI data provider data types
UI data provider data sourcesA UI data provider data source represents a relational database or another sourceof data that can be accessed by using a UI data provider DSA.
You create UI data provider data sources in the GUI. You must create one suchdata source for each UI data provider that you want to access.
Creating a UI data provider data sourceUse this information to create a UI data provider data source.
Procedure1. Click Data Model to open the Data Model tab.2. From the Cluster and Project lists, select the cluster and project you want to
use.3. In the Data Model tab, click the New Data Source icon in the toolbar. Select
UI Data Provider. The tab for the data source opens.4. In the Data Source Name field:
Enter a unique name to identify the data source. You can use only letters,numbers, and the underscore character in the data source name. If you useUTF-8 characters, make sure that the locale on the Impact Server where thedata source is saved is set to the UTF-8 character encoding.
5. In the Host Name field, add the location where the UI data provider isdeployed. The location is a fully qualified domain name or IP address.
6. In the Port field, add the port number of the UI data provider.7. Use SSL: To enable Netcool/Impact to connect over SSL to a data provider,
you must export a certificate from the data provider and import it into theImpact Servers and each GUI Server. If the data provider is an IBMDashboard Application Services Hub server, complete these steps to export
© Copyright IBM Corp. 2006, 2016 17
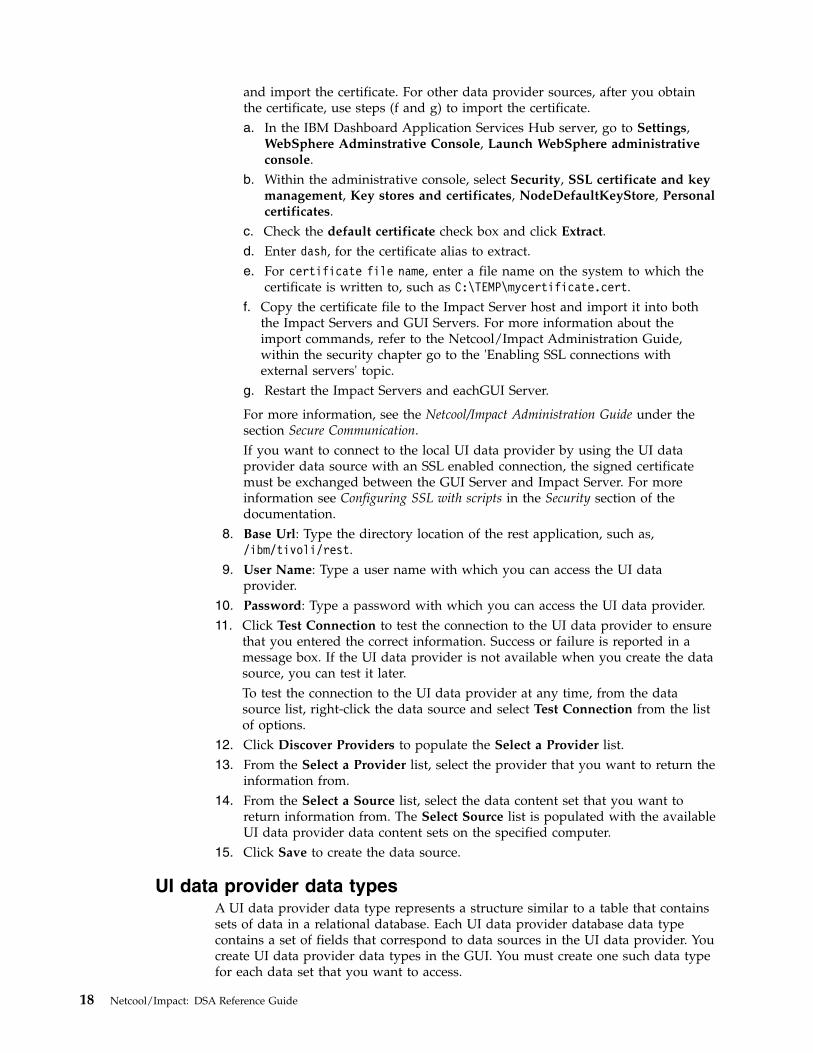
and import the certificate. For other data provider sources, after you obtainthe certificate, use steps (f and g) to import the certificate.a. In the IBM Dashboard Application Services Hub server, go to Settings,
WebSphere Adminstrative Console, Launch WebSphere administrativeconsole.
b. Within the administrative console, select Security, SSL certificate and keymanagement, Key stores and certificates, NodeDefaultKeyStore, Personalcertificates.
c. Check the default certificate check box and click Extract.d. Enter dash, for the certificate alias to extract.e. For certificate file name, enter a file name on the system to which the
certificate is written to, such as C:\TEMP\mycertificate.cert.f. Copy the certificate file to the Impact Server host and import it into both
the Impact Servers and GUI Servers. For more information about theimport commands, refer to the Netcool/Impact Administration Guide,within the security chapter go to the 'Enabling SSL connections withexternal servers' topic.
g. Restart the Impact Servers and eachGUI Server.
For more information, see the Netcool/Impact Administration Guide under thesection Secure Communication.If you want to connect to the local UI data provider by using the UI dataprovider data source with an SSL enabled connection, the signed certificatemust be exchanged between the GUI Server and Impact Server. For moreinformation see Configuring SSL with scripts in the Security section of thedocumentation.
8. Base Url: Type the directory location of the rest application, such as,/ibm/tivoli/rest.
9. User Name: Type a user name with which you can access the UI dataprovider.
10. Password: Type a password with which you can access the UI data provider.11. Click Test Connection to test the connection to the UI data provider to ensure
that you entered the correct information. Success or failure is reported in amessage box. If the UI data provider is not available when you create the datasource, you can test it later.To test the connection to the UI data provider at any time, from the datasource list, right-click the data source and select Test Connection from the listof options.
12. Click Discover Providers to populate the Select a Provider list.13. From the Select a Provider list, select the provider that you want to return the
information from.14. From the Select a Source list, select the data content set that you want to
return information from. The Select Source list is populated with the availableUI data provider data content sets on the specified computer.
15. Click Save to create the data source.
UI data provider data typesA UI data provider data type represents a structure similar to a table that containssets of data in a relational database. Each UI data provider database data typecontains a set of fields that correspond to data sources in the UI data provider. Youcreate UI data provider data types in the GUI. You must create one such data typefor each data set that you want to access.
18 Netcool/Impact: DSA Reference Guide
The configuration properties for the data type specify which subset of data isretrieved from the UI data provider data source.
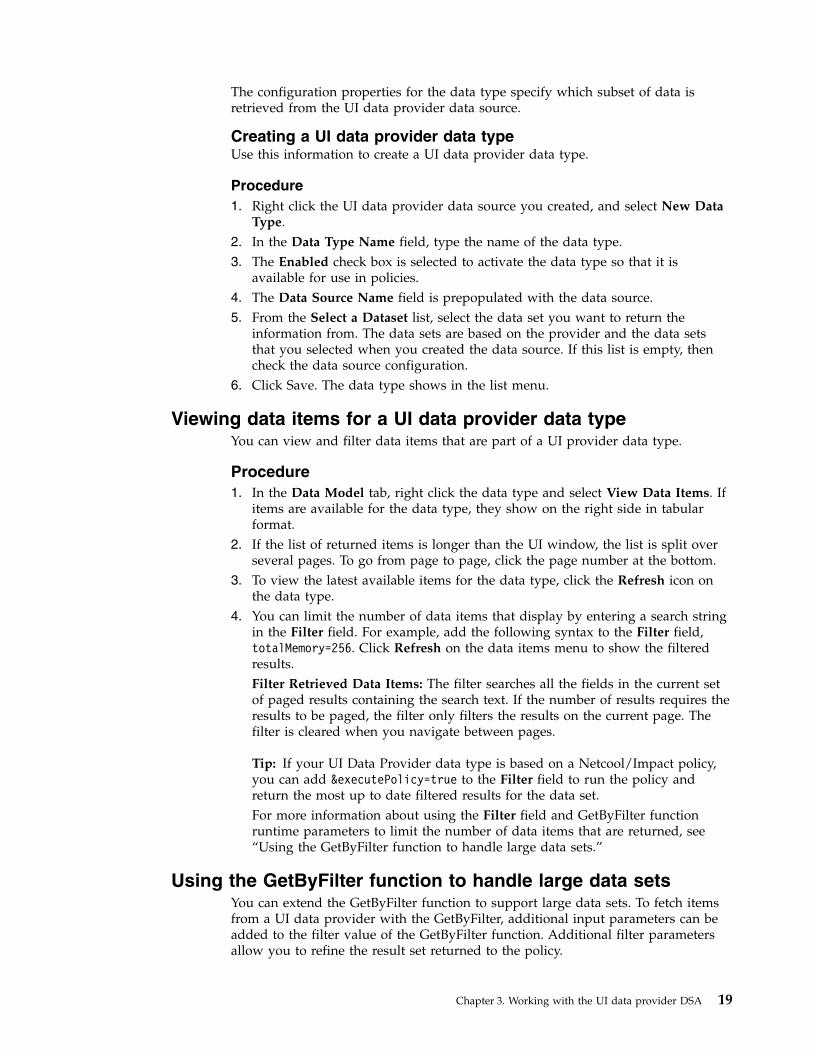
Creating a UI data provider data typeUse this information to create a UI data provider data type.
Procedure1. Right click the UI data provider data source you created, and select New Data
Type.2. In the Data Type Name field, type the name of the data type.3. The Enabled check box is selected to activate the data type so that it is
available for use in policies.4. The Data Source Name field is prepopulated with the data source.5. From the Select a Dataset list, select the data set you want to return the
information from. The data sets are based on the provider and the data setsthat you selected when you created the data source. If this list is empty, thencheck the data source configuration.
6. Click Save. The data type shows in the list menu.
Viewing data items for a UI data provider data typeYou can view and filter data items that are part of a UI provider data type.
Procedure1. In the Data Model tab, right click the data type and select View Data Items. If
items are available for the data type, they show on the right side in tabularformat.
2. If the list of returned items is longer than the UI window, the list is split overseveral pages. To go from page to page, click the page number at the bottom.
3. To view the latest available items for the data type, click the Refresh icon onthe data type.
4. You can limit the number of data items that display by entering a search stringin the Filter field. For example, add the following syntax to the Filter field,totalMemory=256. Click Refresh on the data items menu to show the filteredresults.Filter Retrieved Data Items: The filter searches all the fields in the current setof paged results containing the search text. If the number of results requires theresults to be paged, the filter only filters the results on the current page. Thefilter is cleared when you navigate between pages.
Tip: If your UI Data Provider data type is based on a Netcool/Impact policy,you can add &executePolicy=true to the Filter field to run the policy andreturn the most up to date filtered results for the data set.For more information about using the Filter field and GetByFilter functionruntime parameters to limit the number of data items that are returned, see“Using the GetByFilter function to handle large data sets.”
Using the GetByFilter function to handle large data setsYou can extend the GetByFilter function to support large data sets. To fetch itemsfrom a UI data provider with the GetByFilter, additional input parameters can beadded to the filter value of the GetByFilter function. Additional filter parametersallow you to refine the result set returned to the policy.
Chapter 3. Working with the UI data provider DSA 19

The UI data provider REST API supports the following runtime parameters:v count: limits the size of the returned data items.v start: specifies the pointer to begin retrieving data items.v param_*: sends custom parameters to data sets that the UI data provider uses
during construction and data presentation. The UI Data Provider serverrecognizes any additional parameters and handles the request if the parameterhas the prefix param_. These values are also used to uniquely identify a data setinstance in the REST service cache.
v id: If used, it fetches a single item. The id parameter specifies the id of item youwant to retrieve. For example, &id=1. If the id parameter is used, all otherfiltering parameters are ignored.
Tip: If your UI Data Provider data type is based on a policy, then you can addexecutePolicy=true to the FILTER parameter in GetByFilter( Filter, DataType,CountOnly) to run the policy and ensure the latest data set results are returned bythe provider.
This policy example uses the FILTER runtime parameters in a GetByFilter(Filter, DataType, CountOnly) implementation in a UI data provider.DataType="123UIdataprovider";CountOnly = false;
Filter = "t_DisplayName =’Windows Services’";Filter = "t_DisplayName starts ’Wind’";Filter = "t_DisplayName ends ’ces’";Filter = "t_DisplayName contains 'W'&count=6¶m_One=paramOne";Filter = "t_DisplayName contains ’W’&count=3&start=2";Filter = "((t_DisplayName contains ’Wi’)or (t_InstanceName !isnull))";Filter = "((t_DisplayName contains ’Wi’)or (t_InstanceName=’NewService’))&count=3";Filter = "((t_DisplayName contains ’Wi’)or (t_InstanceName=’NewService’))&count=5&start=1";
MyFilteredItems = GetByFilter( DataType, Filter, CountOnly );
Log( "RESULTS: GetByFilter(DataType="+DataType+", Filter="+Filter+",CountOnly="+CountOnly+")" );
Log( "MATCHED item(s): " + Num );
index = 0;if(Num > 0){
while(index <Num){Log("Node["+index+"] id = " + MyFilteredItems[index].id +
"---Node["+index+"] DisplayName= " +MyFilteredItems[index].t_DisplayName);
index = index + 1;}
}Log("========= END =========");
Here are some more syntax examples of the FILTER runtime parameters that youcan use in a GetByFilter (Filter, DataType, CountOnly) implementation in a UIdata provider.
Example 1:Filter = "&count=6";
20 Netcool/Impact: DSA Reference Guide

No condition is specified. All items are fetched by the server, but only the first 6are returned.
Example 2:Filter = "&count=3&start=2";
No condition specified. All items are fetched by the server, but only the first 3 arereturned, starting at item #2
Example 3:Filter = "t_DisplayName ends ’ces’
Only items that match the condition = "t_DisplayName ends ’ces’ are fetched.
Example 4:Filter = "t_DisplayName contains ’W’&count=6¶m_One=paramOne";
Only items that match the condition "t_DisplayName contains’W’&count=6¶m_One=paramOne"; are fetched. Only the first six items thatcontain 'W' and paramOne are returned and paramOne is available for use by theprovider when it returns the data set.
Example 5:Filter = "¶m_One=paramOne";
All items are fetched by the server, and paramOne is available for use by theprovider when it returns the data set.
Adding Delimiters
The default delimiter is the ampersand (&) character. You can configure a differentdelimiter by editing the property impact.uidataprovider.query.delimiter in theNCI_server.props file. Where NCI is the name of your Impact Server. Any timeyou add a delimiter you must restart the Impact Server to implement the changes.
The delimiter can be any suitable character or regular expression, that is not partof the data set name or any of the characters used in the filter value.
The following characters must use double escape characters \\ when used as adelimiter:* ^ $ . |
Examples:
An example using an Asterisk (*) as a delimiter:v Property Syntax: impact.uidataprovider.query.delimiter=\\*v Filter query: t_DisplayName contains ’Imp’*count=5
An example with a combination of characters:v Property Syntax:impact.uidataprovider.query.delimiter=ABCDv Filter query: t_DisplayName contains ’Imp’ABCDcount=5
An example of a regular expression, subject to Java language reg expression rules:v Property Syntax: impact.uidataprovider.query.delimiter=Z|Y
Chapter 3. Working with the UI data provider DSA 21
v Filter queryt_DisplayName contains ’S’Zcount=9Zstart=7YexecutePolicy=true
An example of a combination of special characters: * . $ ̂ |
v Property Syntax: impact.uidataprovider.query.delimiter=\\*|\\.|\\$|\\^|\\|v Filter query t_DisplayName contains ’S’.count=9|start=7$executePolicy=true
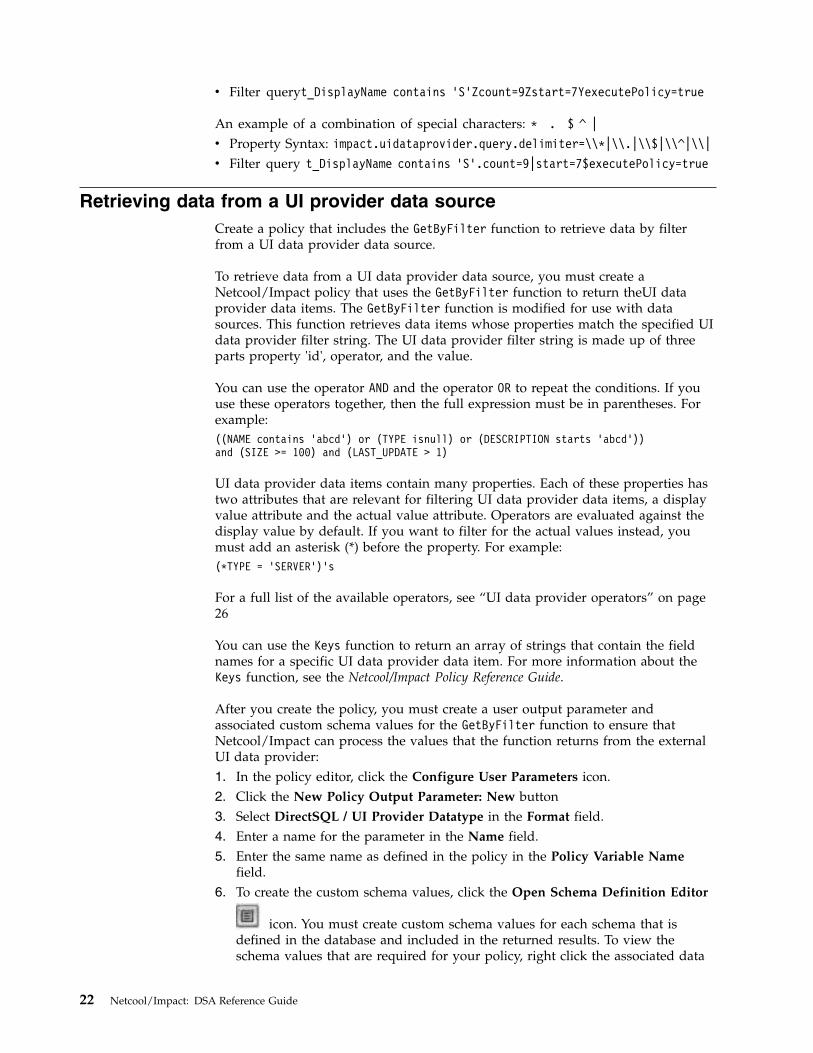
Retrieving data from a UI provider data sourceCreate a policy that includes the GetByFilter function to retrieve data by filterfrom a UI data provider data source.
To retrieve data from a UI data provider data source, you must create aNetcool/Impact policy that uses the GetByFilter function to return theUI dataprovider data items. The GetByFilter function is modified for use with datasources. This function retrieves data items whose properties match the specified UIdata provider filter string. The UI data provider filter string is made up of threeparts property 'id', operator, and the value.
You can use the operator AND and the operator OR to repeat the conditions. If youuse these operators together, then the full expression must be in parentheses. Forexample:((NAME contains 'abcd') or (TYPE isnull) or (DESCRIPTION starts 'abcd'))and (SIZE >= 100) and (LAST_UPDATE > 1)
UI data provider data items contain many properties. Each of these properties hastwo attributes that are relevant for filtering UI data provider data items, a displayvalue attribute and the actual value attribute. Operators are evaluated against thedisplay value by default. If you want to filter for the actual values instead, youmust add an asterisk (*) before the property. For example:(*TYPE = 'SERVER')’s
For a full list of the available operators, see “UI data provider operators” on page26
You can use the Keys function to return an array of strings that contain the fieldnames for a specific UI data provider data item. For more information about theKeys function, see the Netcool/Impact Policy Reference Guide.
After you create the policy, you must create a user output parameter andassociated custom schema values for the GetByFilter function to ensure thatNetcool/Impact can process the values that the function returns from the externalUI data provider:1. In the policy editor, click the Configure User Parameters icon.2. Click the New Policy Output Parameter: New button3. Select DirectSQL / UI Provider Datatype in the Format field.4. Enter a name for the parameter in the Name field.5. Enter the same name as defined in the policy in the Policy Variable Name
field.6. To create the custom schema values, click the Open Schema Definition Editor
icon. You must create custom schema values for each schema that isdefined in the database and included in the returned results. To view theschema values that are required for your policy, right click the associated data
22 Netcool/Impact: DSA Reference Guide
type and click View Data Items. You must create a custom schema value foreach column that you want to view in the widget in the console.
For more information about how to create user output parameters and customschema values, see “Creating custom schema values for output parameters” onpage 24.
Example
In the following policy example, the UI data provider data type calleduidataprovider-ImpactROI is sourcing the data from the REPORT_ImpactROI datatype that uses the GetByFilter function and the IPL policy language. TheREPORT_ImpactROI data type is a standard data type delivered withNetcool/Impact.DataType="uidataprovider-ImpactROI";Filter = "PROCESS_NAME='Escalate'";CountOnly = false;
The GetByFilter function returns an OrgNodes object that represents an array ofvalues:OrgNodes = GetByFilter( DataType, Filter, CountOnly );
The filter matches only one item in the data, and the GetByFilter function returnsone item as a result:Log("Number of org nodes returned:" + Num); // will be = 1Log("Key = " + OrgNodes[0].Key); // will be = Escalate
In the following policy example, the data type is myuidataproviderDataTypeDataType="myuidataproviderDataType";Filter = "SAVED_TIME > 1000";CountOnly = false;
This example returns the following OrgNodes object:OrgNodes = GetByFilter( DataType, Filter, CountOnly );
If the filter matches two items, the GetByFilter function returns these two items asfollows:Log("Number of org nodes returned:" + Num);// will be = 2Log("Key = " + OrgNodes[0].Key);// will be = EscalateLog("Key = " + OrgNodes[1].Key);// will be = Resolve
The following example demonstrates how to create a user output parameter andcustom values to represent the output of the GetByFilter function. The followingpolicy uses the GetByFilter function to retrieve data from an external UI dataprovider. The values that are returned are contained in the DemoUISchemaparameter.Filter="&count=200";DemoUISchema=GetByFilter(’UITestCuriMySQL’,Filter,CountOnly);Log(DemoUISchema);
You create the following output parameter for to represent the DemoUISchemaparameter. You do not have to enter a data source or data type name.
Chapter 3. Working with the UI data provider DSA 23
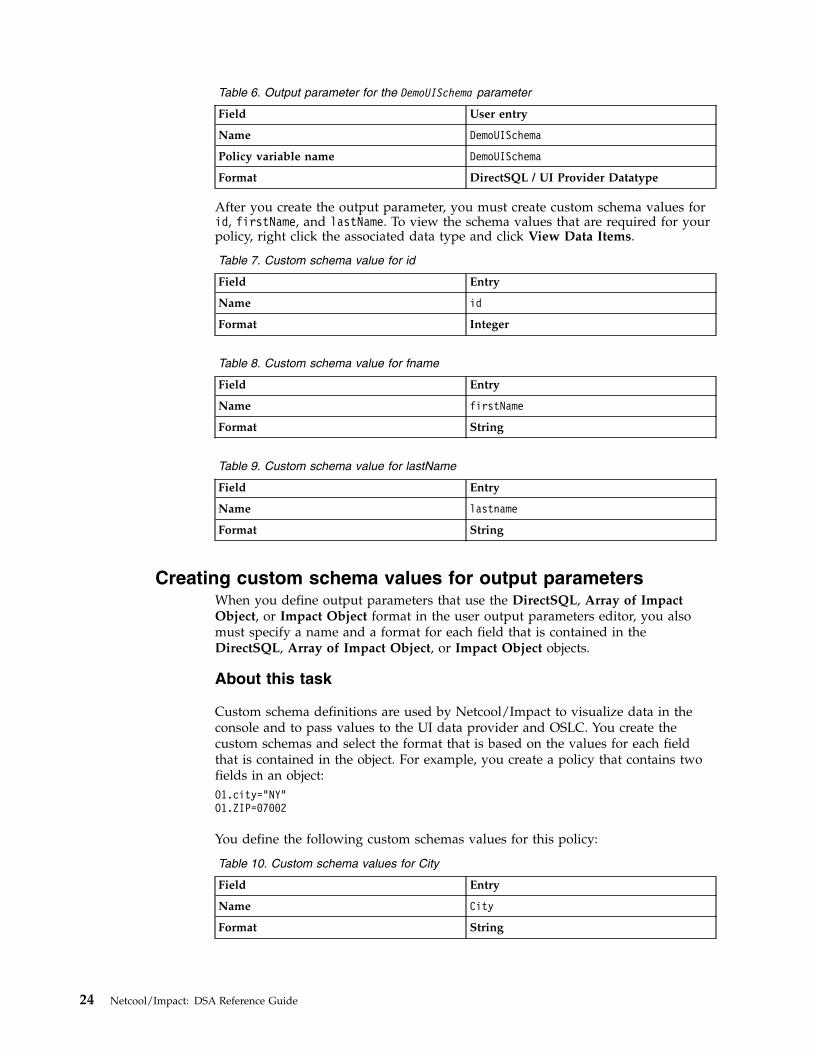
Table 6. Output parameter for the DemoUISchema parameter
Field User entry
Name DemoUISchema
Policy variable name DemoUISchema
Format DirectSQL / UI Provider Datatype
After you create the output parameter, you must create custom schema values forid, firstName, and lastName. To view the schema values that are required for yourpolicy, right click the associated data type and click View Data Items.
Table 7. Custom schema value for id
Field Entry
Name id
Format Integer
Table 8. Custom schema value for fname
Field Entry
Name firstName
Format String
Table 9. Custom schema value for lastName
Field Entry
Name lastname
Format String
Creating custom schema values for output parametersWhen you define output parameters that use the DirectSQL, Array of ImpactObject, or Impact Object format in the user output parameters editor, you alsomust specify a name and a format for each field that is contained in theDirectSQL, Array of Impact Object, or Impact Object objects.
About this task
Custom schema definitions are used by Netcool/Impact to visualize data in theconsole and to pass values to the UI data provider and OSLC. You create thecustom schemas and select the format that is based on the values for each fieldthat is contained in the object. For example, you create a policy that contains twofields in an object:O1.city="NY"O1.ZIP=07002
You define the following custom schemas values for this policy:
Table 10. Custom schema values for City
Field Entry
Name City
Format String
24 Netcool/Impact: DSA Reference Guide

Table 11. Custom schema values for ZIP
Field Entry
Name ZIP
Format Integer
If you use the DirectSQL policy function with the UI data provider or OSLC, youmust define a custom schema value for each DirectSQL value that you use.
If you want to use the chart widget to visualize data from an Impact object or anarray of Impact objects with the UI data provider and the console, you definecustom schema values for the fields that are contained in the objects. The customschemas help to create descriptors for columns in the chart during initialization.However, the custom schemas are not technically required. If you do not definevalues for either of these formats, the system later rediscovers each Impact objectwhen it creates additional fields such as the key field. UIObjectId, or the field forthe tree widget, UITreeNodeId. You do not need to define these values for OSLC.
Procedure1. In the Policy Settings Editor, select DirectSQL, Impact Object, or Array of
Impact Object in the Format field.
2. The system shows the Open the Schema Definition Editor icon
besidethe Schema Definition field. To open the editor, click the icon.
3. You can edit an existing entry or you can create a new one. To define a newentry, click New. Enter a name and select an appropriate format.To edit an existing entry, click the Edit icon beside the entry that you want toedit
4. To mark an entry as a key field, select the check box in the Key Field column.You do not have to define the key field for Impact objects or an array of Impactobjects. The system uses the UIObjectId as the key field instead.
5. To delete an entry, select the entry and click Delete.
Clearing the UI Data Provider server cache with the UI data providerDSA
The DSA and the policy function can be used to send a DELETE HTTP request tothe UI Data Provider server. Sending the DELETE method issues a request to theserver to release obsolete cached data sets from memory. Both GetByFilter() andGetHTTP() functions can be used to send the DELETE HTTP request.
Procedure1. Use the GetHTTP function to send DELETE requests to the UI Data Provider
server.The GetHTTP function with the ’DELETE’ method can be run before or afterretrieving a data set. Here is an example of IPL policy with GetHTTP.host=<host_name> // e.g. "uidp.host.ibm.com";port =<port_num> // e.g. 15210;props = NewObject();props.UserId=<userid> // e.g. "sysadmin";props.Password =<password> // e.g. "password";path = "/ibm/tivoli/rest/providers/<provider_name>/datasources/<datasource_name>/datasets/<dataset_name>?<_paramXXXX>";
// Execute GetHTTP DELETE method to clear cacheof dataset identified with <_paramXXXX>:
Chapter 3. Working with the UI data provider DSA 25
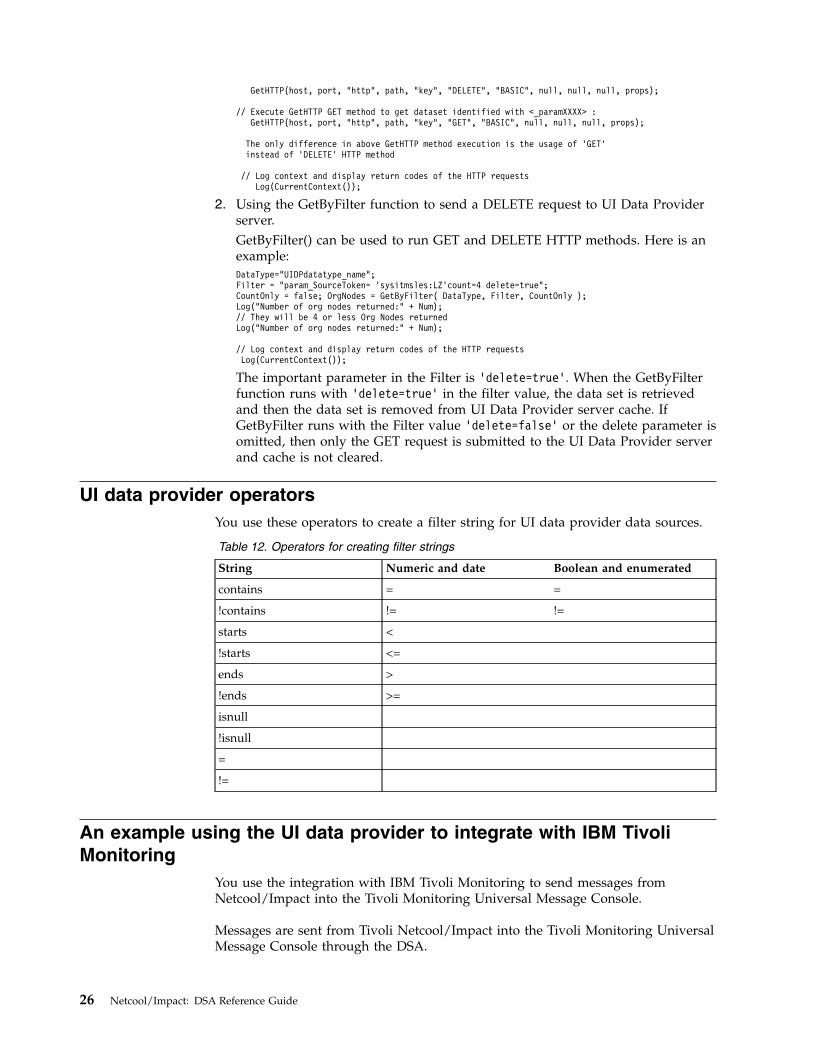
GetHTTP(host, port, "http", path, "key", "DELETE", "BASIC", null, null, null, props);
// Execute GetHTTP GET method to get dataset identified with <_paramXXXX> :GetHTTP(host, port, "http", path, "key", "GET", "BASIC", null, null, null, props);
The only difference in above GetHTTP method execution is the usage of ’GET’instead of ’DELETE’ HTTP method
// Log context and display return codes of the HTTP requestsLog(CurrentContext());
2. Using the GetByFilter function to send a DELETE request to UI Data Providerserver.GetByFilter() can be used to run GET and DELETE HTTP methods. Here is anexample:DataType="UIDPdatatype_name";Filter = "param_SourceToken= ’sysitmsles:LZ’count=4 delete=true";CountOnly = false; OrgNodes = GetByFilter( DataType, Filter, CountOnly );Log("Number of org nodes returned:" + Num);// They will be 4 or less Org Nodes returnedLog("Number of org nodes returned:" + Num);
// Log context and display return codes of the HTTP requestsLog(CurrentContext());
The important parameter in the Filter is ’delete=true’. When the GetByFilterfunction runs with ’delete=true’ in the filter value, the data set is retrievedand then the data set is removed from UI Data Provider server cache. IfGetByFilter runs with the Filter value ’delete=false’ or the delete parameter isomitted, then only the GET request is submitted to the UI Data Provider serverand cache is not cleared.
UI data provider operatorsYou use these operators to create a filter string for UI data provider data sources.
Table 12. Operators for creating filter strings
String Numeric and date Boolean and enumerated
contains = =
!contains != !=
starts <
!starts <=
ends >
!ends >=
isnull
!isnull
=
!=
An example using the UI data provider to integrate with IBM TivoliMonitoring
You use the integration with IBM Tivoli Monitoring to send messages fromNetcool/Impact into the Tivoli Monitoring Universal Message Console.
Messages are sent from Tivoli Netcool/Impact into the Tivoli Monitoring UniversalMessage Console through the DSA.
26 Netcool/Impact: DSA Reference Guide
Configuring Netcool/Impact to send messages to TivoliMonitoring Universal Message Console
Use this procedure to configure Netcool/Impact to send messages to TivoliMonitoring 6.1 and higher, Universal Message Console.
Procedure1. In the Netcool/Impact UI find the ITM project, and the policies for IPL and
JavaScript ITMLibraryFunctionsIPL, ITMLibraryFunctionsJS,ITMFunctionsCallerIPL, and ITMLibraryFunctionsCallerJS.
2. Update the ITMFunctionsCallerJS or ITMFunctionsCallerIPL policy that youwant to use with Tivoli Monitoring specific information such as host name,port, user name, password, attribute, and object that is based on the function tobe called.
Remember: The example function is using default values.3. Run the policy. The functions return an XML formatted string.
Obtaining data from Tivoli Monitoring 6.3 using the UI dataproviderHow to obtain data from Tivoli Monitoring 6.3, with the UI data provider DSA.
Procedurev To obtain data from Tivoli Monitoring 6.3, use the UI data provider DSA to
access the Tivoli Monitoring data provider seeChapter 3, “Working with the UIdata provider DSA,” on page 17.
v For more information, see the following link and information center reference.– Netcool/Impact devWorks wiki, see examples associated to dashboarding in
the Scenarios and Examples page at the following URL: https://www.ibm.com/developerworks/mydeveloperworks/wikis/home?lang=en#/wiki/Tivoli%20Netcool%20Impact/page/Scenarios%20and%20examples
– Netcool/Impact Solutions Guide, Visualizing data from the UI data provider in theconsole, Visualizing a data mashup from two IBM Tivoli Monitoring sources. Thisexample shows how to visualize the data from Tivoli Monitoring sources indashboard. You can use the same method to retrieve data for eventmanagement purposes.
Chapter 3. Working with the UI data provider DSA 27

28 Netcool/Impact: DSA Reference Guide
Chapter 4. Working with the RESTful API DSA
The RESTful API DSA is a data source adaptor to interact with RESTful webservices.
Whenever your web browser fetches a file (a page, a picture, and so forth) from aweb server, it does so using HTTP. HTTP is a request/response protocol, whichmeans your computer sends a request for some file or resource, and the web serversends back a response. Representational State Transfer (REST) is an architecturalstyle where resources are accessed using links, the resources are acted upon byusing a set of simple operations. By accessing and acting on these links user canget resources, add new or update existing ones and also delete resources. Thepurpose of RESTful DSA is to allow Impact policies to make these requests.
To use the REST DSA, you must first do the following:v Create a RESTful API data source. For more information see “Creating a RESTful
DSA data source.”v Write policies to execute actions against the RESTful APIs. For more information
see “Making requests to the RESTful data source” on page 31.
RESTful DSA data modelA RESTful DSA data model is a store for the request properties used whenconnecting to a RESTful API.
The RESTful DSA data model has a single element: the datasource type.
RESTful DSA data sourceTo use the REST DSA, you must create a RESTful DSA data source.
Creating a RESTful DSA data sourceUse this information to create a RESTful DSA data source.
Procedure1. Click Data Model to open the Data Model tab.2. From the Cluster and Project lists, select the cluster and project you want to
use.3. In the Data Model tab, click the New Data Source icon in the toolbar. Select
RESTful API. The tab for the data source opens.4. In the Data Source Name field:
Enter a unique name to identify the data source. You can use only letters,numbers, and the underscore character in the data source name. If you useUTF-8 characters, make sure that the locale on the Impact Server where thedata source is saved is set to the UTF-8 character encoding.
5. In the Host Name field, add the hostname of the REST service that you wantto connect to. The hostname is a fully qualified domain name or IP address.
6. In the Resource Path field, add the path information to the resource ifnecessary.
7. In the Port field, add the port number (this will be 80 by default).
© Copyright IBM Corp. 2006, 2016 29
8. Use HTTPS/SSL to enable Netcool/Impact to connect over SSL to a RESTdata source. You must export a certificate from the data source and import itinto the Impact Servers and each GUI Server.a. Get the certificate through the browser.
Refer to your browser manual, searching for exporting a certificate.b. Copy the certificate file to the Impact Server host and import it into both
the Impact Servers and GUI Servers. For more information about importcommands, see the Netcool/Impact Administration Guide under the sectionEnabling SSL connections with external servers in the Security chapter.
c. Restart the Impact Servers and each GUI Server.9. Select the Reuse Connection checkbox if required.
Connection caching is done at a policy level. This means the same HTTPconnection can be reused within a policy when it is running.
10. Select the Cache Response checkbox if required.Note: Response caching is based on entity tags. It is one of severalmechanisms that the HTTP protocol provides for cache validation, whichallows a client to make conditional requests. Impact by default adds a CacheControl : Max-Age=0 header that causes any caches used during the request torevalidate ensuring that the entity tag is checked. Modify this header to theCache Control setting you want to use. Impact by default adds a CacheControl : Max-Age=0 header to any newly created REST data sources in theHTTP header list.
11. Authentication.If using basic authentication, you must provide the username and password:a. In the User Name field type a user name with which you can access the
REST API.b. In the Password field type a password with which you can access the
REST API.12. Specify an HTTP header if you are making requests to a datasource where the
same HTTP header are being used consistently.For example, if a new header is added to the grid, this is the same as addinga request header. If the grid has the following header details:Header Name Header ValueContent-Type application/jsonMax-Forwards 10
The following will be added to the URL when making the request:GET /api/alerts/v1 HTTP/1.1Host: ibmnotifybm.mybluemix.netAuthorization: Basic ******************Content-Type: application/json;charset=UTF-8Max-Forwards: 10
13. Specify HTTP parameters if you are making requests to the datasource wherethe same HTTP parameters are being used consistently.The REST API datasource can persist these and they will be used on every callto the data source unless overridden by the policy function.For example, if a new parameter is added to the grid, this is the same asadding a query parameter to the request. If the grid has the followingparamaters:Parameter Name Parameter Valuesize 100name impact
30 Netcool/Impact: DSA Reference Guide
Then ?size=100&name=impact will be added to the URL when making therequest.
14. Click Test Connection to see if it is possible to connect to the data source withthe current data source settings.
15. Click Preview Request to preview an example of the raw http request withthe current data source settings.
16. Click Save to create the data source.
Specifying proxy server connection details for a RESTful DSAdata sourceUse this information to specify proxy server connection details for a RESTful DSAdata source.
About this task
Impact can connect to RESTful services through a proxy server. The details for thisconnection are entered in the Proxy Settings tab for the REST API Data SourceEditor. When using the functions RESTfulAPIGET, RESTfulAPIPOST, RESTfulAPIPUT,RESTfulAPIDELETE the request will be sent through the proxy server. To specifyproxy server settings, use the following steps:
Procedure1. Check the Use Proxy Server box if you want connect to a web server using a
proxy server. If the checkbox is checked, you must specify values for the ProxyHostname and Proxy Port properties.
2. Specify the name of the proxy host in the Proxy Hostname field.3. Specify the port on the proxy host through which to make the connection in the
Proxy Port field.4. Select Use HTTPS to connect to the proxy server.
You should select this checkbox if you want to use SSL and if you do you haveto import a certificate.
5. If you want to perform no authentication with the proxy server, select NoAuthentication.
6. If you want to perform basic authentication with the proxy server, selectBASIC.If so, use the User Name and Password properties specified in the ProxySetting tab to authenticate with the proxy server.
7. Specify the realm if the proxy server requires one in the Proxy Realm field.8. Specify the user name to log on to the proxy server in the User Name field.9. Specify the password to log on to the proxy server in the Password field.
Making requests to the RESTful data sourceYou can use Impact policy functions to communicate with the data source.
Chapter 4. Working with the RESTful API DSA 31

32 Netcool/Impact: DSA Reference Guide

Chapter 5. Working with the LDAP DSA
The LDAP DSA are used to access information stored in an LDAP server.
This type of DSA is read-only. You cannot use Netcool/Impact to insert new LDAPdata into the server data store. The LDAP DSA is s built in DSA and does notrequire any additional installation or configuration.
LDAP DSA overviewNetcool/Impact uses the Lightweight Directory Access Protocol (LDAP) datasource adaptor to retrieve data managed by an LDAP server.
The LDAP DSA is a direct-mode data source adaptor that runs in-process withNetcool/Impact. This DSA is automatically loaded during application run time.You do not have to start or stop this DSA independently of the application.Netcool/Impact is not able to use this DSA to add, modify, or delete informationmanaged by the LDAP server
To use the LDAP DSA, complete the following tasks:v Create an LDAP DSA data model that provides an abstract representation of the
data managed by the LDAP server.v Write one or more LDAP DSA policies that retrieve data from the underlying
LDAP server.
For more information about LDAP data model, see.“LDAP data model”
For more information about LDAP policies, see.“LDAP policies” on page 35
Supported LDAP serversNetcool/Impact supports directory servers that fully implement the LDAP v2 andv3 specifications, including Netscape, iPlanet, OpenLDAP, and Microsoft ActiveDirectory servers.
LDAP data modelA Lightweight Directory Access Protocol (LDAP) data model is an abstractrepresentation of data that is managed by an LDAP directory server.
LDAP data models have the following elements:v LDAP data sourcesv LDAP data typesv LDAP data items
LDAP data sourcesThe Lightweight Directory Access Protocol (LDAP) data source represent LDAPdirectory servers.
Netcool/Impact supports the OpenLDAP and Microsoft Active Directory servers.
© Copyright IBM Corp. 2006, 2016 33

You create LDAP data sources in the GUI Server. You must create one data sourcefor each LDAP server that you want to access. The configuration properties for thedata source specify connection information for the LDAP server and any requiredsecurity or authentication information.
LDAP data typesA Lightweight Directory Access Protocol (LDAP) data type represents a set ofentities in an LDAP directory tree.
The LDAP DSA determines which entities are part of this set in real time bydynamically searching the LDAP tree for entities that match a specified LDAP filterwithin a certain scope. The DSA searches in relation to a location in the tree that isknown as the base context.
Use the GUI to create LDAP data. You must create one LDAP data type for eachset of entities that you want to access. You must create a new field in the data typefor each field of data you want to obtain from the LDAP entities.
The following table shows the configuration properties for an LDAP data type.
Table 13. LDAP Data Type Configuration Properties
ConfigurationProperty Description
Data type name Name of the new LDAP data type.
Search scope Keyword that indicates the scope for the LDAP search. Possiblevalues are: OBJECT_SCOPE, ONELEVEL_SCOPE, and SUBTREE_SCOPE.
OBJECT_SCOPE causes the LDAP DSA to search only the specified basecontext for matches.
ONELEVEL_SCOPE causes the DSA to search only the child entities ofthe base context for matches.
SUBTREE_SCOPE causes the DSA to search all descendants of the basecontext.
Base context Location in the LDAP tree regarding which the LDAP DSA searchesfor matching entities. An example is ou=people, o=IBM.com.
Key search field Attribute in the LDAP entity that uniquely identifies it as a key.Used when you retrieve data items from an LDAP data type withthe GetByKey function in a policy.
Display name field Attribute in the LDAP entity that is logged when you log the entityin a policy.
Restriction filter LDAP search filter as described in Internet RFC 2254: StringRepresentation of LDAP Search Filters.
LDAP data itemsA Lightweight Directory Access Protocol (LDAP) data item represents an entity inthe LDAP directory tree.
Each field in an LDAP data item corresponds to an attribute in the LDAP entity.
You use the GUI to view LDAP data items. You cannot use the GUI to add,modify, or delete LDAP data items.
34 Netcool/Impact: DSA Reference Guide
LDAP policiesInformation from LDAP data sources is retrieved by the LDAP policies, which areNetcool/Impact policies. You cannot add, modify, or delete LDAP data from withina policy.
Retrieving data from an LDAP data sourceYou can retrieve data, by key, filter, or link, from an LDAP data source by usingthe GETbyKey, GetByFilter, and GetByLinks functions when you write a policy.
The following table describes the functions that retrieve LDAP data.
Table 14. Functions that Retrieve LDAP Database Data
Function Description
GetByKey Retrieves data items, or entities in the LDAP directory tree, whose keyfields match the specified key expression. The key field is configuredin the Key search field entry in the data type.
GetByFilter Retrieves data items whose field values match the specified LDAPfilter string.
GetByLinks Retrieves data items that are dynamically or statically linked toanother data item using the Netcool/Impact GUI.
Example
The following example shows how to use GetByKey to retrieve data items, orentities in the LDAP directory tree, whose key field matches the specified keyexpression. In this example, the LDAP data type associated with a search scope inthe tree is Customer and the key expression is 12345.DataType = "Customer";Key = 12345;MaxNum = 1;
MyCustomer = GetByKey(DataType, Key, MaxNum);
The following example shows how to use GetByFilter to retrieve data items whosefield values match the specified LDAP filter string. The LDAP filter is part of thespecification that is described in Internet RFC 2254. In this example, the LDAP datatype is Facility and the filter string is (|(facility=WallSt.)(facility=Midtown)(facility=Jersey City)).DataType = "Facility";Filter = "(|(facility=Wall St.)(facility=Midtown)(facility=Jersey City))";CountOnly = False;
MyFacilities = GetByFilter(DataType, Filter, CountOnly);
If the filter does not return any LDAP entities when you think it should,sometimes this can be fixed be adding a * to the end of the search text. Forexample, instead of Filter = "(cn=myuser)", try Filter= "(cn=myuser*)";
The following example shows how to use GetByLinks to retrieve data items thatare statically or dynamically linked to another data item by using theNetcool/Impact GUI. In this example, you use GetByLinks to retrieve data items oftype Customer that are linked to data items in the MyFacilities array that isreturned in the previous example.
Chapter 5. Working with the LDAP DSA 35

DataType = {"Customer"};Filter = "";MaxNum = 1000;DataItems = MyFacilities;
MyCustomers = GetByLinks(DataType, Filter, MaxNum, DataItems);
For detailed syntax descriptions of these functions, see the Policy Reference Guide.
Controlling the number of records returned from an LDAP serverSome LDAP servers are set up for paged data. By default, Impact only requestsone page of data, so for these servers, the number of rows returned, will berestricted to the paging size on the LDAP server. The following parameters can beadded to the LDAP .type file to control the number of records returned from theLDAP server: COUNTLIMIT and PAGESIZE.
PAGESIZE This parameter specifies the number of records Impact requests per page.The default is 0 (no paging). By default, Impact will only ask for one pagefrom the LDAP server. If the LDAP server has a page size set to 1000, thenonly 1000 records will be returned. When PAGESIZE is set, Impact will askthe LDAP server for PAGESIZE number of records, in a loop, and willcontinue to ask the LDAP server for records until all records are returned.Setting PAGESIZE means the Impact server is no longer limited by thepaging restrictions in the LDAP server.
COUNTLIMIT This parameter specifies the number of records returned in a single search.When paging is enabled, this has no effect, except that the value must begreater than or equal to the page size. For example, if you set PAGESIZE to100 and COUNTLIMIT to 90, the server will return "LDAP errpr code 4 -sizeLimit Exceeded" because the server tried to read a page of 100 recordsand the count limit is only 90. If COUNTLIMIT is specified and PAGESIZE isnot, then the number of rows is limited to COUNTLIMIT. The default is 0 (nolimit is set, except that imposed by the LDAP server.
To set these parameters, edit the .type file for the associated LDAP data type andadd the following lines:<LDAP TYPE>.LDAP.COUNTLIMIT=x<LDAP TYPE>.LDAP.PAGESIZE=y
Where x is the limit to be used in a non paging setup and y is the page size in apaging setup.
You must restart the Impact server for the changes to take effect.
Note: The code can only take effect if there is a restriction filter set on the datatype.
Changing how Impact handles referrals for LDAP DSA connectionsImpact allows you to change the referral setting for LDAP searches by setting theimpact.ldap.referral property.
To specify how Impact processes referrals that it encounters, add theimpact.ldap.referral property in the <servername>_datasource.props file inIMPACT_HOME/etc. The property takes one of the following strings:
36 Netcool/Impact: DSA Reference Guide

follow: Impact follows referrals automatically.
ignore: Impact ignores referrals.
throw: Impact throws a ReferralException when a referral is encountered.
For example:
impact.ldap.referral=follow
This instructs Impact to follow referrals automatically.
If the impact.ldap.referral property is not specified, Impact uses the defaultvalue throw.
You must restart the Impact server for the changes to take effect.
International character supportThe Lightweight Directory Access Protocol (LDAP) Data Source Adaptor (DSA)follows the LDAP v3 standard for international character support.
This standard specifies that non-ASCII characters must be stored in UTF-8 formatin the LDAP server to be handled correctly by client applications. If you use theLDAP DSA to access non-ASCII character data, make sure that the data is encodedusing the UTF-8 standard.
Chapter 5. Working with the LDAP DSA 37

38 Netcool/Impact: DSA Reference Guide
Chapter 6. Working with the web services DSA
The web services data source adaptor (DSA) is a direct-mode adaptor thatNetcool/Impact automatically loads during application run time.
You do not have to start or stop this DSA independently of the application. Theweb services DSA is installed with Netcool/Impact so you do not have to completeany additional installation or configuration steps.
To enable SSL connections between Netcool/Impact servers and external servers,refer to the Netcool/Impact Administration Guide, within the security chapter goto the 'Enabling SSL connections with external servers' topic.
The web services DSA provides support for WSDL version 1.1 and 2.0, and SOAPversion 1.1.
Web services DSA overviewThe web services data source adapter (DSA) is used to exchange data with externalsystems, devices, and applications through web services interfaces.
The web services DSA uses blocking messages to communicate with web services.The use of blocking messages forces Netcool/Impact to wait for a reply from theweb service before it can continue processing a policy. If Netcool/Impact does notreceive a reply in the specified time frame, the DSA times out and returns an errormessage to Netcool/Impact.
During policy run time, simple object access protocol (SOAP) messages are sentthrough the DSA to the specified web service. The message structure is defined bya web services definition language (WSDL) file. The message content is defined inthe policy.
After the DSA sends a message, it waits for a reply from the web service. Whenthe DSA receives the reply, the returned data is converted into data items andreturned to the Impact Server for further processing in the policy.
Complete the following tasks when working with the web services DSA:v Compile WSDL files that are associated with the interfaces provided by a web
service.v Create and configure a web services listener that listens on an HTTP port for
SOAP/XML messages from external applications.v Write policies that send messages to a web service interface and handle the
message replies.v Write policies that handle SOAP/XML messages that are received by the web
services listener.
Compiling WSDL filesBefore you can use the web services DSA, you must compile a Web ServicesDescription Language (WSDL) file.
© Copyright IBM Corp. 2006, 2016 39

When you compile a WSDL file, you create a set of Java class files that contain aprogrammatic representation of the WSDL data. This representation is then usedby the web services DSA when it sends messages to the web service and handlesmessage replies.
WSDL files are XML documents that describe the public interface that is providedby a web service.
To compile the WSDL, you complete the following tasks:1. Obtain the WSDL file for the web service.2. Run the WSDL compiler script.3. The JAR files are created in the $NCHOME/wslib directory on the primary server.4. You can now use the web services wizard to create a policy with the newly
compiled JAR file.
Note: If the WSDL file contains XSD imports, files are provided separately. TheWSDL files and related XSD files must be placed in a directory with no spaces.
For more information about WSDL files, see the Web Services Description WorkingGroup home page on the W3C website at http://www.w3c.org/2002/ws/desc.
Obtaining WSDL filesEvery web service must provide one or more Web Services Description Languages(WSDL) files that define its public interfaces. WSDLs are available from knownURLs.
Procedure
Use a version of the WSDL file that defines the SOAP interface for the web servicewith the web services DSA. WSDL files are most often made available by a webservice at a known URL. For example, the web service WSDL for a real-time stockquote service is available at http://www.webservicex.net/stockquote.asmx?wsdl.You can compile a WSDL by using its URL or by using a copy of the file that isstored locally in your file system.
Running the WSDL compiler scriptThe WSDL compiler script, nci_compilewsdl, creates a JAR file that contains aprogrammatic representation of the WSDL data.
Procedure1. Navigate to the $NCHOME/bin directory.2. In the command prompt, run the compiler script with the following options:
nci_compilewsdl package_name wsdl_file destination
Where:
package_nameThe name of the JAR file (without the .jar suffix) to be created by thescript.
wsdl_fileThe name of the JAR file (without the .jar suffix) to be created by thescript.
40 Netcool/Impact: DSA Reference Guide
||

destinationThe directory to copy the generated JAR file to, the default directory is$NCHOME/wslib.
You must enter the entire command in one line, without any line breaks. Forexample, on UNIX:./nci_compilewsdl amazon US.wsdl $NCHOME/wslib
The example command compiles a WSDL file, US.wsdl that is in the currentworking directory, and creates the amazon.jar file, in the $NCHOME/wslibdirectory. Another example shows how to compile a WSDL file using a URL:./nci_compilewsdl weatherhttp://www.webservicex.net/WeatherForecast.asmx?WSDL ../wslib
The weather.jar file, is created under $NCHOME/wslib directory.3. Optional: If the destination directory for the script is different from the default
one, you must copy the generated JAR file into the $NCHOME/wslib directory sothat Netcool/Impact policies can use it.
Recompiling new and changed WSDL filesIf you change an existing WSDL file or add a new file that uses classes from anexisting WSDL file, you must compile the WSDL file again.
About this task
Netcool/Impact uses the Java archive files that the Java virtual machine stores inthe $IMPACT_HOME/wslib directory. You must remove the existing JAR file that isrelated to the WSDL file. Then, recompile the WSDL file.
Procedure1. Change an existing WSDL file or create a new file that references an existing
file.2. Move all the Java archive files from the $IMPACT_HOME/wslib directory to a
temporary location.3. Restart Netcool/Impact.4. Compile the WSDL file.5. If the compiled WSDL file is not saved to the $IMPACT_HOME/wslib directory,
move the new JAR file to the $IMPACT_HOME/wslib directory.6. Move all the Java archive files, except for the files that you either changed or
referenced in your new WSDL file, from the temporary directory to the$IMPACT_HOME/wslib directory. If you do copy the files that you changed, yourchanges are overwritten with the original file.
Enabling and disabling proxy settings using WSInvokeDLUse the following settings in a policy if you are using the Web Service serverbehind a proxy server.
ExampleCallProps=NewObject();CallProps.ProxyEnabled=true;CallProps.ProxyHost=HostName;CallProps.ProxyPort=PortNumber;
//The following are optional if required by the Proxy server:
CallProps.ProxyDomain=DomainName;
Chapter 6. Working with the web services DSA 41

CallProps.ProxyUsername=Username;CallProps.ProxyPassword=Password;
//Password can be plain text or encrypted value using nci_crypt script.//If it’s an encrypted password, the following property must be used:
CallProps.DecryptPassword=true;
You pass CallProps as an additional argument to the WSInvokeDL command.
For example:WSInvokeDLResult = WSInvokeDL(WSService, WSEndPoint, WSMethod, WSParams, CallProps);
Web services DSA functionsThe web services DSA provides a set of special functions that you use to sendmessages from Netcool/Impact to a web service.v WSSetDefaultPKGName
v WSNewObject
v WSNewSubObject
v WSNewArray
v WSNewEnum
v WSInvokeDL
WSSetDefaultPKGNameThe WSSetDefaultPKGName function sets the default package that is used byWSNewObject and WSNewArray.
The package name is the name that you supplied to the nci_compilewsdl scriptwhen you compiled the WSDL file for the web service. It is also the name of theJAR file that is created by this script, without the .jar suffix.
Syntax
This function has the following syntax:WSSetDefaultPKGName(PackageName)
Parameters
The WSSetDefaultPKGName function has the following parameter.
Table 15. WSSetDefaultPKGName function parameter
Parameter Format Description
PackageName String Name of the default WSDL package used byWSNewObject and WSNewArray.
Example
The following example sets the default package that is used by subsequent calls toWSNewObject and WSNewArray to google.WSSetDefaultPKGName("google");
42 Netcool/Impact: DSA Reference Guide

WSNewObjectThe WSNewObject function creates an object of a complex data type as defined inthe WSDL file for the web service.
You use this function when you are required to pass data of a complex type to aweb service as a message parameter.
Syntax
This function has the following syntax:Object = WSNewObject(ElementType)
Parameters
This WSNewObject function has the following parameter.
Table 16. WSNewObject function parameter
Parameter Format Description
ElementType String Name of the complex data type that is defined inthe WSDL file. The name format is[Package.]TypeName, where Package is the name ofthe package you created when you compiled theWSDL file, without the .jar suffix.
Return Value
A new web services object.
Examples
The following example shows how to use WSNewObject to create a web servicesobject, what you previously called WSSetDefaultPKGName in the policy. This examplecreates an object of the data type ForwardeeInfo as defined in the mompkg.jar filecompiled from the corresponding WSDL.// Call WSSetDefaultPKGNameWSSetDefaultPKGName("mompkg");
// Call WSNewObject
MyObject = WSNewObject("ForwardeeInfo");
The following example shows how to use WSNewObject to create a web servicesobject, where you did not previously call WSSetDefaultPKGName in the policy.// Call WSNewObject
MyObject = WSNewObject("mompkg.ForwardeeInfo");
WSNewSubObjectThe WSNewSubObject function creates a child object that is part of its parentobject and has a field or attribute name of ChildName.
Syntax
This function has the following syntax:Object = WSNewSubObject(ParentObject, ChildName)
Chapter 6. Working with the web services DSA 43
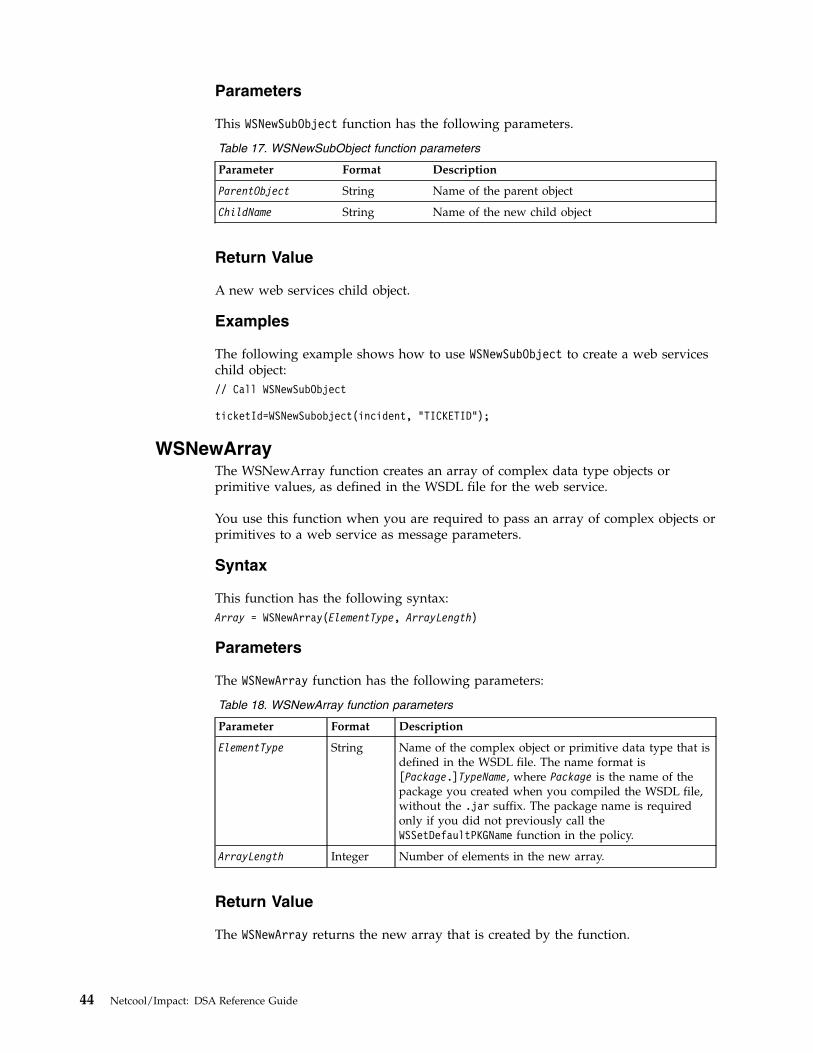
Parameters
This WSNewSubObject function has the following parameters.
Table 17. WSNewSubObject function parameters
Parameter Format Description
ParentObject String Name of the parent object
ChildName String Name of the new child object
Return Value
A new web services child object.
Examples
The following example shows how to use WSNewSubObject to create a web serviceschild object:// Call WSNewSubObject
ticketId=WSNewSubobject(incident, "TICKETID");
WSNewArrayThe WSNewArray function creates an array of complex data type objects orprimitive values, as defined in the WSDL file for the web service.
You use this function when you are required to pass an array of complex objects orprimitives to a web service as message parameters.
Syntax
This function has the following syntax:Array = WSNewArray(ElementType, ArrayLength)
Parameters
The WSNewArray function has the following parameters:
Table 18. WSNewArray function parameters
Parameter Format Description
ElementType String Name of the complex object or primitive data type that isdefined in the WSDL file. The name format is[Package.]TypeName, where Package is the name of thepackage you created when you compiled the WSDL file,without the .jar suffix. The package name is requiredonly if you did not previously call theWSSetDefaultPKGName function in the policy.
ArrayLength Integer Number of elements in the new array.
Return Value
The WSNewArray returns the new array that is created by the function.
44 Netcool/Impact: DSA Reference Guide
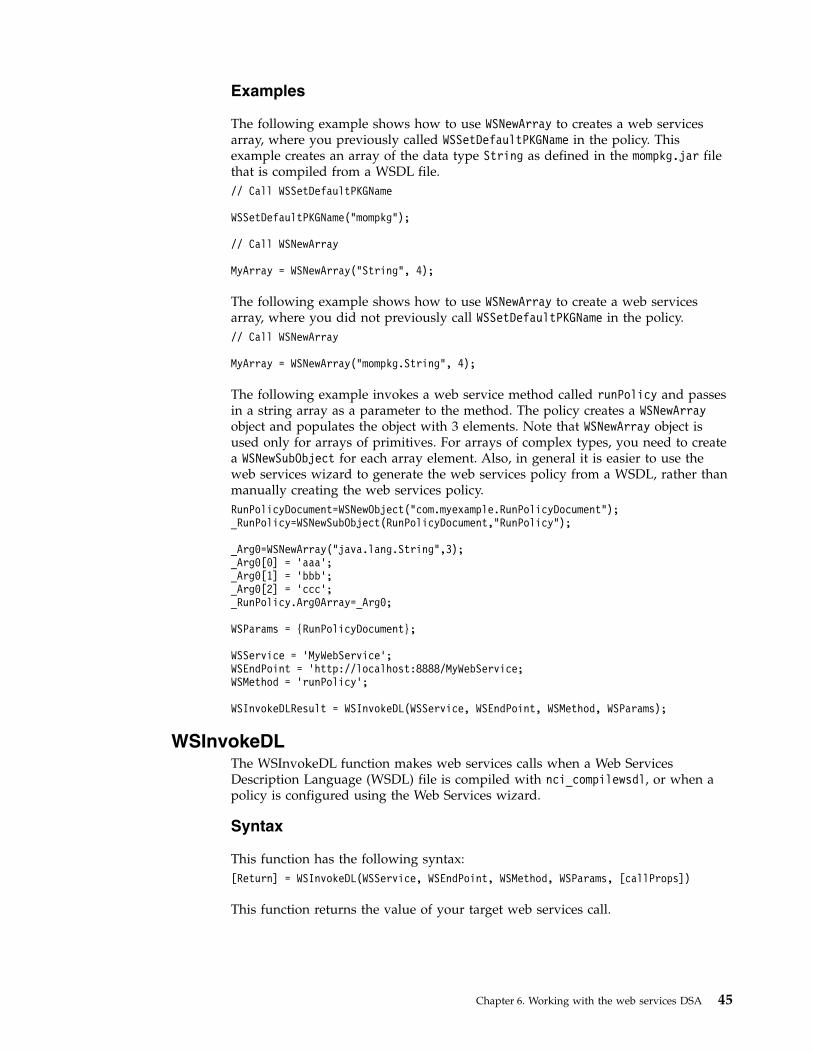
Examples
The following example shows how to use WSNewArray to creates a web servicesarray, where you previously called WSSetDefaultPKGName in the policy. Thisexample creates an array of the data type String as defined in the mompkg.jar filethat is compiled from a WSDL file.// Call WSSetDefaultPKGName
WSSetDefaultPKGName("mompkg");
// Call WSNewArray
MyArray = WSNewArray("String", 4);
The following example shows how to use WSNewArray to create a web servicesarray, where you did not previously call WSSetDefaultPKGName in the policy.// Call WSNewArray
MyArray = WSNewArray("mompkg.String", 4);
The following example invokes a web service method called runPolicy and passesin a string array as a parameter to the method. The policy creates a WSNewArrayobject and populates the object with 3 elements. Note that WSNewArray object isused only for arrays of primitives. For arrays of complex types, you need to createa WSNewSubObject for each array element. Also, in general it is easier to use theweb services wizard to generate the web services policy from a WSDL, rather thanmanually creating the web services policy.RunPolicyDocument=WSNewObject("com.myexample.RunPolicyDocument");_RunPolicy=WSNewSubObject(RunPolicyDocument,"RunPolicy");
_Arg0=WSNewArray("java.lang.String",3);_Arg0[0] = ’aaa’;_Arg0[1] = ’bbb’;_Arg0[2] = ’ccc’;_RunPolicy.Arg0Array=_Arg0;
WSParams = {RunPolicyDocument};
WSService = ’MyWebService’;WSEndPoint = ’http://localhost:8888/MyWebService;WSMethod = ’runPolicy’;
WSInvokeDLResult = WSInvokeDL(WSService, WSEndPoint, WSMethod, WSParams);
WSInvokeDLThe WSInvokeDL function makes web services calls when a Web ServicesDescription Language (WSDL) file is compiled with nci_compilewsdl, or when apolicy is configured using the Web Services wizard.
Syntax
This function has the following syntax:[Return] = WSInvokeDL(WSService, WSEndPoint, WSMethod, WSParams, [callProps])
This function returns the value of your target web services call.
Chapter 6. Working with the web services DSA 45
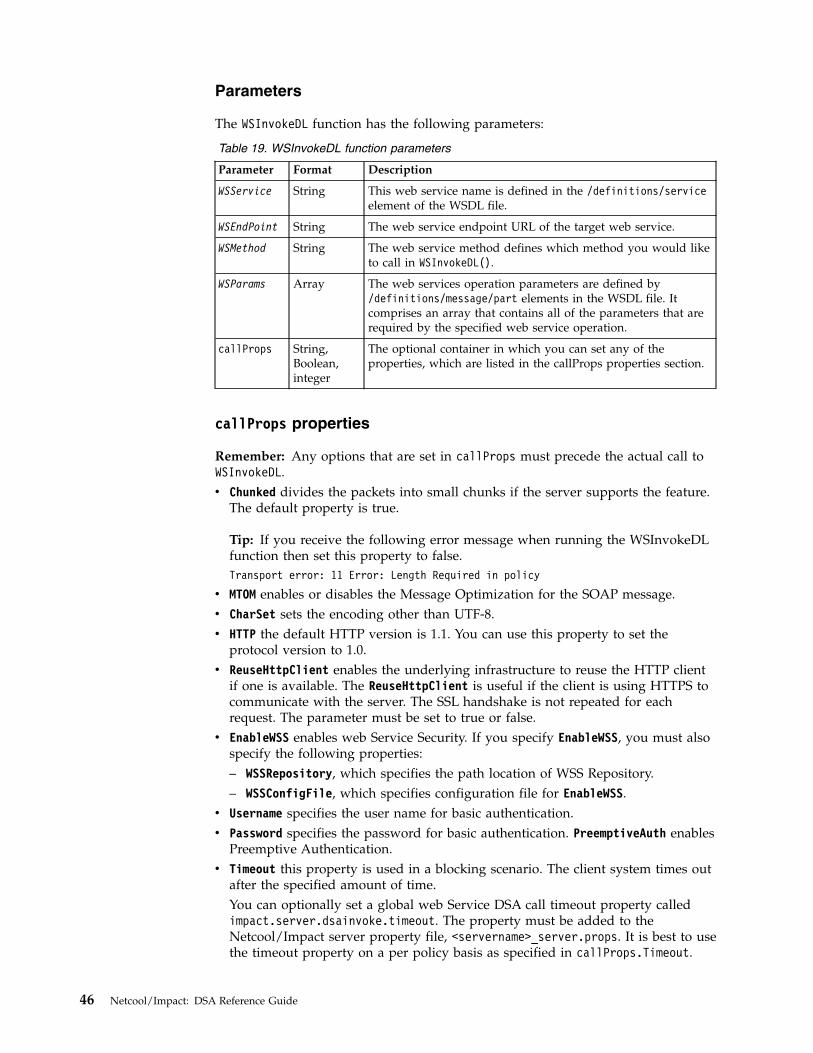
Parameters
The WSInvokeDL function has the following parameters:
Table 19. WSInvokeDL function parameters
Parameter Format Description
WSService String This web service name is defined in the /definitions/serviceelement of the WSDL file.
WSEndPoint String The web service endpoint URL of the target web service.
WSMethod String The web service method defines which method you would liketo call in WSInvokeDL().
WSParams Array The web services operation parameters are defined by/definitions/message/part elements in the WSDL file. Itcomprises an array that contains all of the parameters that arerequired by the specified web service operation.
callProps String,Boolean,integer
The optional container in which you can set any of theproperties, which are listed in the callProps properties section.
callProps properties
Remember: Any options that are set in callProps must precede the actual call toWSInvokeDL.v Chunked divides the packets into small chunks if the server supports the feature.
The default property is true.
Tip: If you receive the following error message when running the WSInvokeDLfunction then set this property to false.Transport error: 11 Error: Length Required in policy
v MTOM enables or disables the Message Optimization for the SOAP message.v CharSet sets the encoding other than UTF-8.v HTTP the default HTTP version is 1.1. You can use this property to set the
protocol version to 1.0.v ReuseHttpClient enables the underlying infrastructure to reuse the HTTP client
if one is available. The ReuseHttpClient is useful if the client is using HTTPS tocommunicate with the server. The SSL handshake is not repeated for eachrequest. The parameter must be set to true or false.
v EnableWSS enables web Service Security. If you specify EnableWSS, you must alsospecify the following properties:– WSSRepository, which specifies the path location of WSS Repository.– WSSConfigFile, which specifies configuration file for EnableWSS.
v Username specifies the user name for basic authentication.v Password specifies the password for basic authentication. PreemptiveAuth enables
Preemptive Authentication.v Timeout this property is used in a blocking scenario. The client system times out
after the specified amount of time.You can optionally set a global web Service DSA call timeout property calledimpact.server.dsainvoke.timeout. The property must be added to theNetcool/Impact server property file, <servername>_server.props. It is best to usethe timeout property on a per policy basis as specified in callProps.Timeout.
46 Netcool/Impact: DSA Reference Guide
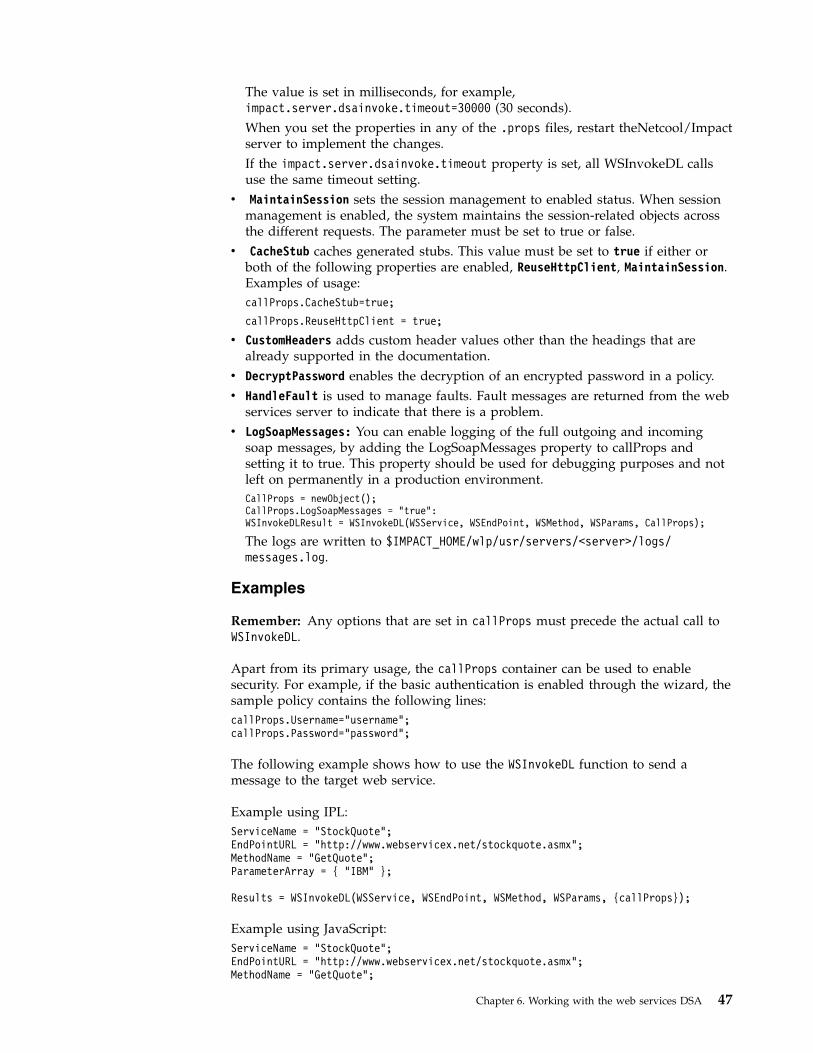
The value is set in milliseconds, for example,impact.server.dsainvoke.timeout=30000 (30 seconds).When you set the properties in any of the .props files, restart theNetcool/Impactserver to implement the changes.If the impact.server.dsainvoke.timeout property is set, all WSInvokeDL callsuse the same timeout setting.
v MaintainSession sets the session management to enabled status. When sessionmanagement is enabled, the system maintains the session-related objects acrossthe different requests. The parameter must be set to true or false.
v CacheStub caches generated stubs. This value must be set to true if either orboth of the following properties are enabled, ReuseHttpClient, MaintainSession.Examples of usage:callProps.CacheStub=true;
callProps.ReuseHttpClient = true;
v CustomHeaders adds custom header values other than the headings that arealready supported in the documentation.
v DecryptPassword enables the decryption of an encrypted password in a policy.v HandleFault is used to manage faults. Fault messages are returned from the web
services server to indicate that there is a problem.v LogSoapMessages: You can enable logging of the full outgoing and incoming
soap messages, by adding the LogSoapMessages property to callProps andsetting it to true. This property should be used for debugging purposes and notleft on permanently in a production environment.CallProps = newObject();CallProps.LogSoapMessages = "true":WSInvokeDLResult = WSInvokeDL(WSService, WSEndPoint, WSMethod, WSParams, CallProps);
The logs are written to $IMPACT_HOME/wlp/usr/servers/<server>/logs/messages.log.
Examples
Remember: Any options that are set in callProps must precede the actual call toWSInvokeDL.
Apart from its primary usage, the callProps container can be used to enablesecurity. For example, if the basic authentication is enabled through the wizard, thesample policy contains the following lines:callProps.Username="username";callProps.Password="password";
The following example shows how to use the WSInvokeDL function to send amessage to the target web service.
Example using IPL:ServiceName = "StockQuote";EndPointURL = "http://www.webservicex.net/stockquote.asmx";MethodName = "GetQuote";ParameterArray = { "IBM" };
Results = WSInvokeDL(WSService, WSEndPoint, WSMethod, WSParams, {callProps});
Example using JavaScript:ServiceName = "StockQuote";EndPointURL = "http://www.webservicex.net/stockquote.asmx";MethodName = "GetQuote";
Chapter 6. Working with the web services DSA 47

ParameterArray = [ "IBM" ];
Results = WSInvokeDL(WSService, WSEndPoint, WSMethod, WSParams, [callProps])
Use the DecryptPassword policy parameter to enable the decryption of anencrypted password in a policy that is used with the CallProps function:CallProps=NewObject();CallProps.Password="<Web Serice encrypted using nci_crypt>";CallProps.DecryptPassword=true;//default is false and must be plain text password.
The password is decrypted at policy runtime and is used in plain text internally toNetcool/Impact.
You can also use the CustomHeaders parameter to add custom http header valuesother than the headings that are already supported in the documentation.Headers = NewObject();Headers.HeaderName1=’HeaderValue1’;Headers.HeaderName2=’HeaderValue2’;CallProps.CustomHeaders=Headers;
Use the HandleFault parameter to handle fault messages.CallProps=NewObject();CallProps.HandleFault=true;
When the default value is false, the policy throws an exception. When the value istrue, the policy returns only the fault string message. No fault code is returned.
If the value is true, the return is similar to the following example.<?xml version=\"1.0\" encoding=\"UTF-8\"?><Fault><faultstring> some message here</faultstring></Fault>
To turn off the formatting and return the message in plain text add the followingparameter anywhere in <serverName>_server.props:impact.wsinvoke.formatfaultmessage=false
The changes are implemented dynamically without restarting the server.
WSNewEnumThe WSNewEnum function returns an enumeration value to a target web service.
Syntax
This function has the following syntax:[Return] = WSNewEnum(EnumType, EnumValue);
48 Netcool/Impact: DSA Reference Guide

Parameters
The WSNewEnum function has the following parameters.
Table 20. WSNewEnum function parameters
Parameter Format Description
EnumType String The enumeration class name that exists in the packagethat is created by nci_compilewsdl
EnumValue String The enumeration value to return
Return Value
A new enumeration type and value.
Example
The following example shows how to use the WSNewEnum function to send amessage to the target web service.euro = WSNewEnum("net.webservicex.www.Currency", "EUR");usd = WSNewEnum("net.webservicex.www.Currency", "USD");
Writing Web services DSA policiesYou can complete the following tasks with the web services DSA in aNetcool/Impact policy:v Send messages to a web servicev Handle data that is returned from a web service as a message reply
Sending messagesYou can use the web services DSA to send messages.
Procedure1. Call WSSetDefaultPKGName.2. Add message parameters with any required data.3. Call WSInvoke or WSInvokeDL.
Important: [The WSInvoke feature is deprecated.]
When a WSDL file is compiled with nci_compilewsdl or by the web servicesDSA wizard, you must use the WSInvokeDL() function to make web servicescalls.
Calling WSSetDefaultPKGNameThe default package used for communication with the web service is set by theWSSetDefaultPKGName function.
The package name can be the name you supplied to the nci_compilewsdl scriptwhen you compiled the WSDL file for the web service. This name is also the nameof the JAR file created by this script, without the .jar suffix. The package namecan also be any other Java package that resides in the CLASSPATH and contains theclass definition of an object you want to use with the WSNewObject or WSNewArrayfunctions (for example, java.util).
Chapter 6. Working with the web services DSA 49
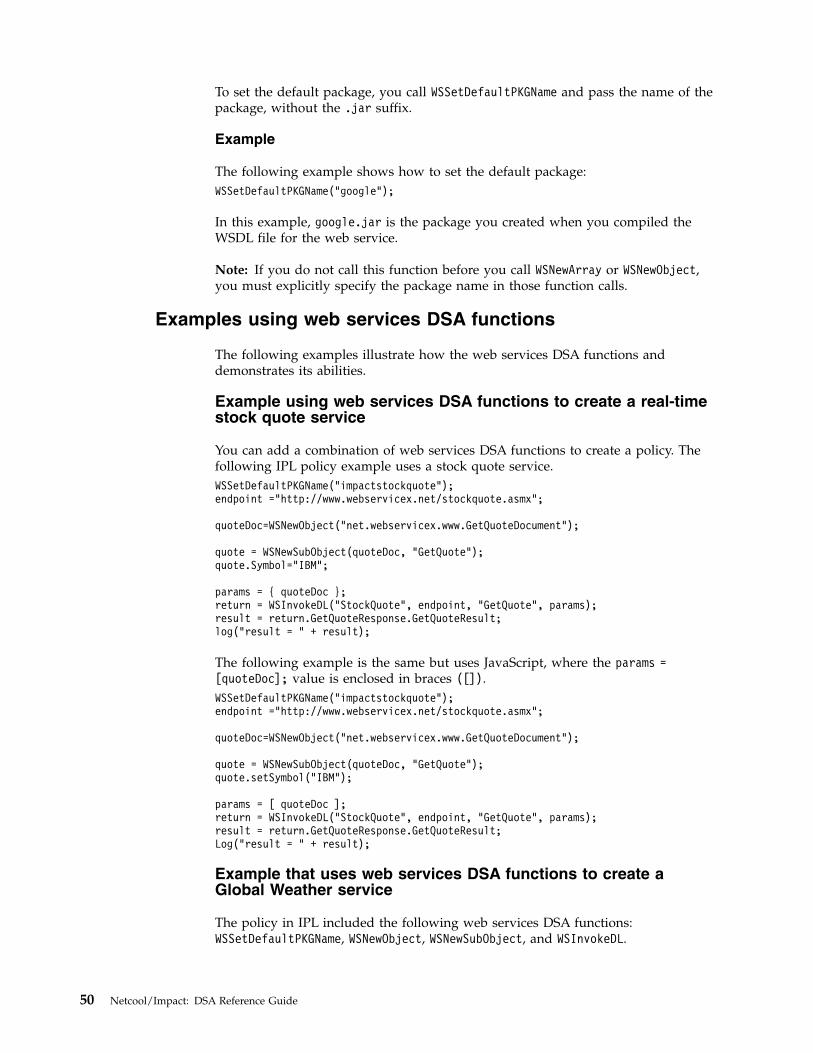
To set the default package, you call WSSetDefaultPKGName and pass the name of thepackage, without the .jar suffix.
Example
The following example shows how to set the default package:WSSetDefaultPKGName("google");
In this example, google.jar is the package you created when you compiled theWSDL file for the web service.
Note: If you do not call this function before you call WSNewArray or WSNewObject,you must explicitly specify the package name in those function calls.
Examples using web services DSA functions
The following examples illustrate how the web services DSA functions anddemonstrates its abilities.
Example using web services DSA functions to create a real-timestock quote service
You can add a combination of web services DSA functions to create a policy. Thefollowing IPL policy example uses a stock quote service.WSSetDefaultPKGName("impactstockquote");endpoint ="http://www.webservicex.net/stockquote.asmx";
quoteDoc=WSNewObject("net.webservicex.www.GetQuoteDocument");
quote = WSNewSubObject(quoteDoc, "GetQuote");quote.Symbol="IBM";
params = { quoteDoc };return = WSInvokeDL("StockQuote", endpoint, "GetQuote", params);result = return.GetQuoteResponse.GetQuoteResult;log("result = " + result);
The following example is the same but uses JavaScript, where the params =[quoteDoc]; value is enclosed in braces ([]).WSSetDefaultPKGName("impactstockquote");endpoint ="http://www.webservicex.net/stockquote.asmx";
quoteDoc=WSNewObject("net.webservicex.www.GetQuoteDocument");
quote = WSNewSubObject(quoteDoc, "GetQuote");quote.setSymbol("IBM");
params = [ quoteDoc ];return = WSInvokeDL("StockQuote", endpoint, "GetQuote", params);result = return.GetQuoteResponse.GetQuoteResult;Log("result = " + result);
Example that uses web services DSA functions to create aGlobal Weather service
The policy in IPL included the following web services DSA functions:WSSetDefaultPKGName, WSNewObject, WSNewSubObject, and WSInvokeDL.
50 Netcool/Impact: DSA Reference Guide

WSSetDefaultPKGName("impactglbweather");endpoint ="http://www.webservicex.net/globalweather.asmx";weatherdoc=WSNewObject("net.webservicex.www.GetWeatherDocument");
weather = WSNewSubObject(weatherdoc, "GetWeather");weather.CityName = "New York";weather.CountryName = "United States";params = { weatherdoc };return = WSInvokeDL("GlobalWeather", endpoint, "GetWeather", params);result = return.GetWeatherResponse.GetWeatherResult;log("result = " + result);
The following example is the same but uses JavaScript, where the params value isenclosed in braces ([]).WSSetDefaultPKGName("impactglbweather");endpoint ="http://www.webservicex.net/globalweather.asmx";weatherdoc=WSNewObject("net.webservicex.www.GetWeatherDocument");
weather = WSNewSubObject(weatherdoc, "GetWeather");weather.setCityName("New York");weather.setCountryName("United States");params = [ weatherdoc ];return = WSInvokeDL("GlobalWeather", endpoint, "GetWeather", params);result = return.GetWeatherResponse.GetWeatherResult;Log("result = " + result);
Example that uses web services DSA functions to create acurrency converter service
The policy in IPL, includes the following web service DSA functions:WSSetDefaultPKGName, WSNewObject, WSNewSubObject, WSInvokeDL, and WSNewEnum.WSSetDefaultPKGName("impactcurrencyconverter");endpoint ="http://www.webservicex.net/CurrencyConvertor.asmx";convDoc=WSNewObject("net.webservicex.www.ConversionRateDocument");
rate = WSNewSubObject(convDoc, "ConversionRate");
fromCur = WSNewEnum("net.webservicex.www.Currency", "EUR");rate.FromCurrency = fromCur;toCur = WSNewEnum("net.webservicex.www.Currency", "USD");rate.ToCurrency = toCur;
params = { convDoc };return = WSInvokeDL("CurrencyConvertor", endpoint, "ConversionRate", params);result = return.ConversionRateResponse.ConversionRateResult;log("result = " + result);log("--------------------------------");
The following example is the same but uses JavaScript, where the params value isenclosed in square braces [].WSSetDefaultPKGName("impactcurrencyconverter");endpoint ="http://www.webservicex.net/CurrencyConvertor.asmx";convDoc=WSNewObject("net.webservicex.www.ConversionRateDocument");
rate = WSNewSubObject(convDoc, "ConversionRate");
fromCur = WSNewEnum("net.webservicex.www.Currency", "EUR");rate.setFromCurrency(fromCur);toCur = WSNewEnum("net.webservicex.www.Currency", "USD");rate.setToCurrency(toCur);
params = [ convDoc ];
Chapter 6. Working with the web services DSA 51

return = WSInvokeDL("CurrencyConvertor", endpoint, "ConversionRate", params);result = return.ConversionRateResponse.ConversionRateResult;Log("result = " + result);Log("--------------------------------");
Web services listenerThe web services listener is a service that provides a Netcool/Impact web servicesinterface to other applications to run Netcool/Impact policies.
Before you can use the web services listener, you must assign theimpactAdminUser or impactWebServiceUser role to the user who uses the webservices.
See the section Working with the command line, Netcool/Impact Roles in the maindocumentation for more information.
Web services listener processPolicy requests from external applications are managed by the web serviceslistener.
The web services listener listens at an HTTP port for SOAP/XML messages fromexternal applications. These messages make requests to Netcool/Impact to run apolicy. When the listener receives a request, it sends it to the Netcool/Impactpolicy engine and any runtime parameters and returns the policy results to thecalling application through the HTTP port.
The requests can also be made over HTTPS protocol.
Netcool/Impact 7.1.0.6 has web services listener implementation that is notcompatible with versions prior to 7.1 of Netcool/Impact.
If you had a previous implementation with any of the following items you need totake the following steps:v A Java client that connects to a web services listener: If the Java client is using
the Jar file from a previous version of Netcool/Impact, the Java client must bemodified to handle the new methods and new parameter names or a new Javaclient class must be used. You can use the WSTestDL.java file as an example tomodel the new Java client. The WSTestDL.java file is in the $IMPACT_HOME/integrations/web-service-listener/ directory. The WSTestDL.java file differsfrom any previous version.
v An XML soap envelope client such as SoapUI: The XML must be rewritten oryou must create new project for Netcool/Impact 7.1.0.6 by using the WSDL filein the $IMPACT_HOME/integrations/web-service-listener directory.
v A Netcool/Impact policy that uses the web services DSA to call the externalImpact Web Services Listener, and uses the WSInvokeDL function that usedcompiled classes for a previous version of the WSDL file: You must compile anew package with the updated WSDL file and policy must be updated. See theexamples in “Compiling the WSDL file for the web services listener” on page 53
Setting up the web services listenerThe web services listener is automatically installed when you installNetcool/Impact. You do not need to complete any additional configuration steps.
52 Netcool/Impact: DSA Reference Guide

You can obtain the web services client information, including the WSDL file and aset of utilities that help you work with web services, at the $NCHOME/integrations/web-service-listener directory.
The following files are provided with the web services listener.
ImpactWebServiceListenerDLService.wsdl
The Web Service Listener WSDL file.
WSListenerTestPolicy.ipl
A sample policy.
WSTestDL.java
A sample client file.
README
A readme file.
bin/test_wslistener.bat
The script that runs the sample client.
/lib
This directory contains JAR files for sample application.
$NCHOME/bin/nci_findendpoint
The script that you can use to find the SOAP endpoint for an ImpactServer.
Compiling the WSDL file for the web services listenerUse the web services listener WSDL file that is provided in theintegrations/web-service-listener directory.
About this task
This WSDL file ImpactWebServiceListenerDLService.wsdl provides a set of classesthat are compatible with the Apache axis 2 compiler. The package name iscom.micromuse.response.common.types.
Procedure
Compile the web services listener WSDL file in the usual way. See “Running theWSDL compiler script” on page 40. When the web services listener WSDL file hascompiled, you can execute a policy like the following example:
Example
To create a Java based client to run a policy, use the WSTestDL.java file as exampleto model the code. Using the XML soap envelope client, the XML is similar to thefollowing examples.
Run a policy without input parameters, no results are retuned.<soapenv:Envelope
xmlns:soapenv="http://schemas.xmlsoap.org/soap/envelope/"xmlns:typ="http://response.micromuse.com/types"><soapenv:Header/><soapenv:Body>
<typ:runPolicy>
Chapter 6. Working with the web services DSA 53

<arg0>PolicyNameTest</arg0><arg2>false</arg2>
</typ:runPolicy></soapenv:Body>
</soapenv:Envelope>
Run a policy with one input parameter, returns a result.<soapenv:Envelopexmlns:soapenv="http://schemas.xmlsoap.org/soap/envelope/"xmlns:typ="http://response.micromuse.com/types">
<soapenv:Header/><soapenv:Body><typ:runPolicy><arg0>PolicyNameTest</arg0><!--Zero or more repetitions:--><arg1><desc>ProductName</desc><format>String</format><label>ProductName</label><name>ProductName</name><value>Impact V7.1</value>
</arg1><arg2>false</arg2></typ:runPolicy></soapenv:Body></soapenv:Envelope>
Multiple input parameters and returns result<soapenv:Envelopexmlns:soapenv="http://schemas.xmlsoap.org/soap/envelope/"xmlns:typ="http://response.micromuse.com/types">
<soapenv:Header/><soapenv:Body><typ:runPolicy><arg0>PolicyNameTest</arg0><!--Zero or more repetitions:--><arg1>
<desc>ProductName</desc><format>String</format><label>ProductName</label><name>ProductName</name><value>Impact</value></arg1><arg1><desc>Company</desc><format>String</format><label>Company</label><name>Company</name><value>IBM</value></arg1><arg1><desc>Revision</desc><format>Integer</format><label>Revision</label><name>Revision</name><value>7</value></arg1><arg2>true</arg2>
</typ:runPolicy></soapenv:Body></soapenv:Envelope>
54 Netcool/Impact: DSA Reference Guide
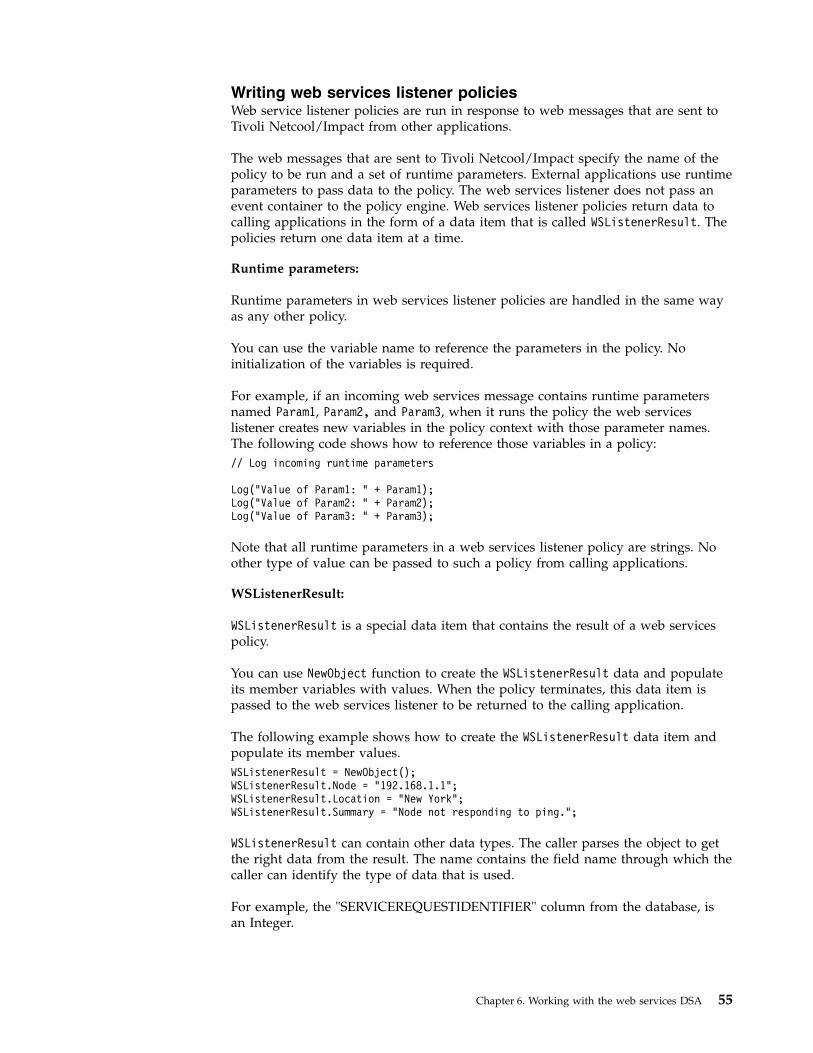
Writing web services listener policiesWeb service listener policies are run in response to web messages that are sent toTivoli Netcool/Impact from other applications.
The web messages that are sent to Tivoli Netcool/Impact specify the name of thepolicy to be run and a set of runtime parameters. External applications use runtimeparameters to pass data to the policy. The web services listener does not pass anevent container to the policy engine. Web services listener policies return data tocalling applications in the form of a data item that is called WSListenerResult. Thepolicies return one data item at a time.
Runtime parameters:
Runtime parameters in web services listener policies are handled in the same wayas any other policy.
You can use the variable name to reference the parameters in the policy. Noinitialization of the variables is required.
For example, if an incoming web services message contains runtime parametersnamed Param1, Param2, and Param3, when it runs the policy the web serviceslistener creates new variables in the policy context with those parameter names.The following code shows how to reference those variables in a policy:// Log incoming runtime parameters
Log("Value of Param1: " + Param1);Log("Value of Param2: " + Param2);Log("Value of Param3: " + Param3);
Note that all runtime parameters in a web services listener policy are strings. Noother type of value can be passed to such a policy from calling applications.
WSListenerResult:
WSListenerResult is a special data item that contains the result of a web servicespolicy.
You can use NewObject function to create the WSListenerResult data and populateits member variables with values. When the policy terminates, this data item ispassed to the web services listener to be returned to the calling application.
The following example shows how to create the WSListenerResult data item andpopulate its member values.WSListenerResult = NewObject();WSListenerResult.Node = "192.168.1.1";WSListenerResult.Location = "New York";WSListenerResult.Summary = "Node not responding to ping.";
WSListenerResult can contain other data types. The caller parses the object to getthe right data from the result. The name contains the field name through which thecaller can identify the type of data that is used.
For example, the "SERVICEREQUESTIDENTIFIER" column from the database, isan Integer.
Chapter 6. Working with the web services DSA 55
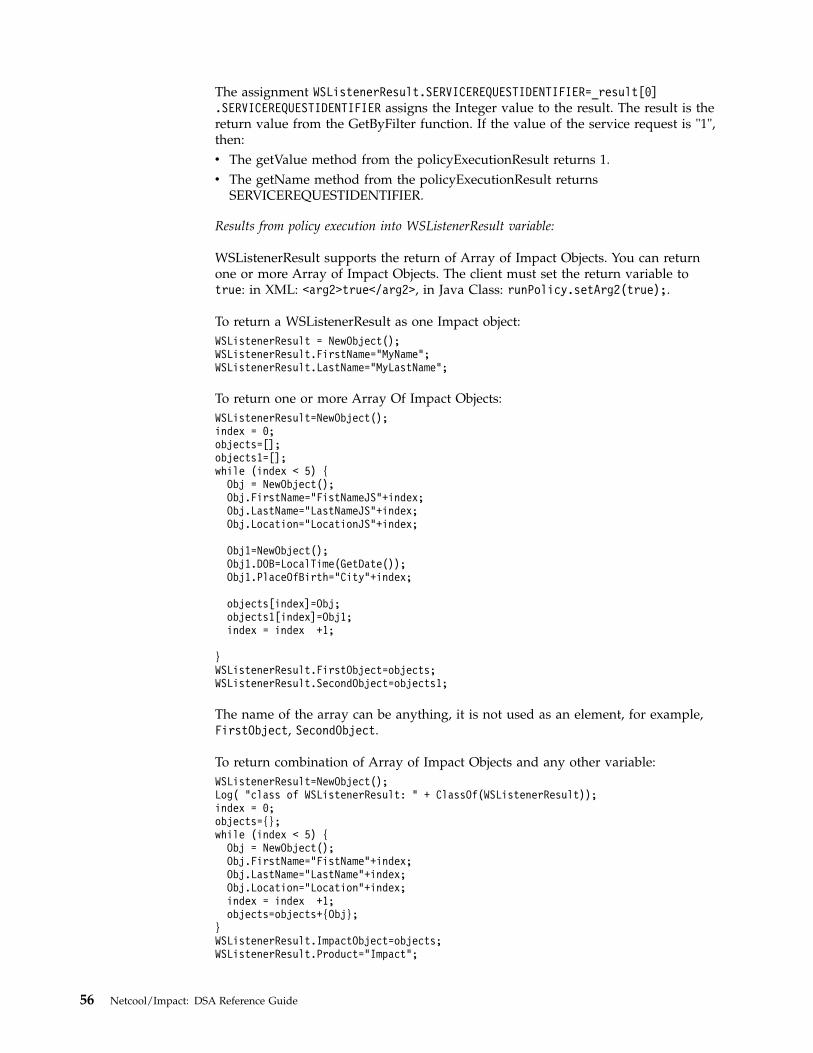
The assignment WSListenerResult.SERVICEREQUESTIDENTIFIER=_result[0].SERVICEREQUESTIDENTIFIER assigns the Integer value to the result. The result is thereturn value from the GetByFilter function. If the value of the service request is "1",then:v The getValue method from the policyExecutionResult returns 1.v The getName method from the policyExecutionResult returns
SERVICEREQUESTIDENTIFIER.
Results from policy execution into WSListenerResult variable:
WSListenerResult supports the return of Array of Impact Objects. You can returnone or more Array of Impact Objects. The client must set the return variable totrue: in XML: <arg2>true</arg2>, in Java Class: runPolicy.setArg2(true);.
To return a WSListenerResult as one Impact object:WSListenerResult = NewObject();WSListenerResult.FirstName=”MyName”;WSListenerResult.LastName=”MyLastName”;
To return one or more Array Of Impact Objects:WSListenerResult=NewObject();index = 0;objects=[];objects1=[];while (index < 5) {
Obj = NewObject();Obj.FirstName="FistNameJS"+index;Obj.LastName="LastNameJS"+index;Obj.Location="LocationJS"+index;
Obj1=NewObject();Obj1.DOB=LocalTime(GetDate());Obj1.PlaceOfBirth="City"+index;
objects[index]=Obj;objects1[index]=Obj1;index = index +1;
}WSListenerResult.FirstObject=objects;WSListenerResult.SecondObject=objects1;
The name of the array can be anything, it is not used as an element, for example,FirstObject, SecondObject.
To return combination of Array of Impact Objects and any other variable:WSListenerResult=NewObject();Log( "class of WSListenerResult: " + ClassOf(WSListenerResult));index = 0;objects={};while (index < 5) {
Obj = NewObject();Obj.FirstName="FistName"+index;Obj.LastName="LastName"+index;Obj.Location="Location"+index;index = index +1;objects=objects+{Obj};
}WSListenerResult.ImpactObject=objects;WSListenerResult.Product="Impact";
56 Netcool/Impact: DSA Reference Guide

The Return Document: The XML returned from calling runPolicy method hasparent name element “return”: example:<soap:Envelope xmlns:soap="http://schemas.xmlsoap.org/soap/envelope/">
<soap:Body><a:runPolicyResponse xmlns:a="http://types.common.response.micromuse.com/">
<return><name>Product</name><value>Impact</value>
</return><return>
<name>Location</name><value>Location0</value>
</return><return>
<name>FirstName</name><value>FistName0</value>
</return><return>
<name>LastName</name><value>LastName0</value>
</return><return>
<name>Location</name><value>Location1</value>
</return><return>
<name>FirstName</name><value>FistName1</value>
</return><return>
<name>LastName</name><value>LastName1</value>
</return></a:runPolicyResponse>
</soap:Body></soap:Envelope>
Writing applications that call into Web services
When you write applications that call into the Web services, you must have thefollowing information:v Location of the SOAP endpoint.v WSDL file.
SOAP endpointThe Simple Object Access Protocol (SOAP) endpoint is a URL. It identifies thelocation on the built-in HTTP service where the web services listener listens forincoming requests. Calling applications must specify this endpoint when they sendweb services messages to Netcool/Impact.
The endpoint URL varies depending on the configuration of Netcool/Impact. Thefollowing URL uses the default configuration.http://<hostname>:<port>/jaxws/impact/ImpactWebServiceListenerDLIfc
Where <hostname> is the name of the system where Netcool/Impact is installed,<port> is the port number that is used by the built-in HTTP service. The defaultport number is 9080.
Chapter 6. Working with the web services DSA 57

The following example shows the endpoint URL for a web services listener that isrunning on a system named impact_01 and uses the default port.http://impact_01:9080/jaxws/impact/ImpactWebServiceListenerDLIfc
You can also determine the SOAP endpoint by using the nci_findendpoint scriptin the $NCHOME/bin directory. When you run this script, it connects to the NameServer, looks up the SOAP endpoint, and prints the URL to the standard output.The syntax of nci_findendpoint is as follows:nci_findendpoint server_name
Where server_name is the name of the Impact Server instance for example, NCI.
The web services call must provide a user name who has the ImpactAdminUserrole in the Impact Server and the password for this user. By default, theimpactadmin user has the ImpactAdminUser role.
Authentication for the web services listenerBefore you can use the web services listener, you must assign theImpactAdminUser role to the user who uses the web services.
If you use an XML envelope such as SoapUI, you must configure the username andpassword in the properties of the header. If you use an Netcool/Impact policy youmust configure the username and password in the Web Services Security section.
For more information about how to assign these roles, see Working withcommand-line tools > Using WebServices through the command line > Mappinggroups, and users to roles on the Netcool/Impact information center at or in theAdministration Guide PDF file.
WSDL fileThe Web Services Description Language (WSDL) file is an XML document thatdescribes the web services interface.
The WSDL file specifies three messages that define the terms of communicationbetween Tivoli Netcool/Impact and calling applications. Calling applications usethese messages to log in to Tivoli Netcool/Impact and to request the execution of apolicy. You can also use the messages to respond to login requests and returnpolicy results. The WSDL file also specifies types of data that can be passed in thebody of the messages.
The WSDL specifies the following messages:v runPolicy
v runPolicyResponse
v WSListenerException
runPolicyThe runPolicy message requests that Tivoli Netcool/Impact run the specifiedpolicy.
Table 1 shows the parameters in runPolicy.
58 Netcool/Impact: DSA Reference Guide

Table 21. runPolicy
Parameter Description
policyName Name of the policy to be run.
policyUserParams Array of runtime parameters to pass to the policy, where eachparameter is represented in the WSDL file as a variable of thecomplex type WslPolicyUserParameter. You must set the values ofthe format, name, and value elements of each parameter to displaythe values in the WSDL file. The required value of the formatelement is String. The value of the name element is the name of theparameter as it is handled in the policy. The value of the valueelement is the parameter value.
wantResult Specifies whether to return the results of the policy to the callingapplication.
A calling application sends this message. The web services listener responds byreturning a message of type runPolicyResponse.
An example using runPolicy. The target namespace is http://types.common.response.micromuse.com The variables names are: arg0, arg1, andarg2.<soapenv:Envelope xmlns:soapenv="http://schemas.xmlsoap.org/soap/envelope/"xmlns:typ="http://types.common.response.micromuse.com/"><soapenv:Header/><soapenv:Body><typ:runPolicy><arg0>PolicyName</arg0><arg1>
<desc>input_parameter</desc><format>String</format><label>input_parameter</label><name>input_parameter</name><value>value</value>
</arg1><arg2>true</arg2>
</typ:runPolicy></soapenv:Body></soapenv:Envelope>
runPolicyResponseThe runPolicyResponse message is sent by the web services listener in response toa request from a calling application to run a policy.
The runPolicyResponse contains a single parameter result. This parametercontains an array of name-value pairs that correspond to the member variables inthe WSListenerResult data item that is returned by the policy.
The web services listener sends this message to a calling application if thewantResult parameter was specified as true in the originating runPolicy message.
WSListenerExceptionThe WSListenerException message is sent by the web services listener in responseto invalid messages from a calling application.
The WSListenerException contains a single parameter named WSListenerExceptionthat provides detail about the error.
Chapter 6. Working with the web services DSA 59
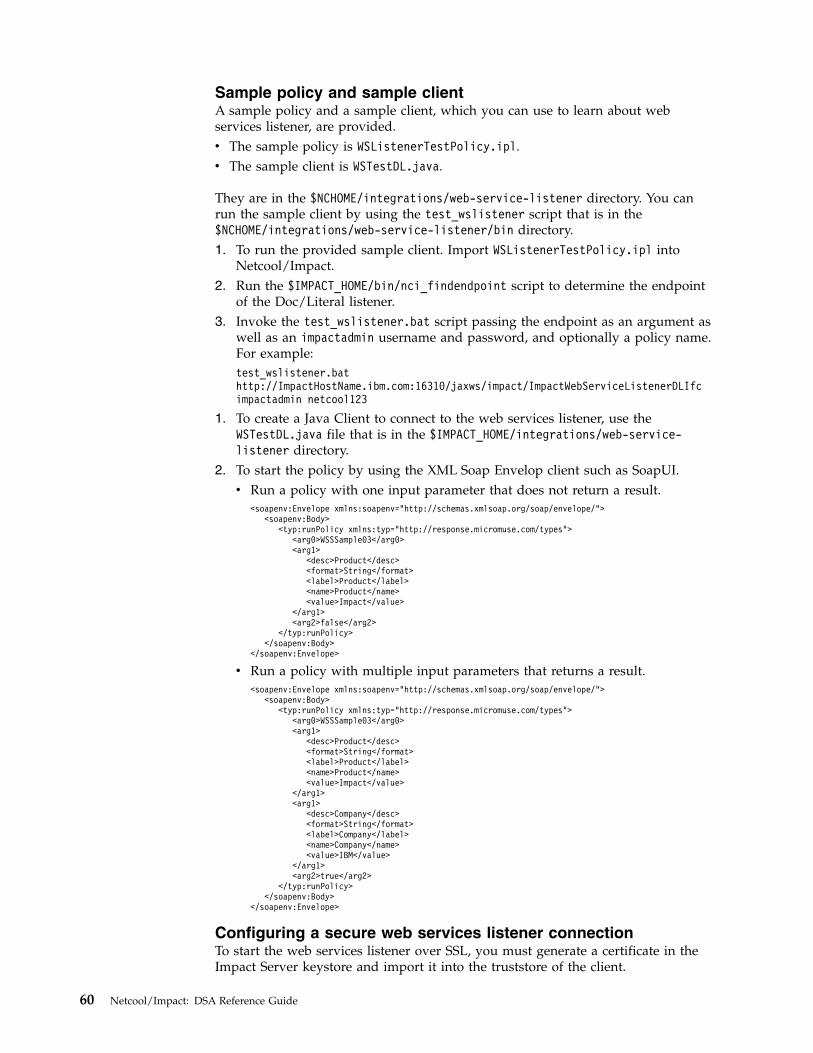
Sample policy and sample clientA sample policy and a sample client, which you can use to learn about webservices listener, are provided.v The sample policy is WSListenerTestPolicy.ipl.v The sample client is WSTestDL.java.
They are in the $NCHOME/integrations/web-service-listener directory. You canrun the sample client by using the test_wslistener script that is in the$NCHOME/integrations/web-service-listener/bin directory.1. To run the provided sample client. Import WSListenerTestPolicy.ipl into
Netcool/Impact.2. Run the $IMPACT_HOME/bin/nci_findendpoint script to determine the endpoint
of the Doc/Literal listener.3. Invoke the test_wslistener.bat script passing the endpoint as an argument as
well as an impactadmin username and password, and optionally a policy name.For example:test_wslistener.bathttp://ImpactHostName.ibm.com:16310/jaxws/impact/ImpactWebServiceListenerDLIfcimpactadmin netcool123
1. To create a Java Client to connect to the web services listener, use theWSTestDL.java file that is in the $IMPACT_HOME/integrations/web-service-listener directory.
2. To start the policy by using the XML Soap Envelop client such as SoapUI.v Run a policy with one input parameter that does not return a result.
<soapenv:Envelope xmlns:soapenv="http://schemas.xmlsoap.org/soap/envelope/"><soapenv:Body>
<typ:runPolicy xmlns:typ="http://response.micromuse.com/types"><arg0>WSSSample03</arg0><arg1>
<desc>Product</desc><format>String</format><label>Product</label><name>Product</name><value>Impact</value>
</arg1><arg2>false</arg2>
</typ:runPolicy></soapenv:Body>
</soapenv:Envelope>
v Run a policy with multiple input parameters that returns a result.<soapenv:Envelope xmlns:soapenv="http://schemas.xmlsoap.org/soap/envelope/">
<soapenv:Body><typ:runPolicy xmlns:typ="http://response.micromuse.com/types">
<arg0>WSSSample03</arg0><arg1>
<desc>Product</desc><format>String</format><label>Product</label><name>Product</name><value>Impact</value>
</arg1><arg1>
<desc>Company</desc><format>String</format><label>Company</label><name>Company</name><value>IBM</value>
</arg1><arg2>true</arg2>
</typ:runPolicy></soapenv:Body>
</soapenv:Envelope>
Configuring a secure web services listener connectionTo start the web services listener over SSL, you must generate a certificate in theImpact Server keystore and import it into the truststore of the client.
60 Netcool/Impact: DSA Reference Guide

About this task
The Liberty keystore used by Netcool/Impact contains a default certificate for thehost where Netcool/Impact is installed. The certificate matches the fqdn or shorthost name depending on your environment.
Procedure1. Use the following command to export the self-signed certificate to a file called
mycertificate.$IMPACT_HOME/sdk/bin/keytool -export -alias default -file mycertificate-keystore $IMPACT_HOME/wlp/usr/servers/<server>/resources/security/key.jks
2. When prompted enter the keystore password which will be the impactadminuser password configured at installation time.
3. Copy the mycertificate file to the location where you want to start theWebService call and import the certificate into the truststore that is used by theJava process. By default the truststore that is used by the Java process is in the$JAVA_HOME/jre/lib/security/cacerts file and its default password ischangeit.This password is not managed or updated by the Netcool/Impact installer. Ifyou change the password you can for you convenience make it the same as theLiberty or Impact keystore password.$JAVA_HOME/bin/keytool -import -alias default -file mycertificate-keystore $JAVA_HOME/jre/lib/security/cacerts
If you are running the test_wslistener script from the Netcool/Impactinstallation, the $JAVA_HOME that is used is $IMPACT_HOME/sdk.
4. When prompted enter the Java keystore password.5. Use the following command to run the test_wslistener script:
test_wslistener.bat https://<hostname>:<https port>/jaxws/impact/ImpactWebServiceListenerDLIfcimpactadmin <password> <optional policy>
Where <hostname> is the host name you configured in the CN field of the dnameargument of the certificate.
6. Run the following command to execute the sample client on a remote host orthe Impact Server.$JAVA_HOME\bin\java -Djavax.net.ssl.keyStore=$JAVA_HOME\<jre>\lib\security\cacerts"-cp ".;<$IMPACT_HOME>\integrations\web-service-listener\lib\*"WSTestDL https:/<impacthost>:16311/jaxws/impact/ImpactWebServiceListenerDLIfc
impactadmin <password> password <policy>
Where <password> is the impactadmin user password and <policy> is the nameof the policy to execute.
Creating policies by using the web services wizardYou can use the web Services wizard to develop policies. To do so, you connect tothe GUI and follow the on-screen prompts.
Procedure1. In the Policies tab, select the arrow next to the New Policy icon. To run the
Web services wizard, select Use Wizard > Web Services.2. In the Web Services Invocation-Introduction window, type in your policy name
in the Policy Name field. Click Next to continue. Examplehttp://www.webservicex.net/stockquote.asmx?wsdl.
Chapter 6. Working with the web services DSA 61

3. In the Web Services Invocation-WSDL file and Jar File window, in the URL orPath to WSDL field, enter the URL or a path for the target WSDL file.In instances where the GUI server is installed separately from the back-endserver, the file path for the WSDL file refers to the back-end server file system,not the GUI server file system. If you enter a URL for the WSDL file, that URLmust be accessible to the back-end Impact Server host and the GUI server host.
Note: If the WSDL file contains XSD imports, these files are providedseparately. The WSDL files and related XSD files must be placed in a directorywith no spaces.
4. In the Jar file area, select one of the following available options:v Select a previously generated jar file for the WSDL file:
Applies if you generated a jar file from a WSDL file previously. Select one ofthe existing jar files from the list menu.– Currency.jar
– Stock.jar
– length.jar
The Package Name field is automatically completed. Select the Edit checkbox to modify the package name.
v Provide a package name for the new jar file :
Select this option to create a jar file. Complete the Package Name field forthe new jar file. The package name cannot have a period ".".
Click Next.5. In the Web Service Invocation-Web Service Name, Port and Method window,
select the general web service information for the following items: WebServices, Web Service Port Type, and Web Service Method. Click Next.
6. In the Web Services Invocation - Web Service Method parameters window,enter the parameters that are required by the target web service method. ClickNext.
A Complex Type is a composite of another type expand the parameter name toview what information is required.For a Collection Type, multiple values are required, the user must first enter asize for the collection when asked to enter a for the collection type. When OKis pressed, parameter entry fields are generated for each item in the collection.
7. Optional: In the Web Service Invocation-Web Service EndPoint window, youcan edit the URL or Path to WSDL by selecting the edit check box. To enableweb service security, select the Enable web service security service check box.Select one of the following authentication types:v HTTP user name authentication
v SOAP message user name authentication
Add the User name and Password. Click Next.
8. The Web Service Invocation-Summary and Finish window is displayed. Itshows the name of the policy. Click Finish to create the policy.
Creating policies by using policy editorYou can use the policy editor to develop policies.
62 Netcool/Impact: DSA Reference Guide
Procedure1. Get the latest WSDL file which must match your target web service.2. Determine the endpoint of your target running web service.3. Run the $NCHOME/impact/bin/nci_compilewsdl script to compile the target
WSDL file. Always place the output JAR file to $NCHOME/wslib directory.Otherwise, Netcool/Impact is not able to find the JAR file at run time.
4. Use policy editor to write your policy to make web services calls.5. Run the policy that you created.
Integrating with third-party web servicesSometimes in the development phase you must change your wsdl file and reuseNetcool/Impact web services wizard for testing purposes. Because JVM caches theloaded classes, the wizard cannot recognize the latest changes. Use this procedureto clear the cache.
Procedure1. Stop the Impact Server.2. Remove the old JAR file from the $NCHOME/wslib directory.3. Start the Impact Server.4. Run the nci_compilewsdl script from IMPACT_HOME/bin to generate the new JAR
file in the wslib directory or alternatively run the web services wizard togenerate a new JAR file and a new policy.
Chapter 6. Working with the web services DSA 63

64 Netcool/Impact: DSA Reference Guide

Chapter 7. Web services security
Web service DSA has limited support to Web services security standard defined byOasis-Open. The following security features are supported:v User name token authenticationv User name token authentication with a plain text passwordv Message integrity and non-repudiation with signaturev Encryptionv Sign and encrypt messages
Enabling web services securityUse the following method to enable web message level web services security. Youcan enable HTTP basic authentication (transport level security) by adding optionalproperties into the policy.
Procedure1. Stop all the Impact Servers in the cluster.2. Complete the following steps for the primary Impact Server. These changes are
replicated to the secondary servers in the cluster.a. Update the $NCHOME/dsa/wsdsa/wss/conf/wss.xml file in your Tivoli
Netcool/Impact installation directory to set up security features that arerequired by your web service calls. For most cases, you must update tworelated XML elements, which are OutflowSecurity and possiblyInflowSecurity in your wss.xml file.
b. Update the $NCHOME/dsa/wsdsa/wss/conf/wscb.properties file to set up userID and password that is required by particular security features. Forexample, UsernameToken or Signature. This file has the following format:num=2uid.1=clientpwd.1=apacheuid.2=servicepwd.2=apache
where num property defines how many user names and password pairs areincluded in the file. uid.1 defines the user name for the first pair, whilepwd.1 is the password for the first pair. The same scheme applies to theconsecutive pairs.
3. Complete the following step for each Impact Server in the cluster:a. If security features such as signature or encryption are required by web
service calls, a signature property file or encryption property file is neededon impact Java class path. Place property files in the jar that is compiled forthe web service, for details see the next topic Creating a web service policyusing web service security. The following is an example property file that iscalled client.properties. You must enter each line of code on a separateline.org.apache.ws.security.crypto.provider=org.apache.ws.security.components.crypto.Merlinorg.apache.ws.security.crypto.merlin.keystore.type=jksorg.apache.ws.security.crypto.merlin.keystore.password=apacheorg.apache.ws.security.crypto.merlin.file=client.jks
© Copyright IBM Corp. 2006, 2016 65
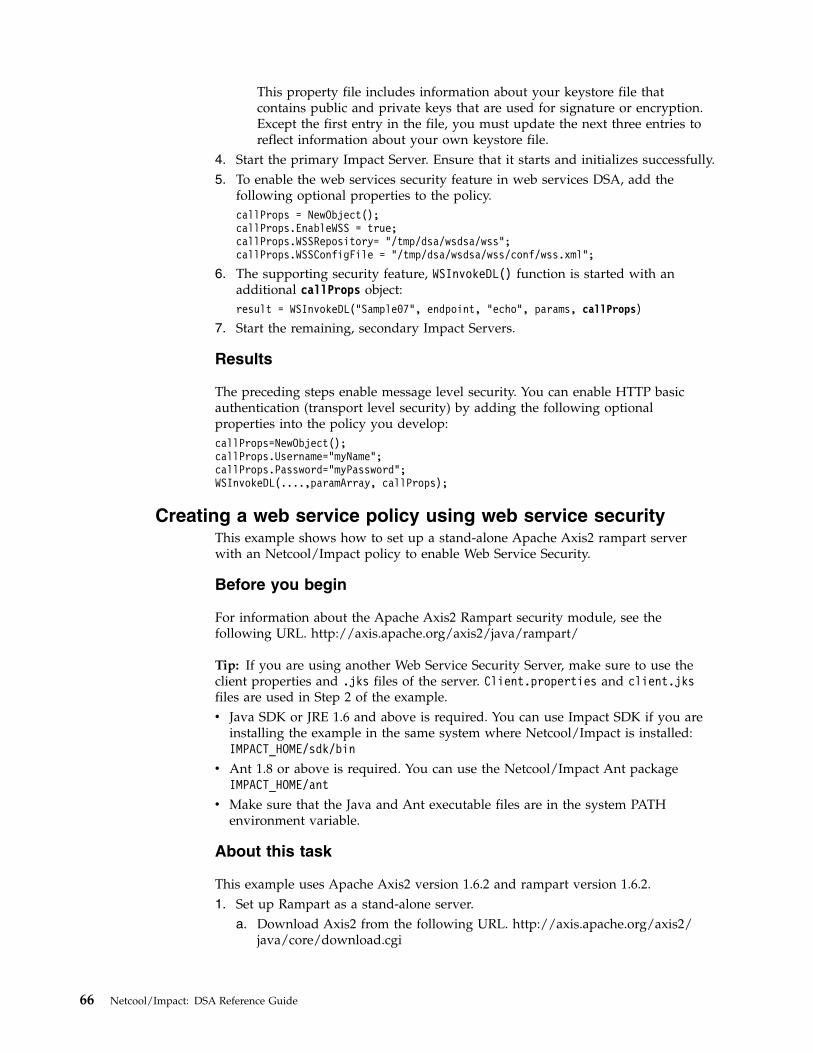
This property file includes information about your keystore file thatcontains public and private keys that are used for signature or encryption.Except the first entry in the file, you must update the next three entries toreflect information about your own keystore file.
4. Start the primary Impact Server. Ensure that it starts and initializes successfully.5. To enable the web services security feature in web services DSA, add the
following optional properties to the policy.callProps = NewObject();callProps.EnableWSS = true;callProps.WSSRepository= "/tmp/dsa/wsdsa/wss";callProps.WSSConfigFile = "/tmp/dsa/wsdsa/wss/conf/wss.xml";
6. The supporting security feature, WSInvokeDL() function is started with anadditional callProps object:result = WSInvokeDL("Sample07", endpoint, "echo", params, callProps)
7. Start the remaining, secondary Impact Servers.
Results
The preceding steps enable message level security. You can enable HTTP basicauthentication (transport level security) by adding the following optionalproperties into the policy you develop:callProps=NewObject();callProps.Username="myName";callProps.Password="myPassword";WSInvokeDL(....,paramArray, callProps);
Creating a web service policy using web service securityThis example shows how to set up a stand-alone Apache Axis2 rampart serverwith an Netcool/Impact policy to enable Web Service Security.
Before you begin
For information about the Apache Axis2 Rampart security module, see thefollowing URL. http://axis.apache.org/axis2/java/rampart/
Tip: If you are using another Web Service Security Server, make sure to use theclient properties and .jks files of the server. Client.properties and client.jksfiles are used in Step 2 of the example.v Java SDK or JRE 1.6 and above is required. You can use Impact SDK if you are
installing the example in the same system where Netcool/Impact is installed:IMPACT_HOME/sdk/bin
v Ant 1.8 or above is required. You can use the Netcool/Impact Ant packageIMPACT_HOME/ant
v Make sure that the Java and Ant executable files are in the system PATHenvironment variable.
About this task
This example uses Apache Axis2 version 1.6.2 and rampart version 1.6.2.1. Set up Rampart as a stand-alone server.
a. Download Axis2 from the following URL. http://axis.apache.org/axis2/java/core/download.cgi
66 Netcool/Impact: DSA Reference Guide

b. Download the Rampart from the following URL: http://axis.apache.org/axis2/java/rampart/download.html
c. Unpack the files that you downloaded in the previous two steps and set thefollowing environment variables:v AXIS2_HOME=<where axis2 package downloaded and unpacked>
v RAMPART_HOME=<where rampart package downloaded and unpacked>
d. Copy all the JAR files from RAMPART_HOME\lib to AXIS2_HOME\lib cp –rfRAMPART_HOME\lib\* AXIS2_HOME\lib\.
Remember: The Rampart package is running on the Windows server andNetcool/Impact is running on the UNIX server. Use the appropriate filesystem separator according to your operating system.
e. Copy the following two MAR files to AXIS2_HOME\repository\modules.v RAMPART_HOME\modules\ rahas-1.6.2.mar
v RAMPART_HOME\modules\rampart-1.6.2.mar.v Use the following commands.
Copy RAMPART_HOME\modules\ rahas-1.6.2.mar AXIS2_HOME\repository\modules\.
Copy RAMPART_HOME\modules\ rampart -1.6.2.mar AXIS2_HOME\repository\modules\.
f. Go to the RAMPART_HOME\samples\basic directorycd RAMPART_HOME\samples\basic directory
The directory includes several sample examples marked sample01 tosample11. This example uses sample04. The Sample04 application echoes onlythe message that you typed in the variable.
g. Run the following command to build sample04 application and start thestand-alone server.ant clean service.04
The command creates all the necessary files and starts a stand-aloneapplication for sample04. The port number is displayed in the terminal.Buildfile: E:\opt\rampart-1.6.2\samples\basic\build.xml
clean:[delete] Deleting directory E:\opt\rampart-1.6.2\samples\basic\build
check.dependency:
service.04:[mkdir] Created dir:
E:\opt\rampart-1.6.2\samples\basic\build\service_repositories\sample04[mkdir] Created dir:
E:\opt\rampart-1.6.2\samples\basic\build\service_repositories\sample04\services[mkdir] Created dir:
E:\opt\rampart-1.6.2\samples\basic\build\service_repositories\sample04\modules[copy] Copying 2 files to
E:\opt\rampart-1.6.2\samples\basic\build\service_repositories\sample04\modules[mkdir] Created dir: E:\opt\rampart-1.6.2\samples\basic\build\temp[mkdir] Created dir: E:\opt\rampart-1.6.2\samples\basic\build\temp\META-INF[javac] E:\opt\rampart-1.6.2\samples\basic\build.xml:191:warning: ’includeantruntime’ was not set,
defaulting to build.sysclasspath=last; set to false for repeatable builds[javac] Compiling 2 source files to E:\opt\rampart-1.6.2\samples\basic\build\temp[copy] Copying 1 file to E:\opt\rampart-1.6.2\samples\basic\build\temp\META-INF[copy] Copying 1 file to E:\opt\rampart-1.6.2\samples\basic\build\temp[copy] Copying 1 file to E:\opt\rampart-1.6.2\samples\basic\build\temp[jar] Building jar:
E:\opt\rampart-1.6.2\samples\basic\build\service_repositories\sample04\services\sample04.aar[delete] Deleting directory E:\opt\rampart-1.6.2\samples\basic\build\temp[java] [SimpleHTTPServer] Starting[java] [SimpleHTTPServer] Using the Axis2 Repository
E:\opt\rampart-1.6.2\samples\basic\build\service_repositories\sample04[java] [SimpleHTTPServer] Listening on port 8080[java] [INFO] Deploying module: addressing-1.6.2 - file:
/E:/opt/rampart-1.6.2/samples/basic/build/service_repositories/sample04/modules
Chapter 7. Web services security 67

/addressing-1.6.2.mar[java] [INFO] Deploying module: rampart-1.6.2 - file:
/E:/opt/rampart-1.6.2/samples/basic/build/service_repositories/sample04/modules/rampart-1.6.2.mar
[java] [INFO] Deploying Web service: sample04.aar - file:/E:/opt/rampart-1.6.2/samples/basic/build/service_repositories/sample04/services/sample04.aar
[java] [INFO] Listening on port 8080[java] [SimpleHTTPServer] Started
The example shows that the server is running on port 8080 and no warningor errors occur.
h. Verify the application by going to http://server:8080/axis2/services andview the following output.Deployed servicessample04Available operationsecho
Click the sample04 link to view the WSDL file. The full link to the WSDLfile is http://server:8080/axis2/services/sample04?wsdl.
Now that service is up and running, the next step is to create a policy andsetup Netcool/Impact.
2. Create a Netcool/Impact policy and configure Web Service Security.a. Create a policy with the policy wizard in the usual way. The WSDL file is
http://server:8080/axis2/services/sample04?wsdl and name of the JARfile is sample04.
Remember: When the wizard prompts for end point and security, makesure to enable the security. Select the following option SOAP message username authentication so you do not have to enter a user name andpassword.
b. The wizard creates the policy with the following parameters://Enable web service securitycallProps = NewObject();callProps.EnableWSS = true;callProps.WSSRepository= "/opt//IBM/tivoli/Impact71/dsa/wsdsa/wss";callProps.WSSConfigFile = "/opt/ /IBM/tivoli/Impact71/dsa/wsdsa/wss/conf/Sample04_wss.xml";
Tip: The path to the file can vary if you have a different Netcool/Impactinstallation location.
c. The xml file /opt/ /IBM/tivoli/Impact71/dsa/wsdsa/wss/conf/Sample04_wss.xml is created as template.For example, if you need to add a statement to update the InFlowSecurityand OutFlowSecurity parameters actions to match applicationimplementation. See the application services.xml file in the$RAMPART_HOME/samples/basic/<sample directory> directory for details.If you are using a different web service server, you need to update the filesaccordingly. A full working xml file for this example is located at the end ofthis section see Example of Sample04_wss.xml. Make sure to overwrite theexisting template with the updated file.
d. Update the file /opt/ /IBM/tivoli/Impact71/dsa/wsdsa/wss/conf/wscb.properties to num=1 uid.1=client pwd.1=apache
e. Copy or FTP client.properties and client.jks from RAMPART_HOME\samples\keys to the IMPACT_HOME\wslib directory.
f. The wizard creates a JAR file in IMPACT_HOME/wslib/sample04.jar. Updatethe JAR file with client.properties and client.jks by using the followingcommand:
68 Netcool/Impact: DSA Reference Guide

IMPACT_HOME/sdk/bin/jar –uf sample04.jar IMPACT_HOME/wslib/ client.*
To verify that the JAR file was updated:IMPACT_HOME\sdk\bin\jar –tf sample04.jar |grep
client to display the content of the JAR file.g. Move the client.properties and client.jks from the wslib directoryh. Restart Netcool/Impact.i. Run the policy that you created with the policy wizard.
Results
The following results are displayed.Parser log: Web Service call echo return result:<ns:echoResponse xmlns:ns="http://sample04.samples.rampart.apache.org"xmlns:soapenv="http://www.w3.org/2003/05/soap-envelope">
<ns:return>Hello from Impact 7 Server</ns:return></ns:echoResponse
Example of Sample04_wss.xmlA working example of the Sample04_wss.xml template.
Example<?xml version="1.0" encoding="UTF-8"?><!-- *************************************************** {COPYRIGHT-TOP-RM} **** Licensed Materials - Property of IBM* "Restricted Materials of IBM"* 5724-S43** (C) Copyright IBM Corporation 2006, 2011. All Rights Reserved.** US Government Users Restricted Rights - Use, duplication, or* disclosure restricted by GSA ADP Schedule Contract with IBM Corp.** this is a new on:******************************************************** {COPYRIGHT-END-RM} --><!--This file is used by automation. Edit at your own risk--><axisconfig name="AxisJava2.0"><module ref="rampart"/><parameter name="OutflowSecurity"><action>
<items>Timestamp Signature</items><user>client</user>
<signaturePropFile>client.properties</signaturePropFile><passwordCallbackClass>com.micromuse.common.util.WSPWCBHandler</passwordCallbackClass><signatureKeyIdentifier>DirectReference</signatureKeyIdentifier>
</action></parameter>
<parameter name="InflowSecurity"><action>
<items>Timestamp Signature</items><signaturePropFile>client.properties</signaturePropFile></action>
</parameter>
<transportSender class="org.apache.axis2.transport.http.CommonsHTTPTransportSender" name="http"><parameter locked="false" name="PROTOCOL">HTTP/1.1</parameter><parameter locked="false" name="Transfer-Encoding">chunked</parameter>
</transportSender>
<phaseOrder type="InFlow"><phase name="Transport">
<handler class="org.apache.axis2.engine.RequestURIBasedDispatcher"name="RequestURIBasedDispatcher">
<order phase="Transport"/></handler><handler class="org.apache.axis2.engine.SOAPActionBasedDispatcher"
name="SOAPActionBasedDispatcher"><order phase="Transport"/>
Chapter 7. Web services security 69

</handler></phase><phase name="Security"/><phase name="PreDispatch"/><phase class="org.apache.axis2.engine.DispatchPhase" name="Dispatch">
<handler class="org.apache.axis2.engine.AddressingBasedDispatcher"name="AddressingBasedDispatcher">
<order phase="Dispatch"/></handler>
<handler class="org.apache.axis2.engine.SOAPMessageBodyBasedDispatcher"name="SOAPMessageBodyBasedDispatcher">
<order phase="Dispatch"/></handler><handler class="org.apache.axis2.engine.InstanceDispatcher" name="InstanceDispatcher">
<order phase="Dispatch"/></handler>
</phase><phase name="OperationInPhase"/>
</phaseOrder><phaseOrder type="OutFlow">
<phase name="OperationOutPhase"/><phase name="PolicyDetermination"/><phase name="MessageOut"/><phase name="Security"/>
</phaseOrder><phaseOrder type="InFaultFlow">
<phase name="PreDispatch"/><phase class="org.apache.axis2.engine.DispatchPhase" name="Dispatch">
<handler class="org.apache.axis2.engine.RequestURIBasedDispatcher"name="RequestURIBasedDispatcher">
<order phase="Dispatch"/></handler>
<handler class="org.apache.axis2.engine.SOAPActionBasedDispatcher"name="SOAPActionBasedDispatcher">
<order phase="Dispatch"/></handler>
<handler class="org.apache.axis2.engine.AddressingBasedDispatcher"name="AddressingBasedDispatcher">
<order phase="Dispatch"/></handler>
<handler class="org.apache.axis2.engine.SOAPMessageBodyBasedDispatcher"name="SOAPMessageBodyBasedDispatcher">
<order phase="Dispatch"/></handler><handler class="org.apache.axis2.engine.InstanceDispatcher" name="InstanceDispatcher">
<order phase="Dispatch"/></handler>
</phase><!-- user can add his own phases to this area --><phase name="OperationInFaultPhase"/>
</phaseOrder><phaseOrder type="OutFaultFlow">
<!-- user can add his own phases to this area --><phase name="OperationOutFaultPhase"/><phase name="PolicyDetermination"/><phase name="MessageOut"/>
</phaseOrder></axisconfig>
User name token authenticationAuthentication uses a security token to validate the user and determine whether aclient is valid in a particular context. User name tokens are used to validate usernames and passwords.
Procedure
Update the $NCHOME/dsa/wsdsa/wss/conf/wss.xml parameters in the following way:<parameter name="OutflowSecurity"<action><items>UsernameToken Timestamp</items>
70 Netcool/Impact: DSA Reference Guide

,user>bob</user><passwordCallbackClass>com.micromuse.common.util.WSPWCBHandler</passwordCallbackClass></action><parameter>
In the corresponding wscb.properties file, the parameter values are like:num=1uid.1=bobpwd.1=bobPassword
User name token authentication with a plain text passwordAuthentication uses a security token to validate the user and determine whether aclient is valid in a particular context. User name tokens are used to validate usernames and passwords.
Procedure
Update the $NCHOME/dsa/wsdsa/wss/conf/wss.xml parameters:<parameter name="OutflowSecurity"><action><items>UsernameToken</items><user>bob</user><passwordCallbackClass>com.micromuse.common.util.WSPWCBHandler</passwordCallbackClass></action><parameter>
In the corresponding wscb.properties file, the parameter values are like:num=1uid.1=bobpwd.1=bobPassword
Message integrity and non-repudiation with signatureProcedure
In the $NCHOME/dsa/wsdsa/wss/conf/wss.xml file, make sure the OutflowSecurityand InflowSecurity are set in the following way:<parameter name="OutflowSecurity"><action><items>Timestamp Signature</items><user>client</user><signaturePropFile>client.properties</signaturePropFile><passwordCallbackClass>com.micromuse.common.util.WSPWCBHandler</passwordCallbackClass><signatureKeyIdentifier>DirectReference</signatureKeyIdentifier>
</action><parameter>
<parameter name="InflowSecurity"><action><items>Timestamp Signature</items>
<signaturePropFile>client.properties</signaturePropFile></action><parameter>
The <user>client</user> expression here denotes the outgoing Web services calls,which will be signed by the private key of user client.In the corresponding wscb.properties file, the parameter values are like:
Chapter 7. Web services security 71
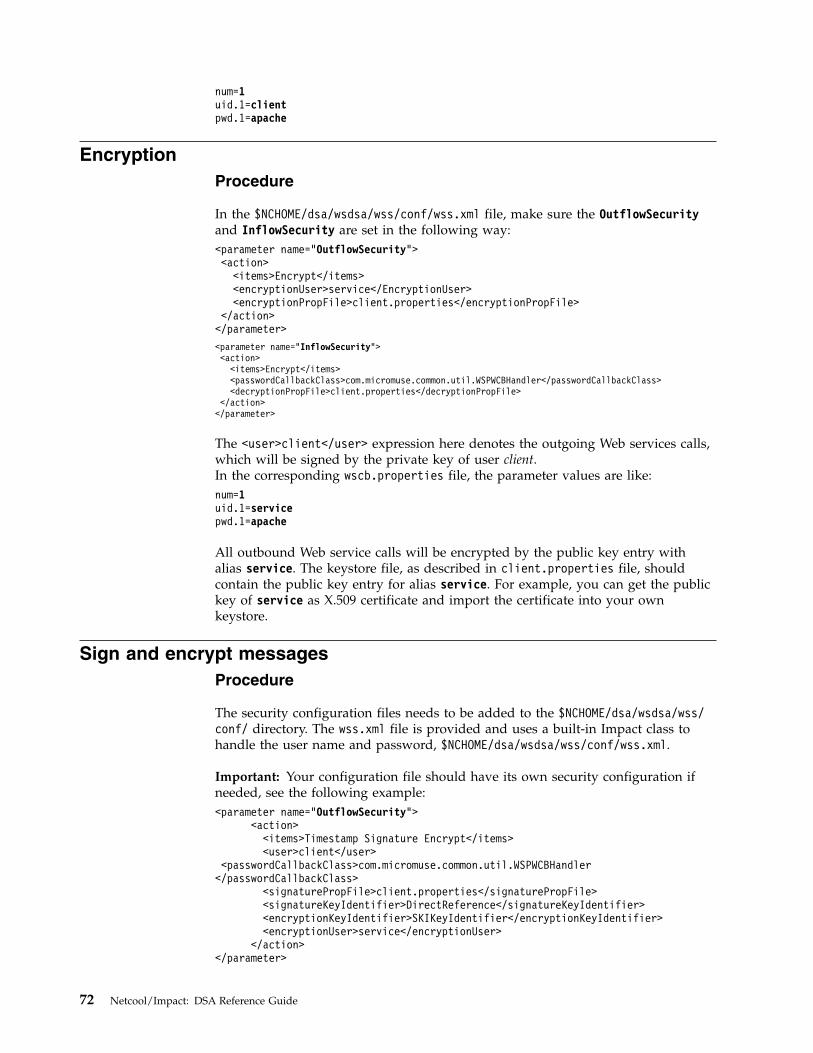
num=1uid.1=clientpwd.1=apache
EncryptionProcedure
In the $NCHOME/dsa/wsdsa/wss/conf/wss.xml file, make sure the OutflowSecurityand InflowSecurity are set in the following way:<parameter name="OutflowSecurity"><action><items>Encrypt</items><encryptionUser>service</EncryptionUser><encryptionPropFile>client.properties</encryptionPropFile>
</action></parameter>
<parameter name="InflowSecurity"><action><items>Encrypt</items><passwordCallbackClass>com.micromuse.common.util.WSPWCBHandler</passwordCallbackClass><decryptionPropFile>client.properties</decryptionPropFile>
</action></parameter>
The <user>client</user> expression here denotes the outgoing Web services calls,which will be signed by the private key of user client.In the corresponding wscb.properties file, the parameter values are like:num=1uid.1=servicepwd.1=apache
All outbound Web service calls will be encrypted by the public key entry withalias service. The keystore file, as described in client.properties file, shouldcontain the public key entry for alias service. For example, you can get the publickey of service as X.509 certificate and import the certificate into your ownkeystore.
Sign and encrypt messagesProcedure
The security configuration files needs to be added to the $NCHOME/dsa/wsdsa/wss/conf/ directory. The wss.xml file is provided and uses a built-in Impact class tohandle the user name and password, $NCHOME/dsa/wsdsa/wss/conf/wss.xml.
Important: Your configuration file should have its own security configuration ifneeded, see the following example:<parameter name="OutflowSecurity">
<action><items>Timestamp Signature Encrypt</items><user>client</user>
<passwordCallbackClass>com.micromuse.common.util.WSPWCBHandler</passwordCallbackClass>
<signaturePropFile>client.properties</signaturePropFile><signatureKeyIdentifier>DirectReference</signatureKeyIdentifier><encryptionKeyIdentifier>SKIKeyIdentifier</encryptionKeyIdentifier><encryptionUser>service</encryptionUser>
</action></parameter>
72 Netcool/Impact: DSA Reference Guide

<parameter name="InflowSecurity"><action><items>Timestamp Signature Encrypt</items>
<passwordCallbackClass>com.micromuse.common.util.WSPWCBHandler</passwordCallbackClass>
<signaturePropFile>client.properties</signaturePropFile></action>
</parameter>
In the corresponding wscb.properties file, the parameter values are like:num=2uid.1=servicepwd.1=apacheuid.2=clientpwd.2=apache
Chapter 7. Web services security 73

74 Netcool/Impact: DSA Reference Guide

Chapter 8. Working with the JMS DSA
You can use the Java Message Service (JMS) data source adapter (DSA) to send andreceive JMS messages from within a policy.
The JMS DSA is installed automatically when you install Netcool/Impact.
For detailed information about connecting WebSphere MQ and JMS DSA, see“Connecting to WebSphere MQ and JMS DSA” on page 87.
Supported JMS providersBefore you can use the Java Message Service (JMS) data source adapter (DSA) tosend and retrieve JMS messages, you must obtain the correct set of JMS clientlibraries.
The JMS client libraries are third-party software components that provide thefunction that is required to connect to the JMS and JNDI providers in yourenvironment. These libraries are Java JAR files that are distributed with each JMSapplication. The JMS DSA is compatible with JMS providers that fully support theJMS 1.1 specification.
For more information about JMS 1.1, see the Oracle Java website athttp://www.oracle.com/technetwork/java/docs-136352.html. Some supported JMSproviders include OpenJMS 0.7.7; BEA WebLogic 8.1; Oracle Java SystemApplication Server 8 and later; and WebSphere MQ. For information aboutconnecting WebSphere MQ to a JMS DSA, see “Connecting to WebSphere MQ andJMS DSA” on page 87.
Configuring JMS DSAs to send and receive JMS messagesYou must complete the configuration steps before you can use the Java MessageService (JMS) data source adapter (DSA) to send and retrieve JMS messages.
Procedure1. Obtain and install the required JMS client libraries.2. Copy the client JAR files from the JMS client installation directory to the
$NCHOME/dsalib directory.3. Restart the Impact Server.4. Create a JMS data source, and configure it for the JMS source.
For more information about creating a JMS data source, see “JMS data source”on page 76.
5. Handle the incoming JMS messages.You can handle the incoming JMS messages by using any of these approaches:v Write JMS policies that use the JMS data source, and the JMS functions.
For more information, see “Writing JMS DSA policies” on page 80.v Configure the JMSListener service to send JMS events to a policy.
© Copyright IBM Corp. 2006, 2016 75

If you use the JMSListener to send JMS messages to your policy, you do nothave to use the ReceiveJMSMessage function to receive them. For moreinformation, see “Handling incoming messages from a JMS message listener”on page 86.
Setting up OpenJMS as the JMS providerYou can set up OpenJMS as the Java Message Service (JMS) provider forNetcool/Impact.
Procedure1. Obtain the OpenJMS libraries from the OpenJMS website http://
openjms.sourceforge.net/.2. To install OpenJMS, follow the procedure in the getting started information that
is available on the OpenJMS website.3. Copy the OpenJMS client JAR files to the $NCHOME/dsalib directory.
You can find the OpenJMS client JAR files in the lib subdirectory in theOpenJMS installation directory.
4. Restart the Impact Server.5. To start the OpenJMS server, use the startup script that is in the bin
subdirectory in the OpenJMS installation directory.6. Create a JMS data source, and configure it for OpenJMS.
For more information, see “JMS data source”
JMS data sourceA Java Message Service (JMS) data source abstracts the information that is requiredto connect to a JMS Implementation.
This data source is used by the JMSMessageListener service, the SendJMSMessage,and ReceiveJMSMessage functions.
JMS data source configuration propertiesYou can configure the properties for the Java Message Service (JMS) data source.
Table 22. General settings for the JMS data source window
Window element Description
Data Source Name Enter a unique name to identify the datasource. You can use only letters, numbers,and the underscore character in the datasource name. If you use UTF-8 characters,make sure that the locale on the ImpactServer where the data source is saved is setto the UTF-8 character encoding.
76 Netcool/Impact: DSA Reference Guide

Table 23. Source settings for the JMS data source window
Window element Description
JNDI Factory Initial Enter the name of the JNDI initial contextfactory. The JNDI initial context factory is aJava object that is managed by the JNDIprovider in your environment. The JNDIprovider is the component that manages theconnections and destinations for JMS.
OpenJMS, BEA WebLogic, and Sun JavaApplication Server distribute a JNDIprovider as part of their JMSimplementations. The required value for thisfield varies by JMS implementation. ForOpenJMS, the value of the property is
org.exolab.jms.jndi.InitialContextFactory
For other JMS implementations, see therelated product documentation.
JNDI Provider URL Enter the JNDI provider URL. The JNDIprovider URL is the network location of theJNDI provider. The required value for thisfield varies by JMS implementation. ForOpenJMS, the default value of this propertyis tcp://hostname:3035, where host name isthe name of the system on which OpenJMSis running. The network protocol TCP orRMI, must be specified in the URL string.For other JMS implementations, see therelated product documentation.
JNDI URL Packages Enter the Java package prefix for the JNDIcontext factory class. For OpenJMS, BEAWebLogic, and Sun Java Application Server,you are not required to enter a value in thisfield.
JMS Connection Factory Name Enter the name of the JMS connectionfactory object. The JMS connection factoryobject is a Java object that is responsible forcreating new connections to the messagingsystem. The connection factory is a managedobject that is administered by the JMSprovider. For example, if the provider isBEA WebLogic, the connection factory objectis defined, instantiated, and controlled bythat application. For the name of theconnection factory object for your JMSimplementation, see the related productdocumentation.
JMS Destination Name Enter the name of a JMS topic or queue,which is the name of the remote topic orqueue where the JMS message listenerlistens for new messages.
Chapter 8. Working with the JMS DSA 77

Table 23. Source settings for the JMS data source window (continued)
Window element Description
JMS Connection User Name Enter a JMS user name. If the JMS providerrequires a user name to listen to remotedestinations for messages, enter the username in this field. JMS user accounts arecontrolled by the JMS provider.
JMS Connection Password If the JMS provider requires a password tolisten to remote destinations for messages,enter the password in this field.
Test Connection Test the connection to the JMSImplementation. If the test is successful, thesystem shows the following message:
JMS: Connection OK
Specifying more JNDI properties for the JMS data sourceYou can specify more Java Naming and Directory Interface (JNDI) properties byediting the Java Message Service (JMS) data source.
Procedure1. Open the JMS data source for editing in a text editor of your choice. You can
find all data sources in the $IMPACT_HOME/etc/ directory. The data source filename is <servername>_<datasourceName>.ds. <servername> is the name of theImpact Server instance, and <datasourceName> is the name of your JMS datasource as displayed in the data source editor in GUI.
2. Add your JNDI properties in the following format:<datasourceName>.JMS.DSPROPERTY.#.NAME=<property><datasourceName>.JMS.DSPROPERTY.#.VALUE=<property value>
# is the property number in a sequence of properties, the starting number is 1,for example:<datasourceName>.JMS.DSPROPERTY.1.NAME=java.naming.factory.initial<datasourceName>.JMS.DSPROPERTY.1.VALUE=org.exolab.jms.jndi.
InitialContextFactory<datasourceName>.JMS.DSPROPERTY.2.NAME=java.naming.provider.url<datasourceName>.JMS.DSPROPERTY.2.VALUE=tcp://jndi_host:3035<datasourceName>.JMS.DSPROPERTY.3.NAME=java.naming.security.principal<datasourceName>.JMS.DSPROPERTY.3.VALUE=User1<datasourceName>.JMS.DSPROPERTY.4.NAME=java.naming.security.credentials<datasourceName>.JMS.DSPROPERTY.4.VALUE=password<datasourceName>.JMS.NUMDSPROPERTIES=4
The <datasourceName>.JMS.NUMDSPROPERTIES=<number of properties> propertyspecifies the number of more properties, 4 in the previous example.
Note: Use the $IMPACT_HOME/bin/nci_crypt utility to encrypt the value of thejava.naming.security.credentials property.
3. Save the changes in the data source, and restart the Impact Server to apply thechanges.
JMS message listenerThe Java Message Service (JMS) message listener service runs a policy in responseto incoming messages that are sent by external JMS message providers.
78 Netcool/Impact: DSA Reference Guide

The message provider can be any other system or application that can send JMSmessages. Each JMS message listener listens to a single JMS topic or queue. Thereis one default JMS message listener named JMSMessageListener. You can create asmany listener services as you need, each of which listens to a different topic orqueue.
A JMS message listener is only required when you want Netcool/Impact to listenpassively for incoming messages that originate with JMS message producers inyour environment. You can actively send and retrieve messages from within apolicy without using a JMS message listener.
JMS message listener service configuration propertiesYou can configure the properties for the Java Message Service (JMS) listenerservice.
Table 24. JMSMessageListener Service configuration window
Window element Description
Service name Enter a unique name to identify the service.
Policy To Execute Select the policy that you created to run in response toincoming messages from the JMS service.
JMS Data Source JMS data source to use with the service.
You need an existing and valid JMS data source for theJMS Message Listener service to establish a connectionwith the JMS implementation and to receive messages.For more information about creating JMS data sources,see “JMS data source configuration properties” on page76.
Message Selector The message selector is a filter string that defines whichmessages cause Netcool/Impact to run the policyspecified in the service configuration. You must use theJMS message selector syntax to specify this string.Message selector strings are similar in syntax to thecontents of an SQL WHERE clause, where messageproperties replace the field names that you might use inan SQL statement.
The content of the message selector depends on the typesand content of messages that you anticipate receivingwith the JMS message listener. For more informationabout message selectors, see the JMS specification or thedocumentation distributed with your JMSimplementation. The message selector is an optionalproperty.
Durable Subscription: Enable You can configure the JMS message listener service to usedurable subscriptions for topics that allow the service toreceive messages when it does not have an activeconnection to the JMS implementation. A durablesubscription can have only one active subscriber at atime. Only a JMS topic can have durable subscriptions.
Client ID Client ID for durable subscription. It defines the clientidentifier value for the connection. It must be unique inthe JMS Implementation.
Chapter 8. Working with the JMS DSA 79
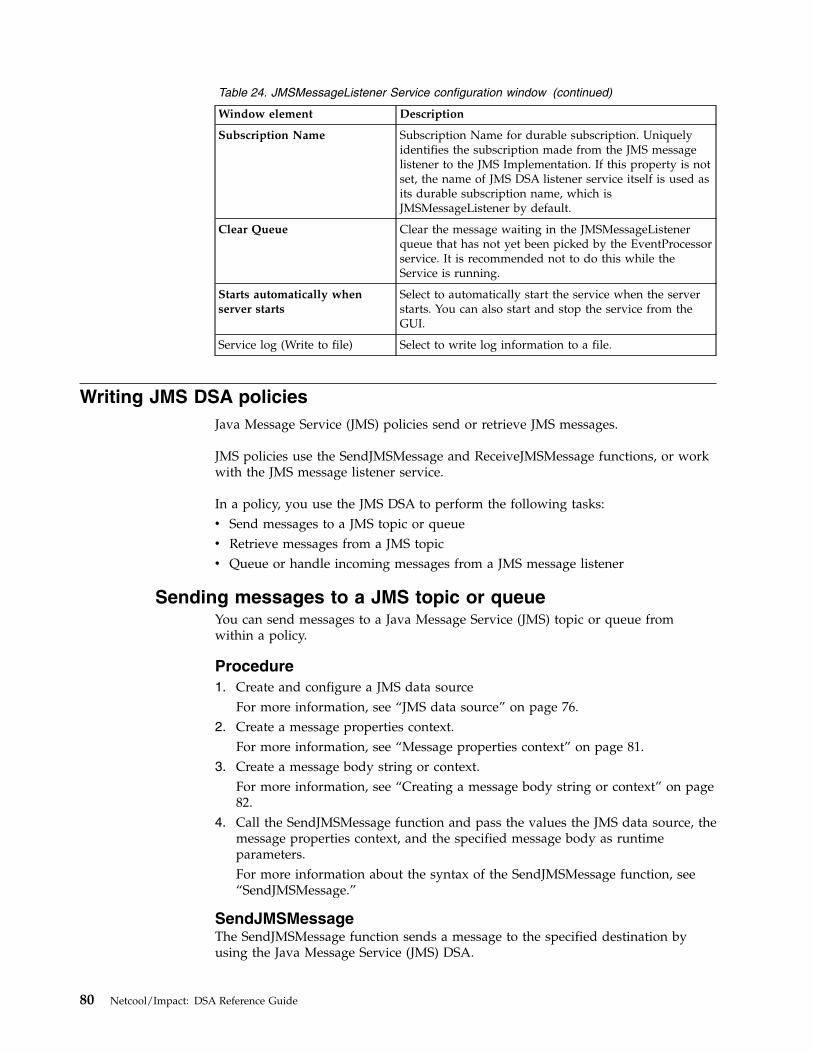
Table 24. JMSMessageListener Service configuration window (continued)
Window element Description
Subscription Name Subscription Name for durable subscription. Uniquelyidentifies the subscription made from the JMS messagelistener to the JMS Implementation. If this property is notset, the name of JMS DSA listener service itself is used asits durable subscription name, which isJMSMessageListener by default.
Clear Queue Clear the message waiting in the JMSMessageListenerqueue that has not yet been picked by the EventProcessorservice. It is recommended not to do this while theService is running.
Starts automatically whenserver starts
Select to automatically start the service when the serverstarts. You can also start and stop the service from theGUI.
Service log (Write to file) Select to write log information to a file.
Writing JMS DSA policiesJava Message Service (JMS) policies send or retrieve JMS messages.
JMS policies use the SendJMSMessage and ReceiveJMSMessage functions, or workwith the JMS message listener service.
In a policy, you use the JMS DSA to perform the following tasks:v Send messages to a JMS topic or queuev Retrieve messages from a JMS topicv Queue or handle incoming messages from a JMS message listener
Sending messages to a JMS topic or queueYou can send messages to a Java Message Service (JMS) topic or queue fromwithin a policy.
Procedure1. Create and configure a JMS data source
For more information, see “JMS data source” on page 76.2. Create a message properties context.
For more information, see “Message properties context” on page 81.3. Create a message body string or context.
For more information, see “Creating a message body string or context” on page82.
4. Call the SendJMSMessage function and pass the values the JMS data source, themessage properties context, and the specified message body as runtimeparameters.For more information about the syntax of the SendJMSMessage function, see“SendJMSMessage.”
SendJMSMessageThe SendJMSMessage function sends a message to the specified destination byusing the Java Message Service (JMS) DSA.
80 Netcool/Impact: DSA Reference Guide
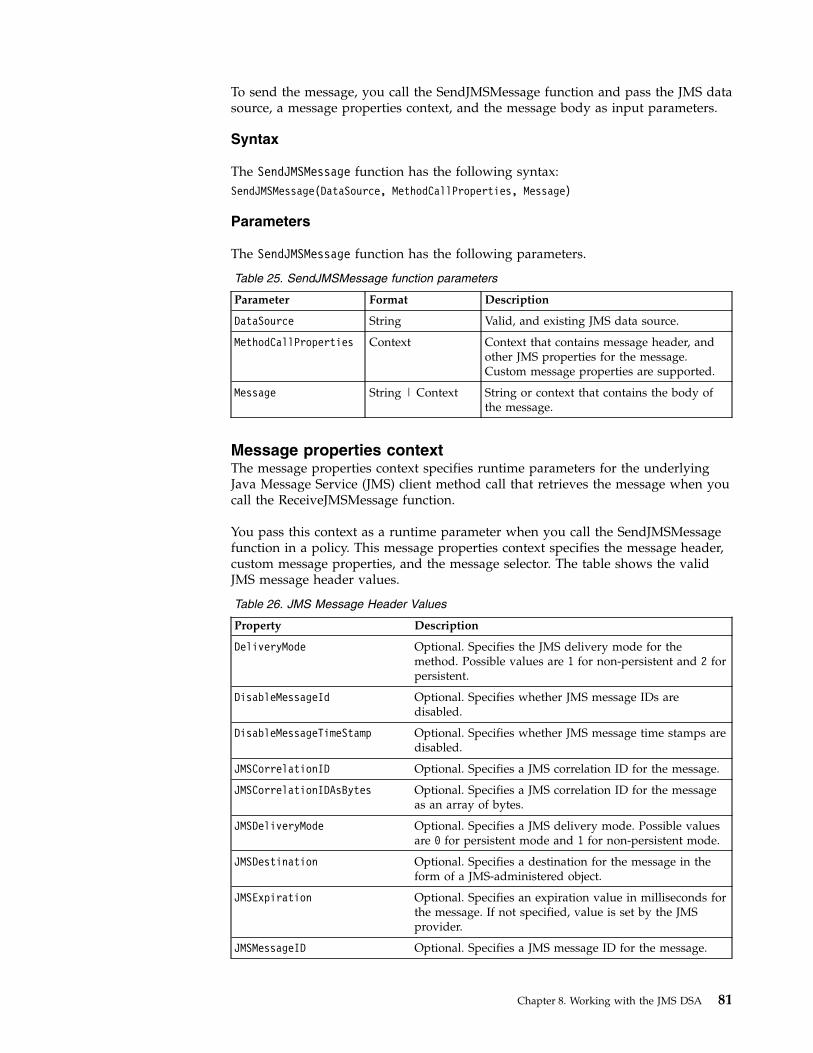
To send the message, you call the SendJMSMessage function and pass the JMS datasource, a message properties context, and the message body as input parameters.
Syntax
The SendJMSMessage function has the following syntax:SendJMSMessage(DataSource, MethodCallProperties, Message)
Parameters
The SendJMSMessage function has the following parameters.
Table 25. SendJMSMessage function parameters
Parameter Format Description
DataSource String Valid, and existing JMS data source.
MethodCallProperties Context Context that contains message header, andother JMS properties for the message.Custom message properties are supported.
Message String | Context String or context that contains the body ofthe message.
Message properties contextThe message properties context specifies runtime parameters for the underlyingJava Message Service (JMS) client method call that retrieves the message when youcall the ReceiveJMSMessage function.
You pass this context as a runtime parameter when you call the SendJMSMessagefunction in a policy. This message properties context specifies the message header,custom message properties, and the message selector. The table shows the validJMS message header values.
Table 26. JMS Message Header Values
Property Description
DeliveryMode Optional. Specifies the JMS delivery mode for themethod. Possible values are 1 for non-persistent and 2 forpersistent.
DisableMessageId Optional. Specifies whether JMS message IDs aredisabled.
DisableMessageTimeStamp Optional. Specifies whether JMS message time stamps aredisabled.
JMSCorrelationID Optional. Specifies a JMS correlation ID for the message.
JMSCorrelationIDAsBytes Optional. Specifies a JMS correlation ID for the messageas an array of bytes.
JMSDeliveryMode Optional. Specifies a JMS delivery mode. Possible valuesare 0 for persistent mode and 1 for non-persistent mode.
JMSDestination Optional. Specifies a destination for the message in theform of a JMS-administered object.
JMSExpiration Optional. Specifies an expiration value in milliseconds forthe message. If not specified, value is set by the JMSprovider.
JMSMessageID Optional. Specifies a JMS message ID for the message.
Chapter 8. Working with the JMS DSA 81

Table 26. JMS Message Header Values (continued)
Property Description
JMSPriority Optional. Specifies a JMS priority level for the message.JMS supports priority levels from 0 to 9, with 9 as thehighest.
JMSRedelivered Optional. Specifies whether the message is beingredelivered. Possible values are True or False.
JMSReplyTo Optional. Specifies the name of a JMS destination wherereplies to this message are sent.
JMSTimeStamp Optional. Specifies a time stamp for the message inseconds since the beginning of the UNIX epoch. If notspecified, the value is set by the JMS provider.
JMSType Optional. Specifies a JMS message type for the message.Some JMS implementations use a message repository tostore defined types of messages. You can use this headervalue to associate a particular message with a messagetype.
Priority Same as JMSPriority.
TimeToLive Optional. Specifies the length of time that a message isretained by the JMS delivery system before it expires. Thedefault value is 0, which indicates an unlimited messagelifetime.
For more information about the JMS message header, see the documentation thatwas provided with your JMS application.
Optionally, you can also specify custom message properties. These properties areuser-defined and can contain any value. Generally, these properties are used tosend meta information about messages that is not otherwise described in themessage header.
The following example shows how to create and populate a message propertiescontext:// Call NewObject to create the new contextMsgProps = NewObject();
// Assign message header values as member variablesMsgProps.TimeToLive = 0;MsgProps.Priority = 5;MsgProps.DeliveryMode = "PERSISTENT";MsgProps.ReplyTo = "jms/Topic";
// Assign custom message properties as member variablesMsgProps.Custom1 = "First custom property";MsgProps.Custom2 = "Second custom property";
Creating a message body string or contextYou specify the message body by using a string value or a context, depending onwhether you want to send a text message or a map message.
To specify the body of a text message, you use a string assignment statement in thepolicy. When you call SendJMSMessage, you pass this string to the function as aruntime parameter. This example shows how to assign the body of a text messageto a string:MsgTextBody = "Body content of text message";
82 Netcool/Impact: DSA Reference Guide
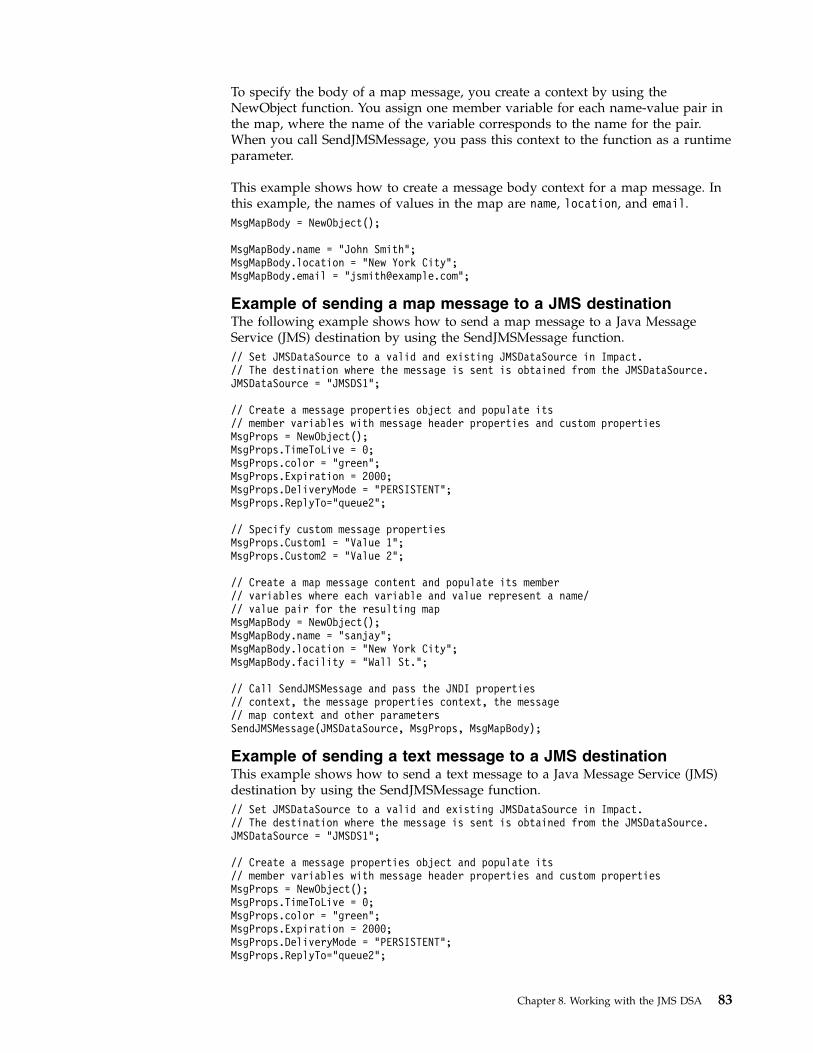
To specify the body of a map message, you create a context by using theNewObject function. You assign one member variable for each name-value pair inthe map, where the name of the variable corresponds to the name for the pair.When you call SendJMSMessage, you pass this context to the function as a runtimeparameter.
This example shows how to create a message body context for a map message. Inthis example, the names of values in the map are name, location, and email.MsgMapBody = NewObject();
MsgMapBody.name = "John Smith";MsgMapBody.location = "New York City";MsgMapBody.email = "[email protected]";
Example of sending a map message to a JMS destinationThe following example shows how to send a map message to a Java MessageService (JMS) destination by using the SendJMSMessage function.// Set JMSDataSource to a valid and existing JMSDataSource in Impact.// The destination where the message is sent is obtained from the JMSDataSource.JMSDataSource = “JMSDS1”;
// Create a message properties object and populate its// member variables with message header properties and custom propertiesMsgProps = NewObject();MsgProps.TimeToLive = 0;MsgProps.color = "green";MsgProps.Expiration = 2000;MsgProps.DeliveryMode = "PERSISTENT";MsgProps.ReplyTo="queue2";
// Specify custom message propertiesMsgProps.Custom1 = "Value 1";MsgProps.Custom2 = "Value 2";
// Create a map message content and populate its member// variables where each variable and value represent a name/// value pair for the resulting mapMsgMapBody = NewObject();MsgMapBody.name = "sanjay";MsgMapBody.location = "New York City";MsgMapBody.facility = "Wall St.";
// Call SendJMSMessage and pass the JNDI properties// context, the message properties context, the message// map context and other parametersSendJMSMessage(JMSDataSource, MsgProps, MsgMapBody);
Example of sending a text message to a JMS destinationThis example shows how to send a text message to a Java Message Service (JMS)destination by using the SendJMSMessage function.// Set JMSDataSource to a valid and existing JMSDataSource in Impact.// The destination where the message is sent is obtained from the JMSDataSource.JMSDataSource = “JMSDS1”;
// Create a message properties object and populate its// member variables with message header properties and custom propertiesMsgProps = NewObject();MsgProps.TimeToLive = 0;MsgProps.color = "green";MsgProps.Expiration = 2000;MsgProps.DeliveryMode = "PERSISTENT";MsgProps.ReplyTo="queue2";
Chapter 8. Working with the JMS DSA 83
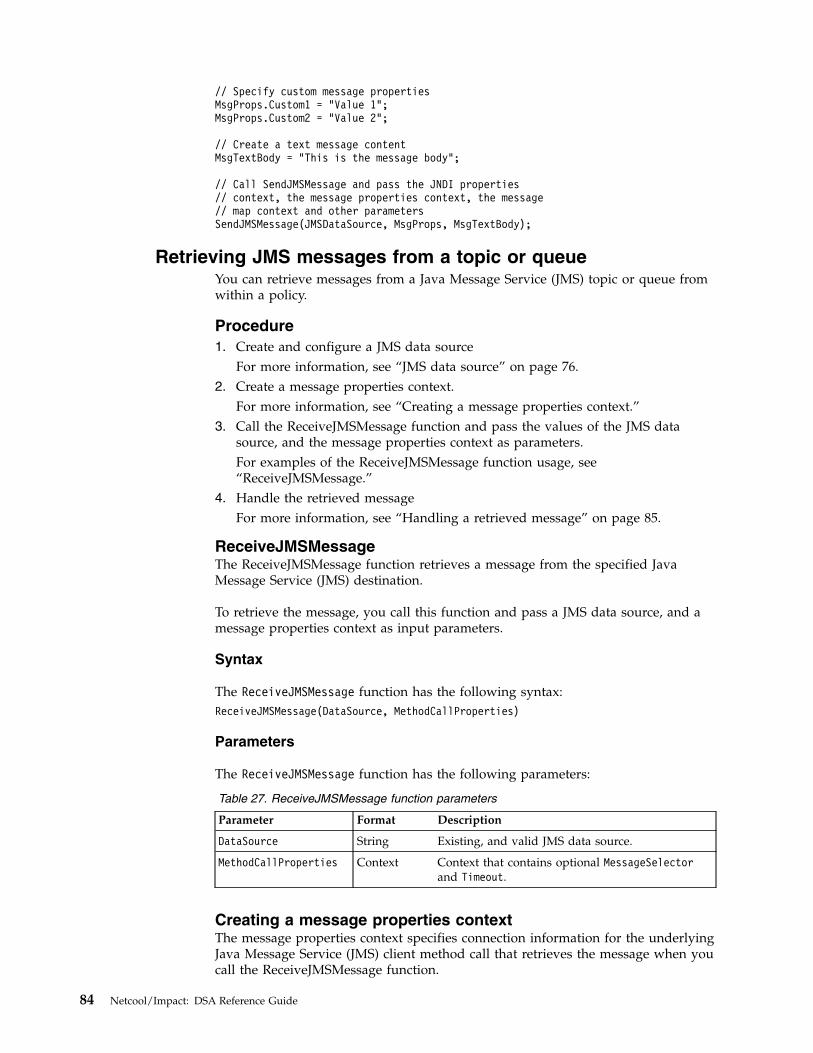
// Specify custom message propertiesMsgProps.Custom1 = "Value 1";MsgProps.Custom2 = "Value 2";
// Create a text message contentMsgTextBody = "This is the message body";
// Call SendJMSMessage and pass the JNDI properties// context, the message properties context, the message// map context and other parametersSendJMSMessage(JMSDataSource, MsgProps, MsgTextBody);
Retrieving JMS messages from a topic or queueYou can retrieve messages from a Java Message Service (JMS) topic or queue fromwithin a policy.
Procedure1. Create and configure a JMS data source
For more information, see “JMS data source” on page 76.2. Create a message properties context.
For more information, see “Creating a message properties context.”3. Call the ReceiveJMSMessage function and pass the values of the JMS data
source, and the message properties context as parameters.For examples of the ReceiveJMSMessage function usage, see“ReceiveJMSMessage.”
4. Handle the retrieved messageFor more information, see “Handling a retrieved message” on page 85.
ReceiveJMSMessageThe ReceiveJMSMessage function retrieves a message from the specified JavaMessage Service (JMS) destination.
To retrieve the message, you call this function and pass a JMS data source, and amessage properties context as input parameters.
Syntax
The ReceiveJMSMessage function has the following syntax:ReceiveJMSMessage(DataSource, MethodCallProperties)
Parameters
The ReceiveJMSMessage function has the following parameters:
Table 27. ReceiveJMSMessage function parameters
Parameter Format Description
DataSource String Existing, and valid JMS data source.
MethodCallProperties Context Context that contains optional MessageSelectorand Timeout.
Creating a message properties contextThe message properties context specifies connection information for the underlyingJava Message Service (JMS) client method call that retrieves the message when youcall the ReceiveJMSMessage function.
84 Netcool/Impact: DSA Reference Guide

You pass this context as a parameter when you call the ReceiveJMSMessagefunction in a policy. The following table shows the properties that you can set inthe message properties context:
Table 28. Message Properties Context
Property Description
MessageSelector String expression that specifies which message in the topicor queue you want to retrieve. The message selector syntaxis similar to the contents of an SQL WHERE clause and isdefined in the JMS specification.
Timeout Specifies the length of time that a message is retained bythe JMS delivery system before it expires. Default value is0, which indicates an unlimited message lifetime.
You can create an empty message properties context by passing the NewObjectfunction to the ReceiveJMSMessage as a parameter.
The following example shows how to create a message properties context.// Call NewObject to create the next contextMsgProps = NewObject();
// Assign a message selector that filters the message to// retrieve
MsgProps.MessageSelector = "color = ’green’ AND custom2 = ’1234543’";
Handling a retrieved messageThe ReceiveJMSMessage function uses three variables to store message informationthat is retrieved from a Java Message Service (JMS) topic or queue.
Table 1 shows the built-in variables that store the message information:
Table 29. Built-in Message Variables
Variable Description
JMSMessage JMS message body. If the message is a text message, thevalue of this variable is a string. If the message is a mapmessage, the value of this variable is a context where eachmember variable in the context corresponds to aname-value pair in the message map.
MessageType If the message is a text message, the value of this variableis a string "Text". If the message is a map message, thevalue of this variable is a string "Map".
JMSProperties Custom JMS message properties that are attached to themessage.
This example shows how to handle a retrieved message:// Call ReceiveJMSMessage and pass the JNDI properties,// message properties and other information as runtime parametersReceiveJMSMessage(JMSDataSource, MsgProps);
// Print the contents of the message to the policy logLog("Message type: " + MessageType);Log("Message properties: " + JMSProperties.Custom1);Log("Message properties: " + JMSProperties.Custom2);
If (MessageType == "Text") {
Chapter 8. Working with the JMS DSA 85

Log("Message body: " + JMSMessage);} Else {
Log("Message map value 1: " + JMSMessage.MyValue1);Log("Message map value 2: " + JMSMessage.MyValue2);
}
Handling incoming messages from a JMS message listenerWhen a Java Message Service (JMS) message listener receives a message from aJMS destination, it compares the contents of the message to message selectorsspecified in its configuration.
If the message matches the message selector, or if no selector is specified, the JMSmessage listener puts the message in its queue. The EventProcessor service picksup the message, and sends it to the policy as an EventContainer.
The JMS message listener uses the message variables that are used when you usethe ReceiveJMSMessage function - JMSMessage, MessageType, and JMSProperties -to retrieve a policy. For more information about these variables, see “Handling aretrieved message” on page 85. When you handle these variables as set by a JMSmessage listener, you must reference them by using the @ notation in an IPLpolicy, or the dot notation in a JavaScript policy, for example,EventContainer.MessageType.
This example shows how to handle an incoming message from a JMS messagelistener by using the @ notation.// Print the contents of the message to the policy logLog("Message type: " + @MessageType);Log("Message properties: " + @JMSProperties.Custom1);Log("Message properties: " + @JMSProperties.Custom2);
If (MessageType == "Text") {Log("Message body: " + @JMSMessage);
} Else {Log("Message map value 1: " + @JMSMessage.MyValue1);Log("Message map value 2: " + @JMSMessage.MyValue2);
}
Example of receiving a map messageThis example shows how to use the ReceiveJMSMessage function to receive a mapmessage.
The example uses the map message that was used in “Example of sending a mapmessage to a JMS destination” on page 83./// Use a existing and valid JMSDataSourceJMSDataSource = “JMSDS1”;
// Create a message properties object and populate its// member variables with optional parameters like MessageSelector and TimeoutMsgProps = NewObject();// MessageSelector is used for filtering incoming messages so that messages// with properties matching the MessageSelector expression are delivered.MsgProps.MessageSelector = "color = ’green’ AND Custom2 = ’Value 2’";
// Timeout must be specified in milliseconds. This parameter specifies how long the// MessageConsumer blocks to receive a Message. A Timeout of zero makes the// MessageConsumer wait indefinitely to receive a message.MsgProps.Timeout = 6000;
// Call ReceiveJMSMessage and pass the JMSDataSource and message propertiesReceiveJMSMessage(JMSDataSource, MsgProps);
86 Netcool/Impact: DSA Reference Guide

// Print the contents of the message to the policy logLog("Message type: " +MessageType);Log("Message prop.Custom1: " + JMSProperties.Custom1);Log("Message prop.Custom2: " + JMSProperties.Custom2);If (MessageType == "Text") {
Log("Message body: " + JMSMessage);} Else {
Log("Message map.name: " + JMSMessage.name);Log("Message map.location: " + JMSMessage.location);
}
The If (MessageType == "Text") statement also checks whether the message is atext message, and prints the message to the log, if it is.
Connecting to WebSphere MQ and JMS DSANetcool/Impact can communicate with WebSphere MQ 7 through the JMS datasource.
There are two possible configuration options:v Option 1: WebSphere MQ client and server and Netcool/Impact all on one
machine.v Option 2: WebSphere MQ client and Netcool/Impact on one machine and
WebSphere MQ server on a separate machine.
For more information about WebSphere MQ, see http://www-03.ibm.com/software/products/en/wmq/#.
Configuration option 1How to configure the WebSphere MQ client and server and Netcool/Impact all onone machine.
Procedure1. Configure WebSphere MQ server. For information see, http://
publib.boulder.ibm.com/infocenter/wmqv7/v7r0/index.jsp.2. Copy the following four JAR files from MQ_HOME/java/lib to
IMPACT_HOME/dsalib.v com.ibm.mq.jmqi.jar
v com.ibm.mqjms.jar
v com.ibm.mq.headers.jar
v fscontext.jar
v providerutil.jar
3. Restart the Impact Server so that it picks up the new JAR files.4. The Netcool/Impact JMS DSA will have the following parameters: For more
information about configuring JMS DSA, see JMS data source configurationproperties.v JNDI Factory initial: com.sun.jndi.fscontext.RefFSContextFactory
v JNDI Provider URL: file:/<PathToBindingDirOnMQClient> for example,file:/C:/MQClientBindings.
v JMS Connection Factory Name as configured on the WebSphere MQ Server.v JMS Destination Name as configured on the WebSphere MQ Server.
Chapter 8. Working with the JMS DSA 87

Configuration option 2How to connect the WebSphere MQ client and Netcool/Impact on one machineand WebSphere MQ server on a separate machine.
Procedure1. Copy the following five JAR files from MQ_HOME/java/lib to
IMPACT_HOME/dsalib.v com.ibm.mq.jmqi.jar
v com.ibm.mqjms.jar
v com.ibm.mq.headers.jar
v fscontext.jar
v providerutil.jar
v dhbcore.jar
2. Restart the Impact Server so that it picks up the new JAR files.3. You must configure the MQSeries® server to use a file system-based JNDI
provider. WebSphere MQ then uses the local file system as a JNDI registrywhen it registers the JMS resources accessed by the DSA.
4. You must use "client" mode in your connection factory on the WebSphere MQserver to ensure that the WebSphere MQ Client communicates through tcp withthe WebSphere MQ Server. For more information see http://publib.boulder.ibm.com/infocenter/wmqv7/v7r0/index.jsp.
5. Ensure that you have a listener that is configured on your preferred port on theWebSphere MQ server.
6. Create the queues and destinations that you need as specified by theWebSphere MQ documentation. For information see, http://publib.boulder.ibm.com/infocenter/wmqv7/v7r0/index.jsp.
7. Copy the bindings directory, which is configured on the WebSphere MQ server,to the local file system of the WebSphere MQ client.
8. The Netcool/Impact JMS DSA will have the following parameters: For moreinformation about configuring JMS DSA, see JMS data source configurationproperties.v JNDI Factory initial: com.sun.jndi.fscontext.RefFSContextFactory
v JNDI Provider URL: file:/<PathToBindingDirOnMQClient> for example,file:/C:/MQClientBindings.
v JMS Connection Factory Name as configured on the WebSphere MQ Server.v JMS Destination Name as configured on the WebSphere MQ Server.
9. If there are any configuration changes on the WebSphere MQ Server, you mustrepeat 7 to ensure that the WebSphere MQ Client picks up the configurationchanges.
Connecting Netcool/Impact to WebSphere Business EventsAbout this task
Tip: When installing Netcool/Impact and WebSphere Business Events on the samecomputer, install WebSphere Business Events first and make sure it is runningbefore installing Netcool/Impact.
The Netcool/Impact integration with WebSphere Business Events uses thispre-defined XML file based project Netcool_Impact_Integration in
88 Netcool/Impact: DSA Reference Guide

$IMPACT_HOME/integrations/wbe. The integration also uses a predefined connectionfactory that is called ImpactTopicConnectionFactory and the following two topics:
The jms/impactTopic topic receives events from Netcool/Impact.The jms/wbeTopic topic sends events to Netcool/Impact.
Complete the following steps to configure WebSphere Business Events. For moreinformation about the steps, see WebSphere Business Events documentationhttp://pic.dhe.ibm.com/infocenter/wbevents/v7r0m1/index.jsp
Procedure1. Create a connection factory called ImpactTopicConnectionFactory.2. Create two new topics that are called jms/impactTopic and jms/wbeTopic.3. Using the WebSphere Business Events Data Design application, load the project
XML file $IMPACT_HOME/integrations/wbe/Netcool_Impact_Integration.xml. Oryou might want to save the project XML file to the Server Store and createBusiness Events to send and test events to the two topics.
Configure Netcool/Impact for WebSphere Business Eventsintegration
To configure Netcool/Impact for WebSphere Business Events integration you mustcopy JAR files from WebSphere Business Events into Netcool/Impact.
Procedure1. Within <WBE HOME>/WAS/runtime copy the two JAR files
com.ibm.ws.sib.client.thin.jms_<version>.jar andcom.ibm.ws.ejb.thinclient_<version>.jar, where <version> is 7.0.0 forWebSphere Business Events version 7.0.1. Paste the two JAR files into<IMPACT_HOME>/dsalib.
2. Within <IMPACT_HOME>/wlp/user/shared/config/features.xml, comment orremove the following line:<feature>wasJmsClient-1.1</feature>
3. Restart the Netcool/Impact server.
Using the WebSphere Business Events integrationIncluded in Netcool/Impact, in <IMPACT_HOME>/integrations/wbe, see theWBEproject that is in XML format file. The WBE project has pre-configured policies,data sources, and a JMS listener.
Data sources
You must update the data sources with the WebSphere Business Events host nameand port details.v The SendToWBE data source is configured to connect to the jms/impactTopic
destination topic.v The ReceiveFromWBE data source is configured to connect to the jms/wbeTopic
destination topic.
Policiesv The WBEPolicy policy includes two library functions that are called the
SendEventToWBE function and the ParseWBEMessage function.v The WBESend policy uses the SendEventToWBE function to accept a
Netcool/Impact object and create a JMS message. It uses the configured
Chapter 8. Working with the JMS DSA 89

SendToWBE data source to send the JMS message to WebSphere BusinessEvents. The JMS message, or event, consists of a few fields from theObjectServer:MsgObject = NewObject();MsgObject.Identifier=’Test Id’;MsgObject.Node=’Test Node’;MsgObject.AlertKey=’Key 5’;MsgObject.AlertGroup=’Group 5’;MsgObject.Serial=5;MsgObject.Severity =5;MsgObject.AdditionalField="Test";WBEPolicy.SendEventToWBE(MsgObject);
v The WBERecieve policy is attached to the WBEJMSMessageListener listener.The policy uses the ParseWBEMessage function to receive a JMS message, orevent, from WebSphere Business Events through the listener and converts it to aNetcool/Impact object.
JMS Listener
The JMS listener WBEJMSMessageListener receives messages from jms/wbeTopicand runs the WBEReceive policy.
The WBE project includes two Touchpoints that are called Netcool Impact Eventand Netcool Impact Action.v The Netcool Impact Event listens on the jms/impactTopic destination topic for
the Netcool/Impact event over the JMS bus and create an intermediate objectcalled Netcool Omnibus Event.
v The Netcool Impact Action sends data to Netcool/Impact over the JMS busthrough the jms/wbeTopic destination topic.
Note: The topics and connection factory are optional. Complete the followingsteps, if you want to use the existing topics and connection factory.1. Edit the data sources in the WBE project to reflect the connection factory and
topics.2. Using any text/XML editor, update the Netcool_Impact_Integration XML file
in IMPACT_HOME/integrations/wbe directory to replace the topics andconnection factory with the existing information.
90 Netcool/Impact: DSA Reference Guide
Chapter 9. Working with the XML DSA
The XML DSA is a data source adaptor that is used to read and to extract datafrom any well-formed XML document.
XML DSA overviewThe XML DSA is used to read and extract data from any XML document.
The XML DSA can read XML data from files, strings, and HTTP servers by way ofthe network (XML over HTTP). The Xerces DOMParser 2.6 parser is used for theXML DSA.
The XML DSA is installed with Netcool/Impact so you do not need to completeany additional installation or configuration steps.
Before you can use the XML DSA, you must complete the following tasks:v Create a set of XML data types that corresponds to the structure of the XML
document you want to read with Netcool/Impact. For more information aboutcreating XML data types, see “Creating XML data types” on page 93.
v Set up XML data type mappings that show the relationship between an XMLdata source, an XML document, and XML data types.
v Write one or more XML DSA policies that read XML data from a file, a string orfrom an HTTP server over a network.
XML documentsThe DSA considers an XML document to be any well-formed set of XML data thatdescends from a single root element.
This document can be in a string, a text file, or on an HTTP server.
XML DTD and XSD filesXML DTD and XSD files contain a document type description.
You must provide an XML DTD or XSD file for each type of XML document thatyou want the DSA to read.
XML data typesXML data types are Netcool/Impact data types that represent XML documents andtheir contents.
The DSA uses the following XML data types Super data types and Element datatypes:
Super data typesSuper data types represent types of XML documents. The DSA uses one data typefor each type of document that it reads.
© Copyright IBM Corp. 2006, 2016 91

A super data type contains a single data item, called the document data item. Thisdata item represents the instance of the document that the DSA uses. The displayname of the document data item is the same as the name of the super data type.The document data item contains a static link to the element data item thatrepresents the root level element of the document.
Element data typesElement data types represent the elements in an XML document. The DSA requiresone such data type for each type of XML element.
An element data type contains one field for each attribute in the correspondingXML element. In addition, the data type contains a field that corresponds to thePCDATA value of the element, if any.
Element data types contain one or more data items, called element data items.Each such data item represents an instance of the element in the document.
The hierarchical relationship between XML elements is represented at the data itemlevel by static links. Element data items are statically linked in such a way thateach data item contains links to other data items. The other data items representthe child elements of the corresponding element in the XML document.
Element namespaces are a convention that is used by the DSA to show that a set ofelement data types is related to a single XML document. The DSA uses elementnamespaces to avoid ambiguity in cases where more than one type of XMLdocument that is used by the DSA has an element of the same name.
XML configuration filesXML configuration files are text files that store mapping information for XML datatypes.
The DSA reads the configuration files at startup and uses the information duringrun time to locate the DTD or XSD file and data source for each XML document.For more information about XML configuration files, see “Data type mappings” onpage 94.
XML document and data type mappingThe XML DSA provides mapping between an XML document and a set of datatypes.
The DSA uses the information in an XML DTD or XSD file to understand thestructure of the XML data and to map the data to the corresponding data types.
One aspect of the structure of the XML data is the hierarchical relationshipbetween XML elements. The DSA uses static links to map this relationship to theXML data types. Each element data item is linked to its logical child data item by astatic link. When you read the XML data in a policy, you use the GetByLinksfunction to traverse the resulting structure. You can also use the embedded linkingsyntax to traverse the structure.
This example shows a partial XML document, and the linking relationship betweenthe corresponding element data items.
92 Netcool/Impact: DSA Reference Guide
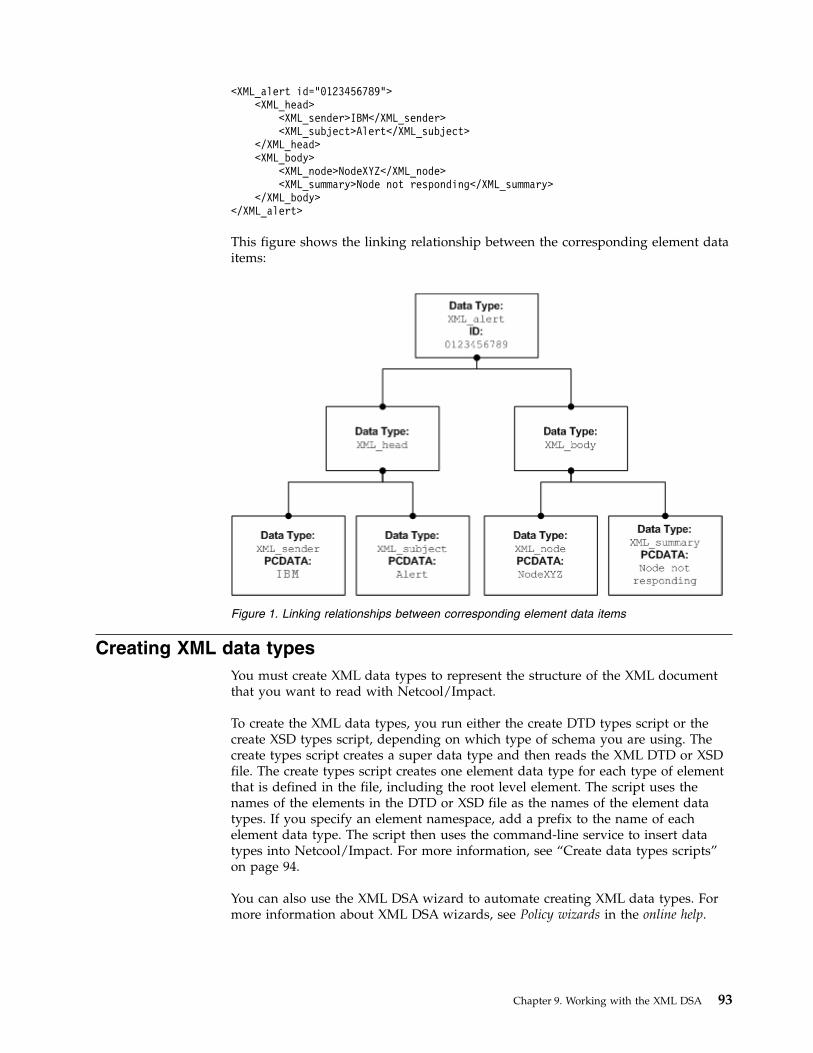
<XML_alert id="0123456789"><XML_head>
<XML_sender>IBM</XML_sender><XML_subject>Alert</XML_subject>
</XML_head><XML_body>
<XML_node>NodeXYZ</XML_node><XML_summary>Node not responding</XML_summary>
</XML_body></XML_alert>
This figure shows the linking relationship between the corresponding element dataitems:
Creating XML data typesYou must create XML data types to represent the structure of the XML documentthat you want to read with Netcool/Impact.
To create the XML data types, you run either the create DTD types script or thecreate XSD types script, depending on which type of schema you are using. Thecreate types script creates a super data type and then reads the XML DTD or XSDfile. The create types script creates one element data type for each type of elementthat is defined in the file, including the root level element. The script uses thenames of the elements in the DTD or XSD file as the names of the element datatypes. If you specify an element namespace, add a prefix to the name of eachelement data type. The script then uses the command-line service to insert datatypes into Netcool/Impact. For more information, see “Create data types scripts”on page 94.
You can also use the XML DSA wizard to automate creating XML data types. Formore information about XML DSA wizards, see Policy wizards in the online help.
Figure 1. Linking relationships between corresponding element data items
Chapter 9. Working with the XML DSA 93
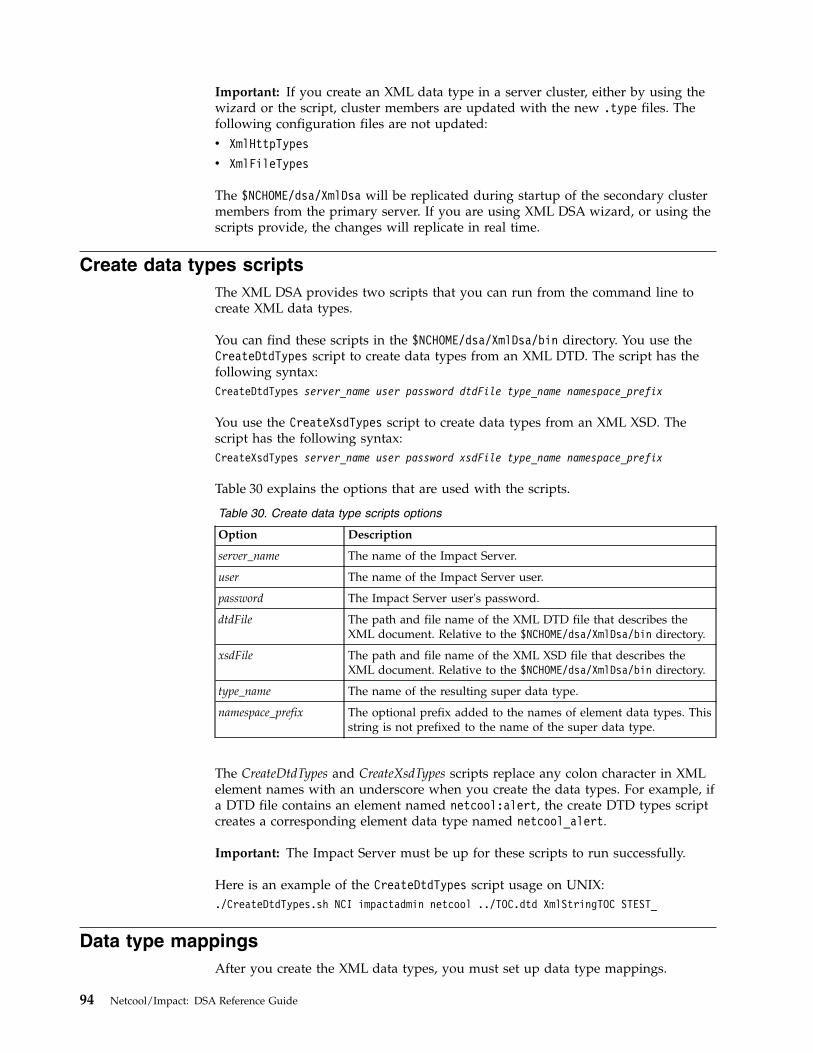
Important: If you create an XML data type in a server cluster, either by using thewizard or the script, cluster members are updated with the new .type files. Thefollowing configuration files are not updated:v XmlHttpTypes
v XmlFileTypes
The $NCHOME/dsa/XmlDsa will be replicated during startup of the secondary clustermembers from the primary server. If you are using XML DSA wizard, or using thescripts provide, the changes will replicate in real time.
Create data types scriptsThe XML DSA provides two scripts that you can run from the command line tocreate XML data types.
You can find these scripts in the $NCHOME/dsa/XmlDsa/bin directory. You use theCreateDtdTypes script to create data types from an XML DTD. The script has thefollowing syntax:CreateDtdTypes server_name user password dtdFile type_name namespace_prefix
You use the CreateXsdTypes script to create data types from an XML XSD. Thescript has the following syntax:CreateXsdTypes server_name user password xsdFile type_name namespace_prefix
Table 30 explains the options that are used with the scripts.
Table 30. Create data type scripts options
Option Description
server_name The name of the Impact Server.
user The name of the Impact Server user.
password The Impact Server user's password.
dtdFile The path and file name of the XML DTD file that describes theXML document. Relative to the $NCHOME/dsa/XmlDsa/bin directory.
xsdFile The path and file name of the XML XSD file that describes theXML document. Relative to the $NCHOME/dsa/XmlDsa/bin directory.
type_name The name of the resulting super data type.
namespace_prefix The optional prefix added to the names of element data types. Thisstring is not prefixed to the name of the super data type.
The CreateDtdTypes and CreateXsdTypes scripts replace any colon character in XMLelement names with an underscore when you create the data types. For example, ifa DTD file contains an element named netcool:alert, the create DTD types scriptcreates a corresponding element data type named netcool_alert.
Important: The Impact Server must be up for these scripts to run successfully.
Here is an example of the CreateDtdTypes script usage on UNIX:./CreateDtdTypes.sh NCI impactadmin netcool ../TOC.dtd XmlStringTOC STEST_
Data type mappingsAfter you create the XML data types, you must set up data type mappings.
94 Netcool/Impact: DSA Reference Guide
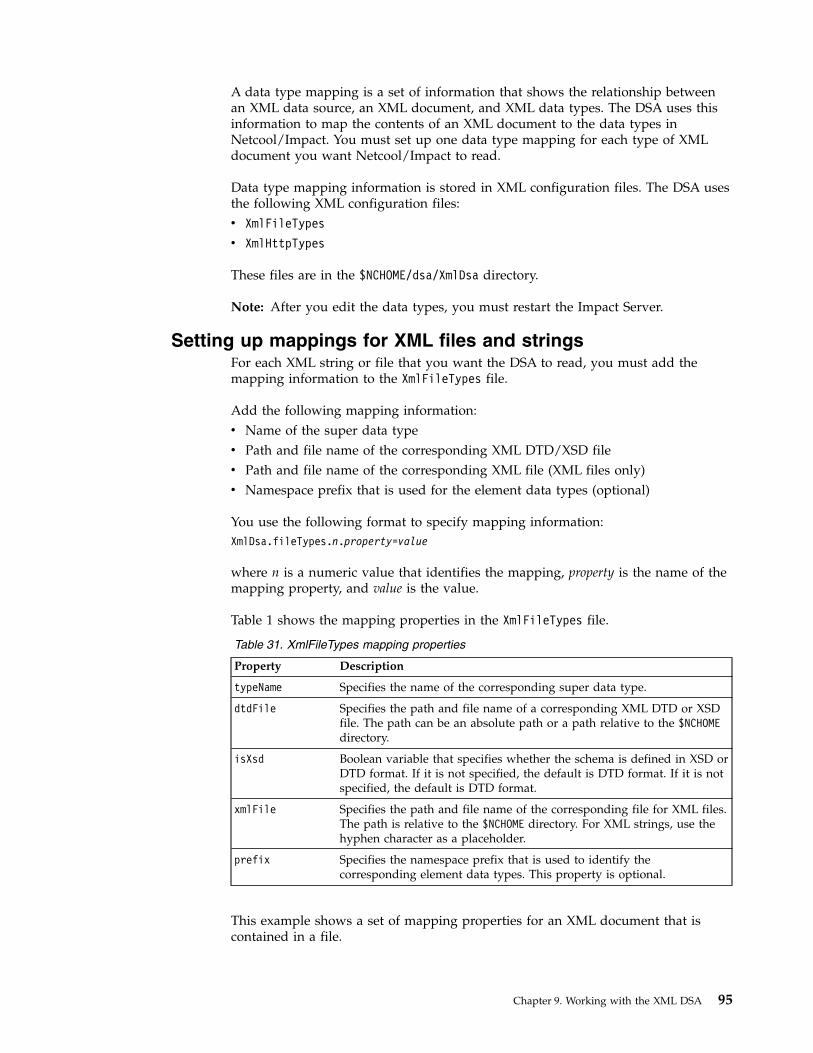
A data type mapping is a set of information that shows the relationship betweenan XML data source, an XML document, and XML data types. The DSA uses thisinformation to map the contents of an XML document to the data types inNetcool/Impact. You must set up one data type mapping for each type of XMLdocument you want Netcool/Impact to read.
Data type mapping information is stored in XML configuration files. The DSA usesthe following XML configuration files:v XmlFileTypes
v XmlHttpTypes
These files are in the $NCHOME/dsa/XmlDsa directory.
Note: After you edit the data types, you must restart the Impact Server.
Setting up mappings for XML files and stringsFor each XML string or file that you want the DSA to read, you must add themapping information to the XmlFileTypes file.
Add the following mapping information:v Name of the super data typev Path and file name of the corresponding XML DTD/XSD filev Path and file name of the corresponding XML file (XML files only)v Namespace prefix that is used for the element data types (optional)
You use the following format to specify mapping information:XmlDsa.fileTypes.n.property=value
where n is a numeric value that identifies the mapping, property is the name of themapping property, and value is the value.
Table 1 shows the mapping properties in the XmlFileTypes file.
Table 31. XmlFileTypes mapping properties
Property Description
typeName Specifies the name of the corresponding super data type.
dtdFile Specifies the path and file name of a corresponding XML DTD or XSDfile. The path can be an absolute path or a path relative to the $NCHOMEdirectory.
isXsd Boolean variable that specifies whether the schema is defined in XSD orDTD format. If it is not specified, the default is DTD format. If it is notspecified, the default is DTD format.
xmlFile Specifies the path and file name of the corresponding file for XML files.The path is relative to the $NCHOME directory. For XML strings, use thehyphen character as a placeholder.
prefix Specifies the namespace prefix that is used to identify thecorresponding element data types. This property is optional.
This example shows a set of mapping properties for an XML document that iscontained in a file.
Chapter 9. Working with the XML DSA 95

XmlDsa.fileTypes.1.typeName XML_file_superTypeXmlDsa.fileTypes.1.dtdFile dsa/XmlDsa/file.dtdXmlDsa.fileTypes.1.xmlFile dsa/XmlDsa/file.xmlXmlDsa.fileTypes.1.prefix XML_
This example shows a set of mapping properties for an XML document that iscontained in a string.XmlDsa.fileTypes.2.typeName XML_string_superTypeXmlDsa.fileTypes.2.dtdFile dsa/XmlDsa/string.dtdXmlDsa.fileTypes.2.xmlFile -XmlDsa.fileTypes.2.prefix XML_
Note: this example uses the hyphen character (-) for the xmlFile property.
The following example shows an expression that uses the XmlFileTOC data typewith isXsd set to true. The name space prefix is FTEST. This prefix must be addedto all data types that are a part of the XML file.XmlDsa.fileTypes.1.typeName XmlFileTOCXmlDsa.fileTypes.1.dtdFile dsa/XmlDsa/TOC.xsdXmlDsa.fileTypes.1.xmlFile dsa/XmlDsa/TOC.xmlXmlDsa.fileTypes.1.prefix FTEST_XmlDsa.fileTypes.1.isXsd true
Setting up mappings for XML over HTTPFor each XML document that you want the DSA to read over HTTP, you must addthe mapping information to the XmlHttpTypes file.
Add the following mapping information:v Name of the super data type.v Base URL for the HTTP server.v User name, password, and authentication realm (optional). This information is
only required if the XML document is in a password-protected area of the HTTPserver.
v Namespace prefix that is used for the element data types (optional).
You use the following format to specify mapping:XmlDsa.httpTypes.n.property=value
where n is a numeric value that identifies the mapping, property is the name ofthe mapping property, and value is the value.
Table 1 shows the mapping properties in the XmlHttpTypes file.
Table 32. XmlHttpTypes mapping properties
Property Description
typeName Name of the corresponding super data type.
dtdFile Path and file name of the corresponding XML DTD file. Can be anabsolute path, or relative to the $NCHOME directory.
xsdFile Path and file name of a corresponding XML XSD file. Can be anabsolute path, or relative to the $NCHOME directory. Used only if theXML schema is an XSD.
isXsd This Boolean variable specifies whether the schema is defined inXSD or DTD format. Default is DTD, if not specified.
96 Netcool/Impact: DSA Reference Guide

Table 32. XmlHttpTypes mapping properties (continued)
Property Description
url Base URL for the HTTP server. The base URL includes the serverhost name, and the path where the script or executable file thatprovides the XML data is located. You do not need to specify thetrailing backslash in the base URL. This URL is combined with thecontents of the FilePath parameter to form the complete URLwhen you retrieve the XML data in a policy.
user User name valid under HTTP server authentication (optional).
password Password valid under HTTP server authentication (optional).
realm Authentication realm on the HTTP server (optional).
prefix Namespace prefix that is used to identify the correspondingelement data types (optional).
connectionsPerHost Number of connections per host. The default is 2. (Optional)
This example shows a set of mapping properties for XML data that is provided byan HTTP server.XmlDsa.httpTypes.1.typeName XML_http_superTypeXmlDsa.httpTypes.1.dtdFile dsa/XmlDsa/http.dtdXmlDsa.httpTypes.1.url http://localhost:9080/cgi-binXmlDsa.httpTypes.1.user jsmithXmlDsa.httpTypes.1.password pwdXmlDsa.httpTypes.1.realm primaryXmlDsa.httpTypes.1.connectionsPerHost 5
Reading XML documentsYou can read XML documents from within a policy.
Procedure1. Retrieve the document data item.
You retrieve the data item by calling the GetByFilter function and passing thename of the super data type and a filter string.
2. Retrieve the root level element data item.To retrieve the root level element data item, use the GetByLinks function.
3. Retrieve the child element data item.To retrieve child element data items, you can use successive calls to theGetByLinks function or you can use the embedded linking syntax.
4. Access attribute values.To access an element data item's attribute values, reference the correspondingdata type fields.
Retrieving the document data itemYou retrieve the data item by calling the GetByFilter function and passing thename of the super data type and a filter string.
The content of the filter string varies depending on whether the data source is anXML string, XML file, or XML data that is located on an HTTP server.
For XML strings, the filter is the entire XML string that you want to read. For XMLfiles, the filter is an empty string. For XML over HTTP, the filter string is an
Chapter 9. Working with the XML DSA 97
expression that specifies the method to use in retrieving the XML data and thepath to a script or executable file that provides the data on the HTTP server. Formore information, see “XML over HTTP.”
This example shows how to retrieve the document data item that is associatedwith an XML string, where the corresponding super type is namedXML_string_SuperType:// Call GetByFilter and pass the name of the super type// and the filter string
Type = "XML_string_superType";Filter = "<alert><node>Node1234</node><summary>Node not responding</summary></alert>";CountOnly = False;DocDataItem = GetByFilter(Type, Filter, CountOnly);
This example shows how to retrieve the document data item that is associatedwith an XML file, where the corresponding super type is namedXML_file_superType:// Call GetByFilter and pass the name of the super type// and the filterstringType = "XML_file_superType";Filter = "";CountOnly = False;DocDataItem =GetByFilter(Type, Filter, CountOnly);
XML over HTTPFor XML over HTTP, the filter string is an expression that specifies the method touse in retrieving the XML data and the path to a script or executable file thatprovides the data on the HTTP server.
The XML DSA uses either the GET or POST method to retrieve the XML data. Forexample::Operation = ’method’ AND FilePath = ’path’
Where method is either GET or POST and path is the location of the script orexecutable relative to the base URL. You specify the base URL when you set themapping information for the document in the XmlHttpTypes file.
Note: The FilePath specification can include query string values. You can retrieveXML documents from the HTTP server that are dynamically created depending onvalues that are sent by Netcool/Impact as part of the HTTP request.
This example shows how to use an HTTP GET request to retrieve the documentdata item that is associated with XML data. In this example, the name of the superdata type is XML_http_superType and the location of the script that provides theXML data is getXMLdoc.pl.// Call GetByFilter and pass the name of the super type// and the filterstringType = "XML_http_superType";Filter = "Operation = ’GET’ ANDFilePath = ’getXMLdoc.pl?node=NodeXYZ’";CountOnly = False;DocDataItem =GetByFilter(Type, Filter, CountOnly);
Retrieving the root level element data itemTo retrieve the root level element data item, use the GetByLinks function.
When you call GetByLinks, you must pass the name of the root level element datatype, an empty filter string, and the document data item.
This example shows how to use GetByLinks to retrieve the root level element dataitem.
98 Netcool/Impact: DSA Reference Guide

// Call GetByLinks and pass the name of theDataTypes = {"XML_alert"};Filter = "";MaxNum = "10000";DataItems = DocDataItem;RootDataItem =GetByLinks(DataTypes, Filter, MaxNum, DataItems);
Retrieving child element data itemsTo retrieve child element data items, you can use successive calls to the GetByLinksfunction or you can use the embedded linking syntax.
This example shows how to use the linking syntax to retrieve the first childelement data item that is linked to the root level element data item. Where the datatype of the child data item is XML_body.ChildNode = RootDataItem[0].links.XML_body.first;
This example shows how to retrieve an array that contains all child element dataitems that are linked to the root level element data item.ChildNodes = RootDataItem[0].links.XML_body.array;
links is a keyword that is used to retrieve the linked data types that are associatedwith RootDataItem.v RootDataItem[0].links returns all the linked data types:v RootDataItem[0].links.XML_body returns all elements for the linked data type
XML_body.
Once the elements retrieved, you can get an array of the elements by using thefollowing command then loop through every element by using an index.bodyArray=RootDataItem[0].links.XML_body.array
In addition, RootDataItem[0].links.XML_body is treated as enumerated elements.You can traverse the data by using the following example./*RootDataItem[0].links.XML_body.first to get the first elementRootDataItem[0].links.XML_body.last to get the last elementRootDataItem[0].links.XML_body.next to get the next element.To use next keyword:*/bodyElement=RootDataItem[0].links.XML_body.next;while(bodyElement != null && bodyElement != NULL) {Log("bodyElement : " + bodyElement);}
The following policy example shows how to get PDCDATA from the XmlFileTOCand exists in XmlFileTestPolicy in the project XML. Enumerated elements meanswhen the element is retrieved by using next, it is removed from the list and doesnot exist anymore.BookNode = TopNodes[0].links.FTEST_JavaXML_Contents;Log("BookNode size: " + BookNode.size);BookNodeLinksTypes=BookNode.links;Log("BookNodeLinksTypes size : " + BookNodeLinksTypes.size);Log("BookNodeLinksTypes: " +BookNodeLinksTypes);Chapters=BookNodeLinksTypes.first.FTEST_JavaXML_Chapter;Log("Chapters and size: " + Chapters.links.size + " " + Chapters);index =0;Chapter= Chapters.first;while(Chapter != null && Chapter != NULL) {
index = index + 1;Log("Chapter" +index + ": " + Chapter);Chapter= Chapters.next;Topics =Chapter.links.FTEST_JavaXML_Topic;i = 1;Topic=Topics.first;
Chapter 9. Working with the XML DSA 99

while(Topic != null && Topic != NULL) {Log("Topic"+i+": " + Topic.PCDATA);Topic=Topics.next;i = i +1;}
}
Accessing attribute valuesTo access an element data item's attribute values, reference the corresponding datatype fields.
This example shows how to log the value of the ID attribute that is associated withthe current element data item:Log("The message ID is: " + DataItem.id);
This example shows how to log the PCDATA value that is associated with thecurrent element data item:Log(DataItem.PCDATA);
Sample policiesThe DSA provides four sample policies.v XmlStringTestPolicy
v XmlFileTestPolicy
v XmlHttpTestPolicy
v XmlXsdFileTestPolicy
These policies are configured to use the TOC.dtd, TOC.xsd and TOC.xml files in the$NCHOME/dsa/XmlDsa directory.
XmlStringTestPolicyThe XmlStringTestPolicy shows how to use the XML DSA to read data from anXML string.
The policy reads the contents of an XML-formatted string and then prints the datato the policy log. Before you use this policy, you must run the create DTD typesscript as follows:./CreateDtdTypes.sh NCI impactadmin impactpass ../TOC.dtd XmlStringTOC STEST_
You do not need to edit the contents of the XmlFileTypes configuration file. Bydefault, this file contains the necessary data source mappings. The data typemappings are defined as follows:
This type declaration shows how to define an XmlFile type to parse an XML file. Italso uses a DTD file as the property "isXsd" is not defined.XmlDsa.fileTypes.1.typeName=XmlFileTOCXmlDsa.fileTypes.1.dtdFile=dsa/XmlDsa/TOC.dtdXmlDsa.fileTypes.1.xmlFile=dsa/XmlDsa/TOC.xmlXmlDsa.fileTypes.1.prefix=FTEST_
This type declaration shows how to define an XmlFile type to parse an XML file.The difference between this type and the previous one is that this one uses an XSDfile to get the schema info from.
100 Netcool/Impact: DSA Reference Guide

XmlDsa.fileTypes.2.typeName=XmlXsdFileTOCXmlDsa.fileTypes.2.dtdFile=dsa/XmlDsa/TOC.xsdXmlDsa.fileTypes.2.xmlFile=dsa/XmlDsa/TOC.xmlXmlDsa.fileTypes.2.prefix=XSDFTEST_XmlDsa.fileTypes.2.isXsd=true
This type declaration shows how to define a XmlString type.XmlDsa.fileTypes.3.typeName=XmlStringTOCXmlDsa.fileTypes.3.dtdFile=dsa/XmlDsa/TOC.dtdXmlDsa.fileTypes.3.xmlFile=-XmlDsa.fileTypes.3.prefix=STEST_
XmlFileTestPolicyThe XmlFileTestPolicy shows how to use the XML DSA to read data from an XMLfile.
This policy reads the contents of the TOC.xml file and then prints the data to thepolicy log. Before you use this policy, you must run the create DTD types script asfollows:./CreateDtdTypes.sh NCI impactadmin impactpass ../TOC.dtd XmlFileTOC FTEST_
You do not need to edit the contents of the XmlFileTypes configuration file. Bydefault, this file contains the necessary data source mappings. The following arethe data type mappings:XmlDsa.fileTypes.1.typeName XmlFileTOCXmlDsa.fileTypes.1.dtdFile dsa/XmlDsa/TOC.dtdXmlDsa.fileTypes.1.xmlFile dsa/XmlDsa/TOC.xmlXmlDsa.fileTypes.1.prefix FTEST_
XmlHttpTestPolicyThe XmlHttpTestPolicy shows how to use the XML DSA to read data from alocation on an HTTP server.
This policy reads the XML data from an HTTP server and then prints it to thepolicy log. Before you use this policy, you must run the CreateDtdTypes script asfollows:./CreateDtdTypes.sh NCI impactadmin impactpass ../TOC.dtd XmlHttpTOC HTEST_
You must also install a Perl CGI script on the HTTP server that generates the XMLoutput that is requested by the DSA. This script is named xml.cgi and is located in$NCHOME/dsa/XmlDsa. You must check to make sure that the first line of the scriptreferences the actual location of the Perl executable file on the system before youinstall the script. To install, copy the script into the cgi-bin directory that is usedby the HTTP server.
After you install the script, modify the XmlHttpTypes configuration file to reflectthe location of the script and to include a valid user name and password for theauthentication realm, if any.
The following example shows the data type mappings:XmlDsa.httpTypes.1.typeName XmlHttpTOCXmlDsa.httpTypes.1.dtdFile dsa/XmlDsa/TOC.dtdXmlDsa.httpTypes.1.prefix HTEST_XmlDsa.httpTypes.1.url http://localhost:9080XmlDsa.httpTypes.1.user JohnXmlDsa.httpTypes.1.password SmithXmlDsa.httpTypes.1.realm basicrealm
Chapter 9. Working with the XML DSA 101

XmlXsdFileTestPolicyThe XmlXsdFileTestPolicy shows how to use the XML DSA to read data from anXML file.
This policy reads XML data returned from a URL and then prints the data to thepolicy log. Before you use this policy, you must run the create XSD types script asfollows:./CreateXsdTypes.sh NCI impactadmin impactpass ../TOC.xsd XmlXsdFileTOC XSDFTEST_
where filename is the name and path of an XML file stored on the file system.
You do not need to edit the contents of the XmlFileTypes configuration file. Bydefault, this file contains the necessary data source mappings. The following arethe data type mappings:XmlDsa.fileTypes.2.typeName=XmlXsdFileTOCXmlDsa.fileTypes.2.dtdFile=dsa/XmlDsa/TOC.xsdXmlDsa.fileTypes.2.xmlFile=dsa/XmlDsa/TOC.xmlXmlDsa.fileTypes.2.prefix=XSDFTEST_XmlDsa.fileTypes.2.isXsd=true
102 Netcool/Impact: DSA Reference Guide

Chapter 10. Working with the SNMP DSA
The SNMP DSA is a data source adaptor that is used set and retrieve managementinformation stored by SNMP agents.
SNMP DSA overviewThe SNMP DSA is a data source adaptor that is used to set and retrievemanagement information stored by SNMP agents. It is also used to send SNMPtraps and notifications to SNMP managers.
The SNMP DSA is installed automatically when you install Tivoli Netcool/Impact.You must make sure that any MIB files that are to be used by the DSA are locatedin the $NCHOME/dsa/snmpdsa/mibs directory when you start the Impact Server. Formore information about installing MIB files, see “Installing MIB files” on page 106.You are not required to perform any additional installation or configuration steps.
Impact reuses the SNMP sessions it creates to connect to the SNMP agent. If youneed to clear the SNMP session cache in Impact, make changes to the SNMP datasource.
You must perform the following tasks when you use the SNMP DSA:v Create one data source for each SNMP agent that you want to access using the
DSA, or create a single data source and use it to access all agents. For moreinformation about working with SNMP data sources, see “Working with SNMPdata sources” on page 106.
v Create data types that you will use to access variables and tables managed bySNMP agents. For more information about working with SNMP data types, see“Working with SNMP data types” on page 108.
v Write one or more policies that set or retrieve variables and tables managed bySNMP agents, or that send SNMP traps and notifications. For more informationabout SNMP policies, see “SNMP policies” on page 110.
SNMP data modelAn SNMP data model is an abstract representation of SNMP data managed byagents in your environment.
SNMP data models have the following elements:v SNMP data sourcesv SNMP data types
SNMP data sourcesSNMP data sources represent an agent in the environment.
The data source configuration specifies the host name and port where the agent isrunning, and the version of SNMP that it supports. For SNMP v3, theconfiguration also optionally specifies authentication properties.
You can either create one data source for each SNMP agent that you want to accessusing the DSA, or you can create a single data source and use it to access all
© Copyright IBM Corp. 2006, 2016 103

agents. You can create and configure data sources using the GUI. After you createa data source, you can create one or more data types that represent the OIDs ofvariables managed by the corresponding agent.
SNMP data typesSNMP data types are Netcool/Impact data types that specify the structure andcontent of data associated with an agent.
The identity of the agent is determined by the data source that is associated withthe data type. Each data type specifies one or more object IDs (OIDs) that referencevariables managed by the agent.
The SNMP DSA supports the following categories of data types:v Packed OID data typesv Table data types
Previous versions of this DSA supported another category of data type calleddiscrete OID data types. This category was used to reference single variable OIDs.In this version of the DSA, you access single variables in the exact same way thatyou access the sets of variables represented by packed OID data types.
For more information about OIDs and SNMP variables, see the referencedocumentation for the agent you want to access using the SNMP DSA.
Packed OID data typesPacked OID data types are data types that reference the OIDs of one or morevariables managed by a single agent. You use this category of data type when youwant to access single variables or sets of related variables. When you create apacked OID data type, you specify the name of the associated data source, the OIDfor each variable and options that determine the behavior of the DSA whenconnecting to the agent.
For more information about creating packed OID data types, see “Working withSNMP data types” on page 108.
Table data typesTable data types are data types that reference the OIDs of one or more SNMPtables managed by a single agent. When you create a table data type, you specifythe name of the associated data source, the OID for the table and options thatdetermine the behavior of the DSA when connecting to the agent.
For more information about creating data types, see “Creating SNMP data types”on page 108.
SNMP DSA processThe SNMP DSA process has the following phases:v Sending Data to Agentsv Retrieving Data from Agentsv Sending Traps and Notifications to Managersv Handling Error Conditionsv Handling Timeouts
104 Netcool/Impact: DSA Reference Guide
Sending data to agentsThe DSA supports two functions in the Netcool/Impact policy language (IPL) thatallow you to send data to an SNMP agent. These functions are the standardfunction AddDataItem and the SNMP function SnmpSetAction.
When Netcool/Impact encounters a call to one of these functions in aNetcool/Impact policy, it assembles an SNMP SET command using the informationspecified in the function parameters and passes this command to the DSA forprocessing. The DSA then sends the command to the agent.
If the SET command is successful, the agent sends a confirmation message to theDSA and Netcool/Impact continues processing the policy.
Retrieving data from agentsThe DSA supports three functions that allow you to retrieve data from an agent.These functions are the standard function GetByFilter and the SNMP functionsSnmpGetAction and SnmpGetNextAction.
When Netcool/Impact encounters a call to one of these functions in aNetcool/Impact policy, it assembles an SNMP GET or GETNEXT command using theinformation specified in the function parameters. It then passes this command tothe DSA for processing. The DSA then sends the command to the agent.
If the GET or GETNEXT command is successful, the agent sends the requested databack to the DSA. The DSA returns the information to Netcool/Impact, which thenstores the information in a policy-level variable that you can access in subsequentparts of the policy.
Sending traps and notifications to managersThe DSA supports an SNMP function named SNMPTrapAction that you use to sendtraps or notifications to an SNMP manager.
When the Netcool/Impact encounters a call to SNMPTrapAction, it assembles anSNMP TRAP command using the information specified in the function parameters.It then passes this command to the DSA for processing. The DSA then sends thecommand to the manager.
If the TRAP command is successful, the manager sends a confirmation message tothe DSA and the policy is processed.
Handling error conditionsIf a SET, GET, GETNEXT, or TRAP command sent to an agent or manager isunsuccessful, the DSA returns an error string to Netcool/Impact that can beprinted to the policy log or otherwise handled in the body of the policy.
Handling timeoutsIf an agent or manager does not respond to a SET, GET, GETNEXT, or TRAP commandsent by the DSA within the timeout period specified in the function call or therelated SNMP data type, the DSA sets a timeout message in the error string andreturns it to Netcool/Impact. This error string can be handled in the body of thepolicy in the same was as any other error message.
Chapter 10. Working with the SNMP DSA 105

Installing MIB filesYou must make sure that any MIB files that are to be used by the DSA are locatedin the $NCHOME/impact/dsa/snmpdsa/mibs directory when you start theNetcool/Impact server. By default, this directory contains the RFC1213-MIB andRFC1271-MIB files. Other commonly used MIB files are installed withNetcool/Impact and are located in the $NCHOME/impact/dsa/snmpdsa/mibs directory.You must copy these or other MIB files that you provide to the$NCHOME/impact/dsa/snmpdsa/mibs directory before you can use them with theDSA. After you copy a new file to this directory, you must stop and restart theNetcool/Impact server.
Working with SNMP data sourcesYou use the GUI to perform the following tasks with SNMP data sources:v Create new data sourcesv Edit data sourcesv Delete data sources
Creating SNMP data sourcesAbout this task
You can either create one data source for each SNMP agent that you want to accessusing the DSA, or you can create a single data source and use it to access allagents.
If you plan to use the standard data-handling functions AddDataItem andGetByFilter to access SNMP data, you must create a separate data source for eachagent. In this scenario, the host name, port, and other connection information forthe agent is encapsulated as part of the data source configuration. When you makea call to the AddDataItem or GetByFilter function, you pass the name of a datatype associated with the data source and Netcool/Impact uses this information toderive the identity and location of the agent in the environment.
If you plan to use the SNMP functions that are provided with this release of theDSA, you can create a single data source and use it to access all agents. In thisscenario, the host name and port are passed as runtime parameters when you calleach function. You can dynamically specify the agent during policy runtime that isbased on host name information from incoming ObjectServer events or derivedfrom other external data sources.
This version of the DSA provides additional support for SNMP v3 authentication.If you are creating a data source for use with SNMP v3, you must performadditional configuration tasks.
Creating SNMP v1 and v2 data sourcesUse this procedure to create an SNMP v1 or v2 data source.
Procedure1. Log in to the Netcool/Impact GUI using a web browser.2. Click the Data Sources tab and select SNMP from the Source list.3. Click the New Data Source button.
The New Data Source dialog box opens.
106 Netcool/Impact: DSA Reference Guide

4. Type a unique name for the data source in the Data Source Name field.5. If you are creating this data source for use with the standard data-handling
functions AddDataItem and GetByFilter, type the host name or IP addresswhere the agent resides in the Host Name field and the port in the Port field.If you are creating this data source for use with the new SNMP functions, youcan accept the default values with no changes.
6. Type the name of the SNMP read-community in the Read Community field.The default is public.
7. Type the name of the SNMP write-community in the Write Community field.The default is public.
8. Type a timeout value in seconds in the Timeout field. When the DSA connectsto an agent associated with this data source, it waits for the specified timeoutperiod before returning an error to Netcool/Impact.
9. Select 1 or 2 from the Version list.10. Click OK.
Creating SNMP v3 data sourcesAbout this task
To create a data source with SNMP v3 authentication, you specify the configurationproperties and then provide the information required for the agent to authenticatethe DSA as an SNMP user. The authentication parameters can be overridden bycalls to the SNMP functions in the Impact Policy Language.
For information about authentication parameters, see the documentation providedby the SNMP agent and manager.
To create an SNMP v3 data source:
Procedure1. Log in to the GUI using a web browser.2. Click the Data Sources tab and select SNMP from the Source list.3. Click the New Data Source button.
The New Data Source dialog box opens.4. Type a data source name, the host name and IP address of the SNMP agent,
community strings and timeout values as specified in the previous section.5. Select 3 from the Version list.6. Type the name of an SNMP v3 authentication user in the User field.7. Select a protocol from the Authentication Protocol list. The default is MD5.8. Type the password for the authentication user in the Password field.9. Select a protocol from the Privacy Protocol field.
10. Type a privacy password in the Privacy Password field.11. Type a context ID in the Context ID field.12. Type a context name in the Context Name field.13. Click OK.
Editing SNMP data sourcesYou can edit the configuration for a data source after you create it. To edit anSNMP data source:
Chapter 10. Working with the SNMP DSA 107
Procedure1. Log in to the GUI using a web browser.2. Click the name of the data source in the Data Sources tab. The Edit Data
Source window opens.3. Set the configuration properties for the data source as described in the previous
sections.4. Click OK.
Results
Any changes to the configuration take effect immediately after you finish editingthe data source. There is no need to restart the Impact Server after making achange.
Deleting an SNMP data sourceAbout this task
To delete an SNMP data source:
Procedure1. Log in to the Netcool/Impact GUI using a web browser.2. In the Data Sources tab, click the Delete Data Source icon next to the name of
the data source you want to delete.
Working with SNMP data typesYou use the GUI to perform the following tasks with SNMP data types:v Create new data typesv Edit data typesv Delete data types
Creating SNMP data typesAbout this task
If you plan to use the standard data-handling functions AddDataItem andGetByFilter to access SNMP data, you must create a separate data type for eachset of variables (packed OID data types) or each set of tables (table data types) thatyou want to access. In this scenario, the object IDs (OIDs) for the variables ortables are encapsulated as part of the data type configuration. When you make acall to the AddDataItem or GetByFilter function, you pass the name of a data typeand this information is used to determine the identity of the variables or table.
If you plan to use the SNMP functions that are provided with this release of theDSA, you can create a single data type for each data source and use it to access allthe variables and tables associated with the agent. In this scenario, the variable ortable OIDs are passed as runtime parameters when you call each function. You candynamically specify the OIDs during policy runtime that is based on informationfrom an external data source.
Creating packed OID data typesPacked OID data types are data types that reference the OIDs of one or morevariables managed by a single agent. You use this category of data type when youwant to access single variables or sets of related variables. When you create a
108 Netcool/Impact: DSA Reference Guide

packed OID data type, you specify the name of the associated data source, the OIDfor each variable and options that determine the behavior of the DSA whenconnecting to the agent.
To create a packed OID data type:1. Log in to the Netcool/Impact GUI using a web browser.2. Click the Data Types tab and select an SNMP data source from the Data
Source list.3. Click the New Data Type icon. The New Data Type editor opens.4. Type a name for the data type in the Data Type Name field.5. Select an SNMP data source from the Data Source Name field. By default, the
data source you chose in step 2 is selected.6. Select Packed from the OID Configuration list.7. If you are creating this data type for use with the standard data-handling
functions AddDataItem and GetByFilter, you must create an attribute on thedata type for each variable you want to access. To create an attribute, click theNew Attribute button and specify an attribute name and the OID for thevariable.If you are creating this data source for use with the new SNMP functions, youdo not need to explicitly create attributes for each variable. In this scenario, youpass the variable OIDs when you make each function call in theNetcool/Impact policy.
8. Click Save.
Creating table data typesUse this procedure to create a table data type.
Procedure1. In the data types tab, select an SNMP data source from the list.2. Click the New Data Type button to open the New Data Type editor.3. Type a name for the data type in the Data Type Name field.
Important:
The data type name must match the table name that will be queried, forexample, ifTable, or ipRouteTable.
4. Select an SNMP data source from the Data Source Name field. By default, thedata source you chose in step 2 is selected.
5. Select Table from the OID Configuration list.6. If you are creating this data type for use with the standard data-handling
functions AddDataItem and GetByFilter, you must create a new attribute on thedata type for each table you want to access. To create an attribute, click theNew Attribute button and specify an attribute name and the OID for the table.
Important:
The attributes are the column names in each table. For example, in thefollowing ifTable, the attributes will be ifIndex, ifDescr and other columnnames:Column Names OIDifIndex .1.3.6.1.2.1.2.2.1.1ifDescr .1.3.6.1.2.1.2.2.1.2... ...
Chapter 10. Working with the SNMP DSA 109

If you are creating this data source for use with the new SNMP functions, youdo not need to explicitly create attributes for each table. In this scenario, youpass the table OIDs when you make each function call in the Netcool/Impactpolicy.
7. If you want the DSA to retrieve table data from the agent using the SNMPGETBULK command instead of an SNMP GET, select Get Bulk.The GETBULK command retrieves table data using a continuous GETNEXTcommand. This option is suitable for retrieving data from very large tables.
8. If you have selected Get Bulk, you can control the number of variables in thetable for which the GETNEXT operation is performed using the specifiedNon-Repeaters and Max Repetitions values.The Non-Repeaters value specifies the first number of non-repeating variablesand Max Repetitions specifies the number of repetitions for each of theremaining variables in the operation.
9. Click Save.
Editing SNMP data typesYou can edit the configuration for a data type after you create it. To edit an SNMPdata types:
Procedure1. Log in to the GUI using a web browser.2. Click the name of the data type in the Data Types tab.
The Edit Data Type window opens.3. Set the configuration properties for the data type as described in the previous
sections.4. Click OK.
Results
Any changes to the configuration take effect immediately after you finish editingthe data type. There is no need to restart the Impact Server after making a change.
Deleting SNMP data typesAbout this task
To delete an SNMP data type:
Procedure1. Log in to the Netcool/Impact GUI using a web browser.2. In the Data Types tab, click the Delete Data Type button next to the name of
the data type you want to delete.
SNMP policiesYou can perform the following tasks related to the SNMP DSA in a policy:v Set packed OID data on SNMP agents using standard data-handling functionsv Set packed OID data on SNMP agents using SNMP functionsv Set table data on SNMP agents using standard data-handling functionsv Set table data on SNMP agents using SNMP functions
110 Netcool/Impact: DSA Reference Guide

v Retrieve packed OID data on SNMP agents using standard data-handlingfunctions
v Retrieve packed OID data on SNMP agents using SNMP functionsv Send SNMP traps and notifications
Setting packed OID data with standard data-handlingfunctions
About this task
You can use the standard data-handling function AddDataItem to set the value of asingle variable managed by an agent or to set the value of multiple variables.
Setting the value of a single variableTo set the value of a single variable, you create a context, and populate its Oid andValue member variables. You can also populate optional HostId and Port membersvariables. After you populate the context variables, you call AddDataItem and passthe name of an SNMP data type and the context as input parameters. If youspecified values for the HostId and Port variables in the context, these override thehost and port information as defined in the data type.
To create a context, you call the NewObject function as shown in the followingexample.// Call the NewObject function
MyContext = NewObject();
After you create the context, you can set the Oid and Value variables, as shown inthe following example. All member variables of the context must be set as strings.// Populate the context variables
MyContext.Oid = ".1.3.6.1.2.1.1.4.0";MyContext.Value = "MyValue";
Oid and Value represent the OID of the variable managed by the agent and itscorresponding value.
After you populate the context variables, you can call AddDataItem and pass thename of an SNMP data type and the context as input parameters, as shown in thefollowing example.// Call AddDataItem and pass the name of an SNMP data type and the context
AddDataItem("MySnmpType", MyContext);
In this example, the host name, and port where the agent is located is specified bythe MySnmpType data type.
If the DSA is unable to successfully send the data to the agent, it stores an errormessage in the policy-level variable ErrorString. The following example showshow to print the error message to the policy log.// Print any error message to the policy log
Log("Errors: " + ErrorString);
The following example shows how to set the value of a variable managed by anagent, where the host name and port are specified by the MySnmpType data type. Inthis example, the variable OID is .1.3.6.1.2.1.1.4.0 and the value is MyValue.
Chapter 10. Working with the SNMP DSA 111
// Create a new context with the NewObject function
MyContext = NewObject();
// Populate the context variables
MyContext.Oid = ".1.3.6.1.2.1.1.4.0";MyContext.Value = "MyValue";
// Call AddDataItem and pass the name of an SNMP data type and the context
AddDataItem("MySnmpType", MyContext);
// Print any error message to the policy log
Log("Errors: " + ErrorString);
The following example shows how to set the value of a variable managed by anagent, where the host name and port specified by the data type are overridden bycontext variables set in the policy. In this example, the host is 192.168.1.1 and theport is 161.// Create a new context with the NewObject function
MyContext = NewObject();
// Populate the context variables
MyContext.Oid = ".1.3.6.1.2.1.1.4.0";MyContext.Value = "MyValue";MyContext.HostId = "192.168.1.1";MyContext.Port = 161;
// Call AddDataItem and pass the name of an SNMP data type and the context
AddDataItem("MySnmpType", MyContext);
// Print any error message to the policy log
Log("Errors: " + ErrorString);
Setting the value of multiple variablesTo set the value of multiple variables, you create a context and populate membervariables that correspond to the attributes you configured when you created thecorresponding SNMP data type. You can also populate optional HostId and Portmembers variables.
After you populate the context variables, you call AddDataItem and pass the nameof the SNMP data type and the context as input parameters. If you specified valuesfor the HostId and Port variables in the context, these override the host and portinformation as defined in the data type.
To create a context, you call the NewObject function as shown in the followingexample.// Call the NewObject function
MyContext = NewObject();
After you create the context, you can set the member variables, and the optionalvariables, as shown in the following example. All member variables of the contextmust be set as strings.
112 Netcool/Impact: DSA Reference Guide
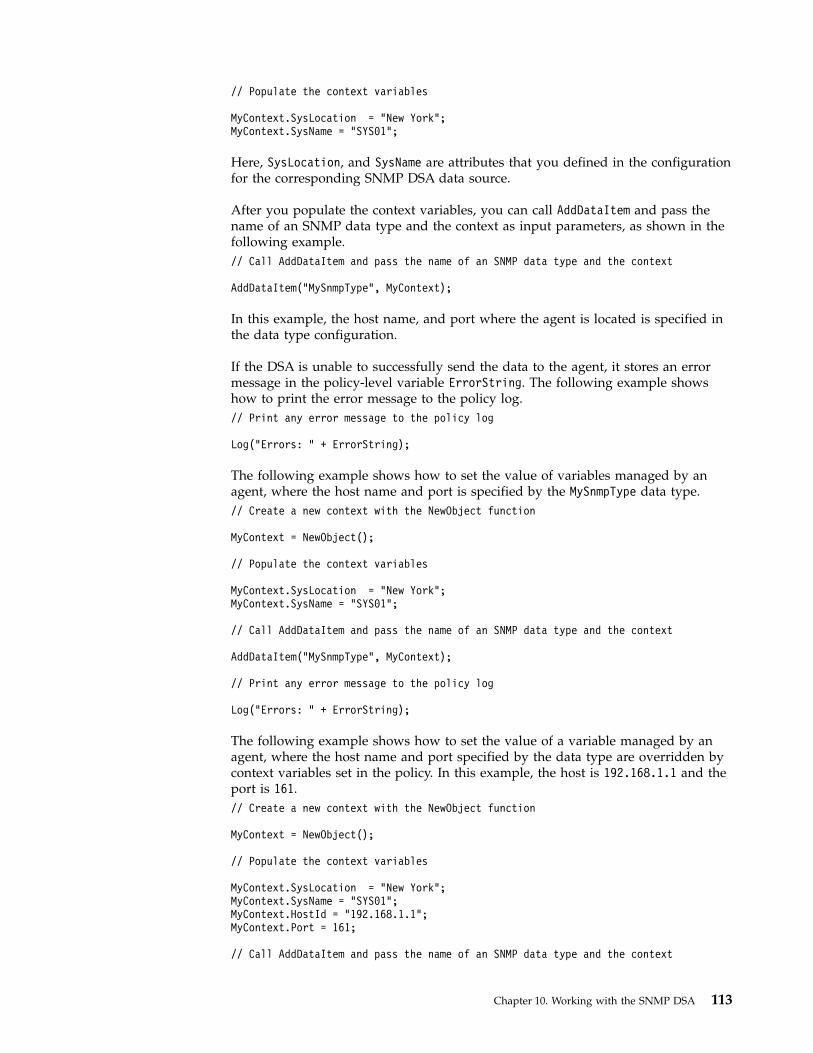
// Populate the context variables
MyContext.SysLocation = "New York";MyContext.SysName = "SYS01";
Here, SysLocation, and SysName are attributes that you defined in the configurationfor the corresponding SNMP DSA data source.
After you populate the context variables, you can call AddDataItem and pass thename of an SNMP data type and the context as input parameters, as shown in thefollowing example.// Call AddDataItem and pass the name of an SNMP data type and the context
AddDataItem("MySnmpType", MyContext);
In this example, the host name, and port where the agent is located is specified inthe data type configuration.
If the DSA is unable to successfully send the data to the agent, it stores an errormessage in the policy-level variable ErrorString. The following example showshow to print the error message to the policy log.// Print any error message to the policy log
Log("Errors: " + ErrorString);
The following example shows how to set the value of variables managed by anagent, where the host name and port is specified by the MySnmpType data type.// Create a new context with the NewObject function
MyContext = NewObject();
// Populate the context variables
MyContext.SysLocation = "New York";MyContext.SysName = "SYS01";
// Call AddDataItem and pass the name of an SNMP data type and the context
AddDataItem("MySnmpType", MyContext);
// Print any error message to the policy log
Log("Errors: " + ErrorString);
The following example shows how to set the value of a variable managed by anagent, where the host name and port specified by the data type are overridden bycontext variables set in the policy. In this example, the host is 192.168.1.1 and theport is 161.// Create a new context with the NewObject function
MyContext = NewObject();
// Populate the context variables
MyContext.SysLocation = "New York";MyContext.SysName = "SYS01";MyContext.HostId = "192.168.1.1";MyContext.Port = 161;
// Call AddDataItem and pass the name of an SNMP data type and the context
Chapter 10. Working with the SNMP DSA 113

AddDataItem("MySnmpType", MyContext);
// Print any error message to the policy log
Log("Errors: " + ErrorString);
Setting packed OID data with SNMP functionsProcedure
You can use the SNMP function SnmpSetAction to set the value of a single ormultiple variables managed by an agent.When you call SnmpSetAction, you pass an SNMP data type, the host name andport of the agent, an array of OIDs, and the array of values that you want to set. Ifyou are using SNMP v3, you can also specify the information required toauthenticate as an SNMP user.For more information about SnmpSetAction, see “SNMPSetAction” on page 127.
Example
The following example shows how to set SNMP variables by calling SnmpSetActionand passing the name of an SNMP data type, an array of OIDs, and an array ofvalues as input parameters. In this example, the SNMP data type is namedSNMP_PACKED.// Call SnmpSetAction and pass the name of the SNMP data type that contains// configuration information required to perform the SNMP SET
TypeName = "SNMP_PACKED";HostId = "192.168.1.1";Port = 161;VarIdList = {".1.3.6.1.2.1.1.4.0", ".1.3.6.1.2.1.1.5.0"};ValueList = {"Value_01", "Value_02"};
SnmpSetAction(TypeName, HostId, Port, VarIdList, ValueList, NULL, NULL,NULL, NULL, NULL, NULL, NULL, NULL, NULL);
For more examples, see “SNMPSetAction” on page 127.
Retrieving packed OID data from SNMP agentsAbout this task
Packed OID data types reference the OIDs of one or more variables managed by asingle agent. You use this category of data type when you want to access singlevariables or sets of related variables.
You can retrieve packed OID data from SNMP agents using one of the followingfunctions:
Procedurev Standard data-handling functionsv SNMP functions
Retrieving packed OID data with standard data-HandlingfunctionsYou can use the standard data-handling function GetByFilter to retrieve packedOID data managed by an agent.
114 Netcool/Impact: DSA Reference Guide

To retrieve the packed OID data, you call GetByFilter and specify the name of anSNMP data type as a runtime parameter. The data type configuration contains alist of OIDs for the variables whose value you want to retrieve and attribute namesthat you can use to reference the values. The data source associated with the datatype specifies the host name and port where the agent is located.
The GetByFilter function returns an array of data items whose first element storesa context where the member variables represent values retrieved from the agent.You can reference the returned values using the attribute names that you definedwhen you created the data type.
If the DSA is unable to successfully retrieve the data, it stores an error message ina member variable on the context called ErrorString.
The following example shows how to call GetByFilter and specify the name of anSNMP data type. You can set the Filter parameter to an empty string andCountOnly to False.// Call GetByFilter and pass the name of an SNMP data type
TypeName = "MySnmpType";Filter = "";CountOnly = False;
MySNMPValues = GetByFilter(TypeName, Filter, CountOnly);
The following example shows how to access values returned by the function. Inthis example, MySnmpType defines attributes named HostId, SysContact, SysName,and SysLocation.// Access the member variables of the context returned by GetByFilter
Log("HostId: " + MySNMPValues[0].HostId);Log("SysContact: " + MySNMPValues[0].SysContact);Log("SysName: " + MySNMPValues[0].SysName);Log("SysLocation: " + MySNMPValues[0].SysLocation);
The following example shows how to access an error message returned by the callto GetByFilter.Log("Errors: " + MySNMPValues[0].ErrorString);
The following complete example shows how to use GetByFilter and handle thevalues it returns.// Call GetByFilter and pass the name of an SNMP data type
TypeName = "MySnmpType";Filter = "";CountOnly = False;
MySNMPValues = GetByFilter(TypeName, Filter, CountOnly);
// Access the member variables of the context returned by GetByFilter
Log("HostId: " + MySNMPValues[0].HostId);Log("SysContact: " + MySNMPValues[0].SysContact);Log("SysName: " + MySNMPValues[0].SysName);Log("SysLocation: " + MySNMPValues[0].SysLocation);
Log("Errors: " + MySNMPValues[0].ErrorString);
Chapter 10. Working with the SNMP DSA 115

Retrieving packed OID data with SNMP functionsYou can use the SNMP function SnmpGetAction to retrieve packed OID datamanaged by an agent.
When you call SnmpGetAction, you pass an SNMP data type, the host name andport of the agent, and other parameters. If you are using SNMP v3, you can alsospecify the information required to authenticate as an SNMP user.
For more information about SnmpGetAction, see “SNMPGetAction” on page 119.
The following example shows how to use SnmpGetAction. In this example, thevariable OIDs are specified by the SNMP_PACKED data type configuration.// Call SnmpGetAction and pass the name of the SNMP data type that contains// configuration information required to perform the SNMP GET
TypeName = "SNMP_PACKED";HostId = "192.168.1.1";Port = 161;
SnmpGetAction(TypeName, HostId, Port, NULL, NULL, NULL, NULL, NULL, NULL, NULL,NULL, NULL, NULL);
// Print the results of the SNMP GET to the policy log
Count = 0;
While (Count < Length(ValueList)) {Log(ValueList[Count]);Count = Count + 1;
}
Traversing SNMP treesYou can use the SnmpGetNextAction function to retrieve the value of the nextSNMP variables in the variable tree from an agent. This function is useful insituations where you want to traverse an entire tree or in situations where you donot know the OID of subsequent variables in a tree that you want to retrieve.
When you call SnmpGetNextAction, you pass an SNMP data type and the hostname and port where the agent is located. If you are using SNMP v3, you can alsospecify the information required to authenticate as an SNMP user. You can alsooptionally pass a list of OIDs and other information needed to retrieve the data.
For more information about the SnmpGetNextAction function, see“SNMPGetNextAction” on page 123.
The following example shows how to use SnmpGetNextAction.// Call SnmpGetNextAction and pass the name of the SNMP data type that contains// configuration information required to perform the SNMP GETNEXT
TypeName = "SNMP_PACKED";HostId = "192.168.1.1";Port = 161;
SnmpGetNextAction(TypeName, HostId, Port, NULL, NULL, NULL, NULL, NULL,NULL, NULL, NULL, NULL, NULL);
// Print the results of the SNMP GETNEXT to the policy log
Count = 0;
116 Netcool/Impact: DSA Reference Guide

While (Count < Length(ValueList)) {Log(VarIdList[Count] + ": " + ValueList[Count]);Count = Count + 1;
}
Retrieving table data from SNMP agentsAbout this task
Table data types reference the OIDs of one or more tables managed by a singleagent. You use this category of data type when you want to access SNMP tables.
You can retrieve table data from SNMP agents using:
Procedurev Standard data-handling functionsv SNMP functions
Retrieving table data with standard data-handling functionsYou can use the standard data-handling function GetByFilter to retrieve table datamanaged by an agent.
To retrieve the table data, you call GetByFilter and specify the name of an SNMPdata type as a runtime parameter. The data type configuration contains a list ofOIDs for the tables whose value you want to retrieve and attribute names that youcan use to reference the tables. The data source associated with the data typespecifies the host name and port where the agent is located.
The GetByFilter function returns an array of data items whose first element storesa context where the member variables represent values retrieved from the agent.You can reference the returned values using the attribute names that you definedwhen you created the data type.
If the DSA is unable to successfully retrieve the data, it stores an error message ina member variable on the context called ErrorString.
The following example shows how to call GetByFilter and specify the name of anSNMP data type. You can set the Filter parameter to an empty string andCountOnly to False.// Call GetByFilter and pass the name of an SNMP data type
TypeName = "MySnmpType";Filter = "";CountOnly = False;
MySNMPValues = GetByFilter(TypeName, Filter, CountOnly);
The following example shows how to access values returned by the function. Inthis example, MySnmpType defines attributes named HostId, SysContact, SysName,and SysLocation.// Access the member variables of the context returned by GetByFilter
Log("HostId: " + MySNMPValues[0].HostId);Log("SysContact: " + MySNMPValues[0].SysContact);Log("SysName: " + MySNMPValues[0].SysName);Log("SysLocation: " + MySNMPValues[0].SysLocation);
Chapter 10. Working with the SNMP DSA 117
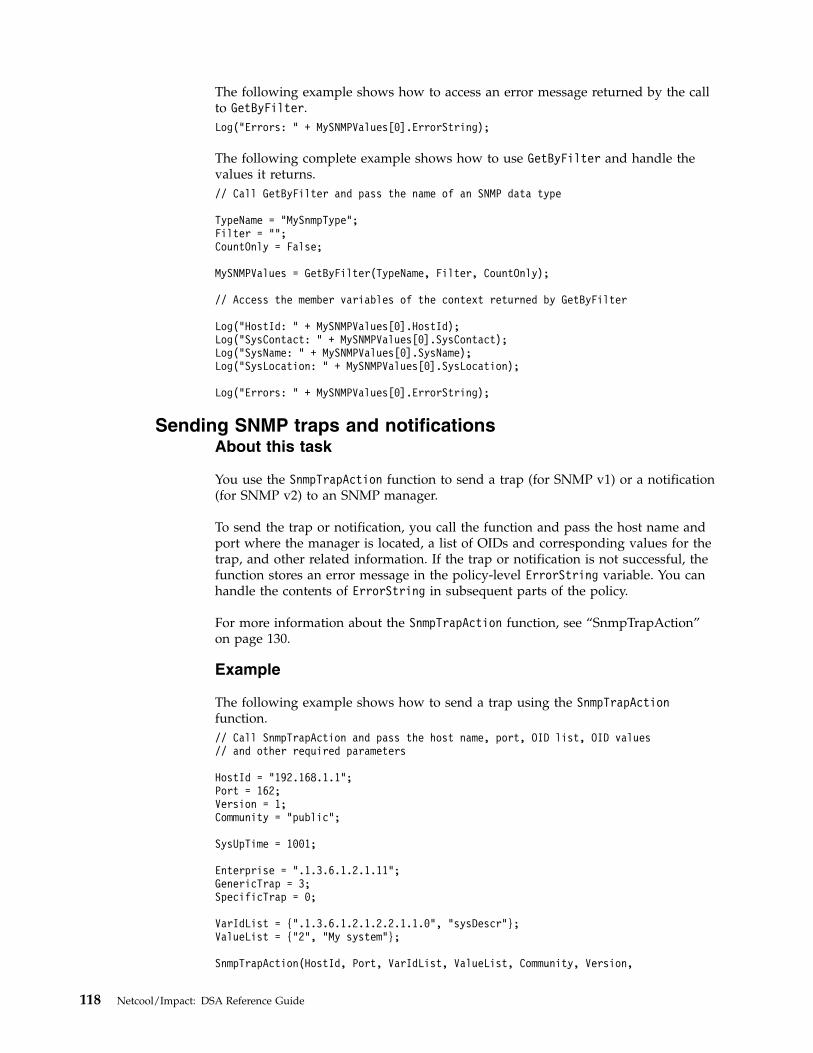
The following example shows how to access an error message returned by the callto GetByFilter.Log("Errors: " + MySNMPValues[0].ErrorString);
The following complete example shows how to use GetByFilter and handle thevalues it returns.// Call GetByFilter and pass the name of an SNMP data type
TypeName = "MySnmpType";Filter = "";CountOnly = False;
MySNMPValues = GetByFilter(TypeName, Filter, CountOnly);
// Access the member variables of the context returned by GetByFilter
Log("HostId: " + MySNMPValues[0].HostId);Log("SysContact: " + MySNMPValues[0].SysContact);Log("SysName: " + MySNMPValues[0].SysName);Log("SysLocation: " + MySNMPValues[0].SysLocation);
Log("Errors: " + MySNMPValues[0].ErrorString);
Sending SNMP traps and notificationsAbout this task
You use the SnmpTrapAction function to send a trap (for SNMP v1) or a notification(for SNMP v2) to an SNMP manager.
To send the trap or notification, you call the function and pass the host name andport where the manager is located, a list of OIDs and corresponding values for thetrap, and other related information. If the trap or notification is not successful, thefunction stores an error message in the policy-level ErrorString variable. You canhandle the contents of ErrorString in subsequent parts of the policy.
For more information about the SnmpTrapAction function, see “SnmpTrapAction”on page 130.
Example
The following example shows how to send a trap using the SnmpTrapActionfunction.// Call SnmpTrapAction and pass the host name, port, OID list, OID values// and other required parameters
HostId = "192.168.1.1";Port = 162;Version = 1;Community = "public";
SysUpTime = 1001;
Enterprise = ".1.3.6.1.2.1.11";GenericTrap = 3;SpecificTrap = 0;
VarIdList = {".1.3.6.1.2.1.2.2.1.1.0", "sysDescr"};ValueList = {"2", "My system"};
SnmpTrapAction(HostId, Port, VarIdList, ValueList, Community, Version,
118 Netcool/Impact: DSA Reference Guide
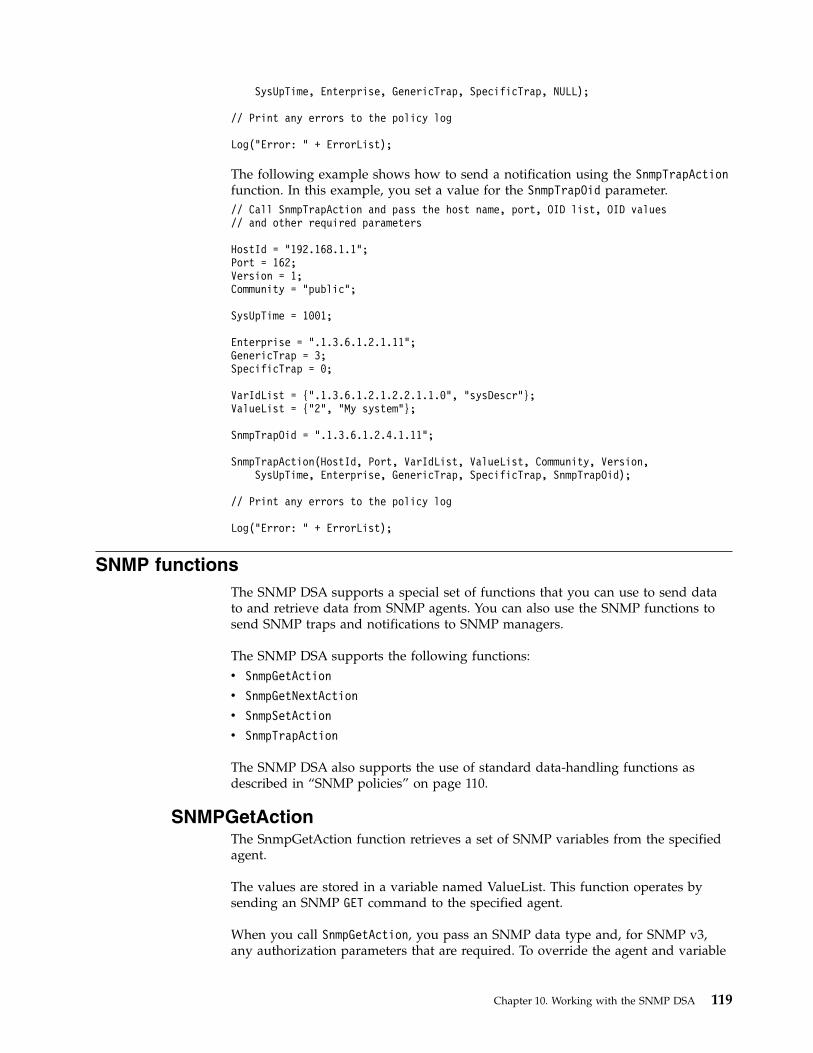
SysUpTime, Enterprise, GenericTrap, SpecificTrap, NULL);
// Print any errors to the policy log
Log("Error: " + ErrorList);
The following example shows how to send a notification using the SnmpTrapActionfunction. In this example, you set a value for the SnmpTrapOid parameter.// Call SnmpTrapAction and pass the host name, port, OID list, OID values// and other required parameters
HostId = "192.168.1.1";Port = 162;Version = 1;Community = "public";
SysUpTime = 1001;
Enterprise = ".1.3.6.1.2.1.11";GenericTrap = 3;SpecificTrap = 0;
VarIdList = {".1.3.6.1.2.1.2.2.1.1.0", "sysDescr"};ValueList = {"2", "My system"};
SnmpTrapOid = ".1.3.6.1.2.4.1.11";
SnmpTrapAction(HostId, Port, VarIdList, ValueList, Community, Version,SysUpTime, Enterprise, GenericTrap, SpecificTrap, SnmpTrapOid);
// Print any errors to the policy log
Log("Error: " + ErrorList);
SNMP functionsThe SNMP DSA supports a special set of functions that you can use to send datato and retrieve data from SNMP agents. You can also use the SNMP functions tosend SNMP traps and notifications to SNMP managers.
The SNMP DSA supports the following functions:v SnmpGetAction
v SnmpGetNextAction
v SnmpSetAction
v SnmpTrapAction
The SNMP DSA also supports the use of standard data-handling functions asdescribed in “SNMP policies” on page 110.
SNMPGetActionThe SnmpGetAction function retrieves a set of SNMP variables from the specifiedagent.
The values are stored in a variable named ValueList. This function operates bysending an SNMP GET command to the specified agent.
When you call SnmpGetAction, you pass an SNMP data type and, for SNMP v3,any authorization parameters that are required. To override the agent and variable
Chapter 10. Working with the SNMP DSA 119
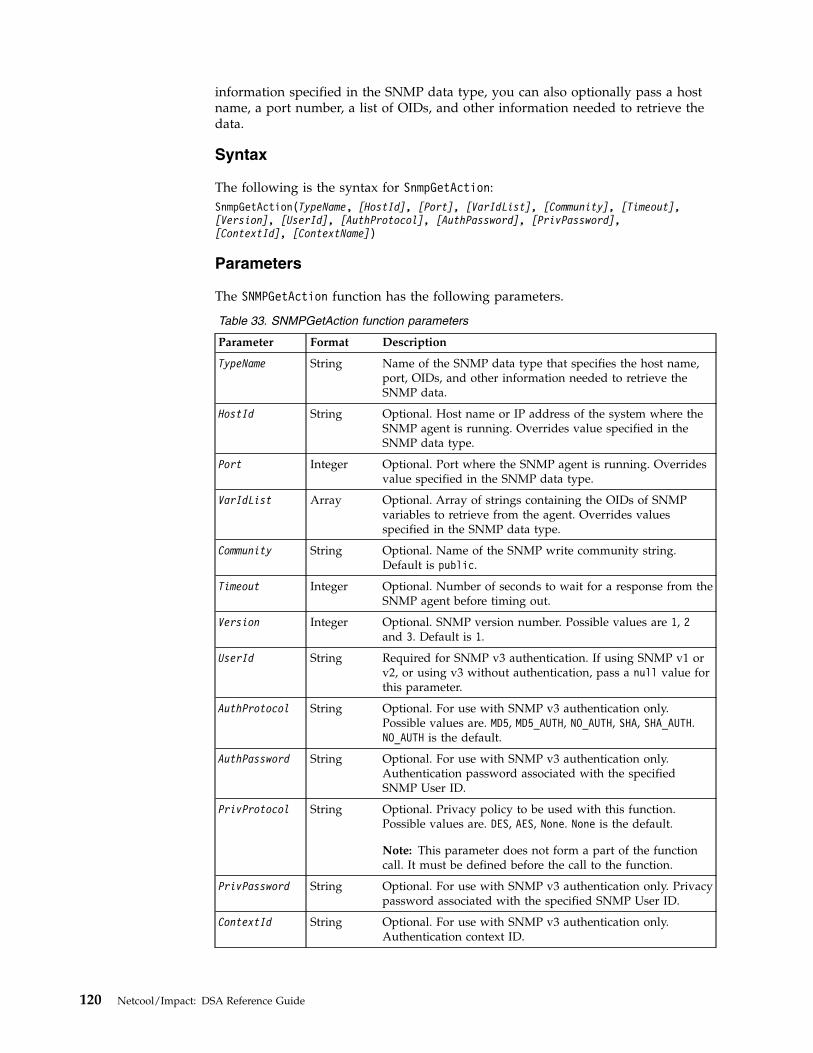
information specified in the SNMP data type, you can also optionally pass a hostname, a port number, a list of OIDs, and other information needed to retrieve thedata.
Syntax
The following is the syntax for SnmpGetAction:SnmpGetAction(TypeName, [HostId], [Port], [VarIdList], [Community], [Timeout],[Version], [UserId], [AuthProtocol], [AuthPassword], [PrivPassword],[ContextId], [ContextName])
Parameters
The SNMPGetAction function has the following parameters.
Table 33. SNMPGetAction function parameters
Parameter Format Description
TypeName String Name of the SNMP data type that specifies the host name,port, OIDs, and other information needed to retrieve theSNMP data.
HostId String Optional. Host name or IP address of the system where theSNMP agent is running. Overrides value specified in theSNMP data type.
Port Integer Optional. Port where the SNMP agent is running. Overridesvalue specified in the SNMP data type.
VarIdList Array Optional. Array of strings containing the OIDs of SNMPvariables to retrieve from the agent. Overrides valuesspecified in the SNMP data type.
Community String Optional. Name of the SNMP write community string.Default is public.
Timeout Integer Optional. Number of seconds to wait for a response from theSNMP agent before timing out.
Version Integer Optional. SNMP version number. Possible values are 1, 2and 3. Default is 1.
UserId String Required for SNMP v3 authentication. If using SNMP v1 orv2, or using v3 without authentication, pass a null value forthis parameter.
AuthProtocol String Optional. For use with SNMP v3 authentication only.Possible values are. MD5, MD5_AUTH, NO_AUTH, SHA, SHA_AUTH.NO_AUTH is the default.
AuthPassword String Optional. For use with SNMP v3 authentication only.Authentication password associated with the specifiedSNMP User ID.
PrivProtocol String Optional. Privacy policy to be used with this function.Possible values are. DES, AES, None. None is the default.
Note: This parameter does not form a part of the functioncall. It must be defined before the call to the function.
PrivPassword String Optional. For use with SNMP v3 authentication only. Privacypassword associated with the specified SNMP User ID.
ContextId String Optional. For use with SNMP v3 authentication only.Authentication context ID.
120 Netcool/Impact: DSA Reference Guide

Table 33. SNMPGetAction function parameters (continued)
Parameter Format Description
ContextName String Optional. For use with SNMP v3 authentication only.Authentication context name.
Return Values
When you call SnmpGetAction, it sets the following variables in the policy context:ValueList.
The ValueList variable is an array of strings, each of which stores the value of onevariable retrieved from the SNMP agent. The strings in the array are assigned inthe order that the variable OIDs are specified in the SNMP data type or theVarIdList parameter.
Error handling
If the SNMP operation fails, the Impact policy engine throws an SnmpDSAException.You can handle this exception using the Handle() function:// Handle SNMP DSA ExceptionsHandle com.micromuse.dsa.snmpdsa.SnmpDSAException {log("ErrorMessage: " + ErrorMessage);javaCall("com.micromuse.dsa.snmpdsa.SnmpDSAException", ExceptionMessage, "getCause", null);log("MyException is " + ExceptionMessage);
}
Example 1
The following example shows how to retrieve a set of SNMP variables by callingSNMPGetAction and passing the name of an SNMP data type as an input parameter.In this example, the SNMP data type is named SNMP_PACKED. The data typeconfiguration specifies the host name and port where the SNMP agent is runningand the OIDs of the variables you want to retrieve.// Call SNMPGetAction and pass the name of the SNMP data type that contains// configuration information required to perform the SNMP GET
TypeName = "SNMP_PACKED";
SnmpGetAction(TypeName, "192.168.1.1", 161, null, null, null,null, null, null, null, null, null, null);
// Print the results of the SNMP GET to the policy log
Count = 0;
while (Count < Length(ValueList)) {Log(ValueList[Count]);Count = Count + 1;}
Example 2
The following example shows how to retrieve a set of SNMP variables by callingSNMPGetAction and explicitly overriding the default host name, port, and otherconfiguration values set in the SNMP data type.
Example 2 using IPL.
Chapter 10. Working with the SNMP DSA 121

// Call SnmpGetAction and pass the name of the SNMP data type that contains// configuration information required to perform the SNMP GET
TypeName = "SNMP_PACKED";HostId = "192.168.1.1";Port = 161;VarIdList = {".1.3.6.1.2.1.1.5.0", ".1.3.6.1.2.1.1.6.0"};Community = "private";Timeout = 15;
SnmpGetAction(TypeName, HostId, Port, VarIdList, Community,Timeout, null, null, null, null, null, null,null);
// Print the results of the SNMP GET to the policy log
Count = 0;
while (Count < Length(ValueList)) {Log(ValueList[Count]);Count = Count + 1;}
Example 2 using JavaScript.// Call SnmpGetAction and pass the name of the SNMP data type that contains// configuration information required to perform the SNMP GETTypeName = "SNMP_PACKED";HostId = "192.168.1.1";Port = 161;VarIdList = [".1.3.6.1.2.1.1.5.0", ".1.3.6.1.2.1.1.6.0"];Community = "private";Timeout = 15;SnmpGetAction(TypeName, HostId, Port, VarIdList, Community,Timeout, null, null, null, null, null, null,null);// Print the results of the SNMP GET to the policy logCount = 0;while (Count < Length(ValueList)) {Log(ValueList[Count]);Count = Count + 1;}
Example 3
The following example shows how to retrieve a set of SNMP variables usingSNMP v3 authentication.
Example 3 using IPL.// Call SnmpGetAction and pass the name of the SNMP data type that contains// configuration information required to perform the SNMP GET
TypeName = "SNMP_PACKED";HostId = "192.168.1.1";Port = 161;VarIdList = {".1.3.6.1.2.1.1.5.0", ".1.3.6.1.2.1.1.6.0"};Community = "private";Timeout = 15;Version = 3;UserId = "snmpusr";AuthProtocol = "MD5_AUTH";AuthPassword = "snmppwd";ContextId = "ctx";
SnmpGetAction(TypeName, HostId, Port, VarIdList, Community,Timeout, Version, UserId, AuthProtocol, AuthPassword, null, ContextId, null);
// Print the results of the SNMP GET to the policy log
122 Netcool/Impact: DSA Reference Guide
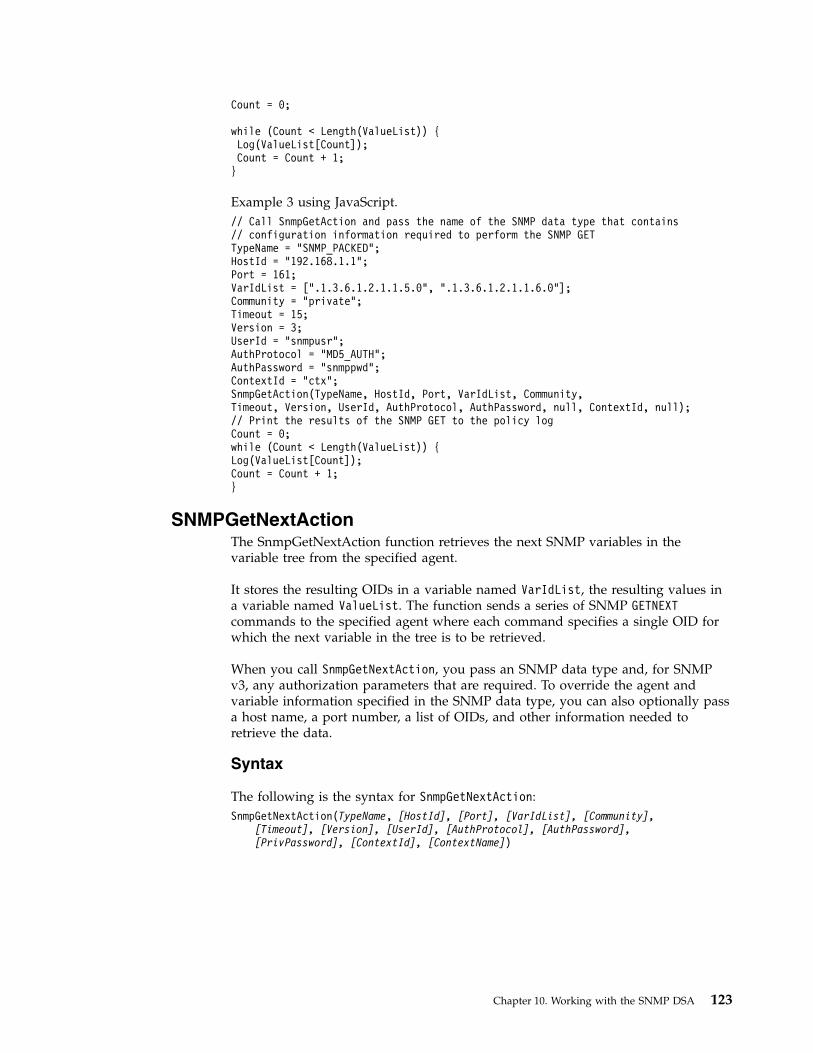
Count = 0;
while (Count < Length(ValueList)) {Log(ValueList[Count]);Count = Count + 1;}
Example 3 using JavaScript.// Call SnmpGetAction and pass the name of the SNMP data type that contains// configuration information required to perform the SNMP GETTypeName = "SNMP_PACKED";HostId = "192.168.1.1";Port = 161;VarIdList = [".1.3.6.1.2.1.1.5.0", ".1.3.6.1.2.1.1.6.0"];Community = "private";Timeout = 15;Version = 3;UserId = "snmpusr";AuthProtocol = "MD5_AUTH";AuthPassword = "snmppwd";ContextId = "ctx";SnmpGetAction(TypeName, HostId, Port, VarIdList, Community,Timeout, Version, UserId, AuthProtocol, AuthPassword, null, ContextId, null);// Print the results of the SNMP GET to the policy logCount = 0;while (Count < Length(ValueList)) {Log(ValueList[Count]);Count = Count + 1;}
SNMPGetNextActionThe SnmpGetNextAction function retrieves the next SNMP variables in thevariable tree from the specified agent.
It stores the resulting OIDs in a variable named VarIdList, the resulting values ina variable named ValueList. The function sends a series of SNMP GETNEXTcommands to the specified agent where each command specifies a single OID forwhich the next variable in the tree is to be retrieved.
When you call SnmpGetNextAction, you pass an SNMP data type and, for SNMPv3, any authorization parameters that are required. To override the agent andvariable information specified in the SNMP data type, you can also optionally passa host name, a port number, a list of OIDs, and other information needed toretrieve the data.
Syntax
The following is the syntax for SnmpGetNextAction:SnmpGetNextAction(TypeName, [HostId], [Port], [VarIdList], [Community],
[Timeout], [Version], [UserId], [AuthProtocol], [AuthPassword],[PrivPassword], [ContextId], [ContextName])
Chapter 10. Working with the SNMP DSA 123

Parameters
The SnmpGetNextAction function has the following parameters.
Table 34. SnmpGetNextAction function parameters
Parameter Format Description
TypeName String Name of the SNMP data type that specifies the host name,port, OIDs, and other information needed to retrieve theSNMP data.
HostId String Optional. Host name or IP address of the system wherethe SNMP agent is running. Overrides value specified inthe SNMP data type.
Port Integer Optional. Port where the SNMP agent is running.Overrides value specified in the SNMP data type.
VarIdList Array Optional. Array of strings containing the OIDs of SNMPvariables to retrieve from the agent. Overrides valuesspecified in the SNMP data type.
Community String Optional. Name of the SNMP write community string.Default is public.
Timeout Integer Optional. Number of seconds to wait for a response fromthe SNMP agent before timing out.
Version Integer Optional. SNMP version number. Possible values are 1, 2and 3. Default is 1.
UserId String Required for SNMP v3 authentication. If using SNMP v1or v2, or v3 without authentication, pass a null value forthis parameter.
AuthProtocol String Optional. For use with SNMP v3 authentication only.Possible values are. MD5, MD5_AUTH, NO_AUTH, SHA, SHA_AUTH.NO_AUTH is the default.
AuthPassword String Optional. For use with SNMP v3 authentication only.Authentication password associated with the specifiedSNMP User ID.
PrivProtocol String Optional. Privacy policy to be used with this function.Possible values are. DES, AES, None. None is the default.
Note: This parameter does not form a part of the functioncall. It must be defined before the call to the function.
PrivPassword String Optional. For use with SNMP v3 authentication only.Privacy password associated with the specified SNMPUser ID.
ContextId String Optional. For use with SNMP v3 authentication only.Authentication context ID.
ContextName String Optional. For use with SNMP v3 authentication only.Authentication context name.
Error handling
If the SNMP operation fails, the Impact policy engine throws an SnmpDSAException.You can handle this exception using the Handle() function:
124 Netcool/Impact: DSA Reference Guide

// Handle SNMP DSA ExceptionsHandle com.micromuse.dsa.snmpdsa.SnmpDSAException {log("ErrorMessage: " + ErrorMessage);javaCall("com.micromuse.dsa.snmpdsa.SnmpDSAException", ExceptionMessage, "getCause", null);log("MyException is " + ExceptionMessage);
}
Example 1
The following example shows how to retrieve SNMP variables in the variable treeby calling SNMPGetNextAction and passing the name of an SNMP data type as aninput parameter. In this example, the SNMP data type is named SNMP_PACKED. Thedata type configuration specifies the host name and port where the SNMP agent isrunning and the OIDs of the variables whose subsequent values in the tree youwant to retrieve.// Call SNMPGetNextAction and pass the name of the SNMP// data type that contains configuration information required// to perform the SNMP GETNEXT
TypeName = "SNMP_PACKED";
SnmpGetNextAction(TypeName, "192.168.1.1", 161, null, null,null, null, null, null, null, null, null, null);
// Print the results of the SNMP GETNEXT to the policy log
Count = 0;
while (Count < Length(ValueList)) {Log(VarIdList[Count] + ": " + ValueList[Count]);Count = Count + 1;}
Example 2
The following example shows how to retrieve SNMP variables in the variable treeby calling SNMPGetNextAction and explicitly overriding the default host name, port,and other configuration values set in the SNMP data type.
Example 2 using IPL.// Call SnmpGetNextAction and pass the name of the// SNMP data type that contains configuration information// required to perform the SNMP GETNEXT
TypeName = "SNMP_PACKED";HostId = "192.168.1.1";Port = 161;VarIdList = {".1.3.6.1.2.1.1.5.0", ".1.3.6.1.2.1.1.6.0"};Community = "private";Timeout = 15;
SnmpGetNextAction(TypeName, HostId, Port, VarIdList, Community,Timeout, null, null, null, null, null, null, null);
// Print the results of the SNMP GETNEXT to the policy log
Count = 0;
while (Count < Length(ValueList)) {Log(VarIdList[Count] + ": " + ValueList[Count]);Count = Count + 1;}
Chapter 10. Working with the SNMP DSA 125

Example 2 using JavaScript.// Call SnmpGetNextAction and pass the name of the// SNMP data type that contains configuration information// required to perform the SNMP GETNEXTTypeName = "ipRouteTable";HostId = "localhost";Port = 161;VarIdList = [".1.3.6.1.2.1.1.5.0", ".1.3.6.1.2.1.1.6.0"];Community = "public";Timeout = 15;SnmpGetNextAction(TypeName, HostId, Port, VarIdList, Community, Timeout, null, null,
null, null, null, null, null);// Print the results of the SNMP GETNEXT to the policy logCount = 0;while (Count < Length(ValueList)) {
Log(VarIdList[Count] + ": " + ValueList[Count]);Count = Count + 1;
}
Example 3
The following example shows how to retrieve subsequent SNMP variables in thevariable tree using SNMP v3 authentication.
Example 3 using IPL.// Call SnmpGetNextAction and pass the name of the// SNMP data type that contains configuration information// required to perform the SNMP GETNEXT
TypeName = "SNMP_PACKED";HostId = "192.168.1.1";Port = 161;VarIdList = {".1.3.6.1.2.1.1.5.0", ".1.3.6.1.2.1.1.6.0"};Community = "private";Timeout = 15;Version = 3;UserId = "snmpusr";AuthProtocol = "MD5_AUTH";AuthPassword = "snmppwd";ContextId = "ctx";
SnmpGetNextAction(TypeName, HostId, Port, VarIdList, Community,Timeout, Version, UserId, AuthProtocol, AuthPassword, null,ContextId, null);
// Print the results of the SNMP GET to the policy log
Count = 0;
while (Count < Length(ValueList)) {Log(VarIdList[Count] + ": " + ValueList[Count]);Count = Count + 1;}
Example 3 using JavaScript.// Call SnmpGetNextAction and pass the name of the// SNMP data type that contains configuration information// required to perform the SNMP GETNEXTTypeName = "ipRouteTable";HostId = "localhost";Port = 161;VarIdList = [".1.3.6.1.2.1.1.5.0", ".1.3.6.1.2.1.1.6.0"];Community = "public";Timeout = 15;
126 Netcool/Impact: DSA Reference Guide

Version = 3;UserId = "snmpuser";AuthProtocol = "MD5";AuthPassword = "snmppwd";PrivProtocol = "DES";PrivPassword = "privpwd";SnmpGetNextAction(TypeName, HostId, Port, VarIdList, Community, Timeout, Version,
UserId, AuthProtocol, AuthPassword, PrivPassword, null, null);// Print the results of the SNMP GET to the policy logCount = 0;while (Count < Length(ValueList)) {
Log(VarIdList[Count] + ": " + ValueList[Count]);Count = Count + 1;
}
SNMPSetActionThe SnmpSetAction function sets variable values on the specified SNMP agent.
This function operates by sending an SNMP SET command to the specified agent.
When you call SNMPSetAction, you pass an SNMP data type, the host name, andport of the agent, an array of OIDs, and the array of values that you want to set. Ifyou are using SNMP v3, you can also include information required to authenticateas an SNMP user.
Syntax
The following is the syntax for SNMPSetAction:SnmpSetAction(TypeName, [HostId], [Port], [VarIdList],ValueList, [Community], [Timeout], [Version], [UserId], [AuthProtocol],[AuthPassword], [PrivPassword], [ContextId], [ContextName])
Parameters
The SNMPSetAction function has the following parameters.
Table 35. SNMPSetAction function parameters
Parameter Format Description
TypeName String Name of the SNMP data type that specifies the hostname, port, OIDs, and other information needed toset the SNMP data.
HostId String Optional. Host name or IP address of the systemwhere the SNMP agent is running. Overrides valuespecified in the SNMP data type.
Port Integer Optional. Port where the SNMP agent is running.Overrides value specified in the SNMP data type.
VarIdList Array Array of strings containing the OIDs of SNMPvariables to set on the agent. Overrides valuesspecified in the SNMP data type.
ValueList Array Array of strings containing the values you want toset. You must specify these values in the same orderthat the OIDs appear either in the SNMP data typeor in the VarIdList variable.
Community String Optional. Name of the SNMP write communitystring. Default is public.
Chapter 10. Working with the SNMP DSA 127

Table 35. SNMPSetAction function parameters (continued)
Parameter Format Description
Timeout Integer Optional. Number of seconds to wait for a responsefrom the SNMP agent before timing out.
Version Integer Optional. SNMP version number. Possible values are1, 2 and 3. Default is 1.
UserId String Required for SNMP v3 authentication. If using SNMPv1 or v2, or using v3 without authentication, pass anull value for this parameter.
AuthProtocol String Optional. For use with SNMP v3 authentication only.Possible values are. MD5, MD5_AUTH, NO_AUTH, SHA,SHA_AUTH. NO_AUTH is the default.
AuthPassword String Optional. For use with SNMP v3 authentication only.Authentication password associated with thespecified SNMP User ID.
PrivProtocol String Optional. Privacy policy to be used with thisfunction. Possible values are. DES, AES, None. None isthe default.
Note: This parameter does not form a part of thefunction call. It must be defined before the call to thefunction.
PrivPassword String Optional. For use with SNMP v3 authentication only.Privacy password associated with the specifiedSNMP User ID.
ContextId String Optional. For use with SNMP v3 authentication only.Authentication context ID.
ContextName String Optional. For use with SNMP v3 authentication only.Authentication context name.
Error handling
If the SNMP operation fails, the Impact policy engine throws an SnmpDSAException.You can handle this exception using the Handle() function:// Handle SNMP DSA ExceptionsHandle com.micromuse.dsa.snmpdsa.SnmpDSAException {log("ErrorMessage: " + ErrorMessage);javaCall("com.micromuse.dsa.snmpdsa.SnmpDSAException", ExceptionMessage, "getCause", null);log("MyException is " + ExceptionMessage);
}
Example 1
The following example shows how to set SNMP variables by calling SNMPSetActionand passing the name of an SNMP data type, an array of OIDs, and an array ofvalues as input parameters. In this example, the SNMP data type is namedSNMP_PACKED.
Example 1 using IPL.// Call SnmpSetAction and pass the name of the// SNMP data type that contains configuration information// required to perform the SNMP SET
TypeName = "SNMP_PACKED";HostId = "192.168.1.1";Port = 161;
128 Netcool/Impact: DSA Reference Guide

VarIdList = {".1.3.6.1.2.1.1.4.0", ".1.3.6.1.2.1.1.5.0"};ValueList = {"Value_01", "Value_02"};
SnmpSetAction(TypeName, HostId, Port, VarIdList, ValueList,null, null, null, null, null, null, null, null, null);
Example 1 using JavaScript.// Call SnmpSetAction and pass the name of the// SNMP data type that contains configuration information// required to perform the SNMP SETTypeName = "SNMP_PACKED";HostId = "192.168.1.1";Port = 161;VarIdList = [".1.3.6.1.2.1.1.4.0", ".1.3.6.1.2.1.1.5.0"];ValueList = ["Value_01", "Value_02"];SnmpSetAction(TypeName, HostId, Port, VarIdList, ValueList,null, null, null, null, null, null, null, null, null);
Example 2
The following example shows how to set SNMP variables using SNMP v3authentication.
Example 2 using IPL.// Call SnmpSetAction and pass the name of the// SNMP data type that contains configuration information// required to perform the SNMP SET
TypeName = "SNMP_PACKED";HostId = "192.168.1.1";Port = 161;VarIdList = { ".1.3.6.1.2.1.1.4.0", ".1.3.6.1.2.1.1.5.0"};ValueList = {"Value_01", "Value_02"};Community = "private";Timeout = 15;Version = 3;UserId = "snmpusr";AuthProtocol = "MD5_AUTH";AuthPassword = "snmppwd";ContextId = "ctx";
SnmpSetAction(TypeName, HostId, Port, VarIdList, ValueList,Community, Timeout, Version, UserId, AuthProtocol,AuthPassword, null, ContextId, null);
Example 2 using JavaScript.// Call SnmpSetAction and pass the name of the// SNMP data type that contains configuration information// required to perform the SNMP SETTypeName = "SNMP_PACKED";HostId = "192.168.1.1";Port = 161;VarIdList = [".1.3.6.1.2.1.1.4.0", ".1.3.6.1.2.1.1.5.0"];ValueList = ["Value_01", "Value_02"];Community = "private";Timeout = 15;Version = 3;UserId = "snmpusr";AuthProtocol = "MD5_AUTH";AuthPassword = "snmppwd";ContextId = "ctx";SnmpSetAction(TypeName, HostId, Port, VarIdList, ValueList,Community, Timeout, Version, UserId, AuthProtocol,AuthPassword, null, ContextId, null);
Chapter 10. Working with the SNMP DSA 129
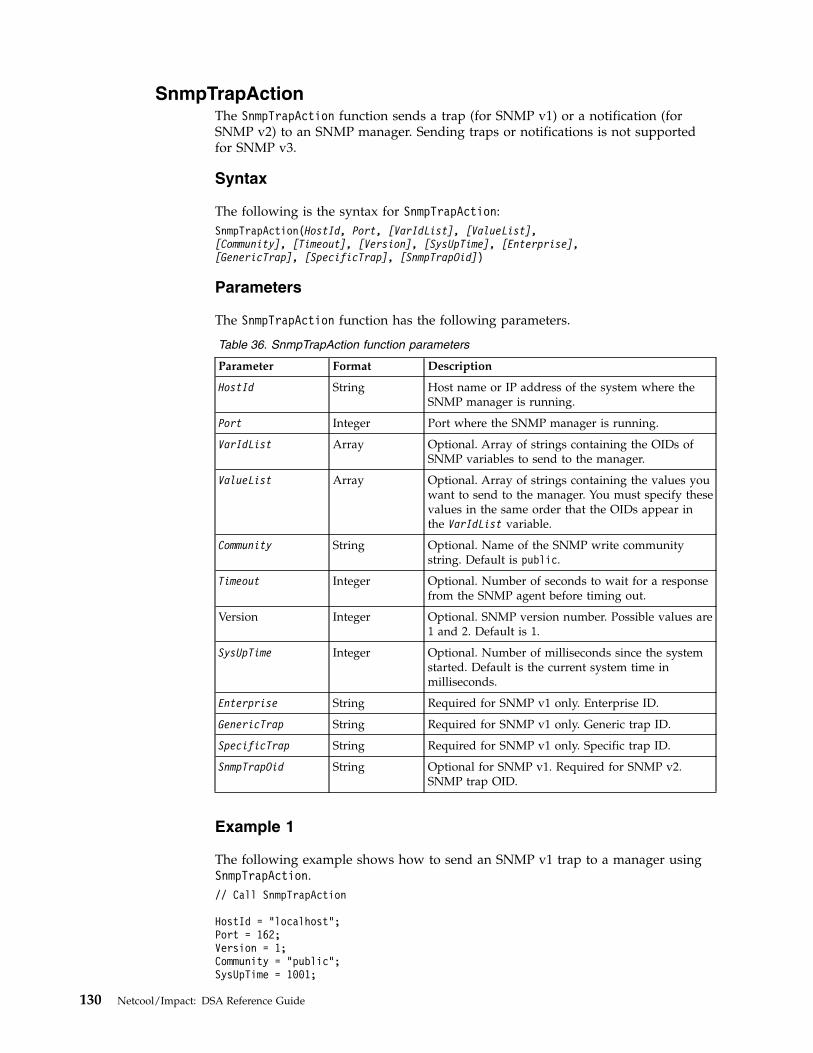
SnmpTrapActionThe SnmpTrapAction function sends a trap (for SNMP v1) or a notification (forSNMP v2) to an SNMP manager. Sending traps or notifications is not supportedfor SNMP v3.
Syntax
The following is the syntax for SnmpTrapAction:SnmpTrapAction(HostId, Port, [VarIdList], [ValueList],[Community], [Timeout], [Version], [SysUpTime], [Enterprise],[GenericTrap], [SpecificTrap], [SnmpTrapOid])
Parameters
The SnmpTrapAction function has the following parameters.
Table 36. SnmpTrapAction function parameters
Parameter Format Description
HostId String Host name or IP address of the system where theSNMP manager is running.
Port Integer Port where the SNMP manager is running.
VarIdList Array Optional. Array of strings containing the OIDs ofSNMP variables to send to the manager.
ValueList Array Optional. Array of strings containing the values youwant to send to the manager. You must specify thesevalues in the same order that the OIDs appear inthe VarIdList variable.
Community String Optional. Name of the SNMP write communitystring. Default is public.
Timeout Integer Optional. Number of seconds to wait for a responsefrom the SNMP agent before timing out.
Version Integer Optional. SNMP version number. Possible values are1 and 2. Default is 1.
SysUpTime Integer Optional. Number of milliseconds since the systemstarted. Default is the current system time inmilliseconds.
Enterprise String Required for SNMP v1 only. Enterprise ID.
GenericTrap String Required for SNMP v1 only. Generic trap ID.
SpecificTrap String Required for SNMP v1 only. Specific trap ID.
SnmpTrapOid String Optional for SNMP v1. Required for SNMP v2.SNMP trap OID.
Example 1
The following example shows how to send an SNMP v1 trap to a manager usingSnmpTrapAction.// Call SnmpTrapAction
HostId = "localhost";Port = 162;Version = 1;Community = "public";SysUpTime = 1001;
130 Netcool/Impact: DSA Reference Guide
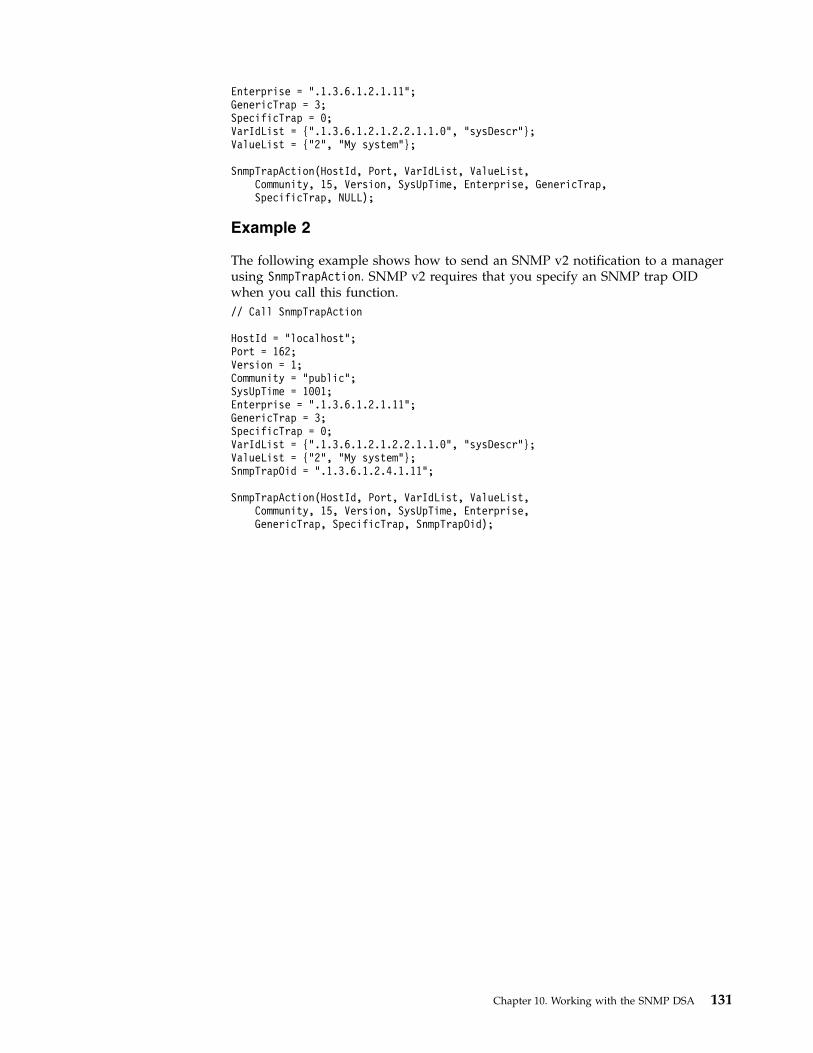
Enterprise = ".1.3.6.1.2.1.11";GenericTrap = 3;SpecificTrap = 0;VarIdList = {".1.3.6.1.2.1.2.2.1.1.0", "sysDescr"};ValueList = {"2", "My system"};
SnmpTrapAction(HostId, Port, VarIdList, ValueList,Community, 15, Version, SysUpTime, Enterprise, GenericTrap,SpecificTrap, NULL);
Example 2
The following example shows how to send an SNMP v2 notification to a managerusing SnmpTrapAction. SNMP v2 requires that you specify an SNMP trap OIDwhen you call this function.// Call SnmpTrapAction
HostId = "localhost";Port = 162;Version = 1;Community = "public";SysUpTime = 1001;Enterprise = ".1.3.6.1.2.1.11";GenericTrap = 3;SpecificTrap = 0;VarIdList = {".1.3.6.1.2.1.2.2.1.1.0", "sysDescr"};ValueList = {"2", "My system"};SnmpTrapOid = ".1.3.6.1.2.4.1.11";
SnmpTrapAction(HostId, Port, VarIdList, ValueList,Community, 15, Version, SysUpTime, Enterprise,GenericTrap, SpecificTrap, SnmpTrapOid);
Chapter 10. Working with the SNMP DSA 131

132 Netcool/Impact: DSA Reference Guide

Chapter 11. Working with the ITNM DSA
The ITNM DSA is a Direct Mode, bi-directional DSA that is used to send queries tothe Netcool/Impact ITNM application and get the results of those queries.
ITNM DSA overviewThe ITNM DSA is a Direct Mode, bi-directional DSA that is used to send queries tothe ITNM application and get the results of those queries.
After you set up Netcool/Impact and install the DSA, you can read the data in apolicy using the GetByFilter function. The DSA can also receive asynchronousmessages from ITNM regarding alerts.
The ITNM DSA requires ITNM version 3.8 or higher.
For more information about ITNM hardware and software requirements, see theTivoli Network Manager IP Edition Knowledge Center at http://www-01.ibm.com/support/knowledgecenter/SSSHRK/landingpage/product_welcome_itnm.html.
Setting up the DSAThe drivers required to connect Netcool/Impact to ITNM version 3.8 and 3.9 areavailable in $NCHOME/integrations/itnm in your Netcool/Impact installation.v To connect to ITNM 3.8 use, ncp_j_api-3.8.0.50.jar.v To connect to ITNM 3.9 or higher use, ncp_j_api-3.9.0.32.jar.
For the version of ITNM you want to receive events from, complete the followingsteps:1. Copy the appropriate jar file from $NCHOME/integrations/itnm and place it in
$NCHOME/dsalib folder.2. Restart the Netcool/Impact server.3. If you are running in a clustered mode, repeat this step for each server in the
cluster.
To set up the ITNM DSA, complete following tasks:1. Edit the precisiondsa.properties file. For more information about this task,
see “Editing the DSA properties file” on page 134.2. Configure the ITNM Event Listenerservice for the DSA (optional). For more
information about this task, see “Running the ITNM event listener service forthe DSA” on page 134.
3. If you plan to receive asynchronous events from ITNM, start the ITNM EventListener Service.
A preconfigured data type, data source, and two sample policies are included inNetcool/Impact.
© Copyright IBM Corp. 2006, 2016 133
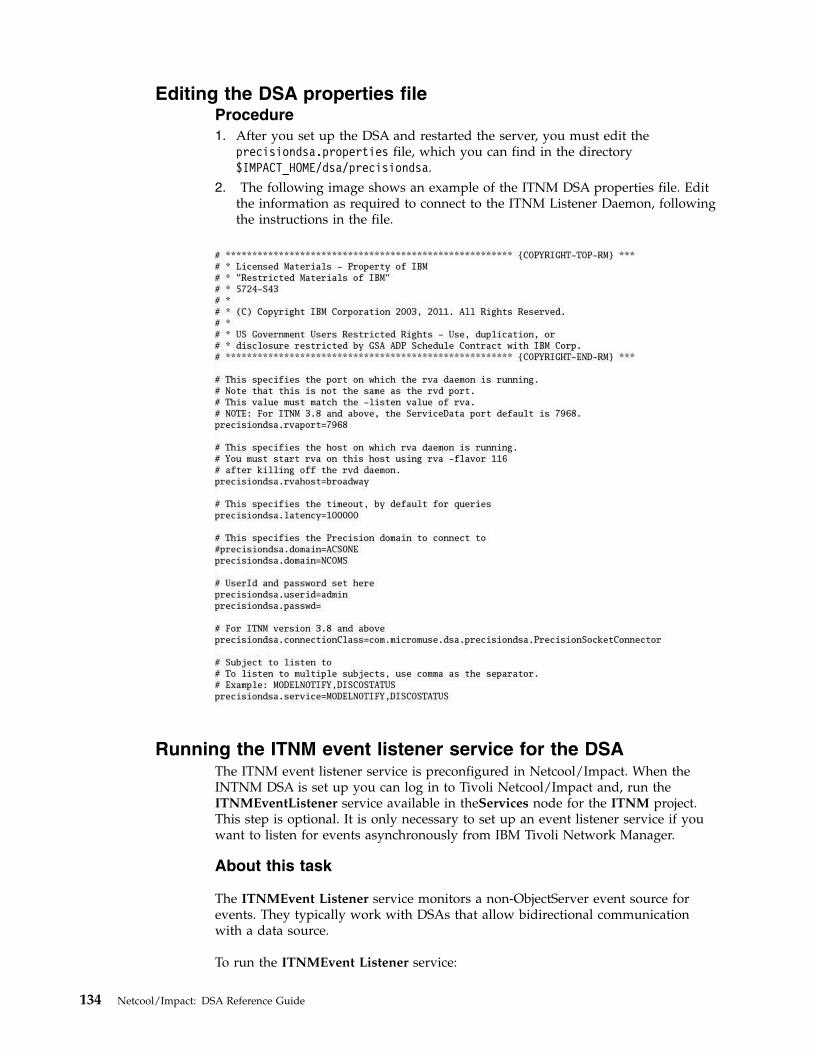
Editing the DSA properties fileProcedure1. After you set up the DSA and restarted the server, you must edit the
precisiondsa.properties file, which you can find in the directory$IMPACT_HOME/dsa/precisiondsa.
2. The following image shows an example of the ITNM DSA properties file. Editthe information as required to connect to the ITNM Listener Daemon, followingthe instructions in the file.
Running the ITNM event listener service for the DSAThe ITNM event listener service is preconfigured in Netcool/Impact. When theINTNM DSA is set up you can log in to Tivoli Netcool/Impact and, run theITNMEventListener service available in theServices node for the ITNM project.This step is optional. It is only necessary to set up an event listener service if youwant to listen for events asynchronously from IBM Tivoli Network Manager.
About this task
The ITNMEvent Listener service monitors a non-ObjectServer event source forevents. They typically work with DSAs that allow bidirectional communicationwith a data source.
To run the ITNMEvent Listener service:
134 Netcool/Impact: DSA Reference Guide

Procedure1. From the Project selection list, select the ITNM project.2. Click the Services tab.3. The ITNMEvent Listener service is displayed.4. Enter the required information in new the Event Listener configuration
window.5. If you want to view the preconfigured settings, right click the service and click
Edit.v Listener Filter Leave this field blankv Policy To Execute shows the ITNMSampleListenerPolicy that runs when an
event is received from the IBM Tivoli Network Manager application.v Direct Mode Class Name this field is prepopulated
con.micromuse.dsa.precisiondsa.PrecisionEventFeedSource
v Direct Mode Source Name this field is prepopulated with a unique namethat identifies the data source, for example, ITNMServer
6. Close the ITNMEvent Listener service tab.7. To run the service, in the Services tab, select the ITNMEvent Listener service
and click the Start Service icon to receive events from IBM Tivoli NetworkManager. For information about IBM Tivoli Network Manager, see the IBMTivoli Network Manager documentation available from the following link,http://publib.boulder.ibm.com/infocenter/tivihelp/v8r1/topic/com.ibm.tivoli.namnmip.doc/welcome_nmip.htm.
ITNM DSA data typeThe ITNM data type is the only one that works with the ITNM DSA.
You cannot rename an ITNM data type.
When the DSA queries the ITNM database, the records are returned as data itemsof the ITNM data type. Each field in the records is turned into an attribute of thecorresponding data item.
For example, a record can contain fields such as:v ObjectId
v EntityName
v Address
v Description
v ExtraInfo
To access the values, you can directly access the attributes just like any other dataitems using the following command:log("Description is " + DataItem.Description);
This command prints out the Description field string that was on the ITNMrecord returned by the query.
Chapter 11. Working with the ITNM DSA 135
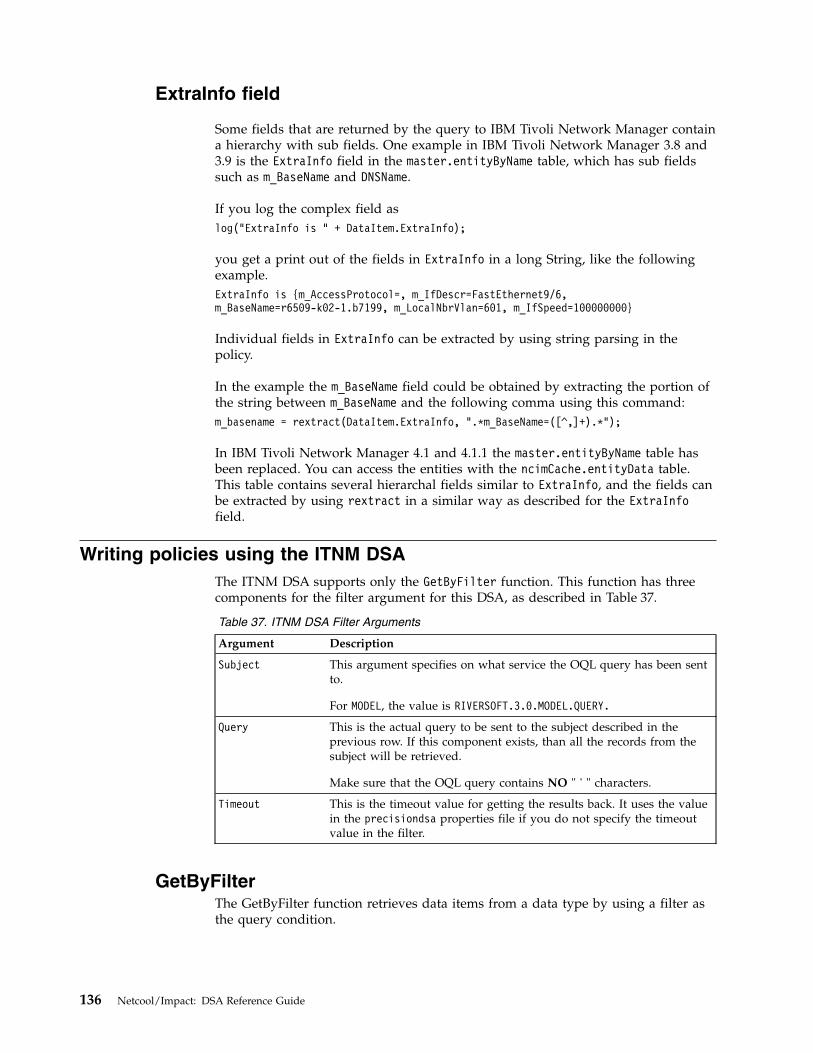
ExtraInfo field
Some fields that are returned by the query to IBM Tivoli Network Manager containa hierarchy with sub fields. One example in IBM Tivoli Network Manager 3.8 and3.9 is the ExtraInfo field in the master.entityByName table, which has sub fieldssuch as m_BaseName and DNSName.
If you log the complex field aslog("ExtraInfo is " + DataItem.ExtraInfo);
you get a print out of the fields in ExtraInfo in a long String, like the followingexample.ExtraInfo is {m_AccessProtocol=, m_IfDescr=FastEthernet9/6,m_BaseName=r6509-k02-1.b7199, m_LocalNbrVlan=601, m_IfSpeed=100000000}
Individual fields in ExtraInfo can be extracted by using string parsing in thepolicy.
In the example the m_BaseName field could be obtained by extracting the portion ofthe string between m_BaseName and the following comma using this command:m_basename = rextract(DataItem.ExtraInfo, ".*m_BaseName=([^,]+).*");
In IBM Tivoli Network Manager 4.1 and 4.1.1 the master.entityByName table hasbeen replaced. You can access the entities with the ncimCache.entityData table.This table contains several hierarchal fields similar to ExtraInfo, and the fields canbe extracted by using rextract in a similar way as described for the ExtraInfofield.
Writing policies using the ITNM DSAThe ITNM DSA supports only the GetByFilter function. This function has threecomponents for the filter argument for this DSA, as described in Table 37.
Table 37. ITNM DSA Filter Arguments
Argument Description
Subject This argument specifies on what service the OQL query has been sentto.
For MODEL, the value is RIVERSOFT.3.0.MODEL.QUERY.
Query This is the actual query to be sent to the subject described in theprevious row. If this component exists, than all the records from thesubject will be retrieved.
Make sure that the OQL query contains NO " ' " characters.
Timeout This is the timeout value for getting the results back. It uses the valuein the precisiondsa properties file if you do not specify the timeoutvalue in the filter.
GetByFilterThe GetByFilter function retrieves data items from a data type by using a filter asthe query condition.
136 Netcool/Impact: DSA Reference Guide

To retrieve data items using a filter condition, you call GetByFilter and pass thedata type name and the filter string as input parameters. The syntax for the filterstring varies depending on whether the data type is an internal, SQL database,LDAP, or Mediator data type.
GetByFilter returns an array of references to the retrieved data items. If you donot assign the returned array to a variable, the function assigns it to the built-inDataItems variable and sets the value of the Num variable to the number of dataitems in the array.
You can use GetByFilter with internal, SQL database, and LDAP data types. Youcan also use GetByFilter with some Mediator data types.
Important: When data items are assigned to the built-in DataItem variable, theyare not immediately updated but are stored in a queue to optimize the number ofcalls to the database. So, for example, if you update multiple fields in theDataItems variable there will only be one call to update the underlying database,when a function call is made. To force all queued updates, call theCommitChanges() function in your policy. The CommitChanges() function does nottake any arguments.
Syntax
The GetByFilter function has the following syntax:[Array =] GetByFilter(DataType, Filter, [CountOnly])
Parameters
The GetByFilter function has the following parameters.
Table 38. GetByFilter function parameters
Parameter Format Description
DataType String Name of the data type.
Filter String Filter expression that specifies which data items to retrieve fromthe data type.
CountOnly Boolean Pass a false value for this parameter. Provided forcompatibility with earlier versions only.
Return value
Array of references to the retrieved data items. Optional.
Examples
The following example shows how to retrieve data items from an internal or SQLdatabase data type.// Call GetByFilter and pass the name of the data type// and an SQL database filter expression
DataType = "Admin";Filter = "Level = ’Supervisor’ AND Location LIKE ’NYC.*’";CountOnly = false;
MyAdmins = GetByFilter(DataType, Filter, CountOnly);
Chapter 11. Working with the ITNM DSA 137
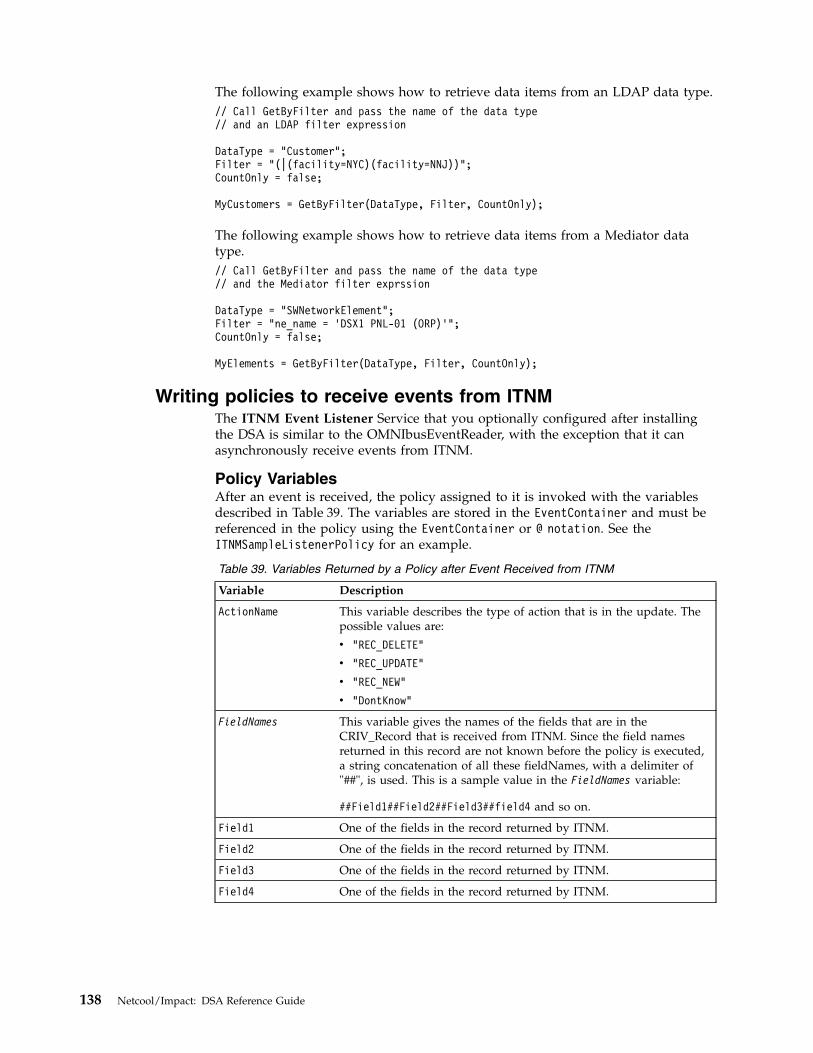
The following example shows how to retrieve data items from an LDAP data type.// Call GetByFilter and pass the name of the data type// and an LDAP filter expression
DataType = "Customer";Filter = "(|(facility=NYC)(facility=NNJ))";CountOnly = false;
MyCustomers = GetByFilter(DataType, Filter, CountOnly);
The following example shows how to retrieve data items from a Mediator datatype.// Call GetByFilter and pass the name of the data type// and the Mediator filter exprssion
DataType = "SWNetworkElement";Filter = "ne_name = ’DSX1 PNL-01 (ORP)’";CountOnly = false;
MyElements = GetByFilter(DataType, Filter, CountOnly);
Writing policies to receive events from ITNMThe ITNM Event Listener Service that you optionally configured after installingthe DSA is similar to the OMNIbusEventReader, with the exception that it canasynchronously receive events from ITNM.
Policy VariablesAfter an event is received, the policy assigned to it is invoked with the variablesdescribed in Table 39. The variables are stored in the EventContainer and must bereferenced in the policy using the EventContainer or @ notation. See theITNMSampleListenerPolicy for an example.
Table 39. Variables Returned by a Policy after Event Received from ITNM
Variable Description
ActionName This variable describes the type of action that is in the update. Thepossible values are:
v "REC_DELETE"
v "REC_UPDATE"
v "REC_NEW"
v "DontKnow"
FieldNames This variable gives the names of the fields that are in theCRIV_Record that is received from ITNM. Since the field namesreturned in this record are not known before the policy is executed,a string concatenation of all these fieldNames, with a delimiter of"##", is used. This is a sample value in the FieldNames variable:
##Field1##Field2##Field3##field4 and so on.
Field1 One of the fields in the record returned by ITNM.
Field2 One of the fields in the record returned by ITNM.
Field3 One of the fields in the record returned by ITNM.
Field4 One of the fields in the record returned by ITNM.
138 Netcool/Impact: DSA Reference Guide

Sample policiesThe DSA provides the following sample policies:v ITNMSampleListenerPolicy
v ITNMSamplePolicy
ITNMSampleListenerPolicyITNMSampleListenerPolicy.ipl shows how to use the ITNM DSA to read datafrom an ITNM Listener. The policy reads the contents of an ITNM formatted stringand then prints the data to the Policy log.
ITNMSamplePolicyITNMSamplePolicy.ipl shows how to use the ITNM DSA to read data from anITNM database. The policy reads the contents of an ITNM formatted string andthen prints the data to the Policy log.
Chapter 11. Working with the ITNM DSA 139

140 Netcool/Impact: DSA Reference Guide

Appendix. Notices
This information was developed for products and services offered in the U.S.A.IBM may not offer the products, services, or features discussed in this document inother countries. Consult your local IBM representative for information on theproducts and services currently available in your area. Any reference to an IBMproduct, program, or service is not intended to state or imply that only that IBMproduct, program, or service may be used. Any functionally equivalent product,program, or service that does not infringe any IBM intellectual property right maybe used instead. However, it is the user's responsibility to evaluate and verify theoperation of any non-IBM product, program, or service.
IBM may have patents or pending patent applications covering subject matterdescribed in this document. The furnishing of this document does not give youany license to these patents. You can send license inquiries, in writing, to:
IBM Director of LicensingIBM CorporationNorth Castle DriveArmonk, NY 10504-1785 U.S.A.
For license inquiries regarding double-byte (DBCS) information, contact the IBMIntellectual Property Department in your country or send inquiries, in writing, to:
Intellectual Property LicensingLegal and Intellectual Property LawIBM Japan Ltd.1623-14, Shimotsuruma, Yamato-shiKanagawa 242-8502 Japan
The following paragraph does not apply to the United Kingdom or any othercountry where such provisions are inconsistent with local law:
INTERNATIONAL BUSINESS MACHINES CORPORATION PROVIDES THISPUBLICATION "AS IS" WITHOUT WARRANTY OF ANY KIND, EITHEREXPRESS OR IMPLIED, INCLUDING, BUT NOT LIMITED TO, THE IMPLIEDWARRANTIES OF NON-INFRINGEMENT, MERCHANTABILITY OR FITNESSFOR A PARTICULAR PURPOSE.
Some states do not allow disclaimer of express or implied warranties in certaintransactions, therefore, this statement might not apply to you.
This information could include technical inaccuracies or typographical errors.Changes are periodically made to the information herein; these changes will beincorporated in new editions of the publication. IBM may make improvementsand/or changes in the product(s) and/or the program(s) described in thispublication at any time without notice.
Any references in this information to non-IBM Web sites are provided forconvenience only and do not in any manner serve as an endorsement of those Websites. The materials at those Web sites are not part of the materials for this IBMproduct and use of those Web sites is at your own risk.
© Copyright IBM Corp. 2006, 2016 141

IBM may use or distribute any of the information you supply in any way itbelieves appropriate without incurring any obligation to you.
Licensees of this program who wish to have information about it for the purposeof enabling: (i) the exchange of information between independently createdprograms and other programs (including this one) and (ii) the mutual use of theinformation which has been exchanged, should contact:
IBM Corporation2Z4A/10111400 Burnet RoadAustin, TX 78758 U.S.A.
Such information may be available, subject to appropriate terms and conditions,including in some cases payment of a fee.
The licensed program described in this document and all licensed materialavailable for it are provided by IBM under terms of the IBM Customer Agreement,IBM International Program License Agreement or any equivalent agreementbetween us.
Any performance data contained herein was determined in a controlledenvironment. Therefore, the results obtained in other operating environments mayvary significantly. Some measurements may have been made on development-levelsystems and there is no guarantee that these measurements will be the same ongenerally available systems. Furthermore, some measurement may have beenestimated through extrapolation. Actual results may vary. Users of this documentshould verify the applicable data for their specific environment.
Information concerning non-IBM products was obtained from the suppliers ofthose products, their published announcements or other publicly available sources.IBM has not tested those products and cannot confirm the accuracy ofperformance, compatibility or any other claims related to non-IBM products.Questions on the capabilities of non-IBM products should be addressed to thesuppliers of those products.
All statements regarding IBM's future direction or intent are subject to change orwithdrawal without notice, and represent goals and objectives only.
All IBM prices shown are IBM's suggested retail prices, are current and are subjectto change without notice. Dealer prices may vary.
This information is for planning purposes only. The information herein is subject tochange before the products described become available.
This information contains examples of data and reports used in daily businessoperations. To illustrate them as completely as possible, the examples include thenames of individuals, companies, brands, and products. All of these names arefictitious and any similarity to the names and addresses used by an actual businessenterprise is entirely coincidental.
COPYRIGHT LICENSE:
This information contains sample application programs in source language, whichillustrate programming techniques on various operating platforms. You may copy,modify, and distribute these sample programs in any form without payment to
142 Netcool/Impact: DSA Reference Guide

IBM, for the purposes of developing, using, marketing or distributing applicationprograms conforming to the application programming interface for the operatingplatform for which the sample programs are written. These examples have notbeen thoroughly tested under all conditions. IBM, therefore, cannot guarantee orimply reliability, serviceability, or function of these programs. The sampleprograms are provided "AS IS", without warranty of any kind. IBM shall not beliable for any damages arising out of your use of the sample programs.
Each copy or any portion of these sample programs or any derivative work, mustinclude a copyright notice as follows:
© (your company name) (year). Portions of this code are derived from IBM Corp.Sample Programs. © Copyright IBM Corp. _enter the year or years_. All rightsreserved.
If you are viewing this information softcopy, the photographs and colorillustrations may not appear.
TrademarksIBM, the IBM logo, and ibm.com are trademarks or registered trademarks ofInternational Business Machines Corp., registered in many jurisdictions worldwide.Other product and service names might be trademarks of IBM or other companies.A current list of IBM trademarks is available on the Web at “Copyright andtrademark information” at www.ibm.com/legal/copytrade.shtml.
Adobe, Acrobat, PostScript and all Adobe-based trademarks are either registeredtrademarks or trademarks of Adobe Systems Incorporated in the United States,other countries, or both.
Java and all Java-based trademarks and logos are trademarks or registeredtrademarks of Oracle and/or its affiliates.
Linux is a trademark of Linus Torvalds in the United States, other countries, orboth.
Microsoft, Windows, Windows NT, and the Windows logo are trademarks ofMicrosoft Corporation in the United States, other countries, or both.
UNIX is a registered trademark of The Open Group in the United States and othercountries.
Other product and service names might be trademarks of IBM or other companies.
Appendix. Notices 143

144 Netcool/Impact: DSA Reference Guide

Index
Aaccessibility viadding JDBC drivers 7authentication 70
with plain text password 71
Bbooks
see publications v
Ccalling WSSetDefaultPKGName 49categories of DSAs 3changing character set encoding 8compiler script
See Web services DSAcompiling WSDL files 40Connecting to WebSphere MQ. 87conventions
typeface ixcreate data types scripts 94creating a message properties context 85Creating an event listener service for the
DSA 134creating message body string or
context 82creating message properties context 81creating RESTful DSA data sources 29creating UI data provider data
sources 17creating UI data provider data types 19customer support viicustomizing
failover 15
Ddata items 34data model 4, 17, 29, 33data source 17, 29data source adapter
ITNM 133JMS 75
data sources 17, 29JMS 76LDAP 33SQL database 8
data typetable 109
data type mapping 92data types 19, 34definition of DSAs 3directory names
notation xDSA
XML 91
DSAscategories 3definition 3even readers 4event listeners 4policies 5
EEditing the DSA properties file 134education
See Tivoli technical trainingelement data types 92Enabling and disabling proxy
settings 41encrypt messages
See Web services securityencryption
See Web services securityenvironment variables
notation xeven readers 4event listeners 4ExtraInfo field 136
Ffailback 14failover 13
configurations 13customizing 15defaults 14setting up 14standard 13
fixesobtaining vi
functionGetByFilter 137ReceiveJMSMessage 84SendJMSMessage 81SnmpGetAction 119SnmpGetNextAction 123SNMPSetAction 127WSInvokeDL 45WSNewArray 44WSNewEnum 48WSNewObject 43WSNewSubObject 43WSSetDefaultPKGName 42
functions 42
GGetByFilter 137GetByFilter output parameters 20
Hhanding incoming messages from a JMS
message listener 86handling a retrieved message 85
Iintegration with third party Web
services 63ITNM DSA data type 135ITNMSampleListenerPolicy 139ITNMSamplePolicy 139
JJMS
data source 76JMS data source 78JMS DSA
creating a message propertiescontext 85
creating message body string orcontext 82
creating message propertiescontext 81
handing incoming messages from aJMS message listener 86
handling a retrieved message 85overview 75retrieving JMS messages from a topic
or queue 84sending messages to JMS topic or
queue 80setting up OpenJMS 76setting up the JMS DSA 75writing JMS DSA policies 80
JMS DSA policieswriting 80
JNDI properties 78
LLDAP data sources
creating 33LDAP DSA
data items 34data model 33data types 34international character support 37overview 33policies 35referrals 36retrieving data 35, 36supported LDAP servers 33
Mmaking requests 33
© Copyright IBM Corp. 2006, 2016 145

manualssee publications v
Mediator DSAs 3message body string or context 82message integrity
See Web services securitymessage properties context 81
Nnon-repudiation
See Web services securitynotation
environment variables xpath names xtypeface x
nternational character supportSee LDAP DSA
Oobtaining WSDL files 40online publications
accessing vOpenJMS 76ordering publications vi
Ppath names
notation xplain text password
See authenticationpolicies 5, 35, 49, 55, 80
sample 60using editor 63using wizard 61
Policy Variables 138problem determination and
resolution viiiprocess 52proxy server RESTful DSA data
sources 31proxy server settings 31publications v
accessing online vordering vi
RReceiveJMSMessage 84RESTful API 29RESTful data model DSA 29RESTful DSA 29RESTful DSA data model 29RESTful DSA data source 29, 31, 33retrieving data 22retrieving JMS messages from a topic or
queue 84Retrieving packed OID data with SNMP
functions 116run Policy 58run Policy Response 59runtime parameters 55
SSample policies 139sending messages 49
to JMS topic or queue 80SendJMSMessage 81service
JMS message listener 79setting up
failover 14JMS DSA 75Web services listener 53
Setting up the DSA 133sign messages
See Web services securitySNMP DSA
data model 103data sources 103
creating 106deleting 108editing 108
data types 104creating 108deleting 110editing 110
functions 119policies 110retrieving packed OID data 114retrieving table data from SNMP
agents 117sending traps and notifications 118setting packed OID data with SNMP
functions 114setting packed OID data with
standard data-handlingfunctions 111
traversing SNMP trees 116SNMPGetAction 119SnmpGetNextAction 123SNMPSetAction 127SNMPTrapAction 130SOAP endpoints 57Software Support
contacting viioverview vireceiving weekly updates vii
SQL database DSA 7, 8SQL database DSAs 5
adding data 10calling database functions 12calling stored procedures 12customizing failover 15data items 9data model 8data types 9deleting data 11failback 14failover 13failover configurations 13failover defaults 14list of provided 5modifying data 11policies 9retrieving data 10setting up failover 14standard failover 13
SSL 61super data types 92
supported LDAP servers 33
TTivoli Information Center vTivoli technical training vitraining
Tivoli technical vitypeface conventions ix
UUI data provider data model 17UI data provider data source 17UI data provider data type 19UI data provider data types 19UI data provider DSA 17, 19UI Data Provider server cache 25uidataprovider data source 22
Vvariables
notation for x
WWeb Service Listener 61Web services DSA 39
calling WSSetDefaultPKGName 49compiling WSDL files 40creating policies using editor 63creating policies using wizard 61examples 50functions 42integration with third party Web
services 63obtaining WSDL files 40overview 39policies 49running the WSDL compiler
script 40sample client 60sample policies 60sending messages 49SOAP endpoints 57Web services listener 52, 53, 55writing applications that call into Web
services 57WSDL file 58, 59WSListenerResult 55
Web services listenerprocess 52runtime parameters 55setting up 53writing policies 55
Web services securityenabling 65encryption 72message integrity and non-repudiation
with signature 71sign and encrypt messages 72user name token authentication 70,
71WebSphere MQ 87
146 Netcool/Impact: DSA Reference Guide

writingWeb services listener policies 55
writing applications that call into Webservices 57
Writing policies to receive events fromITNM 138
Writing policies using the ITNMDSA 136
WSDL 53WSDL file 58
message 58, 59WSDL files 41WSInvokeDL 45WSListenerException 59WSListenerResult
See Web services DSAWSListenerResult variable 56WSNewArray 44WSNewEnum 48WSNewObject 43WSNewSubObject 43WSSetDefaultPKGName 42
XXML configuration files 92XML documents 91XML DSA
create data types scripts 94data type mapping 92overview 91reading XML data 97sample policies 100XML configuration files 92XML data types 91, 92
creating 93setting up mappings 95
XML documents 91XML DTD files 91XML mapping 92XML XSD files 91
XML DTD files 91XML XSD files 91
Index 147

148 Netcool/Impact: DSA Reference Guide


IBM®
Printed in USA
SC27-4919-05