n.c. nutrient management software
TRANSCRIPT

11
N.C. Nutrient Management Software
Software Intro.

22
Index
• Background and Context…………………………………………....…..(3-9)
• Set-Up……………………………………………………………………..(10)
• Icon / Main Screen / Toolbars…………….……………….………....(11-13)
• The System Tree………………………………………………………….(14)
• Producer …………………………………………………………….……..(15)
• Developer………………………………………………………………(16-17)
• Agency………………………………………………………………….(18-19)
• Farm………………………………………………………………………...(20)
• Tracts…………………………………………………………………….....(21)
• Fields…………………………………………………………………....(22-23)
• Leaching Index…………………………………………………………(24-25)
• Soil samples (Manual Entry & Import)...………………………….....(26-28)
• Crop Rotations…………………………………………………………(29-31)
Introduction & Basics
Module 1

• Addresses livestock farms meeting the feedlot definition & threshold:
Cattle……………………………100 head
Swine……………………………250 head
Horse……………………………..75 head
Sheep…………………...…....1,000 head
Poultry, liquid waste………..30,000 birds
• Farms must register w/ NC DEM by 12/31/1993
• Must develop and implement an approved waste management plan by 12/31/1997
• Waste plan certification by “technical specialist” and filed w/State and SWCD
33
0.0200 Rules
Water Quality Non-discharge Rules - 0.0200 Rules (1992)
15A NCAC 2H.0200
4
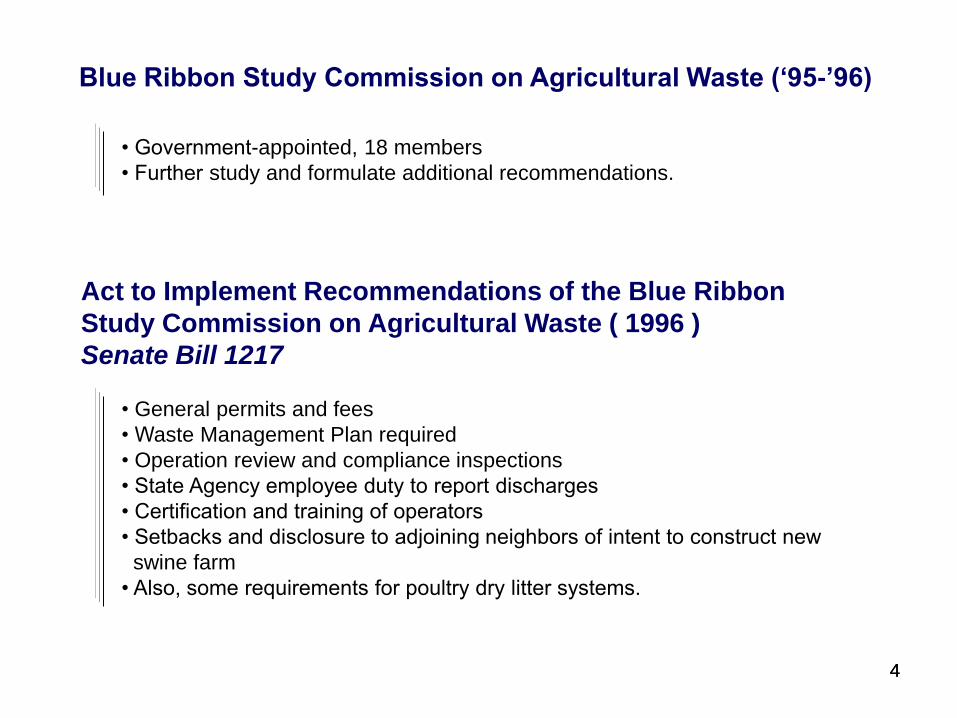
• General permits and fees
• Waste Management Plan required
• Operation review and compliance inspections
• State Agency employee duty to report discharges
• Certification and training of operators
• Setbacks and disclosure to adjoining neighbors of intent to construct new
swine farm
• Also, some requirements for poultry dry litter systems.
• Government-appointed, 18 members
• Further study and formulate additional recommendations.
Act to Implement Recommendations of the Blue Ribbon
Study Commission on Agricultural Waste ( 1996 )
Senate Bill 1217
4
Blue Ribbon Study
Blue Ribbon Study Commission on Agricultural Waste („95-‟96)

5
• January 1, 1997 DWQ began issuing Certificates of Coverage
(COC) under General Permits and Individual Permits for facilities
above threshold.
• In 2003, DWQ began issuing COC under NPDES General Permits
in accordance with federal rules for some farms.
• Currently, any facility above threshold populations is required to
obtain either a (State) General or (Federal) NPDES permit.
• Facilities under threshold are deemed permitted as long as they
are compliant w/ regulations.
5
Permitting
Permitting of CAFO‟s in
North Carolina

6
SECTION .1300 – ANIMAL WASTE MANAGEMENT SYSTEMS
15A NCAC 02T .1301 - .1306
North Carolina Administrative Code
Title 15A
Department of Environment and Natural Resources
Division of Water Quality
SUBCHAPTER 2T – WASTE NOT DISCHARGED TO
SURFACE WATERS
Last Amended on September 1, 2006
Environmental Management Commission
Raleigh, North Carolina
Website:
http://h2o.enr.state.nc.us/admin/rules/documents/2Tbook.pdf
Location of the Latest N.C. Animal Waste
Management System Rules:Current Rules

77
The N.C. Nutrient Management SoftwareNC Nutrient Management Software
Developed as a cooperative effort between the:
• N.C. Division of Soil and Water Conservation
• N.C. Department of Agriculture & Consumer
Services
• N.C. Cooperative Extension Service
• USDA Natural Resources Conservation Service.
* Use of this software program is not mandatory.

8
The N.C. Nutrient Management Software
• USDA-NRCS 590 Nutrient Management
Standard.
• USDA-NRCS 633 Waste Utilization Standard.
• NCDA “Crop Fertilization Based on N.C. Soil
Tests”.
• 0.0200 Rules / SB1217
• North Carolina Nutrient Management
Workgroup. 2003. Realistic yields and nitrogen
application factors for North Carolina crops.
http://nutrients.soil.ncsu.edu/yields/
9
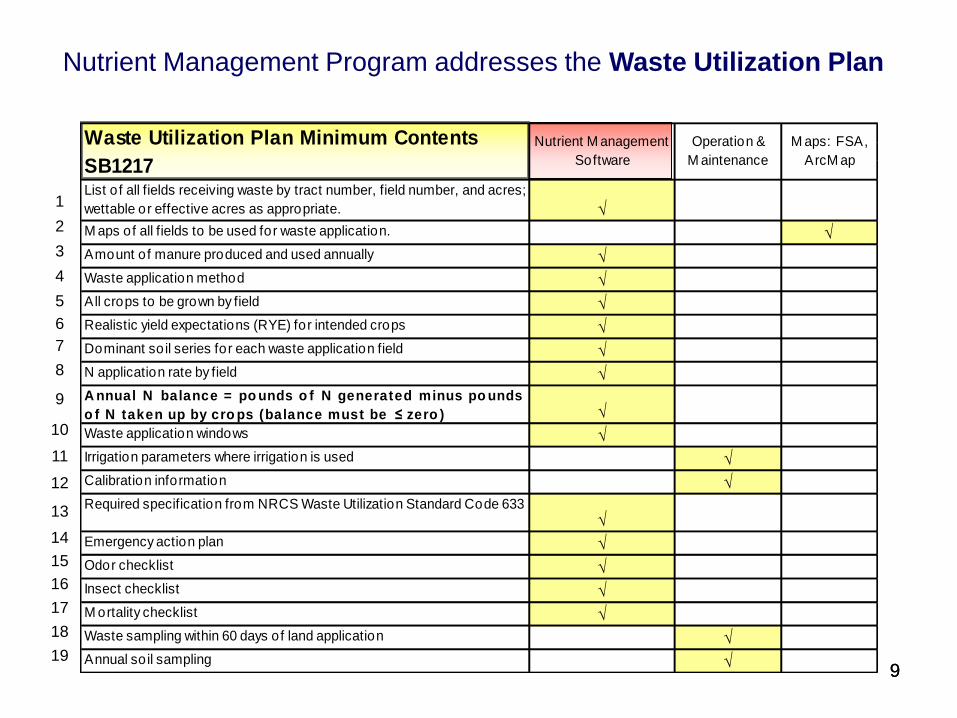
List of all fields receiving waste by tract number, field number, and acres;
wettable or effective acres as appropriate. √
M aps of all fields to be used for waste application. √
Amount of manure produced and used annually √
Waste application method √
All crops to be grown by field √
Realistic yield expectations (RYE) for intended crops √
Dominant so il series for each waste application field √
N application rate by field √
A nnual N balance = po unds o f N generated minus po unds
o f N taken up by cro ps (balance must be ≤ zero ) √
Waste application windows √
Irrigation parameters where irrigation is used √
Calibration information √
Required specification from NRCS Waste Utilization Standard Code 633
√
Emergency action plan √
Odor checklist √
Insect checklist √
M ortality checklist √
Waste sampling within 60 days of land application √
Annual so il sampling √
Waste Utilization Plan Minimum Contents
SB1217
Nutrient M anagement
Software
M aps: FSA,
ArcM ap
Operation &
M aintenance
9
1
2
3
4
5
6
7
8
9
10
11
12
13
14
15
16
17
18
19
WUP Minimum Contents
Nutrient Management Program addresses the Waste Utilization Plan

10
Initial Setup will automatically
generate a folder named
C:\Program Files\Nutrient
Management and install all
necessary files to run the
Nutrient Management
Program.
Unless you choose an alternative
installation configuration, all necessary
files will be installed in this folder.
N.C. Nutrient Management Software: Download & Set-UpDownload & Set-Up
http://www.soil.ncsu.edu/programs/nmp/ncnmwg/nmp/software.htm
Download:
1) Download 2) Extract 3) Install

1) Double-click the Icon
and the Plan Data File
box will appear.
2) Select the
File Name
“Plan.mdb”
and then click
Open.
1) Get Started
Get Started

1212
Use the Toolbars at the top of the
screen, as well as the System Window, to
develop, edit and print Nutrient Management
Plans.
2) Main Nutrient Management ScreenMain
Screen
Toolbars
System Window

1313
In general, use Toolbars from left to right to add plan
information:
2) Main Nutrient Management Screen
Toolbars
Toolbars

14
14) The System Tree
The System Tree represents of
the way farm, plan and rotation data
is organized in the program.
Each field is associated with a
particular tract and each tract is
associated with a single farm.
Plans are also associated with
individual farms. Rotations are not
farm specific and may be used in
multiple plans for numerous farms.
The
System
Tree
Each data item in the system tree
can be manipulated by pointing the
arrow at the item and clicking the
right mouse button. A pop-up menu
will then appear listing the menu of
options associated with that item.
Items in the system tree with the + symbol beside them have
additional branches of associated data, those with the - symbol
do not.

1515
Add a new Producer:
Click Add, add information
and click OK to save.
View producer properties: Tab General > Producer
Select existing Producer or add a new one.
3) General: Producer Information
Edit Producer Information:
Select Producer, click Edit
button.
Add/edit information and click
OK.
Note: Use Delete to
remove a Producer from
the list.
Producer Information
1616
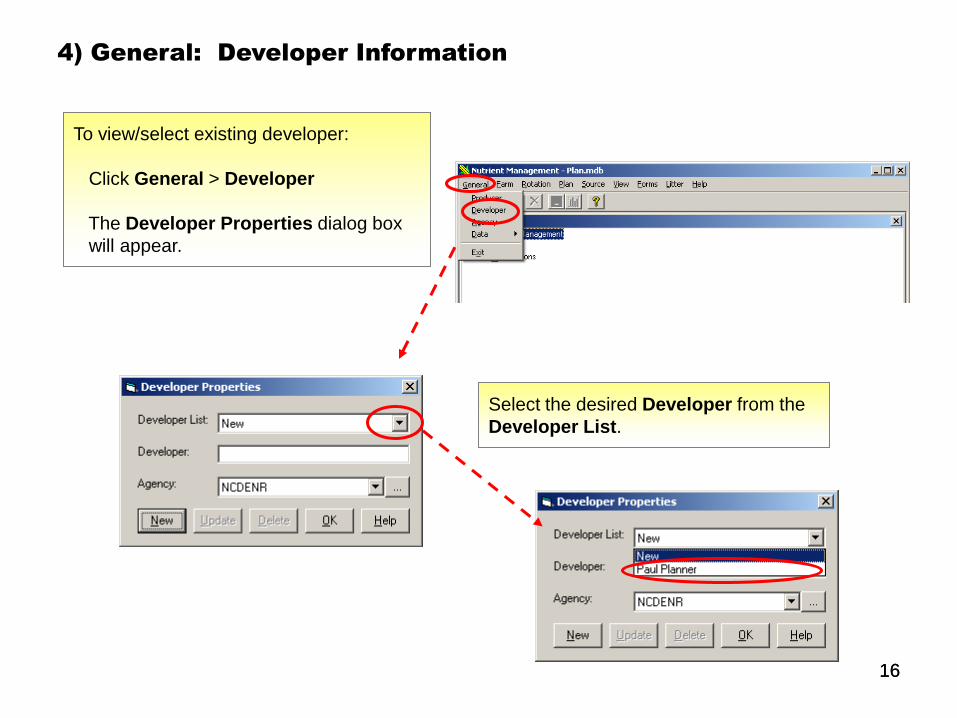
To view/select existing developer:
Click General > Developer
The Developer Properties dialog box
will appear.
4) General: Developer Information
Select the desired Developer from the
Developer List.
Developer Information

1717
To add a new developer:
Note:
Use “...”
button to
add a
New
Agency.
4) General: Developer Information
Note: Before you can enter a developer name, you
must enter the agency properties for that developer.
1) Click New or select New from Developer List
2) enter developer's name
3) select the appropriate agency
4) Click Update and the new developer is displayed
in the list
1
2
3
D
e
v
e
l
o
p
e
r
I
n
f
o
r
m
a
t
i
o
n
4

1818
To view agency properties:
1) Click General > Agency
2) This opens the Agency Properties
dialog box.
5) General: Agency Information
3) Select the desired Agency from the
combo box.
1
2
3
Agency Information

1919
5) General: Agency Information
To add a new agency click Add.
To edit agency information click Edit.
Add or edit
information
and Click
OK to save
and close.
Note: Use the Delete button to
remove an agency and the
associated information.
Agency
Informat
ion

2020
6) Farm: Farm Information
To add a farm:
Click Add to open the New Farm dialog box.
Enter the Farm Name and select the Farm
Type* and Producer Name.** Click OK to
save.
To view farm properties:
Click Farm > Farm from the drop down menu. A
Farm Properties dialog box will appear. View and
select the appropriate name under Farm Name.
Note: *Farm Type
generally refers to
animal operations and
are described as
Existing, Expanding
and New. Select one
of these three
categories to describe
the farm.
To edit a farm:
Click Edit to open the Edit Farm dialog box.
Make the appropriate changes and click OK to
save.
Farm Information
Note: *A Producer Name must be selected
before a farm can be added.
2121
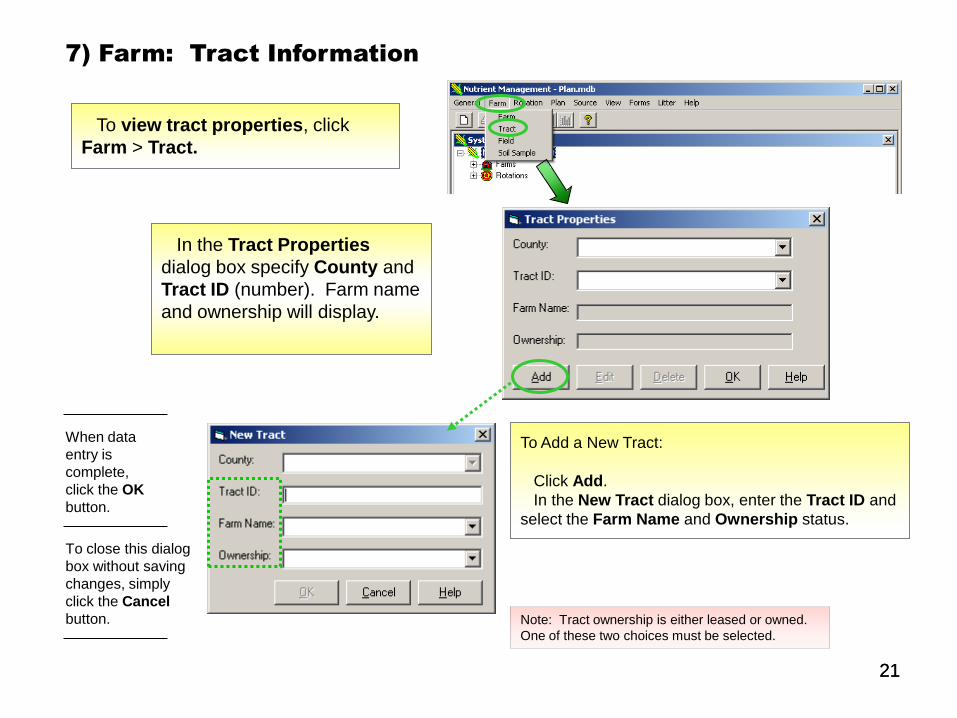
7) Farm: Tract Information
To view tract properties, click
Farm > Tract.
To Add a New Tract:
Click Add.
In the New Tract dialog box, enter the Tract ID and
select the Farm Name and Ownership status.
Note: Tract ownership is either leased or owned.
One of these two choices must be selected.
When data
entry is
complete,
click the OK
button.
To close this dialog
box without saving
changes, simply
click the Cancel
button.
In the Tract Properties
dialog box specify County and
Tract ID (number). Farm name
and ownership will display.
Tract Information

2222
A New Field dialog box will appear.
9) Farm: Field Information
Enter the Field ID,
Soil Type, Total
Acres, Useable
Acres, Slope
Type (%) and
other required
information.
Click OK to save. Waste irrigation properties are based on
irrigation group for a particular soil.
These values will appear automatically.
•Add a Field
Adding a Field
To add a new field: select the County
and Tract, then click Add.

23
Use Edit to
make changes
to field
properties.
Click OK to
save.
23
8) Farm: View Existing Field Information
To view field properties click
Farm > Field.
Verify field information.
Use Delete to remove a field.
View Field Information
In the Field Properties dialog box
specify County, Tract and Field ID.

24
10) Farm: Field Information – Leaching Index
• Used for evaluating the potential for contaminating ground water with soluble
nutrients (e.g. nitrogen)
• Estimates the degree to which water percolates below the root zone in certain soils
• Based on annual precipitation, hydrologic soil group & rainfall distribution data
• NM policy requires LI be used in selected watersheds to assess potential nitrate
leaching
• Reference: NRCS FOTG, Section III
http://efotg.nrcs.usda.gov/toc.aspx?CatID=8562
Procedure:
1) Find the soil’s hydrologic group.
2) Locate the Iso-leaching map for that group
3) From the map, based on the soil location,
determine the LI
Note: The LI Guidelines for Recommendations
will print with the Crop Nutrients report from
NM software.
L
e
a
c
h
i
n
g
I
n
d
e
x

25
Leaching Index
10) Farm: Field Information – Leaching Index

2626
11) Farm: Soil Sample Information
Click Farm > Soil
Sample to activate the
Soil Sampling
Properties dialog box.
1
Soil Sample Manual Entry
2
3
4
5
Manual Entry
Manual Entry:
1) Select Farm Name,
Tract ID & Field ID
2) Enter Sample No.,
Date, & Sample Results
directly from Soils Report
3) Enter Soil Class
4) Enter liming info. under
Applied Lime
5) Use Save to save
data.

2727
11) Farm: Soil Sample Information
Use the Import button to import soil samples into the
program if the report has previously been downloaded
to your computer from the "NCDA&CS Agronomic
Reports Online" web site as a CSV report file.
Soil Sample Information
1
2
I
m
p
o
r
t
s
o
i
l
s
a
m
p
l
e
To Import soil sample information:
1) Click Import, 2) select the appropriate file path
and .csv file name and then 3) click Open.
Import Soils Data
3

28
6) Double-check sample date
7) Enter the tons/ac., year and
month under Applied Lime.
8) Click Save
4
5
6
7
11) Farm: Soil Sample Information Import Soils Data
8
Farmer, Mary K.345 Sycamore LaneGoldsboro, NC 23456Wayne County
Import soil sample
4) Enter Farm Name, Tract ID
and Field ID
5) select the sample number from
the drop-down Sample List
A Soil Sampling Properties
dialog box will appear.
Continue adding and saving all
samples. Use Exit when finished.

2929
13) Rotations: View Existing
View and edit rotations from the
System Window
Click the + to
view existing
rotations. Double-click a specific
rotation to view details
under Rotation
Properties.
View Rotations

3030
13) Rotations: Create New
To add a new rotation: right-click on Rotations
in the System Window and select New Rotation.
The New Rotation dialog box will appear.
Create New Rotation

31
In the New Rotation dialog box:
1) Name the rotation under
Rotation Name.
2) Specify the Number of Crops
and the total Years of Rotation.
3) Move each crop (in order) to the
Crops in Rotation box by selecting
it from the Crop List and clicking
on the “»” button. The Crop, Start
Month, End Month and Year will
fill-in automatically.
4) Select the crop name that has
just been added, and
5) Click on the Crop Year drop
down box to identify the year for
that crop in the rotation. Repeat
this for each crop in order of
appearance in the rotation.
Build A New Rotation
1
2
3
Note: Use the “«” button to remove a specific
crop from the Crops in Rotation list.
4
5
13) Rotations: Build a New Rotation