navigating with the kamal northern hemisphere
TRANSCRIPT

Worksheets: Navigating with the Kamal 1
Navigating with the Kamal – Northern Hemisphere
Background: The positions on Earth and in the sky
Latitude and longitude
Any location in an area is defined by two coordinates. The surface of a sphere is a curved area, and
using directions like up and down is not useful, because the surface of a sphere has neither a begin-
ning nor an ending. Instead, we can use spherical polar coordinates originating from the centre of the
sphere, which has a fixed radius (Error! Reference source not found.). Two angular coordinates re-
main, which for the Earth are called the latitude and the longitude. The axis of rotation is also the
symmetry axis. The North Pole is defined as the point where the theoretical axis of rotation coincides
with the surface of the sphere, and the Earth rotates in a counter-clockwise direction when the pole
is viewed from above. The opposite point is the South Pole. The equator is defined as the great circle
halfway between the poles.
Figure 1: Illustration of how the latitudes and longitudes of the earth are defined (Credits: Peter Mercator, djexplo, CC0).
The latitudes are circles parallel to the equator. They are counted from 0° at the equator to ±90° at
the poles. The longitudes are great circles connecting the two poles of the Earth. For a given position
on Earth, the longitude going through the zenith, which is the point directly above, is called the me-
ridian. This is the line that the Sun apparently crosses at local noon. The origin of this coordinate is
defined as the meridian of Greenwich, where the Royal Observatory of England is located. From
there, longitudes are counted from 0° to ±180°.
Example: Heidelberg in Germany is located at 49.4° north and 8.7° east.
Finding the celestial North Pole
If we project the terrestrial coordinate system of latitudes and longitudes in the sky, we get the ce-
lestial equatorial coordinate system. The Earth’s equator becomes the celestial equator and the geo-
graphical poles are extrapolated to build the celestial poles. If we were to take a photograph of the
northern sky with a long exposure, we would see from the trails of the stars that they all revolve
about a common point, which is the northern celestial pole (Figure 2).
In the northern hemisphere, there is a moderately bright star near the celestial pole, which is the
North Star or Polaris. It is the brightest star in the Little Bear constellation, Ursa Minor (Figure 3). It

2 Worksheets: Navigating with the Kamal
can be easily identified by using the prominent constellation of Ursa Major. The Big Dipper or the
Plough is a part of it. According to Figure 3, extend the separation of the two stars labelled α and β
five times. There you find Polaris. In the present era, Polaris is less than a degree off. A nice video
that explains this quite clearly can be accessed via the following link.
Find North with the Stars - Polaris & Ursa Major - Celestial Navigation (Duration: 11:04)
https://youtu.be/n_gT9nBfhfo
Figure 2: Trails of stars in the sky after an exposure time of approximately 2 hours (Credit: Ralph Arvesen, Live Oak star trails, https://www.flickr.com/photos/rarvesen/9494908143, https://creativecommons.org/licenses/by/2.0/legalcode)
However, 1000 years ago, it was 8° away from the pole. Therefore, today, we can use it as a proxy for
the position of the celestial north pole. At the southern celestial pole, there is no such star that can
be observed with the naked eye. Other procedures have to be applied to find it.
Figure 3: Configuration of the two constellations Ursa Major (Great Bear) and Ursa Minor (Little Bear) in the northern sky. Polaris, the North Star, which is close to the true celestial north pole, is the brightest star in Ursa Minor (Credit: Bonč, https://commons.wikimedia.org/wiki/File:Ursa_Major_-_Ursa_Minor_-_Polaris.jpg, ‘Ursa Major – Ursa Minor – Polaris’, based on https://commons.wikimedia.org/wiki/File:Ursa_Major_and_Ursa_Minor_Constellations.jpg, colours inverted by Markus Nielbock, https://creativecommons.org/licenses/by-sa/3.0/legalcode).

Worksheets: Navigating with the Kamal 3
Elevation of the pole (pole height)
If we stood exactly at the geographical North Pole, Polaris would always be directly overhead. We
can say that its elevation would be (almost) 90°. This information introduces the horizontal coordi-
nate system (Figure 4), which is a natural reference we use every day. We, the observers, are the
origin of that coordinate system located on a flat plane, whose edge is the horizon. The sky is imag-
ined as a hemisphere above. The angle between an object in the sky and the horizon is the altitude
or elevation. The direction within the plane is given as an angle between 0° and 360°, the azimuth,
which is usually measured clockwise from the north. In navigation, this is also called the bearing.
Figure 4: Illustration of the horizontal coordinate system. The observer is the origin of the coordinates assigned as the azimuth and altitude or elevation (Credit: TWCarlson, https://commons.wikimedia.org/wiki/File:Azimuth-Altitude_schematic.svg, ‘Azimuth-Altitude schematic’, https://creativecommons.org/licenses/by-sa/3.0/legalcode).
For any other position on Earth, the celestial pole or Polaris would appear at an elevation less than
90°. At the equator, it would just appear at the horizon, i.e. at an elevation of 0°. The correlation
between the latitude (North Pole = 90°, Equator = 0°) and the elevation of Polaris is no coincidence.
Figure 5 combines all three mentioned coordinate systems. For a given observer at any latitude on
Earth, the local horizontal coordinate system touches the terrestrial spherical polar coordinate sys-
tem at a single tangent point. The sketch demonstrates that the elevation of the celestial north pole,
also called the pole height, is exactly the northern latitude of the observer on Earth.
Figure 5: When the three coordinate systems (terrestrial spherical, celestial equatorial, local horizontal) are combined, it becomes clear that the latitude of the observer is equal to the elevation of the celestial pole, also known as the pole height (Credit: own work).

4 Worksheets: Navigating with the Kamal
From this we can conclude that if we measure the elevation of Polaris, we can determine our latitude
on earth with reasonable precision.
Early navigation
Early seafaring peoples often navigated along coastlines before sophisticated navigational skills were
developed and tools were invented. Sailing directions helped to identify coastal landmarks (Hertel,
1990). To some extent, their knowledge about winds and currents helped them to cross short dis-
tances, e.g. in the Mediterranean.
Soon, navigators realised that celestial objects, especially stars, can be used to maintain the course of
a ship. Such skills have been mentioned in early literature like Homer’s Odyssey, which is believed to
date back to the 8th century BCE. There are accounts of ancient Phoenicians who were able to even
leave the Mediterranean and ventured on voyages to the British coast and even several hundred
miles south along the African coast (Johnson & Nurminen, 2009). A very notable and well-
documented long-distance voyage has been mentioned by ancient authors and scholars like Strabo,
Pliny and Diodorus of Sicily. It is the voyage of Pytheas, a Greek astronomer, geographer and explorer
from Marseille who, around 300 BCE, apparently left the Mediterranean by passing Gibraltar and
carried on north until the British Isles and beyond the Arctic Circle, where he possibly reached Ice-
land or the Faroe Islands, which he called Thule (Baker & Baker, 1997). Pytheas used a gnomon or
sundial, which allowed him to determine his latitude and measure the time during his voyage (Nan-
sen, 1911).
Sailing along a latitude
At these times, the technique of sailing along a parallel (of the equator) or latitude was based on
observing circumpolar stars. The concept of latitudes in the sense of angular distances from the
equator was probably not known. However, it was soon realised that when looking at the night sky,
some stars within a certain radius around the celestial poles never set; these are circumpolar stars.
When sailing north or south, sailors observe that the celestial pole changes, too, and with it, the cir-
cumpolar radius. Therefore, whenever navigators see the same star culminating, i.e. transiting the
meridian, at the same elevation, they stay on the ‘latitude’. For them, it was sufficient to realise the
connection between the elevation of stars and their course. Navigators had navigational documents
that listed seaports together with the elevation of known stars. In order to reach the port, they simp-
ly sailed north or south until they reached the corresponding latitude and then continued west or
east.
The kamal
The kamal is a navigational tool invented by Arabian sailors in the 9th century CE (McGrail, 2001). Its
purpose is to measure stellar elevations without the notion of angles. If you stretch out your arm,
one finger subtends an angle. This method appears to have been the earliest technique to determine
the elevation of stars. In the Arabian world, this ‘height’ is called isba (إصبع), which simply means
finger. The corresponding angle is 1°36‘.
Worksheets: Navigating with the Kamal 5
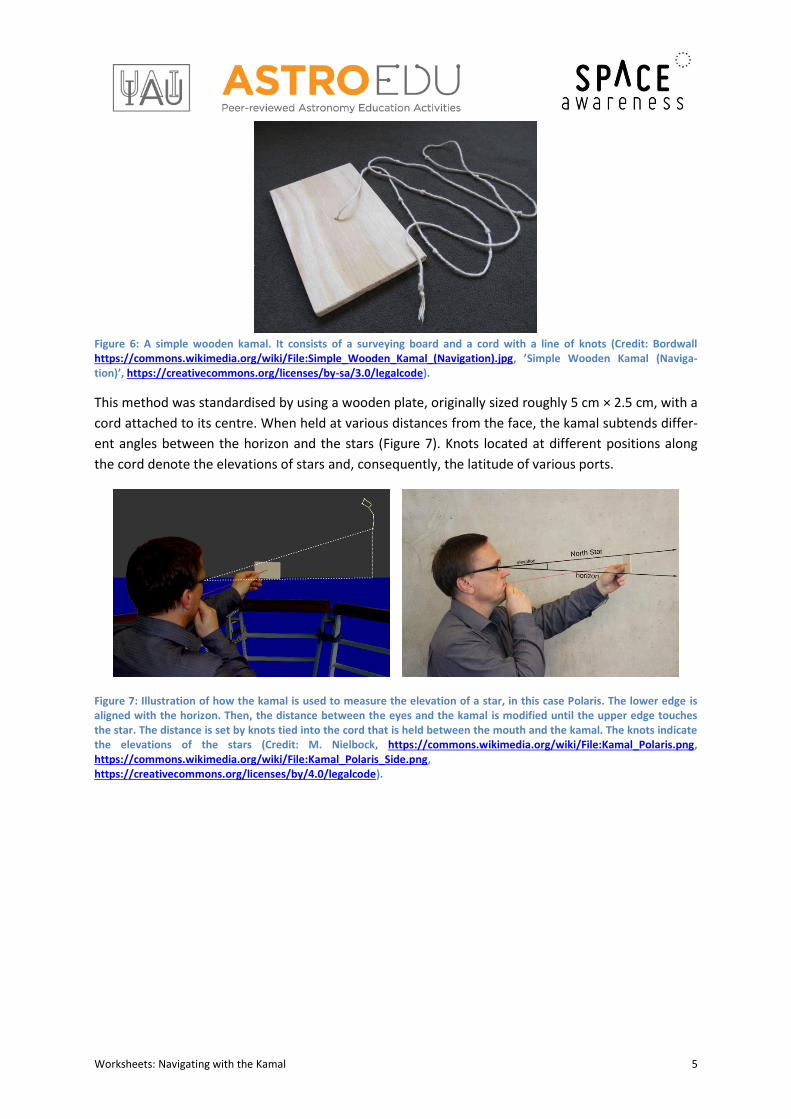
Figure 6: A simple wooden kamal. It consists of a surveying board and a cord with a line of knots (Credit: Bordwall https://commons.wikimedia.org/wiki/File:Simple_Wooden_Kamal_(Navigation).jpg, ’Simple Wooden Kamal (Naviga-tion)’, https://creativecommons.org/licenses/by-sa/3.0/legalcode).
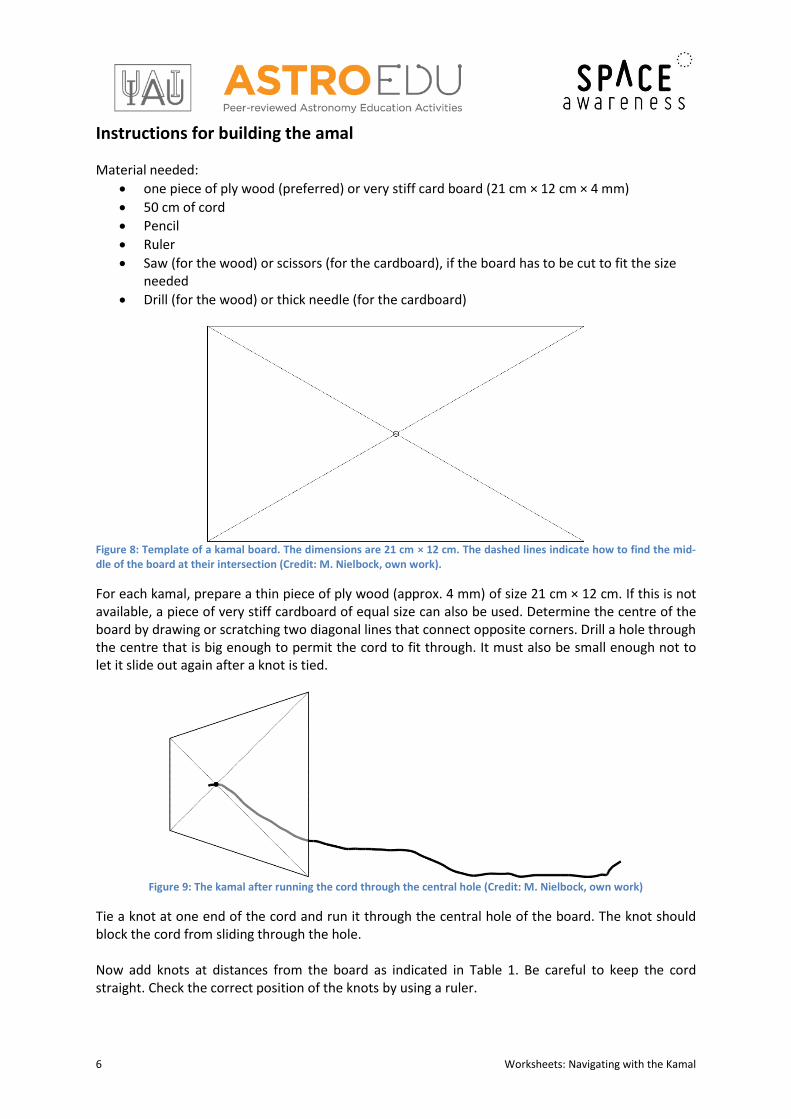
This method was standardised by using a wooden plate, originally sized roughly 5 cm × 2.5 cm, with a
cord attached to its centre. When held at various distances from the face, the kamal subtends differ-
ent angles between the horizon and the stars (Figure 7). Knots located at different positions along
the cord denote the elevations of stars and, consequently, the latitude of various ports.
Figure 7: Illustration of how the kamal is used to measure the elevation of a star, in this case Polaris. The lower edge is aligned with the horizon. Then, the distance between the eyes and the kamal is modified until the upper edge touches the star. The distance is set by knots tied into the cord that is held between the mouth and the kamal. The knots indicate the elevations of the stars (Credit: M. Nielbock, https://commons.wikimedia.org/wiki/File:Kamal_Polaris.png, https://commons.wikimedia.org/wiki/File:Kamal_Polaris_Side.png, https://creativecommons.org/licenses/by/4.0/legalcode).
6 Worksheets: Navigating with the Kamal
Instructions for building the amal
Material needed:
• one piece of ply wood (preferred) or very stiff card board (21 cm × 12 cm × 4 mm)
• 50 cm of cord
• Pencil
• Ruler
• Saw (for the wood) or scissors (for the cardboard), if the board has to be cut to fit the size needed
• Drill (for the wood) or thick needle (for the cardboard)
Figure 8: Template of a kamal board. The dimensions are 21 cm × 12 cm. The dashed lines indicate how to find the mid-dle of the board at their intersection (Credit: M. Nielbock, own work).
For each kamal, prepare a thin piece of ply wood (approx. 4 mm) of size 21 cm × 12 cm. If this is not available, a piece of very stiff cardboard of equal size can also be used. Determine the centre of the board by drawing or scratching two diagonal lines that connect opposite corners. Drill a hole through the centre that is big enough to permit the cord to fit through. It must also be small enough not to let it slide out again after a knot is tied.
Figure 9: The kamal after running the cord through the central hole (Credit: M. Nielbock, own work)
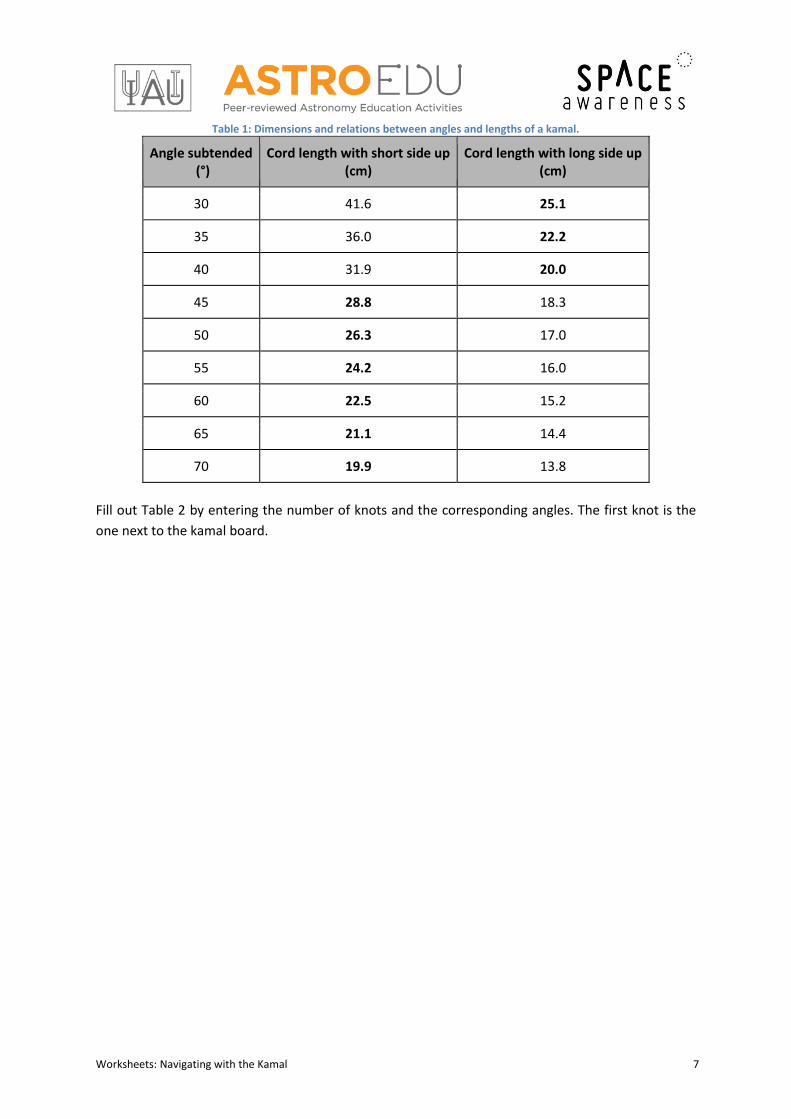
Tie a knot at one end of the cord and run it through the central hole of the board. The knot should block the cord from sliding through the hole. Now add knots at distances from the board as indicated in Table 1. Be careful to keep the cord straight. Check the correct position of the knots by using a ruler.
Worksheets: Navigating with the Kamal 7
Table 1: Dimensions and relations between angles and lengths of a kamal.
Angle subtended (°)
Cord length with short side up (cm)
Cord length with long side up (cm)
30 41.6 25.1
35 36.0 22.2
40 31.9 20.0
45 28.8 18.3
50 26.3 17.0
55 24.2 16.0
60 22.5 15.2
65 21.1 14.4
70 19.9 13.8
Fill out Table 2 by entering the number of knots and the corresponding angles. The first knot is the
one next to the kamal board.

8 Worksheets: Navigating with the Kamal
Activity 1: Angles in the sky
Materials needed:
• Worksheet
• Kamal
• Pencil
• Torch
Questions and answers
Refer to Figure 2.
Q: What does this picture show, in particular, where do the bright curved lines come from?
Q: How does the picture show us that some stars do not set or rise during a full day?
Q: Can you identify the star that is next to the celestial North Pole? In this picture, it should be close
to the centre of rotation.
Q: Imagine you are at the terrestrial North Pole. Where would Polaris be in the sky? Where would it
be if you stood at the equator?
Field action
With this activity, you will work as a navigator using the kamal. Choose an afternoon or evening with
clear skies, so that you can observe the constellations of Ursa Minor (or at least Polaris) and Ursa
Major. The point of observation must allow a clear view to the horizon.
The table below lists the angles that correspond to the knots tied when the kamal is being made.
Table 2: List of knots and angles of the kamal.
Knot # Angle (°)

Worksheets: Navigating with the Kamal 9
How to use the kamal
Here are a few rules to remember when using the kamal.
• Remember the orientation of the kamal. For large elevations, hold it with the short edges up
and down.
• Hold the near end of the cord at your lips.
• Keep the cord straight.
• Hold the kamal board perpendicular to the line of sight.
The elevation of Polaris, the North Star, is measured following the steps below (see Figure 7).
1. Find Polaris (use Figure 3 as guidance).
2. Align the lower edge of the kamal board with the horizon.
3. Change the length of the cord until the upper edge touches Polaris.
4. Check both alignments.
5. Count the knots starting from the kamal board.
By comparing your findings with the list of knots above (Table 2), identify the angle you have meas-
ured. Estimate the angle between knots, if the length of the cord is in between. Fill in the empty
spaces in the following paragraph.
The length of the cord is at knot # _________________ .
This corresponds to an angle of ______________________ degrees.
You have determined the elevation of Polaris, i.e. the angle between the horizon and the star. This
value is equal to the latitude of your position on Earth.
If you compare your result with those obtained by the students, how much do the values differ? Can
you imagine a reason for this?
How would that have affected real navigation?

10 Worksheets: Navigating with the Kamal
Analysis
In order to determine how accurate your measurement is, consult a map that contains coordinates
or online services like Google Maps or Google Earth. Find your location on earth and the coordinates
of your position.
In Google Earth, you can right-click on your location and then click on “What’s here?”. A small win-
dow appears at the bottom of the screen and lists two numbers. The first is the latitude in degrees
with decimals.
Latitude: __________________________
Perhaps, the values do not match as well as you had thought. Can you imagine why?
Worksheets: Navigating with the Kamal 11
Glossary
Apparent movement Movement of celestial objects which, in fact, is caused by the rotation of the Earth. Cardinal directions Main directions, i.e. north, south, west and east Circumpolar Property of celestial objects that never set below the horizon. Culmination Passing the meridian of celestial objects. These objects attain their highest or lowest elevation there. Diurnal Concerning a period that is caused by the daily rotation of the Earth around its axis. Elevation Angular distance between a celestial object and the horizon. Great circle A circle on a sphere, whose radius is identical to the radius of the sphere. Meridian A line that connects north and south at the horizon via the zenith. Pole height Elevation of a celestial pole. Its value is identical to the latitude of the observer on earth. Spherical polar coordinates The natural coordinate system of a flat plane is Cartesian and measures distances in two perpendic-ular directions (ahead, back, left, right). For a sphere, this is not very useful, because it has neither a beginning nor ending. Instead, the fixed point is the centre of the sphere. When projected outside from the central position, any point on the surface of the sphere can be determined by two angles, with one of them being related to the symmetry axis. This axis defines the two poles. In addition, there is the radius that represents the third dimension of space, which enables us to determine each point within a sphere. This defines the spherical polar coordinates. When defining points on the sur-face of a sphere, the radius stays constant. Zenith Point in the sky directly above.