national association of investors corporation · pdf filenational association of investors...
TRANSCRIPT

NATIONAL ASSOCIATION OF INVESTORS
CORPORATION
(NAIC)
CHAPTER ACCOUNTING WITH QUICKBOOKS
USER PROCEDURES
Version: 2.2
Last Revised
September 15, 2004

Table of Contents
1 PURPOSE OF THE USER PROCEDURES.....................................................................................................3
2 REQUIRED TASKS FOR EACH CHAPTER .................................................................................................3
3 SOFTWARE PACKAGE CONTENTS.............................................................................................................4
4 SETTING UP QUICKBOOKS 2002..................................................................................................................5
4.1 NOTE FOR CHAPTERS ALREADY USING QUICKBOOKS ...................................................................................... 5 4.2 INSTALLING QUICKBOOKS 2002........................................................................................................................ 5 4.3 SETTING UP A NEW COMPANY .......................................................................................................................... 6 4.4 LOADING STANDARD CHART OF ACCOUNTS INTO QUICKBOOKS .................................................................... 17 4.5 SETTING PREFERENCES ................................................................................................................................... 19
5 ENTERING BEGINNING BALANCES FOR EACH ACCOUNT ..............................................................23
6 JOURNAL TRANSACTIONS .........................................................................................................................24
7 CREATING THE ACCOUNT BALANCE FILE..........................................................................................33
8 SENDING THE ACCOUNT BALANCE FILE..............................................................................................43
9 BACKING UP YOUR DATA...........................................................................................................................43
10 HELP AND TECHNICAL SUPPORT ............................................................................................................43
APPENDIX A – CREATING SUBACCOUNTS ....................................................................................................44
APPENDIX B – EDITING JOURNAL ENTRIES .................................................................................................48
APPENDIX C - CHANGING ACCOUNT TYPE OF SAVINGS ACCOUNT ....................................................51
APPENDIX D – YEAR-END CLOSING IN QUICKBOOKS ..............................................................................54
APPENDIX E - MOVING QUICKBOOKS DATA TO ANOTHER COMPUTER............................................56
BACKING UP THE CHAPTER’S COMPANY DATA .......................................................................................................... 56 RESTORING THE CHAPTER’S COMPANY DATA ............................................................................................................ 60 UNINSTALLING QUICKBOOKS ..................................................................................................................................... 62
APPENDIX F – FOR QUICKBOOKS PRO, SAVE ACCOUNT BALANCE FILE AS A SPREADSHEET. .65
APPENDIX G - CHAPTER CHART OF ACCOUNTS……………………………………………………….....71

NAIC CHAPTER ACCOUNTING SYSTEM
USER PROCEDURES DOCUMENT
3
1 PURPOSE OF THE USER PROCEDURES
National Association of Investors Corporation (NAIC) is a non-profit organization that
includes all Chapters in the same legal entity. As part of NAIC, the Chapters must send a file
with the Chapter’s account balance information quarterly to NAIC headquarters, where
Chapter financials are integrated with the headquarters accounting system. A standard
accounting package, QuickBooks 2002, has been selected as the software to be implemented
at each of the Chapters.
This document specifies the steps necessary to install, configure, and use the QuickBooks
2002 Accounting Package at an NAIC Chapter to generate the quarterly accounting data file.
It is understood that the Chapters have various levels of experience with computers and
accounting software, and these procedures have been created to provide as much detail as
possible concerning the functions that must be performed to create this data file.
It is recommended that you read this document thoroughly before installing and using the
software. Additional help may also be found by using the Help functionality of QuickBooks
and by consulting the QuickBooks documentation.
2 REQUIRED TASKS FOR EACH CHAPTER
Although every effort has been made to make this process as simple as possible, each Chapter
will be required to perform the following tasks:
� Install and configure QuickBooks 2002 (one-time task)
� Load the standard chart of accounts into QuickBooks from diskette (one-time task)
� Enter beginning balances for each account (one-time task)
� Send the account balance file with the beginning balances to NAIC headquarters (one-
time task)
� Enter journal transactions for the Chapter’s accounting activity for that quarter
� Create the account balance file quarterly
� Send the account balance file to NAIC headquarters every quarter
The procedures in this document detail how to accomplish each of these tasks.
Note that each Chapter’s fiscal year is from October 1 to September 30. Since QuickBooks
automatically handles the transferring of income and expense balances to the Retained
Earnings account, journal entries for this will not need to be entered to close out a fiscal year.

NAIC CHAPTER ACCOUNTING SYSTEM
USER PROCEDURES DOCUMENT
4
3 SOFTWARE PACKAGE CONTENTS
The following items should have been received by your Chapter and are necessary to install
and use QuickBooks:
� QuickBooks 2002 software package, containing:
� CD-ROM containing the QuickBooks installation software
� QuickBooks 2002 User’s Guide
� A 3½” diskette containing the standard Chart of Accounts file for your Chapter
� This User Procedures document
� A document titled, ‘Getting Started’, which indicates your Chapter’s 3-digit chapter number.
New Treasurers should make sure they receive all of the above from their predecessor. If you are
missing any of the above items, please contact Bonnie Reyes at [email protected]
by calling NAIC headquarters.
4 ON THE BACK OF THE CD-ROM CASE IS A YELLOW STICKER INDICATING YOUR QUICKBOOKS INSTALLATION KEY CODE. IT IS VERY IMPORTANT
THAT YOU NOT LOSE THIS NUMBER, AS IT IS REQUIRED IN ORDER TO INSTALL
QUICKBOOKS. WRITE THIS NUMBER IN THE FRONT OF THE USER’S GUIDE,
ON PAGE II, TO ENSURE THAT IT IS NOT LOST.

NAIC CHAPTER ACCOUNTING SYSTEM
USER PROCEDURES DOCUMENT
5
4 SETTING UP QUICKBOOKS 2002
4.1 Note for Chapters Already Using QuickBooks
If you have either Quicken or a previous version of QuickBooks, you should upgrade your
current software to the QuickBooks 2002 version.
4.2 Installing QuickBooks 2002
The following procedure describes the steps necessary to install the QuickBooks 2002
software.
STEP TASK
1 Locate the QuickBooks 2002 User’s Guide that was provided with the software
package.
2 Install the software as specified by this Guide on pages 7 – 9 under the heading,
‘Installing QuickBooks’. Note if you are installing from 3½” diskettes, you will be
prompted to insert certain disks throughout the installation.
3 Register the software as specified by this Guide on page 12 under the heading,
‘Registering QuickBooks’. Make sure to record the registration number in the front
of the User’s Guide, on page ii.
NAIC CHAPTER ACCOUNTING SYSTEM
USER PROCEDURES DOCUMENT
6
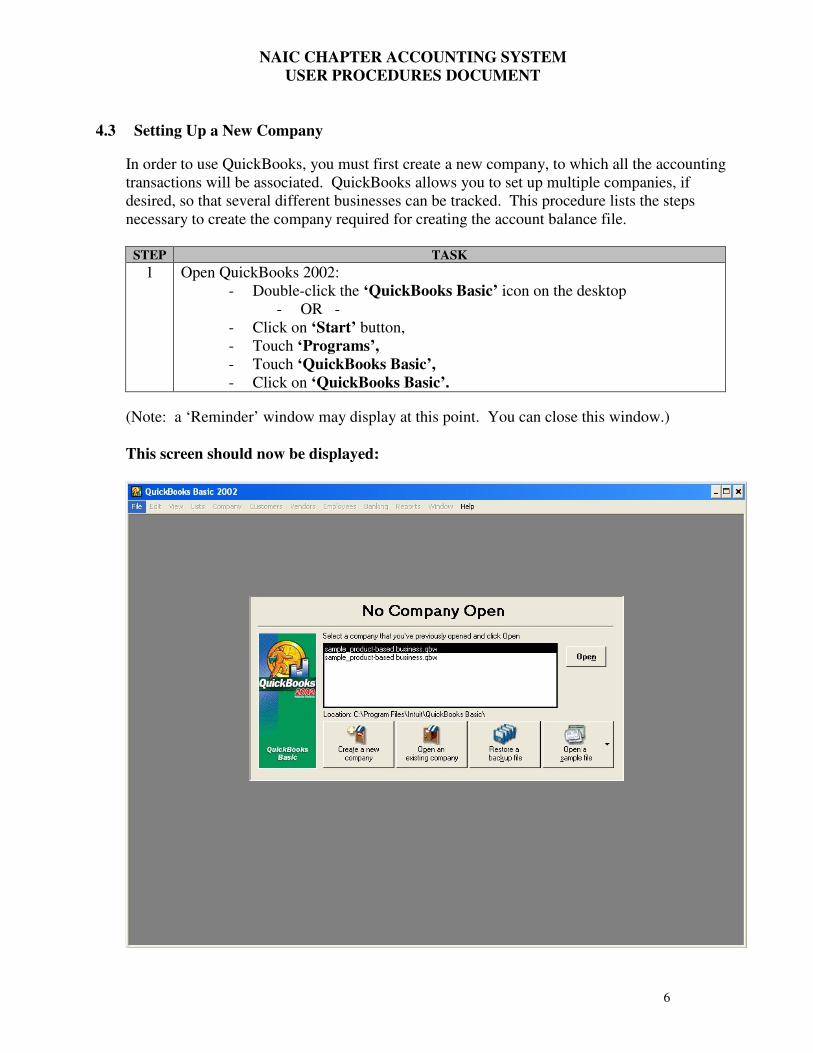
4.3 Setting Up a New Company
In order to use QuickBooks, you must first create a new company, to which all the accounting
transactions will be associated. QuickBooks allows you to set up multiple companies, if
desired, so that several different businesses can be tracked. This procedure lists the steps
necessary to create the company required for creating the account balance file.
STEP TASK
1 Open QuickBooks 2002:
- Double-click the ‘QuickBooks Basic’ icon on the desktop
- OR -
- Click on ‘Start’ button,
- Touch ‘Programs’,
- Touch ‘QuickBooks Basic’,
- Click on ‘QuickBooks Basic’.
(Note: a ‘Reminder’ window may display at this point. You can close this window.)
This screen should now be displayed:

NAIC CHAPTER ACCOUNTING SYSTEM
USER PROCEDURES DOCUMENT
7
STEP TASK
2 Start the EasyStep Interview for creating a new company in QuickBooks
- Click on ‘Create a new company’,
- The EasyStep Interview window should display.
This screen should now be displayed:
Many of the windows in the EasyStep Interview do not require any information to be entered. To
familiarize yourself with QuickBooks, it is recommended that you still read the information in
these windows.
Use the ‘Next’ button to move
forward through the EasyStep
Interview.

NAIC CHAPTER ACCOUNTING SYSTEM
USER PROCEDURES DOCUMENT
8
STEP TASK
3 Click ‘Next’ to go to next window,
4 Click ‘Next’ to go to next window,
5 Click ‘Next’ on the window titled, ‘Setting up a new QuickBooks company’,
6 Click ‘Next’ on the window titled, ‘Navigating around the interview’,
7 Click ‘Next’ on the window titled, ‘Sections and topics’,
8 Click ‘Next’ on the window titled, ‘Feel free to change your answers!’,
9 Click ‘Next’ on the window titled, ‘Welcome completed’,
10 Click ‘Next’ on the window titled, ‘General: Company Information’.
This window should now be displayed:

NAIC CHAPTER ACCOUNTING SYSTEM
USER PROCEDURES DOCUMENT
9
STEP TASK
11 On the window titled, ‘Your company name’:
- In the field, ‘Company Name’, enter ‘NAIC Chapter ###’, substituting
your Chapter’s three digit chapter number for ‘###’. Note the chapter
number should not be your ‘K’ chapter number; it should be the three
digit chapter number that was indicated on the ‘Getting Started’ sheet
that you received with this documentation.
- In the field, ‘Legal Name’, enter the legal name for your Chapter. You
will need to abbreviate ‘National Association of Investors Corporation’
to ‘NAIC’.

NAIC CHAPTER ACCOUNTING SYSTEM
USER PROCEDURES DOCUMENT
10
STEP TASK
12 Click ‘Next’ to go to next window.
13 On the window titled, ‘Your company address’, enter your Chapter’s published
mailing address, phone number, email and web site (if any.)
NAIC CHAPTER ACCOUNTING SYSTEM
USER PROCEDURES DOCUMENT
11
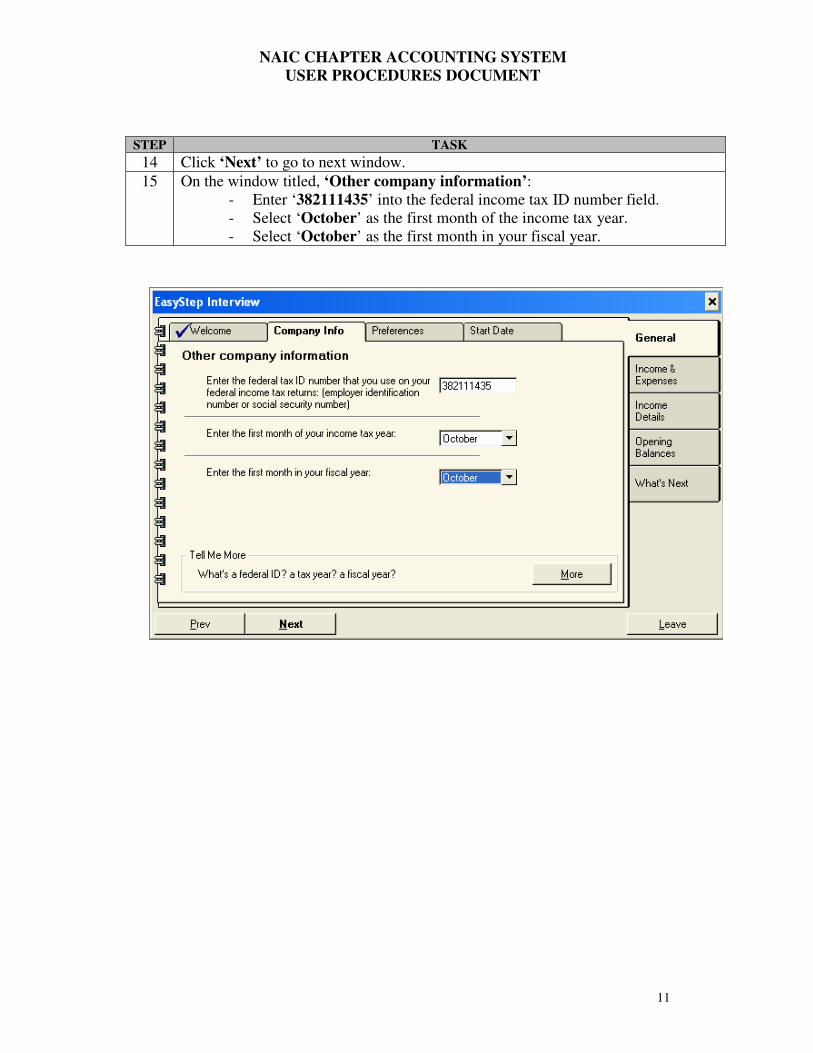
STEP TASK
14 Click ‘Next’ to go to next window.
15 On the window titled, ‘Other company information’:
- Enter ‘382111435’ into the federal income tax ID number field.
- Select ‘October’ as the first month of the income tax year.
- Select ‘October’ as the first month in your fiscal year.

NAIC CHAPTER ACCOUNTING SYSTEM
USER PROCEDURES DOCUMENT
12
STEP TASK
16 Click ‘Next’ to go to next window.
17 On the window titled, ‘Your company income tax form’, select ‘<Other/None>’.

NAIC CHAPTER ACCOUNTING SYSTEM
USER PROCEDURES DOCUMENT
13
STEP TASK
18 Click ‘Next’ to go to next window.
19 A window will display asking for confirmation that ‘<Other/None>’ should be
used as the tax form. Click the ‘OK’ button.
20 On the window titled ‘Select your type of business’, select ‘Accounting/CPA’.
NAIC CHAPTER ACCOUNTING SYSTEM
USER PROCEDURES DOCUMENT
14
STEP TASK
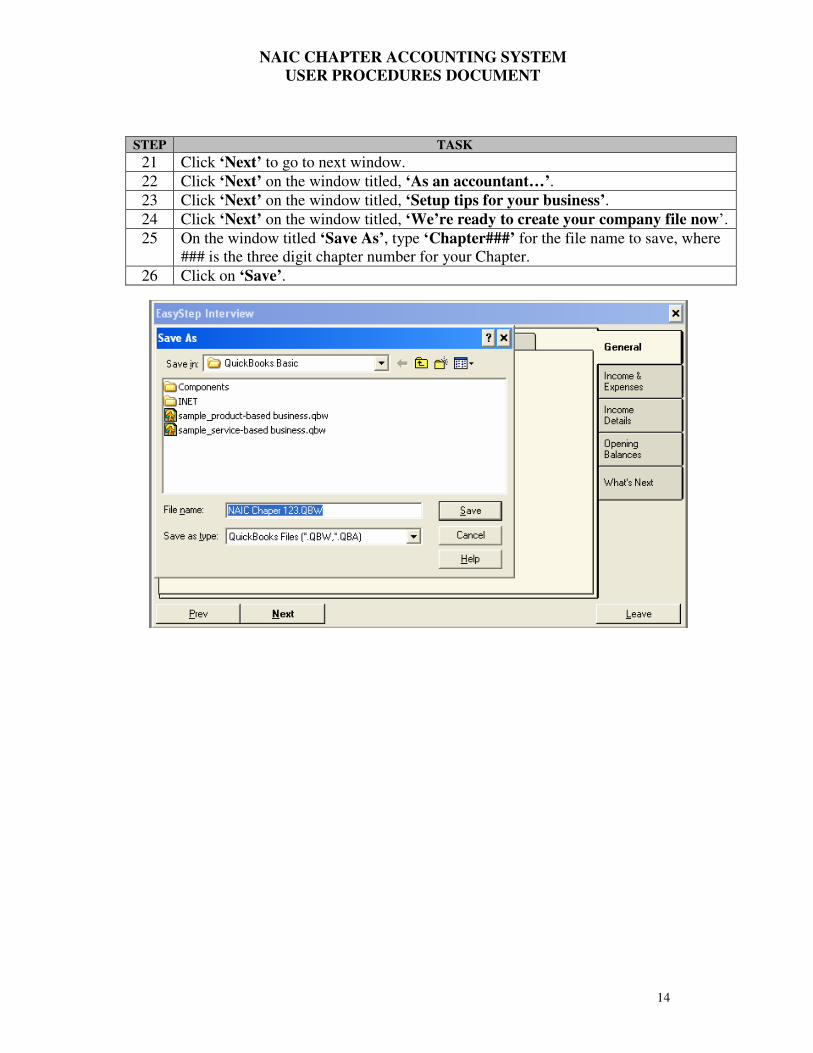
21 Click ‘Next’ to go to next window.
22 Click ‘Next’ on the window titled, ‘As an accountant…’.
23 Click ‘Next’ on the window titled, ‘Setup tips for your business’.
24 Click ‘Next’ on the window titled, ‘We’re ready to create your company file now’.
25 On the window titled ‘Save As’, type ‘Chapter###’ for the file name to save, where
### is the three digit chapter number for your Chapter.
26 Click on ‘Save’.

NAIC CHAPTER ACCOUNTING SYSTEM
USER PROCEDURES DOCUMENT
15
STEP TASK
27 Wait for QuickBooks to finish creating the company file.
28 IMPORTANT STEP: On the window titled ‘Your income and expense
accounts’, click the button ‘NO, I’D LIKE TO CREATE MY OWN’.
MAKE SURE
THAT THIS
BUTTON IS
SELECTED

NAIC CHAPTER ACCOUNTING SYSTEM
USER PROCEDURES DOCUMENT
16
STEP TASK
29 Click ‘Next’ to go to the next window.
30 Although there are other steps in the company creation interview, they are not
needed for this application. Click the ‘Leave’ button.
When this screen is displayed, you may click the ‘Leave’ button to exit the EasyStep Interview
Click the ‘Leave’ button to exit
the EasyStep Interview.

NAIC CHAPTER ACCOUNTING SYSTEM
USER PROCEDURES DOCUMENT
17
4.4 Loading Standard Chart of Accounts into QuickBooks
Each Chapter will use a standard chart of accounts, provided by NAIC headquarters, for their
accounting. It is important that all transactions be made using these accounts. Do not create
any new accounts in addition to these standard accounts, as this will cause errors when the account balance file is sent to headquarters. You may, however, create sub-accounts to
the standard accounts. Please reference ‘APPENDIX A – CREATING SUB ACCOUNTS’
if you wish to set up sub accounts.
STEP TASK
1 Locate the diskette labeled, ‘Chart of Accounts for Chapter’, that was sent to your
chapter along with this user procedure document and the QuickBooks software.
2 Insert the diskette into your computer’s diskette drive.
3 Import the Chart of Accounts into QuickBooks:
- Click on ‘File’ on the top menu bar.
- Touch ‘Utilities’.
- Click on ‘Import’.
- Select ‘3½” Floppy’ by the header titled, ‘Look in’.
- Click on ‘ChartOfAccts###.iif’, where ### is your chapter number, so
that it is highlighted.
- Click the ‘Open’ button.
This is the Import window: Use this down arrow to select the
floppy disk drive after inserting
the diskette containing the
standard chart of accounts file.

NAIC CHAPTER ACCOUNTING SYSTEM
USER PROCEDURES DOCUMENT
18
STEP TASK
4 A window stating, ‘Your data has been imported’, should be displayed.
- If this window does not display or if you receive an error message,
please contact NAIC headquarters. See the section in this document,
‘HELP AND TECHNICAL SUPPORT’, for information on whom to
contact.
5 Click the ‘OK’ button to close the window.
This window should be displayed after the chart of accounts has been successfully
imported:

NAIC CHAPTER ACCOUNTING SYSTEM
USER PROCEDURES DOCUMENT
19
4.5 Setting Preferences
QuickBooks allows the setting of many preferences so users may configure the software to
meet their business needs. This section contains instructions on setting preferences that are
recommended for entering journal entries and creating the account balance file.
STEP TASK
1 Open the Preferences window:
- Click on ‘Edit’ on the top menu bar.
- Click on ‘Preferences’.
This window should now be displayed:
You can click on these tabs to
switch between the two
preference screens for each
preference type.
You can click an icon on
this menu to switch between
preference types.
NAIC CHAPTER ACCOUNTING SYSTEM
USER PROCEDURES DOCUMENT
20
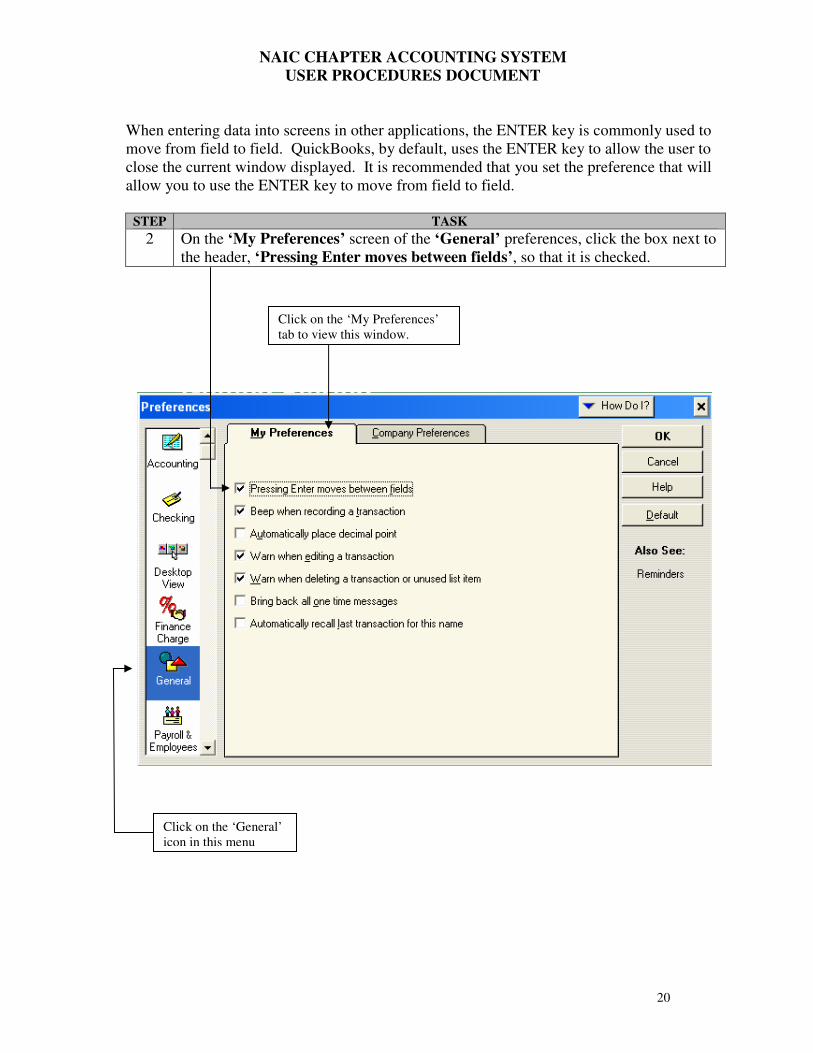
When entering data into screens in other applications, the ENTER key is commonly used to
move from field to field. QuickBooks, by default, uses the ENTER key to allow the user to
close the current window displayed. It is recommended that you set the preference that will
allow you to use the ENTER key to move from field to field.
STEP TASK
2 On the ‘My Preferences’ screen of the ‘General’ preferences, click the box next to
the header, ‘Pressing Enter moves between fields’, so that it is checked.
Click on the ‘My Preferences’
tab to view this window.
Click on the ‘General’
icon in this menu

NAIC CHAPTER ACCOUNTING SYSTEM
USER PROCEDURES DOCUMENT
21
It may be helpful to be able to see the account number as well as the account description when
viewing and entering account information into QuickBooks. To see the account numbers, the
following steps must be taken to set the preferences:
STEP TASK
3 Click the ‘Accounting’ icon in the vertical list in the left of the window.
4 Click the ‘Yes’ button, in the ‘You made changes in …. Do you wish to save
them?’ window.
STEP TASK
5 Click the ‘Company Preferences’ tab.
6 Click the ‘Use account numbers’ checkbox.
STEP TASK
7 Click the ‘OK’ to close the window
8 Click the ‘Yes’ button, in the ‘You made changes in …. Do you wish to save
them?’ window.

NAIC CHAPTER ACCOUNTING SYSTEM
USER PROCEDURES DOCUMENT
22
QuickBooks displays reminder messages that are not needed to perform the tasks in this
document. You may turn off these reminder messages, if desired, by performing the
following steps:
STEP TASK
9 If the Preferences window is not open, open the Preferences window:
- Click on ‘Edit’ on the top menu bar.
- Click on ‘Preferences’.
10 Click on the ‘Reminders’ icon in the vertical list in the left of the window. You
may need to scroll down this list to do this.
11 Click on the ‘Company Preferences’ tab.
12 Click the ‘Don’t Remind Me’ button for all reminders in this window.
This is the ‘Company Preferences’ window for ‘Reminders’:
STEP TASK
13 Click the ‘OK’ to close the window.
14 Click the ‘Yes’ button, in the ‘You made changes in …. Do you wish to save
them?’ window.

NAIC CHAPTER ACCOUNTING SYSTEM
USER PROCEDURES DOCUMENT
23
5 ENTERING BEGINNING BALANCES FOR EACH ACCOUNT
At this point, QuickBooks is set up and ready for use. The first step is to enter the current
account balances for all accounts in the Chart of Accounts. This is accomplished by entering
journal transactions for each account with the full balance of that account. Please reference
the following section in this document, ‘ENTERING JOURNAL TRANSACTIONS’, for
details on how to use the Journal Entry screen. Note that the balances only need to be entered
one time, when the software is first installed and the standard chart of accounts has been
imported.
Keep in mind that there is a slight but very important difference between entering the
beginning balances for each account and the ongoing task of keeping the accounts up-to-date
so that the account balance file can be created and sent to NAIC headquarters every fiscal
quarter. Both of these processes require the entry of journal transactions. When the
beginning balances are entered, the balance amount will be entered as the transaction amount
for each account. After these beginning balances are entered, the Chapter will be required
every quarter to enter journal transactions for all the account activity since the last time the
account balance file was sent. When these journal transaction amounts are entered, the
amounts that are entered should only be the account activity since the last entries were made,
and should NOT be the current account balance.
The main point to remember is that after the beginning balances have been entered, all journal
transaction amounts from that point on should be transaction amounts representing the account
activity. Entering beginning balances is the ONLY time that journal entries should be entered
with the full balance amount for each account.
If you intend to set up sub accounts to allow more detailed tracking of your account
information, you may want to do so at this time, prior to entering the beginning balances for
each account. Please reference ‘APPENDIX A – CREATING SUB ACCOUNTS’ for
information on how to set up sub-accounts.

NAIC CHAPTER ACCOUNTING SYSTEM
USER PROCEDURES DOCUMENT
24
6 JOURNAL TRANSACTIONS
Each Chapter will be required to keep their account balances up-to-date within QuickBooks.
Account activity is entered into QuickBooks by entering journal transactions. The following
procedure explains how to enter journal transactions into QuickBooks:
STEP TASK
1 Start up QuickBooks Basic if it is not already running.
2 Open the company file if it is not already open:
- Click on ‘File’.
- Click on ‘Open Company’.
- Click on (highlight) the company file to open (Chapter###.QBW).
- Click on ‘Open’.
3 Make sure the QuickBooks Navigator window is displayed. If it is not, click on the
‘Company’ and then click on ‘Company Navigator’.
This is the Company Navigator window. It should now be displayed:
NAIC CHAPTER ACCOUNTING SYSTEM
USER PROCEDURES DOCUMENT
25
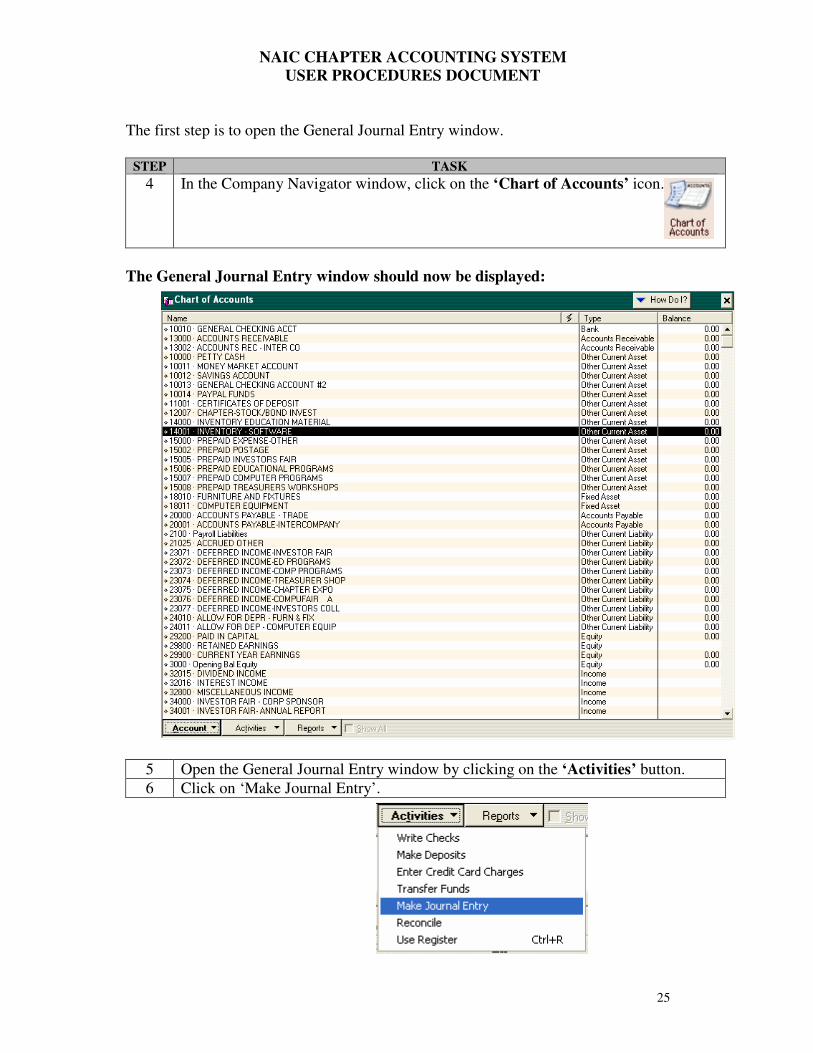
The first step is to open the General Journal Entry window.
STEP TASK
4 In the Company Navigator window, click on the ‘Chart of Accounts’ icon.
The General Journal Entry window should now be displayed:
5 Open the General Journal Entry window by clicking on the ‘Activities’ button.
6 Click on ‘Make Journal Entry’.

NAIC CHAPTER ACCOUNTING SYSTEM
USER PROCEDURES DOCUMENT
26
The first time you open the General Journal Entry window, the ‘Assigning Numbers to
Journal Entries’ window appears.
7 Click the ‘Do not display this message in the future’ checkbox.
8 Click the ‘OK’ to close the window.
The General Journal Entry window should now be displayed:

NAIC CHAPTER ACCOUNTING SYSTEM
USER PROCEDURES DOCUMENT
27
It is important that the correct transaction date be entered for the journal entries. Note that the
‘Date’ field defaults to the current date, which may not be correct for the journal entries that
are being made. As long as this date is a date in the fiscal quarter for the corresponding
account activity, the account balance file can be successfully created. Depending on how your
Chapter uses the QuickBooks accounting package to manage your business, you may track
your account activity more often than once a quarter, and may wish to be more detailed by
entering account activity for certain dates, which QuickBooks allows you to do.
If you are unsure of what date to use, enter or choose the last date of the fiscal quarter for
which the account activity is being entered.
STEP TASK
9 Enter the correct date for the account activity to be entered:
- Highlight and type over the date in the window by the ‘Date’ header.
- OR -
- Select the correct date from the built-in calendar by clicking on the box
immediately to the right of the Date entry field.
- Click on the arrow keys to choose the correct month and year.
- Click on the date in the calendar window.
This shows the calendar window, which may be used to select the correct date for the
journal transactions:
Click on the calendar
button to display the
calendar.
Click on the arrows to move
forward and backward
between months and years.

NAIC CHAPTER ACCOUNTING SYSTEM
USER PROCEDURES DOCUMENT
28
The General Journal Entry window allows for easy entry of both beginning balances and
account activity. You may enter as many account transactions as desired in one general
journal entry. An important thing to note about this window is that you may not complete the
journal entry (by clicking the ‘Save & Close’ or ‘Save & New buttons) unless the accounts are
in balance, meaning that the debits are equal to the credits.
The following are the steps required to enter a journal transaction:
STEP TASK
10 Click in the space under the ‘Account’ column. A down arrow should show next to
the cursor.
11 Click the down arrow to view a list of the chart of accounts.

NAIC CHAPTER ACCOUNTING SYSTEM
USER PROCEDURES DOCUMENT
29
STEP TASK
12 Clicking on an account will automatically choose that account and put the account
in the general journal account column.

NAIC CHAPTER ACCOUNTING SYSTEM
USER PROCEDURES DOCUMENT
30
The ‘Debit’ and ‘Credit’ columns are used to enter the corresponding debit or credit amount
for an account. To enter debit and credit amounts for the accounts:
STEP TASK
13 Click in the space under the ‘Debit’ or ‘Credit’ column.
- OR –
Use the TAB or ENTER key to move from field to field.
14 Enter the amount of the debit or credit in the field.
NAIC CHAPTER ACCOUNTING SYSTEM
USER PROCEDURES DOCUMENT
31
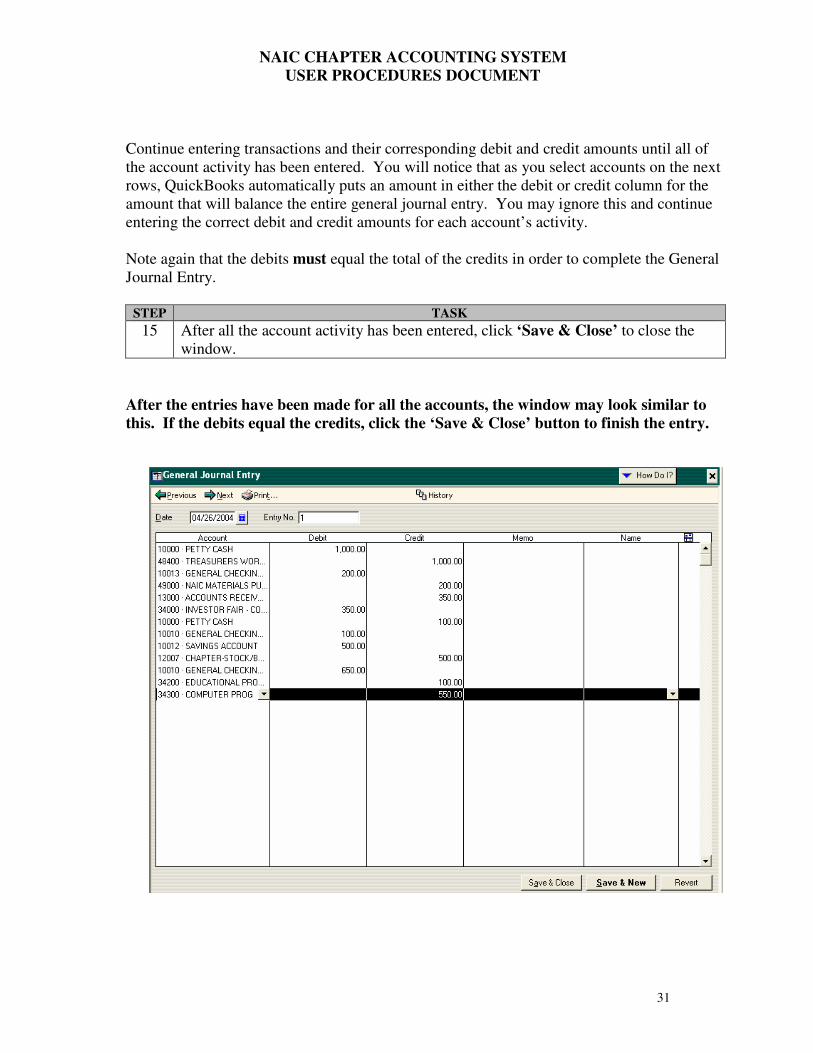
Continue entering transactions and their corresponding debit and credit amounts until all of
the account activity has been entered. You will notice that as you select accounts on the next
rows, QuickBooks automatically puts an amount in either the debit or credit column for the
amount that will balance the entire general journal entry. You may ignore this and continue
entering the correct debit and credit amounts for each account’s activity.
Note again that the debits must equal the total of the credits in order to complete the General
Journal Entry.
STEP TASK
15 After all the account activity has been entered, click ‘Save & Close’ to close the
window.
After the entries have been made for all the accounts, the window may look similar to
this. If the debits equal the credits, click the ‘Save & Close’ button to finish the entry.

NAIC CHAPTER ACCOUNTING SYSTEM
USER PROCEDURES DOCUMENT
32
Here are some tips and things to remember about entering General Journal transactions:
- QuickBooks will occasionally create accounts on its own. These accounts should not
be used when entering journal transactions. The accounts that should be used by your
chapter all have a 5-digit account number; the QuickBooks accounts, which should not
be used, usually have a 4-digit account number. For example, when viewing your chart
of accounts, you may see an account named ‘Opening Bal Equity’. This is an account
that QuickBooks created automatically. This account should never have a balance and
no journal entries should ever be entered for this account. If you are not sure whether
an account was created by QuickBooks, please reference the Chart of Accounts list that
you received with this procedure document.
- It will be helpful to enlarge the General Journal Entry window so that as much of the
account description can be viewed as possible. This can be accomplished by either
stretching the window, or by clicking the maximize button in the upper right hand
corner of the window.
- The ‘Memo’ and ‘Name’ columns do not require any entry. Feel free to enter notes on
journal transactions into the ‘Memo’ column, however.
- The ‘Retained Earnings’ is a special account that is used when a fiscal year ends.
QuickBooks automatically keeps the Retained Earnings account up-to-date and does
not require any special year-end closing procedure. The Chapter should not have to
enter any amounts for this account in the General Journal Entry window.

NAIC CHAPTER ACCOUNTING SYSTEM
USER PROCEDURES DOCUMENT
33
7 CREATING THE ACCOUNT BALANCE FILE
At the end of each fiscal quarter, each NAIC Chapter will be required to send a file to NAIC
headquarters containing the current account balances as of the end of that quarter. The file is
created in QuickBooks by printing the Trial Balance report to a file. This procedure details
how to create this account balance file.
ALTHOUGH CREATING THE FILE IS NOT COMPLICATED, IT IS IMPORTANT
THAT THIS PROCEDURE IS FOLLOWED SO THAT THE FILE IS CREATED
CORRECTLY AND IN THE PROPER FORMAT.
STEP TASK
1 Make sure the Company Navigator window is displayed.
2 Click on the ‘Reports’ pull-down menu.
3 Touch the ‘Accountant & Taxes’ item.
4 Click on the ‘Trial Balance’ item.

NAIC CHAPTER ACCOUNTING SYSTEM
USER PROCEDURES DOCUMENT
34
The ‘Trial Balance’ report window should be displayed. (Note that your Trial Balance
window may have accounts listed with their corresponding debit or credit amounts,
which is okay.):
NAIC CHAPTER ACCOUNTING SYSTEM
USER PROCEDURES DOCUMENT
35
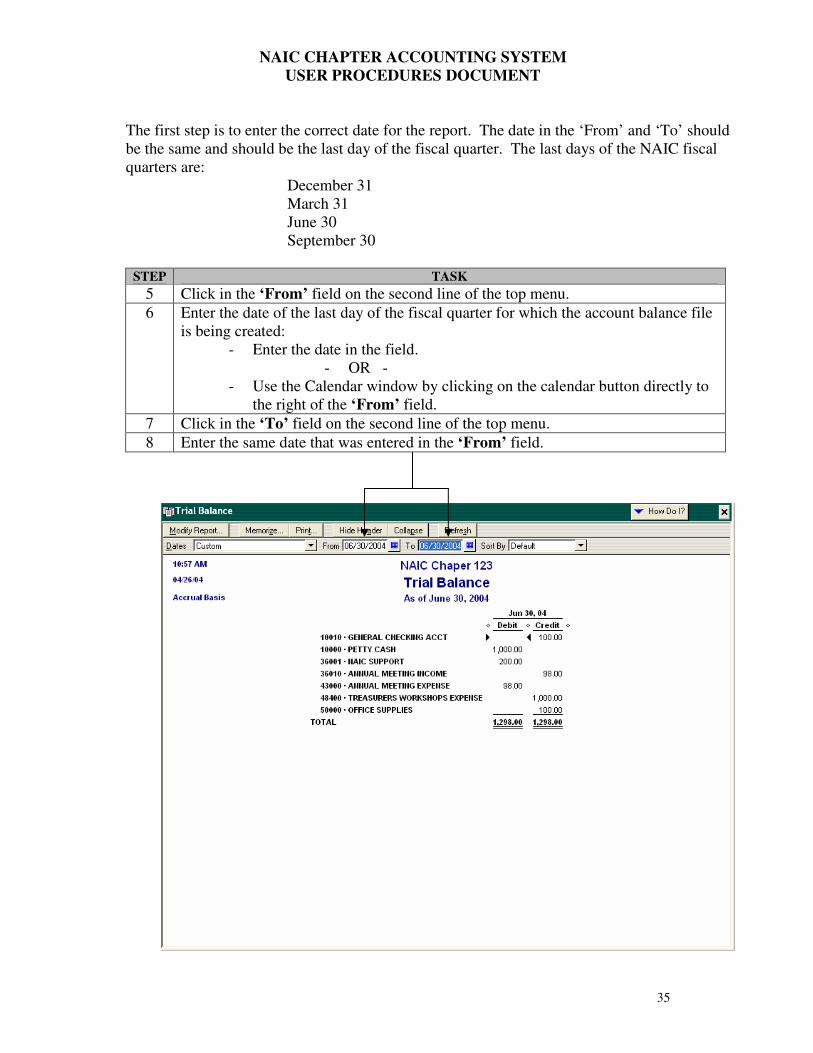
The first step is to enter the correct date for the report. The date in the ‘From’ and ‘To’ should
be the same and should be the last day of the fiscal quarter. The last days of the NAIC fiscal
quarters are:
December 31
March 31
June 30
September 30
STEP TASK
5 Click in the ‘From’ field on the second line of the top menu.
6 Enter the date of the last day of the fiscal quarter for which the account balance file
is being created:
- Enter the date in the field.
- OR -
- Use the Calendar window by clicking on the calendar button directly to
the right of the ‘From’ field.
7 Click in the ‘To’ field on the second line of the top menu.
8 Enter the same date that was entered in the ‘From’ field.

NAIC CHAPTER ACCOUNTING SYSTEM
USER PROCEDURES DOCUMENT
36
Although the new dates have been entered at this point, the data that you see on the report is
still as of the current date. It is necessary to update or ‘refresh’ the data on the report, which
will recreate the report using the new dates that have been entered.
STEP TASK
9 Click on the ‘Refresh’ button, which will refresh the report amounts for the new
date.
You should now see the current balances for all the accounts as of the last day of the
fiscal quarter displayed in the Trial Balance report window. Check all these amounts
to ensure they are correct.

NAIC CHAPTER ACCOUNTING SYSTEM
USER PROCEDURES DOCUMENT
37
After ensuring the Trial Balance is correct, the next step is to save the report to a file. This file
should be saved to a floppy diskette, which you will then need to mail to NAIC headquarters.
STEP TASK
10 Click on the ‘Print’ button on the first line at the top of the Trial Balance window.
11 If the ‘New Printing Features’ window displays, check the box in front of ‘Do not
display this message in the future’ and click ‘OK’.
The ‘Print Reports’ window should now be displayed:

NAIC CHAPTER ACCOUNTING SYSTEM
USER PROCEDURES DOCUMENT
38
STEP TASK
12 Under the header ‘Print to’, click the button next to ‘File’ so that it is marked.

NAIC CHAPTER ACCOUNTING SYSTEM
USER PROCEDURES DOCUMENT
39
STEP TASK
13 Click the down arrow in the file type window, which is immediately to the right of
the ‘File’ header. This will display the file type options.

NAIC CHAPTER ACCOUNTING SYSTEM
USER PROCEDURES DOCUMENT
40
STEP TASK
14 IMPORTANT STEP: click ‘Tab delimited file’.

NAIC CHAPTER ACCOUNTING SYSTEM
USER PROCEDURES DOCUMENT
41
STEP TASK
15 Click ‘Print’. This will display the ‘Create Disk File’ window.

NAIC CHAPTER ACCOUNTING SYSTEM
USER PROCEDURES DOCUMENT
42
STEP TASK
16 If you are saving the file to a diskette, insert the diskette into the disk drive and
select ‘3½ Floppy (A:)’ in the ‘Save in’ field.
17 IMPORTANT STEP: in the ‘File name’ field, type ‘Chapter###’, where ### is
your Chapter number. Do not put a space between ‘Chapter’ and your Chapter
number in the file name.
18 Click on the ‘Save’ button to save the file.
This window shows an example of the file name that should be entered prior to clicking
the ‘Save’ button.
NAIC CHAPTER ACCOUNTING SYSTEM
USER PROCEDURES DOCUMENT
43
It would also be very helpful if a paper copy of the Trial Balance report could also be sent to
NAIC headquarters. If you have a printer attached to your computer or network, follow the
procedure above until you get to the step where the ‘Print’ button is clicked. At this point
choose the ‘Printer’ button under the ‘Print to’ header and choose your printer.
Sending the paper copy of the report should help NAIC headquarters resolve potential
problems with your account balance file.
8 SENDING THE ACCOUNT BALANCE FILE
Please send the diskette with the account balance file, a paper copy of your Trial Balance
report, and a copy of your bank statement (with reconciliation) to:
Bonnie Reyes
NAIC
711 West Thirteen Mile Road
Madison Heights, MI 48071
Also include the Bank Statement(s) for the Quarter End plus a copy of your bank reconciliation.
9 BACKING UP YOUR DATA
To help insure against data loss, it is important that you create backups regularly of your
QuickBooks data. The QuickBooks backup process will save your data to one or more
diskettes, which can later be restored into QuickBooks if you lose your data. Please reference
pages 84-85 in the QuickBooks User Guide for details on how to back up your data. It is
recommended that you back up your data whenever you enter data into QuickBooks, but
should definitely be done whenever a significant amount of journal transactions have been
entered.
10 HELP AND TECHNICAL SUPPORT
The procedures detailed above cover the minimum required tasks for each chapter.
QuickBooks contains many more screens that should simplify the accounting tasks at each
Chapter, and you are encouraged to investigate these other features. The appendix to this
document covers some additional QuickBooks features that may be helpful in accounting for
your Chapter.
Additional help in using QuickBooks may also be found in the User’s Guide that you should
have received with the software, and by using the ‘Support’ features in the software itself. If
you have any problems using QuickBooks or creating the account balance file, please contact
Bonnie Reyes at (877) 275-6242, ext 449, at NAIC headquarters for assistance. NAIC has
purchased Premier Plan support through QuickBooks, which includes access to QuickBooks’
online eSupport Center. The phone number is 888-446-8848, and the support agreement
number is 028013916476.

NAIC CHAPTER ACCOUNTING SYSTEM
USER PROCEDURES DOCUMENT
44
APPENDIX A – CREATING SUBACCOUNTS
Although the Chapters should not create any new accounts in QuickBooks in addition to the
standard chart of accounts, subaccounts may be created to allow more detailed tracking of
account information. This procedure details how to set up subaccounts in QuickBooks.
STEP TASK
1 Start QuickBooks and open the company file for your Chapter, if it not already
open. Make sure the Company Navigator window is displayed.
2 Select the ‘Taxes and Accounting’ tab in the Company Navigator window.
3 Click the icon, ‘Chart of Accounts’, in the top of the Company Navigator window
to display the Chart of Accounts window. You may wish to enlarge this window.
This is the Chart of Accounts window. Note that at this point, your window may not
have any balances listed for the accounts, which is okay.

NAIC CHAPTER ACCOUNTING SYSTEM
USER PROCEDURES DOCUMENT
45
STEP TASK
4 Click on the ‘Account’ button on the bottom of the window.
5 Click on ‘New’.

NAIC CHAPTER ACCOUNTING SYSTEM
USER PROCEDURES DOCUMENT
46
The ‘New Account’ window should now be displayed. This window will be used to set up
subaccounts.
For the purposes of this procedure, we will assume that the Chapter is going to set up a
subaccount for the account ‘Treasurers Workshop Income’ named ‘January Workshop’.
Any subaccounts that are set up must have the same account type as the parent account. The
account type is listed in the Chart of Accounts window. Continuing our example, we note that
the account, ‘Treasurer’s Workshop Income’, has an account type of ‘Income’. Therefore, our
new subaccount must also be an Income account.
STEP TASK
6 In the field, ‘Type’, choose the account type of the parent account to which the
subaccount will be created.

NAIC CHAPTER ACCOUNTING SYSTEM
USER PROCEDURES DOCUMENT
47
STEP TASK
7 In the field, ‘Name’, enter the name for this subaccount.
8 IMPORTANT STEP: click the checkbox next to the header, ‘Subaccount of’, so
that it is checked.
9 Click the down arrow in the field to the right of the header, ‘Subaccount of’, to
view a list of all accounts with an account type of ‘Income’. Choose the parent
account to this subaccount.
10 Click ‘OK’ to complete the subaccount set up.
The new sub account should now show under the parent account in the Chart of Accounts
window. The sub account will also be available in the General Journal Entry window when
selecting accounts.
Note on sub accounts:
� If sub accounts have been created, all journal transactions should be made to these sub
accounts, and not to the parent account to which it belongs.

NAIC CHAPTER ACCOUNTING SYSTEM
USER PROCEDURES DOCUMENT
48
APPENDIX B – EDITING JOURNAL ENTRIES
Although there is validation in the General Journal Entry screen to ensure the entry is in balance, it
is possible that a journal entry has been entered incorrectly. The easiest way to correct any errors
is to make another journal entry that corrects the data. If necessary, however, journal entries can
be edited.
The following procedure is just one of several ways to edit the journal transactions. Many of the
reports that can be viewed in QuickBooks allow you to click on specific accounts to see the journal
transactions.
STEP TASK
1 Open the Chart of Accounts window:
- Make sure the Company Navigator window is open.
- Click the ‘Chart of Accounts’ icon near the top/center of the window.
You may wish to enlarge this window.
2 Double-click on the account that needs to be edited. This will open a window
showing the transactions for that account.
NAIC CHAPTER ACCOUNTING SYSTEM
USER PROCEDURES DOCUMENT
49
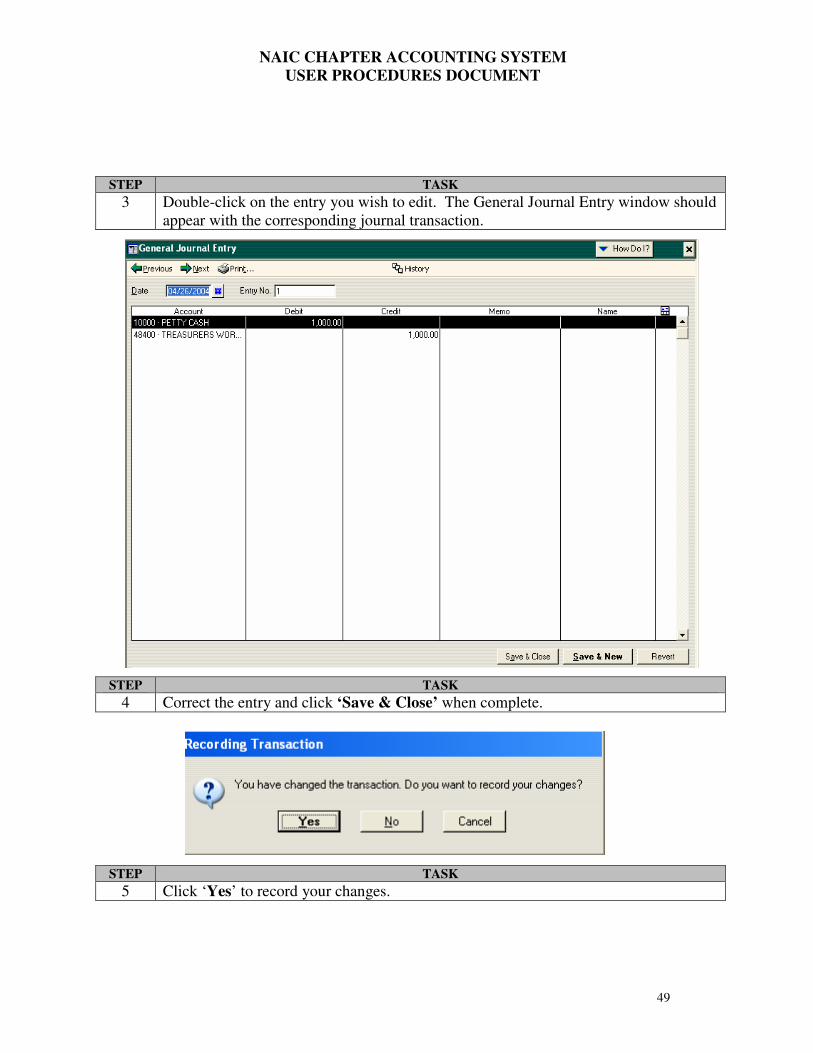
STEP TASK
3 Double-click on the entry you wish to edit. The General Journal Entry window should
appear with the corresponding journal transaction.
STEP TASK
4 Correct the entry and click ‘Save & Close’ when complete.
STEP TASK
5 Click ‘Yes’ to record your changes.
NAIC CHAPTER ACCOUNTING SYSTEM
USER PROCEDURES DOCUMENT
50
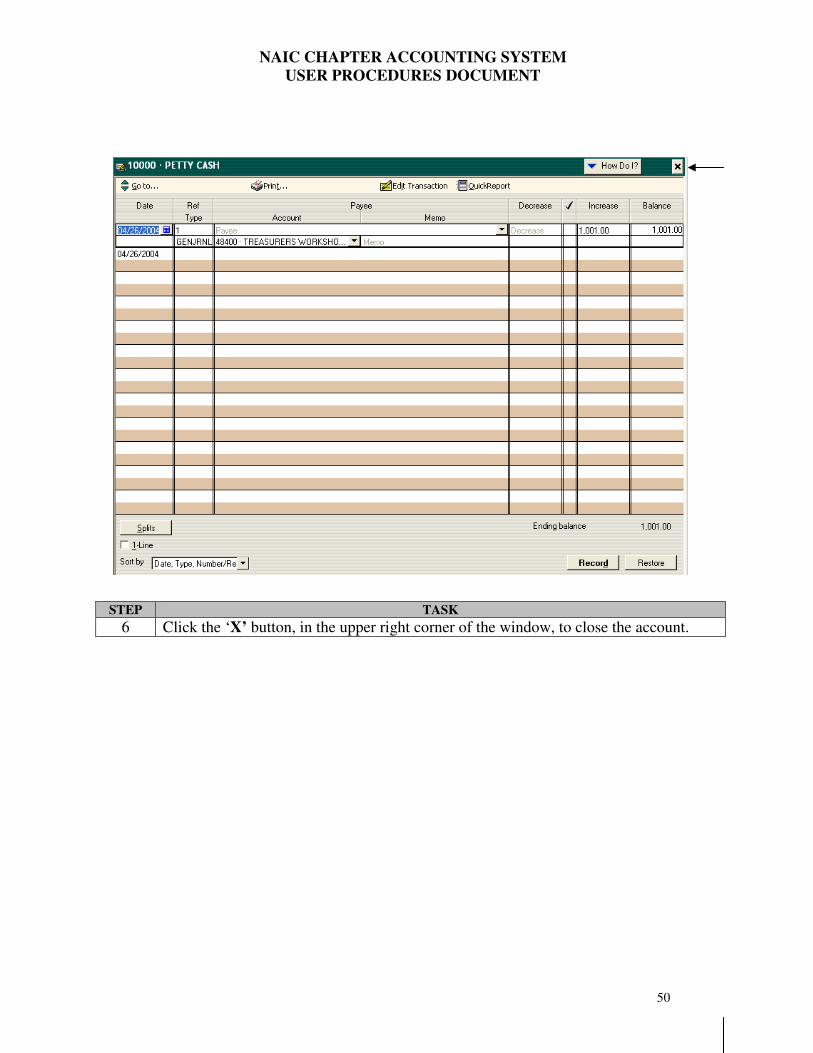
STEP TASK
6 Click the ‘X’ button, in the upper right corner of the window, to close the account.

NAIC CHAPTER ACCOUNTING SYSTEM
USER PROCEDURES DOCUMENT
51
APPENDIX C - CHANGING ACCOUNT TYPE OF SAVINGS ACCOUNT
The following procedure indicates how to change the account type of the checking account
from ‘Other Current Asset’ to ‘Bank’, so that the QuickBooks bank account management
functionality can be used.
STEP TASK
1 If it is not already open, open the Company Navigator window in QuickBooks.
2 Open up the Chart of Accounts by clicking on the ‘Chart of Accounts’ icon.

NAIC CHAPTER ACCOUNTING SYSTEM
USER PROCEDURES DOCUMENT
52
STEP TASK
3 Click on the ‘SAVINGS ACCOUNT’ account so that it is highlighted.
4 Click on the ‘Account’ button at the bottom of the Chart of Accounts window
5 Click on ‘Edit’. The ‘Edit Account’ window should display.

NAIC CHAPTER ACCOUNTING SYSTEM
USER PROCEDURES DOCUMENT
53
STEP TASK
6 Click the down arrow next to the ‘Type’ field to display the account type menu.
7 Click on ‘Bank’.
8 Click on ‘OK’ to close the ‘Edit Account’ window.

NAIC CHAPTER ACCOUNTING SYSTEM
USER PROCEDURES DOCUMENT
54
APPENDIX D - YEAR-END CLOSING IN QUICKBOOKS
As part of the year-end closing process, balance amounts in income and expense accounts are
transferred to the Retained Earnings account at the end of the year. QuickBooks does not
require that any special journal entries or procedures be performed to close these accounts at
year-end; instead it automatically reflects year-end closing based on the dates entered on the
reports.
For example, the Trial Balance report below was generated for the last day of the fiscal year,
September 30. Note that the income and expense accounts have balances.
The dates for this Trial Balance report are
the last day of the fiscal year.
The income and
expense accounts
have balances.

NAIC CHAPTER ACCOUNTING SYSTEM
USER PROCEDURES DOCUMENT
55
Continuing with our example, the Trial Balance report below has been generated for the first day
of the new fiscal year, October 1. Note that the income and expense amounts have zero balances
(they are not displayed on the report), and that the net balance amount for all the income and
expense amounts has been moved to the Retained Earnings account. This transfer of the balances
to Retained Earnings for year-end closing is reflected automatically in QuickBooks based on the
date of the report; the Chapter does not have to make any journal entries to accomplish this.
The dates for the Trial Balance report are
the first day of the new fiscal year.
The Retained Earnings
account now contains
the net balance amount
for all income and
expense accounts.

NAIC CHAPTER ACCOUNTING SYSTEM
USER PROCEDURES DOCUMENT
56
APPENDIX E - MOVING QUICKBOOKS DATA TO ANOTHER
COMPUTER
If a Chapter switches treasurers or purchases a new computer, it may be necessary to move the
QuickBooks program and data from one computer to another. In order to move the data, a
backup must be created on the original computer. After the QuickBooks software is installed
on the new computer, this backup file will be restored, which should restore all the company
data.
The following procedure details how to move the QuickBooks data and how to uninstall the
QuickBooks software from a computer.
Backing Up the Chapter’s Company Data
STEP TASK
1 If it’s not already open, open QuickBooks on the original computer and open the
company file for the Chapter.
2 Insert a 3½” diskette into the disk drive on the original computer.
3 In QuickBooks, click on ‘File’ on the top menu to display the ‘File’ drop-down
menu. Click on ‘Back Up’.
4 The ‘Back Up Company To’ window should now be displayed.

NAIC CHAPTER ACCOUNTING SYSTEM
USER PROCEDURES DOCUMENT
57
Click the down arrow button to
display the drop-down menu of
drive and folder locations.
STEP TASK
5 If necessary, click on the down arrow next to the ‘Save in’ header to display the
drop down menu and select ‘3½ Floppy’.

NAIC CHAPTER ACCOUNTING SYSTEM
USER PROCEDURES DOCUMENT
58
STEP TASK
6 In the ‘File name’ field, type in ‘Chapter###’ for the file name, where ‘###’ is
your Chapter’s unique chapter number. QuickBooks may automatically fill this in
for you.
7 Click the ‘Save’ button to save the backup file to the diskette. A confirmation
window should be displayed after the file has been backed up successfully. Click
‘OK’ to close this window.
This window should be displayed if the data was backed up successfully. If this window
does not display or if you receive any error message while backing up, contact the
Technical Support person at NAIC headquarters as indicated in the User Procedures
binder.

NAIC CHAPTER ACCOUNTING SYSTEM
USER PROCEDURES DOCUMENT
59
STEP TASK
8 Get your chapter’s Registration Number from Quickbooks and write it down, and
keep it with the your backup disk and Quickbooks CD.
With Quickbooks open, press the "F2" key. A “Product Information” window
will open.
The Registration Number is the 3rd one down, on the left side of the window.

NAIC CHAPTER ACCOUNTING SYSTEM
USER PROCEDURES DOCUMENT
60
Restoring the Chapter’s Company Data
After a backup of the company data has been successfully created and saved on a diskette, the
next step is to restore the file to the new computer.
STEP TASK
1 On the new computer, install the QuickBooks software as indicated in the User
Procedures binder.
2 Register the software on the new computer. The registration number should be
written on the inside cover of the QuickBooks manuals, so it may not be necessary
to register online or call Intuit. If you cannot find the registration number, follow
the instructions on page 8 of the QuickBooks Installation and Conversion Guide to
register the software.
3 Insert the diskette containing the backup file into the computer’s disk drive.
4 Click on ‘File’ on the top menu in QuickBooks to display the drop-down menu.
Click on ‘Restore’.
The ‘Restore From’ window should now be displayed:
STEP TASK
5 Click on the down arrow next to the ‘Look in’ header and select ‘3½ Floppy’. The
backup file should now be displayed in the window.
6 Click on the file name to restore in the window, or type the name of the restore file
in the field next to the header, ‘File name’. This file name is most likely named,
‘Chapter###.QBB’, where ‘###’ is your Chapter number.
7 Click the ‘Open’ button. The ‘Restore to’ window should now be displayed.

NAIC CHAPTER ACCOUNTING SYSTEM
USER PROCEDURES DOCUMENT
61
STEP TASK
8 If it is not already entered in the ‘File Name’ field, type ‘Chapter###.QBW’ next
to the header, ‘File Name’, where ‘###’ is your Chapter’s unique chapter number.
9 Click ‘Save’ to save the company file.
10 A confirmation window below should be displayed after the file has been restored
successfully. Click ‘OK’ to close this window.
This window should be displayed if the data was backed up successfully. If this window
does not display or if you receive any error message while backing up, contact the
Technical Support person at NAIC headquarters as indicated in the User Procedures
binder, Section 10.
STEP TASK
11 Enter your chapter’s Registration Number.
Click on "File". Then choose "Register Quickbooks Basic".
Choose "Phone". Enter your Registration Number.

NAIC CHAPTER ACCOUNTING SYSTEM
USER PROCEDURES DOCUMENT
62
Uninstalling QuickBooks
After the Chapter’s accounting data has been successfully backed up and restored to another
computer, the last step is to remove the QuickBooks software from the original computer.
Note: Do not uninstall QuickBooks from the original computer if you received any error during the back up or restore processes.
STEP TASK
1 Open the Windows Control Panel:
- Click on the ‘Start’ button in the lower left hand corner of the screen.
- Click ‘Settings’.
- Click ‘Control Panel’.
2 Double-click the ‘Add or Remove Programs’ icon in the Control Panel.

NAIC CHAPTER ACCOUNTING SYSTEM
USER PROCEDURES DOCUMENT
63
3 Click on ‘QuickBooks 2002’ so that it is highlighted. You may need to scroll this
list down using the mouse or the arrow keys to find QuickBooks.

NAIC CHAPTER ACCOUNTING SYSTEM
USER PROCEDURES DOCUMENT
64
4 With QuickBooks 2002 highlighted, click the ‘Change/Remove’ button.
5 Click ‘OK’ on the window to complete the uninstall process.

NAIC CHAPTER ACCOUNTING SYSTEM
USER PROCEDURES DOCUMENT
65
APPENDIX F – FOR QUICKBOOKS PRO, SAVE ACCOUNT BALANCE
FILE AS A SPREADSHEET.
These instructions replace the steps in “7. Creating the Account Balance File”. Complete
steps 1 – 9 as normal. Step 14 is critical.
After ensuring the Trial Balance is correct, the next step is to save the report to a spreadsheet.
The file should be saved to a floppy diskette, which you will then need to mail to NAIC
headquarters.
STEP TASK
10 Click on the ‘Print’ button on the first line at the top of the Trial Balance window.
11 If the ‘New Printing Features’ window displays, click ‘OK’.
The ‘Print Reports’ window should now be displayed:

NAIC CHAPTER ACCOUNTING SYSTEM
USER PROCEDURES DOCUMENT
66
STEP TASK
12 Under the header ‘Print to’, click the button next to ‘File’ so that it is marked.

NAIC CHAPTER ACCOUNTING SYSTEM
USER PROCEDURES DOCUMENT
67
STEP TASK
13 Click the down arrow in the file type window, which is immediately to the right of
the ‘File’ header. This will display the file type options.

NAIC CHAPTER ACCOUNTING SYSTEM
USER PROCEDURES DOCUMENT
68
STEP TASK
14 IMPORTANT STEP: click ‘Excel/Lotus 123 Spreadsheet’.

NAIC CHAPTER ACCOUNTING SYSTEM
USER PROCEDURES DOCUMENT
69
STEP TASK
15 Click ‘Print’. This will display the ‘Create Disk File’ window.
Excel(*.xls)

NAIC CHAPTER ACCOUNTING SYSTEM
USER PROCEDURES DOCUMENT
70
STEP TASK
16 If you are saving the file to a diskette, insert the diskette into the disk drive and
select ‘3½ Floppy (A:)’ in the ‘Save In’ field.
17 IMPORTANT STEP: in the ‘File name’ field, type ‘Chapter###’, where ### is
your Chapter number. Do not put a space between ‘Chapter’ and your Chapter
number in the file name.
18 Click on the ‘Save’ button to save the file.
This window shows an example of the file name that should be entered prior to clicking
the ‘Save’ button:
M M
Excel(*.xls)

NAIC CHAPTER ACCOUNTING SYSTEM
USER PROCEDURES DOCUMENT
71
APPENDIX G – NAIC CHAPTERS STANDARD CHART OF
ACCOUNTS
The attached Chart of Accounts contains account numbers and descriptions of accounts to be
utilized by all NAIC Chapters. Please do not add accounts without discussing with the VP
Finance or Controller at NAIC Headquarters. Subaccounts can be added to account for
various types of classes and expenses; see Appendix A for detailed instructions.