national 4xdolÛfdwlrqv specimen only - sqa woodworking sqprn5.pdf · general marking principles...
TRANSCRIPT

*S862750101*
*S8627501*
N5FOR OFFICIAL USE
Fill in these boxes and read what is printed below.
Number of seat
Town
©
Mark
Full name of centre
Forename(s) Surname
Scottish candidate numberDate of birth
YearDay Month
NationalQualicationsSPECIMEN ONLY
Total marks — 60
Attempt ALL questions.
Write your answers clearly in the spaces provided in this booklet. Additional space for answers is provided at the end of this booklet. If you use this space you must clearly identify the question number you are attempting.
Use blue or black ink.
Before leaving the examination room you must give this booklet to the Invigilator; if you do not, you may lose all the marks for this paper.
S862/75/01
Date — Not applicable
Duration — 1 hour
Practical Woodworking

*S862750102*page 02
MARKS DO NOT WRITE IN
THIS MARGIN
Total marks — 60
Attempt ALL questions
1. A small coffee table is shown.
Table top
Leg X
Table leg
Top rail
End rail
The diagram below shows how the rails of the coffee table are joined to the legs.
Top rail
Leg X
Slot
End rail
(a) Name the joint used to join the top rail to leg X. 1

*S862750103*page 03
MARKS DO NOT WRITE IN
THIS MARGIN
1. (continued)
The diagram below shows how the end rail is marked out before it is cut.
Shaded areas
(b) Explain the purpose of shading in the areas shown in this diagram.
[Turn over
1

*S862750104*page 04
MARKS DO NOT WRITE IN
THIS MARGIN
1. (continued)
(c) The tool shown below is used to cut the slot in the leg of the table as shown in the diagram.
Ferrule
Leg
Slot
(i) Name this tool.
(ii) Describe the purpose of the ferrule, shown on the tool above.
In the diagram above, the slot in the leg is cut to a depth of 15mm.
(iii) Describe a method of ensuring the slot is cut to the correct depth.
You may use sketches to support your answer.
Health and safety in a workshop is always a priority.
(iv) State two health and safety checks that must be carried out before starting to cut out the slot in the leg.
1
1
2
2

*S862750105*page 05
MARKS DO NOT WRITE IN
THIS MARGIN
1. (continued)
(d) This diagram shows the table leg tapered using a smoothing plane.
Taper
The direction of cut is shown in the diagram below.
(i) Explain why this is the correct direction of cut.
(ii) Explain the purpose of the nut shown on the smoothing plane below.
Nut
[Turn over
1
1

*S862750106*page 06
MARKS DO NOT WRITE IN
THIS MARGIN
1. (continued)
The device shown below is used during the assembly of the coffee table.
(e) Name this device.
Various materials and their properties were considered to make the table top.
(f) Complete the table below with the materials that match the properties and uses given. The first one is completed for you.
Material Properties and uses
Beech Hardwood pinkish brown in colour used for tool handles and toys.
(i)Softwood that is straight grained, but knotty, quite strong and easy to work. Pale yellow in colour.
(ii) Light brown, hardwood, tough, heavy and durable outside. Gets harder with age.
(iii) Hardwood, reddish in colour, quite strong. A common hardwood used in schools.
(iv)Made from veneers glued together with the grain direction at 90° to the one next to it. Very stable and costs less than solid wood.
(v) Made from fine wood fibres, compressed and glued together.
(vi)Strips of softwood are glued together and then sandwiched between two hardwood veneers. Resistant to bending.
1
6
*S862750107*page 07
MARKS DO NOT WRITE IN
THIS MARGIN
1. (continued)
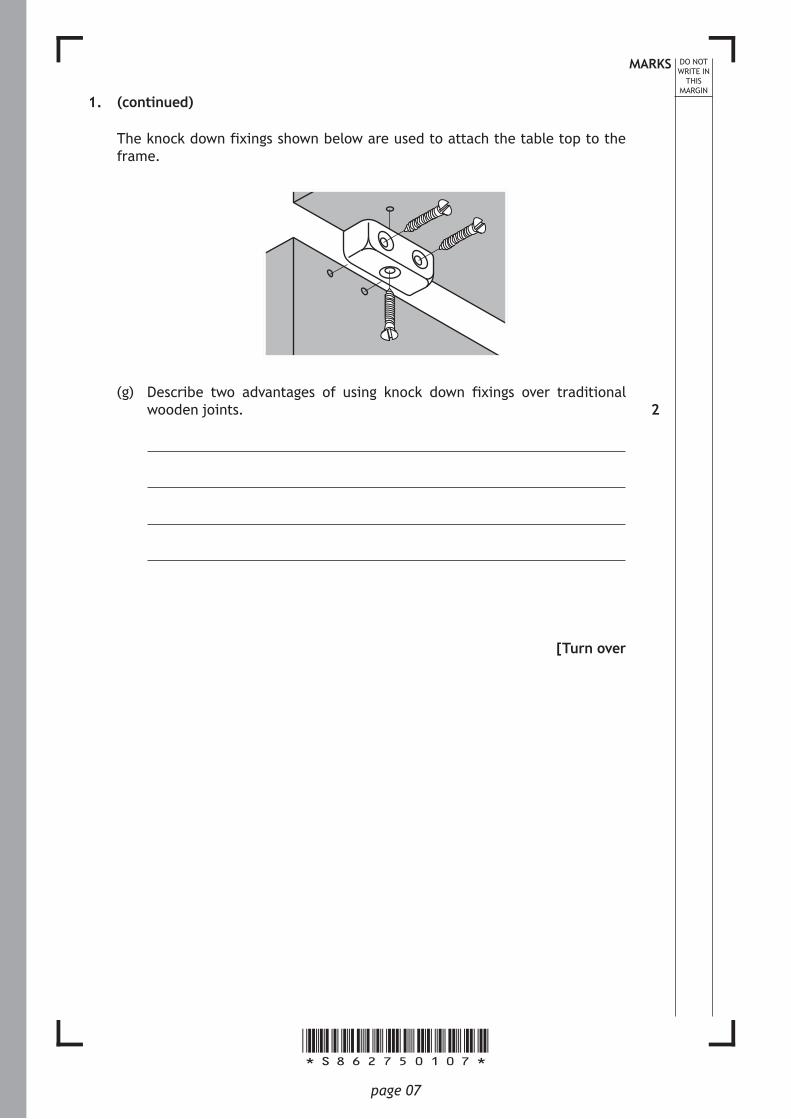
The knock down fixings shown below are used to attach the table top to the frame.
(g) Describe two advantages of using knock down fixings over traditional wooden joints.
[Turn over
2

*S862750108*page 08
MARKS DO NOT WRITE IN
THIS MARGIN 2. A shelving unit is shown.
Top shelf Decorative top piece
Middle shelf
Bottom shelf
Side
SideFoot
Drawer
Feet
The middle and bottom shelves are attached to the sides of the shelving unit using the joint shown in the diagram below.
Side
Shelf
Slot A
Joint A
(a) Name joint A.
Slot A, shown above, is cut using hand tools. The first stage is to mark out the slot. The last stage is to accurately level off the bottom of the slot.
1

*S862750109*page 09
MARKS DO NOT WRITE IN
THIS MARGIN 2. (continued)
(b) (i) Describe the three intermediate stages in the table below. The stages must be in the correct order.
1 mark out the slot
2
3
4
5 accurately level off the bottom of the slot
The tool shown below is used to level off the bottom of the slot accurately.
(ii) Name this tool.
The diagram below shows the decorative top piece of the shelving unit. This has to be reproduced many times.
(c) Name the marking out aid that is used to ensure all the decorative top pieces are marked out identically.
(d) Name the power tool used to cut the curved shape of the decorative top piece.
3
1
1
1
[Turn over

*S862750110*page 10
DO NOT WRITE IN
THIS MARGIN
2. (continued)
This diagram shows the four feet of the shelving unit being turned on the woodwork lathe.
Centre Centre
Foot
All four feet are made from one piece of hardwood, called a ‘wooden blank’, as shown in the diagram below.
Wooden blank
The wooden blank is prepared for the turning process before it is mounted on the woodwork lathe.
There are five stages in the preparation of the wooden blank before fitting it between the centres on the lathe. The first stage is to draw diagonals on the ends of the wooden blank.

*S862750111*page 11
MARKS DO NOT WRITE IN
THIS MARGIN
2. (continued)
(e) Describe the next four stages in the correct order. You may use sketches to support your answer.
Stage 2
Stage 3
Stage 4
Stage 5
[Turn over
4
*S862750112*page 12
MARKS DO NOT WRITE IN
THIS MARGIN
2. (continued)
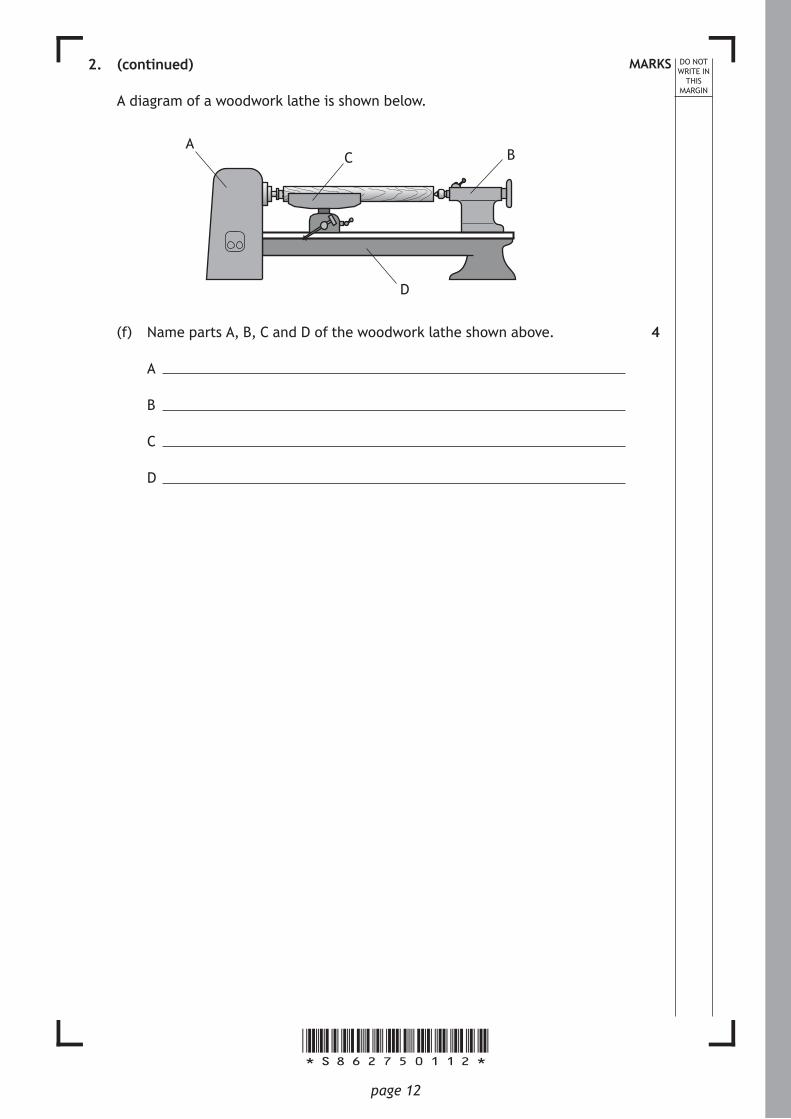
A diagram of a woodwork lathe is shown below.
AB
D
C
(f) Name parts A, B, C and D of the woodwork lathe shown above.
A
B
C
D
4

*S862750113*page 13
DO NOT WRITE IN
THIS MARGIN
2. (continued)
(g) The two cutting tools shown below are used to help shape the feet of the shelving unit.
Tool A Tool B
(i) Name these tools.
Tool A
Tool B
(ii) Explain how each tool is used to help shape the feet of the shelving unit.
Tool A
Tool B
The tool shown below is used to check the diameters of the feet of the shelving unit.
(iii) Name this tool.
2
1
1
1
[Turn over

*S862750114*page 14
MARKS DO NOT WRITE IN
THIS MARGIN
3. A child’s chair is shown.
320
Back legs
Rails
Back supports
Front legs
Seat
220
600
318
80
300
300
Front leg Rail
20
Back leg
Rail
20
220
300
The diagram below shows the working drawing for the child’s chair.
320
Back legs
Rails
Back supports
Front legs
Seat
220
600
318
80
300
300
Front leg Rail
20
Back leg
Rail
20
220
300
Note: The rails are joined to the legs using the joints shown in the drawings above. All sizes are in millimetres.

*S862750115*page 15
MARKS DO NOT WRITE IN
THIS MARGIN
3. (continued)
(a) Complete the cutting list below, using the information provided in the working drawings shown on page 14.
Cutting list
Part Number Material Length Breadth Thickness
Front leg 2 Red pine 300 40 40
Back leg 2 Red pine 40 40
Back support 2 Red pine 220 30
Rails 4 Red pine 40 40
Seat 1 MDF 320
(b) This diagram shows the joint used to join the back supports of the chair to the back legs.
Back legBack support
(i) Name this joint.
(ii) The holes in the back leg are drilled using the pedestal/pillar drill.
State two safety checks that should be carried out on the pedestal/pillar drill before switching it on.
Check 1
Check 2
[Turn over
5
1
1
1

*S862750116*page 16
MARKS DO NOT WRITE IN
THIS MARGIN
3. (continued)
(c) The chair is constructed from red pine. A clear varnish finish is applied to the chair.
(i) State one reason why a clear varnish is a suitable finish.
(ii) Describe three stages to be carried out to prepare the wood before the clear varnish is applied.
1
2
3
(iii) Explain why each part of the chair is prepared for a finish before it is assembled.
(iv) Health and safety is a priority when preparing wood for a finish.
State two safe working practices which should be carried out when preparing wood for a finish.
1
3
1
2

*S862750117*page 17
MARKS DO NOT WRITE IN
THIS MARGIN
3. (c) (continued)
Red pine is a softwood.
(v) Describe three environmental reasons for choosing red pine instead of a hardwood.
1
2
3
[Turn over for next question
3

*S862750118*page 18
MARKS DO NOT WRITE IN
THIS MARGIN
3. (continued)
(d) It is essential to make sure the legs and rails are square to each other when assembling the chair as shown in the diagram below.
Leg
Rail
(i) Explain what is meant by the term square.
(ii) Describe two methods of checking that the leg and rail are assembled correctly and are square.
Method 1
Method 2
[END OF SPECIMEN QUESTION PAPER]
1
2

*S862750119*page 19
MARKS DO NOT WRITE IN
THIS MARGIN
ADDITIONAL SPACE FOR ANSWERS AND ROUGH WORK

*S862750120*page 20
MARKS DO NOT WRITE IN
THIS MARGIN
ADDITIONAL SPACE FOR ANSWERS AND ROUGH WORK

N5
©
NationalQualicationsSPECIMEN ONLY
S862/75/01 Practical Woodworking
Marking Instructions
The information in this publication may be reproduced to support SQA qualifications only on a non-commercial basis. If it is reproduced, SQA should be clearly acknowledged as the source. If it is to be used for any other purpose, written permission must be obtained from [email protected].
Where the publication includes materials from sources other than SQA (ie secondary copyright), this material should only be reproduced for the purposes of examination or assessment. If it needs to be reproduced for any other purpose it is the user’s responsibility to obtain the necessary copyright clearance.
These marking instructions have been provided to show how SQA would mark this specimen question paper.

page 01
General marking principles for National 5 Practical Woodworking
This information is provided to help you understand the general principles you must apply when marking candidate responses to questions in this paper. These principles must be read in conjunction with the detailed marking instructions, which identify the key features required in candidate responses.
(a) Marks for each candidate response must always be assigned in line with these general marking principles and the detailed marking instructions for this assessment.
(b) Marking should always be positive. This means that, for each candidate response, marks are accumulated for the demonstration of relevant skills, knowledge and understanding: they are not deducted from a maximum on the basis of errors or omissions.

page 02
Marking instructions for each question
Question Expected response Max mark Additional guidance
1. (a) Haunched mortise and tenon joint 1 (b) To identify waste wood or material 1 Must be an explanation (c) (i) Mortise chisel 1 (ii) Strengthens the end of handle,
prevents it from splitting or wearing 1
(iii) Measure the depth on chisel Mark the chisel in some way (eg masking tape or similar)
2 Do not accept ‘mortise machine’, answer must relate to stem of 1(c) Clearly annotated sketches are acceptable
(iv) Any two of the following: • check tools for damage • secure leg to workbench • check the tool is sharp
2 Do not accept answers relating to a mortise machine, answer must relate to stem of 1(c)
(d) (i) To plane with the grain (not against the grain) to achieve a smooth finish
1
(ii) Adjusts the cutting height/depth of cut
1
(e) Sash cramp 1 (f) (i) Pine
(ii) Oak
(iii) Mahogany
(iv) Plywood
(v) MDF
(vi) Blockboard
6 1 mark for each correct response
(g) Easier to assemble than traditional wooden joints as no expensive specialised tools are required Easier to take apart than traditional wooden joints as no need for technical knowledge
2
2. (a) Stopped housing 1 (b) (i) 2 Vee-notch
3 Saw or vertical chisel 4 Remove waste wood with chisel
3 Description of stages must be in the correct order Accept description of any valid methods
(ii) Hand router 1 (c) Template 1 (d) Jig saw 1 (e) Stage 2 Centre punch both ends
Stage 3 Mark circle/octagonal shape
Stage 4 Saw diagonals Stage 5 Plane edges
4 Description of stages must be in the correct order

page 03
Question Expected response Max mark Additional guidance
2. (f) A Head stock B Tail stock C Tool rest D Bed
4
(g) (i) Tool A Gouge Tool B Parting chisel
2 Also accept ‘parting tool’ for Tool B
(ii) Tool A Roughing out to shape Tool B Parting off/cutting to
length/cutting shoulders
2
(iii) Outside calipers 1 3. (a)
Part Length Breadth Thickness
Back leg
600
Back support
80
Rails 260
Seat 300 18
5
(b) (i) Dowel joint 1
(ii) Any two of the following: • wood secure • drill secure • chuck key removed • guards in place
2
(c) (i) To allow the grain of the wood to be visible
1
(ii) Remove all pencil marks/saw marks/scratches Raise grain/wet wood Sand smooth/fine paper
3 Other valid stages are acceptable
(iii) More difficult to sandpaper after assembled
1
(iv) Dust mask/eye protection/dust extraction Protective clothes
2
(v) Answers should be a description of any three of the following: • reduce deforestation/protect
rain forests from deforestation • faster speed of growth of
softwood compared to hardwoods/replanting
• encourage sustainable forests • lower levels of transport
pollution as softwoods are grown in local forests
3
(d) (i) 90 degree/right angle 1
(ii) Method 1 Try square Method 2 Check diagonals
2
[END OF SPECIMEN MARKING INSTRUCTIONS]