nas120 ws02 simple beam
TRANSCRIPT
WORKSHOP 2
SIMPLY SUPPORTED BEAM

WS2-2NAS120, Workshop 2, May 2006Copyright© 2005 MSC.Software Corporation

WS2-3NAS120, Workshop 2, May 2006Copyright© 2005 MSC.Software Corporation
Workshop ObjectivesA finite element model must be properly constrained to prevent rigid body motion. This workshop demonstrates what happens when a model is not adequately constrained.

WS2-4NAS120, Workshop 2, May 2006Copyright© 2005 MSC.Software Corporation
Problem DescriptionAnalyze a simply-supported beam with a concentrated loadBeam dimension 1” x 1” x 12”E = 30 x 106 psi ν =0.3Load = 200 lb
PP

WS2-5NAS120, Workshop 2, May 2006Copyright© 2005 MSC.Software Corporation
Suggested Exercise Steps1. Create a new database and name it inadequate_constraint.db. 2. Create a solid to represent the beam.3. Mesh the solid to create 3D elements. 4. Create in-plane boundary conditions.5. Apply loads.6. Create material properties. 7. Create physical properties.8. Run analysis with MSC.Nastran.9. View fatal errors in the .f06 file.10. Add new boundary condition to properly constrain model.11. Re-run the analysis. View the .f06 file.12. Access the results file.13. Plot results.

WS2-6NAS120, Workshop 2, May 2006Copyright© 2005 MSC.Software Corporation
b c
d
f
g
Step 1. Create New Database
Create a new database called inadequate_constraint.db
a. File / New.b. Enter
inadequate_constraintas the file name.
c. Click OK.d. Choose Tolerance Based
on Model.e. Select MSC.Nastran as
the Analysis Code.f. Select Structural as the
Analysis Type. g. Click OK.
a
e

WS2-7NAS120, Workshop 2, May 2006Copyright© 2005 MSC.Software Corporation
Step 2. Create Geometry
Create a solida. Geometry: Create / Solid /
Primitiveb. Enter 12 for the X Lengthc. Click Apply.d. Change to iso 1 view
a
b
c
d
WS2-8NAS120, Workshop 2, May 2006Copyright© 2005 MSC.Software Corporation
a
b
c
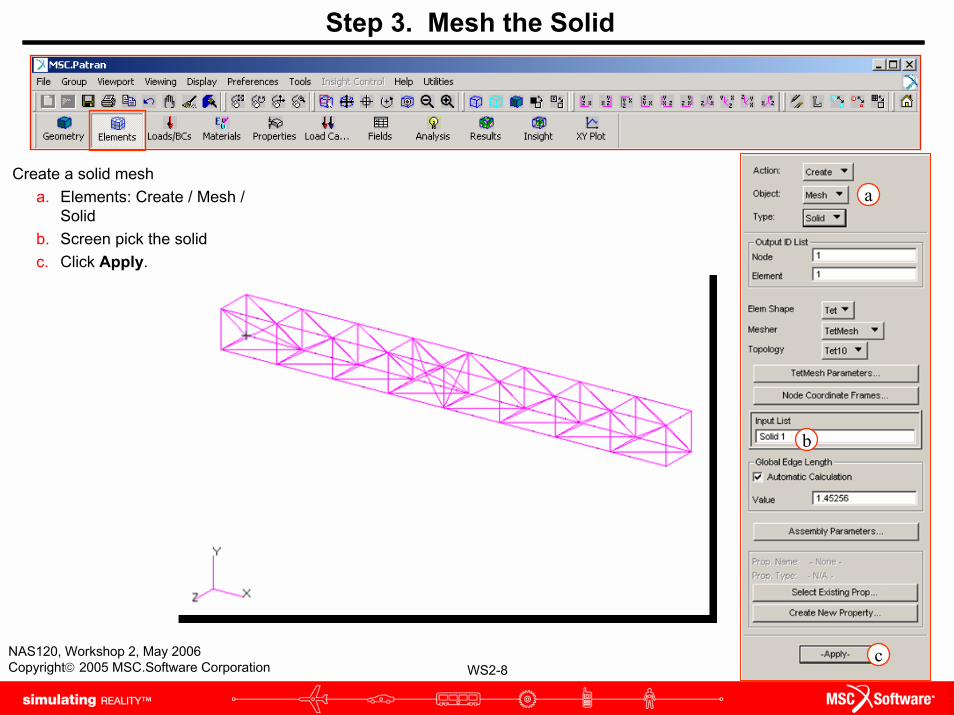
Step 3. Mesh the Solid
Create a solid mesha. Elements: Create / Mesh /
Solidb. Screen pick the solidc. Click Apply.

WS2-9NAS120, Workshop 2, May 2006Copyright© 2005 MSC.Software Corporation
d
e
Step 4. Create Boundary Conditions
Create a boundary conditiona. Loads/BCs: Create /
Displacement / Nodal.b. Enter left_end as the
New Set Name.c. Click Input Data.d. Enter <0,0, > for
Translations. e. Click OK.
b
c
a

WS2-10NAS120, Workshop 2, May 2006Copyright© 2005 MSC.Software Corporation
Apply the boundary conditiona. Click Select
Application Region.b. For the Geometry
Filter select Geometry.
c. Select the curve filterd. Screen pick the left
edge as showne. Click Add.f. Click OK. g. Click Apply.
e
d
b
Step 4. Create Boundary Conditions
c
Screen pick this lower edgef
a
g

WS2-11NAS120, Workshop 2, May 2006Copyright© 2005 MSC.Software Corporation
Step 4. Create Boundary Conditions
Create another boundary condition
a. Loads/BCs: Create / Displacement / Nodal.
b. Enter right_end as the New Set Name.
c. Click Input Data.d. Enter < ,0, > for
Translations. e. Click OK.
d
e
b
a
c

WS2-12NAS120, Workshop 2, May 2006Copyright© 2005 MSC.Software Corporation
Apply the boundary conditiona. Click Select Application Region.b. For the Geometry Filter select
Geometry.c. Select the curve filterd. Screen pick the right edge as showne. Click Add.f. Click OK. g. Click Apply.
ed
b
Step 4. Create Boundary Conditions
c
Screen pick this edge
f
a
g

WS2-13NAS120, Workshop 2, May 2006Copyright© 2005 MSC.Software Corporation
Step 5. Apply Load
Create a loada. Loads/BCs: Create / Force
/ Nodal.b. Enter load as the New Set
Name.c. Click Input Data.d. Enter <0 -100 0> for Force. e. Click OK.
d
e
b
c
a

WS2-14NAS120, Workshop 2, May 2006Copyright© 2005 MSC.Software Corporation
Apply the loada. Click Select
Application Region.b. For the Geometry
Filter select FEM.c. Shift/pick the two
nodes as shownd. Click Add.e. Click OK. f. Click Apply.
e
d
b
Step 5. Apply Load
cScreen pick these nodes
a
f

WS2-15NAS120, Workshop 2, May 2006Copyright© 2005 MSC.Software Corporation
Step 6. Create Material Properties
Create an isotropic materiala. Materials: Create / Isotropic
/ Manual Input.b. Enter steel for the Material
Name.c. Click Input Properties.d. Enter 30e6 for the Elastic
Modulus.e. Enter 0.3 for the Poisson
Ratio.f. Click OK. g. Click Apply.
d
f
e
a
c
b
g

WS2-16NAS120, Workshop 2, May 2006Copyright© 2005 MSC.Software Corporation
Step 7. Create Physical Properties
Create physical propertiesa. Properties: Create / 3D /
Solidb. Enter solid_beam as the
Property Set Name.c. Click Input Properties.d. Click on the Select
Material Icon.e. Select steel as the material
property name.f. Click OK.
f
d
e
a
b
c

WS2-17NAS120, Workshop 2, May 2006Copyright© 2005 MSC.Software Corporation
Apply the physical propertiesa. Click in the Select
Members box.b. Screen pick the solidc. Click Add.d. Click Apply.
ac
d
Step 7. Create Physical Properties
b

WS2-18NAS120, Workshop 2, May 2006Copyright© 2005 MSC.Software Corporation
Step 8. Run Linear Static Analysis
Analyze the modela. Analysis: Analyze /
Entire Model / Full Run.
b. Click Solution Type.c. Choose Linear Static
as the Solution Type.d. Click OK.e. Click Apply.
c
d
a
b
e

WS2-19NAS120, Workshop 2, May 2006Copyright© 2005 MSC.Software Corporation
Step 9. View F06 File
Examine the .f06 filea. Open the file titled
inadequate_constraint.f06 with any text editor.
b. Examine the warning and fatal messages.
Why has the job failed?a. The warning message in the .f06 file lists T3 as the
problem degree of freedom.b. With constraints in the x-y plane only, the beam has a
rigid body motion in the z direction. Need to add a constraint in the z direction.

WS2-20NAS120, Workshop 2, May 2006Copyright© 2005 MSC.Software Corporation
Step 10. Add New Boundary Condition
Add a boundary conditiona. Loads/BCs: Create /
Displacement / Nodal.b. Enter z_constraint as the
New Set Name.c. Click Input Data.d. Enter < , ,0 > for
Translations. e. Click OK.
d
e
b
c
a

WS2-21NAS120, Workshop 2, May 2006Copyright© 2005 MSC.Software Corporation
Apply the boundary conditiona. Click Select Application
Region.b. For the Geometry Filter
select Geometry.c. Select the point filterd. Screen pick the left corner
as showne. Click Add.f. Click OK. g. Click Apply.
e
d
b
Step 10. Add New Boundary Condition
c
Screen pick this point
f
a
g

WS2-22NAS120, Workshop 2, May 2006Copyright© 2005 MSC.Software Corporation
Step 11. Re-run Linear Static Analysis
Analyze the modela. Analysis: Analyze /
Entire Model / Full Run.
b. Click Solution Type.c. Choose Linear Static
as the Solution Type.d. Click OK.e. Click Apply.
After the analysis is completed, view the .f06 file to make sure there is no warning or fatal error message.
c
d
a
b
e

WS2-23NAS120, Workshop 2, May 2006Copyright© 2005 MSC.Software Corporation
Step 12. Access the Results File
Access the results filea. Analysis: Access Results /
Attach XDB / Result Entities.b. Click Select Results File.c. Select the file
inadequate_constraint.xdbd. Click OK.e. Click Apply.
c
d
a
b
e

WS2-24NAS120, Workshop 2, May 2006Copyright© 2005 MSC.Software Corporation
Step 13. Plot the Results
Plot the resultsa. Results: Create / Quick Plotb. Select Stress Tensor for
fringe resultc. Select Displacement,
Translational for deformation result
d. Click Apply.
-- End of workshop --
a
b
c
d