naaya administrator's manual - europa · naaya administrator's manual ... ldap...
TRANSCRIPT

Revision 584 2010-10-13 Naaya administrator manual Page 1 of 60
Naaya administrator's manualNaaya toolkit for EnviroWindows
Prepared byMiruna Bădescu
October 2010Version 1.4
User guide

Version managementNo Date Changes Author1.0 10 Aug 2007 First version Miruna Bădescu1.1 15 Oct 2007 Users and security chapter added Miruna Badescu1.2 4 Jul 2008 Added explanations about the new HTML editor,
portal map and survey toolMiruna Badescu
1.3 3 Jun 2010 Updated versions – added updated information onthe HTML editor, added portlets chapter, photogallery chapter, consultation tools chapter,discussion forum chapter, helpdesk agent chapter;updated the survey chapter
Miruna Badescu
1.4 13 Oct 2010 Added paragraphs on portlets and made smallgrammar improvements
Andreea Teodorescu
Project manager: Paolo Meozzi, EEA
Revision 584 2010-10-13 Naaya administrator manual Page 2 of 60

Contents1. SETTING THE SCENE...................................................................................................................... 4
2. TERMS, ABBREVIATIONS AND ACRONYMS............................................................................ 4
3. NAAYA OVERVIEW.......................................................................................................................... 5
3.1. EXTENSIBILITY.....................................................................................................................................53.2. MODULARITY ......................................................................................................................................53.3. LEVELS OF ADMINISTRATION...................................................................................................................6
4. CONTENT MANAGEMENT............................................................................................................. 9
4.1. CONTENT TYPES...................................................................................................................................94.2. PUBLISHING WORKFLOW.......................................................................................................................214.3. FOLDER-LEVEL ..................................................................................................................................214.4. PORTAL ADMINISTRATION.....................................................................................................................26
5. TRANSLATE THE WEBSITE........................................................................................................ 29
5.1. THE LANGUAGE NEGOTIATION PROCESS..................................................................................................305.2. MULTILINGUAL CONTENT ....................................................................................................................305.3. MULTILINGUAL INTERFACE...................................................................................................................325.4. MULTILINGUAL SEARCHES....................................................................................................................345.5. MULTILINGUAL SYNDICATION...............................................................................................................34
6. CHANGE THE LAYOUT................................................................................................................. 35
6.1. PORTLETS ADMINISTRATION..................................................................................................................37
7. USERS AND SECURITY................................................................................................................. 39
8. DISCUSSION FORUM .................................................................................................................... 41
9. THE SURVEY TOOL....................................................................................................................... 42
9.2. TAKING THE SURVEY...........................................................................................................................479.3. ANALYSING THE RESULTS.....................................................................................................................47
10. CONSULTATION TOOLS............................................................................................................ 48
10.1. NAAYA CONSULTATION.....................................................................................................................4910.2. NAAYA TALKBACK CONSULTATION....................................................................................................51
11. PHOTO GALLERY........................................................................................................................ 53
12. HELPDESK AGENT....................................................................................................................... 56
12.1. ADMINISTRATION..............................................................................................................................5612.2. USAGE............................................................................................................................................58
13. REFERENCES................................................................................................................................. 59
Revision 584 2010-10-13 Naaya administrator manual Page 3 of 60

1. Setting the sceneThis document describes the content management and maintenance operations that anadministrator of a Naaya portal for EnviroWindows can perform.
Currently, all EnviroWindows portals are hosted on the EEA servers at:
● http://root.ew.eea.europa.eu
● http://root-destinet.ew.eea.europa.eu/
● http://root-smap.ew.eea.europa.eu/
● http://root-devel.ew.eea.europa.eu/
An application for creating a new portal on this same server can be made from theEnviroWindows website (http://www.ew.eea.europa.eu/applicants).
Alternatively, separate installations of the software can be done on different locations sinceZope (released under the Zope Public License http://www.zope.org/Resources/License), Naayaand its extension for EnviroWindows (released under the Mozilla Public Licensehttp://www.mozilla.org/MPL/) are all open source applications.
All Naaya source code can be found on the EEA source repositoryhttps://svn.eionet.europa.eu/repositories/Naaya/
Further details on Naaya installation issues do not fall into the subject of this guide, they areincluded in the Naaya installation instructions.
In the following, the assumption is that an EnviroWindows portal has been created and youadministrative rights on it.
2. Terms, abbreviations and acronyms
Term Definition
XML eXtensible Markup Language
CMS Content Management System
Zope An open source application server for building content management systems,intranets, portals, and custom applications
ZMI Zope Management Interface
PTK Portal ToolKit
Naaya A Python-based content management system that works under Zope
EnviroWindows EEA platform for knowledge sharing and development
EW EnviroWindows
TAL Template Active Language, a scripting language for Zope
Remote channel A summary of content published on the Web in XML format andupdated on regular basis. Often referred to as “feed”. Content availablein this format is parsed by websites, browsers and desktop applicationsand presented to visitors as listing of contained items (e.g. latest newsfrom related site). Usually, the presence of RSS/RDF/ATOM feeds issignalled on websites using icons such as or .
Portlet User interface components that are managed and displayed in a web portal.They produce fragments of markup code that are aggregated into a portal
Revision 584 2010-10-13 Naaya administrator manual Page 4 of 60

Term Definition
page, typically on the left or right sides of the page.
LDAP Lightweight Directory Access Protocol is an Internet protocol that email andother programs use to look up information from a server. Simplified, it can becompared with an address book.
3. Naaya overviewNaaya (http://naaya.eaudeweb.ro) is an open source portal toolkit with support for contentmanagement, multilinguality, syndication and friendly through-the-web site administration forwebmasters with all kinds of technical backgrounds.
Naaya portals target users are people that want to quickly start a website and reduce to aminimum the need to refer to technical system administrators for its update and maintenance.They can delegate authority for content management and local administration to a team of non-technical contributors.
Things like access statistics, mapping domain names to the portal, running jobs at regularintervals, updating the software on the file system or installing new modules still requiretechnical intervention, but these are not daily tasks and are usually taken care of by the networkadministrators.
3.1. Extensibility
This platform has been built in a flexible way, which allows:
● adding other components from the Zope open source community,
● replacing various modules to fit custom needs or
● enhancing existing components to comply with emerging Web standards or respond enduser demands.
So, if you are working on a Naaya portal and need a functionality which is not included in thestandard package, it is very likely that somebody has already written an open source componentfor it (e.g. a blog product, integration with external databases); if this is not the case, anadditional component can be developed and added to Naaya.
In comparison with other similar systems such as Plone, plugging generic components orintegrating existing ones is quite straight forward and does not require extensive knowledge ofthe Naaya design and architecture.
Components such as the Yahoo-based maps were re-used in the EEA's website (which is built inPlone) after their initial implementation in Naaya. Reusing open source components from onesystem to another leads to low development costs when it comes to new functionality and allowsthe portals who use them to stay updated with modern technology and standards.
3.2. Modularity
Naaya has been built over the years, following the user requirements gathered from severalcommunities, but its features prove to be quite typical for most modern portals. Since variousnetworks of portals as well as stand-alone applications are powered by Naaya, it is bound tocontain very specific functionalities at some point.
That is why Naaya portals are based on a core set of generic modules to which a customcomponent can be added, in order to overwrite some functionality or add features only requiredin that context. EnviroWindows is one of this cases.
Revision 584 2010-10-13 Naaya administrator manual Page 5 of 60

A special advantage is that, after creating multiple portals on the same Zope server, one canindividually customise each portal. Among others the layout, the wording on the forms, theportlets, etc. can differ. New functions can also be written for each portal.
3.3. Levels of administration
The administration and maintenance of Naaya websites can be done from the ZMI (ZopeManagement Interface) by users having the Manager role in the portal. However, thismanagement console is meant to be used by people with technical backgrounds and with acertain level of Zope knowledge.
Therefore, an Administration area is provided to facilitate users with the role of Administratorto make basic maintenance operations and customisations of their portal. Administrators areintended to be users with full decisional rights over the content and presentation of the portal,but not necessarily technical people.
The rights granted to an Administrator are included in the ones granted to a Manager so, when aperson has the Manager role, there is no need for him or her to also have an Administrators role.
You can reach the Administration area by selecting the Admin option from the top services linkslist after logging in with the proper rights. In here, all functionalities are listed in the right-sideAdministration portlet.
Revision 584 2010-10-13 Naaya administrator manual Page 6 of 60
Figure 1: Naaya - plug and play components

Basically, all operations available from this administration centre are presented inside portalpages and therefore are easier to use because the sense of navigation in the website ismaintained. Moreover, each page contains explanatory texts to guide users in executing theoperations and help them understand the impact each operation will have to the portal.
On the other hand, the ZMI offers a much wider range of functions, such as undo operations,database (ZODB) management, refined modifications to each Zope object, languagemanagement, administration of glossaries and thesauri, etc. For a basic understanding of Zope’smechanisms and of the ZMI operations, read the online documentation athttp://www.zope.org/Documentation/. The Naaya-related objects and operations that can beperformed from the ZMI will be partially explained in this guide.
If you are logged into the system as a portal manager, you can reach the ZMI by typing the siteURL followed by “/manage” in a browser:
http://<portal_url>/manage
Revision 584 2010-10-13 Naaya administrator manual Page 7 of 60
Figure 2: Portal administration centre

Aside from the portal-level administration, a folder-level one is available for localAdministrators, in order to be able to;
manage content in that folder and below in the hierarchy (sub-folders)
manage the right-side portlets displayed here
manage users
potentially add a custom logo to be displayed in the right side of this folder and it’s sub-folders
customize the site’s feedback form
Since the policy is for the portal administrator to fully delegateauthority to local administrators, it is possible to allow visitors thatnavigate in these folders to send a feedback through the site’sfeedback form either to the site administrator’s or to the localadministrator.
Whenever a local administrator will log in and navigate to the folderhe is granted this privilege for, he will see the right-side portletcalled “Folder administration” that contains links to thefunctionalities described above.
Further in this document, all sections that are addressed to the Managers will be marked with thefollowing formatting:
Example text for the Managers
Revision 584 2010-10-13 Naaya administrator manual Page 8 of 60
Figure 4: Folder admin
Figure 3: Zope Management Interface

4. Content managementBefore explaining the operations that can be done upon the content, let's take a look at thecontent types available by default in EnviroWindows portals. As explained before, new typescan be created and added as needed.
4.1. Content types
When you have a piece of information that you want to see published in the portal, the first stepis to decide what type of content would better accommodate it. It is important to put the data inthe right format because each type has a different set of attributes which can later be used tocorrectly index and categorise it.
All types have a common set of attributes that generically describe resources. They are calledmetadata. Since fully defining a resource implies generically describing it and also describingits custom characteristics, all Naaya content types have:
● a common set of properties (e.g. title, description, release date, contributor);
● a custom set of properties (e.g. location for events, expiration date for news);
● a dynamic set of properties, which are are only relevant for one website and are definedby Managers for each portal, individually (e,g, CV for experts).
Since multiple Naaya portals can reside together on the same Zope server, dynamic propertiesof objects allow fulfilling the needs of each portal without impacting on the genericness of thesoftware product.
Managers need to enter the ZMI -> portal_dynamicproperties -> add “NaayaDynamic properties item” for the content type they want to add properties to -> anddefine each additional property here.
Upon adding a dynamic property to a type of objects, it is immediately added to allexisting objects with the predefined value you specify. New objects added from thatpoint on will also have that property. Moreover, the submission and editing forms forthose objects will automatically contain that field.
As you can see in the screen shot below, it is possible to choose the type, apredefined value, predefined list of choices, etc.
Revision 584 2010-10-13 Naaya administrator manual Page 9 of 60

4.1.1. Folder
Folders are containers of information, similar to the ones from the operating systems. They alsohave metadata attached, in order to help describe and the index the data inside them.
Throughout this user guide, folders will be also referred to as sections.
4.1.2. HTML document
Use this type to build a generic Web page. A friendly editor will help compose the pages,without you having to actually write HTML code.
4.1.2.1. The HTML editorHere's a list of operations that can be performed using this interface:
●
choose the formatting of the selected text using theexisting, predefined tags:
● paragraphs (usually contains an idea, separatedvisually by a space before and after it)
● div (rectangular box containing text and images)
● headings (each page must contain one and onlyone heading 1, which is the title of the page, putautomatically by the application. Therefore, youcan choose between headings 2 to 6.
● blockquote (a block of text containing a quotationof somebody's words)
Revision 584 2010-10-13 Naaya administrator manual Page 10 of 60
Figure 5: Define dynamic properties for objects

● choose the text appearance and size from the givenlists. Note: by default, the appearance and size of the fonts are the ones defined in the portallayout and are the same throughout the entire portal for each element. This gives portalvisitors a sense of consistency. Changing these attributes of the text should be donerarely and for good reason. Remember that writing for the Web is not the same aswriting for print and that different users have different means to see the web page(different screen resolutions, mobile phones, smaller monitors, speech interpreters, etc.),so the pages must scale nicely and be accessible to everybody.
● select the text and make it bold, italic, underlined or strike through
● align the text to the left, middle or right sides of the page
● make ordered and unordered lists
● align text more to the left, middle or right sides of the page; the last
option allows you to justify the text, meaning stretch it until the end of the available area
● insert/edit anchor, insert/edit link and remove link buttons. Anchors are points in that same page (usually sub-headings) to which visitors can jumpfor easy navigation (e.g. “Top of the page” or “Next chapter”). They are used in longpages, to avoid the need to scroll. The insert/edit anchor window allows you to enter thename of the anchor. Remember the anchor name needs to be unique inside a page. For the links insertion or editing you must first select the text you want to appear in thelink or that you want to unlink. The link button opens a window that allows inserting thedesired URL and a title for it, but also select an internal link from the sitemap:
Revision 584 2010-10-13 Naaya administrator manual Page 11 of 60

● insert tables and customise theirappearance. First click the “Insert a new table” button (first in the list) and choose itsvarious generic settings:
After the table appears in the area you are editing, the rest of the table-related buttonswill be enabled. When you move away from the table, those buttons will be disabledagain. Clicking inside an existing table will re-enable these buttons.
You can:
○ set the table row and cell properties
○ insert a row before or after another
○ delete a row
○ insert a column before and after another
○ delete a column
○ split columns
○ merge columns
● insert horizontal rule in the current location
● removes formatting from the selection; especially useful when pasting text fromanother source, such as MS Word or another Web page, and you want to remove thedifferent styles copied from the other application. However, this button is not able toremove all formatting, especially not from the Microsoft applications which have theirown embedded styles. For a complete removal, use the “Paste as Plain Text” button (seebelow).
● makes the selection to be subscript or superscript
● the “Paste as Plain Text” and “Paste from Word” buttons are meant to removethe “bad” code copied along with the text. Pasting text copied from other applicationswithout removing the initial formatting has the following downsizes:
○ the text might not maintain the level of accessibility provided by Naaya applications.By accessibility it is understood the possibility for users with different browsers,types of devices, operating systems, different internet connections and so on.
Revision 584 2010-10-13 Naaya administrator manual Page 12 of 60

○ the pasted styles might not match the ones used in the current site
○ the result of mixing the original styles with the local ones can create unexpectedresults
Both these options open a small pop-up window that allow you to paste the text andclick “Insert”. The system will then do the necessary cleaning of the code. The first oneis the safest as it removes ALL styles and formatting, while the latter only removes apart of them and preserves things like alignments, paragraphs and colours.
● change the font colour for the current selection
● change the background colour of the current selection
● inserts or displays an image. For a new image, just click on this button from afteryou ave positioned yourself in the desired position in the text. In order to change thesettings of existing images, first click on the image to select it and then click on thisbutton.
This button opens a pop-up window that allows you to specify the URL of an image. Ifthe image is located outside your website, just put the external URL. If the image needsto be uploaded from the local computer, use the Computer tab to upload it and then clickon it from the list below. If the image is or should be local, then you can push the littlebutton next to the “Image URL” field, Browse:
When you select the Browse tab, a list with all available picture albums will bedisplayed. You can select an album, and you will be shown all the pictures inside thatalbum. Select a picture, click on it and you will have it available in all sizes. You willthen select the required picture size, by clicking on the “Save size” button.
Once you've made your image and image size selection, you can proceed to thefollowing step, which is defining the customize attributes, and fitting the image in thetext.
Revision 584 2010-10-13 Naaya administrator manual Page 13 of 60

You need to provide an alternative description of that image in order to make its contentaccessible to people with disabilities. The image description is also for the betterindexing of your portal pages. It results in better searches when using the internal searchmechanism or in external engines such as Google.
The final step is to prepare the image, by setting its title, alignment (left, right,baseline,bottom, middle, etc.), dimensions, vertical and horizontal space, borders, andinsert it, as in the figure below:
● the preview button lets you know how your text is going to look like
● the “Clean up messy code” removes unwanted formatting
● the HTML button displays the HTML code and lets users with technical backgroundwrite more complex code.
Please note that the editor removes potentially unsafe code so, if you know what you aredoing and want to write some code which is not allowed by the editor for some reason,just disable the Javascript in your browser for a while. Follow these steps to do so for IE:
○ Tools > Internet Options > Security > Custom Level
○ Scroll down to Scripting and disable Active Scripting
○ Click on the OK button
○ Answer "yes" to: "Are you sure you want to change the setting for this zone?"
○ After this refresh the portal properties page
○ The editor icons will no longer be visible.
○ You can then paste your HTML code in the corresponding field (e.g. Description),which is now a simple text area without the editor
To use the Naaya editor again, re-enable Active Scripting.
Revision 584 2010-10-13 Naaya administrator manual Page 14 of 60

● the Help button displays online instructions and good practices on using this editor
● the full screen button which allows expanding the editing area on the entire screen.The same button will be than available to shrink back the writing area to the original
size. The editor text area is however expandable by dragging the lower right corner until the text area reached the desired dimensions.
You'll notice the description fields of all objects also allow inputting HTML content. Wheneveran object is viewed by portal visitors, the description is shown right after the title, so peopletend to use a lot of formatting to emphasis certain ideas and to make the paragraphs look nicelyin the browser page.
4.1.3. File
A standard file, briefly described by its metadata. Visitors can download it on their computers orview it inside the browser - proving the right plug-in is installed. The file types areautomatically recognised by the system in most cases and the corresponding icon appears nextto them.
It is possible to keep old versions of Naaya files for user consultation by selecting thecorresponding check-box in the file edit form, as shown in the figure below:
If the file already exists somewhere on the web, you don't have to first download it on yourmachine and then upload it on the EnviroWindows portal, but just use the URL option from thefile upload part of the add or edit form.
4.1.4. Extended file (multilingual)
The difference from the usual Naaya file is that different files can be stored for differentlanguages. For instance, say you want to offer a PDF file for download in all portal languages.You will then use the Naaya Extended File and when translating the metadata (title, description,etc.) in the available languages, you need to also upload a different PDF file for each language.
This way, users will be able to read the entire document in the language of their navigation, notjust its metadata.
4.1.5. Media file
When the need to display films, presentations, audio tracks or other multimedia materials insidethe portal pages presents itself, you can use this content type to upload the film file in anyformat.
The film will be converted by the system in Flash format (.flv) at upload time and displayed tovisitors in an embedded Flash player. The significant advantage of using Flash against other
Revision 584 2010-10-13 Naaya administrator manual Page 15 of 60
Figure 6: File edit form - upload file part

browser plug-ins (e.g. Windows Media Player, QuickTime Player, etc.) is platformindependence, along with removing the need for user to download the file on their computerprior to viewing it.
See a live demonstration of the Naaya Media File at http://test-chm.eea.europa.eu/naaya-objects-demonstration/film-published-eea-site-introduction-film-our
The Naaya Media File also allows inserting subtitles in .srt for each portal language by editingthe item and uploading the .srt file or pasting its text inside the corresponding text area.
The Naaya Media File displays the HTML code to use in a different page in order to have theFlash film played on that site. Using this code, you can publish several Naaya Media Files inyour site and then gather the code from each for creating portlets, composing on-linepresentations or tutorials, present the speakers in a conference, etc.
A good practice for the usage of online videos was done by the Integrated Assessment website, with aseries of presentations that constitute a frequently asked questions system:http://ia.ew.eea.europa.eu/QAvideos
Revision 584 2010-10-13 Naaya administrator manual Page 16 of 60
Figure 7: Media file on DestiNet

The Flash film of a Naaya Media File can also be downloaded on the local computer by clickingon the “Download” link under the film.
4.1.6. News
The news item is a short piece of information with a limited duration of life. Traditionally, newshave an expiration date which allows the latest ones to be displayed automatically on the frontpage and still not have outdated content there.
It is very simple to display news from remote sources of information in the portal pages and alsoto allow other websites to pick up the latest news from Naaya portals.
The news, events and stories submission is usually left opened to the public or at least for theusers with no roles in the portal. This is useful when the community of contributors of your siteis small and public contributions comes handy to keep the site live. Therefore, the submissionforms for these content types contain a word verification field, which ensures the system that thesubmitter is a person and not a malicious script:
Revision 584 2010-10-13 Naaya administrator manual Page 17 of 60
Figure 8: Question and Answers videos on the IA portal
Figure 9: Word verification mechanism in the newssubmission

You can add a small picture and a big picture in a news item. The small picture appears rightafter the title, when the news is displayed. A bigger picture can be only added when editing thenews, in which case the small picture links to the big picture. This is useful in case you want tooffer your visitors a high resolution version of an image, but that is too big to publish directly onthe news page.
4.1.7. Event
Stores information about an event, a meeting, a conference, etc.
The types of events available are configurable byAdministrators
at portal level from the administration area -> “Selection lists”page -> “Event types” list.
Like the news, the events are also syndicated by default andthey can be shown under the form of an events calendar. TheRDF calendar is able to display events from various sources of information, including the localportal.
A Naaya calendar is also available in the portal. The main difference from the RDF calendar isthat this one only exposes the events published in the local website, and that it shows all events,even the ones that took place a long time ago. Usually website administrators decide to onlyprovide upcoming events in their events channel so the RDF calendar might only show futureevents.
4.1.8. Story
The story is somewhat similar to the news, but with an unlimited duration of relevancy. Storiescan contain a longer body, have pictures inserted in it and a small image to be displayed on thefront page if necessary.
4.1.9. URL
URL objects contain links to remote pages. They are easy to check at regular intervals using anautomatic link checkers and can be described by the metadata.
A special importance is placed on the links management, since they are frequent content types.Therefore, in the administrative area it is available the Link checker, which presents the log ofthe last run of the automatic link checker and allows you to manually run the check and displayresults in that very moment. To be noted that the automatic link checker does not only look forbroken links found on URL objects, but it is configured to also look for them in the events, newsand stories. Managers can further configure it to check any other content types: folders, HTMLdocuments, etc. The links verified are both internal and remote.
4.1.10. Pointer
Pointers are links to internal portal pages. When adding a pointer, a sitemap is displayed to pickfrom.
Since content can be moved, renamed or simply deleted, internal links may become broken intime. Broken pointers can be easily spotted by Administrators using the link checker.
Revision 584 2010-10-13 Naaya administrator manual Page 18 of 60
Figure 10: RDF calendar

4.1.11. Expert
Data about a person that has expertise in the area of activity of the portal. The person's domainof expertise is added from a list configured at portal level.
4.1.12. Project
Data about a project that covers the area of interest of the portal. The focuses of the projectcome from a list defined at portal level.
4.1.13. Contact
Holds data about a person's credentials and contact details.
4.1.14. Geo Point
This content type stores data about certain locations, which are then shown on an interactivemap. Based on the address, the system is sometimes able to retrieve the geographicalcoordinates of that location. All Geo Points published in the portal will be displayed on the mapaccording to their type. The possible operations on the map are: zoom, pan, changebackgrounds, identify points.
The types of location are defined in the administration area for each portal. It is possible to filterthe points shown on the map from the right-side “Filter locations” box.
Each location type has an image associated with it, usually a pin that will allow you to identifythe point on the map. When clicking on a pin, a small window appears, containing the title ofthe Geo Point and the “see more” link, that leads to the Geo Point index.
Revision 584 2010-10-13 Naaya administrator manual Page 19 of 60
Figure 11: The portal map on the DestiNet portal

The Geo Point page (index) also displays a small map with just that particular point and thenearby area. The zoom level of this small map is set by Administrators at the administrationarea.
A map is available on each Naaya portal at the address:
<portal_url>/portal_map
Additionally on the map page, an export of the selected points is available in Google Earth,provided that you have this application installed on your computer. This has the advantage thatyou can download these points as a layer and place them on top of other layers that you mighthave.
On browsers on which Javascript is not enabled, a tabular listing of the Geo Points is displayed,along with the button to export the in Google Earth. Therefore, these points remain accessible topeople with various disabilities.
Revision 584 2010-10-13 Naaya administrator manual Page 20 of 60
Figure 12: Clicking on a Geo Point on the map
Figure 13: Index of a Geo Point

4.2. Publishing workflow
The (default) publishing workflow of the Naaya websites allows a contributor to submit thecontent (news item, HTML page, expert data, etc.) and an administrator (or, of course, manager)to review and approve/delete it. Before an administrator’s approval, that content is available inthe portal but not visible to regular visitors. For obvious reasons, content posted directly byadministrators is immediately published in the portal.
This way, the administrators can appoint a few persons to gather and post content and still havethe final decision on what is actually published on their portal with minimum effort. If the‘Maintainer email” property for the a folder is filled in with the administrator’s email, he/shereceives a notification each time a piece of content is submitted in the portal. Multiple addressescan be specified here separated by commas.
Then, they access the corresponding “Basket of approvals” form which lists the pendingcontent, allows its viewing and editing and gives administrators the possibility to approve(publish) or delete each content item by just clicking on the corresponding checkbox.
The full publishing workflow of Naaya portals and the actors involved in it are described by thepicture below:
4.3. Folder-level
All content is published in folders across the portals, so most of the content managementfacilities are available from each folder when logged on with a user that has proper rights (seesection “Users and security” for more details).
The full set of possible operations is:
● edit folder properties including its metadata, maintainers emails, allowing userregistrations, etc - “Edit Folder” button;
● define new objects available for that specific folder pushing the “Subobjects” button;
● publish pending items or revoke publishing status from the basket of approvals -“Approvals” button;
Revision 584 2010-10-13 Naaya administrator manual Page 21 of 60
Figure 14: Complete publishing workflow in Naaya

● setting the sort order of contained items (by default the items are sorted alphabeticallyby title) - “Sort order” button;
● restricting the folder from public view and granting access only to users with a certainrole - “Restrict” button;
● CSV import, which allows importing objects from CSV files, following three easy steps:selecting object type, downloading the CSV template for that object type and filling outthe rows, and finally uploading the CSV file; please note that the CSV file should beUTF-8 encoded;
● Zip import, which allows importing a ZIP file, in which case a folder will be createdfrom the archive name and the contents of the archive will be represented as File andFolder objects in the newly created folder;
● cut/copy/paste objects from one folder to another (you need to make sure that you stillhave contribution rights in the target folder and that the target folder allows adding thecopies/moved content types as sub-objects);
● renaming objects which means changing their ids, which implies changing the URL theycan be accessed through;
● delete one or more contained items;
● submit items of the types which are listed in the “Type to add” selection box;
● edit or work on a version for each contained item;
● bulk download, which allows downloading selected files in a ZIP archive to a computer.
4.3.1. Local folder administration portlet
Aside from the content management operations, administrators can do more also at folder level:
● assign a logo which will be displayed on that folder and all its sub-folders;
● see the hierarchical basket of approvals (all pending content from that folder and its sub-folders);
● manage users at that level (grant/revoke local roles);
● display right-side portlets on that folder index;
● customise the feedback form at that level: when end users navigate through the contentfrom that folder and click the “Feedback” link in order to contact the webmaster for
Revision 584 2010-10-13 Naaya administrator manual Page 22 of 60
Figure 15: Folder view for administrators

questions and comments, they see a customised feedback form that goes to the localfolder administrator and not at the site administrator.
All this functionality is also present in the administration area for the entire portal. The folderadministration portlet offers quick links for administrators, but they are especially useful forlocal administration (users that have the Administrator role granted only for a folder, not for theentire site).
Therefore, it becomes easy for the webmaster of a Naaya portal to delegate authority for contentmanagement and site management onto trusted users, in the sections (folders) where their areaof expertise is significant. The local administrators at their turn can do the same.
4.3.2. Default view and custom index
Naaya folders are shown to visitors as a listing of contained objects:
The sub-folders are listed first, then the rest of the objects. Authenticated users with contentmanagement rights see more toolbars and links to functionality that they can access.
If you want to add introductory text before the actual listing, edit the folder and fill in itsdescription. Chances are that you sometimes need another display for a folder: e.g. a customsearch interface, showing graphs and charts.
In these cases, a Manager can enter the ZMI for that folder, access the “Properties” tab andcheck the “Use/create public interface” option. Now, a Page Template called “index” willappear in the folder content just in the ZMI, not on the public interface.
It contains a copy of the folder index page written in TAL (Zope's Template Active Language).Managers that have the necessary programming knowledge can modify it to define customviews.
In this manual, the default display of a folder or another object will be also referred to as index.
Only indexes of folders can be customised for a particular item since the need for other types ofcontent to have individually different displays did not come up amongst our users.
Revision 584 2010-10-13 Naaya administrator manual Page 23 of 60
Figure 16:: Default display of a Naaya folder

In any case, the forms that define how each object is seen by visitors are available to Managersfrom the ZMI -> portal_forms, under self-explanatory names, such as folder_index, file_index,news_index, etc. Managers can also find here the add and edit forms for all objects in case theywant to change something inside. All forms are written in Zope's scripting languages for theinterface TAL and METAL.
4.3.3. Working on versions (check-in/check-out)
Sometimes, there is need to work a longer time on a content item and save temporary versionseach time you complete a part of it. However, you don't want site visitors to see intermediaryunfinished versions of that text because it could be misleading or even incorrect.
There is a simple way to do that for Naaya objects – start a version of the document. When younavigate in a folder, you'll see a small image (a key with an arrow on top of it pointing right)next to each item that allows versioning.
This link is also provided when entering the object itself under the name “Checkout”. Uponclicking on this image/button, the item is reserved for your user to work on (having multipleusers work on the same content in the same time leads to overwriting work). No one can nowdirectly edit the item, just you can continue working on that version. Now the object looks likethis:
and the editing on a version form looks exactly like the usual editing one, aside from two extrabuttons that permit to “Commit” or “Discard” the changes.
After multiple saving of changes (which are not visible to end users), the content managercommits (puts this version online) or discards (all the changes made since the version wasopened are lost), allowing the item to be edited again.
Revision 584 2010-10-13 Naaya administrator manual Page 24 of 60
Figure 17:: Inside a folder, "checkout" button for each item
Figure 18: Inside a folder, "version control" button for checked-out items
Figure 19: Edit project on a version

As a safety measure, the administration form called “Version control” lists all items from theportal that have opened versions along with the user that opened them and allows administratorsto discard changes that are not made by them (assuring that the content remains manageableafter, for instance, someone resigns).
4.3.4. Comments to content
It is possible to open each piece of content for discussions by checking the “Open forcomments” property when editing an item. Subsequently, a button saying “Login to addcomments” or “Add comments” will appear to end users when they access that particular item ofcontent.
By default, all visitors that have logged in the portal, regardless whether they have any roles ornot, can post comments on items opened for discussions. The comments are shown in the orderof their posting. When commenting, it is not possible to respond to a certain posting other thatmentioning this in the text.
Administrators see a “Delete comment” button for each posting and, since the user name isdisplayed for each comment, they can take action (e.g. delete user) in case unwanted commentsare posted.
4.3.5. Glossaries as picklists for metadata
The geographical coverage and keywords are part of the common metadata for all Naayaobjects - they are actually Dublin Core (http://dublincore.org) elements. There is an importantadded value from properly indexing the portal content with terms taken from controlledvocabularies, glossaries or thesauri.
Mainly, it leads to better search results from external search engines and the possibility to buildguided searches in the portal, where people would be able to pick the search terms from thesame glossary or thesaurus used to index the data.
Therefore, administrators can decide to allow content contributors pick from glossary wordswhen filling the geographical coverage and keywords fields for each item. It can beaccomplished by accessing the Administrative area -> Portal properties -> Glossaries tab. Inthis form, choose a value from the “Keywords glossary” and/or “Geographical coverageglossary”.
You'll be given the possibility to choose among the glossaries available in your portal.
By default, no glossary is available in EnviroWindows portals, but Naaya has support formultilingual glossaries and thesauri as separate products and one can be easily created and filledin with data for you by Managers.
4.3.6. Allow user registration
Each folder can have a link in the bottom of the page that only appears to visitors that have notlogged in (yet). It leads to a form of registration and asking for contribution rights in that part ofthe portal or on the entire portals.
The result is that an email goes to the administrator(s) with that request. The administrator cansimply access the User management form and grant the appropriate role to the user, if needed.In any event, the user object is created upon submission of such request, even if no role isgranted to it.
The fact that this link appears in the bottom of some folders is decided by the checking of thefolder-level property “Allow users enrolment here?”.
Revision 584 2010-10-13 Naaya administrator manual Page 25 of 60

4.3.7. Sub-objects
The list of object types you can add in a folder can be seen in the “Submit” selection box.
There is a default set of Naaya objects that can be added in folders, established at portal level(ZMI -> portal_properties -> Subobjects tab).
So, when creating a new folder, content managers will be able to add those kinds of objects. It isalso possible to change the sub-objects for each individual folders, also by accessing the ZMI forthat folder (after the folder's URL type /manage) and from here clicking on the Subobjects tab.
When changing this list at portal level, only new folders created from that point on will havethose setting, they would not be applied on existing folders – it would be rather difficult tomake automatic decisions on folders that might have custom lists. If you want to take out or addsome content type throughout the portal, a Manager would have to create a Python script thatdoes that.
4.4. Portal administration
The portal administration area contains a set of forms for:
● setting various portal-level properties such as:
○ metadata – site title and subtitle, description (which appears on the front page of theportal), publisher, contributor, creator, rights
○ the two upper logos – for the left and right site of the top banner
○ email settings – containing the mail server used to send mails, the address fromwhich the mails are sent, the list of emails of people that want to receive uploadnotifications and notifications on errors
○ keywords glossary – the glossary of terms used to index the content by filling in thekeywords property of each item.
○ geographical coverage glossary – the possibility to pick a glossary containing thegeographical regions and countries, used to fill in the “geographical coverage”property of each item. No glossary is available by default for EW sites, but a Naaya Glossary can beinstalled and filled in by Managers, if necessary
○ various other properties relevant for the entire portal:
■ Show release date – this option allows leaving aside the release date fromportlets containing the latest news or latest updates, which is useful when thecontent is rather old
■ Rename objects' ids – shows the possibility to change the ids of folders' sub-objects
Revision 584 2010-10-13 Naaya administrator manual Page 26 of 60
Figure 20: Submit content in folders

■ Network registry – if you decide to make use of a network registry and declarethe other members of your network, specify its URL address here. The NetworkRegistry is used in searches across multiple websites and for storing the list offeeds (local channels) exposed by each participant portal
■ Portal URL – the URL your portal is mapped to. Even though your portal mightrespond to multiple URL addresses, this one should be the official one, used tosend notification emails and for the information of system administrators. Beforeyour portal is launched, this property should be empty
■ HTTP Proxy – if your portal is behind a proxy server, its address needs to bementioned here. Ask your system administrators for details
■ RDF maximum number of items – the maximum number of items to include inthe local feeds. If you don't put a limit for it (aka provide the value 0), channelssuch as “latest news” can contain a large number of items and therefore burdenthe server each time they are read by remote websites.
■ Allow switching language for content? - check this item if your portal has morethan one language and you have wrongly published items in one language, whenyou meant to mark them in another. If checked, this option will appear in the editforms for each item
■ Display contributor name in content indexes – when enabled, the index of allcontent types will show the name of the contributor who uploaded it.
■ Show how many objects are in a folder – when enabled, the folder index willshow how many objects (sub-folders, sub-objects) are in each listed folder.
● layout customisation which allows choosing from the existing the existing layouts andcolour schemes;
● users' management - allow managing users and their roles from one or multiple userrepositories;
● translation centre for the messages across the portal, with the possibility to individuallytranslate items or import/export all the translation in CSV, XLIFF and PO formats;
● managing the lists of links that appear:
○ in the header and footer of each page
○ in “list of links” portlets
● selection lists – which appear when adding/editing content types (e.g. when adding anevent, there is a choice asking for the type of event; these choices can be set in thecorresponding selection list)
● the listing of all portal contacts (content type that stores information about a person),allows import/export of contacts in vCard or CSV formats, and allows sending emails toall of portal contacts
● the possibility to send bulk mail to all users that have been granted a role in the portal(easily accessible in three steps – first, choosing the portal role you want to send amessage to - for example, administrators; second step, selecting the person(s) from theportal role list exposed, and then, composing a message to be sent to the person(s)selected)
● Manage Notifications to which users have subscribed, be they instant, daily, weekly ormonthly digest
Revision 584 2010-10-13 Naaya administrator manual Page 27 of 60

● map management:
○ the “General settings” allow specifying:
■ Yahoo Maps API Key or Google Maps API Key – obtained freely from Yahoo orGoogle; there is also the possibility to set the map engine to Bing maps
■ Center location – the initial centre of the map, which can be a country or alocality
■ Center zoom – the initial level of zoom of the map, from 1 to 17, 1 being themost zoomed and 17 displaying the entire planet
■ Map height – the dimension in pixels you want your map to be appear on thescreen
■ Detailed zoom – the level of zoom for the small map that appears on each GeoPoint
■ Detailed map width and height – the dimensions in pixels for the small map thatappears on each geo-tagged object
■ Choose possible and default map types – limit the background choices from theavailable list
■ The possibility to embed the map in another website
○ Location types allows managing the types of locations which can be added for geo-taggable objects and their icons; the icons will be used when locations are shown onthe map
○ Bulk upload locations using a CSV template, in which case the system will createone Geo Point for each record inside the comma separated values file andautomatically try to find their coordinates based on the addresses provided
○ Manage locations that lists all the geo-tagged objects found in the system, theircoordinates and addresses, with the possibility to edit or delete them
○ Duplicate locations form that individuates possible duplicates based on the title,address or coordinates. It is then the Administrator's choice to remove some of them
○ Objects with no coordinates form which lists the locations that don't havecoordinates.
● content management:
○ content type management, which allows configuring properties of all types ofobjects, as well as choosing which content types are geo-taggable.
○ overall basket of approvals, which lists the portal folders that contain pending items
○ version control that displays a list of all objects checked in for editing by varioususers
○ management of the main sections that are listed on the top bar of the layout, but canbe also listed on the portal left side as a portlet
○ link checker which displays a log of the automatic or manual verification of all links(local or remote) found inside the portal content. For each possibly broken link, thelog shows:
■ the item that link was contained by
■ the error encountered
Revision 584 2010-10-13 Naaya administrator manual Page 28 of 60

■ the property of the object where the link appeared and
■ a link to the edit form of the item, so Administrators can correct the error ifnecessary
● syndication - allows defining and managing local and remote channels in Atom, RDFformats;
○ also makes possible setting up the “Portals in your network” list of remote websitethat can be used to set up a search across multiple portals.
Note: portals must implement and expose via XML-RPC similar functions tobe possible to be added to the list
○ also lists the remote channels aggregators that can be defined by the portaladministrator, which are collections of remote channels that contain all the data fromthe channels defined in the Remote channels section.
● portlets - define, edit or delete them and arrange existing portlets around the pages
5. Translate the websiteNaaya portals are multilingual in terms of interface, content, search and syndication. Initially,the only available languages is English.
Managers can easily define additional languages in which the portal can betranslated by using the Zope Management Interface. Add/remove languagesoperations can be done by accessing the Languages tab of the portal_propertiesobject from the root of each Naaya portal;
Revision 584 2010-10-13 Naaya administrator manual Page 29 of 60
Figure 21: Administration area, portal properties, metadata editing

Also from here, the default language of the portal can be set. Once a language isadded or deleted, this is immediately reflected around the portal interface andcontent.
All Naaya portal pages are encoded in UTF-8(Unicode) which means that all characters andsigns from any language are supported.
5.1. The language negotiation process
Here's the full language negotiation process:
1. Navigation language (end user selection)
2. Preferred local language (client’s browser or operating system)
3. Default portal language
When an end user opens a page from this portal for the first time, a localization process takesplace and the Navigation language is set. If any match is found between the list of availablelanguages for the portal and the languages in the browsers preferences, that language is set forthe navigation language by default. If more language matches are found, then the first one in thesettings of the browser takes precedence.
The end user can manually select the navigation language at any time and from any portal pagefrom the list of available languages. This will overwrite all other settings done automatically bythe system:
5.2. Multilingual content
All types of content from the portal can be translated in each available language. An item can beadded in just one language, which is the content contributor's choice (Posting language field oneach submission form):
Revision 584 2010-10-13 Naaya administrator manual Page 30 of 60
Figure 23: Change languages selection box
Figure 22: Languages tab from portal_properties (ZMI)

After that, the item can be edited in order to be translated. On the editing form of each item, the“Translate in” banner appears in the bottom of the page and it contains the available languagesas buttons, as shown in the figure below:
Here is what happens when a piece of content (a folder, a file, a news item, etc.) is not translatedin a certain language:
● first of all, the system searches for the translation in the portal default language (in thiscase English) and displays this one if available
● then, the system looks for a translation in the preferred local language (client’s browseror operating system) and displays this one if available
● finally, the system displays the item’s ID
This approach allows users to see that content exists in the portal and, even if they don’tunderstand the language that item is displayed in (because it hasn’t been translated in the chosenlanguage) or just ID is shown, at least they know that additional data is available and, uponincreased interest, they can ask someone to translate the content or they can write to thewebmaster and ask for the translation.
Let's take the example of a portal being available in English and Romanian and the defaultlanguage of the portal is English. If the local settings of my computer are Romanian (forinstance the preferred browser language is Romanian or the entire system is installed inRomanian), the selected language will be automatically Romanian.
In this case, the content will be displayed as follows:
● if there is a translation in both English and Romanian of that item, I would be seeing theRomanian one
● if there is a translation just in English, but not also in Romanian, I would see theEnglish version (because English is the default language)
● if only the Romanian translation is available (aka the item was added in Romanian andnever translated in English), I would, of course, see the Romanian translations
What if my computer does not have Romanian as an alternative language? Here's what happens:
Revision 584 2010-10-13 Naaya administrator manual Page 31 of 60
Figure 25: Translate content toolbar
Figure 24: Add form for folders

● if there is a translation in both English and Romanian of that item, I would see theEnglish version
● if there is a translation just in English, but not also in Romanian, I would see theEnglish version
● if only the Romanian translation is available I would see the id of the item and the text“Item only translated in Romanian” appearing next to it, with the possibility to click onRomanian and change the language correspondingly.
Below you can see screen shots of a news item published only in Romanian, in the twoconditions described above:
Figure 27: News index when the selected language is English
Therefore, it is always a good practice to add items in the default portal language if you don'tintend to translate them right away.
Note: not all the properties of content items need to be translated; some of them (e.g. dates,numbers, booleans, email addresses, some URLs) are not multilingual and will be filledautomatically for each language on the editing forms.
5.3. Multilingual interface
All labels, explanatory messages, lists of links and their descriptions, the portlets (aside from thestatic ones) and other texts that appear on the user interface can be translated by specialisedpeople into any of the available languages using the Translate messages form available in theadministration centre. By default, only Administrators and Managers have the right to accessthis interface.
The translation centre for the interface lists the messages marked for translation in the portal andusers can translate them individually. To ease the translation process, when a message is
Revision 584 2010-10-13 Naaya administrator manual Page 32 of 60
Figure 26: News index when the selected language is Romanian

translated into a language, an OK sign will appear next to it in the language column. A messagesearch is available, which will narrow down the list of messages to those that contain a certaintext. Users can sort the list of messages, both ascending and descending: alphabetically or bytranslation status in a certain language.
Some of the messages contain HTML tags because splitting the texts around the tags wouldmean taking some phrases out of their context and therefore losing their meaning. All HTMLtags MUST NOT be changed during the translation process.
When the portal has no translation for the navigation language, it will attempt to find one in thelanguages from the settings of the browser. Ultimately, the translation is shown in the defaultportal language.
Since the number of messages to translate is high, an export can be made in .PO, .XLIFF or.CSV formats, the texts translated using external tools (e.g. text editors, specific translation
Revision 584 2010-10-13 Naaya administrator manual Page 33 of 60
(1) – translation selection
(2) – translation form
Figure 28: Translate messages from the administration area

tools) and imported back into the portal. Such operation can be made from the Import/Export tabof the Translate messages centre.
The PO file is a simple text file which will be downloaded with texts in English and the targetlanguage in which the messages have to be translated, while the XLIFF file is XML and it's verygood when the translators use desktop programs that know to navigate among the messages, tosuggest translations, search messages, escape HTML tags, etc.
5.4. Multilingual searches
The free text search available in the portal is performed in any subset of the available languageson the portal. For each result, links to other available translations are provided.
5.5. Multilingual syndication
All local channels of information generated in RDF format can be downloaded by end users inthe language selected in the browser. Only items which are translated into that language areincluded in the channel. An item is considered translated into a language if at least its title istranslated.
When administrators define the relevant channels exposed by their website, they are able tochoose the language in which each one of them is generated. Alternatively, they can choose the“Auto” option, which returns all items, regardless of their translation status in one language,applying the generic language negotiation algorithm.
Revision 584 2010-10-13 Naaya administrator manual Page 34 of 60
Figure 29: Multilingual free text search for the SMAP portal

6. Change the layoutThe user interface for the portal is based on templates for header and footer. The generic pagestructure is detailed in the image below:
Modifying the user interface can be done from the administration centre as follows:
● Portal properties -> Metadata for editing the site title and subtitle, as well as the frontpage description;
● Portal properties -> Logos for the modification of the top-left and right logos. Thedefault EnviroWindows design doesn't have logos on the top banner, but it is simple todisplay them using this form;
● Portal layout - for choosing the layout and colour scheme used. By default, EW portalscome with just one layout and 17 colour schemes, but others can be created from theZMI by specialised people (e.g. Web designers) and later selected from this page
● Portlets -> manage and arrange - allows adding, changing, deleting and arranging theportlets, which are boxes containing information. The portlets can be arranged in the leftand right sides of the pages, and in the middle of the front page
Since the content is separated from the presentation and from the data, it is possible to createother layouts by accessing the ZMI -> portal_templates. In here, you'll find the EnviroWindowslayout containing templates for the header, footer, left/center/right portlets and the colourschemes. Changing the template requires knowledge of TAL and METAL.
Creating or changing a colour scheme is however very simple for the web designers, since theyneed to make a copy of an existing one and edit the CSS files and/or replace the few imagesused in designing the template.
Here are some previews of available colour schemes for EW portals:
Revision 584 2010-10-13 Naaya administrator manual Page 35 of 60
Figure 30: Generic page elements

For each portal, new layouts can be created and the existing ones can be changedfrom the Zope Management interface by entering the portal_layout object from thecorresponding EnviroWindows Site object. The easiest way to create a new layout isto copy the EnviroWindows one and to start modifying the ‘Naaya Template’s inside:
● portlet_center_macro – the template for the central portlets that appear on thefront page
● portlet_left_macro – the template for the left-side portlets
● portlet_right_macro – the template for the right-side portlets
Revision 584 2010-10-13 Naaya administrator manual Page 36 of 60
Figure 31: EnviroWindows colour schemes

● site_footer – the dynamic page footer. Since Naaya Templates are XMLdocuments, all opened tags must close and vice versa. That’s why this pagealso contains a dummy header area which only opens the tags that are closedin the actual footer. The two parts are separated by the string
<!--SITE_HEADERFOOTER_MARKER-->
● site_header – the dynamic page header. For the reason described below, thistemplate also contains a dummy footer area which only closes the tagsopened in the header; the tow areas are separated by the string
<!--SITE_HEADERFOOTER_MARKER-->
This offers a consistent look and feel throughout the entire site and gives visitors asense of place and easy navigation.
Naaya websites are compliant with modern web standards such as:
● the website pages conform the Web Content Accessibility Guidelines 1.0 priority 2(WAI-AA) for the end user interface
● the pages corresponding to the administrative areas of the portal are compliant to theWeb Content Accessibility Guidelines 1.0 priority 1 (WAI-A)
● pages validate XHTML 1.1 Transitional
● the mark-up respects the semantic HTML rules
● the Cascading Style Sheets respect the CSS2 Specification
● the portal has a user-friendly interface built with respect of the most important usabilityprinciples
● the website is usable in any web browser
● the site information is accessible to all users (including users with disabilities), to alltypes of devices (different browsers, PDAs and mobile phones, TVs, speechsynthesizers, Braille interpreters, TVs, printers, etc.) and to search engines.
The portal has different display versions for print (contains only useful content and ignoresnavigation elements). Try printing a page without making any choices or additional settingsfrom that page or browser.
6.1. Portlets administration
The division of some parts of the layout into portlets is made available for its easy customisationby the Administrators, who can create and move around boxes of information that are relevantfor that particular portal.
Portlet assignments are configured from the Portlets -> Arrange administration page. In orderto create a new assignment, select its position, the portlet, whether it should be inherited, andthen select its location (e.g. a folder). It is also possible to change the ordering of existingportlets by clicking and dragging the colored "position" field in the assigned portlets table. Inthis table, administrators can also choose not to have displayed certain portlets, by pressing onthe “Remove”button.
Revision 584 2010-10-13 Naaya administrator manual Page 37 of 60

In the “Arrange portlets” form, administrators can choose where to display portlets. Portlets canbe shown on the left side, right side, or center (below the page content). Portlets can also beassigned to the entire portal or to a folder, and they can also be inherited (shown also in sub-folders) or non-inherited. For example, assigning a portlet on the site, non-inherited, will causeit to be shown just on the homepage, while assigning the portlet as inherited will display it on allpages in the site. There is a further restriction: right-side and center portlets are only shown onhomepage and folder index pages.
The listing of the assigned portlets allows executing management operations as follows:
● changing the order the portlets are shown in a certain location by dragging and droppingthe corresponding row up and down. For the drag and drop operation, the mouse has tobe positioned on the “Position” column
● deciding to display each portlet
○ only in the specified location (home page or a folder) or
○ also in the subfolders of that location.
Revision 584 2010-10-13 Naaya administrator manual Page 38 of 60
Figure 32: Portlets: “Arrange portlets” form

This is done by choosing “yes” or “no”on the inherit column of the table. Forinstance, if you want the left portlets to be shown on all the portal pages, you willchoose them to be displayed on the front page and then set “Inherit” attribute to“yes”.
● removing portlets from the locations (which does not result in deletion of the portlet, justnot displaying it in that location)
Note that portlets inherited from parent folders will always be displayed above portlets in sub-folders.
In the Portlets -> Manage administration page, it is possible to create several kinds of portlets.There are pre-defined templates for remote channel portlets (which display syndicatednews/events from remote RSS feeds), local channel portlets (same for locally-generated feeds),folders (showing the contents of a folder), lists of links (showing links defined from theAdministration -> Lists of links page). Administrators can also create portlets with static HTMLcontent.
1) Portlet from Remote channels
Such portlet will display the items of the selected remote channel (e.g. the news from anotherbiodiversity website), showing their titles and the links to the corresponding page on the remotewebsite.Administrators can choose to create a portlet from a remote channel, if a portlet is not alreadydefined for that channel. As a reminder, when users create a remote channel, they can choose toalso create a portlet for it. If they don't at that stage, they can choose to create a portlet fromhere.
2) Portlet from Local channels
Revision 584 2010-10-13 Naaya administrator manual Page 39 of 60
Figure 33: Portlets: “Manage portlets” form, remote channels

As in the case of remote channels, portlets created from a local channel display titles and linksof the items included in that local channel. For instance, if you want to publish the latest newson front page, you will have to create a portlet from the local channel Latest news.
Similar to the remote channels, it is also possible to create portlets for local channels at themoment of their adding.
The maximum number of items that this portlet displays is set when creating the local channel.
3) Portlet for Folders
This kind of portlet is created as a quick link to the folder in the portal. The Administratorschoose the folder from a small sitemap displayed in this page and the portlet generated willcontain the title of the folder and its description, with a link to the folder itself.
Such portlet is useful when Administrators want to emphasise from the front page a folderwhere important documents are published.
4) Portlet from Lists of links
The lists of links can be created from the “Lists of links” administrative page and they are usedto put together a collection of entry points – from the current website or external - useful tocertain topic.
Like in the case of channels, this page offers the possibility to choose a list of links from theexisting ones and creates a portlet with that list.
5) Portlet as Static HTML
This type of portlet has static text, images and links, that Administrators compose using thefriendly HTML editor, the same editor used to add and edit the various content types. It is alsopossible to include films or other Flash or Javascript-based code taken from the local or remotewebsites by editing the HTML source of the portlet and pasting the corresponding HTML orJavascript code.
As opposed to the above-mentioned types of portlets, this one is multilingual and its title andbody can be translated in all the languages available in the portal.
Additionally, the Manage portlets page lists a few portlets defined in the system that cannot bechanged or deleted by Administrators. These portlets are called special and Naaya portals needthem in order to work properly.
When Administrators need to create other types of portlets that require computation, forinstance the items in the portal that are tagged with certain keywords or that have a certaingeographical coverage, technical Managers can create these portlets from the ZMI, using TALand Python.
7. Users and securityThree concepts govern the security mechanism in Zope and therefore in Naaya portals:
● Users - similar to the ones in operating systems. The user accounts have a case sensitiveusername and password; in Naaya, additional information is also attached for easiertracking (names and email address).
● Permissions - define granular rights that users might or might nor have. Permissions arenot granted directly to individual users, but to roles.
● Roles - groups of users that receive the same set of permissions; after a role is defined,users are “granted” that roles either on the entire portal or just locally, on one or more
Revision 584 2010-10-13 Naaya administrator manual Page 40 of 60

folders. For instance, all users having the role of Contributor on the entire portal cansubmit content to the portal.
The security model of a Naaya-based portal is based on the concept that what you see is whatyou can do, meaning that whenever a user sees the link to an operation, he/she has the necessaryrights to execute that operation. By default a set of roles are defined:
● content Contributors - only allowed to add content
● Administrators - can execute all operations available on the portal pages andadministrative area, but not enter the ZMI
● technical Managers, with full rights to execute any set of operations
The list of roles can be tailored according with each specific portal needs, taking into accountthe wideness, skills and availability of the community that provides content and administratesthe website.
Once users are defined in the system (have an account), they might be granted with any subsetof the above roles (obviously having the Manager role eliminates the need for additional ones)on the entire portal or just on the locations (folders) they need to perform the operations that fallunder their areas of expertise.
Naaya allows additional user repositories to be added if necessary. For instance,EnviroWindows users often have accounts in the Eionet LDAP directory, so this repository canbe “plugged in” and used along with the local user repository (acl_users).
Only LDAP integration is shipped by default with Naaya, but others can be writtenby Web programmers as necessary.
When the LDAP repository is defined as an alternative source in a portal, a second tab appearsin the Users' management area:
Revision 584 2010-10-13 Naaya administrator manual Page 41 of 60
Figure 34: Local user management form
While for the local users is possible to add, edit and delete accounts, LDAP users can only besearched in order to assign them roles. Local users can be assigned roles by clicking on the“Users & Roles” button.
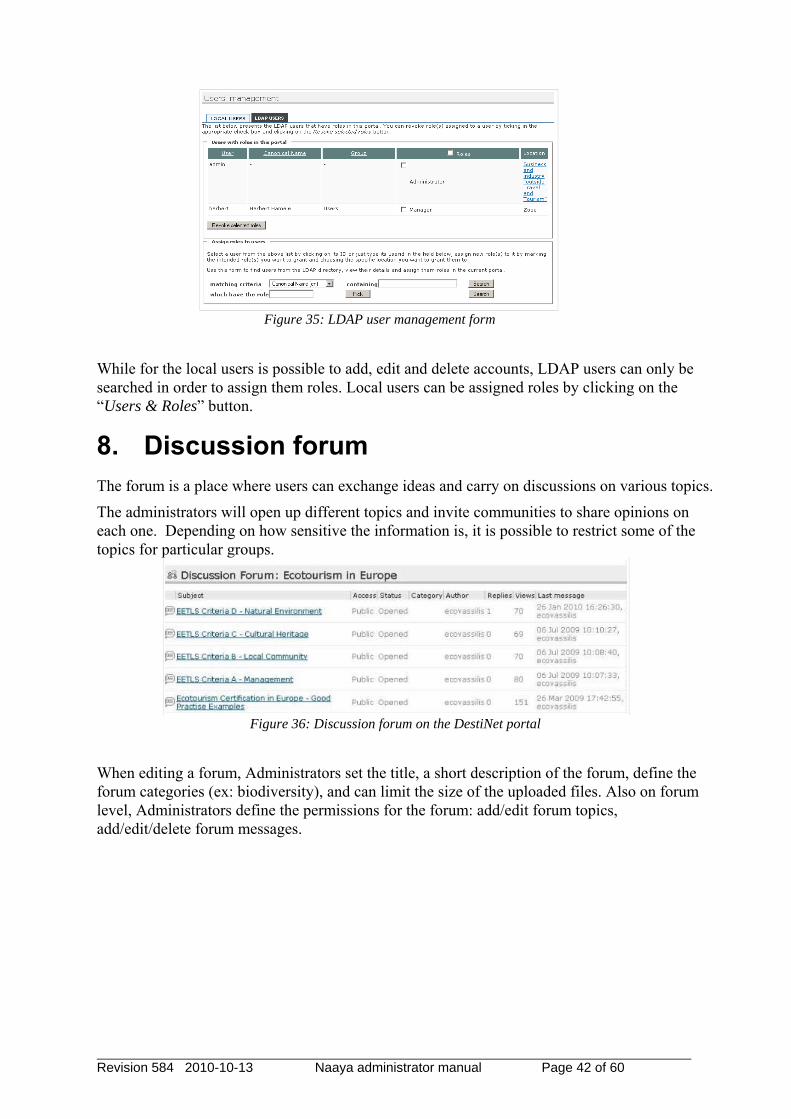
8. Discussion forum The forum is a place where users can exchange ideas and carry on discussions on various topics.
The administrators will open up different topics and invite communities to share opinions oneach one. Depending on how sensitive the information is, it is possible to restrict some of thetopics for particular groups.
When editing a forum, Administrators set the title, a short description of the forum, define theforum categories (ex: biodiversity), and can limit the size of the uploaded files. Also on forumlevel, Administrators define the permissions for the forum: add/edit forum topics,add/edit/delete forum messages.
Revision 584 2010-10-13 Naaya administrator manual Page 42 of 60
Figure 35: LDAP user management form
Figure 36: Discussion forum on the DestiNet portal

Portal Administrators get to add, delete and edit topics. When adding a topic, the topic subject isdefined, its category, and a file can also be attached, supporting the topic. Administrators alsoget to choose to be notified by mail of all postings on that topic. It's possible to close a topic, inwhich case people cannot comment anymore.
Inside a topic, the description and its attachments (optional) are the start of the discussion. Usersthat have the permission to answer that topic (by default Authenticated users) can post a replyto:
● the entire topic or
● someone else's answer
The administrators are able to delete certain answers and even to edit them, this way acting astopic moderator.
When new postings occur in a topic, notifications are sent to the owner of that topic.
9. The survey toolThis component lets content contributors create surveys that both authenticated and anonymoususers can take. A survey is a research instrument consisting of a series of questions for thepurpose of gathering information from respondents. The respondents are usually part of acommunity with relevant knowledge in the area of interest of your survey and they can be froma restricted group (authenticated users only) or part of the general public.
The answers to the survey can be analysed individually or they can be aggregated as statistics inreports. Both numerical and graphical statistics exist.
Revision 584 2010-10-13 Naaya administrator manual Page 43 of 60
Figure 37: Editing forum permissions
Figure 38: Administrative functions of the forum

This is an optional component that may not come by default with your portalinstallation, but that can be added later. If you use it for the first time in a Naayaportal, enter the ZMI and add a Naaya Survey Tool in its root. This tool makes basicconfigurations in the portal, that allow surveys later defined to be indexed bysearches, have a default notification mechanism and makes a default assignation ofrelevant permissions to roles (see the section about survey security).
A survey can be added inside Naaya folders, just like any other content type (e.g. NaayaDocument, Naaya News). Go the folder where you want to create it and click on the Subobjectsbutton. Make sure that Survey is selected in the list of object types, click "Save changes" andthen go back to the folder index. This step needs to be done only once per folder if the surveytype is not a default data type for the entire portal.
After submission, the administrators can change the survey's :
● metadata (e.g. title, description)
● attachments
● composing questions and
● its automatically generated reports
by using the upper toolbar buttons.
When editing a survey, you'll notice a few custom properties:
Revision 584 2010-10-13 Naaya administrator manual Page 44 of 60
Figure 39: the Survey index for Administrators

Users cannot take the survey before the release date. The expiration date disables the possibilityto take the survey after that date if “Allow posting answers after the survey expiration date” isset to No. This proves useful since it is almost always the case for some (key) people not to beable to respond before the expiration date. In any case, the number of remaining days appears onthe survey index and it urges people to respond faster.
9.1.1. Attachments
When taking the survey implies having read some background documentation, the usermanaging the survey will upload these documents as attachments. When respondents take thesurvey, the attachments appear at the top of the page (below the description).
9.1.2. Questions
The following types of questions are supported:
● Multiple choice - one answer:
● Combobox
Revision 584 2010-10-13 Naaya administrator manual Page 45 of 60
Figure 40: The edit form of a survey

● Radio buttons
● Radio matrix (group of questions with one answer per row)
● Multiple choice - multiple answers:
● Checkboxes
● Checkbox matrix (group of questions with multiple answers per row)
● Single line text (free text input box)
● Paragraph text (multiple line answer, used for longer responses)
● Date (for date type answers)
● File (for letting the respondents back their answers with additional information insidefiles)
If you need to better describe certain sections of the survey, you can use the "Label" question,which has no answer. The respondent will only see the descriptive text.
After adding a question, you can further customize it (e.g. set the available choices) by clickingon the corresponding "Edit" button, or you preview it by clicking on its title.
To change the order of the questions, change the "sort order" column accordingly and press the"Set sort order" button.
Figure 41: Some question type examples
9.1.2.1. Radio buttons questionsSometimes the choices of a radio question might not be enough for the respondent. In this caseyou can let the respondent answer with their own choice. To do this, go the the edit page of thequestion and set “Add extra option” to “Yes”. The question will look like in the figure below.
If the respondent chooses the extra option, the choice will appear exactly as he/she entered it inthe survey answer and as “Other” in the reports.
Revision 584 2010-10-13 Naaya administrator manual Page 46 of 60

Figure 42: Radio buttons question withextra choice
Figure 43: Answer to aquestion with extra choice
9.1.2.2. Changing questions after the survey was takenAfter the survey was taken, only a limited set of changes of the questions are permitted, e.g. thechoices from multiple choice questions can't be changed. If no answer exists for a question1 ,then the question can be changed in any way.
To delete the existing answers enter the ZMI and delete all the “answer_*” objects.
9.1.3. Reports
To analyse the answers of the survey by aggregating them, you might need to create one or moreextra reports and add statistics to them.
Click on the "Edit Reports" button to go to the reports management section. To add a newreport, choose a title for it and click on "Add report". To change its description click on thecorresponding "Edit" button. To configure the statistics included in the report, click on its title.Now choose the question that will be included in the report and then what kind of statisticswould you like. There are 2 major types of statistics: numerical (tabular) and graphical (charts).
Because adding a statistic one by one would take too much time for a complex survey withmany questions, there is the possibility of creating a complete report with all the question -statistic combinations. To create this report, choose a title and click on the "Generate fullreport" button.
9.1.4. Email notifications
When a respondent answers, the owner of the survey can receive a notification email, whichincludes a link to the newly added answer. The notification can be enabled or disabled by usingthe "notify owner when someone takes the survey" setting.
1Because either the question did not exist at the time the survey was taken or the respondent didnot answer.
Revision 584 2010-10-13 Naaya administrator manual Page 47 of 60
Figure 44: Edit survey reports

After a survey is taken the authenticated respondents can receive an email notification with theiranswer by using the "Email me my answer" setting. In some cases, e.g. short surveys, it isdesirable to let administrators disable notifications, while in other cases, e.g. large surveys,notifications should always be sent. This is why, the survey has an "email answer torespondents" setting (for administrators) with the following choices:
● Always - a notification is always sent to respondents
● Never - a notification is never sent to respondents
● Let respondents choose (default is yes) - respondents can choose if they wish toreceive a notification; the "Email me my answers" setting will be checked
● Let respondents choose (default is no) - respondents can choose if they wish to receivea notification; the "Email me my answers" setting will be unchecked
9.2. Taking the survey
Send the link of the survey to the respondents, so that they can take it.
To prevent spam, a text recognition mechanism (CAPTCHA) is used for anonymous users.Authenticated users are permitted to answer only once, but they can change their answers anytime they wish to.
9.3. Analysing the results
The user managing the survey can see the individual answers by clicking on the "View answers"button from the survey's page and selecting the answer he/she wants to see. Administrators havethe possibility to download the list of answers in the CSV format.
While the individual answers can only be seen by a restricted group of users, the reports can beseen by anyone (if the default settings are used). To view the reports click on the "View reports"button from the survey's page and then select the report you want to see.
Revision 584 2010-10-13 Naaya administrator manual Page 48 of 60
Figure 45: List of answers

10. Consultation toolsThese tools serve in getting feedback on a document from a user community. They allowuploading a file for each portal language, on which users can comment:
● freely, as overall comments
● for each line, in which case case the file must contain line numbers
● by answering guided questions previously defined by Administrators
● by adding files in support to their answers
Revision 584 2010-10-13 Naaya administrator manual Page 49 of 60
Figure 46: Survey answer
Figure 47: Survey report

● by inserting comments directly on the online text
When creating a consultation tool, Administrators should be aware of the capabilities of eachtool before deciding which one to use.
10.1. Naaya Consultation
This tool is more complex and allows three types of users' review:
● responses to the questions prepared by Administrators (only if questions are defined forthe Consultation)
● a file uploaded in support to the review (only of the Administrator checks the option)
● comments added for specific lines of certain pages (only if the Administrator checks theoption)
When editing the Consultation item, Administrators can choose from the following:
● Allow visitors to register as reviewers for this consultation – option which adds a link tothe registration page for unauthenticated users
● Allow reviewers to upload files when answering – option which enables the fileattachment in the review
● Allow reviewers to post comments on lines in their answers – option which adds thepossibility for responders to post comments for specific pages and lines
First of all, the Administrator needs to prepare the document for the consultation, following theinstructions provided under “Consultation instructions”. Basically, it describes how to includeline numbers into the file (useful only if commenting on lines is chosen) and how to includeinstructions in the file. Please note that this tool, along with the Simple Consultation entail thatthe users download the file, read it offline and than return to the website and post theircomments. That is why the file has to contain clear instructions on how to return to the site andwhat is available for review.
After that, the Administrator uploads the file by editing the Consultation item and establishes astart and end date, in between which users can post comments.
The definition of the questions can be done by clicking on the “Manage ConsultationQuestions” button. Please note that questions cannot be deleted anymore after at least onereview has been posted.
Revision 584 2010-10-13 Naaya administrator manual Page 50 of 60
Figure 48: Consultation front page - Administrator's view

The list of all answers (reviews) is available by clicking on the right-side button “Viewanswers”.
This page contains an extra-operation for the Administrators, namely providing ratings for eachanswer. The rating of each answer is not mandatory and it only appears if an Administrator haspreviously defined one or more rating categories using the “Manage Consultation Ratings”button. If a large number of reviews are expected and the result of the consultation needs to bemade public, these ratings help sort the answers by filters such “Quality” or “Relevance”.
Aside from the simple listing of the answers, other statistics of the reviews are available for theAdministrators: the number of people that have reviewed the consultation, the number of peoplethat attached files or commented on lines and the listing of the answers on each question, alongwith their rating if they exist. Only Administrators have by default access to these statistics.
Notifications are sent to the Administrators each time reviews are added.
Revision 584 2010-10-13 Naaya administrator manual Page 51 of 60
Figure 49: Review page consultation - all options available

10.2. Naaya TalkBack Consultation
The TalkBack can be used to publish a series of articles and to let users comment directly on thetext. Inside a TalkBack the idea is to define chapters like an online book, each chapter beingdivided by the system in paragraphs on which users can add comments.
As in the other cases described above, there is a start and end date between which users cancomment.
When editing the TalkBack item, Administrators can choose from the following:
● Allow visitors to register as reviewers for this consultation – option which adds a link tothe registration page for unauthenticated users
● Allow reviewers to upload files when posting a comment – option which enables the fileattachment in each comment
● Allow reviewers to invite other people to review
Revision 584 2010-10-13 Naaya administrator manual Page 52 of 60
Figure 50: TalkBack consultation - Administrator's view

By clicking on the “Add section” button, Administrators can define sections, one by one. Thesystem will split the text into paragraphs, so the text must be either constructed using the HTMLeditor, or to be clean up first if it's pasted from another application (e.g. Word, PDF). It ispossible to do this by using either the “Paste from Word” or “Paste as plain text” buttons of theHTML editor.
The reviewers will then see a button to comment on after each paragraph, as shown in the figurebelow:
The table of contents is available on the right side of each page and the navigation from onechapter to another can be easily made using the “Previous section” and “Next section”. If userswill want to see the other comments previously posted on that chapter, they will click on the topbutton “Show comments”. Users can both contribute with comments to the consultation sections,and answer to already published comments.
When logged in as Administrator, it is possible to edit and delete comments, which makes iteasy to moderate the feedback.
After adding a chapter, it can be edited by Administrators paragraph by paragraph, with thepossibility to:
● Split a paragraph into two
● Merge a paragraph with the next one
● Edit the text from a paragraph
● changing the order of two paragraphs, by swapping with next paragraph.
Deleting a paragraph can be done by merging it with the next paragraph and editing the result toremove the unnecessary text.
Revision 584 2010-10-13 Naaya administrator manual Page 53 of 60
Figure 51: Comment on the TalkBack paragraphs

Aside from the consultation editing, from adding/editing new sections to the consultation,administrators can also create and manage invitations, in the Consultation invitations form,respectively in the Manage invitations tab, from where they can invite people to participate inthe consultation.
By using this invitation form, the invited persons will be notified by e-mail with a personalizedlink, and they will be able to submit directly their comments to the consultation, without theneed to register and contribute directly in the portal. After they have contributed with theircomments, such comments can be approved, edited or deleted by administrators.
These invitations can be managed from the Manage invitations tab, place from where activeinvitations can be revoked.
When going to the Manage comments tab, the total number of approved comments will bedisplayed by default, along with the number of unapproved comments and the number ofcomments submitted as an answer to the invitations sent by means of the Consultationinvitations form.
11. Photo galleryA photo gallery is a space for image publishing that can contain multiple albums, which containphotos, all described by metadata. Photos can be added either one by one or from a zip file. Atalbum level, visitors can download either all the album photos, or a selection of the album, as azip file.
One of the album's photos can be chosen as album cover. Aside from this, administrators canadd and edit the properties of the galleries, albums and photos.
At photo gallery level, the options available are to define its title, define the key words andgeographical coverage, restrict comments on the gallery, as well as restricting the access (when
Revision 584 2010-10-13 Naaya administrator manual Page 54 of 60
Figure 52: TalkBack consultation – Consultation invitations form

checked) to the original images; available operations are also defining the sort order,cut/copy/paste and deleting certain albums from the photo gallery.
When adding a new album to the photo gallery, administrators define its title, description,keywords and geographical coverage, can indicate specific attributes such as the author andsource of the photos; they can also limit the maximum number of photos in an album, themaximum number of photos to be displayed per page, can restrict the access to the originalimages, can watermark the images with a pre-defined text, and geo-tag the album and its photos.As mentioned above, photos can be uploaded either one by one, or by uploading a zip archive inthe album.
Editing a photo album allows administrators to define the album's title, fill in a shortdescription, define key words and geographical coverage; they can indicate specific attributes,such as the author and source of the photos, and can also limit the maximum number of photosin an album, as well as the maximum number of photos to be displayed on a page. Restriction tothe original version of the photos can be also set here, and photos can be geo-tagged, as well asthe whole album, by defining its geographic location on the map.
Revision 584 2010-10-13 Naaya administrator manual Page 55 of 60
Figure 53: Photo gallery - Administrator's view

The index of an album displays the photos, some of the album's characteristics, the photonumber, keywords, geographic location – map, and offers to users the download option, be iteither selective, or bulk (entire photo album), as well as the possibility to add new photos toalbum. At album level, administrators have the cut/copy/paste option, as well as to delete certainphotos of the album.
A photo search is available at album level for finding the search string inside the photos'metadata.
When adding a new album, its default status is public, accessible without restrictions to allvisitors on the website. Administrators can opt for the Restrict access functionality,which allowsrestricting access or granting the access to that particular folder to a group of users, thus makingthe album no longer public.
When photos are uploaded, a few versions of each photo, with different dimensions, aregenerated: thumbnail, very small, small, medium, large and very large. Visitors see itsthumbnail, but can also see, download and use the photo in any of these versions, along with theoriginals.
When clicking on a photo, visitors can go back and forth to the previous/next one, can see thewhole photo album as a slideshow, can access the details and technical information of thephotos and can visualize its geographic location.
In the same context, aside form the album navigation, administrators can also flip and rotate thephotos using the buttons on top of the thumbnail if necessary, can replace certain photos in analbum and geotag them.
Revision 584 2010-10-13 Naaya administrator manual Page 56 of 60
Figure 54: Photo gallery album - Administrator's view

The operations available for administrators are:
● add Photo Gallery/ Photo Album/ Photo
● bulk upload photos from a zip file
● edit Photo Gallery/ Photo Album/ Photo
● flip and rotate photos
● geotag photos/albums
12. Helpdesk agentThis tool allows tracking and responding to issues posted by a community of users. Users posttheir questions, comments or problem reports and resolvers carry out a discussion with themuntil the issues are concluded.
12.1. Administration
There are two roles in the Helpdesk Agent, independent from the ones in Naaya, due to the factthat this is a generic component which can work on any Zope website:
● Issue administrator – user who can manage all the aspects of the Helpdesk, as presentedbelow
● Issue resolver – user who can see all public and private issues, respond and resolve them
Revision 584 2010-10-13 Naaya administrator manual Page 57 of 60
Figure 55: Photo navigation - Administrator's view

The entire administration of the Helpdesk Agent can be done only from the ZMI, by clicking onthe Administration tab of the Helpdesk Agent object. It includes:
● Settings
○ User folder – the repository of users that will act as Issue administrator or Issueresolver
○ Mail server name and port – the mail relay used to send the notification mails
○ Notify users – allows choosing the events that will trigger notification emails; thechoices are “adding issues” and “modifying issues”
○ From address – the email address that the notification emails come from, [email protected]
○ Subjects of all types of mails – allows setting the subject that will appear in eachnotification mail
○ Default Issue confidentiality – establishes whether a newly posted issue is visible toeverybody or confidential; in any case, the resolvers can change the confidentialitystatus of the issue when responding
○ Priority set by – establishes if the users posting an issue can also set its priority, or ifonly the resolver can set it
● Priority: allows adding, deleting and changing the list of priorities issues can have andthe order in which they appear; the default list is: low, medium, high, urgent
Revision 584 2010-10-13 Naaya administrator manual Page 58 of 60
Figure 56: Helpdesk agent - Post issue form

● Status: allows adding, deleting and changing the list of statuses issues can have and theorder in which they appear; the default list is: opened, stand by, in progress, closed
● Category: allows adding, deleting and changing the list of issue categories, their defaultpriority and their default assignee (i.e. user assigned automatically to that thosecategories of issues)
● Users: allows assigning one or both roles of Issue administrator and Issue resolver tousers from the chosen user repository
● Presentation: allows choosing the format in which the dates are displayed, whether ornot to show the time next to the date, and the number of issues which will be listed onthe “List issues” tab of the Helpdesk
12.2. Usage
The Helpdesk Agent user interface contains a starting page with explanatory texts and threetabs:
● List issues, that provides a sortable table with all issues and a search form; when loggedin as Issue resolver or administrator, both private and public issues are displayed
● Post issue, which allows posting the issue description
● Reports, available to Issue resolvers and administrators; this page offers statistics aboutthe number of issues posted for each category, with each priority, with each status, andalso which are assigned to each Issue resolver
When end users fills in the“Post issue” form, an email notification is sent to the person whoposted the issue, as well as to Issue Administrators and Issue resolver, if one is alreadyassigned.
If the issue is not automatically assigned to an Issue resolver, the Issue Administrator assignsone for the list. The resolver is the person with the necessary expertise to solve the issue, so heor she marks the issue as being in progress and starts posting comments on it, in response to theinitial question. The owner of the issue replies also by posting comments, and there can be alonger discussion with the resolver through these comments, that leads to the closer of the issue.When solved, the issue should be marked as closed.
Revision 584 2010-10-13 Naaya administrator manual Page 59 of 60
Figure 57: Helpdesk administration in ZMI - Category form

Each time an issue is changed, notification emails are sent to all people involved – person thatposted the issue (if the correct email address was provided), Issue resolver and Issueadministrators.
13. ReferencesWeb Content Accessibility Guidelines (WAI )
http://www.w3.org/TR/WAI-WEBCONTENT/
XHTML 1.0
http://www.w3.org/TR/xhtml1/
Zope documentation
http://www.zope.org/Documentation/
Revision 584 2010-10-13 Naaya administrator manual Page 60 of 60