mysqlworkbench tutorial: creating related database...
TRANSCRIPT
Page 1 Sally Kyvernitis, Temple University
MySqlWorkbench Tutorial:
Creating Related Database Tables
(Primary Keys, Foreign Keys, Joining Data)
Contents
1. Overview __________________________________________________________________________________ 2
2. Before You Start ____________________________________________________________________________ 2
3. Connect to MySql using MySqlWorkbench _______________________________________________________ 2
4. Create Tables “web_user” and “user_role” _______________________________________________________ 2
5. Add Foreign Key from Table “web_user” to Table “user_role”________________________________________ 4
6. Add Data to Table “user_role” (and Get Primary Key Violation) ______________________________________ 5
7. Add Data to Table “web_user” (and Get Foreign Key Violation) ______________________________________ 6
8. SELECT Data ________________________________________________________________________________ 7
9. Join Data __________________________________________________________________________________ 9

Page 2 Sally Kyvernitis, Temple University
1. Overview
After reviewing database terms, you will use MySqlWorkbench to create a database with 2 tables (customer and
product) and enter test data into both of these tables. You will learn about primary keys (auto-increment and not
auto-increment) and primary key constraints. You will also learn how to write and execute simple (single table) SQL
select statements.
2. Before You Start
There is a separate document that tells you how to install MySqlWorkbench on your PC/MAC. MySqlWorkbench is
a GUI (Graphical User Interface) front end to the MySql database management system (which runs on a temple
database server).
There is a separate document which reviews database terms and concepts.
3. Connect to MySql using MySqlWorkbench
There is a separate document that tells you how to find your database credentials and connect to the database that
was created for your use in your class. It’s a little involved the first time since you have to find your database
password, etc.
4. Create Tables “web_user” and “user_role”
Using MySqlWorkbench, locate then double click on your database schema (left pane under “SCHEMAS”). Your
schema will then become bold indicating that this is the “default database”. Then open up your schema and right
click on “Tables” (under your database schema), then select “create table”.
The bolded database schema is the default schema. Double
click to select yours (otherwise you’ll have to prefix every
table name with your schema name in your SQL code).
Right click Tables – Select “Create Table”

Page 3 Sally Kyvernitis, Temple University
From the “New Table” window, enter the new table name (“web_user”), check that “InnoDB” is selected for
database engine “InnoDB” (so foreign keys will work), and open up the two chevrons so that there is space to enter
in the columns for the web_user table.
Mouse over the abbreviations above the check boxes to learn the various attributes of database table columns:
PK: Primary Key (unique identifier of each record within the table)
NN: Not Null (not allowed to be null, means it is a required field for the user to enter)
UQ: field must be unique within the table.
AI: Auto-increment. The database management system supplies the next available number (automatically)
– the user does not have to enter a value into this field.
Then enter in the colum names, data types, and attributes of the web_user table exactly as shown. You will be
getting sample code all semester that expects this table to be just so.
Create a second table named “user_role” with columns and attributes (exactly) as shown:
If you ever need to modify the design of one of your tables, right click on the table, then select “Alter Table”.
If you are not seeing a table that you just created, right click on “Tables” and select “Refresh All”.
Click the chevrons so you can enter in the columns.

Page 4 Sally Kyvernitis, Temple University
When you design a database table,
Typically you will have one column that is the primary key (PK, NN). By naming convention, the name of this
field should be tableName_id. A primary key may often be auto-increment (AI) which means that the
database management system is “in charge of” allocating a unique number to each record as the records are
inserted. In this tutorial, one of the tables (web_user) has an auto-increment primary key, but the other
(user_role) does not. This is to show you the difference between the two typical design choices.
For other columns, specify the desired data type. Here are some of the “normal” types are:
o VARCHAR: specify the maximum size of a string to be stored.
o INT: this is a normal integer. Specify the maximum number of digits to be stored.
o DECIMAL: this is the best data type to store currency. It’s stored like an integer (not real
number/floating point number), but with the decimal point moved to the left a certain number of
digits. Specify the maximum digits and the number of digits to the right of the decimal point.
o DATE: this is the data type to use (not DATETIME) if you just want to store day/month/year.
DATETIME Is more complicated to use – it includes hours/minutes/seconds/milliseconds and it
requires more effort to convert and format.
In our data model, we want each web_user record to indicate which user_role they are. To implement this,
we add field user_role_id to table web_user (type matching user_role.user_role_id) and in the next step we
will turn that field into a foreign key (like a pointer). It is a database naming convention to name a foreign
key field the same as the primary key that it references.
5. Add Foreign Key from Table “web_user” to Table “user_role”
A foreign key is like a pointer. To create a foreign key from web_user.user_role_id to user_role.user_role_id,
type the following SQL into the Query area then click on the execute icon (lightning bolt).
Note: if the query area is closed/disabled, right click on one of your tables and choose “Select Rows”. This will
open a query window. Then replace that SQL (e.g., “SELECT * FROM web_user”) with the SQL you want to run.
If there is an error, you should see a message at the bottom of the output window.
Verify that you created the foreign key by right clicking on table web_user, selecting “Alter Table”, and
clicking on the “Foreign Keys” tab. You should see an automatically named foreign key listed there.

Page 5 Sally Kyvernitis, Temple University
6. Add Data to Table “user_role” (and Get Primary Key Violation)
To add data into table “user_role”, right click that table and select the top option “Select Rows”.
Enter 2-3 records into table “user_role” then click “Apply”. Your data doesn’t have to match what’s below.
Try to enter a record that has the same user_role_id as a record already in the table (and click “Apply”).
Since this would violate the Primary Key (PK) constraint that you specified for the user_role.user_role_id,
the database management system will give an error (like below). This is one of the main jobs of a database
management system – to prevent constraint violations, to protect the integrity of the database.

Page 6 Sally Kyvernitis, Temple University
7. Add Data to Table “web_user” (and Get Foreign Key Violation)
Right click on table “web_user” and enter one record. Note:
o Leave the “web_user_id” field empty. We designed this field as “auto-increment” which means we
want the database management system to assign the next available (unique) number whenever we
insert a record.
o Enter the date in this format: YYYY-MM-DD.
o Don’t put commas in the decimal field (membership_fee).
o Enter a web_user.user_role_id value that matches one of the values in user_role.user_role_id.
o Click “Apply” and confirm that the record got inserted.
Now enter 3-5 more “web_user” records - all with empty web_user_id, some with empty birthday, some
with empty membership_fee, all with valid user_role_id (values found in user_role.user_role_id). Click
“Apply” and confirm that all records were inserted (if any one is rejected, all are rejected until you fix it).
Try to enter a web_user record that has an invalid user_role_id (a value that is not found in
user_role.user_role_id). This should cause a foreign key constraint violation and the database management
system will give an error like this:
Page 7 Sally Kyvernitis, Temple University
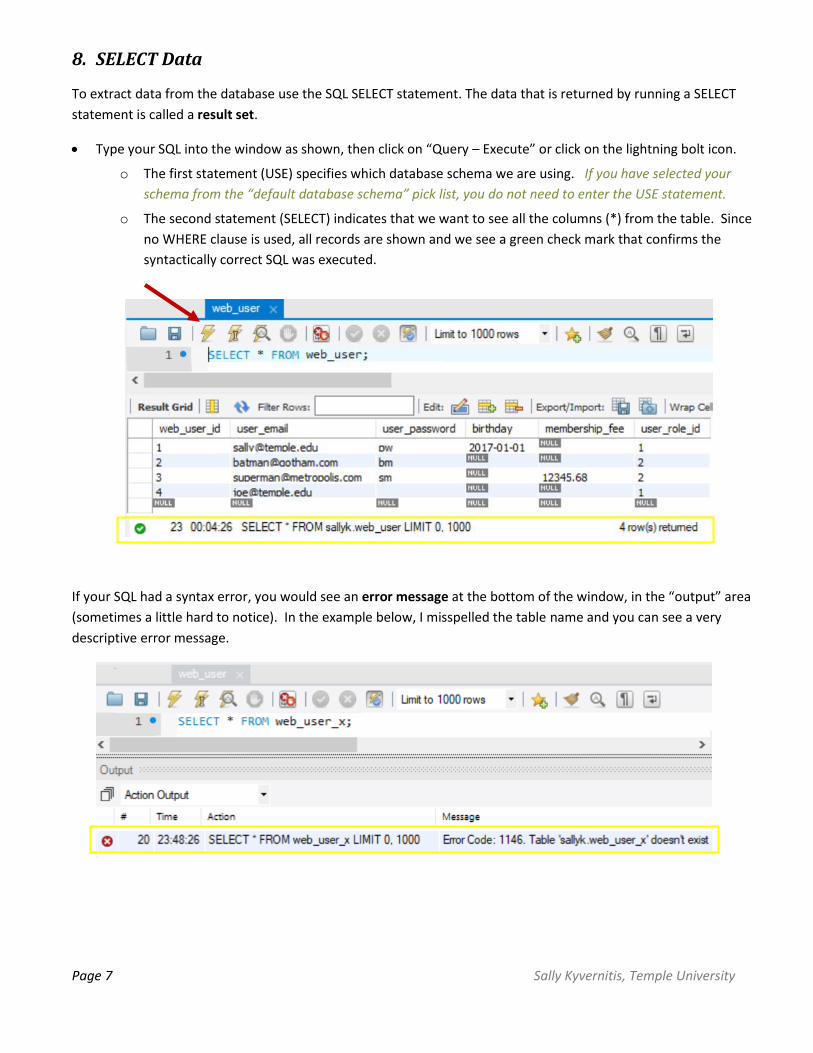
8. SELECT Data
To extract data from the database use the SQL SELECT statement. The data that is returned by running a SELECT
statement is called a result set.
Type your SQL into the window as shown, then click on “Query – Execute” or click on the lightning bolt icon.
o The first statement (USE) specifies which database schema we are using. If you have selected your
schema from the “default database schema” pick list, you do not need to enter the USE statement.
o The second statement (SELECT) indicates that we want to see all the columns (*) from the table. Since
no WHERE clause is used, all records are shown and we see a green check mark that confirms the
syntactically correct SQL was executed.
If your SQL had a syntax error, you would see an error message at the bottom of the window, in the “output” area
(sometimes a little hard to notice). In the example below, I misspelled the table name and you can see a very
descriptive error message.

Page 8 Sally Kyvernitis, Temple University
Instead of using *, you can specify which columns you want to see by listing them out.
You can specify the order you want to see in the result set by adding an ORDER BY clause.
You can specify which records you want to see by adding a WHERE clause.
You can split a SQL statement into multiple lines. At the end of each SQL statement, you need a “;”
Page 9 Sally Kyvernitis, Temple University
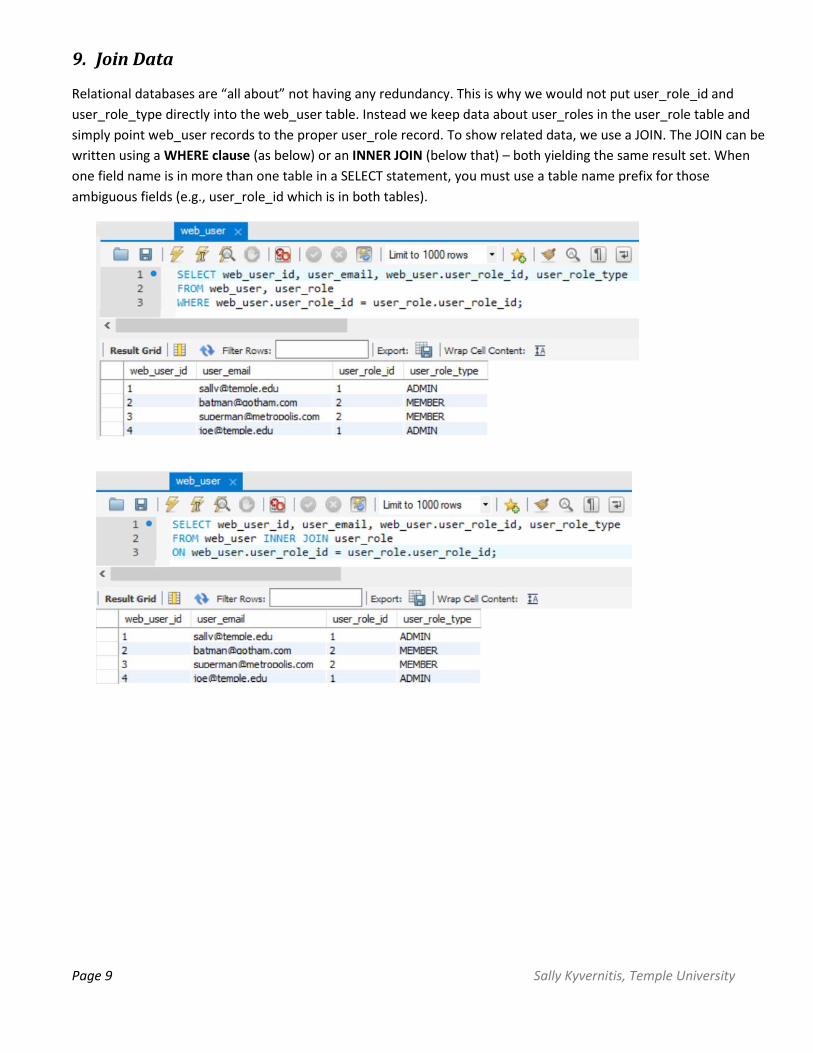
9. Join Data
Relational databases are “all about” not having any redundancy. This is why we would not put user_role_id and
user_role_type directly into the web_user table. Instead we keep data about user_roles in the user_role table and
simply point web_user records to the proper user_role record. To show related data, we use a JOIN. The JOIN can be
written using a WHERE clause (as below) or an INNER JOIN (below that) – both yielding the same result set. When
one field name is in more than one table in a SELECT statement, you must use a table name prefix for those
ambiguous fields (e.g., user_role_id which is in both tables).