my easy center for system center configuration manager
TRANSCRIPT

MY EASY CENTER
FOR
SYSTEM CENTER CONFIGURATION
MANAGER
MY EASY CENTER 2.0 User guide
User Guide - My Easy Center © 2016 – Easy Center Corp
SUMMARY
1. My Easy Center startup ............................................................................... 4
1.1 Introduction ................................................................................................................. 4
1.2 Prerequisite ................................................................................................................. 6
1.3 Initial installation and setup ......................................................................................... 7
1.3.2 Security Roles ........................................................................................... 9
1.3.3 Restrictions and CostCenter ..................................................................... 11
2. Applications .............................................................................................. 15
2.1 Introduction ............................................................................................................... 15
2.2 Functions ................................................................................................................... 18
2.2.1 Template Management ............................................................................ 18
2.2.2 Application Creation ................................................................................ 37
2.2.3 Add and Delete Device or User ................................................................. 63
2.2.4 Add and Delete Device or User in AD Groups ............................................ 71
2.2.5 Deployment Collections ........................................................................... 76
2.2.6 Delete Collections And Applications ......................................................... 78
2.2.7 History Operations ................................................................................... 83
2.2.8 Applications Group .................................................................................. 84
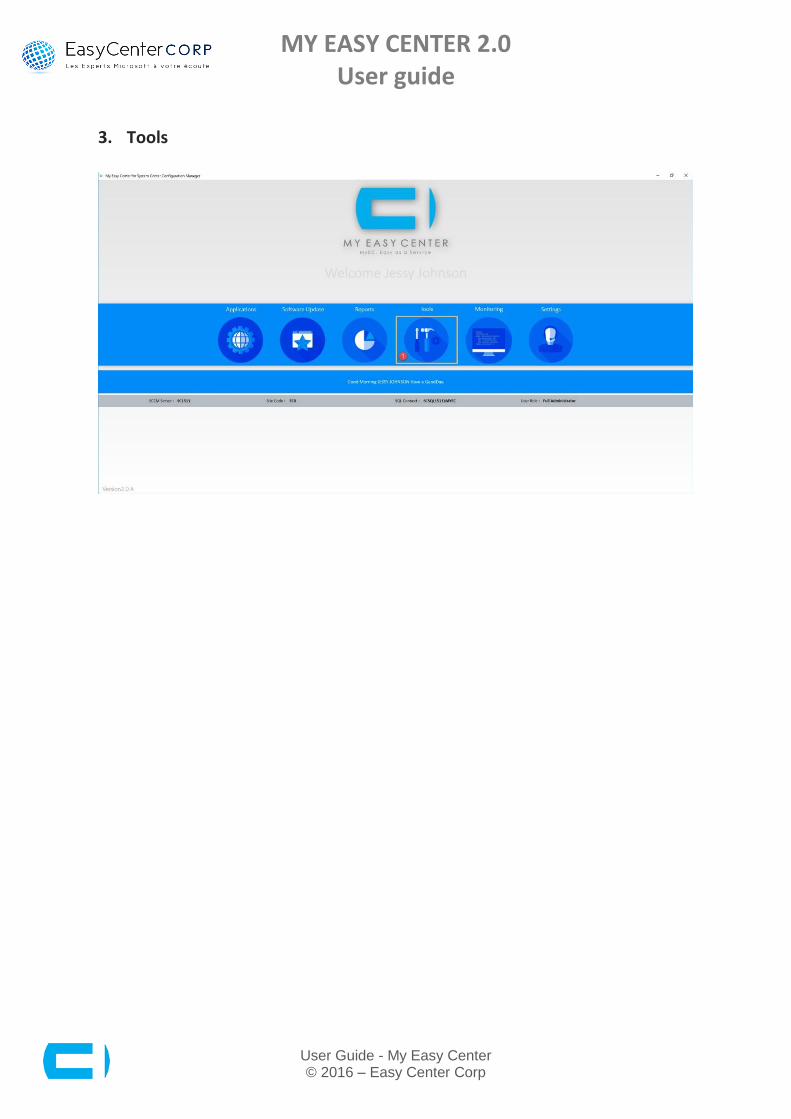
3. Tools ......................................................................................................... 89
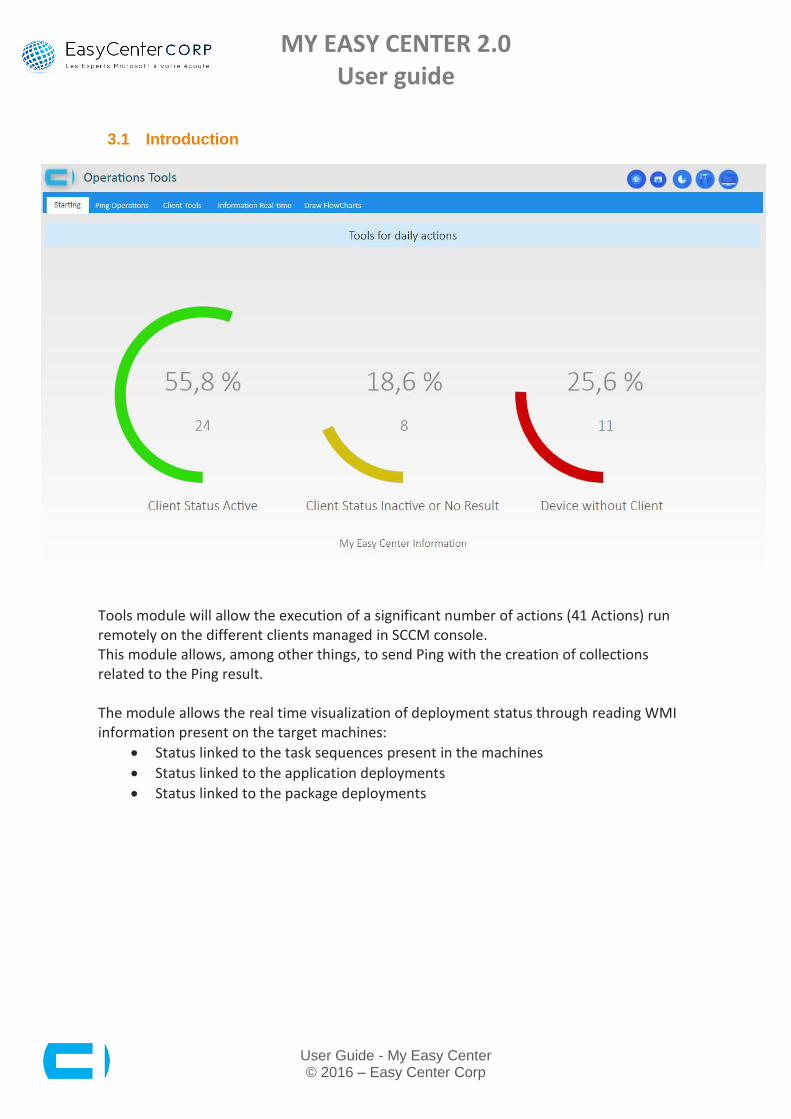
3.1 Introduction ............................................................................................................... 90
3.2 Ping Operations ......................................................................................................... 92
3.3 Client Tools ................................................................................................................ 99
3.4 Draw FlowChart ........................................................................................................ 101
4. Search engine for Reports and Monitoring modules................................. 103
5. Software Update ...................................................................................... 107
5.1 Introduction .............................................................................................................. 107
5.2 Patch Management Dashboard .................................................................................. 108
6. Reports .................................................................................................... 112
6.1 Introduction .............................................................................................................. 113
6.2 Applications Deployment .......................................................................................... 115
6.3 Deployment Details ................................................................................................... 121
6.4 Applications Dependencies ........................................................................................ 125

MY EASY CENTER 2.0 User guide
User Guide - My Easy Center © 2016 – Easy Center Corp
6.5 Users Deployment ..................................................................................................... 127
6.6 Applications installed on Devices ............................................................................... 129
6.7 Collections Members ................................................................................................. 131
6.8 Distribution Status .................................................................................................... 134
6.9 Infrastructure ............................................................................................................ 135
6.10 Task Sequences ......................................................................................................... 136
6.11 Software Inventory ................................................................................................... 138
6.12 Add/Remove Program ............................................................................................... 139
6.13 Hardware Inventory .................................................................................................. 140
6.14 OSD .......................................................................................................................... 141
7. Monitoring............................................................................................... 142
7.1 Introduction .............................................................................................................. 142
7.2 OSD .......................................................................................................................... 144
7.3 DP Content ............................................................................................................... 146
7.4 Deployment .............................................................................................................. 148
7.5 Clients ...................................................................................................................... 149
8. Settings .................................................................................................... 151
8.1 Settings ..................................................................................................................... 151
8.2 Security Roles ........................................................................................................... 153
8.3 Restrictions And CostCenter ...................................................................................... 156

MY EASY CENTER 2.0 User guide
User Guide - My Easy Center © 2016 – Easy Center Corp
1. My Easy Center startup
1.1 Introduction
My Easy Center is an operating console addresses to System Center Configuration Manager 2012 et 1511 Software (SCCM) users. This console is intended for users who needed to perform very straightforwardly operational daily tasks on SCCM Software. The simplification of the principal actions realized by the operational team of type:
Call center
Level 1 System support
Level 2 System support
Park manager
Packagers Allows users to build confidence and become more reactive on actions of type:
Applications creation and applications deployment
Addition and deletion of resources for applications deployment
Applications addition and deletion
Collections addition and deletion
Applications deployment follow-up
Follow- up of the deployment spates of the operating system
Follow-up of the Microsoft corrective deployment spates
Information reports on the applicative and material park
Graphic infrastructure diagram
Follow-up reports on the actions carried out on SCCM software over a given period.
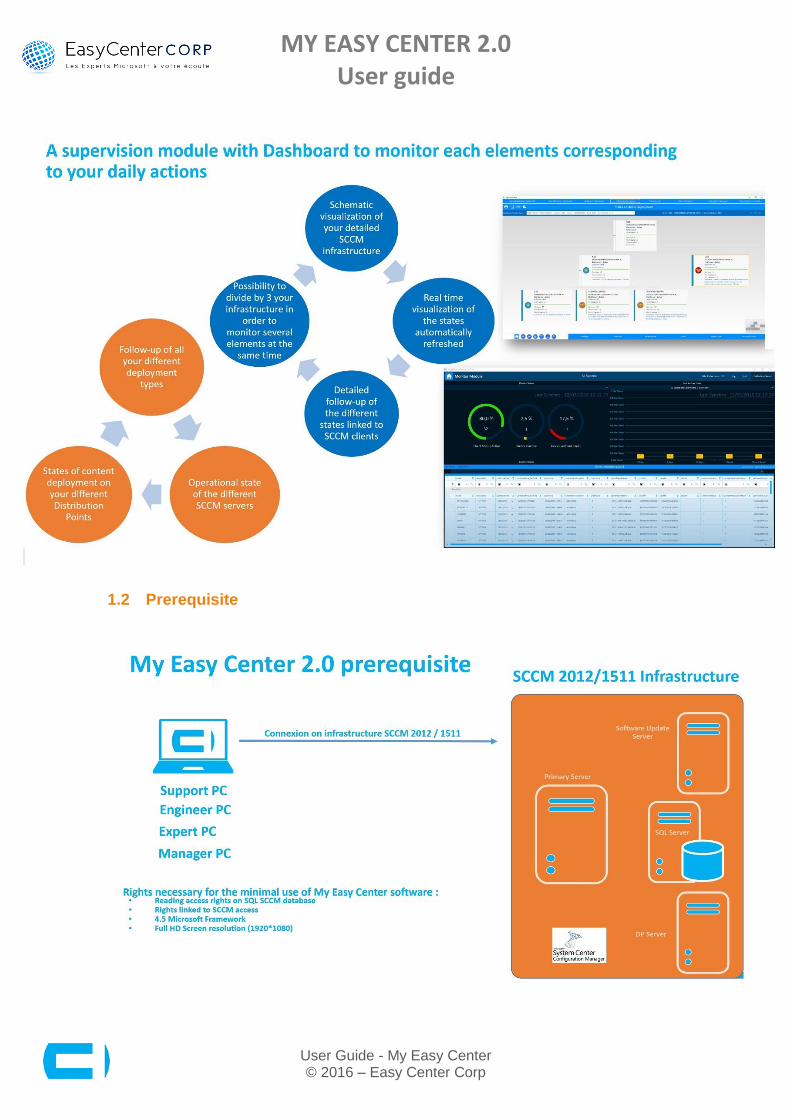
It is possible to control access to My Easy Center utilization to enable users to use a limited number of modules and functions. Prerequisite:
Minimum of System Center Configuration Manager 2012 SP1.
AD Domain Account necessary for the execution of My Easy Center software
4.5 Framework
Reading access rights on the SQL database (CM_XXX)
Rights positioned from SCCM on the desired functions
1920*1080 Screen resolution (Full HD resolution)
MY EASY CENTER 2.0 User guide
User Guide - My Easy Center © 2016 – Easy Center Corp
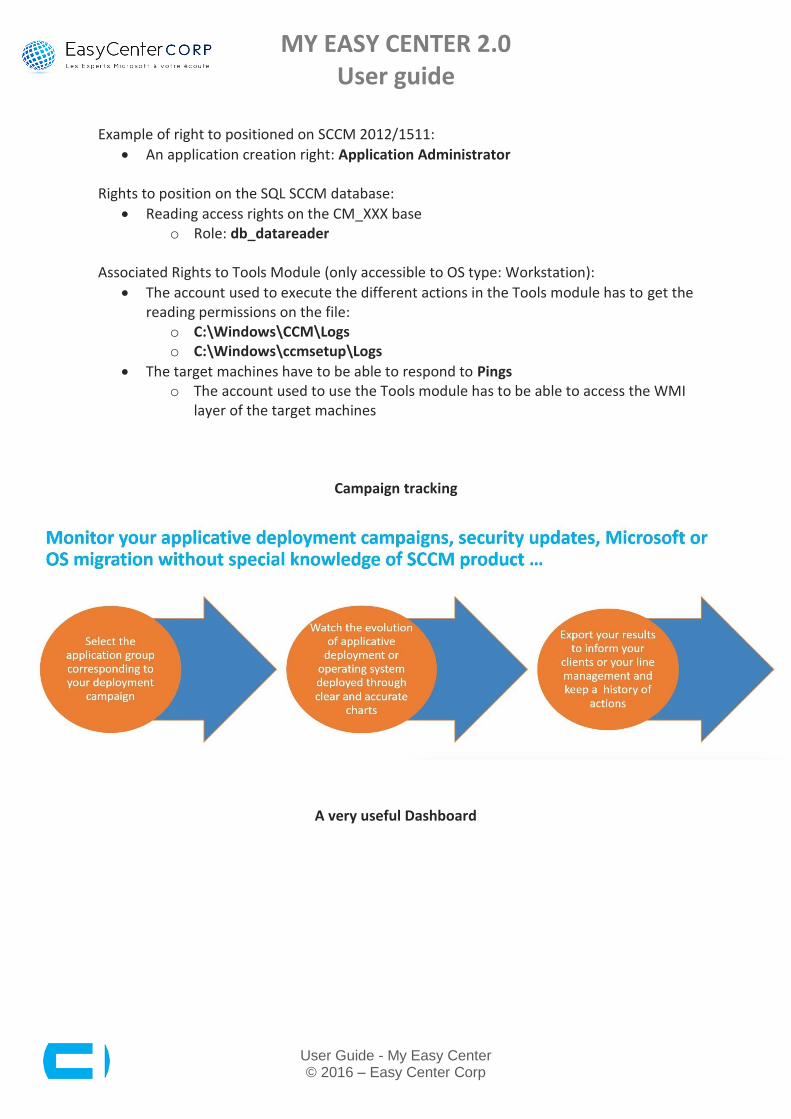
Example of right to positioned on SCCM 2012/1511:
An application creation right: Application Administrator Rights to position on the SQL SCCM database:
Reading access rights on the CM_XXX base o Role: db_datareader
Associated Rights to Tools Module (only accessible to OS type: Workstation):
The account used to execute the different actions in the Tools module has to get the reading permissions on the file:
o C:\Windows\CCM\Logs o C:\Windows\ccmsetup\Logs
The target machines have to be able to respond to Pings o The account used to use the Tools module has to be able to access the WMI
layer of the target machines
Campaign tracking
A very useful Dashboard
MY EASY CENTER 2.0 User guide
User Guide - My Easy Center © 2016 – Easy Center Corp
1.2 Prerequisite
MY EASY CENTER 2.0 User guide
User Guide - My Easy Center © 2016 – Easy Center Corp
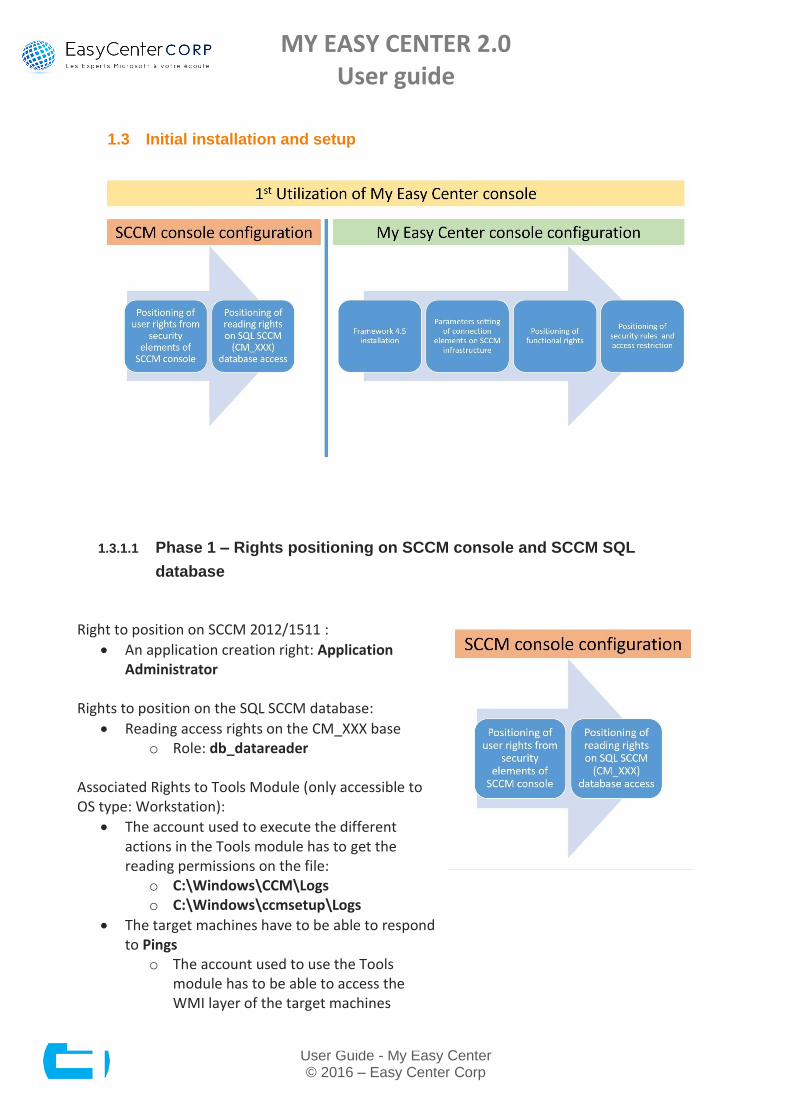
1.3 Initial installation and setup
1.3.1.1 Phase 1 – Rights positioning on SCCM console and SCCM SQL
database
Right to position on SCCM 2012/1511 :
An application creation right: Application Administrator
Rights to position on the SQL SCCM database:
Reading access rights on the CM_XXX base o Role: db_datareader
Associated Rights to Tools Module (only accessible to OS type: Workstation):
The account used to execute the different actions in the Tools module has to get the reading permissions on the file:
o C:\Windows\CCM\Logs o C:\Windows\ccmsetup\Logs
The target machines have to be able to respond to Pings
o The account used to use the Tools module has to be able to access the WMI layer of the target machines

MY EASY CENTER 2.0 User guide
User Guide - My Easy Center © 2016 – Easy Center Corp
1.3.1.2 Phase 2 – Rights positioning on My Easy Center console For the first utilization of My Easy Center console, we are going to set the connection elements parameters associated with the functioning rights of My Easy Center console.
2 Insertion of the long name (FQDN) associated with the SCCM Primary server (SCCM Server on the role of Provider) managed by My Easy Center (FQDN: Example = SC1511.MYECLAB.local) 3 Insertion of the short name associated with the SCCM Primary server (SCCM Server on the role of Provider) managed by My Easy Center (Example = SC1511) 4 Insertion of the short name associated with the SQL SCCM Database Server (Server on the role of Database) (Example = SCSQL1511\MYEC) 5 Insertion of SCCM Database name targeted (Example = CM_EC0) 6 Insertion of the Site Code of the SCCM Primary Server targeted (Example = EC0) 7 Insertion of the domain name hosting the SCCM server (Example = MYECLAB.local) 8 Insertion of the LDAP path providing access to the OU containing Security Groups associated with the SCCM applications (Example = OU=Applications SCCM, OU=MyECC) 9 Validate the connection parameters/settings to the SCCM infrastructure targeted by clicking on « Save Settings ».
MY EASY CENTER 2.0 User guide
User Guide - My Easy Center © 2016 – Easy Center Corp
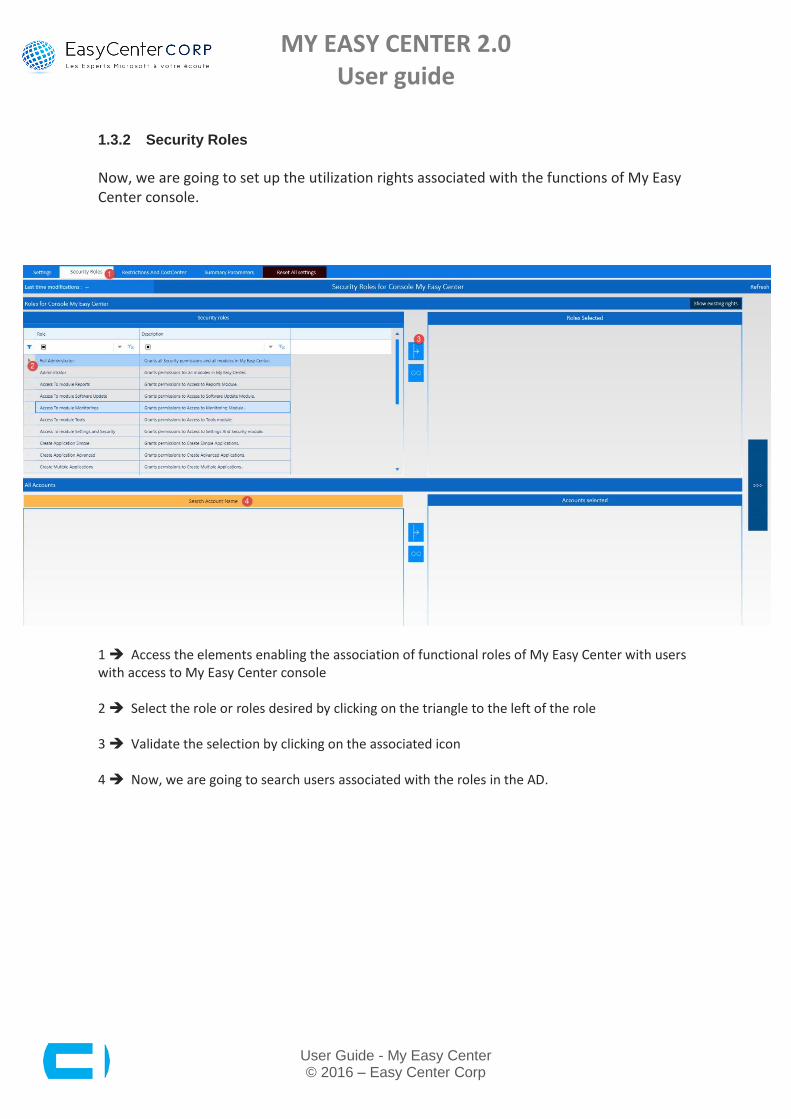
1.3.2 Security Roles
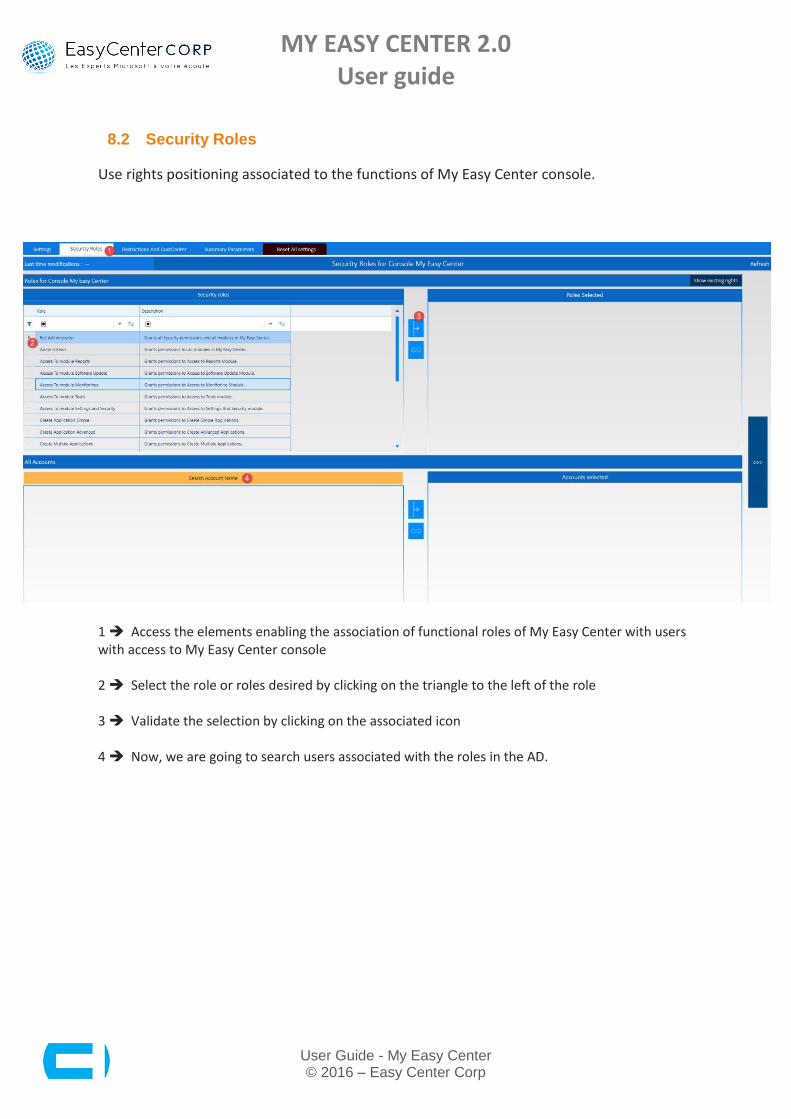
Now, we are going to set up the utilization rights associated with the functions of My Easy Center console.
1 Access the elements enabling the association of functional roles of My Easy Center with users with access to My Easy Center console 2 Select the role or roles desired by clicking on the triangle to the left of the role 3 Validate the selection by clicking on the associated icon 4 Now, we are going to search users associated with the roles in the AD.
MY EASY CENTER 2.0 User guide
User Guide - My Easy Center © 2016 – Easy Center Corp
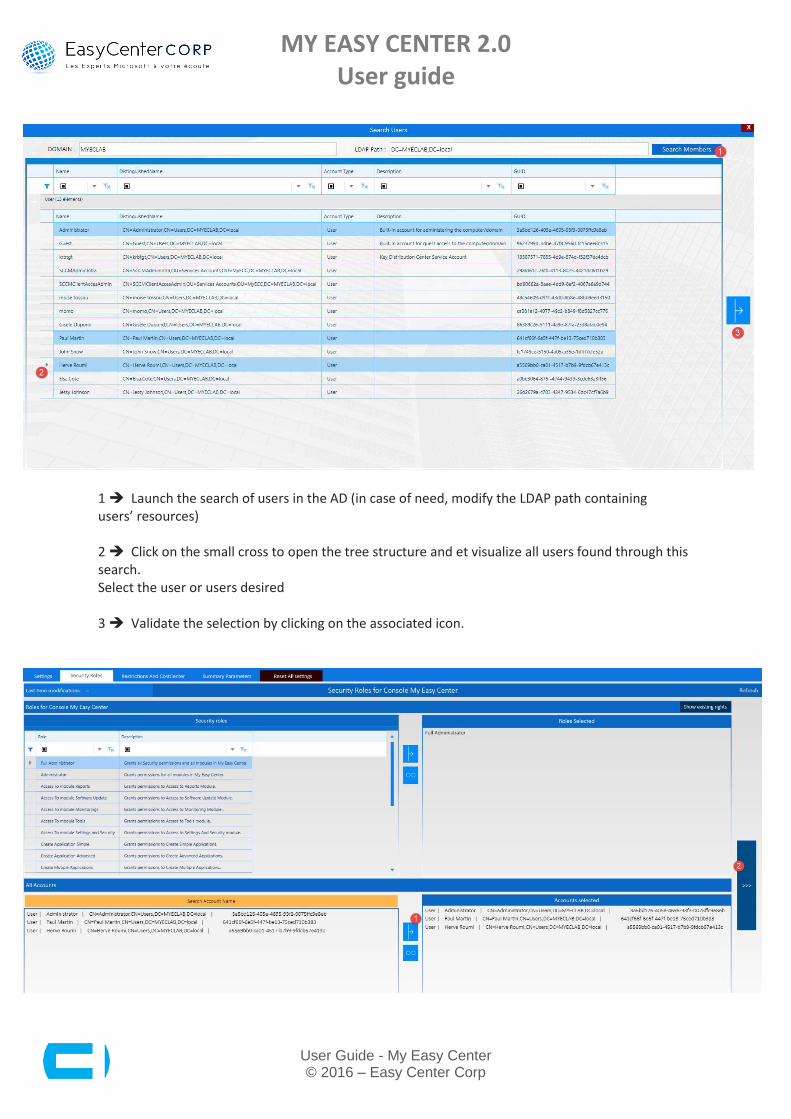
1 Launch the search of users in the AD (in case of need, modify the LDAP path containing users’ resources) 2 Click on the small cross to open the tree structure and et visualize all users found through this search. Select the user or users desired 3 Validate the selection by clicking on the associated icon.

MY EASY CENTER 2.0 User guide
User Guide - My Easy Center © 2016 – Easy Center Corp
1 Validate the selection by clicking on the associated icon 2 Validate all the elements (roles and users) by clicking on the associated icon.
1 Validate the security rule creation by clicking on « Create Security Roles » button.
1 You can visualize the associations Users/Roles from this window, click on « Done » button to close the association window.
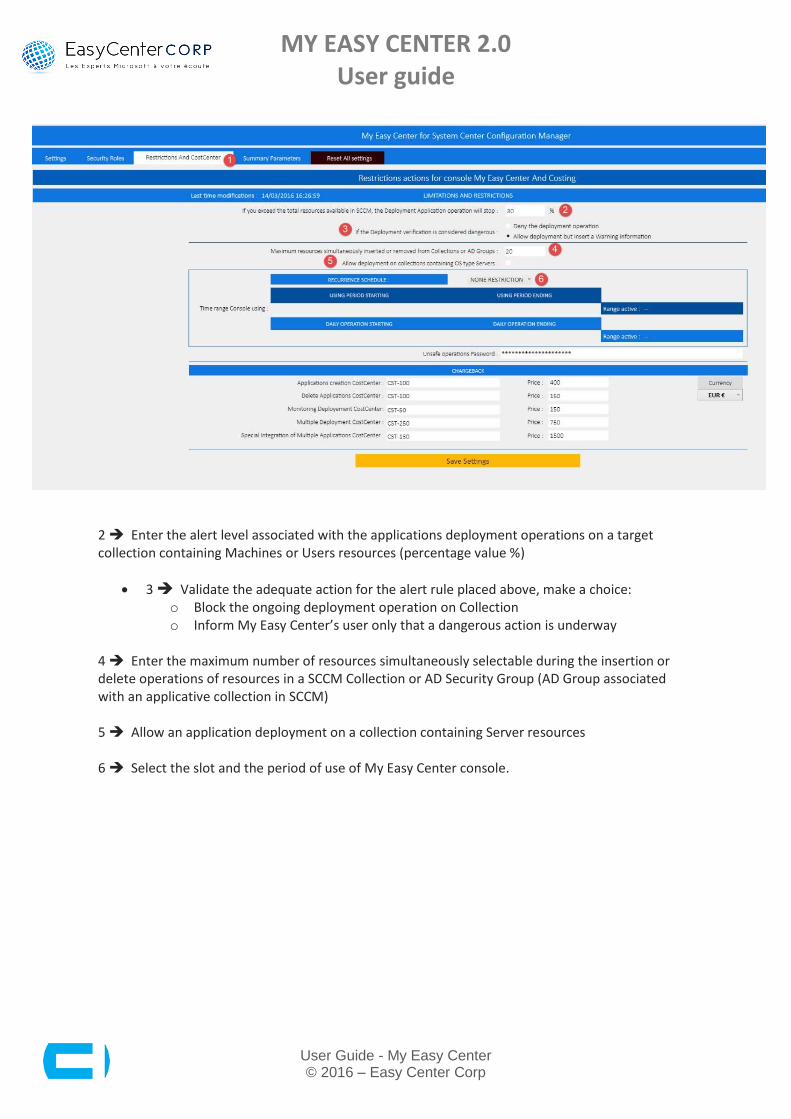
1.3.3 Restrictions and CostCenter
Now, we are going to set up the control and restriction rules of My Easy Center console. Click the tab « Restrictions and CostCenter »
MY EASY CENTER 2.0 User guide
User Guide - My Easy Center © 2016 – Easy Center Corp
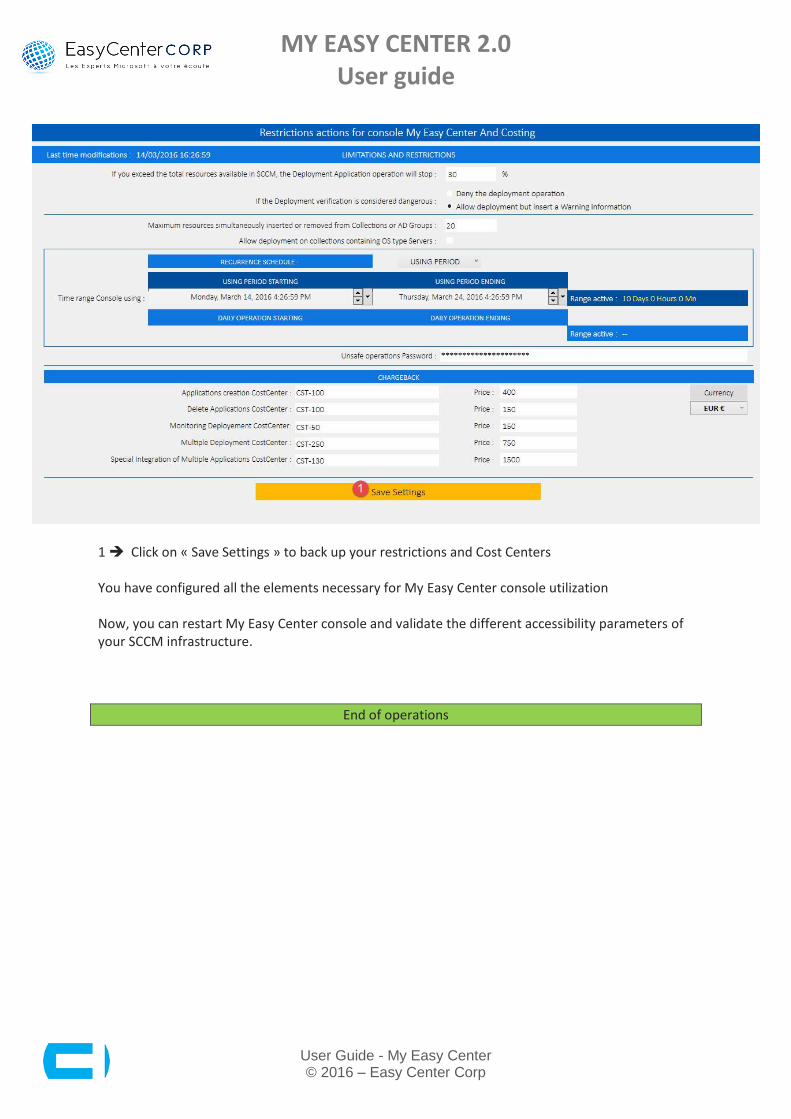
2 Enter the alert level associated with the applications deployment operations on a target collection containing Machines or Users resources (percentage value %)
3 Validate the adequate action for the alert rule placed above, make a choice: o Block the ongoing deployment operation on Collection o Inform My Easy Center’s user only that a dangerous action is underway
4 Enter the maximum number of resources simultaneously selectable during the insertion or delete operations of resources in a SCCM Collection or AD Security Group (AD Group associated with an applicative collection in SCCM) 5 Allow an application deployment on a collection containing Server resources 6 Select the slot and the period of use of My Easy Center console.
MY EASY CENTER 2.0 User guide
User Guide - My Easy Center © 2016 – Easy Center Corp
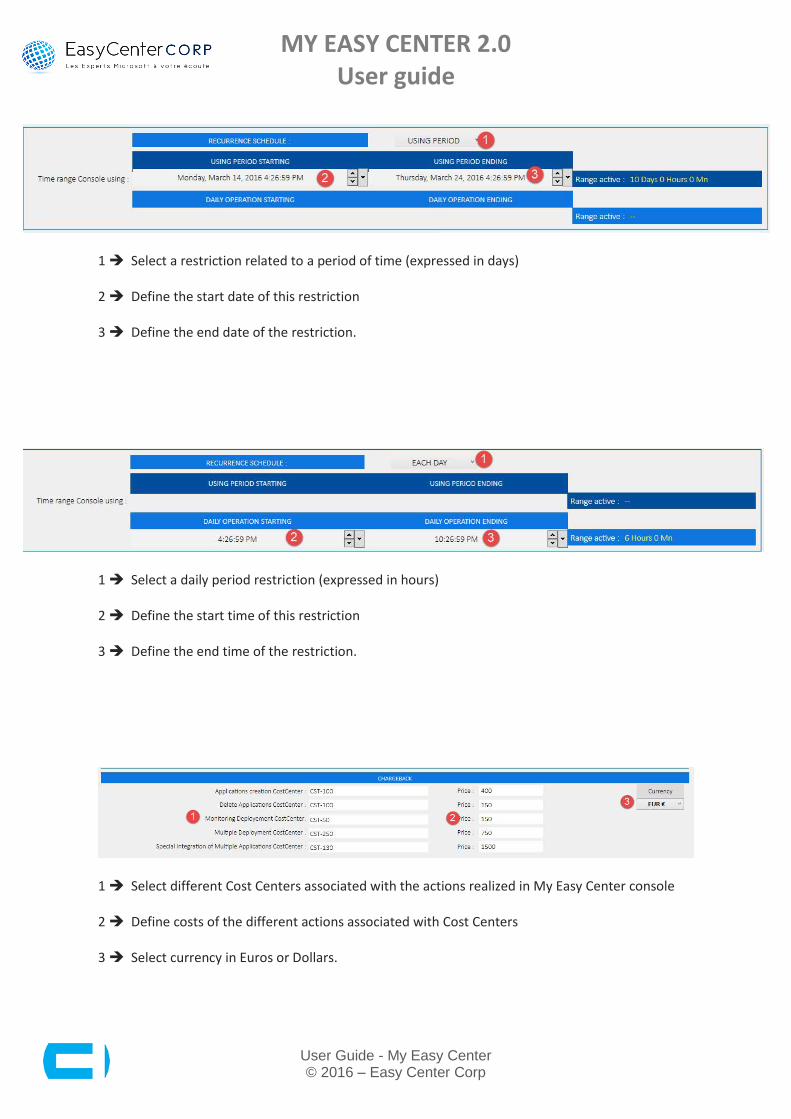
1 Select a restriction related to a period of time (expressed in days) 2 Define the start date of this restriction 3 Define the end date of the restriction.
1 Select a daily period restriction (expressed in hours) 2 Define the start time of this restriction 3 Define the end time of the restriction.
1 Select different Cost Centers associated with the actions realized in My Easy Center console 2 Define costs of the different actions associated with Cost Centers 3 Select currency in Euros or Dollars.
MY EASY CENTER 2.0 User guide
User Guide - My Easy Center © 2016 – Easy Center Corp
1 Click on « Save Settings » to back up your restrictions and Cost Centers You have configured all the elements necessary for My Easy Center console utilization Now, you can restart My Easy Center console and validate the different accessibility parameters of your SCCM infrastructure.
End of operations

MY EASY CENTER 2.0 User guide
User Guide - My Easy Center © 2016 – Easy Center Corp
2. Applications
2.1 Introduction
MY EASY CENTER 2.0 User guide
User Guide - My Easy Center © 2016 – Easy Center Corp
Applications module is one of the central modules of My Easy Center software. This module will allow different users to save time on daily operating tasks. The integrated analysis engine to the module will allow user to focus only on the principal tasks to be carry out. In a production environment, it is necessary to respect the functioning and actions standardization rules. In this module, it will be possible to:
Respect a formalism in the applications creation (Applicative name, applications creation rules, rules in the applicative security groups creation, etc)
Add or delete resources (Machines or Users) in an applicative collection
Delete mass applications through an access control
Delete mass Collections through an access control
Deploy an application with content distribution on your Distribution Points through an access control associated with security rules (verification rules of collection contents)
Create application groups to allow user to focus on application groups managed by its entity or its team for example.
Create applicative Templates for a simplified applications creation
View the history of the different actions carried out over a given period

MY EASY CENTER 2.0 User guide
User Guide - My Easy Center © 2016 – Easy Center Corp
MY EASY CENTER 2.0 User guide
User Guide - My Easy Center © 2016 – Easy Center Corp
2.2 Functions
2.2.1 Template Management
An application Template is a container enabling the automatic insertion and realization of a set of parameters and actions. During the application creation within SCCM, different actions are to be carried out to proceed with the application deployment:
o Application creation o Creation of Installation and Uninstallation Collections o Application distribution on the different Distribution Points or Distribution
Points Groups o Application deployment on the Installation and Uninstallation o AD security groups creation (linked to the collections created for the
companies using this insertion method of machines or users in the applicative collections)
The application Template takes over all the elements mentioned below in order to harmonize and accelerate the application creation. The functions using application Templates are:
Simple application creation Application creation options cannot be modified by the user
Advanced application creation Application creation options can be modified by the user despite a Template using.
Multiple application creation The user can modify some application creation options despite a Template using.
It is possible to export different Templates created by different users of My Easy Center console in order to establish a Templates’ library constituting all of your needs related to your company.

MY EASY CENTER 2.0 User guide
User Guide - My Easy Center © 2016 – Easy Center Corp
MY EASY CENTER 2.0 User guide
User Guide - My Easy Center © 2016 – Easy Center Corp
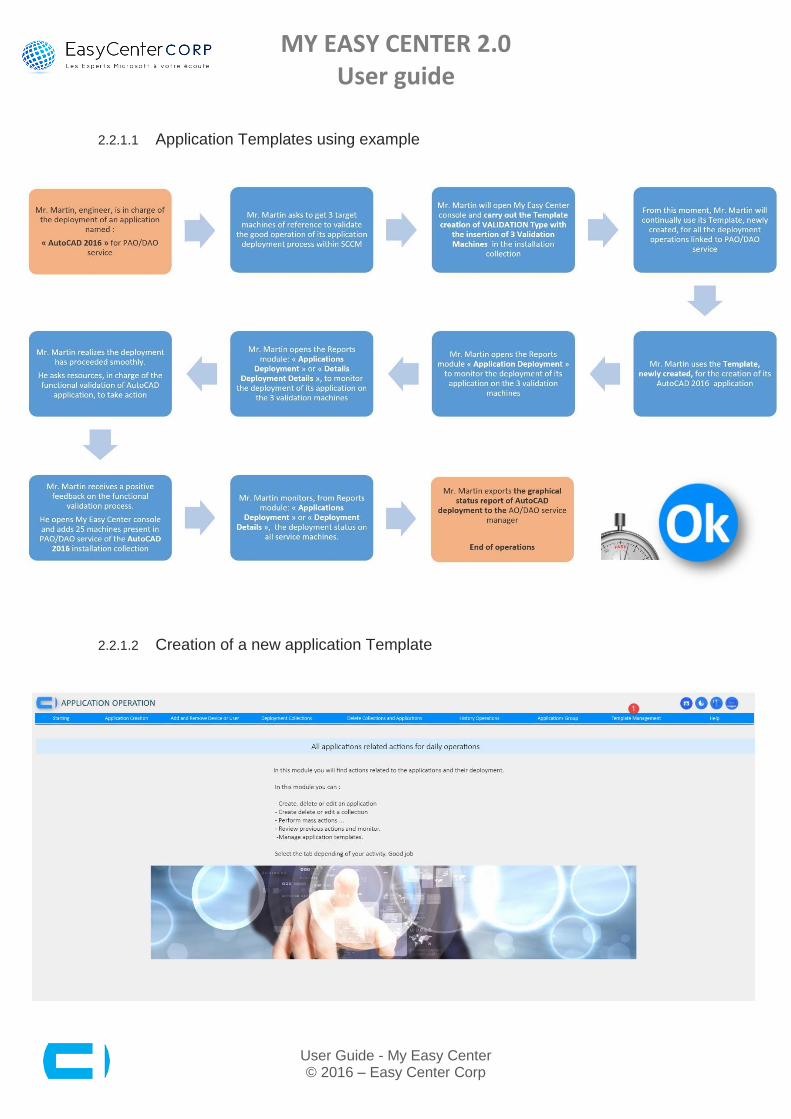
2.2.1.1 Application Templates using example
2.2.1.2 Creation of a new application Template
MY EASY CENTER 2.0 User guide
User Guide - My Easy Center © 2016 – Easy Center Corp
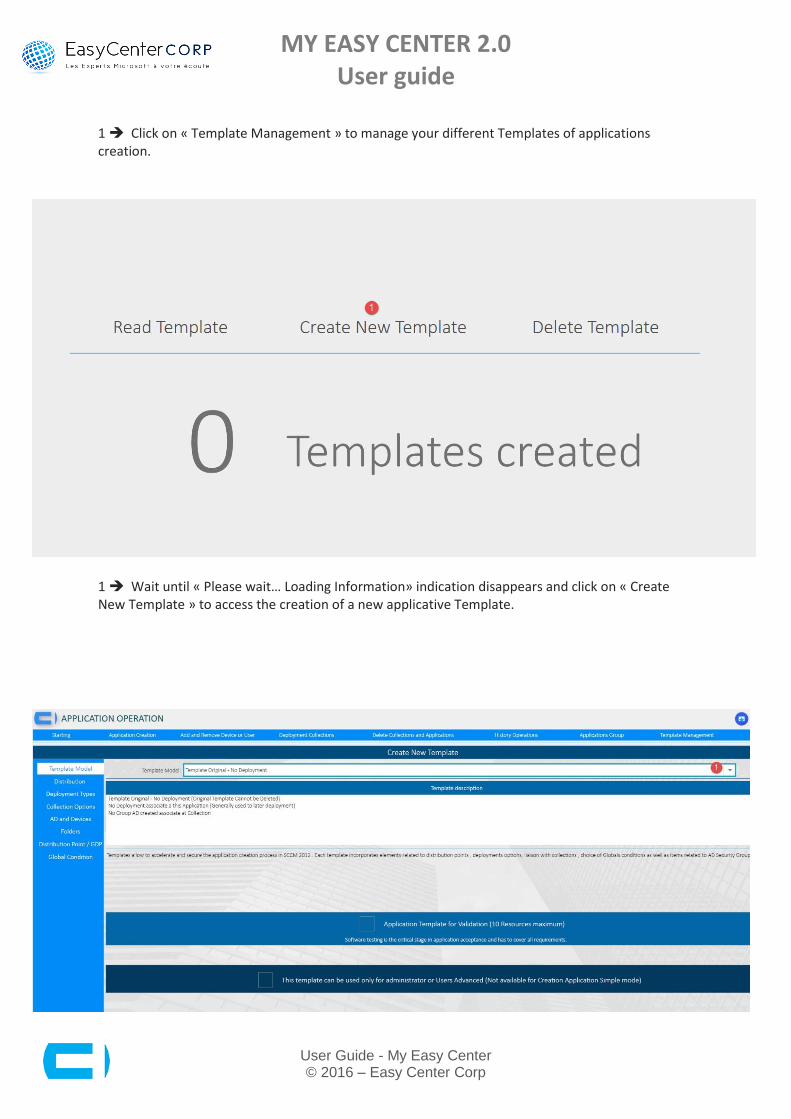
1 Click on « Template Management » to manage your different Templates of applications creation.
1 Wait until « Please wait… Loading Information» indication disappears and click on « Create New Template » to access the creation of a new applicative Template.
MY EASY CENTER 2.0 User guide
User Guide - My Easy Center © 2016 – Easy Center Corp
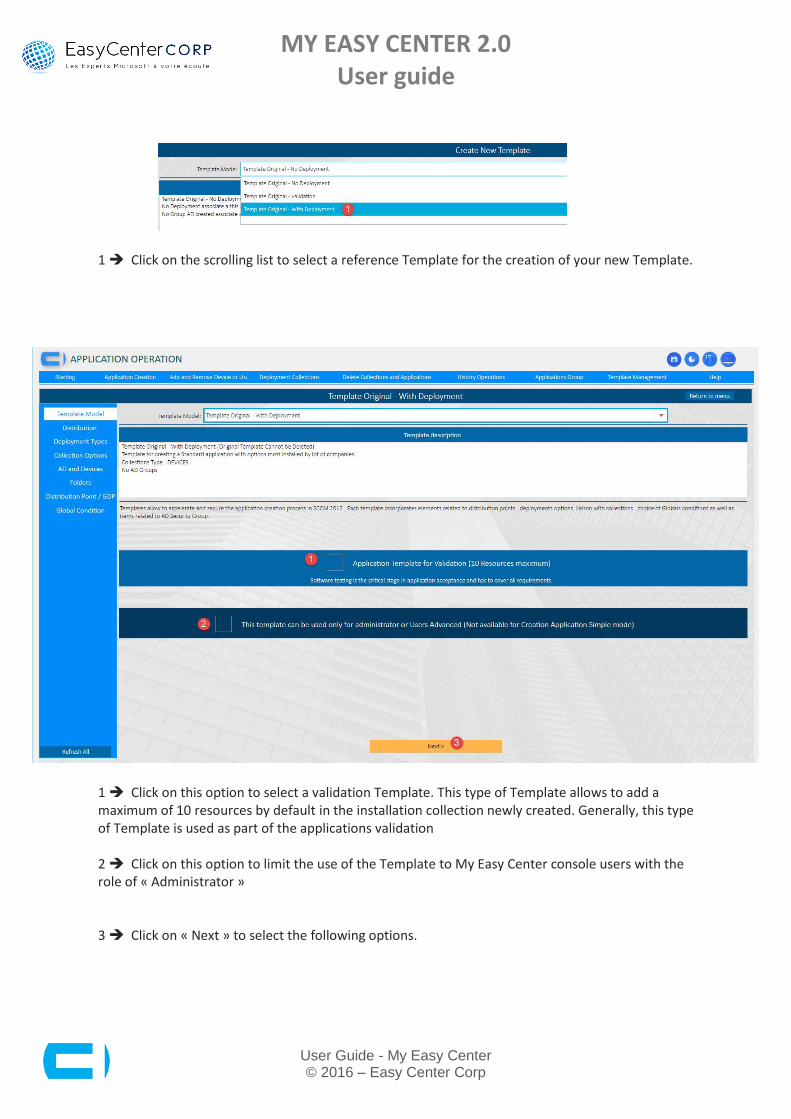
1 Click on the scrolling list to select a reference Template for the creation of your new Template.
1 Click on this option to select a validation Template. This type of Template allows to add a maximum of 10 resources by default in the installation collection newly created. Generally, this type of Template is used as part of the applications validation 2 Click on this option to limit the use of the Template to My Easy Center console users with the role of « Administrator » 3 Click on « Next » to select the following options.

MY EASY CENTER 2.0 User guide
User Guide - My Easy Center © 2016 – Easy Center Corp
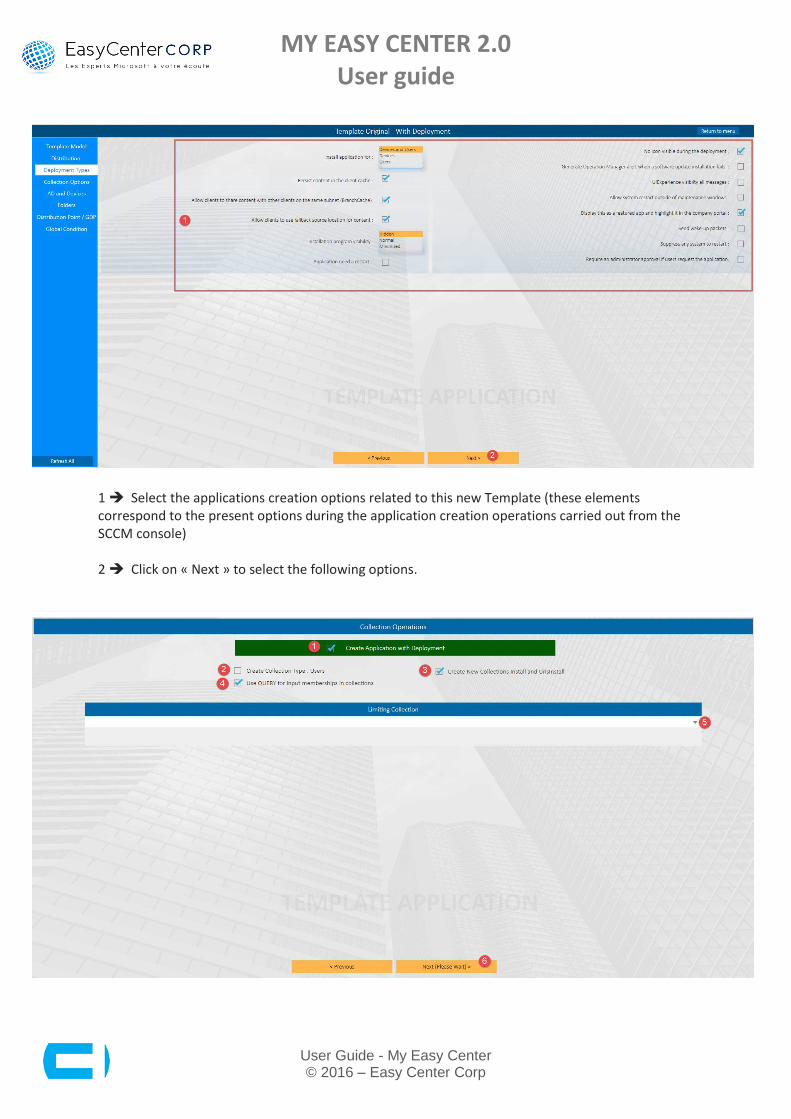
1 Select the applications creation options related to this new Template (these elements correspond to the present options during the application creation operations carried out from the SCCM console) 2 Click on « Next » to select the following options.
MY EASY CENTER 2.0 User guide
User Guide - My Easy Center © 2016 – Easy Center Corp
1 Tick the box to select the option of the application deployment validation 2 Tick the box to specify the type of contained resources related to the creation phase of the installation and uninstallation collections 3 Tick the box to validate the creation of the installation and uninstallation collections related to the application newly created 4 Tick the box to define the adherence rule to the collections of type Request (by default, this option allows the association of collections newly created to AD Security Groups created/generated by the system) 5 Select the collection limit 6 Click on « Next » to select the following options.
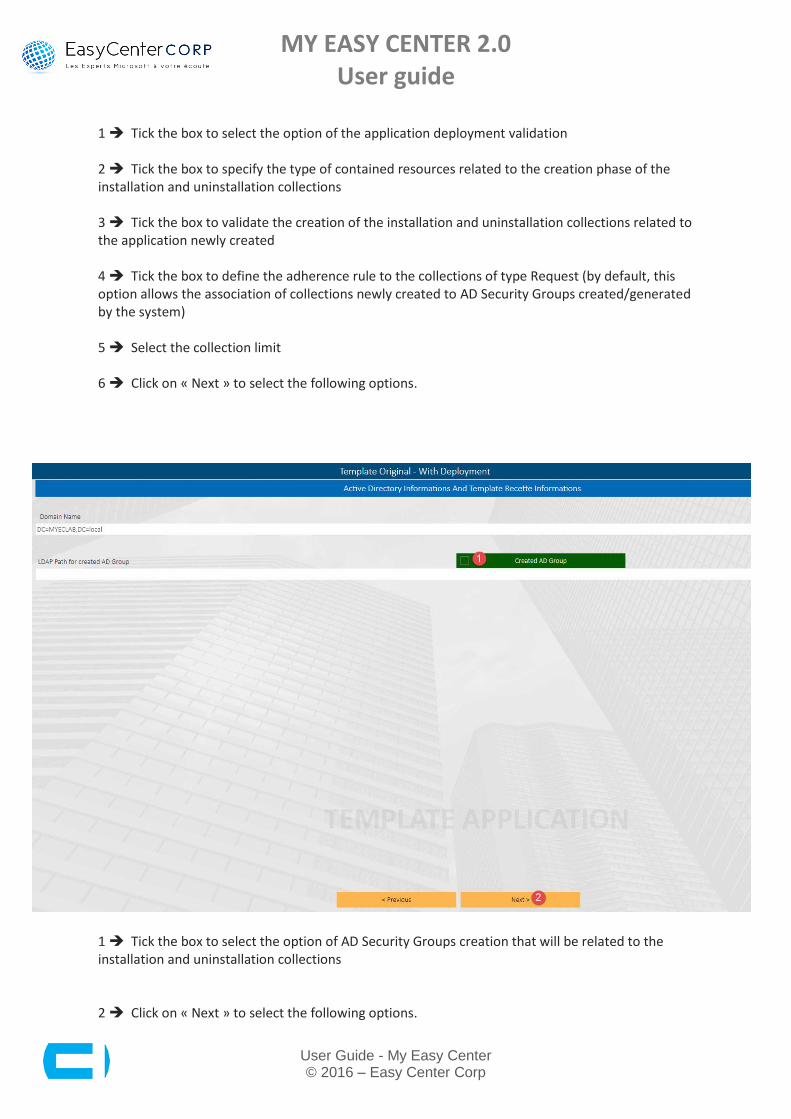
1 Tick the box to select the option of AD Security Groups creation that will be related to the installation and uninstallation collections 2 Click on « Next » to select the following options.

MY EASY CENTER 2.0 User guide
User Guide - My Easy Center © 2016 – Easy Center Corp
1 Select the deposit file of the application newly created 2 Select the deposit file of the installation and uninstallation collections newly created 3 Click on « Next » to select the following options.

MY EASY CENTER 2.0 User guide
User Guide - My Easy Center © 2016 – Easy Center Corp
1 Select the deposit file of the application newly created 2 Select the deposit file of the installation and uninstallation collections newly created 3 Click on « Next » to select the following options.

MY EASY CENTER 2.0 User guide
User Guide - My Easy Center © 2016 – Easy Center Corp
1 Select the operating system related to the Global Conditions to define in your application 2 Select the operating system to be taken into account (multiple choice is possible) 3 Select your choice 4 Add your choices by clicking on « Add Remove Selected OS » button.
1 Select the language(s) related to the Global Conditions to define in your application 2 Select the language(s) to be taken into account (multiple choice is possible) 3 Select your choice 4 Add your choice by clicking on « Add Remove your language » button.
MY EASY CENTER 2.0 User guide
User Guide - My Easy Center © 2016 – Easy Center Corp
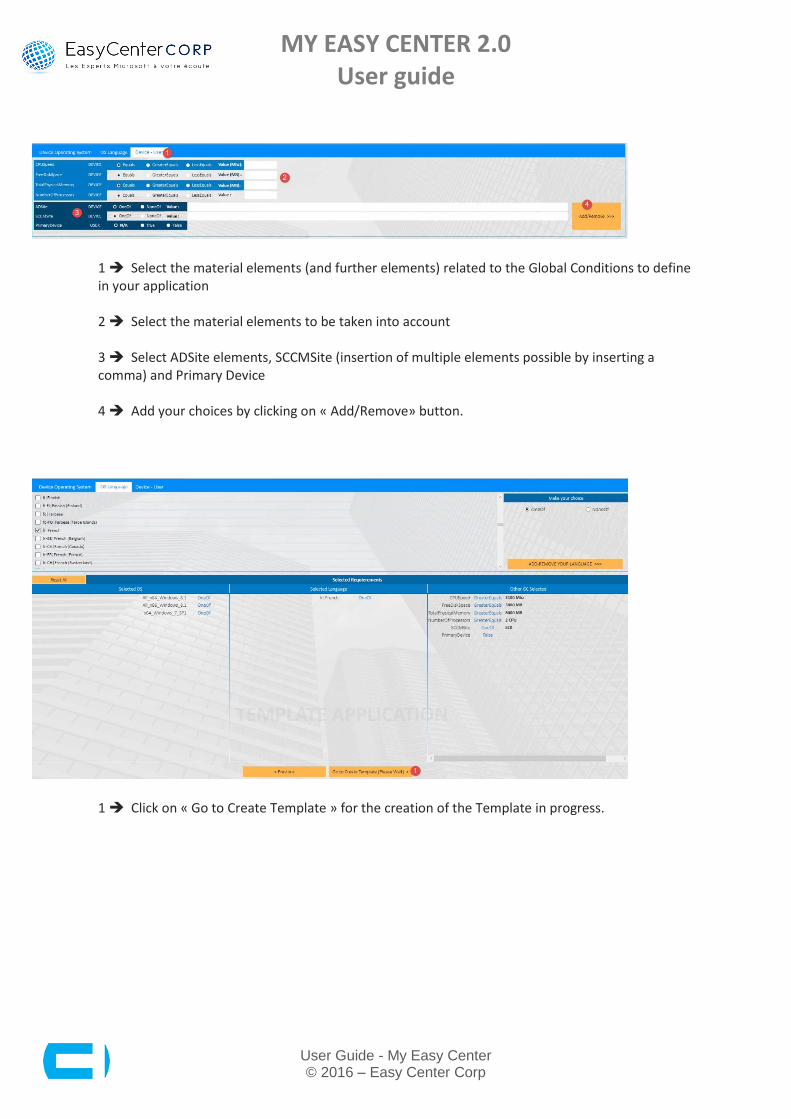
1 Select the material elements (and further elements) related to the Global Conditions to define in your application 2 Select the material elements to be taken into account 3 Select ADSite elements, SCCMSite (insertion of multiple elements possible by inserting a comma) and Primary Device 4 Add your choices by clicking on « Add/Remove» button.
1 Click on « Go to Create Template » for the creation of the Template in progress.
MY EASY CENTER 2.0 User guide
User Guide - My Easy Center © 2016 – Easy Center Corp
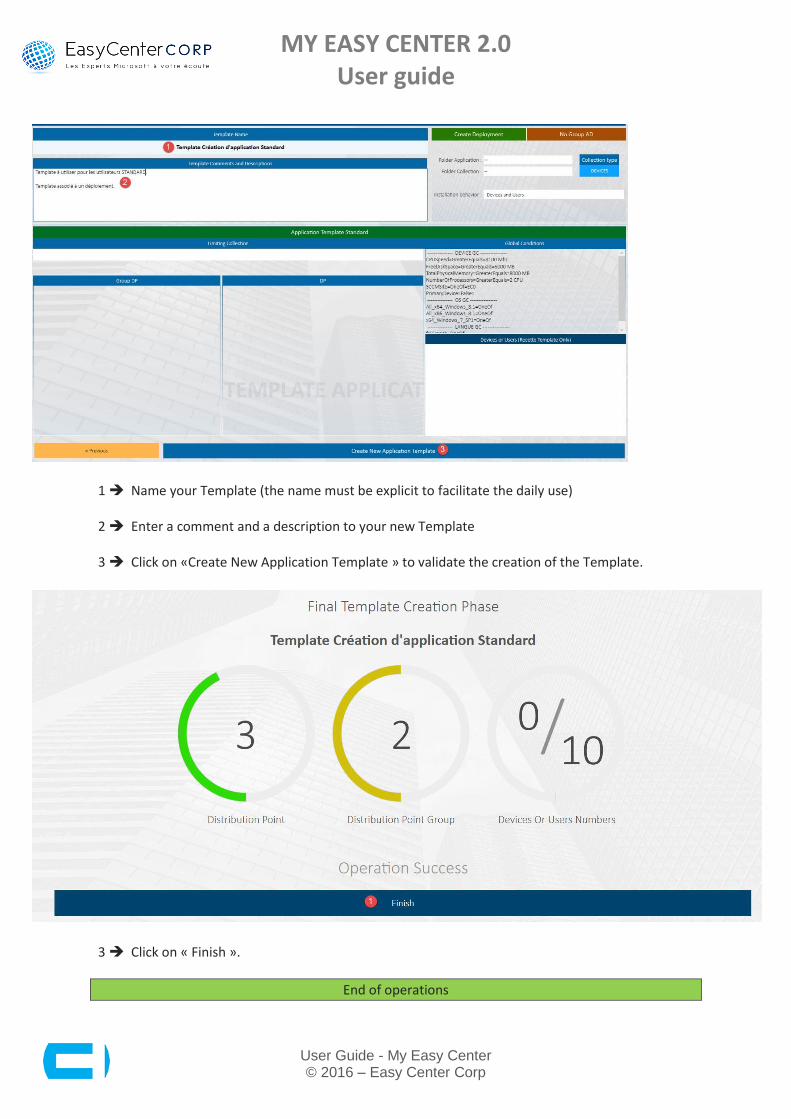
1 Name your Template (the name must be explicit to facilitate the daily use) 2 Enter a comment and a description to your new Template 3 Click on «Create New Application Template » to validate the creation of the Template.
3 Click on « Finish ».
End of operations

MY EASY CENTER 2.0 User guide
User Guide - My Easy Center © 2016 – Easy Center Corp
1 Click on « Read Template » to access the visualization of an existing Template.

MY EASY CENTER 2.0 User guide
User Guide - My Easy Center © 2016 – Easy Center Corp
1 Select the Template to visualize in the scrolling list. 2 Click on the button that corresponds to the options groups desired:
Distribution Options
Deployment Type
Collection Options
Folders And Devices Or Users
DP and Global Conditions
1 Click on « Deployment Type » button to visualize the elements related to the deployment Types.
MY EASY CENTER 2.0 User guide
User Guide - My Easy Center © 2016 – Easy Center Corp
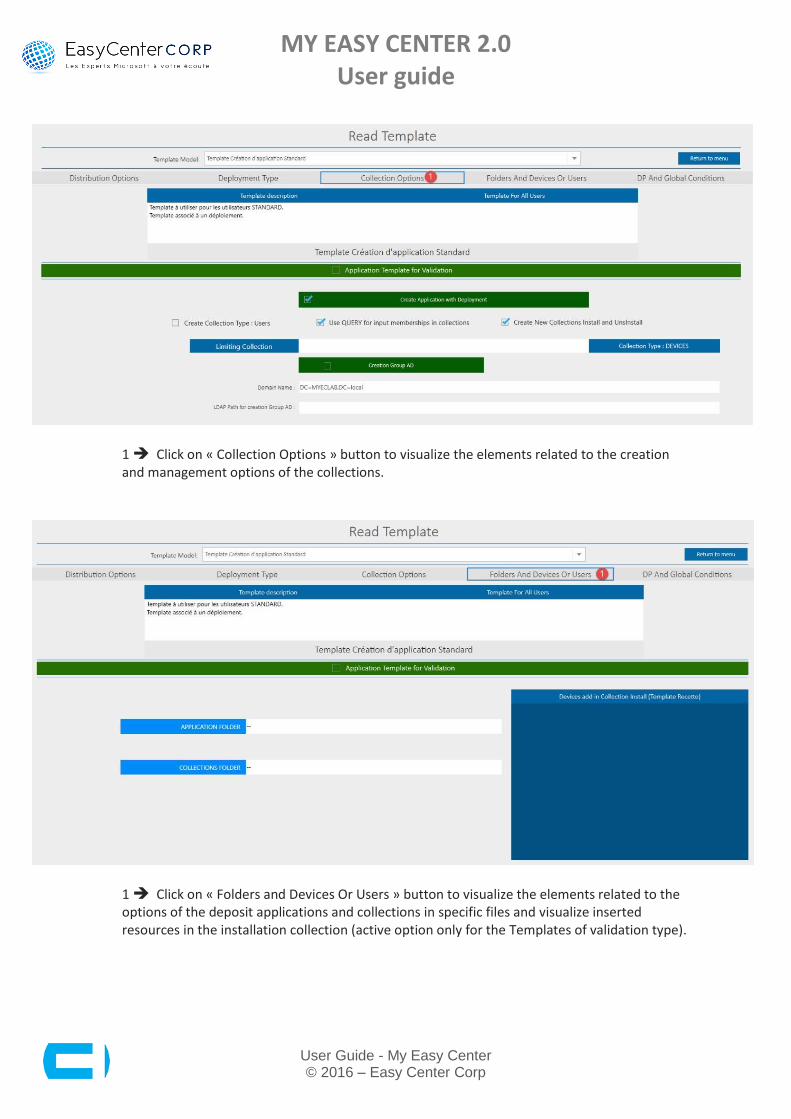
1 Click on « Collection Options » button to visualize the elements related to the creation and management options of the collections.
1 Click on « Folders and Devices Or Users » button to visualize the elements related to the options of the deposit applications and collections in specific files and visualize inserted resources in the installation collection (active option only for the Templates of validation type).
MY EASY CENTER 2.0 User guide
User Guide - My Easy Center © 2016 – Easy Center Corp
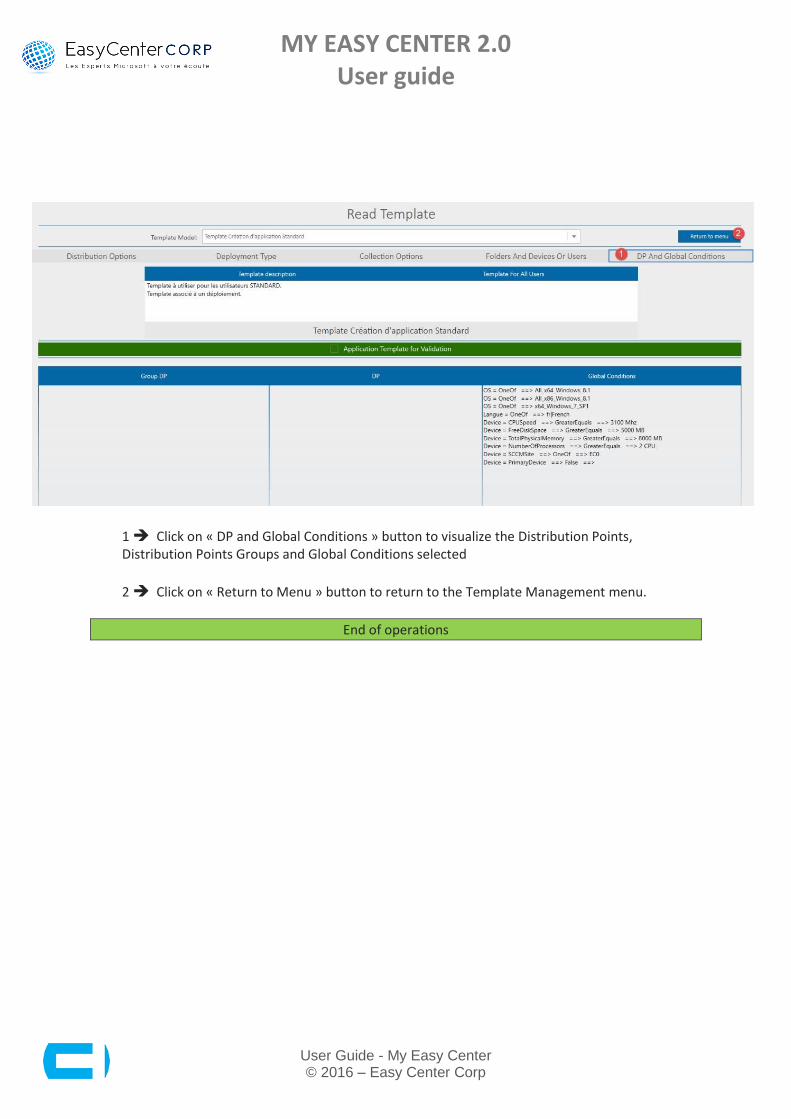
1 Click on « DP and Global Conditions » button to visualize the Distribution Points, Distribution Points Groups and Global Conditions selected
2 Click on « Return to Menu » button to return to the Template Management menu.
End of operations
MY EASY CENTER 2.0 User guide
User Guide - My Easy Center © 2016 – Easy Center Corp
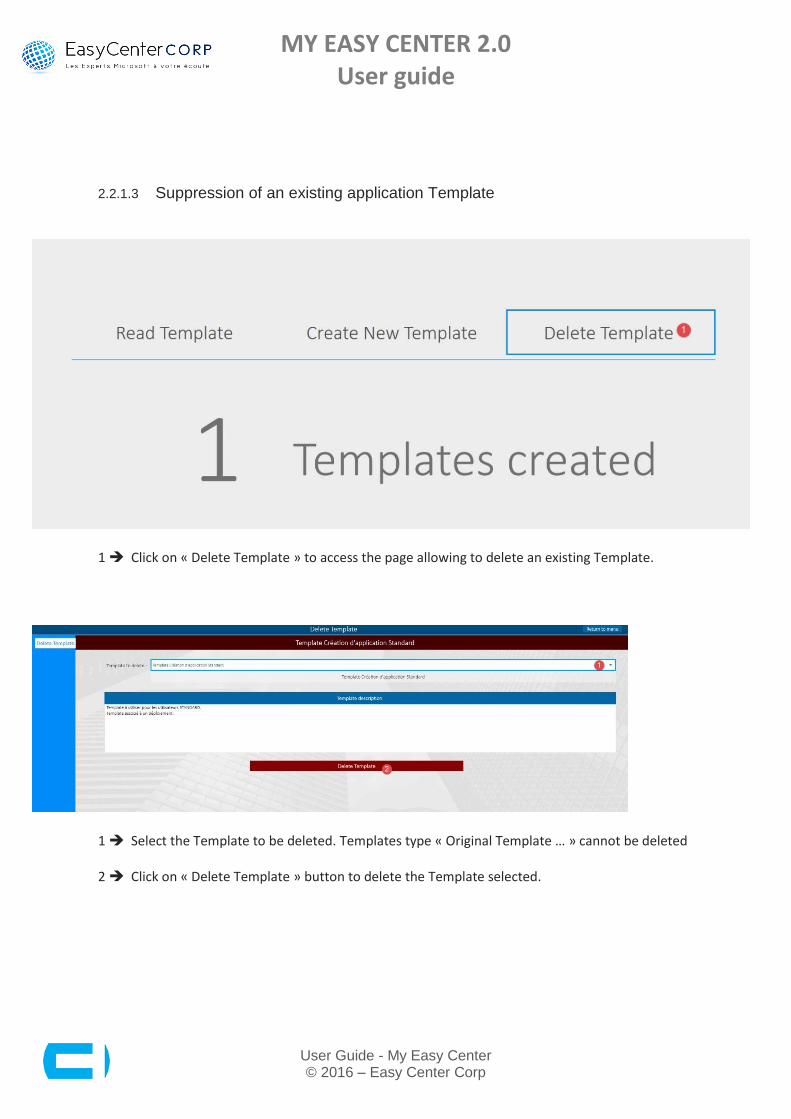
2.2.1.3 Suppression of an existing application Template
1 Click on « Delete Template » to access the page allowing to delete an existing Template.
1 Select the Template to be deleted. Templates type « Original Template … » cannot be deleted 2 Click on « Delete Template » button to delete the Template selected.
MY EASY CENTER 2.0 User guide
User Guide - My Easy Center © 2016 – Easy Center Corp
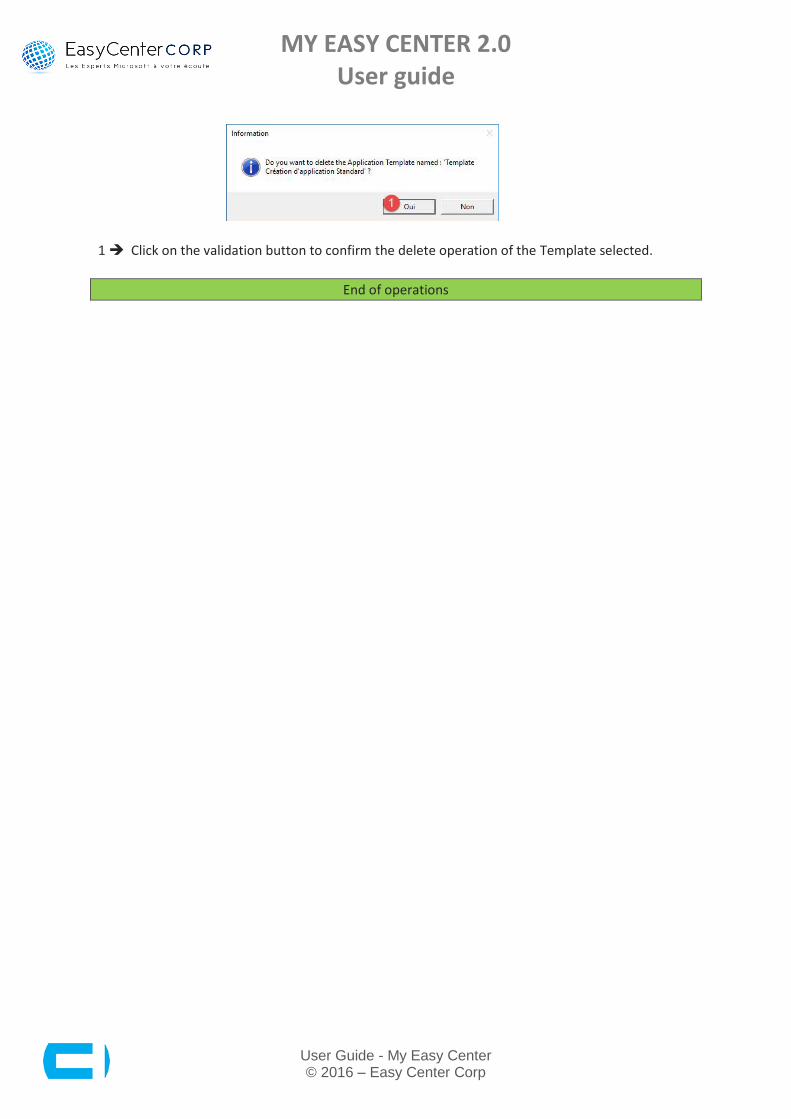
1 Click on the validation button to confirm the delete operation of the Template selected.
End of operations

MY EASY CENTER 2.0 User guide
User Guide - My Easy Center © 2016 – Easy Center Corp
2.2.2 Application Creation
2.2.2.1 Introduction The function allowing the application creation from My Easy Center console permit the harmonization of actions and application creation rules. This application creation function can be performed in different ways according to needs:
Application creation without any specific knowledge on the creation mode of an application from SCCM. This method is based on the use of application Templates defined beforehand
Application creation for advanced users. This method is based on the use of application Templates defined beforehand with the possibility to modify each parameter defined in the Template
Multiple application creation for advanced users. This method is generally used for the complex application creation, for the complex creation of the validation platform or training room creation….

MY EASY CENTER 2.0 User guide
User Guide - My Easy Center © 2016 – Easy Center Corp
2.2.2.2 Application creation
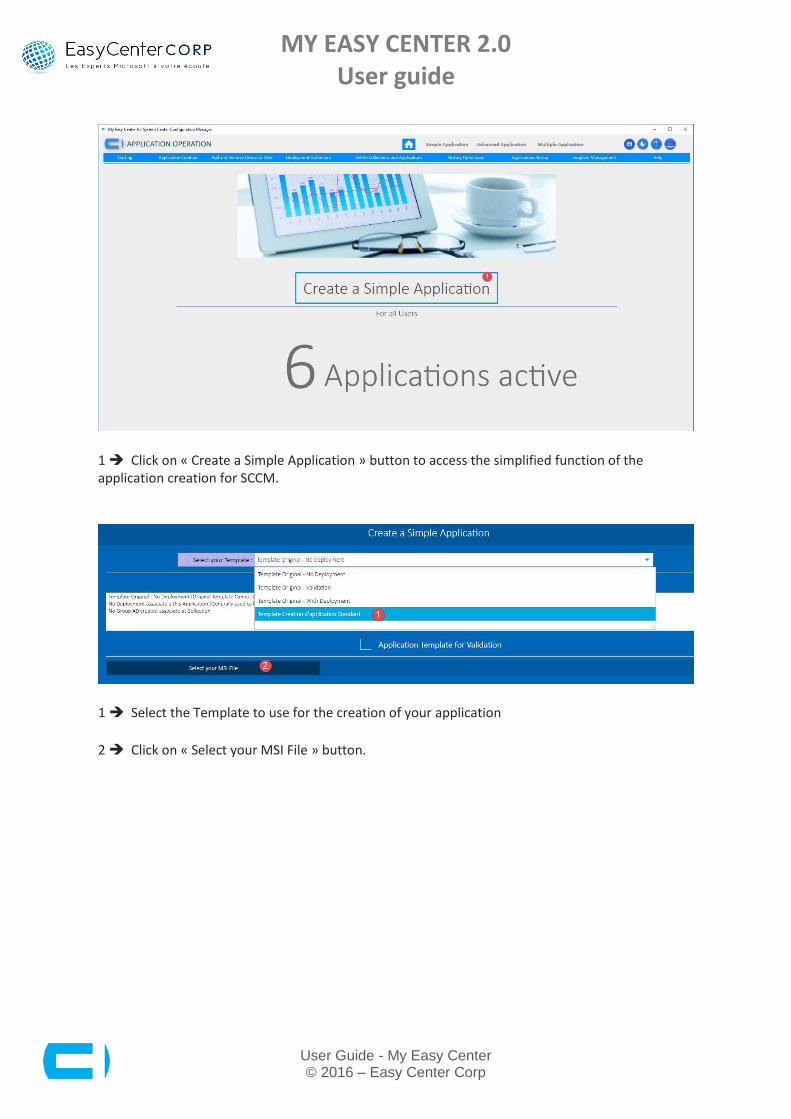
1 Click on « Application Creation » button to access the application creation module for SCCM.
1 Click on « Simple Application » button to access the simplified function of the application creation for SCCM.
MY EASY CENTER 2.0 User guide
User Guide - My Easy Center © 2016 – Easy Center Corp
1 Click on « Create a Simple Application » button to access the simplified function of the application creation for SCCM.
1 Select the Template to use for the creation of your application
2 Click on « Select your MSI File » button.

MY EASY CENTER 2.0 User guide
User Guide - My Easy Center © 2016 – Easy Center Corp
1 Insert UNC application path to integrate in SCCM (MSI file only)
2 Click on « Read MSI Information » button to retrieve properties linked to MSI file selected
It will be possible to modify the following elements:
Application Name (the name of the application within SCCM)
Installation and uninstallation controls of the program.
Application description
Publisher
1 It will be possible to modify the following elements:
Application Name (the name of the application within SCCM)
Installation and uninstallation controls of the program.
Application description
Publisher
2 Click on « Next » button to access the MSI application creation

MY EASY CENTER 2.0 User guide
User Guide - My Easy Center © 2016 – Easy Center Corp
1 / 2/ 3 It will be possible to define the descriptions and comments for the following elements:
Deployment description, comment linked to the application deployment
Comment for the installation collection
Comment for the uninstallation collection
4 Insert a comment for the ongoing operation of the application creation (comment visible in the History module of My Easy Center console) 5 Insert a Ticket N° for this application creation operation (Information visible in the History module of My Easy Center console) 6 Tick the box « I Validate this operation » to continue the application creation process
7 Click on « Next » button to start the application creation operation.
MY EASY CENTER 2.0 User guide
User Guide - My Easy Center © 2016 – Easy Center Corp
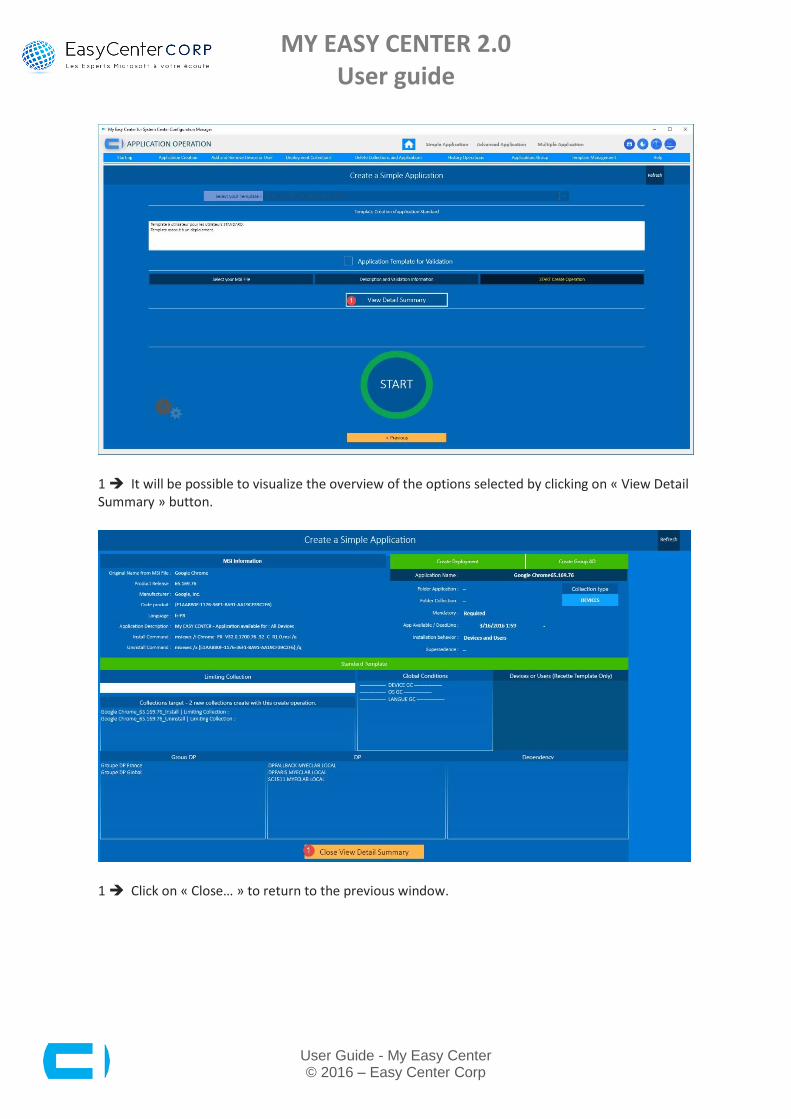
1 It will be possible to visualize the overview of the options selected by clicking on « View Detail Summary » button.
1 Click on « Close… » to return to the previous window.

MY EASY CENTER 2.0 User guide
User Guide - My Easy Center © 2016 – Easy Center Corp
1 Click on « Start» to start the creation operation.
MY EASY CENTER 2.0 User guide
User Guide - My Easy Center © 2016 – Easy Center Corp
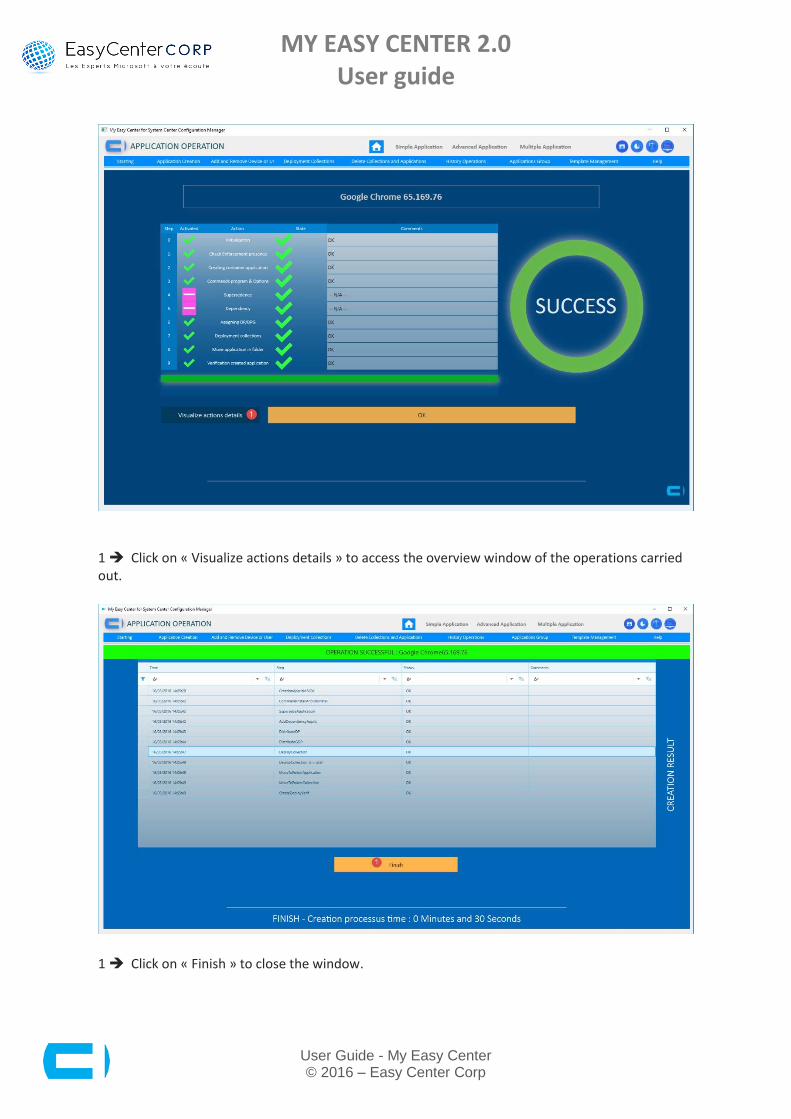
1 Click on « Visualize actions details » to access the overview window of the operations carried out.
1 Click on « Finish » to close the window.
MY EASY CENTER 2.0 User guide
User Guide - My Easy Center © 2016 – Easy Center Corp
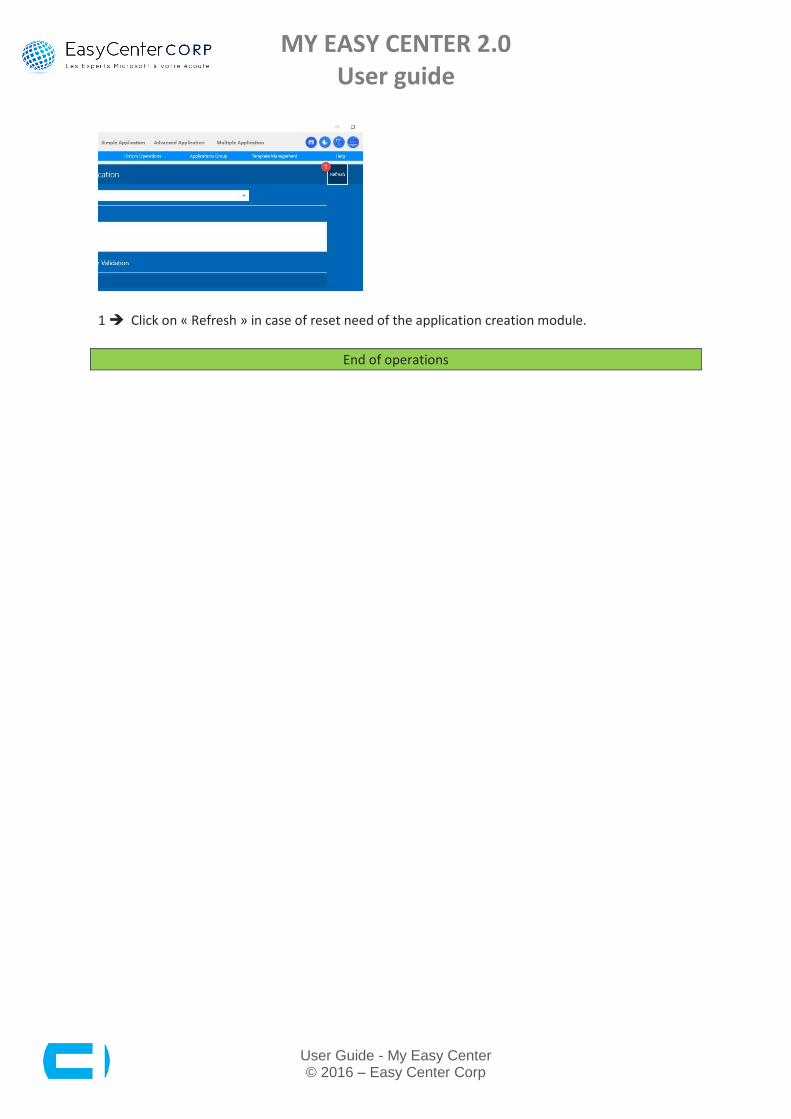
1 Click on « Refresh » in case of reset need of the application creation module.
End of operations
MY EASY CENTER 2.0 User guide
User Guide - My Easy Center © 2016 – Easy Center Corp
2.2.2.3 Application creation for advanced users
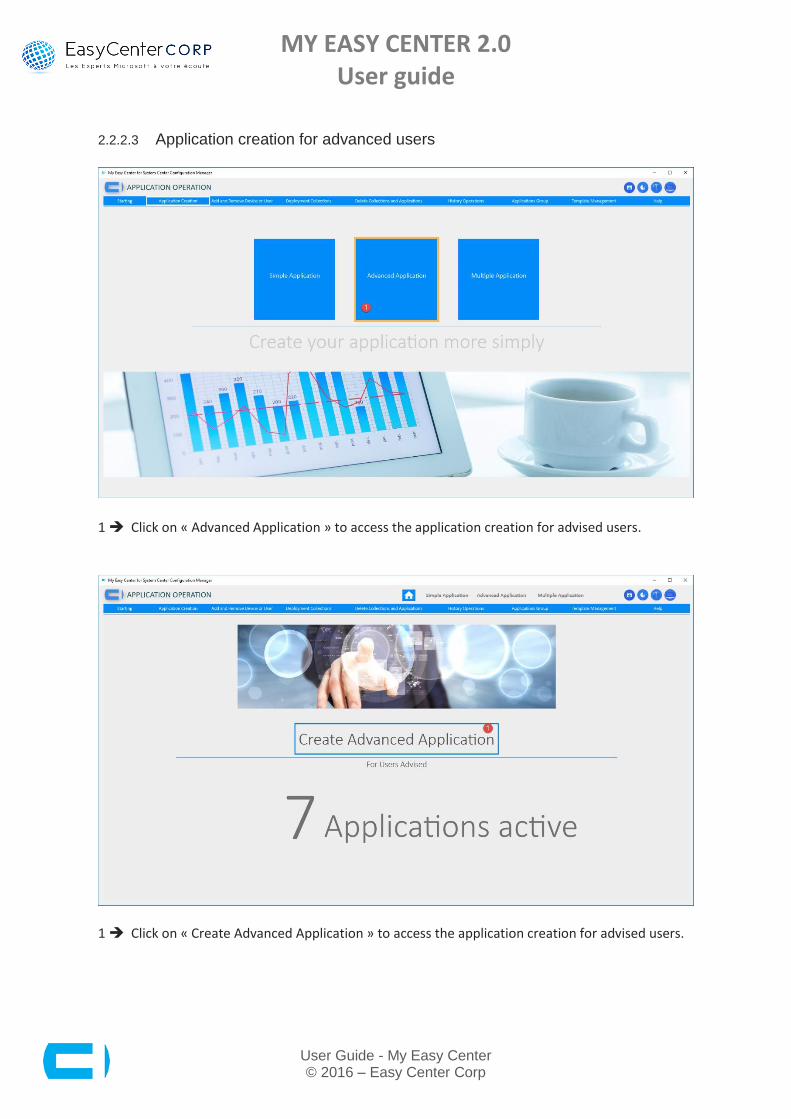
1 Click on « Advanced Application » to access the application creation for advised users.
1 Click on « Create Advanced Application » to access the application creation for advised users.
MY EASY CENTER 2.0 User guide
User Guide - My Easy Center © 2016 – Easy Center Corp
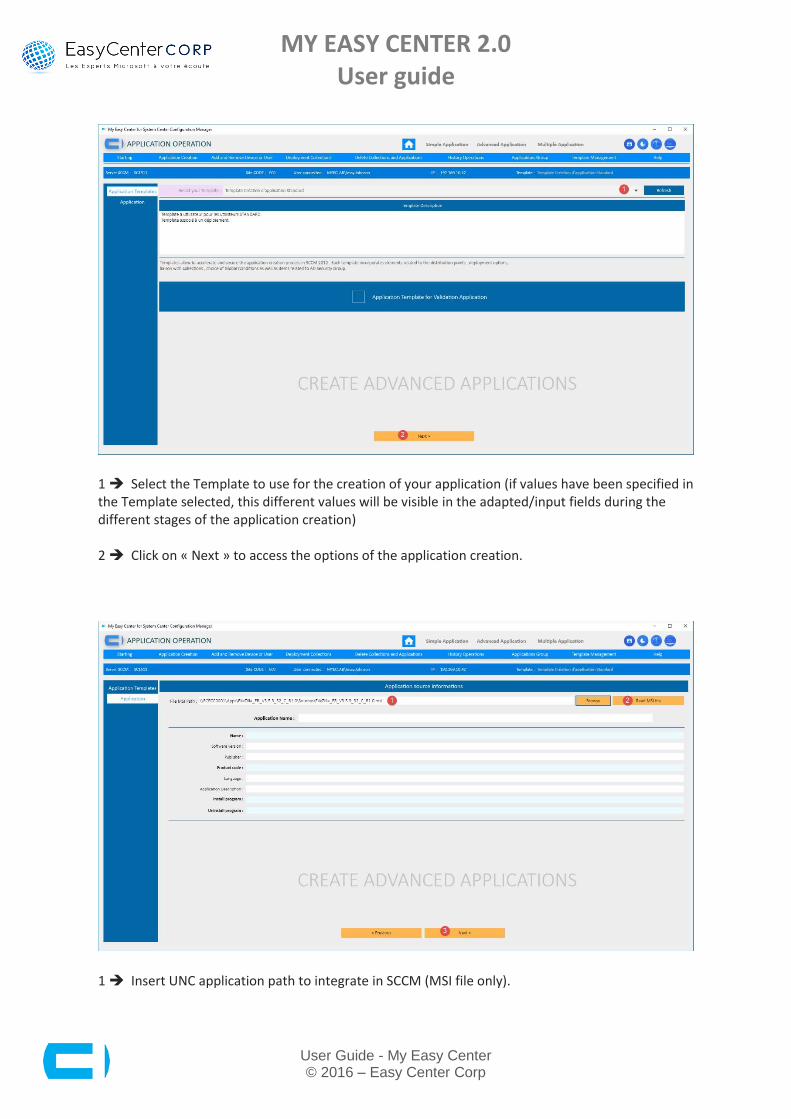
1 Select the Template to use for the creation of your application (if values have been specified in the Template selected, this different values will be visible in the adapted/input fields during the different stages of the application creation) 2 Click on « Next » to access the options of the application creation.
1 Insert UNC application path to integrate in SCCM (MSI file only).
MY EASY CENTER 2.0 User guide
User Guide - My Easy Center © 2016 – Easy Center Corp
2 Click on « Read MSI File » button to retrieve properties linked to MSI file selected. It will be possible to modify the following elements:
Application Name (the name of the application within SCCM)
Installation and uninstallation controls of the program.
Application description
Publisher 3 Click on « Next » button to access the MSI application creation.
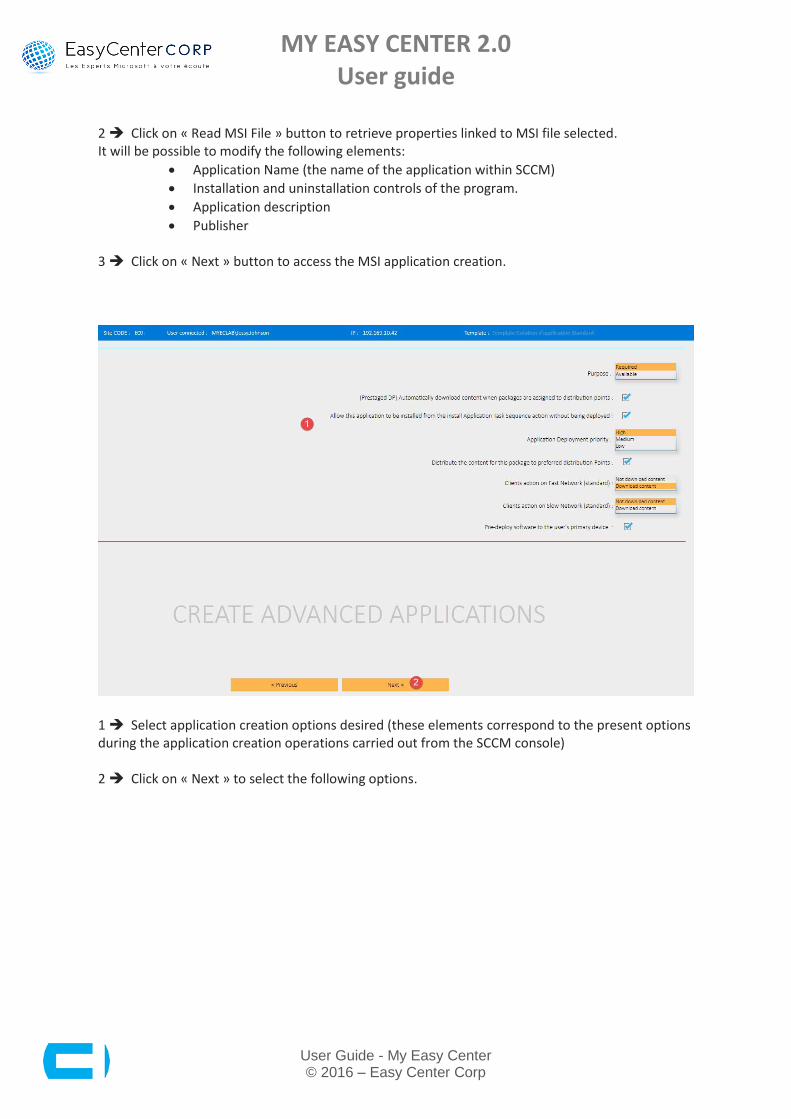
1 Select application creation options desired (these elements correspond to the present options during the application creation operations carried out from the SCCM console) 2 Click on « Next » to select the following options.
MY EASY CENTER 2.0 User guide
User Guide - My Easy Center © 2016 – Easy Center Corp
1 Select application creation options desired (these elements corresponds to the present options during the application creation operations carried out from the SCCM console). 2 Click on « Next » to select the following options.

MY EASY CENTER 2.0 User guide
User Guide - My Easy Center © 2016 – Easy Center Corp
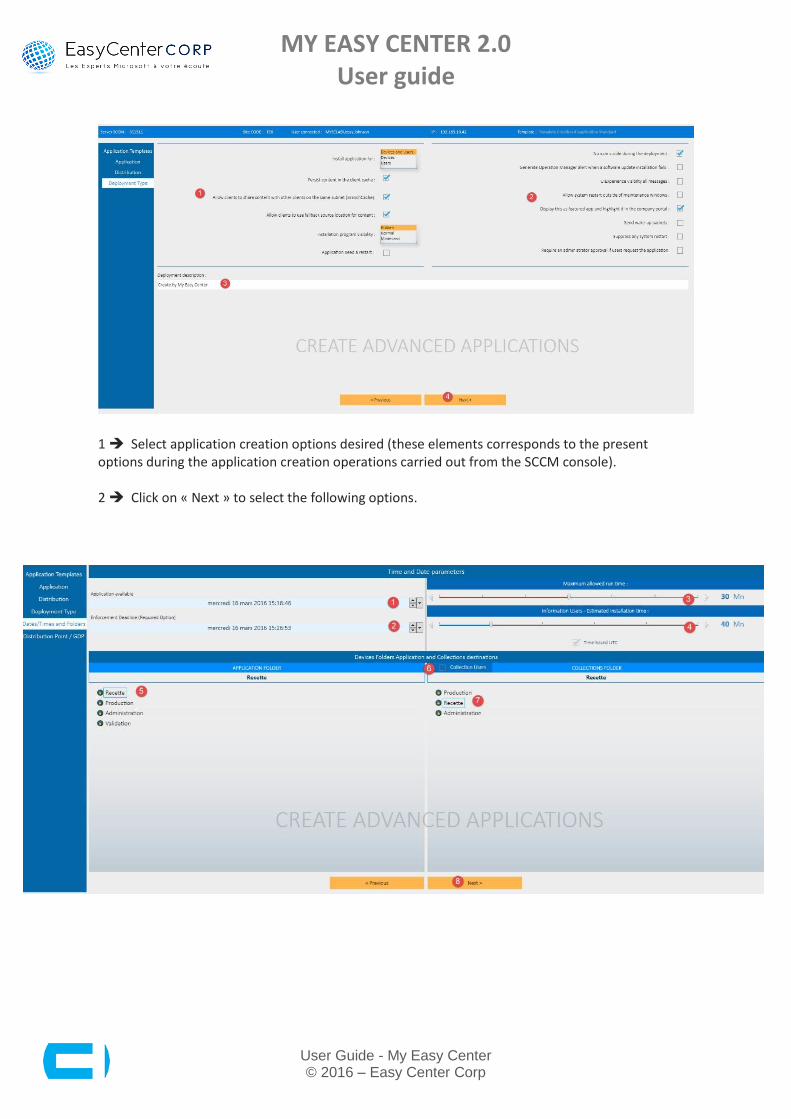
1 Select the availability date of your application 2 Select the date of the mandatory deployment of your application for a positioned deployment in a « Mandatory » status
3 Specify the maximum allotted time for the execution of the applicative program 4 Specify the estimated allotted time to the installation of the applicative program (Information dedicated to the user) 5 If necessary, specify the deposit file of your application 6 Specify if the collections created (Installation and Uninstallation) will be collections dedicated to the insertion of Users type resources
7 If necessary, specify the deposit file of your collections (Installation and Uninstallation) 8 Click on « Next » to select the following options.
1 Select the Distribution Points desired 2 Select the Distribution Points Groups desired 3 Click on « Next » to select the following options.
MY EASY CENTER 2.0 User guide
User Guide - My Easy Center © 2016 – Easy Center Corp
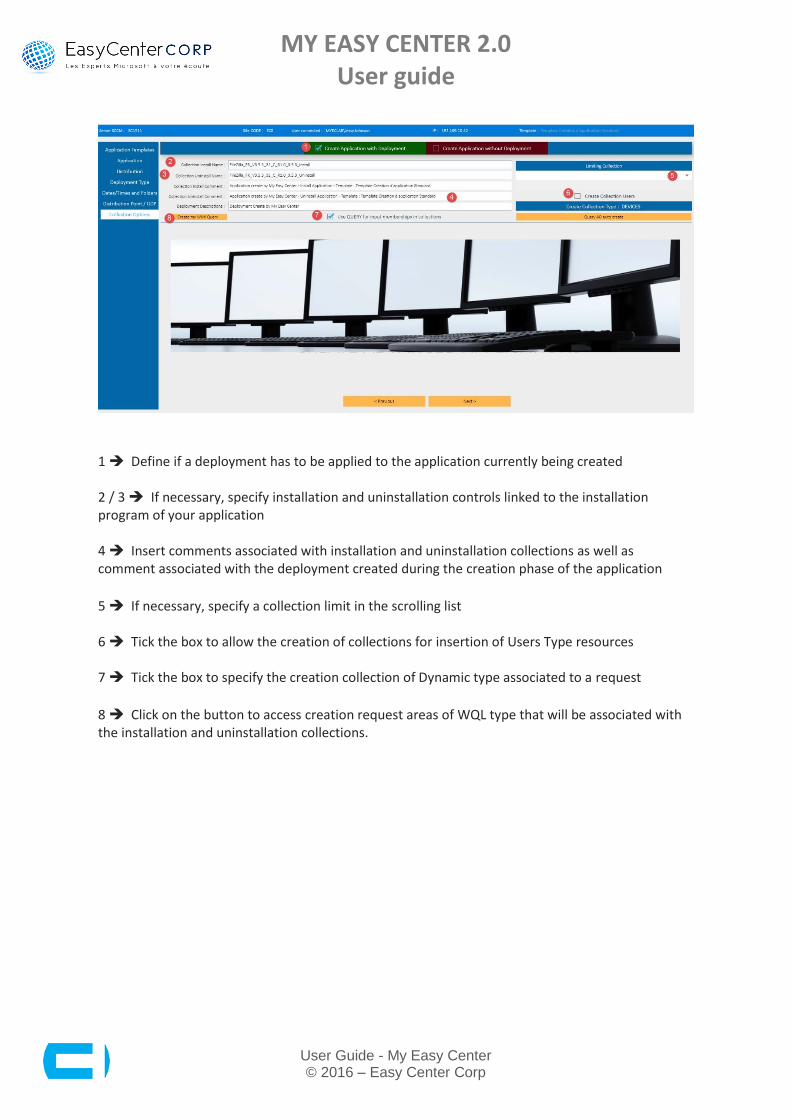
1 Define if a deployment has to be applied to the application currently being created 2 / 3 If necessary, specify installation and uninstallation controls linked to the installation program of your application 4 Insert comments associated with installation and uninstallation collections as well as comment associated with the deployment created during the creation phase of the application
5 If necessary, specify a collection limit in the scrolling list 6 Tick the box to allow the creation of collections for insertion of Users Type resources 7 Tick the box to specify the creation collection of Dynamic type associated to a request
8 Click on the button to access creation request areas of WQL type that will be associated with the installation and uninstallation collections.
MY EASY CENTER 2.0 User guide
User Guide - My Easy Center © 2016 – Easy Center Corp
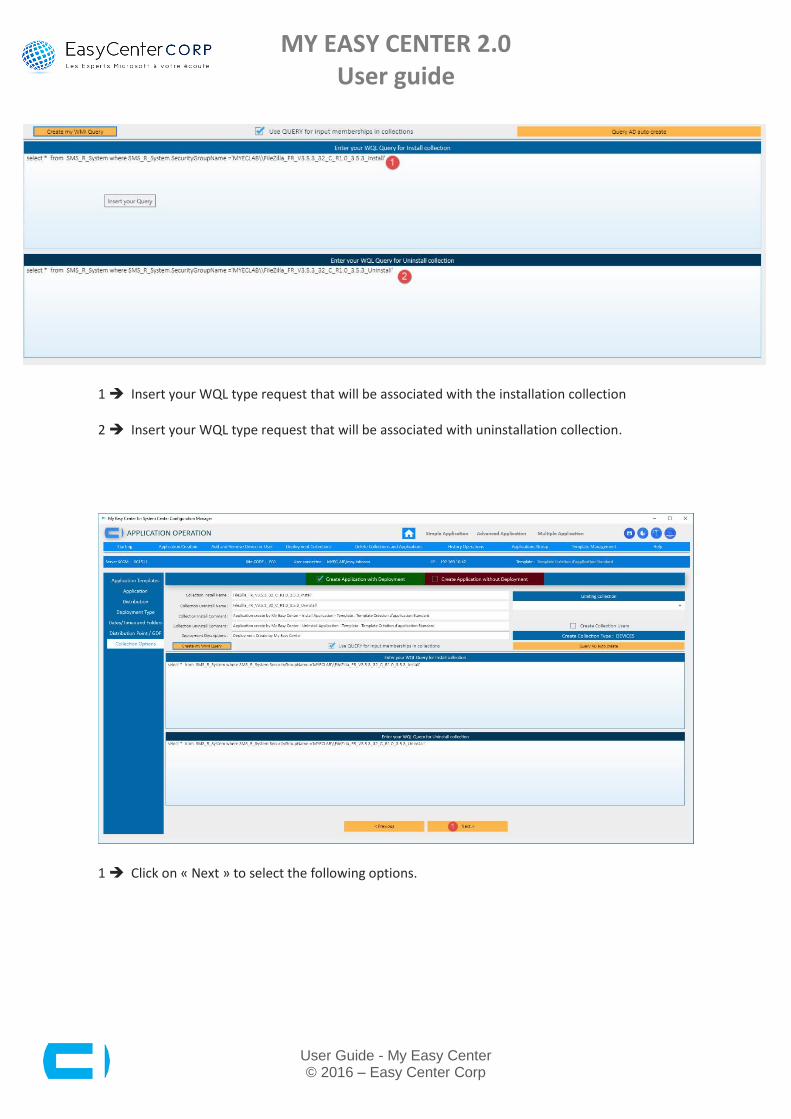
1 Insert your WQL type request that will be associated with the installation collection 2 Insert your WQL type request that will be associated with uninstallation collection.
1 Click on « Next » to select the following options.
MY EASY CENTER 2.0 User guide
User Guide - My Easy Center © 2016 – Easy Center Corp
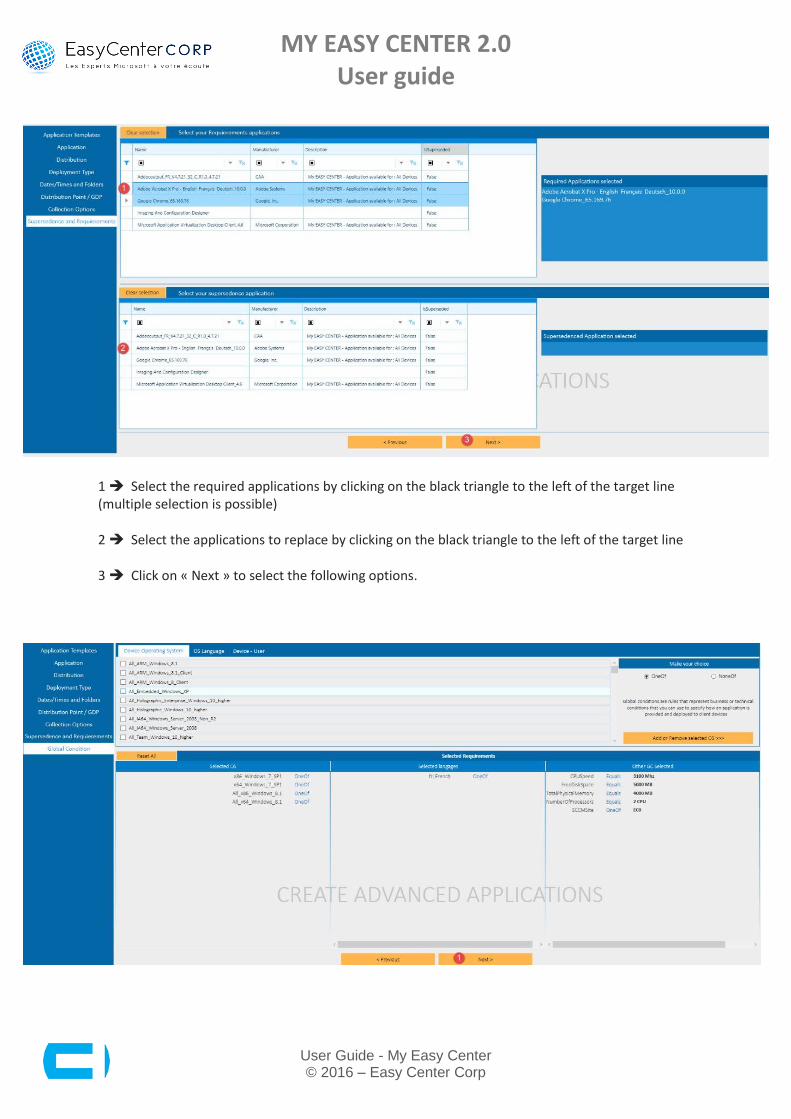
1 Select the required applications by clicking on the black triangle to the left of the target line (multiple selection is possible) 2 Select the applications to replace by clicking on the black triangle to the left of the target line 3 Click on « Next » to select the following options.
MY EASY CENTER 2.0 User guide
User Guide - My Easy Center © 2016 – Easy Center Corp
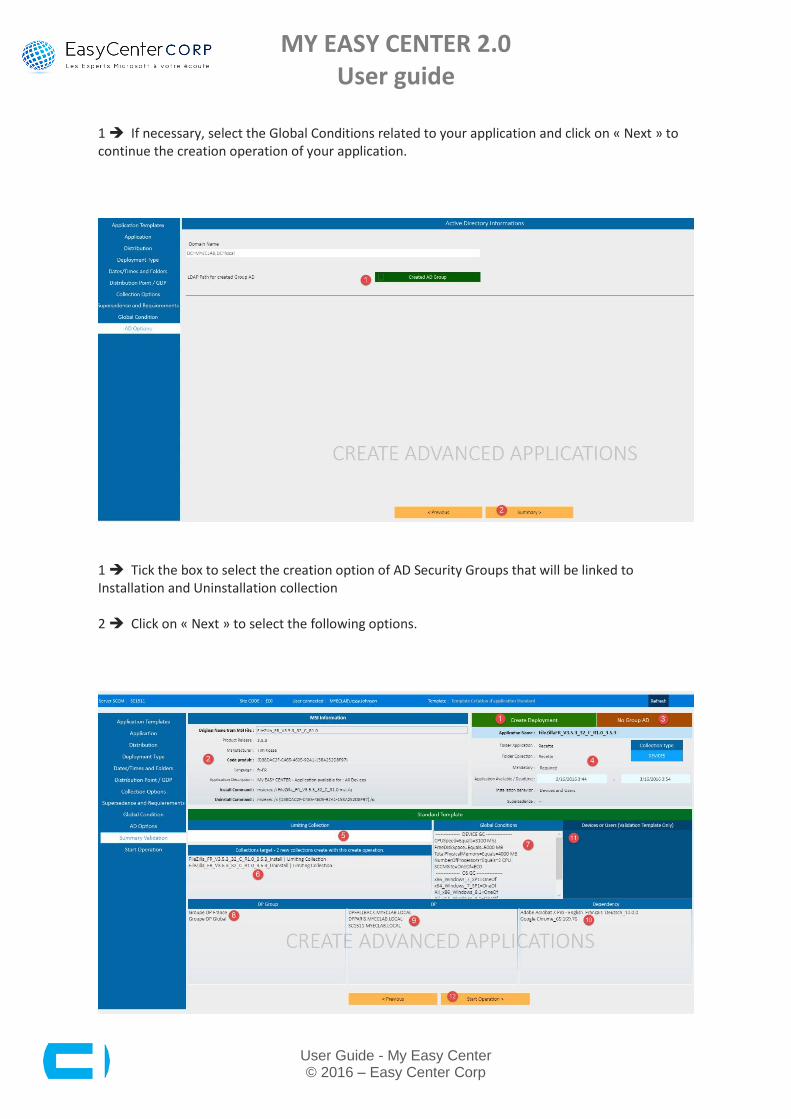
1 If necessary, select the Global Conditions related to your application and click on « Next » to continue the creation operation of your application.
1 Tick the box to select the creation option of AD Security Groups that will be linked to Installation and Uninstallation collection 2 Click on « Next » to select the following options.
MY EASY CENTER 2.0 User guide
User Guide - My Easy Center © 2016 – Easy Center Corp
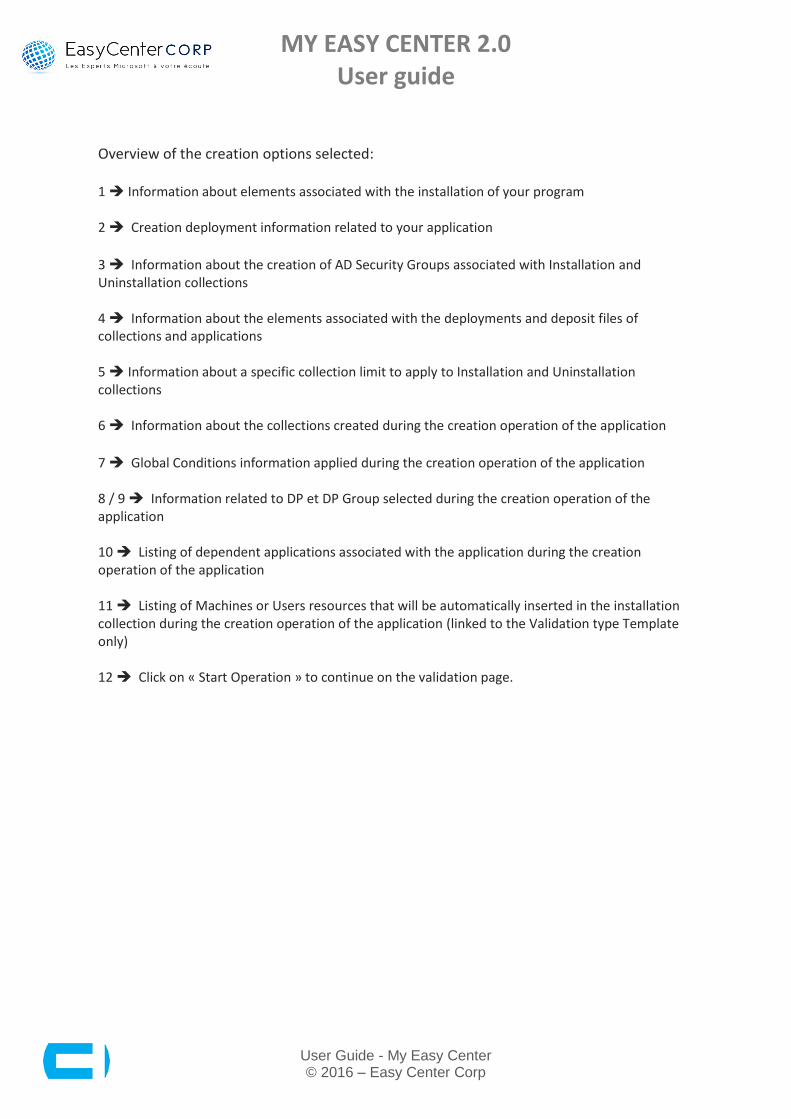
Overview of the creation options selected: 1 Information about elements associated with the installation of your program 2 Creation deployment information related to your application
3 Information about the creation of AD Security Groups associated with Installation and Uninstallation collections 4 Information about the elements associated with the deployments and deposit files of collections and applications 5 Information about a specific collection limit to apply to Installation and Uninstallation collections 6 Information about the collections created during the creation operation of the application
7 Global Conditions information applied during the creation operation of the application 8 / 9 Information related to DP et DP Group selected during the creation operation of the application 10 Listing of dependent applications associated with the application during the creation operation of the application 11 Listing of Machines or Users resources that will be automatically inserted in the installation collection during the creation operation of the application (linked to the Validation type Template only) 12 Click on « Start Operation » to continue on the validation page.

MY EASY CENTER 2.0 User guide
User Guide - My Easy Center © 2016 – Easy Center Corp
1 Insert a comment for the operation in progress 2 Insert your ticket N°(option)
3 Tick the validation box to continue the creation operation 4 Click on « Create Application » button to launch the creation operation of your application.
1 Click on « Summarize Creation Information » to visualize the results of the creation actions realized
MY EASY CENTER 2.0 User guide
User Guide - My Easy Center © 2016 – Easy Center Corp
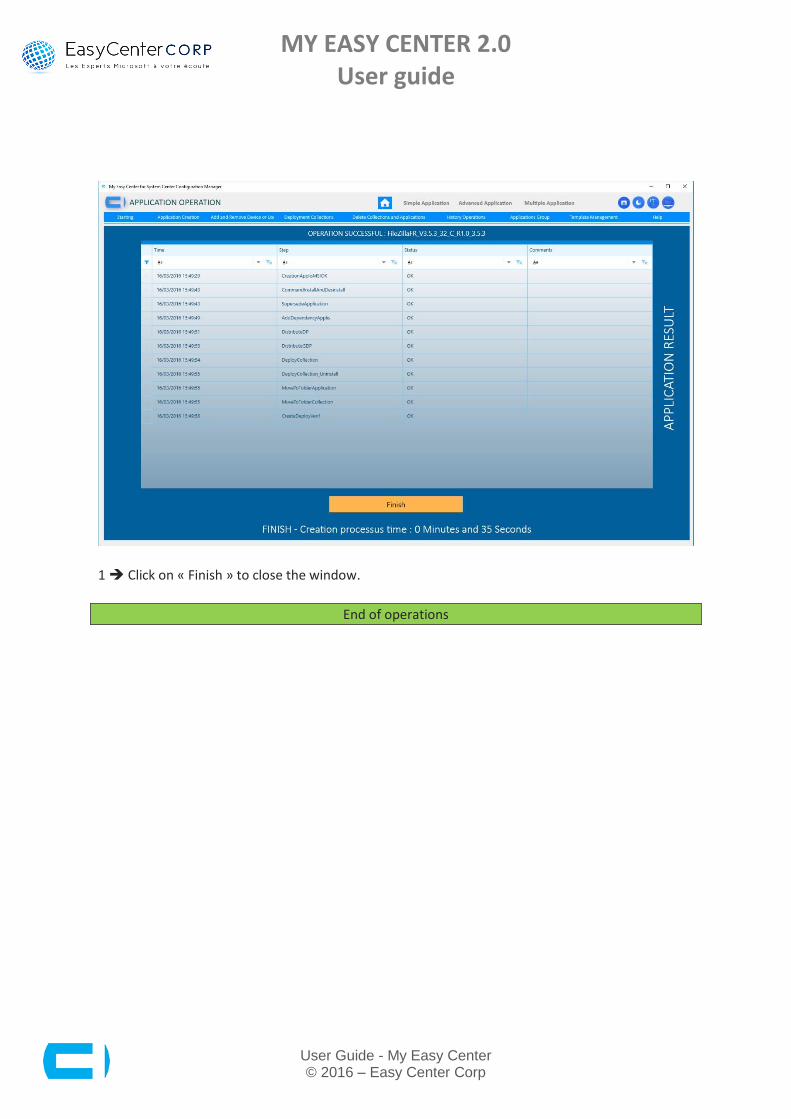
1 Click on « Finish » to close the window.
End of operations
MY EASY CENTER 2.0 User guide
User Guide - My Easy Center © 2016 – Easy Center Corp
2.2.2.4 Application creation in Batch mode
1 Click on « Multiple Applications » button to access the simplified creation function of applications for SCCM.
1 Click on « Create multiple application operations » button to access the creation function of multiple applications for SCCM.

MY EASY CENTER 2.0 User guide
User Guide - My Easy Center © 2016 – Easy Center Corp
1 Import your CSV file containing all your applications with respect for the rules present in the table below:
Element Type Example
*SCCM_ApplicationName Mandatory ActivePerl_EN_V5.14.1402_32_C_R2.0
*TemplateName Mandatory Standard application creation Template
*FileMSI_Path Mandatory \\PCECC0001\Apps\ ActivePerl_EN_V5.14.1402_32_C_R1.0\ ActivePerl_EN_V5.14.1402_32_C_R1.0.msi
*Overribe_All_otherInformations Mandatory (put 0 or 1) 0
**Install_Program Mandatory if "Overribe_All_otherInformations" = 1
**Uninstall_Program Mandatory if "Overribe_All_otherInformations" = 1
Supersedence ActivePerl_EN_V5.14.1402_32_C_R1.0
AppsDeployementComments
**DeployementApplication Mandatory if "Overribe_All_otherInformations" = 1 (put 0 or 1)
**CollectionType Mandatory if "Overribe_All_otherInformations" = 1
**CollectionInstall Obligatoire si "Overribe_All_otherInformations" = 1
**CollectionUninstall Obligatoire si "Overribe_All_otherInformations" = 1

MY EASY CENTER 2.0 User guide
User Guide - My Easy Center © 2016 – Easy Center Corp
**LimitingCollection Mandatory if "Overribe_All_otherInformations" = 1
Comments_Collection_created
**CreateADGroup Mandatory if "Overribe_All_otherInformations" = 1 (put 0 or 1)
Dependence1 AccessDatabaseEngine_FR_V14.0.4763.1000_C_R1.0
Dependence2 ActivePerl_EN_V5.14.1402_32_C_R1.0
Dependence3 AdeliaStudio11_FR_V112.6.02035_32_C_R1.0
Dependence4 ARKADIN_FR_V5.0_32_C_R1.0
Dependence5
(Use the file model in the directory: Samples Files\Example file Import Application multiple.csv. Do not delete the first 2 lines of the file) 2 Click « Read File » button to extract the information present in the CSV file imported
3 Click on « Next » button to access the following information.
MY EASY CENTER 2.0 User guide
User Guide - My Easy Center © 2016 – Easy Center Corp
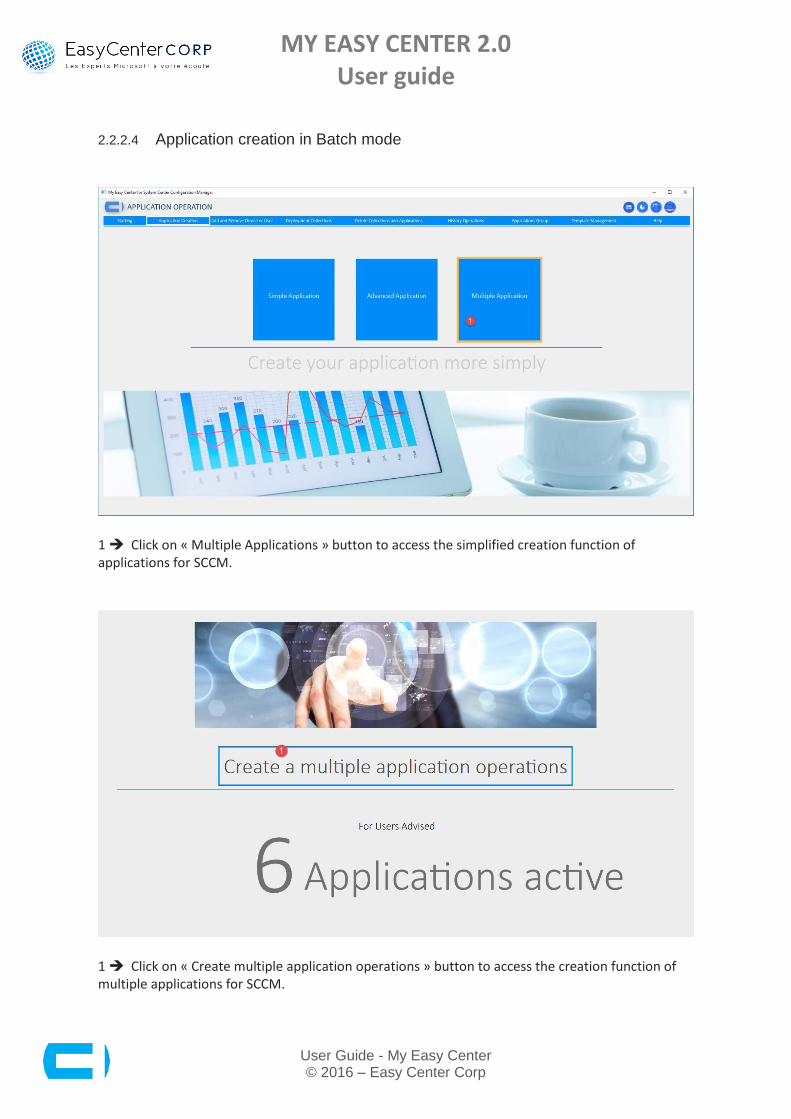
2 Insert a comment linked to the multiple creations operation in progress
3 Insert the ticket N° linked to the creation request (Option)
4 Click on « Start » to start the operations.
1 Click « Ok ».
MY EASY CENTER 2.0 User guide
User Guide - My Easy Center © 2016 – Easy Center Corp
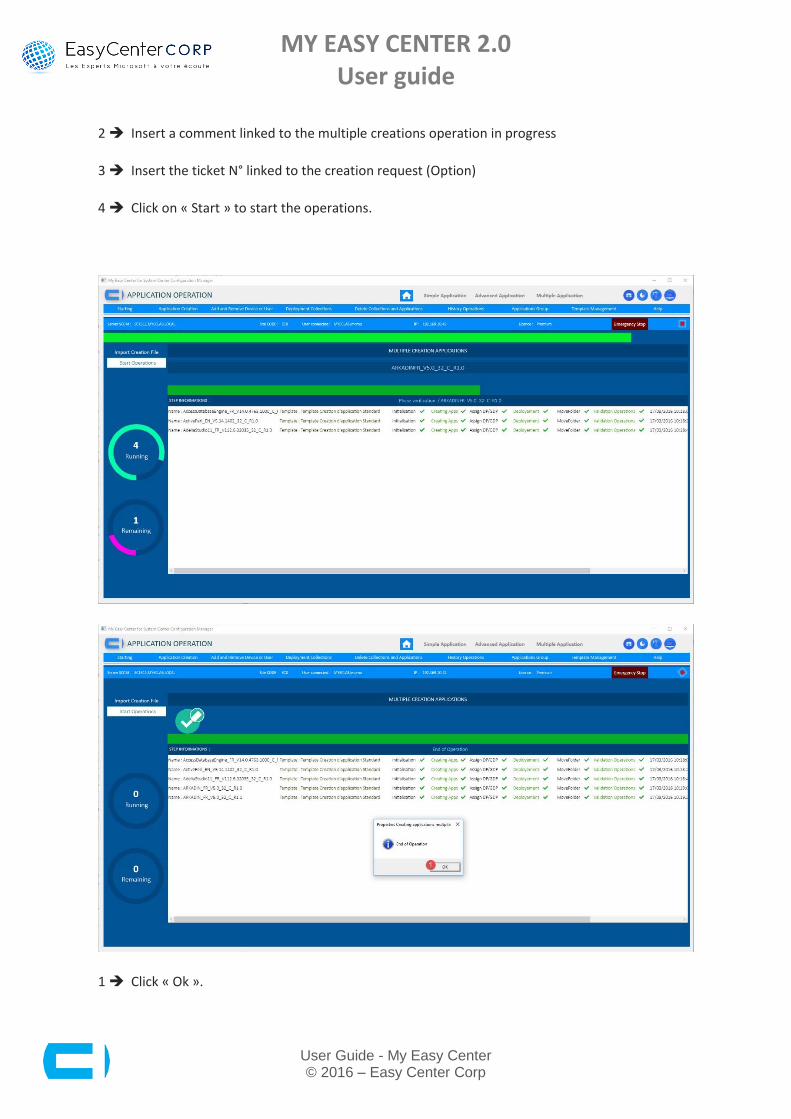
1 Click on « Finish ».
End of operations
MY EASY CENTER 2.0 User guide
User Guide - My Easy Center © 2016 – Easy Center Corp
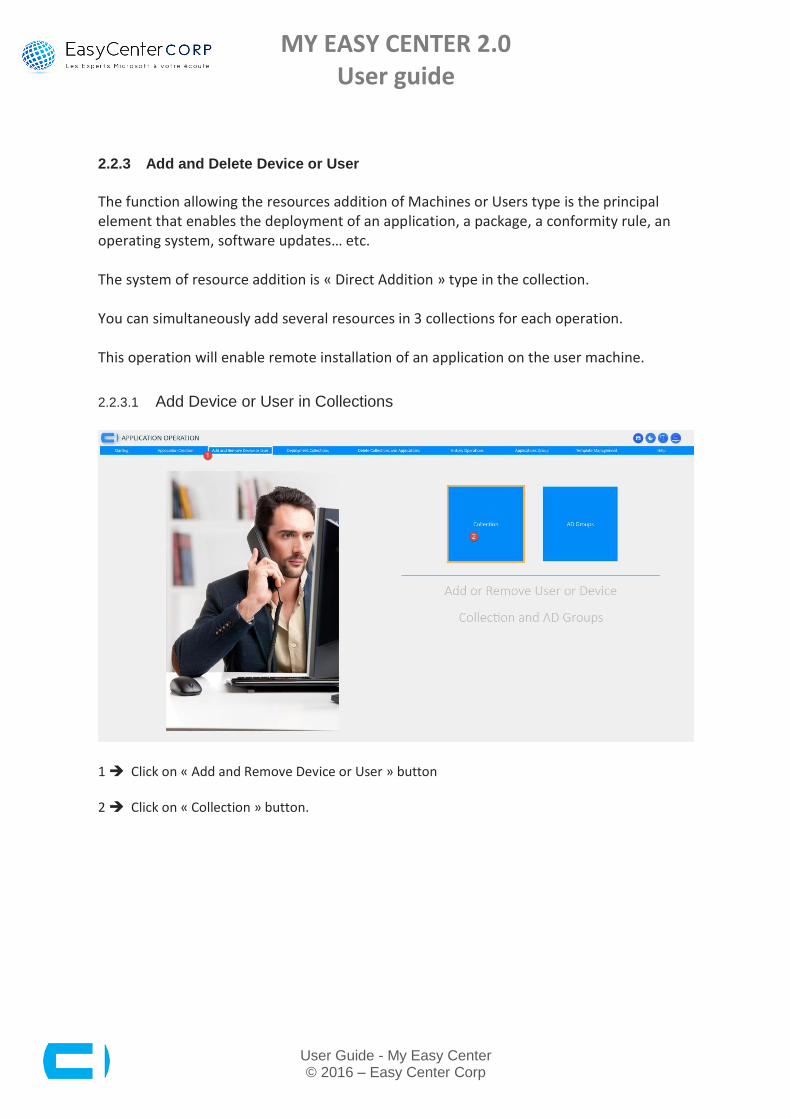
2.2.3 Add and Delete Device or User
The function allowing the resources addition of Machines or Users type is the principal element that enables the deployment of an application, a package, a conformity rule, an operating system, software updates… etc. The system of resource addition is « Direct Addition » type in the collection. You can simultaneously add several resources in 3 collections for each operation. This operation will enable remote installation of an application on the user machine.
2.2.3.1 Add Device or User in Collections
1 Click on « Add and Remove Device or User » button 2 Click on « Collection » button.
MY EASY CENTER 2.0 User guide
User Guide - My Easy Center © 2016 – Easy Center Corp
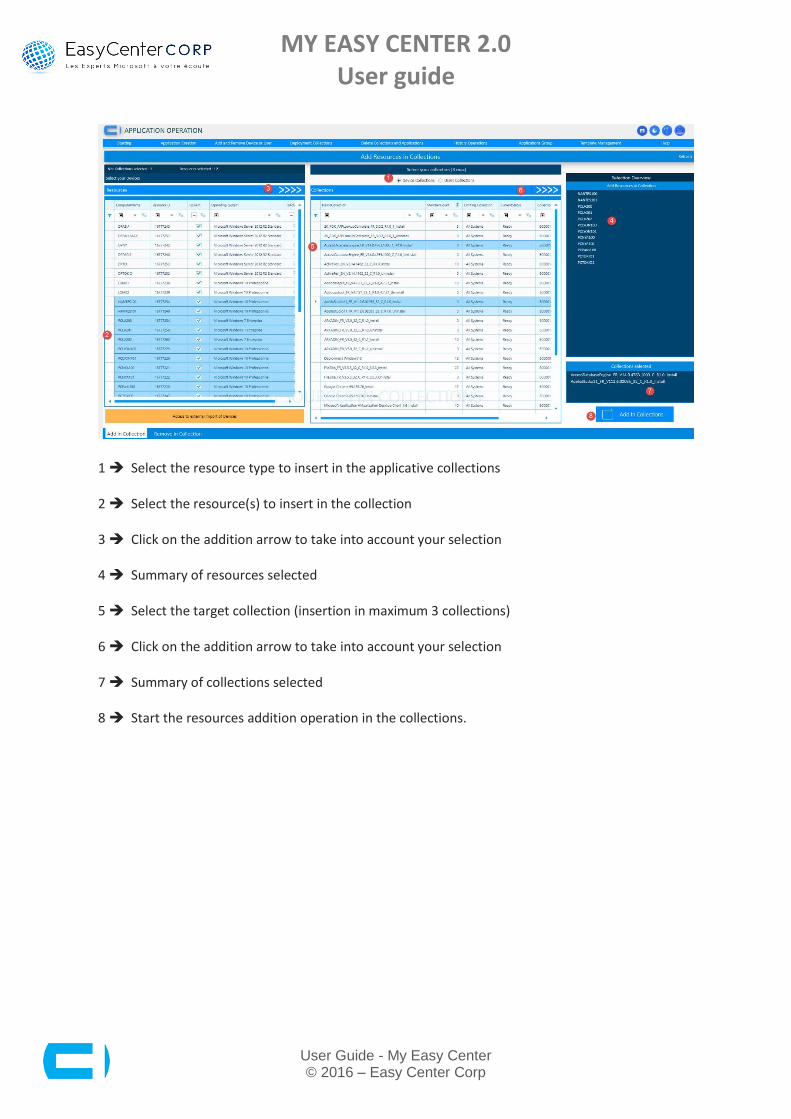
1 Select the resource type to insert in the applicative collections 2 Select the resource(s) to insert in the collection 3 Click on the addition arrow to take into account your selection 4 Summary of resources selected 5 Select the target collection (insertion in maximum 3 collections) 6 Click on the addition arrow to take into account your selection 7 Summary of collections selected 8 Start the resources addition operation in the collections.

MY EASY CENTER 2.0 User guide
User Guide - My Easy Center © 2016 – Easy Center Corp
1 Information related to the target collections 2 Reminder of the target collections 3 / 4 Insert a comment and ticket N° for this resources addition action 5 Validate the additions operation 6 Validate the resources addition operation in the collections.

MY EASY CENTER 2.0 User guide
User Guide - My Easy Center © 2016 – Easy Center Corp
1 / 2 Status overview (Failure or Operation Success) 3 Reminder related to the target collections 4 Status chart on the operations carried out (Failure or operation success) 5 Chart allowing to view the resources percentage having a compliance status in the collection 6 End of operation.
Fin des opérations
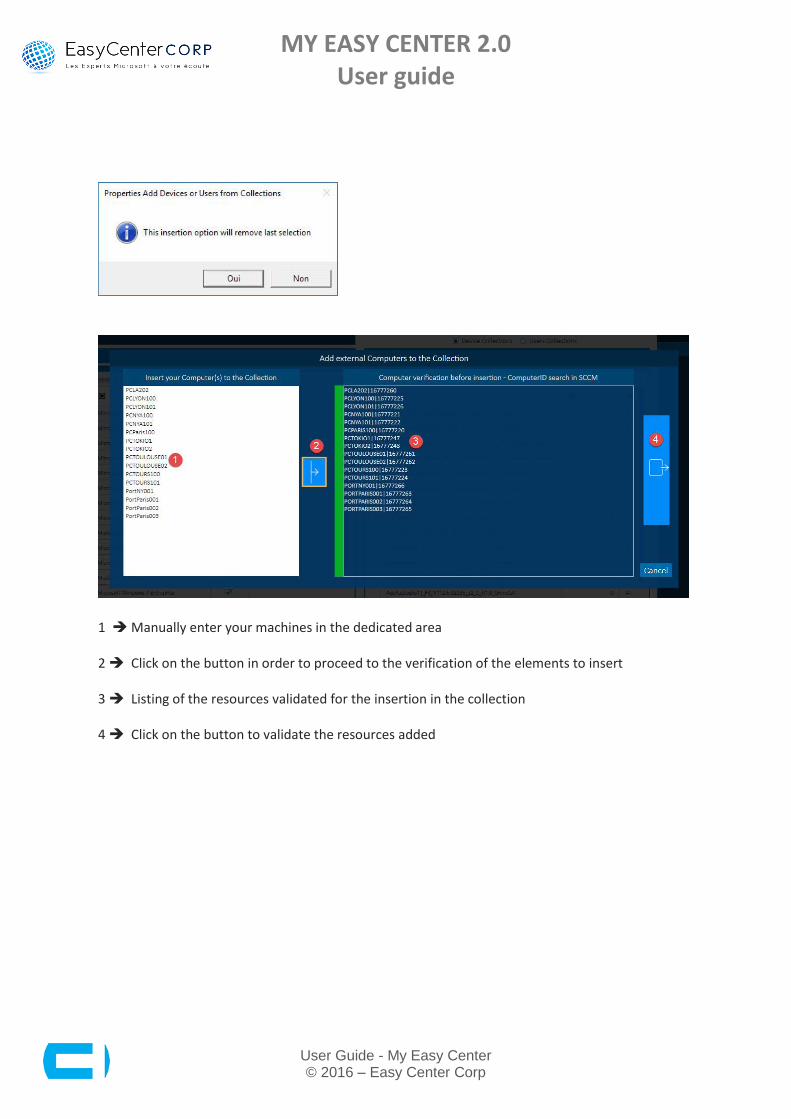
You can carry out the insertion machines operation in manual mode. It will be possible to insert machines via direct addition of machines.
1 Click on « Access to external import of devices » button.
MY EASY CENTER 2.0 User guide
User Guide - My Easy Center © 2016 – Easy Center Corp
1 Manually enter your machines in the dedicated area 2 Click on the button in order to proceed to the verification of the elements to insert 3 Listing of the resources validated for the insertion in the collection 4 Click on the button to validate the resources added
MY EASY CENTER 2.0 User guide
User Guide - My Easy Center © 2016 – Easy Center Corp
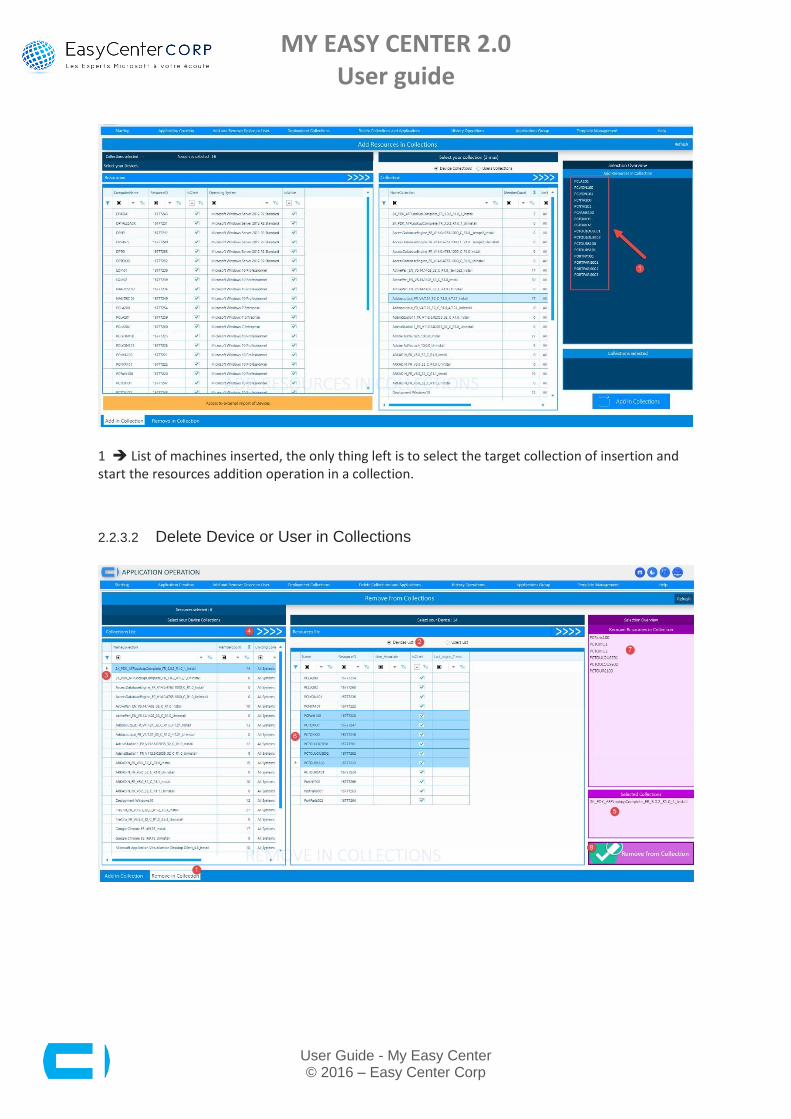
1 List of machines inserted, the only thing left is to select the target collection of insertion and start the resources addition operation in a collection.
2.2.3.2 Delete Device or User in Collections

MY EASY CENTER 2.0 User guide
User Guide - My Easy Center © 2016 – Easy Center Corp
1 Click on « Remove in Collection » tab to access the resources remove window of a collection 2 Select the Resources type to remove from applicative collections (Devices or Users) 3 Select the target collection 4 Click on the arrow to take into account your selection 5 Name of the collection selected 6 Select the resources to remove from the target collection 7 Click on the arrow to take into account your selection 7 Overview of the resources selected 8 Start the operation allowing to remove resources from a collection.
1 Information related to the target collections 2 Reminder related to the target collection 3 Insert a comment et ticket N° for this resources removal action 4 Validate the operation allowing the resources removal of a collection 5 Validate the operation.

MY EASY CENTER 2.0 User guide
User Guide - My Easy Center © 2016 – Easy Center Corp
1 / 2 Status overview (Failure or operation success) 3 End of operation.
End of operations

MY EASY CENTER 2.0 User guide
User Guide - My Easy Center © 2016 – Easy Center Corp
2.2.4 Add and Delete Device or User in AD Groups
The function allowing the resources addition or removal of Machines or Users type is the principal element that enables the deployment of an application, a package, a conformity rule, an operating system, software updates…etc. The resources addition/removal system is directly carried out in the AD application Group. You can simultaneously add several resources in 3 AD application Groups for each operation carried out.
2.2.4.1 Add Device or User in AD Groups
1 Click on « Add and Remove Device or User » button 2 Click on « AD Groups » button.

MY EASY CENTER 2.0 User guide
User Guide - My Easy Center © 2016 – Easy Center Corp
2 Select the resources type to insert in the applicative collections 3 Select the resource(s) to insert in the collection 4 Click on the addition arrow to take into account your selection 5 Overview of the resources selected 6 Select the target collection (insertion in maximum 3 Collections) 7 Click on the addition arrow to take into account your selection 8 Overview of the collections selected 9 Start the resources addition operation in the AD applications Groups.
1 Information related to the target collections 1 Reminder related to the target collections 2 Insert a comment et ticket N° for this resources addition action
MY EASY CENTER 2.0 User guide
User Guide - My Easy Center © 2016 – Easy Center Corp
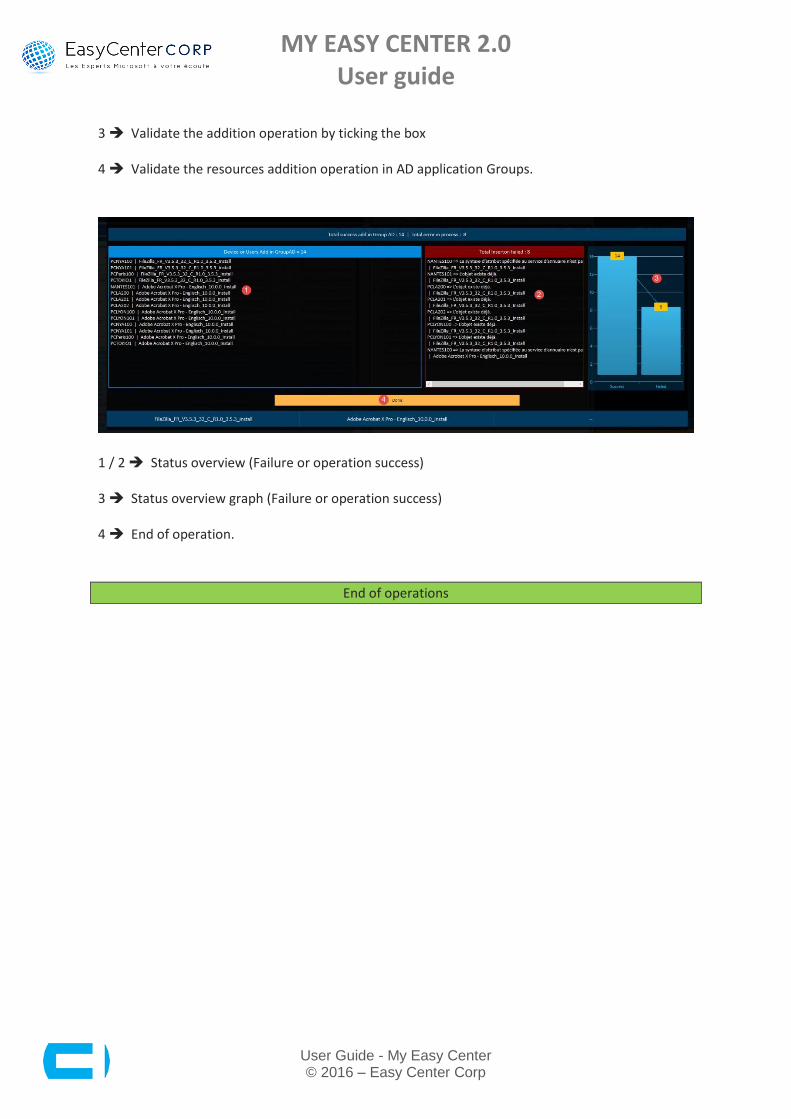
3 Validate the addition operation by ticking the box 4 Validate the resources addition operation in AD application Groups.
1 / 2 Status overview (Failure or operation success) 3 Status overview graph (Failure or operation success) 4 End of operation.
End of operations
MY EASY CENTER 2.0 User guide
User Guide - My Easy Center © 2016 – Easy Center Corp
2.2.4.2 Delete Device or User in AD Groups
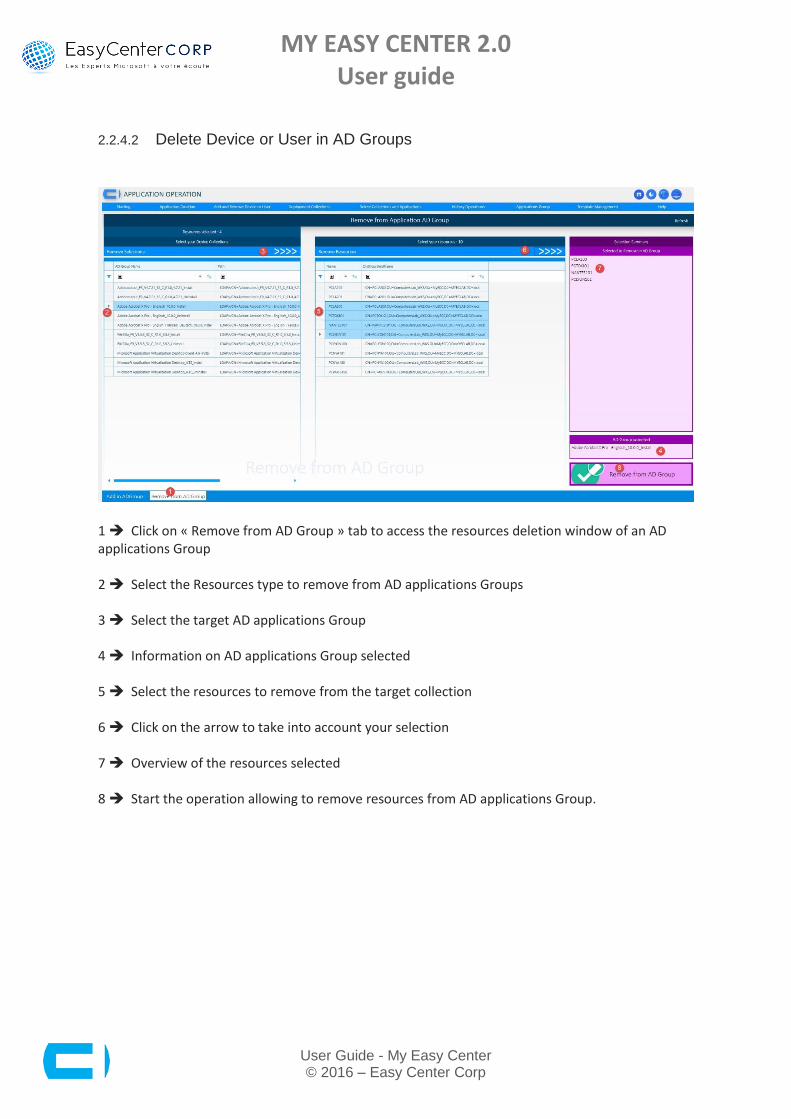
1 Click on « Remove from AD Group » tab to access the resources deletion window of an AD applications Group 2 Select the Resources type to remove from AD applications Groups 3 Select the target AD applications Group 4 Information on AD applications Group selected 5 Select the resources to remove from the target collection 6 Click on the arrow to take into account your selection 7 Overview of the resources selected 8 Start the operation allowing to remove resources from AD applications Group.
MY EASY CENTER 2.0 User guide
User Guide - My Easy Center © 2016 – Easy Center Corp
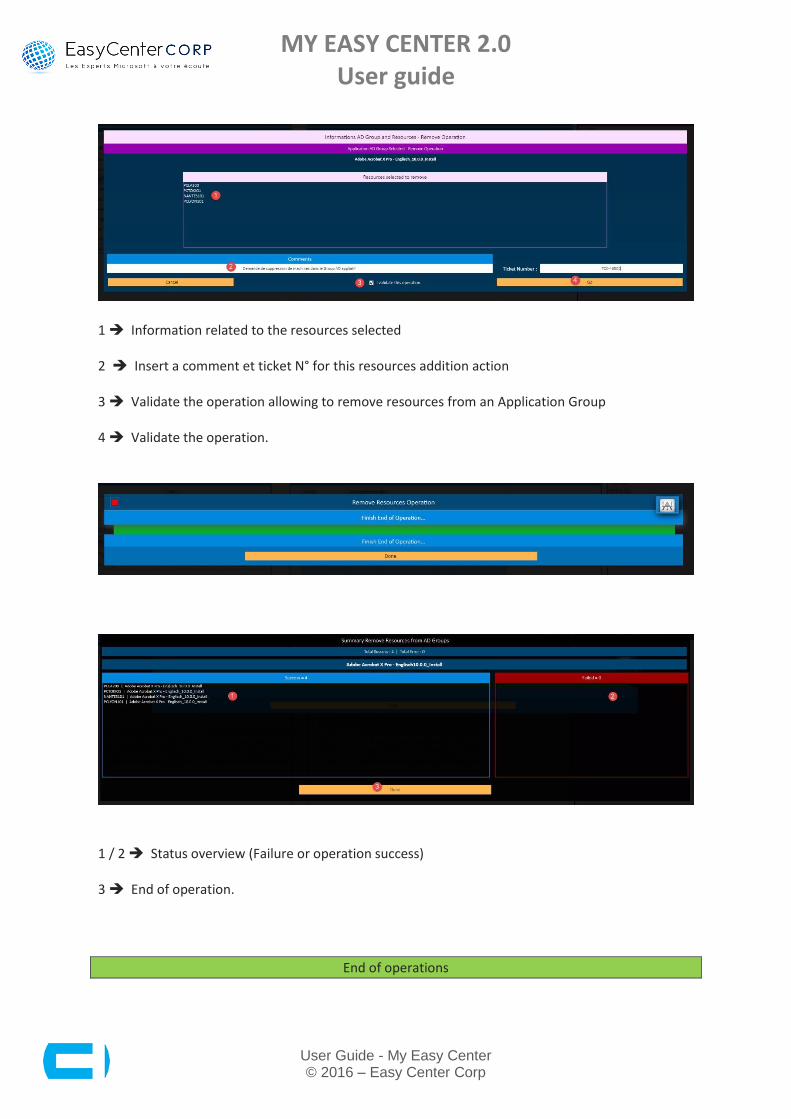
1 Information related to the resources selected 2 Insert a comment et ticket N° for this resources addition action 3 Validate the operation allowing to remove resources from an Application Group 4 Validate the operation.
1 / 2 Status overview (Failure or operation success) 3 End of operation.
End of operations

MY EASY CENTER 2.0 User guide
User Guide - My Easy Center © 2016 – Easy Center Corp
2.2.5 Deployment Collections
The function allowing the application deployment will be carry out with a set of security measures positioned at the Settings part level of My Easy Center console.
1 Click on « Deployment Collections » button 2 Click on « Deploy Your Application » button to access the deployment window.
MY EASY CENTER 2.0 User guide
User Guide - My Easy Center © 2016 – Easy Center Corp
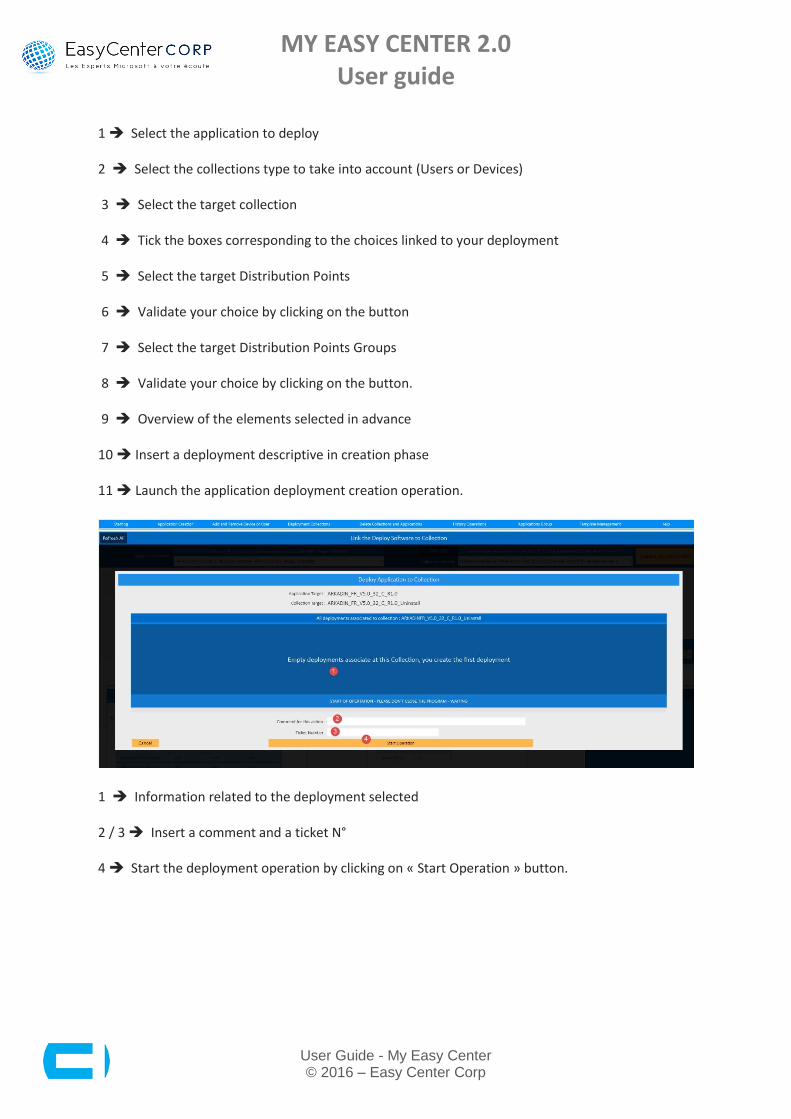
1 Select the application to deploy 2 Select the collections type to take into account (Users or Devices) 3 Select the target collection 4 Tick the boxes corresponding to the choices linked to your deployment 5 Select the target Distribution Points 6 Validate your choice by clicking on the button 7 Select the target Distribution Points Groups 8 Validate your choice by clicking on the button. 9 Overview of the elements selected in advance 10 Insert a deployment descriptive in creation phase 11 Launch the application deployment creation operation.
1 Information related to the deployment selected 2 / 3 Insert a comment and a ticket N° 4 Start the deployment operation by clicking on « Start Operation » button.

MY EASY CENTER 2.0 User guide
User Guide - My Easy Center © 2016 – Easy Center Corp
1 Display of the operation status carried out 2 Click on « Done » to close the window.
End of operations
2.2.6 Delete Collections And Applications
The function allows to delete Applications and Collections in a controlled way.
2.2.6.1 Deletion of Collections
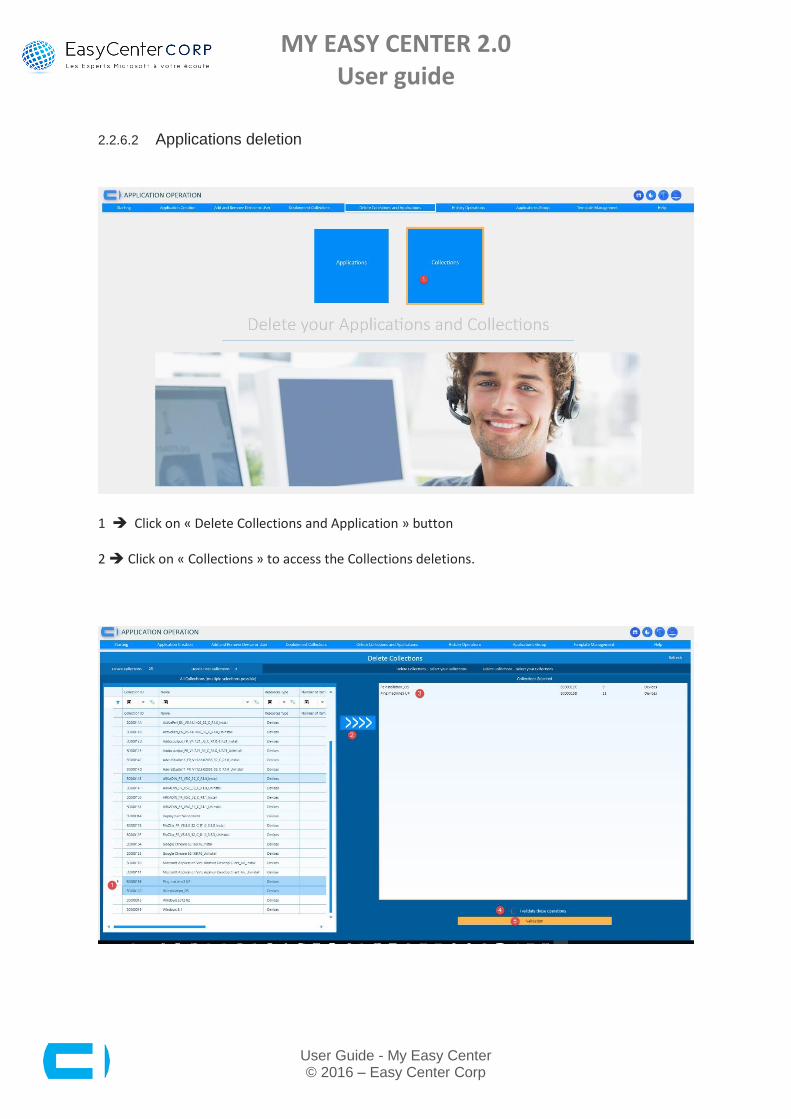
1 Click on « Delete Collections and Application » button 2 Click on « Applications » to access the Applications deletion

MY EASY CENTER 2.0 User guide
User Guide - My Easy Center © 2016 – Easy Center Corp
1 Select the application to delete (multiple choices possible) 2 Click on the button to validate the choice 3 Information on the applications choices selected 4 Validate the deletion operation by ticking the box 5 Click on the button to validate the choice.

MY EASY CENTER 2.0 User guide
User Guide - My Easy Center © 2016 – Easy Center Corp
1 / 2 Information concerning the applications to delete 3 / 4 Insert a comment and a ticket N°
5 Validate your operation by ticking the boxes
6 Click on « Go » to start the delete operation.
1 Overview of the applications delete operations 2 Click on the button « Done » to close the window.
End of operations
MY EASY CENTER 2.0 User guide
User Guide - My Easy Center © 2016 – Easy Center Corp
2.2.6.2 Applications deletion
1 Click on « Delete Collections and Application » button 2 Click on « Collections » to access the Collections deletions.
MY EASY CENTER 2.0 User guide
User Guide - My Easy Center © 2016 – Easy Center Corp
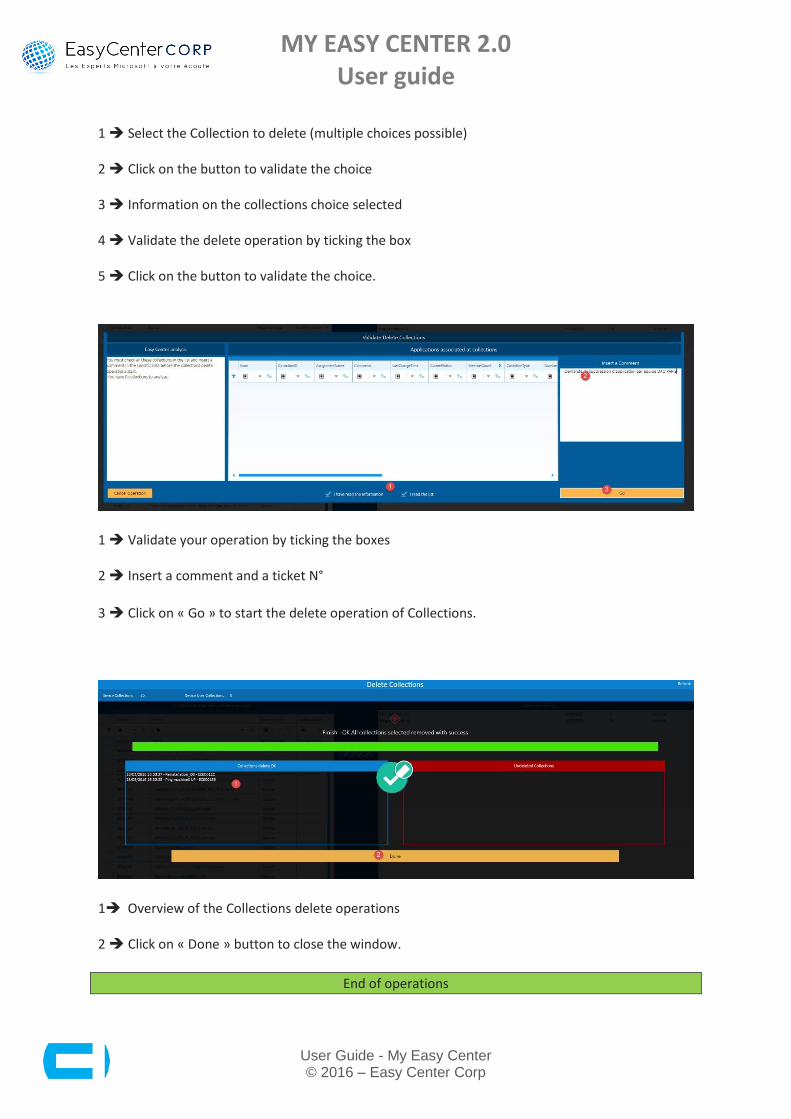
1 Select the Collection to delete (multiple choices possible) 2 Click on the button to validate the choice 3 Information on the collections choice selected 4 Validate the delete operation by ticking the box 5 Click on the button to validate the choice.
1 Validate your operation by ticking the boxes 2 Insert a comment and a ticket N°
3 Click on « Go » to start the delete operation of Collections.
1 Overview of the Collections delete operations 2 Click on « Done » button to close the window.
End of operations

MY EASY CENTER 2.0 User guide
User Guide - My Easy Center © 2016 – Easy Center Corp
2.2.7 History Operations
Historization function of actions allows to monitor and perform a financial analysis for the different actions carried out from « Applications » module.
1 Click on « History Operations » button 2 Select the analysis period (in months and years) and validate the choice by clicking on the validation button (arrow)
3 Chart allowing the viewing of the operations carried out during the month selected
4 Detailed table of the operations carried out during the month selected
5 Total sum of the operations carried out during the month selected (connected to the sums associated with the Cost Centers of the different operations)
6 Total number of operations carried out over the month selected.
MY EASY CENTER 2.0 User guide
User Guide - My Easy Center © 2016 – Easy Center Corp
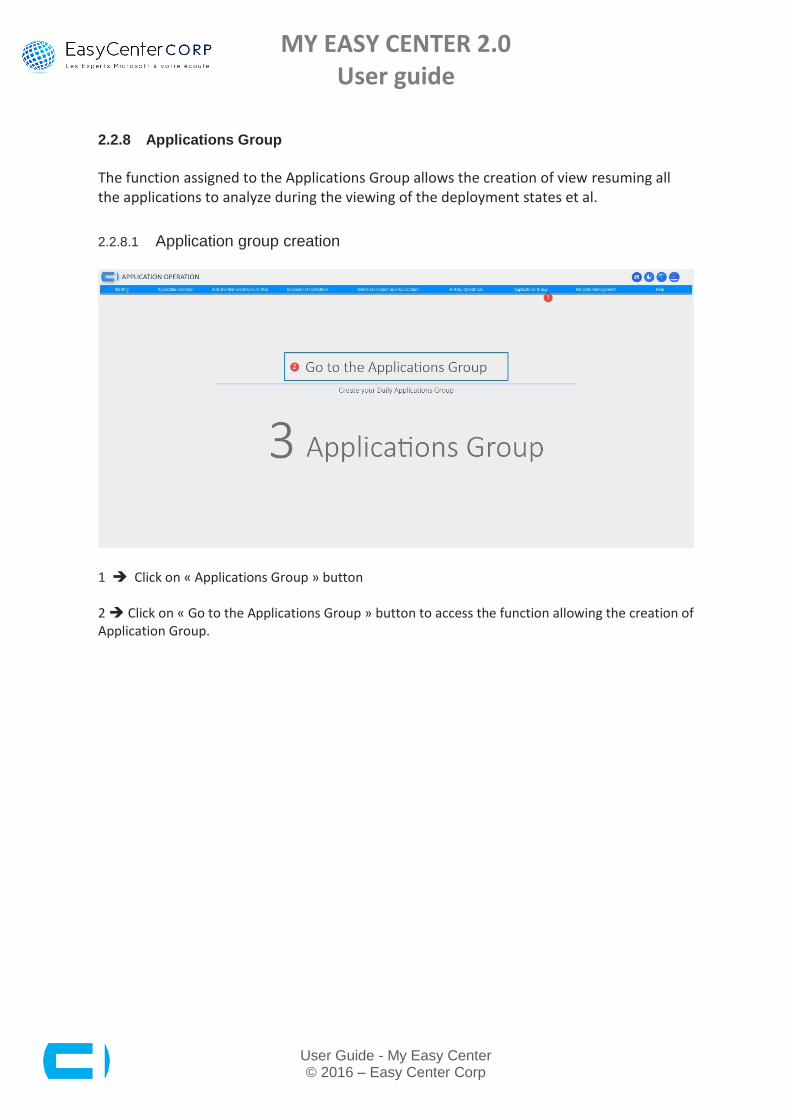
2.2.8 Applications Group
The function assigned to the Applications Group allows the creation of view resuming all the applications to analyze during the viewing of the deployment states et al.
2.2.8.1 Application group creation
1 Click on « Applications Group » button 2 Click on « Go to the Applications Group » button to access the function allowing the creation of Application Group.
MY EASY CENTER 2.0 User guide
User Guide - My Easy Center © 2016 – Easy Center Corp
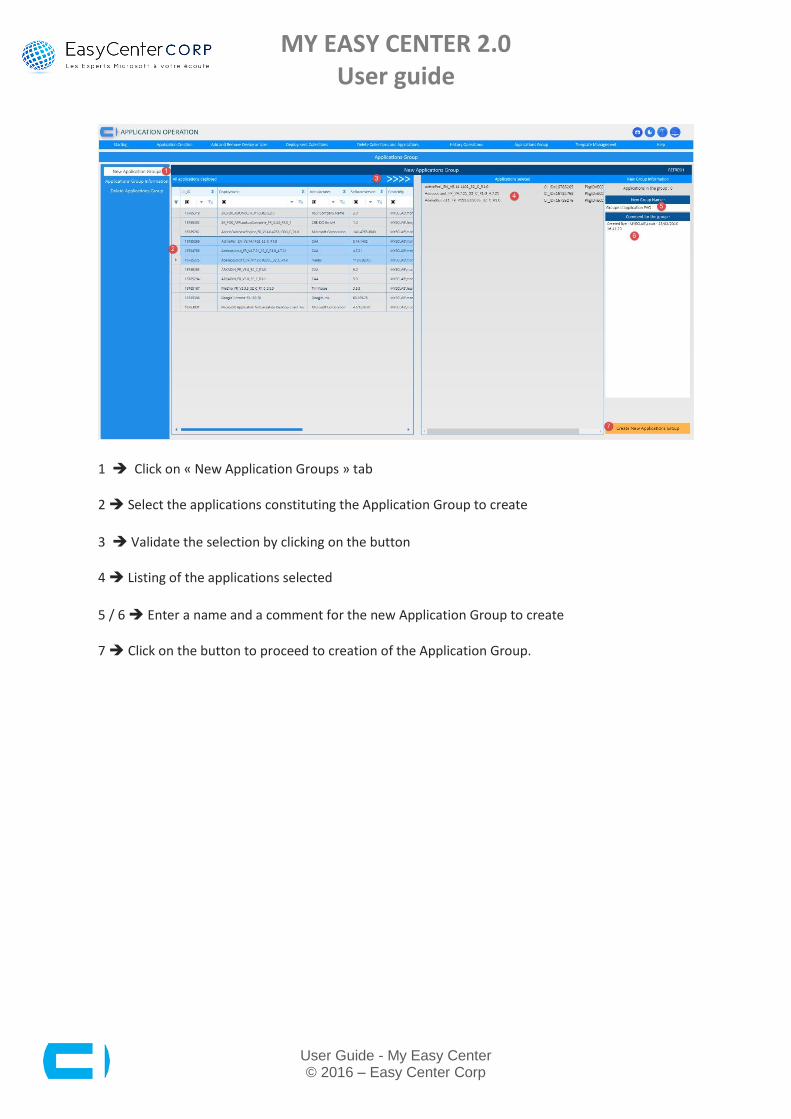
1 Click on « New Application Groups » tab 2 Select the applications constituting the Application Group to create
3 Validate the selection by clicking on the button 4 Listing of the applications selected
5 / 6 Enter a name and a comment for the new Application Group to create 7 Click on the button to proceed to creation of the Application Group.
MY EASY CENTER 2.0 User guide
User Guide - My Easy Center © 2016 – Easy Center Corp
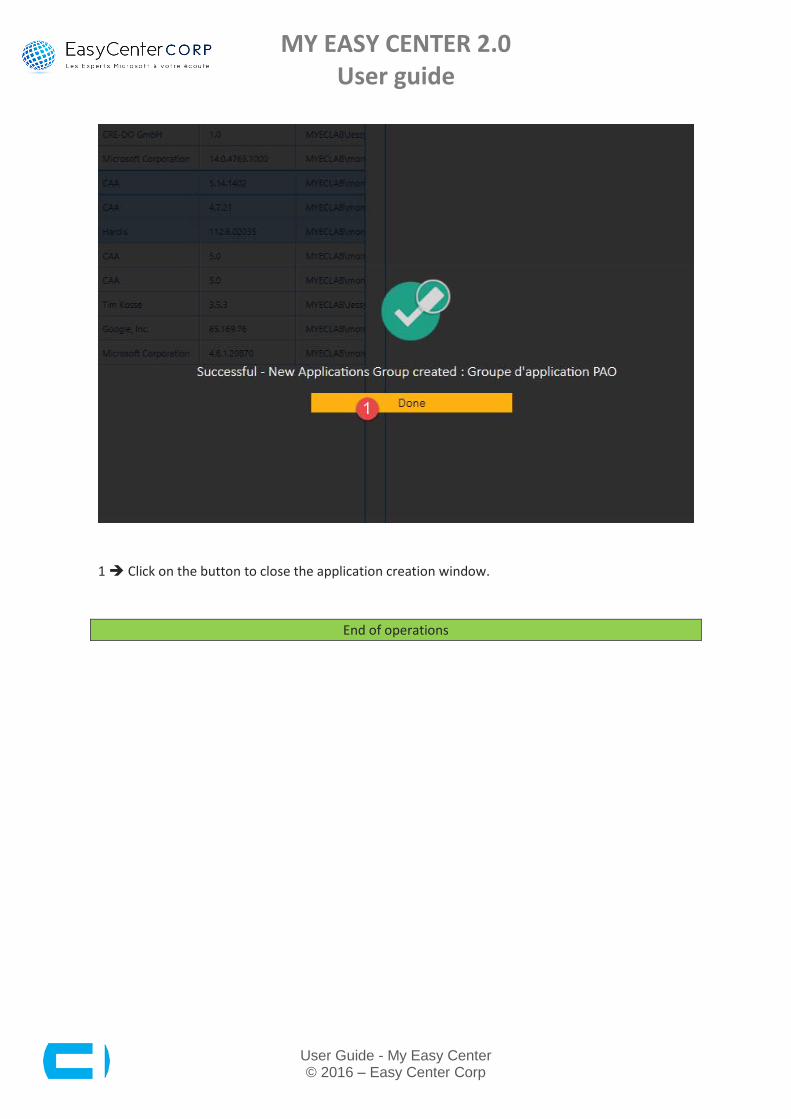
1 Click on the button to close the application creation window.
End of operations

MY EASY CENTER 2.0 User guide
User Guide - My Easy Center © 2016 – Easy Center Corp
2.2.8.2 Application group information
1 Click on « Applications Group Information » tab to view the applications present in an Application Group 2 Select the application to view
3 View the applications linked with this Application Group.
2.2.8.3 Application group delete

MY EASY CENTER 2.0 User guide
User Guide - My Easy Center © 2016 – Easy Center Corp
1 Click on « Delete Applications Group » tab to delete an Application Group 2 Select the application to delete 3 Click on the button enabling to validate the selection 4 View the Application Group selected 5 / 6 Tick the validation box and enter a comment in order to continue the delete operation of the Application Group 7 Click on « Delete Applications Group » button to start the delete operation of the Application Group.
1 Click on « Done » button to close the window.
End of operations
MY EASY CENTER 2.0 User guide
User Guide - My Easy Center © 2016 – Easy Center Corp
3. Tools
MY EASY CENTER 2.0 User guide
User Guide - My Easy Center © 2016 – Easy Center Corp
3.1 Introduction
Tools module will allow the execution of a significant number of actions (41 Actions) run remotely on the different clients managed in SCCM console. This module allows, among other things, to send Ping with the creation of collections related to the Ping result. The module allows the real time visualization of deployment status through reading WMI information present on the target machines:
Status linked to the task sequences present in the machines
Status linked to the application deployments
Status linked to the package deployments

MY EASY CENTER 2.0 User guide
User Guide - My Easy Center © 2016 – Easy Center Corp
The integrated design module will allow you a quick access to a Visio type tool. This allows you to simply schematize the elements constituting a new complex application (with a significant number of dependencies and prerequisite) for example or the creation of complex task sequences (OS deployment task sequences or others).
MY EASY CENTER 2.0 User guide
User Guide - My Easy Center © 2016 – Easy Center Corp
3.2 Ping Operations
3.2.1.1 Simple Ping
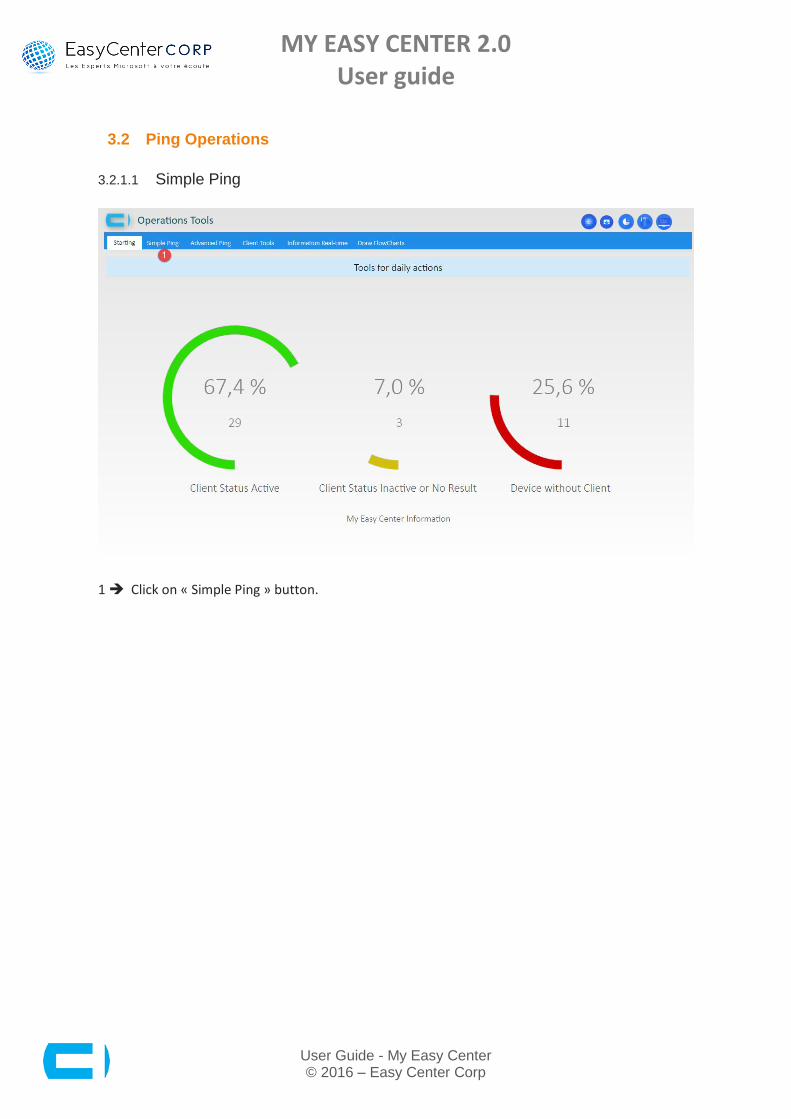
1 Click on « Simple Ping » button.
MY EASY CENTER 2.0 User guide
User Guide - My Easy Center © 2016 – Easy Center Corp
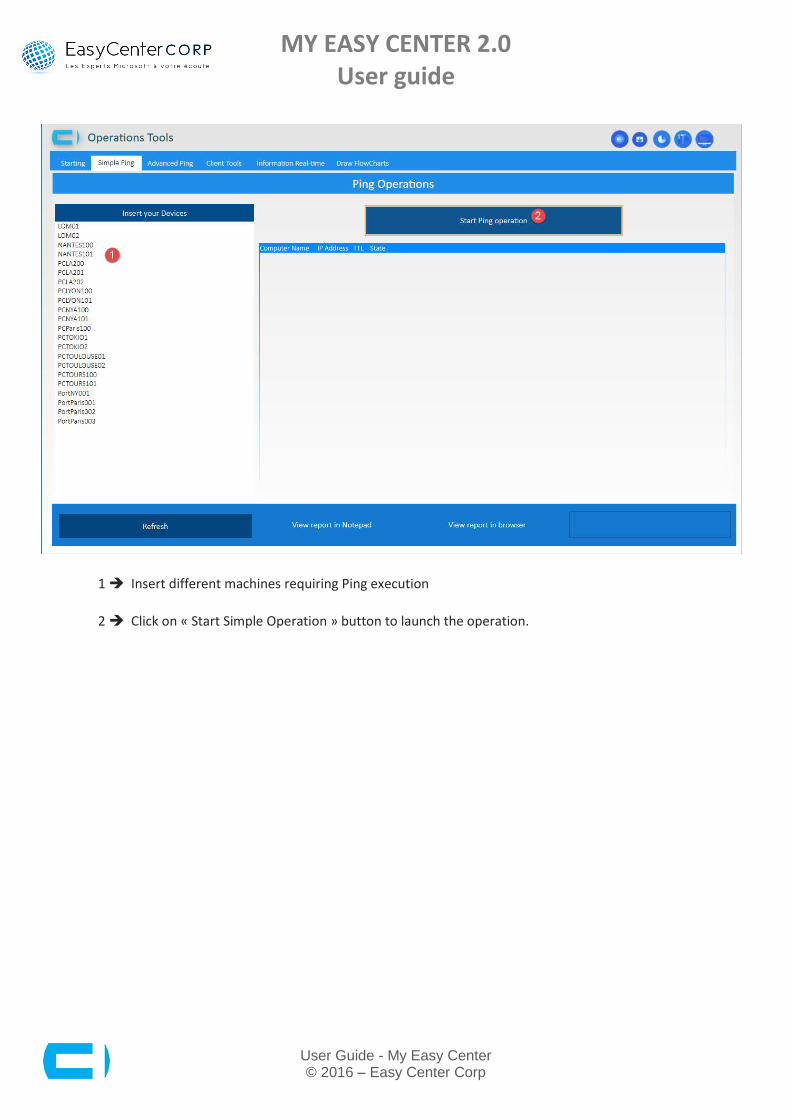
1 Insert different machines requiring Ping execution
2 Click on « Start Simple Operation » button to launch the operation.

MY EASY CENTER 2.0 User guide
User Guide - My Easy Center © 2016 – Easy Center Corp
1 View the result of different pings carried out on the machine
2 Export the result in TXT format
3 Export the result in HTML format
4 Click on the « Refresh » button to start a new Ping execution wave.
MY EASY CENTER 2.0 User guide
User Guide - My Easy Center © 2016 – Easy Center Corp
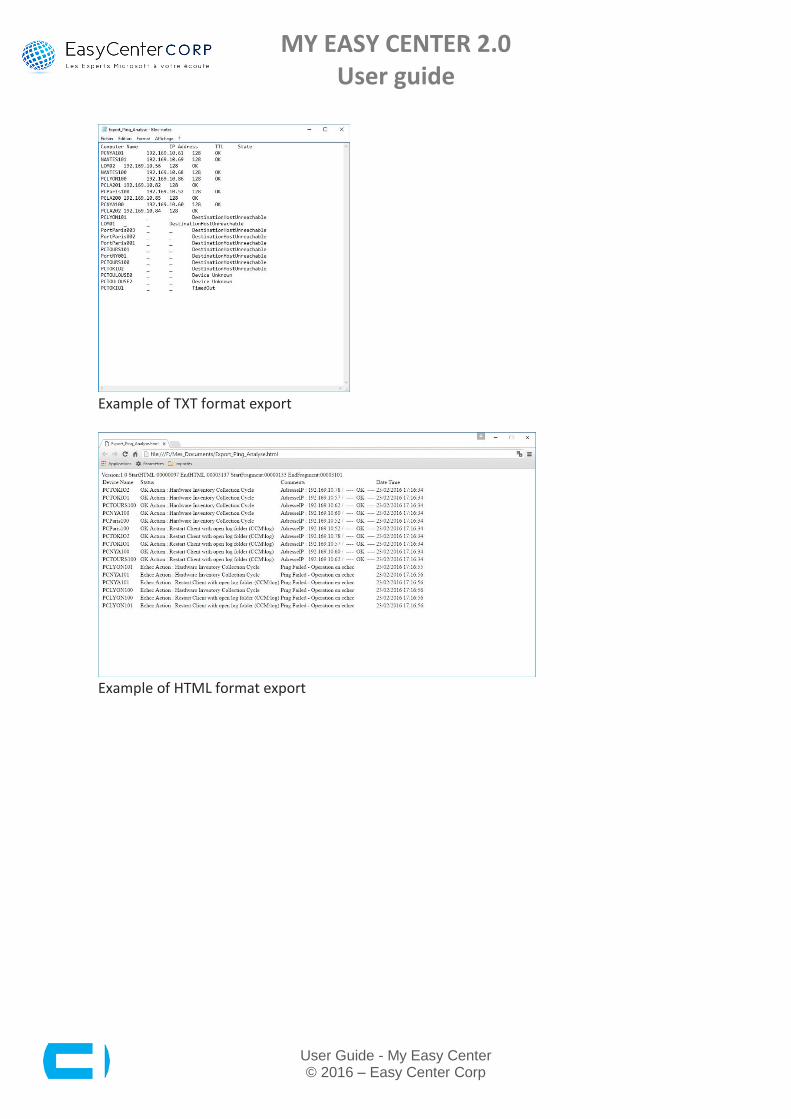
Example of TXT format export
Example of HTML format export
MY EASY CENTER 2.0 User guide
User Guide - My Easy Center © 2016 – Easy Center Corp
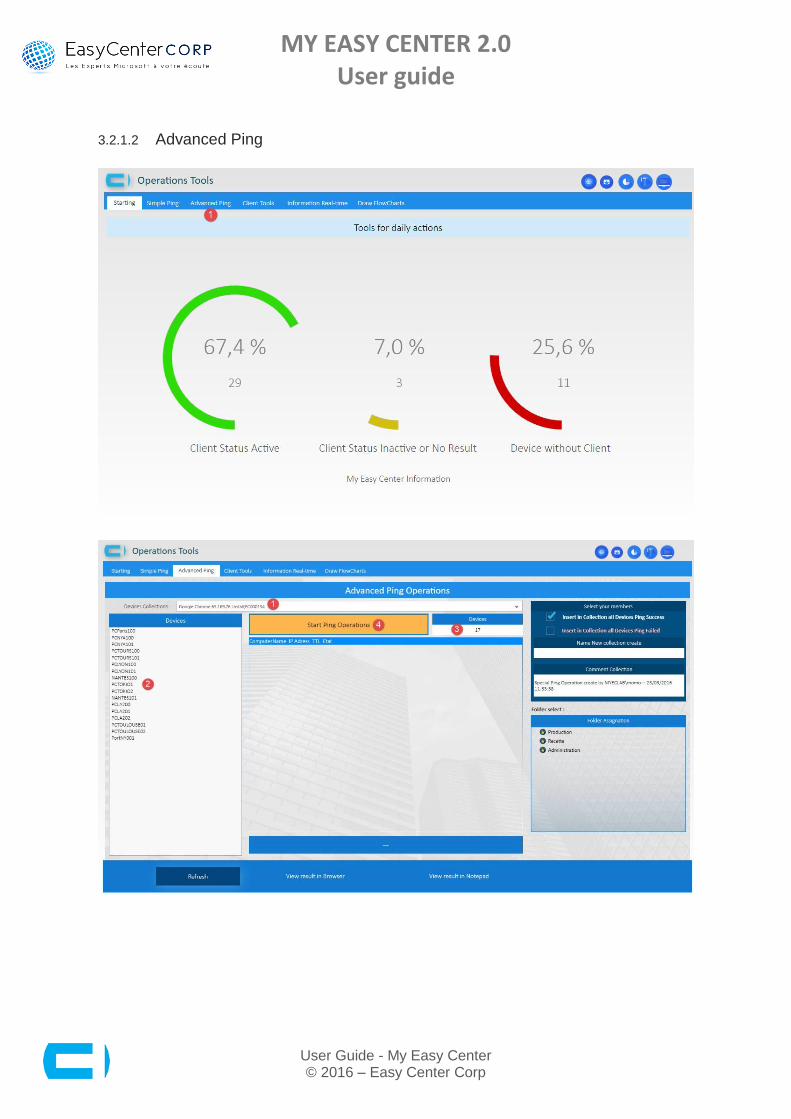
3.2.1.2 Advanced Ping
MY EASY CENTER 2.0 User guide
User Guide - My Easy Center © 2016 – Easy Center Corp
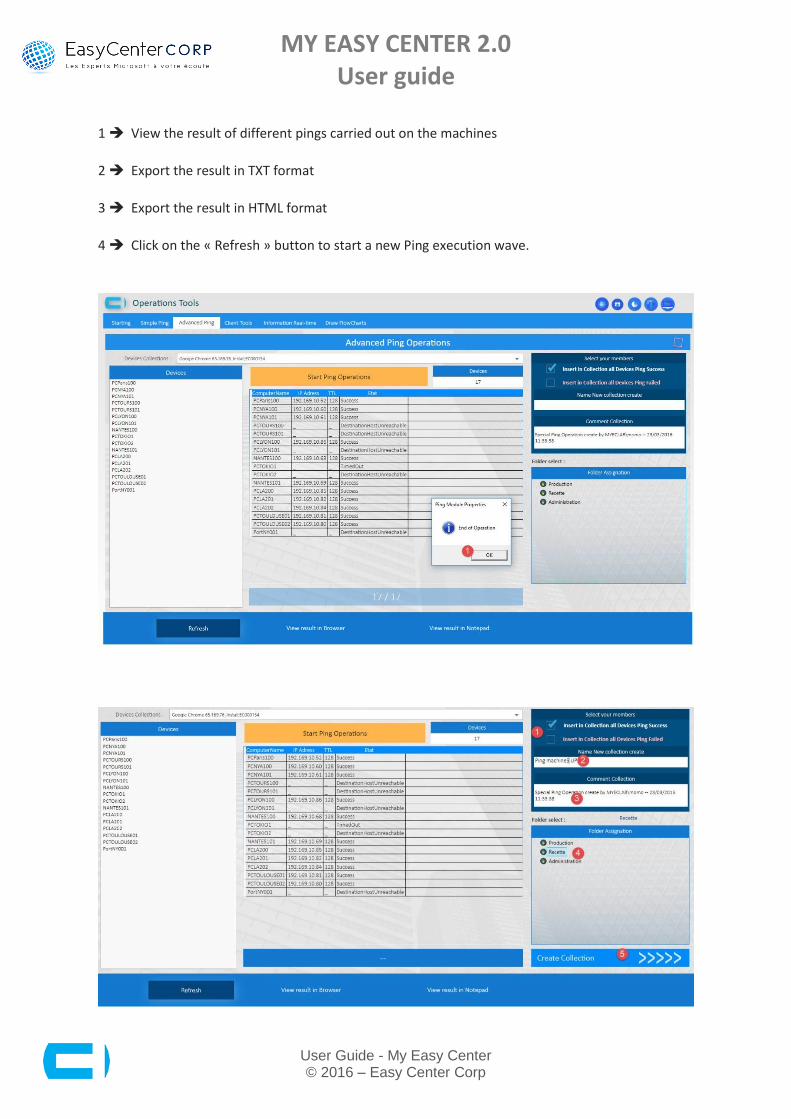
1 View the result of different pings carried out on the machines
2 Export the result in TXT format
3 Export the result in HTML format
4 Click on the « Refresh » button to start a new Ping execution wave.
MY EASY CENTER 2.0 User guide
User Guide - My Easy Center © 2016 – Easy Center Corp
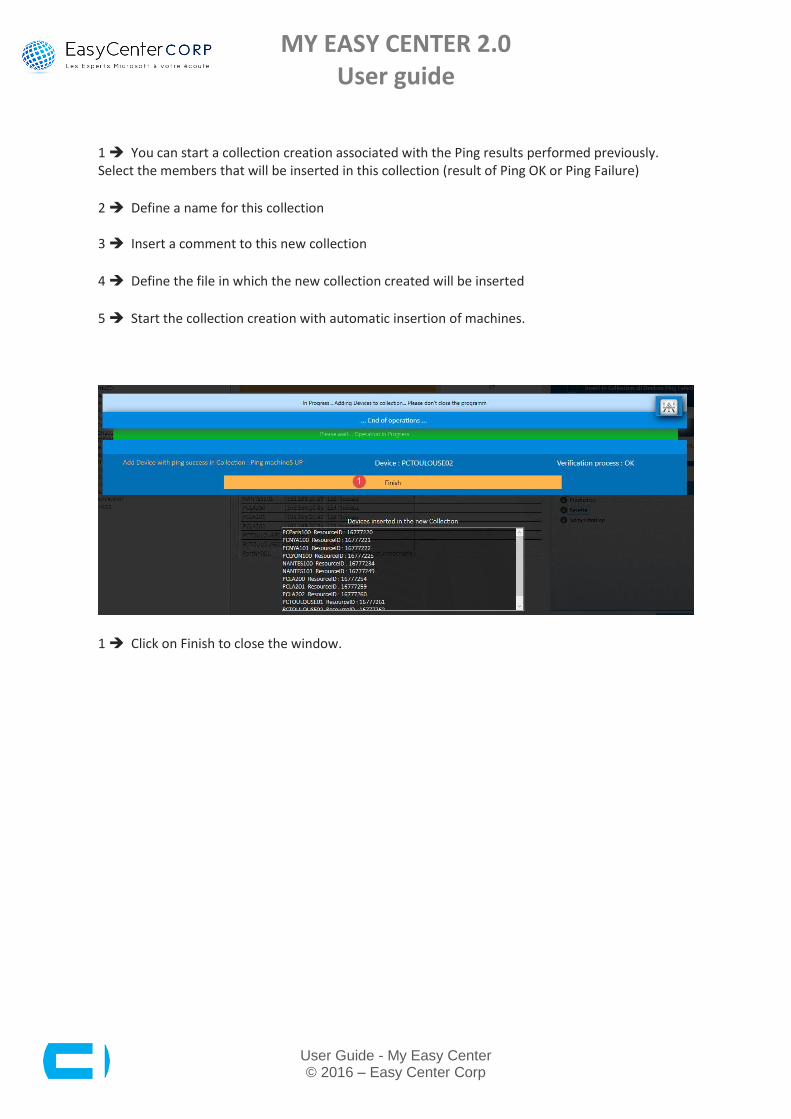
1 You can start a collection creation associated with the Ping results performed previously. Select the members that will be inserted in this collection (result of Ping OK or Ping Failure)
2 Define a name for this collection 3 Insert a comment to this new collection
4 Define the file in which the new collection created will be inserted
5 Start the collection creation with automatic insertion of machines.
1 Click on Finish to close the window.
MY EASY CENTER 2.0 User guide
User Guide - My Easy Center © 2016 – Easy Center Corp
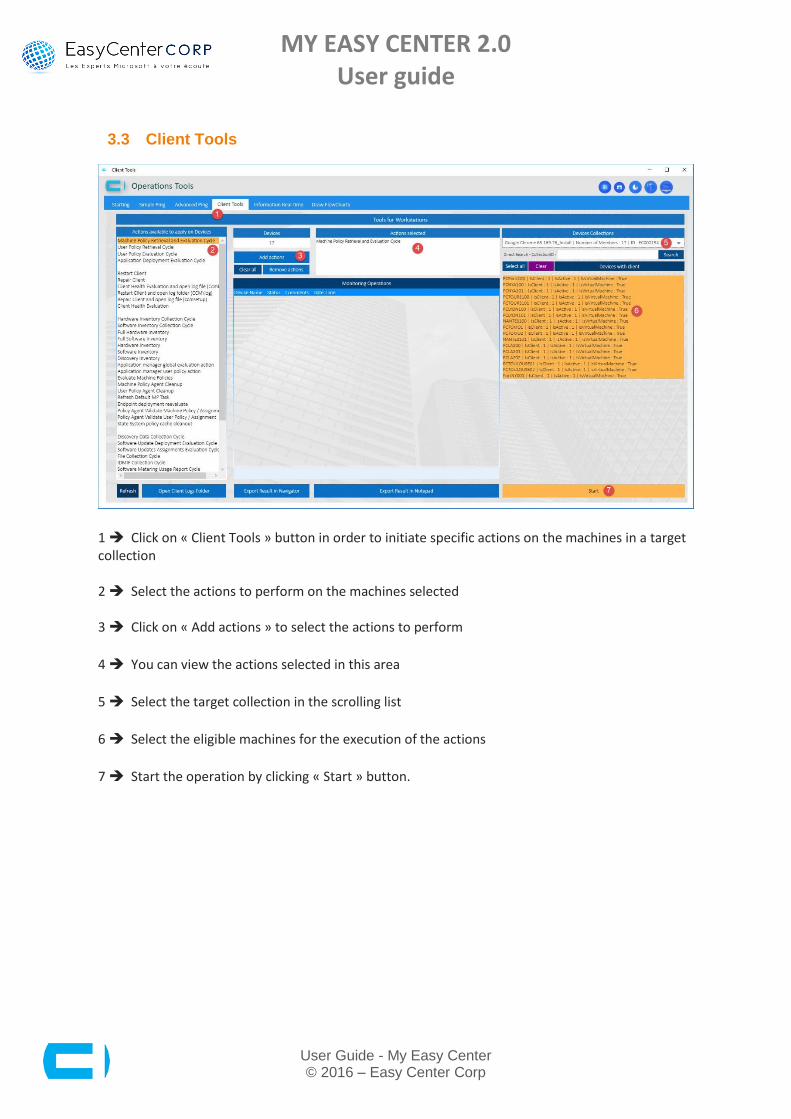
3.3 Client Tools
1 Click on « Client Tools » button in order to initiate specific actions on the machines in a target collection 2 Select the actions to perform on the machines selected 3 Click on « Add actions » to select the actions to perform
4 You can view the actions selected in this area
5 Select the target collection in the scrolling list
6 Select the eligible machines for the execution of the actions
7 Start the operation by clicking « Start » button.
MY EASY CENTER 2.0 User guide
User Guide - My Easy Center © 2016 – Easy Center Corp
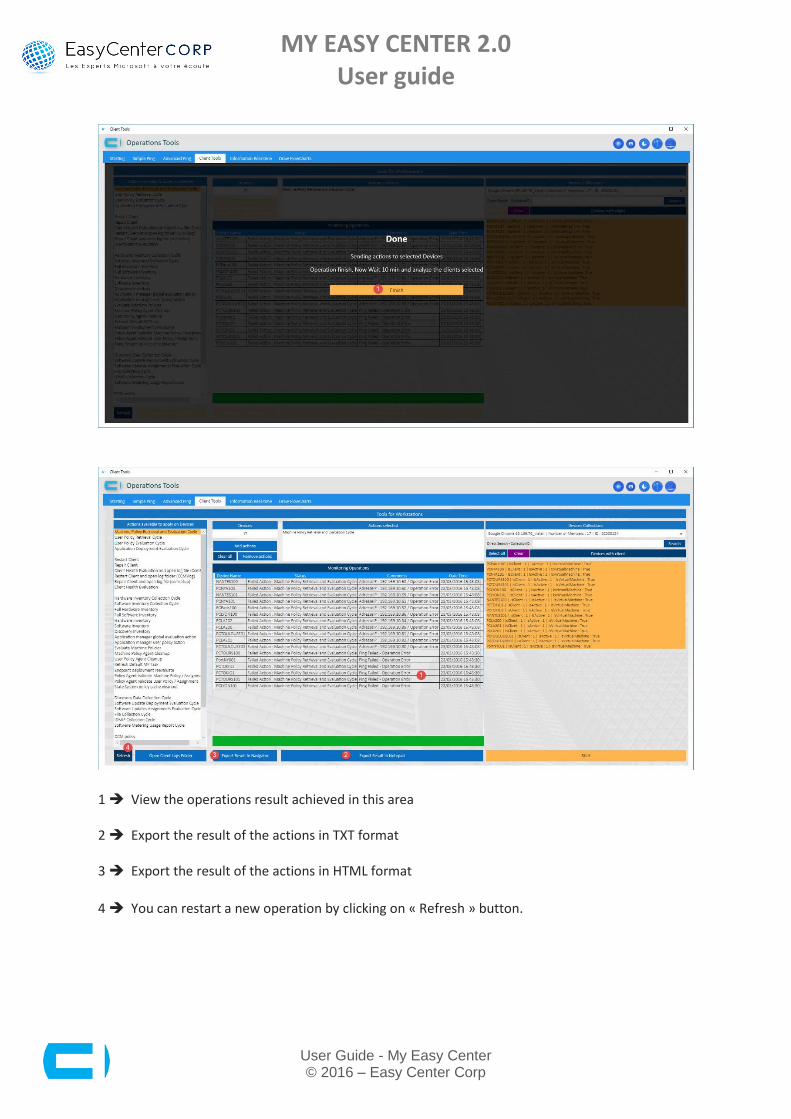
1 View the operations result achieved in this area 2 Export the result of the actions in TXT format 3 Export the result of the actions in HTML format
4 You can restart a new operation by clicking on « Refresh » button.
MY EASY CENTER 2.0 User guide
User Guide - My Easy Center © 2016 – Easy Center Corp
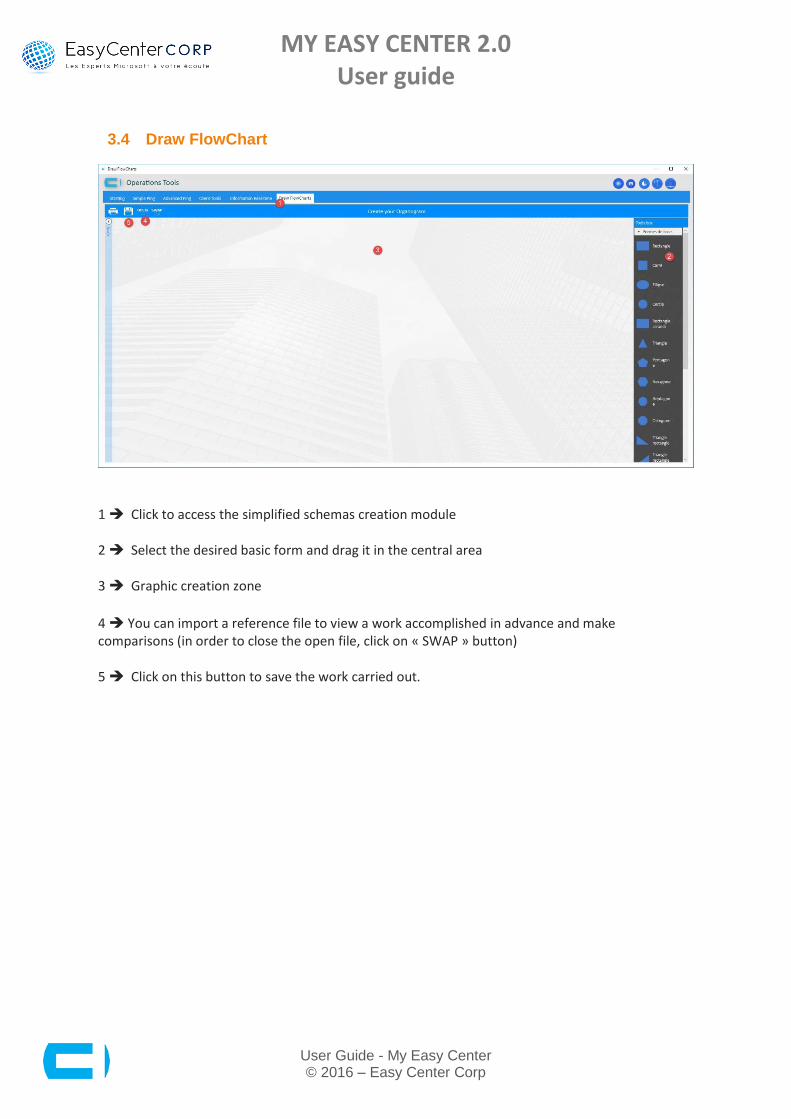
3.4 Draw FlowChart
1 Click to access the simplified schemas creation module 2 Select the desired basic form and drag it in the central area 3 Graphic creation zone
4 You can import a reference file to view a work accomplished in advance and make comparisons (in order to close the open file, click on « SWAP » button) 5 Click on this button to save the work carried out.
MY EASY CENTER 2.0 User guide
User Guide - My Easy Center © 2016 – Easy Center Corp
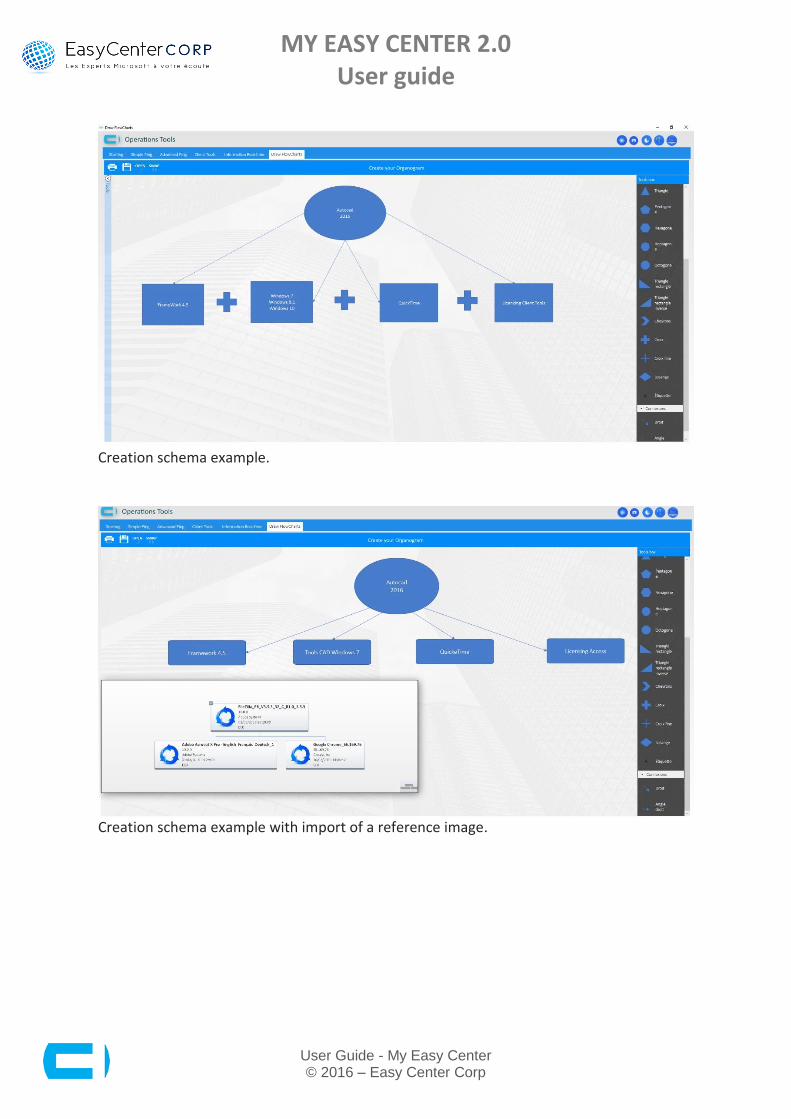
Creation schema example.
Creation schema example with import of a reference image.

MY EASY CENTER 2.0 User guide
User Guide - My Easy Center © 2016 – Easy Center Corp
4. Search engine for Reports and Monitoring modules
The search engine integrated to the different tables of My Easy Center console will allow you, among other things, to:
Quickly search for information through a set of filters.
Perform value calculations (addition, average, subtraction, sum and further of calculations)
Simply make regroupings through a simple drag-and-drop
Move the different fields of a table by a simple drag-and-drop
Each field can be moved from left to right
Each field can be sorted alphabetically and numerically
1 Click on the blue area to access the filter elements.

MY EASY CENTER 2.0 User guide
User Guide - My Easy Center © 2016 – Easy Center Corp
1 You can delete or add regroupings by dragging up the field to delete and selecting the field to filter dragging it up in the filter area.

MY EASY CENTER 2.0 User guide
User Guide - My Easy Center © 2016 – Easy Center Corp
1 You can perform calculations through the options located to the right of the columns in each table.
1 You can set up specific filters by clicking on the black square to the left of the column desired.

MY EASY CENTER 2.0 User guide
User Guide - My Easy Center © 2016 – Easy Center Corp
1 You can set up advanced filters by clicking on the scrolling list triangle and clicking on the « Personalized » choice of the desired column.
1 Select your condition 2 Insert the required element 3 Click OK to validate the filter.
MY EASY CENTER 2.0 User guide
User Guide - My Easy Center © 2016 – Easy Center Corp
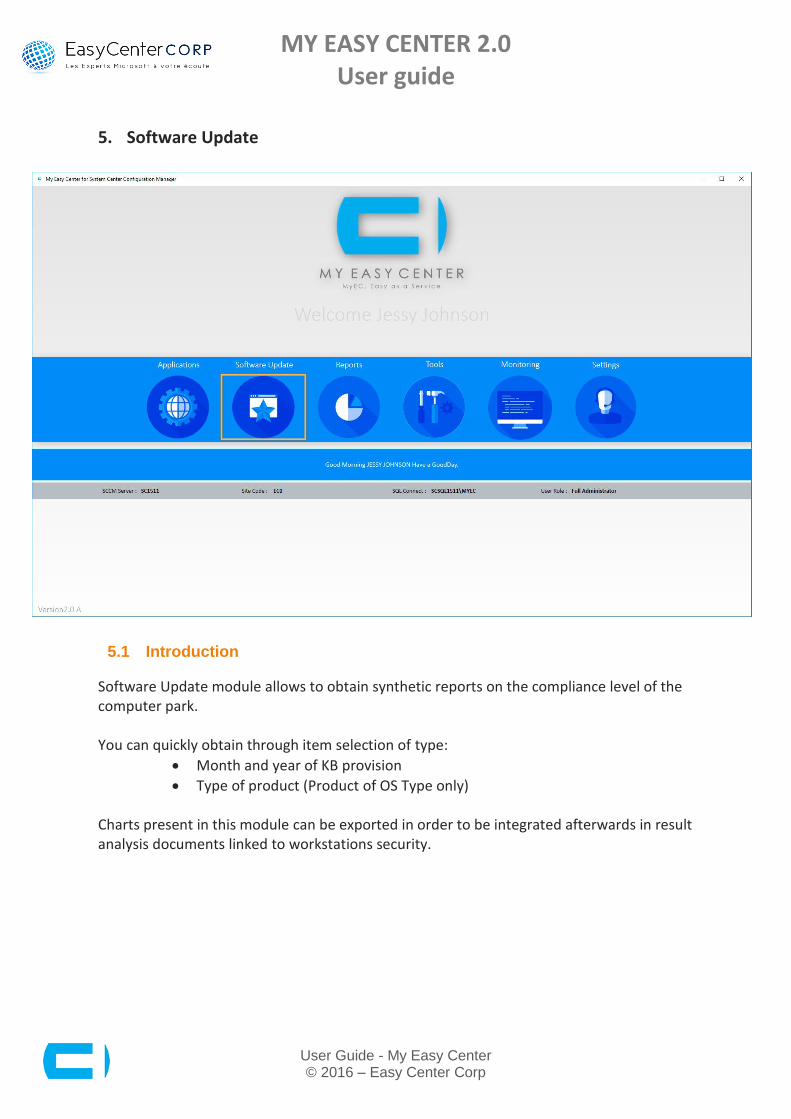
5. Software Update
5.1 Introduction
Software Update module allows to obtain synthetic reports on the compliance level of the computer park. You can quickly obtain through item selection of type:
Month and year of KB provision
Type of product (Product of OS Type only) Charts present in this module can be exported in order to be integrated afterwards in result analysis documents linked to workstations security.
MY EASY CENTER 2.0 User guide
User Guide - My Easy Center © 2016 – Easy Center Corp
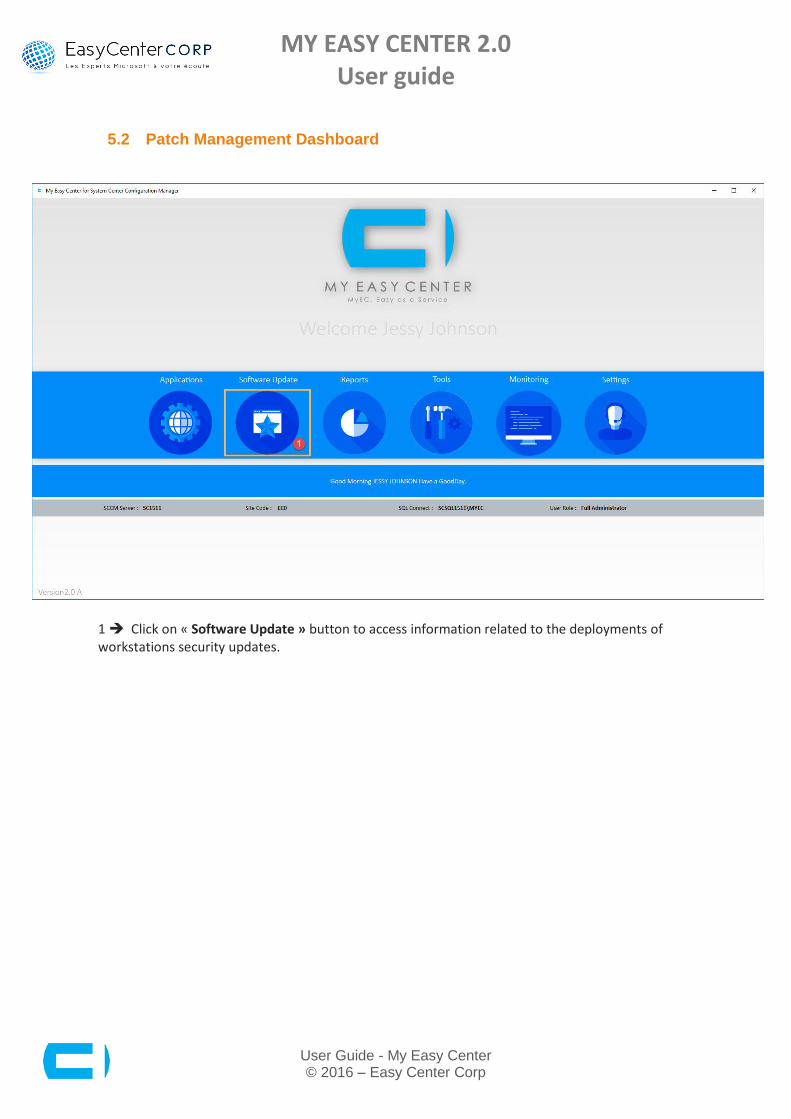
5.2 Patch Management Dashboard
1 Click on « Software Update » button to access information related to the deployments of workstations security updates.

MY EASY CENTER 2.0 User guide
User Guide - My Easy Center © 2016 – Easy Center Corp
Software Update module is Dashboard type interlocking 3 windows 1 Area 1 provides a chart containing information in percentage associated to the following filters:
KB
Month
Year
Products
2 Area 2 provides a chart (within a month and a defined product) to extract the different percentages of compliance (5 levels):
From 0 to 30% of compliance with a « Success » status
From 31 to 50% of compliance with a « Success » status
From 51 to 75% of compliance with a « Success » status
From 76 to 95% of compliance with a « Success » status
More than 95% of compliance with a « Success » status
3 Area 3 provides a table containing all the KB deployed on the park with the possibility to set up filters and make regroupings through the report engine integrated to the table.

MY EASY CENTER 2.0 User guide
User Guide - My Easy Center © 2016 – Easy Center Corp
1 Select the KB to be analyzed (insert « All KB » to avoid to specify a particular KB) 2 Select the month 3 Select the year 4 Select the OS to be analyzed and click on « Search » button to view the result.
MY EASY CENTER 2.0 User guide
User Guide - My Easy Center © 2016 – Easy Center Corp
1 Select the month 2 Select the year 3 Select the OS to be analyzed
4 Click on « Search » button to view the result.

MY EASY CENTER 2.0 User guide
User Guide - My Easy Center © 2016 – Easy Center Corp
6. Reports
MY EASY CENTER 2.0 User guide
User Guide - My Easy Center © 2016 – Easy Center Corp
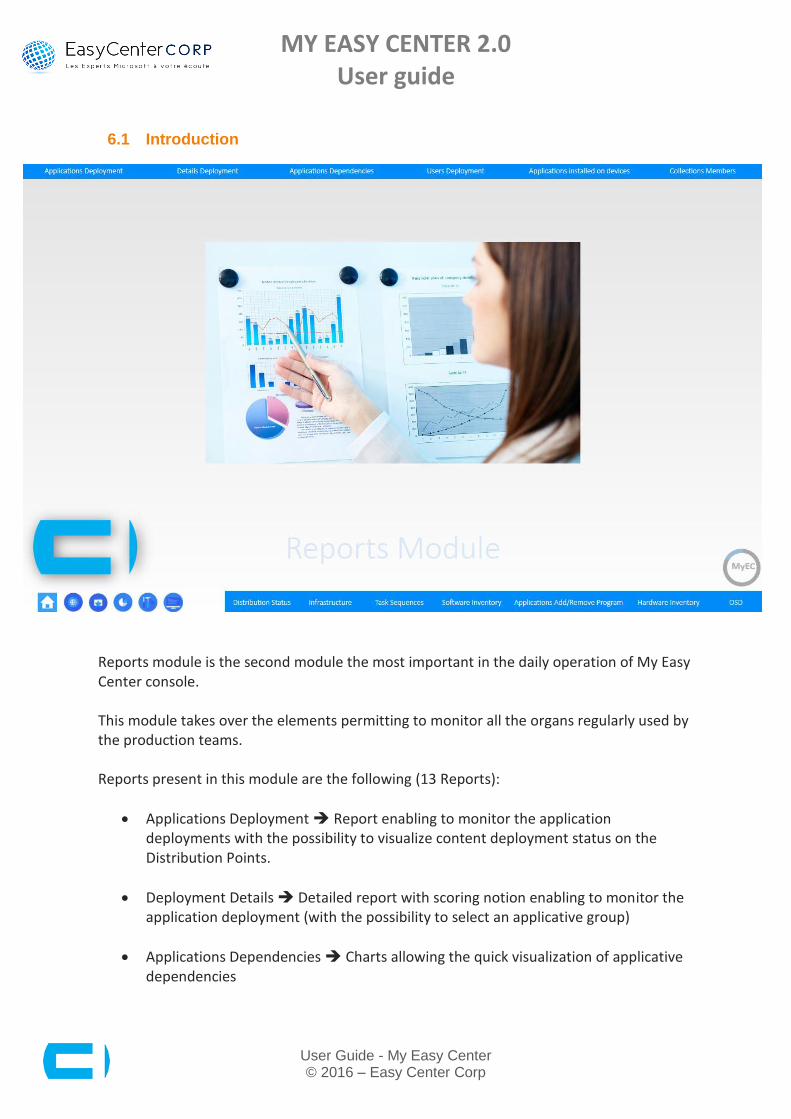
6.1 Introduction
Reports module is the second module the most important in the daily operation of My Easy Center console. This module takes over the elements permitting to monitor all the organs regularly used by the production teams. Reports present in this module are the following (13 Reports):
Applications Deployment Report enabling to monitor the application deployments with the possibility to visualize content deployment status on the Distribution Points.
Deployment Details Detailed report with scoring notion enabling to monitor the application deployment (with the possibility to select an applicative group)
Applications Dependencies Charts allowing the quick visualization of applicative dependencies

MY EASY CENTER 2.0 User guide
User Guide - My Easy Center © 2016 – Easy Center Corp
Users Deployment Detailed report enabling to monitor application deployment related to users’ collections
Applications installed on Devices Report allowing to visualize all deployment status (applications and packages) on the different machines present in the park
Collections Members Report enabling the visualization of different collections as well as associated members (with client members state)
Distribution Status Report enabling to visualize the content distribution status on the different Distribution Points and Distribution Points Groups
Infrastructure Diagram of SCCM Infrastructure Flow chart type
Task Sequences Report enabling to visualize the different sequences status of deployed tasks
Software Inventory Rapport enabling the visualization of all the applications installed on a specific machine (Add/Delete Program)
Applications Add/Delete Program Report listing all the applications installed on the computer park (Add/Delete Program)
Hardware Inventory Report enabling to visualize all devices installed on a specific machine
OSD Report enabling to visualize the deployment status of task sequences related to deployment operations or OS migrations

MY EASY CENTER 2.0 User guide
User Guide - My Easy Center © 2016 – Easy Center Corp
6.2 Applications Deployment
1 Click on « Application Deployment » to access the reports of application deployments with the possibility to view the content deployment status on the Distribution Points 2 Select the deployment to be analyzed.
MY EASY CENTER 2.0 User guide
User Guide - My Easy Center © 2016 – Easy Center Corp
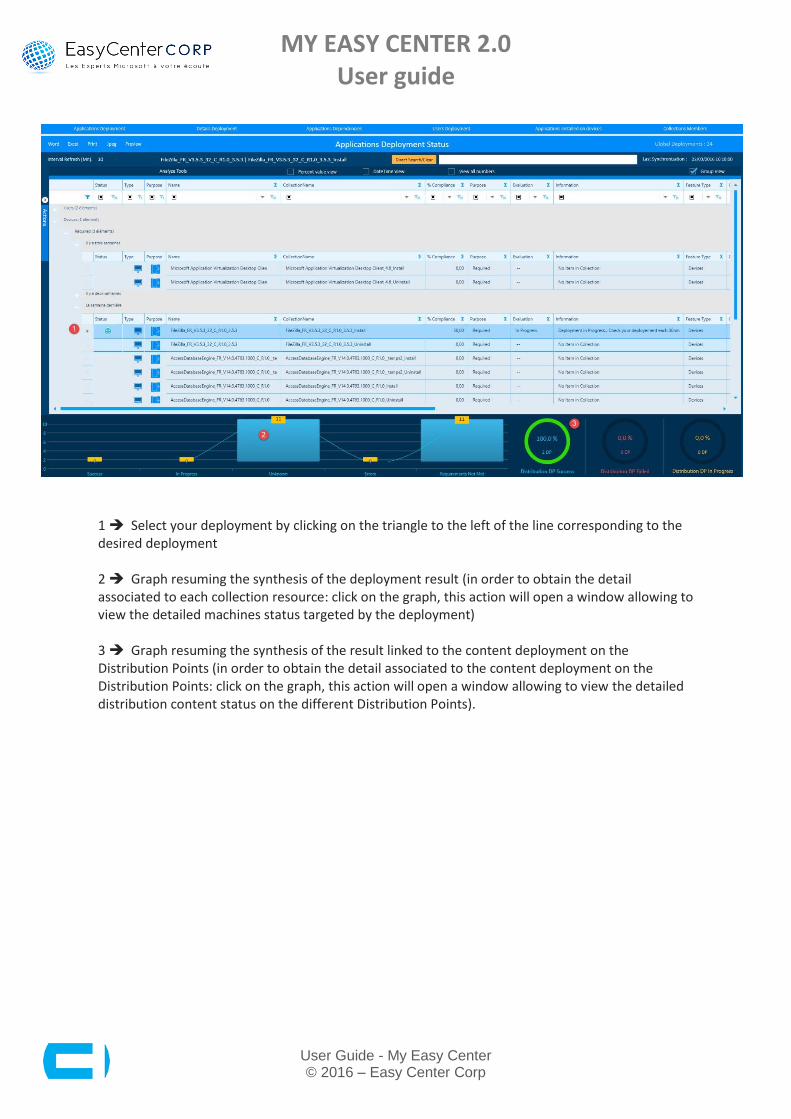
1 Select your deployment by clicking on the triangle to the left of the line corresponding to the desired deployment 2 Graph resuming the synthesis of the deployment result (in order to obtain the detail associated to each collection resource: click on the graph, this action will open a window allowing to view the detailed machines status targeted by the deployment) 3 Graph resuming the synthesis of the result linked to the content deployment on the Distribution Points (in order to obtain the detail associated to the content deployment on the Distribution Points: click on the graph, this action will open a window allowing to view the detailed distribution content status on the different Distribution Points).

MY EASY CENTER 2.0 User guide
User Guide - My Easy Center © 2016 – Easy Center Corp
1 Detail example associated to each of the collection resources, click on the graph.
1 To return to the previous window, click on « Action » button at the left of the window and click on « Return To the previous Page » button.

MY EASY CENTER 2.0 User guide
User Guide - My Easy Center © 2016 – Easy Center Corp
1 / 2 Details example linked to the content deployments on the Distribution Points. By clicking again on the graph linked to the content deployments on the Distribution Points at the bottom right of the window, you can close the details window to return to the previous view.
1 You can directly access the « Tools » module associated with Actions to be carried out by SCCM clients of the target collection by clicking on « Swap Tools » button.
MY EASY CENTER 2.0 User guide
User Guide - My Easy Center © 2016 – Easy Center Corp
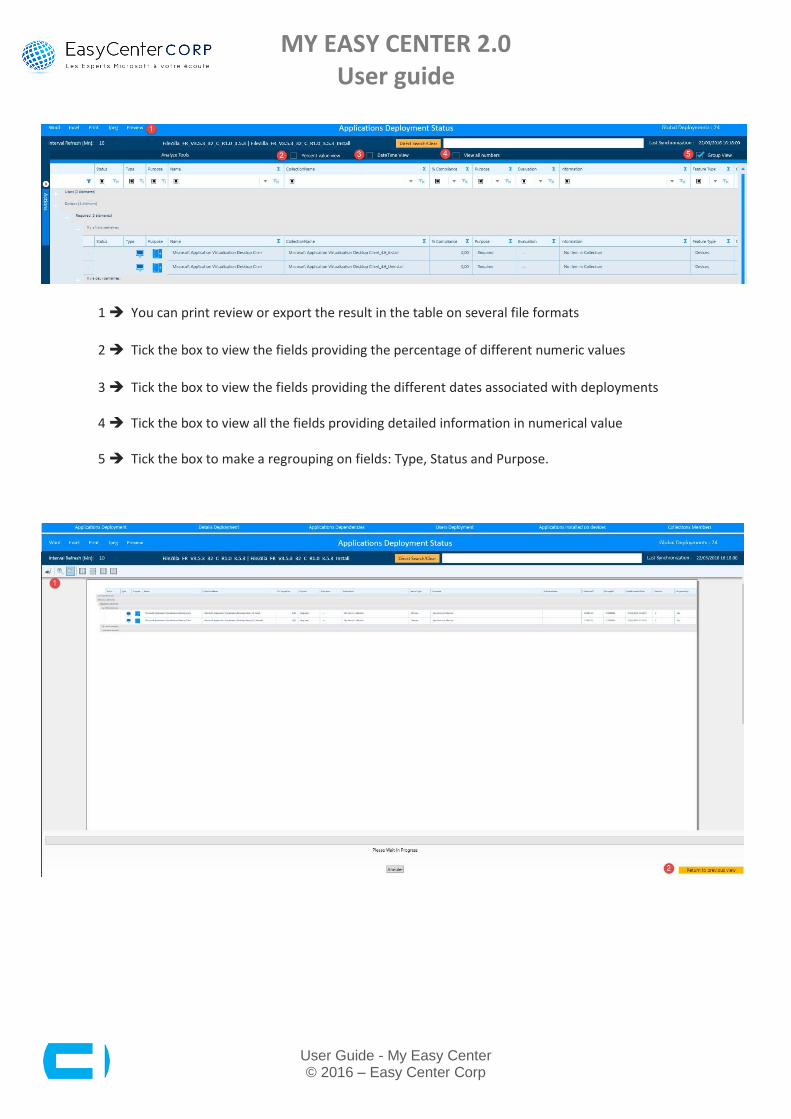
1 You can print review or export the result in the table on several file formats
2 Tick the box to view the fields providing the percentage of different numeric values
3 Tick the box to view the fields providing the different dates associated with deployments 4 Tick the box to view all the fields providing detailed information in numerical value 5 Tick the box to make a regrouping on fields: Type, Status and Purpose.
MY EASY CENTER 2.0 User guide
User Guide - My Easy Center © 2016 – Easy Center Corp
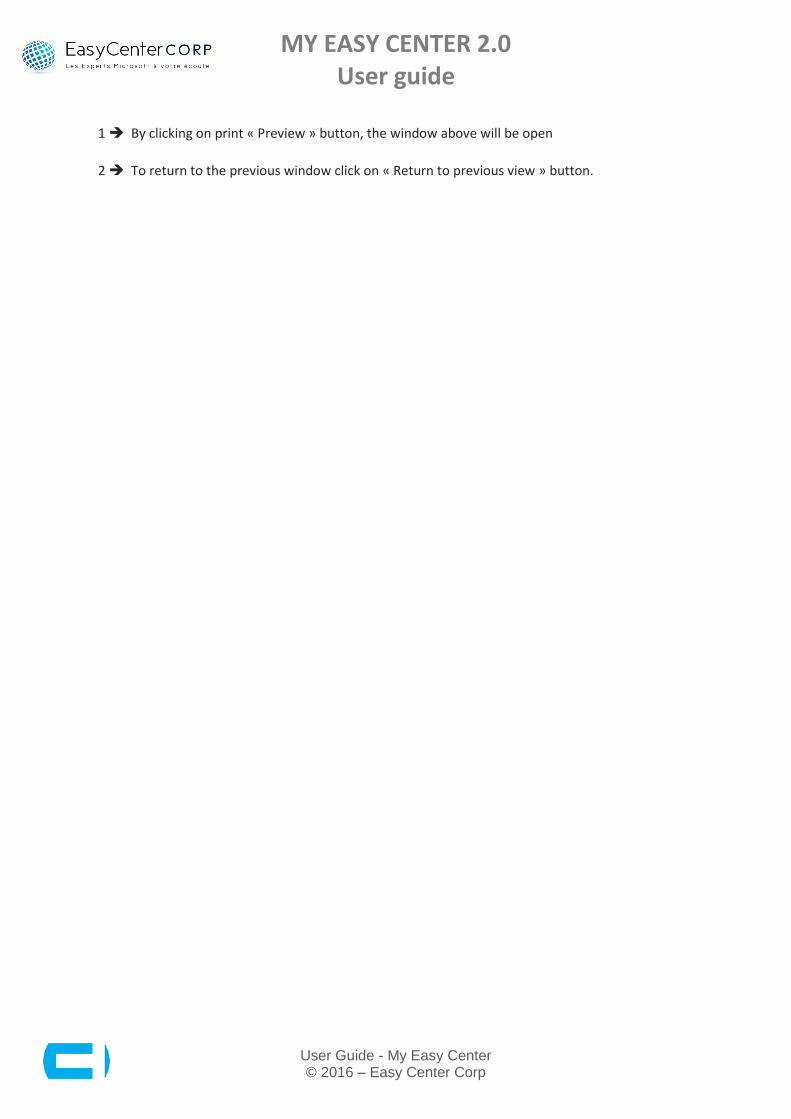
1 By clicking on print « Preview » button, the window above will be open
2 To return to the previous window click on « Return to previous view » button.

MY EASY CENTER 2.0 User guide
User Guide - My Easy Center © 2016 – Easy Center Corp
6.3 Deployment Details
1 Click on « Deployment Details » to access the detailed reports of application deployments with the possibility to select an application group in case of need.

MY EASY CENTER 2.0 User guide
User Guide - My Easy Center © 2016 – Easy Center Corp
1 Select the application to be analyzed
2 Select the desired collection.

MY EASY CENTER 2.0 User guide
User Guide - My Easy Center © 2016 – Easy Center Corp
1 The value present in this area is representative of the applicative deployment quality. 10 points is the highest value. It is possible to reach/obtain a 10 points scoring on condition that the following rules are respected:
A minimal number of Machines without SCCM clients
A minimal number of Machines having a « Requirements Not Met » status, that is to say Machines with a « Condition Not Required » status
A minimal number of Error Machines
2 Graph providing the number of Machines without SCCM clients
3 Click on the button to access the table listing the different status detail associated with the selected deployment.

MY EASY CENTER 2.0 User guide
User Guide - My Easy Center © 2016 – Easy Center Corp
.
1 / 2 Select the desired tree structure to view the members having the selected status.
6.3.1.1 Direct search of application
1 Enter the element of research « example: access »
2 Click on the « Direct Search » button to put a filter on the element of research
3 Select the application in list desired in the list 4 Select the collection list desired in the list.

MY EASY CENTER 2.0 User guide
User Guide - My Easy Center © 2016 – Easy Center Corp
6.4 Applications Dependencies
1 Click on « Applications Dependencies » button to access the chart allowing to view all applicative dependencies for applications with relations.

MY EASY CENTER 2.0 User guide
User Guide - My Easy Center © 2016 – Easy Center Corp
1 Select in the scrolling list the application to view. Only the applications having at least an applicative dependence will be visible in the graph.
MY EASY CENTER 2.0 User guide
User Guide - My Easy Center © 2016 – Easy Center Corp
6.5 Users Deployment
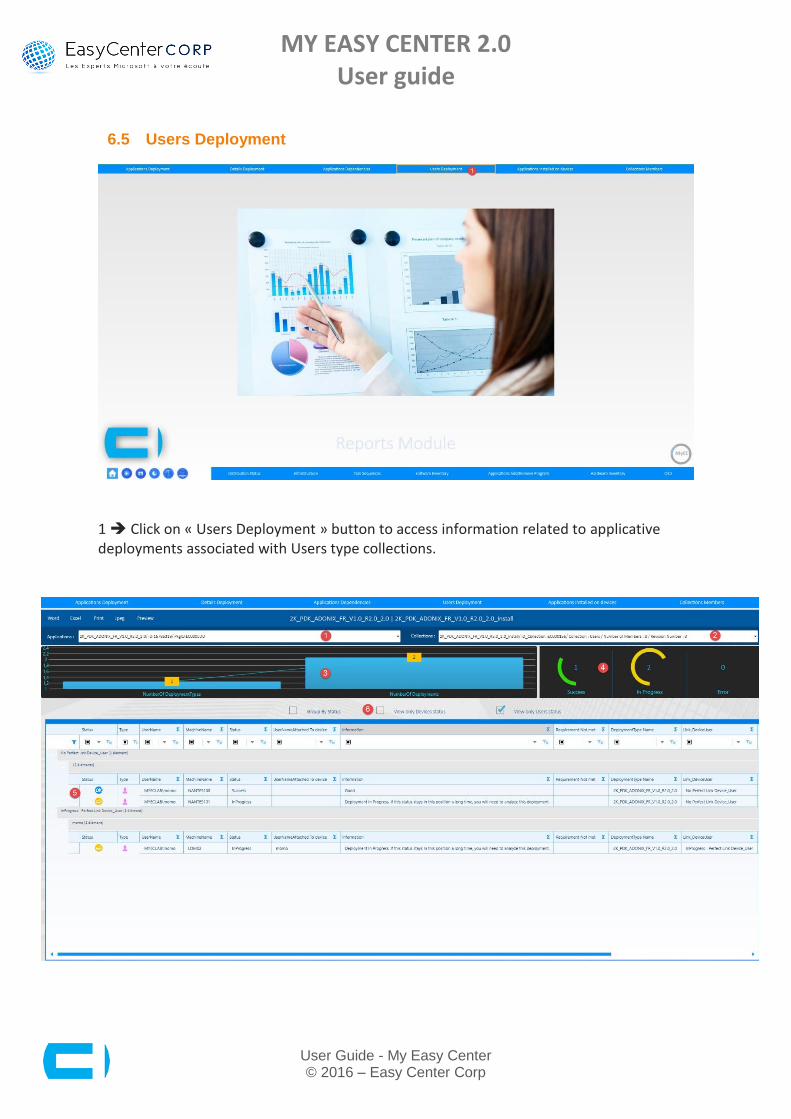
1 Click on « Users Deployment » button to access information related to applicative deployments associated with Users type collections.
MY EASY CENTER 2.0 User guide
User Guide - My Easy Center © 2016 – Easy Center Corp
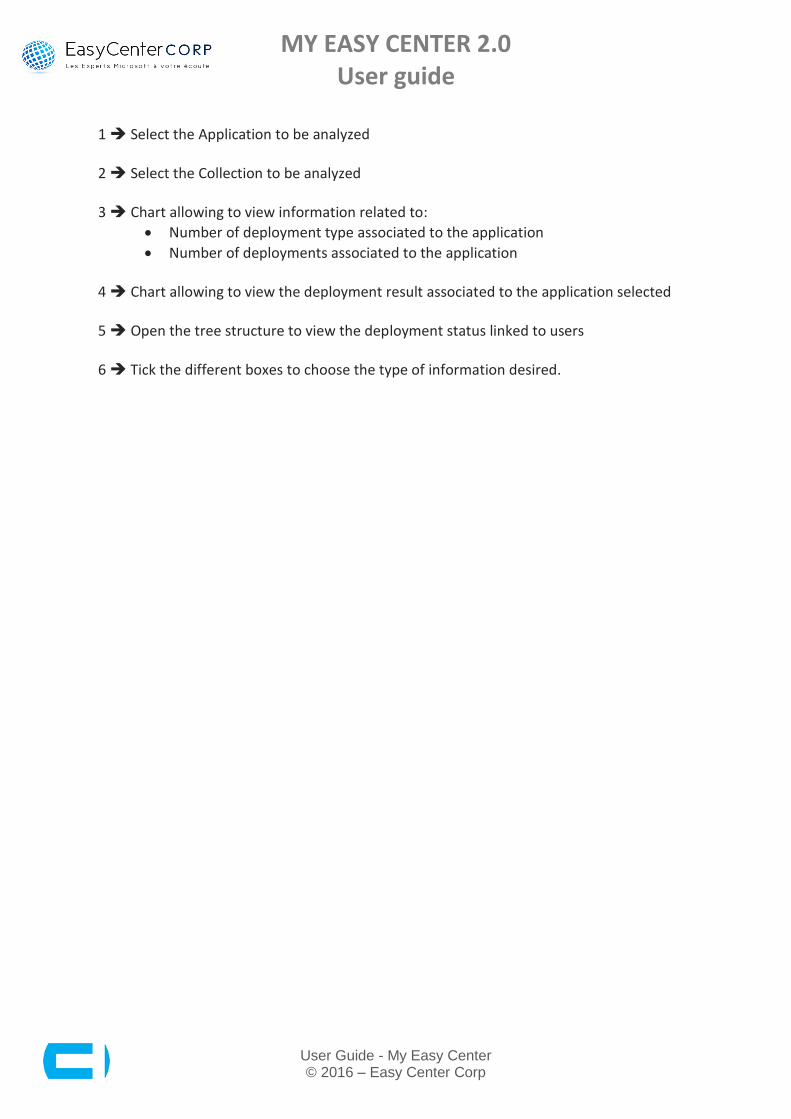
1 Select the Application to be analyzed 2 Select the Collection to be analyzed 3 Chart allowing to view information related to:
Number of deployment type associated to the application
Number of deployments associated to the application 4 Chart allowing to view the deployment result associated to the application selected 5 Open the tree structure to view the deployment status linked to users 6 Tick the different boxes to choose the type of information desired.
MY EASY CENTER 2.0 User guide
User Guide - My Easy Center © 2016 – Easy Center Corp
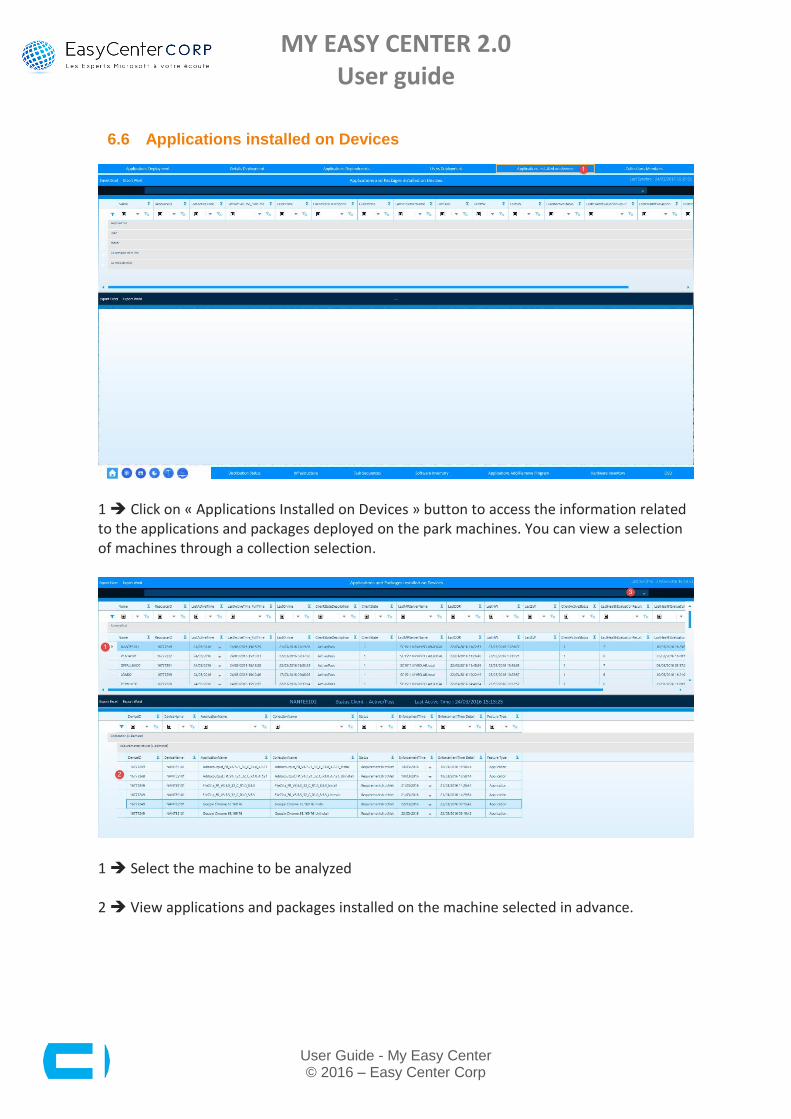
6.6 Applications installed on Devices
1 Click on « Applications Installed on Devices » button to access the information related to the applications and packages deployed on the park machines. You can view a selection of machines through a collection selection.
1 Select the machine to be analyzed 2 View applications and packages installed on the machine selected in advance.

MY EASY CENTER 2.0 User guide
User Guide - My Easy Center © 2016 – Easy Center Corp
2 Select the collection in the scrolling list which will serve as a collection reference for research of machines.
MY EASY CENTER 2.0 User guide
User Guide - My Easy Center © 2016 – Easy Center Corp
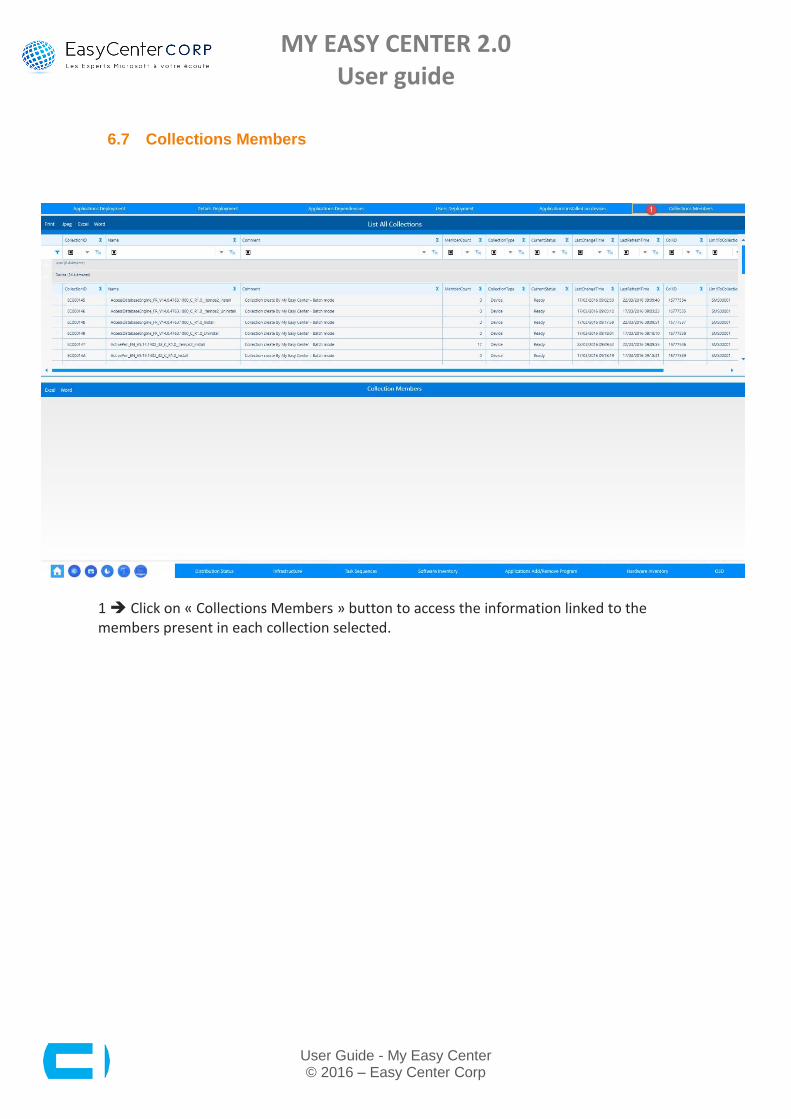
6.7 Collections Members
1 Click on « Collections Members » button to access the information linked to the members present in each collection selected.
MY EASY CENTER 2.0 User guide
User Guide - My Easy Center © 2016 – Easy Center Corp
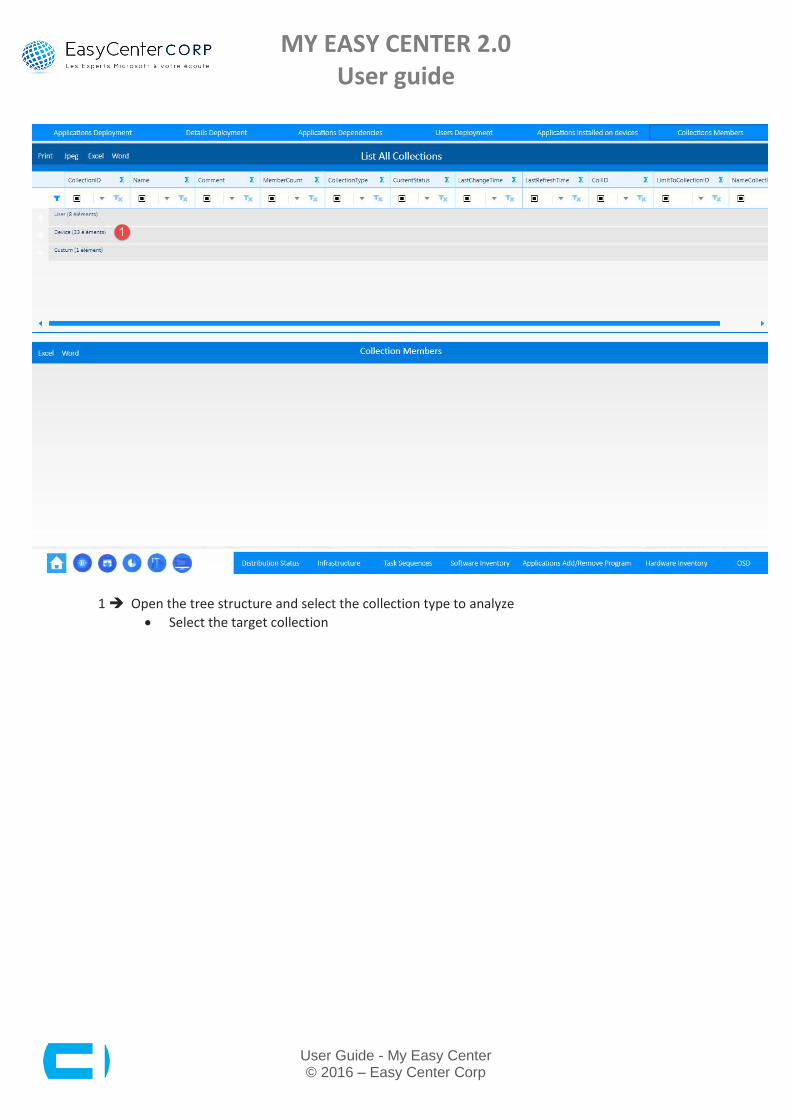
1 Open the tree structure and select the collection type to analyze
Select the target collection

MY EASY CENTER 2.0 User guide
User Guide - My Easy Center © 2016 – Easy Center Corp
1 Select the collection to analyze 2 View the result 3 Export the result if needed.

MY EASY CENTER 2.0 User guide
User Guide - My Easy Center © 2016 – Easy Center Corp
6.8 Distribution Status
1 Click on « Distribution Status » button to access the application contents present on the Distribution Points.
1 Select the Distribution Point to view 2 Chart allowing to view all distribution content status linked to the applications 3 Detailed table of application deployment status.

MY EASY CENTER 2.0 User guide
User Guide - My Easy Center © 2016 – Easy Center Corp
6.9 Infrastructure
1 Click on « Infrastructure » button to access the flow chart 2 The schema of your infrastructure is represented in the window central area 3 You can select a specific server to have a quick access to the server.
MY EASY CENTER 2.0 User guide
User Guide - My Easy Center © 2016 – Easy Center Corp
6.10 Task Sequences
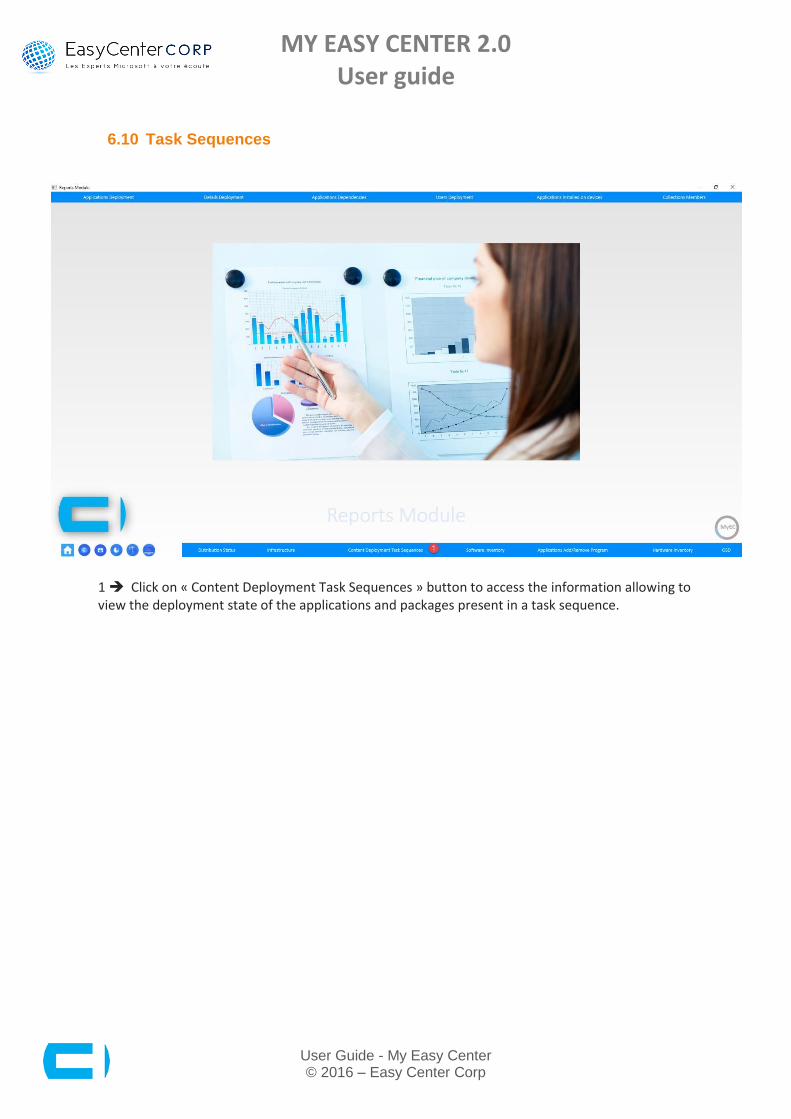
1 Click on « Content Deployment Task Sequences » button to access the information allowing to view the deployment state of the applications and packages present in a task sequence.
MY EASY CENTER 2.0 User guide
User Guide - My Easy Center © 2016 – Easy Center Corp
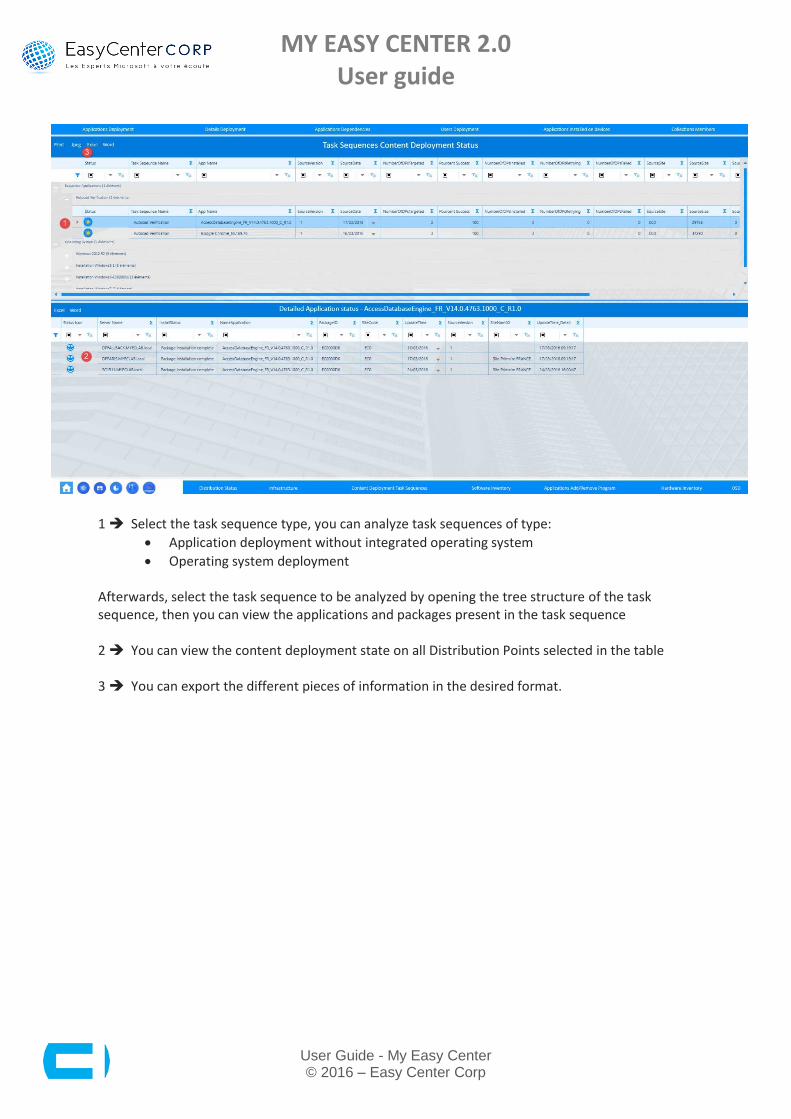
1 Select the task sequence type, you can analyze task sequences of type:
Application deployment without integrated operating system
Operating system deployment Afterwards, select the task sequence to be analyzed by opening the tree structure of the task sequence, then you can view the applications and packages present in the task sequence 2 You can view the content deployment state on all Distribution Points selected in the table 3 You can export the different pieces of information in the desired format.
MY EASY CENTER 2.0 User guide
User Guide - My Easy Center © 2016 – Easy Center Corp
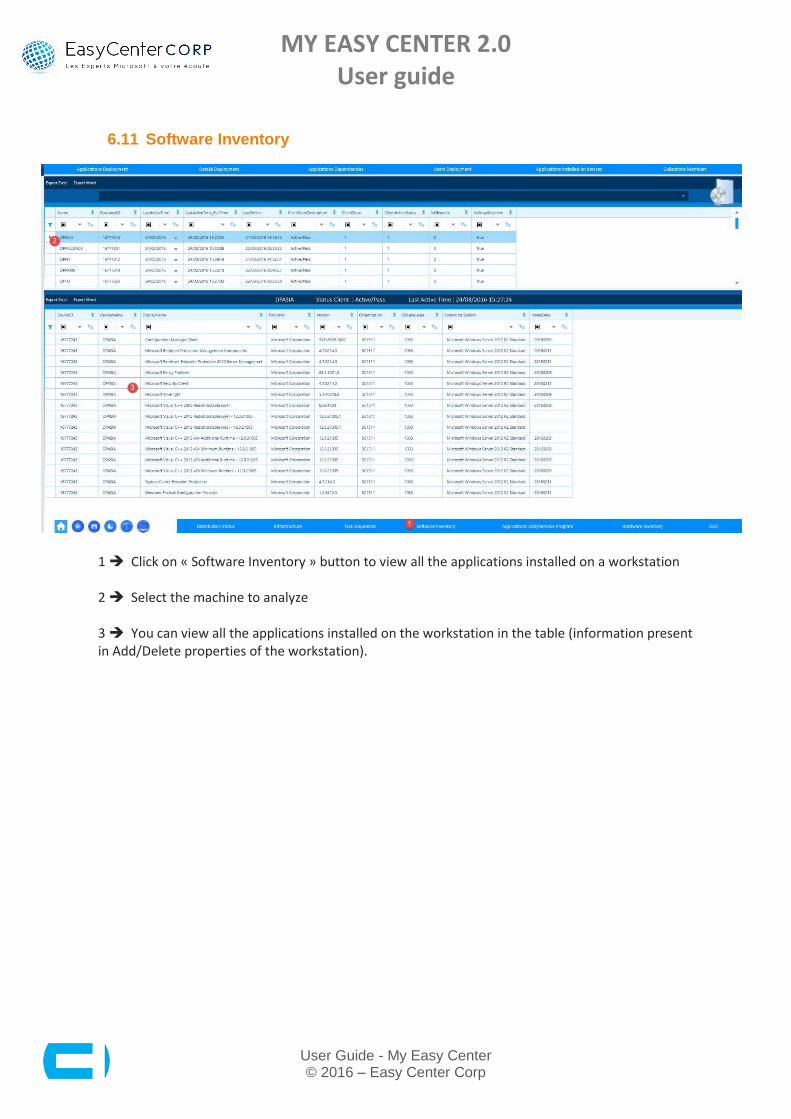
6.11 Software Inventory
1 Click on « Software Inventory » button to view all the applications installed on a workstation 2 Select the machine to analyze 3 You can view all the applications installed on the workstation in the table (information present in Add/Delete properties of the workstation).

MY EASY CENTER 2.0 User guide
User Guide - My Easy Center © 2016 – Easy Center Corp
6.12 Add/Remove Program
1 Click on « Add/Delete Program » button to view all applications present in the computer park 2 Select the target application for which you want to know the machines with the target application installed 3 You can view all the machines having the selected application present on the workstation in the table (information present in Add/Delete properties of the workstation)
4 Chart allowing to know the percentage of machines having the selected installation in Add/Delete properties of the program 5 Total number of machines having the target application installed
6 Total number of machines managed by SCCM 7 You can select an application to be analyzed in the scrolling list.

MY EASY CENTER 2.0 User guide
User Guide - My Easy Center © 2016 – Easy Center Corp
6.13 Hardware Inventory
1 Click on « Hardware Inventory » button to view all the components installed on the different workstation in the computer park 2 Select the target machine for which you want to know the components 3 / 4 / 5 / 6 Information linked to the components present on the target workstation.

MY EASY CENTER 2.0 User guide
User Guide - My Easy Center © 2016 – Easy Center Corp
6.14 OSD
1 Click on « OS » button to view the deployment state of your operating systems 2 Select the task sequences linked to the deployment of your operating system 3 Table listing deployment status of your operating system on the target machines 4 Overview chart linked to the deployment status of the task sequences.
MY EASY CENTER 2.0 User guide
User Guide - My Easy Center © 2016 – Easy Center Corp
7. Monitoring
7.1 Introduction
MY EASY CENTER 2.0 User guide
User Guide - My Easy Center © 2016 – Easy Center Corp
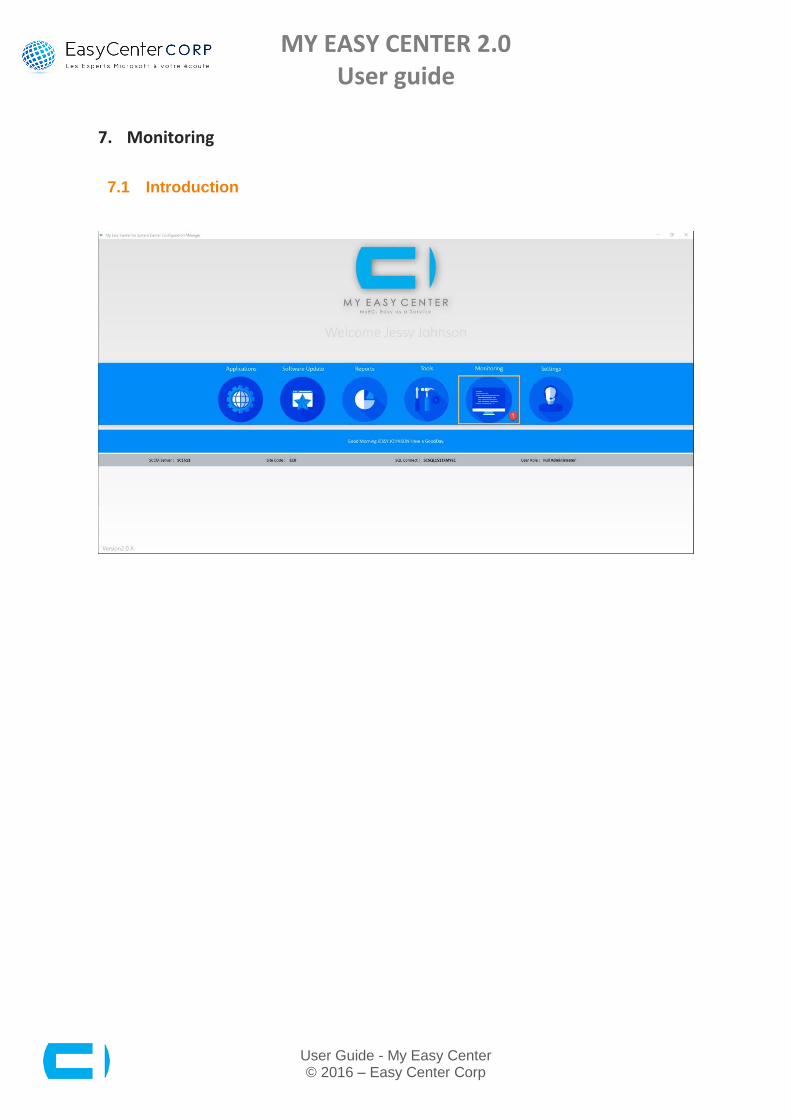
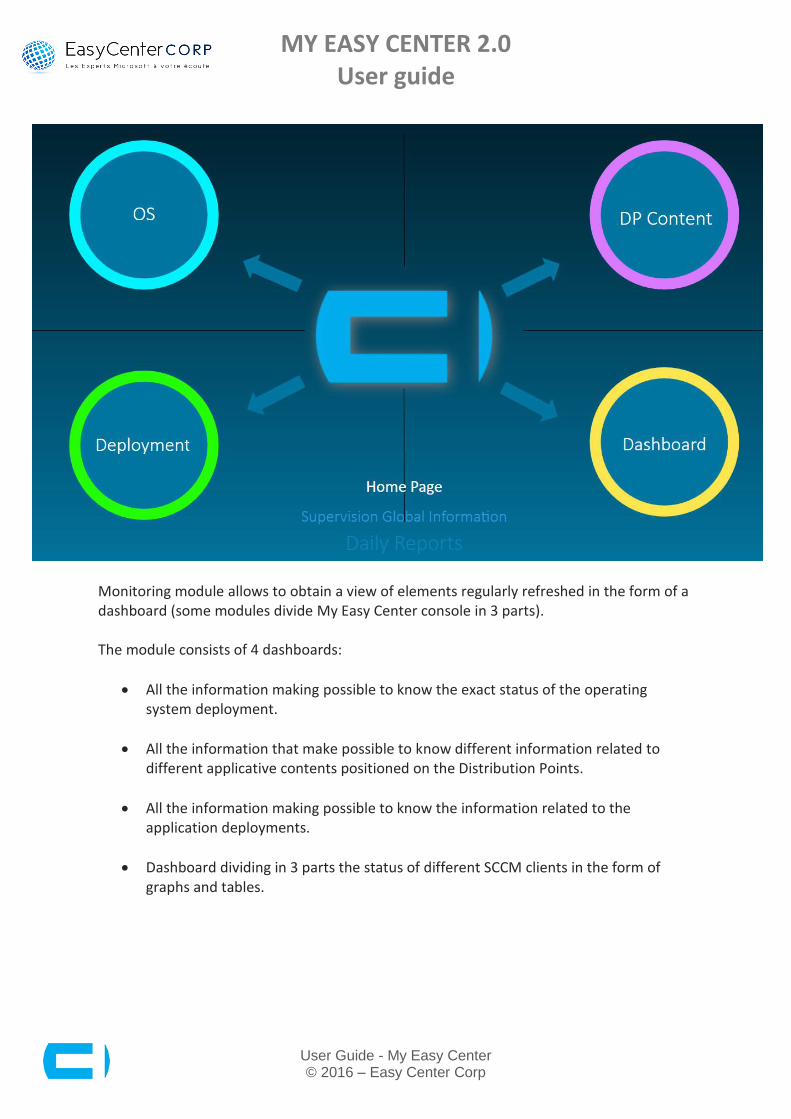
Monitoring module allows to obtain a view of elements regularly refreshed in the form of a dashboard (some modules divide My Easy Center console in 3 parts). The module consists of 4 dashboards:
All the information making possible to know the exact status of the operating system deployment.
All the information that make possible to know different information related to different applicative contents positioned on the Distribution Points.
All the information making possible to know the information related to the application deployments.
Dashboard dividing in 3 parts the status of different SCCM clients in the form of graphs and tables.

MY EASY CENTER 2.0 User guide
User Guide - My Easy Center © 2016 – Easy Center Corp
1 « Home Page » button allows to return to the central menu of My Easy Center operating console giving access to Applications, Software Update, Reports, Tools, Monitoring and Settings modules.
7.2 OSD
MY EASY CENTER 2.0 User guide
User Guide - My Easy Center © 2016 – Easy Center Corp
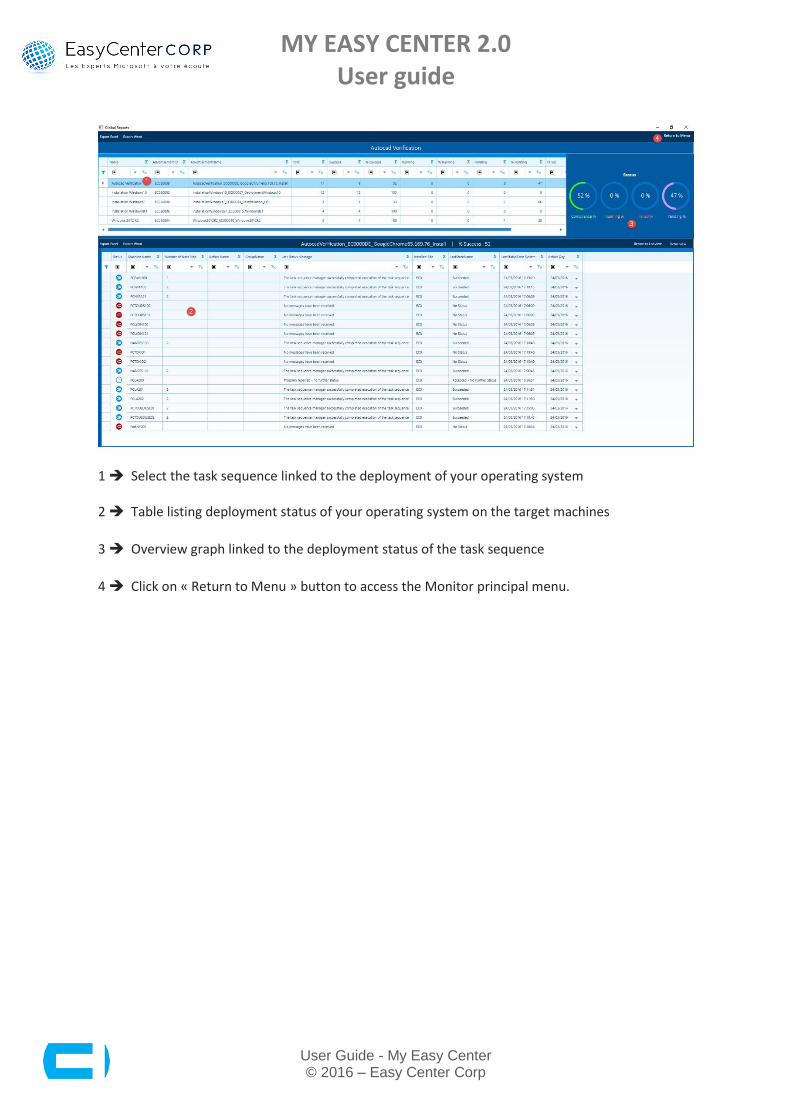
1 Select the task sequence linked to the deployment of your operating system 2 Table listing deployment status of your operating system on the target machines
3 Overview graph linked to the deployment status of the task sequence
4 Click on « Return to Menu » button to access the Monitor principal menu.
MY EASY CENTER 2.0 User guide
User Guide - My Easy Center © 2016 – Easy Center Corp
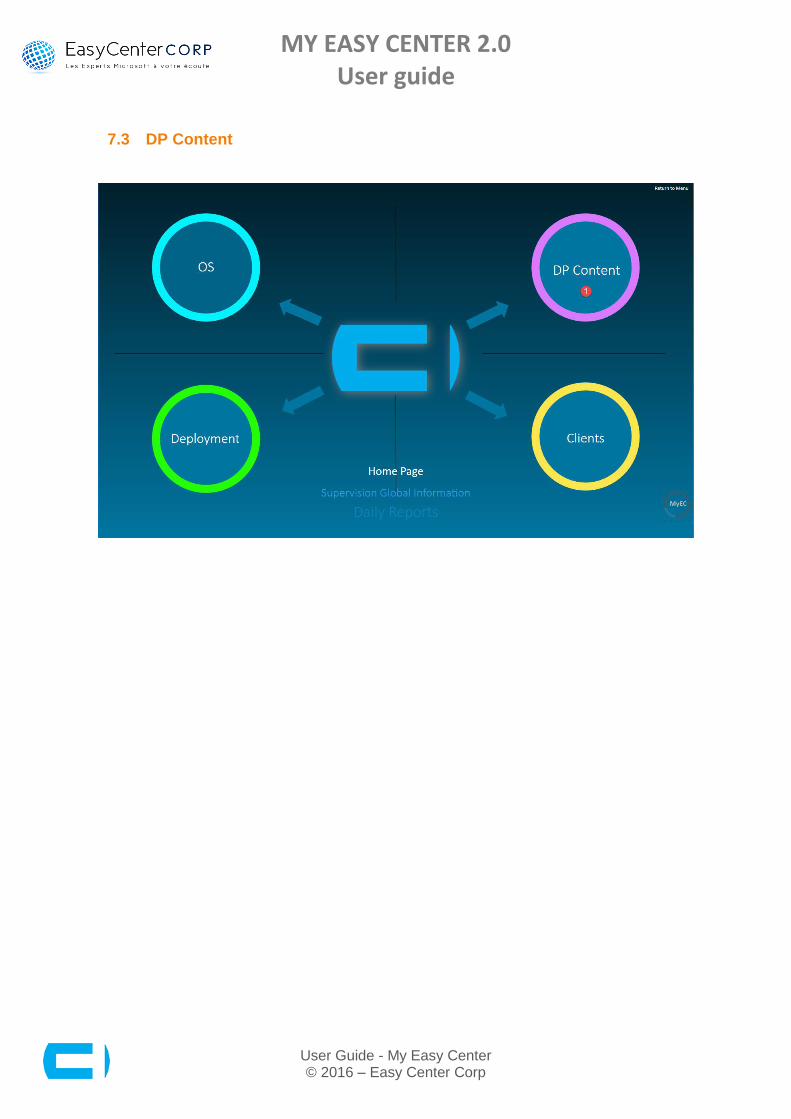
7.3 DP Content
MY EASY CENTER 2.0 User guide
User Guide - My Easy Center © 2016 – Easy Center Corp
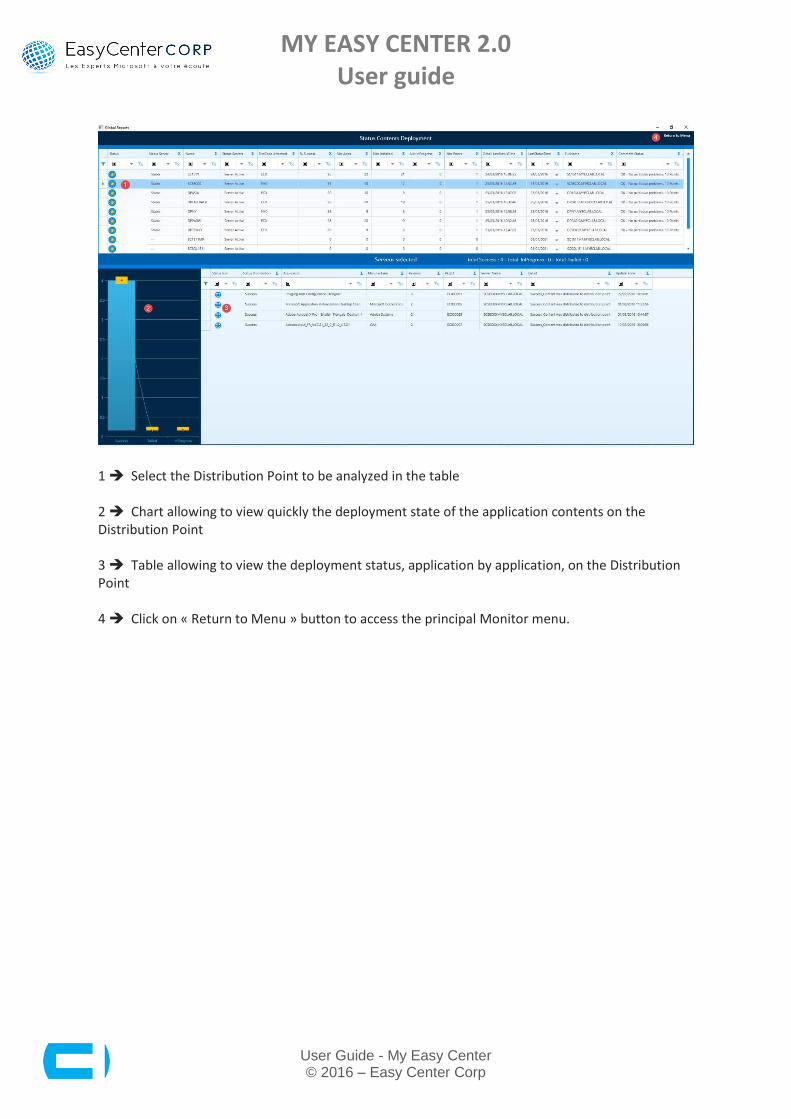
1 Select the Distribution Point to be analyzed in the table 2 Chart allowing to view quickly the deployment state of the application contents on the Distribution Point 3 Table allowing to view the deployment status, application by application, on the Distribution Point 4 Click on « Return to Menu » button to access the principal Monitor menu.
MY EASY CENTER 2.0 User guide
User Guide - My Easy Center © 2016 – Easy Center Corp
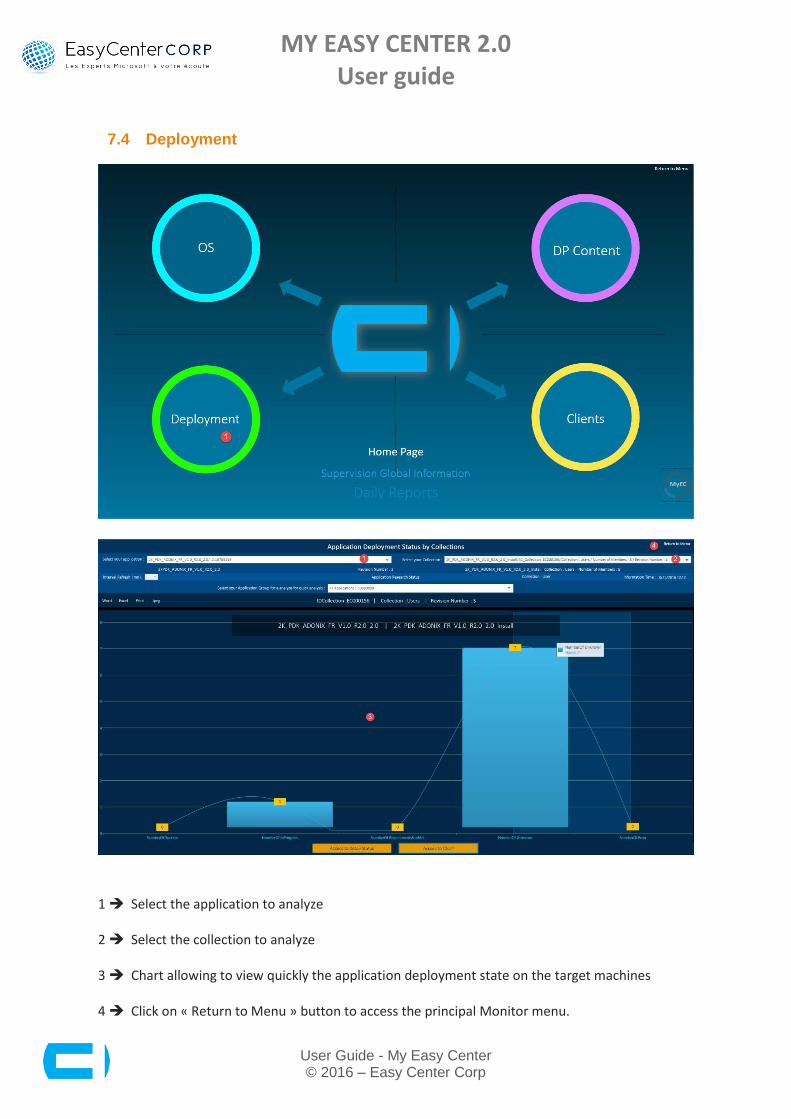
7.4 Deployment
1 Select the application to analyze 2 Select the collection to analyze 3 Chart allowing to view quickly the application deployment state on the target machines 4 Click on « Return to Menu » button to access the principal Monitor menu.

MY EASY CENTER 2.0 User guide
User Guide - My Easy Center © 2016 – Easy Center Corp
7.5 Clients
MY EASY CENTER 2.0 User guide
User Guide - My Easy Center © 2016 – Easy Center Corp
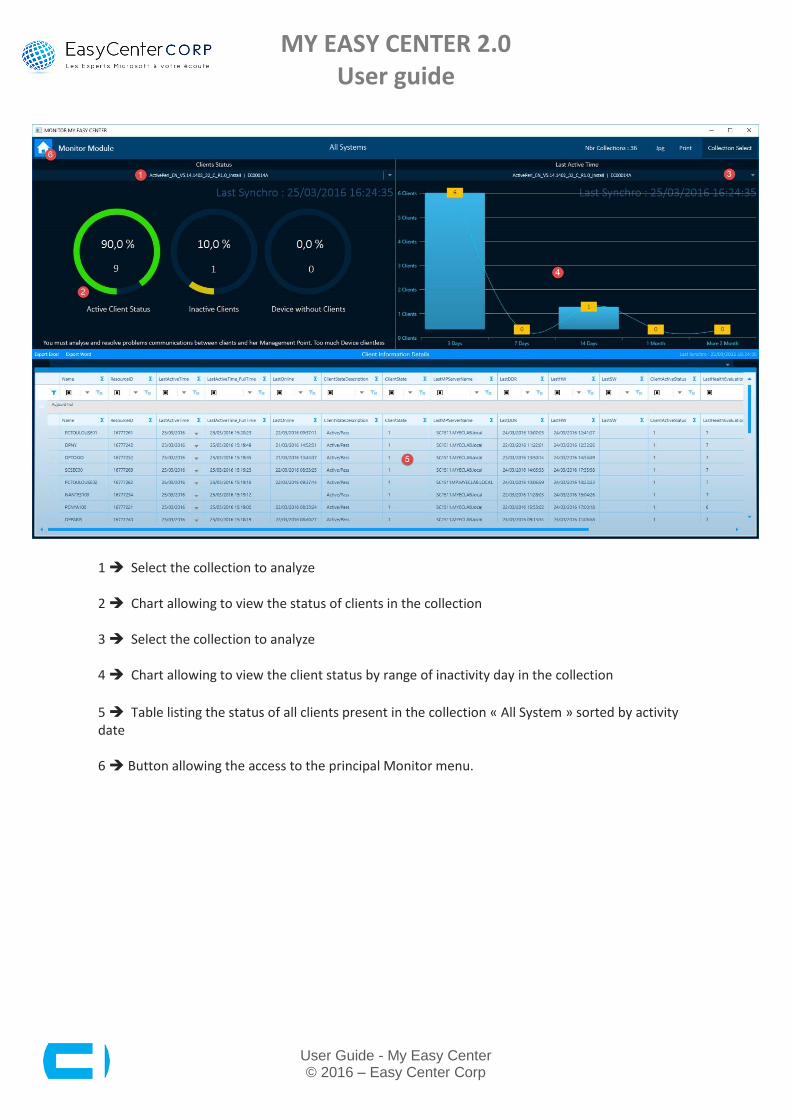
1 Select the collection to analyze 2 Chart allowing to view the status of clients in the collection 3 Select the collection to analyze 4 Chart allowing to view the client status by range of inactivity day in the collection
5 Table listing the status of all clients present in the collection « All System » sorted by activity date 6 Button allowing the access to the principal Monitor menu.

MY EASY CENTER 2.0 User guide
User Guide - My Easy Center © 2016 – Easy Center Corp
8. Settings
8.1 Settings
To access the parameters menu, click on « Settings » button.

MY EASY CENTER 2.0 User guide
User Guide - My Easy Center © 2016 – Easy Center Corp
1 To access the parameters menu of the connection elements to the SCCM infrastructure, click on « Settings » button 2 Insertion of the long name (FQDN) associated with the SCCM Primary server (SCCM Server on the role of Provider) managed by My Easy Center (FQDN: Example = SC1511.MYECLAB. local) 3 Insertion of the short name associated with the SCCM Primary server (SCCM Server on the role of Provider) managed by My Easy Center (Example = SC1511) 4 Insertion of the short name associated with the SQL SCCM Database Server (Server on the role of Database) (Example = SCSQL1511\MYEC) 5 Insertion of SCCM Database name targeted (Example = CM_EC0) 6 Insertion of the Site Code of the SCCM Primary Server targeted (Example = EC0) 7 Insertion of the domain name hosting the SCCM server (Example = MYECLAB.local) 8 Insertion of the LDAP path providing access to the OU containing Security Groups associated with the SCCM applications (Example = OU=Applications SCCM, OU=MyECC) 9 Validate the connection parameters/settings to the SCCM infrastructure targeted by clicking on « Save Settings »
MY EASY CENTER 2.0 User guide
User Guide - My Easy Center © 2016 – Easy Center Corp
8.2 Security Roles
Use rights positioning associated to the functions of My Easy Center console.
1 Access the elements enabling the association of functional roles of My Easy Center with users with access to My Easy Center console 2 Select the role or roles desired by clicking on the triangle to the left of the role 3 Validate the selection by clicking on the associated icon 4 Now, we are going to search users associated with the roles in the AD.

MY EASY CENTER 2.0 User guide
User Guide - My Easy Center © 2016 – Easy Center Corp
1 Launch the search of users in the AD (in case of need, modify the LDAP path containing users’ resources) 2 Click on the small cross to open the tree structure and et visualize all users found through this search Select the user or users desired 3 Validate the selection by clicking on the associated icon.
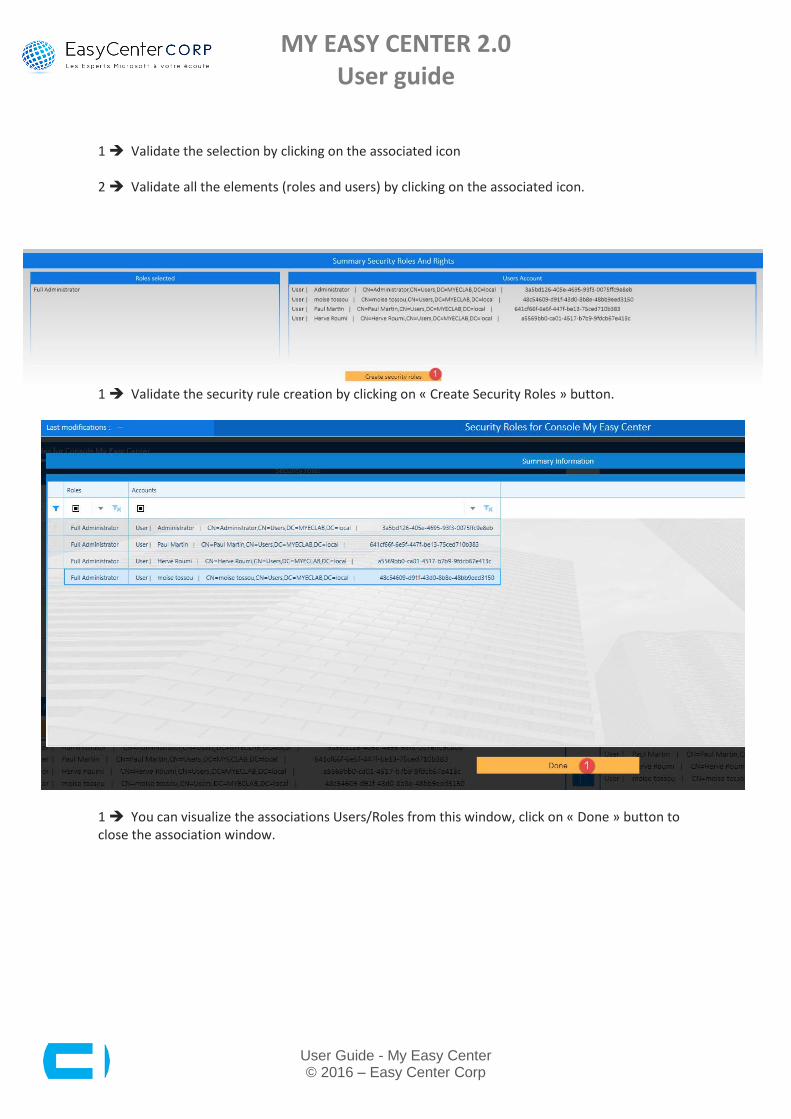
MY EASY CENTER 2.0 User guide
User Guide - My Easy Center © 2016 – Easy Center Corp
1 Validate the selection by clicking on the associated icon 2 Validate all the elements (roles and users) by clicking on the associated icon.
1 Validate the security rule creation by clicking on « Create Security Roles » button.
1 You can visualize the associations Users/Roles from this window, click on « Done » button to close the association window.
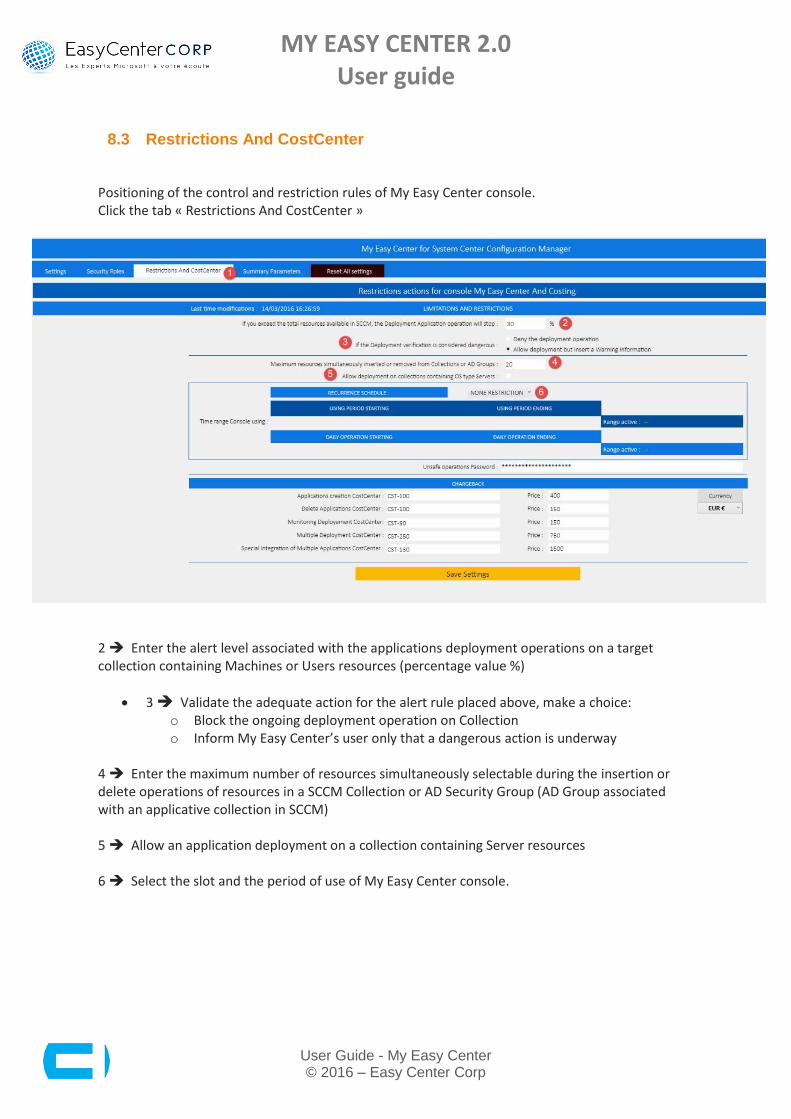
MY EASY CENTER 2.0 User guide
User Guide - My Easy Center © 2016 – Easy Center Corp
8.3 Restrictions And CostCenter
Positioning of the control and restriction rules of My Easy Center console. Click the tab « Restrictions And CostCenter »
2 Enter the alert level associated with the applications deployment operations on a target collection containing Machines or Users resources (percentage value %)
3 Validate the adequate action for the alert rule placed above, make a choice: o Block the ongoing deployment operation on Collection o Inform My Easy Center’s user only that a dangerous action is underway
4 Enter the maximum number of resources simultaneously selectable during the insertion or delete operations of resources in a SCCM Collection or AD Security Group (AD Group associated with an applicative collection in SCCM) 5 Allow an application deployment on a collection containing Server resources 6 Select the slot and the period of use of My Easy Center console.

MY EASY CENTER 2.0 User guide
User Guide - My Easy Center © 2016 – Easy Center Corp
1 Select a restriction related to a period of time (expressed in days) 2 Define the start date of this restriction 3 Define the end date of the restriction.
1 Select a daily period restriction (expressed in hours) 2 Define the start time of this restriction 3 Define the end time of the restriction.
1 Select different Cost Centers associated with the actions realized in My Easy Center console 2 Define costs of the different actions associated with Cost Centers 3 Select currency in Euros or Dollars.
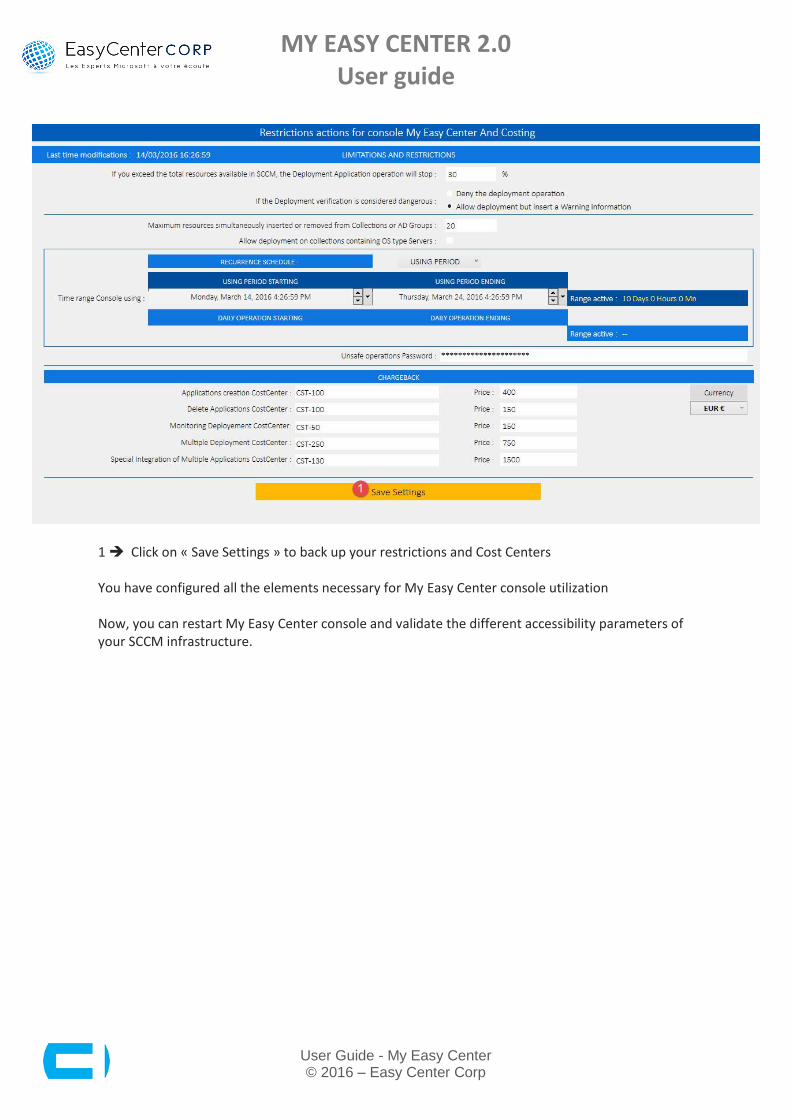
MY EASY CENTER 2.0 User guide
User Guide - My Easy Center © 2016 – Easy Center Corp
1 Click on « Save Settings » to back up your restrictions and Cost Centers You have configured all the elements necessary for My Easy Center console utilization Now, you can restart My Easy Center console and validate the different accessibility parameters of your SCCM infrastructure.