my devices user guide - cisco · pdf filemy devices user guide august 30th, 2017 americas...
TRANSCRIPT
My Devices User Guide
February 19th, 2018
Americas Headquarters
Cisco Systems, Inc.
170 West Tasman Drive
San Jose, CA 95134-1706
http://www.cisco.com
Tel: 408 526-4000
800 553-NETS(6387)
Fax: 408 527-0883

CCDE, CCENT, CCSI, Cisco Eos, Cisco Explorer, Cisco HealthPresence, Cisco IronPort, the Cisco logo, Cisco Nurse Connect, Cisco Pulse, Cisco SensorBase, Cisco StackPower, Cisco StadiumVision, Cisco TelePresence, Cisco TrustSec, Cisco Unified Computing System, Cisco
WebEx, DCE, Flip Channels, Flip for Good, Flip Mino, Flipshare (Design), Flip Ultra, Flip Video, Flip Video (Design), Instant Broadband, and
Welcome to the Human Network are trademarks; Changing the Way We Work, Live, Play, and Learn, Cisco Capital, Cisco Capital (Design), Cisco:Financed (Stylized), Cisco Store, Flip Gift Card, and One Million Acts of Green are service marks; and Access Registrar, Aironet,
AllTouch, AsyncOS, Bringing the Meeting To You, Catalyst, CCDA, CCDP, CCIE, CCIP, CCNA, CCNP, CCSP, CCVP, Cisco, the Cisco
Certified Internetwork Expert logo, Cisco IOS, Cisco Lumin, Cisco Nexus, Cisco Press, Cisco Systems, Cisco Systems Capital, the Cisco Systems logo, Cisco Unity, Collaboration Without Limitation, Continuum, EtherFast, EtherSwitch, Event Center, Explorer, Follow Me Browsing,
GainMaker, iLYNX, IOS, iPhone, IronPort, the IronPort logo, Laser Link, LightStream, Linksys, MeetingPlace, MeetingPlace Chime Sound,
MGX, Networkers, Networking Academy, PCNow, PIX, PowerKEY, PowerPanels, PowerTV, PowerTV (Design), PowerVu, Prisma, ProConnect, ROSA, SenderBase, SMARTnet, Spectrum Expert, StackWise, WebEx, and the WebEx logo are registered trademarks of Cisco
and/or its affiliates in the United States and certain other countries.
All other trademarks mentioned in this document or website are the property of their respective owners. The use of the word partner does not
imply a partnership relationship between Cisco and any other company. (1002R)
Any Internet Protocol (IP) addresses and phone numbers used in this document are not intended to be actual addresses and phone numbers. Any
examples, command display output, network topology diagrams, and other figures included in the document are shown for illustrative purposes
only. Any use of actual IP addresses or phone numbers in illustrative content is unintentional and coincidental.
My Devices User Guide
© 2018 Cisco Systems, Inc. All rights reserved.
i
Table of Contents Get Started with My Devices ......................................................................................................................................... 1
About My Devices ..................................................................................................................................................... 1
Access My Devices ................................................................................................................................................... 2
Log Out of My Devices ............................................................................................................................................. 2
Manage Your Devices ................................................................................................................................................... 3
Device addition .......................................................................................................................................................... 3
Add an Individual Device .......................................................................................................................................... 3
Upload Multiple Devices ........................................................................................................................................... 4
Create a CSV File of Devices .................................................................................................................................... 5
Import Devices from your Contracts ......................................................................................................................... 6
Export Devices to a CSV File .................................................................................................................................... 8
Locate Devices ............................................................................................................................................................ 10
Select a View Format............................................................................................................................................... 10
Sort the Device List ................................................................................................................................................. 11
Search for Devices ................................................................................................................................................... 12
Filter the Device List ............................................................................................................................................... 12
Adding Multiple Tags .............................................................................................................................................. 13
View Devices ............................................................................................................................................................... 14
Product Overview .................................................................................................................................................... 14
Notes ........................................................................................................................................................................ 14
Installed At .............................................................................................................................................................. 15
Device Milestones ................................................................................................................................................... 15
Report Views ............................................................................................................................................................... 16
Contract Renewal Report ......................................................................................................................................... 16
Product Lifecycle Report ......................................................................................................................................... 18
Software Version Report ......................................................................................................................................... 19
Sharing your My Devices View .................................................................................................................................. 20
Activities View ........................................................................................................................................................ 22
Opening and Viewing TAC Support Cases ................................................................................................................. 23
Submit Comments and Questions ................................................................................................................................ 25
Frequently Asked Questions ........................................................................................................................................ 26
Why do I need to use my Cisco.com account to log in? ...................................................................................... 26
Why was my device serial number not accepted? ............................................................................................... 26
Why were some devices not imported from my CSV file? ................................................................................. 26
What does “Unassociated Contracts” mean? ....................................................................................................... 26

ii
Why is some device information absent? ............................................................................................................ 26
Why are some devices misidentified or in the “Other” category? ....................................................................... 26
How do I request features or provide product feedback? .................................................................................... 26
Get Started with My Devices My Devices User Guide
1
Get Started with My Devices
Topics
About My Devices
Access My Devices
Log Out of My Devices
About My Devices
My Devices is an online tool that lets you build and manage a persistent list of the Cisco products you own. It
provides a single unified reference for device information that includes:
Product ID, category, and model
Product release date
End-of-sale and end-of-support dates
Support contract type and expiration date
Warranty type and expiration date
Location where the product is installed
To add a device, you only need to enter its serial number. After a device is added, you can easily locate it in the list,
view device details, and add your own notes.
Note: You must have a valid Cisco.com account to use My Devices. If you do not have a valid Cisco.com account,
you must register on the Cisco.com Registration page and associate a Service Contract to your Cisco.com profile.
Get Started with My Devices My Devices User Guide
2
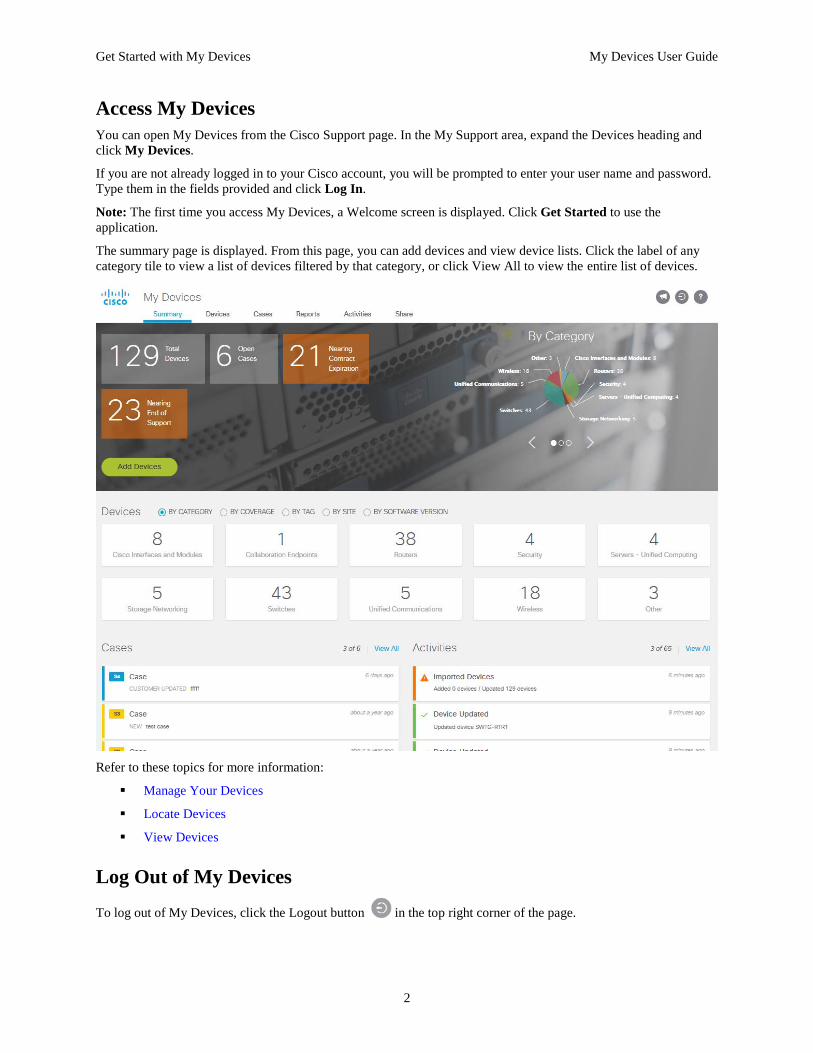
Access My Devices
You can open My Devices from the Cisco Support page. In the My Support area, expand the Devices heading and
click My Devices.
If you are not already logged in to your Cisco account, you will be prompted to enter your user name and password.
Type them in the fields provided and click Log In.
Note: The first time you access My Devices, a Welcome screen is displayed. Click Get Started to use the
application.
The summary page is displayed. From this page, you can add devices and view device lists. Click the label of any
category tile to view a list of devices filtered by that category, or click View All to view the entire list of devices.
Refer to these topics for more information:
Manage Your Devices
Locate Devices
View Devices
Log Out of My Devices
To log out of My Devices, click the Logout button in the top right corner of the page.
Manage Your Devices My Devices User Guide
3
Manage Your Devices
You can add devices individually, upload multiple devices to the list from a CSV or TXT file, or import from your
associated Contracts*. You can also export your device list to a CSV file for import elsewhere.
*Cisco end user customers only.
Topics
Add an Individual Device
Upload Multiple Devices
Create a CSV File of Devices
Import Devices from your Contracts
Export Devices to a CSV File
Device addition
Add an Individual Device
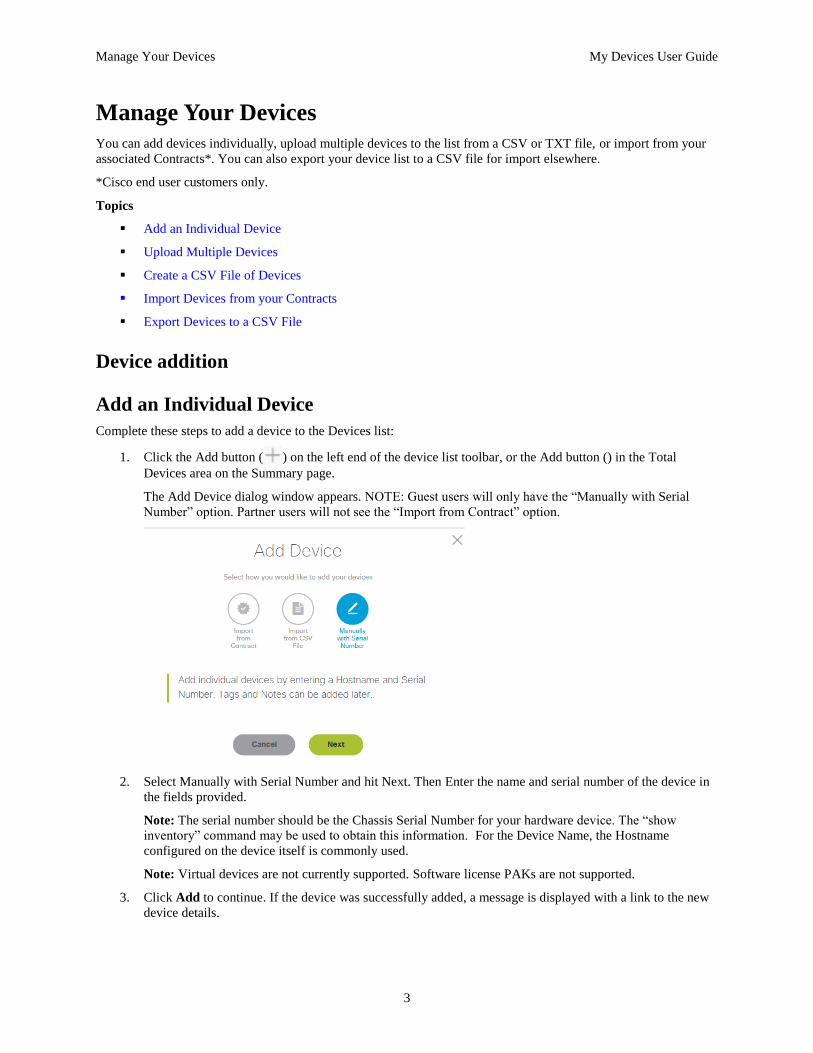
Complete these steps to add a device to the Devices list:
1. Click the Add button ( ) on the left end of the device list toolbar, or the Add button () in the Total
Devices area on the Summary page.
The Add Device dialog window appears. NOTE: Guest users will only have the “Manually with Serial
Number” option. Partner users will not see the “Import from Contract” option.
2. Select Manually with Serial Number and hit Next. Then Enter the name and serial number of the device in
the fields provided.
Note: The serial number should be the Chassis Serial Number for your hardware device. The “show
inventory” command may be used to obtain this information. For the Device Name, the Hostname
configured on the device itself is commonly used.
Note: Virtual devices are not currently supported. Software license PAKs are not supported.
3. Click Add to continue. If the device was successfully added, a message is displayed with a link to the new
device details.
Manage Your Devices My Devices User Guide
4
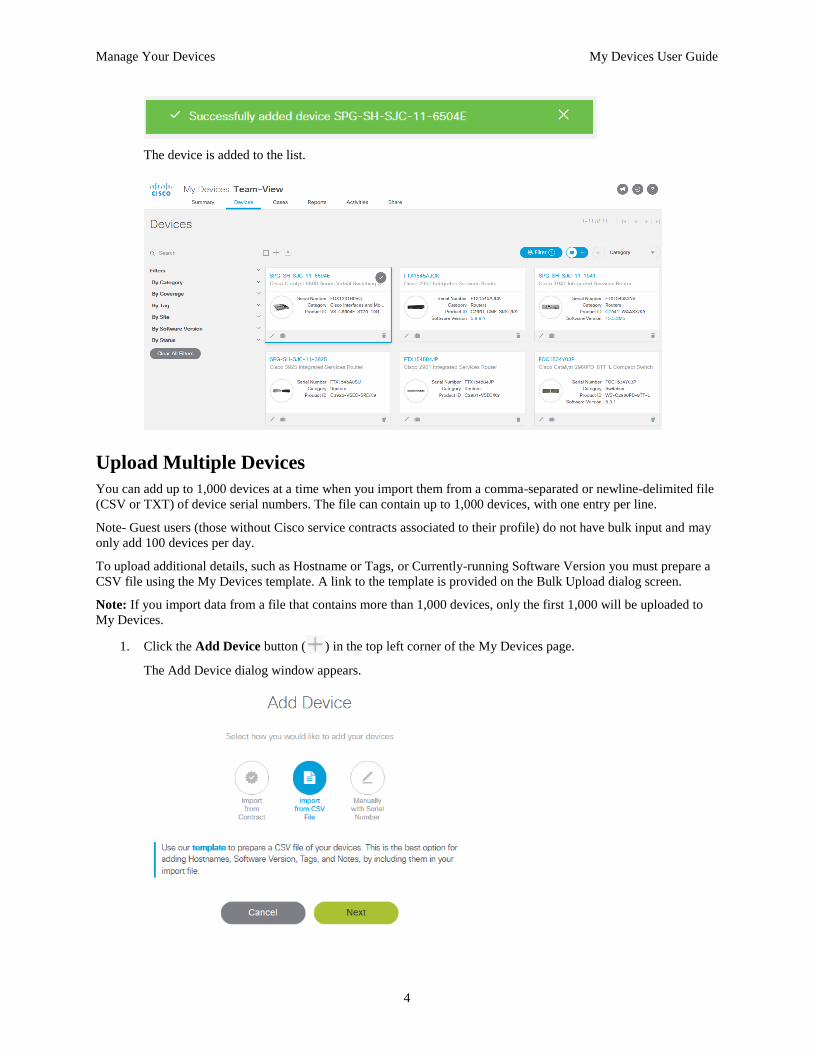
The device is added to the list.
Upload Multiple Devices
You can add up to 1,000 devices at a time when you import them from a comma-separated or newline-delimited file
(CSV or TXT) of device serial numbers. The file can contain up to 1,000 devices, with one entry per line.
Note- Guest users (those without Cisco service contracts associated to their profile) do not have bulk input and may
only add 100 devices per day.
To upload additional details, such as Hostname or Tags, or Currently-running Software Version you must prepare a
CSV file using the My Devices template. A link to the template is provided on the Bulk Upload dialog screen.
Note: If you import data from a file that contains more than 1,000 devices, only the first 1,000 will be uploaded to
My Devices.
1. Click the Add Device button ( ) in the top left corner of the My Devices page.
The Add Device dialog window appears.

Manage Your Devices My Devices User Guide
5
2. Select Import from CSV file, click Next, then the Bulk Upload dialog window opens.
3. Complete one of these steps to choose a file to upload:
Select Click Here or Drop File to Upload. In the Open dialog, navigate to the CSV file you want to
import, choose it, and click Open.
Drag the CSV file from a separate window onto the text “Click Here or Drop File to Upload.” Be sure
that the icon below the pointer indicates that the file will be copied before you release the mouse
button to drop the file.
4. Click Upload.
A progress indicator appears, which shows how close to completion the upload process is. When the upload
is complete, the devices imported from the CSV file appear in the device list.
The message bar at the top of the page displays the number of devices imported successfully and the
number of devices that could not be imported from the CSV file (because the serial number was invalid or a
duplicate of a device already present in My Devices).
Note: If a CSV file contains a serial number that is identical to the serial number of a device already present in My
Devices, that serial number and the associated device information is not imported (it does not overwrite the existing
device).
Create a CSV File of Devices
You can create a CSV file with device information that can be imported to My Devices.
1. Click the Add Device button ( ) in the top left corner of the My Devices page.
The Add Device dialog window appears.
2. Click bulk upload tool at the bottom of the Add Device dialog window.
The Bulk Upload dialog window opens.
Manage Your Devices My Devices User Guide
6
3. Click template just above the “Click Here or Drop Files to Upload” box.
The CSV template is downloaded to your computer. If prompted, specify a location to save the template
file.
4. Open the CSV file in your preferred application.
5. Enter the information for each device on a separate row. The only required information is the device’s
serial number. Other device information is optional and can be added from within My Devices when you
edit the device.
Note: You can enter multiple Tags for a single device. Separate each asset tag with the pipe “ | ” character,
as shown in the image below.
6. When you are finished, click Save. Ensure that the file is saved in the CSV format.
7. If processing of your CSV produces errors, please check Activities log for details. You may need to correct
serial number or software version strings. Most Cisco software types will be recognized, but some may not
– these will be reported in the Activities error log and indicated on the Device and Report:
Note: You can use the EXPORT file (Default Format) directly as an Input CSV file, once you have your
initial device set loaded. Simply Export, edit as necessary and Re Import as the CSV file.
Import Devices from your Contracts
Cisco end–user Customers (CCO ID Access level 2, ie not Partners or Guest users) can import devices from their
associated service contracts. Using the Import from Contract option, you will be asked to provide a sample Serial
Number from one of your contracts.
Together with your login credentials, My Devices will verify the serial number is associated to your account and
will then display the contracts that match you and your company.
You can then choose to import from the listed contract(s), with options to include IP Phones and low-level items
configured in your device Chassis.
Note: My Devices has a 10,000 device limit. Choosing to import phones and low-level items may increase the
probability of reaching the limit.
Manage Your Devices My Devices User Guide
7
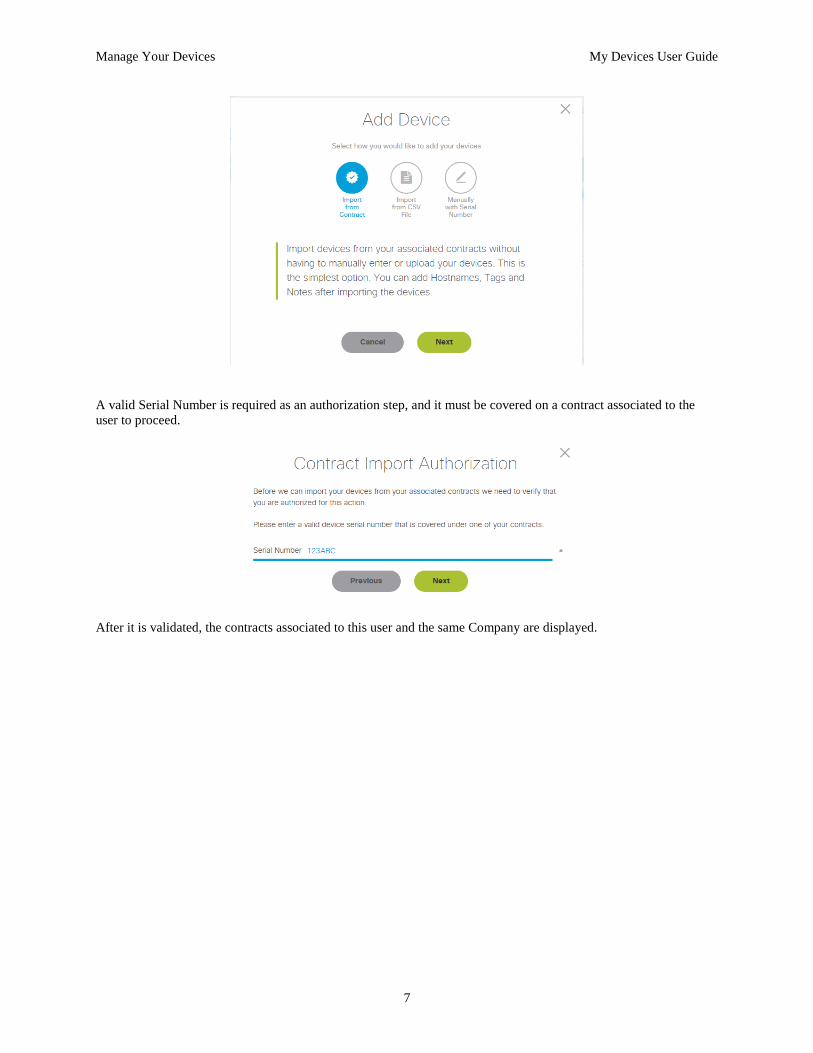
A valid Serial Number is required as an authorization step, and it must be covered on a contract associated to the
user to proceed.
After it is validated, the contracts associated to this user and the same Company are displayed.

Manage Your Devices My Devices User Guide
8
If this contract list is incomplete, click here to request additions; you will need to supply the missing
contract number(s).
The user can now select the Contracts from which to import, and refine the type of items imported. By default only
top level items (Routers, Switches, Chassis, etc) are included.
Options are presented to include IP Phones and all Sub-Chassis items, adding in all other items with serial numbers.
This will include line cards, modules, power supplies, memory cards and other low level items.
Note: My Devices allows you to add up to 10,000 devices. Including sub-chassis items will make it more
likely to hit the maximum device count. For larger networks, please use the Smart Net Total Care Portal.
The process will validate the Installation sites of devices on your contracts and import those on sites matching your
Company. Parent/Child relationships will be retrieved, ie between chassis and the configured items (if sub-chassis
import was selected). Imported devices will be added to your Device list.
If your import results in fewer devices than expected, your Company–Site mapping may require attention. You will
need to open a Customer Service case to handle any changes or corrections. See the Help instructions
Export Devices to a CSV File
You can export all the devices in your list to a CSV file.
Click the Export Devices button ( ) in the toolbar above the device list. A CSV file is created and automatically
placed in your default downloads folder. You also have the choice of format, the default will allow direct re-import
into My Devices. The “SNTC Portal file” format allows import to the Smart Net Total Care Portal.

Manage Your Devices My Devices User Guide
9
Note: Devices are exported to the CSV file based on any applied filtering. If no filters are applied, all Devices are
exported. If you Select a device or Select All, then the devices exported will be limited to those selected in the
current view.
Note: As noted above, the default-format exported file can be used directly as an Upload CSV file. Fields such as
Notes and Tags can be edited in a spreadsheet program, saved to retain the CSV format, and then Uploaded as
described above, to overwrite existing device Names, Notes or Tags.

Locate Devices My Devices User Guide
10
Locate Devices
My Devices provides multiple ways to find devices by category or by device-specific information:
Select a View Format
Sort the Device List
Search for Devices
Filter the Device List
Select a View Format
After you select View All or a filtered view on the Summary page, the Device List page opens.You can view the
device list in either of two formats: a Table View or a Tile View.
To change the format, click the toggle button beside the Sort By button on the right end of the device list toolbar.
The button highlights the icon of the format currently displayed. Your selection will be retained for next time
visiting the Device list page.
Table View ( ): Each device is displayed in a table row that contains the device name, model, and
serial number, as well as a check box to select the device. This view format allows more devices to appear
on the screen but displays less information about each device.
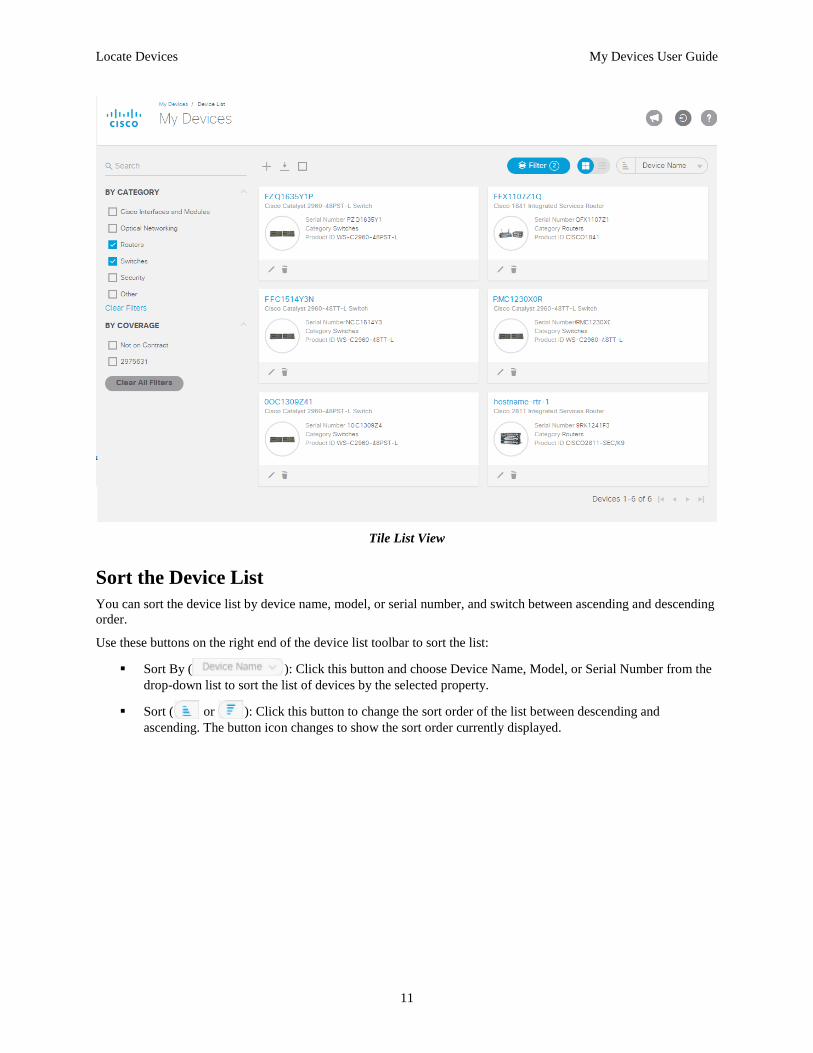
Tile View ( ): Each device is displayed as a tile that contains an image of the device, summary
information, and buttons to select, edit, and delete the device. This view format presents more information
but allows fewer devices to appear in the viewable area of the screen.
These figures illustrate the two list styles.
Table List View
Locate Devices My Devices User Guide
11
Tile List View
Sort the Device List
You can sort the device list by device name, model, or serial number, and switch between ascending and descending
order.
Use these buttons on the right end of the device list toolbar to sort the list:
Sort By ( ): Click this button and choose Device Name, Model, or Serial Number from the
drop-down list to sort the list of devices by the selected property.
Sort ( or ): Click this button to change the sort order of the list between descending and
ascending. The button icon changes to show the sort order currently displayed.
Locate Devices My Devices User Guide
12
Search for Devices
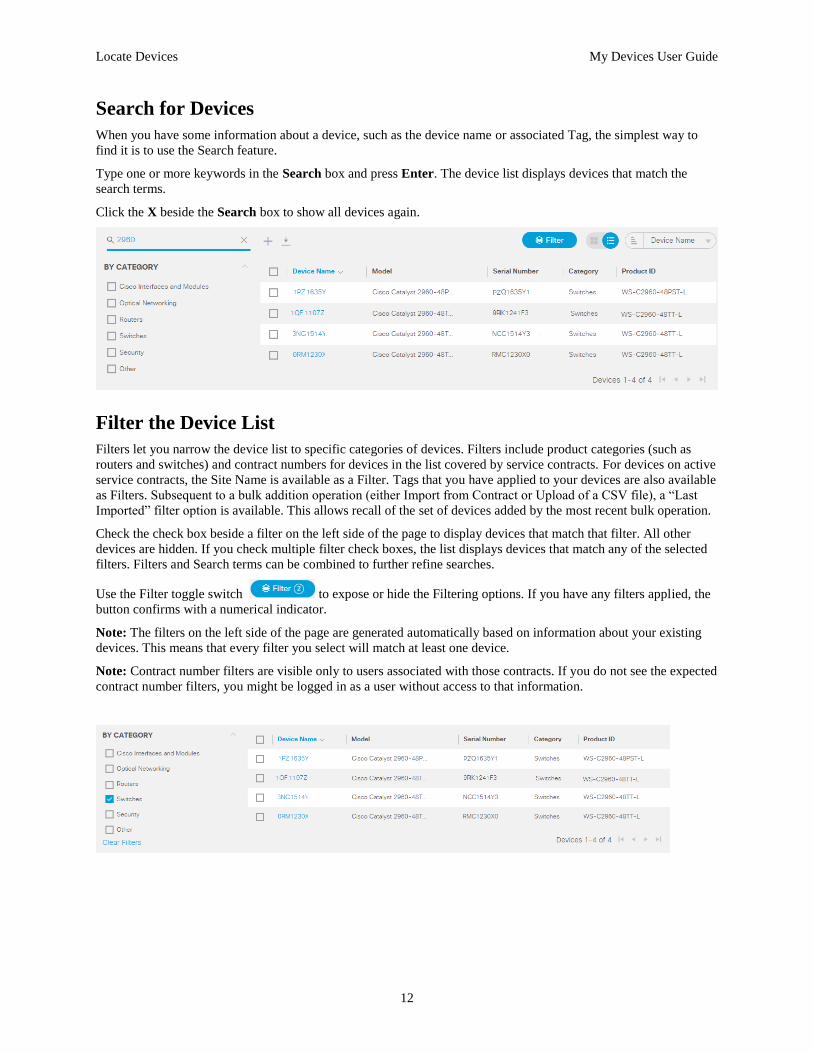
When you have some information about a device, such as the device name or associated Tag, the simplest way to
find it is to use the Search feature.
Type one or more keywords in the Search box and press Enter. The device list displays devices that match the
search terms.
Click the X beside the Search box to show all devices again.
Filter the Device List
Filters let you narrow the device list to specific categories of devices. Filters include product categories (such as
routers and switches) and contract numbers for devices in the list covered by service contracts. For devices on active
service contracts, the Site Name is available as a Filter. Tags that you have applied to your devices are also available
as Filters. Subsequent to a bulk addition operation (either Import from Contract or Upload of a CSV file), a “Last
Imported” filter option is available. This allows recall of the set of devices added by the most recent bulk operation.
Check the check box beside a filter on the left side of the page to display devices that match that filter. All other
devices are hidden. If you check multiple filter check boxes, the list displays devices that match any of the selected
filters. Filters and Search terms can be combined to further refine searches.
Use the Filter toggle switch to expose or hide the Filtering options. If you have any filters applied, the
button confirms with a numerical indicator.
Note: The filters on the left side of the page are generated automatically based on information about your existing
devices. This means that every filter you select will match at least one device.
Note: Contract number filters are visible only to users associated with those contracts. If you do not see the expected
contract number filters, you might be logged in as a user without access to that information.
Locate Devices My Devices User Guide
13
Adding Multiple Tags
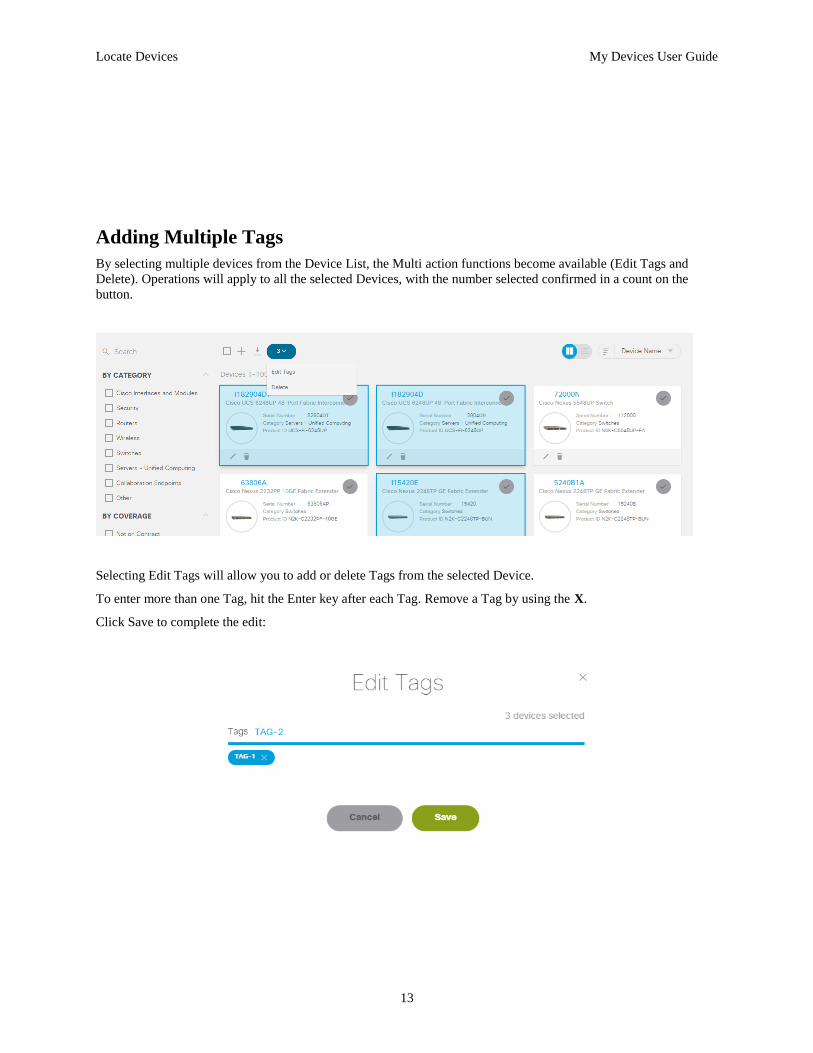
By selecting multiple devices from the Device List, the Multi action functions become available (Edit Tags and
Delete). Operations will apply to all the selected Devices, with the number selected confirmed in a count on the
button.
Selecting Edit Tags will allow you to add or delete Tags from the selected Device.
To enter more than one Tag, hit the Enter key after each Tag. Remove a Tag by using the X.
Click Save to complete the edit:

View Devices My Devices User Guide
14
View Devices
After you locate a device, click the device name (displayed as a hyperlink) to open the Details page for that device.
To close the Details page and return to the device list, click the MyDevices link at the top of the page.
The Details page contains these areas:
Product Overview
Notes
Installed At
Device Milestones
Product Overview
The Product Overview area displays an image of the device model, summary information about the product and its
milestone dates, and the service contract and warranty that apply to the device.
At the top of this area, just below the product name, is a link to the Cisco product support web page for that model.
These buttons are at the bottom of the Product Overview area:
Edit : Make changes to the device name, model description (if multiple available), asset tag, software
version, or add notes. For devices categorized as “Other”, you can manually assign the product Category.
Refresh : Manually refresh product and contract details. Details are typically refreshed daily, but if
required a manual refresh can be forced.
TAC Case : If the device is covered by active contract coverage, you can submit a TAC case here
Delete : Delete this device from My Devices.
Note: If you change the serial number, this device entry effectively represents a different device. My Devices
retrieves most information for the device automatically. However, make sure to review any information that was
entered manually, notes included, and update it as needed to apply to the new device.
Note: Some Product IDs refer to a “bundle” including chassis, module and software options. In these cases there
may be multiple options for Product ID. If you wish to change from the default selection, please use the Edit
capability, with the option to apply to all other devices of the same ProductID.
Notes
This area contains your own information about the device, entered manually. Click inside the box to add new notes
or modify existing content.
View Devices My Devices User Guide
15
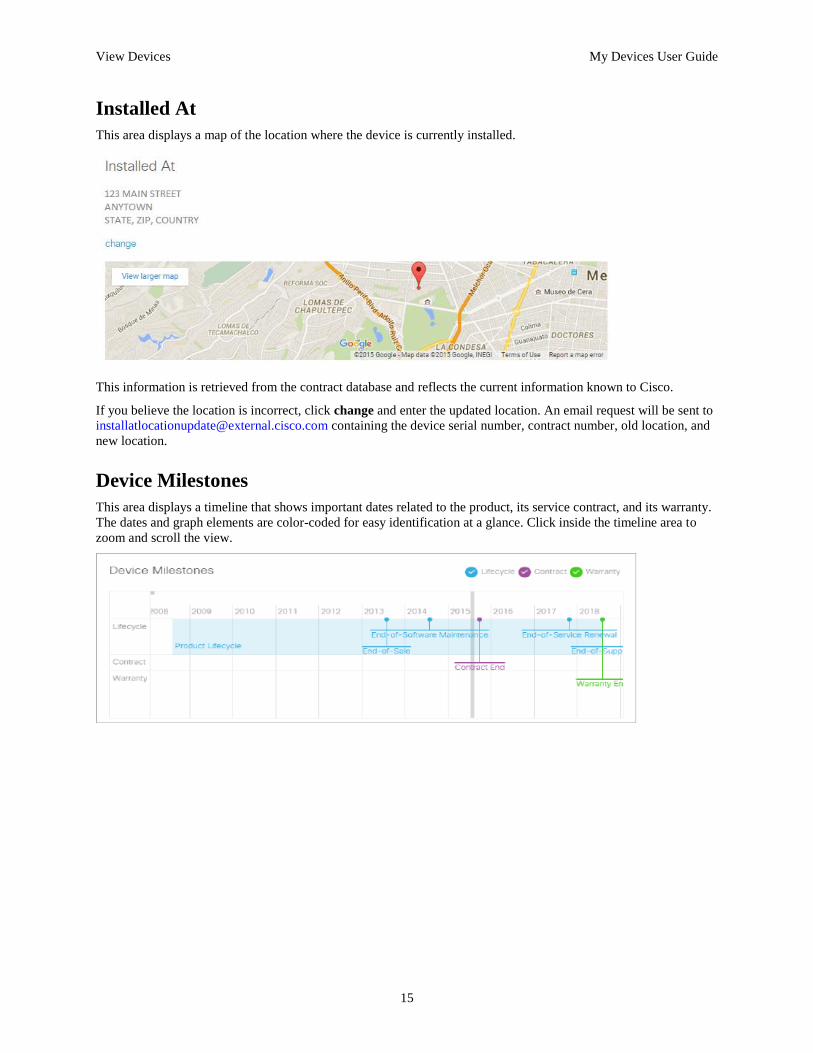
Installed At
This area displays a map of the location where the device is currently installed.
This information is retrieved from the contract database and reflects the current information known to Cisco.
If you believe the location is incorrect, click change and enter the updated location. An email request will be sent to
[email protected] containing the device serial number, contract number, old location, and
new location.
Device Milestones
This area displays a timeline that shows important dates related to the product, its service contract, and its warranty.
The dates and graph elements are color-coded for easy identification at a glance. Click inside the timeline area to
zoom and scroll the view.
Report Views My Devices User Guide
16
Report Views
Report views are provided to display the overall status of the Devices, indicating the Contract coverage and expiry
date ranges, and the Lifecycle status of the devices with regard to the significant End of Life Milestones.
You can select the Reports from any page on My Devices.
Note: By default, the Reports operate on the complete Device list. You may use the Filter toggle
to access filtering options and generate the Report for just the selected set of devices.
There are three types of Report available:
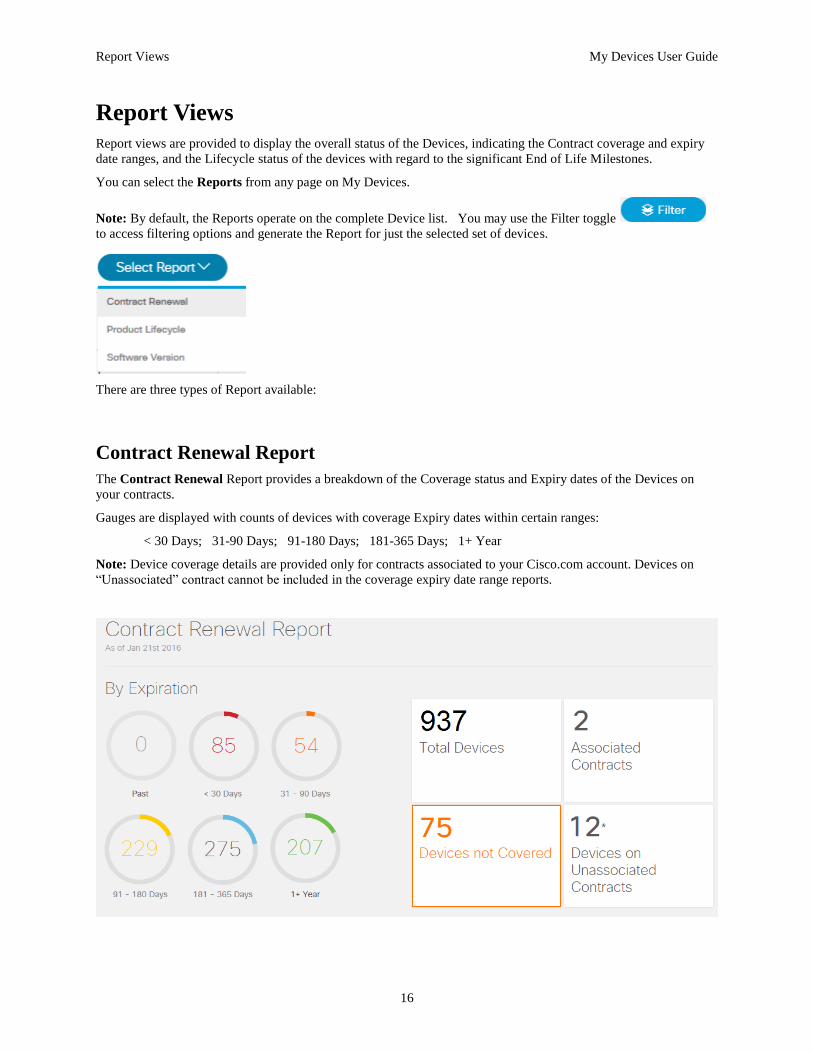
Contract Renewal Report
The Contract Renewal Report provides a breakdown of the Coverage status and Expiry dates of the Devices on
your contracts.
Gauges are displayed with counts of devices with coverage Expiry dates within certain ranges:
< 30 Days; 31-90 Days; 91-180 Days; 181-365 Days; 1+ Year
Note: Device coverage details are provided only for contracts associated to your Cisco.com account. Devices on
“Unassociated” contract cannot be included in the coverage expiry date range reports.

Report Views My Devices User Guide
17
The interactive Tiles to the right of the Gauges indicate the following details and clicking will take you to the
affected Devices:
Total Devices – the full count of all of your entered Devices
Associated Contracts – The number of Contracts associated to your Cisco.com login account on which the Devices
are covered.
Devices Not Covered – the number of Devices that have no current Active Contract Coverage
(If all Devices have Active contract coverage, this Tile will not be displayed)
Devices on Unassociated Contracts – the number of Devices covered by Active contract(s), but those contract(s)
are not currently associated to your Cisco.com login account. To verify existing associations or to associate any
missing contracts, access your profile here: https://rpfa.cloudapps.cisco.com/rpfa/profile/profile_management.do
(If all of your contracts are correctly associated to your Cisco.com login, this Tile will not be displayed)
In addition to the gauge counters, tables are provided to further display the device Lifecycle status, this time grouped
by Contract, and by Product Category. Click the numbers to be taken to a list of the actual devices affected:
Report Views My Devices User Guide
18
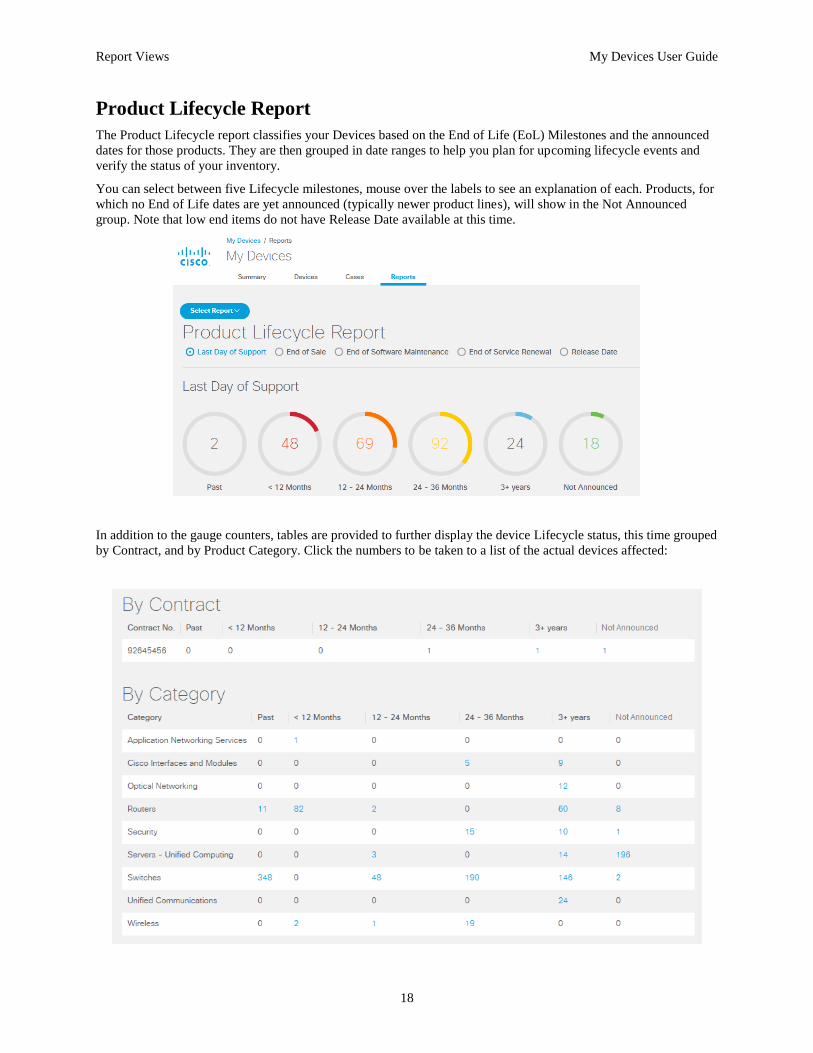
Product Lifecycle Report
The Product Lifecycle report classifies your Devices based on the End of Life (EoL) Milestones and the announced
dates for those products. They are then grouped in date ranges to help you plan for upcoming lifecycle events and
verify the status of your inventory.
You can select between five Lifecycle milestones, mouse over the labels to see an explanation of each. Products, for
which no End of Life dates are yet announced (typically newer product lines), will show in the Not Announced
group. Note that low end items do not have Release Date available at this time.
In addition to the gauge counters, tables are provided to further display the device Lifecycle status, this time grouped
by Contract, and by Product Category. Click the numbers to be taken to a list of the actual devices affected:
Report Views My Devices User Guide
19
Software Version Report
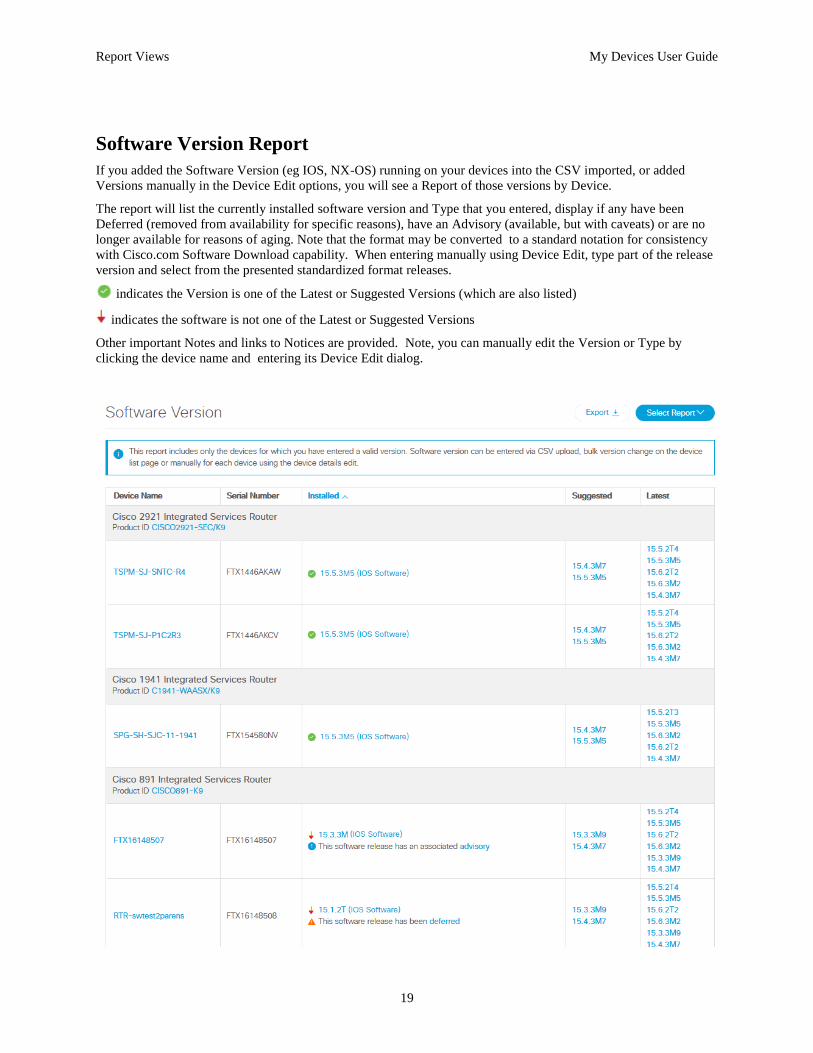
If you added the Software Version (eg IOS, NX-OS) running on your devices into the CSV imported, or added
Versions manually in the Device Edit options, you will see a Report of those versions by Device.
The report will list the currently installed software version and Type that you entered, display if any have been
Deferred (removed from availability for specific reasons), have an Advisory (available, but with caveats) or are no
longer available for reasons of aging. Note that the format may be converted to a standard notation for consistency
with Cisco.com Software Download capability. When entering manually using Device Edit, type part of the release
version and select from the presented standardized format releases.
indicates the Version is one of the Latest or Suggested Versions (which are also listed)
indicates the software is not one of the Latest or Suggested Versions
Other important Notes and links to Notices are provided. Note, you can manually edit the Version or Type by
clicking the device name and entering its Device Edit dialog.
Sharing your My Devices View My Devices User Guide
20
Sharing your My Devices View
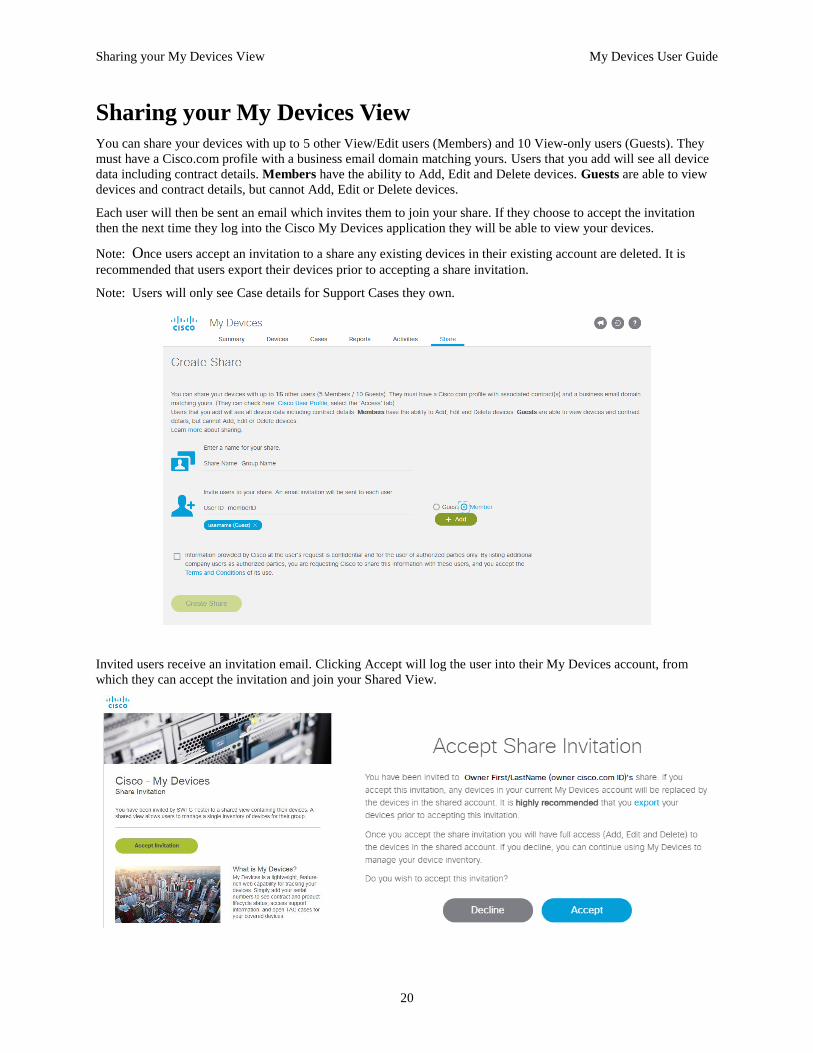
You can share your devices with up to 5 other View/Edit users (Members) and 10 View-only users (Guests). They
must have a Cisco.com profile with a business email domain matching yours. Users that you add will see all device
data including contract details. Members have the ability to Add, Edit and Delete devices. Guests are able to view
devices and contract details, but cannot Add, Edit or Delete devices.
Each user will then be sent an email which invites them to join your share. If they choose to accept the invitation
then the next time they log into the Cisco My Devices application they will be able to view your devices.
Note: Once users accept an invitation to a share any existing devices in their existing account are deleted. It is
recommended that users export their devices prior to accepting a share invitation.
Note: Users will only see Case details for Support Cases they own.
Invited users receive an invitation email. Clicking Accept will log the user into their My Devices account, from
which they can accept the invitation and join your Shared View.
Sharing your My Devices View My Devices User Guide
21
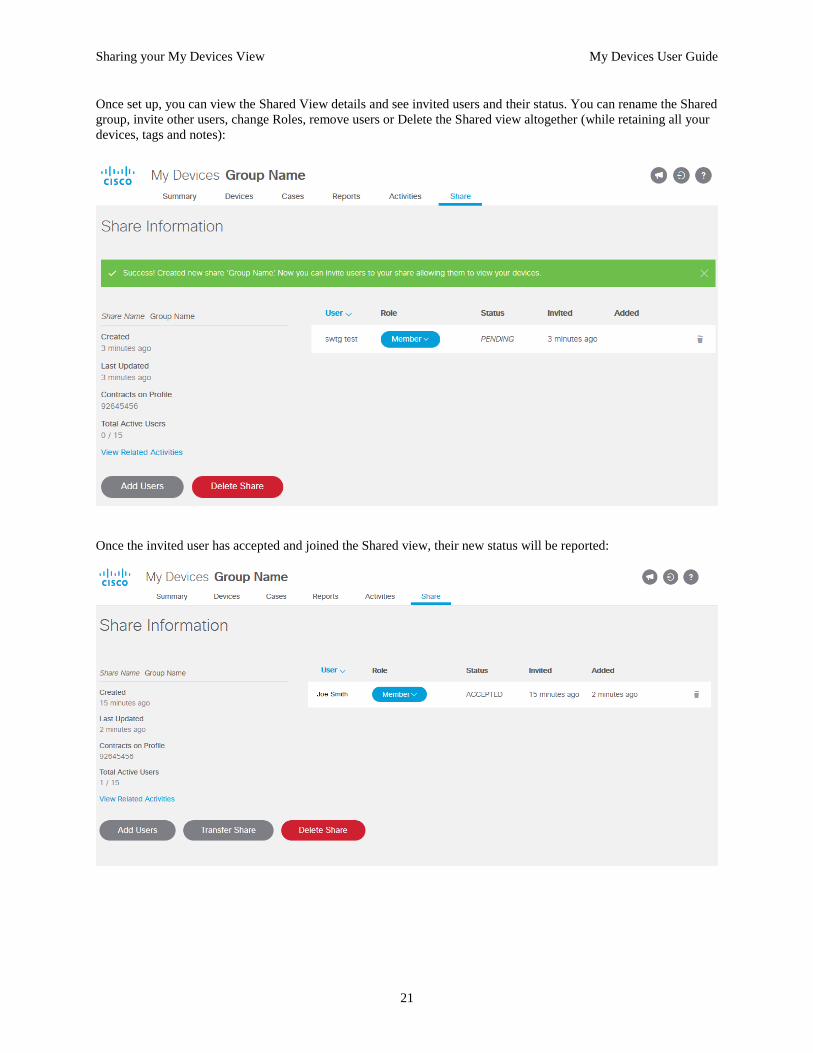
Once set up, you can view the Shared View details and see invited users and their status. You can rename the Shared
group, invite other users, change Roles, remove users or Delete the Shared view altogether (while retaining all your
devices, tags and notes):
Once the invited user has accepted and joined the Shared view, their new status will be reported:
Sharing your My Devices View My Devices User Guide
22
Members versus Guests –
All device data including contract details is visible to all users in a Shared view.
Members have the ability to Add, Edit and Delete devices. The can also request ownership of the group, if for any
reason you need to relinquish it (ie leaving your work function or company). You may also request Transfer of the
group ownership to any Member.
Guests are able to view devices and contract details, but cannot Add, Edit or Delete devices. They cannot request
ownership, or be nominated to take ownership of the group view.
You may change the role of any user, (within the limits of 5 Members and 10 Guests). Next time they log in, their
new status will be reflected. Guests will have no access to any Edit, Delete or Device Add capabilities.
Users will receive an email advising them of the change of Role.
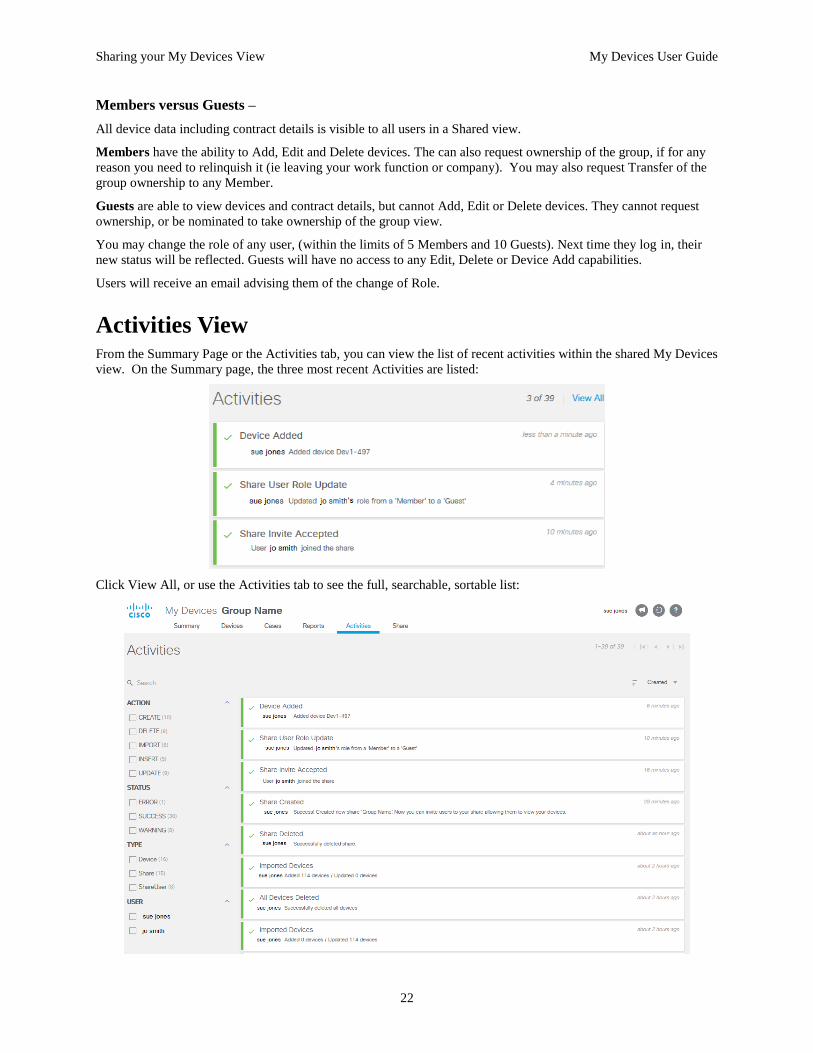
Activities View
From the Summary Page or the Activities tab, you can view the list of recent activities within the shared My Devices
view. On the Summary page, the three most recent Activities are listed:
Click View All, or use the Activities tab to see the full, searchable, sortable list:
Opening and Viewing TAC Support Cases My Devices User Guide
23
Opening and Viewing TAC Support Cases
Submit a new TAC Case
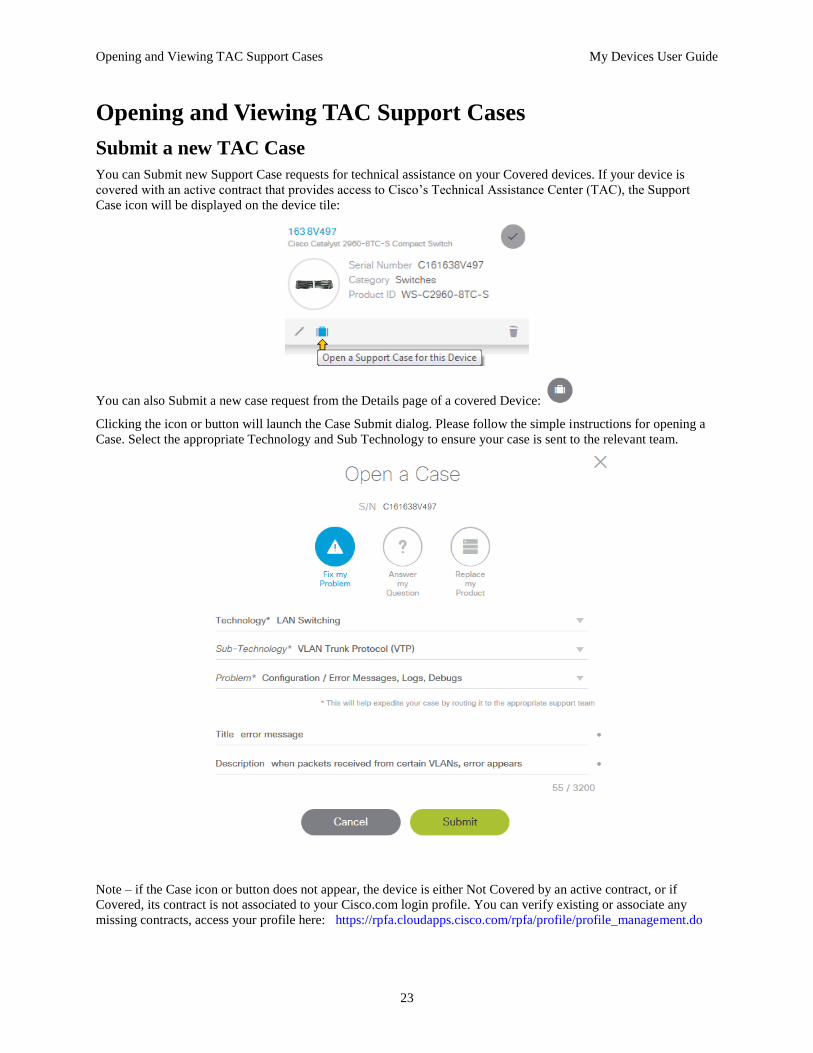
You can Submit new Support Case requests for technical assistance on your Covered devices. If your device is
covered with an active contract that provides access to Cisco’s Technical Assistance Center (TAC), the Support
Case icon will be displayed on the device tile:
You can also Submit a new case request from the Details page of a covered Device:
Clicking the icon or button will launch the Case Submit dialog. Please follow the simple instructions for opening a
Case. Select the appropriate Technology and Sub Technology to ensure your case is sent to the relevant team.
Note – if the Case icon or button does not appear, the device is either Not Covered by an active contract, or if
Covered, its contract is not associated to your Cisco.com login profile. You can verify existing or associate any
missing contracts, access your profile here: https://rpfa.cloudapps.cisco.com/rpfa/profile/profile_management.do
Opening and Viewing TAC Support Cases My Devices User Guide
24
Note - for Severity 1 and 2 issues (Network Down or Severely Degraded) you must call Cisco directly to obtain
support: US/Canada 800-553-2447 – or click for Worldwide Phone Numbers
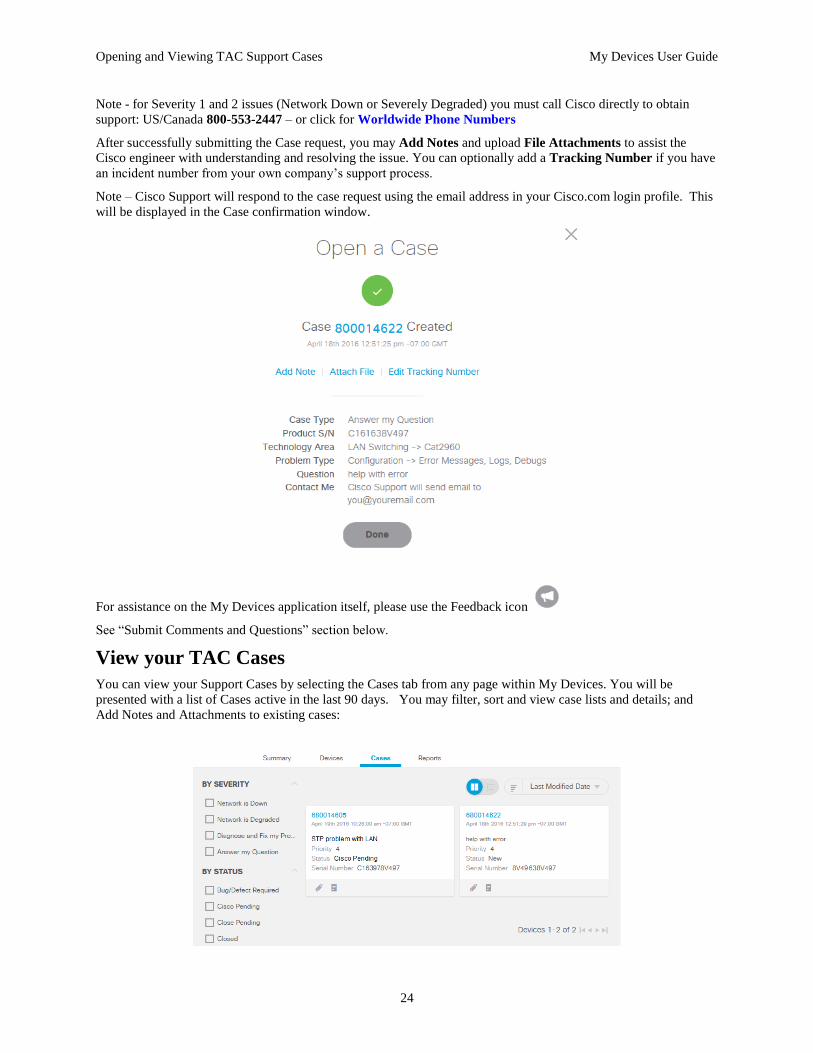
After successfully submitting the Case request, you may Add Notes and upload File Attachments to assist the
Cisco engineer with understanding and resolving the issue. You can optionally add a Tracking Number if you have
an incident number from your own company’s support process.
Note – Cisco Support will respond to the case request using the email address in your Cisco.com login profile. This
will be displayed in the Case confirmation window.
For assistance on the My Devices application itself, please use the Feedback icon
See “Submit Comments and Questions” section below.
View your TAC Cases
You can view your Support Cases by selecting the Cases tab from any page within My Devices. You will be
presented with a list of Cases active in the last 90 days. You may filter, sort and view case lists and details; and
Add Notes and Attachments to existing cases:

Submit Comments and Questions My Devices User Guide
25
Submit Comments and Questions
To submit comments and questions about My Devices, click the Feedback button ( ) in the top right corner of
the window. The Feedback form appears. Type your comments in the field provided and click Submit to send your
feedback.
Frequently Asked Questions My Devices User Guide
26
Frequently Asked Questions
Why do I need to use my Cisco.com account to log in?
You must have a valid Cisco.com account to use My Devices. If you do not have a valid Cisco.com account, you
must register on the Cisco.com Registration page and associate a Service Contract to your Cisco.com profile. Details
of the contracts for the devices entered are only shown to users whose Cisco.com account is associated to that
contract. Verify your contract association here: https://rpfa.cloudapps.cisco.com/rpfa/profile/profile_management.do
Why was my device serial number not accepted?
Only hardware Serial Numbers are accepted. Either the serial number is a duplicate of an existing device in the list,
or the serial number entered does not match the data sources used by My Devices. You may use your device’s
“show inventory” command to verify the Chassis serial number. If a valid serial number is not being recognized,
please use the Feedback form described above.
Why were some devices not imported from my CSV file?
Note: If you want to upload a list of serial numbers only, you can import a comma-delimited CSV or TXT file. To
upload device details in addition to the serial numbers, you must prepare a CSV file that uses the available template.
XLS format is not supported.
A device might not be imported for one of these reasons:
The serial number in the CSV file is incorrect, or it is a duplicate of a number already in the device list.
The CSV file contained more than the maximum limit of 1,000 devices per upload.
The device list has reached the maximum limit of 10,000 devices.
What does “Unassociated Contracts” mean?
My Devices shows devices categorized by their contract coverage. If a device is not on a contract, it shows as "Not
on Contract." If a device is covered by a contract, and your Cisco.com account ID is associated to that contract, you
see the Contract Number and the number of devices covered.
If a device is covered by a contract, but your Cisco.com account ID is not associated to that contract, the device is
categorized under "Unassociated Contracts." You can verify existing or associate any missing contracts, access your
profile here: https://rpfa.cloudapps.cisco.com/rpfa/profile/profile_management.do
Why is some device information absent?
My Devices retrieves real-time product information from multiple sources. If a source is temporarily unavailable,
that product information will not be displayed.
If your Cisco.com account ID is not associated to the contract on which the device is covered, you will not have
access to privileged information, which will appear as “Unavailable.”
Why are some devices misidentified or in the “Other” category?
My Devices maps Product IDs to Model names. If the device properties are incorrectly mapped or the device is in
the "Other" category, please send Feedback with the affected devices, serial numbers, and PIDs for corrective action
to be performed.
How do I request features or provide product feedback?
To request additional features or provide product feedback, use the Feedback form as described in Submit
Comments and Questions.