musculoskeletal injury prevention program · 2015 safe resident handling workshop 6 bed mobility:...
TRANSCRIPT
Musculoskeletal Injury Prevention Program
Safe Resident Handling Workshop
Participant’s Manual
03/17/15
2015 Safe Resident Handling Workshop 2
Continuing Care Safety Association
110 6325 Gateway Boulevard Edmonton AB T6H 5H6 T: 780.433.5330
www.continuingcaresafety.ca
Vision Incident free workplaces.
Mission To create safe workplaces through the provision of education, leadership & collaboration.
Values
Value safe work, and safe work behaviors.
Value the right of each worker to have a safe, healthy and incident free work environment.
Value members’ input, feedback and direction.
Disclaimer The information presented within this publication is intended for the general use
of the members of the Continuing Care Safety Association. This is not a guide to
government regulations and does not relieve anyone using this manual from their
legal responsibilities under current or future applicable safety legislation. The
Continuing Care Safety Association does not guarantee the accuracy of, nor
assume any liability for the information within this document.
Copywright 2015 Continuing Care Safety Association. This publication is the property
of the Continuing Care Safety Association. Reproduction in any form, by any means, in whole or in part, or use of this publication for other than Continuing Care Safety Associationuses is prohibited without the express written consent of the Association.
2015 Safe Resident Handling Workshop 3
Safe Resident Handling Workshop Introduction Health care facilities have struggled with reducing worker injuries related to resident handling. While it is
true, there are many devices and equipment that can help to reduce the amount of effort required for
resident handling, there is still some physical effort required to move, steady or position the resident. If
the resident handling tasks are not designed properly, or we use poor body mechanics, the risk of injury is
increased. The incidence of Musculoskeletal Injury (MSI) in our industry has driven up costs to facilities,
and adversely affected workers’ day-to-day activities.
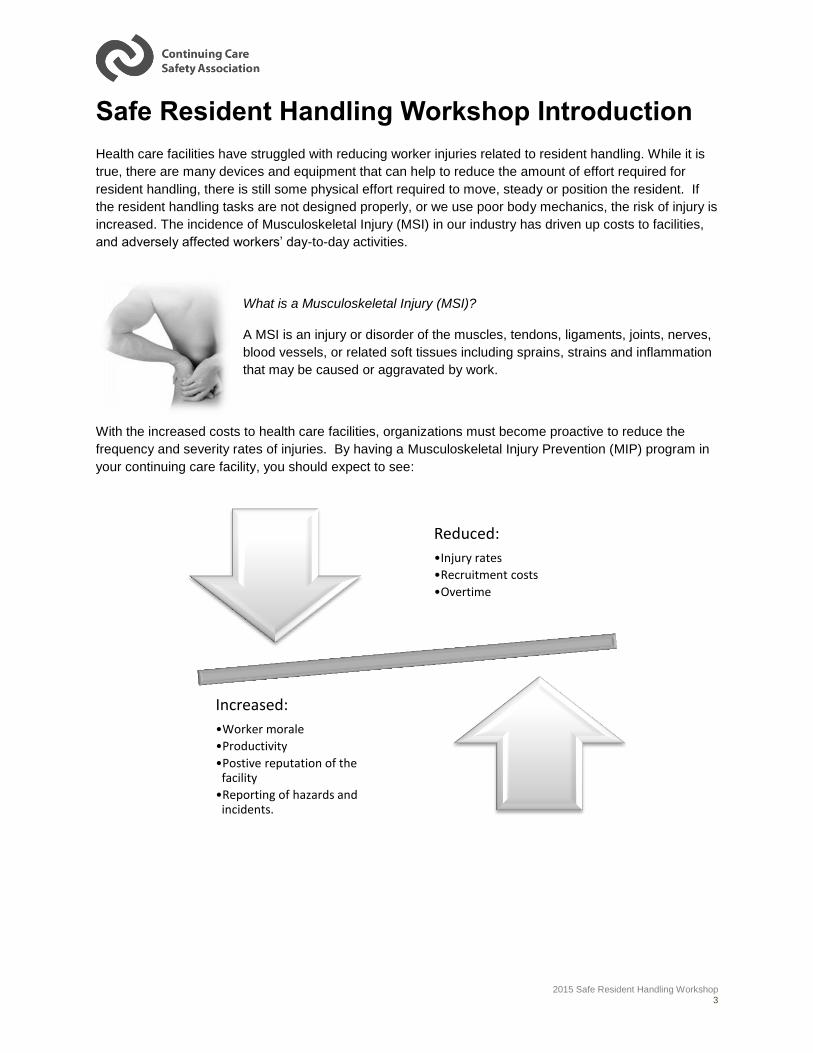
What is a Musculoskeletal Injury (MSI)?
A MSI is an injury or disorder of the muscles, tendons, ligaments, joints, nerves,
blood vessels, or related soft tissues including sprains, strains and inflammation
that may be caused or aggravated by work.
With the increased costs to health care facilities, organizations must become proactive to reduce the
frequency and severity rates of injuries. By having a Musculoskeletal Injury Prevention (MIP) program in
your continuing care facility, you should expect to see:
Reduced:
•Injury rates
•Recruitment costs
•Overtime
Increased:
•Worker morale
•Productivity
•Postive reputation of the facility
•Reporting of hazards and incidents.
2015 Safe Resident Handling Workshop 4
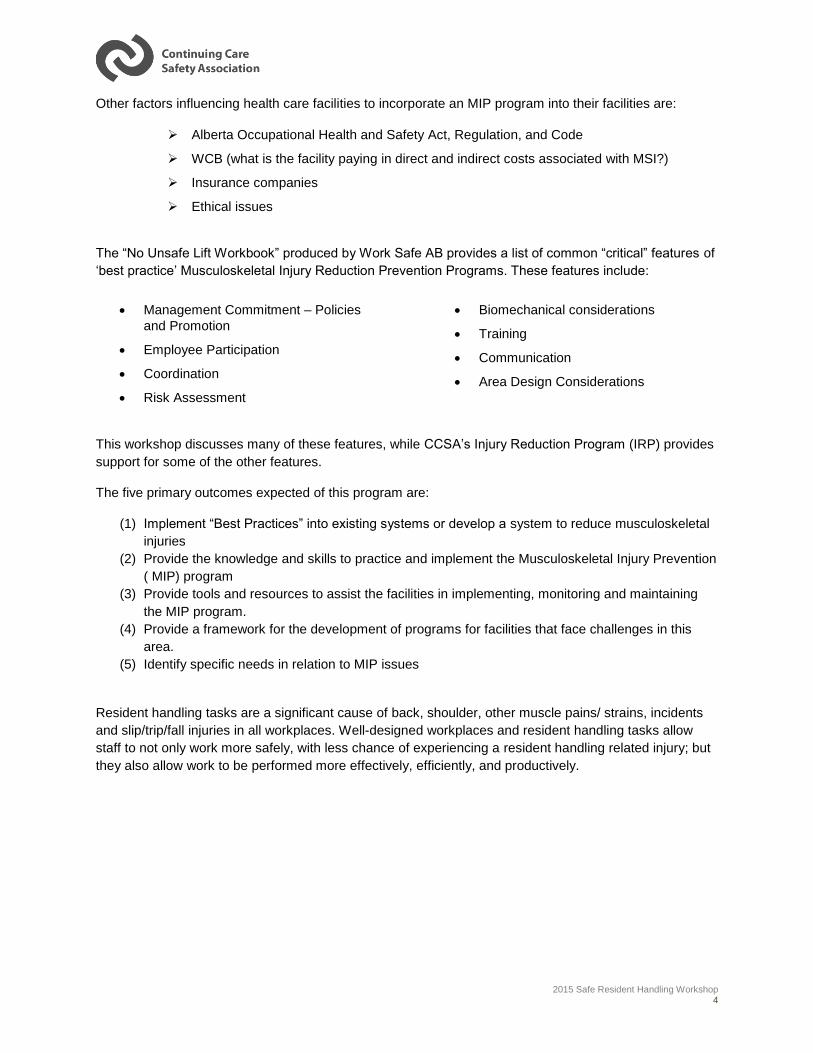
Other factors influencing health care facilities to incorporate an MIP program into their facilities are:
Alberta Occupational Health and Safety Act, Regulation, and Code
WCB (what is the facility paying in direct and indirect costs associated with MSI?)
Insurance companies
Ethical issues
The “No Unsafe Lift Workbook” produced by Work Safe AB provides a list of common “critical” features of
‘best practice’ Musculoskeletal Injury Reduction Prevention Programs. These features include:
Management Commitment – Policies
and Promotion
Employee Participation
Coordination
Risk Assessment
Biomechanical considerations
Training
Communication
Area Design Considerations
This workshop discusses many of these features, while CCSA’s Injury Reduction Program (IRP) provides
support for some of the other features.
The five primary outcomes expected of this program are:
(1) Implement “Best Practices” into existing systems or develop a system to reduce musculoskeletal
injuries
(2) Provide the knowledge and skills to practice and implement the Musculoskeletal Injury Prevention
( MIP) program
(3) Provide tools and resources to assist the facilities in implementing, monitoring and maintaining
the MIP program.
(4) Provide a framework for the development of programs for facilities that face challenges in this
area.
(5) Identify specific needs in relation to MIP issues
Resident handling tasks are a significant cause of back, shoulder, other muscle pains/ strains, incidents
and slip/trip/fall injuries in all workplaces. Well-designed workplaces and resident handling tasks allow
staff to not only work more safely, with less chance of experiencing a resident handling related injury; but
they also allow work to be performed more effectively, efficiently, and productively.
2015 Safe Resident Handling Workshop 5
Table of Contents
Continuing Care Safety Association 2
Vision 2 Mission 2 Values 2
Safe Resident Handling Workshop Introduction 3
Safe Resident Handling Learning Objectives 7
Exercise 1: Ice Breaker 8
Module 1: Your Job Your Body 9
An Introduction to Musculoskeletal Injury Prevention 16
Understanding Musculoskeletal Injuries 17
Recognizing the Signs and Symptoms 18
Early Reporting 18
Legal Requirements 19
Module 2: Resident Handling Hazards 21
What causes MSI? 22
Understanding and Identifying Resident Handling Hazards 23
Module 3: Principles of Safe Lifting 33
1. Plan Your Move! 34
2. Strong Foundation 35
3. Your Centre of Gravity 35
4. Big Jobs Call for Big Muscles 36
5. Get a Grip! 36
6. Reduce Friction 37
7. Communicate! 37
8. Stick to the Script 38
Module 4: Safe Resident Handling Techniques 39
2015 Safe Resident Handling Workshop 6
Bed Mobility: 40
Rolling Resident 1 Caregiver – Bent Legs 40 Rolling Resident 1 Caregiver – Straight Legs 41 Lateral Slide Using Slider Sheet – Two-Person Task 43 Boosting or Repositioning Resident with Slider Sheet or Soaker Pad 44 Supine to Sit: One Caregiver – Bent Knee 47 Supine to Sit: One Caregiver – Straight Leg 48 Supine to Sit: Two Caregivers 49 Sit-to-Stand: 50
One Person Transfer 51
Bed to Chair; Chair to Bed; Chair to Chair 51
Two Person Transfer 52
Chair to Bed; Bed to Chair; Chair to Chair 52
One Person Transfer with a Walker 54
Two Person Transfer with a Walker 55
Lifts 57
Sit to Stand Lift 57 Resident Lift 58
Assisted Mobility 59
Assisting a Resident when Walking 59
Assisting a Falling Resident 63
Managing and Assessing a Fallen Resident 64 Coaching of an Uninjured Resident 65 Lifting an Injured Fallen Resident – 2 caregivers67 In an Area Difficult to Access – 2 or more caregivers 68 Reposition Resident in a Wheelchair- 2 caregivers 69
Sustaining Change 72
Workshop Summary 74
Appendix 1: Alberta Occupational Health and Safety Act, Code and Regulation 75
Appendix 2: Features of an Effective Musculoskeletal Injury Prevention Program 79
Appendix 3: Sample No Unsafe Lift Policies 82
Appendix 4: Sample Supervisor Follow-up Checklist 93
Appendix 5: CCSA’s Safe Resident Handling Hazard Identification Checklist Booklet
97
Appendix 6: Safe Resident Handling Algorithms 98
Appendix 7: Transfer Logos 111
Appendix 8: Immediate Changes to Improve Resident Handling Safety 114
2015 Safe Resident Handling Workshop 7
Safe Resident Handling Learning Objectives
By the end of this workshop, you will be able to:
1. Discuss why organizations should consider implementing a musculoskeletal injury reduction
program (intro)
2. Identify the potential impact of resident handling tasks on your body (Module 1)
3. Describe what safe resident handling is and why it is important (Module 1)
4. Recognize the signs and symptoms of musculoskeletal injury in yourself and your co-workers
(Module 1)
5. Identify resident handling-related hazards in your workplace (Module 2)
6. Explain why and how poor design contributes to MSI (Module 2)
7. Adapt the principles of safe lifting to resident handling situations (Module 3)
8. Correctly demonstrate each of the safe resident handling techniques presented in this workshop
(Module 4)
9. Adapt the safe resident handling techniques to your daily resident handling tasks (Module 4)
10. Explain how to make simple changes to the design and organization of resident handling tasks to
improve your health and well-being! (Module 4)
2015 Safe Resident Handling Workshop 8
Exercise 1: Ice Breaker
Instructions:
Your instructor will introduce a warm up/introductory exercise based on the number of
participants.
The purpose of the warm up exercise is to:
o Get to know each other;
o ‘Break the ice’ – the CCSA courses are designed to include a lot of participation and
interaction; breaking the ice early helps to create a safe & comfortable learning
environment.
Timeframe: 5-10 minutes
2015 Safe Resident Handling Workshop 9
Module 1: Your Job Your Body Like cars, our bodies have an engine (our heart and lungs) and gears
(our muscles) that when healthy allow us to do many different tasks at
work.
Our bodies are most happy when they are in motion using the engine
and gears to their full potential. But like a car, our body’s engine and
gears also have limits. Understanding our body’s limits will help you
understand and recognize things that can injure you.
The following section will inform you about:
Muscles and joints
Body parts used in moving residents
Safe and unsafe ways to use these body parts
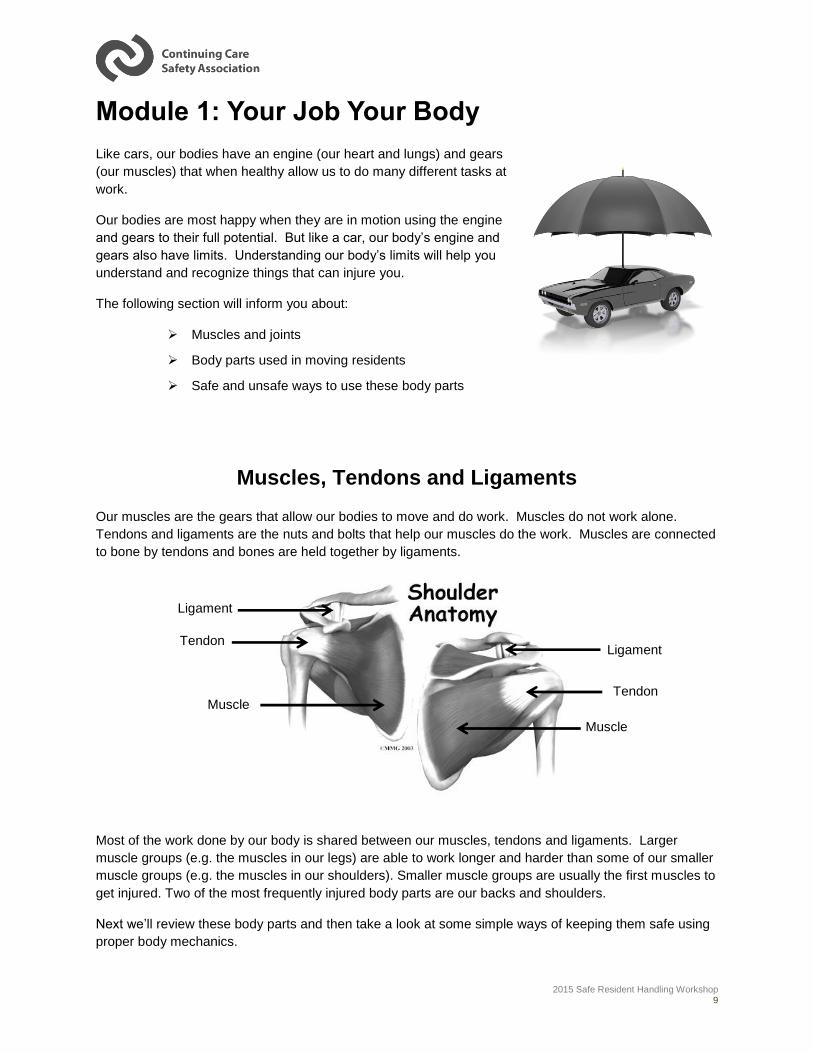
Muscles, Tendons and Ligaments Our muscles are the gears that allow our bodies to move and do work. Muscles do not work alone.
Tendons and ligaments are the nuts and bolts that help our muscles do the work. Muscles are connected
to bone by tendons and bones are held together by ligaments.
Most of the work done by our body is shared between our muscles, tendons and ligaments. Larger
muscle groups (e.g. the muscles in our legs) are able to work longer and harder than some of our smaller
muscle groups (e.g. the muscles in our shoulders). Smaller muscle groups are usually the first muscles to
get injured. Two of the most frequently injured body parts are our backs and shoulders.
Next we’ll review these body parts and then take a look at some simple ways of keeping them safe using
proper body mechanics.
Ligament
Tendon
Muscle
Ligament
Tendon
Muscle
2015 Safe Resident Handling Workshop 10
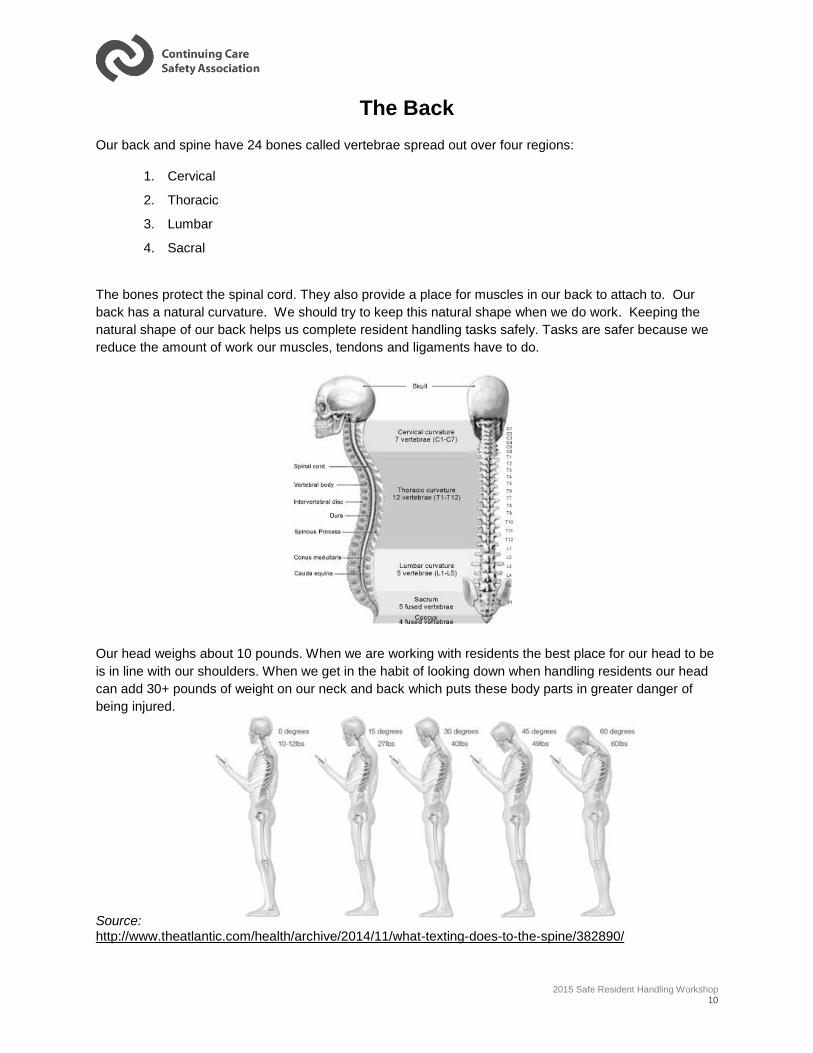
The Back
Our back and spine have 24 bones called vertebrae spread out over four regions:
1. Cervical
2. Thoracic
3. Lumbar
4. Sacral
The bones protect the spinal cord. They also provide a place for muscles in our back to attach to. Our
back has a natural curvature. We should try to keep this natural shape when we do work. Keeping the
natural shape of our back helps us complete resident handling tasks safely. Tasks are safer because we
reduce the amount of work our muscles, tendons and ligaments have to do.
Our head weighs about 10 pounds. When we are working with residents the best place for our head to be
is in line with our shoulders. When we get in the habit of looking down when handling residents our head
can add 30+ pounds of weight on our neck and back which puts these body parts in greater danger of
being injured.
Source: http://www.theatlantic.com/health/archive/2014/11/what-texting-does-to-the-spine/382890/
2015 Safe Resident Handling Workshop 11
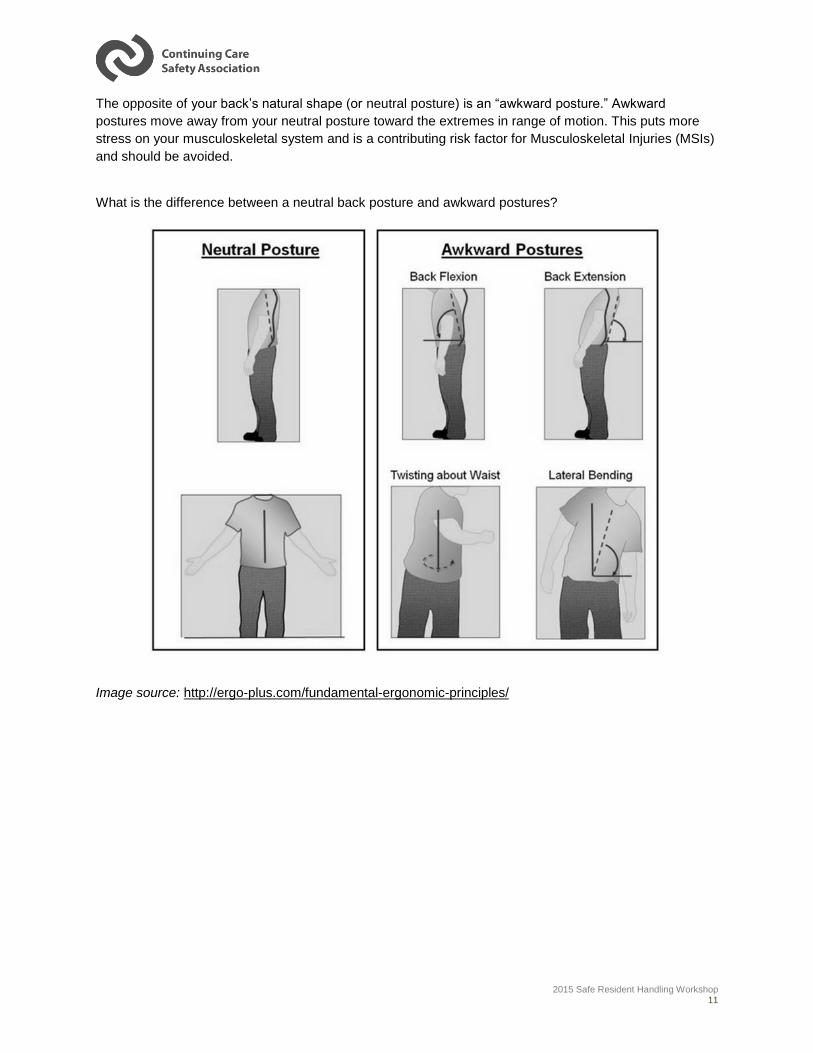
The opposite of your back’s natural shape (or neutral posture) is an “awkward posture.” Awkward
postures move away from your neutral posture toward the extremes in range of motion. This puts more
stress on your musculoskeletal system and is a contributing risk factor for Musculoskeletal Injuries (MSIs)
and should be avoided.
What is the difference between a neutral back posture and awkward postures?
Image source: http://ergo-plus.com/fundamental-ergonomic-principles/
2015 Safe Resident Handling Workshop 12
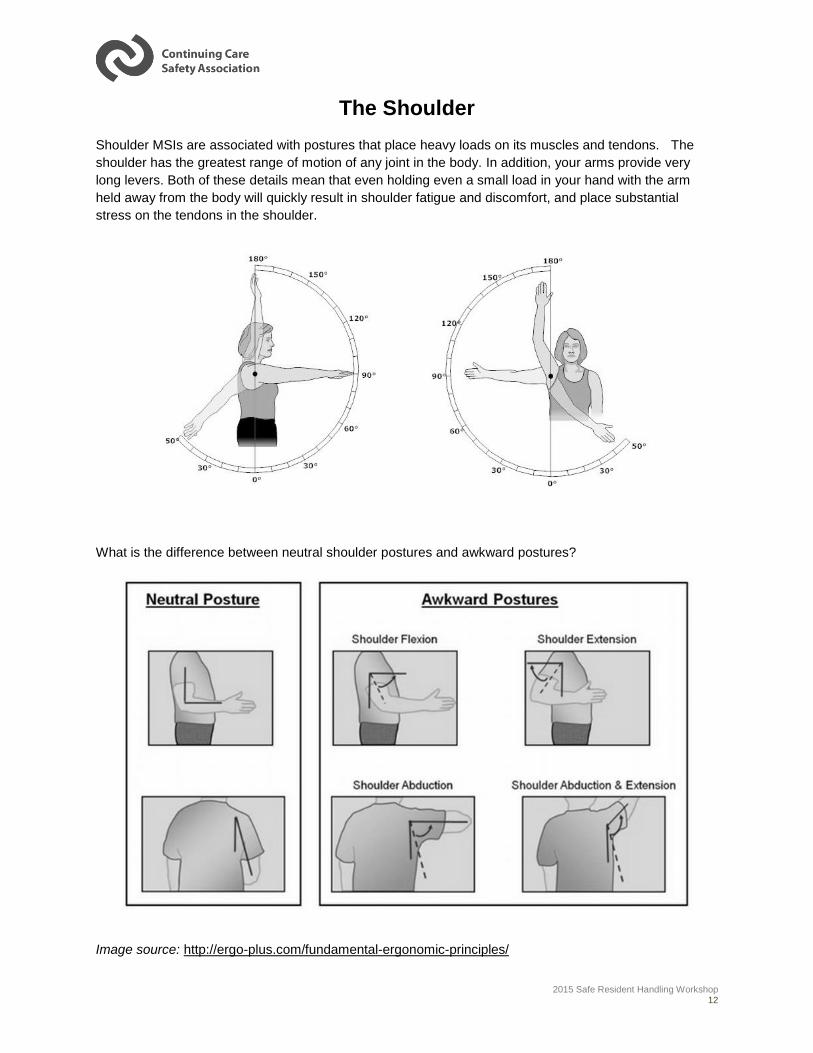
The Shoulder
Shoulder MSIs are associated with postures that place heavy loads on its muscles and tendons. The
shoulder has the greatest range of motion of any joint in the body. In addition, your arms provide very
long levers. Both of these details mean that even holding even a small load in your hand with the arm
held away from the body will quickly result in shoulder fatigue and discomfort, and place substantial
stress on the tendons in the shoulder.
What is the difference between neutral shoulder postures and awkward postures?
Image source: http://ergo-plus.com/fundamental-ergonomic-principles/
2015 Safe Resident Handling Workshop 13
Power Position
What is the “Power Zone”?
The power zone for lifting is close to the body, between mid-thigh and mid-
chest height. This zone is where the arms and back can lift the most, with
the least amount of effort.
The “hand shake zone” or “comfort zone” are other common names for the
power zone. The principle here is that if you can “shake hands with your
work”, you are minimizing excessive reach and maintaining a neutral
posture.
Working from the power zone ensures that you are working within proper
heights and reaches, which reduces MSI risk factors and allows for more
efficient and pain-free work.
Image source: http://ergo-plus.com/fundamental-ergonomic-principles/
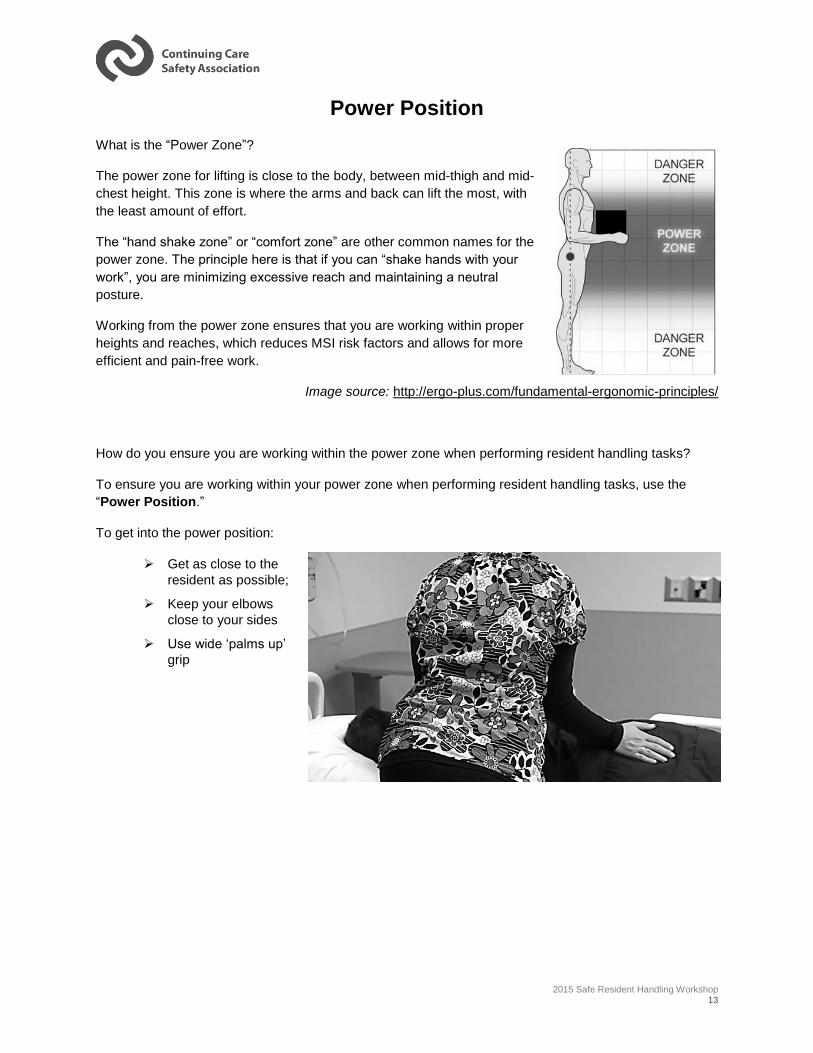
How do you ensure you are working within the power zone when performing resident handling tasks?
To ensure you are working within your power zone when performing resident handling tasks, use the
“Power Position.”
To get into the power position:
Get as close to the
resident as possible;
Keep your elbows
close to your sides
Use wide ‘palms up’
grip
2015 Safe Resident Handling Workshop 14
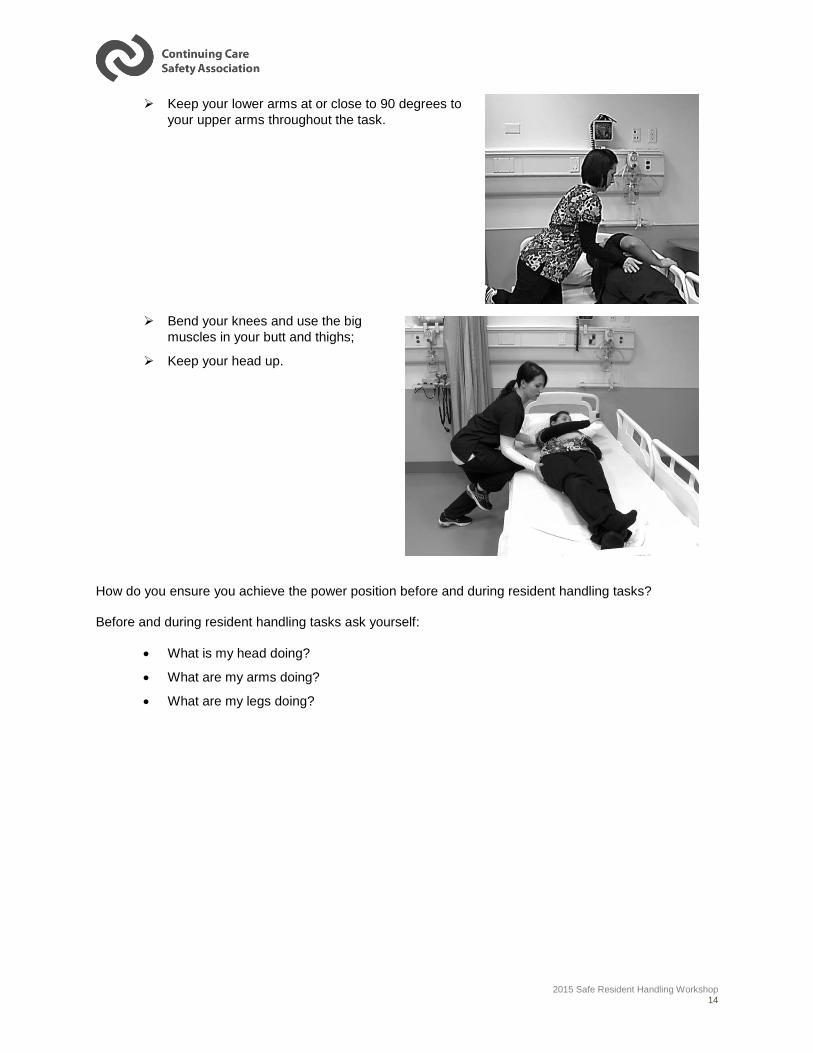
Keep your lower arms at or close to 90 degrees to
your upper arms throughout the task.
Bend your knees and use the big
muscles in your butt and thighs;
Keep your head up.
How do you ensure you achieve the power position before and during resident handling tasks?
Before and during resident handling tasks ask yourself:
What is my head doing?
What are my arms doing?
What are my legs doing?
2015 Safe Resident Handling Workshop 15
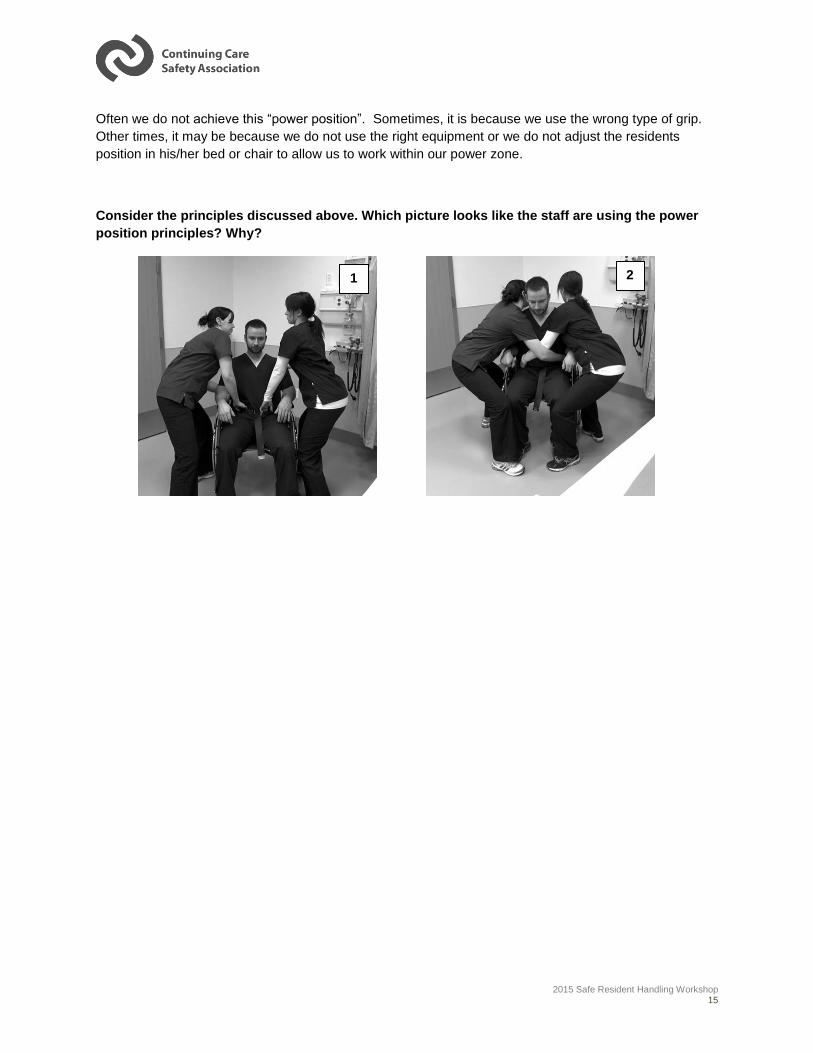
Often we do not achieve this “power position”. Sometimes, it is because we use the wrong type of grip.
Other times, it may be because we do not use the right equipment or we do not adjust the residents
position in his/her bed or chair to allow us to work within our power zone.
Consider the principles discussed above. Which picture looks like the staff are using the power
position principles? Why?
2 1

2015 Safe Resident Handling Workshop 16
An Introduction to Musculoskeletal Injury Prevention
Successful implementation of an MIP program begins with a common understanding of a musculoskeletal
injury.
What is a musculoskeletal Injury (MSI)?
A MSI is an injury or disorder of the muscles, tendons, ligaments, joints, nerves, blood vessels or related
soft tissues including sprains, strains and inflammation; work activities may cause or aggravate these
injuries.
Other terms used to describe musculoskeletal injuries include:
Sprains and strains
Musculoskeletal Disorders (MSDs)
Cumulative Trauma Disorders (CTDs)
Repetitive Strain Injuries (RSIs)
Overexertion injuries
Soft tissue injuries
Work related musculoskeletal injuries (WRMS)
They all mean the same thing!
2015 Safe Resident Handling Workshop 17
Understanding Musculoskeletal Injuries
There are two ways to categorize MSI:
Category 1: Overexertion MSI (2 types)
1. Strains: Generally caused by a one-time exertion that tears a tendon and or a muscle.
2. Sprains: Generally caused by a one-time exertion that tears a ligament.
An overexertion injury occurs when a person works
beyond his or her physical capacity or, more
specifically, when the physical forces required to
perform a task exceed what the body is capable of
doing. These types of injuries have been associated
with lifting, bending at the waist with twisting,
pushing/pulling, carrying, slips/trips/falls and reaching.
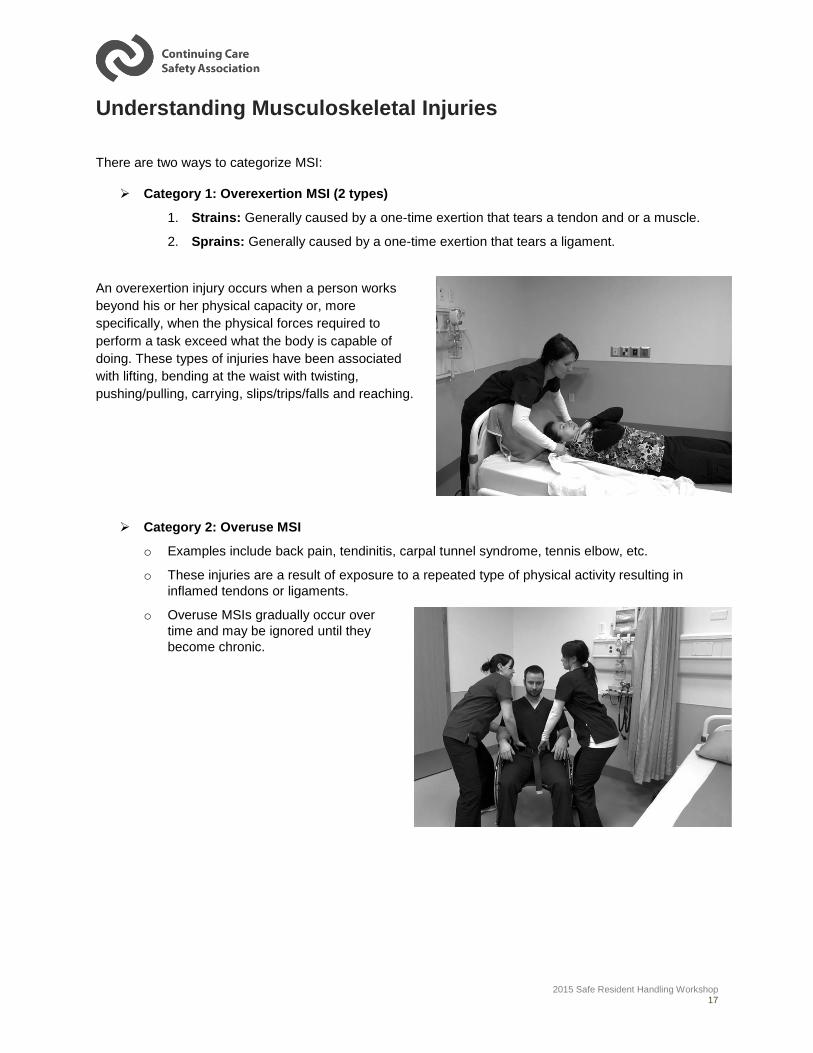
Category 2: Overuse MSI
o Examples include back pain, tendinitis, carpal tunnel syndrome, tennis elbow, etc.
o These injuries are a result of exposure to a repeated type of physical activity resulting in
inflamed tendons or ligaments.
o Overuse MSIs gradually occur over
time and may be ignored until they
become chronic.
2015 Safe Resident Handling Workshop 18
Recognizing the Signs and Symptoms There are often signs and symptoms that come before an injury occurs and long before any missed work.
It is very important that everyone (managers, supervisors, workers, etc.) is aware of the signs and is
keeping a “look out” for:
Reports/complaints of numbness, tingling, joint stiffness, etc.
Stretching or rubbing muscles while working
Quality problems, errors
High turnover or absenteeism
Damage to equipment/materials/property
Etc.
Early Reporting
One of the keys to managing MSIs is to encourage a system of early reporting. It is important to report
early signs and symptoms because:
Continuing to work with an injured body part can affect other parts of the body and
compound the situation.
If left untreated, symptoms can become chronic and can lead to a disability.
Early treatment of an injury can prevent lost time from the work place.
It may help keep a co-worker injury free.
It is especially important to report signs and/or symptoms if the:
Pain is persistent, severe or worsening.
Pain radiates.
Symptoms keep you from sleeping at night.
2015 Safe Resident Handling Workshop 19
Legal Requirements
Employers and workers have responsibilities for workplace health and safety as specified in the Alberta
Occupational Health and Safety Act, Section 2(1) and (2). These are briefly:
EMPLOYERS: To ensure, as far as it is reasonably practicable, the health and safety of all
workers at the worksite and that all workers are aware of their responsibilities and duties under
the OHS Act, Regulation and Code.
WORKERS: To take reasonable care to protect the health and safety of themselves and other
workers, and to cooperate with the employer to protect the health and safety of themselves and
other workers.
The Alberta Occupational Health and Safety Code refer to MSI prevention in several parts and/or sections
of legislation. Below is a summary of the legislation, however the detailed legislation quoted from the
Alberta Occupational Health and Safety Act, Code and Regulation can be found in Appendix 1.
Alberta OH & S Code, Part 2, Hazard Assessment, Elimination and Control
An employer must assess a worksite to identify hazards or risks associated with jobs performed. This
assessment must be documented, dated and updated at regular intervals. Employers must involve
workers in this assessment; implement controls for the hazards identified; and, inform workers of the
methods in the workplace provided to keep them safe.
For healthcare workers especially, the risk of MSI is one of the largest hazards we face in the workplace.
It is important to ensure a thorough assessment of MSI risk factors and train workers in the various
methods of control available in order to keep them safe.
Alberta OH & S Code, Part 14, Lifting and Handling Loads
NOTE: for the purposes of the following, a heavy or awkward load includes equipment, goods, supplies,
persons and animals. (AB OHS Code, Part 14, Section 208(4))
Assessing Hazards – When workers are required to perform resident handling tasks in the workplace,
the employer is required to perform a hazard assessment that considers the weight, size, shape, number
of times the load will be moved and the manner in which the load will be moved. Additionally, the hazard
assessment should consider the worker’s physical and mental capabilities to perform the work.
Equipment - An employer must provide and ensure workers are using the appropriate equipment for
resident handling tasks. Workers are required to use the equipment the employer provides.
Safe Lifting Program – There is a requirement for an employer to develop and implement a safe resident
handling program when workers are required to lift, transfer or reposition residents. This safe resident
2015 Safe Resident Handling Workshop 20
handling program must include an annual evaluation of its effectiveness. An employer also must ensure
that workers comply with the program and in turn, workers are required to follow it.
Employers are required to train all workers who are at risk of MSI in order to prevent these injuries. This
training must include the identification factors that could lead to an MSI injury, the early signs and
symptoms of MSI injuries and preventative measures including safe work procedures, mechanical aides
and personal protective equipment.
Reporting MSI – If a worker reports to their employer that they believe they have symptoms of an MSI,
the employer is required to review the activities of that worker and also any other workers doing similar
tasks to identify if there are any work related causes. If it is found that there are work-related causes the
employer must take corrective measures to avoid further injuries.
2015 Safe Resident Handling Workshop 21
Module 2: Resident Handling Hazards
Welcome to the CCSA Musculoskeletal Injury Prevention (MIP) Program: Safe Resident Handling (SRH)
Module.
This module helps you make your workplace safer by helping you identify unsafe resident handling
situations that may result in a MSI injury.
Module Objectives
At the end of this module, you should be able to:
1) List the four key resident handling risk factors.
2) Identify resident handling-related hazards.
3) Perform an informal hazard assessment before performing resident handling tasks.
4) Report resident handling-related hazards.

2015 Safe Resident Handling Workshop 22
What causes MSI?
Recognizing what causes MSI injuries is perhaps the biggest challenge for front-line workers and
organizations. The reason is that some workplace hazards are easy to spot (i.e. electrical cords strung
across the floor, transitions between different flooring spaces, spills on the floor, torn or frayed slings,
etc.). However, most hazards are not easy to recognize and more often than not relate directly to work
design or the way work is carried out!
A hazard is “a situation, condition or thing that may be dangerous to the health and safety of workers.” A
hazard has the potential to cause an injury, illness or loss. Some people think of a hazard as “an incident
waiting to happen”. Potential hazards are those that are foreseeable and reasonably likely to occur.
What are situations, conditions or behaviours that may expose workers to MSI risks?
Situations Conditions Behaviours
Circumstances that exist in the
workplace.
State of the workplace
environment.
The way that workers perform
their tasks.
Examples include:
Lack of appropriate
resident handling
equipment
Resident’s current
mental and physical
capabilities
Working short staffed
Examples include:
Clutter
Wet floors
Icy sidewalks
Poor lighting
Lack of space
Examples include:
Not asking or offering
help when needed
Not using resident
handling equipment or
devices
Working outside of
your power zone
2015 Safe Resident Handling Workshop 23
Understanding and Identifying Resident Handling Hazards
The following is adapted from the Work Safe Alberta “No Unsafe Lift Workbook” and the Work Safe BC
“Handle with Care: Patient Handling and the Application of Ergonomics (MSI) Requirements” manual.
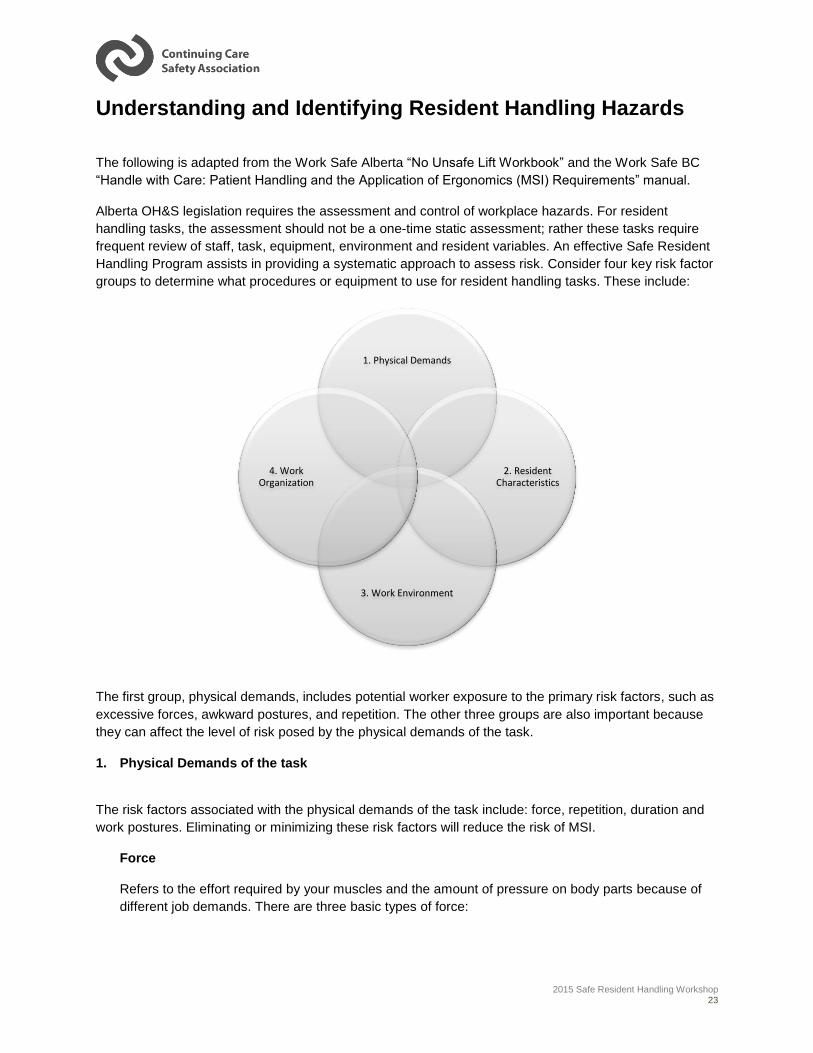
Alberta OH&S legislation requires the assessment and control of workplace hazards. For resident
handling tasks, the assessment should not be a one-time static assessment; rather these tasks require
frequent review of staff, task, equipment, environment and resident variables. An effective Safe Resident
Handling Program assists in providing a systematic approach to assess risk. Consider four key risk factor
groups to determine what procedures or equipment to use for resident handling tasks. These include:
The first group, physical demands, includes potential worker exposure to the primary risk factors, such as
excessive forces, awkward postures, and repetition. The other three groups are also important because
they can affect the level of risk posed by the physical demands of the task.
1. Physical Demands of the task
The risk factors associated with the physical demands of the task include: force, repetition, duration and
work postures. Eliminating or minimizing these risk factors will reduce the risk of MSI.
Force
Refers to the effort required by your muscles and the amount of pressure on body parts because of
different job demands. There are three basic types of force:
1. Physical Demands
2. Resident Characteristics
3. Work Environment
4. Work Organization
2015 Safe Resident Handling Workshop 24
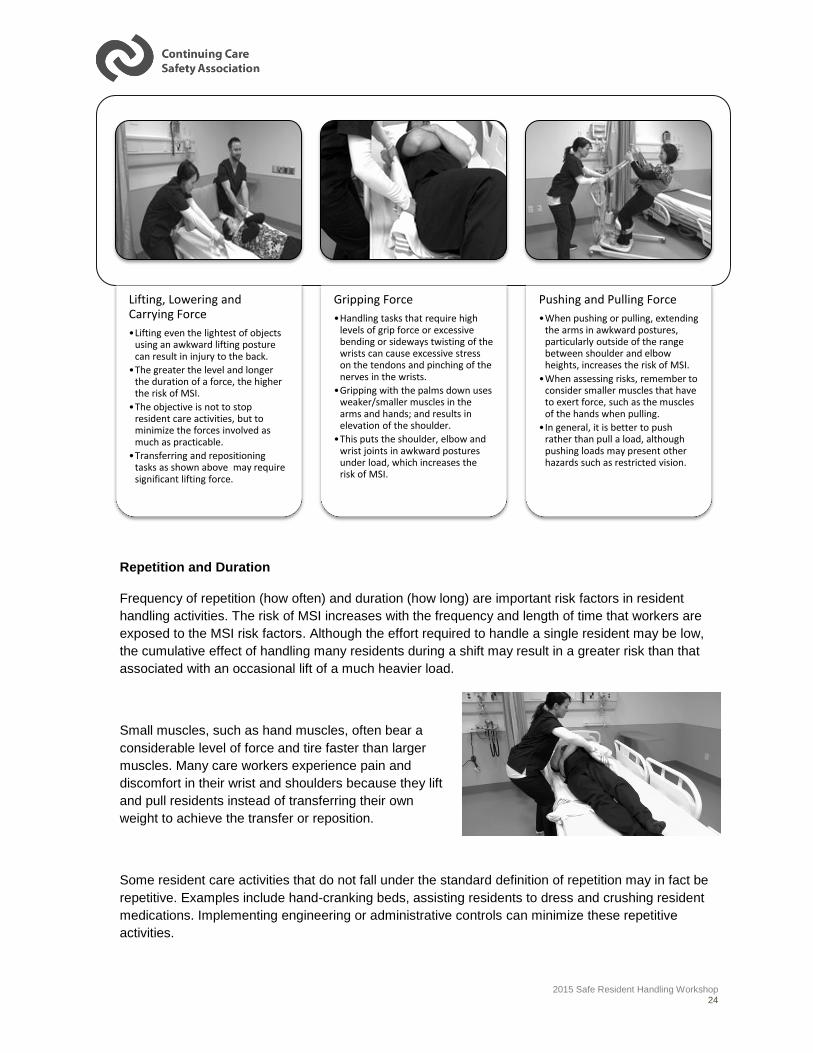
Repetition and Duration
Frequency of repetition (how often) and duration (how long) are important risk factors in resident
handling activities. The risk of MSI increases with the frequency and length of time that workers are
exposed to the MSI risk factors. Although the effort required to handle a single resident may be low,
the cumulative effect of handling many residents during a shift may result in a greater risk than that
associated with an occasional lift of a much heavier load.
Small muscles, such as hand muscles, often bear a
considerable level of force and tire faster than larger
muscles. Many care workers experience pain and
discomfort in their wrist and shoulders because they lift
and pull residents instead of transferring their own
weight to achieve the transfer or reposition.
Some resident care activities that do not fall under the standard definition of repetition may in fact be
repetitive. Examples include hand-cranking beds, assisting residents to dress and crushing resident
medications. Implementing engineering or administrative controls can minimize these repetitive
activities.
Lifting, Lowering and Carrying Force
•Lifting even the lightest of objects using an awkward lifting posture can result in injury to the back.
•The greater the level and longer the duration of a force, the higher the risk of MSI.
•The objective is not to stop resident care activities, but to minimize the forces involved as much as practicable.
•Transferring and repositioning tasks as shown above may require significant lifting force.
Gripping Force
•Handling tasks that require high levels of grip force or excessive bending or sideways twisting of the wrists can cause excessive stress on the tendons and pinching of the nerves in the wrists.
•Gripping with the palms down uses weaker/smaller muscles in the arms and hands; and results in elevation of the shoulder.
•This puts the shoulder, elbow and wrist joints in awkward postures under load, which increases the risk of MSI.
Pushing and Pulling Force
•When pushing or pulling, extending the arms in awkward postures, particularly outside of the range between shoulder and elbow heights, increases the risk of MSI.
•When assessing risks, remember to consider smaller muscles that have to exert force, such as the muscles of the hands when pulling.
•In general, it is better to push rather than pull a load, although pushing loads may present other hazards such as restricted vision.
2015 Safe Resident Handling Workshop 25
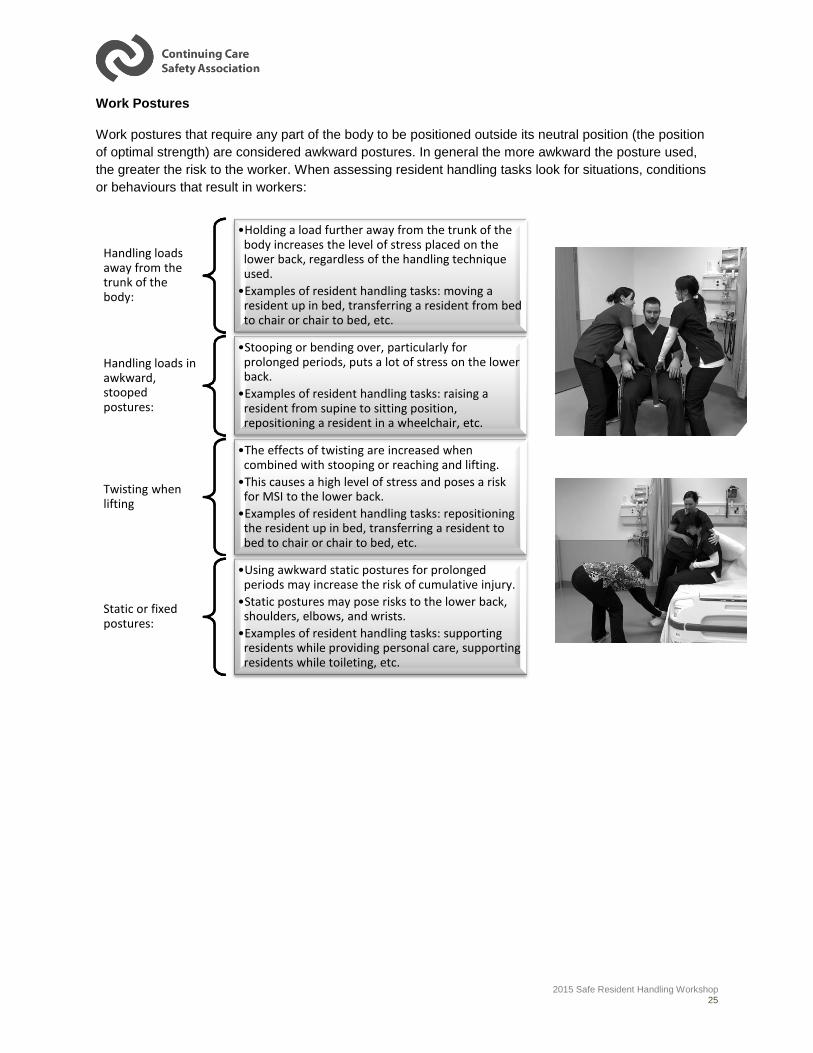
Work Postures
Work postures that require any part of the body to be positioned outside its neutral position (the position
of optimal strength) are considered awkward postures. In general the more awkward the posture used,
the greater the risk to the worker. When assessing resident handling tasks look for situations, conditions
or behaviours that result in workers:
Handling loads away from the trunk of the body:
•Holding a load further away from the trunk of the body increases the level of stress placed on the lower back, regardless of the handling technique used.
•Examples of resident handling tasks: moving a resident up in bed, transferring a resident from bed to chair or chair to bed, etc.
Handling loads in awkward, stooped postures:
•Stooping or bending over, particularly for prolonged periods, puts a lot of stress on the lower back.
•Examples of resident handling tasks: raising a resident from supine to sitting position, repositioning a resident in a wheelchair, etc.
Twisting when lifting
•The effects of twisting are increased when combined with stooping or reaching and lifting.
•This causes a high level of stress and poses a risk for MSI to the lower back.
•Examples of resident handling tasks: repositioning the resident up in bed, transferring a resident to bed to chair or chair to bed, etc.
Static or fixed postures:
•Using awkward static postures for prolonged periods may increase the risk of cumulative injury.
•Static postures may pose risks to the lower back, shoulders, elbows, and wrists.
•Examples of resident handling tasks: supporting residents while providing personal care, supporting residents while toileting, etc.
2015 Safe Resident Handling Workshop 26
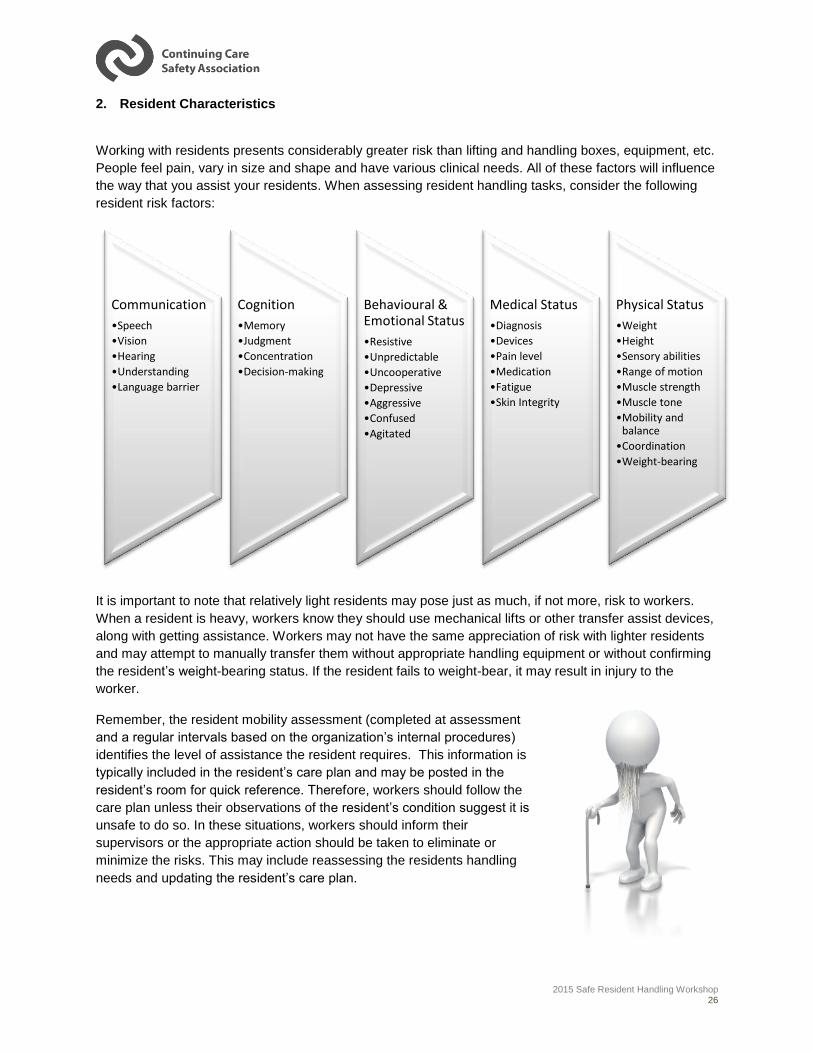
2. Resident Characteristics
Working with residents presents considerably greater risk than lifting and handling boxes, equipment, etc.
People feel pain, vary in size and shape and have various clinical needs. All of these factors will influence
the way that you assist your residents. When assessing resident handling tasks, consider the following
resident risk factors:
It is important to note that relatively light residents may pose just as much, if not more, risk to workers.
When a resident is heavy, workers know they should use mechanical lifts or other transfer assist devices,
along with getting assistance. Workers may not have the same appreciation of risk with lighter residents
and may attempt to manually transfer them without appropriate handling equipment or without confirming
the resident’s weight-bearing status. If the resident fails to weight-bear, it may result in injury to the
worker.
Remember, the resident mobility assessment (completed at assessment
and a regular intervals based on the organization’s internal procedures)
identifies the level of assistance the resident requires. This information is
typically included in the resident’s care plan and may be posted in the
resident’s room for quick reference. Therefore, workers should follow the
care plan unless their observations of the resident’s condition suggest it is
unsafe to do so. In these situations, workers should inform their
supervisors or the appropriate action should be taken to eliminate or
minimize the risks. This may include reassessing the residents handling
needs and updating the resident’s care plan.
Communication
•Speech
•Vision
•Hearing
•Understanding
•Language barrier
Cognition
•Memory
•Judgment
•Concentration
•Decision-making
Behavioural & Emotional Status
•Resistive
•Unpredictable
•Uncooperative
•Depressive
•Aggressive
•Confused
•Agitated
Medical Status
•Diagnosis
•Devices
•Pain level
•Medication
•Fatigue
•Skin Integrity
Physical Status
•Weight
•Height
•Sensory abilities
•Range of motion
•Muscle strength
•Muscle tone
•Mobility and balance
•Coordination
•Weight-bearing
2015 Safe Resident Handling Workshop 27
3. Work Environment
Hazard (formal and informal) assessments must include characteristics of the work environment. This
requires an assessment of the physical work environment, including aspects of the design of the
workplace and equipment that could contribute to the risks of MSI.
Here are examples of how the layout and condition of the work environment can affect the
physical demands of resident handling:
o Rooms, bathrooms, hallways and other spaces may be small or crowded, or may contain
obstructions that prevent workers from using optimal postures.
o Heights of resident transferring points such as beds, chairs or toilets may result in
awkward postures.
There may not be enough mechanical lifts, slide equipment or other transfer-assist devices to
ensure that all workers have ready access to them.
Manual cranks or hard-to-reach controls on beds, chairs or handling equipment may discourage
workers from making the necessary adjustments, resulting in awkward postures or forceful
exertions.
Poorly maintained wheels may make moving and positioning beds and wheelchairs difficult.
Missing or faulty brakes may cause beds or chairs to shift during transfers.
Uneven or slippery floors may increase the risks of MSI.
Poor lighting may disorient residents and result in residents or workers losing their footing.
The position of beds and other furniture or equipment may not reflect the needs of the facility’s
written handling procedures.
Doorways may not be wide enough for equipment such as mechanical lifts.
4. Work Organization
The way in which work is organized can affect the risk of MSI. For example, jobs that involve frequent
handling activities with little variation or many separate tasks with similar postures, such as washing and
dressing a resident, may lead to chronic overuse of specific muscles increasing the risk of injury.
Current research indicates that the cumulative effects of heavy lifting in care environments poses a
significant risk of chronic overuse and damage to the soft tissues of the lower back and other areas of the
body.
Work organization risk assessments should consider such things as:
Work recovery cycles
o Work recovery cycles are opportunities to periodically rest body parts that perform
physical activities.
o Insufficient recovery time increases the risk of injury.

2015 Safe Resident Handling Workshop 28
Task variability
o Tasks that are performed repeatedly over a prolonged period can result in overuse or
stress of muscles or other soft tissues.
o The longer workers perform tasks, the great the risk of injury.
Work rate
o Work rate refers to the speed with which a task is carried out.
o Excessive work rates lead to fatigue, poor technique and increased risk of injury.
Facilities can reduce risks by reorganizing work tasks. For example:
Whenever possible, bring care to the resident rather than moving the resident.
Improve planning and assessment to eliminate unnecessary resident handling (for example, by
reducing the number of transfers required in a given activity).
Spread handling tasks as evenly as practicable over the work shift and among staff.
Expand jobs by increasing the variety of tasks each worker performs.
Avoid designated bathing positions; as the staff allocated to these positions must complete the
same repetitive tasks on a daily basis.
Ensure that workers take adequate rest breaks. It is generally better to take frequent, shorter
breaks than infrequent longer breaks. NOTE: a break in this context does not necessarily refer to
stopping work; it may include periods of light duties or alternative task that enable stressed body
parts to recover.
Additional risk factors to consider:
In addition to considering the elements in the four risk factor groups, consider the following additional risk
factors:
Personal (Staff)
Before starting a resident handling task, assess whether the task can be done safely for both the
resident and staff. Consider:
o Physical readiness to perform the task
Am I properly warmed up, wearing proper footwear, etc.;
How am I feeling today? Am I tired or sore?
Do my co-workers or I have any injury or limitations that I need to be aware of?
Some workers may have personal limitations, such as pregnancy, that
place them at greater risk of MSI.
Workers returning to work after an injury are at risk of re-injury. Disability
prevention and return to work strategies should be employed allowing for
modified work duties to help the work manage the injury while remaining
productively employed.
2015 Safe Resident Handling Workshop 29
Poor physical fitness can increase a worker’s risk of injury. Workers
should be encouraged to maintain a good level of physical fitness.
However, even the fittest workers can sustain injuries when the physical
demands of tasks or jobs exceed the strength and abilities of the worker.
o Do I need additional assistance from a co-worker or co-workers based on the key risk
factors or my personal risk factors?
o Communication between caregivers assisting in the task is key,
What do I need to communicate to my co-workers and to the resident?
o What equipment do I need to use? Do I know how to properly use the equipment?
Clothing
It is important to wear clothing that is appropriate for performing resident handling activities.
For example, some clothing may inhibit free worker movement or prevent the worker from getting
close enough to the resident during handling activities.
Adaptive resident clothing may make some resident care tasks easier. (for example, dressing and
toileting)
So, how do these risk factors help you to identify resident handling hazards?
Unlike other risk assessments, resident handling risk assessments must take into account
interdependent hazards that will affect the overall risk of the handling task. Resident handling risk
assessments present the following challenges:
Most handling procedures present multiple MSI risk factors that together increase the risk of
injury.
Without the use of specialized equipment, it is difficult to quantify the force and effort required to
assist and move a person. The force or effort required by a worker changes from resident to
resident, depending on the level of resident mobility.
The functional ability of residents can change rapidly, which may significantly increase the MSI
risk factors involved with the task.
Assessing the physical demands of a task only addresses one group of risk factors involved with
resident handling. Resident characteristics, work environment and work organization are also
important. The emphasis on these other three groups of risk factors will depend on the specific
handling situation.
Source: Work Safe BC “Handle with Care: Patient Handling and the Application of Ergonomics (MSI)
Requirements”
Risk Factor Source Type of Hazard Hazard
Physical Demands: Force Equipment and
materials
Physical
Awkward Posture
Work Environment Environment
Resident Characteristics People
2015 Safe Resident Handling Workshop 30
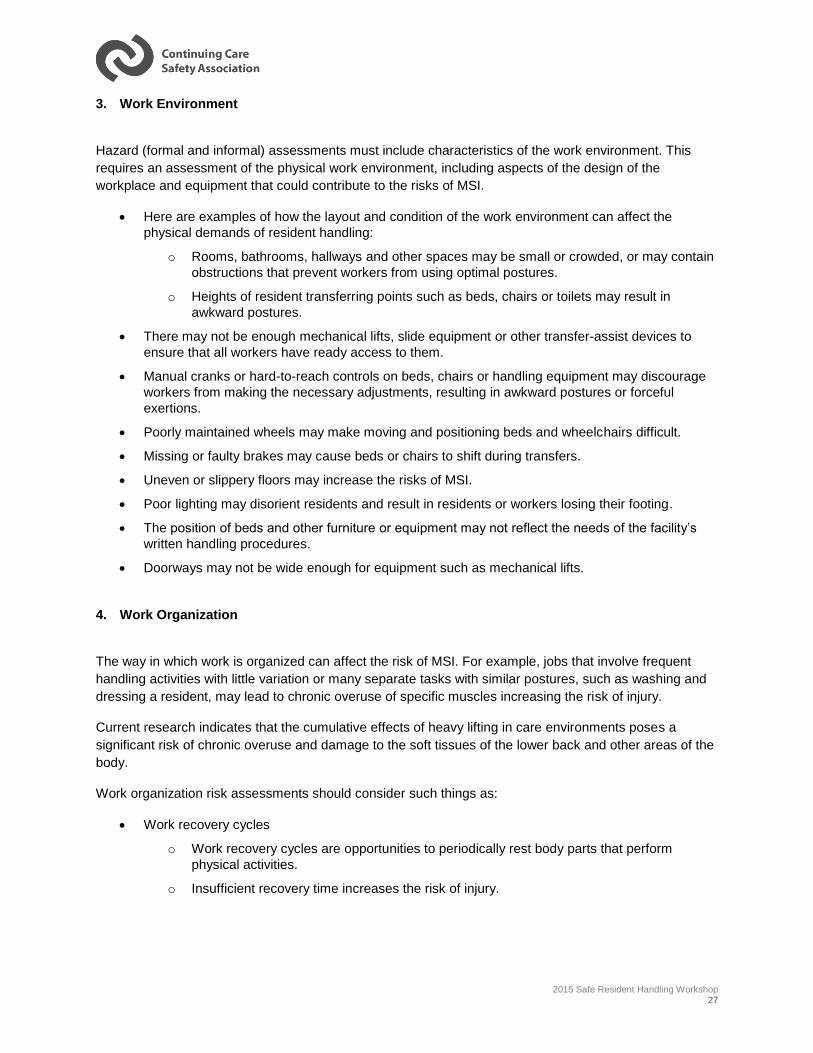
Identifying Resident Handling Hazards
What are the obvious risk factors in the above picture?
2015 Safe Resident Handling Workshop 31
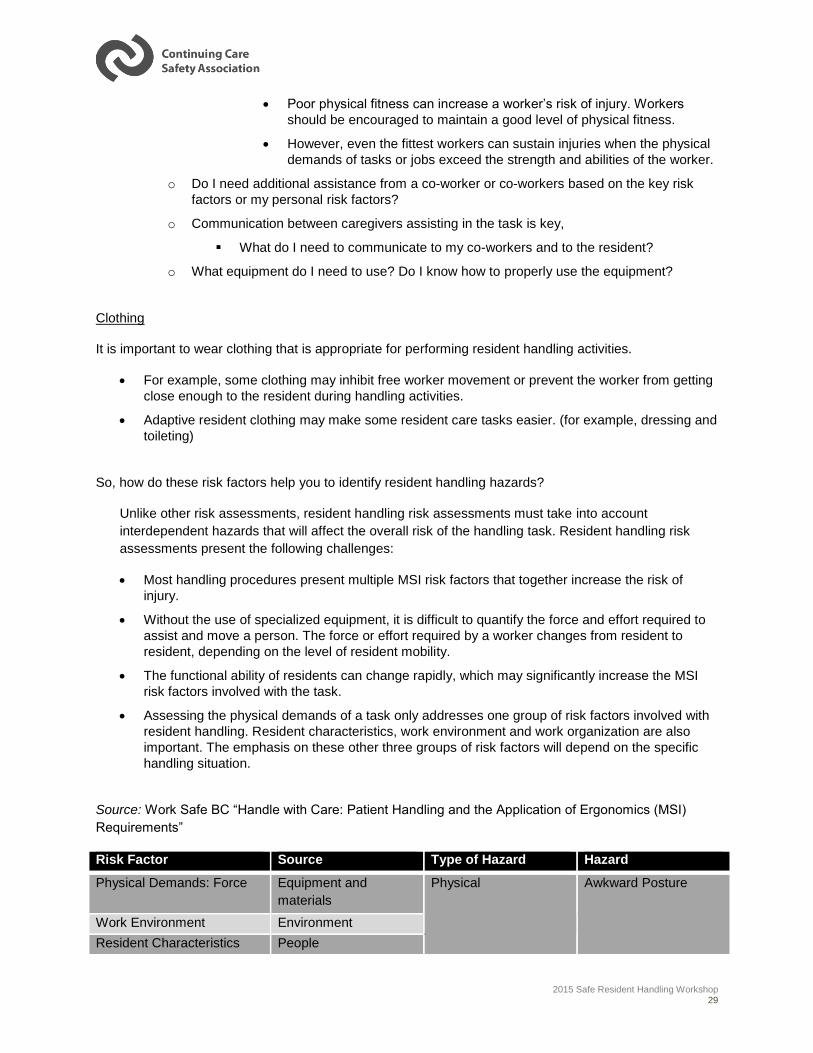
What are the obvious risk factors in the above picture?
2015 Safe Resident Handling Workshop 32
IMPORTANT NOTE:
Remember, the resident mobility assessment (completed prior to or at admission and at regular intervals
based on the organization’s internal procedures) identifies the level assistance the resident requires. This
information is typically included in the resident’s care plan and posted in the resident’s room for quick
reference. Therefore, workers should follow the resident’s care plan unless their observations of the
resident’s condition suggest it is unsafe to do so. In these situations, workers should inform their
supervisors or take the appropriate action to eliminate or minimize the risks. This may include
reassessing the residents’ handling needs and updating the resident’s care plan.
Using the Safe Resident Handling Algorithms in Appendix 2 can help the caregiver decide which resident
handling technique is appropriate based on the change in residents cognitive or physical status (i.e.
weight-bearing ability) observed during the pre-task assessment, until the resident can be re-assessed.
2015 Safe Resident Handling Workshop 33
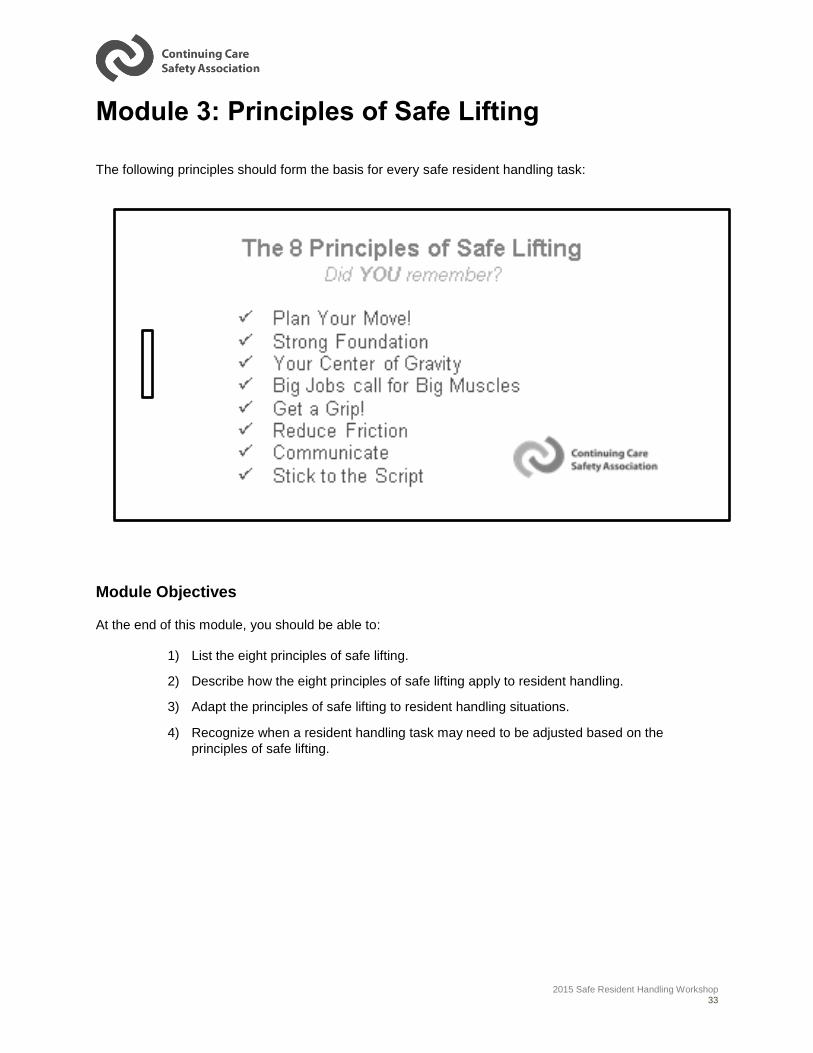
Module 3: Principles of Safe Lifting
The following principles should form the basis for every safe resident handling task:
Module Objectives
At the end of this module, you should be able to:
1) List the eight principles of safe lifting.
2) Describe how the eight principles of safe lifting apply to resident handling.
3) Adapt the principles of safe lifting to resident handling situations.
4) Recognize when a resident handling task may need to be adjusted based on the
principles of safe lifting.
2015 Safe Resident Handling Workshop 34
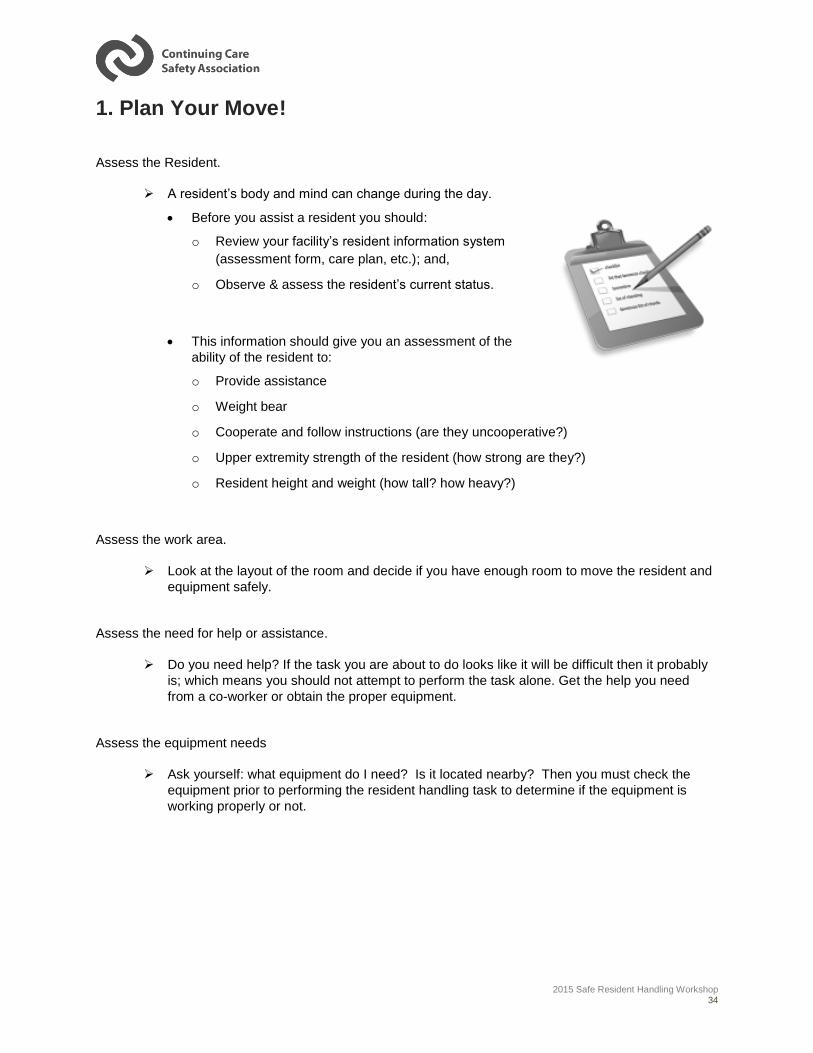
1. Plan Your Move!
Assess the Resident.
A resident’s body and mind can change during the day.
Before you assist a resident you should:
o Review your facility’s resident information system
(assessment form, care plan, etc.); and,
o Observe & assess the resident’s current status.
This information should give you an assessment of the
ability of the resident to:
o Provide assistance
o Weight bear
o Cooperate and follow instructions (are they uncooperative?)
o Upper extremity strength of the resident (how strong are they?)
o Resident height and weight (how tall? how heavy?)
Assess the work area.
Look at the layout of the room and decide if you have enough room to move the resident and
equipment safely.
Assess the need for help or assistance.
Do you need help? If the task you are about to do looks like it will be difficult then it probably
is; which means you should not attempt to perform the task alone. Get the help you need
from a co-worker or obtain the proper equipment.
Assess the equipment needs
Ask yourself: what equipment do I need? Is it located nearby? Then you must check the
equipment prior to performing the resident handling task to determine if the equipment is
working properly or not.

2015 Safe Resident Handling Workshop 35
2. Strong Foundation
Your largest and strongest muscles are in your butt and legs. Using these muscles to build a strong base
of support will reduce your effort and increase your safety.
To ensure you are in a strong foundation:
place your feet at least shoulder-width apart;
and,
drop your butt into a squat position.
3. Your Centre of Gravity
Your body has a centre of gravity, located somewhere between
your stomach and your hips. The weight of your body is evenly
distributed and balanced around the centre of gravity.
You should always try to achieve postures that keep you in
balance over your centre of gravity. This will help you stabilize
your body and protect your smaller muscle groups. Now you
can focus on using your larger muscles for resident handling
tasks.
A key part of maintaining this balance is to keep your head up and the resident close to your centre of
gravity. This provides a greater amount of protection from injury to your back.
2015 Safe Resident Handling Workshop 36
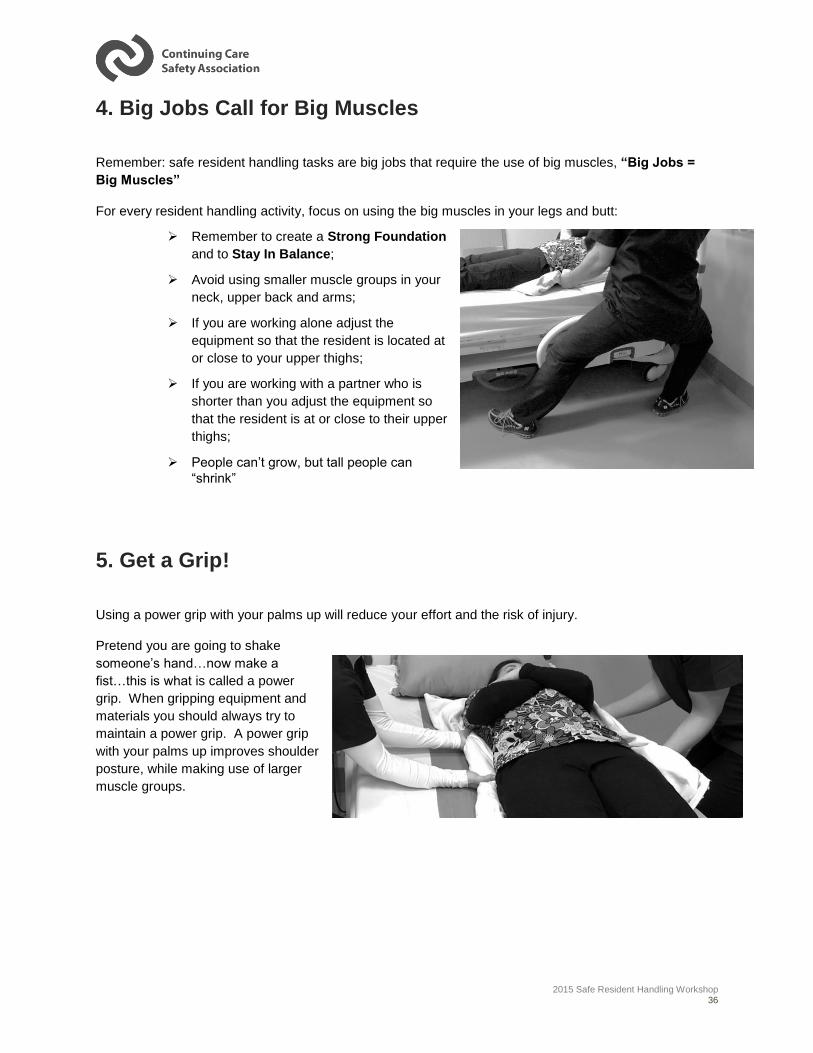
4. Big Jobs Call for Big Muscles
Remember: safe resident handling tasks are big jobs that require the use of big muscles, “Big Jobs =
Big Muscles”
For every resident handling activity, focus on using the big muscles in your legs and butt:
Remember to create a Strong Foundation
and to Stay In Balance;
Avoid using smaller muscle groups in your
neck, upper back and arms;
If you are working alone adjust the
equipment so that the resident is located at
or close to your upper thighs;
If you are working with a partner who is
shorter than you adjust the equipment so
that the resident is at or close to their upper
thighs;
People can’t grow, but tall people can
“shrink”
5. Get a Grip!
Using a power grip with your palms up will reduce your effort and the risk of injury.
Pretend you are going to shake
someone’s hand…now make a
fist…this is what is called a power
grip. When gripping equipment and
materials you should always try to
maintain a power grip. A power grip
with your palms up improves shoulder
posture, while making use of larger
muscle groups.
2015 Safe Resident Handling Workshop 37
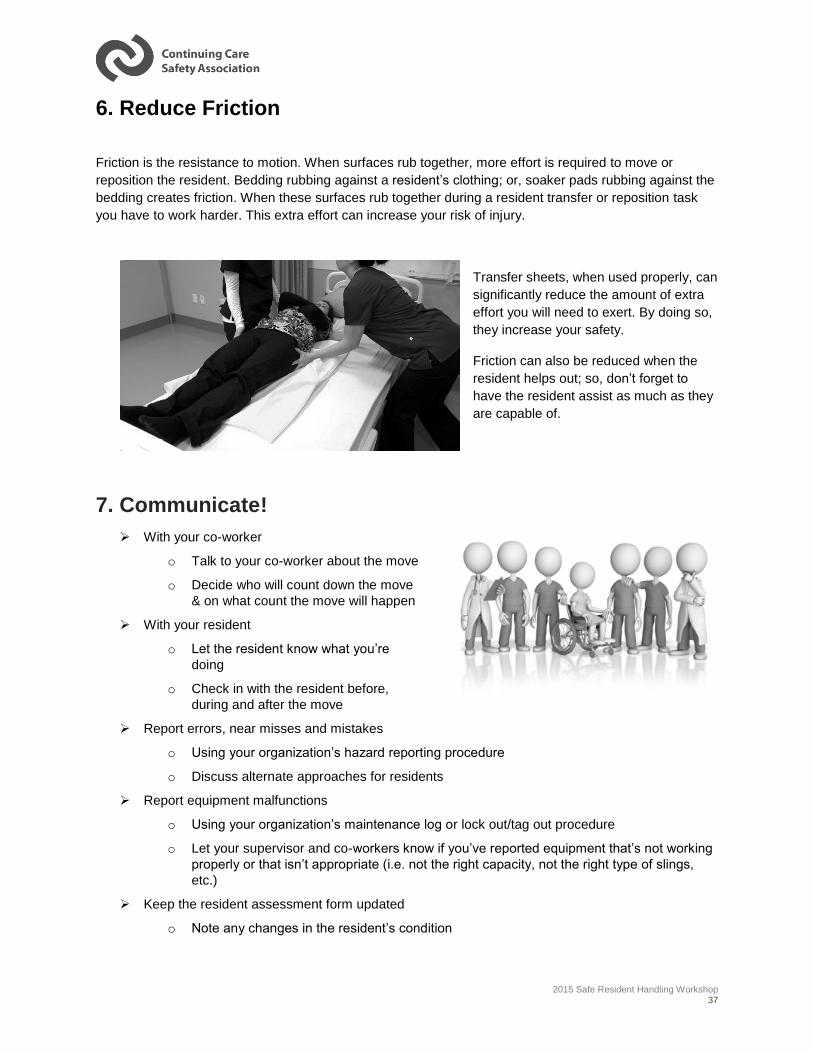
6. Reduce Friction
Friction is the resistance to motion. When surfaces rub together, more effort is required to move or
reposition the resident. Bedding rubbing against a resident’s clothing; or, soaker pads rubbing against the
bedding creates friction. When these surfaces rub together during a resident transfer or reposition task
you have to work harder. This extra effort can increase your risk of injury.
Transfer sheets, when used properly, can
significantly reduce the amount of extra
effort you will need to exert. By doing so,
they increase your safety.
Friction can also be reduced when the
resident helps out; so, don’t forget to
have the resident assist as much as they
are capable of.
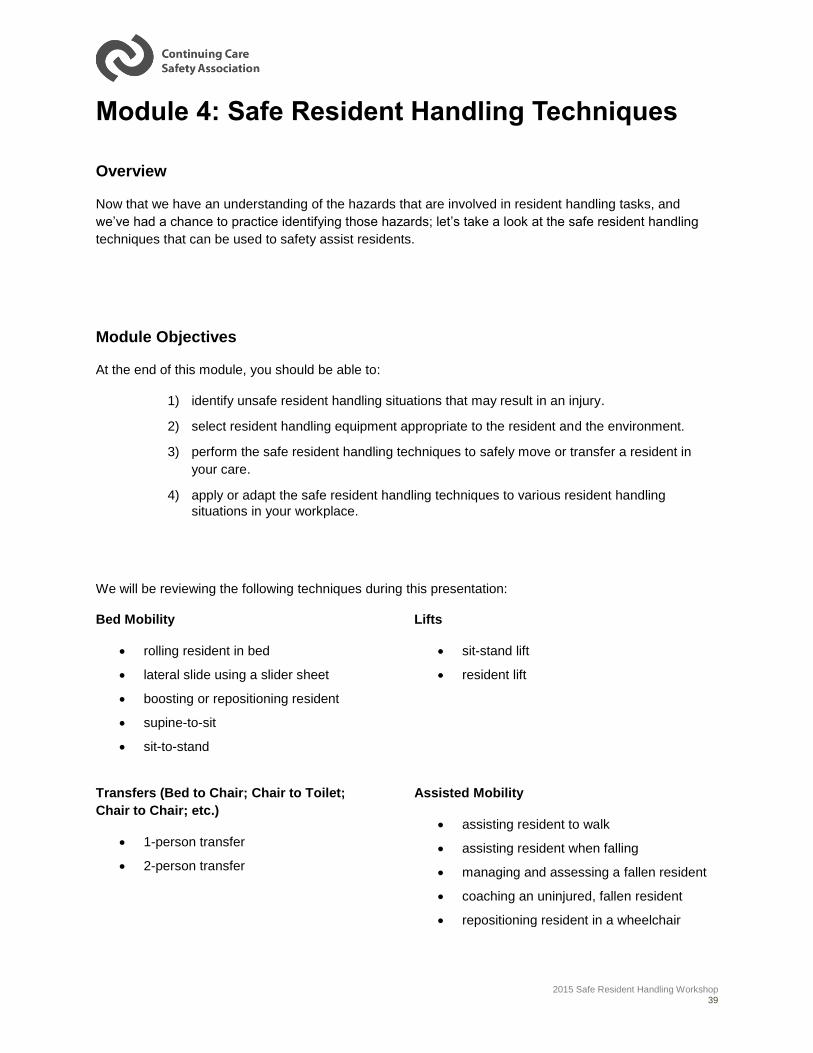
7. Communicate!
With your co-worker
o Talk to your co-worker about the move
o Decide who will count down the move
& on what count the move will happen
With your resident
o Let the resident know what you’re
doing
o Check in with the resident before,
during and after the move
Report errors, near misses and mistakes
o Using your organization’s hazard reporting procedure
o Discuss alternate approaches for residents
Report equipment malfunctions
o Using your organization’s maintenance log or lock out/tag out procedure
o Let your supervisor and co-workers know if you’ve reported equipment that’s not working
properly or that isn’t appropriate (i.e. not the right capacity, not the right type of slings,
etc.)
Keep the resident assessment form updated
o Note any changes in the resident’s condition

2015 Safe Resident Handling Workshop 38
8. Stick to the Script
You should try to apply the principles of safe resident handling to every
situation.
Consistently apply them and they will become second nature to you.
1. Plan Your Move
2. Strong Foundation
3. Centre of Gravity
4. Big Jobs = Big Muscles
5. Get a Grip!
6. Reduce Friction
7. Communicate
8. Stick to the Script!
2015 Safe Resident Handling Workshop 39
Module 4: Safe Resident Handling Techniques
Overview
Now that we have an understanding of the hazards that are involved in resident handling tasks, and
we’ve had a chance to practice identifying those hazards; let’s take a look at the safe resident handling
techniques that can be used to safety assist residents.
Module Objectives
At the end of this module, you should be able to:
1) identify unsafe resident handling situations that may result in an injury.
2) select resident handling equipment appropriate to the resident and the environment.
3) perform the safe resident handling techniques to safely move or transfer a resident in
your care.
4) apply or adapt the safe resident handling techniques to various resident handling
situations in your workplace.
We will be reviewing the following techniques during this presentation:
Bed Mobility
rolling resident in bed
lateral slide using a slider sheet
boosting or repositioning resident
supine-to-sit
sit-to-stand
Lifts
sit-stand lift
resident lift
Transfers (Bed to Chair; Chair to Toilet;
Chair to Chair; etc.)
1-person transfer
2-person transfer
Assisted Mobility
assisting resident to walk
assisting resident when falling
managing and assessing a fallen resident
coaching an uninjured, fallen resident
repositioning resident in a wheelchair
2015 Safe Resident Handling Workshop 40
Bed Mobility:
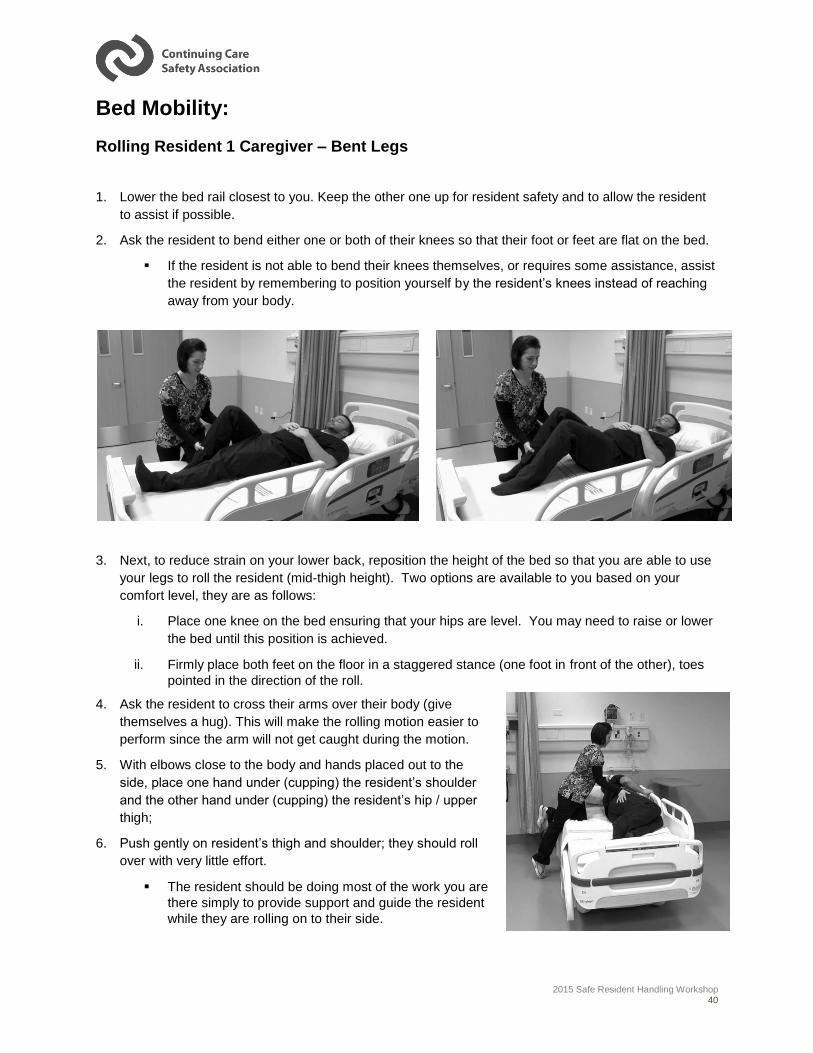
Rolling Resident 1 Caregiver – Bent Legs
1. Lower the bed rail closest to you. Keep the other one up for resident safety and to allow the resident
to assist if possible.
2. Ask the resident to bend either one or both of their knees so that their foot or feet are flat on the bed.
If the resident is not able to bend their knees themselves, or requires some assistance, assist
the resident by remembering to position yourself by the resident’s knees instead of reaching
away from your body.
3. Next, to reduce strain on your lower back, reposition the height of the bed so that you are able to use
your legs to roll the resident (mid-thigh height). Two options are available to you based on your
comfort level, they are as follows:
i. Place one knee on the bed ensuring that your hips are level. You may need to raise or lower
the bed until this position is achieved.
ii. Firmly place both feet on the floor in a staggered stance (one foot in front of the other), toes
pointed in the direction of the roll.
4. Ask the resident to cross their arms over their body (give
themselves a hug). This will make the rolling motion easier to
perform since the arm will not get caught during the motion.
5. With elbows close to the body and hands placed out to the
side, place one hand under (cupping) the resident’s shoulder
and the other hand under (cupping) the resident’s hip / upper
thigh;
6. Push gently on resident’s thigh and shoulder; they should roll
over with very little effort.
The resident should be doing most of the work you are
there simply to provide support and guide the resident
while they are rolling on to their side.

2015 Safe Resident Handling Workshop 41
7. To return the resident to the start position:
Use the same technique but with a lowering motion instead of a pushing motion.
Remember, with resident’s knees up and arms crossed, very little effort is required.
Rolling Resident 1 Caregiver – Straight Legs
1. Lower the bed rail closest to you. Keep the other one up, for resident safety and to allow the resident
to assist if possible.
2. Ask the resident to cross their leg closest to you over their other leg.
If the resident is not able to cross one leg over the other on their own or requires some
assistance, assist the resident by remembering to position yourself by the resident’s feet,
instead of reaching away from your body, to cross the top leg in the direction of the roll.
3. Follow the same rolling procedure steps 2 through 7 as in the “rolling resident 1 caregiver – bent legs”
technique.

2015 Safe Resident Handling Workshop 42
Rolling Resident 2 Caregivers – Straight Legs
1. Since two caregivers are involved in this technique, communication is key. Prior to performing the
technique both caregivers need to discuss who will be performing each role. One caregiver will be
required to roll the resident while the other caregiver will need to steady the resident.
2. Lower both bed rails.
3. Next, to reduce strain on the lower back the caregiver rolling will need to reposition the height of the
bed so that they are able to use their legs to roll the resident (approx. mid-thigh height). If the worker
holding the resident is taller, they would need to bend their knees to adjust to the height difference
without bending at the waist. Two options are available to the caregiver rolling the resident based on
comfort level; they are as follows:
i. Place one knee on the bed ensuring that
your hips are level. You may need to
raise or lower the bed until this position
is achieved.
ii. Firmly place both feet on the floor in a
staggered stance, toes pointed in the
direction of the roll.
4. Ask the resident to cross their arms over their body (give themselves a hug). This will make the rolling
motion easier to perform since the arm will not get caught during the motion. If resident is fearful the
second caregiver is there to comfort and reassure the resident during the motion.
5. With elbows close to the body and hands placed out to the side, place one hand under (cupping) the
resident’s shoulder and the other hand under (cupping) the resident’s hip;
6. Using your legs, push gently on resident’s hip and shoulder; they should roll over with very little upper
body effort.
Should the resident require more effort, use a small rocking motion with the legs to assist with the
rolling momentum. Remember to count off (1-2-3) so that both your co-worker and the resident
are aware of when the motion will be occurring.
7. Once the rolling motion is complete, the
second caregiver will steady the
resident.
8. To return the resident to the start
position
Use the same technique but with a
lowering motion instead of a rolling
motion.
2015 Safe Resident Handling Workshop 43
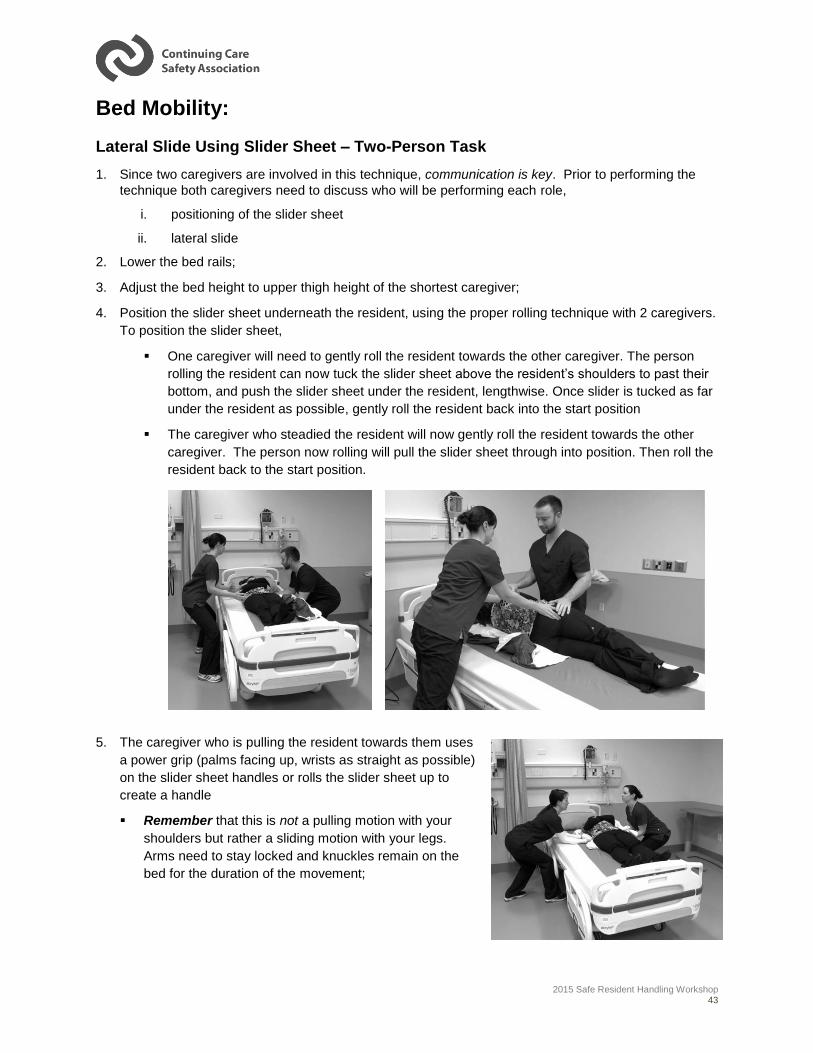
Bed Mobility:
Lateral Slide Using Slider Sheet – Two-Person Task
1. Since two caregivers are involved in this technique, communication is key. Prior to performing the
technique both caregivers need to discuss who will be performing each role,
i. positioning of the slider sheet
ii. lateral slide
2. Lower the bed rails;
3. Adjust the bed height to upper thigh height of the shortest caregiver;
4. Position the slider sheet underneath the resident, using the proper rolling technique with 2 caregivers.
To position the slider sheet,
One caregiver will need to gently roll the resident towards the other caregiver. The person
rolling the resident can now tuck the slider sheet above the resident’s shoulders to past their
bottom, and push the slider sheet under the resident, lengthwise. Once slider is tucked as far
under the resident as possible, gently roll the resident back into the start position
The caregiver who steadied the resident will now gently roll the resident towards the other
caregiver. The person now rolling will pull the slider sheet through into position. Then roll the
resident back to the start position.
5. The caregiver who is pulling the resident towards them uses
a power grip (palms facing up, wrists as straight as possible)
on the slider sheet handles or rolls the slider sheet up to
create a handle
Remember that this is not a pulling motion with your
shoulders but rather a sliding motion with your legs.
Arms need to stay locked and knuckles remain on the
bed for the duration of the movement;
2015 Safe Resident Handling Workshop 44
6. The caregiver who is pushing the resident away from them, will place one hand on the resident’s
shoulder and their other hand cupping the resident’s upper thigh/buttocks while ensuring the fabric of
the slider sheet is between their hands and the resident;
7. One caregiver should count off (1-2-3) while both caregivers prepare to coordinate the push/pull
movement; perform the movement on third count.
Bed Mobility
Boosting or Repositioning Resident with Slider Sheet or Soaker Pad
1. Since two caregivers are involved in this technique, communication is key. Prior to performing the
technique both caregivers need to discuss who will be performing each role for the tasks involved,
i. positioning of the slider sheet
ii. boosting/repositioning
2. Lower the bed rails;
3. Adjust the bed height to upper thigh height of the shortest caregiver;
4. Position the slider sheet underneath the resident, using the proper rolling technique with 2 caregivers.
Again, communication is key; both caregivers need to determine who will be performing each task.
To position the slider sheet,
One caregiver will need to gently roll the resident towards the other caregiver. The person
rolling the resident can now tuck the slider sheet above the resident’s shoulders to past their
bottom, and push the slider sheet under the resident, lengthwise. Once slider is tucked as far
under the resident as possible gently roll the resident back into the start position
The caregiver who steadied the resident will now gently roll the resident towards the other
caregiver. The person now rolling will pull the slider sheets through into position. Then roll
the resident back to the start position.
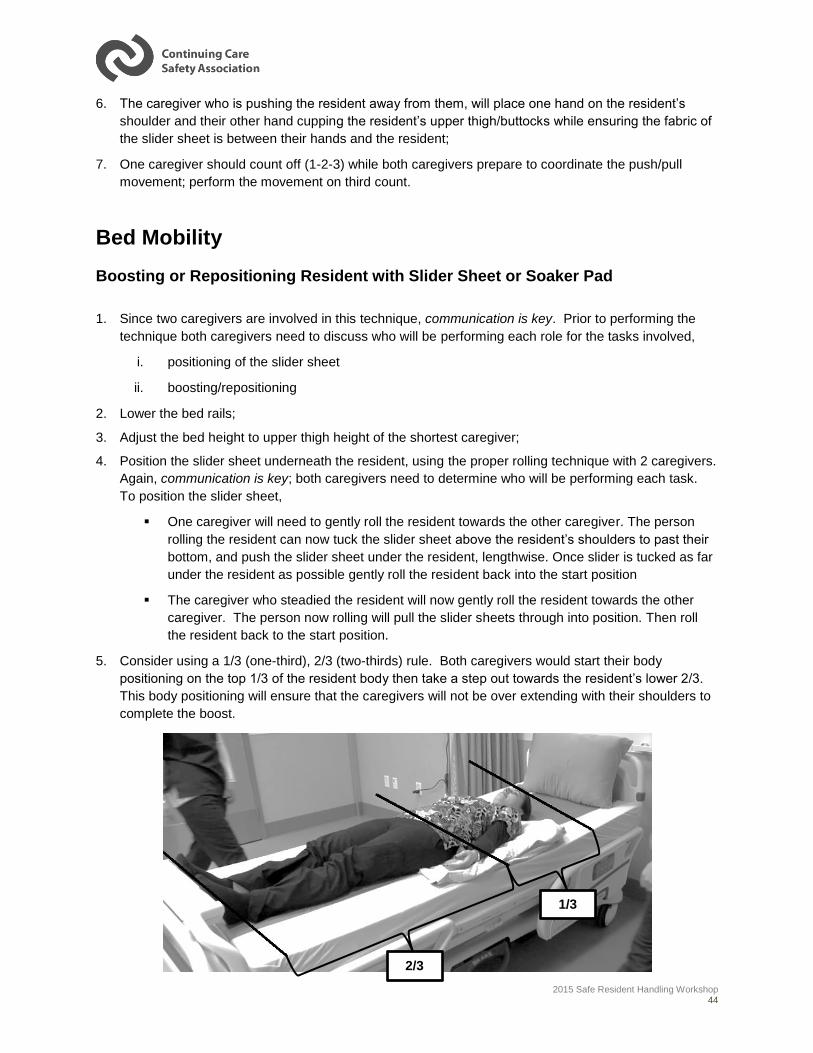
5. Consider using a 1/3 (one-third), 2/3 (two-thirds) rule. Both caregivers would start their body
positioning on the top 1/3 of the resident body then take a step out towards the resident’s lower 2/3.
This body positioning will ensure that the caregivers will not be over extending with their shoulders to
complete the boost.
2/3
1/3
2015 Safe Resident Handling Workshop 45
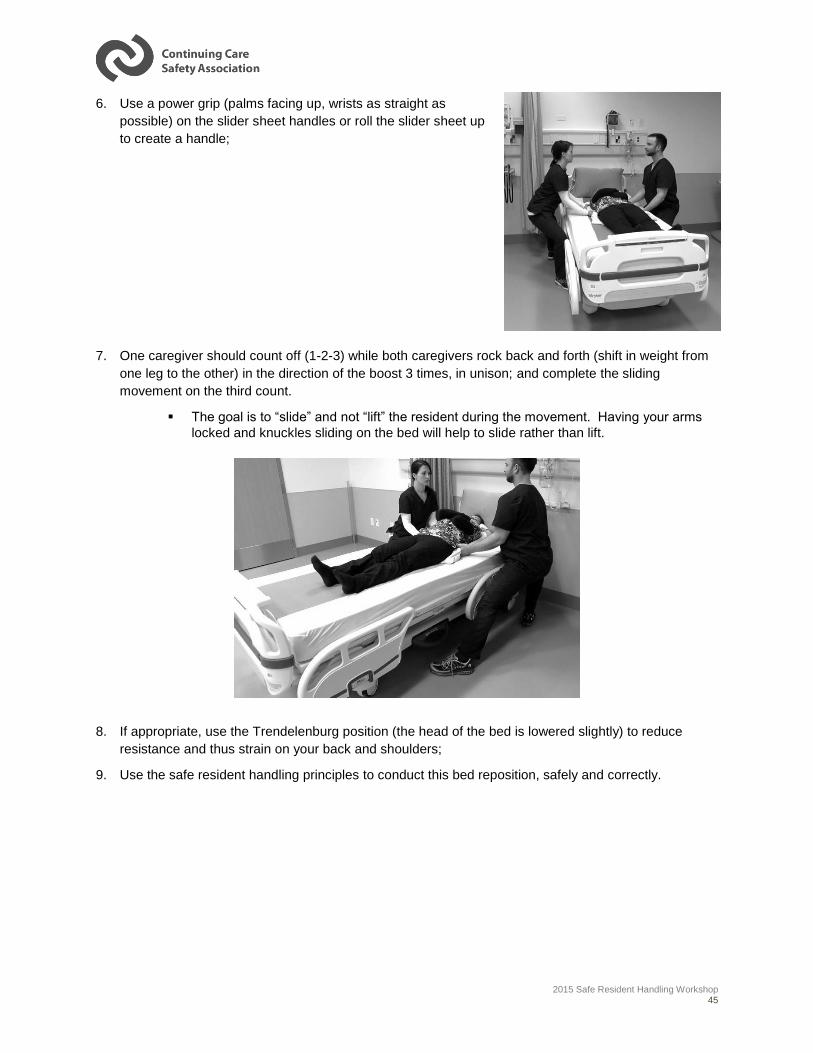
6. Use a power grip (palms facing up, wrists as straight as
possible) on the slider sheet handles or roll the slider sheet up
to create a handle;
7. One caregiver should count off (1-2-3) while both caregivers rock back and forth (shift in weight from
one leg to the other) in the direction of the boost 3 times, in unison; and complete the sliding
movement on the third count.
The goal is to “slide” and not “lift” the resident during the movement. Having your arms
locked and knuckles sliding on the bed will help to slide rather than lift.
8. If appropriate, use the Trendelenburg position (the head of the bed is lowered slightly) to reduce
resistance and thus strain on your back and shoulders;
9. Use the safe resident handling principles to conduct this bed reposition, safely and correctly.
2015 Safe Resident Handling Workshop 46
Important considerations when using a soaker pad for boosting or repositioning:
Since more effort is required to boost or reposition a resident using a soaker pad, the principles of
safe resident handling are critical, including:
o Focus on small movements vs. trying to complete the slide all in one motion
o Assess the resident, particularly for changes in physical or mental capabilities
o Ask the resident to help as much as they can
o Ensure there are two or more staff involved in the task
o Really concentrate on sliding not lifting
o Communicate with the resident and co-workers before and during the task
o Use other techniques to get the resident in as ideal a position as possible before
attempting to boost/reposition
o Use gravity and the hospital bed to your advantage – raise or lower the residents trunk or
feet in the direction of the move
o Use your big muscles in your butt and legs – focus on shifting your weight instead of
using your arms and back
o Consider using a mechanical lift – particularly if there has been a change in the resident’s
condition and/or there is a significant size difference between you and the resident
IMPORTANT NOTE:
Healthcare workers are using soaker pads to reposition (boost or turn) patients in bed, despite the risk of sprains or strains (musculoskeletal injury) to themselves. Soaker pads, also known as incontinence pads or bed pads, are designed to absorb urine in order to keep beds and linens dry, and protect residents' skin. Soaker pads should only be used for their intended purpose—they are not meant for repositioning residents.
There are several concerns with using soaker pads to reposition patients in bed:
• Soaker pads are not designed for repositioning patients.
• Soaker pads do not have low friction properties—sliding them requires great effort.
• Soaker pads are small and positioned under the lower part of a patient's trunk and upper legs.
• The pads do not fully support the patient's trunk and shoulders, so using them for repositioning results in an unbalanced load and greater effort
Source: WorkSafe BC Hazard Alert, WorkSafe Bulletin WS 2009-01
2015 Safe Resident Handling Workshop 47
Bed Mobility:
Supine to Sit: One Caregiver – Bent Knee
Before you begin any transfer, be aware of any conditions a resident may have that would
prevent a successful transfer, such as a weak side due to a stroke or recent injury. Remember
always transfer a resident toward their stronger side.
1. Adjust bed height so that when resident is in the seated position their feet will be able to touch the
floor;
2. If the resident’s condition permits, raise the head of the bed until the resident is in an upright position.
This will make the transfer safer for your back.
3. Lower the bed rail closest to you. Ask the resident to raise their knees. If necessary, assist the
resident to raise their knees, one at a time, towards the resident’s chest.
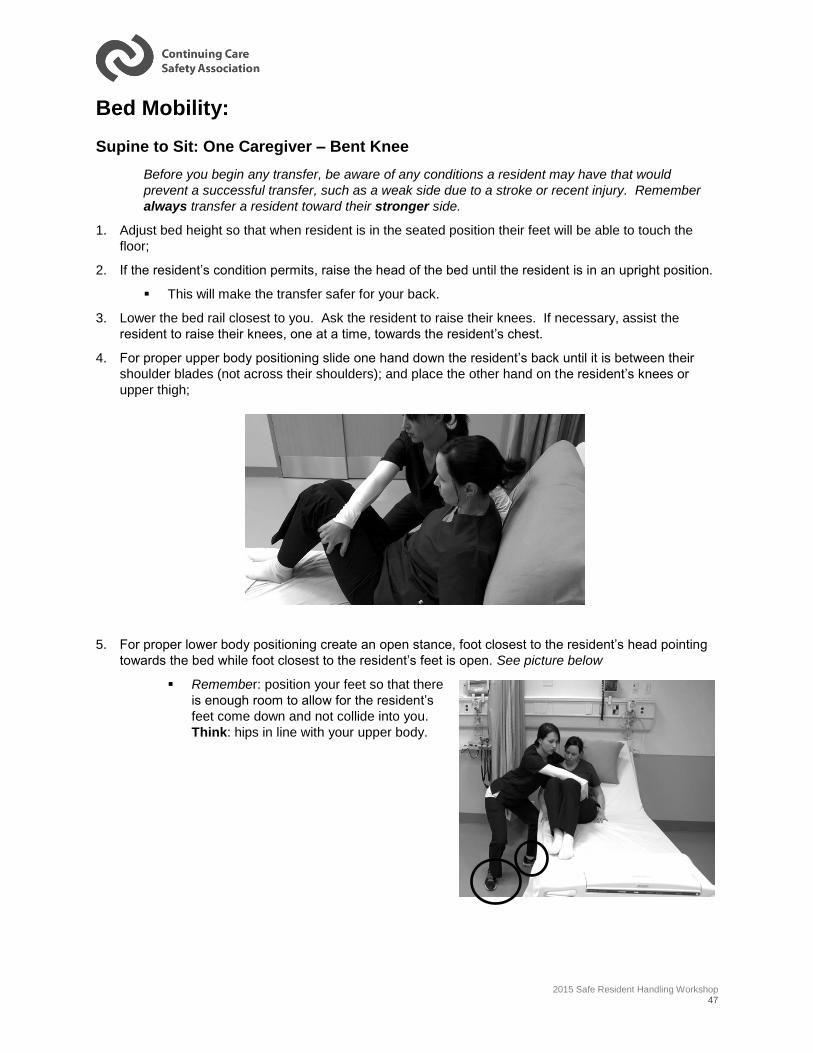
4. For proper upper body positioning slide one hand down the resident’s back until it is between their
shoulder blades (not across their shoulders); and place the other hand on the resident’s knees or
upper thigh;
5. For proper lower body positioning create an open stance, foot closest to the resident’s head pointing
towards the bed while foot closest to the resident’s feet is open. See picture below
Remember: position your feet so that there
is enough room to allow for the resident’s
feet come down and not collide into you.
Think: hips in line with your upper body.
2015 Safe Resident Handling Workshop 48
6. To assist the resident into the sitting position, first communicate with resident how and what they will
be assisting with (such as “On “3” I want you to help by pushing up,” etc.) and begin the 1-2-3 count.
7. On “3”, gently move the resident’s knees towards you off of the bed, rotating their legs and hips. At
the same time pivoting the foot closest to the head of the bed so that you are not twisting at the waist.
Think: Toes follow your nose
8. Finish the transfer by being close to the resident providing any needed support and allowing the
resident time to stabilize.
Supine to Sit: One Caregiver – Straight Leg
Before you begin any transfer, be aware of any conditions a resident may have that would
prevent a successful transfer such as a weak side due to a stroke or recent injury. Remember
always transfer a resident toward their stronger side.
1. Adjust bed height so that when resident is in the seated position their feet will be able to touch the
floor;
2. If the resident’s condition permits, raise the head of the bed until the resident is in an upright position.
This will make the transfer safer for your back.
3. Lower the bed rail closest to you. Ask the resident to bring their feet towards the edge of the bed. If
necessary, assist the resident to bring their feet towards the edge of the bed.
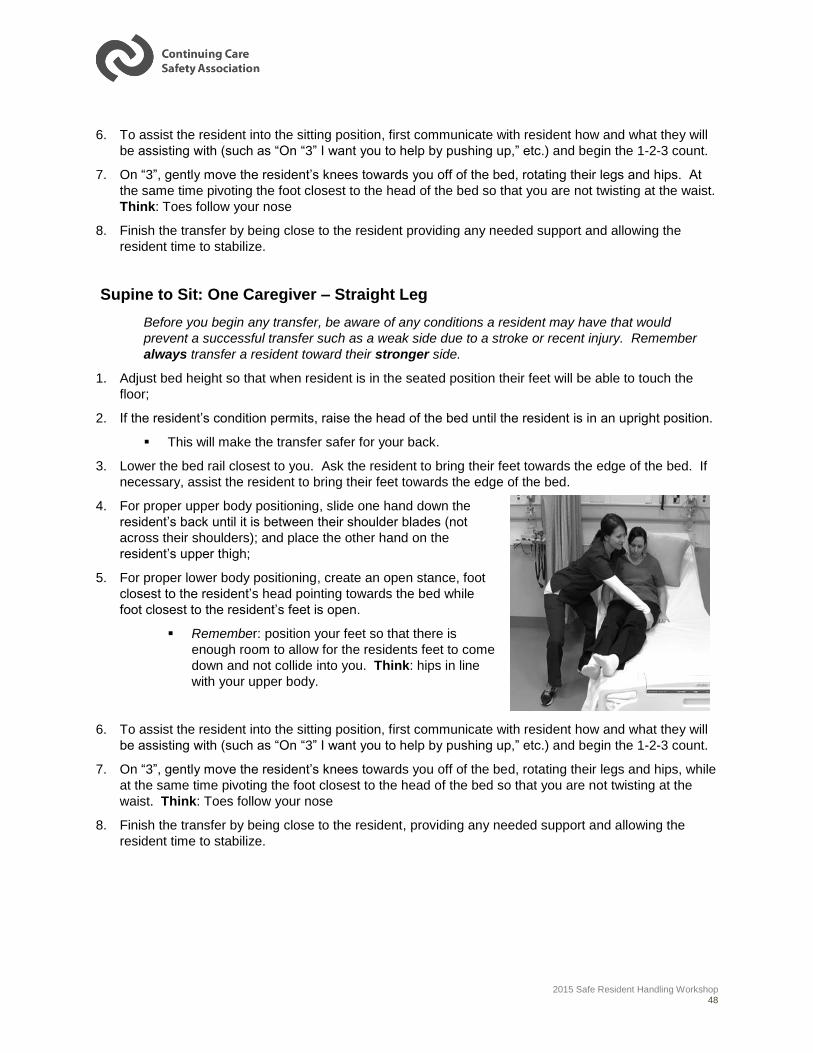
4. For proper upper body positioning, slide one hand down the
resident’s back until it is between their shoulder blades (not
across their shoulders); and place the other hand on the
resident’s upper thigh;
5. For proper lower body positioning, create an open stance, foot
closest to the resident’s head pointing towards the bed while
foot closest to the resident’s feet is open.
Remember: position your feet so that there is
enough room to allow for the residents feet to come
down and not collide into you. Think: hips in line
with your upper body.
6. To assist the resident into the sitting position, first communicate with resident how and what they will
be assisting with (such as “On “3” I want you to help by pushing up,” etc.) and begin the 1-2-3 count.
7. On “3”, gently move the resident’s knees towards you off of the bed, rotating their legs and hips, while
at the same time pivoting the foot closest to the head of the bed so that you are not twisting at the
waist. Think: Toes follow your nose
8. Finish the transfer by being close to the resident, providing any needed support and allowing the
resident time to stabilize.
2015 Safe Resident Handling Workshop 49
Bed Mobility:
Supine to Sit: Two Caregivers
Before you begin any transfer, be aware of any conditions a resident may have that would
prevent a successful transfer such as a weak side due to a stroke or recent injury. Remember
always transfer a resident toward their stronger side.
1. Since two caregivers are involved in this technique, communication is key. Prior to performing the
technique, both caregivers need to discuss who will be performing each role for the tasks involved:
i. Head and Torso caregiver (lead caregiver)
ii. Lower body caregiver
2. If the resident’s condition permits, raise the top of the bed until the resident is upright position.
o This will make the transfer safer for your back.
Caregiver # 1: Head and Torso (lead caregiver)
1. Slide one hand down the resident’s back until it is between their shoulder blades (not across their
shoulders); and place the other hand on the resident’s upper thigh;
2. Coordinate movement with co-worker using 1-2-3 count.
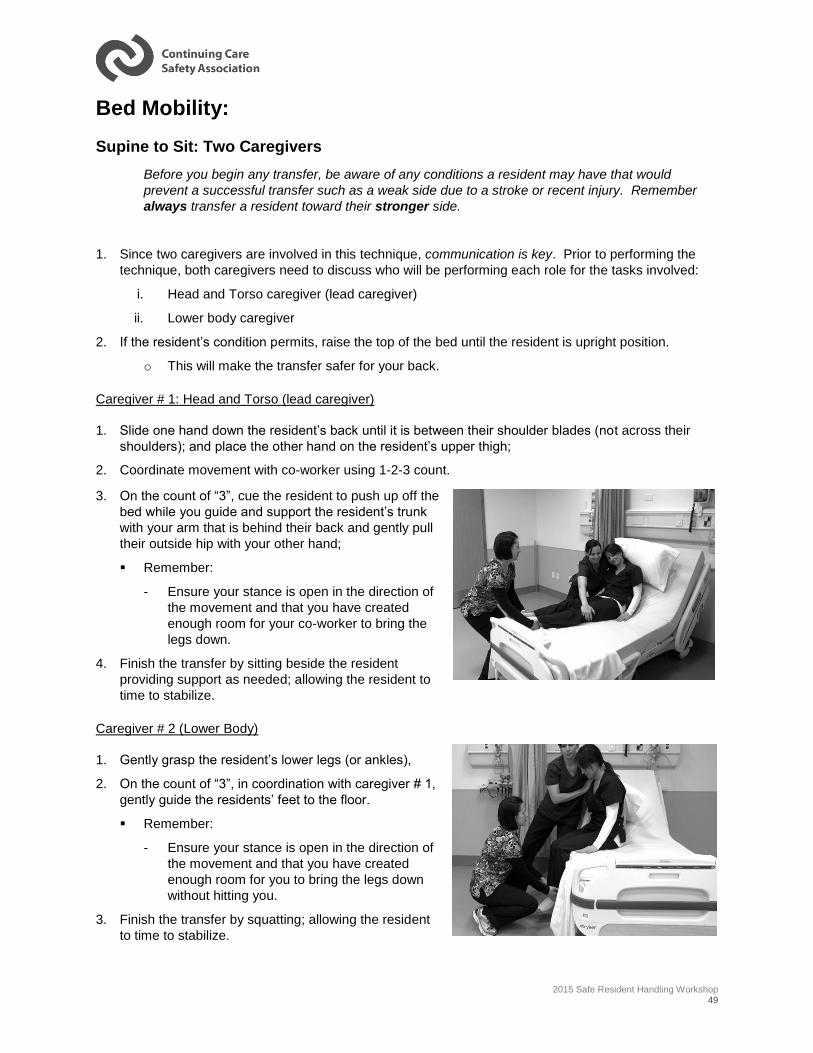
3. On the count of “3”, cue the resident to push up off the
bed while you guide and support the resident’s trunk
with your arm that is behind their back and gently pull
their outside hip with your other hand;
Remember:
- Ensure your stance is open in the direction of
the movement and that you have created
enough room for your co-worker to bring the
legs down.
4. Finish the transfer by sitting beside the resident
providing support as needed; allowing the resident to
time to stabilize.
Caregiver # 2 (Lower Body)
1. Gently grasp the resident’s lower legs (or ankles),
2. On the count of “3”, in coordination with caregiver # 1,
gently guide the residents’ feet to the floor.
Remember:
- Ensure your stance is open in the direction of
the movement and that you have created
enough room for you to bring the legs down
without hitting you.
3. Finish the transfer by squatting; allowing the resident
to time to stabilize.
2015 Safe Resident Handling Workshop 50
Bed Mobility:
Sit-to-Stand:
1. Adjust the height of bed so resident can reach the
floor with their feet.
2. If resident is in wheelchair, ensure the brakes are
on, swing footrests away, and have resident place
feet flat on the floor.
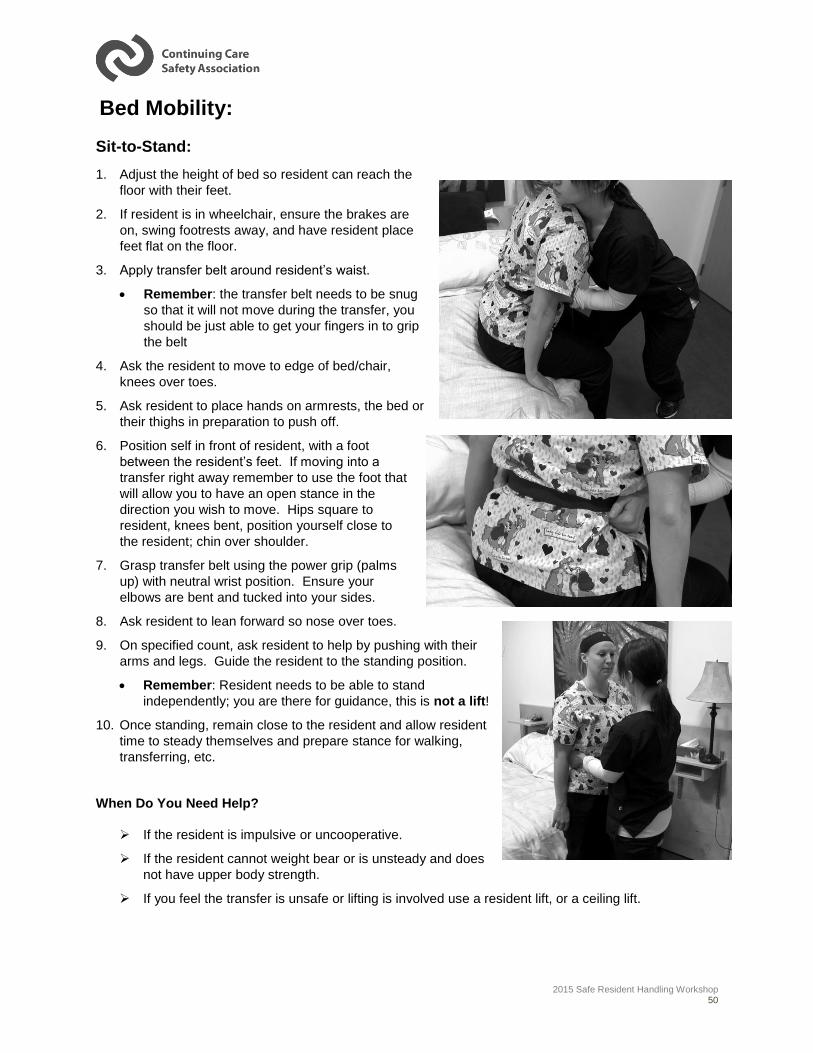
3. Apply transfer belt around resident’s waist.
Remember: the transfer belt needs to be snug
so that it will not move during the transfer, you
should be just able to get your fingers in to grip
the belt
4. Ask the resident to move to edge of bed/chair,
knees over toes.
5. Ask resident to place hands on armrests, the bed or
their thighs in preparation to push off.
6. Position self in front of resident, with a foot
between the resident’s feet. If moving into a
transfer right away remember to use the foot that
will allow you to have an open stance in the
direction you wish to move. Hips square to
resident, knees bent, position yourself close to
the resident; chin over shoulder.
7. Grasp transfer belt using the power grip (palms
up) with neutral wrist position. Ensure your
elbows are bent and tucked into your sides.
8. Ask resident to lean forward so nose over toes.
9. On specified count, ask resident to help by pushing with their
arms and legs. Guide the resident to the standing position.
Remember: Resident needs to be able to stand
independently; you are there for guidance, this is not a lift!
10. Once standing, remain close to the resident and allow resident
time to steady themselves and prepare stance for walking,
transferring, etc.
When Do You Need Help?
If the resident is impulsive or uncooperative.
If the resident cannot weight bear or is unsteady and does
not have upper body strength.
If you feel the transfer is unsafe or lifting is involved use a resident lift, or a ceiling lift.
2015 Safe Resident Handling Workshop 51
One Person Transfer
Bed to Chair; Chair to Bed; Chair to Chair
Before you begin any transfer, be aware of any conditions a resident may have that would
prevent a successful transfer such as a weak side due to a stroke or recent injury. Remember
always transfer a resident toward their stronger side.
For a successful transfer, communication between caregiver and resident is critical. Since
caregiver is there solely for guidance and safety purposes, it is essential that resident is aware of
when and what they are to do during the transfer so caregiver’s safety is optimized.
1. Determine resident’s strong side;
2. Position target (chair/wheelchair/bed) at 90º to resident’s strong side;
If using a wheelchair, remove foot rest closest to the resident, and apply brakes;
3. Apply transfer belt around resident’s waist.
Remember: the transfer belt needs to be snug so that it will not move during the transfer, you
should be just able to get your fingers in to grip the belt
4. Raise the bed until the resident’s hips are slightly higher than their knees (with their feet flat on the
floor).
5. Ask the resident to move to edge of the bed/chair, so that the resident’s knees are over their toes
6. Ask the resident to place their hands on the armrests, the bed or their thighs in preparation to push
off, if possible;
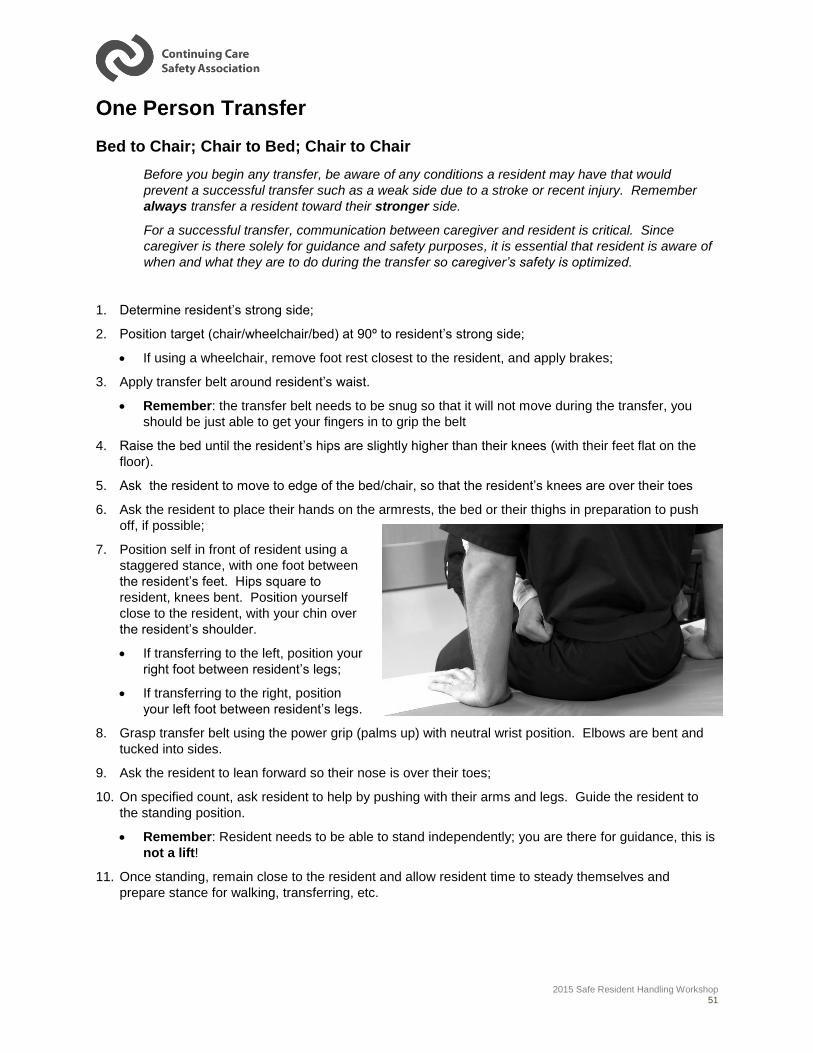
7. Position self in front of resident using a
staggered stance, with one foot between
the resident’s feet. Hips square to
resident, knees bent. Position yourself
close to the resident, with your chin over
the resident’s shoulder.
If transferring to the left, position your
right foot between resident’s legs;
If transferring to the right, position
your left foot between resident’s legs.
8. Grasp transfer belt using the power grip (palms up) with neutral wrist position. Elbows are bent and
tucked into sides.
9. Ask the resident to lean forward so their nose is over their toes;
10. On specified count, ask resident to help by pushing with their arms and legs. Guide the resident to
the standing position.
Remember: Resident needs to be able to stand independently; you are there for guidance, this is
not a lift!
11. Once standing, remain close to the resident and allow resident time to steady themselves and
prepare stance for walking, transferring, etc.

2015 Safe Resident Handling Workshop 52
12. Assist the resident towards the target by
shuffling / taking small steps. Remain close
to the resident with elbows in a locked
position. Have resident communicate when
they can feel the back of their legs touch the
target.
13. At this point, the resident will want to sit.
Continue to remain close to the resident,
elbows in and squat (butt out and knees
bent) when resident is sitting down.
Remember: When the resident sits, the
caregiver needs to remain in a squat
(sit) position. This will help to maintain
proper back position and avoid any
jarring motion on the caregiver’s body.
When Do You Need Help?
If the resident is impulsive or uncooperative.
If the resident cannot weight bear or is unsteady and does not have upper body strength.
If you feel the transfer is unsafe or lifting is involved use a resident lift, or a ceiling lift.
Two Person Transfer
Chair to Bed; Bed to Chair; Chair to Chair
Before you begin any transfer, be aware of any conditions a resident may have that would
prevent a successful transfer such as a weak side due to a stroke or recent injury. Remember
always transfer a resident toward their stronger side.
For a successful transfer communication between caregiver and resident is critical. Since
caregiver is there solely for guidance and safety purposes, it is essential that resident is aware of
when and what they are to do during the transfer so caregiver’s safety is optimized.
1. Since two caregivers are involved in this technique, communication is key. Prior to performing the
technique both caregivers need to discuss who will be performing each role for the tasks involved,
i. Lead caregiver: giving the directions to both resident and co-worker
2. Determine resident’s strong side.
3. Position the target (chair/wheelchair/bed) at approximately a 45º angle from where you are
transferring. This is to allow room for both caregivers to move unobstructed.
If using a wheelchair, remove foot rest closest to the resident, and apply brakes;
4. Apply transfer belt around resident’s waist.
Remember: the transfer belt needs to be snug so that it will not move during the transfer, you
should be just able to get your fingers in to grip the belt

2015 Safe Resident Handling Workshop 53
5. Raise the bed until the resident’s hips are slightly higher than their knees (with their feet flat on the
floor).
6. Lead caregiver directs resident to move to edge of bed/chair, so that the resident’s knees are over
their toes and to place hands on armrests, bed or thighs in preparation to push off.
7. With one caregiver on each side of
resident, both caregivers block resident’s
foot with his/her foot, grip transfer belt with
power grip (palms up) on back and with
arms crossed in front of belt. See picture.
8. Ask the resident to lean forward so their
nose is over their toes.
9. On specified count, lead caregiver will ask
resident to help by pushing with their arms
and legs. Guide the resident to the
standing position.
Remember: Resident needs to be able
to stand independently; you are there
for guidance, this is not a lift!
10. Once standing, remain close to the resident and allow resident time to steady themselves and
prepare stance for walking, transferring, etc.
11. Assist the resident towards the target by shuffling / taking small steps. Remain close to the resident
with elbows in a locked position. Have resident communicate when they can feel the back of their
legs touch the target.
12. At this point, the resident will want to sit. Continue to remain close to the resident, elbows in and
squat (butt out and knees bent) when resident is sitting down.
Remember: When the resident sits,
caregiver needs to remain in a squat
(sit) position. This will help to
maintain proper back position and
avoid any jarring motion on the
caregiver’s body.
When is a lift needed?
If the resident is impulsive,
uncooperative or combative.
If the resident cannot weight bear or
is unsteady and does not have upper
body strength.
If you feel the transfer is unsafe or lifting is involved use a resident lift, or a ceiling lift.
2015 Safe Resident Handling Workshop 54
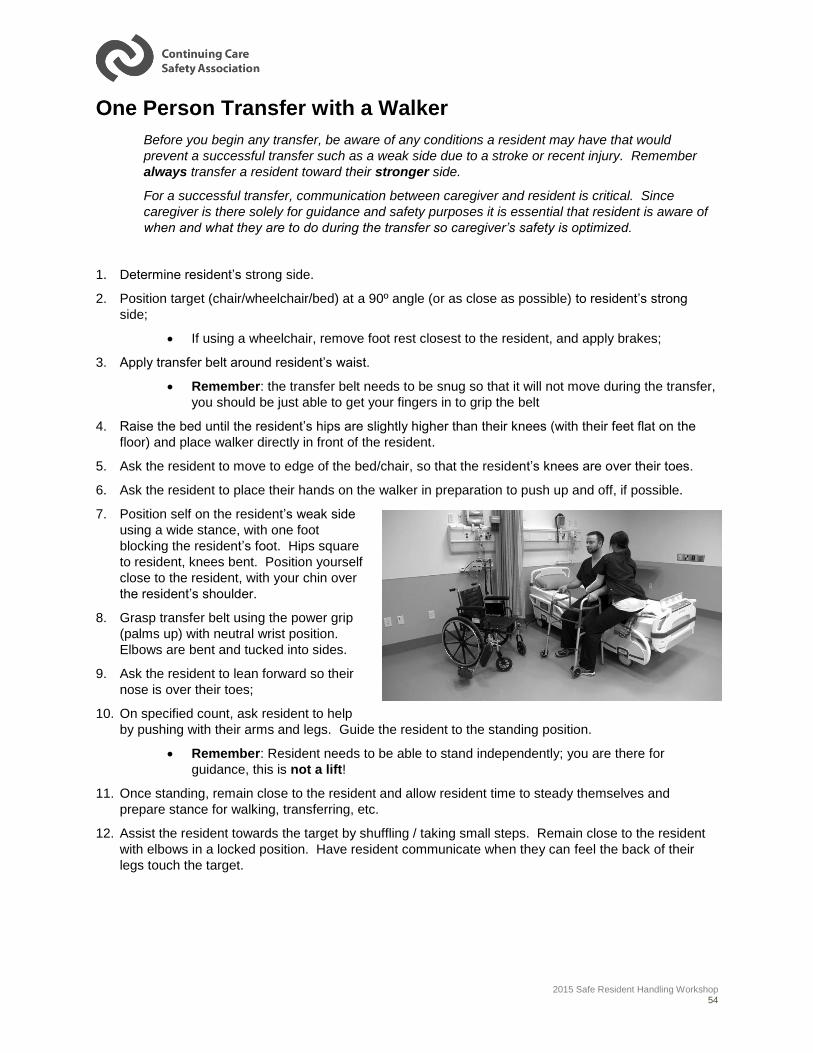
One Person Transfer with a Walker
Before you begin any transfer, be aware of any conditions a resident may have that would
prevent a successful transfer such as a weak side due to a stroke or recent injury. Remember
always transfer a resident toward their stronger side.
For a successful transfer, communication between caregiver and resident is critical. Since
caregiver is there solely for guidance and safety purposes it is essential that resident is aware of
when and what they are to do during the transfer so caregiver’s safety is optimized.
1. Determine resident’s strong side.
2. Position target (chair/wheelchair/bed) at a 90º angle (or as close as possible) to resident’s strong
side;
If using a wheelchair, remove foot rest closest to the resident, and apply brakes;
3. Apply transfer belt around resident’s waist.
Remember: the transfer belt needs to be snug so that it will not move during the transfer,
you should be just able to get your fingers in to grip the belt
4. Raise the bed until the resident’s hips are slightly higher than their knees (with their feet flat on the
floor) and place walker directly in front of the resident.
5. Ask the resident to move to edge of the bed/chair, so that the resident’s knees are over their toes.
6. Ask the resident to place their hands on the walker in preparation to push up and off, if possible.
7. Position self on the resident’s weak side
using a wide stance, with one foot
blocking the resident’s foot. Hips square
to resident, knees bent. Position yourself
close to the resident, with your chin over
the resident’s shoulder.
8. Grasp transfer belt using the power grip
(palms up) with neutral wrist position.
Elbows are bent and tucked into sides.
9. Ask the resident to lean forward so their
nose is over their toes;
10. On specified count, ask resident to help
by pushing with their arms and legs. Guide the resident to the standing position.
Remember: Resident needs to be able to stand independently; you are there for
guidance, this is not a lift!
11. Once standing, remain close to the resident and allow resident time to steady themselves and
prepare stance for walking, transferring, etc.
12. Assist the resident towards the target by shuffling / taking small steps. Remain close to the resident
with elbows in a locked position. Have resident communicate when they can feel the back of their
legs touch the target.
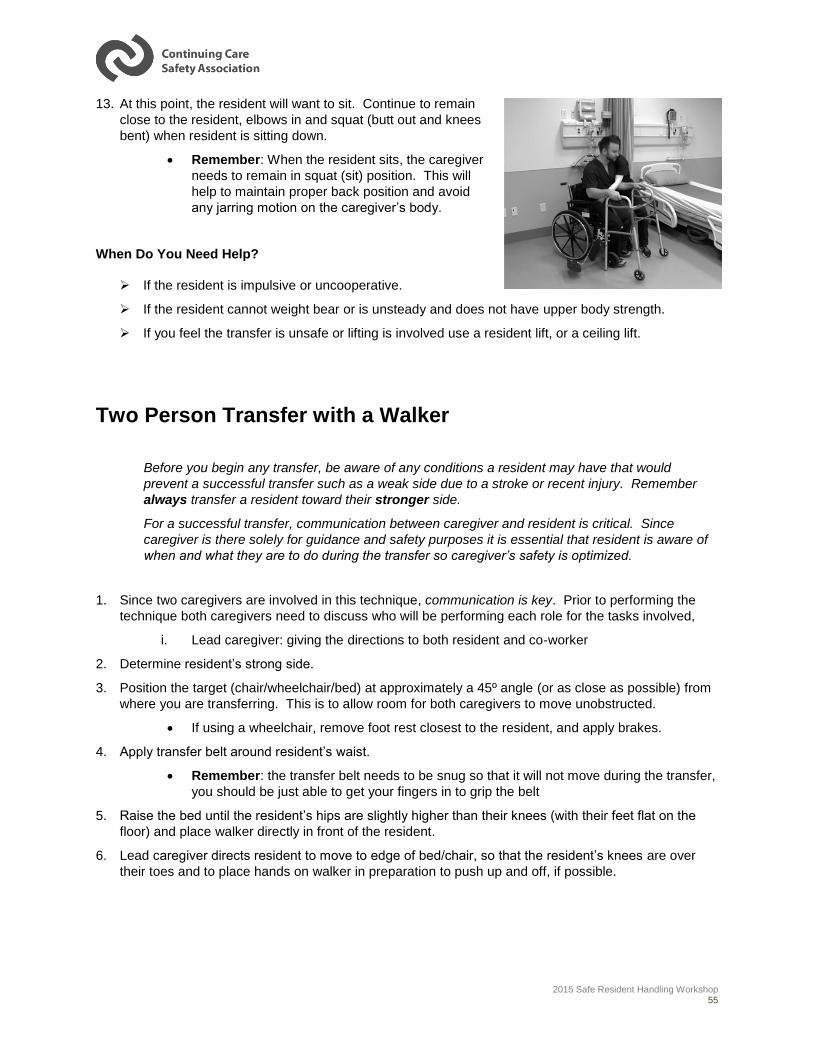
2015 Safe Resident Handling Workshop 55
13. At this point, the resident will want to sit. Continue to remain
close to the resident, elbows in and squat (butt out and knees
bent) when resident is sitting down.
Remember: When the resident sits, the caregiver
needs to remain in squat (sit) position. This will
help to maintain proper back position and avoid
any jarring motion on the caregiver’s body.
When Do You Need Help?
If the resident is impulsive or uncooperative.
If the resident cannot weight bear or is unsteady and does not have upper body strength.
If you feel the transfer is unsafe or lifting is involved use a resident lift, or a ceiling lift.
Two Person Transfer with a Walker
Before you begin any transfer, be aware of any conditions a resident may have that would
prevent a successful transfer such as a weak side due to a stroke or recent injury. Remember
always transfer a resident toward their stronger side.
For a successful transfer, communication between caregiver and resident is critical. Since
caregiver is there solely for guidance and safety purposes it is essential that resident is aware of
when and what they are to do during the transfer so caregiver’s safety is optimized.
1. Since two caregivers are involved in this technique, communication is key. Prior to performing the
technique both caregivers need to discuss who will be performing each role for the tasks involved,
i. Lead caregiver: giving the directions to both resident and co-worker
2. Determine resident’s strong side.
3. Position the target (chair/wheelchair/bed) at approximately a 45º angle (or as close as possible) from
where you are transferring. This is to allow room for both caregivers to move unobstructed.
If using a wheelchair, remove foot rest closest to the resident, and apply brakes.
4. Apply transfer belt around resident’s waist.
Remember: the transfer belt needs to be snug so that it will not move during the transfer,
you should be just able to get your fingers in to grip the belt
5. Raise the bed until the resident’s hips are slightly higher than their knees (with their feet flat on the
floor) and place walker directly in front of the resident.
6. Lead caregiver directs resident to move to edge of bed/chair, so that the resident’s knees are over
their toes and to place hands on walker in preparation to push up and off, if possible.
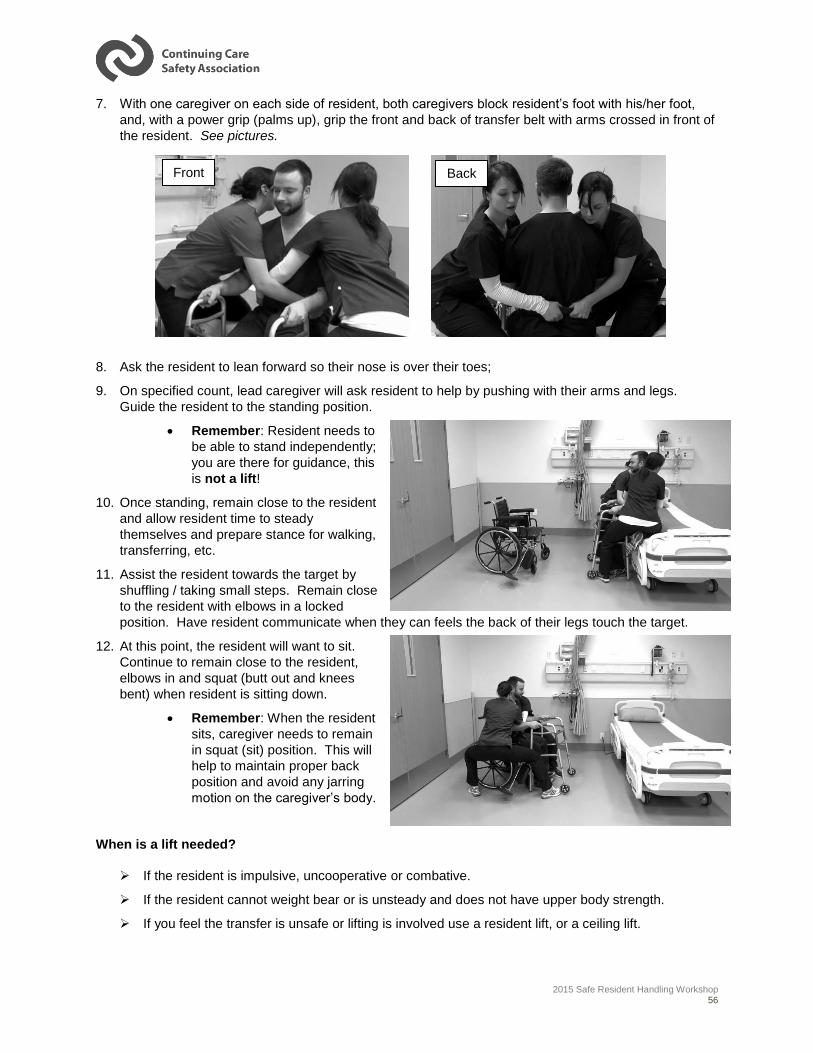
2015 Safe Resident Handling Workshop 56
7. With one caregiver on each side of resident, both caregivers block resident’s foot with his/her foot,
and, with a power grip (palms up), grip the front and back of transfer belt with arms crossed in front of
the resident. See pictures.
8. Ask the resident to lean forward so their nose is over their toes;
9. On specified count, lead caregiver will ask resident to help by pushing with their arms and legs.
Guide the resident to the standing position.
Remember: Resident needs to
be able to stand independently;
you are there for guidance, this
is not a lift!
10. Once standing, remain close to the resident
and allow resident time to steady
themselves and prepare stance for walking,
transferring, etc.
11. Assist the resident towards the target by
shuffling / taking small steps. Remain close
to the resident with elbows in a locked
position. Have resident communicate when they can feels the back of their legs touch the target.
12. At this point, the resident will want to sit.
Continue to remain close to the resident,
elbows in and squat (butt out and knees
bent) when resident is sitting down.
Remember: When the resident
sits, caregiver needs to remain
in squat (sit) position. This will
help to maintain proper back
position and avoid any jarring
motion on the caregiver’s body.
When is a lift needed?
If the resident is impulsive, uncooperative or combative.
If the resident cannot weight bear or is unsteady and does not have upper body strength.
If you feel the transfer is unsafe or lifting is involved use a resident lift, or a ceiling lift.
Front Back
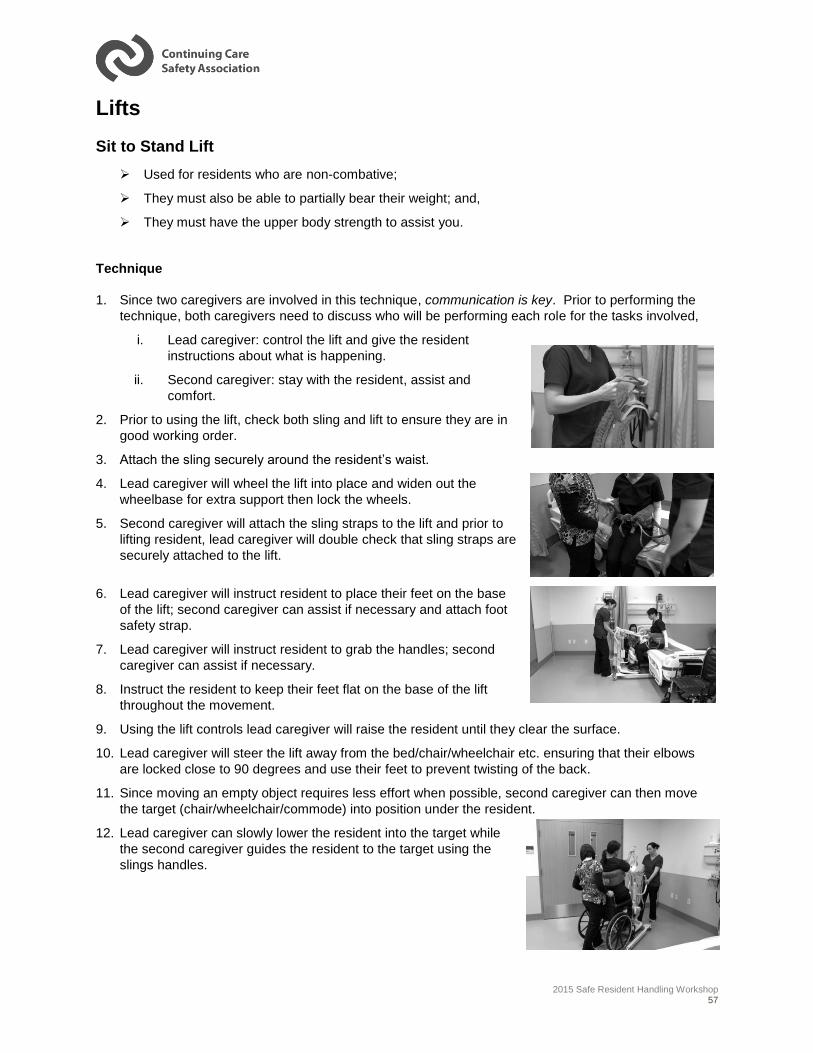
2015 Safe Resident Handling Workshop 57
Lifts
Sit to Stand Lift
Used for residents who are non-combative;
They must also be able to partially bear their weight; and,
They must have the upper body strength to assist you.
Technique
1. Since two caregivers are involved in this technique, communication is key. Prior to performing the
technique, both caregivers need to discuss who will be performing each role for the tasks involved,
i. Lead caregiver: control the lift and give the resident
instructions about what is happening.
ii. Second caregiver: stay with the resident, assist and
comfort.
2. Prior to using the lift, check both sling and lift to ensure they are in
good working order.
3. Attach the sling securely around the resident’s waist.
4. Lead caregiver will wheel the lift into place and widen out the
wheelbase for extra support then lock the wheels.
5. Second caregiver will attach the sling straps to the lift and prior to
lifting resident, lead caregiver will double check that sling straps are
securely attached to the lift.
6. Lead caregiver will instruct resident to place their feet on the base
of the lift; second caregiver can assist if necessary and attach foot
safety strap.
7. Lead caregiver will instruct resident to grab the handles; second
caregiver can assist if necessary.
8. Instruct the resident to keep their feet flat on the base of the lift
throughout the movement.
9. Using the lift controls lead caregiver will raise the resident until they clear the surface.
10. Lead caregiver will steer the lift away from the bed/chair/wheelchair etc. ensuring that their elbows
are locked close to 90 degrees and use their feet to prevent twisting of the back.
11. Since moving an empty object requires less effort when possible, second caregiver can then move
the target (chair/wheelchair/commode) into position under the resident.
12. Lead caregiver can slowly lower the resident into the target while
the second caregiver guides the resident to the target using the
slings handles.
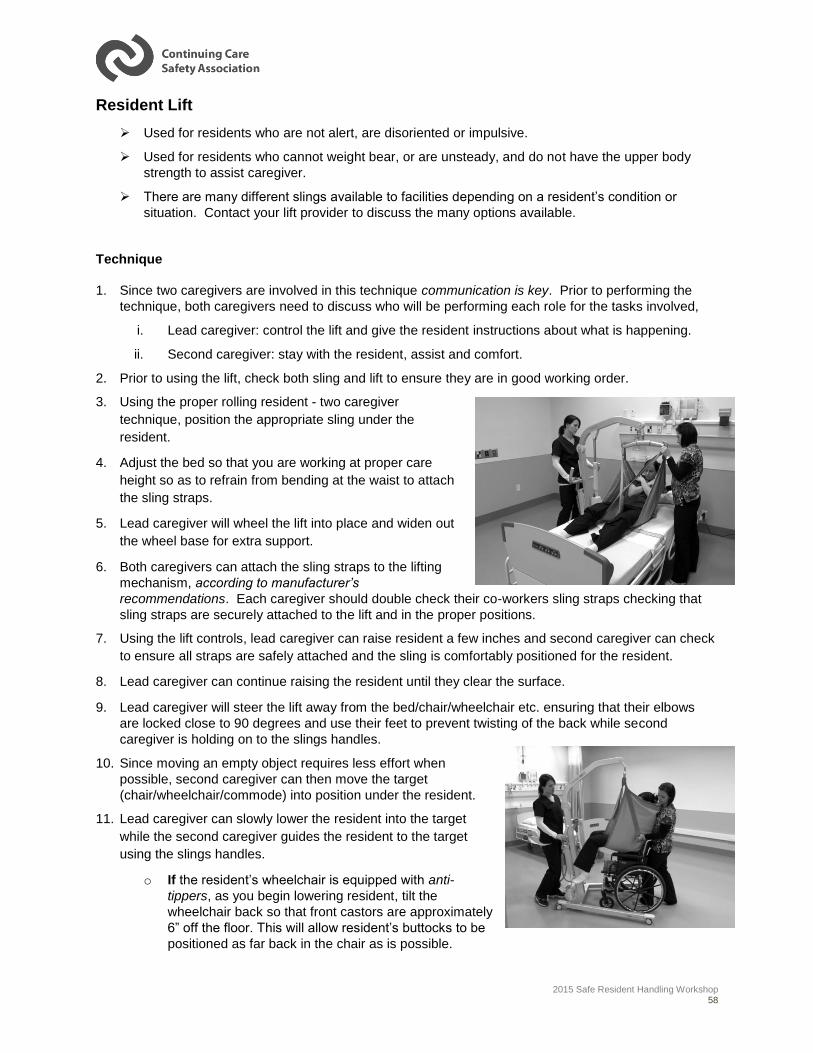
2015 Safe Resident Handling Workshop 58
Resident Lift
Used for residents who are not alert, are disoriented or impulsive.
Used for residents who cannot weight bear, or are unsteady, and do not have the upper body
strength to assist caregiver.
There are many different slings available to facilities depending on a resident’s condition or
situation. Contact your lift provider to discuss the many options available.
Technique
1. Since two caregivers are involved in this technique communication is key. Prior to performing the
technique, both caregivers need to discuss who will be performing each role for the tasks involved,
i. Lead caregiver: control the lift and give the resident instructions about what is happening.
ii. Second caregiver: stay with the resident, assist and comfort.
2. Prior to using the lift, check both sling and lift to ensure they are in good working order.
3. Using the proper rolling resident - two caregiver
technique, position the appropriate sling under the
resident.
4. Adjust the bed so that you are working at proper care
height so as to refrain from bending at the waist to attach
the sling straps.
5. Lead caregiver will wheel the lift into place and widen out
the wheel base for extra support.
6. Both caregivers can attach the sling straps to the lifting
mechanism, according to manufacturer’s
recommendations. Each caregiver should double check their co-workers sling straps checking that
sling straps are securely attached to the lift and in the proper positions.
7. Using the lift controls, lead caregiver can raise resident a few inches and second caregiver can check
to ensure all straps are safely attached and the sling is comfortably positioned for the resident.
8. Lead caregiver can continue raising the resident until they clear the surface.
9. Lead caregiver will steer the lift away from the bed/chair/wheelchair etc. ensuring that their elbows
are locked close to 90 degrees and use their feet to prevent twisting of the back while second
caregiver is holding on to the slings handles.
10. Since moving an empty object requires less effort when
possible, second caregiver can then move the target
(chair/wheelchair/commode) into position under the resident.
11. Lead caregiver can slowly lower the resident into the target
while the second caregiver guides the resident to the target
using the slings handles.
o If the resident’s wheelchair is equipped with anti-
tippers, as you begin lowering resident, tilt the
wheelchair back so that front castors are approximately
6” off the floor. This will allow resident’s buttocks to be
positioned as far back in the chair as is possible.
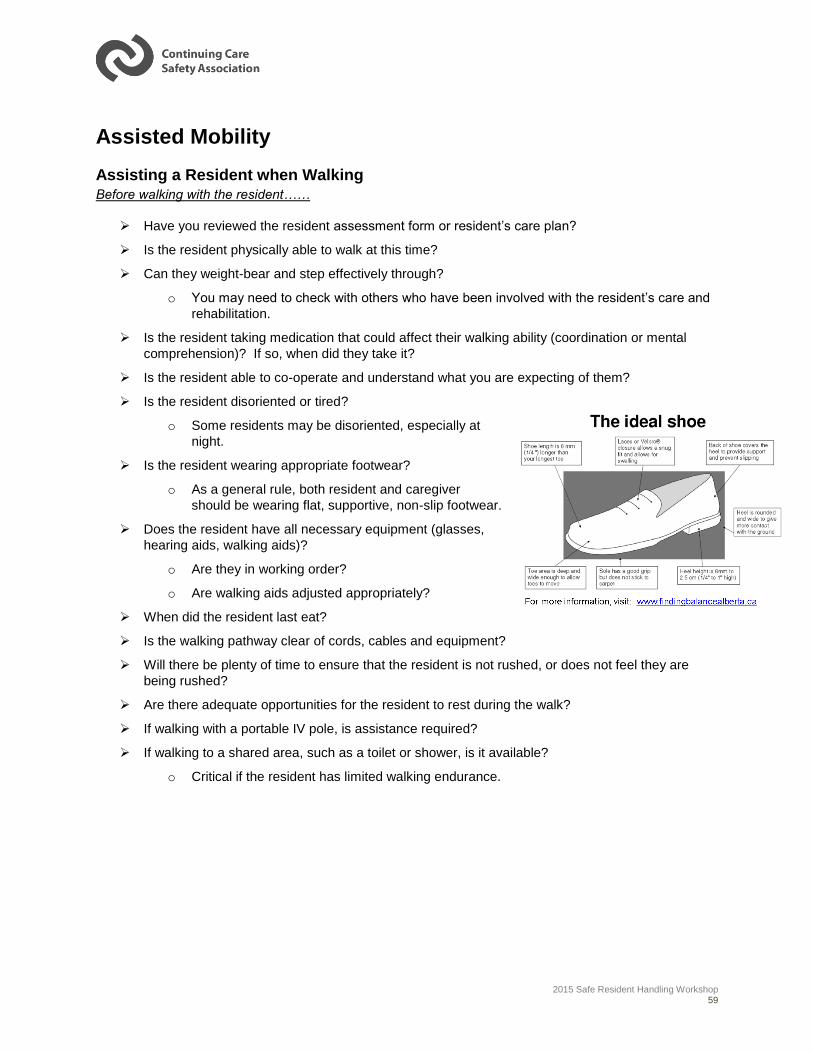
2015 Safe Resident Handling Workshop 59
Assisted Mobility
Assisting a Resident when Walking Before walking with the resident……
Have you reviewed the resident assessment form or resident’s care plan?
Is the resident physically able to walk at this time?
Can they weight-bear and step effectively through?
o You may need to check with others who have been involved with the resident’s care and
rehabilitation.
Is the resident taking medication that could affect their walking ability (coordination or mental
comprehension)? If so, when did they take it?
Is the resident able to co-operate and understand what you are expecting of them?
Is the resident disoriented or tired?
o Some residents may be disoriented, especially at
night.
Is the resident wearing appropriate footwear?
o As a general rule, both resident and caregiver
should be wearing flat, supportive, non-slip footwear.
Does the resident have all necessary equipment (glasses,
hearing aids, walking aids)?
o Are they in working order?
o Are walking aids adjusted appropriately?
When did the resident last eat?
Is the walking pathway clear of cords, cables and equipment?
Will there be plenty of time to ensure that the resident is not rushed, or does not feel they are
being rushed?
Are there adequate opportunities for the resident to rest during the walk?
If walking with a portable IV pole, is assistance required?
If walking to a shared area, such as a toilet or shower, is it available?
o Critical if the resident has limited walking endurance.
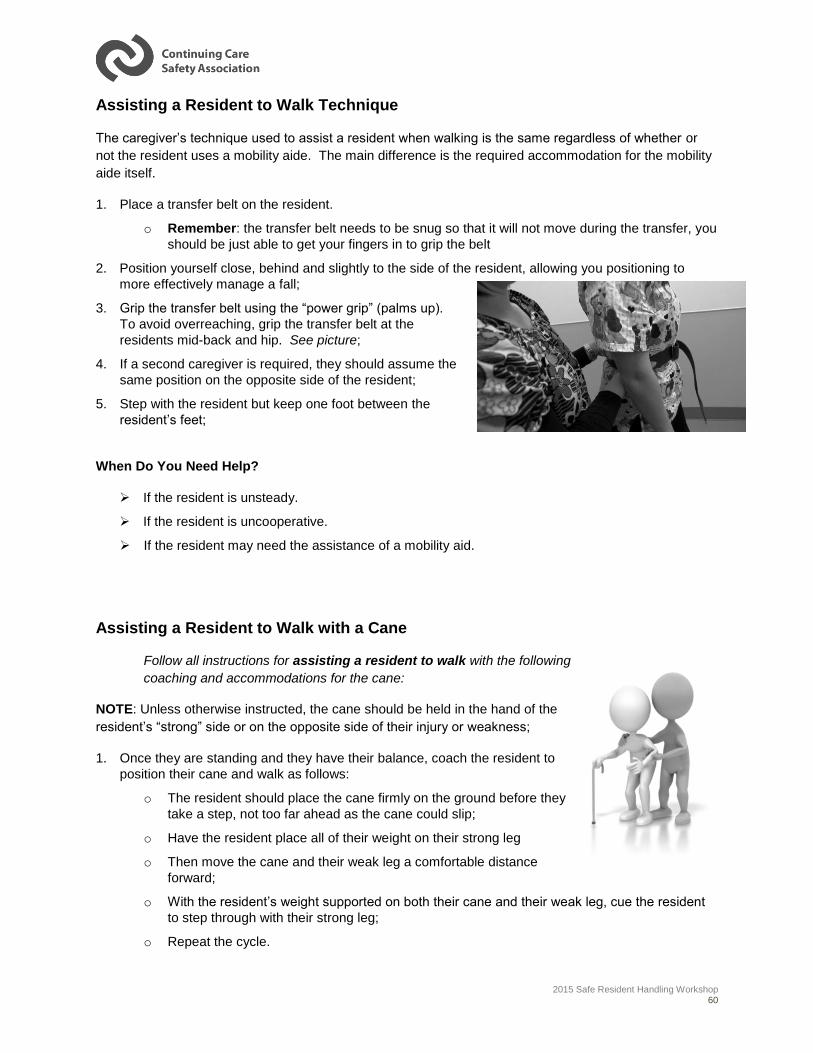
2015 Safe Resident Handling Workshop 60
Assisting a Resident to Walk Technique
The caregiver’s technique used to assist a resident when walking is the same regardless of whether or
not the resident uses a mobility aide. The main difference is the required accommodation for the mobility
aide itself.
1. Place a transfer belt on the resident.
o Remember: the transfer belt needs to be snug so that it will not move during the transfer, you
should be just able to get your fingers in to grip the belt
2. Position yourself close, behind and slightly to the side of the resident, allowing you positioning to
more effectively manage a fall;
3. Grip the transfer belt using the “power grip” (palms up).
To avoid overreaching, grip the transfer belt at the
residents mid-back and hip. See picture;
4. If a second caregiver is required, they should assume the
same position on the opposite side of the resident;
5. Step with the resident but keep one foot between the
resident’s feet;
When Do You Need Help?
If the resident is unsteady.
If the resident is uncooperative.
If the resident may need the assistance of a mobility aid.
Assisting a Resident to Walk with a Cane
Follow all instructions for assisting a resident to walk with the following
coaching and accommodations for the cane:
NOTE: Unless otherwise instructed, the cane should be held in the hand of the
resident’s “strong” side or on the opposite side of their injury or weakness;
1. Once they are standing and they have their balance, coach the resident to
position their cane and walk as follows:
o The resident should place the cane firmly on the ground before they
take a step, not too far ahead as the cane could slip;
o Have the resident place all of their weight on their strong leg
o Then move the cane and their weak leg a comfortable distance
forward;
o With the resident’s weight supported on both their cane and their weak leg, cue the resident
to step through with their strong leg;
o Repeat the cycle.
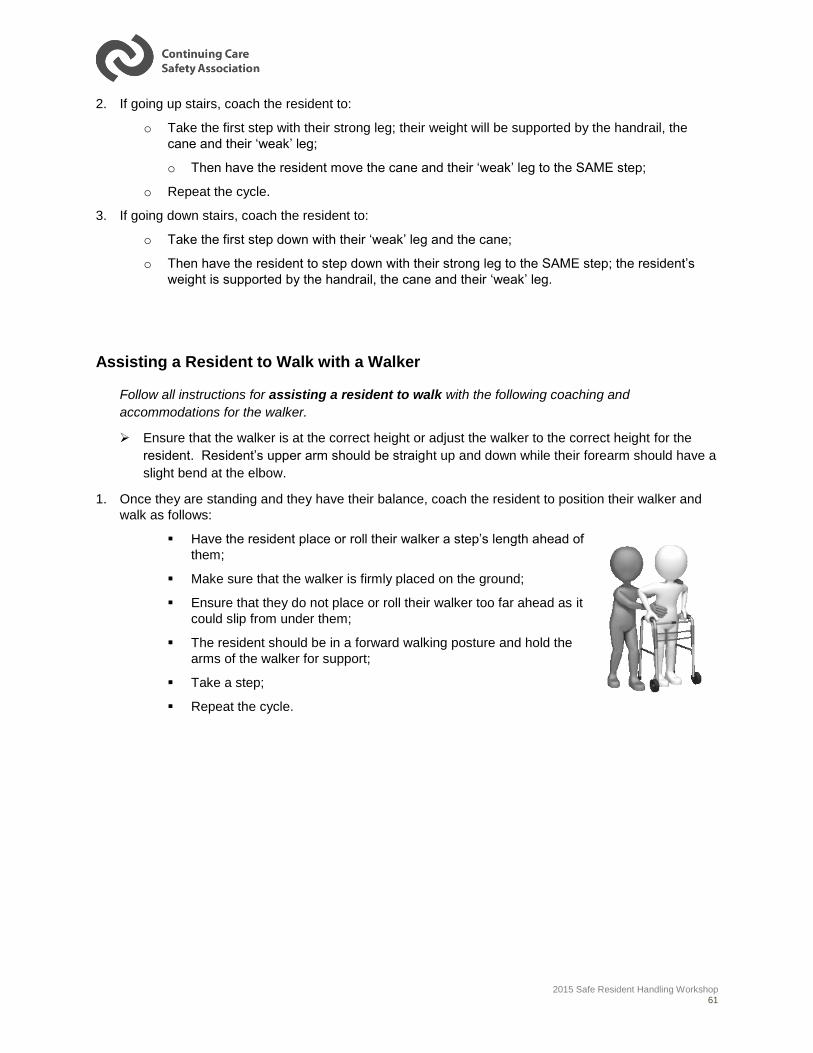
2015 Safe Resident Handling Workshop 61
2. If going up stairs, coach the resident to:
o Take the first step with their strong leg; their weight will be supported by the handrail, the
cane and their ‘weak’ leg;
o Then have the resident move the cane and their ‘weak’ leg to the SAME step;
o Repeat the cycle.
3. If going down stairs, coach the resident to:
o Take the first step down with their ‘weak’ leg and the cane;
o Then have the resident to step down with their strong leg to the SAME step; the resident’s
weight is supported by the handrail, the cane and their ‘weak’ leg.
Assisting a Resident to Walk with a Walker
Follow all instructions for assisting a resident to walk with the following coaching and
accommodations for the walker.
Ensure that the walker is at the correct height or adjust the walker to the correct height for the
resident. Resident’s upper arm should be straight up and down while their forearm should have a
slight bend at the elbow.
1. Once they are standing and they have their balance, coach the resident to position their walker and
walk as follows:
Have the resident place or roll their walker a step’s length ahead of
them;
Make sure that the walker is firmly placed on the ground;
Ensure that they do not place or roll their walker too far ahead as it
could slip from under them;
The resident should be in a forward walking posture and hold the
arms of the walker for support;
Take a step;
Repeat the cycle.
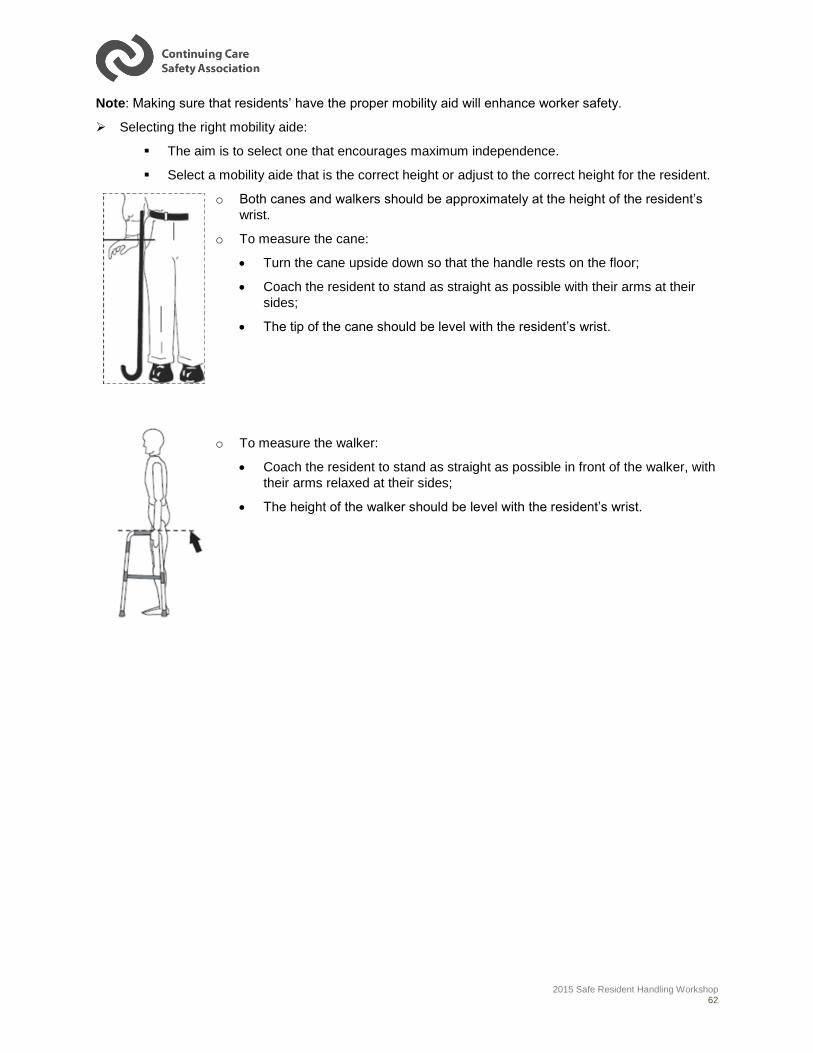
2015 Safe Resident Handling Workshop 62
Note: Making sure that residents’ have the proper mobility aid will enhance worker safety.
Selecting the right mobility aide:
The aim is to select one that encourages maximum independence.
Select a mobility aide that is the correct height or adjust to the correct height for the resident.
o Both canes and walkers should be approximately at the height of the resident’s
wrist.
o To measure the cane:
Turn the cane upside down so that the handle rests on the floor;
Coach the resident to stand as straight as possible with their arms at their
sides;
The tip of the cane should be level with the resident’s wrist.
o To measure the walker:
Coach the resident to stand as straight as possible in front of the walker, with
their arms relaxed at their sides;
The height of the walker should be level with the resident’s wrist.
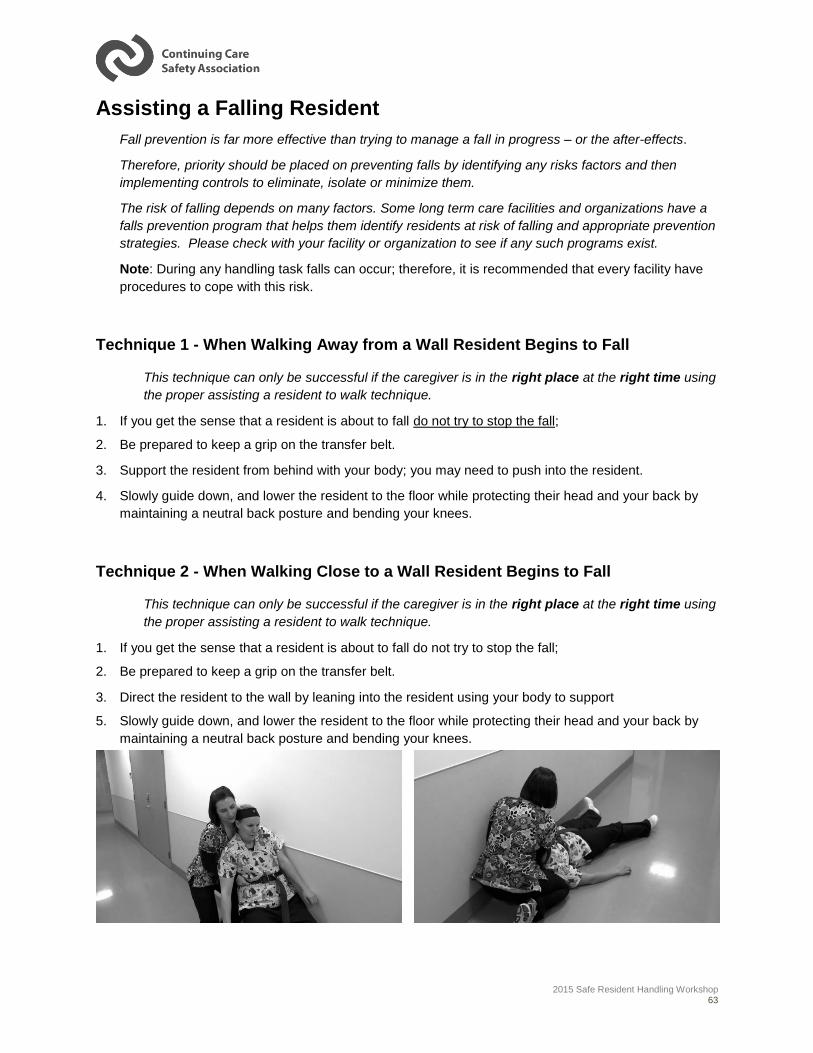
2015 Safe Resident Handling Workshop 63
Assisting a Falling Resident
Fall prevention is far more effective than trying to manage a fall in progress – or the after-effects.
Therefore, priority should be placed on preventing falls by identifying any risks factors and then
implementing controls to eliminate, isolate or minimize them.
The risk of falling depends on many factors. Some long term care facilities and organizations have a
falls prevention program that helps them identify residents at risk of falling and appropriate prevention
strategies. Please check with your facility or organization to see if any such programs exist.
Note: During any handling task falls can occur; therefore, it is recommended that every facility have
procedures to cope with this risk.
Technique 1 - When Walking Away from a Wall Resident Begins to Fall
This technique can only be successful if the caregiver is in the right place at the right time using
the proper assisting a resident to walk technique.
1. If you get the sense that a resident is about to fall do not try to stop the fall;
2. Be prepared to keep a grip on the transfer belt.
3. Support the resident from behind with your body; you may need to push into the resident.
4. Slowly guide down, and lower the resident to the floor while protecting their head and your back by
maintaining a neutral back posture and bending your knees.
Technique 2 - When Walking Close to a Wall Resident Begins to Fall
This technique can only be successful if the caregiver is in the right place at the right time using
the proper assisting a resident to walk technique.
1. If you get the sense that a resident is about to fall do not try to stop the fall;
2. Be prepared to keep a grip on the transfer belt.
3. Direct the resident to the wall by leaning into the resident using your body to support
5. Slowly guide down, and lower the resident to the floor while protecting their head and your back by
maintaining a neutral back posture and bending your knees.

2015 Safe Resident Handling Workshop 64
Managing and Assessing a Fallen Resident
Never try to lift a fallen resident off the floor unless there is an emergency or life-threatening situation.
o Make sure the area around the resident is safe and that no further harm can occur.
o Clear any spills or objects away from the immediate area.
Call for help – and ask for the resident’s care plan and profile.
o Place a pillow under the resident’s head, cover them with a blanket if appropriate, and
insist they wait until they are calm and feel ready to get up.
Continue the assessment using your facility approved First Aid procedures, and decide if the resident
can be moved.
o Remember, the resident cannot fall any further and acting without assessing the situation
carefully could cause injury to you and the resident.
If there is a possibility the resident is injured, do not move them, make them comfortable on the floor
and seek further medical advice.
If resident is not injured, give them time to calm down and then either coach them to get up (providing
reassurance) or help them with a powered resident lift, or some other powered assist device like a
lifting cushion.
NOTE: It’s important that residents and their families know your resident handling policy on lifting, and
understand the reason for it, so they don’t expect to be lifted by a caregiver after a fall.
NOTE: If you find a fallen resident, you need to assess the situation carefully to ensure the resident
isn’t injured further while you are trying to help them. This affects the method you use to help them –
and the choice of equipment.
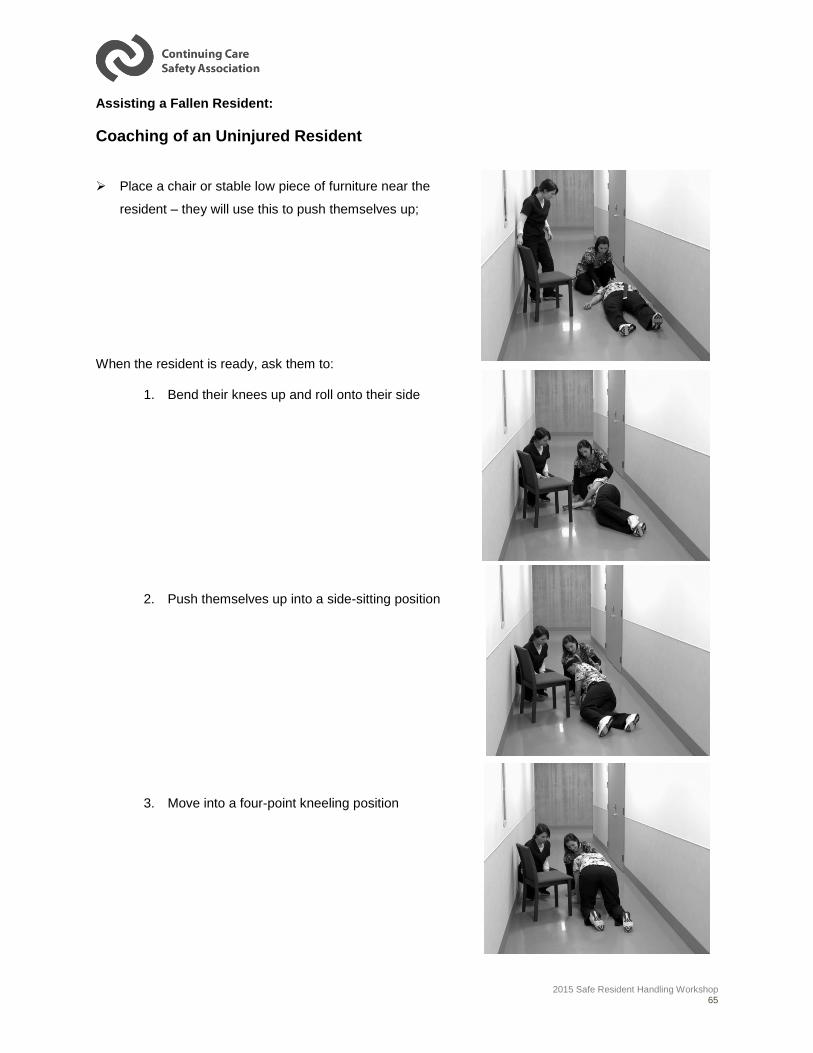
2015 Safe Resident Handling Workshop 65
Assisting a Fallen Resident:
Coaching of an Uninjured Resident
Place a chair or stable low piece of furniture near the
resident – they will use this to push themselves up;
When the resident is ready, ask them to:
1. Bend their knees up and roll onto their side
2. Push themselves up into a side-sitting position
3. Move into a four-point kneeling position
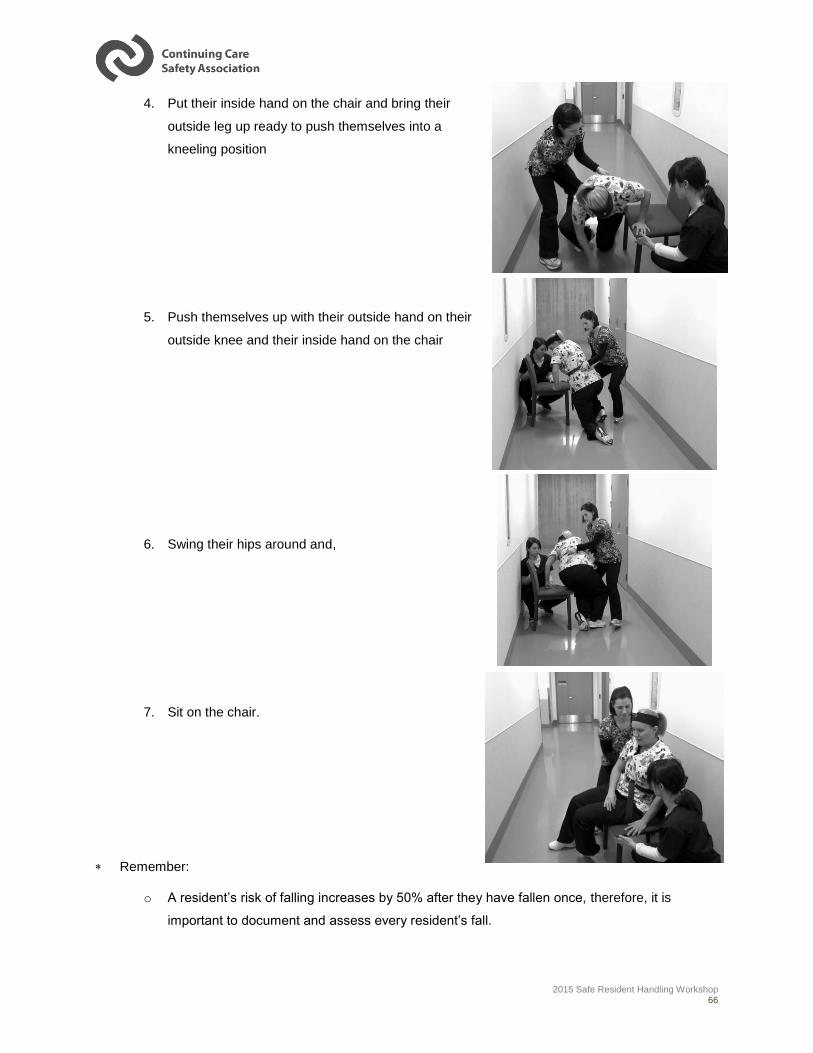
2015 Safe Resident Handling Workshop 66
4. Put their inside hand on the chair and bring their
outside leg up ready to push themselves into a
kneeling position
5. Push themselves up with their outside hand on their
outside knee and their inside hand on the chair
6. Swing their hips around and,
7. Sit on the chair.
Remember:
o A resident’s risk of falling increases by 50% after they have fallen once, therefore, it is
important to document and assess every resident’s fall.
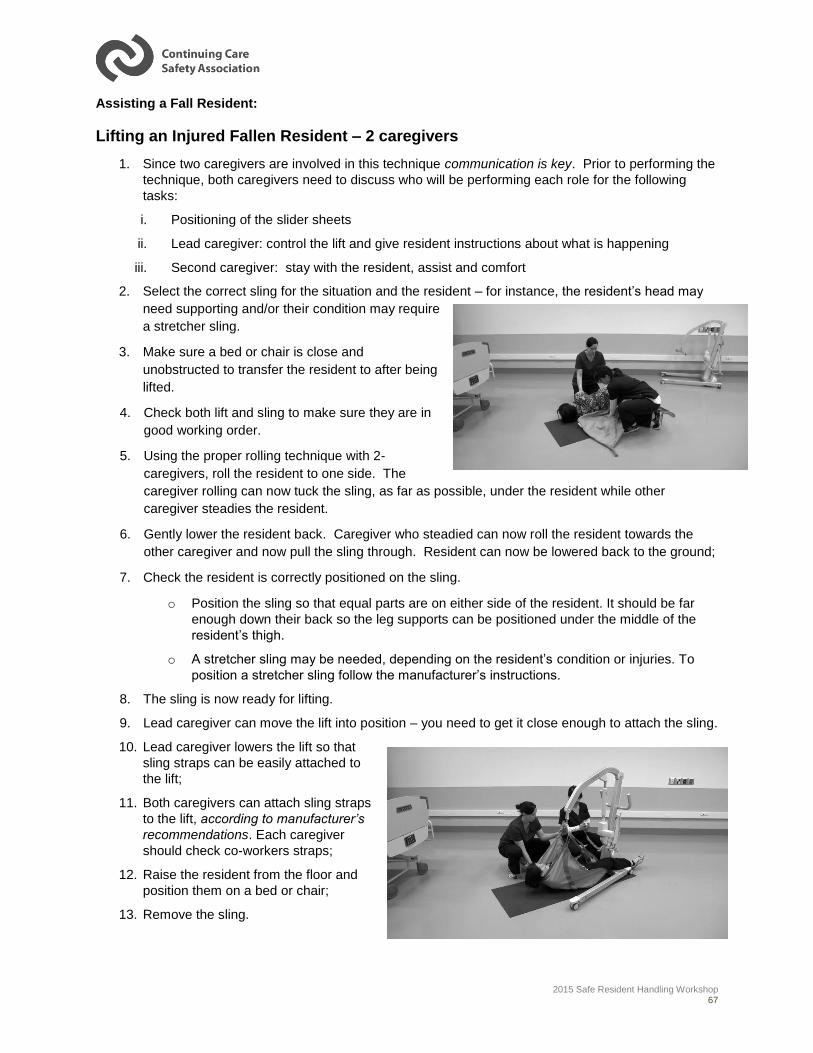
2015 Safe Resident Handling Workshop 67
Assisting a Fall Resident:
Lifting an Injured Fallen Resident – 2 caregivers
1. Since two caregivers are involved in this technique communication is key. Prior to performing the
technique, both caregivers need to discuss who will be performing each role for the following
tasks:
i. Positioning of the slider sheets
ii. Lead caregiver: control the lift and give resident instructions about what is happening
iii. Second caregiver: stay with the resident, assist and comfort
2. Select the correct sling for the situation and the resident – for instance, the resident’s head may
need supporting and/or their condition may require
a stretcher sling.
3. Make sure a bed or chair is close and
unobstructed to transfer the resident to after being
lifted.
4. Check both lift and sling to make sure they are in
good working order.
5. Using the proper rolling technique with 2-
caregivers, roll the resident to one side. The
caregiver rolling can now tuck the sling, as far as possible, under the resident while other
caregiver steadies the resident.
6. Gently lower the resident back. Caregiver who steadied can now roll the resident towards the
other caregiver and now pull the sling through. Resident can now be lowered back to the ground;
7. Check the resident is correctly positioned on the sling.
o Position the sling so that equal parts are on either side of the resident. It should be far
enough down their back so the leg supports can be positioned under the middle of the
resident’s thigh.
o A stretcher sling may be needed, depending on the resident’s condition or injuries. To
position a stretcher sling follow the manufacturer’s instructions.
8. The sling is now ready for lifting.
9. Lead caregiver can move the lift into position – you need to get it close enough to attach the sling.
10. Lead caregiver lowers the lift so that
sling straps can be easily attached to
the lift;
11. Both caregivers can attach sling straps
to the lift, according to manufacturer’s
recommendations. Each caregiver
should check co-workers straps;
12. Raise the resident from the floor and
position them on a bed or chair;
13. Remove the sling.
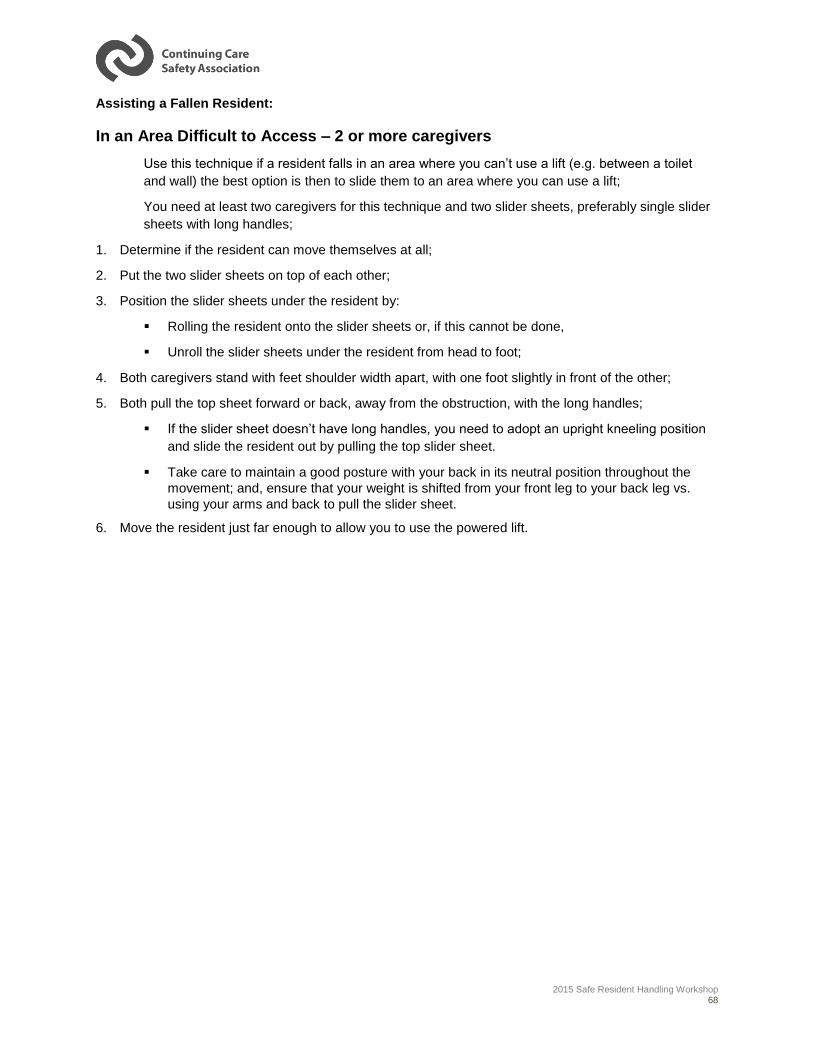
2015 Safe Resident Handling Workshop 68
Assisting a Fallen Resident:
In an Area Difficult to Access – 2 or more caregivers
Use this technique if a resident falls in an area where you can’t use a lift (e.g. between a toilet
and wall) the best option is then to slide them to an area where you can use a lift;
You need at least two caregivers for this technique and two slider sheets, preferably single slider
sheets with long handles;
1. Determine if the resident can move themselves at all;
2. Put the two slider sheets on top of each other;
3. Position the slider sheets under the resident by:
Rolling the resident onto the slider sheets or, if this cannot be done,
Unroll the slider sheets under the resident from head to foot;
4. Both caregivers stand with feet shoulder width apart, with one foot slightly in front of the other;
5. Both pull the top sheet forward or back, away from the obstruction, with the long handles;
If the slider sheet doesn’t have long handles, you need to adopt an upright kneeling position
and slide the resident out by pulling the top slider sheet.
Take care to maintain a good posture with your back in its neutral position throughout the
movement; and, ensure that your weight is shifted from your front leg to your back leg vs.
using your arms and back to pull the slider sheet.
6. Move the resident just far enough to allow you to use the powered lift.
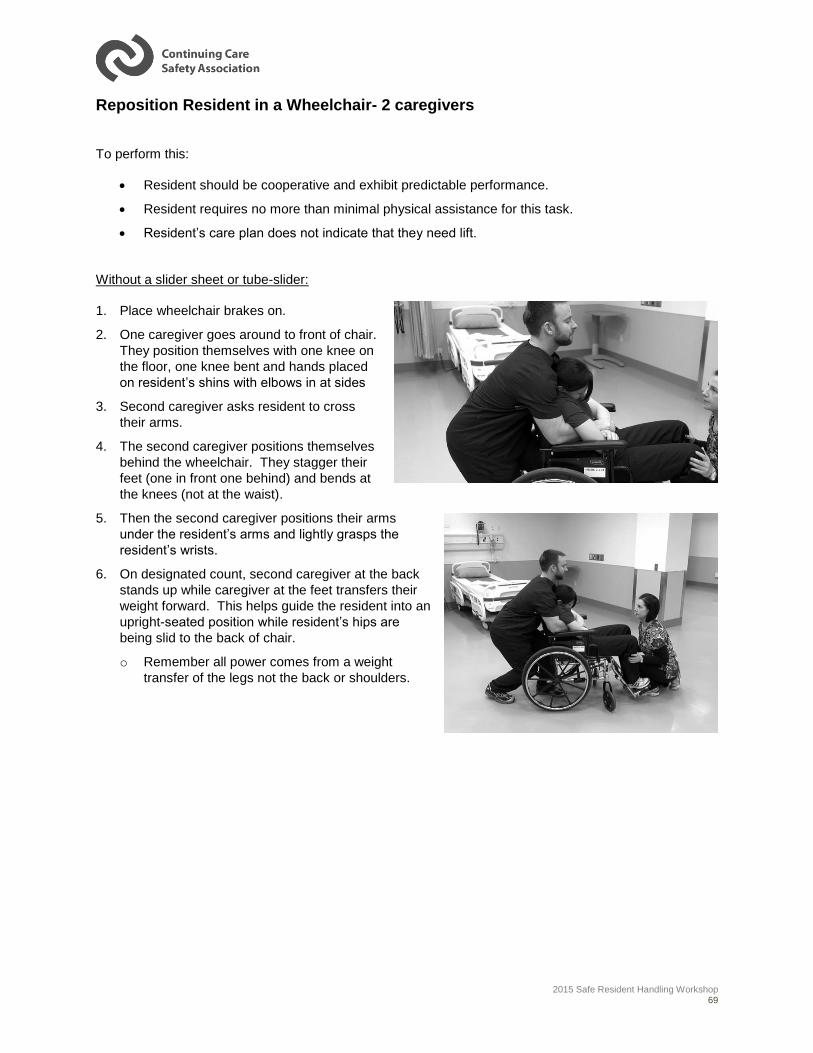
2015 Safe Resident Handling Workshop 69
Reposition Resident in a Wheelchair- 2 caregivers
To perform this:
Resident should be cooperative and exhibit predictable performance.
Resident requires no more than minimal physical assistance for this task.
Resident’s care plan does not indicate that they need lift.
Without a slider sheet or tube-slider:
1. Place wheelchair brakes on.
2. One caregiver goes around to front of chair.
They position themselves with one knee on
the floor, one knee bent and hands placed
on resident’s shins with elbows in at sides
3. Second caregiver asks resident to cross
their arms.
4. The second caregiver positions themselves
behind the wheelchair. They stagger their
feet (one in front one behind) and bends at
the knees (not at the waist).
5. Then the second caregiver positions their arms
under the resident’s arms and lightly grasps the
resident’s wrists.
6. On designated count, second caregiver at the back
stands up while caregiver at the feet transfers their
weight forward. This helps guide the resident into an
upright-seated position while resident’s hips are
being slid to the back of chair.
o Remember all power comes from a weight
transfer of the legs not the back or shoulders.
2015 Safe Resident Handling Workshop 70
With a slider sheet or tube-slider:
For this technique use either a tube slider or fold a slider sheet in half with handles outside
1. Fold slider every six inches, starting from the folded end if using folded slider sheet. Leave a small
piece of the slider unfolded.
2. Ensure that the wheelchair brakes on.
3. If possible and safe, remove or swing away chair sides
4. With one caregiver on each side of the resident, turn the slider over and place behind the resident’s
tail bone, with the unfolded end against the backrest and the folds facing down against the bottom of
the chair
5. Caregivers face back of chair on one knee with shin against resident’s shin to prevent the resident
from sliding out of the chair or caregivers alternate holding both knees to restrict movement and take
turns unfurling slider.
6. Caregivers secure slider with outside hand while inside hand grasps the bulk of the folds from
underneath and weight shift back to unfurl one fold of the slider under the resident. Repeat till
unfurled.
7. One caregiver goes around to front of chair. He/she positions him/herself with one knee on the floor,
one knee bent and hands placed on resident’s shins with elbows in at sides
8. The second caregiver positions him/herself behind the resident, encourages and may assist resident
to lean forward by guiding shoulders.
9. On designated count, caregiver at legs will transfers their weight forward, sliding resident’s hips to
back of chair.
10. The second caregiver encourages resident to push downward on armrests, lean forward until final
positioning in chair.
OPTION B
1. Fold slider as described above in step 1.
2. Ensure wheelchair brakes on.
3. If possible and safe, remove or swing away chair sides
4. Caregivers, on one knee, face the same direction as resident, they insert the slider below resident’s
legs, thin fold or open ends toward knees and folds facing down toward back of chair.
5. On designated count, the caregivers together unfurl the slider from knees to behind buttocks.
6. Push resident back in chair as described above in steps 7-10.
To Remove Slider Sheet
Option 1: Caregiver in front of the chair grasps a handle on bottom slider and, transferring weight
from forward foot back onto knee, draws slider forward; repeat procedure, alternating sides until slider
is removed.
Option 2: Remove the slider from the back of the chair by folding the front corner of the slider under
and drawing the slider under itself, from the resident’s knees toward their buttocks.
2015 Safe Resident Handling Workshop 71
Exercise 2: Safe Resident Handling Hands On Practice:
The instructor will advise whether or not you will break up in to smaller groups to complete the
hands on practice.
Regardless of the group format, each participant will take turns:
1. Practicing the Safe Resident Handling Techniques by performing as many of the resident
handling tasks at each practice station as possible.
2. Assessing the technique used while performing the Resident Handling task.
3. Playing the role of the resident.
The participant who is practicing the Safe Resident Handling techniques performs the resident
handling tasks; while the other participants assess how the tasks were performed using the Safe
Resident Handling checklist.
After each task, the participants who were the assessors should provide feedback based on what
they recorded on the Safe Resident Handling checklist.
Repeat until all each technique has been practiced by all participants.
At the end of this exercise we’ll re-group to discuss briefly – how did it feel to perform the tasks using the safe Resident Handling techniques & how did it feel to assess a peer’s technique?
Timeframe: 90 minutes
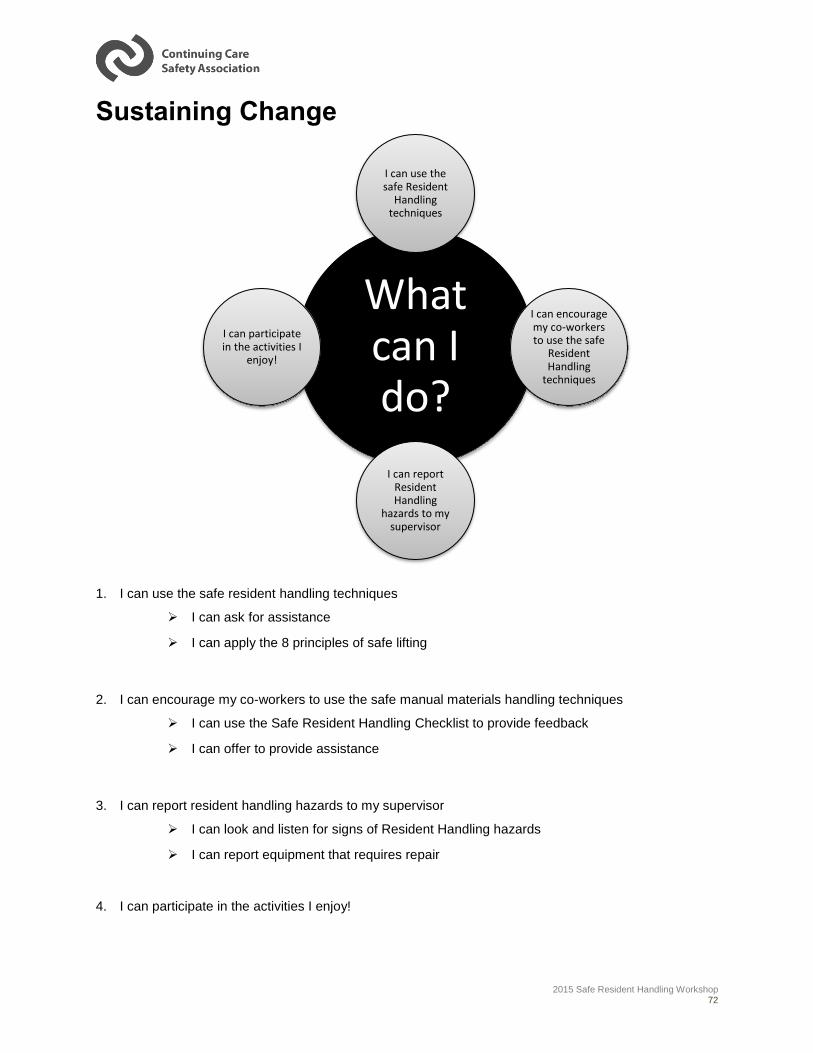
2015 Safe Resident Handling Workshop 72
Sustaining Change
1. I can use the safe resident handling techniques
I can ask for assistance
I can apply the 8 principles of safe lifting
2. I can encourage my co-workers to use the safe manual materials handling techniques
I can use the Safe Resident Handling Checklist to provide feedback
I can offer to provide assistance
3. I can report resident handling hazards to my supervisor
I can look and listen for signs of Resident Handling hazards
I can report equipment that requires repair
4. I can participate in the activities I enjoy!
What can I do?
I can use the safe Resident
Handling techniques
I can encourage my co-workers to use the safe
Resident Handling
techniques
I can report Resident Handling
hazards to my supervisor
I can participate in the activities I
enjoy!
2015 Safe Resident Handling Workshop 73
General Design Guidelines for Resident Handling Tasks
The following resident handling guidelines may help eliminate risks of MSI to workers:
1. Eliminate unnecessary resident handling. 5. Use electric beds to eliminate handling
procedures such as sitting up in bed.
2. Encourage residents to assist in their own
transfers as much as they are safely able to.
6. Design new facilities with resident handling
needs in mind.
3. Install appropriate resident assistive devices
such as grab bars or rails to help the resident be
more independent.
7. Do not perform the task if a safe solution is
unavailable. Use an alternative work method
until a safe solution is provided.
4. Use mechanical equipment such as ceiling lifts
or electric beds to eliminate the need for strong
manual forces.
The following resident handling guidelines may help minimize risks of MSI to workers:
1. Use height-adjustable beds and specialized
feeding tables to avoid awkward postures.
8. Store heavy items at more convenient heights.
2. Use slide boards, transfer boards, or slide
sheets to reduce forces and awkward postures.
9. Modify tasks to reduce the amount of time
workers spend stooped over.
3. Develop safe work procedures that reduce the
risks of MSI to workers to the lowest possible
levels and ensure that workers follow these
procedures.
10. Modify or reorganize tasks to increase variety.
4. Train workers to improve their techniques. 11. Share or rotate tasks among workers.
5. Ensure the resident assessments are kept up to
date.
12. Install ramps so that stretchers, carts, and
wheelchairs can be moved easily.
6. Observe the resident’s condition before each
transfer to ensure that the designated transfer
can be performed safely.
13. Use improved handles, wheels or castors to
help reduce the amount of force needed to
move a load.
7. Change the workplace layout for the
organization of tasks to reduce distances for
pushing or carrying tasks.
14. Implement a preventative maintenance program
for the moving parts of equipment.
2015 Safe Resident Handling Workshop 74
Workshop Summary
1. Discuss why organizations should consider implementing a musculoskeletal injury prevention
program (intro)
2. Identify the potential impact of resident handling tasks on your body (Module 1)
3. Describe what safe resident handling is and why it is important (Module 1)
4. Recognize the signs and symptoms of musculoskeletal injury in yourself and your co-workers
(Module 1)
5. Identify resident handling-related hazards in your workplace (Module 2)
6. Explain why and how poor design contributes to MSI (Module 2)
7. Adapt the principles of safe lifting to resident handling situations (Module 3)
8. Correctly demonstrate each of the safe resident handling techniques presented in this workshop
(Module 4)
9. Adapt the safe resident handling techniques to your daily resident handling tasks (Module 4)
10. Explain how to make simple changes to the design and organization of resident handling tasks to
improve your health and well-being! (Module 4)
2015 Safe Resident Handling Workshop 75
Appendix 1: Alberta Occupational Health and
Safety Act, Code and Regulation
The definitions section of the Alberta Occupational Health and Safety Act states the definitions of
“employer” and “worker” are as follows;
“employer” means;
(i) A person who is self-employed in an occupation,
(ii) A person who employs one or more workers,
(iii) A person designated by an employer as the employer’s representative, or
(iv) A director or officer of a corporation who oversees the occupational health and safety of the workers employed by the corporation.
“worker” means a person engaged in an occupation.
Employers and workers have responsibilities for workplace health and safety as specified in the Alberta
Occupational Health and Safety Act, Section 2(1) and (2). These are briefly:
EMPLOYERS: To ensure the health and safety of all workers at the worksite by identifying
existing and potential hazards and implementing measures to eliminate or reduce
the risk by involving workers in the process.
WORKERS: To take reasonable care to protect the health and safety of themselves and other
workers, and to cooperate with the employer to protect the health and safety of
themselves and others on the job.
Legal Requirements under the Alberta OH&S Code include:
Part 2 Hazard Assessment, Elimination and Control
Hazard assessment
7(1) An employer must assess a work site and identify existing and potential hazards before work
begins at the work site or prior to the construction of a new work site.
7(2) An employer must prepare a report of the results of a hazard assessment and the methods
used to control or eliminate the hazards identified.
7(3) An employer must ensure that the date on which the hazard assessment is prepared or
revised is recorded on it.
7(4) An employer must ensure that the hazard assessment is repeated
(a) at reasonably practicable intervals to prevent the development of unsafe and
unhealthy working conditions,
(b) when a new work process is introduced,
(c) when a work process or operation changes, or
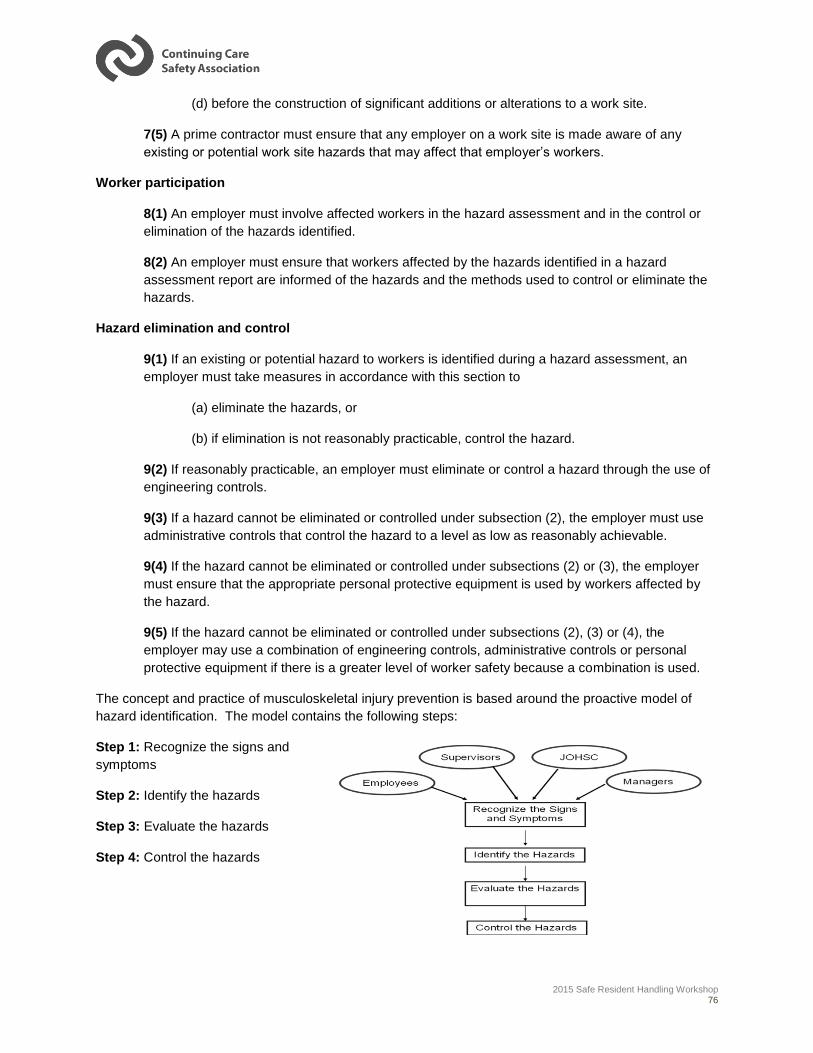
2015 Safe Resident Handling Workshop 76
(d) before the construction of significant additions or alterations to a work site.
7(5) A prime contractor must ensure that any employer on a work site is made aware of any
existing or potential work site hazards that may affect that employer’s workers.
Worker participation
8(1) An employer must involve affected workers in the hazard assessment and in the control or
elimination of the hazards identified.
8(2) An employer must ensure that workers affected by the hazards identified in a hazard
assessment report are informed of the hazards and the methods used to control or eliminate the
hazards.
Hazard elimination and control
9(1) If an existing or potential hazard to workers is identified during a hazard assessment, an
employer must take measures in accordance with this section to
(a) eliminate the hazards, or
(b) if elimination is not reasonably practicable, control the hazard.
9(2) If reasonably practicable, an employer must eliminate or control a hazard through the use of
engineering controls.
9(3) If a hazard cannot be eliminated or controlled under subsection (2), the employer must use
administrative controls that control the hazard to a level as low as reasonably achievable.
9(4) If the hazard cannot be eliminated or controlled under subsections (2) or (3), the employer
must ensure that the appropriate personal protective equipment is used by workers affected by
the hazard.
9(5) If the hazard cannot be eliminated or controlled under subsections (2), (3) or (4), the
employer may use a combination of engineering controls, administrative controls or personal
protective equipment if there is a greater level of worker safety because a combination is used.
The concept and practice of musculoskeletal injury prevention is based around the proactive model of
hazard identification. The model contains the following steps:
Step 1: Recognize the signs and
symptoms
Step 2: Identify the hazards
Step 3: Evaluate the hazards
Step 4: Control the hazards
2015 Safe Resident Handling Workshop 77
Part 14 Lifting and Handling Loads
Equipment
208(1) An employer must provide, where reasonably practicable, appropriate equipment for
lifting, lowering, pushing, pulling, carrying, handling, or transporting heavy or awkward loads.
208(2) An employer must ensure that workers use the equipment provided under subsection (1).
208(3) Workers must use the equipment provided for lifting, lowering, pushing, pulling, carrying,
handling or transporting heavy or awkward loads.
208(4) For the purpose of this section, a heavy or awkward load includes equipment, goods,
supplies, persons and animals.
Adapting heavy or awkward loads
209 If the equipment provided under section 208 is not reasonably practicable in a particular
circumstance or for a particular heavy or awkward load, the employer must take all practicable
means to
(a) Adapt the load to facilitate lifting, lowering, pushing, pulling, carrying, handling or transporting the load without injuring workers, or
(b) Otherwise minimize the manual handling required to move the load.
Work site design – health care facilities
209.1(1) An employer must ensure that appropriate patient/client/resident handling equipment is
adequately incorporated into the design and construction of
(a) a new health care facility, and
(b) a health care facility undergoing significant physical alterations, renovations or repairs.
209.1(2) An employer must ensure that any new patient/client/resident handling equipment
installed at an existing work site, including vehicles in which patient/client/resident handling
occurs, fits adequately in the space intended for it.
209.1(3) Subsections (1) and (3) do not apply to health care facility construction, alterations,
renovations or repairs started before July 1, 2009.
Patient/client/resident handling
209.2(1) An employer must develop and implement a safe patient/client/resident handling
program if workers are required to lift, transfer or reposition patients/clients/residents.
209.2(2) The program required by subsection (1) must include an annual evaluation of its
effectiveness at preventing worker injuries.
209.2(3) An employer must ensure that workers follow the safe handling program required by
subsection (1).
2015 Safe Resident Handling Workshop 78
209.2(4) Workers must follow the safe handling program required by subsection (1).
Assessing manual handling hazards
210(1) Before a worker manually lifts, lowers, pushes, pulls, carries, handles or transports a load
that could injure the worker, an employer must perform a hazard assessment that considers
(a) the weight of the load,
(b) the size of the load
(c) the shape of the load
(d) the number of times the load will be moved, and
(e) the manner in which the load will be moved.
210(2) Before a worker performs any manual patient/client/resident handling activities, an
employer must perform a hazard assessment that considers the worker’s physical and mental
capabilities to perform the work.
210(3) If the hazard assessment required by section 7 and subsections (1) and (2) determines
that there is potential for musculoskeletal injury, an employer must ensure all reasonably
practicable measures are used to eliminate or reduce that potential in accordance with section 9.
Musculoskeletal injuries
211 If a worker reports to the employer what the worker believes to be work related symptoms
of a musculoskeletal injury, the employer must promptly
(a) review the activities of that worker, and of other workers doing similar tasks, to identify work-related causes of symptoms, if any, and
(b) take corrective measures to avoid further injuries if the causes of the symptoms are work related.
Training to prevent musculoskeletal injury
211.1(1) An employer must ensure that a worker who may be exposed to the possibility of
musculoskeletal injury is trained in specific measures to eliminate or reduce that possibility.
211.1(2) An employer must ensure that the training referred to in subsection (1) includes
(a) identification of factors that could lead to a musculoskeletal injury
(b) the early signs and symptoms of musculoskeletal injury and their potential health effects, and
(c) preventative measures including, where applicable, the use of altered work procedures, mechanical aids and personal protective equipments.
2015 Safe Resident Handling Workshop 79
Appendix 2: Features of an Effective
Musculoskeletal Injury Prevention Program
The “No Unsafe Lift Workbook” identifies 9 critical features based on extensive research of the best
practices from programs around the world (p.17-66). These features include:
Management Commitment – Policies and Promotion
Key aspects of management commitment:
o Understanding the scope of the problem,
o Defining objectives
o Establishing the policies,
o Roles, responsibilities and accountabilities, and
o Follow through – attention and evaluation.
Employee Participation
Opportunities to involve employees and ensure two-way communication include:
o Seek employee input before drafting policy and procedures
o Set up a formal feedback process; but also use informal means (i.e.
suggestion boxes and talking to workers on the job)
o Include worker representatives in the review, plan and action cycle.
o Seek employee input before making big changes; such as: buying
equipment or altering facilities.
o Maintain a regular stream of communication regarding what’s happening
and make sure results are communicated to all employees.
o Encourage regular staff meetings to review progress, and use forums
like training sessions to gain employee views and suggestions.
o Seek comment on issues using means such as feedback forms in
newsletters, questionnaires and surveys.
Coordination
If possible, designating a coordinator whose full-time responsibility it is to ensure that
no program element “falls through the cracks” without clear accountabilities assigned.
Risk Assessment
An effective Safe Resident Handling Program will assist in providing a systemic
approach to assess risk.
Four key risk assessments are required to determine what procedures or equipment
should be used for resident handling. (See Appendix 3: CCSA’s Safe Resident
Handling Hazard Identification Checklist Booklet)
These include:
o A self-assessment for the caregiver
o A resident assessment

2015 Safe Resident Handling Workshop 80
o A workplace assessment (including equipment and environment)
o A task assessment.
Equipment
Successful musculoskeletal injury prevention programs in continuing care facilities
are those that reduce the use of manual lifting techniques and increase the sure of
technological advances that limit the biomechanical stress on workers.
An inventory of equipment and an evaluation of equipment needs are important first
steps.
Inclusion of a preventative as well as reparative maintenance plan is important for the
program’s success.
Additionally, it is critical to provide thorough training on the equipment’s use and
ensure that employees are competent to use each device.
Biomechanical Considerations
Key components of New Zealand’s “LITEN UP” Program include:
o A focus on the resident
Review the resident’s characteristics that may impact the
handling risk, including the resident’s: age, gender, diagnosis,
dependency, neurological status, size, weight, ability to
cooperate, and fall risk.
o A focus on the individual worker capabilities
These capabilities may include: language, education, training,
physical limitations, stress, and fatigue.
o A focus on the specific task
Including: the nature of the task, what has to be done, how, and
when.
Different tasks have different requirements, each needing
assessment and a unique approach.
o A focus on the environment
Including: consideration of the facility design, staffing levels,
culture and resources.
Biomechanical considerations should be a major factor in designing a
musculoskeletal injury prevention program.
A consistent approach using standard, well-accepted good body mechanics is
preferable.
Training
As a best practice, training must be focused on proper resident assessment, proper
environmental evaluation, proper use of appropriate resident handling devices,
effective communication, and the management commitment to enforce the policy.
Successful programs encourage “big picture thinking” and problem solving skills
which enable the worker to consider all aspects of the situation in a timely manner to
determine the best technique to use.
2015 Safe Resident Handling Workshop 81
Communication
Communication of the results of the risk assessment will ensure that all workers are
aware of the risk and safe handling procedures.
o A variety of mechanisms currently exist for communicating resident risk
assessments in an effective and efficient manner.
o These can be both formal (written into care plans) and informal (mention
at daily report).
However, the resident’s status may change gradually or suddenly, and reliance on a
previous risk assessment may be insufficient.
Therefore, some organizations have developed quick visual cues to indicate the
resident handling requirements for each resident.
o Consistency in the use of the cues is important.
A process must be in place to ensure that the assessment (and any communication
tool used for the assessment) is updated regularly to reflect the most up to date
information about the resident.
Area Design Considerations
A Safe Resident Handling Program must address area design issues and should
include a proactive consultative approach in the design of new or renovated facilities.
Some of the criteria that should be considered in area design/configuration to assist
in reducing resident handling injuries include:
o Ceiling lifts, where resident population warrants them, and the facility’s
physical structure can support them; ensure ceiling lifts track all the way
into the bathroom.
o Furniture in resident’s rooms to include adjustable beds, under-bed
clearance to accommodate resident lifting devises, castors on furniture
legs for easier moving of beds, and chairs with armrests to assist in
standing.
o Sufficient electrical outlets arranged to reduce the need for long electrical
cords or extension cords.
o Sufficient clearance bedside, at the foot of, and on the transfer side of
the bed to allow for two caregivers and equipment as necessary
(equipment may include a stretcher, wheelchair, lifting devices, etc.)
o Handrails in corridors; unobstructed corridors of sufficient width to allow
resident equipment/furniture to be moved.
o Hard, smooth flooring (no carpet) that allows for easy movement of
resident wheeled equipment; permanently sealed joints in flooring to
reduce tripping; non-slip flooring in bathrooms.
o Sufficient storage space for resident handling equipment and supplies to
ensure they are readily available.
2015 Safe Resident Handling Workshop 82
Appendix 3: Sample No Unsafe Lift Policies Sample 1 - Resident Transfers and Lifts / No Unsafe Lift
STANDARD
______________ is committed to providing a safe and healthy environment for all staff and Residents. In
respect of this a no manual resident lift policy is established. Residents are not to be lifted manually
unless medically contraindicated or in an emergency.
All Residents are safely transferred by staff members who have received training in the proper lifting,
transferring and repositioning procedures and the principles of good body mechanics.
If a transfer is deemed unsafe or lifting is involved staff must use a mechanical lifting device. Staff are not
to lift a resident without the use of the equipment. Research indicates that care givers that perform
manual resident lifts are at the greatest risk of musculoskeletal injuries.
PROCEDURE
1. A Resident transfer assessment is to be completed by a Nurse and/or Therapist on admission or
readmission after a stay in acute care.
The most appropriate transfer or lift should:
Be safe for both the resident and caregiver;
Encourage the resident to assist with the move as much as possible; and
Provide the least possible work for the care giver by making use of good body mechanics and/or
equipment.
2. Assistive devices such as transfer belts, slider sheets or mechanical lifts should be used where
appropriate to aid in the transfer or repositioning.
3. The Resident is assessed whenever there is a significant change in condition. Never decrease the
amount of assistance given in a transfer until a reassessment has been done. If transfer increases in
difficulty, the transfer can be completed and the supervisor must be informed and will arrange for
reassessment.
4. The transfer/lifting technique and sling, if required, must be documented on the Resident care plan. It
is the responsibility of all staff to comply with the transfer method specified.
2015 Safe Resident Handling Workshop 83
5. _____________ will provide and maintain equipment required for resident lifts and transfers. Staff
must receive training and demonstrate competency in using the equipment prior to using for a
resident transfer.
6. Staff are to receive annual training and demonstrate competency in performing resident lifts and
transfers and the principles of good body mechanics.
7. Prior to doing a lift or transfer the staff does an assessment of the resident to ensure their condition
has not deteriorated.
8. Prior to using a lift staff must do an inspection of both the sling and the lift.
9. Prior to doing a transfer or lift staff will ensure the transfer area is clear and free of obstruction and
required equipment is in place.
10. Prior to doing a transfer or lift staff conduct a self-assessment to assess their ability to safely
complete the task, assistance required, physical readiness to perform the task and establish
communication with the resident and co-worker.
11. The mechanical lift will be used when possible to lift a resident who has fallen, following assessment
by the RN / LPN. If a lift is not available and the Resident is unable to get up staff must call the
emergency response department (911).
12. Transfer belts are readily available to all staff and must be used for all one person and two person
transfers.
13. Workers found in non-compliance with this policy will receive corrective intervention from the
supervisor. Non-compliance with this policy may result in disciplinary action.
OUTCOME
Residents will be transferred in accordance with a pre-transfer assessment and staff will not perform a
manual lift.
References
No Unsafe Lift Workbook – Work Safe Alberta
It Doesn’t Have to Hurt - Occupational Health & Safety Agency for Healthcare in BC 2004
Musculoskeletal Injury Prevention Program - Continuing Care Safety Association
2015 Safe Resident Handling Workshop 84
Sample 2 – Slider Sheet Policy and Procedure
STANDARD
All Residents are safely repositioned by staff members who have received training in the proper
repositioning procedures and the principles of good body mechanics. Slider sheets are used to reduce
the risk of injury for residents and staff.
PROCEDURE
1. A Resident transfer assessment is to be completed by a Nurse and/or Therapist on admission or
readmission after a stay in acute care or whenever there is a significant change in condition. The
assessment will identify residents who require assistance with repositioning.
2. Assistive devices such as slider sheets or mechanical lifts should be used where appropriate to aid
repositioning.
3. Two staff are required to place and use the slider sheet.
4. Prior to doing a task, staff conduct a self-assessment to assess their ability to safely complete the
task, assistance required, physical readiness to perform the task and establish communication with
the resident and co-worker.
5. Prior to repositioning, assess the resident to ensure that their condition has not deteriorated.
6. Check the area around the bed to ensure the area is clear and free of obstructions.
7. Raise the height of the bed to position the resident at waist height of the shortest caregiver. The goal
is to slide not lift the resident into position.
8. To place the slider sheet under the resident:
i. One staff member on each side of the bed
ii. Gently roll the resident to face one staff member
iii. Place the slider sheet lengthwise at the resident’s back and gently push the slider sheet
under the resident
iv. Roll the resident back to the start position.
v. Gently roll the resident to face the other staff member
vi. The staff member facing the Resident’s back pulls the slider sheet into position
vii. Roll the resident back to the start position.
2015 Safe Resident Handling Workshop 85
9. Use a power grip (wide grip with palms up) on the transfer sheet. Create a strong foundation by
placing your feet shoulder width apart in a squat position or place one knee on the bed.
10. Grasp the sheet close to the resident at the resident’s shoulder and thigh height.
11. Rock back and forth 3 times and count off 1-2-3 and perform the move on the 3rd
count.
12. If removing the slider sheet from under the resident use the procedures as above.
OUTCOME
Residents are repositioned using a slider sheet in order to reduce risk of injury to resident and staff.
2015 Safe Resident Handling Workshop 86
Sample 3 – Mechanical Lifts Policy and Procedure
STANDARD
All Residents will be transferred or lifted safely by staff members who have received training in the proper
lifting and transferring procedures and the principles of good body mechanics.
Two staff members must assist throughout the lifting process when using all types of mechanical lifts.
If a transfer is deemed to be unsafe or lifting is involved staff must use a mechanical lift.
All mechanical lifts are to be operated in accordance with manufacturer’s instructions.
There may be a number of types of mechanical lifts at Sherwood Park Care Center: Please list the type of
lifts available at the organization.
Portable standard mechanical lift (i.e. MediMan)
Portable sit-stand lift (i.e. MediMan SSL or ERGO SSL)
A portable sit-stand lift (SSL) transfer can be utilized only for those residents:
Able to follow instructions;
Are predictable in behavior;
Can weight bear;
Who have upper body strength;
Are assessed by a Therapist and or Nurse for appropriateness of use of SSL.
A standard mechanical lift transfer will be utilized for those residents:
Who are not alert or are disoriented;
Who are / may be unpredictable;
Who may be inconsistent in weight bearing or
Unable to bear weight.
Staff may operate a mechanical lift only after receiving instruction in the correct operation of the lift in
accordance with the manufacturer’s instructions.
A Resident transfer assessment is to be completed by a Nurse and/or Therapist on admission or
readmission after a stay in acute care.
The Resident is assessed whenever there is a significant change in condition. Never decrease the
amount of assistance given in a transfer until a reassessment has been done. If transfer increases in
difficulty, the transfer can be completed and the supervisor must be informed and will arrange for
reassessment.
2015 Safe Resident Handling Workshop 87
The transfer/lifting technique must be documented on the Resident care plan. It is the responsibility of all
staff to comply with the transfer method specified.
PROCEDURE
1. Before using the mechanical lift, staff must check that the lift is in good working order:
All casings are free of cracks
Hand remote control functions
Lift moves freely
Battery is charged
Brakes work
Emergency lowering device works
Safety latches function on spreader bar
Lift is clean and free of debris
Immediately remove from use any damaged lift and tag “Out of Order” until it has been repaired.
2. Ensure the correct sling is used for the lift and resident.
3. Inspect sling to ensure it is safe for use:
Check loops for wear/tear;
Check for fraying or loose stitching, especially at strap attachment points;
Check for tears or holes;
Ensure head support stiffeners are intact;
Check that label is intact and shows size, type and safe load;
Check for heat damage, shrinkage or rigid areas;
Engage clips and pull on them to ensure they stay clipped;
If sling has been in continuous use for over 2 years it needs to be replaced.
If any damage is observed, remove the sling from service and report it to the Charge
Nurse/designate.
4. Take lift to the Resident and explain what will be done.
5. Complete a quick assessment of the Resident to ensure that their condition has not deteriorated.
6. Prior to doing a task, staff conduct a self-assessment to assess their ability to safely complete the
task, assistance required, physical readiness to perform the task and establish communication
with the resident and co-worker.
2015 Safe Resident Handling Workshop 88
7. Ensure that the entire transfer area is clear and free of obstructions.
8. Raise the bed so that you are working at elbow height with the sling straps and lower the head of
the bed to a flat position.
9. When lifting the resident to or from a chair or commode the caregiver is to use proper body
positioning to avoid bending or twisting their body.
10. Position sling in accordance with manufacturer’s instructions.
11. Ensure brakes on bed are engaged.
12. One staff member operates the controls and the other staff member guides the Resident in the
sling.
13. Use the controls to ensure the resident’s feet clear the surface they are being lifted from and to.
14. Proceed as per manufacturer’s instructions.
15. Ensure the Resident is properly positioned and in good alignment.
16. Remove the sling from under the resident.
17. Leave the Resident safe and comfortable.
18. Return lift to appropriate area.
Outcome
The Resident who is to be lifted is safely lifted using a mechanical lift.
2015 Safe Resident Handling Workshop 89
Sample 4 – One-Person Transfer Policy and Procedure
STANDARD
All Residents are safely transferred by staff members who have received training in the proper lifting and
transferring procedures and the principles of good body mechanics.
A Resident transfer assessment is to be completed by a Nurse and/or Therapist on admission or
readmission after a stay in acute care.
The Resident is assessed whenever there is a significant change in condition. Never decrease the
amount of assistance given in a transfer until a reassessment has been done. If transfer increases in
difficulty, the transfer can be completed and the supervisor must be informed and will arrange for
reassessment.
The transfer/lifting technique must be documented on the Resident care plan. It is the responsibility of all
staff to comply with the transfer method specified.
Transfer belts are readily available to all staff involved in direct care, and will be used for all one person
and two person transfers.
PROCEDURE
1. The Resident is alert, oriented and non-impulsive and must be able to:
Participate to some degree in the transfer and follow instructions;
Partially or fully bear weight;
Be consistent in weight bearing capabilities;
Use upper body strength.
2. Ensure that the Resident is a one-person transfer and that their condition has not deteriorated.
3. Prior to doing a task, staff conduct a self-assessment to assess their ability to safely complete the
task, assistance required, physical readiness to perform the task and establish communication with
the resident and co-worker.
4. Explain to Resident what you are going to do and what is expected of them.
5. Ensure that the entire transfer area is clear and free of obstructions.
6. If you are unsure that you can safely transfer the resident on your own, request assistance.
7. Whenever possible, position Resident with his/her strongest side closest to transfer surface.

2015 Safe Resident Handling Workshop 90
8. Position transfer surfaces close to each other at a 45- 90° angle and ensure that brakes are applied.
If using a wheelchair/commode with footrests, remove footrests.
9. If the Resident is in bed raise the bed until the Resident’s hips are slightly higher than their knees
(when Resident is sitting on the edge of the bed) and assist resident to sitting position.
10. Apply transfer belt snugly around the Resident’s waist.
11. Stand in front of the Resident. Place one foot between the Resident’s knees and the other foot on
outside –do not block Resident’s knees or feet:
If transferring to the left use right foot
If transferring to the right use left foot
12. Position your palms towards the Resident and grasp the transfer belt using the power grip. Keep
your elbows close to your body and shoulders down. Never let the resident put their arms around
your neck or back. Use your “big muscles” to do the work and maintain a neutral body position.
13. If transferring the Resident from a chair and if the Resident is able instruct the resident to place their
hands on the arm rests and lean forward and then push up.
14. Say to resident “please stand” with a rocking momentum (optional) and assist Resident to standing
position.
15. Allow time for the Resident to gain balance.
16. Turn to the transfer surface, by taking small steps in the direction of the chair/bed. Instruct Resident
to take small steps in the direction of the chair/bed.
17. Once you are facing the chair or bed and the Resident has the back of their knees touching the
chair/bed, help the Resident to lower themselves to a sitting position by saying “Sit Down”. The
Resident may reach back with their arms to touch the wheelchair, bed or chair while lowering self.
18. Ensure that the Resident is properly positioned and in good alignment.
19. Remove transfer belt and ensure the Resident is safe and comfortable.
Outcome
The Resident assessed as a one-person transfer is safely transferred.
2015 Safe Resident Handling Workshop 91
Sample 5 – Two-Person Transfer Policy and Procedure
STANDARD
All Residents are safely transferred by staff members who have received training in the proper lifting and
transferring procedures and the principles of good body mechanics.
A Resident transfer assessment is to be completed by a Nurse and/or Therapist on admission or
readmission after a stay in acute care.
The Resident is assessed whenever there is a significant change in condition. Never decrease the
amount of assistance given in a transfer until a reassessment has been done. If transfer increases in
difficulty, the transfer can be completed and the supervisor must be informed and will arrange for
reassessment.
The transfer/lifting technique must be documented on the Resident care plan. It is the responsibility of all
staff to comply with the transfer method specified.
Transfer belts are readily available to all staff involved in direct care, and will be used for all one person
and two person transfers.
PROCEDURE
1. The Resident must be able to:
Participate to some degree in the transfer and follow instructions;
Partially or fully bear weight;
Be consistent in weight bearing capabilities;
2. Check the Care Plan to ensure that the Resident is a two-person transfer.
3. Complete a quick assessment of the Resident to ensure that their condition has not deteriorated. If
you are unsure that the Resident can be safely transferred by two staff, use a mechanical lifting
device.
4. Prior to doing a task, staff conduct a self-assessment to assess their ability to safely complete the
task, assistance required, physical readiness to perform the task and establish communication with
the resident and co-worker.
5. Explain to the Resident what you are going to do and what is expected of them.
6. Ensure that the entire transfer area is clear and free of obstructions.
2015 Safe Resident Handling Workshop 92
7. Whenever possible, position Resident with his/her strongest side closest to transfer surface.
8. Position transfer surfaces close to each other at a 45 angle and ensure that brakes are applied. If
using a wheelchair/commode with footrests, remove footrests.
9. If the resident is in bed assist the Resident to a sitting position.
10. Raise the bed until the resident’s hips are slightly higher than their knees.
11. Apply transfer belt snugly around the Resident’s waist.
12. Each caregiver stands in front of the resident with the inner foot in front of the resident’s foot and the
knee ready to block the resident’s knee, in case it should buckle.
13. Each caregiver grasps the transfer belt with a power grip on back and front of belt with arms crossing.
Do not lift up under the resident’s arm. Instruct the Resident to push up from the bed/wheelchair
using his/hers hands. Never let the resident put their arms around your neck or back.
14. The lead caregiver establishes communication between the caregivers and the resident. When ready
to assist the resident count 1-2-3 stand and smoothly guide the resident to a standing position. Bend
your knees and hips and lean forward keeping your back in a neutral posture.
15. Allow time for the Resident to gain balance in the standing position.
16. Turn to the transfer surface, taking small steps and instructing the resident to take small steps to pivot
around. Stop when backs of the resident’s knees are against the edge of the wheelchair seat/bed.
17. Instruct the resident to reach back with one or both hands and grasp the bed/wheelchair arm(s). Tell
the resident to “Sit Down” and assist him/her to sit in the wheelchair/bed. Remember to bend your
knees and hips and keep your back flat.
18. Ensure that the Resident is properly positioned and in good alignment.
19. Remove transfer belt and leave Resident safe and comfortable.
Outcome
The Resident assessed as a two person transfer is safely transferred.

2015 Safe Resident Handling Workshop 93
Appendix 4: Sample Supervisor Follow-up
Checklist Safe Resident Handling Assessment Form
Date: ________________ Location: ________________________
Employee Name: ____________________ Position: ___________________
Department: ________________________
Lift Preparation Assessment Y N N/A Comments
1. Proper footwear
2. Obstacles are removed as necessary
3. Determine if equipment is required
4. If equipment is required, is it in working order?
5. Is another person required to help move the resident?
Rolling Resident
1. Bed height is adjusted, if possible 2. Resident is cued to bend or cross legs and is
prepared for roll
3. One knee is on or touching the bed, while the other is behind, bent at the knee
4. Hands are placed under the resident’s hip and shoulder
5. Counts 1, 2, 3 before rolling 6. Motion comes from the legs and resident is
gently turned onto the side
Lateral Slide 1. Bed height is adjusted, if possible 2. Roll technique is used to get a slider sheet into
position
3. The caregiver who is pulling has a palms-up power grip on the slider sheet
4. The caregiver who is pushing has hands placed palms-up under the resident’s shoulder and hip
5. Counts 1, 2, 3 before sliding 6. Legs are bent and power comes from the legs
moving. The back is kept straight and the head is up.
Boosting 1. Roll technique is used to get a slider sheet into
position
2. Both caregivers roll up the ends of the slider sheet close to the resident’s body and have a palms-up grip.
3. Legs are wide and in a squat position. 4. Counts 1, 2, 3, while rocking in the direction of
the slide to maintain good body mechanics and build momentum
5. Resident is not lifted, but slid, up the bed.

2015 Safe Resident Handling Workshop 94
Supine to sit 1. Resident’s legs are positioned close to the
edge of the bed.
2. Caregiver places one hand down the resident’s spine, between the shoulder blades and the other just above the resident’s knee
3. Legs are in a squat position and the back is straight.
4. Resident is cued to assist with sitting motion. Counts 1, 2, 3
5. Legs are gently pulled off the bed, and caregiver pivots and provides support as the resident sits up.
Transfer 1. Transfer belt is placed properly and is tight so
only two fingers can be fit under
2. Wheelchair is placed 90° to bed, with footrests removed and brakes locked.
3. Cargiver should have one leg inbetween resident’s legs, and the other open in the direction of the transfer
4. Resident’s feet should be flat on the floor, knees bent to 90°, hands should be inside staff’s arms or on bed or chair for push off
5. Staff explains process of transfer to resident , counts 1, 2, 3, stand
6. Staff bends knees while assisting resident to standing position
7. Staff shuffles with resident keeping their knees and feet facing the same direction
8. When residents knees touch the back of the chair/bed staff counts 1-2-3-lower to assist resident to seating position
Mechanical Lift 1. Raise or flatten bed to appropriate position 2. Place sling under residents back using rolling
technique
3. Lift is positioned over the resident and the sling attached. Sling attachments and placement is double checked.
4. Lift procedure is communicated to resident 5. Resident is safely lifted to clear the bed with
one staff member using the controls and other helping guide and support the resident
6. Position lift over chair/bed and lowers resident safely into position
7. Sling is removed from behind the resident
Employee Name: _____________________ Employee Signature: _____________________
Observers Name:_____________________ Observers Signature: _____________________
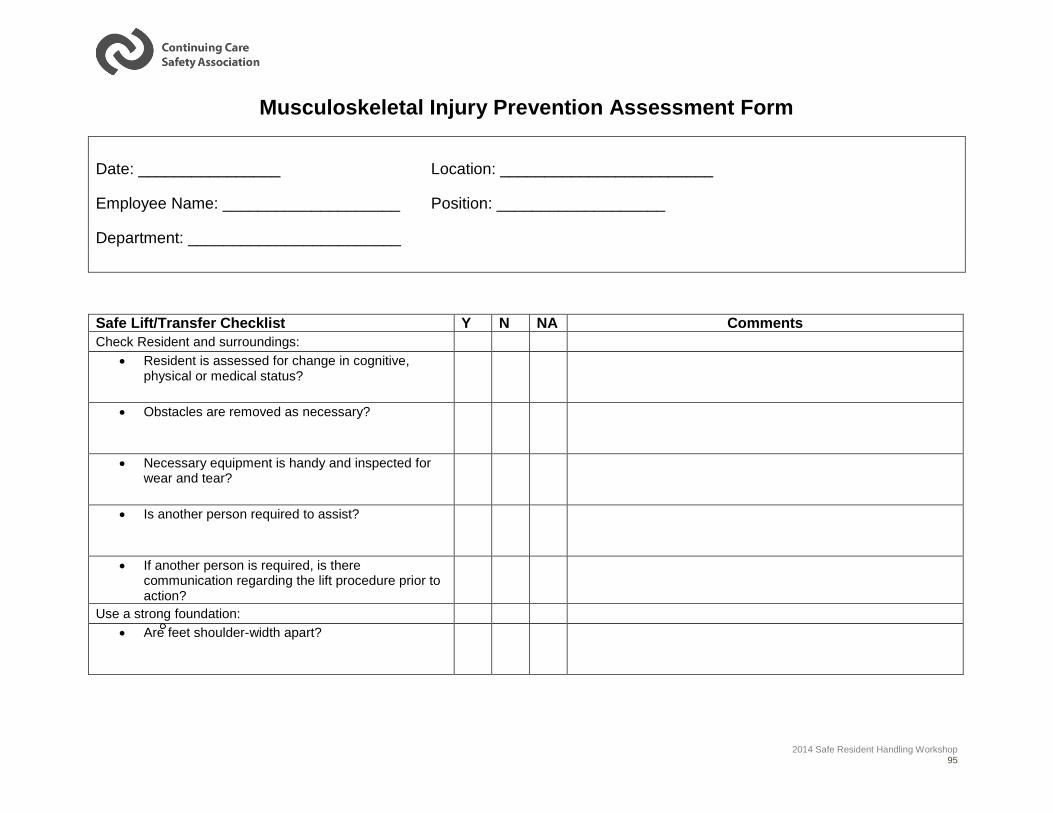
2014 Safe Resident Handling Workshop 95
Musculoskeletal Injury Prevention Assessment Form
Date: ________________ Location: ________________________
Employee Name: ____________________ Position: ___________________
Department: ________________________
Safe Lift/Transfer Checklist Y N NA Comments
Check Resident and surroundings:
Resident is assessed for change in cognitive, physical or medical status?
Obstacles are removed as necessary?
Necessary equipment is handy and inspected for wear and tear?
Is another person required to assist?
If another person is required, is there communication regarding the lift procedure prior to action?
Use a strong foundation:
Are feet shoulder-width apart?
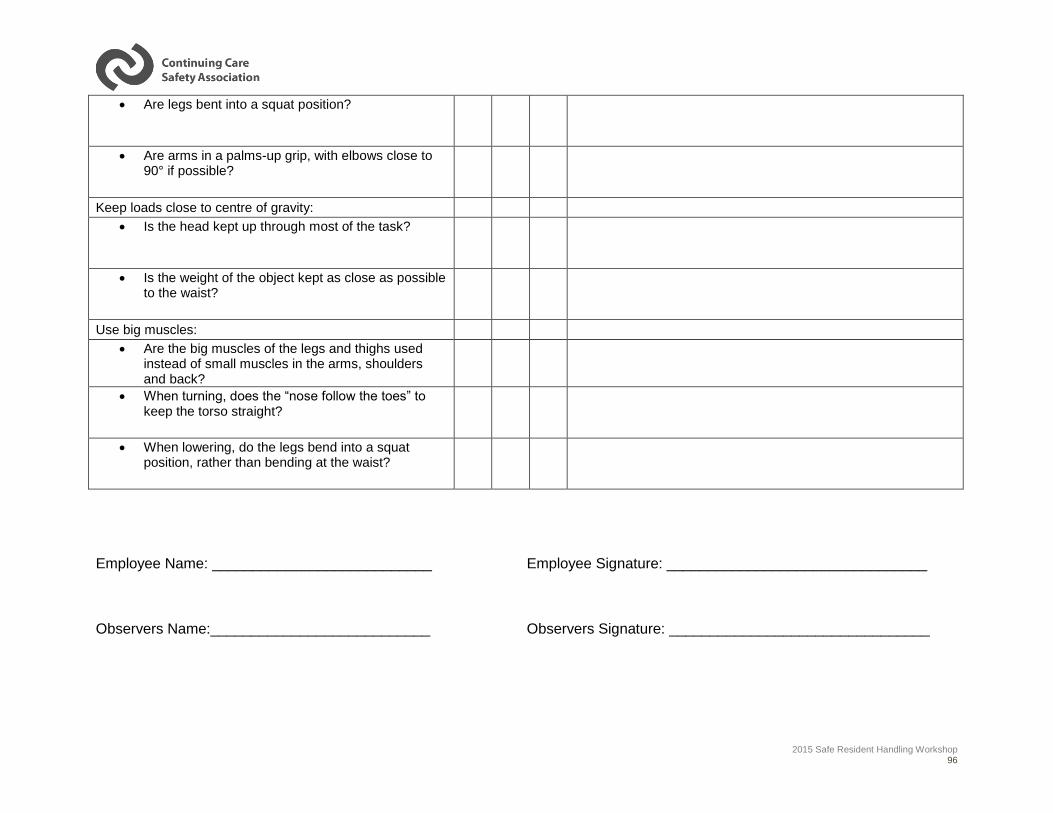
2015 Safe Resident Handling Workshop 96
Are legs bent into a squat position?
Are arms in a palms-up grip, with elbows close to 90° if possible?
Keep loads close to centre of gravity:
Is the head kept up through most of the task?
Is the weight of the object kept as close as possible to the waist?
Use big muscles:
Are the big muscles of the legs and thighs used instead of small muscles in the arms, shoulders and back?
When turning, does the “nose follow the toes” to keep the torso straight?
When lowering, do the legs bend into a squat position, rather than bending at the waist?
Employee Name: ___________________________ Employee Signature: ________________________________
Observers Name:___________________________ Observers Signature: ________________________________
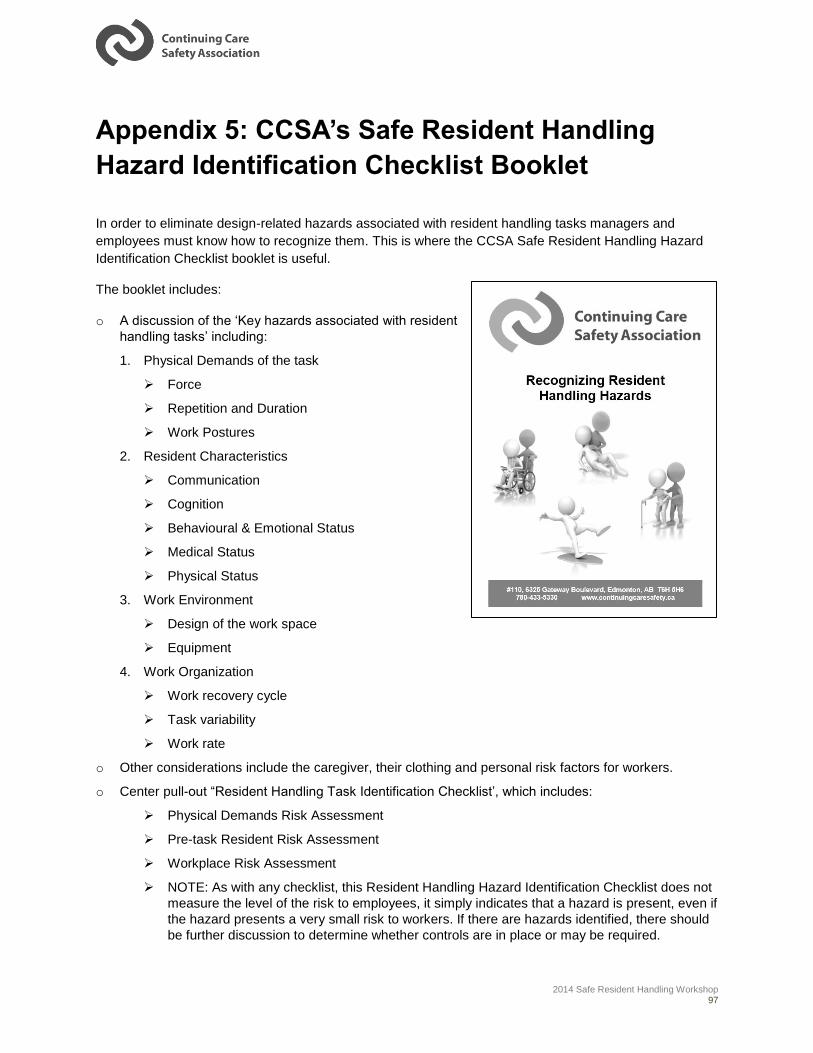
2014 Safe Resident Handling Workshop 97
Appendix 5: CCSA’s Safe Resident Handling
Hazard Identification Checklist Booklet
In order to eliminate design-related hazards associated with resident handling tasks managers and
employees must know how to recognize them. This is where the CCSA Safe Resident Handling Hazard
Identification Checklist booklet is useful.
The booklet includes:
o A discussion of the ‘Key hazards associated with resident
handling tasks’ including:
1. Physical Demands of the task
Force
Repetition and Duration
Work Postures
2. Resident Characteristics
Communication
Cognition
Behavioural & Emotional Status
Medical Status
Physical Status
3. Work Environment
Design of the work space
Equipment
4. Work Organization
Work recovery cycle
Task variability
Work rate
o Other considerations include the caregiver, their clothing and personal risk factors for workers.
o Center pull-out “Resident Handling Task Identification Checklist’, which includes:
Physical Demands Risk Assessment
Pre-task Resident Risk Assessment
Workplace Risk Assessment
NOTE: As with any checklist, this Resident Handling Hazard Identification Checklist does not
measure the level of the risk to employees, it simply indicates that a hazard is present, even if
the hazard presents a very small risk to workers. If there are hazards identified, there should
be further discussion to determine whether controls are in place or may be required.
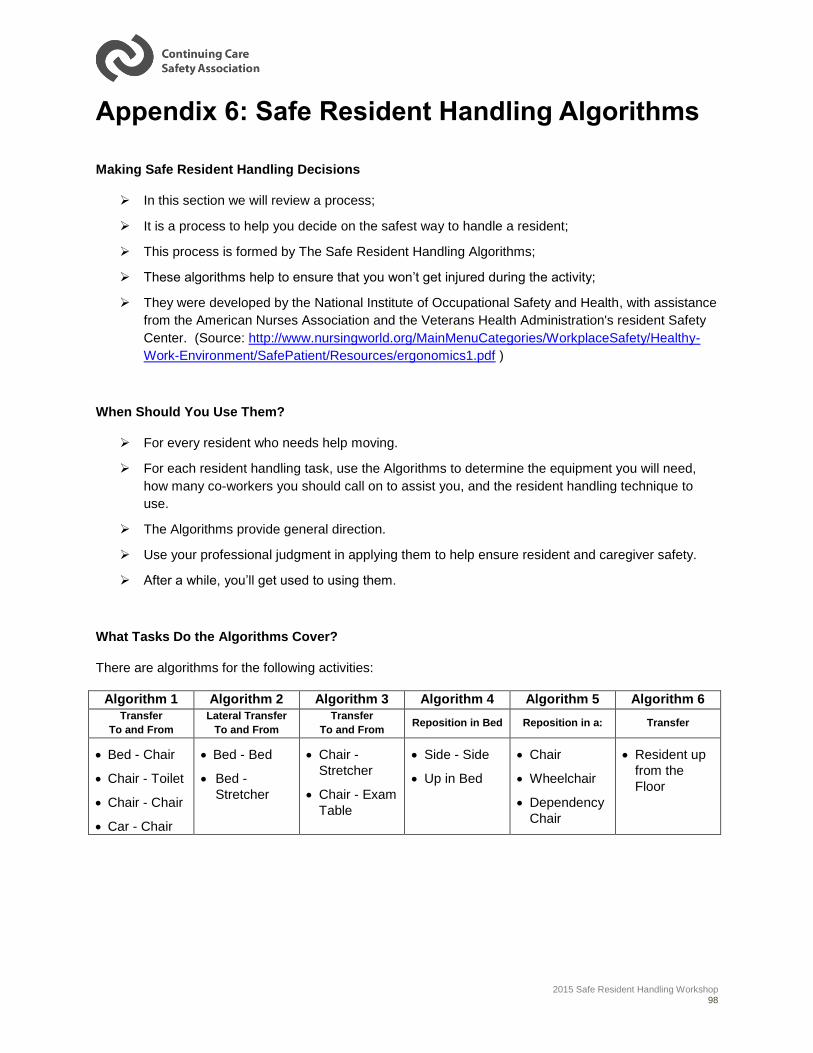
2015 Safe Resident Handling Workshop 98
Appendix 6: Safe Resident Handling Algorithms
Making Safe Resident Handling Decisions
In this section we will review a process;
It is a process to help you decide on the safest way to handle a resident;
This process is formed by The Safe Resident Handling Algorithms;
These algorithms help to ensure that you won’t get injured during the activity;
They were developed by the National Institute of Occupational Safety and Health, with assistance
from the American Nurses Association and the Veterans Health Administration's resident Safety
Center. (Source: http://www.nursingworld.org/MainMenuCategories/WorkplaceSafety/Healthy-
Work-Environment/SafePatient/Resources/ergonomics1.pdf )
When Should You Use Them?
For every resident who needs help moving.
For each resident handling task, use the Algorithms to determine the equipment you will need,
how many co-workers you should call on to assist you, and the resident handling technique to
use.
The Algorithms provide general direction.
Use your professional judgment in applying them to help ensure resident and caregiver safety.
After a while, you’ll get used to using them.
What Tasks Do the Algorithms Cover?
There are algorithms for the following activities:
Algorithm 1 Algorithm 2 Algorithm 3 Algorithm 4 Algorithm 5 Algorithm 6
Transfer
To and From
Lateral Transfer
To and From
Transfer
To and From Reposition in Bed Reposition in a: Transfer
Bed - Chair
Chair - Toilet
Chair - Chair
Car - Chair
Bed - Bed
Bed -
Stretcher
Chair -
Stretcher
Chair - Exam
Table
Side - Side
Up in Bed
Chair
Wheelchair
Dependency
Chair
Resident up
from the
Floor
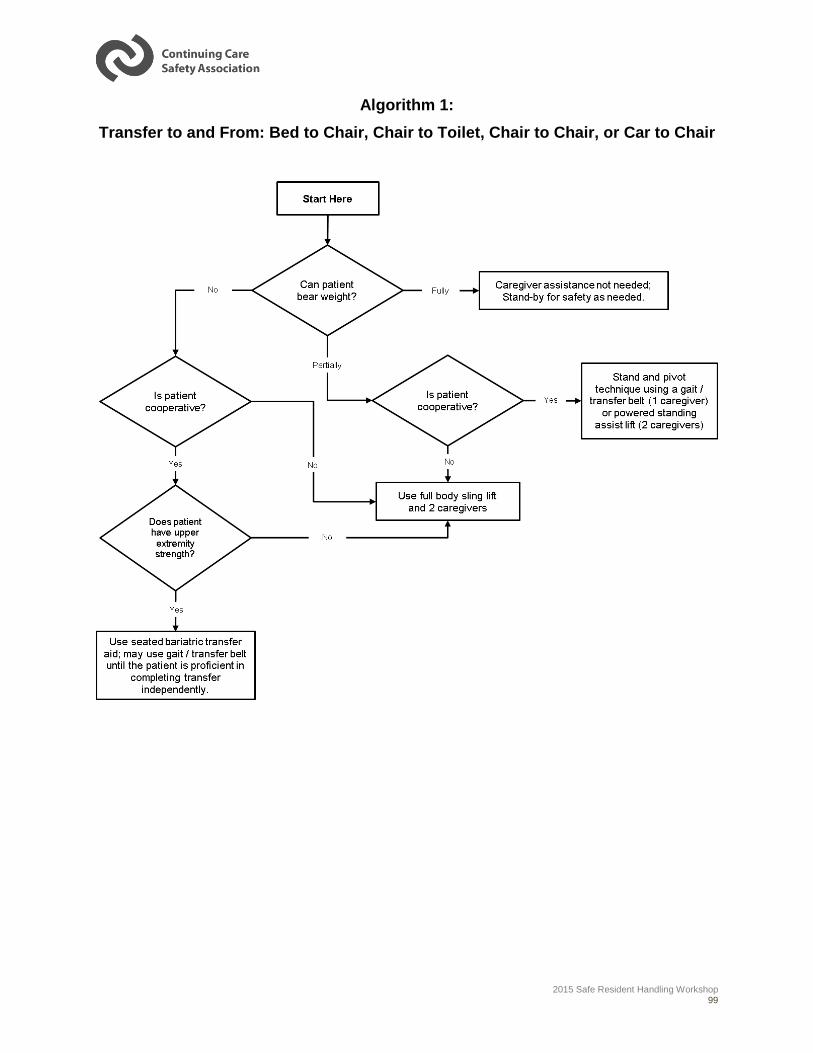
2015 Safe Resident Handling Workshop 99
Algorithm 1:
Transfer to and From: Bed to Chair, Chair to Toilet, Chair to Chair, or Car to Chair
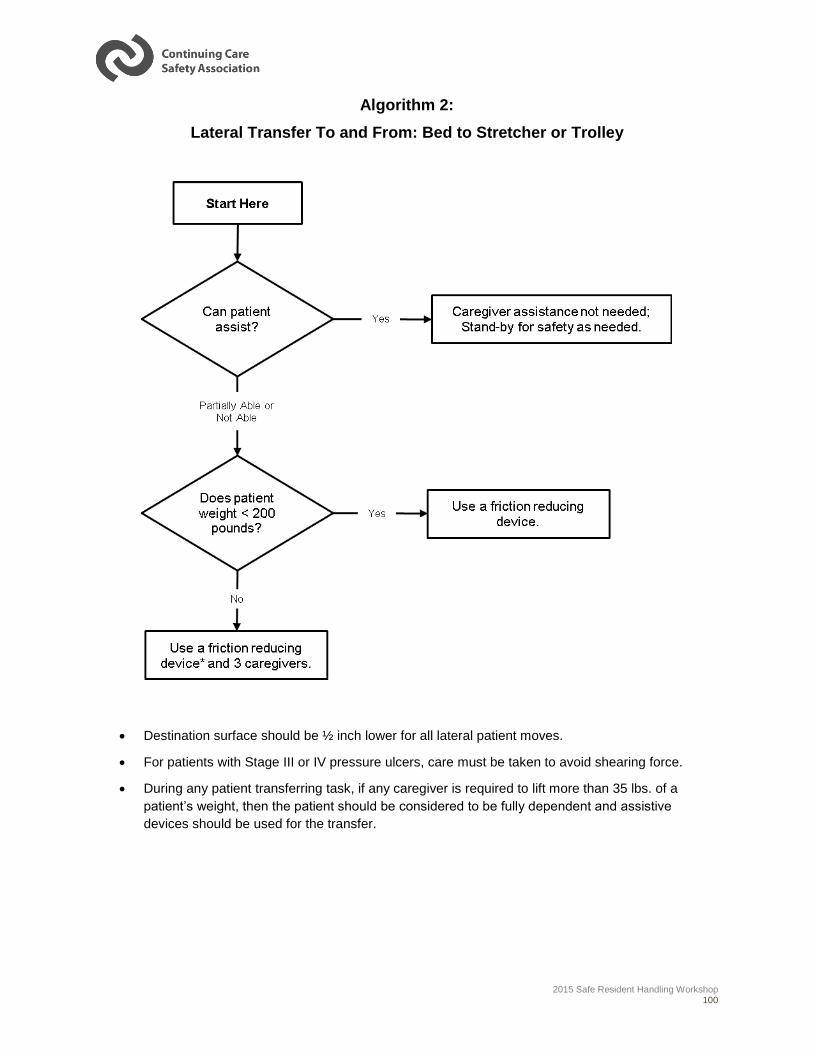
2015 Safe Resident Handling Workshop 100
Algorithm 2:
Lateral Transfer To and From: Bed to Stretcher or Trolley
Destination surface should be ½ inch lower for all lateral patient moves.
For patients with Stage III or IV pressure ulcers, care must be taken to avoid shearing force.
During any patient transferring task, if any caregiver is required to lift more than 35 lbs. of a
patient’s weight, then the patient should be considered to be fully dependent and assistive
devices should be used for the transfer.
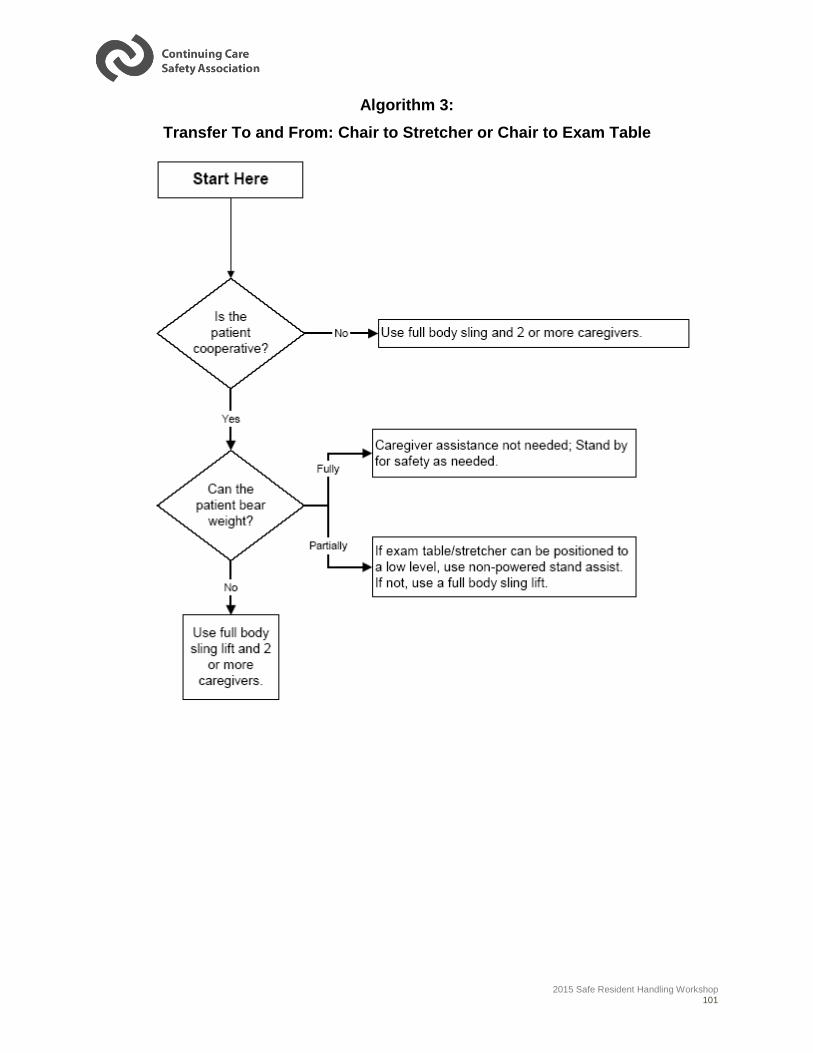
2015 Safe Resident Handling Workshop 101
Algorithm 3:
Transfer To and From: Chair to Stretcher or Chair to Exam Table
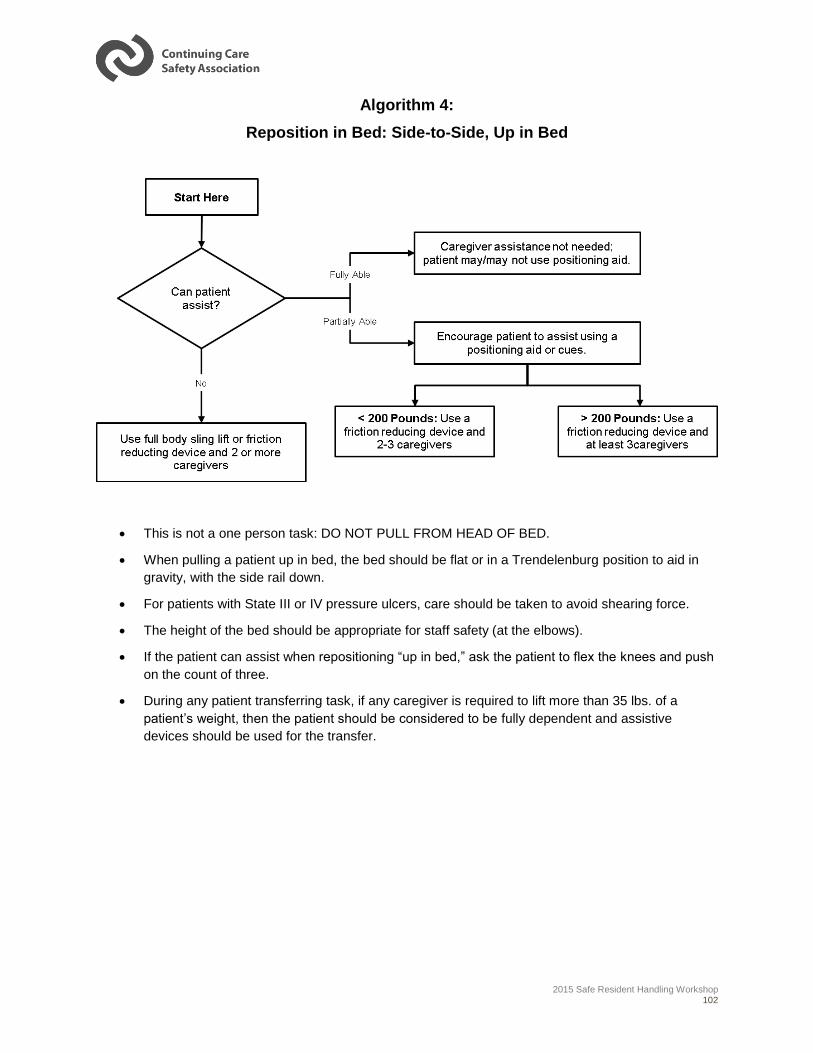
2015 Safe Resident Handling Workshop 102
Algorithm 4:
Reposition in Bed: Side-to-Side, Up in Bed
This is not a one person task: DO NOT PULL FROM HEAD OF BED.
When pulling a patient up in bed, the bed should be flat or in a Trendelenburg position to aid in
gravity, with the side rail down.
For patients with State III or IV pressure ulcers, care should be taken to avoid shearing force.
The height of the bed should be appropriate for staff safety (at the elbows).
If the patient can assist when repositioning “up in bed,” ask the patient to flex the knees and push
on the count of three.
During any patient transferring task, if any caregiver is required to lift more than 35 lbs. of a
patient’s weight, then the patient should be considered to be fully dependent and assistive
devices should be used for the transfer.
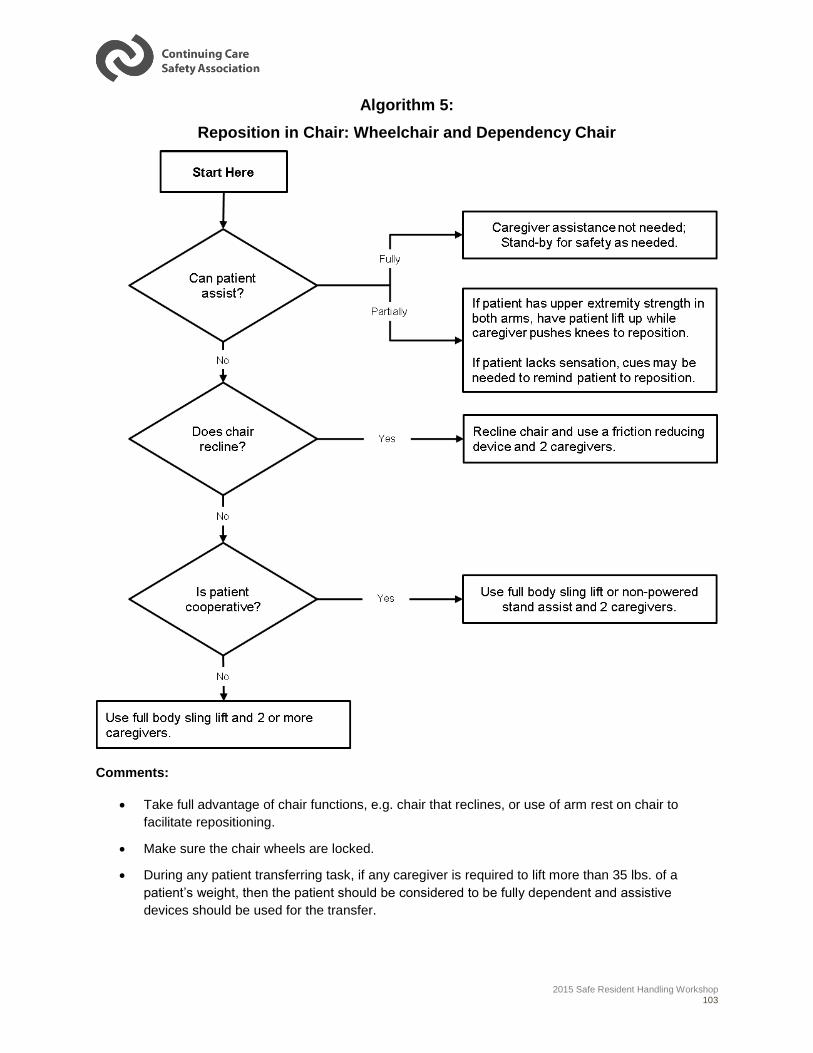
2015 Safe Resident Handling Workshop 103
Algorithm 5:
Reposition in Chair: Wheelchair and Dependency Chair
Comments:
Take full advantage of chair functions, e.g. chair that reclines, or use of arm rest on chair to
facilitate repositioning.
Make sure the chair wheels are locked.
During any patient transferring task, if any caregiver is required to lift more than 35 lbs. of a
patient’s weight, then the patient should be considered to be fully dependent and assistive
devices should be used for the transfer.
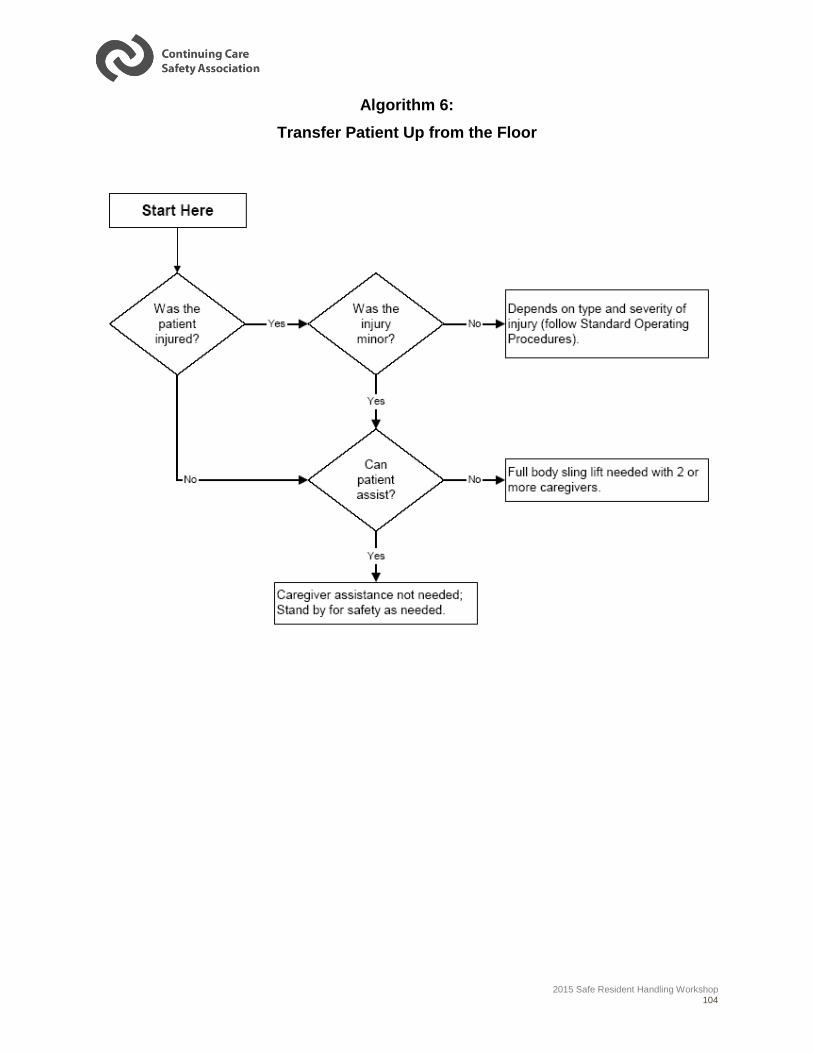
2015 Safe Resident Handling Workshop 104
Algorithm 6:
Transfer Patient Up from the Floor
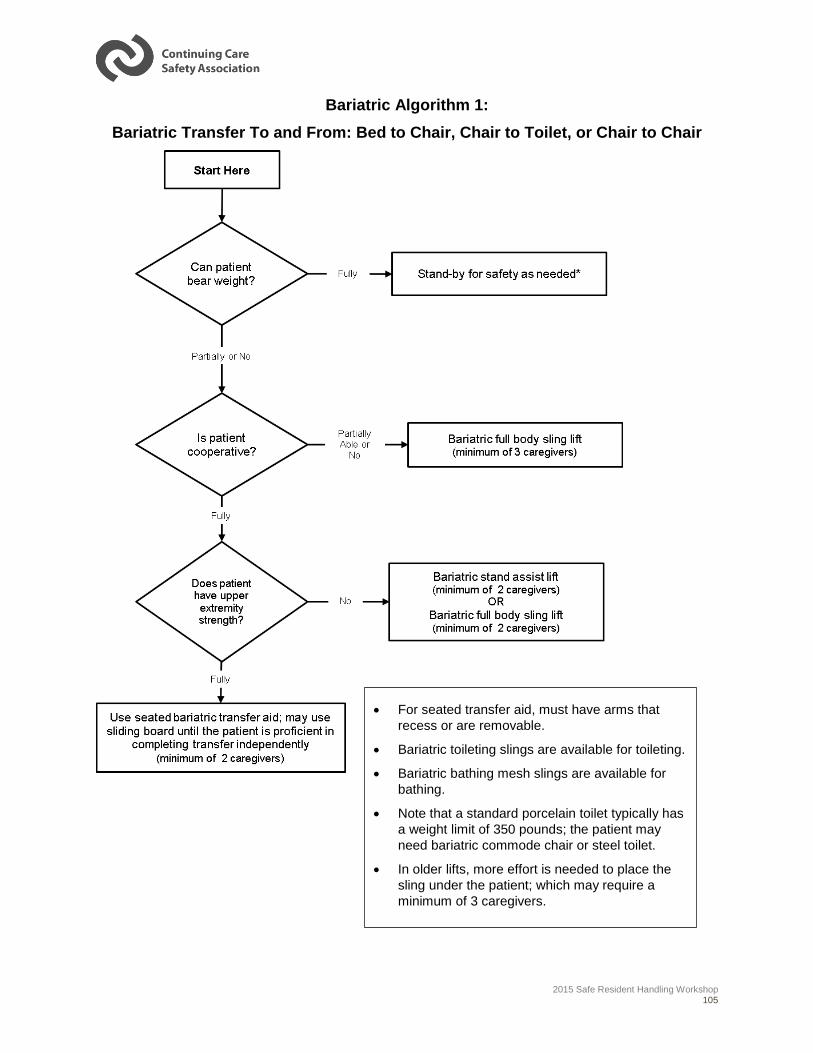
2015 Safe Resident Handling Workshop 105
Bariatric Algorithm 1:
Bariatric Transfer To and From: Bed to Chair, Chair to Toilet, or Chair to Chair
For seated transfer aid, must have arms that
recess or are removable.
Bariatric toileting slings are available for toileting.
Bariatric bathing mesh slings are available for
bathing.
Note that a standard porcelain toilet typically has
a weight limit of 350 pounds; the patient may
need bariatric commode chair or steel toilet.
In older lifts, more effort is needed to place the
sling under the patient; which may require a
minimum of 3 caregivers.
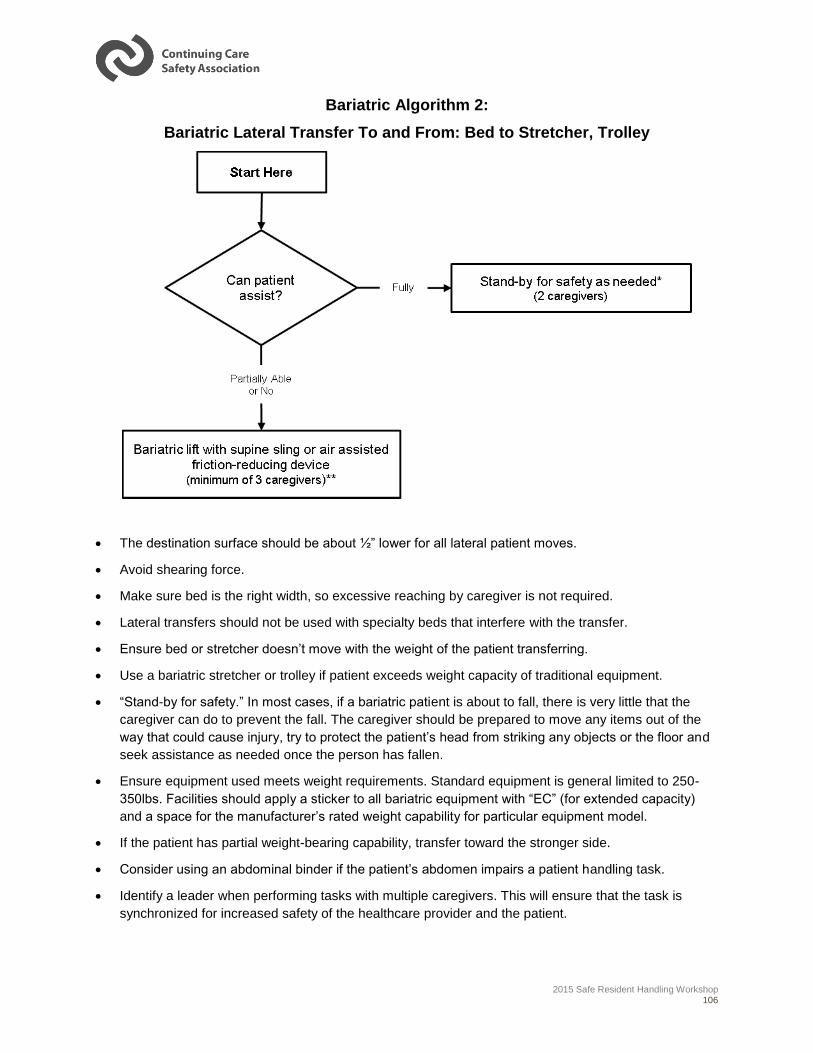
2015 Safe Resident Handling Workshop 106
Bariatric Algorithm 2:
Bariatric Lateral Transfer To and From: Bed to Stretcher, Trolley
The destination surface should be about ½” lower for all lateral patient moves.
Avoid shearing force.
Make sure bed is the right width, so excessive reaching by caregiver is not required.
Lateral transfers should not be used with specialty beds that interfere with the transfer.
Ensure bed or stretcher doesn’t move with the weight of the patient transferring.
Use a bariatric stretcher or trolley if patient exceeds weight capacity of traditional equipment.
“Stand-by for safety.” In most cases, if a bariatric patient is about to fall, there is very little that the
caregiver can do to prevent the fall. The caregiver should be prepared to move any items out of the
way that could cause injury, try to protect the patient’s head from striking any objects or the floor and
seek assistance as needed once the person has fallen.
Ensure equipment used meets weight requirements. Standard equipment is general limited to 250-
350lbs. Facilities should apply a sticker to all bariatric equipment with “EC” (for extended capacity)
and a space for the manufacturer’s rated weight capability for particular equipment model.
If the patient has partial weight-bearing capability, transfer toward the stronger side.
Consider using an abdominal binder if the patient’s abdomen impairs a patient handling task.
Identify a leader when performing tasks with multiple caregivers. This will ensure that the task is
synchronized for increased safety of the healthcare provider and the patient.
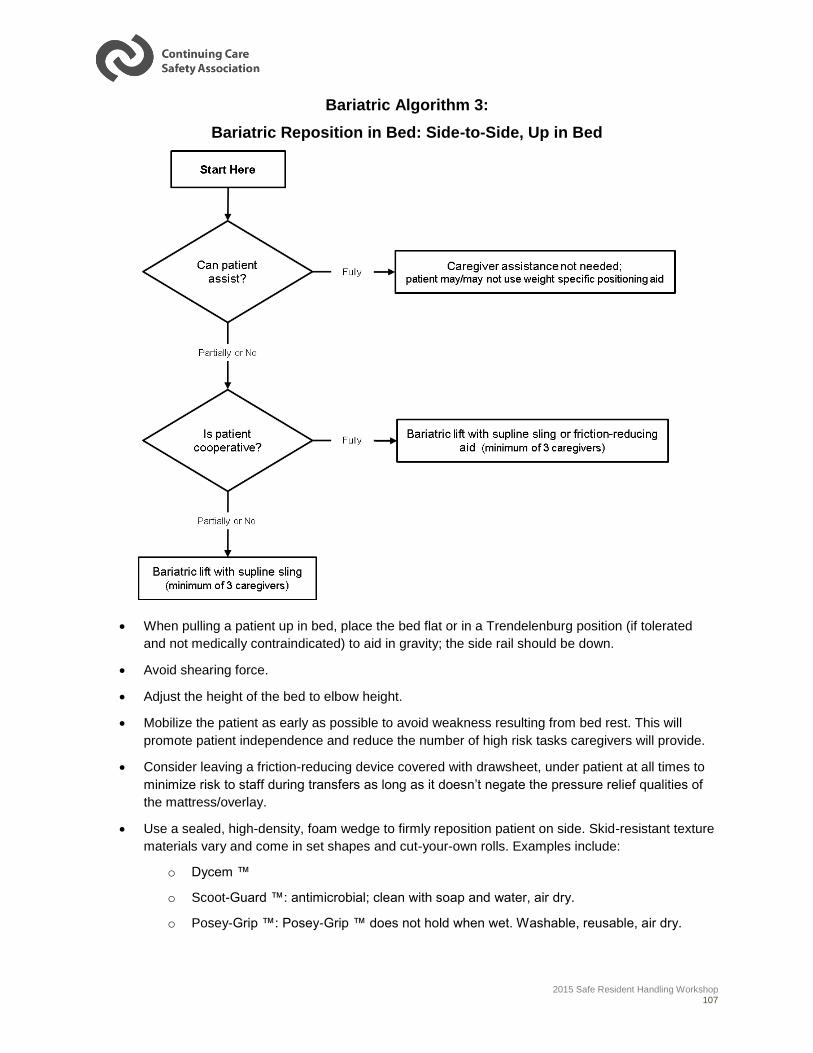
2015 Safe Resident Handling Workshop 107
Bariatric Algorithm 3:
Bariatric Reposition in Bed: Side-to-Side, Up in Bed
When pulling a patient up in bed, place the bed flat or in a Trendelenburg position (if tolerated
and not medically contraindicated) to aid in gravity; the side rail should be down.
Avoid shearing force.
Adjust the height of the bed to elbow height.
Mobilize the patient as early as possible to avoid weakness resulting from bed rest. This will
promote patient independence and reduce the number of high risk tasks caregivers will provide.
Consider leaving a friction-reducing device covered with drawsheet, under patient at all times to
minimize risk to staff during transfers as long as it doesn’t negate the pressure relief qualities of
the mattress/overlay.
Use a sealed, high-density, foam wedge to firmly reposition patient on side. Skid-resistant texture
materials vary and come in set shapes and cut-your-own rolls. Examples include:
o Dycem ™
o Scoot-Guard ™: antimicrobial; clean with soap and water, air dry.
o Posey-Grip ™: Posey-Grip ™ does not hold when wet. Washable, reusable, air dry.
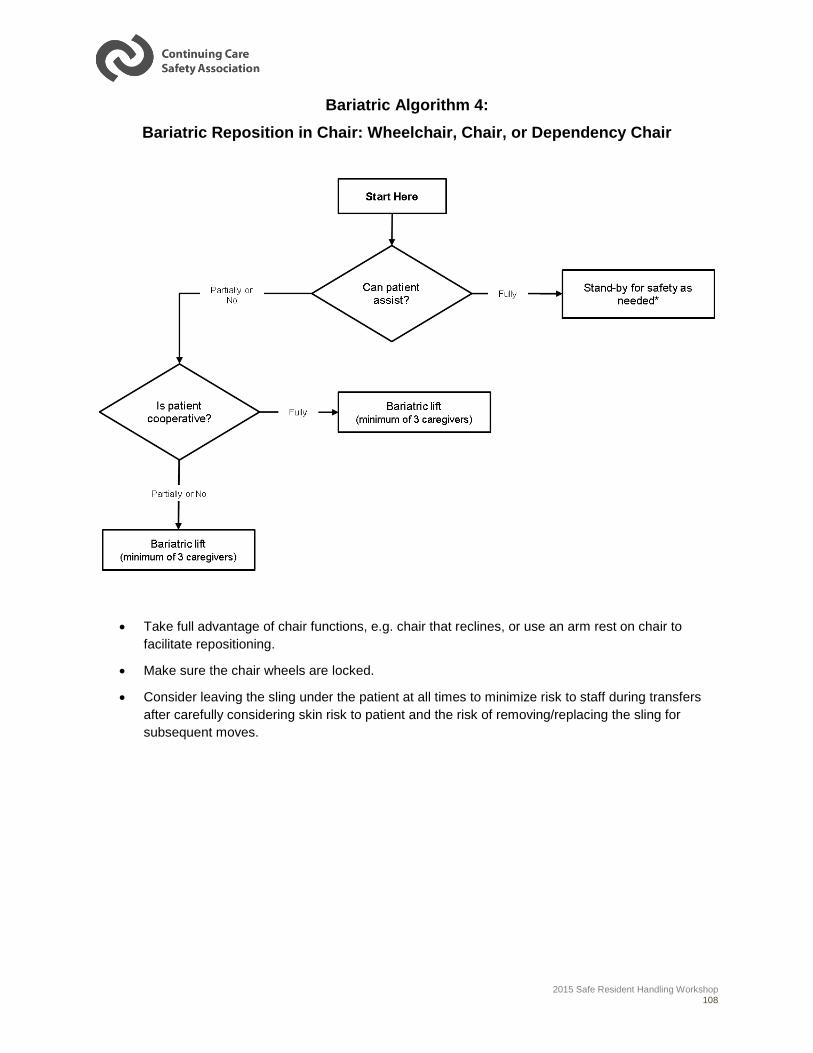
2015 Safe Resident Handling Workshop 108
Bariatric Algorithm 4:
Bariatric Reposition in Chair: Wheelchair, Chair, or Dependency Chair
Take full advantage of chair functions, e.g. chair that reclines, or use an arm rest on chair to
facilitate repositioning.
Make sure the chair wheels are locked.
Consider leaving the sling under the patient at all times to minimize risk to staff during transfers
after carefully considering skin risk to patient and the risk of removing/replacing the sling for
subsequent moves.
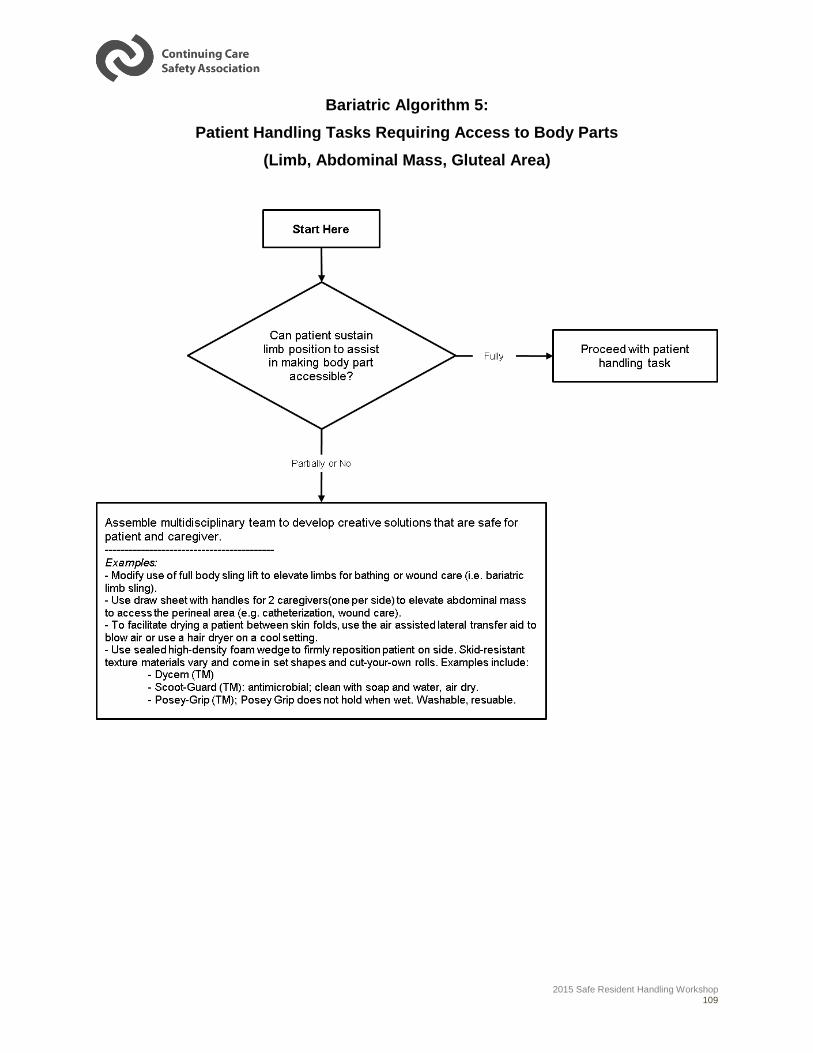
2015 Safe Resident Handling Workshop 109
Bariatric Algorithm 5:
Patient Handling Tasks Requiring Access to Body Parts
(Limb, Abdominal Mass, Gluteal Area)
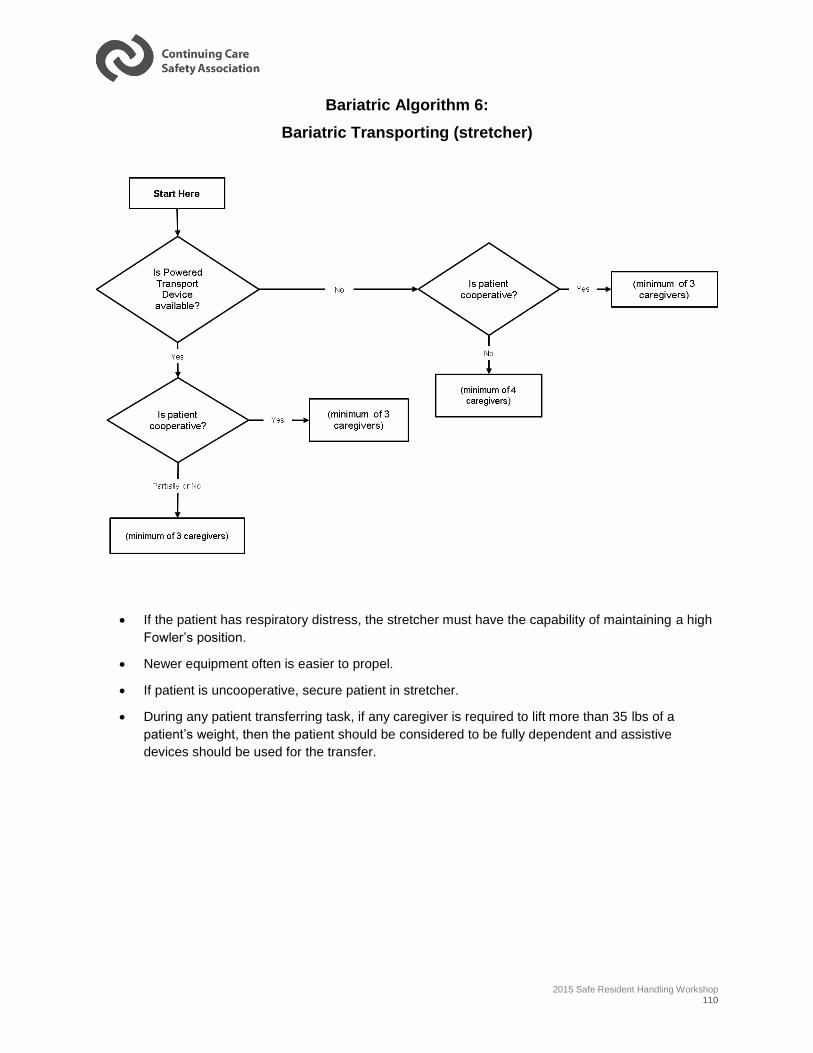
2015 Safe Resident Handling Workshop 110
Bariatric Algorithm 6:
Bariatric Transporting (stretcher)
If the patient has respiratory distress, the stretcher must have the capability of maintaining a high
Fowler’s position.
Newer equipment often is easier to propel.
If patient is uncooperative, secure patient in stretcher.
During any patient transferring task, if any caregiver is required to lift more than 35 lbs of a
patient’s weight, then the patient should be considered to be fully dependent and assistive
devices should be used for the transfer.
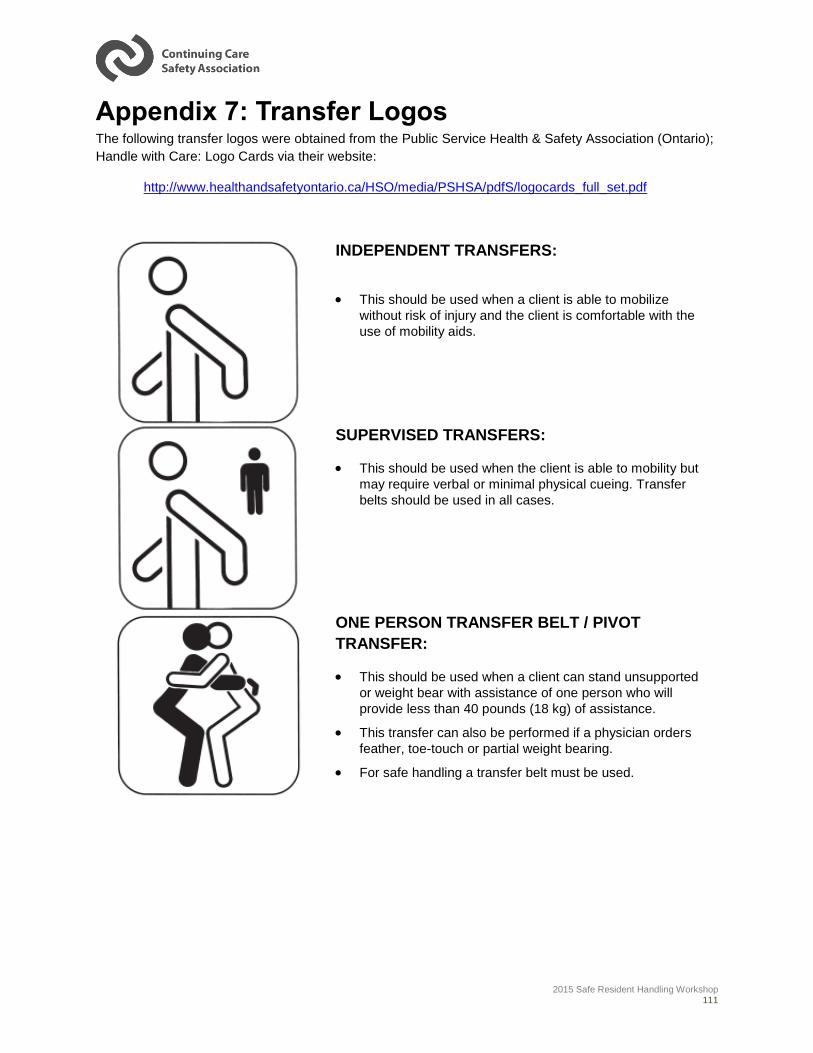
2015 Safe Resident Handling Workshop 111
Appendix 7: Transfer Logos The following transfer logos were obtained from the Public Service Health & Safety Association (Ontario);
Handle with Care: Logo Cards via their website:
http://www.healthandsafetyontario.ca/HSO/media/PSHSA/pdfS/logocards_full_set.pdf
INDEPENDENT TRANSFERS:
This should be used when a client is able to mobilize
without risk of injury and the client is comfortable with the
use of mobility aids.
SUPERVISED TRANSFERS:
This should be used when the client is able to mobility but
may require verbal or minimal physical cueing. Transfer
belts should be used in all cases.
ONE PERSON TRANSFER BELT / PIVOT
TRANSFER:
This should be used when a client can stand unsupported
or weight bear with assistance of one person who will
provide less than 40 pounds (18 kg) of assistance.
This transfer can also be performed if a physician orders
feather, toe-touch or partial weight bearing.
For safe handling a transfer belt must be used.
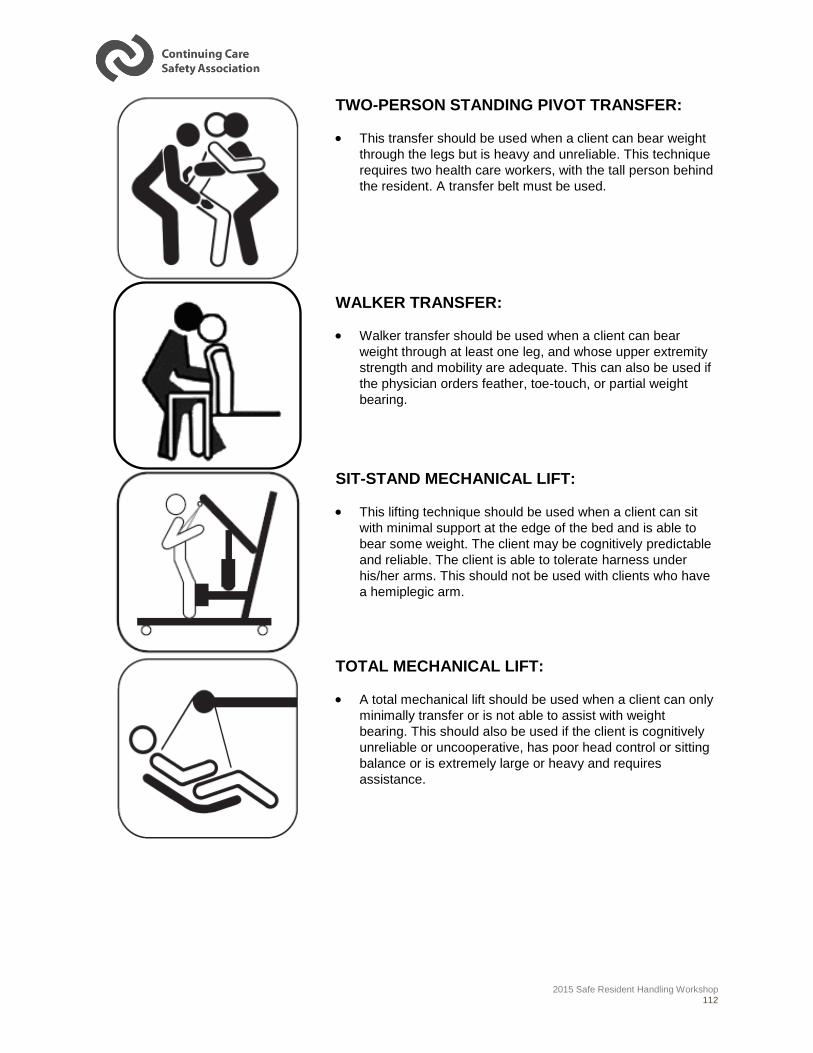
2015 Safe Resident Handling Workshop 112
TWO-PERSON STANDING PIVOT TRANSFER:
This transfer should be used when a client can bear weight
through the legs but is heavy and unreliable. This technique
requires two health care workers, with the tall person behind
the resident. A transfer belt must be used.
WALKER TRANSFER:
Walker transfer should be used when a client can bear
weight through at least one leg, and whose upper extremity
strength and mobility are adequate. This can also be used if
the physician orders feather, toe-touch, or partial weight
bearing.
SIT-STAND MECHANICAL LIFT:
This lifting technique should be used when a client can sit
with minimal support at the edge of the bed and is able to
bear some weight. The client may be cognitively predictable
and reliable. The client is able to tolerate harness under
his/her arms. This should not be used with clients who have
a hemiplegic arm.
TOTAL MECHANICAL LIFT:
A total mechanical lift should be used when a client can only
minimally transfer or is not able to assist with weight
bearing. This should also be used if the client is cognitively
unreliable or uncooperative, has poor head control or sitting
balance or is extremely large or heavy and requires
assistance.
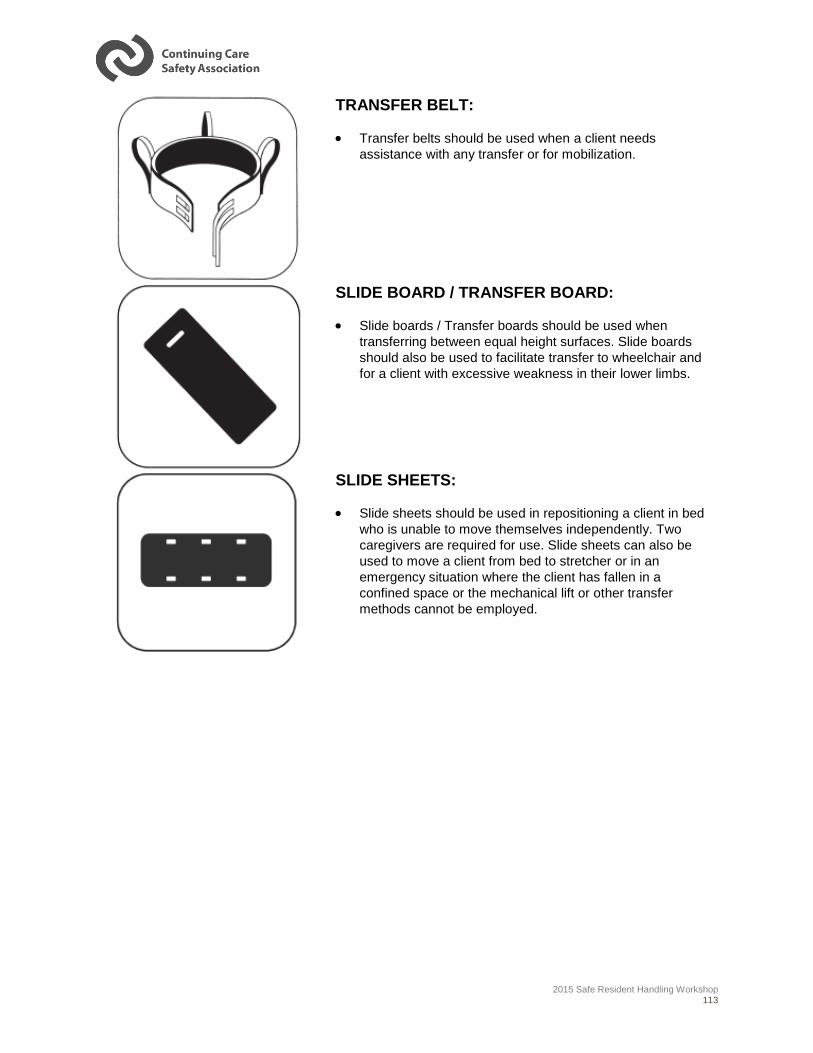
2015 Safe Resident Handling Workshop 113
TRANSFER BELT:
Transfer belts should be used when a client needs
assistance with any transfer or for mobilization.
SLIDE BOARD / TRANSFER BOARD:
Slide boards / Transfer boards should be used when
transferring between equal height surfaces. Slide boards
should also be used to facilitate transfer to wheelchair and
for a client with excessive weakness in their lower limbs.
SLIDE SHEETS:
Slide sheets should be used in repositioning a client in bed
who is unable to move themselves independently. Two
caregivers are required for use. Slide sheets can also be
used to move a client from bed to stretcher or in an
emergency situation where the client has fallen in a
confined space or the mechanical lift or other transfer
methods cannot be employed.
2015 Safe Resident Handling Workshop 114
Appendix 8: Immediate Changes to Improve
Resident Handling Safety
The New Zealand Resident Handling Guidelines offers the following suggestions for “Immediate changes
to improve resident handling safety” as cited in the “No Unsafe Lift Workbook” (p. 66-68).
Resident Rooms:
Keep rooms tidy and free of clutter.
Create a permanent clear passage from the foot of the bed to the door, so there is always clear
access to move equipment from the door to the bed.
In small rooms, and where space is at a premium, attach castors to the furniture so it can be
easily moved out of the way during resident handling tasks.
Make sure beds are height adjustable.
Make sure chairs have armrests to help resident transfers.
Try to locate residents who need to be assisted with wheelchairs as near to day or dining rooms
as possible, to minimize the distance they have to travel.
Provide plenty of electrical sockets, to prevent trailing electrical and extension cords.
Maintain a policy regarding acceptable furniture for residents to bring into the facility, to avoid
clutter and heavy lifting for workers.
Toilets, Showers and Bathrooms
If toilets are small, inaccessible and in difficult places in which to perform resident handling tasks
safety, consider using other toileting methods such as commodes, pans or bottles.
Consider the loading weight of toilets, especially for bariatric residents.
If the shower or bathroom is too small and inaccessible for large resident handling equipment,
consider:
o Bed bathing the resident until an alternative is found, or
o Using a shower chair that can be pushed into the shower or bathroom.
Corridors, Doors and Flooring
Check corridors and access routes are free of items that restrict minimum recommended widths.
Check that:
o Corridor doors swing in the direction of the exit,
o Door swings do not restrict recommended minimum corridor widths,
o Toilet doors do not swing inwards, and
o Items are not stored behind doors that can restrict them fully opening.

2015 Safe Resident Handling Workshop 115
Check floor coverings are tightly fixed to the floor, and permanently seal all gaps and loose
edges.
Check carpet edging strips are beveled and not more than 10mm above the floor.
Resident Handling Equipment
Ensure resident handling equipment is well maintained, and repaired or replaced when damaged.
Use temporary ramps for wheeled equipment to eliminate the risks associated with lifting
equipment over thresholds. Install grab rails in toilets, showers and bathrooms to encourage
residents to stand and sit independently.
Install continuous handrails along corridors and stairs.
Consider installing ceiling tracks and wall hung or gantry hoists because these require less room
to move residents than mobile hoists.
Storage
Ensure the storage area is well organized with clearly defined areas for resident handling
equipment.
Locate storage areas preferably within 20 meters of handling areas and within 10 meters of the
nurses’ station.