multimedia interface for toyota lexus 2016~ car-solutions
TRANSCRIPT

Installation Manual Multimedia Interface for Toyota Lexus 2016~
car-solutions.com [email protected]
car-s
olutio
ns.co
m

Compatibility: LEXUS LX570 12” 2016~
LEXUS NX 8”/10” 2018~
LEXUS CT200 7” ~2018
RX450/UX2019/GS2014/GS
ES/LX/RX/IS/GX 7”/8”/12”
Interface Input / Output specification :
Input: LVDS In (Car System) *1
LVDS *1
A/V *1
CVBS(Front Camera) *1
CVBS(Rear Camera) *1
HDMI *1 [Optional]
Output: LVDS Out (Car System) *1
Audio Out *1
Power Spec:
Input Power: 8VDC ~ 18VDC
Consumption: 5WATT
Switch input mode:
1. External video sources skip function: Able to control input videos on and off
via Dip switches
2. Able to switch videos via the remote and button switch
3. Able to detect the rear view camera by CAN or rear lamp cable
* Support Control Car-play and Android Box by OEM Controller
2
Specification
car-solutions.com [email protected]
car-s
olutio
ns.co
m

3
Main Board
QCPASS1555
IF Cable
HARETC0368
AV Cable
HAVCAB0070
Remote CTRL.
REMOTE0001
Button Cable
HARETC0001
IR Cable
HIRCAB0002
UART Cable
HTOUCH0015
Components
car-solutions.com [email protected]
car-s
olutio
ns.co
m

4
Lexus Y19 NX Power/CAN/LCD Cable
OPTION
Y19 NX Power
HPOWER0275
OPTION
Y19 NX CAN
HARETC0370
LX OEM Navi CAN
HARETC0369
LX OEM Navi Power
HPOWER0274
Lexus LX OEM Navi Power/CAN/LCD Cable
Old Lexus LCD
HLCDCA0065
OPTION
New Lexus LCD
HLCDCA0066
Components with Options
car-solutions.com [email protected]
car-s
olutio
ns.co
m

5
HDMI 480P 1Port SUB Option
OPTION
HDMI-SUB
QCPASS1435
OPTION
HDMI-SUB CABLE
HARETC0327
Components with Options
car-solutions.com [email protected]
car-s
olutio
ns.co
m

6
Compatible Car List
Power/CAN Year Car Model LCD CableOEM Touch
Screen
OEM
Controller
Y19 NX
Jack by Jack
(with AUX RCA)
[HPOWER0275/
HARETC0370]
2018~ NX 8”/10”
2019~ LCD
Cable (NEW)
[HLCDCA0066]
NO
2019~
New
Touch Pad
(CAN IN/OUT)
2019~ ES 8”/12”
2019~ LS 8”/12”
2019~ UX 8”/10”
2019~ IS 10”
2019~ LC 12"
2019~ RC 10”
LX OEM NAVI
Jack by Jack
[HPOWER0274/
HARETC0369]
2016~2019 RX 8”/12"
~2018 LCD
Cable (OLD)
[HLCDCA0065]
NO
~2018
Old
Touch Pad
and
Joy Stick
(CAN IN/OUT)
2012~2015 RX 8”
~2018 GS 8"/12"
~2018 CT 7"
~2018 ES 8”
~2018 IS 7”
~2018 LS 12"
2016~2021 LX570 12"
~2018 IS 10”
~2018 NX 7"
car-solutions.com [email protected]
car-s
olutio
ns.co
m

PIN FUNCTION Dip S/W SELECT
1 LVDSOFF : LVDS MODE
ON : LVDS MODE SKIP
2 HDOFF : HD Mode
ON : HD Mode Skip
3 AVOFF : AV MODE
ON : AV MODE SKIP
4 Front CameraOFF : Ext. Front Camera Mode
ON : OEM Front Camera Mode
5LCD Resolution
(Car Model)
5 OFF, 6 OFF -> 800 X 480
5 OFF, 6 ON -> 1280 X 480
5 ON, 6 OFF -> 800 X 480 (IS)
5 ON, 6 ON -> 800 X 480 (CT200)6
7 Rear CameraOFF : OEM Rear Camera Mode
ON : Ext. Rear Camera Mode
8 In case External Mode goes black, please set Dip #8 ON.
9 CAN In/OutOFF : CAN In/Out Mode for OEM Controller
ON : CAN Bypass Mode for OEM Controller
10 N/C
7
* ON : DOWN / OFF : UP
Please make sure to disconnect the power cable
of the interface and reconnect the power cable
again to apply the dip switch changes.
DIP Switch Settings
car-solutions.com [email protected]
car-s
olutio
ns.co
m

8
Key FUNCTION
POWER & PIP N/C
MENU Activating OSD menu
OK Making a selection, changing image display
▲ Moving upward
▼ Moving downward
◀
Moving leftward
(If you press this button 2 seconds long, you can access the
factory mode)
▶
Moving rightward
(If you press this button 2 seconds long, you can reset all the
data about user environment)
Remote Control
car-solutions.com [email protected]
car-s
olutio
ns.co
m

9
PARK
PAS TYPE:
Select parking line type.
NOT USED: Do not use parking line
PAS ON: No Use
PAS OFF: Use fixed parking line
PAS SETUP:
Move the position of parking line.
REAR TYPE:
Choose rear camera recognition.
CAN: Detecting the rear view camera by CAN signal. (Installer must connect
“CAN” cable of the power cable to the “CAN” cable of the car)
LAMP: Detecting the rear view camera via “Grey Rear” wire. (Installer must
connect “Rear-C” cable of the power cable to the rear lamp of the car)
FCAM TIME:
Front Camera Display Setting
PARK
UTIL1
UTIL2
INFO
PAS TYPE
PAS SETUP
REAR TYPE
FCAM TIME
Menu of FACTORY
MENU to Return SEL to Select/Save
Factory Settings
car-solutions.com [email protected]
car-s
olutio
ns.co
m
10
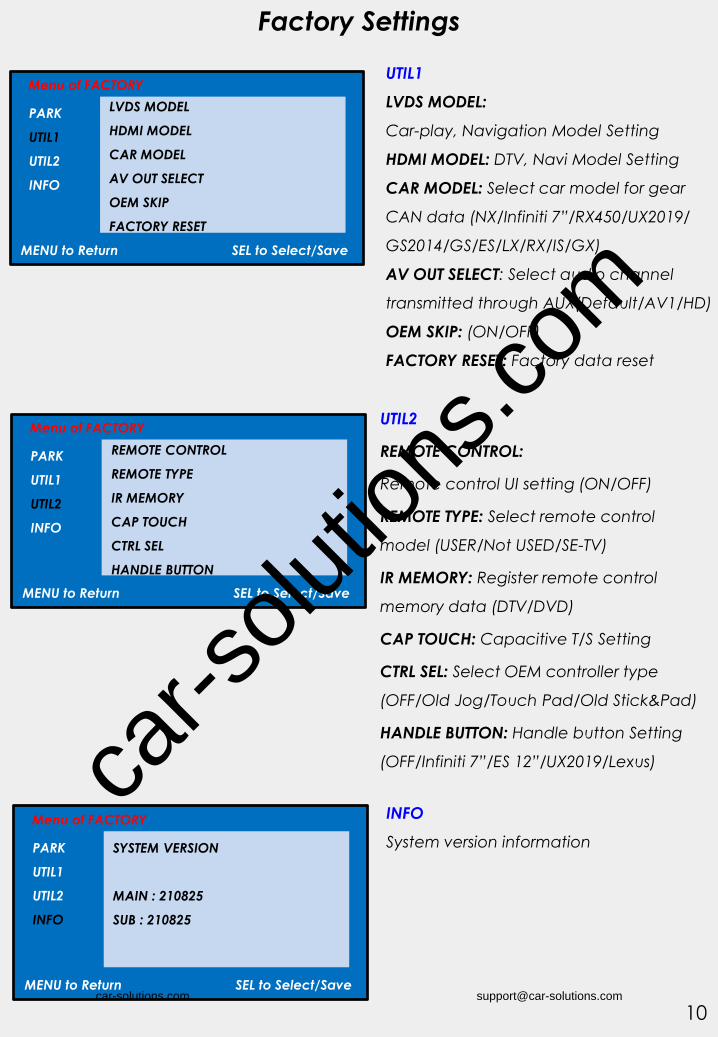
UTIL1
LVDS MODEL:
Car-play, Navigation Model Setting
HDMI MODEL: DTV, Navi Model Setting
CAR MODEL: Select car model for gear
CAN data (NX/Infiniti 7”/RX450/UX2019/
GS2014/GS/ES/LX/RX/IS/GX)
AV OUT SELECT: Select audio channel
transmitted through AUX(Default/AV1/HD)
OEM SKIP: (ON/OFF)
FACTORY RESET: Factory data reset
UTIL2
REMOTE CONTROL:
Remote control UI setting (ON/OFF)
REMOTE TYPE: Select remote control
model (USER/Not USED/SE-TV)
IR MEMORY: Register remote control
memory data (DTV/DVD)
CAP TOUCH: Capacitive T/S Setting
CTRL SEL: Select OEM controller type
(OFF/Old Jog/Touch Pad/Old Stick&Pad)
HANDLE BUTTON: Handle button Setting
(OFF/Infiniti 7”/ES 12”/UX2019/Lexus)
INFO
System version informationPARK
UTIL1
UTIL2
INFO
SYSTEM VERSION
MAIN : 210825
SUB : 210825
Menu of FACTORY
MENU to Return SEL to Select/Save
PARK
UTIL1
UTIL2
INFO
REMOTE CONTROL
REMOTE TYPE
IR MEMORY
CAP TOUCH
CTRL SEL
HANDLE BUTTON
Menu of FACTORY
MENU to Return SEL to Select/Save
PARK
UTIL1
UTIL2
INFO
LVDS MODEL
HDMI MODEL
CAR MODEL
AV OUT SELECT
OEM SKIP
FACTORY RESET
Menu of FACTORY
MENU to Return SEL to Select/Save
Factory Settings
car-solutions.com [email protected]
car-s
olutio
ns.co
m

11
1. Please disconnect OEM LCD cable from the back
side of monitor and connect it to supplied LCD cable
female connector.
2. Connect supplied LCD cable male connector to the
back side of monitor.
HDMI *1
[Optional]
Pin#2 is
UART-TX for
UART Touch
CARPLAY
Or Android
Box
AV In *1
Rear camera in *1
Front camera in *1
Aux out *1
OEM
Monitor
Supplied LCD
In/Out cable
OEM LCD cable
Power/CAN/ADC/AVC
connection made by
provided Jack by Jack
cable behind the head unit
Installation Diagram
car-solutions.com [email protected]
car-s
olutio
ns.co
m

12
HDMI IN
HD1P Sub Board
[Optional]
Pin#2 is
UART-TX for
UART Touch
Installation Diagram_ HD1P Sub board
car-solutions.com [email protected]
car-s
olutio
ns.co
m

13
Press high lighted OEM button for 3 seconds long to mode switch.
* Please access into Factory settings -> UTIL2 -> Handle button for the button usage.
Activation with OEM Button
car-solutions.com [email protected]
car-s
olutio
ns.co
m

14
Activation with OEM Button
Press high lighted OEM button for 3 seconds long to mode switch.
* Please access into Factory settings -> UTIL2 -> Handle button for the button usage.
car-solutions.com [email protected]
car-s
olutio
ns.co
m

15
Activation with OEM Button
Press high lighted OEM button for 3 seconds long to mode switch.
* Please access into Factory settings -> UTIL2 -> CTRL SEL for the button and
Joy Stick usage.
Please select Old Stick
and Pad for these
controller usage.
car-solutions.com [email protected]
car-s
olutio
ns.co
m

16
Activation with OEM Button
Press high lighted OEM button for 3 seconds long to mode switch.
* Please access into Factory settings -> UTIL2 -> CTRL SEL for the button and
Joy Stick usage.
Old Jog
Touch Pad
car-solutions.com [email protected]
car-s
olutio
ns.co
m
17
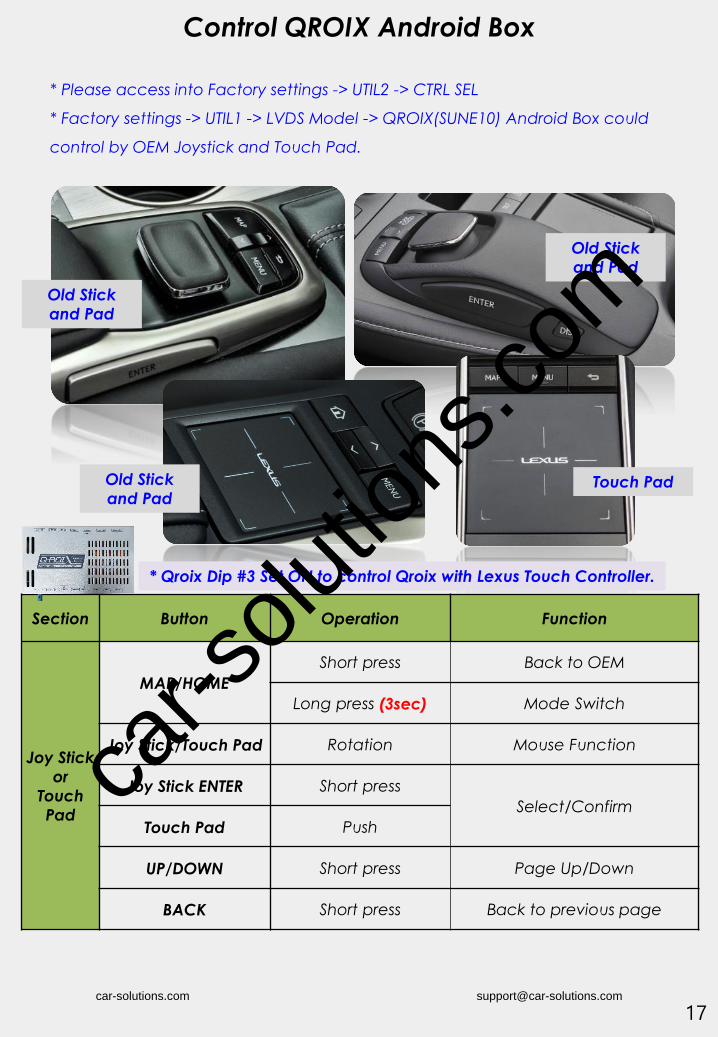
Control QROIX Android Box
* Please access into Factory settings -> UTIL2 -> CTRL SEL
* Factory settings -> UTIL1 -> LVDS Model -> QROIX(SUNE10) Android Box could
control by OEM Joystick and Touch Pad.
Section Button Operation Function
Joy Stick
or
Touch
Pad
MAP/HOME
Short press Back to OEM
Long press (3sec) Mode Switch
Joy Stick/Touch Pad Rotation Mouse Function
Joy Stick ENTER Short press
Select/Confirm
Touch Pad Push
UP/DOWN Short press Page Up/Down
BACK Short press Back to previous page
Old Stick
and Pad
Old Stick
and Pad
Old Stick
and Pad
Touch Pad
* Qroix Dip #3 Set ON to control Qroix with Lexus Touch Controller.
car-solutions.com [email protected]
car-s
olutio
ns.co
m

18
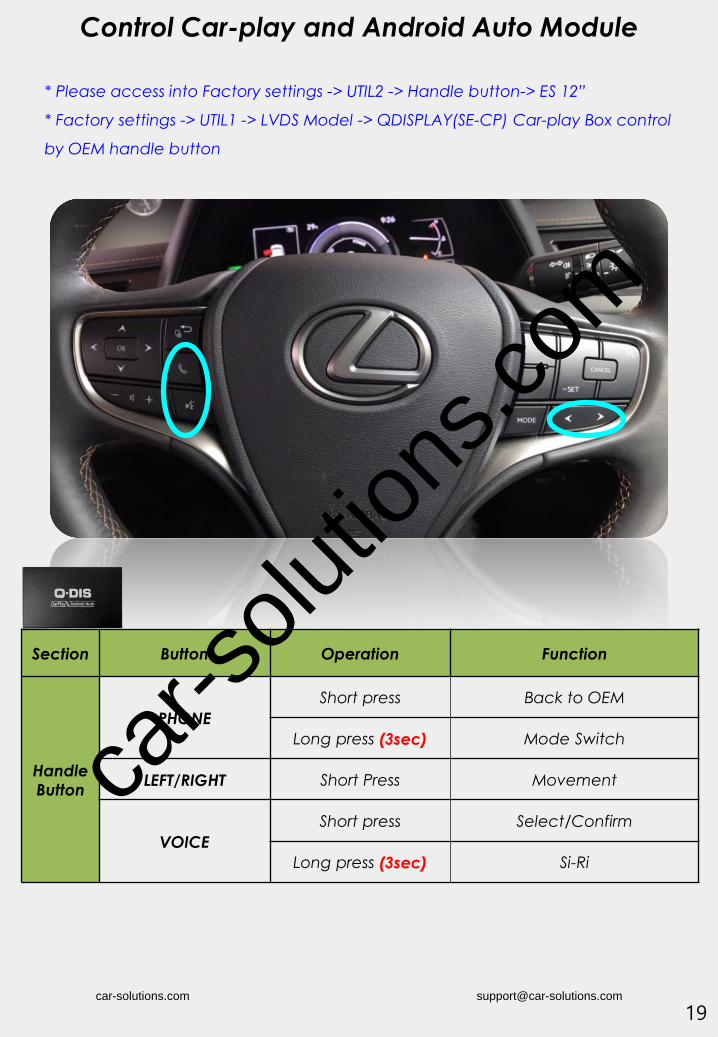
Control Car-play and Android Auto Module
* Please access into Factory settings -> UTIL2 -> CTRL SEL
* Factory settings -> UTIL1 -> LVDS Model -> QDISPLAY(SE-CP) Car-play Box
control by OEM Joystick and Touch Pad.
Section Button Operation Function
Joy Stick
or
Touch
Pad
MAP/HOME
Short press Back to OEM
Long press (3sec) Mode Switch
Joy Stick/Touch Pad Rotation Mouse Function
Joy Stick ENTER Short press
Select/Confirm
Touch Pad Push
Old Stick
and Pad
Old Stick
and Pad
Old Stick
and Pad
Touch Pad
car-solutions.com [email protected]
car-s
olutio
ns.co
m
19
* Please access into Factory settings -> UTIL2 -> Handle button-> ES 12”
* Factory settings -> UTIL1 -> LVDS Model -> QDISPLAY(SE-CP) Car-play Box control
by OEM handle button
Control Car-play and Android Auto Module
Section Button Operation Function
Handle
Button
PHONE
Short press Back to OEM
Long press (3sec) Mode Switch
LEFT/RIGHT Short Press Movement
VOICE
Short press Select/Confirm
Long press (3sec) Si-Ri
car-solutions.com [email protected]
car-s
olutio
ns.co
m


26
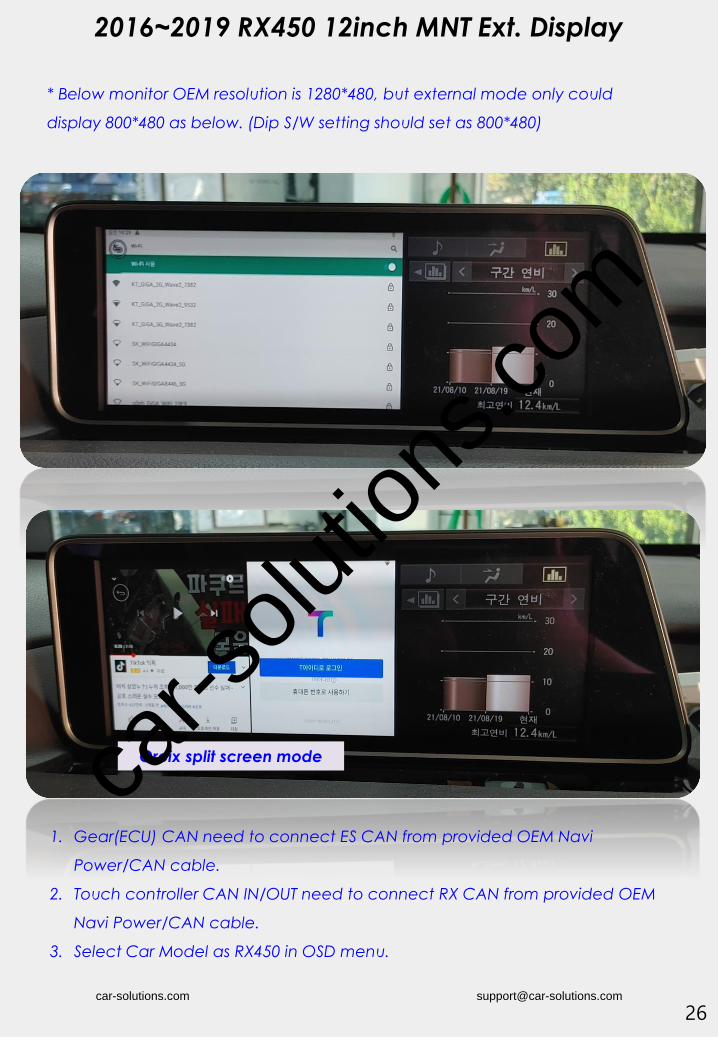
2016~2019 RX450 12inch MNT Ext. Display
* Below monitor OEM resolution is 1280*480, but external mode only could
display 800*480 as below. (Dip S/W setting should set as 800*480)
Qroix split screen mode
1. Gear(ECU) CAN need to connect ES CAN from provided OEM Navi
Power/CAN cable.
2. Touch controller CAN IN/OUT need to connect RX CAN from provided OEM
Navi Power/CAN cable.
3. Select Car Model as RX450 in OSD menu.
car-solutions.com [email protected]
car-s
olutio
ns.co
m

1. Ignition key should be taken off before starting installation, interface
power connection must be the last step in installation.
2. Power cable should be separated when connecting interface.
3. Should be no any electronic devices or magnetic pole around
installation place.
4. All steps of installation should be done by well-trained specialist.
5. Dismantling without manufacturer’s permission can not be guaranteed,
(No permission to break attached label on the board.)
6. Kindly check all parts are in the box, when receiving the product, if
anything missing, inform to the supplier or manufacturer.
7. According to our sales policy, any problems caused by user’s mistake,
careless can not be guaranteed.
27
Cautions Before Installation
car-solutions.com [email protected]
car-s
olutio
ns.co
m

28
Trouble shooting
Q. I cannot change mode
A. Check connection of Ground cable and IR Cable. Check LED lamp is on, if not
check connection of POWER cable.
Q. All I got on the screen is black.
A. Check second LED lamp of the interface is on, if not, check A/V sources
connected are working well. (Second lamp indicates AV sources connected works
well) Check interface connection has been done well.
Q. Displayed image color is not proper (too dark or unsuitable color)
A. Press ▶ button on the remote control for 2 seconds and check how it goes, if it
does not work, inform to manufacturer.
Q. I cannot watch the rear camera on the screen
A. Set the DIP switch #7 as state “ON”.
Q. Set mode not appear
A. Check DIP Switch.
Q. OEM image is not displayed.
A. Check interface’s LCD In/Out cable connection. If the status keeps on, inform to
manufacturer.
Q. Screen only displays white color.
A. Check LCD out cable is connected well, if this status keeps, inform to
manufacturer.
Q. If no image is shown on screen after connecting CAN wire with Park gear.
A. Go on the “FACTORY MODE”, check “UTIL-Rear Select”. If “LAMP”, change the
setting as “CAN” with the remote control. (* when connecting Rear-C wire of LAMP
power cable to Backup lights, Setting should be like this / CAN : if controlling rear
camera with CAN wire)
car-solutions.com [email protected]
car-s
olutio
ns.co
m