multi oscillator synthesis system korg - vintage … solo synthesizer players i basic guide multi...
TRANSCRIPT
Prophecy SOLO SYNTHESIZER
Players I Basic Guide
Multi Oscillator Synthesis System
KORG

IMPORTANT SAFETY INSTRUCTIONS WARNING- When using electrical products, basic precautions should be followed, including the following:
1. Read all the instructions before using the product.
2. Do not use this product near water - for example, near a bathtub, washbowl, kitchen sink, in a wet basement, or near a swimming pool, or the like.
3. This product should be used only with the cart or stand that is recommended by the manufacturer.
4. This product, either alone or in combination with an amplifier and headphones or speakers, may cause permanent hearing loss. Do not operate for a long period of time at a high volume level or at a level that is uncomfortable. If you experience any hearing loss or ringing in the ears, you should consult an audiologist.
5. The product should be located so that its location or position does not interfere with its proper ventilation.
6. The product should be located away from heat sources such as radiators, heat registers, or other products that produce heat.
7. The product should be connected to a power supply of the type described in the operating instructions or as marked on the product.
SAVE THESE INSTRUCTIONS
RISK OF ELECTRIC SHOCK DO NOT OPEN e
CAUTION: TO REDUCE THE RISK OF ELECTRIC SHOCK, DO NOT REMOVE
COVER (OR BACK). NO USER-SERVICEABLE PARTS INSIDE. REFER SERVICING TO
QUALIFIED SERVICE PERSONNEL.
GROUNDING INSTRUCTIONS
8. The power-supply cord of the product should be unplugged from the outlet when left unused for a long period of time.
9. Care should be taken so that objects do not fall and liquids are not spilled into the enclosure through openings.
10. The product should be serviced by qualified personnel when: A. The power-supply cord or the plug has been
damaged; or B. Objects have fallen, or liquid has been spilled
into the product; or C. The product has been exposed to rain; or D. The product does not appear to operate
normally or exhibits a marked change in performance; or
E. The product has been dropped, or the enclosure damaged.
11 . Do not attempt to service the product beyond that described in the user-maintenance instructions. All other servicing should be referred to qualified service personnel.
The lightning flash with the arrowhead symbol within an equilateral triangle, is intended to alert the user to the presence of uninsulated "dangerous voltage" within the product's enclosure that may be of sufficient magnitude to constitute a risk of electric shock. The exclamation point within an equilateral triangle is intended to alert the user to the presence of important operating and maintenance (servicing) instructions in the literature accompanying the product.
This product must be grounded (earthed). If it should malfunction or breakdown, grounding a path of least resistance for electric current to reduce the risk of electric shock. This product is equipped with a cord having an equipment-grounding conductor and a grounding plug. The plug must be plugged into an appropriate outlet that is properly installed and grounded in accordance with the local codes and ordinances. DANGER - Improperconnection of the equipment-grounding conductor can result in a risk of electric shock. Check with a qualified electrician or serviceman if you are in doubt as to whether the product is properly grounded. Do not modify the plug provided with the product- if it will not fit the outlet, have a proper outlet fitted.
THE FCC REGULATION WARNING This equipment generates and uses radio frequency energy and if not installed and used properly, that is, in strict accordance with the manufacturer's instructions, may cause interference to radio and television reception. It has been type tested and found to comply with the limits for a Class B computing device in accordance with the specifications in Subpart J of Part 15 FCC Rules, which are designed to provide reasonable protection against such interference in a residential installation. However, there is no guarantee that the interference will not occur in a particular installation. If this equipment does cause interference to radio and television reception, which can be determined by turning the equipment off and on, the user is encouraged to try to correct the interference by one or more of the following measures:
Reorientate the receiving antenna. Relocate the equipment with respect to the receiver. Move the equipment away from the receiver. Plug the equipment into a different outlet so that equipment and receiver are on different branch circuits.
If necessary, the user should consult the dealer or an experienced radio/television technician for additional suggestions. The user may find the following booklet prepared by the Federal Communications Commission helpful: "How to Identify and Resolve Radio-TV Interference Problems". This booklet is available from the U.S. Government Printing Office, Washington, D.C. 20402, Stock No. 004-000-00345-4.
CANADA THIS APPARATUS DOES NOT EXCEED THE "CLASS B" LIMITS FOR RADIO NOISE EMISSIONS FROM DIGITAL APPARATUS SET OUT IN THE RADIO INTERFERENCE REGULATION OF THE CANADIAN DEPARTMENT OF COMMUNICATIONS.
LE PRESENT APPAREIL NUMERIQUE N'EMET PAS DE BRUITS RADIOELECTRIQUES DEPASSANT LES LIMITES APPLICABLES AUX APPAREILS NUMERIQUES DE LA "CLASSE B" PRESCRITES DANS LE REGLEMENT SUR LE BROUILLAGE RADIOELECTRIQUE EDICTE PARLE MINISTERE DES COMMUNICATIONS DU CANADA.
CE mark for European Harmonized Standards CE mark which is attached to our company's products of AC mains operated apparatus until December 31, 1996 means it conforms to EMC Directive (89/336/EEC) and CE mark Directive (93/68/EEC). And, CE mark which is attached after January 1, 1997 means it conforms to EMC Directive (89/336/EEC), CE mark Directive (93/68/ EEC) and Low Voltage Directive (73/23/EEC). Also, CE mark which is attached to our company's products of Battery operated apparatus means it conforms to EMC Directive (89/336/ EEC) and CE mark Directive (93/68/EEC).
Precautions Location Using the unit in the following location can result in malfunction. •In direct sunlight •Locations of extreme temperature or humidity •Excessively dusty or dirty locations •Locations of excessive vibration
Power supply Please connect the AC power cable to an AC outlet of the correct voltage. Do not connect it to an AC outlet of voltage other than for which your unit is intended.
Interference with other electrical devices This unit contains a microcomputer. Radios and televisions placed nearby may experience reception interference. Operate this unit at a suitable distance from radios and televisions.
The Backup Battery The Prophecy SOLO SYNTHESIZER contains a battery that preserves its memory settings when the power is turned off. When the display indicates "*INTERNAL BATTERY IS LOW.", please
Memory Card RAM The RAM card (SRC-512) requires battery power in order to
preserve data in memory. The included lithium battery (type CR2016) should be put in place before use.
Installing the battery Turn the card over to the side without the terminal. You will find a slot in the battery holder. Install the lithium battery in the holder with the"+" side up.
Write Protect Switch No data can be written on the card when this switch is set to "ON". To preserve data, set this switch to ON, except when writing new data.
Replacing Lithium Battery Power from the lithium battery is used to protect data held in memory. The battery should be replaced once a year. However,
Handling To avoid breakage, do not apply excessive force to the switches or controls.
Care If the exterior becomes dirty, wipe it with a clean, dry cloth. Do not use liquid cleaners such as benzene or thinner, or cleaning compounds or flammable polishes.
Keep this manual After reading this manual, please keep it for later reference.
contact your dealer or a nearby Korg service center to have the battery replaced.
battery life is shortened if kept at temperatures exceeding 40 degrees centigrade. (104 Fahrenheit) Always use a CR2016 type lithium battery. When replacing the battery, leave the card in the unit with unit power ON. This will preserve the contents of the memory. If the card is removed before battery replacement, memory contents will be lost.
*The names of the Programs, Combinations, Multisounds, etc. appearing in the displays given as examples in this manual do not necessarily correspond to any internal data.
SOLO SYNTHESIZER
OCT
Q ==============
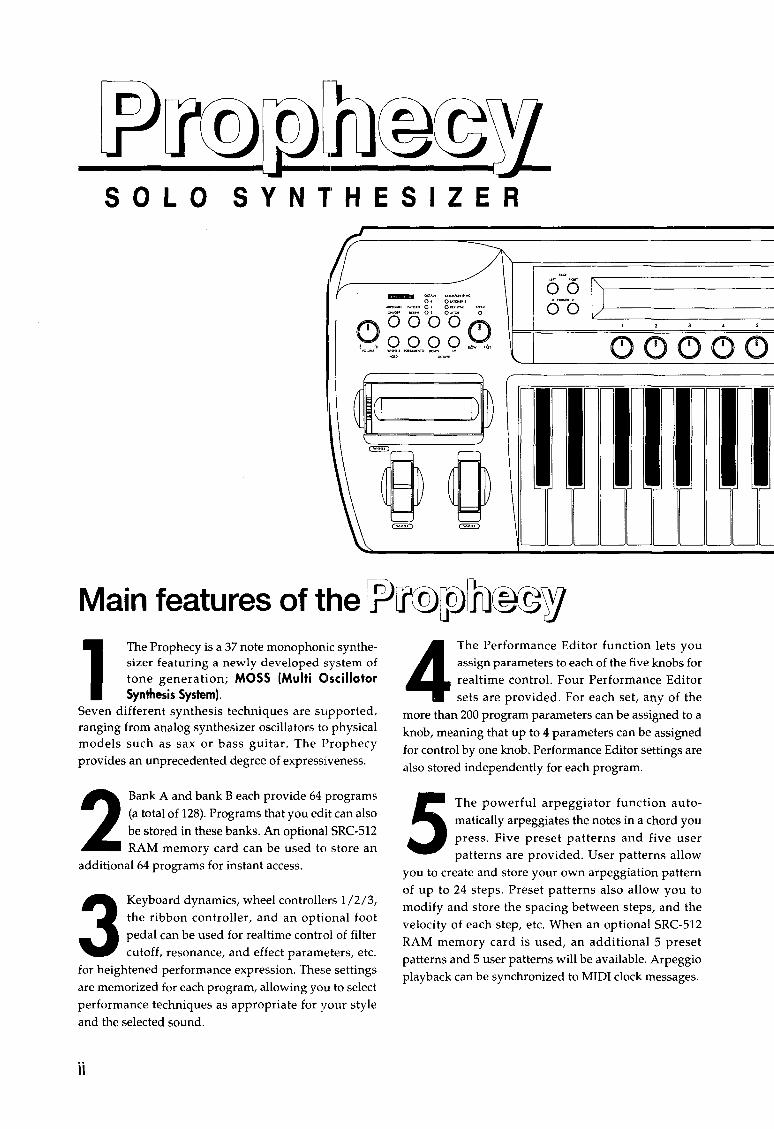
Main features of the Prophecy
1 The Prophecy is a 37 note monophonic synthe-sizer featuring a newly developed sys~em of tone generation; MOSS (Multi Oscillator Synthesis System).
Seven different synthesis techniques are supported, ranging from analog synthesizer oscillators to physical models such as sax or bass guitar. The Prophecy provides an unprecedented degree of expressiiveness.
2 Bank A and bank B each provide 64 programs (a total of 128). Programs that you eedit can also be stored in these banks. An optional SRC-512 RAM memory card can be used to store an
additional 64 programs for instant access.
3 Keyboard dynamics, wheel controllers 1/2/3, the ribbon controller, and an optional foot pedal can be used for realtime control of filter cutoff, resonance, and effect parameters, etc.
for heightened performance expression. These settings are memorized for each program, allowing you to select performance techniques as appropriate for your style and the selected sound.
ii
4 The Performance Editor function lets you assign parameters to each of the five knobs. for realtime control. Four Performance Editor sets are provided. For each set, any of the
more than 200 program parameters can be assigned to a knob, meaning that up to 4 parameters can be assigned for control by one knob. Performance Editor settings are also stored independently for each program.
5 The powerful arpeggiator function auto-matically arpeggiates the notes in a chordyou press. Five preset patterns and five user patterns are provided. User patterns allow
you to create and store your own arpeggiation pattern of up to 24 steps. Preset patterns also allow you to modify and store the spacing between steps, and the velocity of each step, etc. When an optional SRC-512 RAM memory card is used, an additional 5 preset patterns and 5 user patterns will be available. Arpeggio playback can be synchronized to MIDI clock messages.
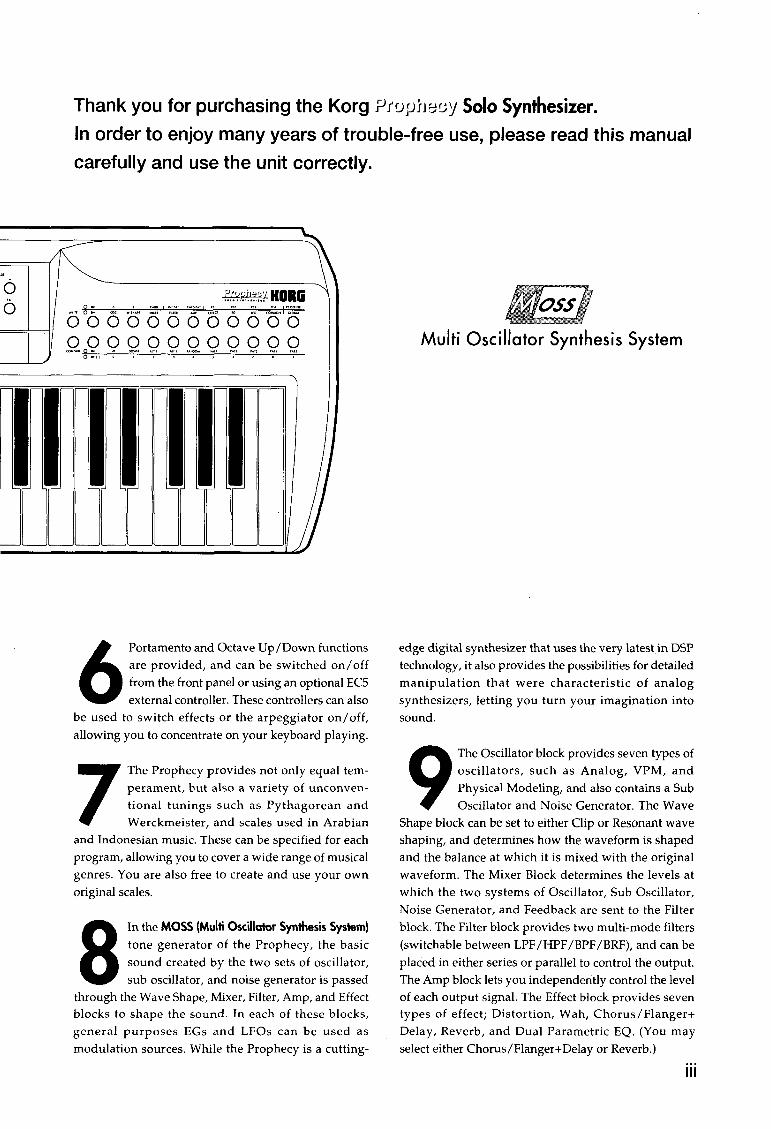
Thank you for purchasing the Korg ProphecySolo Synthesizer. In order to enjoy many years of trouble-free use, please read this manual carefully and use the unit correctly.
: w
Q
6 Portamento and Octave Up /Down functions are provided, and can be switched on/ off from the front panel or using an optional ECS external controller. These controllers can also
be used to switch effects or the arpeggiator on/ off, allowing you to concentrate on your keyboard playing.
7 The Prophecy provides not only equal tem-perament, but also a variety of unconven-tional tunings such as Pythagorean and Werckmeister, and scales used in Arabian
and Indonesian music. These can be specified for each program, allowing you to cover a wide range of musical genres. You are also free to create and use your own original scales.
8 In the MOSS (Multi Oscillator Syntnesis System) tone generator of the Prophecy, the basic sound created by the two sets of oscillator, sub oscillator, and noise generator is passed
through the Wave Shape, Mixer, Filter, Amp, and Effect blocks to shape the sound. In each of these blocks, general purposes EGs and LFOs can be used as modulation sources. While the Prophecy is a cutting-
Multi Oscillator Synthesis System
edge digital synthesizer that uses the very latest in DSP technology, it also provides the possibilities for detailed manipulation that were characteristic of analog synthesizers, letting you turn your imagination into sound.
9 The Oscillator block provides seven types of oscillators, such as Analog, VPM, and Physical Modeling, and also contains a Sub Oscillator and Noise Generator. The Wave
Shape block can be set to either Clip or Resonant wave shaping, and determines how the waveform is shaped and the balance at which it is mixed with the original waveform. The Mixer Block determines the levels at which the two systems of Oscillator, Sub Oscillator, Noise Generator, and Feedback are sent to the Filter block. The Filter block provides two multi-mode filters (switchable between LPF /HPF /BPF /BRF), and can be placed in either series or parallel to control the output. The Amp block lets you independently control the level of each output signal. The Effect block provides seven types of effect; Distortion, Wah, Chorus/Flanger+ Delay, Reverb, and Dual Parametric EQ. (You may select either Chorus/Flanger+Delay or Reverb.)
Ill
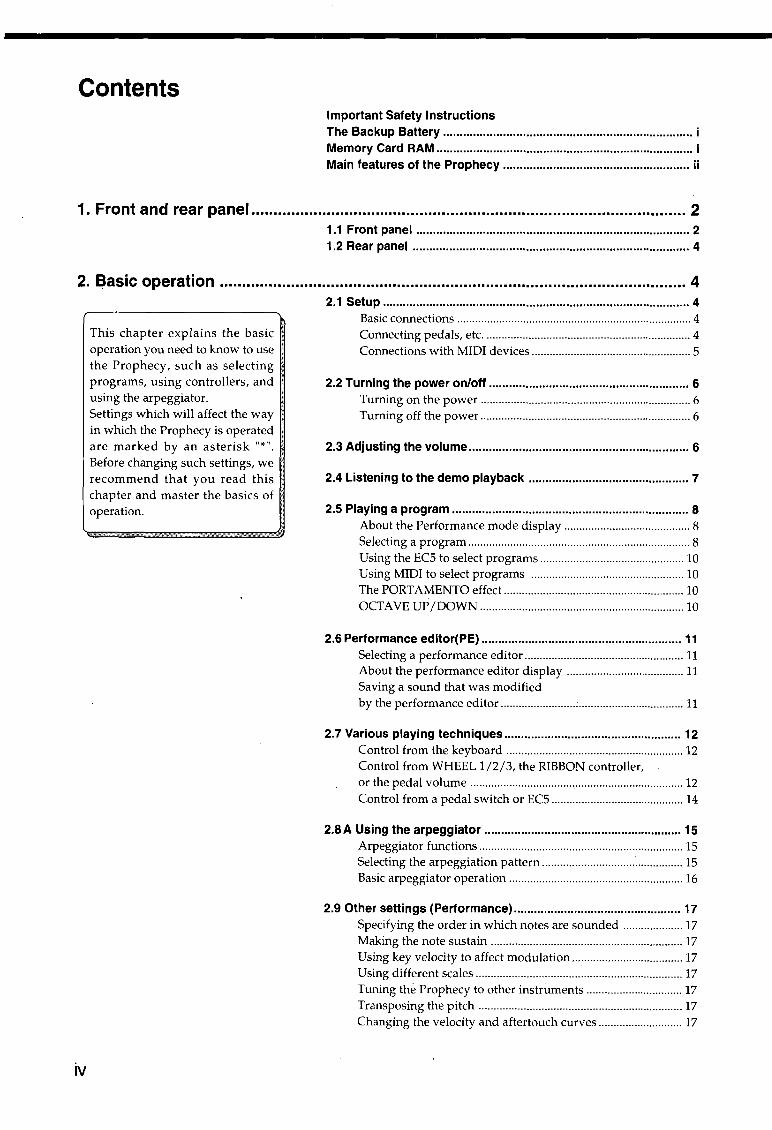
Contents Important Safety Instructions The Backup Battery ........................................................................... i Memory Card RAM ............................................................................. i Main features of the Prophecy ........................................................ ii
1. Front and rear panel .................................................................................................. 2 1.1 Front panel .................................................................................. 2 1.2 Rear panel ................................................................................... 4
2. Basic operation ......................................................................................................... 4
iv
This chapter explains the basic operation you need to know to use the Prophecy, such as selecting programs, using controllers, and using the arpeggiator. Settings which will affect the way in which the Prophecy is operated are marked by an asterisk "*".
Before changing such settings, we recommend that you read this chapter and master the basics of operation.
2.1 Setup ............................................................................................ 4 Basic connections .............................................................................. 4 Connecting pedals, etc. .................................................................... 4 Connections with MIDI devices ..................................................... 5
2.2 Turning the power on/off ............................................................ 6 Turning on the power ...................................................................... 6 Turning off the power ...................................................................... 6
2.3 Adjusting the volume .................................................................. 6
2.4 Listening to the demo playback ................................................ 7
2.5 Playing a program ....................................................................... 8 About the Performance mode display .......................................... 8 Selecting a program .......................................................................... 8 Using the EC5 to select programs ................................................ 10 Using MIDI to select programs ................................................... 10 The PORTAMENTO effect ............................................................ 10 OCTAVE UP /DOWN .................................................................... 10
2.6 Performance editor(PE) ............................................................ 11 Selecting a performance editor ..................................................... 11 About the performance editor display ....................................... 11 Saving a sound that was modified by the performance editor ............................................................. 11
2.7 Various playing techniques ..................................................... 12 Control from the keyboard ........................................................... 12 Control from WHEEL 1/2/3, the RIBBON controller, or the pedal volume ....................................................................... 12 Control from a pedal switch or EC5 ............................................ 14
2.8 A Using the arpeggiator ........................................................... 15 Arpeggiator functions .................................................................... 15 Selecting the arpeggiation pattern ............................... ............... 15 Basic arpeggiator operation .......................................................... 16
2.9 Other settings (Performance) .................................................. 17 Specifying the order in which notes are sounded .................... 17 Making the note sustain ................................................................ 17 Using key velocity to affect modulation ..................................... 17 Using different scales ..................................................................... 17 Tuning the Prophecy to other instruments ................................ 17 Transposing the pitch .................................................................... 17 Changing the velocity and aftertouch curves ............................ 17
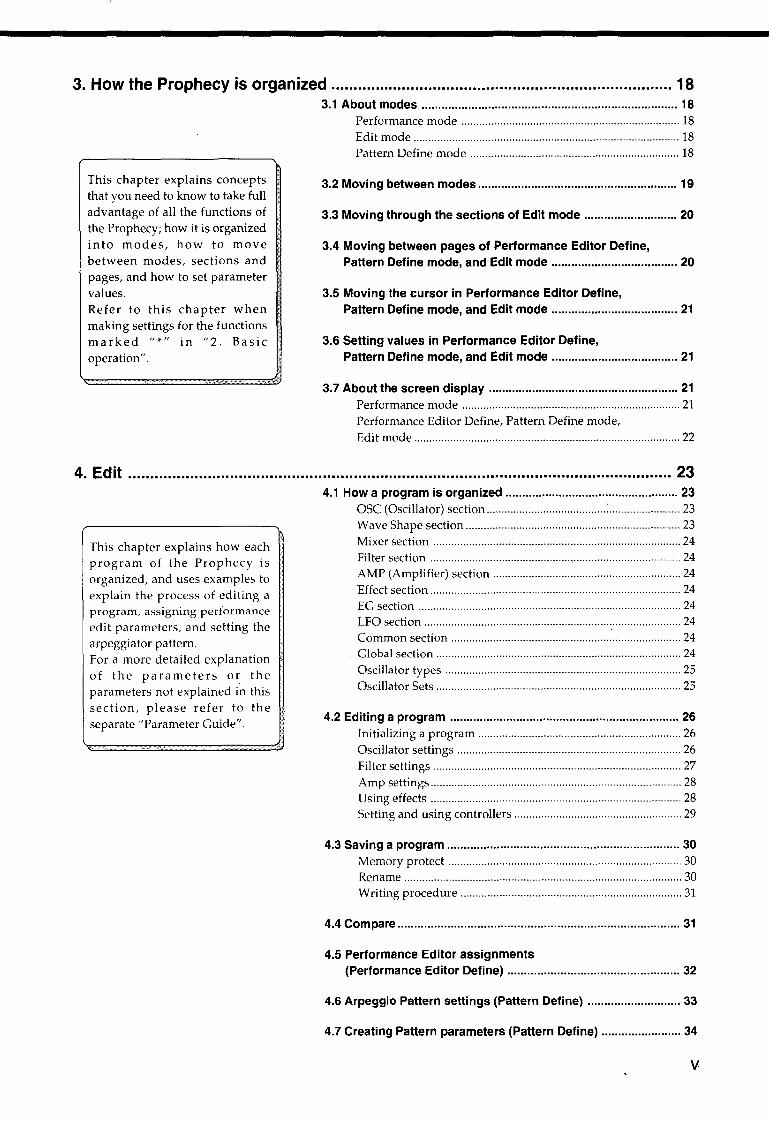
3. How the Prophecy is organized ............................................................................. 18
This chapter explains concepts that you need to know to take full advantage of all the functions of the Prophecy; how it is organized into modes, how to move between modes, sections and pages, and how to set parameter values. Refer to this chapter when making settings for the functions marked "*" in "2. Basic operation".
3.1 About modes ............................................................................. 18 Performance mode oooo 18 Edit mode 18 Pattern Define mode ... oooooooooooooooo 18
3.2 Moving between modes ............................................................ 19
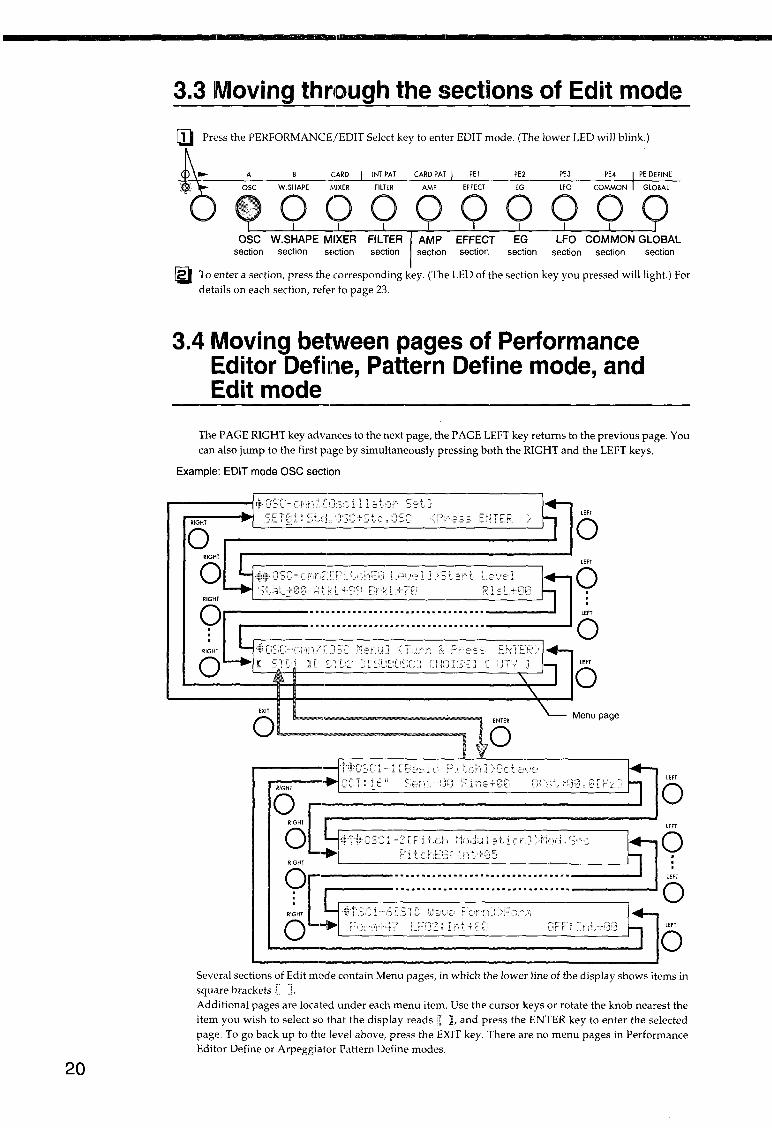
3.3 Moving through the sections of Edit mode ............................ 20
3.4 Moving between pages of Performance Editor Define, Pattern Define mode, and Edit mode ...................................... 20
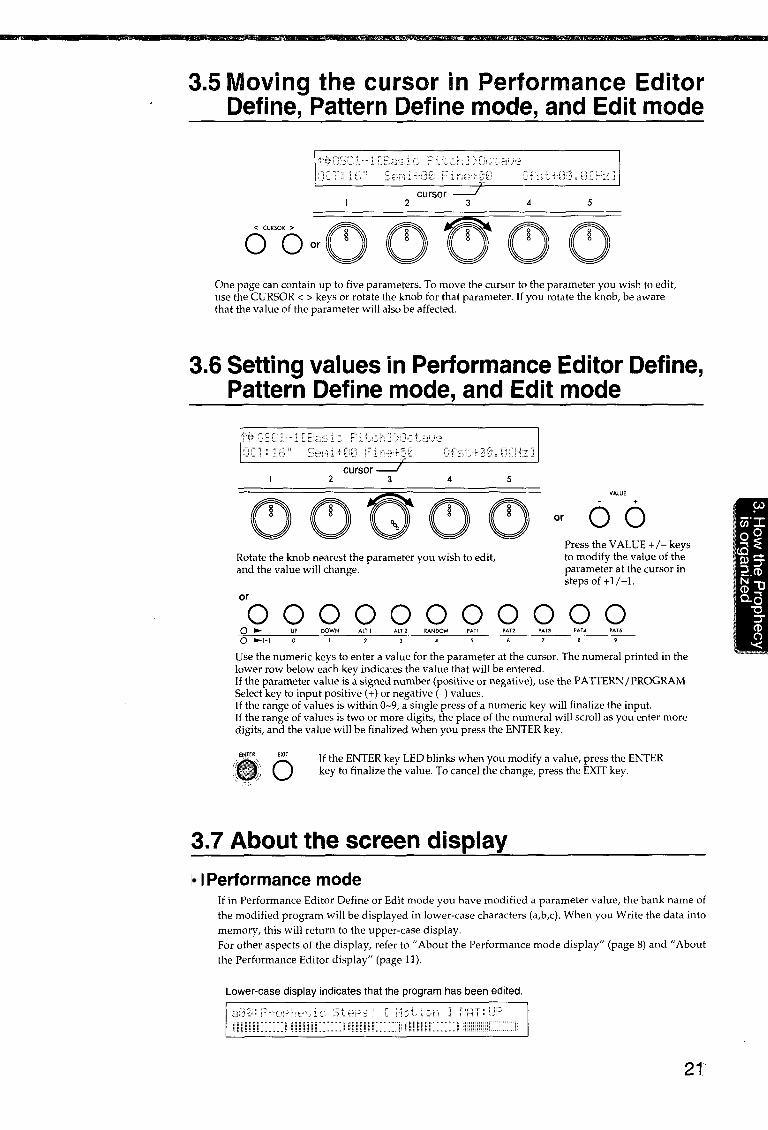
3.5 Moving the cursor in Performance Editor Define, Pattern Define mode, and Edit mode ...................................... 21
3.6 Setting values in Performance Editor Define, Pattern Define mode, and Edit mode ...................................... 21
3. 7 About the screen display ......................................................... 21 Performance mode .oo oo 21 Performance Editor Define, Pattern Define mode, Edit mode ......................................................................................... 22
4. Edit ........................................................................................................................... 23
This chapter explains how each program of the Prophecy is organized, and uses examples to explain the process of editing a program, assigning performance edit parameters, and setting the arpeggiator pattern. For a more detailed explanation of the parameters or the parameters not explained in this section, please refer to the separate "Parameter Guide".
4.1 How a program is organized .................................................... 23 OSC (Oscillator) section 23 Wave Shape section ..... 23 Mixer section .. 24 Filter section .oo ........ 24 AMP (Amplifier) section .oo oooooooooo oo 24 Effect section .. oo. oo oo .oo oo ............. .oo oo. oooo ............ oo oo 24 EG section .. oo .......... oo ................ oooo ............ 24 LFO section oo oo oo .oo. oo.oooo .oo 24 Common section ... oo oo .oo oo oo oo .oo .oo oooo 24 Global section oo .......... oo .oo oo oo 24 Oscillator types ............................................................................... 25 Oscillator Sets oooo ....... oo .oo. oooo oo .oo .oo .oooo oo .oo. 25
4.2 Editing a program ..................................................................... 26 Initializing a program ... oooooooooooo oooooooooo 26 Oscillator settings 26 Filter settings ............. oo .oooooooo oo oo .oooo oo oo oo 27 Amp settings .oo oooo ............ oo oo oo ............. oo. 28 Using effects ............. .......... oo.oo ........... 28 Setting and using controllers oo oo oo ............ oo oooo 29
4.3 Saving a program ...................................................................... 30 Memory protect ....... oo oo oo ............ oo ooo.oo ........ oo. oo. 30 Rename ............................................................................................. 30 Writing procedure 31
4.4 Compare ..................................................................................... 31
4.5 Performance Editor assignments (Performance Editor Define) .................................................... 32
4.6 Arpeggio Pattern settings (Pattern Define) ............................ 33
4.7 Creating Pattern parameters (Pattern Define) ........................ 34
v
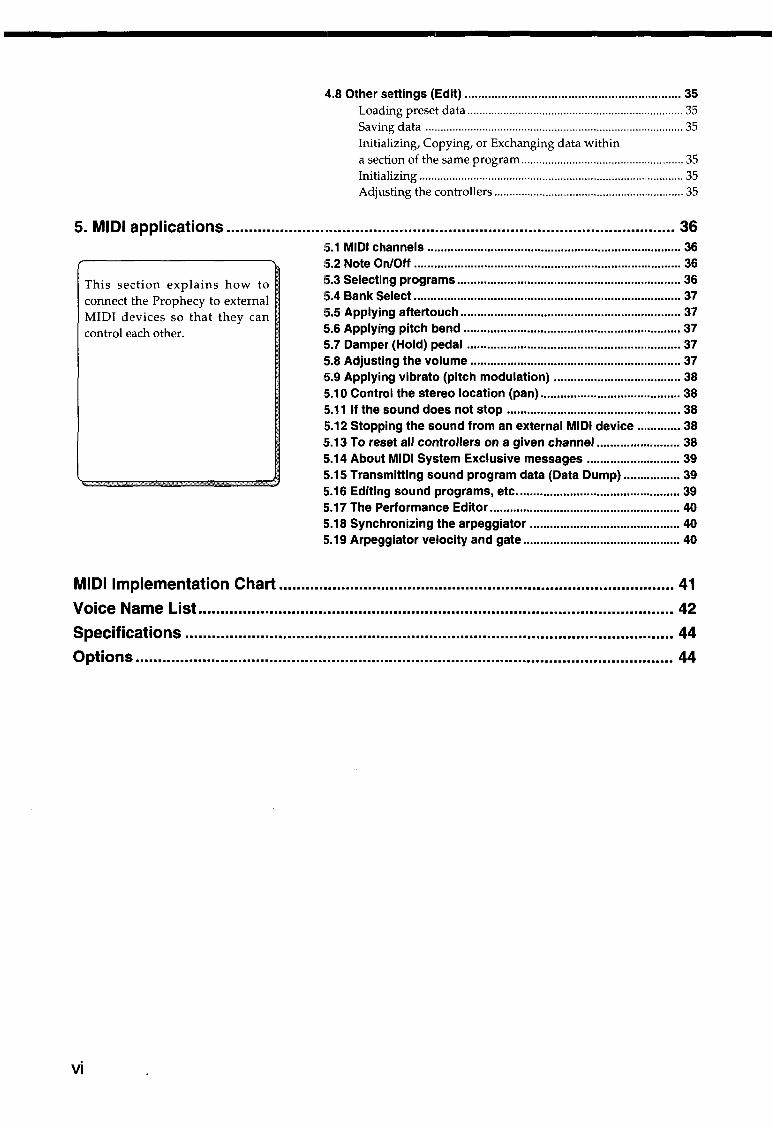
4.8 Other settings (Edit) ................................................................. 35 Loading preset data ........................................................................ 35 Saving data ...................................................................................... 35 Initializing, Copying, or Exchanging data within a section of the same program ...................................................... 35 Initializing ........................................................................................ 35 Adjusting the controllers ............................................................... 35
5. MIDI applications ..................................................................................................... 36
This section explains how to connect the Prophecy to external MIDI devices so that they can control each other.
!5.1 MIDI channels ............................................................................ 36 !5.2 Note On/Off ................................................................................ 36 !5.3 Selecting programs ................................................................... 36 5.4 Bank Select ................................................................................ 37 5.5 Applying attertouch .................................................................. 37 5.6Applying pitch bend ................................................................. 37 !5.7 Damper (Hold) pedal ................................................................ 37 !5.8 Adjusting the volume ............................................................... 37 5.9Applying vibrato (pitch modulation) ...................................... 38 5.10Control the stereo location (pan) .......................................... 38 :5.11 If the sound does not stop ..................................................... 38 5.12 Stopping the sound from an external MIDI device ............. 38 5.13 To reset all controllers on a given channel ......................... 38 5.14 About MIDI System Exclusive messages ............................ 39 5.15 Transmitting sound program data (Data Dump) ................. 39 5.16 Editing sound programs, etc ................................................. 39 5.17 The Performance Editor ......................................................... 40 5.18 Synchronizing the arpeggiator ............................................. 40 5.19 Arpeggiator velocity and gate ............................................... 40
MIDI Implementation Chart ......................................................................................... 41 Voice Name List ..................•........................................................................................ 42 Specifications .............................................................................................................. 44 Options ......................................................................................................................... 44
vi

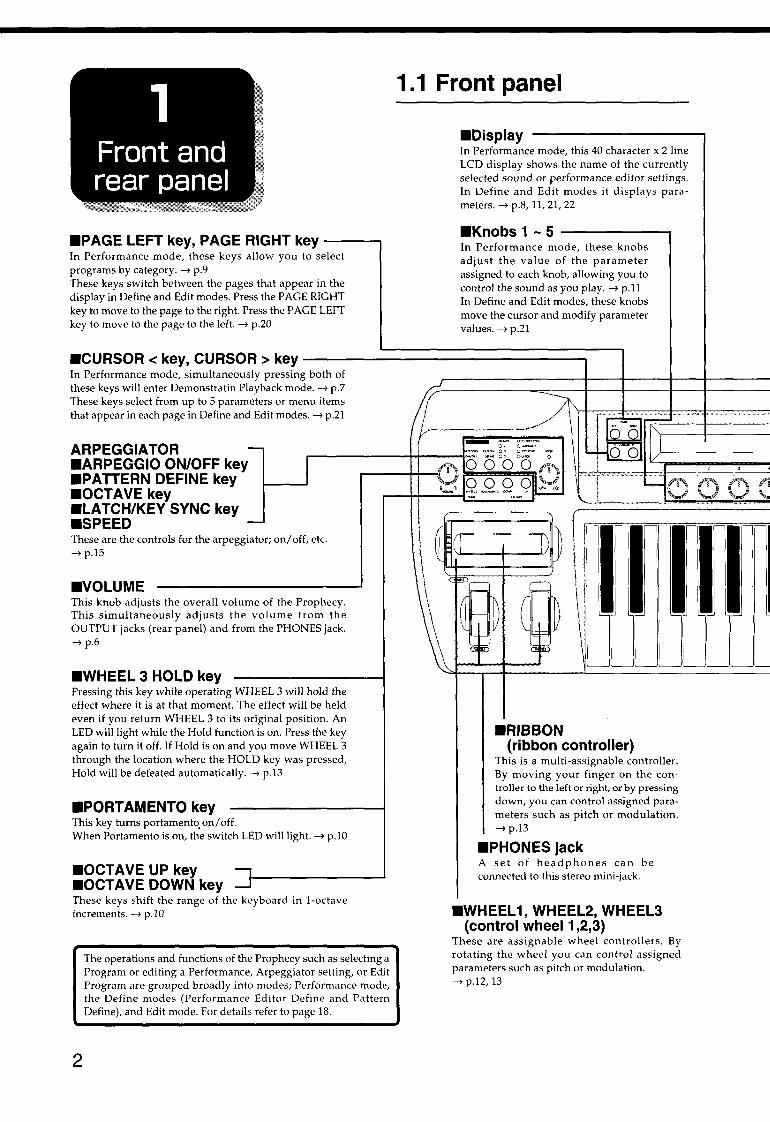
•PAGE LEFT key, PAGE RIGHT key In Performance mode, these keys allow you to select programs by category.--> p.9 These keys switch between the pages that appear in the display in Define and Edit modes. Press the PAGE RIGHT key to move to the page to the right. Press the PAGE LEFT key to move to the page to the left. --> p.20
1.1 Front panel
•Display In Performance mode, this 40 character x 2 line LCD display shows the name of the currently selected sound or performance editor settings. In Define and Edit modes it displays para-meters. --> p.8, 11, 21, 22
•Knobs 1-5 In Performance mode, these knobs adjust the value of the parameter assigned to each knob, allowing you to control the sound as you play. --> p.ll In Define and Edit modes, these knobs move the cursor and modify parameter values. --> p.21
•CURSOR <key, CURSOR> key-------------..., In Performance mode, simultaneously pressing both of these keys will enter Demonstratin Playback mode. --> p.7 These keys select from up to 5 parameters or menu items that appear in each page in Define and Edit modes.--> p.21
ARPEGGIATOR •ARPEGGIO ON/OFF key .PATTERN DEFINE key •OCTAVE key •LATCH/KEY SYNC key •SPEED These are the controls for the arpeggiator; on/ off, etc. --> p.15
•VOLUME This knob adjusts the overall volume of the Prophecy. This simultaneously adjusts the volume from the OUTPUT jacks (rear panel) and from the PHONES jack. --> p.6
•WHEEL 3 HOLD key Pressing this key while operating WHEEL 3 will hold the effect where it is at that moment. The effect will be held even if you return WHEEL 3 to its original position. An LED will light while the Hold function is on. Press the key again to turn it off. If Hold is on and you move WHEEL 3 through the location where the HOLD key was pressed, Hold will be defeated automatically.--> p.13
•PORTAMENTO key This key turns portamento. on/ off. When Portamento is on, the switch LED will light.--> p.10
•OCTAVE UP key •OCTAVE DOWN key These keys shift the range of the keyboard in 1-octave increments.--> p.IO
2
The operations and functions of the Prophecy such as selecting a Program or editing a Performance, Arpeggiator setting, or Edit Program are grouped broadly into modes; Performance mode, the Define modes (Performance Editor Define and Pattern Define), and Edit mode. For details refer to page 18.
•RIBBON (ribbon controller)
This is a multi-assignable controller. By moving your finger on the con-troller to the left or right, or by pressing down, you can control assigned para-meters such as pitch or modulation. --> p.13
•PHONES jack A set of headphones can be connected to this stereo mini-jack.
•WHEEL 1, WHEEL2, WHEEL3 (control wheel1 ,2,3)
These are assignable wheel controllers. By rotating the wheel you can control assigned parameters such as pitch or modulation. --> p.12, 13
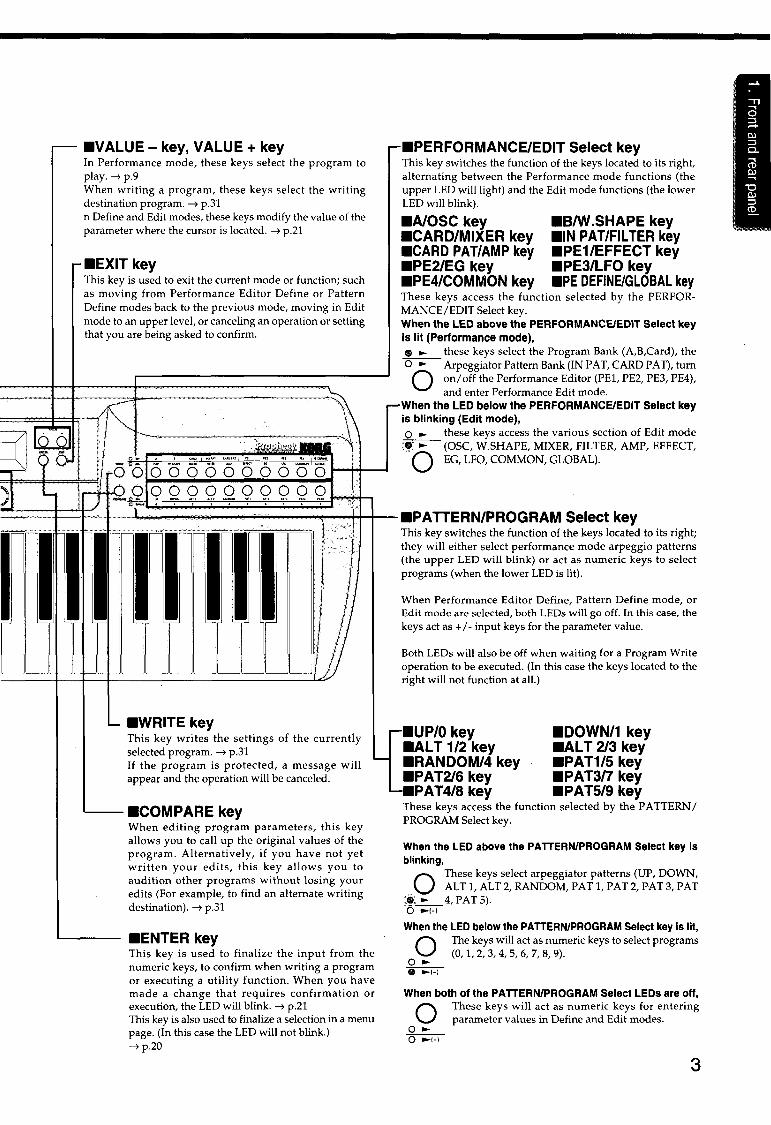
•VALUE- key, VALUE+ key In Performance mode, these keys select the program to play. --7 p.9 When writing a program, these keys select the writing destination program. --7 p.31 n Define and Edit modes, these keys modify the value of the parameter where the cursor is located. --> p.21
•EXIT key This key is used to exit the current mode or function; such as moving from Performance Editor Define or Pattern Define modes back to the previous mode, moving in Edit mode to an upper level, or canceling an operation or setting that you are being asked to confirm.
•PERFORMANCE/EDIT Select key This key switches the function of the keys located to its right, alternating between the Performance mode functions (the upper LED will light) and the Edit mode functions (the lower LED will blink).
•A/OSC key •CARD/MIXER key •CARD PAT/AMP key •PE2/EG key •PE4/COMMON key
•B/W.SHAPE key •IN PAT/FILTER key •PE1/EFFECT key •PE3/LFO key •PE DEFINE/GLOBAL key
These keys access the function selected by the PERFOR-MANCE/EDIT Select key. When the LED above the PERFORMANCE/EDIT Select key is lit (Performance mode),
these keys select the Program Bank (A,B,Card), the Arpeggiator Pattern Bank (IN PAT, CARD PAT), turn on/off the Performance Editor (PEl, PE2, PE3, PE4), and enter Performance Edit mode.
When the LED below the PERFORMANCE/EDIT Select key is blinking (Edit mode), o these keys access the various section of Edit mode
(OSC, W.SHAPE, MIXER, FILTER, AMP, EFFECT, EG, LFO, COMMON, GLOBAL).
Pattern/ProgramSelect key
•WRITE key This key writes the settings of the currently selected program. p.31 If the program is protected, a message will appear and the operation will be canceled.
•COMPARE key When editing program parameters, this key allows you to call up the original values of the program. Alternatively, if you have not yet written your edits, this key allows you to audition other programs without losing your edits (For example, to find an alternate writing destination). p.31
•ENTER key This key is used to finalize the input from the numeric keys, to confirm when writing a program or executing a utility function. When you have made a change that requires confirmation or execution, the LED will blink. p.21 This key is also used to finalize a selection in a menu page. (In this case the LED will not blink.) --7 p.20
This key switches the function of the keys located to its right; they will either select performance mode arpeggio patterns (the upper LED will blink) or act as numeric keys to select programs (when the lower LED is lit).
When Performance Editor Define, Pattern Define mode, or Edit mode are selected, both will go off. In this case, the keys act as +I- input keys for the parameter value.
Both LEDswill also be off when waiting for a Program Write operation to be executed. (In this case the keys located to the right will not function at all.)
P/0 key •ALT 1/2 key •RANDOM/4 key •PAT2/6 key
DOWN/1key •ALT 2/3 key •PAT115 key •PAT3/7key
PAT4/8 key •PAT5/9 key These keys access the function selected by the PATTERN I PROGRAM Select key.
When the LED above the PATTERN/PROGRAM Select key is blinking,
These keys select arpeggiator patterns (UP, DOWN, ALT 1, ALT 2, RANDOM, PAT 1, PAT 2, PAT 3, PAT
When the LED below the PATTERN/PROGRAM Select key is lit, The keys will act as numeric keys to select programs
9).
When both of the PATTERN/PROGRAM Select LEOs are off, These keys will act as numeric keys for entering parameter values in Define and Edit modes.
3
2 Basic
operation
•MEMORY CARD
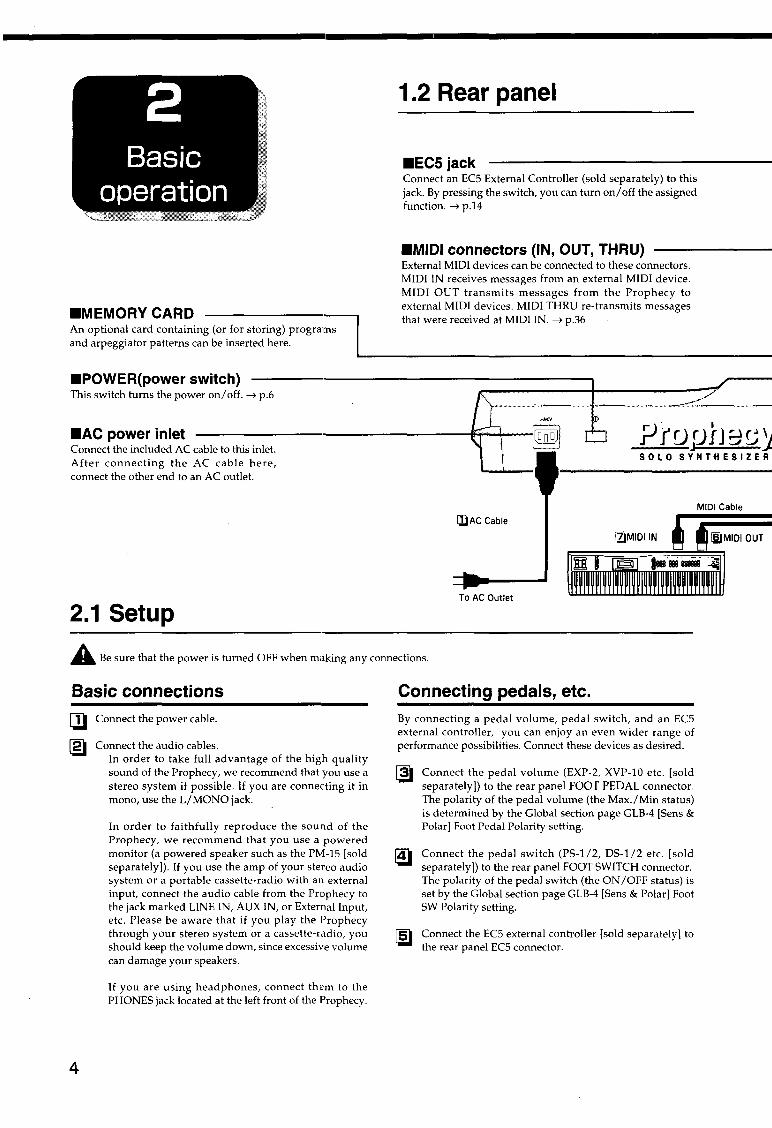
1.2 Rear panel
•ECS jack Connect an ECS External Controller (sold separately) to this jack. By pressing the switch, you can turn on/ off the assigned function. p.14
•MIDI connectors (IN, OUT, THRU) External MIDI devices can be connected to these connectors. MIDI IN receives messages from an external MIDI device. MIDI OUT transmits messages from the Prophecy to external MIDI devices. MIDI THRU re-transmits messages that were received at MIDI IN. p.36
An optional card containing (or for storing) programsand arpeggiator patterns can be inserted here.
~-----------------------------------------------------•POWER(power switch) This switch turns the power on/off. p.6
•Ac power inlet Connect the included AC cable to this inlet. After connecting the AC cable here, connect the other end to an AC outlet.
2.1 Setup
Cable
To AC Outlet
ProphecySOLO SYNTHESIZER
MIDI Cable
Be sure that the power is turned OFF when making any connections.
Basic connections
4
Connect the power cable.
Connect the audio cables. In order to take full advantage of the high quality sound of the Prophecy, we recommend that you use a stereo system if possible. If you are connectingit in mono, use the L/MONO jack.
In order to faithfully reproduce the sound of the Prophecy, we recommend that you use a powered monitor (a powered speaker such as the PM-15 [sold separately]). If you use the amp of your stereo audio system or a portable cassette-radio with an external input, connect the audio cable from the Prophecy to the jack marked LINE IN, AUXIN, or External Input, etc. Please be aware that if you play the Prophecy through your stereo system or a cassette-radio, you should keep the volume down, since excessive volume can damage your speakers.
If you are using headphones, connect them to the PHONES jack located at the left front of the Prophecy.
Connecting pedals, etc. By connecting a pedal volume, pedal switch, and an ECS external controller, you can enjoy an even wider range of performance possibilities. Connect these devices as desired.
Connect the pedal volume (EXP-2, XVP-10 etc. [sold separately]) to the rear panel FOOT PEDAL connector. The polarity of the pedal volume (the Max./Min status) is determined by the Global section page GLB-4 [Sens & Polar] Foot Pedal Polarity setting.
Connect the pedal switch (PS-1/2, DS-1/2 etc. [sold separately]) to the rear panel FOOT SWITCH connector. The polarity of the pedal switch (the ON/OFF status) is set by the Global section page GLB-4 [Sens & Polar] Foot SW Polarity setting.
Connect the ECS external controller [sold separately] to the rear panel ECS connector.
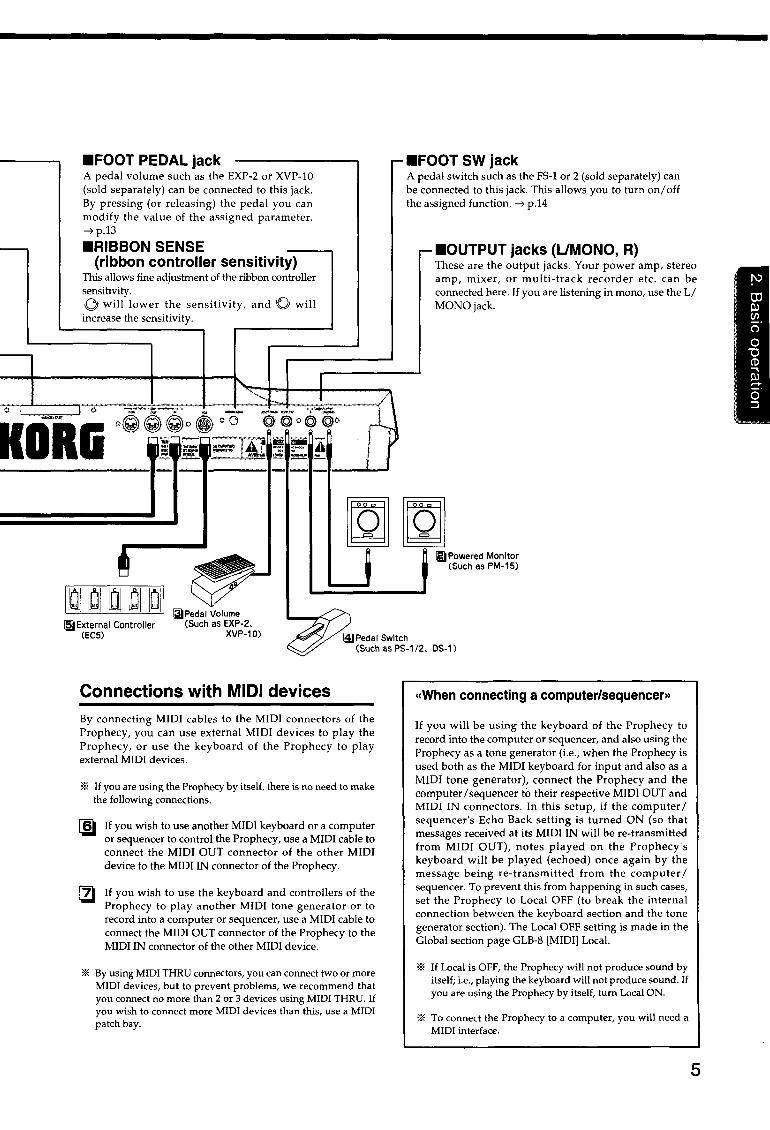
•FOOT PEDAL jack A pedal volume such as the EXP-2 or XVP-10 (sold separately) can be connected to this jack. By pressing (or releasing) the pedal you can modify the value of the assigned parameter.
•RIBBON SENSE (ribbon controller sensitivity)
This allows fine adjustment of the ribbon controller sensitivity.
will lower the sensitivity, and will increase the sensitivity.
KORG
5 ExternalController (EC5)
3 PedalVolume (Such as EXP-2,
XVP-10)
Connections with MIDI devices By connecting MIDI cables to the MIDI connectors of the Prophecy, you can use external MIDI devices to play the Prophecy, or use the keyboard of the Prophecy to play external MIDI devices.
If you are using the Prophecy by itself, there is no need to make the following connections.
If you wish to use another MIDI keyboard or a computer or sequencer to control the Prophecy, use a MIDI cable to connect the MIDI OUT connector of the other MIDI device to the MIDI IN connector of the Prophecy.
If you wish to use the keyboard and controllers of the Prophecy to play another MIDI tone generator or to record into a computer or sequencer, use a MIDI cable to connect the MIDI OUT connector of the Prophecy to the MIDI IN connector of the other MIDI device.
By using MIDI THRU connectors, you can connect two or more MIDI devices, but to prevent problems, we recommend that you connect no more than 2 or 3 devices using MIDI THRU. If you wish to connect more MIDI devices than this, use a MIDI patch bay.
•FOOT SW jack A pedal switch such as the FS-1 or 2 (sold separately) can be connected to this jack. This allows you to turn on/ off the assigned function.~ p.14
OUTPUTjacks (UMONO, R) These are the output jacks. Your power amp, stereo amp, mixer, or multi-track recorder etc. can be connected here. If you are listening in mono, use the L/ MONO jack.
2Powered Monitor (Such as PM-15)
«When connecting a computer/sequencer»
If you will be using the keyboard of the Prophecy to record into the computer or sequencer, and also using the Prophecy as a tone generator (i.e., when the Prophecy is used both as the MIDI keyboard for input and also as a MIDI tone generator), connect the Prophecy and the computer I sequencer to their respective MIDI OUT and MIDI IN connectors. In this setup, if the computer 1 sequencer's Echo Back setting is turned ON (so that messages received at its MIDI IN will be re-transmitted from MIDI OUT), notes played on the Prophecy's keyboard will be played (echoed) once again by the message being re-transmitted from the computer I sequencer. To prevent this from happening in such cases, set the Prophecy to Local OFF (to break the internal connection between the keyboard section and the tone generator section). The Local OFF setting is made in the Global section page GLB-8 [MIDI] Local.
If Local is OFF, the Prophecy will not produce sound by itself; i.e., playing the keyboard will not produce sound. If you are using the Prophecy by itself, tum Local ON.
To connect the Prophecy to a computer, you will need a MIDI interface.
5

6
2.2 Turning the power on/off Turning on the power 1When all necessary connections are complete, press the POWER switch to turn on the
power of the Prophecy.
2Turn on the power for your powered speakers or stereo amp.
When the Prophecy's power is turned on, the opening screen will be displayed for several seconds, and then the Performance mode page will appear. Immediately after power-on, you will always be in this mode. Program ADO (*1) will be selected, and the arpeggio pattern that was last selected when the power was turned off will be selected.
*1. If the Global section page GLB-21 Page Memory setting is turned ON, the program that was selected when the power was turned off will be selected.
Example of the Performance mode display
..... .. ,:: .... i.' .. ''.
EG
Turning off the power Press the POWER switch once again, and the Prophecy's power will go off. Turn off the power to your powered speakers or stereo amp before turning off the Prophecy.
2.3 Adjusting the volume Rotate the VOLUME knob to set an appropriate volume. This knob also sets the headphone volume.
«Getting back into Performance mode»
VOlUME
The Prophecy allows you to move easily between the various modes and operations such as Program Write or Demo Playback. This means that until you become accustomed to operating the Prophecy, you may inadvertently move to some other mode or to an unfamiliar display. If you ever need to get back to Performance mode, use the following procedure. If the Performance mode display shown above does not appear in the LCD, check the following points.
1. Turn on the Performance (upper) LED for the PERFORMANCE/EDIT select key. If the Edit (lower) LED is blinking, press the PERFORMANCE/EDIT Select key to make the upper LED light.
VALUE +
ENTER EXIT
EXITkey
PERFORMANCE LED is lit
Select key
FitTER EG
If pressing the PERFORMANCE/EDIT Select key does not switch the LED, you have entered Pattern Define mode or Program Write from Edit mode. Repeatedly press the EXIT key until the screen display no longer changes. Then press the PERFORMANCE/EDIT Select key to make the upper LED light.
2. If the upper LED of the PERFORMANCE/EDIT Select key is lit and the display is different than that shown above, press the EXIT key until the display no longer changes.
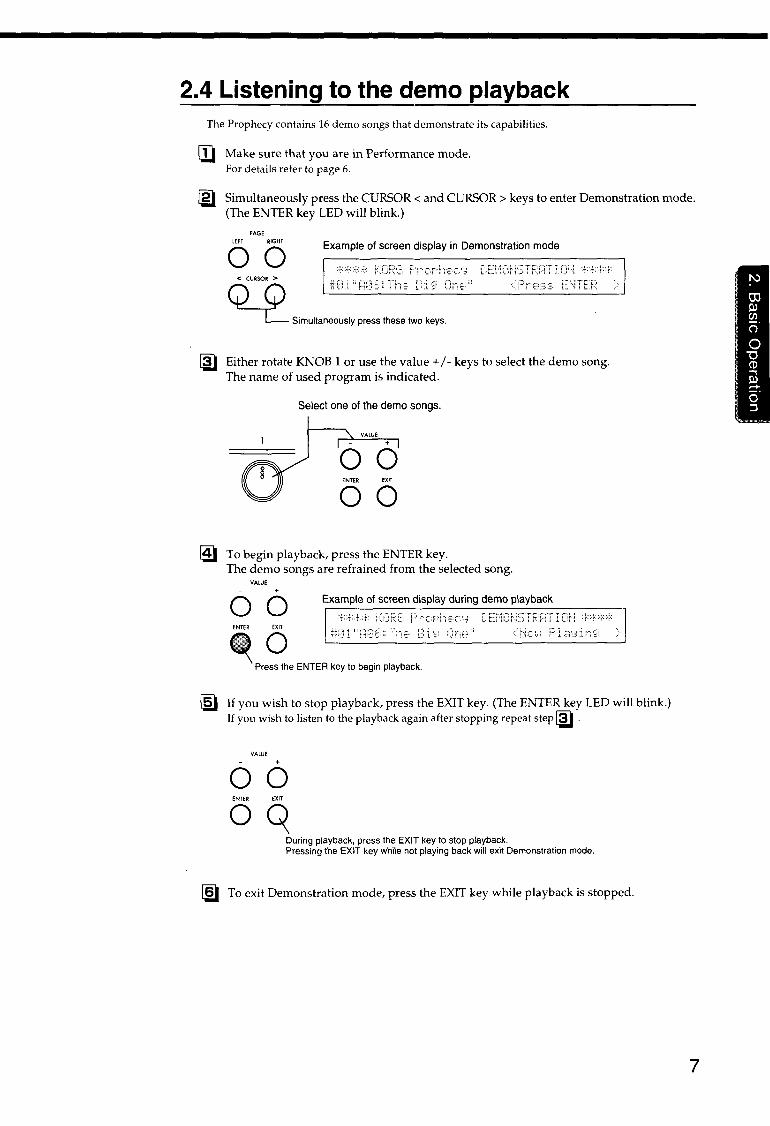
2.4 Listening to the demo playback The Prophecy contains 16 demo songs that demonstrate its capabilities.
1 Make sure that you are in Performance mode. For details refer to page 6.
2 Simultaneously press the CURSOR < and CURSOR> keys to enter Demonstration mode. (The ENTER key LED will blink.)
LEFT Example of screen display in Demonstration mode
.. , .... ,
3Either rotate knob1 or use the value +I- keys to select the demo song. The name of used program is indicated.
Select one of the demo songs.
ENTER
4 To begin playback, press the ENTER key. The demo songs are refrained from the selected song.
VALUE + Q Example of screen display during demo playback
Press the ENTER key to begin playback.
5 If you wish to stop playback, press the EXIT key. (The ENTER key LED will blink.) If you wish to listen to the playback again after stopping repeat step 3.
VALUE +
ENTER EXIT
During playback, press the EXIT key to stop playback. Pressing the EXIT key while not playing back will exit Demonstration mode.
6 To exit Demonstration mode, press the EXIT key while playback is stopped.
7

8
2.5 Playing a program There are 128 programs in internal memory (00-63 in bank A, and 00-63 in bank B). If an optional card is inserted, you can select from an additional 64 programs (00-63 in the Card bank).
About the Performance mode display In Performance mode, the display will be as shown below. The selected bank key and Performance Editor (PE) key LEDs will light.
Program bank Program number
Program name Program category (see page 9)
Arpeggiator pattern narne (see page 15)
PE1 PE2 PE3 PE4 PE5
Performance editor (see page 11)
Q .. A CARD INT PAT CARD PAT PEl PE2 PE3 PE4 PE DEFINE
WRITE Q ~ OSC W SHAPE MIXER FILTER AMP EFFECT EG LFO COMMON GLOBAl
00@<)0(i)000000 Program bank Pattern bank Performance editor
• Selecting a prouram Press the mSelect key to enter Performance mode (see page '6) Programs are selected in Performance mode.
Selecting the program bank You can select from bank A, bank B, and (if a card is inserted) the Card bank. Use the following procedure to select the bank.
Press the desired bank key (the A key for bank A, the B key for bank B, or the CARD key for the Card bank (*1)) to reserve the bank. The LED of the bank key that you pressed and the ENTER key LED will begin blinking. At this point the bank has not yet been changed. The LED of the currently selected bank key is lit.
CARD
osc W.SHAPE HIXER Et>UfR e ~If () ~-~ I:'=· -1 ~ ~::;:. -~'
1111 If a card is not inserted, pressing the CARD key will produce an error message, and the bank will not change.
•
Inserting or removing a card should be done while the power is turned off.
Use one of the following methods to finalize the bank you reserved in step []} . • Once again press the bank key you pressed in step []),or press the ENTER key.
The program number will remain the same, and only the bank will change. • Use the numeric keys (and the ENTER key) to select a program number (refer to the following
explanation of "Selecting a program number", "Numeric key input".) The bank and program number will change.
Use one of the fo1llowing methods to cancel the reservation you m~de in step [j) . • Press the EXIT kt~y or the currently selected (lit) bank key.
The blinking will stop, and you will return to the condition before step [j}. • Press a bank key which is not lit or blinking.
That bank key wiH begin blinking and enter the (reserved) status of step [!J . • Press the VALUE key.
You will return to the currently selected bank, and the program number will change.

Selecting the program number Each bank contains 64 programs (00-63). You can use one of the following five ways to select a program.
,.. III Using the VALUE+ and VALUE- keys Pressing the VALUE+ key will select the next higher program number, and pressing the VALUE- key will select the next lower program number.
If you press the VALUE+ key when program A63 is selected, program BOO will be selected. If you press the VALUE+ key when program B63 is selected, program COO will be selected if the Card bank is available (i.e., if a
t The program number will increment each time you
vALuE press the key. +
00 I The program number will decrement f each time you press the key.
card is inserted). If not, program AOO will be selected. If program C63 is selected, pressing the VALUE+ key will select program AOO. The VALUE- key will have the opposite effect.
Using. the numeric keys Press the PATTERN/PROGRAM Select key to make the LED light as shown below. Each time you press the key, the upper and lower LEOs will alternate.
PATTERN/PROGRAM Select key
I 00000000000
Q ~ UP DOWN All l All 2 RANDOM PAll PAT2 PAll PAT-4 PAT5 f ~1-1 3
lit specify the Program number .
.- [iJ Two-digit entry using the numeric keys Use the numeric keys to specify a two-digit number. To select a program 0-9, press 0 first, and then press the desired number. If you enter a number above 63, program 63 will be selected .
.- [!I Numeric keys+ ENTER key (lO's Hold: OFF) The lO's place will be fixed at 0, and the numeric keys will enter the value of the 1 's place .
.- liJ Numeric keys + ENTER key (lO's Hold: ON) The lO's place will be fixed at its current value, and the numeric keys will enter the value of the l's place.
*Methods @) and ~ are selected by the setting in Edit mode Global section page GLB-21 [Page Memory & lO's Hold]. With the factory settings, this is OFF.
Example: If program 58 is selected, the following operations will select ...
Two-digit entry using the numeric keys
5s-Q~~>O-o3
Numeric keys + ENTER key (10's Hold: OFF)
Numeric keys + ENTER key (10's Hold: ON)
58
58
--
UP 0
0 ALT2
0 ALT2
3
AU 2
3
ENTER .. 0 ENTER .. 0
,.. [§l Selecting programs by Program Category
- 03
- 53
You can search for and select programs that have the same category as the currently selected program. Press the PAGE RIGHT key to select higher-numbered programs, and press the PAGE LEFT key to select lower-numbered programs.
The Program number that have
t the same category will increment PAGE each time you press the key.
LEFT RIGHT
00 ~ The Program number thai have
the same category will decrement each time you press the key.
9
10
• Using the ECS to select programs If an external controller (ECS [sold separately]) is connected to the ECS jack, you can select programs from the ECS. The Prophecy allows you to assign various control functions to the ECS. * These settings are made in Edit mode Global section, page GLB-7 [ECS Function].
• Using MIDI to sel~ect programs You can select programs by transmitting a Program Change message from an external MIDI device to the Prophecy (see page 36).
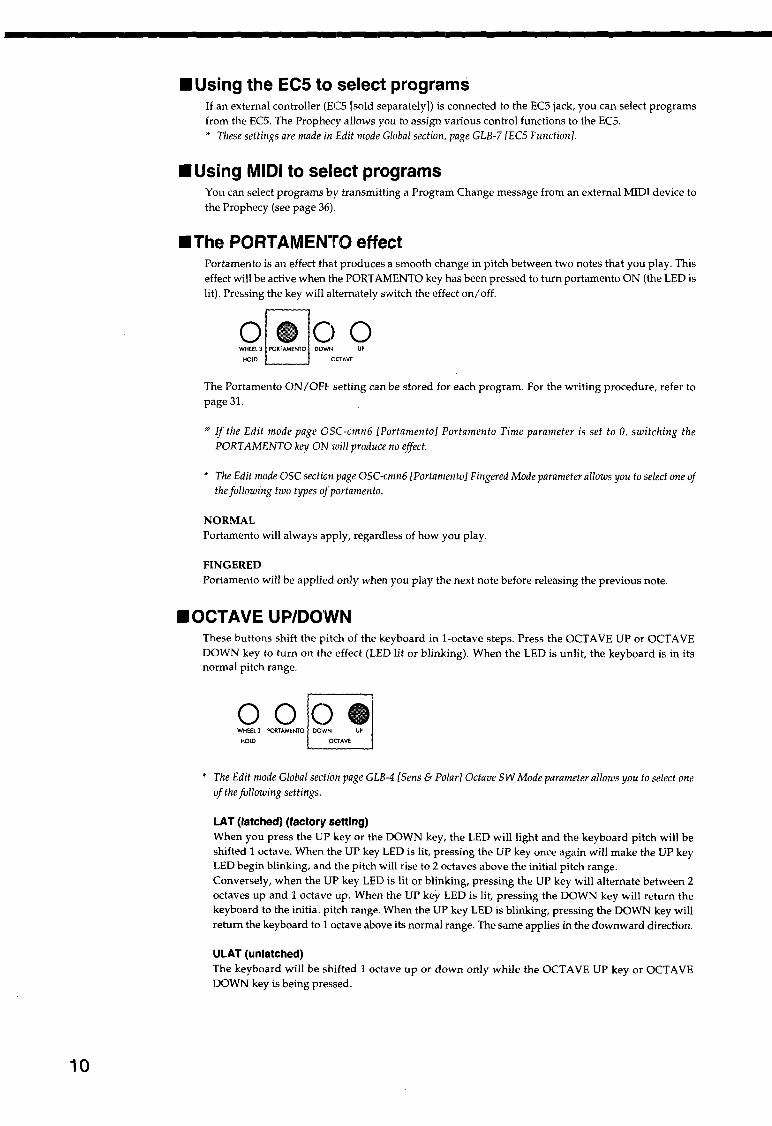
•The PORTAMENTO effect Portamento is an effect that produces a smooth change in pitch between two notes that you play. This effect will be active when the PORTAMENTO key has been pressed to turn portamento ON (the LED is lit). Pressing the key will alternately switch the effect on/ off.
0 8 () 0 WHEEL 3 PORT AMENTO DOWI'-1 UP
HOLD '-----' OCTAVE
The Portamento ON/OFF setting can be stored for each program. For the writing procedure, refer to page 31.
* If the Edit mode page OSC-cmn6 [Portamento] Portamento Time parameter is set to 0, switching the PORTAMENTO key ON will produce no effect.
* The Edit mode OSC section page OSC-cmn6 [Portamento] Fingered Mode parameter allows you to select one of the following two types of portamento.
NORMAL Portamento will always apply, regardless of how you play.
FINGERED Portamento will be applied only when you play the next note before releasing the previous note.
•OCTAVE UP/DO'WN These buttons shift the pitch of the keyboard in 1-octave steps. Press the OCTAVE UP or OCTAVE DOWN key to turn on the effect (LED lit or blinking). When the LED is unlit, the keyboard is in its normal pitch range.
* The Edit mode Global section page GLB-4 [Sens & Polar] Octave SW Mode parameter allows you to select one of the following settings.
LA T (latched) (factory setting) When you press the UP key or the DOWN key, the LED will light and the keyboard pitch will be shifted 1 octave. When the UP key LED is lit, pressing the UP key once again will make the UP key LED begin blinking, and the pitch will rise to 2 octaves above the initial pitch range. Conversely, when the UP key LED is lit or blinking, pressing the UP key will alternate between 2 octaves up and 1 octave up. When the UP key LED is lit, pressing the DOWN key will return the keyboard to the initial pitch range. When the UP key LED is blinking, pressing the DOWN key will return the keyboard to 1 octave above its normal range. The same applies in the downward direction.
ULAT (unlatched) The keyboard will be shifted 1 octave up or down only while the OCTAVE UP key or OCTAVE DOWN key is being pressed.

2.6 Performance Editor (PE) Modifications to the sound of a program are done in Edit mode. However in Performance mode, you can also assign any desired parameter ( * 1) to knobs 1-5, allowing you to adjust volume or brightness of the sound, envelope speed (the time over which the sound rises or decays), or effect settings. This capability is referred to as the Performance Editor (PE) function. Each program has four PE sets. If two or more PE sets are turned on, one knob can modify up to 4 different parameters at once.
*1 Parameters are assigned to the Performance Editor in Performance Editor Define (see page 32).
• Selecting a Performance Editor When one of the PE1-4 keys are pressed to make the LED light, that Performance Editor is turned on. The previously selected PE will be turned off. Pressing the key of a currently-on PE will also turn it off. If you wish to turn on two or more Performance Editors, press the desired PE keys simultaneously. PE keys that were not pressed will be turned off. To turn off PE keys that are on, individually press the PE keys that are on. With a PE turned on, rotate knob 1-5 to modify the value of the parameters assigned to them, and listen to the tone change.
H~::~~~i:~ Pr·or::·\···p::;··\: .. ic. ~::;t;:::·F·~::. ~ ~ ;.:,j: ·:•r F~rr~: UP tii!!!!!~!!!!!!!!!!!i::i' UZF'i·lc'd I Ci;;:,Fbk l!!!i!!i!!!!!!!!!!H!!::::il D l :!Fbk
• About the Performance Editor display Rotate a knob, and the value will change.
PEl EfFECT
PE3 PE-6 I PE2 EG lFO
If after rotating a knob you then select another program (or if you enter Define or Edit mode, rotate a knob, and then return to Performance mode), an arrow will appear in the display as shown below. This indicates that the physical position of the knob differs from the value memorized in the program. Rotate the knob in the direction of the arrow until it reaches the location of the program setting, and from that point the knob will once again control its assigned parameter(s).
Rotate the knob to modify the level.
1!!:::::::::::::::::::::::!! li!!~!!!!!!!!!::::il
-0
Rotate the knob in the direction of the arrow. Control will resume when the memorized value is reached.
I i!<~::::::::::::::J I !1:::::::::::::->::J
When PE1-4 are turned on, the display will show an abbreviated name for the parameters assigned to each knob.
• Saving a sound that was modified by the Performance Editor Changes you make to a sound in Performance mode by operating the Performance Editor can be saved. For the Write procedure, refer to "4.3 Saving a program" (page 30).
1 1
12
2.7 Various pllaying techniques By operating the Performance Editor and controllers (WHEEL 1-3, the ribbon controller, a connected foot switch etc.), and by varying the way that you play the keyboard, you can modify the volume, brightness, envelope speed (the length of the attack or decay), and effect settings, and in this way add expressiveness to your playing.
• Control from the keyboard Various control functions (*1) can be assigned within each program, allowing your playing to be more expressive.
*1 In Edit mode, you can independently specify the amount of control for the oscillator, filter, and effect parameters, and use one cf the following control functions as a modulation source.
Velocity This provides control bas<~d on the force with which you play a note.
After Touch This provides control bas,~d on pressure applied to the keyboard after playing a note.
PORTAMENTO This button controls the F'ortamento effect to create smooth pitch change between two notes.
Note Number The note number of the key you press can affect a parameter in the way that you specify, for example by increasing the effect as you play higher on the keyboard.
•control from WfsdgsEL 1/2/3, the RIBBON controller, or the pedal volume
Various control functions (*2) can be assigned within each program, allowing your playing to be more expressive.
*2 To assign a controller to a parameter, make settings in Edit mode Common section pages CMN-5-9. The depth of the change can be set for the modulation source for each parameter. For details on these settings, refer to "Setting and using controllers" (page 29).
WHEEL1 Rotating the wheel away from or toward yourself will apply the effect. This controller is normally used for Pitch Bending. For programs whose OSC type is Brass (Reed), the pitch bender will produce a Mode Jump effect characteristic of brass (reed) instruments.
PBend+-
Here's what happens when Edit mode Common section page CMN-5 Control Wheel 1 is set to PBend+-. The example is for when the C4 key is played and OSC section page OSC-cmn5 PB Intensity (+X) is set to +02 and PB Intensity (-X) is set to -o2.
*3 Setting the Edit mode Common section page CMN-5 Control Wheel 1 controller function to PBend+- will result in a pitch bend of 0 when WHEEL 1 is in the center position, and +1- pitch bend when the wheel is moved away from or toward yourself. With settings such as PBend+, Atouch, or CChg #00-95, the center position of the wheel will produce 0 and moving the wheel away from yourself I toward yourself will produce a +I+ effect. A setting of PBend- will produce a -1- effect. The +I- polarity of the resulting effect will depend on the parameter setting.
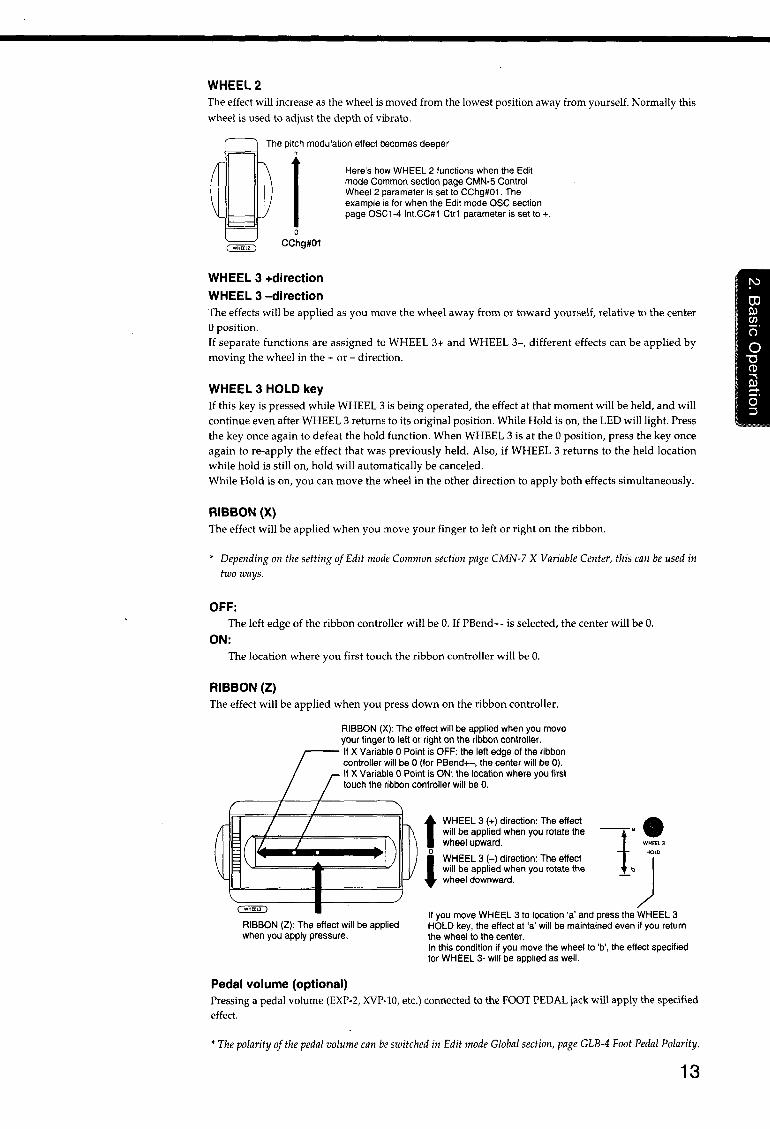
WHEEL 2 The effect will increase as the wheel is moved from the lowest position away from yourself. Normally this wheel is used to adjust the depth of vibrato.
0 CChg#01
WHEEL 3 +direction WHEEL 3 -direction
Here's how WHEEL 2 functions when the Edit mode Common section page CMN-5 Control Wheel 2 parameter is set to CChg#01 . The example is for when the Edit mode OSC section page OSC1-4 lnt.CC#1 Ctr1 parameter is set to+.
The effects will be applied as you move the wheel away from or toward yourself, relative to the center 0 position. If separate functions are assigned to WHEEL 3+ and WHEEL 3-, different effects can be applied by moving the wheel in the + or- direction.
WHEEL 3 HOLD key If this key is pressed while WHEEL 3 is being operated, the effect at that moment will be held, and will continue even after WHEEL 3 returns to its original position. While Hold is on, the LED will light. Press the key once again to defeat the hold function. When WHEEL 3 is at the 0 position, press the key once again to re-apply the effect that was previously held. Also, if WHEEL 3 returns to the held location while hold is still on, hold will automatically be canceled. While Hold is on, you can move the wheel in the other direction to apply both effects simultaneously.
RIBBON (X) The effect will be applied when you move your finger to left or right on the ribbon.
• Depending on the setting of Edit mode Common section page CMN-7 X Variable Center, this can be used in two ways.
OFF: The left edge of the ribbon controller will be 0. If PBend+- is selected, the center will be 0.
ON: The location where you first touch the ribbon controller will be 0.
RIBBON (Z) The effect will be applied when you press down on the ribbon controller.
RIBBON (X): The effect will be applied when you move your finger to left or right on the ribbon controller. If X Variable 0 Point is OFF: the left edge of the ribbon controller will be 0 (for PBend+-, the center will be 0). If X Variable 0 Point is ON: the location where you first touch the ribbon controller will be 0.
t WHEEL 3 (+)direction: The effect will be applied when you rotate the wheel upward.
0
l WHEEL 3 (-) direction: The effect will be applied when you rotate the wheel downward.
-·-1 WHEEL3
1) RIBBON (Z): The effect will be applied when you apply pressure.
If you move WHEEL 3 to location ·a· and press the WHEEL 3 HOLD key, the effect at 'a' will be maintained even if you return the wheel to the center.
Pedal volume (optional)
In this condition if you move the wheel to 'b', the effect specified for WHEEL 3- will be applied as well.
Pressing a pedal volume (EXP-2, XVP-10, etc.) connected to the FOOT PEDAL jack will apply the specified effect.
• The polarity of the pedal volume can be switched in Edit mode Global section, page GLB-4 Foot Pedal Polarity.
13
14
• Control from a pedal switch or EC5 Functions such as sustain pedal, program number up I down, octave up I down, portamento, effect, and arpeggiator on/ off can be assigned for control from a pedal switch or ECS.
Pedal switch (optional) A pedal switch (PS-1, PS-2, etc.) connected to the FOOT SW jack can turn an assigned function on/off.
* Pedal switch function assignments are made in Edit mode Common section, page CMN-8 Foot SW. The polarity of the foot switch can be set in Edit mode Global section, page GLB-4 Foot SW Polarity.
EC5 External ControiiE!r (optional) By operating an ECS External Controller connected to the ECS jack, functions assigned to each of the five switches can be turned on/off.
* Function assignments for the EC5 External Controller are made in Edit mode Global section, page GLB-7 [EC5 Function].
2.8 Using the arpeggiator The arpeggiator in the Prophecy contains 5 preset patterns (UP, DOWN, ALTl, ALT2, RANDOM) and 5 user patterns (PAT 1-5). For each user pattern you can create your own arpeggio pattern of up to 24 steps (see page 34). You can also make various settings to customize the preset patterns as well, such as modifying the step interval and the velocity and length of the arpeggio notes, giving you a wide variety of possibilities (see page 33).
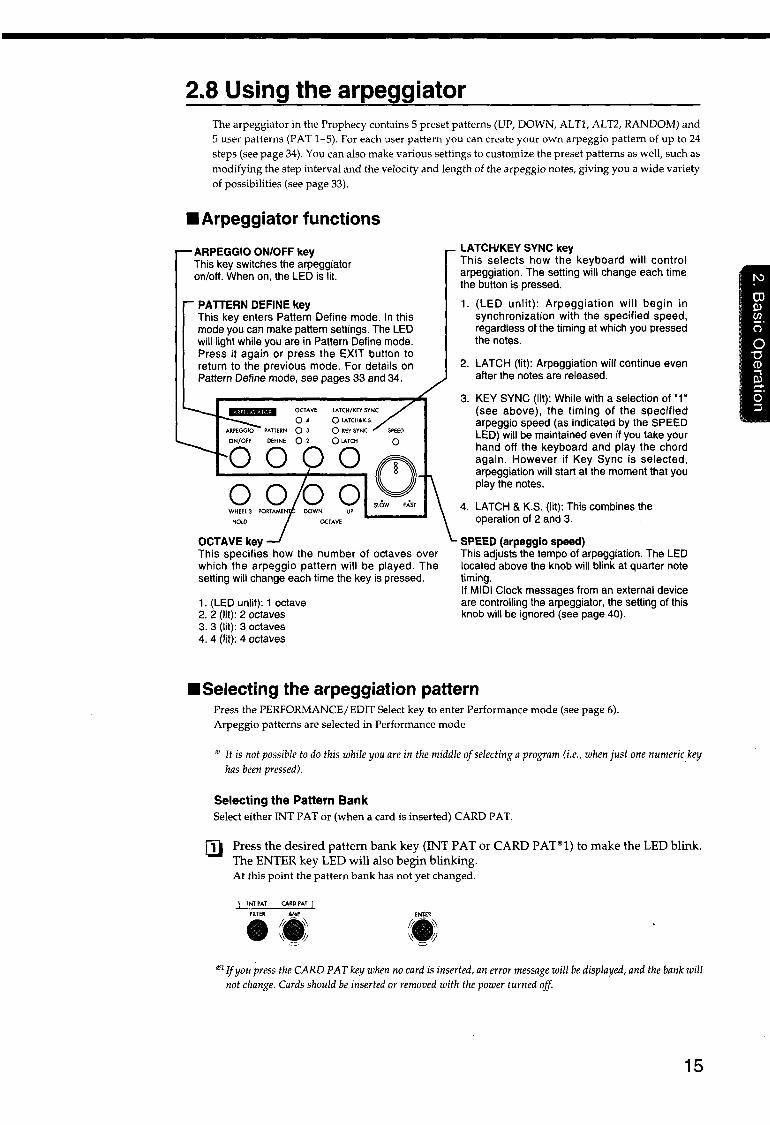
• Arpeggiator functions
ARPEGGIO ON/OFF key This key switches the arpeggiator on/off. When on, the LED is lit.
PATTERN DEFINE key This key enters Pattern Define mode. In this mode you can make pattern settings. The LED will light while you are in Pattern Define mode. Press it again or press the EXIT button to return to the previous mode. For details on Pattern Define mode, see pages 33 and 34.
PAITERN DEFINE
OCTAVE
O• 03 02
lATCH/KEY SYNC
Q lATCH&K.S.
Q KEY SYNC
0 LATCH 0
00000 OOOOSlOW
UP
HOlD OCTAVE
OCTAVE key This specifies how the number of octaves over which the arpeggio pattern will be played. The setting will change each time the key is pressed.
1. (LED unlit): 1 octave 2. 2 (lit): 2 octaves 3. 3 (lit): 3 octaves 4. 4 (lit): 4 octaves
LATCH/KEY SYNC key This selects how the keyboard will control arpeggiation. The setting will change each time the button is pressed.
1. (LED unlit): Arpeggiation will begin in synchronization with the specified speed, regardless of the timing at which you pressed the notes.
2. LATCH (lit): Arpeggiation will continue even after the notes are released.
3. KEY SYNC (lit): While with a selection of "1" (see above), the timing of the specified arpeggio speed (as indicated by the SPEED LED) will be maintained even if you take your hand off the keyboard and play the chord again. However if Key Sync is selected, arpeggiation will start at the moment that you play the notes.
4. LATCH & K.S. (lit): This combines the operation of 2 and 3.
SPEED (arpeggio speed) This adjusts the tempo of arpeggiation. The LED located above the knob will blink at quarter note timing. If MIDI Clock messages from an external device are controlling the arpeggiator, the setting of this knob will be ignored (see page 40).
• Selecting the arpeggiation pattern Press the PERFORMANCE/EDIT Select key to enter Performance mode (see page 6). Arpeggio patterns are selected in Performance mode
* It is not possible to do this while you are in the middle of selecting a program (i.e., when just one numeric key has been pressed).
Selecting the Pattern Bank Select either INT PAT or (when a card is inserted) CARD PAT.
[J} Press the desired pattern bank key (INT PAT or CARD PAT*l) to make the LED blink. The ENTER key LED will also begin blinking. At this point the pattern bank has not yet changed.
INTPAT CARD PAl I FILTER AMP ENI.ER e ~-~· ~ ::::::.. J) ~-~ '!! ·= o/
*1 If you press the CARD PAT key when no card is inserted, an error message will be displayed, and the bank will not change. Cards should be inserted or removed with the power turned off.
15

16
Use one of the following operations to finalize the selection made in!]}.
• Either press the pattern bank key selected in !]}once again, or press the ENTER key. The pattern will remain the same, and only the pattern bank will change.
• Press one of the UP - PATS keys to select a pattern (refer to "Selecting the arpeggio pattern," below). The bank and arpeggio pattern will change.
If you wish to cancel the selection made inl]l , press the EXIT key or the currently selected (lit) pattern bank key.
Selecting the arpeggiopattern []) Press the PATTERN/PROGRAM Select key to make the upper PATTERN LED blink.
When this is done, thE' UP /0 - P ATS/9 keys will act to select patterns. Each time you press the PATTERN /PROGRAM Select key, the upper /lower LEOs will alternate between blinking/lit.
PATIERN/PROGRAM Select key I
00000000000 (~ .... ... I-I
UP DOWN ALTl ALT2 RANDOM PAT! PAT2 PATJ PAT4 PATS
blinking Select a pattern.
Press one of the UP -- PATS keys to select the arpeggio pattern. When the pattern is selected, the upper right of the LCD will indicate the selected pattern as "PAT:UP", "PAT:DOWN" ... "PAT:PAT5".
• Basic arpeggiator operation []) Press the ARPEGGIO ON/OFF key to make the LED light.
The arpeggiator function will be turned on. If you now press notes on the keyboard, an arpeggio will be played.
Rotate the SPEED knob to set the desired tempo.
Press the LATCH/KEY SYNC key to make LATCH light. When the LATCH function is on, the arpeggio will continue playing even after you take your hands off the keyboard. The LATCH/KEY SYNC key allows you to select one of four methods of operation (see "Arpeggiator functions" page 15).
[!I Press the OCTAVE key to switch the range of the arpeggiation in 1-octave increments. As the LED is switched 2~3~4, the range of arpeggiation will change.
In the case of PATIERN UP OCTAVE: LED unlit
rm To stop arpeggiation, press the ARPEGGIO ON/OFF key to turn off the LED.
Try playing various chords, and use the UP - P AT5 keys to select different arpeggio patterns and hear the results.
* With the above procedure, notes will be sounded in the order of their pitch, regardless of the order in which they were pressed. You can also make Pattern Define settings so that notes will be sounded in the order that they were pressed. In addition, you can adjust the step interval and the velocity and length of the arpeggio notes, and create your own arpeggio pattern.
2.9 Other settings (Performance) • Specifying the order in which notes are sounded
You can specify whether the lowest/highest/last note will be sounded when two or more notes are pressed simultaneously. This can be set for each program. • This is set by the Edit mode Common section, page CMN-3 [Voice Control] Key Priority setting (Parameter
Guide, page 127).
• Making the note sustain A note can be made to continue sounding even after the keyboard is released. This can be set for each program. • This is set by the Edit mode Common section, page CMN-3 [Voice Control] Hold setting (Parameter Guide,
page 127).
• Using key velocity to affect modulation The force with which you play a new note while the previous note is still held can be used to specify whether the EG and LFO will continue their cycle, or will be re-started. This setting allows you to articulate slurs, etc. This can be set for each program. • This is set by the Edit mode Common section, page CMN-3 [Voice Control] Trigger Mode setting (Parameter
Guide, page 127).
• Using different scales In addition to the conventional equal tempered scale, the Prophecy provides other scale types such as Pythagorean, Werckmeister, Arabian, Indonesian, and also user scales. These can be selected for each program. • This is set by the Edit mode Common section, page CMN-4 [Scale] setting (Parameter Guide, page 128).
User Scales allow you to create your own scale. • This is done in Edit mode Global section, page GLB-3 [User Scale] (Parameter Guide, page 135).
•Tuning the Prophecy to other instruments When playing the Prophecy together with other instruments or when playing along with a CD or tape, you can adjust Master Tune in the range of 430 Hz - 450 Hz. • Tuning is adjusted by the Edit mode Global section, page GLB-1 [Tune & Transpose] Master Tune setting
(Parameter Guide, page 133).
•Transposing the pitch To shift the pitch in chromatic steps, you can adjust the Transpose setting over a range of -12 (one octave down) to +12 (one octave up). • This is set by the Edit mode Global section, page GLB-1 [Tune & Transpose] Transpose setting (Parameter
Guide, page 133).
• Changing the velocity and aftertouch curves The way in which velocity and aftertouch take effect can be changed by selecting from 8 types of curve. • The velocity curve is determined by the Edit mode Global section, page GLB-2 [Curve & Effects] Velocity
Curve parameter. The ajtertouch curve is determined by the After Touch Curve located in the same page (Parameter Guide, page 134).
17
3 How the Prophecy
is organized
18
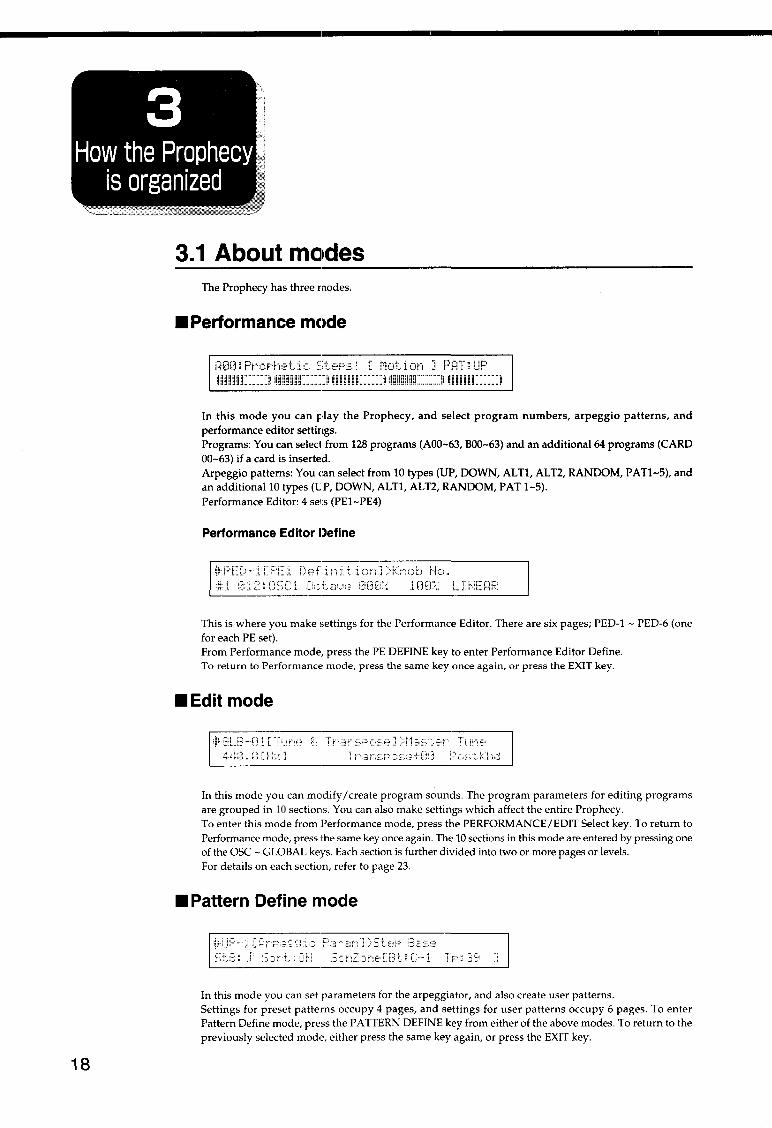
3.1 About modesThe Prophecy has three modes.
• Performance mc,de
R00~ProPhetic Steps! [ Motion J PRT:UP i!!H!mc:::::J m~m::::::::11 mr:iii!L:::::::J m~m::::::::il mm~::::::::il
In this mode you can play the Prophecy, and select program numbers, arpeggio patterns, and performance editor settings. Programs: You can select from 128 programs (A00-63, B00-63) and an additional64 programs (CARD 00-63) if a card is inserted. Arpeggio patterns: You <:an select from 10 types (UP, DOWN, ALTl, ALT2, RANDOM, PATl-5), and an additionallO types (LP, DOWN, ALTl, ALT2, RANDOM, PAT 1-5). Performance Editor: 4 sets (PE1-PE4)
Performance Editor Define
This is where you make settings for the Performance Editor. There are six pages; PED-1 - PED-6 (one for each PE set). From Performance mode, press the PE DEFINE key to enter Performance Editor Define. To return to Performance mode, press the same key once again, or press the EXIT key.
•Edit mode
In this mode you can modify I create program sounds. The program parameters for editing programs are grouped in 10 sections. You can also make settings which affect the entire Prophecy. To enter this mode from Performance mode, press the PERFORMANCE/EDIT Select key. To return to Performance mode, press the same key once again. The 10 sections in this mode are entered by pressing one of the OSC - GLOBAL keys. Each section is further divided into two or more pages or levels. For details on each section, refer to page 23.
• Pattern Define mode
I 'il'" !F'··-
. :::; .. · : ... ' ~
In this mode you can set parameters for the arpeggiator, and also create user patterns. Settings for preset patterns occupy 4 pages, and settings for user patterns occupy 6 pages. To enter Pattern Define mode, press the PATTERN DEFINE key from either of the above modes. To return to the previously selected mode, either press the same key again, or press the EXIT key.
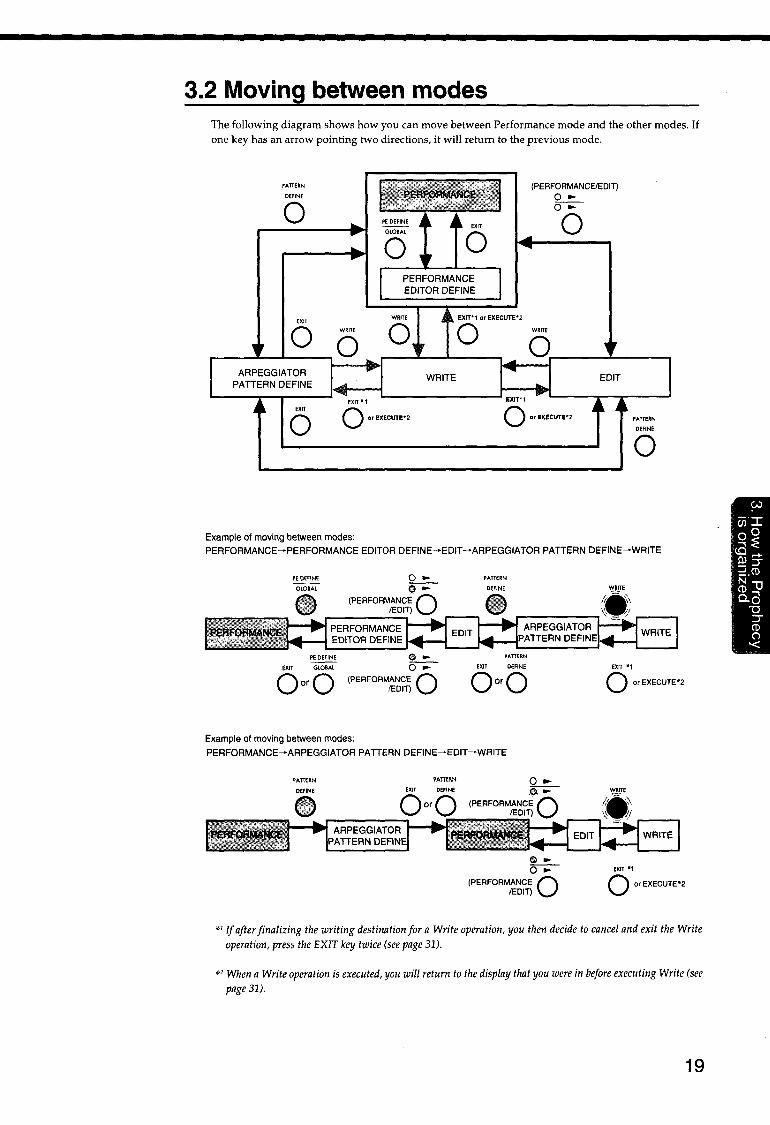
3.2 Moving between modes The following diagram shows how you can move between Performance mode and the other modes. If one key has an arrow pointing two directions, it will return to the previous mode.
PATTERN
DEFINE
0
EXIT
0 WRITE
0 WRITE
Example of moving between modes:
EXrT""1 or EXECUTE*2
0
EXIT"'1
(PERFORMANCE/EDIT) O• ~
0
WRITE
0 EDIT
0 or EXECUTE'2 PATTERN
DEFINE
0
PERFORMANCE~PERFORMANCE EDITOR DEFINE-EDIT-ARPEGGIATOR PATTERN DEFINE-WRITE
PE DEFINE GLOBAL
O• 0•
(PERFORMANCE 0 /EDIT)
PERFORMANCE EDITOR DEFINE
PEDEFINE EXIT GLOBAL
OorQ e-~
(PERFORMANCE 0 /EDIT)
Example of moving between modes:
PATTERN
DEFINE
PAnERN
EXIT DEFINE
QorO
PERFORMANCE-ARPEGGIATOR PATTERN DEFINE~EDIT~WRITE
$-~
(PERFORMANCE 0 lEDin
EXIT .,1 0 or EXECUTE"2
EXIT •1 0 or EXECUTP2
"'1 If after finalizing the writing destination for a Write operation, you then decide to cancel and exit the Write operation, press the EXIT key twice (see page 31).
*2 When a Write operation is executed, you will return to the display that you were in before executing Write (see page 31).
19
20
3.3 Moving through the sections of Edit mode [) Press the PERFORMANCE/EDIT Select key to enter EDIT mode. (The lower LED will blink.)
A CARD INT PAT CARD PAT PEl PE2 PE3 PE4 PE DEFINE
OSC W.SHAPE MIXER FILTER AMP EFFECT EG LFO COMMON GLOBAL
~Q<)OQQQQO AMP EFFECT EG LFO COMMON GLOBAL
section section section section section section section section section
!ID To enter a section, press the corresponding key. (The LED of the section key you pressed will light.) For details on each section, refer to page 23.
3.4 Moving between pages of Performance Editor Define, Pattern Define mode, and Edit mode
The PAGE RIGHT key advances to the next page, the PAGE LEFT key returns to the previous page. You can also jump to the first page by simultaneously pressing both the RIGHT and the LEFT keys.
Example: EDIT mode OSC section
Several sections of Edit mode contain Menu pages, in which the lower line of the display shows items in square brackets ::: J Additional pages are located under each menu item. Use the cursor keys or rotate the knob nearest the item you wish to select so that the display reads ::;: t and press the ENTER key to enter the selected page. To go back up to the level above, press the EXIT key. There are no menu pages in Performance Editor Define or Arpeggiator Pattern Define modes.
3.5 Moving the cursor in Performance Editor Define, Pattern Define mode, and Edit mode
2 3 A 5
One page can contain up to five parameters. To move the cursor to the parameter you wish to edit, use the CURSOR<> keys or rotate the knob for that parameter. If you rotate the knob, be aware that the value of the parameter will also be affected.
3.6 Setting values in Performance Editor Define, Pattern Define mode, and Edit mode
......... ,, f ... [ .. ·"'' ..... , :. : I'::· .. ::: :: .. :: -:. j
Rotate the knob nearest the parameter you wish to edit, and the value will change.
or
5
or
VAlUE +
00 Press the VALUE +I- keys to modify the value of the parameter at the cursor in steps of+ 1/-1.
00000000000 a ... UP DOWN ALT I ALT 2 RANDOM PAT1 PAT2 PAT:J PAT.& PATS
0 .... 1-1
Use the numeric keys to enter a value for the parameter at the cursor. The numeral printed in the lower row below each key indicates the value that will be entered. If the parameter value is a signed number (positive or negative), use the PATTERN/PROGRAM Select key to input positive(+) or negative(-) values. If the range of values is within 0-9, a single press of a numeric key will finalize the input. If the range of values is two or more digits, the place of the numeral will scroll as you enter more digits, and the value will be finalized when you press the ENTER key.
If the ENTER key LED blinks when you modify a value, press the ENTER key to finalize the value. To cancel the change, press the EXIT key.
3.7 About the screen display • Performance mode
If in Performance Editor Define or Edit mode you have modified a parameter value, the bank name of the modified program will be displayed in lower-case characters (a,b,c). When you Write the data into memory, this will return to the upper-case display. For other aspects of the display, refer to "About the Performance mode display" (page 8) and "About the Performance Editor display" (page 11).
Lower-case display indicates that the program has been edited.
21'
22
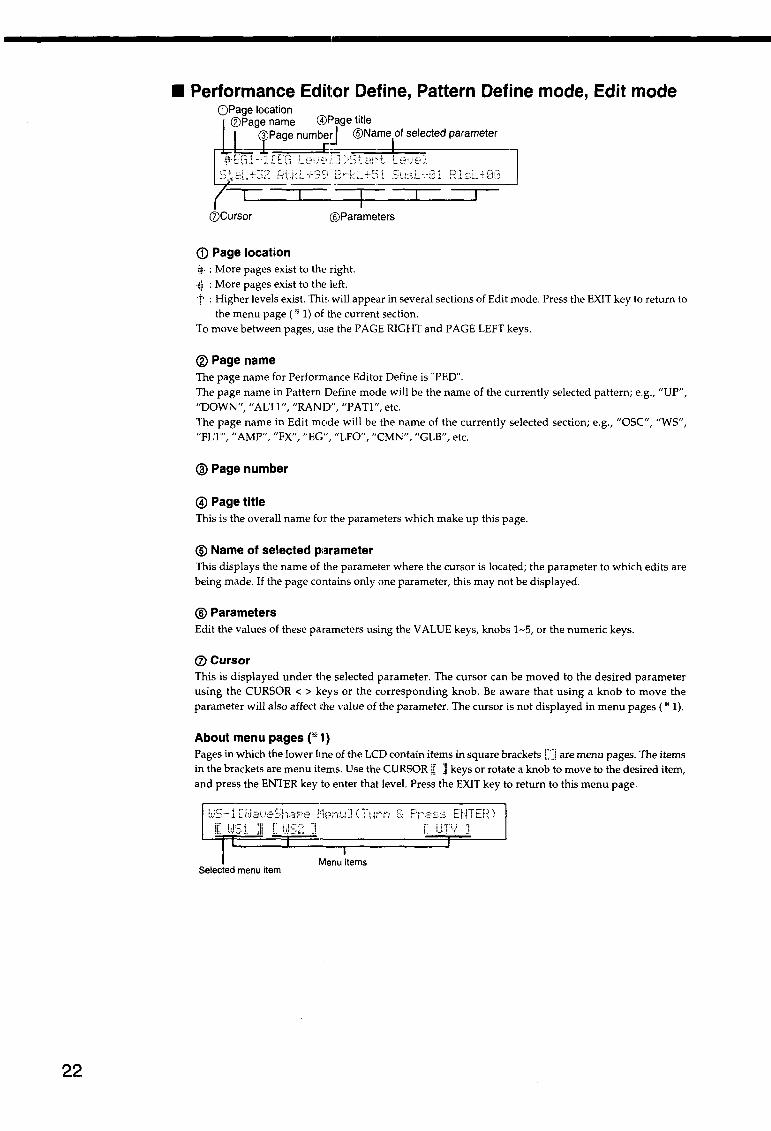
• Performance Editor Define, Pattern Define mode, Edit mode CDPage location
®Page name @Page title 3 Page numbe~ @Name of selected parameter
I >:::: !: ... :::11"''''' 1....::::•• . .:;:::, '1
(Z)Cursor @Parameters
(j) Page location 'i!'· : More pages exist to the right. -~i' : More pages exist to the left. ··r· : Higher levels exist. This will appear in several sections of Edit mode. Press the EXIT key to return to
the menu page ( * 1) of the current section. To move between pages, use the PAGE RIGHT and PAGE LEFT keys.
®Page name The page name for Performance Editor Define is "PED". The page name in Pattern Define mode will be the name of the currently selected pattern; e.g., "UP", "DOWN", "ALT1", "RAND", "PAT1", etc. The page name in Edit mode will be the name of the currently selected section; e.g., "OSC", "WS", "FLT", "AMP", "FX", "EG~~, "LFO", 11CMN", 11GLB", etc.
® Page number
@Page title This is the overall name fo:r the parameters which make up this page.
@ Name of selected p1arameter This displays the name of the parameter where the cursor is located; the parameter to which edits are being made. If the page contains only one parameter, this may not be displayed.
® Parameters Edit the values of these parameters using the VALUE keys, knobs 1-5, or the numeric keys.
(j) Cursor This is displayed under the selected parameter. The cursor can be moved to the desired parameter using the CURSOR < > keys or the corresponding knob. Be aware that using a knob to move the parameter will also affect i:he value of the parameter. The cursor is not displayed in menu pages ( * 1).
About menu pages (* 1) Pages in which the lower Hne of the LCD contain items in square brackets 1::::1 are menu pages. The items in the brackets are menu items. Use the CURSOR ~: j keys or rotate a knob to move to the desired item, and press the ENTER key to enter that level. Press the EXIT key to return to this menu page.
:l UTY I
Menu items Selected menu item
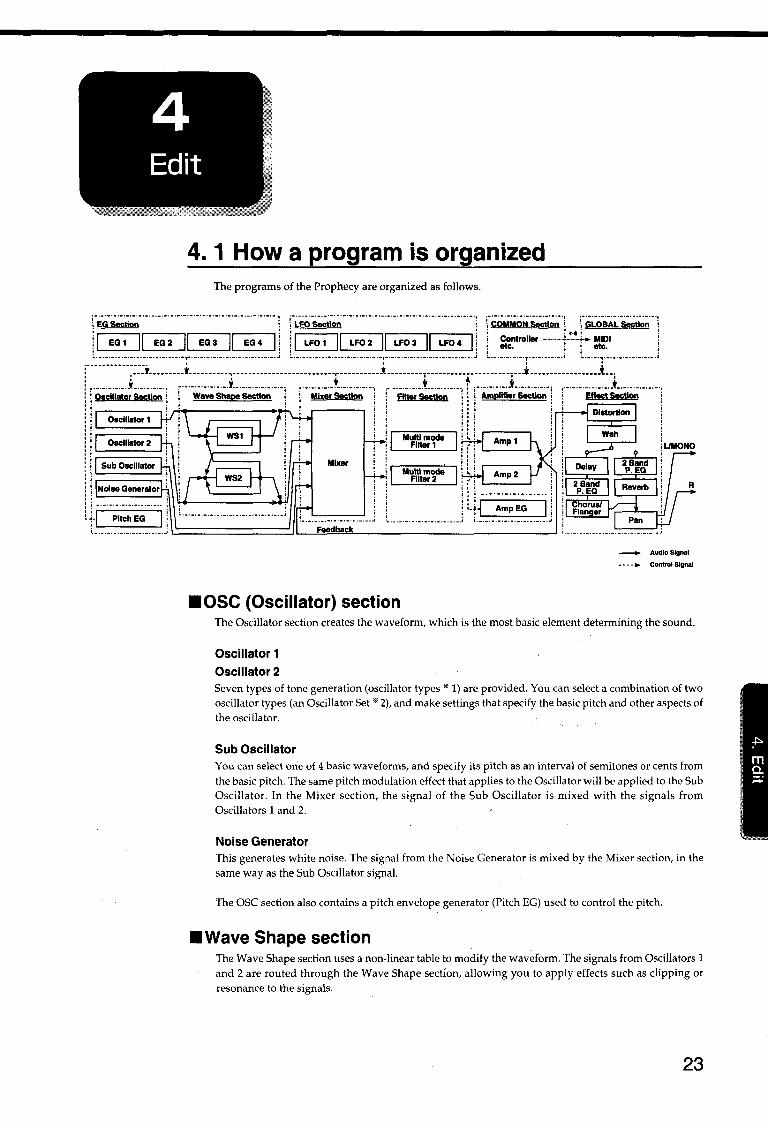
4. 1 How a program is organized The programs of the Prophecy are organized as follows.
___...... Audto Signal
---- • Control Signal
• OSC (Oscillator) section The Oscillator section creates the waveform, which is the most basic element determining the sound.
Oscillator 1 Oscillator 2 Seven types of tone generation (oscillator types* 1) are provided. You can select a combination of two oscillator types (an Oscillator Set* 2), and make settings that specify the basic pitch and other aspects of the oscillator.
Sub Oscillator You can select one of 4 basic waveforms, and specify its pitch as an interval of semitones or cents from the basic pitch. The same pitch modulation effect that applies to the Oscillator will be applied to the Sub Oscillator. In the Mixer section, the signal of the Sub Oscillator is mixed with the signals from Oscillators 1 and 2.
Noise Generator This generates white noise. The signal from the Noise Generator is mixed by the Mixer section, in the same way as the Sub Oscillator signal.
The OSC section also contains a pitch envelope generator (Pitch EG) used to control the pitch.
• Wave Shape section The Wave Shape section uses a non-linear table to modify the waveform. The signals from Oscillators 1 and 2 are routed through the Wave Shape section, allowing you to apply effects such as clipping or resonance to the signals.
23

24
• Mixer section The Mixer section mixes the signals from Oscillators 1 and 2, the Sub Oscillator, the Noise Generator, and feedback from the Amp section, and outputs the result to the Multi Mode Filters 1 and 2 (the Filter section).
• Filter section The Filter section modifies the waveform by attenuating or emphasizing specified frequency regions. This section contains two multi-mode filters. Each allows you to select the filter type (low pass, high pass, band bass, or band reject). The Filter section allows you to modify the overall brightness of the sound. You can also specify how the two filters will be connected to the Mixer section and the Amp section.
Serlal1
Mixer0utput1 ~~ toAmp1
Mixer Output2 ------------------~~ toAmp2
Serial2
Mixer output1 ~ur Filter2 ~ to Amp1
Mixer Output2 - - to Amp2
Parallel
Mixer Output1 ---{'IF;jlljt,te;,r::j1-,.------a.~ to Amp1
Mixer Output2 ---1.!F~II~te~r~2_J------Jio~ to Amp2
•AMP (Amplifier) section The Amplifier section creates time-varying changes in the volume of the sound output from the Filter section. Two independent amps are provided, and the volume input to each amp will depend on how the filters are connected.
The Amplifier section also contains an amplitude envelope generator (Amp EG) for controlling the amp.
• Effect section The Effect section contains seven types of effect; Distortion, Wah, Delay+ Chorus/Flanger, Reverb, and Dual Parametric EQ. Of these effects, you must select either Chorus/Flanger +Delay or Reverb (it is not possible to use both of these simultaneously).
•EG section This section provides four general purpose envelope generators (EG). These EGs can be used as modulation sources for parameters in each section (except for EG, Common, and Global sections), to apply time-varying changes to the sound.
• LFO section This section provides four LFOs. These LFOs can be used as modulation sources for parameters in each section (except for EG, Common, and Global sections), to apply cyclical change to the sound.
• Common sectionThis section contains parameters such as program name, and settings for the keyboard and controllers (WHEEL 1/2/3, RIBBON, etc.).
• Global section This section contains settings that affect the entire Prophecy, such as tuning and MIDI-related settings.

• *,Oscillator types Standard Oscillator This simulates the oscillator of an analog synthesizer. You can achieve the same effects as on an analog synthesizer, such as Pulse Width Modulation.
Noise + Comb Filter This oscillator extracts a pitched component from white noise. It can create not only unique sounds, but also a wide variety of sounds ranging from string-type sounds to synth bass.
VPM (Variable Phase Modulation) This modulates the phase of two oscillators and uses the wave shaping table to process the sound to create rich overtones.
Cross/Sync/Ring Modulation This oscillator simulates the inter-modulation between oscillators that was possible on analog synthesizers.
Brass Model Oscillator* 3
This oscillator provides a physical model simulation of lip reed brass instruments such as trumpet and trombone.
Reed Model Oscillator* 3
This oscillator provides a physical model simulation of reed instruments such as a saxophone.
Plucked String Model Oscillator* 3
This oscillator provides a physical model simulation of plucked string instruments such as a bass guitar.
20scillator Sets
Set Oscillator 1 Oscillator 2 Set 1 Standard OSC Standard OSC Set 2 Standard OSC Comb Filter OSC Set 3 Standard OSC VPMOSC Set4 Standard OSC Modulation OSC Set 5 Comb Filter OSC Comb Filter OSC Set 6 Comb Filter OSC VPM OSC Set 7 Comb Filter OSC Modulation OSC Set 8 VPMOSC VPM OSC Set9 VPMOSC Modulation OSC Set 10 Brass OSC no oscillator Set 11 Reed OSC no oscillator Set 12 PluckOSC no oscillator
* 3 The Brass Model Oscillator, Reed Model Oscillator, and Plucked String Oscillator use physical models. Unlike conventional oscillators which produce a fixed waveform, physical models simulate the physical characteristics of the components that make up an instrument, such as the bore, reed, or string. For example, a physical model might calculate the way in which a pressure wave would be reflected and attenuated as it passed through a bore, or the way in which a reed moves when air is blown past it. These calculations are made in realtime to determine what sound would result.
* 4 In order to use the controllers of the Prophecy to control its own tone generator or an external MIDI device, you need to specify how the Prophecy's controllers correspond to control messages such as pitch bender, aftertouch, and control changes #00-95. These settings are made in the Common section of each program. In the Global section, you can specify how the MIDI messages assigned to the Prophecy's controllers will be transmitted and received.
25
26
4.2 Editing a program This section explains the procedure for editing a program. * In these explanations WI~ are modifying parameter values using only the knobs, but for making fine
changes it is more efficient to use the VALUE keys.
•Initializing a programThe programs of the Prophecy consist of a complex combination of settings. In order to help you understand the procedure for creating a program, we will initialize a program to the simplest possible settings as follows.
III Press the PERFORMANCE/EDIT Select key to enter Edit mode (the lower LED will blink).
[gJ Press the COMMON key to enter the Common section. Use the PAGE keys to move to page CMN-10 [Initialize Program].
~ Press the ENTER key. You will be asked <Are you sure?> Press the ENTER key once again. The program will be initialized, and the display will indicate <COMPLETED>.
Now play the keyboard. You will hear a simply sawtooth wave.
• Oscillator settingsThe oscillator is the section that creates the "waveform", which is the most basic element of the sound. The Prophecy is able to produce a wide variety of waveforms, but in this example we will use the most basic Std.OSC in the following explanation of the sound-editing procedure.
III Press the OSC key to enter the OSC section. Use the PAGE keys to move to page OSC-cmn1 [Oscillator Set]. Make sure that the display indicates "SETOl:Std.OSC+Std.OSC". This means that Std.OSC is assigned to both OSCl and OSC2.
[gJ Use the PAGE keys to move to page OSC-cmn7 [OSC Menu]. Move the knob located below the [STD1] display so that it reads [STD1] , and press the ENTER key. You will move to page OSC:L-1 [Basic Pitch]. The four parameters shown in this page specify the pitch of OSCl. As you play the keyboard, modify the parameters and notice how the pitch changes.
~ Use the PAGE keys to move to page OSC1-5 [STD WaveLevel]. Use knob 1located below the "SAW" display, and change it to "PULSE". Play the keyboard and notice that the waveform has been changed from sawtooth to pulse.
@J Use the PAGE keys to move to page OSCl-6 [STD Wave Form]. While playing the keyboard, rotate knob 3located at the lower right of the "LF02:Int+00" display. Notice that the sound begins to "waver". This is because LF02 is being used to vary the width of the pulse wave. For this example, set it to "Int+SO".
(§I Now we will modify the setting of the LF02 that we heard in step I!J . Press the LFO key to move to page LF0-1 [LFO Menu]. Rotate knob 2located under the [LF02] display, so that it reads [LF02] , and press the ENTER key. Next use the PAGE keys to move to page LF02-2 [Frequency]. Rotate knob 1 located under the "005(0.150[Hz])" display. Notice that the frequency of the "wavering" changes. For this example, set it to "031(0.800[Hz])".
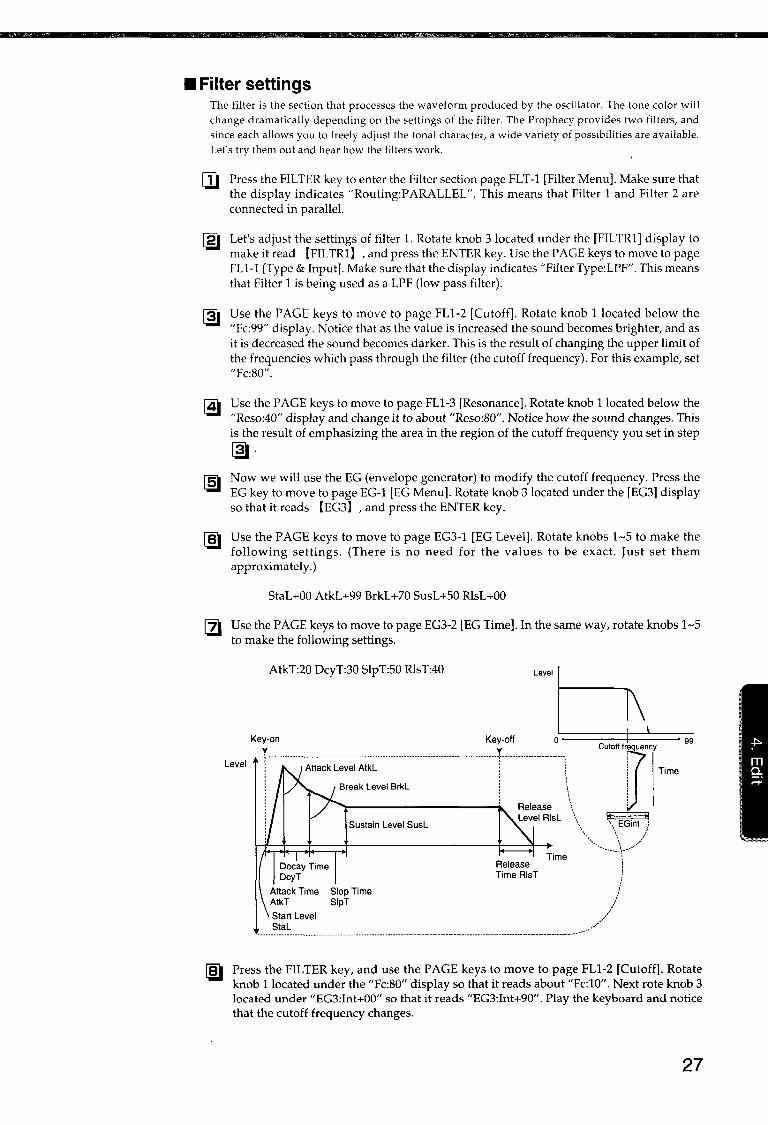
• Filter settings The filter is the section that processes the waveform produced by the oscillator. The tone color will change dramatically depending on the settings of the filter. The Prophecy provides two filters, and since each allows you to freely adjust the tonal character, a wide variety of possibilities are available. Let's try them out and hear how the filters work.
Press the FILTER key to enter the Filter section page FLT-1 [Filter Menu]. Make sure that the display indicates "Routing:P ARALLEL". This means that Filter 1 and Filter 2 are connected in parallel.
Let's adjust the settings of filter 1. Rotate knob 3located under the [FILTR1] display to make it read [FIL TR1] , and press the ENTER key. Use the PAGE keys to move to page FLl-1 [Type & Input]. Make sure that the display indicates "Filter Type:LPF". This means that Filter 1 is being used as a LPF (low pass filter).
Use the PAGE keys to move to page FLl-2 [Cutoff]. Rotate knob 1located below the "Fc:99" display. Notice that as the value is increased the sound becomes brighter, and as it is decreased the sound becomes darker. This is the result of changing the upper limit of the frequencies which pass through the filter (the cutoff frequency). For this example, set "Fc:80".
Use the PAGE keys to move to page FLl-3 [Resonance]. Rotate knob 1located below the "Reso:40" display and change it to about "Reso:80". Notice how the sound changes. This is the result of emphasizing the area in the region of the cutoff frequency you set in step ~·
Now we will use the EG (envelope generator) to modify the cutoff frequency. Press the EG key to move to page EG-1 [EG Menu]. Rotate knob 3located under the [EG3] display so that it reads [EG3] , and press the ENTER key.
Use the PAGE keys to move to page EG3-1 [EG Level]. Rotate knobs 1-5 to make the following settings. (There is no need for the values to be exact. Just set them approximately.)
StaL+OO AtkL+99 BrkL+70 SusL+50 RlsL+OO
[lJ Use the PAGE keys to move to page EG3-2 [EG Time]. In the same way, rotate knobs 1-5 to make the following settings.
Level
AtkT:20 DcyT:30 SlpT:SO RlsT:40 Level
Key-on Key-off o 99
--j-------------------------------·---------·----··---------------------------------------T·----------------------l Cutoff fr~~~'::,e• quency Time
~ l \ ~ l \ l . \ : \ I• •I j Sustain Level SusL \... \\EGin:./
, ~;:':,T T;m, ''·······r·
-------------------------------------------------------------------------------------------------------------------------------/·,.··
I I
/ /
Press the FILTER key, and use the PAGE keys to move to page FLl-2 [Cutoff]. Rotate knob 1located under the "Fc:80" display so that it reads about "Fc:10". Next rote knob 3 located under "EG3:Int+00" so that it reads "EG3:Int+90". Play the keyboard and notice that the cutoff frequency changes.
27
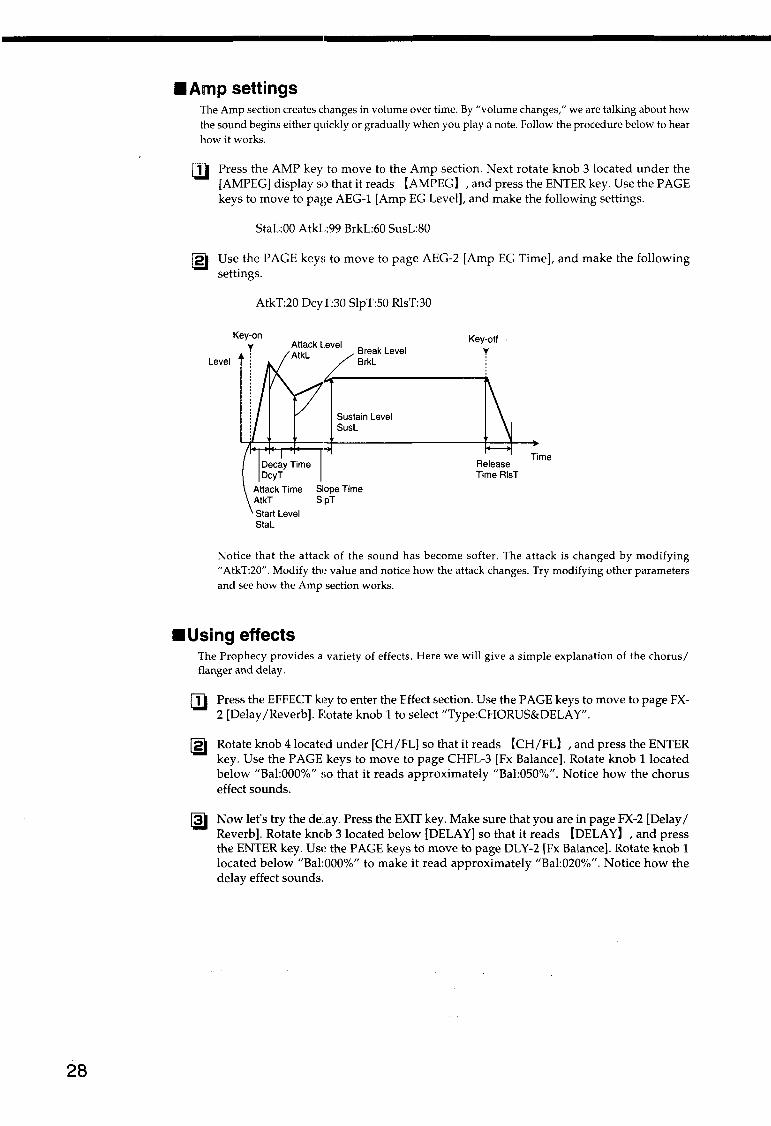
28
• Amp settings The Amp section creates changes in volume over time. By "volume changes," we are talking about how the sound begins either quickly or gradually when you play a note. Follow the procedure below to hear how it works.
Press the AMP key to move to the Amp section. Next rotate knob 3 located under the [AMPEG] display so that it reads [AMPEG] , and press the ENTER key. Use the PAGE keys to move to page AEG-1 [Amp EG Level], and make the following settings.
StaL:OO AtkL:99 BrkL:60 SusL:80
rm Use the PAGE keys to move to page AEG-2 [Amp EG Time], and make the following settings.
Level
AtkT:20 DcyT:30 SlpT:SO RlsT:30
Key-on
Break Level BrkL
Key-off y
Release Time RlsT
Time
Notice that the attack of the sound has become softer. The attack is changed by modifying "AtkT:20". Modify the value and notice how the attack changes. Try modifying other parameters and see how the Amp section works.
• Using effects The Prophecy provides a variety of effects. Here we will give a simple explanation of the chorus/ flanger and delay.
[]) Press the EFFECT key to enter the Effect section. Use the PAGE keys to move to page FX-2 [Delay/Reverb]. Rotate knob 1 to select "Type:CHORUS&DELAY".
Rotate knob 4located under [CH/FL] so that it reads [CH/FL] , and press the ENTER key. Use the PAGE keys to move to page CHFL-3 [Fx Balance]. Rotate knob 1located below "Bal:OOO%" so that it reads approximately "Bal:OSO%". Notice how the chorus effect sounds.
Now let's try the de:lay. Press the EXIT key. Make sure that you are in page FX-2 [Delay I Reverb]. Rotate knob 3 located below [DELAY] so that it reads [DELAY] , and press the ENTER key. Use the PAGE keys to move to page DLY-2 [Fx Balance]. Rotate knob 1 located below "Bal:OOO%" to make it read approximately "Bal:020%". Notice how the delay effect sounds.
• Setting and using controllers The Prophecy has a variety of controllers; Wheell-3, Ribbon Controller, Foot Pedal, Foot SW etc. For each program you can freely assign the function of each controller, to control the sound in the most suitable way. In an initialized program, the controllers are assigned as follows.
Wheell Wheel2 Wheel3+ Wheel3-RibbonX RibbonZ FootPedal FootSW
Pitch Bend+-Control Change 1 Control Change 2 Control Change 3 Control Change 16 Control Change 17 Control Change 18 Sustain (Control Change 64)
Let's make some changes to these settings.
[I Press the COMMON key, and use the PAGE keys to move to page CMN-5 [Wheel1/2 Assign]. Rotate knob 1 to modify the function assigned to Wheell. For this example, set Wheel1 OFF. Move Wheel1 and notice that the Pitch Bend effect does not occur.
Use the PAGE keys to move to page CMN-7 [Ribbon Assign]. Move knob 1 to change the Ribbon X setting to Pitch Bend+-. Move your finger over the Ribbon Controller to left and right, and notice how the pitch bend effect is applied. Moving from the center toward the right end of the ribbon will raise the pitch, and moving toward the left will lower the pitch.
Rotate knob 3 to set XVC:ON. With this setting, the location where you first place your finger on the ribbon will be the zero point of the controller value. Operate the ribbon and notice the result.
Use the PAGE keys to move to page CMN-6 [Wheel3 Assign]. Notice that the settings are "+:007(CChg#02)" and" -:008(CChg#03)". This means that moving the wheel upward will transmit control change #2, and moving it downward will transmit control change #3. Let's use this to control the sound. First press the FILTER key, and use the PAGE keys to move to page FLTl-5 [Fe Modulation]. Rotate knobs 3 and 4 to make a setting of "CChg#02:Int+20". Raise Wheel3 upward, and the cutoff frequency of Filter 1 will change. Next, press the MIXER key, and use the PAGE keys to move to page MIX-7 [NOISE~ OUTl]. Rotate knobs 1, 2, and 3 to make settings of "Lvl:OO" and "CChg#3:Int+50". Move Wheel3 downward, and notice that noise is mixed into the sound. Try operating the Ribbon Controller and Wheel 3 at the same time to modify the pitch and tone.
The examples above demonstrate only a small fraction of the possibilities of the Prophecy. For details on its other functions, refer to the separate Parameter Guide.
29
30
4.3 Saving a program Programs can be saved in bank A 00-63, bank B 00--63, and if a writable card is inserted, bank CARD 00~ 63. In Performance mode, ~:hanges you make to the sound using the Performance Editor, and the on/ off status of the PORTAMENTO key can be saved for each program. Each program also contains the settings made in Edit mode (excepl: for the Global section settings) and all settings of Performance Editor Define. These settings are not saved in memory unless you perform the Write operation. In the Edit mode Global section, changes you make are saved at the moment they are modified, so there is no need to Write them into memory.
Ten arpeggio patterns can be saved in bank INT PAT, and if a writable card is inserted, the CARD PAT bank can accommodate ten more patterns. However, it is not possible to write directly into the CARD PAT bank. The UP, DOWN ALTl, ALT2 and RANDOM patterns can save arpeggio parameters. PATl--P A TS can save arpeggio parameters and also pattern parameters. As with the Edit mode Global section parameters, this data is saved at the moment it is modified, so there is no need to Write them into memory.
To write a program, press the WRITE key from any mode or condition.
• Memory protect To help prevent data from being inadvertently overwritten, the Global section contains a memory protect setting. Before writing data that you create, you must turn off the memory protect setting in the Global section.
iJl Press the PERFORMANCE/EDIT Select key to enter Edit mode (the lower LED will blink).
[!} Press the GLOBAL key to enter the Global section. Use the PAGE keys to move to page GLB-20 [Memory Protect].
If you wish to edit and write a program, rotate knob 2 to turn Program Memory OFF. If you wish to edit arpeggio parameters, rotate knob 4 to turn Pattern Memory OFF.
* When you write data, the data that was previously in the writing destination will be lost. However, you can use Global section page GLB-19 [Load Factory Data] to restore the sounds that the Prophecy was shipped with. Global section settings and arpeggio parameter settings can also be restored to the factory settings.
•Rename Here's how to assign a new name to a program you have edited.
[!) Press the PERFORMANCE/EDIT Select key to enter EDIT mode (the lower LED will blink).
[!} Press the COMMON key to enter the Common section. Use the PAGE keys to move to page CMN-1 [Program Name].
rm Press the CURSOR keys or rotate knob 4 and make sure that the cursor appears. When the cursor appears, you can modify the character at the location of the cursor.
@I Use the CURSOR k~eys or knob 4 to move the cursor, and use the VALUE keys or knob 5 to select a character. At this time you can press the ENTER key to input a space, or the EXIT key to delete a character.
r:w Use the PAGE keys to move to page CMN-2 [Prog Category]. Use knob 1 to select the program category. The Program Category allows you to classify your programs by sub-name or type of sound. The Program Category is displayed at the right of the program name in Performance mode. When selecting programs in Performance mode, you can use the PAGE keys to find and select programs that have the same category.
•writing procedure
Press the WRITE key. The WRITE key LED and the bank LED of the writing destination will light, and the LEDs of the available banks and the ENTER key LED will blink. The display will indicate the current program parameter load source in the upper line, and the writing destination in the lower line.
I ,.·.''' 0
!' .. ·;··, ····:·,!'' ....... , ;::::·: ... ,[! ·-.. I * If memory protect is ON, an error message will be displayed. Press the EXIT key to return to the previous display.
Set the Edit mode Global section, page GLB-20 [Memory Protect] parameter to OFF.
• If you wish to return to the display you were in previously, press the EXIT key.
!g) Using the A, B, or CARD* 1 keys, specify the writing destination bank. *1 Cif the CARD key LED is unlit, pressing the CARD key will produce an error message. If you wish to write
into the CARD bank, you must set the write protect slider of the card to the OFF position before inserting it into the card slot.
Use the VALUE keys, numeric keys, or knob 1 to specify the writing destination program number.
To confirm the writing destination program number you specified in steps [g} and ~ , press the ENTER key. The following display will appear, and the ENTER key LED will blink faster.
• To cancel, press the EXIT key. If you then press the EXIT key once again, you will return to the display you were in before initiating the Write operation.
If you are sure that you want to write the data, press the ENTER key. The data will be written. When execution is complete, you will return to the display you were in before initiating the Write operation.
• If you decide to cancel the Write operation, press the EXIT key. You will return to the display of step [J}. If you then press the EXIT key once again, you will return to the display you were in before initiating the Write operation.
4.4 Compare By pressing this key during editing, you can recall the unedited settings. The data being edited will be held in internal memory until the next time you edit. When you press this key once again, the edited data will be recalled. Be aware that if you edit parameters while the LED of the COMPARE key is lit, you will lose the edits that you made before pressing the COMPARE key.
If you enter Performance mode without writing your edited data, the bank name shown in the upper left of the display will appear in lower-case characters. As long as you do not change programs, the COMPARE key will still act as explained above.
Even if you return to Performance mode without writing your edited data and then select another program number, you will still be able to recall your edited data. Press the COMPARE key and the bank name (of Performance mode) will change to lower-case characters, and the edited data will be recalled. Press the key once again and the LED will go out, and the currently selected program number will be recalled.
If you write the edited data, the Compare function will not be available.
31
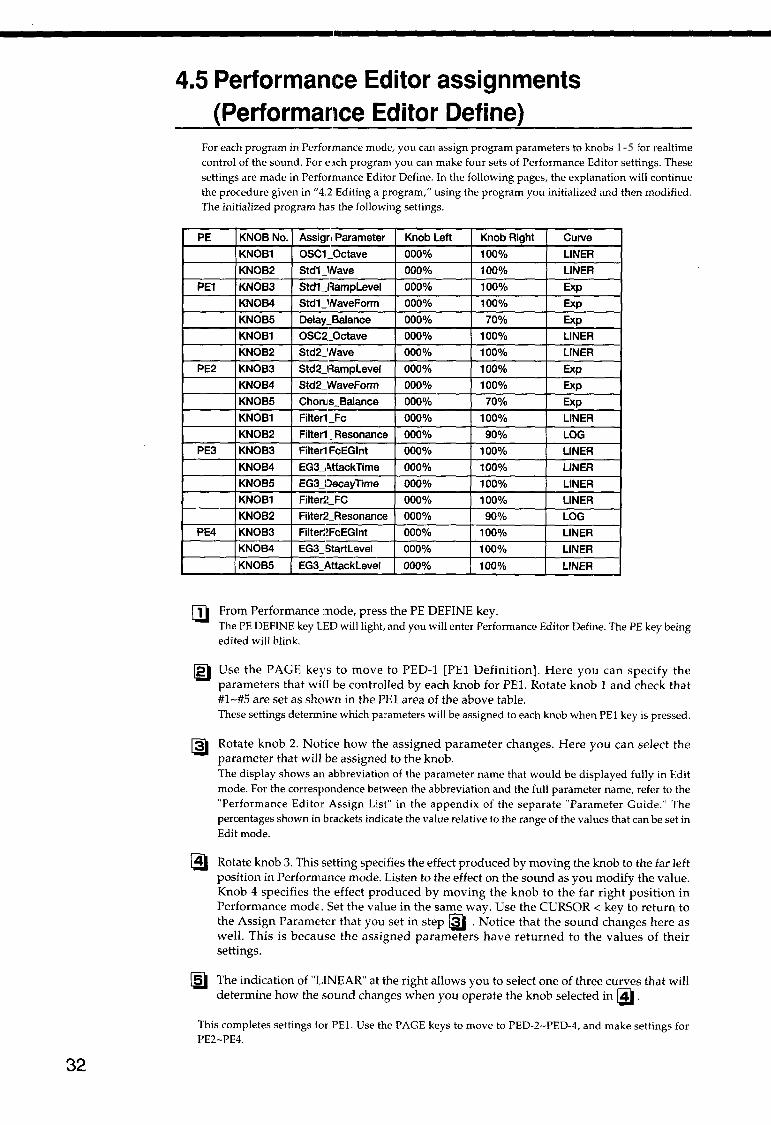
32
4.5 PerformanceEditor assignments (Performance Editor Define)
For each program in Performance mode, you can assign program parameters to knobs 1-5 for realtime control of the sound. For each program you can make four sets of Performance Editor settings. These settings are made in Performance Editor Define. In the following pages, the explanation will continue the procedure given in "4.2 Editing a program," using the program you initialized and then modified. The initialized program has the following settings.
PE
PEl
PE2
PE3
PE4
KNOB No. Assign Parameter Knob Left Knob Right Curve KNOB1 OSC1 __ 0ctave 000% 100% LINER KNOB2 Std1_Wave 000% 100% LINER KNOB3 Stdl_FiampLevel 000% 100% Exp KNOB4 Std1_ WaveForm 000% 100% Exp KNOB5 Delay __ Balance 000% 70% Exp KNOB1 OSC2 __ Octave 000% 100% LINER KNOB2 Std2_Wave 000% 100% LINER KNOB3 Std2_1RampLevel 000% 100% Exp KNOB4 Std2_WaveForm 000% 100% Exp KNOB5 Chorus_Balance 000% 70% Exp KNOB1 Filter1_Fc 000% 100% LINER KNOB2 Filter1_Resonance 000% 90% LOG KNOB3 Filter1 FcEGint 000% 100% LINER KNOB4 EG3_AttackTime 000% 100% LINER KNOB5 EG3_1DecayTime 000% 100% LINER KNOB1 Filter:!_FC 000% 100% LINER KNOB2 Filter:!_Resonance 000% 90% LOG KNOB3 Filter:!FcEGint 000% 100% LINER KNOB4 EG3_StartLevel 000% 100% LINER KNOB5 EG3_)l.ttackLevel 000% 100% LINER
From Performance mode, press the PE DEFINE key. The PE DEFINE key LED will light, and you will enter Performance Editor Define. The PE key being edited will blink.
~ Use the PAGE keys to move to PED-1 [PEl Definition]. Here you can specify the parameters that will be controlled by each knob for PEl. Rotate knob 1 and check that #1-#5 are set as shown in the PEl area of the above table. These settings determine which parameters will be assigned to each knob when PEl key is pressed.
Rotate knob 2. Notice how the assigned parameter changes. Here you can select the parameter that will be assigned to the knob. The display shows an abbreviation of the parameter name that would be displayed fully in Edit mode. For the correspondence between the abbreviation and the full parameter name, refer to the "Performance Editor Assign List" in the appendix of the separate "Parameter Guide." The percentages shown in brackets indicate the value relative to the range of the values that can be set in Edit mode.
Rotate knob 3. This setting specifies the effect produced by moving the knob to the far left position in Performance mode. Listen to the effect on the sound as you modify the value. Knob 4 specifies the effect produced by moving the knob to the far right position in Performance mode. Set the value in the same way. Use the CURSOR< key to return to the Assign Parameter that you set in step [ji . Notice that the sound changes here as well. This is because the assigned parameters have returned to the values of their settings.
liD The indication of "LINEAR" at the right allows you to select one of three curves that will determine how the sound changes when you operate the knob selected in ~ .
This completes settings for PEl. Use the PAGE keys to move to PED-2-PED-4, and make settings for PE2-PE4.
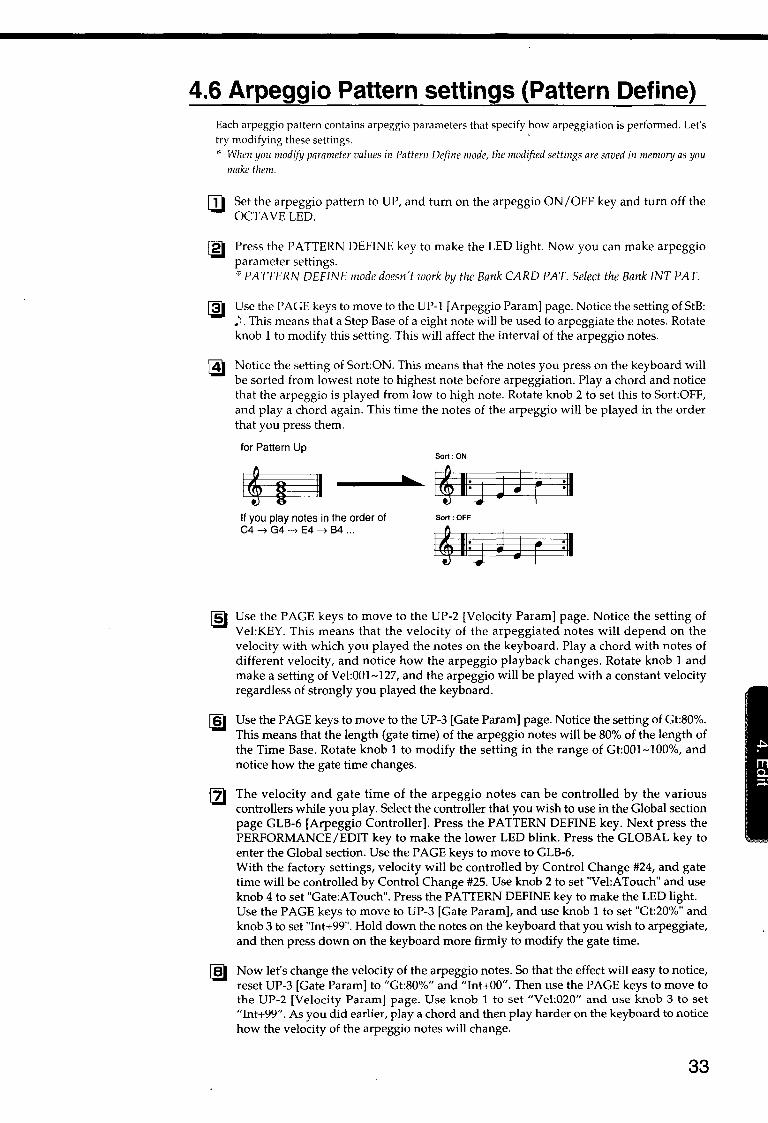
4.6 Arpeggio Pattern settings (Pattern Define) Each arpeggio pattern contains arpeggio parameters that specify how arpeggiation is performed. Let's try modifying these settings. · '" When you modify parameter values in Pattern Define mode, the modified settings are saved in memory as you
make them.
a::J Set the arpeggio pattern to UP, and turn on the arpeggio ON/OFF key and turn off the OCTAVE LED.
Press the PATTERN DEFINE key to make the LED light. Now you can make arpeggio parameter settings. '*PATTERN DEFINE mode doesn't work by the Bank CARD PAT. Select the Bank !NT PAT.
Use the PAGE keys to move to the UP-1 [Arpeggio Par am] page. Notice the setting of StB: )l. This means that a Step Base of a eight note will be used to arpeggiate the notes. Rotate knob 1 to modify this setting. This will affect the interval of the arpeggio notes.
Notice the setting of Sort:ON. This means that the notes you press on the keyboard will be sorted from lowest note to highest note before arpeggiation. Play a chord and notice that the arpeggio is played from low to high note. Rotate knob 2 to set this to Sort:OFF, and play a chord again. This time the notes of the arpeggio will be played in the order that you press them.
for Pattern Up
If you play notes in the order of C4--? G4--? E4--? 84 ...
Sort:ON
Sort: OFF
I~ II=J J J r =II
Use the PAGE keys to move to the UP-2 [Velocity Param] page. Notice the setting of Vel:KEY. This means that the velocity of the arpeggiated notes will depend on the velocity with which you played the notes on the keyboard. Play a chord with notes of different velocity, and notice how the arpeggio playback changes. Rotate knob 1 and make a setting of Vel:001-127, and the arpeggio will be played with a constant velocity regardless of strongly you played the keyboard.
Use the PAGE keys to move to the UP-3 [Gate Param] page. Notice the setting of Gt:80%. This means that the length (gate time) of the arpeggio notes will be 80% of the length of the Time Base. Rotate knob 1 to modify the setting in the range of Gt:OOl-100%, and notice how the gate time changes.
The velocity and gate time of the arpeggio notes can be controlled by the various controllers while you play. Select the controller that you wish to use in the Global section page GLB-6 [Arpeggio Controller]. Press the PATTERN DEFINE key. Next press the PERFORMANCE/EDIT key to make the lower LED blink. Press the GLOBAL key to enter the Global section. Use the PAGE keys to move to GLB-6. With the factory settings, velocity will be controlled by Control Change #24, and gate time will be controlled by Control Change #25. Use knob 2 to set "Vel:ATouch" and use knob 4 to set "Gate:ATouch". Press the PATTERN DEFINE key to make the LED light. Use the PAGE keys to move to UP-3 [Gate Param], and use knob 1 to set "Gt:20%" and knob 3 to set "Int+99". Hold down the notes on the keyboard that you wish to arpeggiate, and then press down on the keyboard more firmly to modify the gate time.
Now let's change the velocity of the arpeggio notes. So that the effect will easy to notice, reset UP-3 [Gate Param] to "Gt:80%" and "Int+OO". Then use the PAGE keys to move to the UP-2 [Velocity Param] page. Use knob 1 to set "Vel:020" and use knob 3 to set "lnt+99". As you did earlier, play a chord and then play harder on the keyboard to notice how the velocity of the arpeggio notes will change.
33
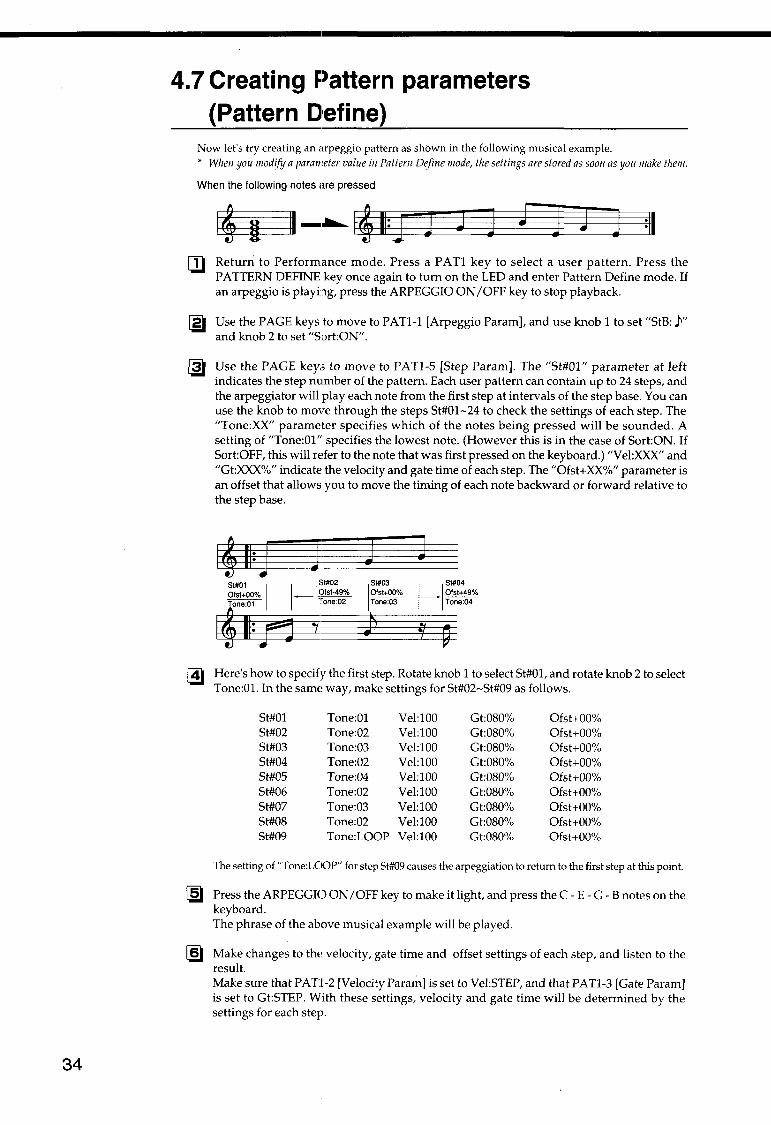
34
4. 7 Creating Pattern parameters (Pattern Define
Now let's try creating an arpeggio pattern as shown in the following musical example. * When you modify a parameter value in Pattern Define mode, the settings are stored as soon as you make them.
When the following notes are pressed
I' I 11-......._ I' ll=j J j J J J J J =II Return to Performance mode. Press a P AT1 key to select a user pattern. Press the PATTERN DEFINE key once again to turn on the LED and enter Pattern Define mode. If an arpeggio is playing, press the ARPEGGIO ON I OFF key to stop playback.
liJ Use the PAGE keys to move to PATl-1 [Arpeggio Param], and use knob 1 to set "StB: }" and knob 2 to set "Sort:ON".
@I
Use the PAGE keys to move to PATl-5 [Step Param]. The "St#01" parameter at left indicates the step number of the pattern. Each user pattern can contain up to 24 steps, and the arpeggiator will play each note from the first step at intervals of the step base. You can use the knob to move through the steps St#01-24 to check the settings of each step. The "Tone:XX" parameter specifies which of the notes being pressed will be sounded. A setting of "Tone:01" specifies the lowest note. (However this is in the case of Sort:ON. If Sort:OFF, this will refer to the note that was first pressed on the keyboard.) "Vel:XXX" and "Gt:XXX%" indicate the velocity and gate time of each step. The "Ofst+XX%" parameter is an offset that allows you to move the timing of each note backward or forward relative to the step base.
I' II:] J St#Ot I I 'Bl#02 Ofst+OO% _ '9fst·49% I 'ooli;~ ~,.00~
j St#03
IOfst+OO% Tone:03
}
J . St#04 :_lotst+49% [ Tone:04
Here's how to specify the first step. Rotate knob 1 to select St#01, and rotate knob 2 to select Tone:Ol. In the same way, make settings for St#02-St#09 as follows.
St#01 Tone:01 Vel:100 Gt:080% Ofst+OO% St#02 Tone:02 Vel:lOO Gt:080% Ofst+OO% St#03 Tone:03 Vel:100 Gt:080% Ofst+OO% St#04 Tone:02 Vel:100 Gt:080% Ofst+OO% St#05 Tone:04 Vel:lOO Gt:080% Ofst+OO% St#06 Tone:02 Vel:100 Gt:080% Ofst+OO% St#07 Tone:03 Vel:100 Gt:080% Ofst+OO% St#08 Tone:02 Vel:100 Gt:080% Ofst+OO% St#09 Tone: LOOP Vel:lOO Gt:080% Ofst+OO%
The setting of "Tone: LOOP" for step St#09 causes the arpeggiation to return to the first step at this point.
(ID Press the ARPEGGIO ON /OFF key to make it light, and press the C- E- G- B notes on the keyboard. The phrase of the above musical example will be played.
~ Make changes to the velocity, gate time and offset settings of each step, and listen to the result. Make sure that PATl-2 [Velocity Param] is set to Vel:STEP, and that PATl-3 [Gate Param] is set to Gt:STEP. With these settings, velocity and gate time will be determined by the settings for each step.

4.8 Other settings (Edit) • Loading factory preset data
If after modifying the program and arpeggio pattern settings you decide to bring back the factory settings, use Edit mode Global section page GLB-19 [LoadFactory Data] to recall the initial data. You can initialize a single program, or all programs, arpeggio patterns, and Global settings at once (Parameter Guide, page 148). When you recall the factory settings, any settings that had been previously made will be lost. If necessary, save your data before initializing.
•saving data Edited data can be saved using the Write operation. However for some parameters, the modified values are saved immediately without the need for the Writ operation (page 30).
The programs of bank A or B and the arpeggio patterns of bank INT PAT can be saved by copying them to an optional SRC-512 RAM Memory Card. This is done in Edit mode Global section page GLB-17 [Save to Card] (Parameter Guide, page 145). You can also save data by connecting a sequencer or data file capable of saving MIDI data to the MIDI connectors, and using Edit mode Global section page GLB-18 [MIDI Data Dump] to select and transmit the data that you wish to save (Parameter guide, page 146).
•Initializing, Copying, or Exchanging data within a section of the same program
It is possible to initialize, copy, or exchange (swap) data within sections of a program. This can help you create sounds more efficiently. You can also initialize or copy PE Define settings.
· To initialize an entire program, use Edit mode Common section page CMN-10 (page 27).
•Initializing This operation resets all settings of the Prophecy to the factory settings. When this is done, all program sounds, arpeggio patterns, and settings (Global section) will also r~turn to the factory settings. Be aware that since the controllers will return to an un-adjusted state, you will need to use GLB-22 [Controller Calibration] to re-adjust them. You can also initialize by using Edit mode Global section page GLB-19 [Load FactoryData] and selecting "ALL_Data", but this will not initialize the settings such as Controller Calibration, etc. (Parameter Guide, page 149).
• To initialize, turn the power on while holding down the EXIT key and the VALUE+ key.
• Adjusting the controllers The active range of the WHEEL 1/2/3, RIBBON X/Z, After Touch, and Foot Pedal controllers can be adjusted. For WHEEL 1 and 3, you can also adjust the center. • These settings are made in Edit mode Global section, page GLB-22 [Controller Calibration] (Parameter Guide,
page 149). For RIBBON Z, adjust the sensitivity of the ribbon controller using the RIBBON SENSE knob located on the rear panel, and make fine adjustments using Edit mode Global section, page GLB-4 Ribbon Z Sense (Parameter Guide, page 136). After Touch can be adjusted by the After Touch Sense parameter located in the same page as GLB-4 After Touch Sense (Parameter Guide, page 136).
35
36
5 Midi
applications
MIDI (Musical Instrument Digital Interface) is a world-wide standard that allows electronic musical instruments and computers to exchange musical data.
5.1 MIDI channels MIDI channels are similar to television channels in that when the channel of a receiving device is set to match the channel of a transmitting device, the data of that channel will be received. The Prophecy sends and receives data on its specified Global MIDI channel. The Global MIDI channel setting is made in Edit mode Global section page GLB-8 [MIDI] Global Channel.
5.2 Note On/Off When you play a note, a Note On message [9n,kk,vv] is transmitted which tells which note was pressed (the Note Number), how strongly it was pressed (the Velocity). (n:channel, kk:note number, vv:velocity) When you release the note, a Note Off message [8n,kk,vv] is transmitted. The Prophecy transmits Note On/Off messages on the Global MIDI channel when you play its keyboard. However, if the Prophecy is set to Omni ON, it will receive and produce sound in response to incoming Note On/Off messages of any channel, regardless of its Global MIDI channel setting. Normally you will leave Omni OFF (Global mode GLB-8 Omni), so that Note On/Off messages will be received only on the Global MIDI channel.
5.3 Selecting programs Programs can be selected by Program Change messages [Cn,pp] (pp: program number, up to 128 sounds can be selected). You can select programs of other banks by using Bank Selecf1 messages [Bn,OO,mn] (control change #.00) and [Bn,20,bb] (control change #.32). (mm: upper byte of bank number, bb: lower byte of bank number, together they allow you to select from 16384 banks.) An incoming Bank Select message will change the program bank from which subsequent program changes will be taken; i.e., the bank will not achtally change until the next program change message is received. Normally the Prophecy will receive program change messages on its Global MIDI channel to change programs. Program change messages are transmitted and received only when in Performance mode.
Transmission and reception of program change messages can be turned on/ off in Edit mode Global section page GLB-12 [MIDI Program Change]. You can also specify the correspondence between the Prophecy's internal programs (AOO-C63) and the program number I program bank of external MIDI devices. (Edit mode Global section page GLB-13 [Program Bank Select Map] and page GLB-14 [Program No. Select Map].
*1 When only Program Chunge messages are used to select sounds via MIDI, only 128 different sounds can be selected. If you need to select more than 128 sounds, use Bank Select messages. Control Change 0 specifies the upper byte of the bank number, and Control Change 32 specifies the lower byte. This provides a total of 16384 program banks. When a bank select message is received, the next-received Program Select message will select a program from the newly specified bank.
When selecting sounds from a MIDI sequencer, send Control Change 0 as the MSB, Control Change 32 as the LSB, and then a Program Change message. The result of receiving these messages will depend on the settings of Global sedion page GLB-13 [Program Bank Select Map] and GLB-14 [Program No. Select Map].
* Depending on the oscillator type being used by a program, a certain amount of time may be required from when a Program Change message is received to when the Prophecy switches programs. When changing programs, be sure to allow plenty of time between the Program Change and the first note-on.
5.4 Bank Select Refer to 5.3Selecting Programs."
5.5 Applying aftertouch*2
The capability of modifying the sound by pressing down on the keyboard after playing a note is known as Aftertouch. When you apply aftertouch on the keyboard of the Prophecy, Channel Pressure messages [Dn,vv] (vv is the aftertouch value) are transmitted. When another device receives these messages, it will produce the effect specified by its aftertouch settings. On the Prophecy, the settings of Edit mode Global section page GLB-10 [MIDI After Touch] allow Aftertouch (channel pressure) message transmission to be turned on/ off, or Aftertouch messages converted to a specified Control Change message.
Some MIDI devices use a different type of aftertouch which allows an independent effect for each note (Polyphonic Key Pressure). The Prophecy does not implement this message, and all references to "aftertouch" in this manual refer to Channel Pressure (the type of aftertouch in which all notes are affected equally, regardless of the location on the keyboard).
5.6 Applying pitch bend*2
When the Pitch Bender function is assigned to a Wheel1-3 or the Ribbon Controller of the Prophecy, you can operate that controller to apply a pitch bend effect. At the same time, the controller also transmits Pitch Bend messages [En,bb,mm]. (bb: lower byte of the value, mm: upper byte of the value, providing a value of 16384 steps, with 8192 [bb,mm=00,40] as the center value.) If you want to control Pitch Bend from an external MIDI device, set Edit mode Global section page GLB-9 [MIDI Pitch Bend] Receive to "ENABLE".
5. 7 Damper {Hold} pedal*2
If in Edit mode Common section page CMN-8 you assign a function of Sustain to the Foot SW jack, you can use a connected pedal switch to control the damper effect. At the same time, a Hold message [Bn,40,vv] (control change #64) will be transmitted. (vv: 127[7F] when ON, 00 when OFF). If you want to control the damper effect from an external device using control change messages, set the Global section page GLB-11 [MIDI ControlChange] Contrl No. #64 Receive parameter to "ENBL". With this setting, messages with value "vv" of 63 [3F] or less will turn off the damper effect, and 64 [40] or higher will turn on the damper effect.
5.8 Adjusting the volume*2
If you have assigned Volume (control change #07) to a controller such as Wheel 1-3, the Ribbon Controller, or a connected pedal volume, operating that controller will control the Effect section parameter "Output Level" (page FX-4,5) to adjust the overall volume. At the same time, Volume messages [Bn, 07, vv] (control change #07) will be transmitted. (vv: value) If you change the function assigned to the Prophecy's Wheel 1-3, Ribbon Controller, or a connected pedal volume to Expression (control change #11), operating that controller will control the AMP section parameter "Amplitude" (page AMPl-1.1, AMP2-1.1 ), adjusting the volume before the Effect section. At the same time, Expression messages [Bn, OB, vv] (control change #11) will be transmitted. (vv: value) If you want to control the volume from an external device using control change messages, set the Global section page GLB-11 [MIDI Control Change] control change #07 or #11 Receive parameter to "ENBL" or "INTP." * The parameter displays for "Output Level" and" Amplitude" cannot be changed using MIDI control
changes.
37
38
5.9 Applying vibrato (pitch modulation}*2
If you have assigned Pitch Modulation (control change #01) to a controller such as Wheel1--3, the Ribbon Controller, or a connected pedal switch, operating that controller will control the vibrato effect. At the same time, Pitch Modulation Depth messages [Bn,01,vv] (control change #01) will be transmitted. (vv: value). If you want to control pitch modulation from an external device using control change messages, set the Global section page GLB-11 [MIDI Control Change] control change #01 Receive parameter to "ENBL" or "INTP."
5.10 Control the stereo location (pan}*2
These settings are made in Edit mode Effect section page FX-4 [Pan & Output Level]. If you wish to control this using the MIDI Pan message [Bn,OA,vv] (control change #10) (vv: value), make settings in Edit mode Global section page GLB-11 [MIDI ControlChange] to set reception for Control Change #10 to "ENBL'' or "INTP".
' 2 The Prophecy allows you to specify how the built-in controllers (Wheel 1/2/3, Ribbon Controller, etc.) and MIDI control messages (Control Change #00-#95, Pitch Bend, etc.) that are transmitted and received will correspond to the parameters of the tone generator (i.e., those parameters for which a modulation source can be selected). This means that the examples given in 5.5-5.10 above are only example of one particular setting, and are not fixed. (For the relation between controllers, messages and parameters, refer to the diagram in Global section GLB-9 [MIDI Pitch Bend].
5.11 If the sound does not stop If due to some problem a note becomes "stuck" and the sound does not stop, you can re-select a program to stop the sound. If the Prophecy is receiving MIDI messages from a MIDI device that transmits Active Sensing messages [FE], and if for some reason no MIDI messages are received for a certain interval, the sound will automatically be halted.
5.12 Stoppingthe sound from an external MIDI device
When an All Note Off message [Bn,7B,OOJ (control change #123) is received, the Prophecy will turn off all its keys. When an All Sound Off message [Bn,78,00J (control change #120) is received, the Prophecy will stop sounding. The difference between these two messages is that with All Note Off, the decay of the note will remain, while with All Sound Off, the note will stop immediately. However these messages are intended only for emergencies, and should not be used during normal playing.
5.13 To reset all controllers on a given channel When an All Controller Reset message [Bn,79,00] (control change #121) is received, all controllers will be reset. However this message i:; intended only for emergencies, and should not be used during normal playing.

5.14 About MIDI System Exclusive messages System Exclusive messages are used to transmit data which is specific to a particular manufacturer or device. The Prophecy's System Exclusive message format is [F0,42,3n,41,ff, ... ,F7] (n: Global MIDI Channel, ff: Function code). These messages are used for the functions explained in "5.15 Transmitting sound program data etc. (Data Dump)" and "5.16 E~iting sound programs etc." A few special System Exclusive messages are used for data which is not limited to a particular manufacturer or device. These are called Universal System Exclusive messages.
The Prophecy uses the following Universal System Exclusive messages.
* When an Inquiry Message Request [F0,7F,nn,06,01,F7] (nn: MIDI channel) is received, the Prophecy will transmit an Inquiry message [F0,7E,nn,06,02, (9 bytes), F7] saying; "I am a Korg Prophecy, system version
5.15 Transmitting sound program data (Data Dump)
Programs, arpeggio patterns, and global data can be transmitted to an external device as MIDI exclusive data. To transmit this data, use the Global mode page GLB-18 [MIDI DataDump]. There you can specify the type of data to be transmitted. If the GLB-15 [Sys EX Filter] MIDI Exclusive Data Transmission setting is ON (Xmt: ON), selecting a program will cause MIDI Exclusive data for 1 program to be transmitted. The Prophecy can also transmit these data dumps in response to a Dump Request. These types of data are transmitted and received on the Global MIDI channel.
5.16 Editing sound programs, etc. By using MIDI System Exclusive Parameter Change messages, you can modify individual parameters from an external device. If you wish to use this, set the Edit mode Global section page GLB-15 [SysEX Filter] Transmit to ON, and Receive to ENABLE.
• If in page GLB-18 you specify either a bank of programs or an individual program as the data to be dumped, the received data will be written directly into backup memory, so there is no need to use the Write operation. However in the case of the data that is dumped when a program is selected, or parameter change data that is transmitted during editing, the changes that result will affect only the editing memory, and if you wish to save that program you will need to use the Write operation. (You do not need to use the Write operation for Global parameter data and Arpeggio Pattern data.) It is possible to perform the Write operation using the MIDI exclusive message Program Write. (Refer to the separate parameter guide, "MIDI Implementation".)
39
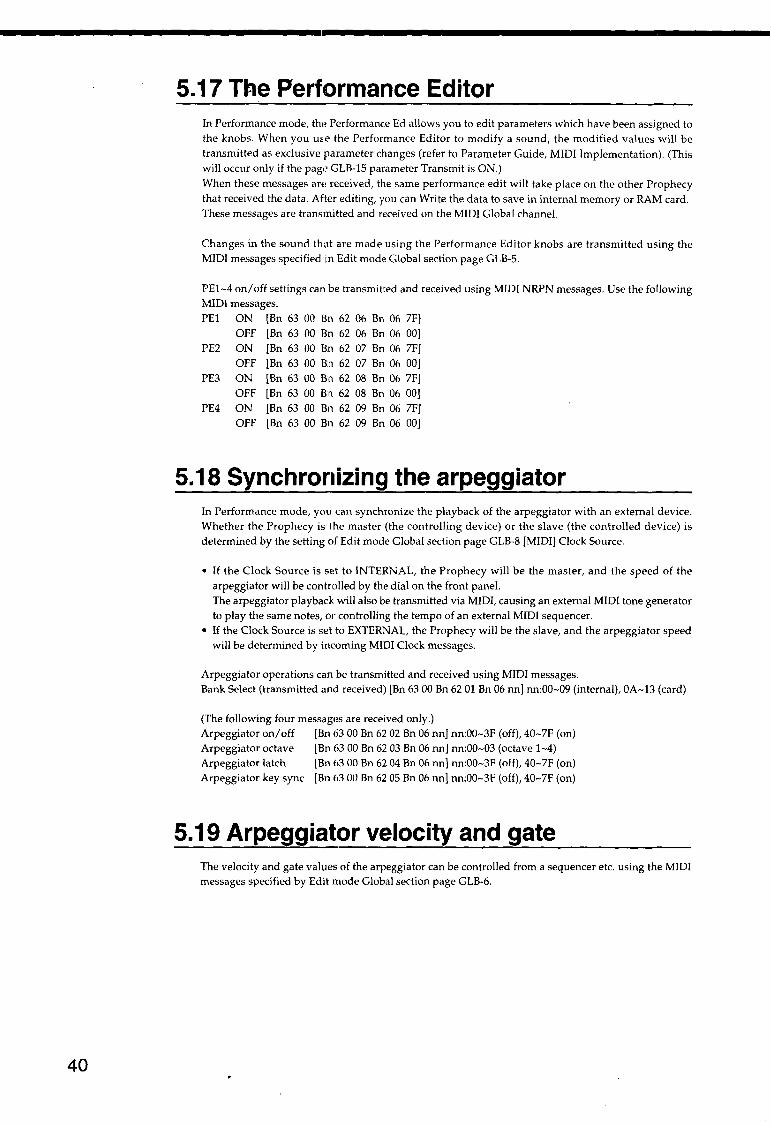
40
5.17 The Performance Editor In Performance mode, the Performance Ed allows you to edit parameters which have been assigned to the knobs. When you use the Performance Editor to modify a sound, the modified values will be transmitted as exclusive parameter changes (refer to Parameter Guide, MIDI Implementation). (This will occur only if the page GLB-15 parameter Transmit is ON.) When these messages are received, the same performance edit will take place on the other Prophecy that received the data. After editing, you can Write the data to save in internal memory or RAM card. These messages are transmitted and received on the MIDI Global channel.
Changes in the sound th<It are made using the Performance Editor knobs are transmitted using the MIDI messages specified 1n Edit mode Global section page GLB-5.
PEl-4 on/ off settings can be transmitted and received using MIDI NRPN messages. Use the following MIDI messages. PEl ON [Bn 63 00 Bn 62 06 Bn 06 7F]
OFF [Bn 63 00 Bn 62 06 Bn 06 00] PE2 ON [Bn 63 00 Bn 62 07 Bn 06 7F]
OFF [Bn 63 00 Bn 62 07 Bn 06 00] PE3 ON [Bn 63 00 Bn 62 08 Bn 06 7F]
OFF [Bn 63 00 Bn 62 08 Bn 06 00] PE4 ON [Bn 63 00 Bn 62 09 Bn 06 7F]
OFF [Bn 63 00 Bn 62 09 Bn 06 00]
5.18 Synchronizing the arpeggiator In Performance mode, you can synchronize the playback of the arpeggiator with an external device. Whether the Prophecy is the master (the controlling device) or the slave (the controlled device) is determined by the setting of Edit mode Global section page GLB-8 [MIDI] Clock Source.
• If the Clock Source is set to INTERNAL, the Prophecy will be the master, and the speed of the arpeggiator will be controlled by the dial on the front panel. The arpeggiator playback will also be transmitted via MIDI, causing an external MIDI tone generator to play the same notes, or controlling the tempo of an external MIDI sequencer.
• If the Clock Source is set to EXTERNAL, the Prophecy will be the slave, and the arpeggiator speed will be determined by incoming MIDI Clock messages.
Arpeggiator operations can be transmitted and received using MIDI messages. Bank Select (transmitted and received) [Bn 63 00 Bn 62 01 Bn 06 nn] nn:00-09 (internal), OA-13 (card)
(The following four messages are received only.) Arpeggiator on/off [Bn 63 00 Bn 62 02 Bn 06 nn] nn:00-3F (off), 40-7F (on) Arpeggiator octave [Bn 63 00 Bn 62 03 Bn 06 nn] nn:00-03 (octave 1-4) Arpeggiator latch [Bn 63 00 Bn 62 04 Bn 06 nn] nn:00-3F (off), 40-7F (on) Arpeggiator key sync [Bn 63 00 Bn 62 05 Bn 06 nn] nn:00-3F (off), 40-7F (on)
5.19 Arpeggiatorvelocity and gate The velocity and gate values of the arpeggiator can be controlled from a sequencer etc. using the MIDI messages specified by Edit mode Global section page GLB-6.
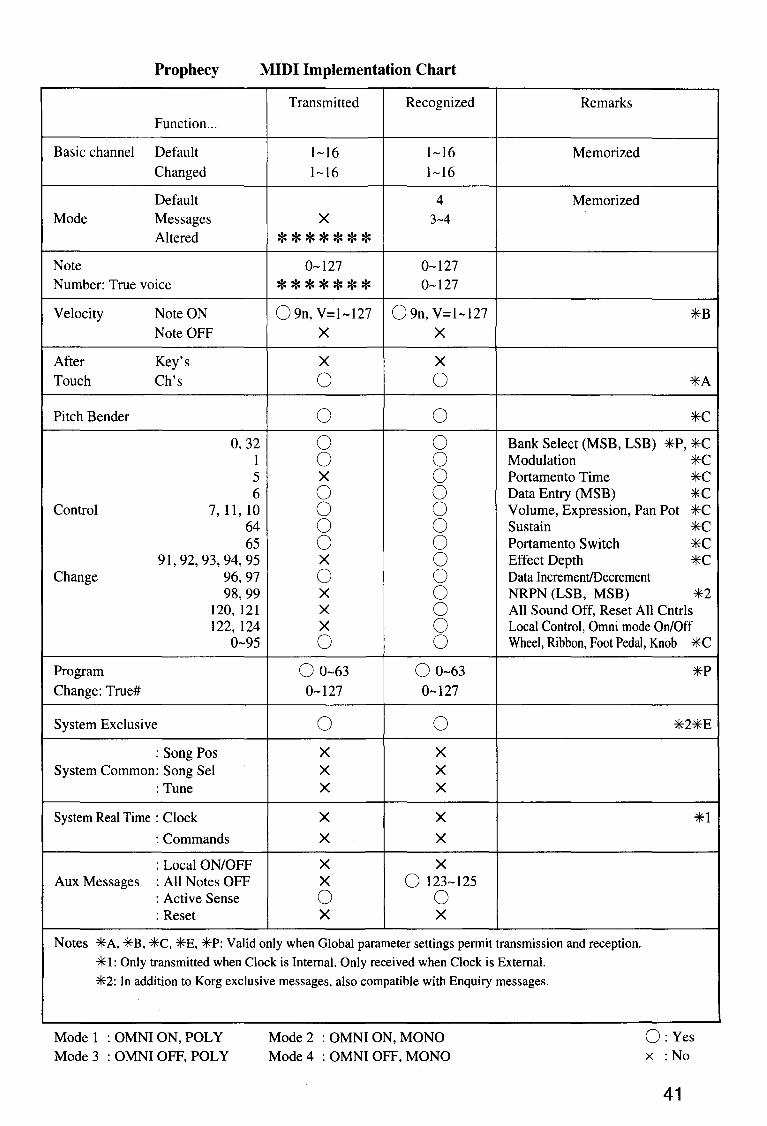
Prophecy MIDI Implementation Chart
Transmitted Recognized Remarks Function ...
Basic channel Default l-16 Memorized Changed 1-16 1-16
Default 4 Memorized Mode Messages X 3-4
Altered ******* Note 0-127 0-127 Number: True voice ******* 0-127
Velocity Note ON 0 9n, V=1-127 0 9n, V=1-127 *B Note OFF X X
After Key's X X Touch Ch's 0 0 *A
Pitch Bender 0 0 *C
0,32 0 0 Bank Select (MSB, LSB) *P, *C 1 0 0 Modulation *C 5 X 0 Portamento Time *C 6 0 0 Data Entry (MSB) *C
Control 7, 11,10 0 0 Volume, Expression, Pan Pot *C 64 0 0 Sustain *C 65 0 0 Portamento Switch *C
91,92,93,94,95 X 0 Effect Depth *C Change 96,97 0 0 Data Increment/Decrement
98,99 X 0 NRPN (LSB, MSB) *2 120, 121 X 0 All Sound Off, Reset All Cntrls 122, 124 X 0 Local Control, Omni mode On/Off
0-95 0 0 Wheel, Ribbon, Foot Pedal, Knob *C
Program 0 0-63 0 0-63 *P Change: True# 0-127 0-127
System Exclusive 0 0 *2*E
:Song Pos X X System Common: Song Sel X X
:Tune X X
System Real Time : Clock X X *1 :Commands X X
: Local ON/OFF X X Aux Messages : All Notes OFF X 0 123-125
: Active Sense 0 0 :Reset X X
Notes *A. *B, *C, *E, *P: Valid only when Global parameter settings permit transmission and reception. * 1: Only transmitted when Clock is Internal. Only received when Clock is External. *2: In addition to Korg exclusive messages, also compatible with Enquiry messages.
Mode 1 : OMNI ON, POLY Mode 3 : OMNI OFF, POLY
Mode 2 : OMNI ON, MONO Mode 4 : OMNI OFF, MONO
O:Yes x :No
41
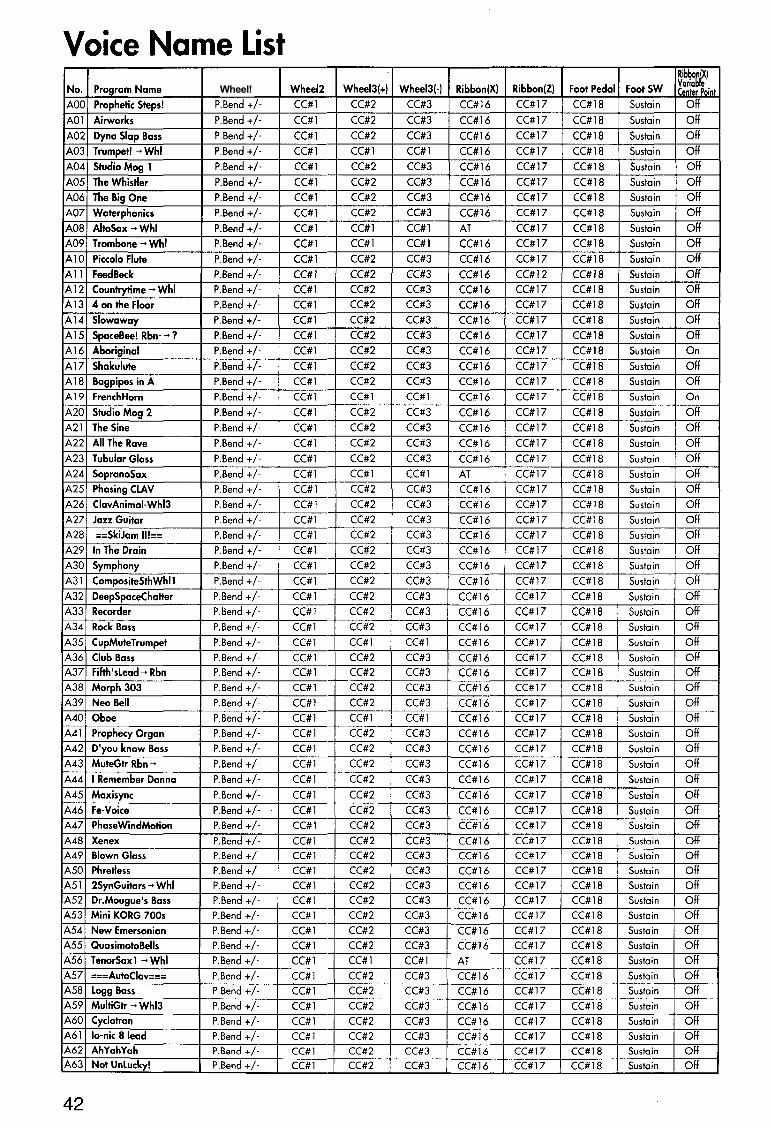
Voice Name List No. Program Name Wheel! Wheel2 Wheel3(+) WheeiJ(·) Ribbon(X) Ribbon(Z) Foot Pedal Foot SW
Rib~o~jXI Yarra e Center Point
AOO Prophetic Steps! P.Bend +/· CC#l CC#2 CC#3 ((#16 ((#17 ((#18 Sustain Off AOl Airworks P.Bend +/- CC#l CC#2 CC#3 CC#l6 CC#l7 ((#18 Sustain Off A02 Dyna Slap Bass P.Bend +/- CC#l CC#2 CC#3 CC#l6 CC#l7 ((#18 Sustain Off A03 Trumpet!~ Whl P.Bend +/- CC#l CC#l CC#l CC#l6 CC#l7 ((#18 Sustain Off A04 Studio Mog 1 P.Bend +/· CC#l CC#2 CC#3 ((#16 CC#l7 CC#l8 Sustain Off AOS The Whistler P.Bend +/· CC#l ((#2 CC#3 CC#l6 ((#17 CC#lB Sustain Off A06 The Big One P.Bend +/- CC#l CC#2 CC#3 CC#l6 ((#17 ((#18 Sustain Off A07 Waterphonics P.Bend +/· CC#l CC#2 CC#3 CC#l6 CC#l7 CC#l8 Sustain Off AOB AltoSax ~ Whl P.Bend +/· CC#l CC#l CC#l AT CC#l7 CC#l8 Sustain Off A09 Trombone ~whl P.Bend +/- CC#l CC#l CC#l ((#16 ((#17 CC#lB Sustain Off AlO Piccolo Flute P.Bend +/· CC#l CC#2 CC#3 CC#l6 CC#l7 CC#l8 Sustain Off All Feed Beck P.Bend +/· CC#l CC#2 CC#3 ((#16 ((#12 ((#18 Sustain Off Al2 Countrytime ~ Whl P.Bend +/· CC#l CC#2 CC#3 ((#16 ((#17 ((#18 Sustain Off Al3 4 on the Floor P.Bend +/· CC#l CC#2 CC#3 CC#l6 ((#17 ((#18 Sustain Off Al4 Slowaway P.Bend +/· CC#1 CC#2 CC#3 CC#l6 CC#l7 CC#l8 Sustain Off AlS SpaceBee! Rbn· ~ ? P.Bend +/· CC#l CC#2 CC#3 ((#16 ((#17 ((#18 Sustain Off Al6 Aboriginal P.Bend +/- CC#l CC#2 CC#3 CC#l6 CC#l7 ((#18 Sustain On Al7 Shakulute P.Bend +/- CC#l CC#2 CC#3 ((#16 ((#17 ((#18 Sustain Off AlB Bagpipes in A P.Bend +/· CC#l CC#2 CC#3 CC#16 CC#17 CC#18 Sustain Off A19 French Horn P.Bend +/· CC#1 CC#1 CC#1 CC#16 CC#17 CC#18 Sustain On A20 Studio Mog 2 P.Bend +/· CC#1 CC#2 CC#3 ((#16 ((#17 CC#18 Sustain Off A21 The Sine P.Bend +/- CC#1 CC#2 CC#3 CC#16 CC#17 ((#18 Sustain Off A22 All The Rave P.Bend +/· CC#1 CC#2 CC#3 CC#16 CC#17 CC#18 Sustain Off A23 Tubular Glass P.Bend +/- CC#1 ((#2 CC#3 CC#16 CC#17 CC#18 Sustain Off A24 SopranoSax P.Bend +/- CC#1 CC#1 CC#1 AT CC#17 CC#18 Sustain Off A2S Phasing CLAV P.Bend +/- CC#1 CC#2 CC#3 CC#16 ((#17 CC#18 Sustain Off A26 ClavAnimai-WhiJ P.Bend +/· CC#1 CC#2 CC#3 CC#16 CC#17 CC#18 Sustain Off A27 Jazz Guitar P.Bend +/- CC#1 CC#2 CC#3 CC#16 CC#17 CC#18 Sustain Off A28 ==SkiJam II!== P.Bend +/- CC#1 ((#2 CC#3 CC#16 CC#17 CC#18 Sustain Off A29 In The Drain P.Bend +/- CC#1 CC#2 CC#3 CC#16 CC#17 CC#18 Sustain Off A30 Symphony P.Bend +/- CC#1 CC#2 CC#3 CC#16 CC#17 CC#18 Sustain Off A31 Composite5thWhl1 P.Bend +/- CC#1 CC#2 CC#3 CC#16 CC#17 CC#18 Sustain Off A32 DeepSpaceChatter P.Bend +/- CC#1 CC#2 CC#3 ((#16 ((#17 CC#18 Sustain Off A33 Recorder P.Bend +/- CC#1 CC#2 CC#3 CC#16 ((#17 ((#18 Sustain Off A34 Rock Bass P.Bend +/- CC#1 CC#2 CC#3 CC#16 CC#17 CC#18 Sustain Off A35 CupMuteTrumpet P.Bend +/- CC#1 CC#1 CC#1 CC#16 CC#17 CC#18 Sustain Off A36 Club Bass P.Bend +/- CC#1 CC#2 CC#3 CC#16 CC#17 CC#18 Sustain Off A37 Fifth'slead ~ Rbn P.Bend +/· CC#1 CC#2 CC#3 ((#16 ((#17 CC#18 Sustain Off A38 Morph 303 P.Bend +/· CC#1 CC#2 CC#3 CC#16 CC#17 CC#18 Sustain Off A39 Neo Bell P.Bend +/- CC#1 CC#2 CC#3 CC#16 CC#17 CC#18 Sustain Off A40 Oboe P.Bend +/- CC#1 CC#1 CC#1 ((#16 CC#17 CC#18 Sustain Off A41 Prophecy Organ P.Bend +/- CC#1 CC#2 CC#3 CC#16 CC#17 CC#18 Sustain Off A42 D'you know Bass P.Bend +/- CC#1 CC#2 CC#3 CC#16 CC#17 CC#18 Sustain Off A43 MuteGtr Rbn ~ P.Bend +/- CC#1 ((#2 CC#3 CC#16 CC#17 ((#18 Sustain Off A44 I Remember Donna P.Bend +/· CC#1 CC#2 CC#3 CC#16 CC#17 CC#18 Sustain Off A4S Maxi sync P.Bend +/- CC#1 CC#2 CC#3 ((#16 ((#17 CC#18 Sustain Off A46 Fe.Voice P.Bend +/- CC#1 CC#2 CC#3 ((#16 ((#17 ((#18 Sustain Off A47 PhaseWindMotion P.Bend +/· CC#1 CC#2 CC#3 CC#16 CC#17 CC#18 Sustain Off A48 Xenex P.Bend +1- CC#1 CC#2 CC#3 CC#16 CC#17 CC#18 Sustain Off A49 Blown Glass P.Bend +/- CC#1 CC#2 CC#3 CC#16 CC#17 CC#18 Sustain Off A 50 Phretless P.Bend +/- CC#1 CC#2 CC#3 CC#16 CC#17 CC#18 Sustain Off A51 2SynGuitors ~ Whl P.Bend +/· CC#1 CC#2 CC#3 CC#16 CC#17 CC#18 Sustain Off AS2 Dr.Mougue's Bass P.Bend +/- CC#1 CC#2 CC#3 CC#16 CC#17 CC#18 Sustain Off A53 Mini KORG 700s P.Bend +/· CC#1 CC#2 CC#3 CC#16 CC#17 CC#18 Sustain Off AS4 New Emersonian P.Bend +/· CC#1 CC#2 CC#3 CC#16 CC#17 CC#18 Sustain Off ASS QuasimotoBells P.Bend +/· CC#1 CC#2 CC#3 CC#16 CC#17 CC#18 Sustain Off AS6 TenorSaxl ~ Whl P.Bend +/· CC#1 CC#1 CC#1 AT ((#17 ((#18 Sustain Off A57 ===AutoCiav=== P.Bend +/· CC#1 CC#2 CC#3 CC#16 CC#17 CC#18 Sustain Off ASS Logg Bass P.Bend +/· CC#1 CC#2 CC#3 CC#16 CC#17 CC#18 Sustain Off A59 MultiGtr - Whl3 P.Bend +/- CC#1 CC#2 CC#3 CC#16 CC#17 CC#18 Sustain Off A60 Cyclotron P.Bend +/· CC#1 CC#2 CC#3 ((#16 ((#17 ((#18 Sustain Off A61 Io-nic 8 lead P.Bend +/· CC#1 CC#2 CC#3 CC#16 CC#17 CC#18 Sustain Off A62 AhYahYah P.Bend +/- CC#1 CC#2 CC#3 CC#16 CC#17 CC#18 Sustain Off A63 Not Unlucky! P.Bend +/- CC#1 CC#2 CC#3 CC#16 CC#17 CC#18 Sustain Off
42
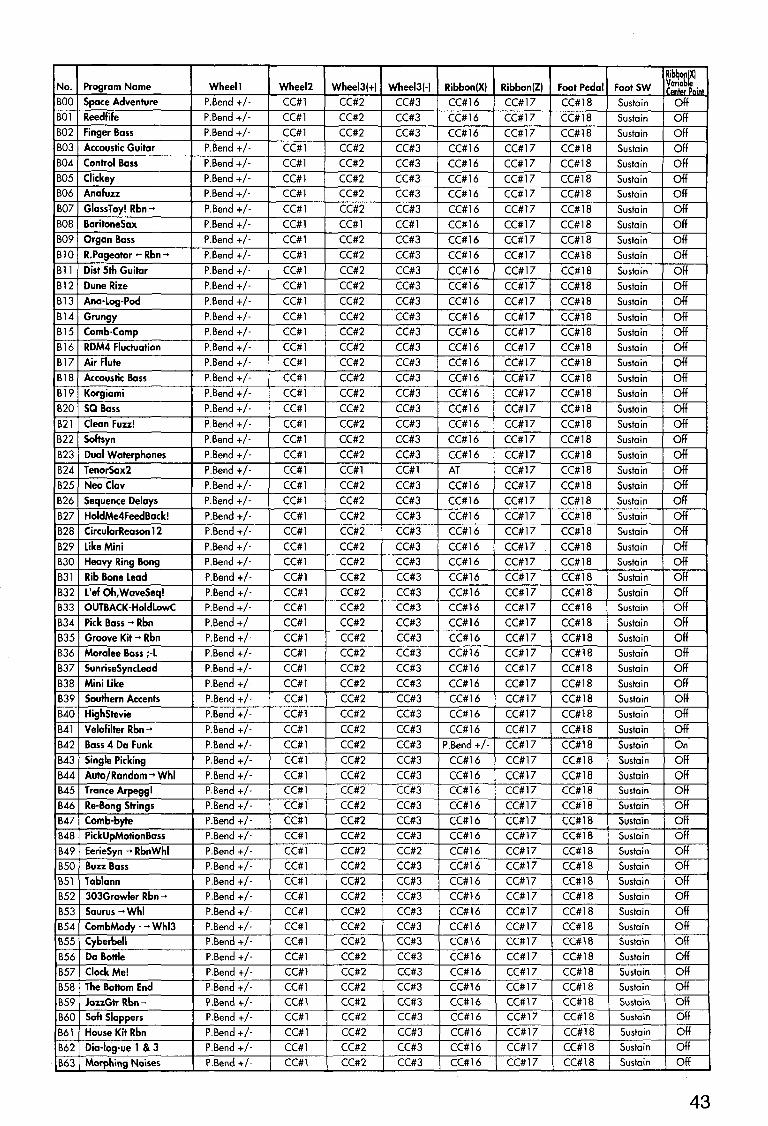
No. Program Name Wheell Wheel2 WheeiJ(+) WheeiJ(-) Ribbon(X) Ribbon(Z) Foot Pedal Foot SW RibbocjXI I ~~~~~·~oint
BOO Space Adventure P.Bend +/- CC#l CC#2 CC#3 CC#l6 CC#l7 CC#l8 Sustain Off BOl Reed fife P.Bend +/- CC#l CC#2 CC#3 CC#l6 CC#l7 CC#l8 Sustain Off B02 Finger Bass P.Bend +/- CC#l CC#2 CC#3 CC#l6 CC#l7 CC#lB Sustain Off B03 Accoustic Guitar P.Bend +/- CC#l CC#2 CC#3 CC#l6 CC#l7 CC#l8 Sustain Off B04 Control Bass P.Bend +/- CC#l CC#2 CC#3 CC#l6 CC#l7 CC#lB Sustain Off B05 Clickey P.Bend +/- CC#l CC#2 CC#3 CC#l6 CC#l7 CC#lB Sustain Off B06 Ana fuzz P.Bend +/- CC#l CC#2 CC#3 CC#l6 CC#l7 CC#lB Sustain Off B07 GlassToy! Rbn-> P.Bend +/- CC#l CC#2 CC#3 CC#l6 CC#l7 CC#lB Sustain Off BOB BaritoneSax P.Bend +/- CC#l CC#l CC#l CC#l6 CC#l7 CC#lB Sustain Off B09 Organ Bass P.Bend +/- CC#l CC#2 CC#3 CC#l6 CC#l7 CC#lB Sustain Off BlO R.Pageator +- Rbn ... P.Bend +/- CC#l CC#2 CC#3 CC#l6 CC#l7 CC#l8 Sustain Off Bll Dist 5th Guitar P.Bend +/- CC#l CC#2 CC#3 CC#l6 CC#l7 CC#l8 Sustain Off B12 Dune Rize P.Bend +/- CC#l CC#2 CC#3 CC#l6 CC#l7 CC#l8 Sustain Off B13 Ana-Log-Pod P.Bend +/- CC#l CC#2 CC#3 CC#l6 CC#l7 CC#l8 Sustain Off B14 Grungy P.Bend +/- CC#l CC#2 CC#3 CC#l6 CC#l7 CC#lB Sustain Off B15 Comb-Comp P.Bend +/- CC#l CC#2 CC#3 CC#l6 CC#l7 CC#l8 Sustain Off B16 RDM4 Fluctuation P.Bend +/- CC#l CC#2 CC#3 CC#l6 CC#l7 CC#l8 Sustain Off B17 Air Flute P.Bend +/- CC#l CC#2 CC#3 CC#l6 CC#l7 CC#lB Sustain Off B18 Accoustic Bass P.Bend +/- CC#l CC#2 CC#3 CC#l6 CC#l7 CC#l8 Sustain Off B19 Korgiami P.Bend +/- CC#l CC#2 CC#3 CC#l6 CC#l7 CC#l8 Sustain Off B20 SQ Bass P.Bend +/- CC#l CC#2 CC#3 CC#l6 CC#l7 CC#lB Sustain Off B21 Clean Fuzz! P.Bend +/- CC#l CC#2 CC#3 CC#l6 CC#l7 CC#lB Sustain Off B22 Softsyn P.Bend +/- CC#l CC#2 CC#3 CC#l6 CC#l7 CC#lB Sustain Off B23 Dual Waterphones P.Bend +/- CC#l CC#2 CC#3 CC#l6 CC#l7 CC#lB Sustain Off B24 TenorSax2 P.Bend +/- CC#l CC#l CC#l AT CC#l7 CC#l8 Sustain Off B25 Neo Clav P.Bend +/- CC#l CC#2 CC#3 CC#l6 CC#l7 CC#l8 Sustain Off B26 Sequence Delays P.Bend +/- CC#l CC#2 CC#3 CC#l6 CC#l7 CC#lB Sustain Off B27 HoldMe4FeedBack! P.Bend +/- CC#l CC#2 CC#3 CC#l6 CC#l7 CC#l8 Sustain Off B28 CircularReason 12 P.Bend +/- CC#l CC#2 CC#3 CC#l6 CC#l7 CC#lB Sustain off B29 Like Mini P.Bend +/- CC#l CC#2 CC#3 CC#l6 CC#l7 CC#l8 Sustain Off B30 Heavy Ring Bong P.Bend +/- CC#l CC#2 CC#3 CC#l6 CC#l7 CC#l8 Sustain Off B31 Rib Bone Lead P.Bend +/- CC#l CC#2 CC#3 CC#l6 CC#l7 CC#lB Sustain Off B32 L'ef Oh,WaveSeq! P.Bend +/- CC#l CC#2 CC#3 CC#l6 CC#l7 CC#lB Sustain Off B33 OUTBACK -HoldLowC P.8end +/- CC#l CC#2 CC#3 CC#l6 CC#l7 CC#l8 Sustain Off B34 Pick Bass ... Rbn P.Bend +/- CC#l CC#2 CC#3 CC#l6 CC#l7 CC#l8 Sustain Off 835 Groove Kit - Rbn P.8end +/- CC#l CC#2 CC#3 CC#l6 CC#l7 CC#l8 Sustain Off 836 Moralee Bass ;-L P.Bend +/- CC#l CC#2 CC#3 CC#l6 CC#l7 CC#lB Sustain Off 837 SunriseSyncLead P.8end +/- CC#l CC#2 CC#3 CC#l6 CC#l7 CC#l8 Sustain Off 838 Mini Like P.8end +/- CC#l CC#2 CC#3 CC#l6 CC#l7 CC#lB Sustain Off 839 Southern Accents P.8end +/- CC#l CC#2 CC#3 CC#l6 CC#l7 CC#l8 Sustain Off 840 HighStevie P.Bend +/- CC#l CC#2 CC#3 CC#l6 CC#l7 CC#lB Sustain Off 841 Velofilter Rbn ... P.Bend +/- CC#l CC#2 CC#3 CC#l6 CC#l7 CC#l8 Sustain Off 842 Boss 4 Do Funk P.8end +/- CC#l CC#2 CC#3 P.8end +/- CC#l7 CC#l8 Sustain On B43 Single Picking P.Bend +/- CC#l CC#2 CC#3 CC#l6 CC#l7 CC#lB Sustain Off 844 Auto/Random ... Whl P.Bend +/- CC#l CC#2 CC#3 CC#l6 CC#l7 CC#l8 Sustain Off B45 Trance Arpegg! P.Bend +/- CC#l CC#2 CC#3 CC#l6 CC#l7 CC#l8 Sustain Off B46 Re·Bong Strings P.Bend +/- CC#l CC#2 CC#3 CC#l6 CC#l7 CC#l8 Sustain Off 847 Comb-byte P.8end +/- CC#l CC#2 CC#3 CC#16 CC#l7 CC#l8 Sustain Off 848 PickUpMotionBass P.8end +/- CC#l CC#2 CC#3 CC#l6 CC#l7 CC#l8 Sustain Off 849 EerieSyn ... RbnWhl P.Bend +/- CC#l CC#2 CC#2 CC#l6 CC#l7 CC#l8 Sustain Off 850 Buzz Bass P.8end +/- CC#l CC#2 CC#3 CC#l6 CC#l7 CC#l8 Sustain Off B51 Tablann P.Bend +/- CC#l CC#2 CC#3 CC#l6 CC#l7 CC#l8 Sustain Off 852 303Growler Rbn ... P.Bend +/- CC#l CC#2 CC#3 CC#l6 CC#l7 CC#lB Sustain Off 853 Saurus -Whl P.Bend +/- CC#l CC#2 CC#3 CC#l6 CC#l7 CC#l8 Sustain Off B54 CombMody - ... Whl3 P.8end +/- CC#l CC#2 CC#3 CC#l6 CC#l7 CC#l8 Sustain Off 855 Cyberbell P.Bend +/- CC#l CC#2 CC#3 CC#l6 CC#l7 CC#lB Sustain Off B56 Do Bottle P.Bend +/- CC#l CC#2 CC#3 CC#l6 CC#l7 CC#l8 Sustain Off B57 Clock Me! P.Bend +/- CC#l CC#2 CC#3 CC#l6 CC#l7 CC#l8 Sustain Off B58 The Bottom End P.Bend +/- CC#l CC#2 CC#3 CC#l6 CC#l7 CC#l8 Sustain Off B59 JazzGtr Rbn~ P.Bend +/- CC#l CC#2 CC#3 CC#l6 CC#17 CC#l8 Sustain Off B60 Soft Slappers P.Bend +/- CC#l CC#2 CC#3 CC#l6 CC#l7 CC#lB Sustain Off B61 House Kit Rbn P.Bend +/- CC#l CC#2 CC#3 CC#l6 CC#l7 CC#l8 Sustain Off 862 Dia-log-ue 1 & 3 P.Bend +/- CC#l CC#2 CC#3 CC#l6 CC#l7 CC#lB Sustain Off 863 Morphing Noises P.Bend +/- CC#l CC#2 CC#3 CC#l6 CC#l7 CC#l8 Sustain Off
43

44
Specifications Prophecy
Sound Generation Method MOSS (Multi-Oscillator Synthesis System)
Sound Source 2 oscillators (max.) +Sub Oscillator+ Noise Generator, Monophonic
Keyboard 37 notes, with velocity and aftertouch sensitivity
Effects 7 effects, including Distortion, Wah, dual Parametric EO, and a choice of Chorus/Fianger + Delay or Reverb.
Programs 128 programs
Arpeggiator Section 5 presElt patterns, 5 user patterns
Controllers 3 x Modulation Wheel, Ribbon Controller
Control Inputs Assignable Foot Switch, Assignable Foot Pedal
Outputs UMono; R, Headphones
MIDI IN, OUT, THRU
Card Slot Program Data, Arpeggio Patterns
Display 40 x 2 character LCD
Power Supply AC, Local Voltage
Power Consumption 10W
Dimensions 740 (W) x 286 (D) x 100 (H) mm
Weight 5.7kg
Accessories ACcord
Appearance and specifications are subjHct to change without notice for product improvement.
Options ExpressionNolume Pedal
XVP-10, VP-10, KVP-002, EXP-2 Pedal Switch
PS-1, PS-2 Damper Pedal
DS-1, DS-2 External Controller
EC5 Memory Card RAM
SRC-512 Monitors
RM-158
NOTICE KORG products are manufactured under strict specifications and voltages required by each country. These products are warranted by the KORG distributor only in each country. Any KORG product not sold with a warranty card or carrying a serial number disqualifies the product sold from the manufacturer's/distributor's warranty and liability. This requirement is for your own protection and safety.
KO RG ~~~~la~~; chome, Sug;nam;-ku, Tokyo, Japan.
© KORG INC. 0801 CTH Printed in Japan