multi-cyclonic bagless vacuum cleaner
TRANSCRIPT

1
MODEL NO.: GVC2000
1800W
MuLti-CyCLONiC BaGLEss
VaCuuM CLEaNEr
A GILMAN GROUP BRAND
多重離心旋風免塵袋吸塵機

2
Please read and retain for future reference.
• Verify that the mains voltage is the same as that indicated on the rating plate on the appliance before use.
• Make sure that you always use a grounded wall socket to connect the appli-ance.
• Always remove the plug from the wall socket when the appliance is not in use.• Remove the plug from the wall socket by pulling the plug, not the power cord.• Make sure that the appliance, the power cord and plug do not make contact
with water.• Make sure that the appliance, the power cord and plug do not make contact
with hot surface, such as a hot hob or naked flame.• Check the appliance’s power cord regularly to make sure it is not damaged.
Do not use the appliance if the power cord is damaged. If the power cord is damaged, it must be replaced by an electrical technician or a person with similar qualification, in order to avoid any hazards.
• Never use the appliance in the vicinity of flammable material.
saFEty iNstruCtiON - GENEraL
saFEty iNstruCtiON - ELECtriCity aND HEat
• Use this appliance solely in accordance with these instructions.• This appliance is for household use only, not for commercial purpose.• Remove all packaging material from the appliance before use.• This appliance shall not be used by children of 0 to 8-year old.• This appliance can be used by children older than 8-year old and persons
with reduced physical, sensory or mental capabilities or lack of experience and knowledge, but only if they have been given supervision or instruction concerning use of the appliance in safe way and understand the hazards involved.
• Children should be supervised to ensure that they do not play with the appliance.• Cleaning and maintenance must not be done by children.• Have any repairs carried out solely by a qualified electrician. Never try to repair
the appliance yourself.• Do not handle the plug or appliance with wet hands.• Do not immerse the main body in water.• Children shall not play with the appliance.• Do not leave the appliance unattended when connected to the mains supply.• Keep hair, loose clothing, fingers and all parts of the body away from openings
of the appliance.• Only use the attachments/accessories supplied with the product.

3
• Do not pick up the appliance if falls into water. Remove the plug from the socket immediatedly. Do not use the appliance again.
• Never use corrosive or scouring cleaning agents or sharp objects (such as knives or hard brushes) to clean the appliance
• Do not use the appliance to vacuum the following objects- glowing or burning objects- glass splinters or other sharp objects- residues of plaster, cement, stone, soot, and similar- liquids, or moist dirt.
• Do not use the vacuum cleaner on wet rugs and carpets.• Never insert objects in the air-exhaust vents.• Clean the appliance thoroughly after use (please refer to “Cleaning and Stor-
age” section.
saFEty iNstruCtiON - DuriNG OPEratiON

4
PrODuCt OVErViEW
6
3
5
10 7
8
11
4
2
1
9
19
1. Unithandle2. Dustlid3. Dustcontainer4. Rearwheelsleftsidecover5. Hoseconnector6. Hose7. Hosehandle8. Airflowvalve9. MetalTube10.Floorbrush11.Floorselectionbutton12.On/offswitch13.Dustcontainerreleasebutton14.Cablerewindbutton15.Speedcontroller16.Floorbrushholder17.Dustmitesbrush18.2-in-1crevicetool19.Air-exhaustvents
17
18
13
1615
1412

5
Fitting the hose to the hose connector. (Pic.1)• Rotate the hose connector into the hose inlet of the unit at clockwise direction
unit it locked in position tightly. To remove the hose, rotate the connector to anti-clockwise direction, pull the connector from the hose inlet.
Adjusting the length of the metal tubes. (Pic.2)• Slide the metal tubes into the hose handle.(A)• Push the release button on the metal tubes and keep it pressed in; you can
then extend or retract the tube to the required length.(B)
Floor brush uses for soft and hard surfaces floor. (Pic.3)• Press the floor selection button on the brush to set the required vacuum
surface. For using on hard surface floor, press the floor selection button down on the brush to extend the brushes or lift the button up for using on soft surface floor.
assEMBLy & OPEratiNG iNstruCtiON
(Pic.3)
(Pic.2)
(Pic.1)
Release button
Floor selection button

6
Markings on the power cord (Pic.5)• The power cord has a yellow and red mark as lengh limit indication. Pull out
the cord not longer than the yellow mark for normal use.
• Never pull out the power cord beyond the red mark. This could damage the power cord.
PLEasE NOtE
(Pic.5)
• Insert the plug in the wall socket, and press the On/Off switch. To switch off the appliance, press the On/Off button again.
• The appliance is now ready for use. You can move the vacuum cleaner while you are cleaning by pulling on the hose handle.
Note: If necessary, you can push outward on the airflow valve of handle to reduce suction.
On/ Off button (Pic.6)
Speed controller. (Pic.4)• Max. speed control: roll the speed controller to
upward for increasing the speed level.• Min. speed control: roll the speed controller to
downward for decreasing the speed level.
Cable rewind button (Pic.5)• Press the cable rewind button and keep it pressed in; the power cord will
automatically rewind onto the reel.
Cable rewind button
(Pic.4)

7
2-in-1 crevice tool
Dust mites brush
• A: A crevice tool with a narrow nozzle, which you can use to clean window frames, crevices, etc.
• B: Push unwards the cleaning brush of 2-in-1 crevice tool, you can use to clean delicate or irregular surfaces, furniture, Venetian blinds,etc.
• A: Roll the dust mites brush head to the up position for removing dirt and bacteria;
• B: Roll the dust mites brush head to the down position for collecting hair.
Up
A
Down
B
aCCEssOriEs
(Pic.7)
A B
(Pic.8)

8
• Remove the plug from the wall socket.• Press the rewind button and keep it pressed in; the power cord will automatically
rewind to the unit.• Clean the outer surface of all parts with a damp cloth.
NOtE: When the power cord is rewinded, ensure that the power cord is smoothly rewinded since otherwise the cord could become tangled or the plug could strike the back of the appliance.
• Remove the hose.• Remove the dust container by pressing the release button on the dust container
(Pic.9) and pulling on the container, and hold it above a waste-bin.
• Press the release button to clean the dust container. (Pic.10).• You may use your hand to remove any waste sticking to the dust container.• After cleaned, close the container bottom lid, and press until it clicks into place.• Fit the dust container onto the appliance, and click it into position.
CLEaNiNG aND stOraGE
Cleaning dust container
(Pic.9)
(Pic.10)

9
Cleaning the filters
Cleaning or replacing the HEPa filter of left wheel
• Remove the filters (A-D) from the dust container (E) as above steps. • Press the dust container lid lock to open the dust container lid. • Take the filter (B) from (A).• Rinse all filters and the dust separation system thoroughly in lukewarm water. • Allow the filters to dry thoroughly.• Install the filters in the reverse sequence back to the dust container.
NOtE: Water could penetrate into the appliance if the filters are not thoroughly dry. This can result in electrical damage, poor suction performance and smelly during operation.
NOtE: DO NOT put the HEPA filter (Pic.12) of the rear wheel to the dust container (A).
• Open the cover of the wheel cap by turning it at anti-clockwise direction. Take out the HEPA filter from the appliance. (Pic.12)
• Rinse the filter in lukewarm water.• Allow it to dry thoroughly.• Install the cleaned filter to the appliance. Close the cover, and turn right direction
until it clicks into place.
NOtE: Water could penetrate into the appliance if the filters are not thoroughly dry. This can result in electrical damage, poor suction performace and smelly during operation.
For best results clean, or replace the filter after every second or third times use of the vacuum cleaner, and more frequently if the filter is visibly blocked.
(Pic.11)
HEPa filterLeft wheel of unit
(Pic.12)
AC D E
B
Dust container lid lock

10
PrODuCt sPECiFiCatiONsModel no.: GVC2000
Voltage: 220-240V~
Frequency: 50/60Hz
Output power: 1800W
Product dimensions: 380(W) x 290(H) x 245(D) mm
Cleaning dust mites brush
Clean the brush if any waste threads or hairs got tangled in the brush.
• Turn the screw cap to unlock position and open the upper cover.• Remove the belt pulley from the roll brush.• Take out the roll brush and then remove the blockage. If its difficult to clean, use
a knife to remove the debris along the pits on the brush shaft.• Re-install the roll brush again after clean and also the belt pulley. Finally, check if
the brush cover is securely fixed and the roll brush rotates properly.
(Pic.13)
Screw cap Roll brush
Belt pulley

11
安全指引 - 一般安全
安全指引 - 電子和熱能產品
- 請按照這些說明事項, 使用本產品。
- 本產品僅供家用,不作商業用途。
- 使用前,請將所有包裝材料拆除。
- 0至8歲的兒童不應使用本產品。
- 超過8歲的兒童可使用本產品,但請勿由肢體不健全、感覺或精神上有障礙或
缺乏相關經驗和知識的人使用,除非有負責他們安全的人對他們使用本產品進
行監督或指導。
- 請務必看顧好兒童,以確保他們不玩耍本產品。
- 兒童不應清潔或維修本產品。
- 當需進行任何維修,必須由專業維修人員進行維修。永遠不要嘗試自己修理本
產品。
- 手濕時不可以接觸電源插頭或本機。
- 主機不可以浸入水中。
- 兒童不可以把玩本機。
- 本機開著後不可以無人監管。
- 當本機開著時,頭髮、鬆身衣物、手指和身體其他部份都要離開本機。
- 只使用隨機附送的配件。
- 使用相符的電源和電壓,以防止觸電。
- 本產品只能使用帶接地線的電源插座。
- 當本產品不使用時,請從牆上的插座中拔掉插頭。
- 從牆上插座中拔掉插頭時,應拿著插頭而不是電源線。
- 確保本產品、電源線和插頭不與水接觸。
- 確保本產品、電源線和插頭不接觸發熱表面,如明火。
- 定期檢查本產品的電源線以確保其沒有損壞。如果電源線損壞,請勿使用其產
品,並須由專業維修人員來更換,以避免出現任何危險。
- 切勿在易燃材料附近使用本產品。
閱讀下列說明事項並請妥善保管,以供日後參考。

12
安全指引 - 操作期間
- 如果本產品落入水中,立即從插槽中拔下插頭,並且不要再次使用本產品。
- 切勿使用腐蝕性,清潔劑或尖銳物體(如刀或硬刷)清潔本產品。
- 某些物件可能對本吸塵機及濾網系統造成嚴重損害,致使造成危險。包括以下物件:
1. 燃點中或燃燒中的物件
2. 玻璃碎或其它鋒利物件
3. 灰泥、水泥、石頭、煤灰等殘屑
4. 液體,或濕的污物
- 不可在濕地毯上使用本吸塵機。
- 切勿插入物件阻擋排氣口及排氣通道。
- 使用後徹底清潔本產品 (請參閱“清潔和保養”)部分。

13
部件示意圖
1.塵箱把手
2.塵箱蓋
3.塵箱
4.後輪蓋
5.軟管連接口
6.軟管
7.軟管把手
8.氣流閥
9.金屬伸縮管
10.地板吸扒
11.地板選擇按鈕
12.開/關按鈕
13.塵箱釋放按鈕
14.電線回捲按鈕
15.速度控制旋鈕
16.地板吸扒掛鈎鈎
17.滾輪除塵蟎刷
18.2合1縫隙吸咀
19.排氣口
6
3
5
10 7
8
11
4
2
1
9
19
17
18
13
1615
1412

14
安裝及使用說明
連接軟管頭至機身軟管接口 (圖1)- 順時針轉動軟管頭以連接軟管接口。如要移除軟管,逆時針轉動及拉出軟管頭。
調校伸縮管長度 (圖2)- 把伸縮管套入至軟管把手。見圖A
- 按下伸縮管上的釋放按鈕以調較所需長度,完成後鬆開按鈕即可。見圖B
地板吸扒可用於硬或軟的地下表面 (圖3)- 按下地板吸扒上的按鈕以調校軟/硬地板表面。如硬表面,按下地板選擇
按鈕以伸出毛刷。如清潔軟表面,鬆開地板選擇按鈕即可。
(圖3)
(圖2)
(圖1)
地扒選擇按鈕
釋放按鈕

15
開/關按鈕 (圖6)
(圖5)
電線回捲按鈕
按下電線回捲按鈕,電源線會自動回捲及收回。 (圖5)
電源線上有黃色和紅色標示,作為長度限制指示。使用時,請勿拉出電源線至
超越黃色標示的長度。(圖5)
注意:
切勿拉出電源線至超越紅色標示的長度,超出長度可能會造成電源線損壞。
- 連接電源插頭,按下開/關按鈕 (見圖6) 以開動吸塵機,再次按下開/關按 鈕以關掉吸塵機。- 現在可以開始使用本產品,在清潔時,您可以通過拉動軟管手柄移動吸塵機。
注意:
如果需要,您可以在軟管手柄上的吸力調節按鈕向外推出,以減少吸力。
速度控制旋鈕 (圖4)
- 最大吸力速度控制: 將速度控制旋鈕推向上, 以增加速度。
- 最小吸力速度控制: 將速度控制旋鈕推向下, 以減少速度。
黃色
(圖4)
紅色電線回捲按鈕

16
(圖7)
(圖8)
配件:
2合1縫隙吸咀 (圖7)
A:肩吸咀頭,以應付難處理的地方,如窗框、窄縫等。
B:將2合1縫隙吸咀向上推,以清除除塵毛刷,以應付柔軟或凹凸表面,如傢
俱、百葉窗簾等。
A:將滾輪除塵蟎刷頭推向上,以清除傢俱表面的污垢和細菌;
B:將滾輪除塵蟎刷頭推向下,使刷毛伸出,以便收集毛髮。
向上 向下
滾輪除塵蟎刷:
A B
A B

17
清潔及保養
- 拔下插頭。- 按下電線回捲按鈕,電源線會自動回捲及收回。- 用濕布抹擦本機外殼。
注意:
電源線回捲時,確保電源線暢順回捲,避免電源線纏結及電源插頭撞擊吸塵
機。
- 將軟管拔除。- 按下塵箱上的釋放鈕 (圖9),然後拉出塵箱。將塵箱放置於垃圾桶上面。
- 按下塵箱後面的釋放鈕以開啟塵箱底部,及倒清塵箱的廢物。(圖10) - 如有需要,可用手去清理塵箱內牆的廢物。- 關閉塵箱底部,直至聽到「卡搭」一聲,表示底部已被鎖緊。- 放回塵箱於吸塵機,直至聽到「卡搭」一聲,表示塵箱已被正確放置。
清理塵箱
(圖9)
(圖10)
18
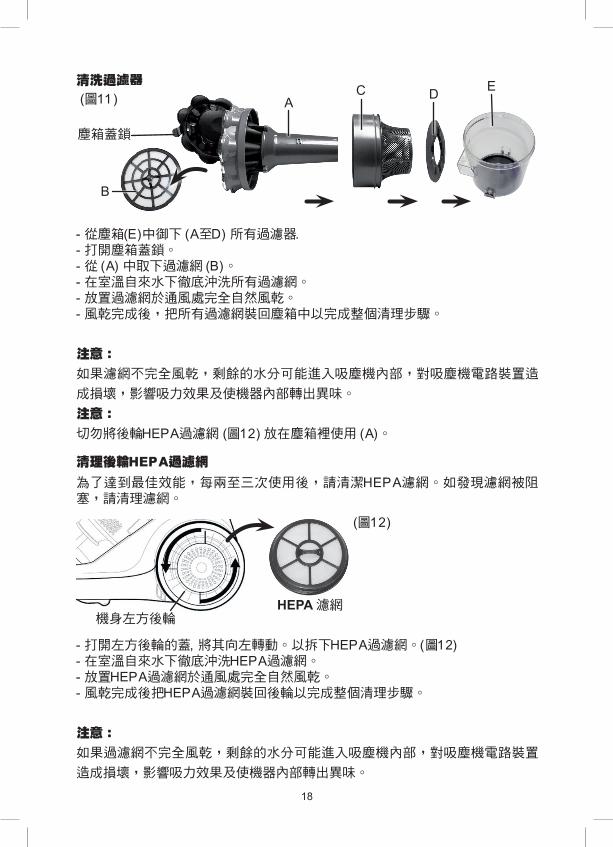
清洗過濾器
- 打開左方後輪的蓋, 將其向左轉動。以拆下HEPA過濾網。(圖12)- 在室溫自來水下徹底沖洗HEPA過濾網。- 放置HEPA過濾網於通風處完全自然風乾。- 風乾完成後把HEPA過濾網裝回後輪以完成整個清理步驟。
注意:
如果過濾網不完全風乾,剩餘的水分可能進入吸塵機內部,對吸塵機電路裝置
造成損壞,影響吸力效果及使機器內部轉出異味。
清理後輪HEPA過濾網
- 從塵箱(E)中御下 (A至D) 所有過濾器.- 打開塵箱蓋鎖。- 從 (A) 中取下過濾網 (B)。 - 在室溫自來水下徹底沖洗所有過濾網。- 放置過濾網於通風處完全自然風乾。- 風乾完成後,把所有過濾網裝回塵箱中以完成整個清理步驟。
注意:
如果濾網不完全風乾,剩餘的水分可能進入吸塵機內部,對吸塵機電路裝置造
成損壞,影響吸力效果及使機器內部轉出異味。
注意:
切勿將後輪HEPA過濾網 (圖12) 放在塵箱裡使用 (A)。
為了達到最佳效能,每兩至三次使用後,請清潔HEPA濾網。如發現濾網被阻塞,請清理濾網。
HEPa 濾網機身左方後輪
(圖12)
(圖11) AC D E
B
塵箱蓋鎖

19
產品規格
型號:GVC2000
電源:220-240V~
頻率:50/60Hz
熱量輸出:1800瓦
產品尺寸:380(闊) x 290(高) x 245(深) 毫米
清理滾輪除塵蟎刷
如果頭髮和毛線糾纏於滾輪除塵蟎刷內,請用下列方法清理- 將螺旋帽膠件旋轉至解鎖位置並打開上蓋。- 並把滾刷上的傳動帶拉開。- 把滾刷取出,用手把頭髮等污穢物清理。如垃圾糾纏難以清理,可使用小刀, 沿滾刷軸上的坑糟把污物清理。- 把滾刷裝回滾輪除塵蟎刷,並把傳動帶套回,並裝上滾輪除塵蟎刷頂蓋,再擰 緊螺旋帽膠件,才裝配完成。
(圖13)
螺旋帽
傳動帶
滾刷

20
太平家庭電器
4/F, DCH Building, 20 Kai Cheung Road,, Kowloon Bay, Hong Kong 香港九龍灣啓祥道20號大昌行集團大廈4樓