mufla de cenizas
DESCRIPTION
ninguanaTRANSCRIPT

7/18/2019 Mufla de Cenizas
http://slidepdf.com/reader/full/mufla-de-cenizas 1/24
Muffle Furnace
OPERATION MANUALAND PARTS LIST
Series 1249
Model Voltage Control Display
5300A30/F6010-TS 240V Single Setpoint °C
LT1249X14 • 5/13/09

7/18/2019 Mufla de Cenizas
http://slidepdf.com/reader/full/mufla-de-cenizas 2/24
Important Information
This manual contains important operating and safety information. The user must carefullyread and understand the contents of this manual prior to the use of this equipment.
Safety Information ..............................................................................................................................................3Alert Signals..................................................................................................................................................3
Warnings ......................................................................................................................................................3Introduction..........................................................................................................................................................5
Intended Use ................................................................................................................................................5General Usage..............................................................................................................................................5Principles of Operation ................................................................................................................................5
General Specifications ........................................................................................................................................6Environmental Conditions ............................................................................................................................6
Unpacking ..........................................................................................................................................................7Installation ..........................................................................................................................................................8
Site Selection................................................................................................................................................8Electrical Connections ..................................................................................................................................8
Operation, All Models ..........................................................................................................................................9
Power Switch ................................................................................................................................................9Cycle Light ....................................................................................................................................................9
Door Safety Switch ......................................................................................................................................9Single Setpoint Models......................................................................................................................................11
Basic Operation ..........................................................................................................................................10Buttons and Indicators ................................................................................................................................10
To View or Change the Setpoint ................................................................................................................10To View the Display Units ..........................................................................................................................11To View the % Output Power ......................................................................................................................11
Controller Parameters ................................................................................................................................11Alarms ........................................................................................................................................................12
Sensor Break Protection ............................................................................................................................12Tuning ........................................................................................................................................................13
Furnace Loading ..............................................................................................................................................14
Maintenance and Servicing ..............................................................................................................................15Preventive Maintenance ............................................................................................................................15
General Cleaning Instructions ....................................................................................................................15To Replace a Heating Element ..................................................................................................................15
To Replace the Thermocouple....................................................................................................................16To Replace a Solid State Relay..................................................................................................................17
To Replace a Door Switch ..........................................................................................................................17To Realign Door Switch ..............................................................................................................................18To Replace Controller ................................................................................................................................19
Troubleshooting ................................................................................................................................................20Replacement Parts List ....................................................................................................................................22
Ordering Procedures ..................................................................................................................................22Wiring Diagrams................................................................................................................................................23
Warranty Repair and Service ............................................................................................................................24
2
Table of Contents

7/18/2019 Mufla de Cenizas
http://slidepdf.com/reader/full/mufla-de-cenizas 3/24
Your Thomas Scientific 5300A30/F6010-TS Furnace has
been designed with function, reliability and safety in mind. Itis your responsibility to install it in conformance with localelectrical codes. For safe operation, please pay attention to
the alert signals throughout the manual.
This manual contains important operating and safety infor-mation. You must carefully read and understand the con-
tents of this manual prior to the use of this furnace.
WarningsTo avoid electrical shock, this furnace must:
1. Use a properly grounded electrical outlet of cor-
rect voltage and current handling capacity.
2. Be disconnected from the power supply prior to
maintenance and servicing.
3. Have the door switch operating properly.
To avoid personal injury:
1. Do not use in the presence of flammable or com-
bustible materials; fire or explosion may result.This device contains components which mayignite such material.
2. Caution: Hot Surface - Avoid Contact. To avoid
burns, do not touch the exterior or interior sur-faces of this furnace during use or for a period oftime after use.
3. Always wear safety glasses or a safety shield and
high temperature gloves when loading or unload-ing the furnace. Long sleeved, fire retardant cloth-
ing and a fire retardant apron is also recommend-ed.
4. Refer servicing to qualified personnel.
3
Safety Information
Warning
Warnings alert you to apossibility of personal injury.
Caution
Cautions alert you to apossibility of damage to the equip-
ment.
Note
Notes alert you to pertinent facts andconditions.
Hot SurfaceHot surfaces alert you to a
possibility of personal injury if youcome in contact with a surface during
use or for a period of time after use.
Alert Signals

7/18/2019 Mufla de Cenizas
http://slidepdf.com/reader/full/mufla-de-cenizas 4/24
WarningThis warning is presented for compliance with California
Proposition 65 and other regulatory agencies and onlyapplies to the insulation in this product. This product con-
tains refractory ceramic, refractory ceramic fiber or fiber-glass insulation, which can produce respirable dust orfibers during disassembly. Dust or fibers can cause irrita-
tion and can aggravate pre-existing respiratory diseases.Refractory ceramic and refractory ceramic fibers (after
reaching 1000°C) contain crystalline silica, which can
cause lung damage (silicosis). The International Agencyfor Research on Cancer (IARC) has classified refractoryceramic fiber and fiberglass as possibly carcinogenic(Group 2B), and crystalline silica as carcinogenic to
humans(Group 1).
The insulating materials can be located in the door, the
hearth collar, in the chamber of the product or under thehot plate top. Tests performed by the manufacturer indi-cate that there is no risk of exposure to dust or respirable
fibers resulting from operation of this product under nor-mal conditions. However, there may be a risk of exposure
to respirable dust or fibers when repairing or maintainingthe insulating materials, or when otherwise disturbing
them in a manner which causes release of dust or fibers.By using proper handling procedures and protectiveequipment you can work safely with these insulating
materials and minimize any exposure. Refer to the appro-priate Material Safety Data Sheets (MSDS) for informa-
tion regarding proper handling and recommended protec-tive equipment. For additional MSDS copies, or additional
information concerning the handling of refractory ceramicproducts, please contact the Customer ServiceDepartment at Thomas Scientific at 1-800-345-2100.
4
SAFETY INFORMATION

7/18/2019 Mufla de Cenizas
http://slidepdf.com/reader/full/mufla-de-cenizas 5/24
Intended UseThe 5300A30/F6010-TS muffle furnace is a general pur-
pose laboratory and heat treating furnace. For optimumelement life, Thomas Scientific recommends observing
these temperature ranges: from 100°C (212°F) to 1093°C(2000°F) continuous use or from 1093°C (2000°F) to1200C (2192°F) for intermittent use. Continuous use is
operating the furnace for more than 3 hours and intermit-tent use is operating the furnace for less than 3 hours.
Furnaces consists of: 1) a vented heating chamber; 2) atemperature controller; and 3) a door safety switch foroperator safety.
General UsageDo not use this product for anything other than its intend-
ed usage.
Principles of OperationThe furnace chamber is heated by electric resistance ele-ments and is insulated with ceramic fiber insulation. The
controller is located under the furnace chamber and iswell insulated from the heat generated in the furnacechamber. A door safety switch removes power to the
heating elements whenever the furnace door is opened.The temperature is controlled by one of three types of
controllers.
5
Introduction
Caution
Do not exceed operatingtemperatures shown in “General
Specifications.” Exceeding these limitswill result in severely reduced element
life.

7/18/2019 Mufla de Cenizas
http://slidepdf.com/reader/full/mufla-de-cenizas 6/24
6
General Specifications
Model 5300A30/F6010-TS Furnace
Dimensions in. (cm) Overall Width 19.25 (48.9)Height 21 (53.3)Depth 20 (50.8), w/door open 29.5” (74.9)
Chamber Width 12.75 (32.4)Height 6.75 (17.1)
Depth 10 (25.4)
Weight Lbs. (kg) 96 (43.5)
Electrical Volts 220-240
Ratings Amps 12.9
Watts 3095Freq. 50/60Phase 1
Oper. Temp. Range
°F (°C) 212-2192°F(100-1200°C)
Notes: The maximum ramp rates for this furnace for heat up are: 12°C (22°F) per min. from 25°C-537°C (75°F-
1000°F), 10°C (18°F) per min. from 537°C-1093°C (1000°F-2000°F).
Environmental ConditionsOperating: 17°C to 27°C; 20% to 80% relative humidity, non-condensing. Installation Category II
(overvoltage) in accordance with IEC 664. Pollution degree 2 in accordance with IEC 664.
Altitude Limit: 2,000 meters.
Storage: -25°C to 65°C; 20% to 85% relative humidity

7/18/2019 Mufla de Cenizas
http://slidepdf.com/reader/full/mufla-de-cenizas 7/24
1. Visually check for any physical damage to the
shipping container.
2. Inspect the equipment surfaces that are adja-
cent to any damaged area.
3. Open the furnace door and remove the packingmaterial from inside the furnace chamber.
4. Vacuum the chamber prior to use to remove theinsulation dust due to shipment.
5. Retain the original packaging material if reship-
ment is foreseen or required.
7
Unpacking
NoteThe 5300A30/F6010-TS is supplied
with cord and plug (240V, 15 ampcord set).

7/18/2019 Mufla de Cenizas
http://slidepdf.com/reader/full/mufla-de-cenizas 8/24
Site SelectionInstall furnace on a sturdy, level surface and allow space
for ventilation.
Electrical Connections1. The electrical specifications are located on the
specification plate on the back of the furnace.
Consult Thomas Scientific if your electrical serv-
ice is different than those listed on the specifica-tion plate. Prior to connecting your5300A30/F6010-TS furnace to your electricalsupply, be sure the front power switch is in the
OFF position.
NOTE: Please observe the alert signals on the left-
hand side of this page before operating your furnace.
8
Installation
Caution
Be sure ambient temperature does notexceed 104°F (40°C). Ambients above
this level may result in damage to thecontroller.
Allow at least six inches of space
between the furnace and any verticalsurface. This permits the heat from fur-
nace case to escape so as not to cre-ate a possible fire hazard.
WarningTo avoid electrical shock, this furnace
must be installed by a competent,qualified electrician who ensures com-
patibility among furnace specifications,power source and grounding code
requirements.
Hot Surface“Caution: Hot Surface. Avoid Contact.”
To avoid burns, this furnace must not
be touched on the exterior or interiorsurfaces during use or for a period oftime after use.
WarningDo not use in the presence of flamma-
ble or combustible materials; fire orexplosion may result. This device con-
tains components which may ignitesuch material.

7/18/2019 Mufla de Cenizas
http://slidepdf.com/reader/full/mufla-de-cenizas 9/24
Power SwitchBoth the ON/OFF power switch and the digital display will
illuminate when power is switched ON. The furnace willbegin to heat to its controller's current setpoint. (See the
instructions for information on checking and setting thesetpoint.)
Cycle LightThe amber cycle light will illuminate whenever the poweris being applied to the heating elements. The cycle lightwill turn on and off as the furnace reaches the setpoint.
Door Safety SwitchThe door safety switch removes power from the heating
elements when the door is opened. Open and close thedoor a few times; note that the amber CYCLE light willswitch off when the door is opened. If this condition is not
true, consult the Troubleshooting section before proceed-ing. This check must be done when the furnace is heating
and the cycle light is illuminated.
9
Operation, All Models
Warning
To avoid personal injury do not use in
the presence of flammable or com-bustible chemicals; fire or explosion
may result. This device contains com-ponents which may ignite such materi-als.
Hot SurfaceCaution: Avoid Contact. To avoid burns,
this furnace must not be touched onthe exterior or interior surfaces during
use or for a period of time after use.
Warning
To avoid electrical shock, the doorsafety switch must be
operating properly.
WarningAlways wear safety glasses or a safety
shield and high temperature gloveswhen loading or unloading the furnace.
Long sleeved, fire retardant clothingand a fire retardant apron is also rec-ommended.

7/18/2019 Mufla de Cenizas
http://slidepdf.com/reader/full/mufla-de-cenizas 10/24
10
The single setpoint model furnace provides a single
digital display to indicate the current chamber tempera-ture or setpoint temperature. This temperature con-troller features sensor break protection and self-tuning
capability.
Basic OperationWhen the controller is turned ON it will perform a shortself-test and then display the measured value (process
value) in the HOME DISPLAY.
Buttons and IndicatorsOP1 (Output 1): Illuminates when the logic output isON.
OP2 (Output 2): Illuminates when the relay output is
ON (will go out during an alarm situation).
PAGE button: Allows you to select a new list of param-eters.
SCROLL button: Allows you to select a parameterwithin a list of parameters.
DOWN button: Allows you to decrease a value.
UP button: Allows you to increase a value.
To View or Change theSetpointTo view the setpoint, press and release the UP orDOWN buttons. If you want to change the setpoint,continue pressing until the desired setpoint value is dis-played and then release the button. A few seconds after
the button is released, the controller will accept the newvalue and revert to the HOME DISPLAY.
Single Setpoint Models
Output 1
UP ARROWButton
Temperature
Display
Display
Window
DOWN ARROWButton
PAGE
ButtonSCROLL
Button
Output 2
NoteIf at any time you want to return to the
HOME DISPLAY, simultaneously pressthe PAGE and SCROLL buttons.
Single Setpoint Models

7/18/2019 Mufla de Cenizas
http://slidepdf.com/reader/full/mufla-de-cenizas 11/24
11
To View the Display UnitsFrom the HOME DISPLAY press the SCROLL button. Thedisplay will show the temperature units in °C/F/K and then
return to the HOME DISPLAY. (Call Customer Service ifyou require a different temperature unit.)
To View the % Output PowerFrom the HOME DISPLAY press the SCROLL button
twice. Press and release the UP or DOWN button to viewthe % output power. This value is a read-only value and
cannot be changed.
Controller Parameters
Home display°C: Temperature units in Celsius. Temperature units can
not be changed without entering the configuration.Contact Customer Service if a different temperature unit
is required.
OP: % output power demand.
IdHi: Deviation high alarm. Factory preset to 50.
Al ListIdHi: Deviation high alarm. Factory preset to 50.
3FSL: Full scale low alarm. Factory preset to -82°C.Cannot be adjusted by end users.
Atun ListtunE: One-shot autotune enable.
Pid ListPb: Proportional band (in display units). Factory preset to11.
SINGLE SETPOINT MODELS

7/18/2019 Mufla de Cenizas
http://slidepdf.com/reader/full/mufla-de-cenizas 12/24
ti: Integral time in seconds. Factory preset to 10.25.
td: Derivative time in seconds. Factory preset to 1.44.
ACCS List Code: Access code (Code needed to enter orchange the other configuration parameters which are notnormally accessible.) Not accessible.
AlarmsThe controller will flash an alarm message in the homedisplay if an alarm condition is detected.
2FSH: Measured value full scale high alarm. The fullscale high alarm is for furnace protection. The parameter
is not accessible from the user list.
IdHi: Measured value deviation high alarm. The deviationalarm is for load protection. Factory preset at 50°C. If thechamber temperature rises to 50°C above the setpoint
temperature, this error condition will alert end users. Thefurnace will continue to heat as the IdHi is only a soft
alarm. End users must power off the furnace and contactCustomer Service for troubleshooting assistance. Do not
reset this alarm below 20.
S.br: Sensor break: check that sensor is connected cor-rectly.
L.br: Loop break: check that the heating circuits areworking properly.
Ld.F: Heater Circuit fault: indication of either an open or
short solid sate relay, a blown fuse, missing supply oropen circuit heater.
Sensor Break ProtectionThis controller provides sensor break protection in the
event the thermocouple opens. If an open thermocouplecondition occurs, the digital display will blink “S.br” andthe power to the heating element will be shut OFF (Cycle
light will extinguish).
12
SINGLE SETPOINT MODELS
Note
The following alarm messages are
factory default settings and may varyif you have changed the configurationof your controller:
IDHi: = 50°C
2FSH = 1225°C
Note
3FSL is not a true alarm. The value
can be seen in the user list but can-not be changed.

7/18/2019 Mufla de Cenizas
http://slidepdf.com/reader/full/mufla-de-cenizas 13/24
13
TuningThis controller incorporates a self-tuning feature which
determines the optimum control parameters for the besttemperature accuracy with your load and setpoint. Use
this feature the first time you use your furnace and eachtime you change either your setpoint or the type of loadyou are heating. Thomas Scientific recommends you use
this feature to provide the best temperature accuracy thecontroller can attain. To use the tuning feature:
1. Adjust the setpoint to your desired value.
2. Press the PAGE button until display reads,“Atun.”
3. Press the SCROLL button. Display will read,“tunE.”
4. Press the UP or DOWN button to select, “on.”
5. Simultaneously press the PAGE and SCROLLbuttons to return to the HOME DISPLAY. The
display will alternately flash between “tunE” andthe HOME DISPLAY while tuning is in progress.
6. The controller will then turn the heating on and
off to induce an oscillation. When the measuredvalue reaches the required setpoint the firstcycle will end.
7. Tuning will be complete after two oscillation
cycles and then the tuner will turn itself off.
8. Normal control function will resume after thecontroller calculates tuning parameters.
SINGLE SETPOINT MODELS
NoteFurnace must be at ambient
temperature before starting a tune.
Note
Tune has completed when “tunE”
stops flashing on display.

7/18/2019 Mufla de Cenizas
http://slidepdf.com/reader/full/mufla-de-cenizas 14/24
For best results, use only the center two-thirds of the fur-
nace chamber.
• If you are heating a number of small parts,
spread them throughout the center of the fur-nace chamber.
• Keep objects away from thermocouple.
• Use insulated tongs and mittens when loadingand unloading furnace.
• Always wear safety glasses.
• Use Thomas Scientific hearth plates if you place
load on bottom of chamber. PHX2 (threerequired), PH177X1 is an optional hearth plate,(one required.)
14
Furnace Loading
Caution
Do not overload your furnace cham-ber. If the load is to be heated uniform-
ly, it should not occupy more than two-thirds of the furnace chamber. Failure
to observe this caution could result indamage to furnace components.

7/18/2019 Mufla de Cenizas
http://slidepdf.com/reader/full/mufla-de-cenizas 15/24
Preventative MaintenanceThis unit is equipped with a venting system on the top of
the furnace. This is for the removal of fumes from thechamber of the unit. Contamination is a major cause of el-
ement failure, therefore, remove all fume forming materialbefore heating. (e.g. clean cutting oil from tool steel).Thomas Scientific offers a ventilation kit (AY408X1A)
including 5ʼ (1.5 m) of flexible stainless steel exhaust tub-ing and mounting hardware to connect the tubing to the
vent port on the roof of the furnace.
Housekeeping is vital to your electric furnace - KEEP ITCLEAN. Run your furnace up to 871°C (1600°F) emptyoccasionally to burn off the contamination that may exist
on the insulation and elements. Maintain 871°C (1600°F)for at least 4 hours to ensure complete ashing of foreign
materials.
Element life is reduced somewhat by repeated heatingand cooling. If the furnace is to be used again within afew hours, it is best to keep it at the operating tempera-
ture or at a reduced level such as 260°C (500°F).
Change the thermocouple every six months to a year as apreventative measure.
General Cleaning InstructionsWipe exterior surfaces with lightly dampened cloth con-
taining mild soap solution.
To Replace a Heating Element1. Disconnect furnace from power supply.
2. Remove the back terminal cover of the furnace.(Note placement and connections of wires)
3. Loosen the nuts on the terminals of the elementto be replaced.
4. Open the door and pull the defective element
out. (It may be easiest to turn the furnace sothat the element to be removed is on top).
Maintenance and Servicing
Warning
Disconnect from the power supplyprior to maintenance and servicing.
WarningRefer servicing to qualified personnel.
Warning
Replace fuses with same type andrating.
Hot Surface
“Caution. Hot Surface.Avoid Contact.”To avoid burns, this furnace must not
be touched on the exterior or interiorsurfaces during use or for a period of
time after use.
NotePerform only maintenance described in
this manual. Contact an authorizeddealer or our factory for parts and
assistance.
15
Note
Discoloration of chassis paint (espe-cially above the door) is to be expect-
ed over time. This is normal wear andtear due to heat escaping the chamber
when the door is opened.

7/18/2019 Mufla de Cenizas
http://slidepdf.com/reader/full/mufla-de-cenizas 16/24
5. Slide the new element into place, threading the
leads through the insulating porcelain bushingon the back of the furnace.
6. Tighten the nuts securely. Cut off any excesslead wire.
7. Replace the back terminal cover.
8. Reconnect furnace to power supply.
9. Test operation of furnace.
To Replace the Thermocouple1. Disconnect furnace from power supply.
2. Remove both back covers. (Note placement and
connection of wires).
3. Remove clip holding thermocouple in place (1
screw) and remove the two screws on the ther-
mocouple terminals.
4. Remove the thermocouple. Pull thermocouple
straight out of hole in the chamber first to avoiddamage to the insulation.
5. Guide the looped ends of the new thermocouplethrough the plastic bushings with the red (-) lead
to the right as you face the back of the furnace.
6. Insert the thermocouple straight through thehole in the chamber.
7. Secure the thermocouple with clip and screw.Connect the looped ends of the thermocouple to
the terminals with + to + (yellow wire).Chromel/Alumel thermocouples and lead wire
are easily tested with a magnet. The non-mag-netic wire is positive (+) and the magnetic wireis negative (-).
8. Replace both back covers.
9. Reconnect to power supply. Test operation of
furnace.16
MAINTENANCE AND SERVICING

7/18/2019 Mufla de Cenizas
http://slidepdf.com/reader/full/mufla-de-cenizas 17/24
To Replace Solid State Relay1. Disconnect furnace from power supply.
2. Remove back control cover. (Note connection
and placement of wires to relay). Remove thefront control panel screws to provide access tosolid state relay. Slide control section forward.
3. Disconnect wires from terminals. Identify or
mark wires.
4. Remove nuts, washers, and screws from relay,then remove relay.
5. Install new relay.
6. Reconnect the wires identified or marked in step3.
7. Replace covers.
8. Reconnect furnace to power supply.
9. Test operation of furnace.
To Replace Door Switch1. Disconnect furnace from power supply.
2. Remove the four top screws on the front dialand the four bottom screws on the back cover.
3. Slide the control section forward. (Do not pull
excessively on the internal wires).
4. Disconnect the wires from the door switch.(Note connection and placement of wires tomicro switch). Identify or mark wires.
5. Remove the two screws and nuts from the door
switch(es).
6. Insert new door switch(es) and secure withscrews and nuts removed in Step 5.
17
MAINTENANCE AND SERVICING

7/18/2019 Mufla de Cenizas
http://slidepdf.com/reader/full/mufla-de-cenizas 18/24
7. Reconnect wires identified or marked in Step 4
to new door switch(es).
8. To realign door switch see “To Realign Door
Switch” section.
9. Slide control section back in and replace thescrews described in Step 2.
10. Reconnect to power supply.
11. Test operation of door switch. (See “To RealignDoor Switch” section.)
To Realign Door Switch1. Disconnect furnace from power supply.
2. Remove the four top screws on the front dialand the four bottom screws on the back cover.
3. Slide the control section forward. (Do not pull
excessively on the internal wires).
4. With the door closed loosen the screws on the
microswitch and slide the switch downward, sothat the screws are at the bottom of the slots in
the mounting bracket.
5. Finger tighten both screws. While holding down
the rear of the micro switch housing, gently pushup on the front of switch until you hear a click.
6. Open and close the door; the switch should click
approximately 1" to 1.5" before the door isclosed.
7. Tighten the two screws to secure the microswitch. Check the operation of the switch as
described in Step 6 after tightening the screws.
8. Slide control section back and replace thescrews described in Step 2.
9. Reconnect to power supply.
18
MAINTENANCE AND SERVICING

7/18/2019 Mufla de Cenizas
http://slidepdf.com/reader/full/mufla-de-cenizas 19/24
10. To test the operation of the door switch: turn the
power switch on, set the control setting highenough to keep the control from cycling, openand close the door; the cycle light should turn off
approximately 1" to 1.5” before the door isclosed.
To Replace the ControllerThe controller plugs into a panel mounting sleeve whichshould be left permanently installed in the furnace hous-ing. To remove the controller, release the side clips and
slide the controller out. Do not attempt to dismantle thisunit further.
MAINTENANCE AND SERVICING
19
7/18/2019 Mufla de Cenizas
http://slidepdf.com/reader/full/mufla-de-cenizas 20/24
20
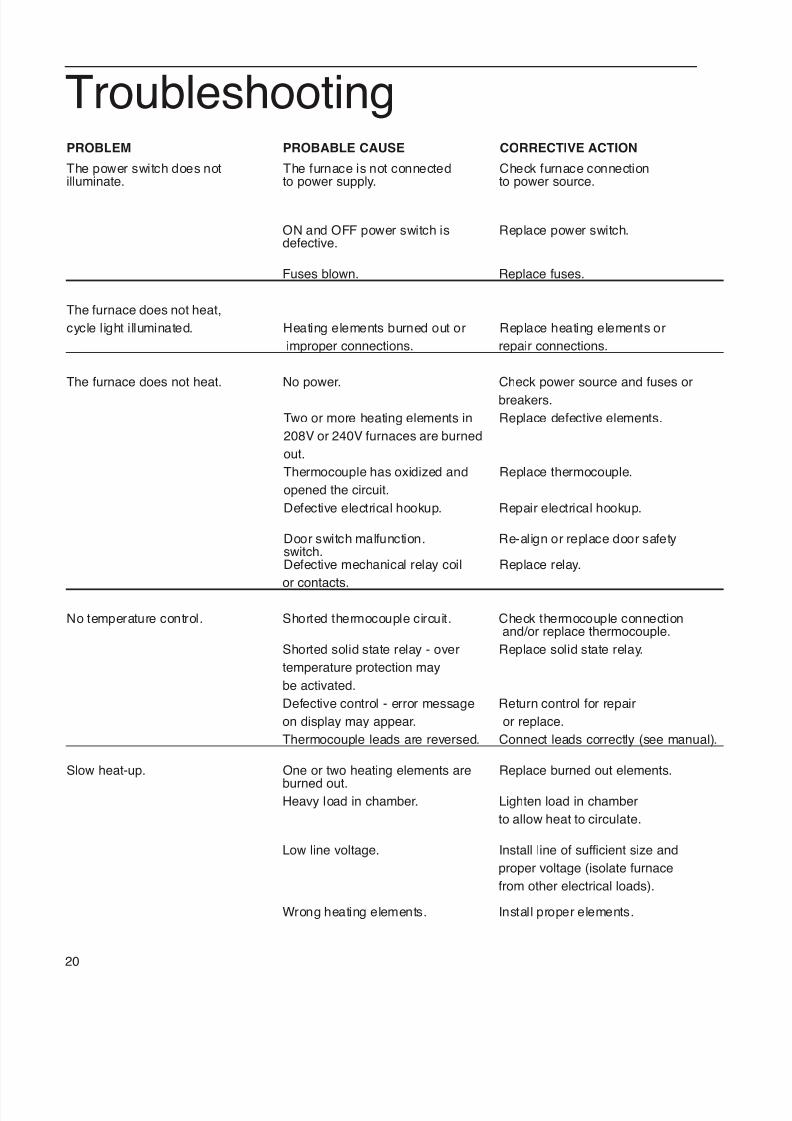
TroubleshootingPROBLEM PROBABLE CAUSE CORRECTIVE ACTION
The power switch does not The furnace is not connected Check furnace connectionilluminate. to power supply. to power source.
ON and OFF power switch is Replace power switch.defective.
Fuses blown. Replace fuses.
The furnace does not heat,
cycle light illuminated. Heating elements burned out or Replace heating elements or
improper connections. repair connections.
The furnace does not heat. No power. Check power source and fuses or
breakers.
Two or more heating elements in Replace defective elements.
208V or 240V furnaces are burned
out.
Thermocouple has oxidized and Replace thermocouple.
opened the circuit.
Defective electrical hookup. Repair electrical hookup.
Door switch malfunction. Re-align or replace door safetyswitch.Defective mechanical relay coil Replace relay.
or contacts.
No temperature control. Shorted thermocouple circuit. Check thermocouple connectionand/or replace thermocouple.
Shorted solid state relay - over Replace solid state relay.
temperature protection may
be activated.
Defective control - error message Return control for repair
on display may appear. or replace.
Thermocouple leads are reversed. Connect leads correctly (see manual).
Slow heat-up. One or two heating elements are Replace burned out elements.
burned out.Heavy load in chamber. Lighten load in chamber
to allow heat to circulate.
Low line voltage. Install line of sufficient size and
proper voltage (isolate furnace
from other electrical loads).
Wrong heating elements. Install proper elements.

7/18/2019 Mufla de Cenizas
http://slidepdf.com/reader/full/mufla-de-cenizas 21/24
21
TROUBLESHOOTING
PROBLEM PROBABLE CAUSE CORRECTIVE ACTION
Door switch does not cut power Door switch is not functioning. Re-align or replace door safetyto the furnace chamber. switch.
Mechanical relay contacts sticking. Replace relay.
Repeated element burnout. Chamber improperly loaded. See loading procedures instart-up procedure.
Heating harmful materials. Enclose material in container.Clean up spills on chamber.Ventilate chamber by leavingdoor cracked slightly open when
heating known harmful reagents.
Overheating furnace. Keep furnace under maximumtemperature. Closer supervisionof control setting.
Wrong element. Install proper element.
Oxidized thermocouple. Replace thermocouple.
Contamination present from Replace insulation material.previous burnout.
Wired improperly. Check wiring diagram for correctwiring of your furnace.
Inaccurate temperature display. Oxidized or contaminated Replace thermocouple.
thermocouple.
Improper loading. Use proper loading procedures.
Refer to start-up procedure.
Poor thermocouple connection. Tighten connections.
Solid state relay malfunction. Replace solid state relay.
Thermocouple connections Reconnect thermocouplecorrectly.

7/18/2019 Mufla de Cenizas
http://slidepdf.com/reader/full/mufla-de-cenizas 22/24
22
Listed below is the common replacement parts for the 5300A30/F6010-TS furnace.
REPLACEMENT PART DESCRIPTION
0165A27 Controller
0165A69 Pilot Light
0165A40 Heating Element, top
0165A42 Heating Element, bottom
0165A41 Heating Element, side
0165A71 Solid State Relay
0165A79 Power Switch
0165A80 Micro Switch (2)
0165A84 Thermocouple, Type K
0165A50 Fuse Holder
0165A23 Fuse
0165A55 Hearth Collar
0165A64 Ceramic Insulator for Vent Port
Replacement Parts List
Ordering Procedures
Please refer to the Specification Plate for the complete model number, serial number, and series numberwhen requesting service, replacement parts or in any correspondence concerning this unit.

7/18/2019 Mufla de Cenizas
http://slidepdf.com/reader/full/mufla-de-cenizas 23/24
23
Wiring DiagramsSingle Setpoint Control

7/18/2019 Mufla de Cenizas
http://slidepdf.com/reader/full/mufla-de-cenizas 24/24
Warranty Repair and Service
Thomas Scientific provides product descriptions and photographs that are in effect at the time of catalog publi-cations. Specfications and appearances are subject to change; therefore delivered products sometimes vary
from those depicted.
In addition to manufacturer warranties, Thomas Scientific (the Company) warrants all instruments and equip-ment (other than supplies, small items, reagents and chemicals) delivered to and retained by their original pur-
chasers to be free from defect in material and workmanship for one year from the date of the Companyʼsinvoice to the purchaser (Thomas Scientific makes no warranty with respect to consumable parts or supplies).For a period of one year from the date of such invoice, the Company will correct, either by repair or replace-
ment at the Companyʼs sole election, any defect in material or workmanship (not including defects due to mis-use, abuse, abnormal conditions or operation, accident, alteration, improper installation, acts of God, or serv-
ice or modification of the product without prior authorization of the Company) without charge for labor, parts orshipment of the product to and from the service facility designated by the Company. Manufacturer warranties
that extend beyond this 1-year period are the sole responsibility of the manufacturer.
The determination of whether any product has been subject to misuse or abuse will be made solely by theCompany. The Company shall not be liable for any delay in performance under this warranty caused by anycontingency beyond the Companyʼs control, including war, government restrictions, strikes, acts of God, or
reduced supply of materials. The Company shall not be liable for any special, incidental, or consequentialdamages, or any damage to plant, personnel, equipment or products, directly or indirectly resulting from the
use or misuse of any product. Representations and warranties made by any person, including dealers andrepresentatives of the Company which are inconsistent, in conflict with or in excess of the terms of this war-ranty shall not be binding upon the Company unless placed in writing and approved by an officer of the
Company.
This warranty and all claims hereunder shall be governed by the laws of the State of New Jersey, UnitedStates of America.
The foregoing warranty is in lieu of all other warranties, guarantees, or representations, whether oral, written
or implied, including any warranty of merchantability or fitness for use or purpose.
The Companyʼs liability under this warranty or otherwise with respect to products of their use (including liability
for negligence or otherwise in tort) is limited exclusively to the remedies provided herein and no other right orremedy shall be available to any person.
Thomas ScientificP.O. Box 99
Swedesboro, NJ 08085T: 800-345-2100