mp630 getting startedgdlp01.c-wss.com/gds/9/0300001329/01/mp630_gs_en-au_v1.pdf · 2008. 8. 26. ·...
TRANSCRIPT
Getting Started
Make sure to read this manual before using the machine. Please keep it in hand for future reference.
MP630
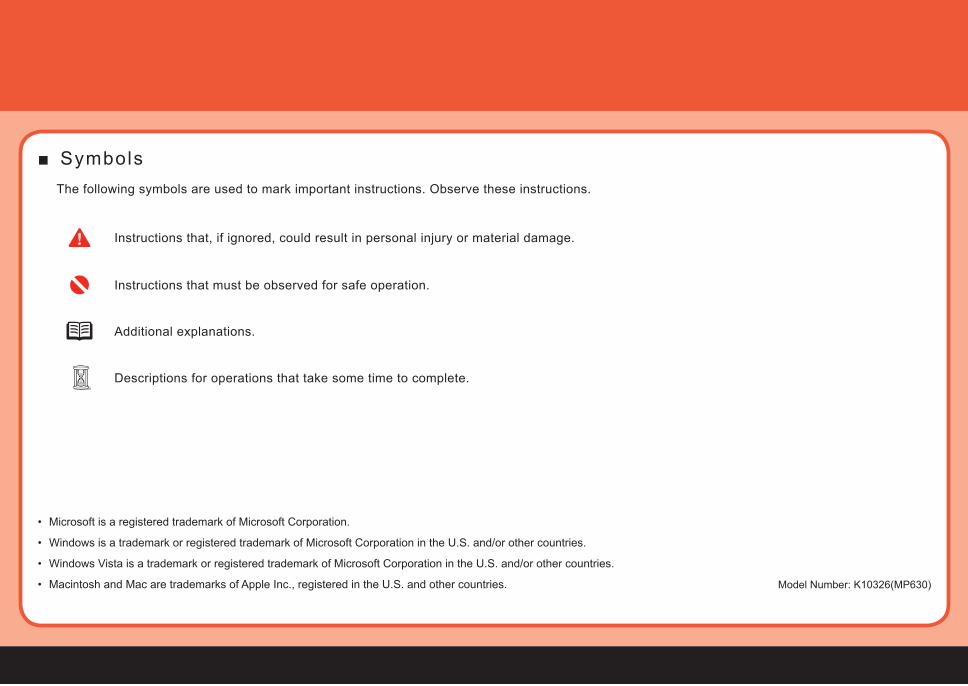
Symbols■The following symbols are used to mark important instructions. Observe these instructions.
Instructions that, if ignored, could result in personal injury or material damage.
Instructions that must be observed for safe operation.
Additional explanations.
Descriptions for operations that take some time to complete.
Microsoft is a registered trademark of Microsoft Corporation.
Windows is a trademark or registered trademark of Microsoft Corporation in the U.S. and/or other countries.
Windows Vista is a trademark or registered trademark of Microsoft Corporation in the U.S. and/or other countries.
Macintosh and Mac are trademarks of Apple Inc., registered in the U.S. and other countries.
•
•
•
• Model Number: K10326(MP630)
�
Contents
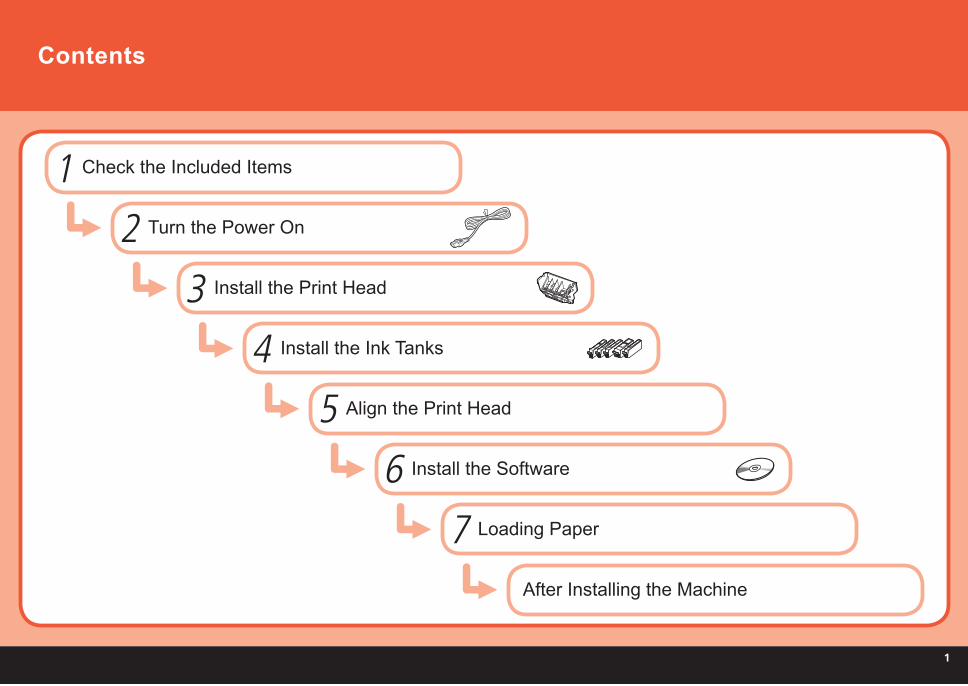
Check the Included Items
Turn the Power On
Install the Print Head
Install the Ink Tanks
Align the Print Head
Install the Software
Loading Paper
1
2
3
4
5
6
7After Installing the Machine
2
1 2 3 4 5 6 7
(C)
(B)
(A)
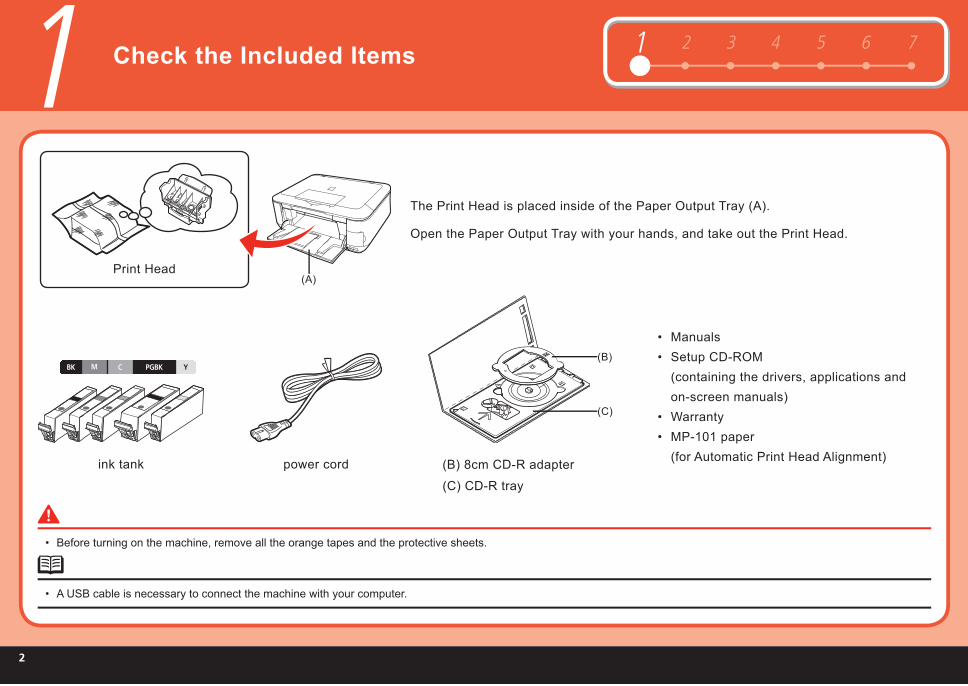
1 Check the Included Items
(B) 8cm CD-R adapter
(C) CD-R tray
ManualsSetup CD-ROM(containing the drivers, applications and on-screen manuals)Warranty MP-101 paper (for Automatic Print Head Alignment)
••
••
Before turning on the machine, remove all the orange tapes and the protective sheets.•
Open the Paper Output Tray with your hands, and take out the Print Head .
The Print Head is placed inside of the Paper Output Tray (A).
ink tank
Print Head
power cord
A USB cable is necessary to connect the machine with your computer.•
3
1 2 3 4 5 6 7
(1)(2)
(A)
(B)
(C)
(D)
22 31
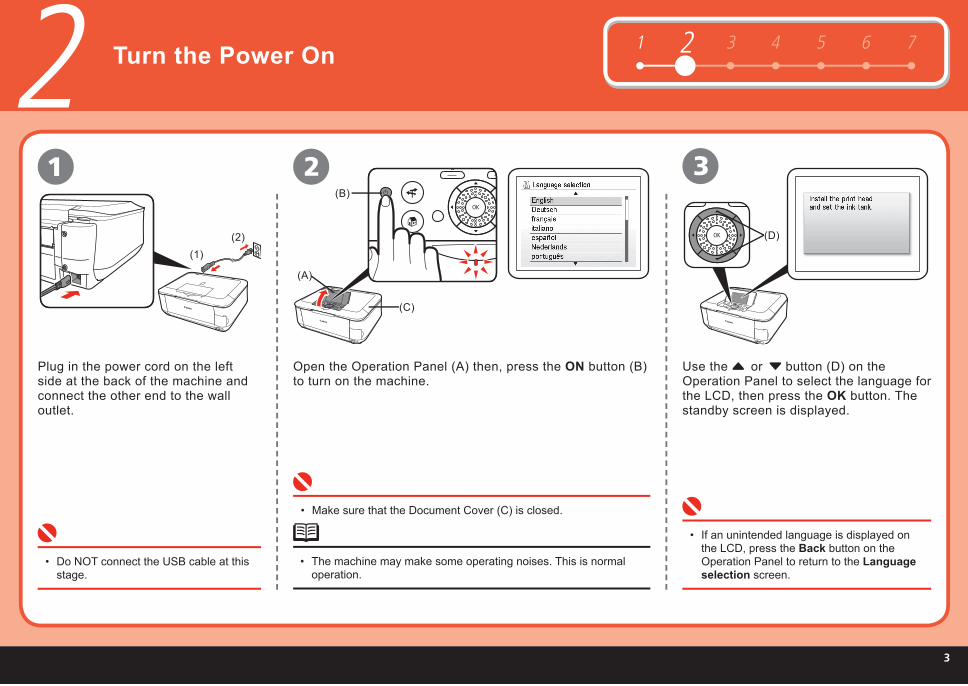
Turn the Power On
Make sure that the Document Cover (C) is closed.•
Do NOT connect the USB cable at this stage.
•
Plug in the power cord on the left side at the back of the machine and connect the other end to the wall outlet.
Open the Operation Panel (A) then, press the ON button (B) to turn on the machine.
Use the { or } button (D) on the Operation Panel to select the language for the LCD , then press the OK button . The standby screen is displayed.
The machine may make some operating noises. This is normal operation.
•
If an unintended language is displayed on the LCD , press the Back button on the Operation Panel to return to the Language selection screen.
•
�
(A)
(B)
(C)
(D)
31 2
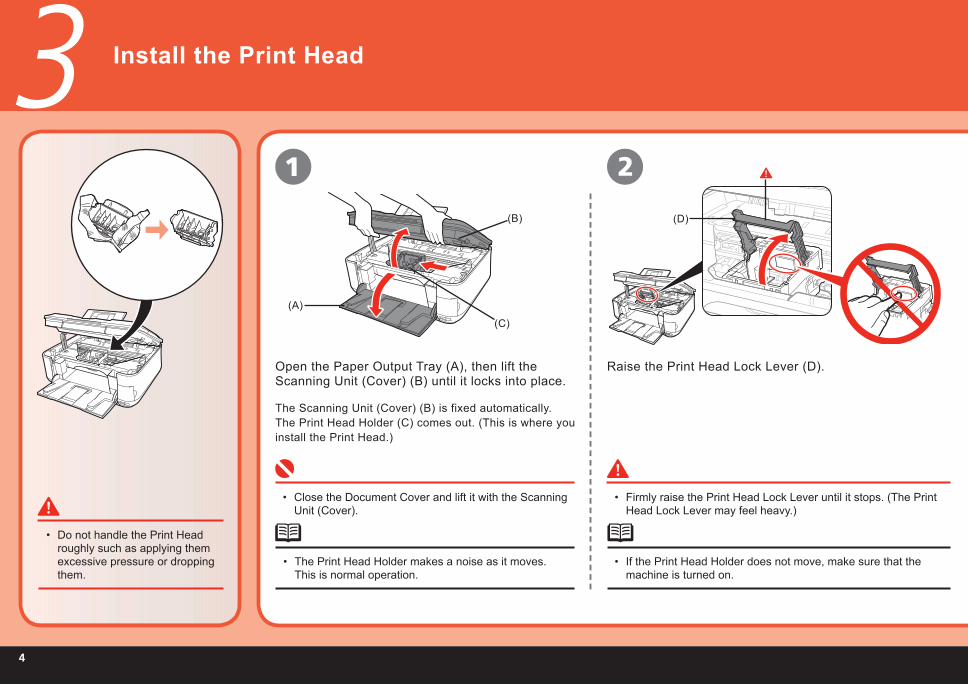
Install the Print Head
Close the Document Cover and lift it with the Scanning Unit (Cover).
• Firmly raise the Print Head Lock Lever until it stops. (The Print Head Lock Lever may feel heavy.)
•
If the Print Head Holder does not move, make sure that the machine is turned on.
•
Open the Paper Output Tray (A), then lift the Scanning Unit (Cover) (B) until it locks into place.
Raise the Print Head Lock Lever (D).
The Scanning Unit (Cover) (B) is fixed automatically. The Print Head Holder (C) comes out. (This is where you install the Print Head.)
Do not handle the Print Head roughly such as applying them excessive pressure or dropping them.
•
The Print Head Holder makes a noise as it moves. This is normal operation.
•
5
1 2 3 4 5 6 7
(D)
543
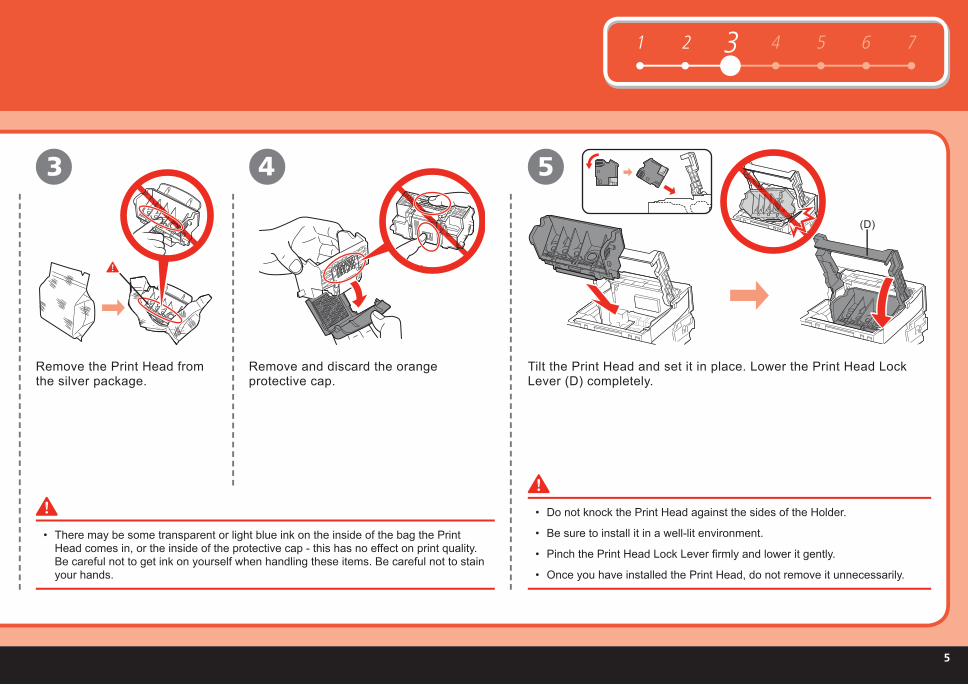
Remove the Print Head from the silver package.
Remove and discard the orange protective cap.
Tilt the Print Head and set it in place. Lower the Print Head Lock Lever (D) completely.
There may be some transparent or light blue ink on the inside of the bag the Print Head comes in, or the inside of the protective cap - this has no effect on print quality. Be careful not to get ink on yourself when handling these items. Be careful not to stain your hands.
•
Do not knock the Print Head against the sides of the Holder.
Be sure to install it in a well-lit environment.
Pinch the Print Head Lock Lever fi rmly and lower it gently.
Once you have installed the Print Head , do not remove it unnecessarily.
•
•
•
•
�
(1)
(2)
(A)
41 2
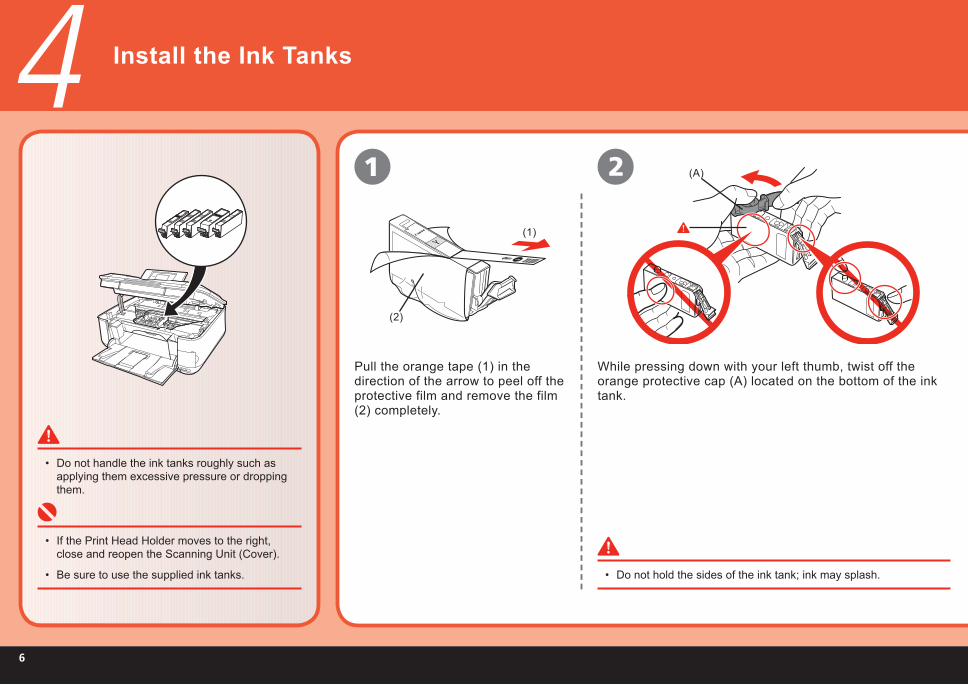
Install the Ink Tanks
Do not hold the sides of the ink tank; ink may splash.•
Pull the orange tape (1) in the direction of the arrow to peel off the protective film and remove the film (2) completely.
If the Print Head Holder moves to the right, close and reopen the Scanning Unit (Cover).
Be sure to use the supplied ink tanks.
•
•
Do not handle the ink tanks roughly such as applying them excessive pressure or dropping them.
•
While pressing down with your left thumb, twist off the orange protective cap (A) located on the bottom of the ink tank.

7
5 61 2 3 4 7
543
Install all the other ink tanks in the same way.
Wait until the screen above appears (about 6 minutes) and go to the next step.
The machine may make some operating noises when preparing to print. This is normal operation.
•
•
Install all the ink tanks .
Close the Scanning Unit (Cover) .
Make sure all the Ink lamp lights red.•
Once you have installed the ink tanks , do not remove them unnecessarily.
•
If an error message is displayed on the LCD , make sure that the Print Head and the ink tanks are correctly installed.
•
Press the PUSH mark on the ink tank until it clicks into place.
Make sure the Ink lamp lights red.
Instal l the Ink Tank
Be sure to install it in a well-lit environment.•
Match the labels when installing.•

�
(A)
(B) (B)
(D)
(C)
52 31
Align the Print Head
Align the Print Head for better print results. This takes about 7 minutes.Use a sheet of supplied speciality paper (MP-101) for alignment.
Open the Paper Support (A) and pull it out.
Load a sheet of supplied speciality paper (MP-101) in the Rear Tray (D).
Move the Paper Guides (B) to both edges.
For details, refer to "7 Loading Paper" on page 21.
•
Be sure to use the supplied speciality paper (MP-101) for Automatic Print Head Alignment.
MP-101 cannot be fed from the Cassette. Load it in the Rear Tray.
MP-101 has the front and back sides. Load it with the whiter side facing up.
•
•
•
Make sure that the Output Tray Extension (C) is extended.
•

9
61 2 3 54 7
(E)(E)
654
Confirm the message on the LCD (E) and press the OK button .
Make sure that a pattern similar to the one shown in the illustration is printed.
Print Head Alignment takes about 7 minutes to complete. Wait until the pattern is printed, then go to the next step.
•
When an error message is displayed on the LCD , refer to " Troubleshooting " in the on-screen manual: Advanced Guide .
The pattern is printed in black and blue.
•
•For details on media sizes and types you can use, refer to " Loading Paper " in the on-screen manual: Basic Guide .
•
For details, refer to " 7 Loading Paper " on page 21.•
Confirm the message on the LCD (E), then load plain paper into the Cassette and press the OK button .
The standby screen is displayed on the LCD .
�0
6 Install the Software
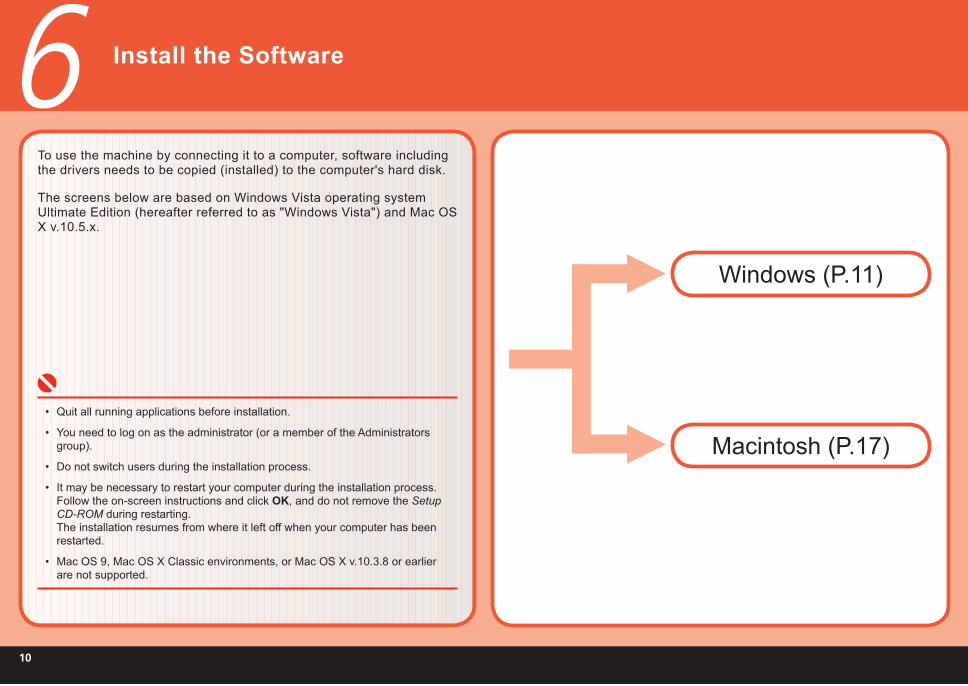
Quit all running applications before installation.
You need to log on as the administrator (or a member of the Administrators group).
Do not switch users during the installation process.
It may be necessary to restart your computer during the installation process. Follow the on-screen instructions and click OK, and do not remove the Setup CD-ROM during restarting. The installation resumes from where it left off when your computer has been restarted.
Mac OS 9, Mac OS X Classic environments, or Mac OS X v.10.3.8 or earlier are not supported.
•
•
•
•
•
To use the machine by connecting it to a computer, software including the drivers needs to be copied (installed) to the computer's hard disk.
Macintosh (P.17)
Windows (P.11)
The screens below are based on Windows Vista operating system Ultimate Edition (hereafter referred to as "Windows Vista") and Mac OS X v.10.5.x.
��
61 2 3 4 5 7
(A)
(B)
1 2
1
23
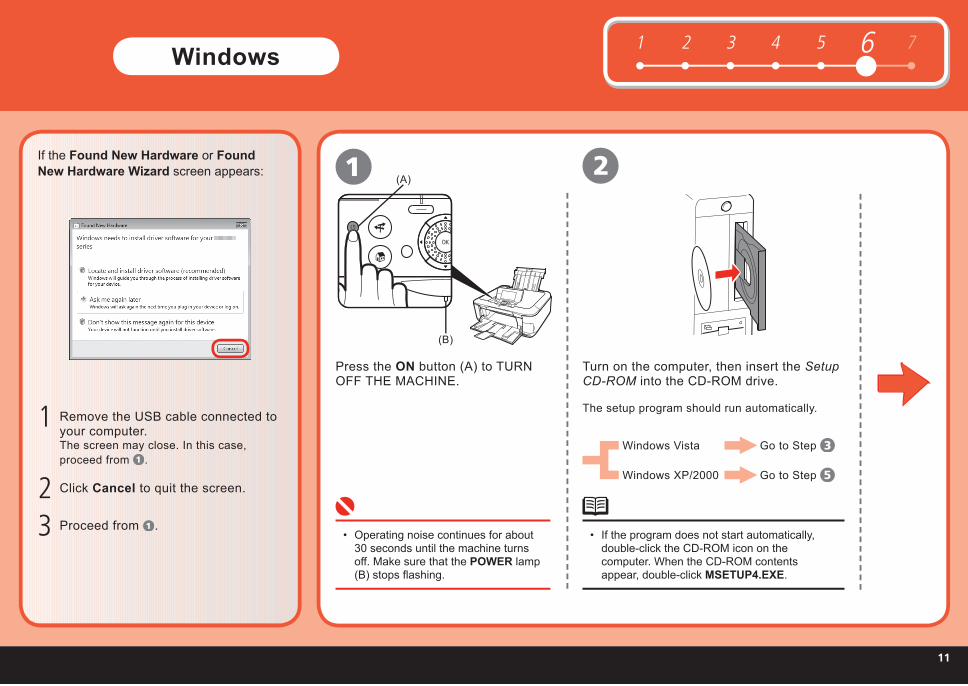
If the Found New Hardware or Found New Hardware Wizard screen appears:
Press the ON button (A) to TURN OFF THE MACHINE.
Turn on the computer, then insert the Setup CD-ROM into the CD-ROM drive.
The setup program should run automatically.
Operating noise continues for about 30 seconds until the machine turns off. Make sure that the POWER lamp (B) stops fl ashing.
• If the program does not start automatically, double-click the CD-ROM icon on the computer. When the CD-ROM contents appear, double-click MSETUP4.EXE .
•
Windows Vista
Windows XP/2000
Go to Step
Go to Step
Windows
Click Cancel to quit the screen.
Proceed from .
Remove the USB cable connected to your computer.The screen may close. In this case, proceed from .
�2
3 4 5
6
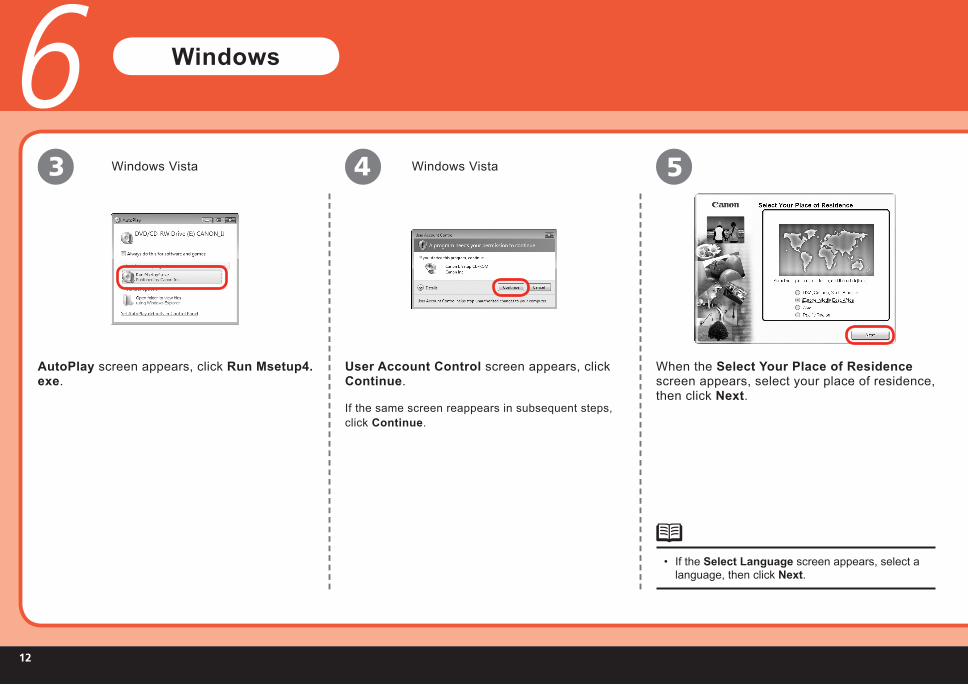
AutoPlay screen appears, click Run Msetup4.exe.
User Account Control screen appears, click Continue.
If the same screen reappears in subsequent steps, click Continue.
Windows Vista Windows Vista
Windows
When the Select Your Place of Residence screen appears, select your place of residence, then click Next.
If the Select Language screen appears, select a language, then click Next.
•
�3
61 2 3 4 5 7
76 8
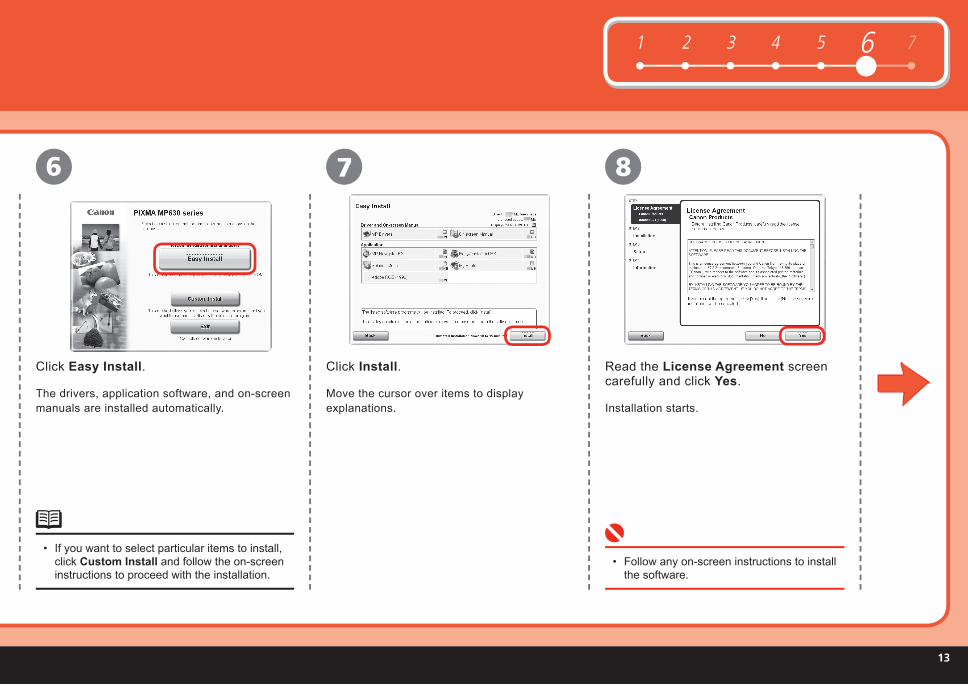
Read the License Agreement screen carefully and click Yes .
Click Install .
Move the cursor over items to display explanations. Installation starts.
Follow any on-screen instructions to install the software.
•
Click Easy Install .
The drivers, application software, and on-screen manuals are installed automatically.
If you want to select particular items to install, click Custom Install and follow the on-screen instructions to proceed with the installation.
•

��
USB
9
610
When the Printer Connection screen appears, connect one end of the USB cable to the computer, the other to the machine, then TURN THE MACHINE ON.
When the Load plain paper into the cassette screen appears, load plain paper in the Cassette and click Next.
The USB port is located on the right side at the back of the machine.•
When the machine is recognized by the computer, a message appears on the screen.
If you cannot go to the next procedure after 10 minutes, click Help and confirm the message.
•
•
For details, refer to "7 Loading Paper" on page 21.•
Windows
�5
61 2 3 4 5 7
Serial Number* * * * * * *
11 12
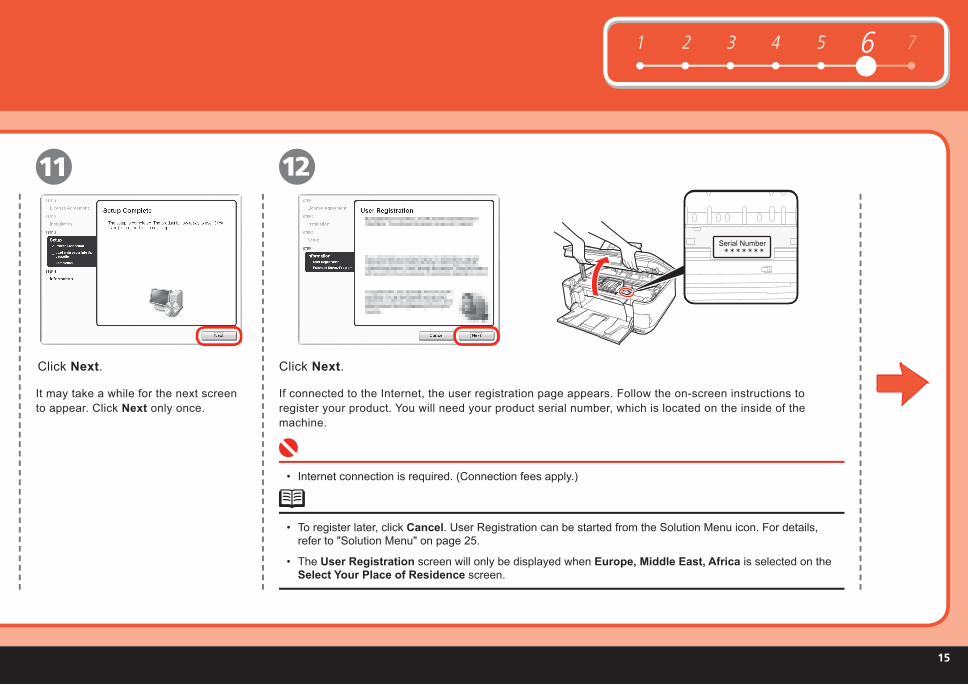
Click Next .Click Next .
If connected to the Internet, the user registration page appears. Follow the on-screen instructions to register your product. You will need your product serial number, which is located on the inside of the machine.
To register later, click Cancel . User Registration can be started from the Solution Menu icon. For details, refer to " Solution Menu " on page 25.
The User Registration screen will only be displayed when Europe, Middle East, Africa is selected on the Select Your Place of Residence screen.
•
•
Internet connection is required. (Connection fees apply.)•
It may take a while for the next screen to appear. Click Next only once.
��
13
614
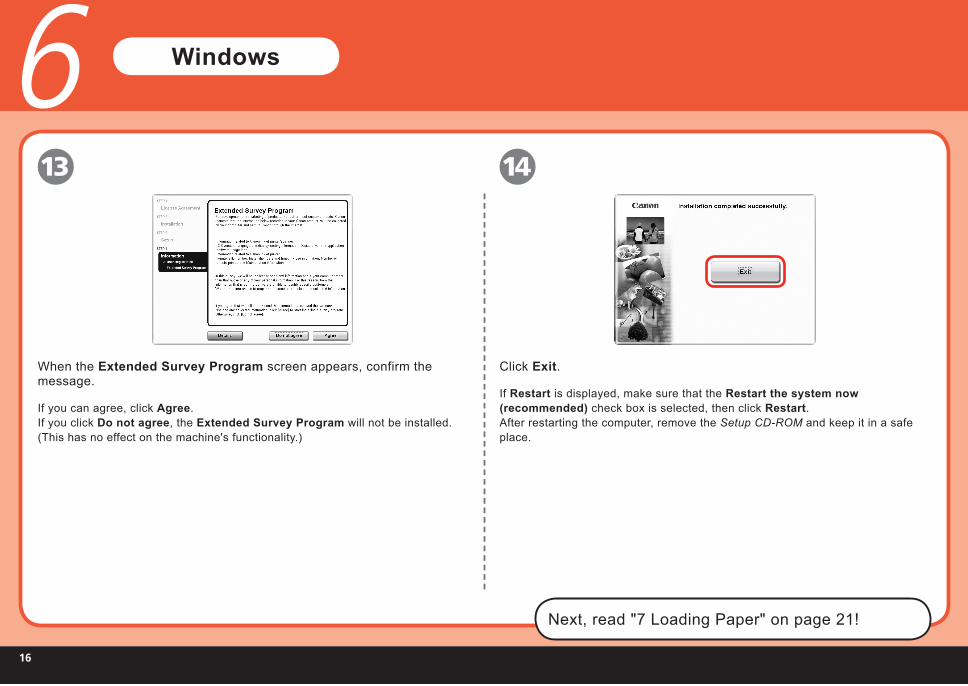
Click Exit.
If Restart is displayed, make sure that the Restart the system now (recommended) check box is selected, then click Restart.After restarting the computer, remove the Setup CD-ROM and keep it in a safe place.
When the Extended Survey Program screen appears, confirm the message.
If you can agree, click Agree.If you click Do not agree, the Extended Survey Program will not be installed. (This has no effect on the machine's functionality.)
Next, read "7 Loading Paper" on page 21!
Windows

�7
61 2 3 4 5 7
USB
2 31
Connect one end of the USB cable to the computer and the other to the machine.
Make sure the machine is turned on.
Double-click the Setup icon.Turn on the computer, then insert the Setup CD-ROM into the CD-ROM drive. If the CD-ROM folder does not open
automatically, double-click the CANON_IJ icon on the desktop.
The USB port is located on the right side at the back of the machine.
•
Macintosh
��
5 6
64 7
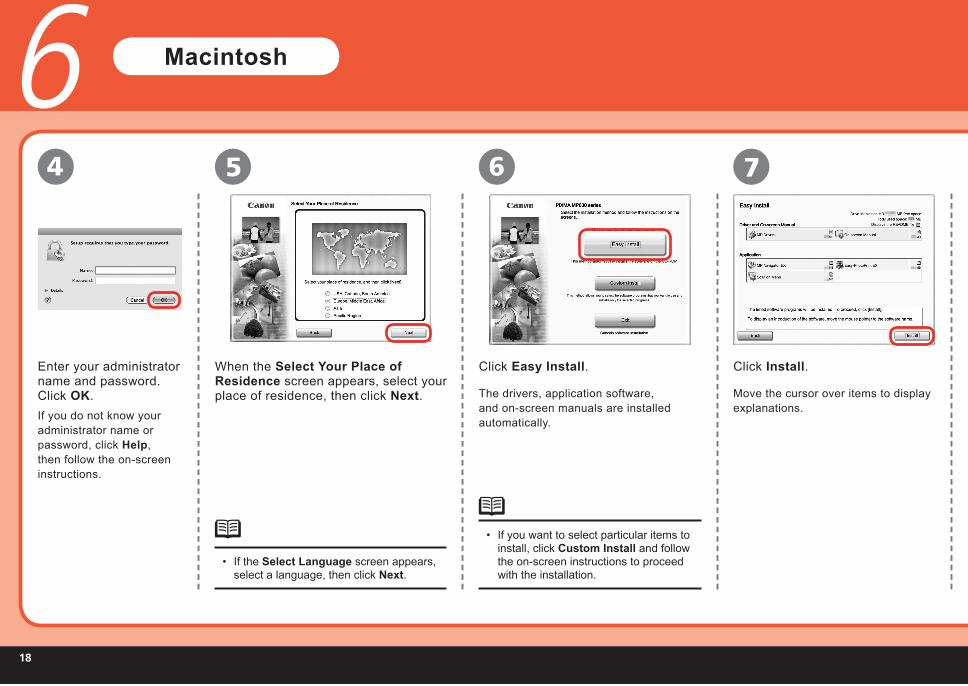
Click Easy Install.
The drivers, application software, and on-screen manuals are installed automatically.
Click Install.
Move the cursor over items to display explanations.
If you want to select particular items to install, click Custom Install and follow the on-screen instructions to proceed with the installation.
•
Enter your administrator name and password. Click OK.If you do not know your administrator name or password, click Help, then follow the on-screen instructions.
Macintosh
When the Select Your Place of Residence screen appears, select your place of residence, then click Next.
If the Select Language screen appears, select a language, then click Next.
•

�9
61 2 3 4 5 7
98 10
Click Next .Read the License Agreement screen carefully and click Yes .
Installation starts.
Follow any on-screen instructions to install the software.
•
When the Load plain paper into the cassette screen appears, load plain paper in the Cassette and click Next .
For details, refer to " 7 Loading Paper " on page 21.
•
The Setup Complete screen will only be displayed when Europe, Middle East, Africa is selected on the Select Your Place of Residence screen.
•
20
61 2 3 4 5 7
Serial Number* * * * * * *
11
612
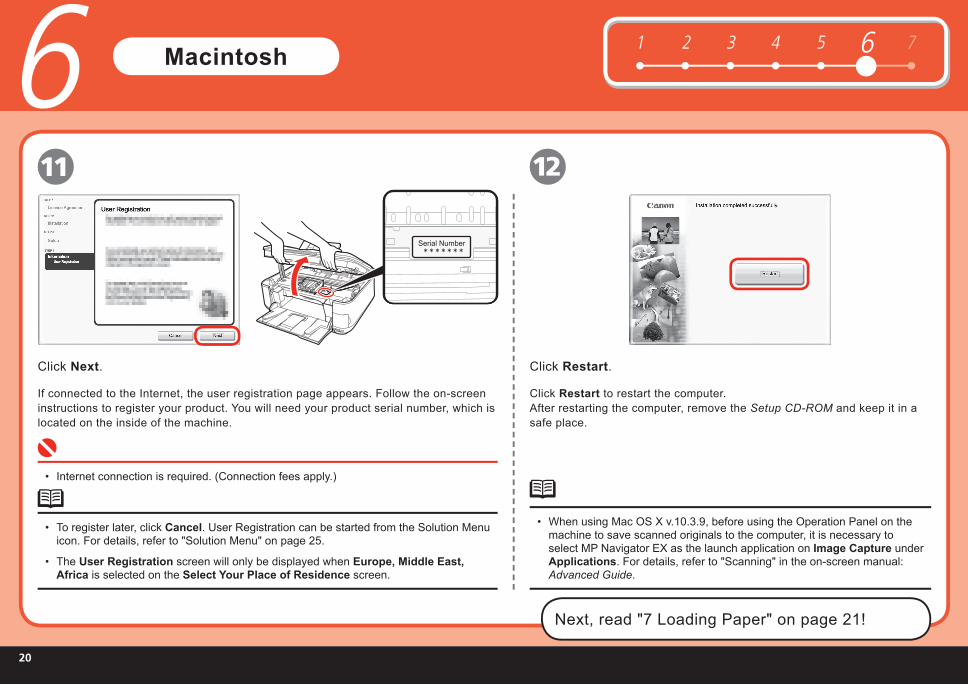
Click Restart .
Click Restart to restart the computer.After restarting the computer, remove the Setup CD-ROM and keep it in a safe place.
When using Mac OS X v.10.3.9 , before using the Operation Panel on the machine to save scanned originals to the computer, it is necessary to select MP Navigator EX as the launch application on Image Capture under Applications . For details, refer to " Scanning " in the on-screen manual: Advanced Guide .
•
Next, read " 7 Loading Paper " on page 21!
Macintosh
Click Next .
If connected to the Internet, the user registration page appears. Follow the on-screen instructions to register your product. You will need your product serial number, which is located on the inside of the machine.
Internet connection is required. (Connection fees apply.)•
To register later, click Cancel . User Registration can be started from the Solution Menu icon. For details, refer to " Solution Menu " on page 25.
The User Registration screen will only be displayed when Europe, Middle East, Africa is selected on the Select Your Place of Residence screen.
•
•

2�
71 2 3 4 5 6
(A)
(B)
(C)
(D)(F)
(E)
(A)
721
Loading Paper
Load in the Cassette This section explains how to load paper in the Cassette (A) and the Rear Tray (B).
The Cassette (A) supports plain paper (C) only. To print Photo Paper / Hagaki (D), be sure to load it in the Rear Tray (B).
Move the Paper Guides (E) and (F) to both edges.
Pull out the Cassette (A).
22
A4
(F)
(G)(E)
654
73
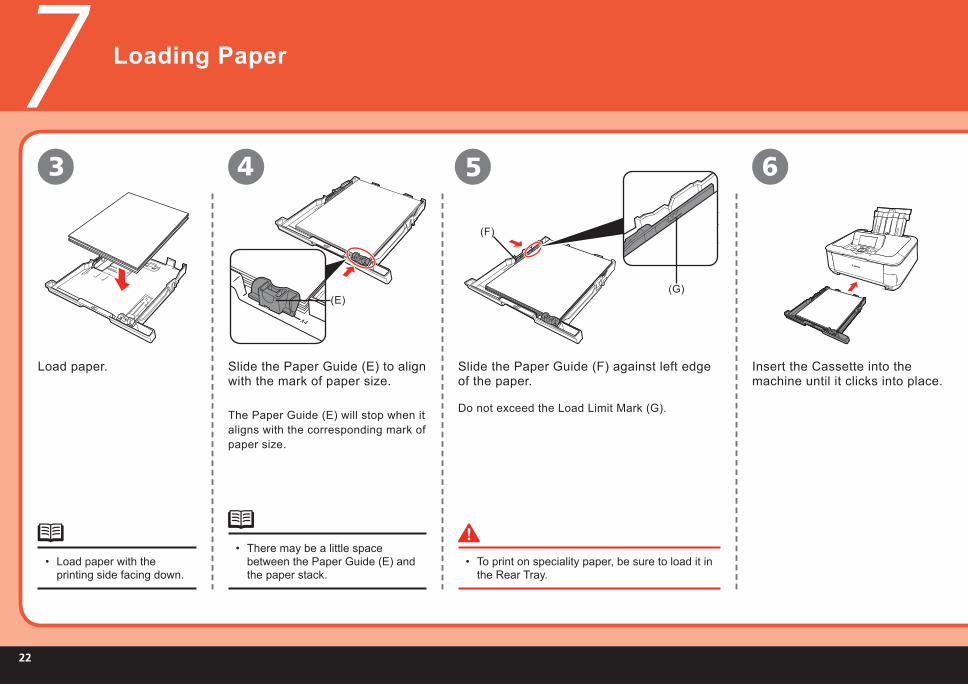
Loading Paper
Insert the Cassette into the machine until it clicks into place.
Slide the Paper Guide (F) against left edge of the paper.
Do not exceed the Load Limit Mark (G).
Slide the Paper Guide (E) to align with the mark of paper size.
Load paper.
Load paper with the printing side facing down.
•
The Paper Guide (E) will stop when it aligns with the corresponding mark of paper size.
There may be a little space between the Paper Guide (E) and the paper stack.
•To print on speciality paper, be sure to load it in the Rear Tray.
•
23
71 2 3 4 5 6
(H)
(I) (I)
(J)
(I) (I)
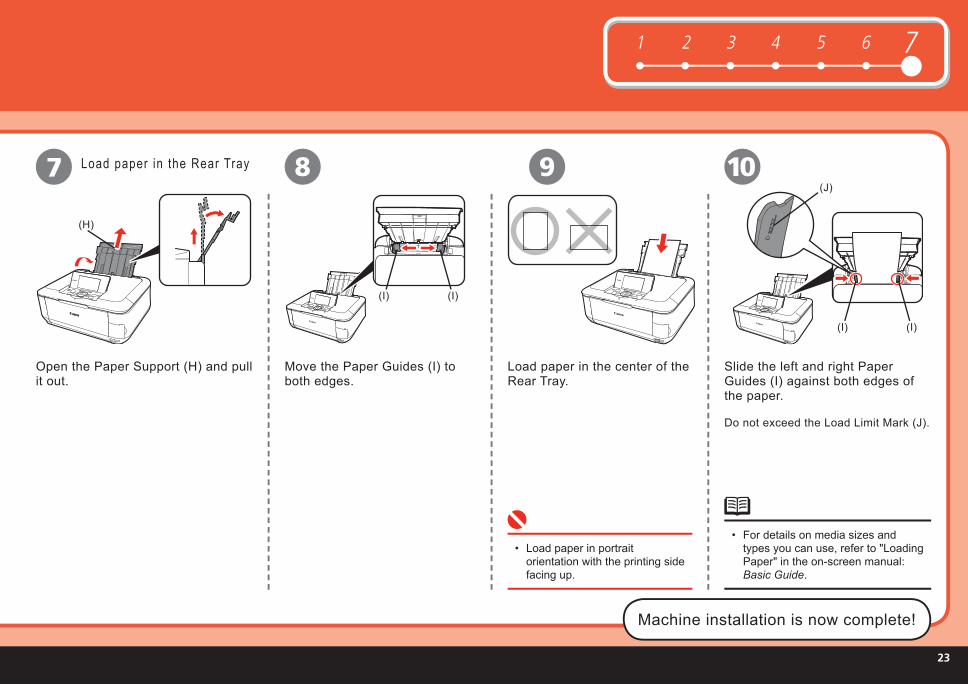
7 98 10Load paper in the Rear Tray
For details on media sizes and types you can use, refer to " Loading Paper " in the on-screen manual: Basic Guide .
•Load paper in portrait orientation with the printing side facing up.
•
Machine installation is now complete!
Open the Paper Support (H) and pull it out.
Move the Paper Guides (I) to both edges.
Load paper in the center of the Rear Tray .
Slide the left and right Paper Guides (I) against both edges of the paper.
Do not exceed the Load Limit Mark (J).
2�
After Installing the Machine
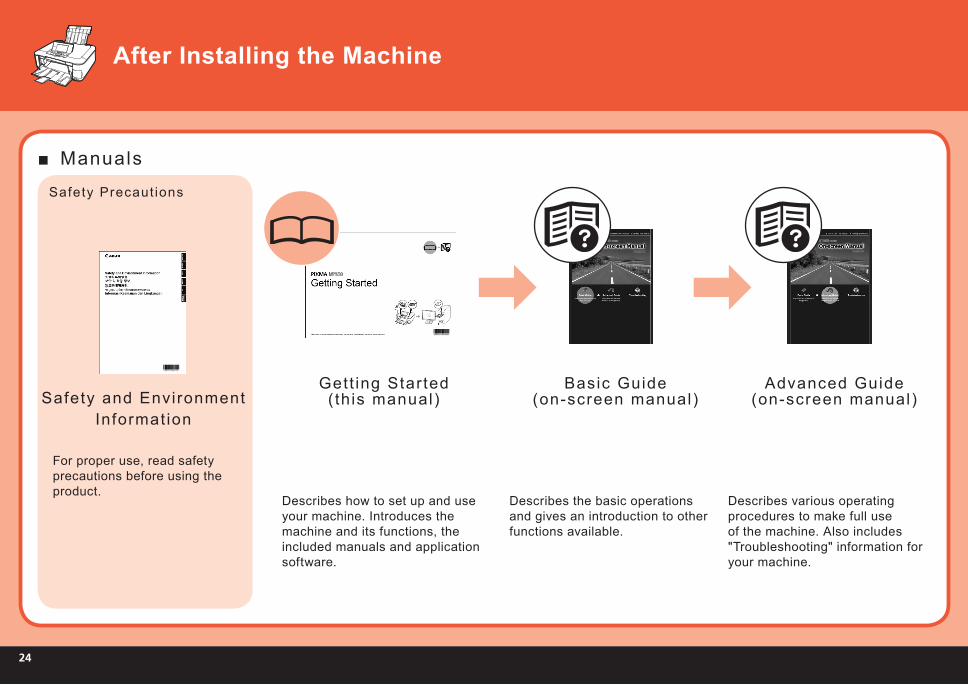
Safety Precaut ions
For proper use, read safety precautions before using the product.
Safety and Environment Informat ion
Manuals■
Gett ing Started(this manual)
Describes how to set up and use your machine. Introduces the machine and its functions, the included manuals and application software.
Basic Guide(on-screen manual)
Describes the basic operations and gives an introduction to other functions available.
Advanced Guide(on-screen manual)
Describes various operating procedures to make full use of the machine. Also includes "Troubleshooting" information for your machine.
25
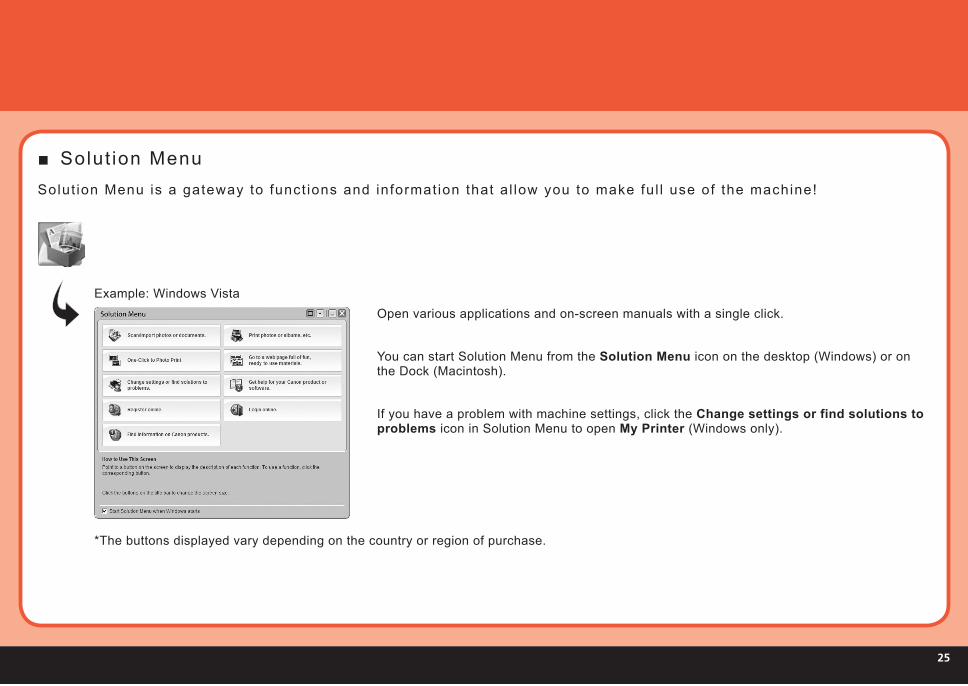
Solut ion Menu■Solut ion Menu is a gateway to funct ions and informat ion that al low you to make ful l use of the machine!
Open various applications and on-screen manuals with a single click.
You can start Solution Menu from the Solution Menu icon on the desktop (Windows) or on the Dock (Macintosh).
If you have a problem with machine settings, click the Change settings or find solutions to problems icon in Solution Menu to open My Printer (Windows only).
*The buttons displayed vary depending on the country or region of purchase.
Example: Windows Vista
2�
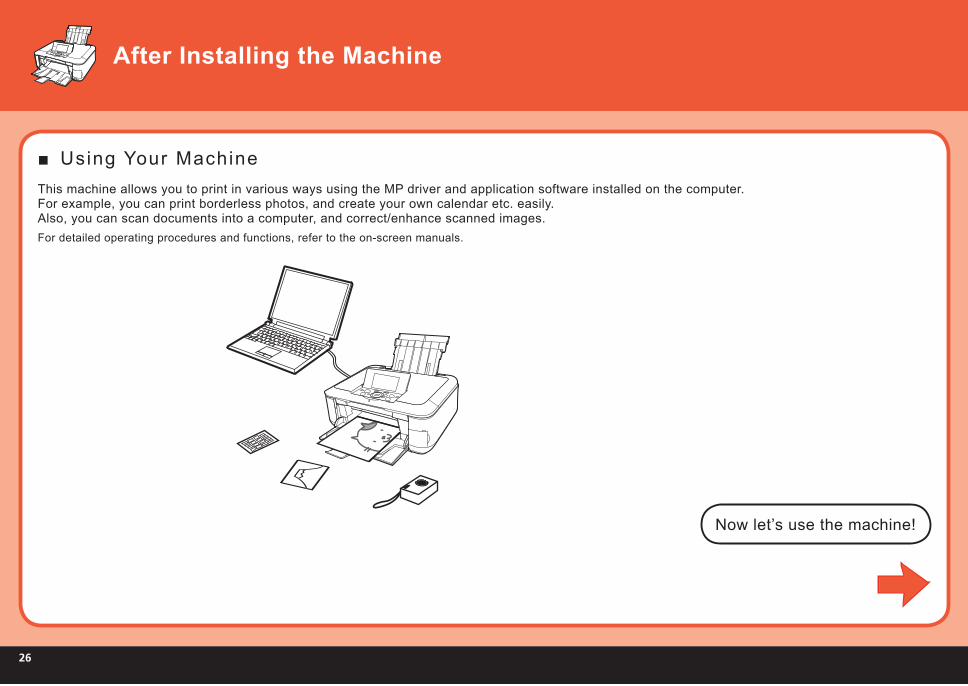
Using Your Machine■
Now let’s use the machine!
This machine allows you to print in various ways using the MP driver and application software installed on the computer.For example, you can print borderless photos, and create your own calendar etc. easily.Also, you can scan documents into a computer, and correct/enhance scanned images.For detailed operating procedures and functions, refer to the on-screen manuals.
After Installing the Machine
27
CF
SDMS
MSDuo
CF
SDMS
MSDuo
CF
SDMS
MSDuo
(B)
(A)
(C)
1
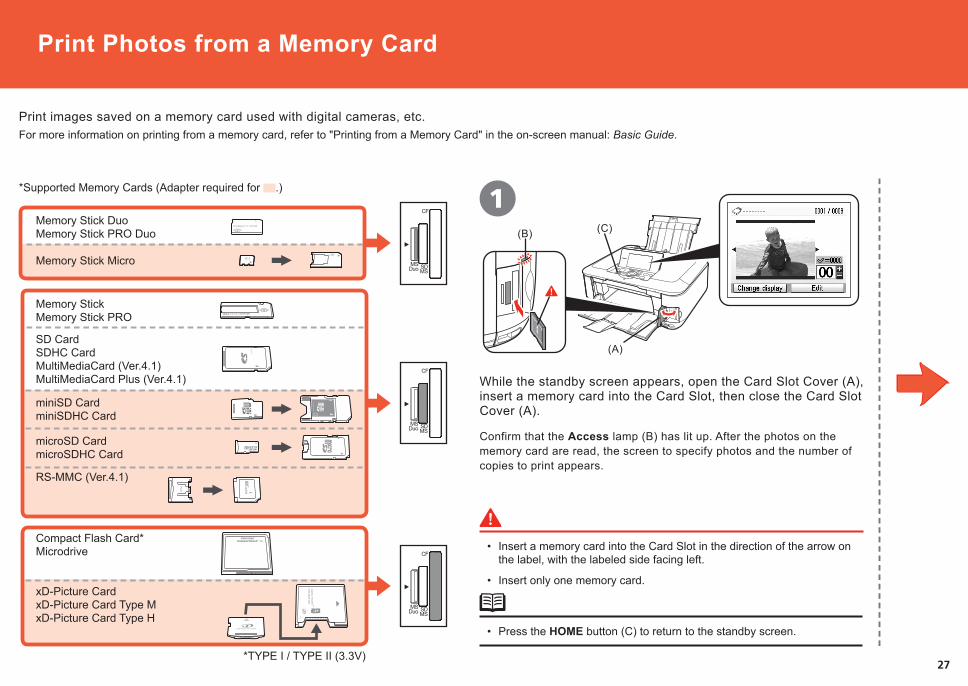
Print images saved on a memory card used with digital cameras, etc.
*Supported Memory Cards (Adapter required for .)
For more information on printing from a memory card, refer to "Printing from a Memory Card" in the on-screen manual: Basic Guide.
SD CardSDHC CardMultiMediaCard (Ver.4.1)MultiMediaCard Plus (Ver.4.1)
miniSD CardminiSDHC Card
microSD CardmicroSDHC Card
Memory Stick DuoMemory Stick PRO Duo
RS-MMC (Ver.4.1)
Compact Flash Card*Microdrive
xD-Picture CardxD-Picture Card Type MxD-Picture Card Type H
Memory StickMemory Stick PRO
Memory Stick Micro
*TYPE I / TYPE II (3.3V)
Print Photos from a Memory Card
While the standby screen appears, open the Card Slot Cover (A), insert a memory card into the Card Slot, then close the Card Slot Cover (A).
Confirm that the Access lamp (B) has lit up. After the photos on the memory card are read, the screen to specify photos and the number of copies to print appears.
Insert a memory card into the Card Slot in the direction of the arrow on the label, with the labeled side facing left.
Insert only one memory card.
•
•
Press the HOME button (C) to return to the standby screen.•
2�
(E)(D)2 3
Print Photos from a Memory Card
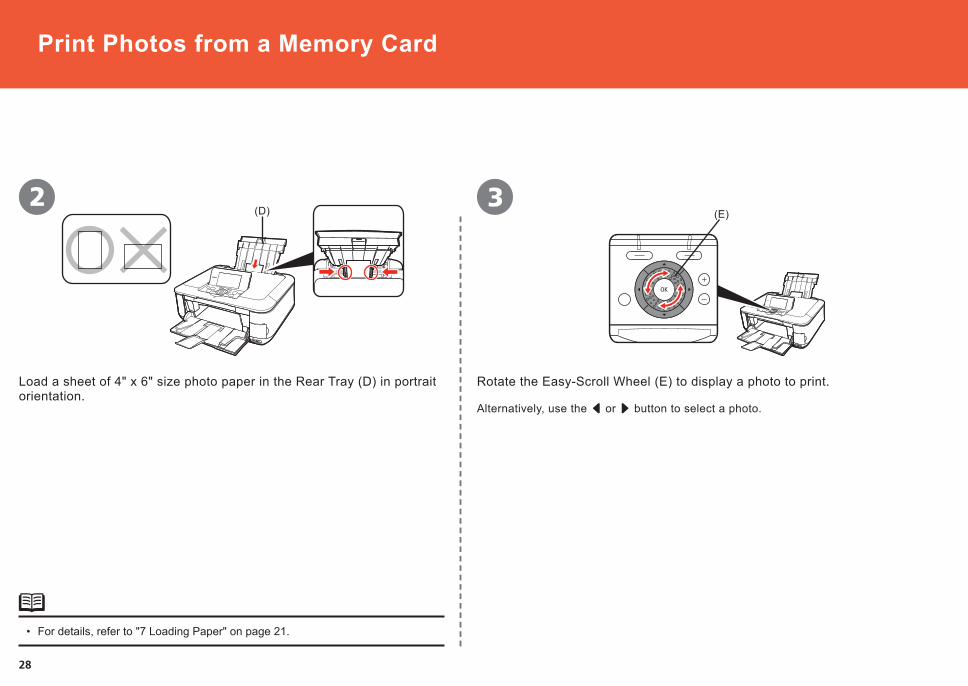
Rotate the Easy-Scroll Wheel (E) to display a photo to print.
Alternatively, use the [ or ] button to select a photo.
For details, refer to "7 Loading Paper" on page 21.•
Load a sheet of 4" x 6" size photo paper in the Rear Tray (D) in portrait orientation.

29
(A)
(F)
(B)654
Press the [+] or [-] button to specify the number of copies, then press the OK button.
The Print Settings Confirmation Screen appears.
Press the Color button (F). After printing, open the Card Slot Cover (A), pinch the memory card and pull it straight out, then close the Card Slot Cover (A).Printing will start.
Do not remove the memory card while the Access lamp (B) is flashing. Saved data may be damaged.
•

30
(A)(B) (A)
(E)
(D)
(C)
(F)
2 31 4
Try Copying
This section explains with Plain Paper. For various copying procedures, refer to "Copying" in the on-screen manual: Basic Guide.
For details, refer to "7 Loading Paper" on page 21.
•
You can copy a document by simply placing it on the Platen Glass and pressing the Color button or the Black button.
Load A4 or Letter-sized plain paper in the Cassette.
Open the Document Cover (A).
Place the document face-down and align it with the Alignment Mark (B).
Close the Document Cover (A), press the HOME button (C), then press the Black button (D) twice for black & white copying, or the Color button (E) twice for color copying.
Copying will start.Remove the document after printing.
Do not place any objects weighing more than 4.4 lb / 2.0 kg on the Platen Glass.
Do not press or put weight on the original with pressure exceeding 4.4 lb / 2.0 kg. Doing so may cause the scanner to malfunction or the Platen Glass to break.
•
•
Do not open the Document Cover until copying is complete.
•
Make sure that the Output Tray Extension (F) is extended.
•
3�
(A)
21 3 4
Print Photos from a Computer
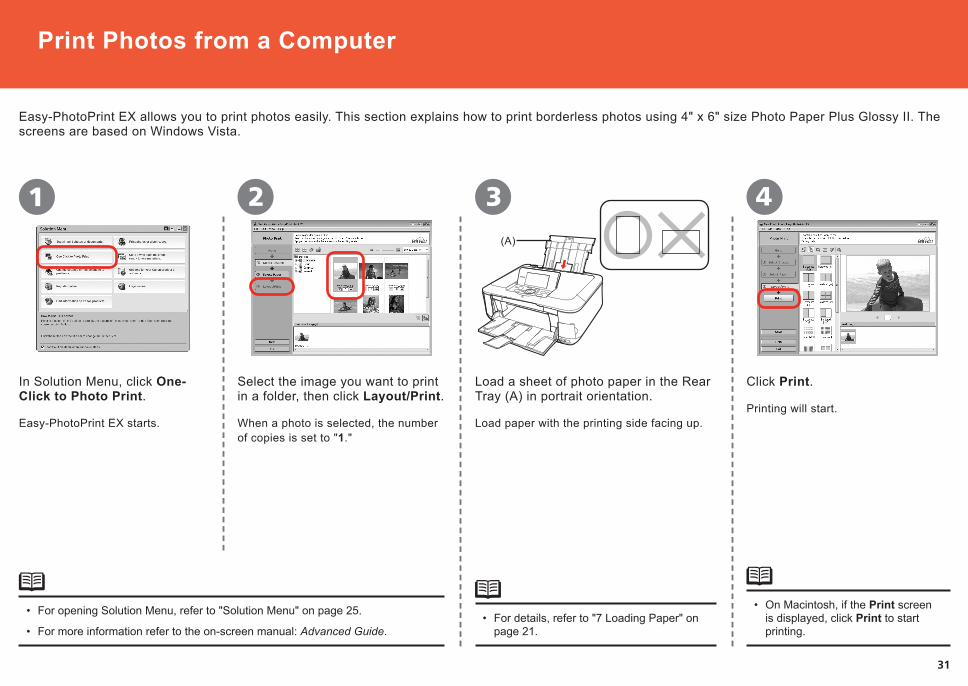
Easy-PhotoPrint EX allows you to print photos easily. This section explains how to print borderless photos using 4" x 6" size Photo Paper Plus Glossy II. The screens are based on Windows Vista.
For opening Solution Menu, refer to "Solution Menu" on page 25.
For more information refer to the on-screen manual: Advanced Guide.
•
•
Load a sheet of photo paper in the Rear Tray (A) in portrait orientation.
For details, refer to "7 Loading Paper" on page 21.
•
Click Print.
Printing will start.Load paper with the printing side facing up.
Select the image you want to print in a folder, then click Layout/Print.
When a photo is selected, the number of copies is set to "1."
In Solution Menu, click One-Click to Photo Print.
Easy-PhotoPrint EX starts.
On Macintosh, if the Print screen is displayed, click Print to start printing.
•
32
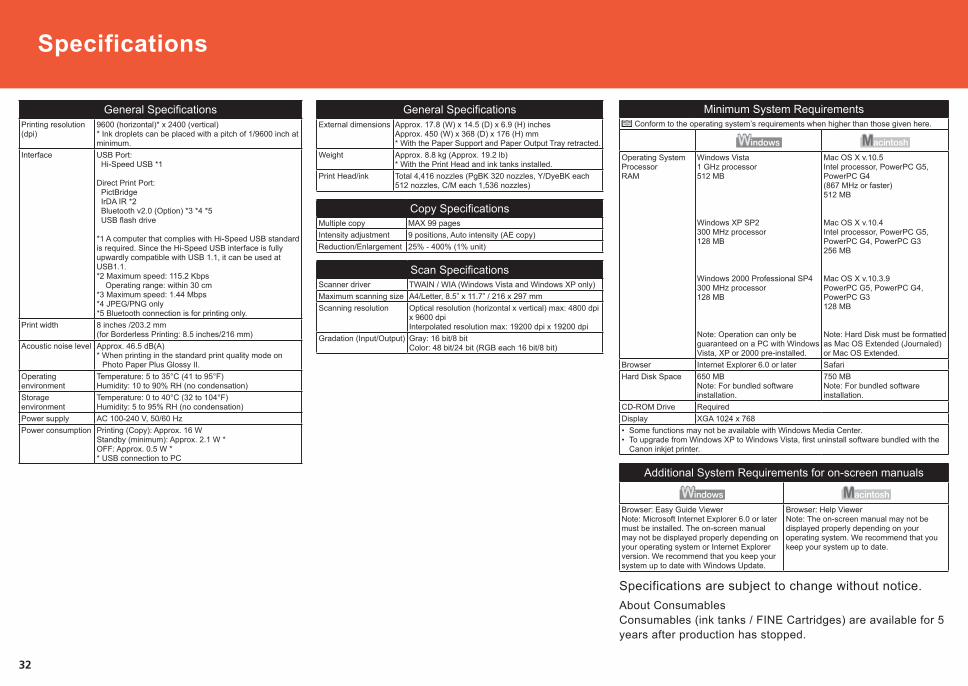
General SpecificationsPrinting resolution (dpi)
9600 (horizontal)* x 2400 (vertical)* Ink droplets can be placed with a pitch of 1/9600 inch at minimum.
Interface USB Port: Hi-Speed USB *1
Direct Print Port: PictBridge IrDA IR *2 Bluetooth v2.0 (Option) *3 *4 *5 USB flash drive
*1 A computer that complies with Hi-Speed USB standard is required. Since the Hi-Speed USB interface is fully upwardly compatible with USB 1.1, it can be used at USB1.1.*2 Maximum speed: 115.2 Kbps Operating range: within 30 cm*3 Maximum speed: 1.44 Mbps*4 JPEG/PNG only*5 Bluetooth connection is for printing only.
Print width 8 inches /203.2 mm(for Borderless Printing: 8.5 inches/216 mm)
Acoustic noise level Approx. 46.5 dB(A)* When printing in the standard print quality mode on
Photo Paper Plus Glossy II.Operating environment
Temperature: 5 to 35°C (41 to 95°F) Humidity: 10 to 90% RH (no condensation)
Storage environment
Temperature: 0 to 40°C (32 to 104°F) Humidity: 5 to 95% RH (no condensation)
Power supply AC 100-240 V, 50/60 HzPower consumption Printing (Copy): Approx. 16 W
Standby (minimum): Approx. 2.1 W * OFF: Approx. 0.5 W * * USB connection to PC
Copy SpecificationsMultiple copy MAX 99 pagesIntensity adjustment 9 positions, Auto intensity (AE copy)Reduction/Enlargement 25% - 400% (1% unit)
Scan SpecificationsScanner driver TWAIN / WIA (Windows Vista and Windows XP only)Maximum scanning size A4/Letter, 8.5” x 11.7” / 216 x 297 mmScanning resolution Optical resolution (horizontal x vertical) max: 4800 dpi
x 9600 dpi Interpolated resolution max: 19200 dpi x 19200 dpi
Gradation (Input/Output) Gray: 16 bit/8 bit Color: 48 bit/24 bit (RGB each 16 bit/8 bit)
General SpecificationsExternal dimensions Approx. 17.8 (W) x 14.5 (D) x 6.9 (H) inches
Approx. 450 (W) x 368 (D) x 176 (H) mm* With the Paper Support and Paper Output Tray retracted.
Weight Approx. 8.8 kg (Approx. 19.2 lb)* With the Print Head and ink tanks installed.
Print Head/ink Total 4,416 nozzles (PgBK 320 nozzles, Y/DyeBK each 512 nozzles, C/M each 1,536 nozzles)
Minimum System Requirements Conform to the operating system’s requirements when higher than those given here.
Operating System Processor RAM
Windows Vista1 GHz processor512 MB
Windows XP SP2300 MHz processor128 MB
Windows 2000 Professional SP4300 MHz processor128 MB
Note: Operation can only beguaranteed on a PC with Windows Vista, XP or 2000 pre-installed.
Mac OS X v.10.5Intel processor, PowerPC G5, PowerPC G4(867 MHz or faster)512 MB
Mac OS X v.10.4Intel processor, PowerPC G5, PowerPC G4, PowerPC G3256 MB
Mac OS X v.10.3.9PowerPC G5, PowerPC G4, PowerPC G3128 MB
Note: Hard Disk must be formatted as Mac OS Extended (Journaled) or Mac OS Extended.
Browser Internet Explorer 6.0 or later SafariHard Disk Space 650 MB
Note: For bundled software installation.
750 MB Note: For bundled software installation.
CD-ROM Drive RequiredDisplay XGA 1024 x 768
Some functions may not be available with Windows Media Center.To upgrade from Windows XP to Windows Vista, first uninstall software bundled with the Canon inkjet printer.
••
Additional System Requirements for on-screen manuals
Browser: Easy Guide ViewerNote: Microsoft Internet Explorer 6.0 or later must be installed. The on-screen manual may not be displayed properly depending on your operating system or Internet Explorer version. We recommend that you keep your system up to date with Windows Update.
Browser: Help ViewerNote: The on-screen manual may not be displayed properly depending on your operating system. We recommend that you keep your system up to date.
Specifications are subject to change without notice.
Specifications
About ConsumablesConsumables (ink tanks / FINE Cartridges) are available for 5 years after production has stopped.
QT5-1724-V01 XXXXXXXX ©CANON INC.2008 PRINTED IN THAILAND
canon.com.aucanon.co.nz
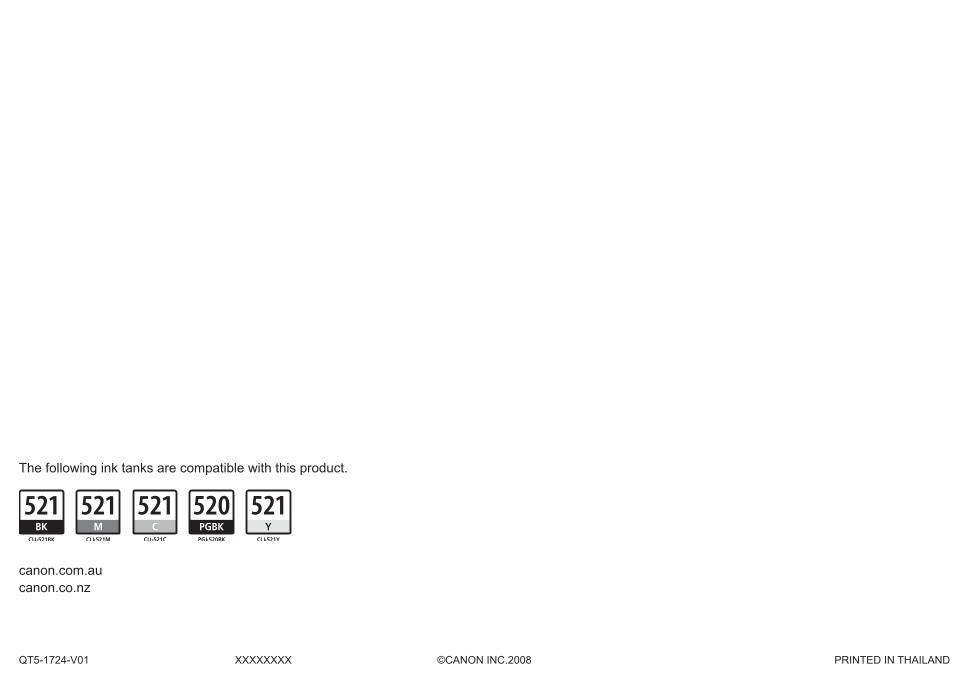
The following ink tanks are compatible with this product.