mounting systems for solar technology - eco … sheets...everest solar systems crossrail pitched...
TRANSCRIPT

EVEREST SOLAR SYSTEMS
CROSSRAIL PITCHED ROOF SOLUTION
Mounting systems for solar technology
L-Foot w/ T-Bolt and Flange Nut (CR 48)
L-Foot Material: Aluminum
Hardware Material: Stainless SteelT Bolt 28/15 M10Hex Flange Nut, Serrated M10
CrossRail 48
CrossRail Material: AluminiumLength: 161.42“
Rail Connector Set CrossRail 48
Material: Aluminium SpliceHarware: Stainless Steel
Module End Clamp Set
Material: Aluminium ClampHardware : Stainless Steel
Module Middle Clamp Set
Material: AluminiumHardware: Stainless Steel
End Cap for CrossRail 48
Material: glass fibre reinforced polyamid
Burndy WEEB Lug 8.0 Hardware Only
Material: Stainless SteelFor attching Burndy WEEB Lug 8.0 to CrossRail 48TBolt 28/15 M20Hex Flange Net, Serrated 20
Omega Wire Management Clip
Material: polyamid, black
CROSSRAIL ACCESORIESCROSSRAIL MAIN COMPONENTS
Below are the parts to assemble the Everest CrossRail system
Burndy WEEB Lug 8.0
Material: aluminium
Enphase 215 Mounting Kit
Material: Aluminium
Dark Module End Clamp Set
Material: aluminium
Dark Module Middle Clamp SetMaterial: aluminium
Burndy KMC WEEB Clip
Material: Stainless SteelUse with Everest Mid Clamps to Bond Modules to the CrossRail 48
Everest Solar Systems, LLC3809 Ocean Ranch Blvd.
Suite 111Oceanside, CA 92056Tel. +1.760.301.5300
CrossRail Technisches PB | US3 | 0213Product images are for illustrative purposes only. Specifi cations are subject to change without notice. All sales of our products shall be subject to Everest Solar Systems terms and conditions, including the exclusive limited warranty set forth therein.Image sources: fotolia, elpo elektrotechnik, solmotion
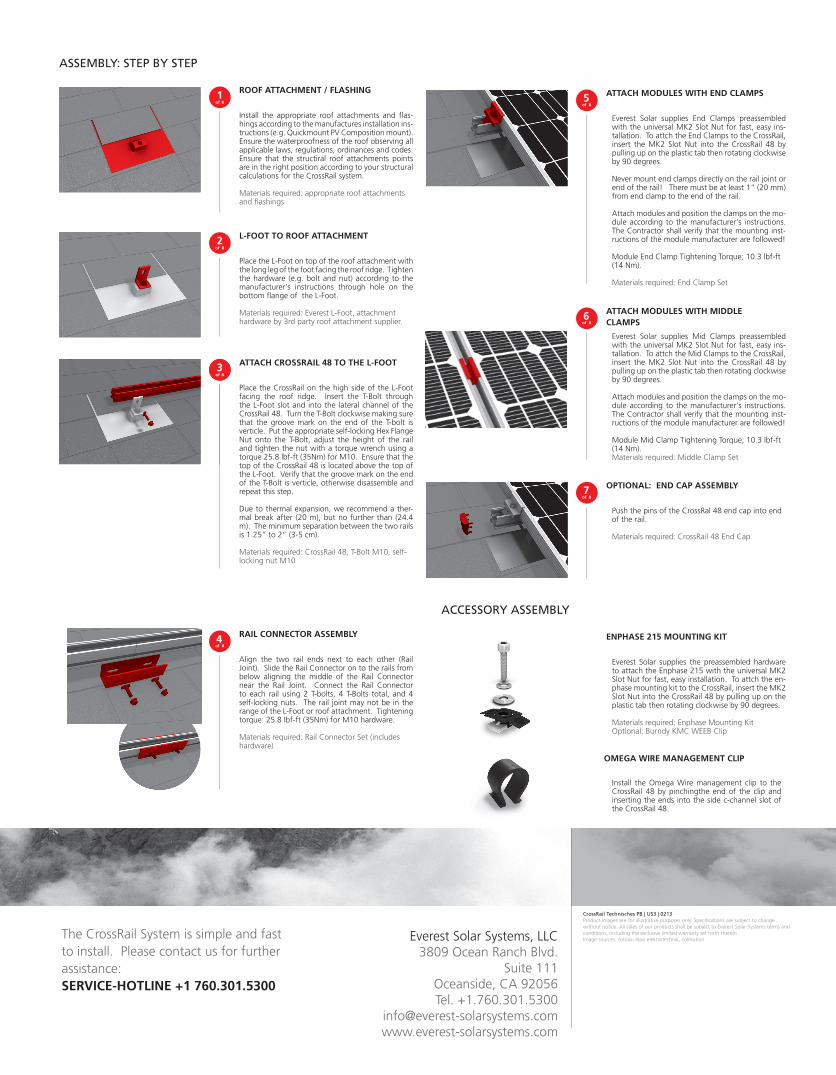
ROOF ATTACHMENT / FLASHING
L-FOOT TO ROOF ATTACHMENT
Install the appropriate roof attachments and flas-hings according to the manufactures installation ins-tructions (e.g. Quickmount PV Composition mount). Ensure the waterproofness of the roof observing all applicable laws, regulations, ordinances and codes. Ensure that the structiral roof attachments points are in the right position according to your structural calculations for the CrossRail system.
Materials required: appropriate roof attachments and flashings
Place the L-Foot on top of the roof attachment with the long leg of the foot facing the roof ridge. Tighten the hardware (e.g. bolt and nut) according to the manufacturer‘s instructions through hole on the bottom flange of the L-Foot.
Materials required: Everest L-Foot, attachment hardware by 3rd party roof attachment supplier.
1of 8
2of 8
ASSEMBLY: STEP BY STEP
RAIL CONNECTOR ASSEMBLY
Align the two rail ends next to each other (Rail Joint). Slide the Rail Connector on to the rails from below aligning the middle of the Rail Connector near the Rail Joint. Connect the Rail Connector to each rail using 2 T-bolts, 4 T-Bolts total, and 4 self-locking nuts. The rail joint may not be in the range of the L-Foot or roof attachment. Tightening torque: 25.8 lbf-ft (35Nm) for M10 hardware.
Materials required: Rail Connector Set (includes hardware)
4of 8
Place the CrossRail on the high side of the L-Foot facing the roof ridge. Insert the T-Bolt through the L-Foot slot and into the lateral channel of the CrossRail 48. Turn the T-Bolt clockwise making sure that the groove mark on the end of the T-bolt is verticle. Put the appropriate self-locking Hex Flange Nut onto the T-Bolt, adjust the height of the rail and tighten the nut with a torque wrench using a torque 25.8 lbf-ft (35Nm) for M10. Ensure that the top of the CrossRail 48 is located above the top of the L-Foot. Verify that the groove mark on the end of the T-Bolt is verticle, otherwise disassemble and repeat this step.
Due to thermal expansion, we recommend a ther-mal break after (20 m), but no further than (24.4 m). The minimum separation between the two rails is 1.25” to 2” (3-5 cm).
Materials required: CrossRail 48, T-Bolt M10, self-locking nut M10
ATTACH CROSSRAIL 48 TO THE L-FOOT 3of 8 3
of 8
ATTACH MODULES WITH END CLAMPS
ATTACH MODULES WITH MIDDLE CLAMPS
OPTIONAL: END CAP ASSEMBLY
Everest Solar supplies End Clamps preassembled with the universal MK2 Slot Nut for fast, easy ins-tallation. To attch the End Clamps to the CrossRail, insert the MK2 Slot Nut into the CrossRail 48 by pulling up on the plastic tab then rotating clockwise by 90 degrees.
Never mount end clamps directly on the rail joint or end of the rail! There must be at least 1“ (20 mm) from end clamp to the end of the rail.
Attach modules and position the clamps on the mo-dule according to the manufacturer‘s instructions. The Contractor shall verify that the mounting inst-ructions of the module manufacturer are followed!
Module End Clamp Tightening Torque; 10.3 lbf-ft (14 Nm).
Materials required: End Clamp Set
Everest Solar supplies Mid Clamps preassembled with the universal MK2 Slot Nut for fast, easy ins-tallation. To attch the Mid Clamps to the CrossRail, insert the MK2 Slot Nut into the CrossRail 48 by pulling up on the plastic tab then rotating clockwise by 90 degrees.
Attach modules and position the clamps on the mo-dule according to the manufacturer‘s instructions. The Contractor shall verify that the mounting inst-ructions of the module manufacturer are followed!
Module Mid Clamp Tightening Torque; 10.3 lbf-ft (14 Nm).Materials required: Middle Clamp Set
Push the pins of the CrossRal 48 end cap into end of the rail.
Materials required: CrossRail 48 End Cap
5
6
7
of 8
of 8
of 8
Everest Solar supplies the preassembled hardware to attach the Enphase 215 with the universal MK2 Slot Nut for fast, easy installation. To attch the en-phase mounting kit to the CrossRail, insert the MK2 Slot Nut into the CrossRail 48 by pulling up on the plastic tab then rotating clockwise by 90 degrees.
Materials required: Enphase Mounting KitOptional: Burndy KMC WEEB Clip
ENPHASE 215 MOUNTING KIT
ACCESSORY ASSEMBLY
The CrossRail System is simple and fast to install. Please contact us for further assistance: SERVICE-HOTLINE +1 760.301.5300
Install the Omega Wire management clip to the CrossRail 48 by pinchingthe end of the clip and inserting the ends into the side c-channel slot of the CrossRail 48.
OMEGA WIRE MANAGEMENT CLIP