mount sinai hospital medical center meditech … (il) - meditech training 060110.pdf · mount sinai...
TRANSCRIPT

Mount Sinai Hospital Medical Center – Meditech Training 1 of 65 Implemented on June 1, 2010
MOUNT SINAI HOSPITAL MEDICAL CENTER MEDITECH TRAINING
This orientation manual is designed to ensure all per diem and contract agency personnel receive an orientation to Meditech prior to working at Mount Sinai Hospital Medical Center. All per diem and contracted agency employees are expected to read, acknowledge and adhere to the clinical documentation procedures provided within the Mount Sinai Hospital Medical Center – Meditech Training.
TABLE OF CONTENTS
MEDITECH .............................................................................................................................................................................. 2
GETTING STARTED .............................................................................................................................................................. 3
THE STATUS BOARD ........................................................................................................................................................... 5
YOUR PATIENT LIST ............................................................................................................................................................. 6
ASSESSING YOUR PATIENT ............................................................................................................................................. 12
CHARTING PATIENT CARE ................................................................................................................................................ 26
DOCUMENTING PATIENT NOTES ..................................................................................................................................... 59
ACKNOWLEDGING PATIENT ORDERS ............................................................................................................................ 61

Mount Sinai Hospital Medical Center – Meditech Training 2 of 65 Implemented on June 1, 2010
MEDITECH
• Meditech is Mt. Sinai Hospital’s Health Information Management System. • It integrates all functions associated with the requisition and delivery of patient care.
– Nursing – Laboratory – Imaging / Diagnostic Services – Pharmacy – Dietary Services – Ancillary Subspecialties – Social Work, PT, OT, RT, Pastoral Care
It uses multi-directional communication to permit all care givers to know the status of any given element of a
patient’s plan of care. Activity within Meditech on any patient record is written to that patient’s Electronic Medical Record.
Meditech has ‘hot’ charting several hot keys that save time when charting.
– F9 → initiates a lookup. – F11 → exits the current screen and does not save the data entered – F12 → files the data entered and exits the current screen. – F6 → moves the cursor to the previous field. – N → when entered in a ‘TIME’ field, enters the current clock time. – T → when entered in a ‘DATE’ field, enters the current date.
Example: if today is 5/19/09, entering ‘T’ in any date field will autopopulate that field with 05/19/09.
– T +/- ‘#’ → when entered in a ‘DATE’ field, will enter a date # number of days before or after the current date.
Example: if today is 5/19/09, entering ‘T-2’ in any date field will autopopulate that field with 05/17/09, two days PRIOR to the current date.
Use these keystrokes to expedite your charting.
Mount Sinai Hospital Medical Center – Meditech Training 3 of 65 Implemented on June 1, 2010
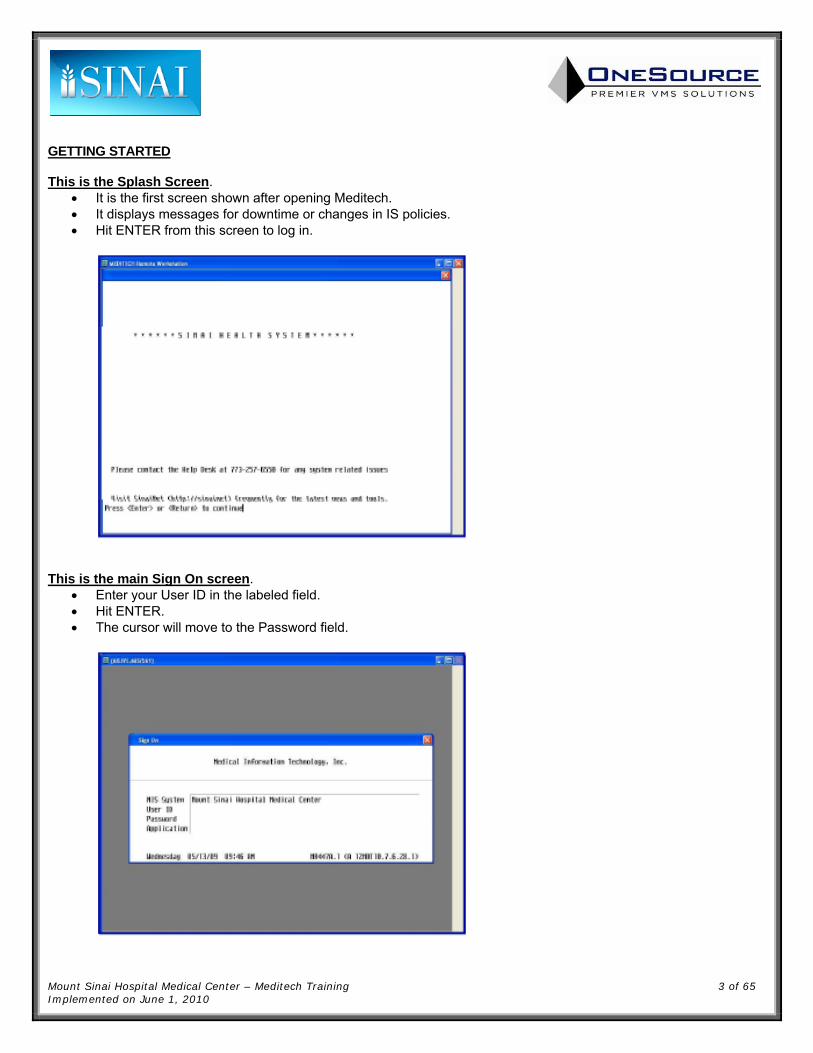
GETTING STARTED This is the Splash Screen.
It is the first screen shown after opening Meditech. It displays messages for downtime or changes in IS policies. Hit ENTER from this screen to log in.
This is the main Sign On screen.
Enter your User ID in the labeled field. Hit ENTER. The cursor will move to the Password field.

Mount Sinai Hospital Medical Center – Meditech Training 4 of 65 Implemented on June 1, 2010
Enter your password in the labeled field. NOTE: No characters or space holders will indicate you have entered any data. If logging in for the first time, you will be prompted to change your password. Follow the prompts to change your password.
This is the Main Application screen.
Access the Nursing application (NUR) either by using your mouse to click on the menu item, or by entering its number in the SELECT field and hitting ENTER.
Mount Sinai Hospital Medical Center – Meditech Training 5 of 65 Implemented on June 1, 2010
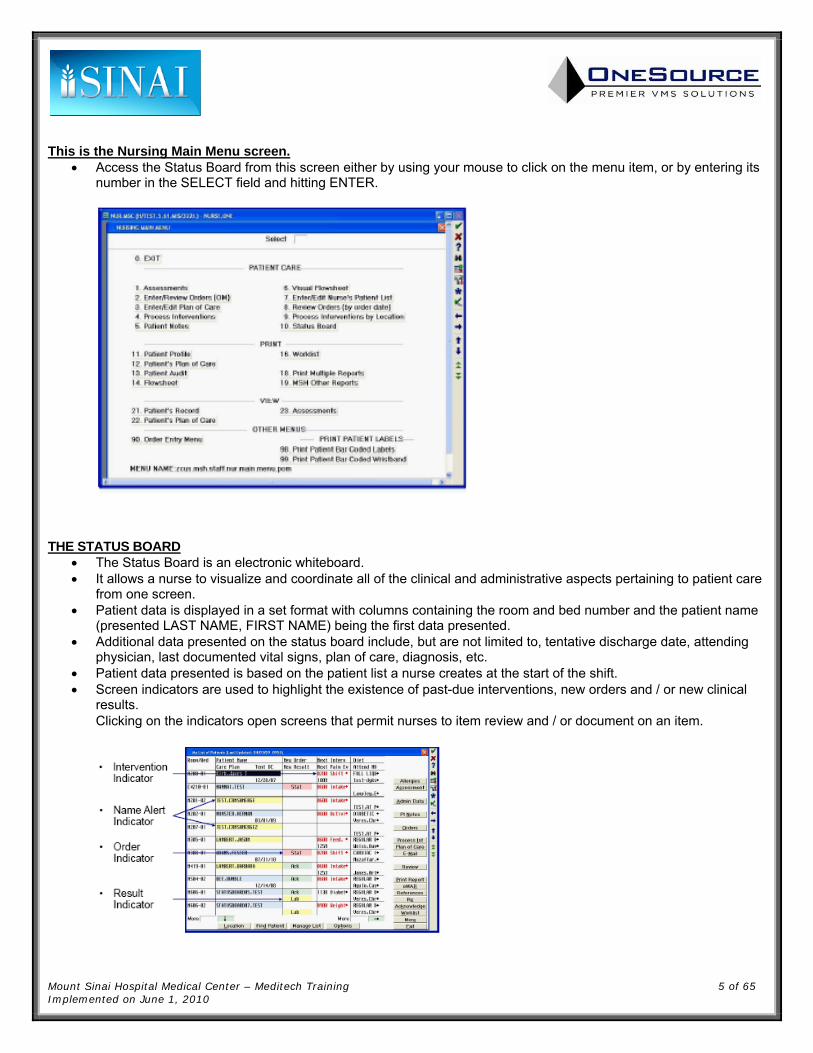
This is the Nursing Main Menu screen. Access the Status Board from this screen either by using your mouse to click on the menu item, or by entering its
number in the SELECT field and hitting ENTER.
THE STATUS BOARD
The Status Board is an electronic whiteboard. It allows a nurse to visualize and coordinate all of the clinical and administrative aspects pertaining to patient care
from one screen. Patient data is displayed in a set format with columns containing the room and bed number and the patient name
(presented LAST NAME, FIRST NAME) being the first data presented. Additional data presented on the status board include, but are not limited to, tentative discharge date, attending
physician, last documented vital signs, plan of care, diagnosis, etc. Patient data presented is based on the patient list a nurse creates at the start of the shift. Screen indicators are used to highlight the existence of past-due interventions, new orders and / or new clinical
results. Clicking on the indicators open screens that permit nurses to item review and / or document on an item.
Mount Sinai Hospital Medical Center – Meditech Training 6 of 65 Implemented on June 1, 2010
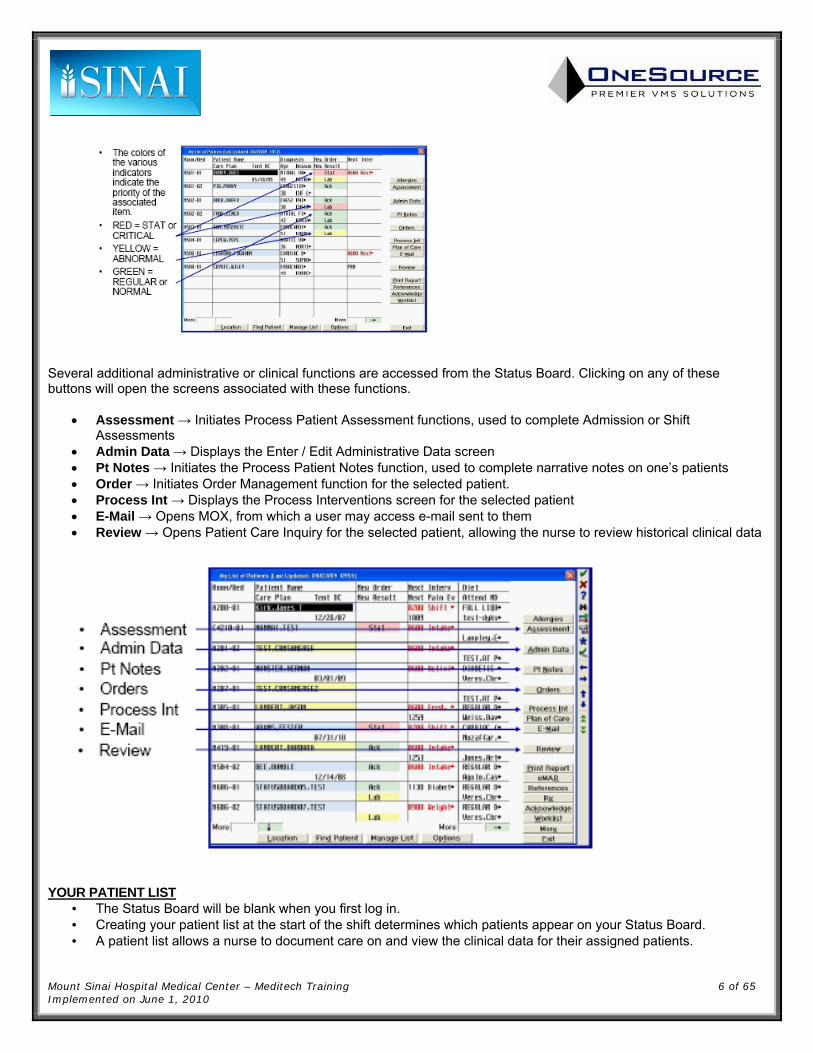
Several additional administrative or clinical functions are accessed from the Status Board. Clicking on any of these buttons will open the screens associated with these functions.
Assessment → Initiates Process Patient Assessment functions, used to complete Admission or Shift Assessments
Admin Data → Displays the Enter / Edit Administrative Data screen Pt Notes → Initiates the Process Patient Notes function, used to complete narrative notes on one’s patients Order → Initiates Order Management function for the selected patient. Process Int → Displays the Process Interventions screen for the selected patient E-Mail → Opens MOX, from which a user may access e-mail sent to them Review → Opens Patient Care Inquiry for the selected patient, allowing the nurse to review historical clinical data
009 YOUR PATIENT LIST
• The Status Board will be blank when you first log in. • Creating your patient list at the start of the shift determines which patients appear on your Status Board. • A patient list allows a nurse to document care on and view the clinical data for their assigned patients.
Mount Sinai Hospital Medical Center – Meditech Training 7 of 65 Implemented on June 1, 2010
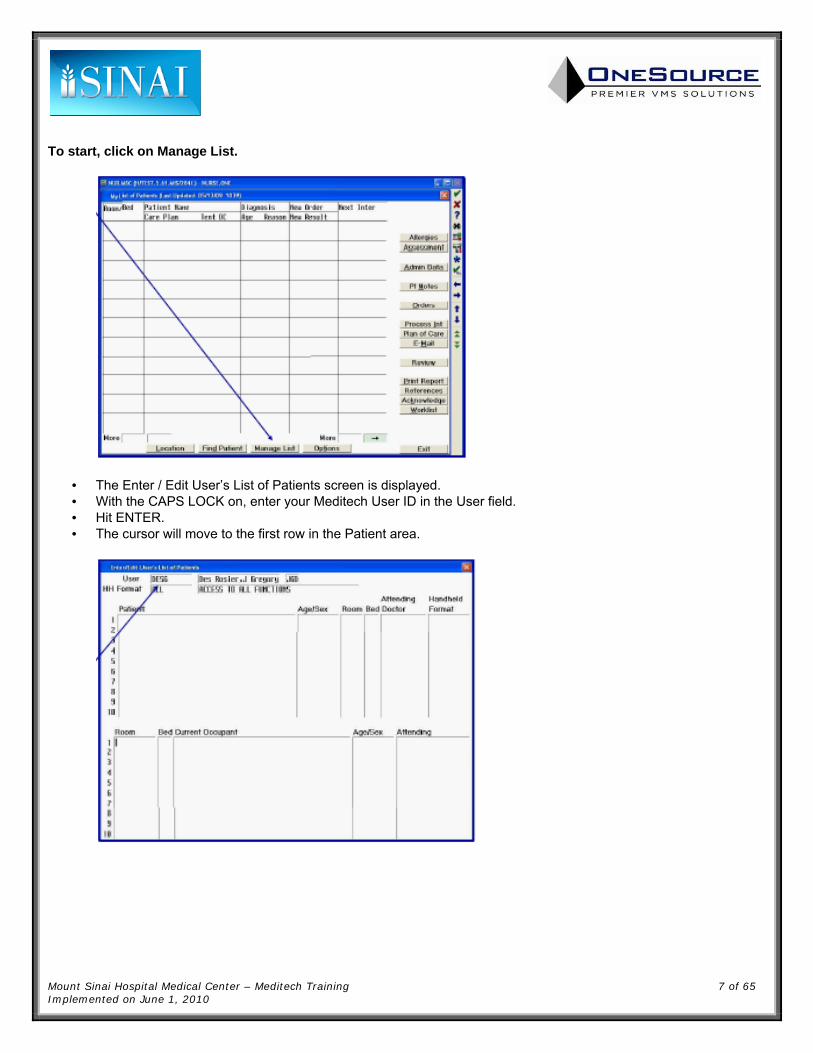
To start, click on Manage List.
• The Enter / Edit User’s List of Patients screen is displayed. • With the CAPS LOCK on, enter your Meditech User ID in the User field. • Hit ENTER. • The cursor will move to the first row in the Patient area.
Mount Sinai Hospital Medical Center – Meditech Training 8 of 65 Implemented on June 1, 2010
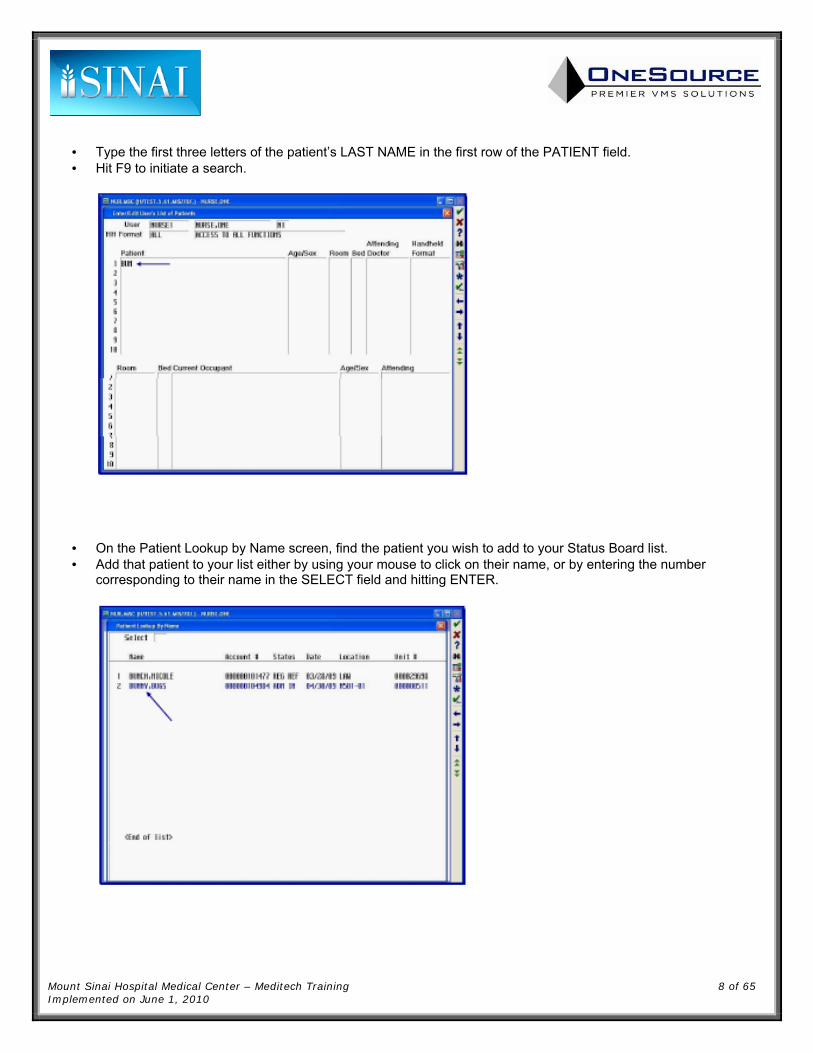
• Type the first three letters of the patient’s LAST NAME in the first row of the PATIENT field. • Hit F9 to initiate a search.
• On the Patient Lookup by Name screen, find the patient you wish to add to your Status Board list. • Add that patient to your list either by using your mouse to click on their name, or by entering the number
corresponding to their name in the SELECT field and hitting ENTER.

Mount Sinai Hospital Medical Center – Meditech Training 9 of 65 Implemented on June 1, 2010
• Confirm you have selected the correct patient by using your mouse to click on the YES button. • Alternately, you may hit the ‘Y’ key.
• Your patient will be added to the list. • Hit ENTER to move to row 2. • Repeat the previously defined steps to add all assigned patients to your list.

Mount Sinai Hospital Medical Center – Meditech Training 10 of 65 Implemented on June 1, 2010
• When you have added all of your assigned patients, hit F12 to confirm and file your list. • The screen will appear blank after hitting F12. • Hit F11 to close the Enter / Edit User’s List of Patients screen and to return to the Status Board.
8/3/2009
• When you have finished, all of the patients you selected will appear on your Status Board.
Mount Sinai Hospital Medical Center – Meditech Training 11 of 65 Implemented on June 1, 2010
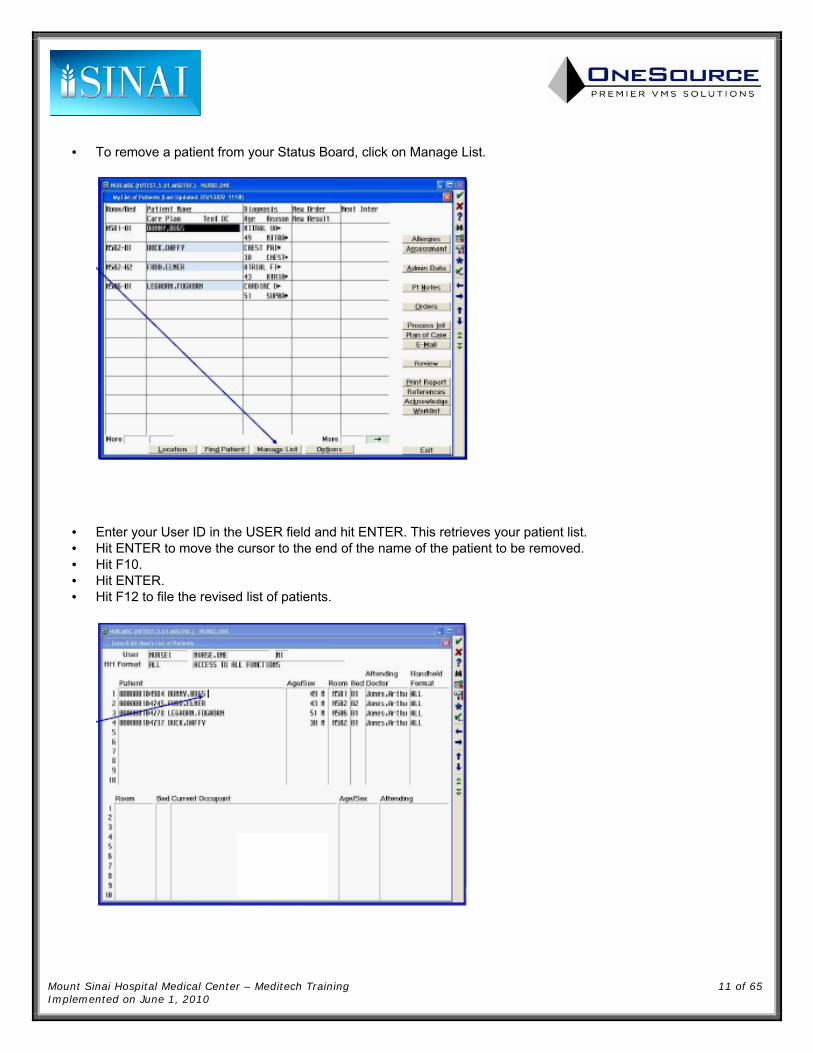
• To remove a patient from your Status Board, click on Manage List.
• Enter your User ID in the USER field and hit ENTER. This retrieves your patient list. • Hit ENTER to move the cursor to the end of the name of the patient to be removed. • Hit F10. • Hit ENTER. • Hit F12 to file the revised list of patients.
Mount Sinai Hospital Medical Center – Meditech Training 12 of 65 Implemented on June 1, 2010
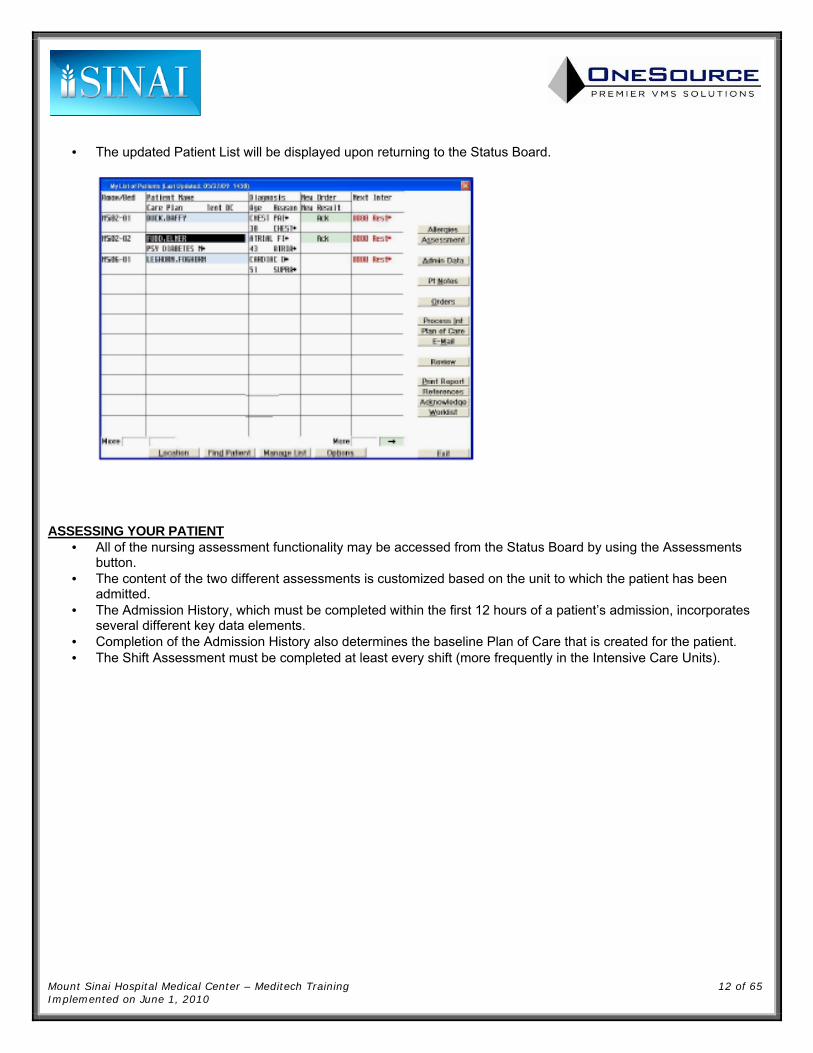
• The updated Patient List will be displayed upon returning to the Status Board.
ASSESSING YOUR PATIENT
• All of the nursing assessment functionality may be accessed from the Status Board by using the Assessments button.
• The content of the two different assessments is customized based on the unit to which the patient has been admitted.
• The Admission History, which must be completed within the first 12 hours of a patient’s admission, incorporates several different key data elements.
• Completion of the Admission History also determines the baseline Plan of Care that is created for the patient. • The Shift Assessment must be completed at least every shift (more frequently in the Intensive Care Units).

Mount Sinai Hospital Medical Center – Meditech Training 13 of 65 Implemented on June 1, 2010
• Select the patient on whom you wish to complete an assessment by using your mouse to click on their name. • Start an assessment by using your mouse to click on the ASSESSMENT button.
• Use the DOWN ARROW key to navigate to the Enter Form (For Location)’ menu option. • Hit the RIGHT ARROW key to display the submenu contents.

Mount Sinai Hospital Medical Center – Meditech Training 14 of 65 Implemented on June 1, 2010
• Use the DOWN ARROW key to navigate to the Pt Admission Data / History menu option. • Hit the RIGHT ARROW key to open and start the admission assessment.
• The Admission Assessment is comprised of several different parts. • Page 1 of the assessment captures data pertaining to the date, time, and reason for admission; contact
information; allergies; and advanced directives.

Mount Sinai Hospital Medical Center – Meditech Training 15 of 65 Implemented on June 1, 2010
• Some fields on the assessment have look up functionality. • Hitting the F9 key displays a list of options for the field. • To select an entry, enter the number of the entry in the SELECT field and hit ENTER.
• Some fields on the assessment are ‘YES / NO’ questions. • Enter either ‘Y’ for ‘YES’ or ‘N’ for ‘NO’. • When in doubt as to the type of data a field requires, start by hitting F9. • Either a list or a message telling you the type of data required will appear.

Mount Sinai Hospital Medical Center – Meditech Training 16 of 65 Implemented on June 1, 2010
• The medical history starts on page 2 of the Admission Assessment. • It continues on pages 3 and 4.
• The medical history is charted by exception: if you enter ‘Y’ in any ‘History’ field, a multi-select list will appear for that system.
• Multi-select lists are used frequently in the Admission Assessment.
Mount Sinai Hospital Medical Center – Meditech Training 17 of 65 Implemented on June 1, 2010
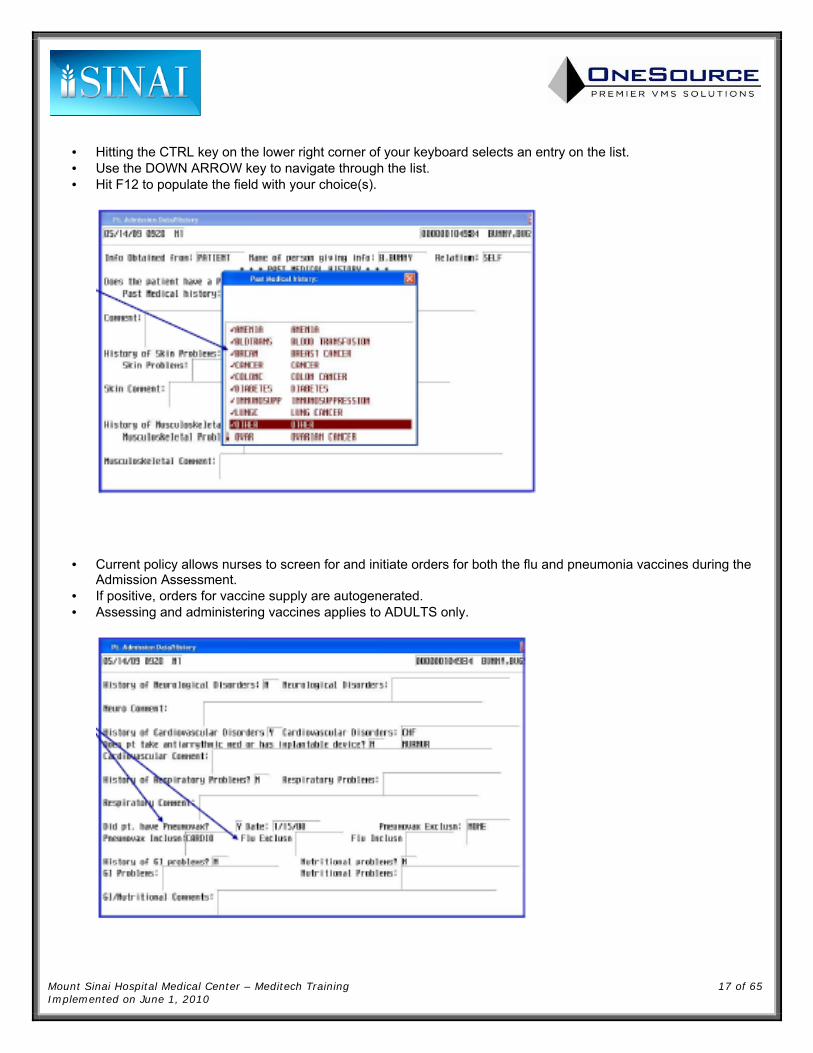
• Hitting the CTRL key on the lower right corner of your keyboard selects an entry on the list. • Use the DOWN ARROW key to navigate through the list. • Hit F12 to populate the field with your choice(s).
• Current policy allows nurses to screen for and initiate orders for both the flu and pneumonia vaccines during the Admission Assessment.
• If positive, orders for vaccine supply are autogenerated. • Assessing and administering vaccines applies to ADULTS only.
Mount Sinai Hospital Medical Center – Meditech Training 18 of 65 Implemented on June 1, 2010
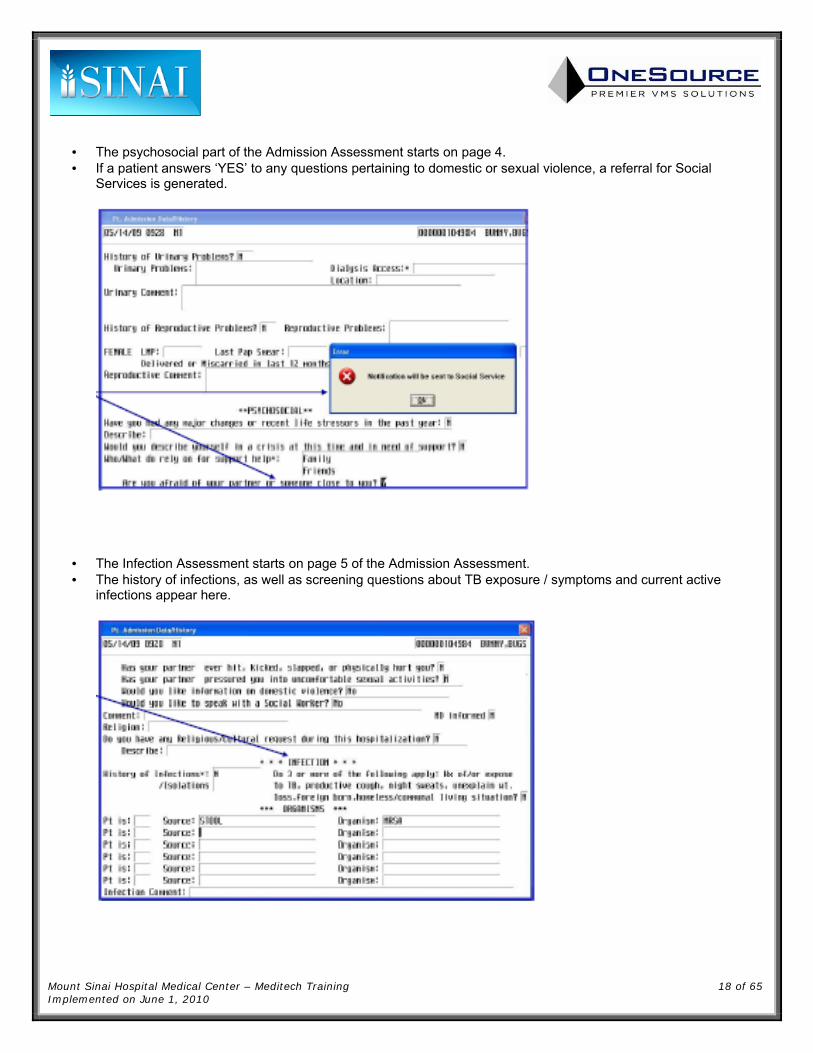
• The psychosocial part of the Admission Assessment starts on page 4. • If a patient answers ‘YES’ to any questions pertaining to domestic or sexual violence, a referral for Social
Services is generated.
• The Infection Assessment starts on page 5 of the Admission Assessment. • The history of infections, as well as screening questions about TB exposure / symptoms and current active
infections appear here.
Mount Sinai Hospital Medical Center – Meditech Training 19 of 65 Implemented on June 1, 2010
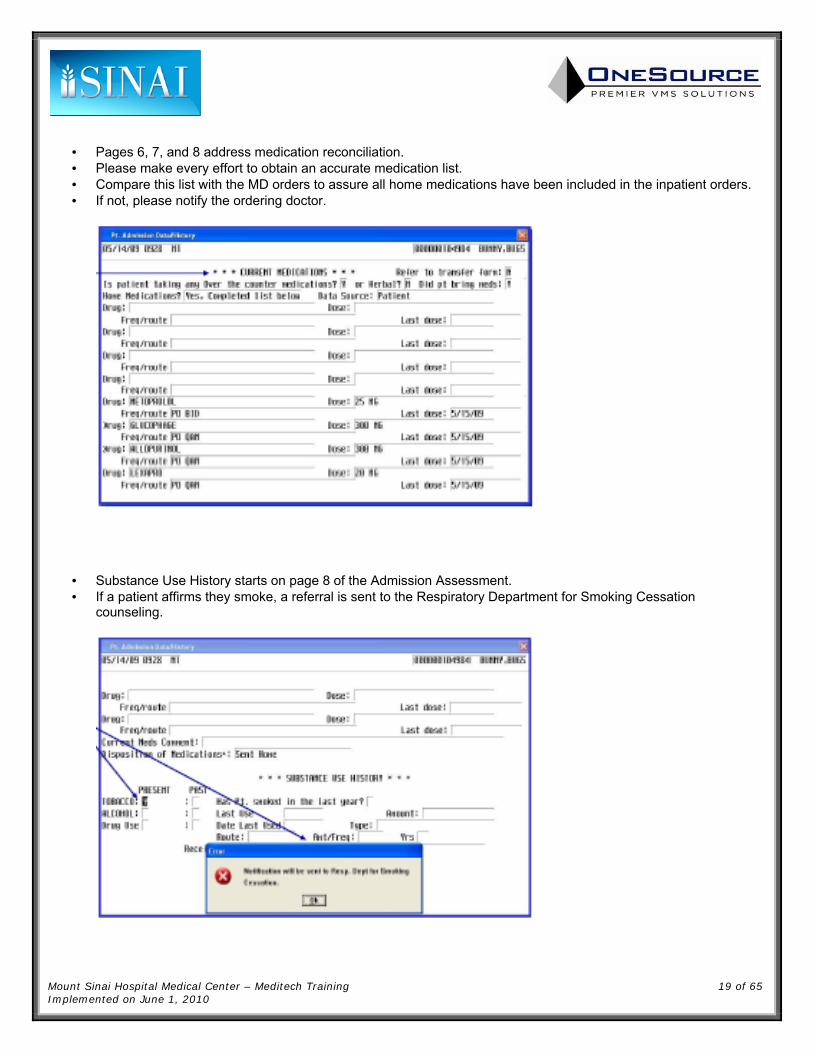
• Pages 6, 7, and 8 address medication reconciliation. • Please make every effort to obtain an accurate medication list. • Compare this list with the MD orders to assure all home medications have been included in the inpatient orders. • If not, please notify the ordering doctor.
• Substance Use History starts on page 8 of the Admission Assessment. • If a patient affirms they smoke, a referral is sent to the Respiratory Department for Smoking Cessation
counseling.
Mount Sinai Hospital Medical Center – Meditech Training 20 of 65 Implemented on June 1, 2010
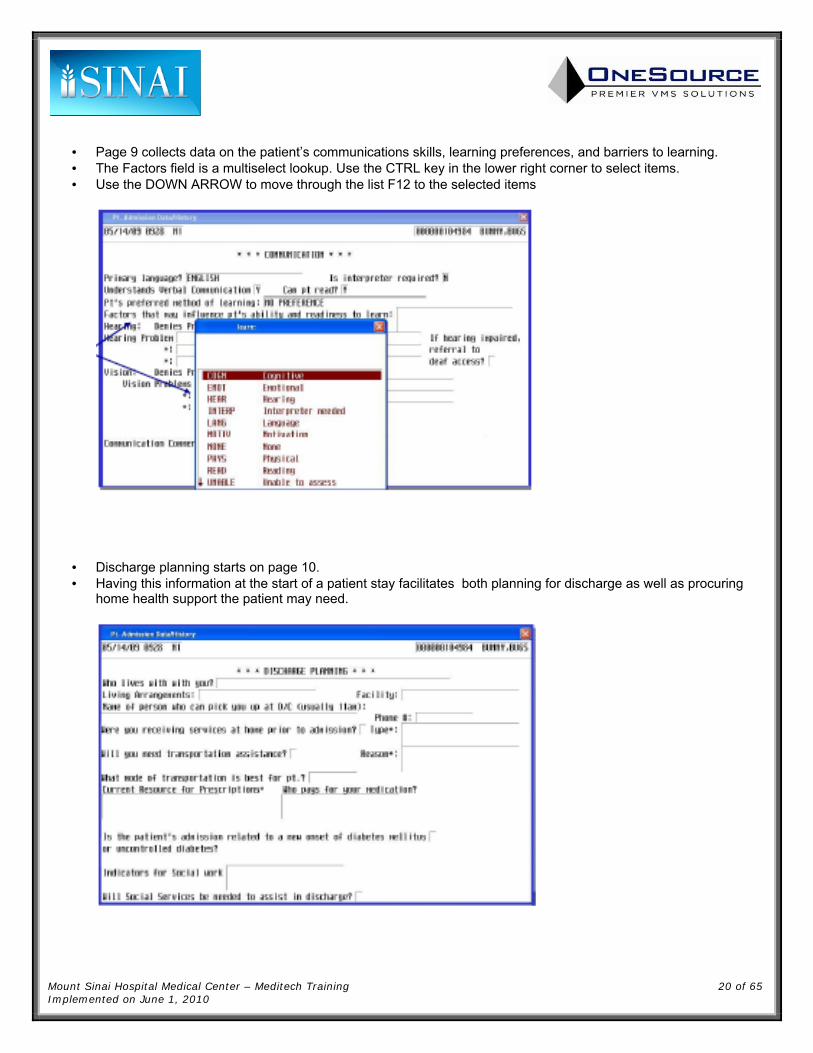
• Page 9 collects data on the patient’s communications skills, learning preferences, and barriers to learning. • The Factors field is a multiselect lookup. Use the CTRL key in the lower right corner to select items. • Use the DOWN ARROW to move through the list F12 to the selected items
8/3/
• Discharge planning starts on page 10. • Having this information at the start of a patient stay facilitates both planning for discharge as well as procuring
home health support the patient may need.
Mount Sinai Hospital Medical Center – Meditech Training 21 of 65 Implemented on June 1, 2010
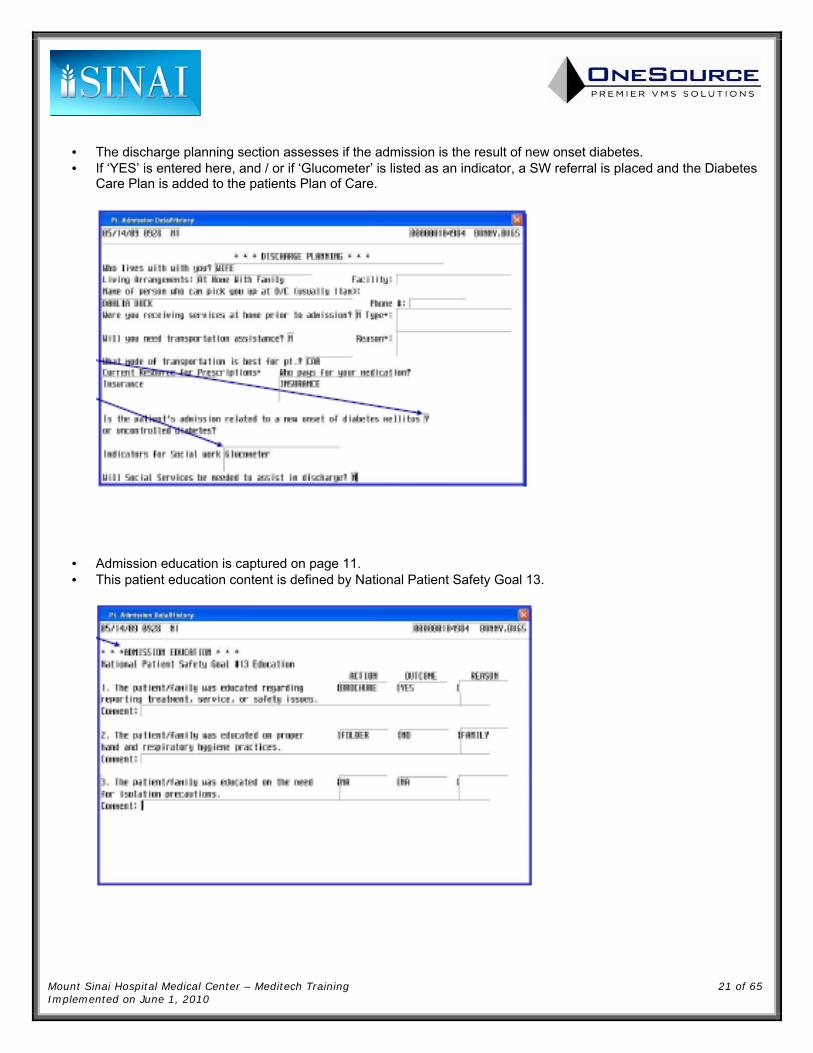
• The discharge planning section assesses if the admission is the result of new onset diabetes. • If ‘YES’ is entered here, and / or if ‘Glucometer’ is listed as an indicator, a SW referral is placed and the Diabetes
Care Plan is added to the patients Plan of Care.
• Admission education is captured on page 11. • This patient education content is defined by National Patient Safety Goal 13.
Mount Sinai Hospital Medical Center – Meditech Training 22 of 65 Implemented on June 1, 2010
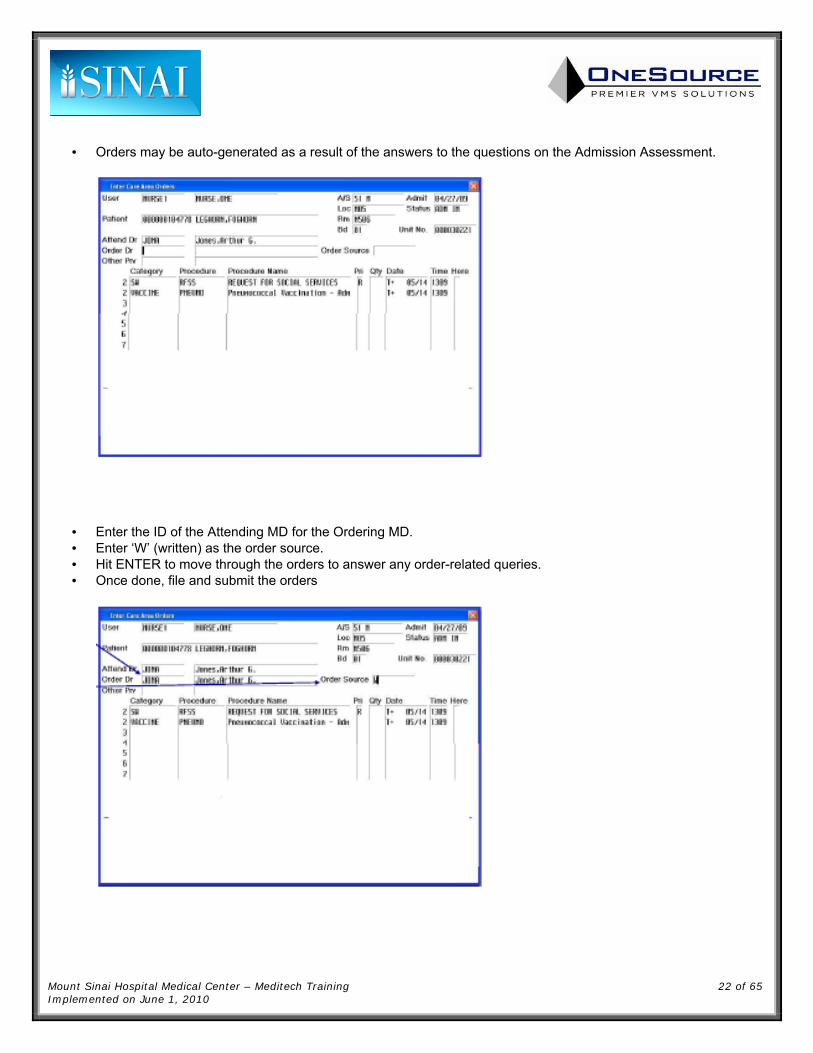
• Orders may be auto-generated as a result of the answers to the questions on the Admission Assessment.
• Enter the ID of the Attending MD for the Ordering MD. • Enter ‘W’ (written) as the order source. • Hit ENTER to move through the orders to answer any order-related queries. • Once done, file and submit the orders8/3/
2009

Mount Sinai Hospital Medical Center – Meditech Training 23 of 65 Implemented on June 1, 2010
• After you have completed the assessment, you will be prompted to confirm the contents of the patient’s Plan of Care.
• Enter ‘Y’ to add the suggested diagnoses to the Plan of Care.
• On the Enter / Edit Patient’s Plan of Care screen, hit ENTER through all of the fields until both plans of care are listed in the Diagnoses table.
• Hit F12 to file the final Plan of Care.

Mount Sinai Hospital Medical Center – Meditech Training 24 of 65 Implemented on June 1, 2010
• Once done, you are returned to the Select Assessment screen. • The date and time when the Admission Assessment was completed will appear. • Hit F11 to return to the Status Board.
• There are two types of Shift Assessments: o Full Assessment – this is a complete head-to-toe physical assessment that must be completed every shift o Focused Assessment – this targets a specific anatomical system and may be completed as needed.
• Users access both types of assessments in the same way.
• The full assessment also incorporates:
o Pain assessment o Braden scale assessment o Fall risk assessment o Suicide risk and Behavioral Health assessment
• The full assessment also is charted by exception.
o If you indicate that any individual system deviates from its physiological norm, a window pops up, requiring the user to complete an assessment on that system.
Mount Sinai Hospital Medical Center – Meditech Training 25 of 65 Implemented on June 1, 2010
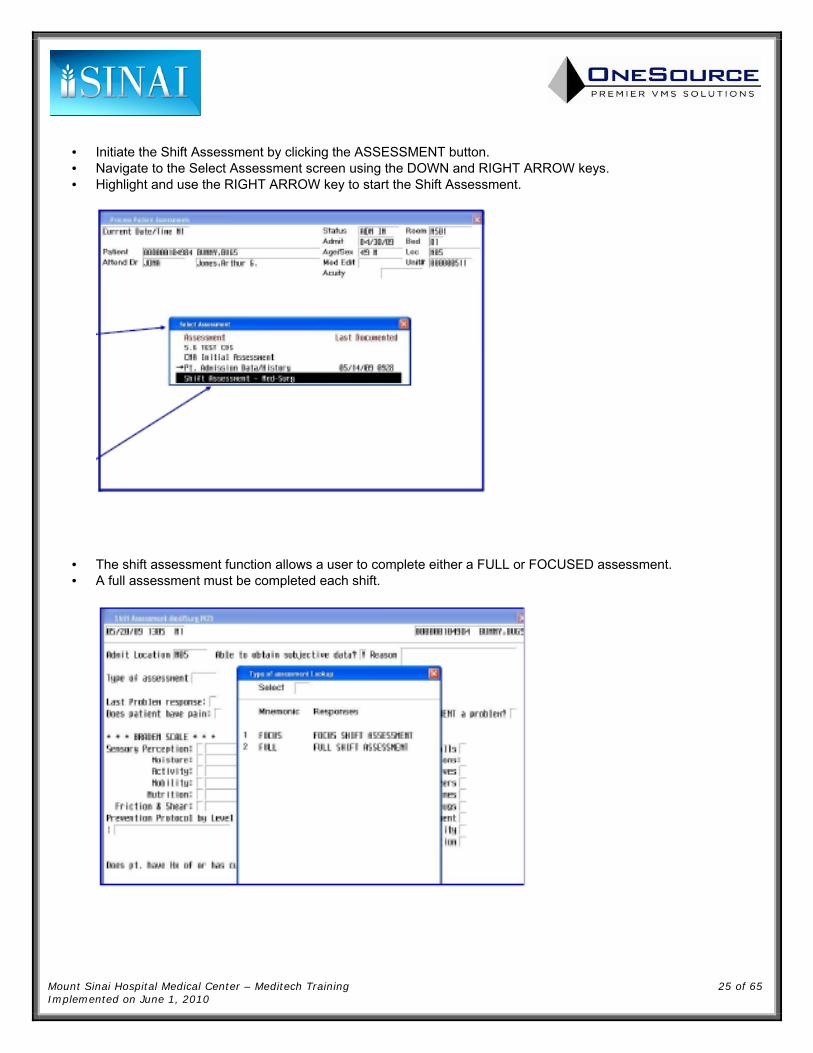
• Initiate the Shift Assessment by clicking the ASSESSMENT button. • Navigate to the Select Assessment screen using the DOWN and RIGHT ARROW keys. • Highlight and use the RIGHT ARROW key to start the Shift Assessment.
• The shift assessment function allows a user to complete either a FULL or FOCUSED assessment. • A full assessment must be completed each shift.

Mount Sinai Hospital Medical Center – Meditech Training 26 of 65 Implemented on June 1, 2010
CHARTING PATIENT CARE • As previously discussed, the patient’s Plan of Care is created on admission and is made up of several specific
nursing interventions and physician orders. • Over the course of the patient’s stay, nurses document on these interventions, providing pertinent clinical data for
ongoing clinical management. • Nurses initiate documenting on interventions on the Plan of Care from the Status Board. • Three terms that are frequently used in this portion of the presentation require definition:
o Patient Interventions: elements of care that result from physician orders (e.g. vital signs, I & O, etc.) or the provisioning of generally accepted standards of nursing care (e.g. rest, ambulation, etc.).
o Care Plan: a patient-specific aggregation of patient interventions designed to return the patient to optimum health.
o Process Interventions: the Meditech function and screen through which a user charts data on certain patient interventions in the care plan.
• Key interventions that will be reviewed here include: o IV’s o Tubes and Drains o I&O o Pain o Vital Signs
o Patient Education o Problem List o Patient Acuity o Wound Management o Non-Behavioral Restraints
• Documenting on interventions starts on the Status Board. • Use your mouse to click on the Process Int button.
Mount Sinai Hospital Medical Center – Meditech Training 27 of 65 Implemented on June 1, 2010
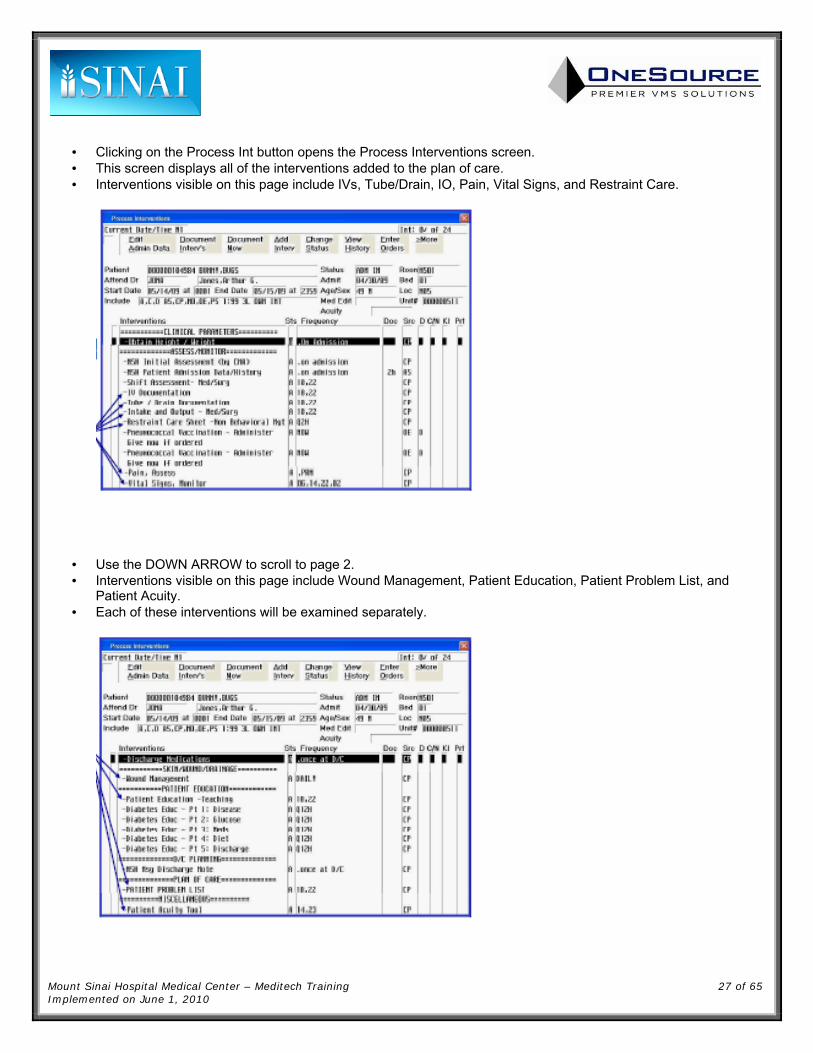
• Clicking on the Process Int button opens the Process Interventions screen. • This screen displays all of the interventions added to the plan of care. • Interventions visible on this page include IVs, Tube/Drain, IO, Pain, Vital Signs, and Restraint Care.
• Use the DOWN ARROW to scroll to page 2. • Interventions visible on this page include Wound Management, Patient Education, Patient Problem List, and
Patient Acuity. • Each of these interventions will be examined separately.
Mount Sinai Hospital Medical Center – Meditech Training 28 of 65 Implemented on June 1, 2010
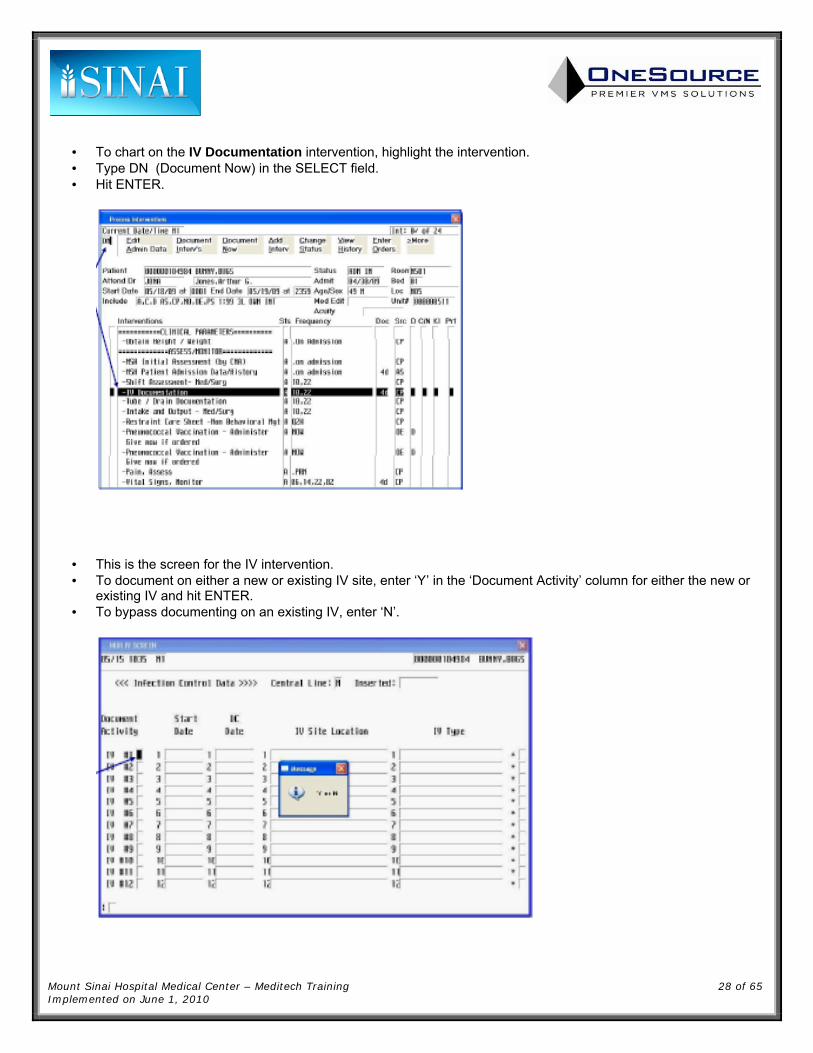
• To chart on the IV Documentation intervention, highlight the intervention. • Type DN (Document Now) in the SELECT field. • Hit ENTER.
• This is the screen for the IV intervention. • To document on either a new or existing IV site, enter ‘Y’ in the ‘Document Activity’ column for either the new or
existing IV and hit ENTER. • To bypass documenting on an existing IV, enter ‘N’.
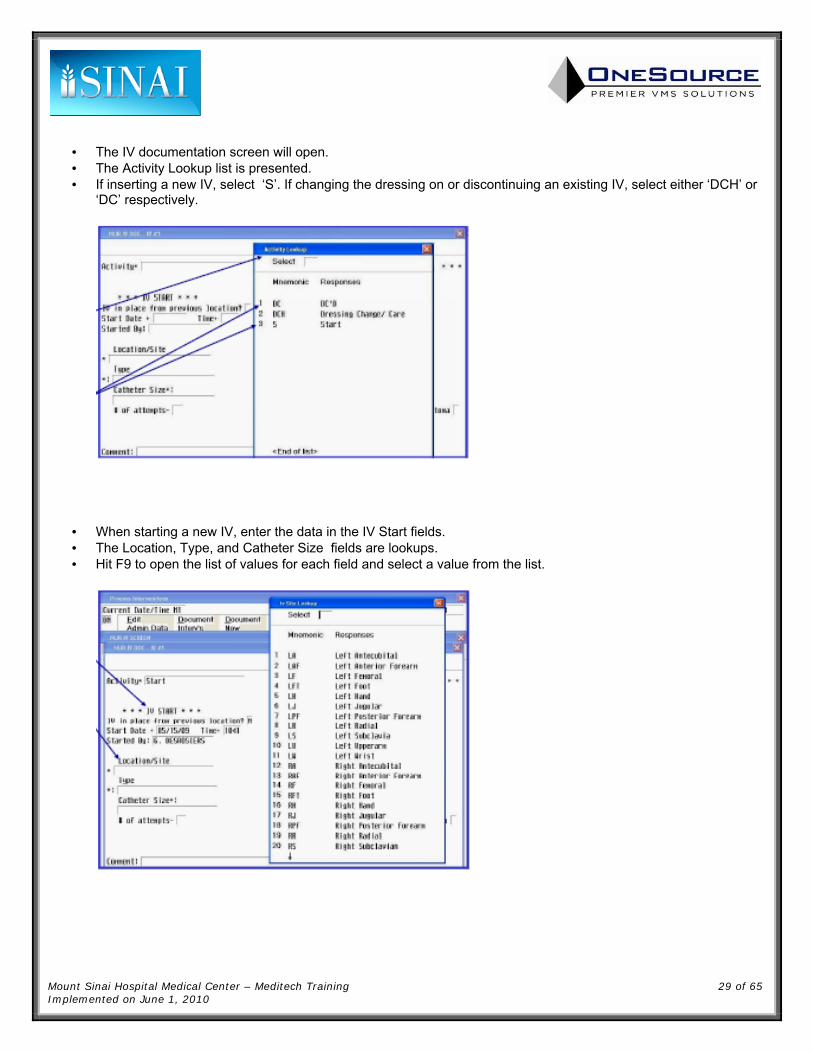
Mount Sinai Hospital Medical Center – Meditech Training 29 of 65 Implemented on June 1, 2010
• The IV documentation screen will open. • The Activity Lookup list is presented. • If inserting a new IV, select ‘S’. If changing the dressing on or discontinuing an existing IV, select either ‘DCH’ or
‘DC’ respectively.
• When starting a new IV, enter the data in the IV Start fields. • The Location, Type, and Catheter Size fields are lookups. • Hit F9 to open the list of values for each field and select a value from the list.
Mount Sinai Hospital Medical Center – Meditech Training 30 of 65 Implemented on June 1, 2010
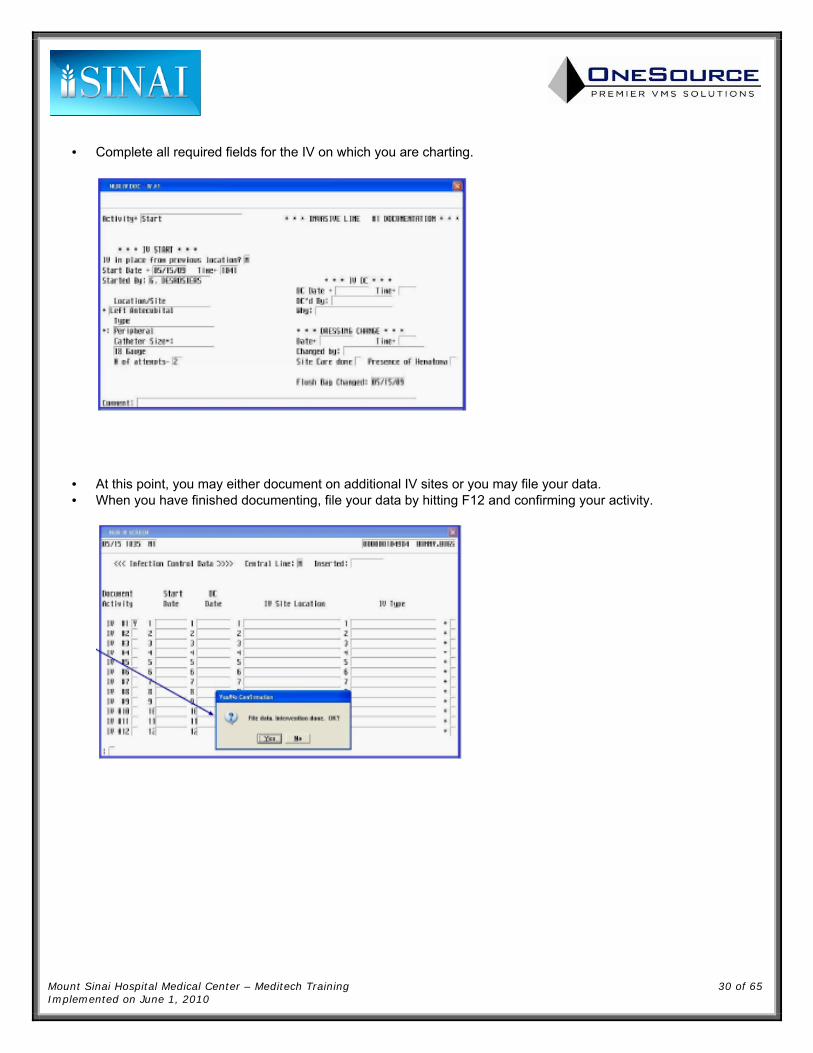
• Complete all required fields for the IV on which you are charting.
• At this point, you may either document on additional IV sites or you may file your data. • When you have finished documenting, file your data by hitting F12 and confirming your activity.
Mount Sinai Hospital Medical Center – Meditech Training 31 of 65 Implemented on June 1, 2010
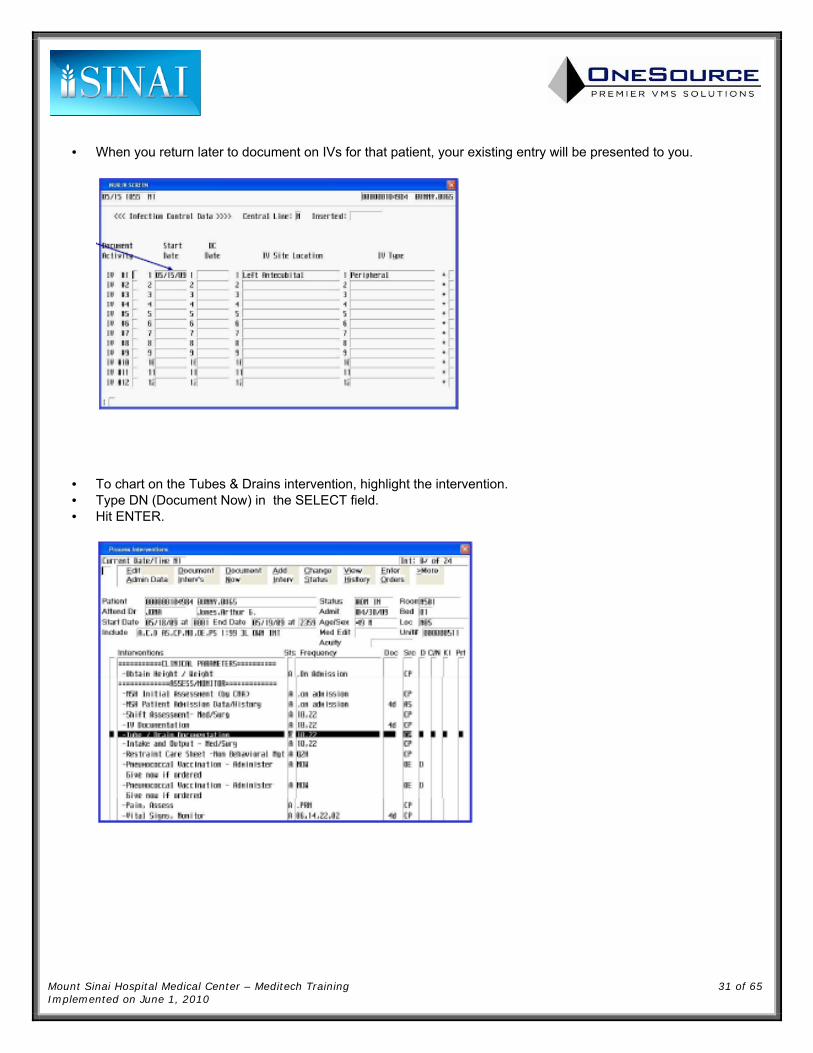
• When you return later to document on IVs for that patient, your existing entry will be presented to you.
• To chart on the Tubes & Drains intervention, highlight the intervention. • Type DN (Document Now) in the SELECT field. • Hit ENTER.

Mount Sinai Hospital Medical Center – Meditech Training 32 of 65 Implemented on June 1, 2010
• This is the screen for the Tube & Drain intervention. • To document on either a new or existing tube or drain site, enter ‘Y’ in the ‘Document Activity’ column for either
the new or existing drain and hit ENTER. • To bypass documenting on an existing drain, enter ‘N’.
• Documenting on tubes & drains essentially is the same process as that for IVs. • Once you decide to document on a tube or drain, the data screen for that specific tube or drain is displayed, along
with the Activity Lookup.
Mount Sinai Hospital Medical Center – Meditech Training 33 of 65 Implemented on June 1, 2010
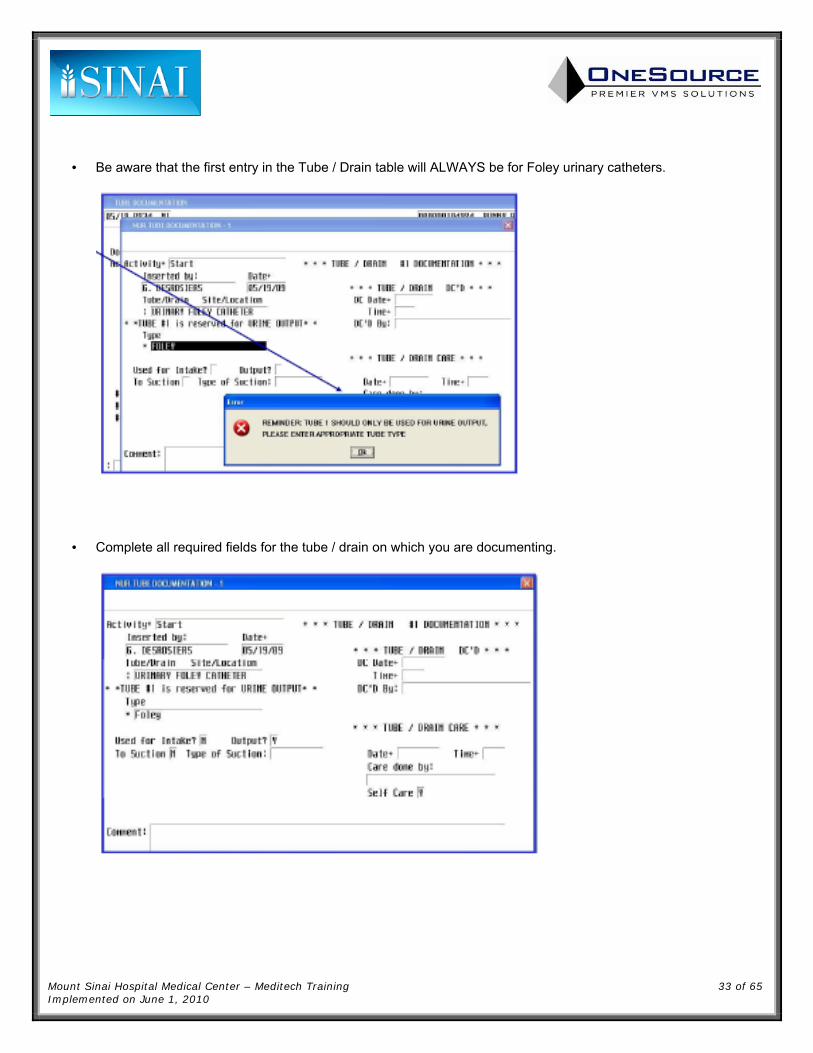
• Be aware that the first entry in the Tube / Drain table will ALWAYS be for Foley urinary catheters.
• Complete all required fields for the tube / drain on which you are documenting.
Mount Sinai Hospital Medical Center – Meditech Training 34 of 65 Implemented on June 1, 2010
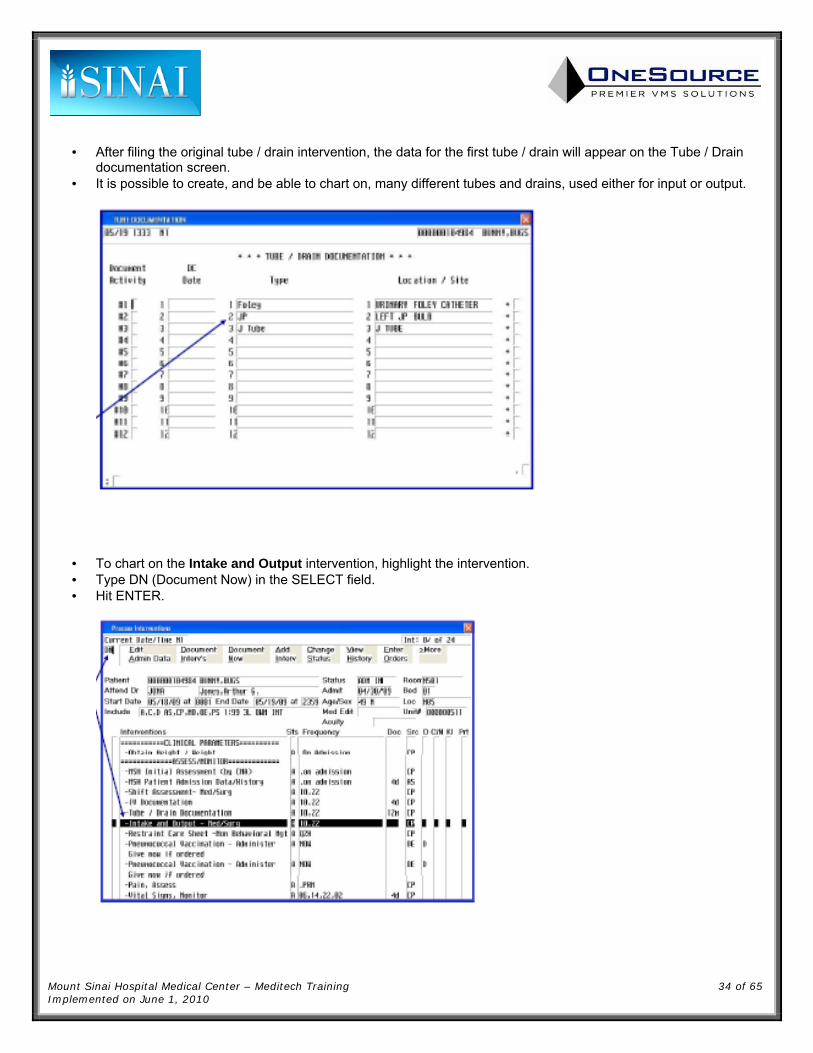
• After filing the original tube / drain intervention, the data for the first tube / drain will appear on the Tube / Drain documentation screen.
• It is possible to create, and be able to chart on, many different tubes and drains, used either for input or output.
• To chart on the Intake and Output intervention, highlight the intervention. • Type DN (Document Now) in the SELECT field. • Hit ENTER.

Mount Sinai Hospital Medical Center – Meditech Training 35 of 65 Implemented on June 1, 2010
• The first section of the I & O screen collects data on fluid intake.
• On the I & O screen, the Fluid Type field is a lookup. • Hit F9 to display the list of values. • To select an entry, enter the number of the entry in the SELECT field and hit ENTER.

Mount Sinai Hospital Medical Center – Meditech Training 36 of 65 Implemented on June 1, 2010
• On the I & O screen, the data for blood products (volume, type, and unit number) are captured on page 1. • The Type field is a lookup.
• Page 2 of the I & O screen captures output unrelated to that resulting from a tube or drain. • Total volume removed during hemodialysis is charted on this page.
Mount Sinai Hospital Medical Center – Meditech Training 37 of 65 Implemented on June 1, 2010
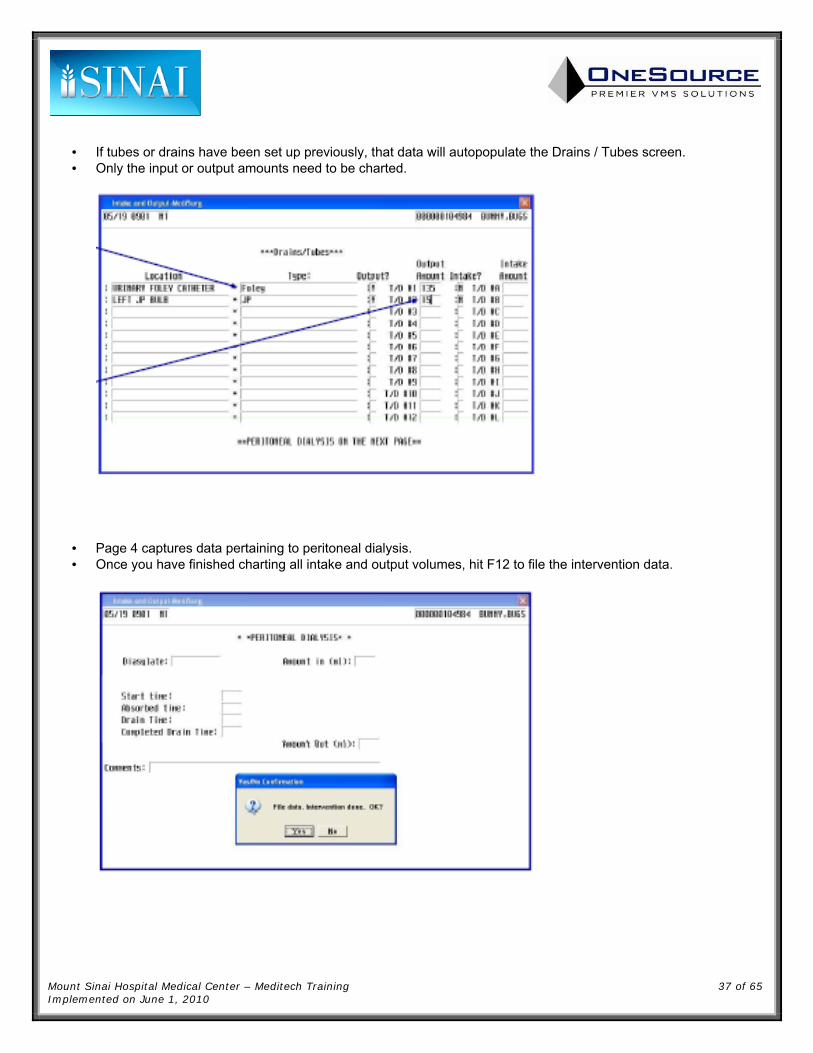
• If tubes or drains have been set up previously, that data will autopopulate the Drains / Tubes screen. • Only the input or output amounts need to be charted.
• Page 4 captures data pertaining to peritoneal dialysis. • Once you have finished charting all intake and output volumes, hit F12 to file the intervention data.

Mount Sinai Hospital Medical Center – Meditech Training 38 of 65 Implemented on June 1, 2010
• To chart on the Pain intervention, highlight the intervention. • Type DN (Document Now) in the SELECT field. • Hit ENTER.
• When initiated, the Pain intervention will prompt the user to identify what type of pain assessment is being completed.
• Choose a value from the lookup list. • To select an entry, enter the number of the entry in the SELECT field and hit ENTER.
Mount Sinai Hospital Medical Center – Meditech Training 39 of 65 Implemented on June 1, 2010
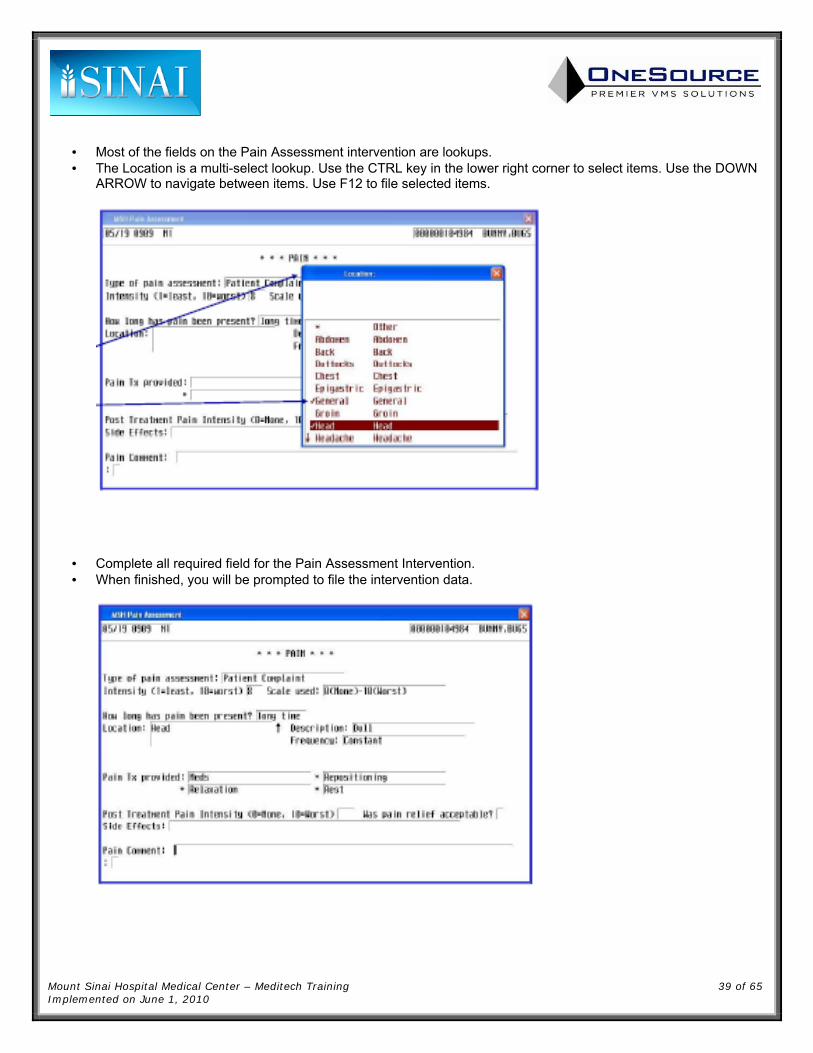
• Most of the fields on the Pain Assessment intervention are lookups. • The Location is a multi-select lookup. Use the CTRL key in the lower right corner to select items. Use the DOWN
ARROW to navigate between items. Use F12 to file selected items.
• Complete all required field for the Pain Assessment Intervention. • When finished, you will be prompted to file the intervention data.
Mount Sinai Hospital Medical Center – Meditech Training 40 of 65 Implemented on June 1, 2010
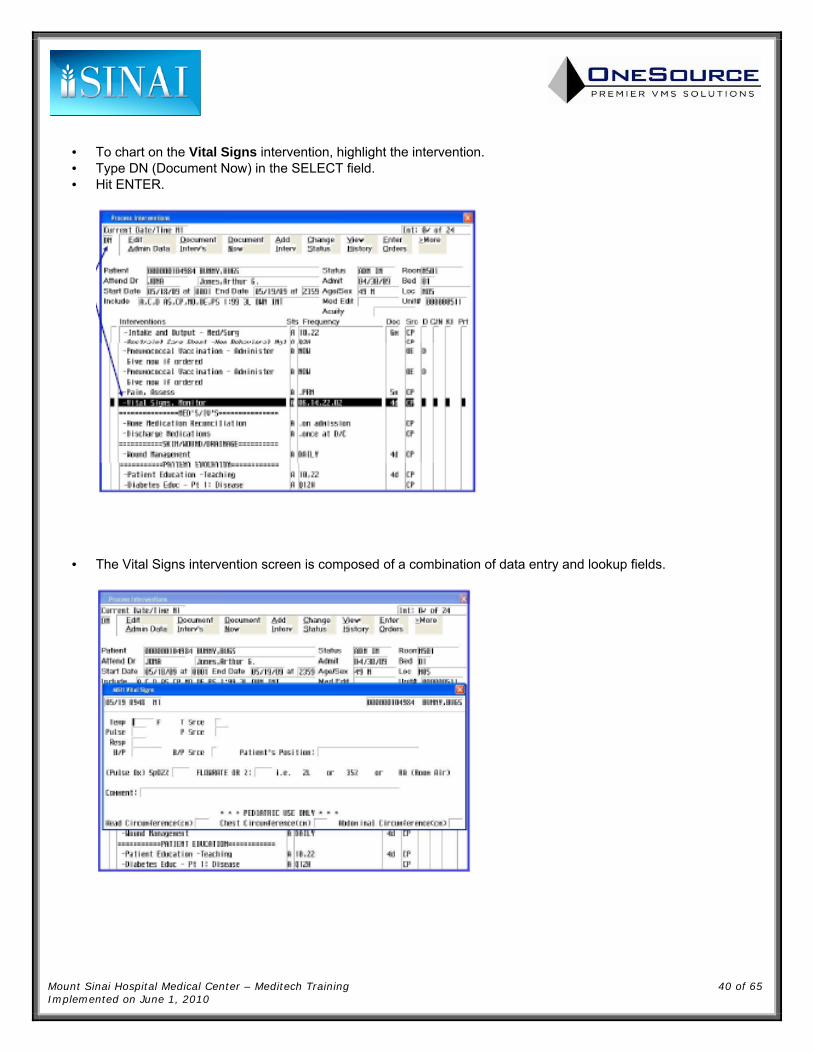
• To chart on the Vital Signs intervention, highlight the intervention. • Type DN (Document Now) in the SELECT field. • Hit ENTER.
• The Vital Signs intervention screen is composed of a combination of data entry and lookup fields.

Mount Sinai Hospital Medical Center – Meditech Training 41 of 65 Implemented on June 1, 2010
• Messages for abnormal vital signs values may be presented.
• When finished entering the vital sign data, file the intervention.

Mount Sinai Hospital Medical Center – Meditech Training 42 of 65 Implemented on June 1, 2010
• To chart on the Patient Education intervention, highlight the intervention. • Type DN (Document Now) in the SELECT field. • Hit ENTER.
• The Patient Education intervention screen is composed of a combination of data entry and lookup fields. • There are several different general areas about which patient education may be completed.

Mount Sinai Hospital Medical Center – Meditech Training 43 of 65 Implemented on June 1, 2010
• Once an education topic has been identified, the remaining fields associated with that topic must be completed. • A user may document on one, many, or all educational topics available on the screen.
• Once you have finished documenting your patient education, be certain to file your data. • Hit F12 to file the data, then click on the YES button with your mouse to confirm.
Mount Sinai Hospital Medical Center – Meditech Training 44 of 65 Implemented on June 1, 2010
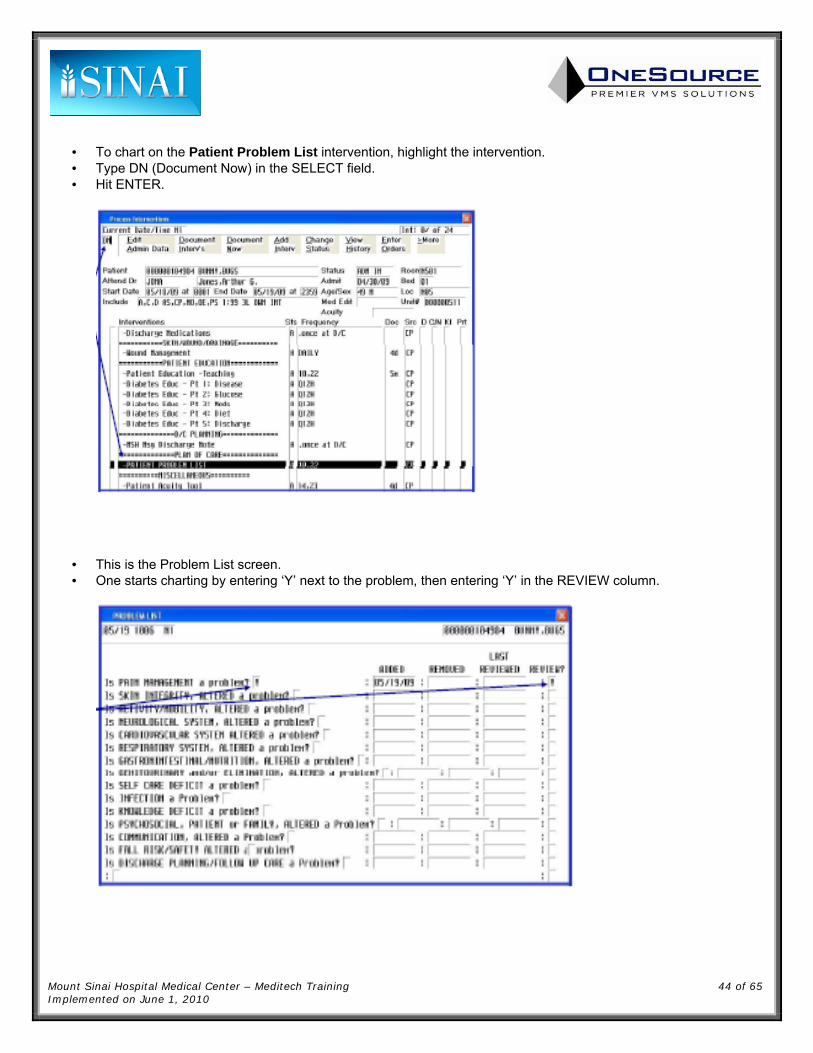
• To chart on the Patient Problem List intervention, highlight the intervention. • Type DN (Document Now) in the SELECT field. • Hit ENTER.
• This is the Problem List screen. • One starts charting by entering ‘Y’ next to the problem, then entering ‘Y’ in the REVIEW column.

Mount Sinai Hospital Medical Center – Meditech Training 45 of 65 Implemented on June 1, 2010
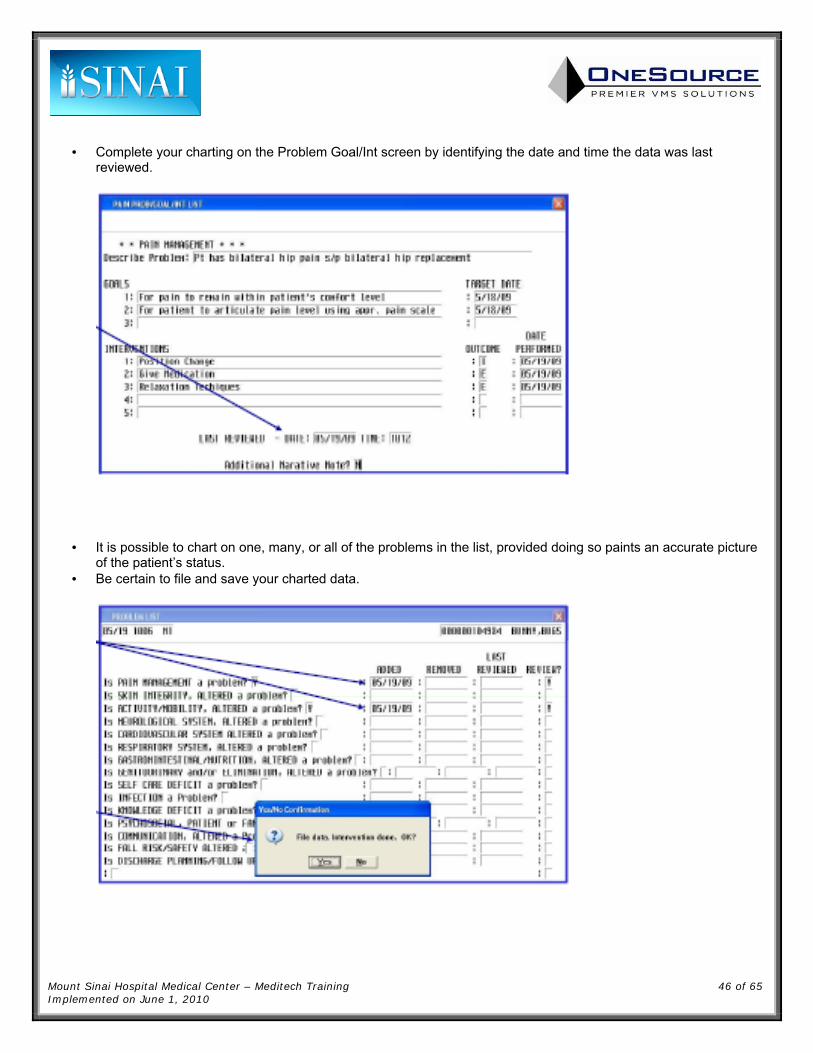
• Reviewing the problem data by entering ‘Y’ in the REVIEW column opens the GOAL/INT page. • On this page, one describes the problem, and defines the goals to resolve that problem.
• Once goals have been defined, interventions can be identified and charted, along with their associated outcome and dates performed.
Mount Sinai Hospital Medical Center – Meditech Training 46 of 65 Implemented on June 1, 2010
• Complete your charting on the Problem Goal/Int screen by identifying the date and time the data was last reviewed.
• It is possible to chart on one, many, or all of the problems in the list, provided doing so paints an accurate picture of the patient’s status.
• Be certain to file and save your charted data.

Mount Sinai Hospital Medical Center – Meditech Training 47 of 65 Implemented on June 1, 2010
• To chart on the Patient Acuity intervention, highlight the intervention. • Type DN (Document Now) in the SELECT field. • Hit ENTER.
• This is the patient acuity screen. • This intervention assures correct unit staffing levels based on individual and aggregate unit patient acuity scores. • To be useful in leveling staffing, it MUST be completed at its defined times.

Mount Sinai Hospital Medical Center – Meditech Training 48 of 65 Implemented on June 1, 2010
• Each acuity subsection is comprised of a multi-select lookup. • Use the CTRL key in the lower right corner to select an item. Use the DOWN ARROW to move between items.
Use F12 to populate the field with the selected items.
• Once each acuity field is completed, file the charted data.
Mount Sinai Hospital Medical Center – Meditech Training 49 of 65 Implemented on June 1, 2010
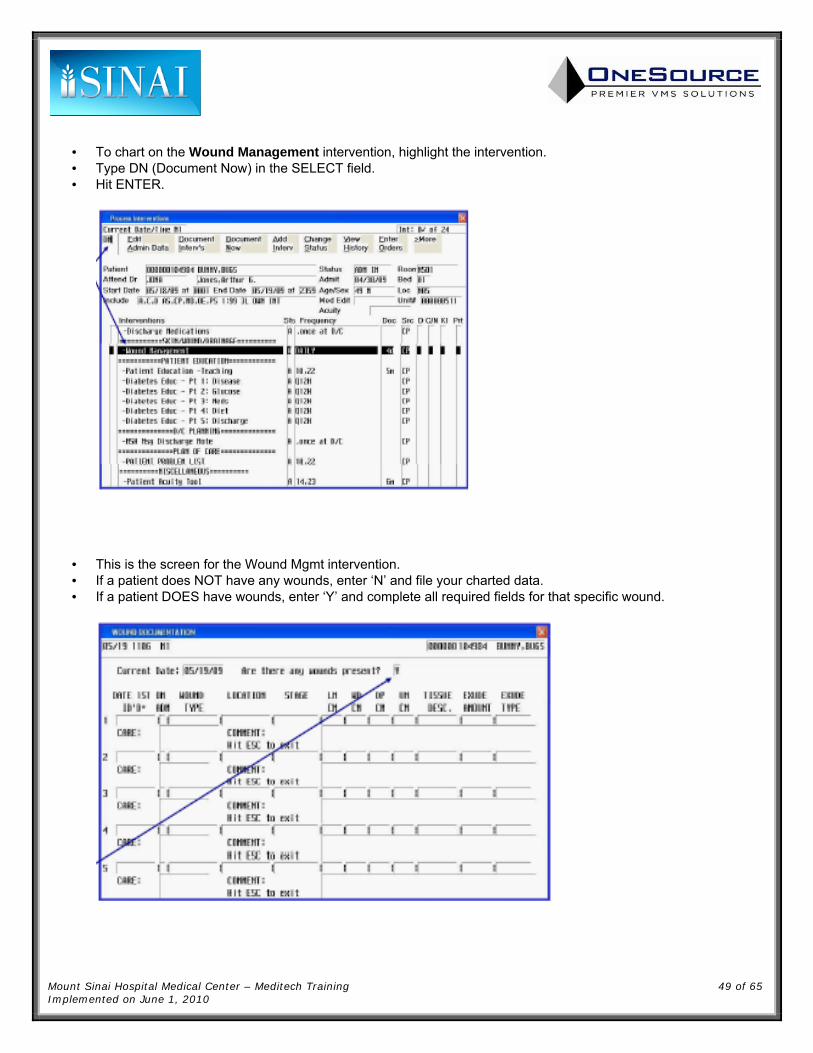
• To chart on the Wound Management intervention, highlight the intervention. • Type DN (Document Now) in the SELECT field. • Hit ENTER.
• This is the screen for the Wound Mgmt intervention. • If a patient does NOT have any wounds, enter ‘N’ and file your charted data. • If a patient DOES have wounds, enter ‘Y’ and complete all required fields for that specific wound.
Mount Sinai Hospital Medical Center – Meditech Training 50 of 65 Implemented on June 1, 2010
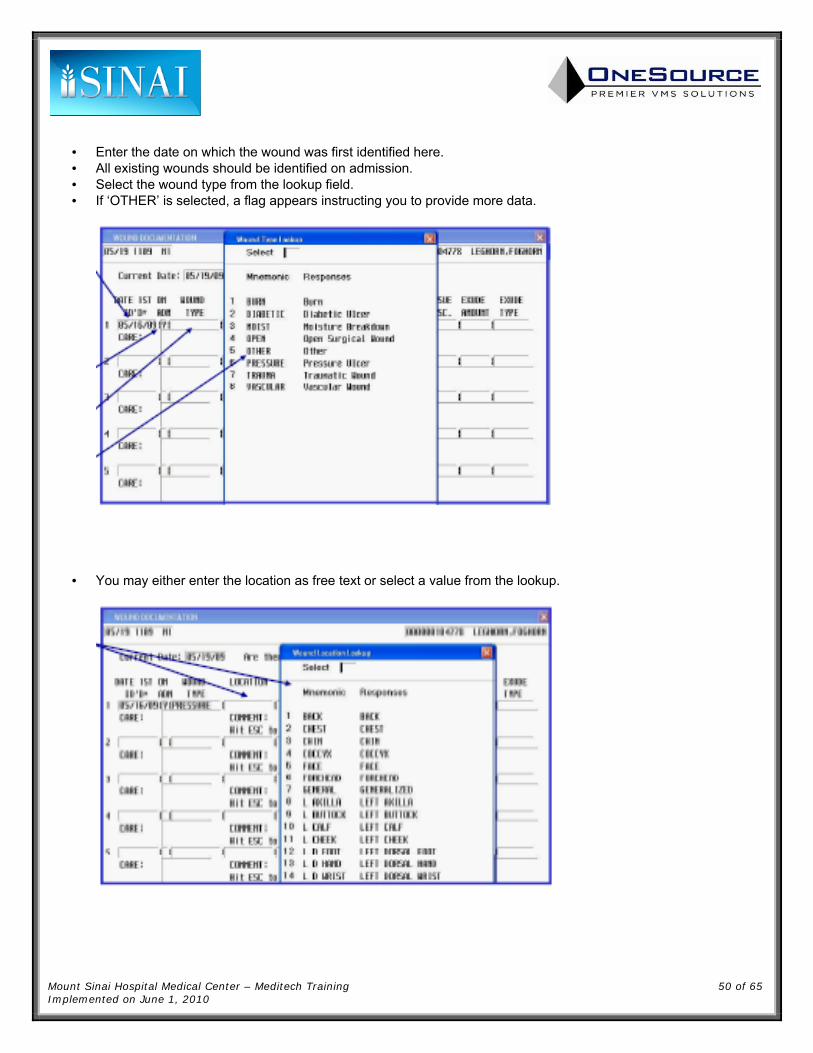
• Enter the date on which the wound was first identified here. • All existing wounds should be identified on admission. • Select the wound type from the lookup field. • If ‘OTHER’ is selected, a flag appears instructing you to provide more data.
• You may either enter the location as free text or select a value from the lookup.
Mount Sinai Hospital Medical Center – Meditech Training 51 of 65 Implemented on June 1, 2010
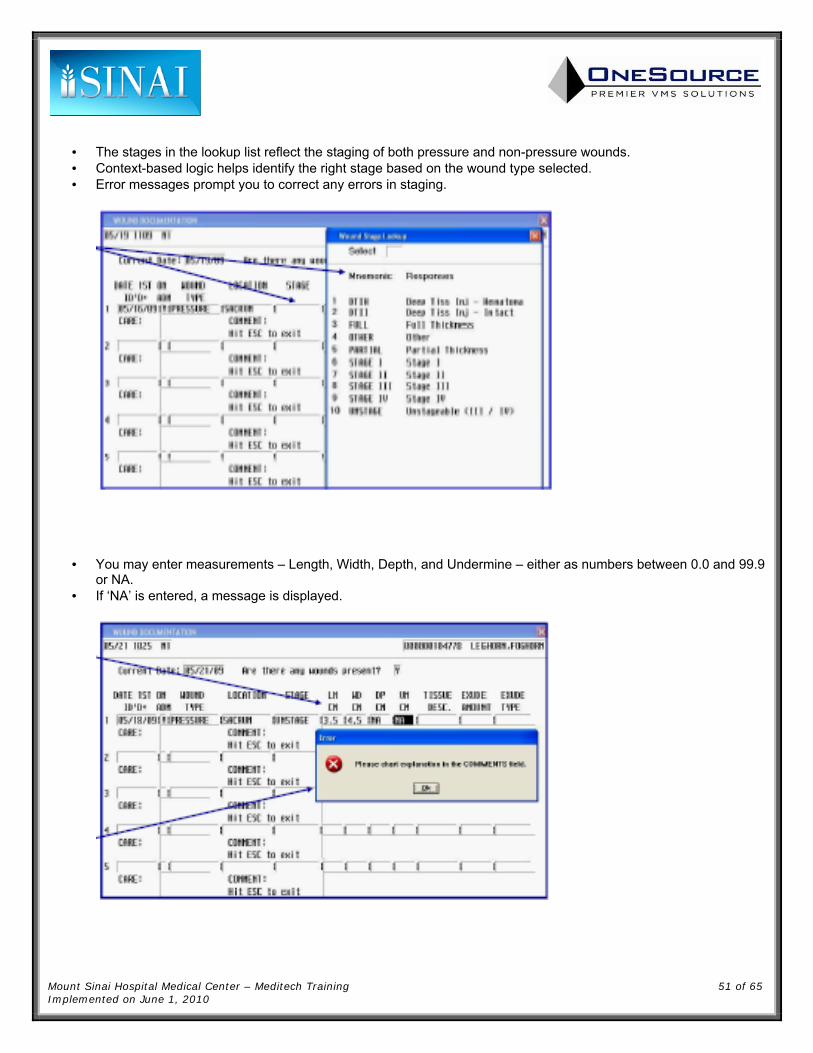
• The stages in the lookup list reflect the staging of both pressure and non-pressure wounds. • Context-based logic helps identify the right stage based on the wound type selected. • Error messages prompt you to correct any errors in staging.
• You may enter measurements – Length, Width, Depth, and Undermine – either as numbers between 0.0 and 99.9 or NA.
• If ‘NA’ is entered, a message is displayed.
Mount Sinai Hospital Medical Center – Meditech Training 52 of 65 Implemented on June 1, 2010
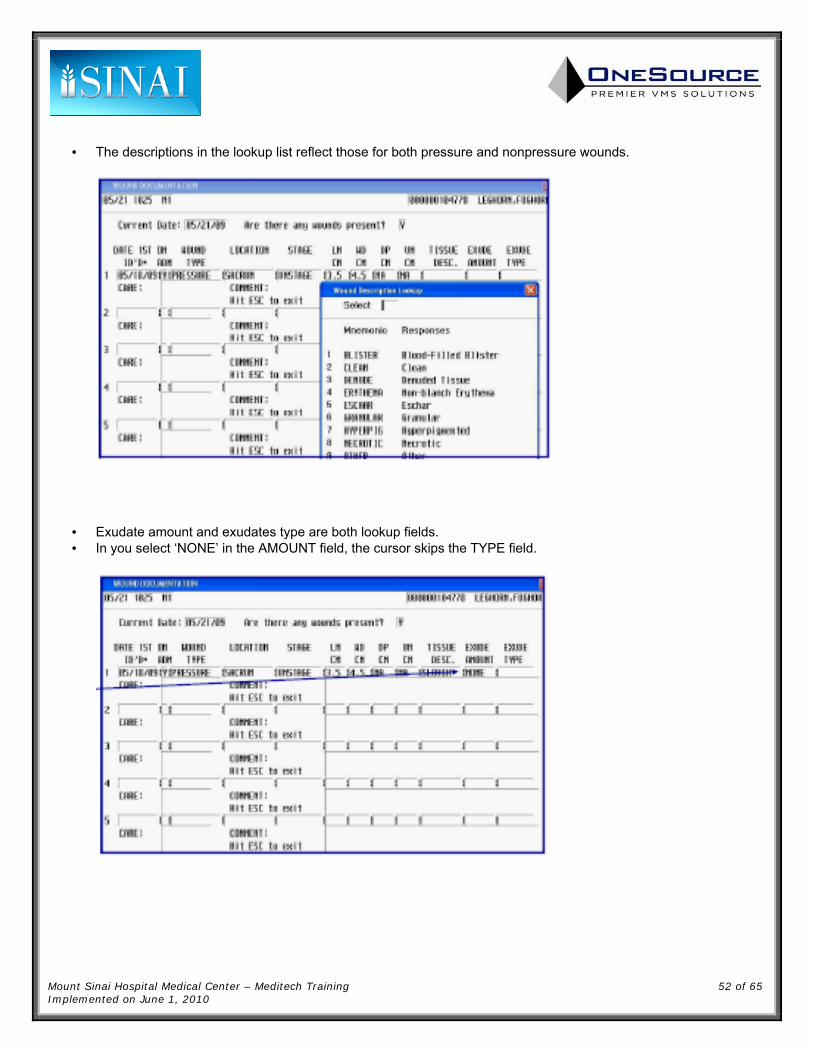
• The descriptions in the lookup list reflect those for both pressure and nonpressure wounds.
• Exudate amount and exudates type are both lookup fields. • In you select ‘NONE’ in the AMOUNT field, the cursor skips the TYPE field.
Mount Sinai Hospital Medical Center – Meditech Training 53 of 65 Implemented on June 1, 2010
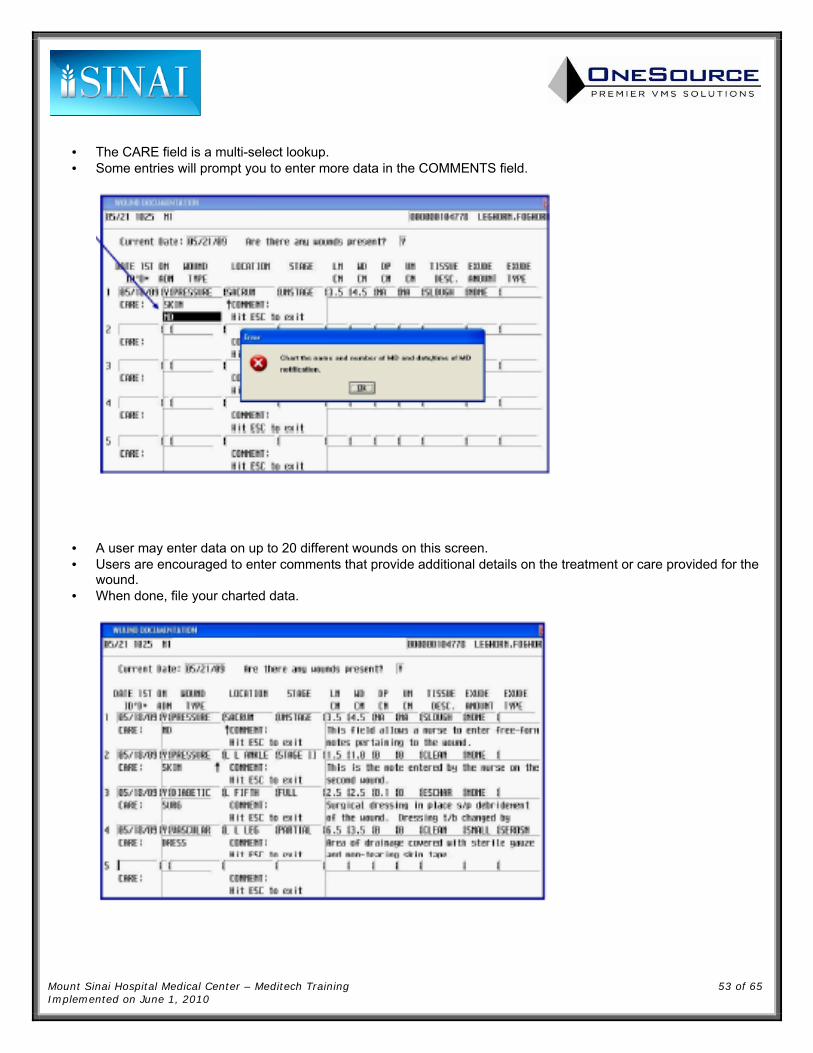
• The CARE field is a multi-select lookup. • Some entries will prompt you to enter more data in the COMMENTS field.
• A user may enter data on up to 20 different wounds on this screen. • Users are encouraged to enter comments that provide additional details on the treatment or care provided for the
wound. • When done, file your charted data.

Mount Sinai Hospital Medical Center – Meditech Training 54 of 65 Implemented on June 1, 2010
• To chart on the Restraint Care Sheet for Non-Behavioral Restraints, highlight the intervention. • Type DN (Document Now) in the SELECT field. • Hit ENTER.
• The Restraint Care Sheet screen is composed of a combination of data entry and single and multi-lookup fields. • When starting, the Activity lookup appears. Select the type of restraint activity you wish to chart on.
Mount Sinai Hospital Medical Center – Meditech Training 55 of 65 Implemented on June 1, 2010
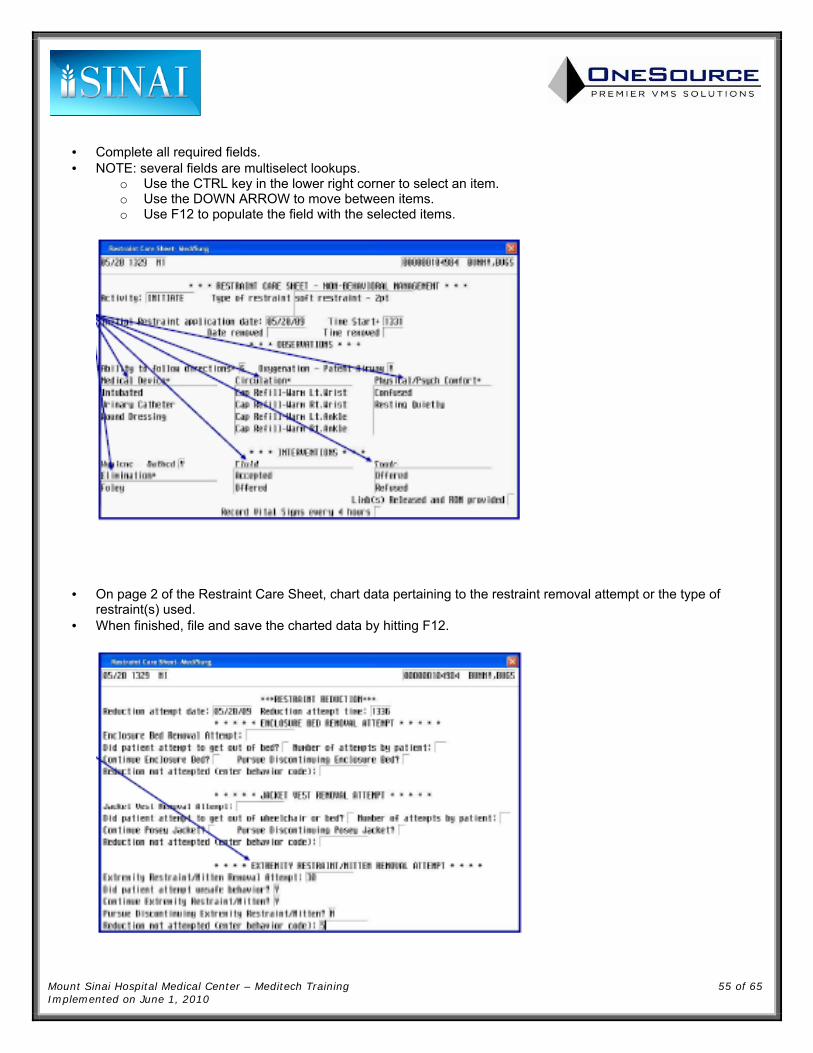
• Complete all required fields. • NOTE: several fields are multiselect lookups.
o Use the CTRL key in the lower right corner to select an item. o Use the DOWN ARROW to move between items. o Use F12 to populate the field with the selected items.
• On page 2 of the Restraint Care Sheet, chart data pertaining to the restraint removal attempt or the type of restraint(s) used.
• When finished, file and save the charted data by hitting F12.
Mount Sinai Hospital Medical Center – Meditech Training 56 of 65 Implemented on June 1, 2010
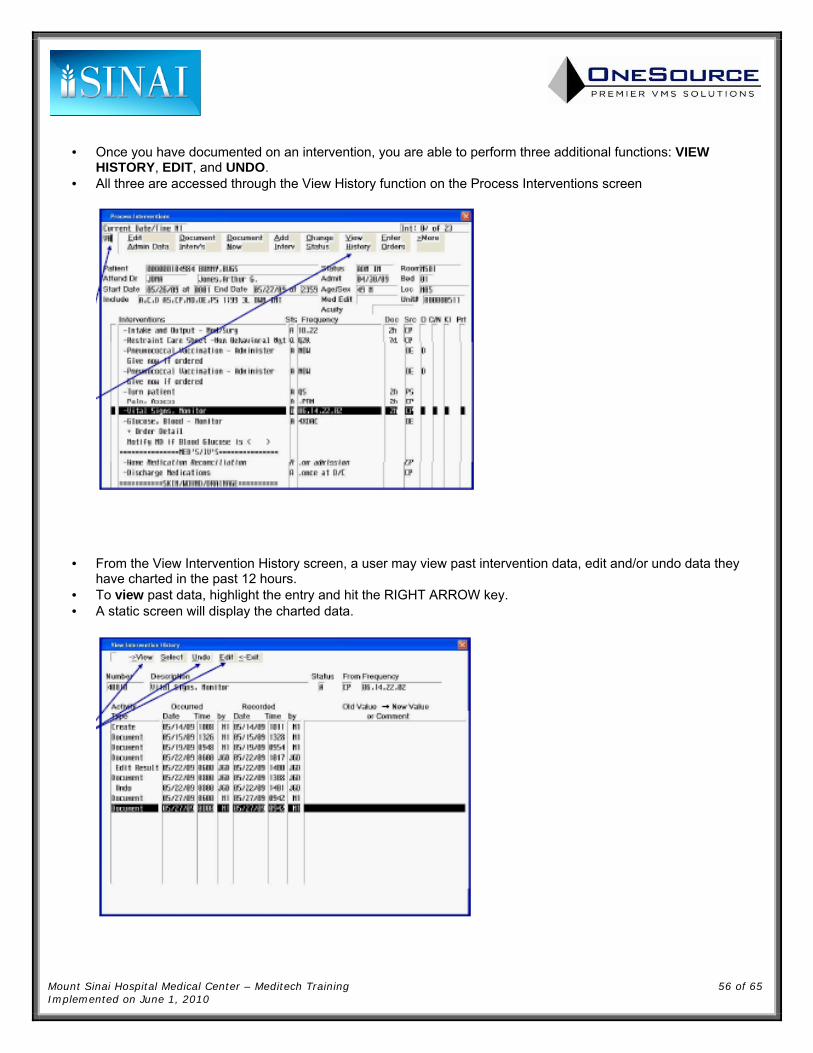
• Once you have documented on an intervention, you are able to perform three additional functions: VIEW HISTORY, EDIT, and UNDO.
• All three are accessed through the View History function on the Process Interventions screen
• From the View Intervention History screen, a user may view past intervention data, edit and/or undo data they have charted in the past 12 hours.
• To view past data, highlight the entry and hit the RIGHT ARROW key. • A static screen will display the charted data.

Mount Sinai Hospital Medical Center – Meditech Training 57 of 65 Implemented on June 1, 2010
• Selecting Edit on the View Intervention History screen opens the Edit Previous Documentation screen. • A user may change any or all values originally charted. • Hit F12 to file the revisions.
• Once filed, the edited data appears on the View Intervention History screen with audit information showing the date and time the data was edited as well as the nurse responsible for editing the data.

Mount Sinai Hospital Medical Center – Meditech Training 58 of 65 Implemented on June 1, 2010
Selecting Undo on the View Intervention History screen prompts the user to confirm this action. Undoing the charting of data is comparable to striking through an entry on a paper chart.
Once filed, the undone / deleted data appears on the View Intervention History screen with audit information showing the date and time the data was deleted as well as the nurse responsible for deleting the data.
Mount Sinai Hospital Medical Center – Meditech Training 59 of 65 Implemented on June 1, 2010
DOCUMENTING PATIENT NOTES Including patient notes as part of the patient s care not only supplements the data that is documented on specific
interventions, but also allows the nurse to provide additional supporting material, relating to the patient’s care, their reactions to their disease or care, information received from the attending or consulting physician(s) pertaining to the patient, etc.
No specific note format – e.g. PIE, SOAP, etc. – is required at Mt. Sinai Hospital. 8/3/2009
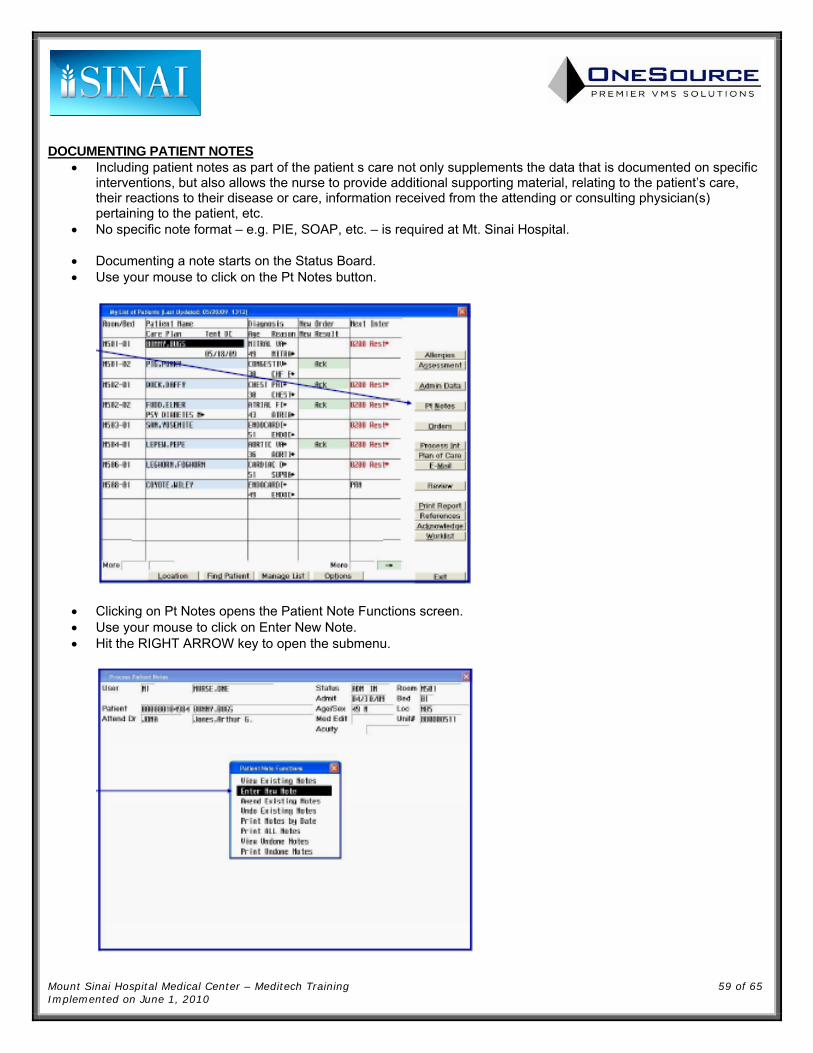
Documenting a note starts on the Status Board. Use your mouse to click on the Pt Notes button.
Clicking on Pt Notes opens the Patient Note Functions screen. Use your mouse to click on Enter New Note. Hit the RIGHT ARROW key to open the submenu.

Mount Sinai Hospital Medical Center – Meditech Training 60 of 65 Implemented on June 1, 2010
Initiating a new note from the Enter New Note menu displays the Note Type screen. Highlight and use the RIGHT ARROW key to open the No Type menu option.
Use the RIGHT ARROW key to select Nursing Note as the Note Category.

Mount Sinai Hospital Medical Center – Meditech Training 61 of 65 Implemented on June 1, 2010
This is the Enter Note screen. It displays the administrative data relevant to the note: date, time, nurse, and patient. In the free-form text field, enter the text of the note. Hit F12 to file the note & Hit F11 to exit the note function.
ACKNOWLEDGING PATIENT ORDERS
Whenever new orders patient are placed on a patient, a visual indicator appears on the Status Board. Nurses must acknowledge patient orders during their shift. Acknowledging orders is the process by which nurses indicate they are aware of the order’s existence. The process also provides an audit trail that the order was transmitted to the receiving department and was
viewed properly by the nurse assigned to the patient.
New order indicators may appear either in RED (for STAT orders) or GREEN (for all other orders).

Mount Sinai Hospital Medical Center – Meditech Training 62 of 65 Implemented on June 1, 2010
Clicking on the New Order Indicator opens the Acknowledge Single Patient screen. This screen displays all orders for a given patient that the nurse has not acknowledged. STAT orders are displayed first.
Select an order by clicking on it with the mouse. Once selected, the Details and Acknowledge buttons become enabled.

Mount Sinai Hospital Medical Center – Meditech Training 63 of 65 Implemented on June 1, 2010
Continue clicking on individual orders until all orders are highlighted. Click on the Acknowledge button.
A confirmation message will appear. Click ‘YES’ to confirm acknowledging the orders.
Mount Sinai Hospital Medical Center – Meditech Training 64 of 65 Implemented on June 1, 2010
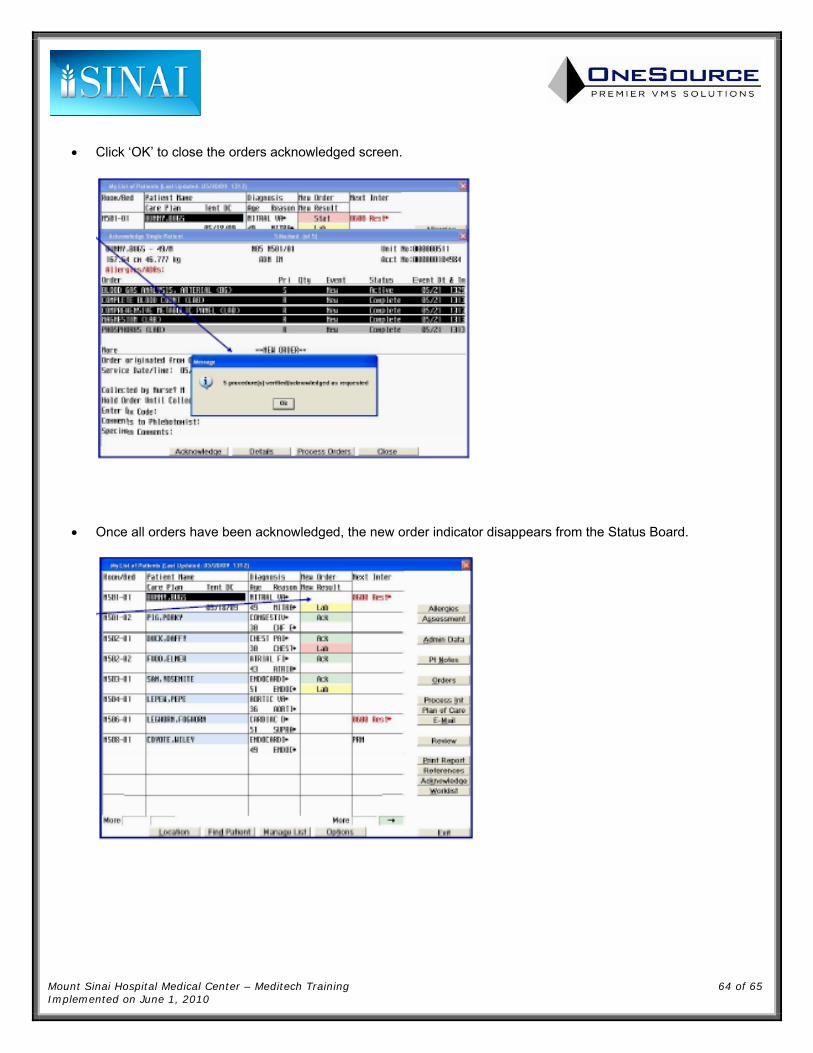
Click ‘OK’ to close the orders acknowledged screen.
Once all orders have been acknowledged, the new order indicator disappears from the Status Board.