molecular cloning. overview of molecular cloning restriction digest of plasmid puc19 and phage...
TRANSCRIPT

Molecular Cloning

Overview of Molecular Cloning• Restriction digest of plasmid pUC19 and phage
– GOAL: Linear pUC19 DNA and several fragments of phage DNA
• Ligation reaction
– GOAL: pUC19 recombined with one or more fragments
• Transformation reaction
– GOAL: Use a bacterial host create multiple copies of our new DNA construct (cloning)

Overview of Molecular Cloning
• Identification of candidates
– GOAL: Determine which bacteria have the desired product (plasmid pUC19 with fragment insert)
• Re-isolation of plasmid DNA
– GOAL: Obtain multiple copies of the desired DNA construct
• Restriction map of plasmid DNA
– GOAL: Determine which fragment was inserted in pUC19

pUC19 a genetically engineered plasmid• 2.7 Kb (small size allows lots of room for inserting DNA)
• Circular non-genomic DNA. - DNA (also known as phage) is linear and much larger (48.5 Kb).
• Has an origin of replication, and a high copy number. (200+/cell)
• Ampicillin resistance gene – Codes for an enzyme that binds and degrades ampicillin.
• Lac Z gene (part of the Lac operon)–Codes for ß-galactosidase–An enzyme that breaks down lactose into glucose and galactose.–Polylinker cloning site within LacZ
• Contains recognition sequences for several restriction enzymes. • A disruption at this site prevents the production of ß-galactosidase. • When cells with the LacZ gene are grown on X-gal and IPTG a blue color results as long
as LacZ gene is not disrupted.
Restriction Digest of plasmid pUC19 and phage Lab 1: Restriction Digest (you have this recipe…look it up)
•Use a restriction enzyme to cut both plasmid pUC19 and phage .
•Generally it is a good idea to include
•The DNA fragments will be separated and analyzed with gel electrophoresis to make sure the digest was successful.
•Determine the number and size of fragments your restriction enzyme will create with lambda.
•Predict what size your cut (Linerized) plasmid will run at.
•Choose a proper marker. Your choices are Lambda/HindIII or 2-Log Ladder.
•Load a 0.7% gel to determine if your digest was successful.
•What should you put in each lane?
•What should it look like if you were successful?

Plasmids and Gels
• An uncut plasmid can actually have 3 forms.– Supercoiled– Nicked– Circular
• Once you cut your plasmid it should be linear.

What will you see?


•BstEII pUC19 pUC19 •HindIII •HindIII •BstEII
Marker Marker
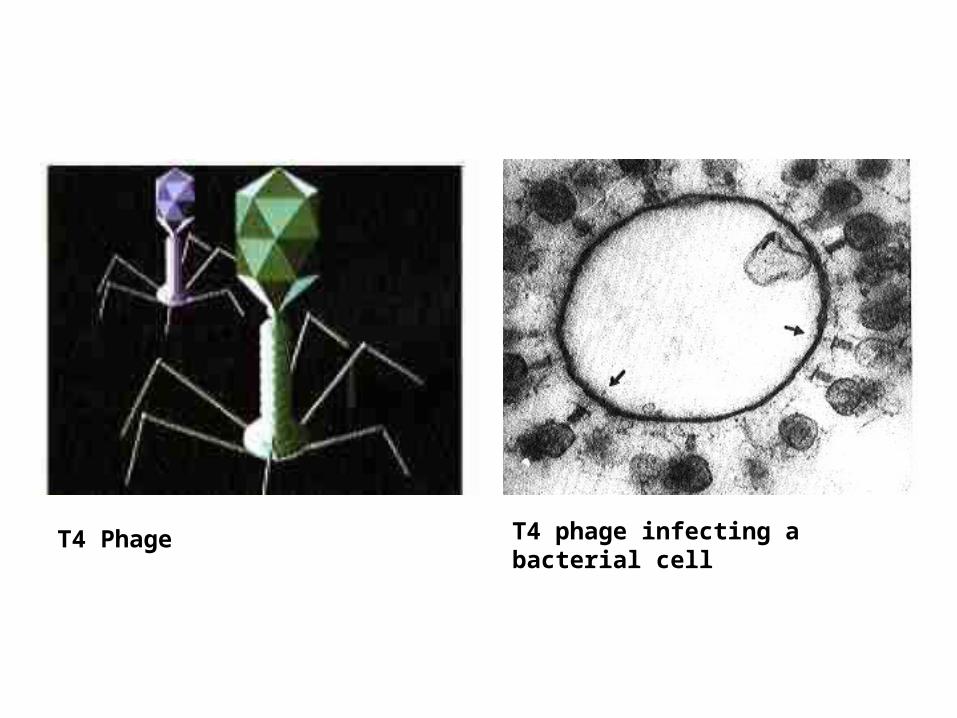
T4 Phage T4 phage infecting a bacterial cell

Ligation Reaction
• Hind III breaks covalent bonds at the recognition sequence.– A•AGCTT A AGCTT
– T TCGA•A TTCGA A
• The complimentary or “sticky” ends can readily form H -bonds.
• During the ligation reaction, the linearized plasmid and fragments are combined.
– Most of these DNA fragments have “sticky” ends. However, because is originally linear, the fragments cut from each end do not have overhangs complementary to the HindIII cuts.
• When combined, the pieces form H-bonds in various configurations.
• The enzyme DNA ligase is used to form new covalent bonds. – ATP drives this reaction.
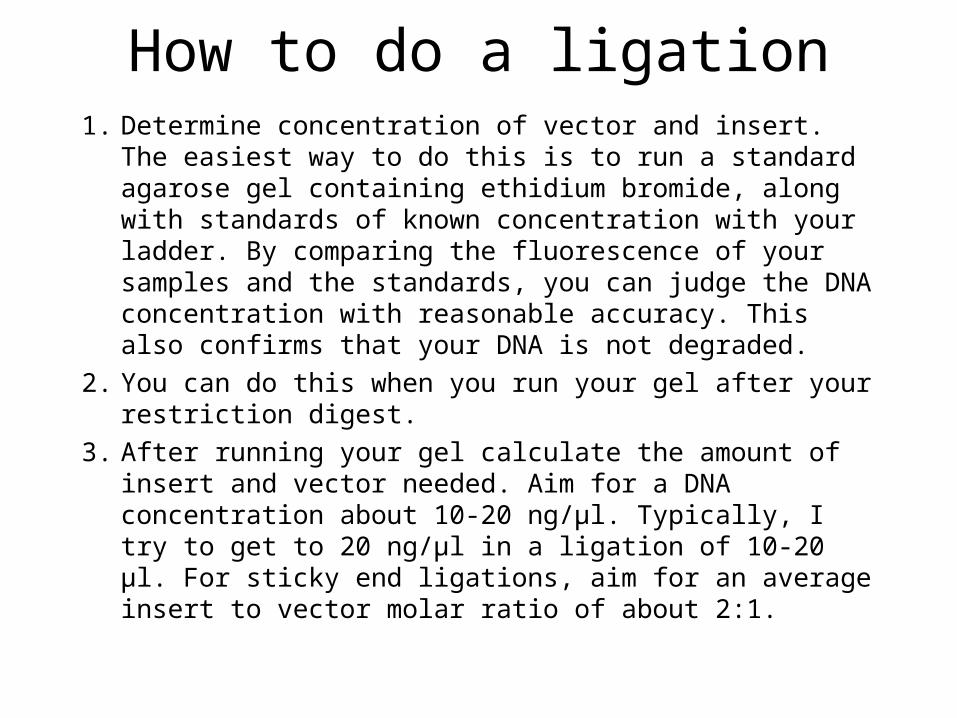
How to do a ligation1. Determine concentration of vector and insert. The easiest
way to do this is to run a standard agarose gel containing ethidium bromide, along with standards of known concentration with your ladder. By comparing the fluorescence of your samples and the standards, you can judge the DNA concentration with reasonable accuracy. This also confirms that your DNA is not degraded.
2. You can do this when you run your gel after your restriction digest.
3. After running your gel calculate the amount of insert and vector needed. Aim for a DNA concentration about 10-20 ng/μl. Typically, I try to get to 20 ng/μl in a ligation of 10-20 μl. For sticky end ligations, aim for an average insert to vector molar ratio of about 2:1.

Some theory:
Optimal conditions for ligation depend on the length of the molecule, the size of the DNA, whether the ends are sticky or blunt, and whether both ends of the vector have the same restriction site. This involves calculations related to both the DNA concentration of DNA ends (not the total DNA concentration), the flexibility of DNA, etc.
A common error is to add too much insert, or have too high an overall DNA concentration. In such cases, there will be a tendency to ligate 2 or more insert fragments into the vector, or a to form dimers, trimers, etc. of vector or insert that are non-productive for cloning.
Therefore, insert:vector molar ratios between 2 and 6 are best. Ratios below 2:1 result in lower ligation efficiency. Ratios above 6:1 promote multiple inserts or the formation of long chains

In general, for ligations of fragments with sticky ends, one can achieve the greatest number of recombinants when the molar concentration of insert is 2x that of the vector. For a 3 kb vector, the optimum concentration of vector (not total DNA) is 10-20 ng/μl.
I normally aim for a volume of 20 μl in a ligation. Anything greater than 25 μl is usually just a waste of reagents.

The Ligation Recipe
10X Ligase buffer 2ul
vector, insert and water 16ul
T4 DNA ligase 2ul
Mix gently by flicking with your finger, and spin for 2 seconds in a microcentrifuge to get the liquid down to the bottom of the tube.
Incubate at room temperature for 24 hours.

Some possible ligation reaction products:
Recombinant No insert Fragments No ligation

Transformation• Using bacterial cells to amplify the DNA of interest.
• Competent cells are able to take up foreign DNA and acquire genetic information.
• Ordinary Escherichia coli cells can be made competent through a treatment with Ca2+ .
– Competent cells have very fragile cell walls, and must be handled gently.
• During the transformation reaction: – Competent cells are combined with the ligation products. – Incubated on ice (DNA sticks to the outer cell walls.)– Heat Shocked (Membranes become more porous and allow DNA to enter.)
• Not all the competent cells will take up DNA. We will determine the frequency.
– Incubated in LB broth in shaking incubator at 37ºC for 30-45 min will REALLY improve transformation efficiency.
• Long enough to allow transcription and translation of ampicillin resistance gene.
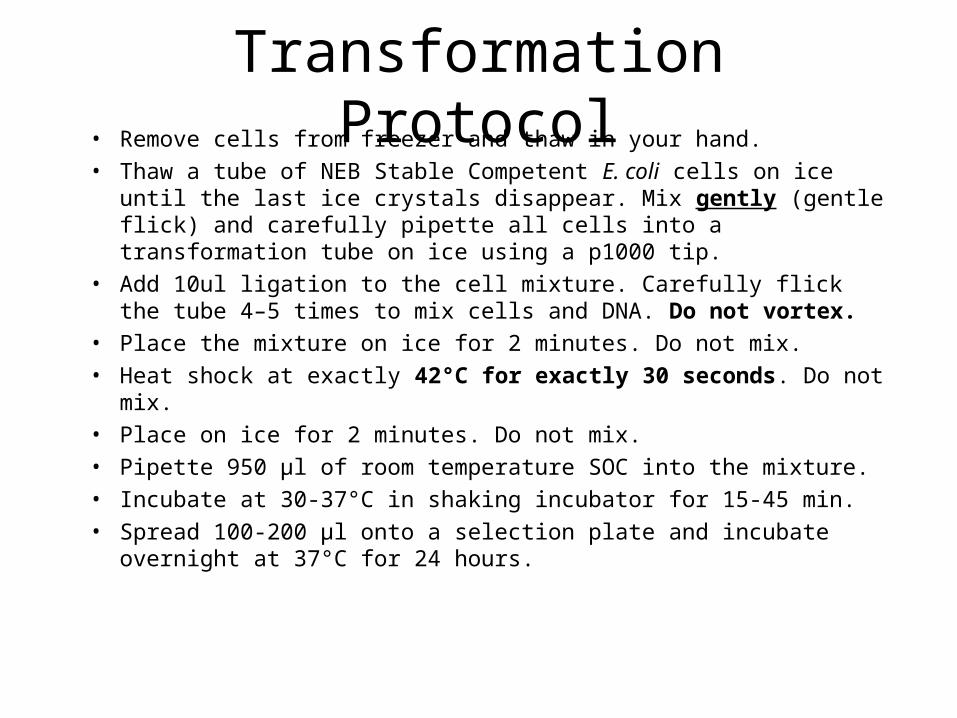
Transformation Protocol• Remove cells from freezer and thaw in your hand.
• Thaw a tube of NEB Stable Competent E. coli cells on ice until the last ice crystals disappear. Mix gently (gentle flick) and carefully pipette all cells into a transformation tube on ice using a p1000 tip.
• Add 10ul ligation to the cell mixture. Carefully flick the tube 4–5 times to mix cells and DNA. Do not vortex.
• Place the mixture on ice for 2 minutes. Do not mix.
• Heat shock at exactly 42°C for exactly 30 seconds. Do not mix.
• Place on ice for 2 minutes. Do not mix.
• Pipette 950 µl of room temperature SOC into the mixture.
• Incubate at 30-37°C in shaking incubator for 15-45 min.
• Spread 100-200 µl onto a selection plate and incubate overnight at 37°C for 24 hours.

Some possible products of the transformation reaction:
Plasmid w/ insert
Ampicillin resistant
Nonfunctional LacZ
Plasmid w/o insert
Ampicillin resistant
Functional LacZ
No plasmid
No ampicillin resistance
No LacZ gene
Non circular DNA gets degraded within the cells.
Bacterial cell Genomic DNA
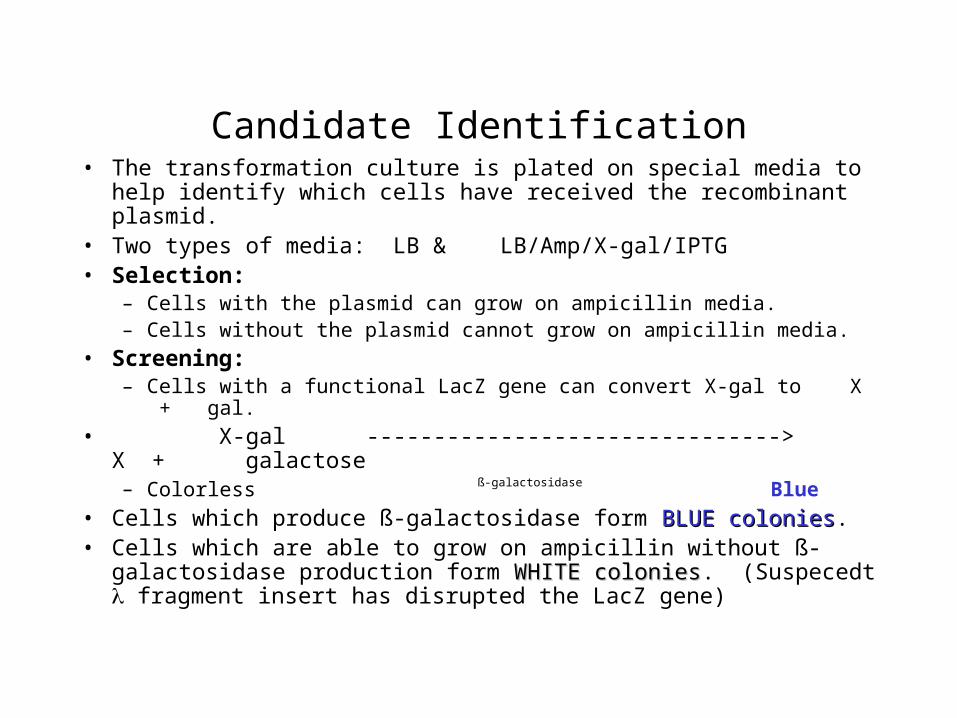
Candidate Identification• The transformation culture is plated on special media to help identify
which cells have received the recombinant plasmid. • Two types of media: LB & LB/Amp/X-gal/IPTG• Selection:
– Cells with the plasmid can grow on ampicillin media. – Cells without the plasmid cannot grow on ampicillin media.
• Screening: – Cells with a functional LacZ gene can convert X-gal to X + gal.
• X-gal -------------------------------> X + galactose– Colorless ß-galactosidase Blue
• Cells which produce ß-galactosidase form BLUE coloniesBLUE colonies. • Cells which are able to grow on ampicillin without ß-galactosidase
production form WHITE coloniesWHITE colonies. (Suspecedt fragment insert has disrupted the LacZ gene)

Some possible products of the transformation reaction:
Plasmid w/ insert
Ampicillin resistant
Nonfunctional LacZ
White colony on White colony on LB+X-gal+amp.LB+X-gal+amp.
Plasmid w/o insert
Ampicillin resistant
Functional LacZ
Blue colony on Blue colony on LB+X-gal+amp.LB+X-gal+amp.
No plasmid
No ampicillin resistance
No LacZ gene
No growth on Ampicillin
Bacterial cell Genomic DNA

Inoculation• Choose one colony…which color will it be?• Using your sterile loope OR a sterile tooth pick,
scrape up that ONE colony. Try not to touch any others.
• Twirl your loope in 2 ml of LB/Amp solution in a 15ml falcon tube. OR drop your whole toothpick in the 15ml falcon tube. Why must the Amp be in the LB this time?
• Place this tube in the shaking incubator overnight.
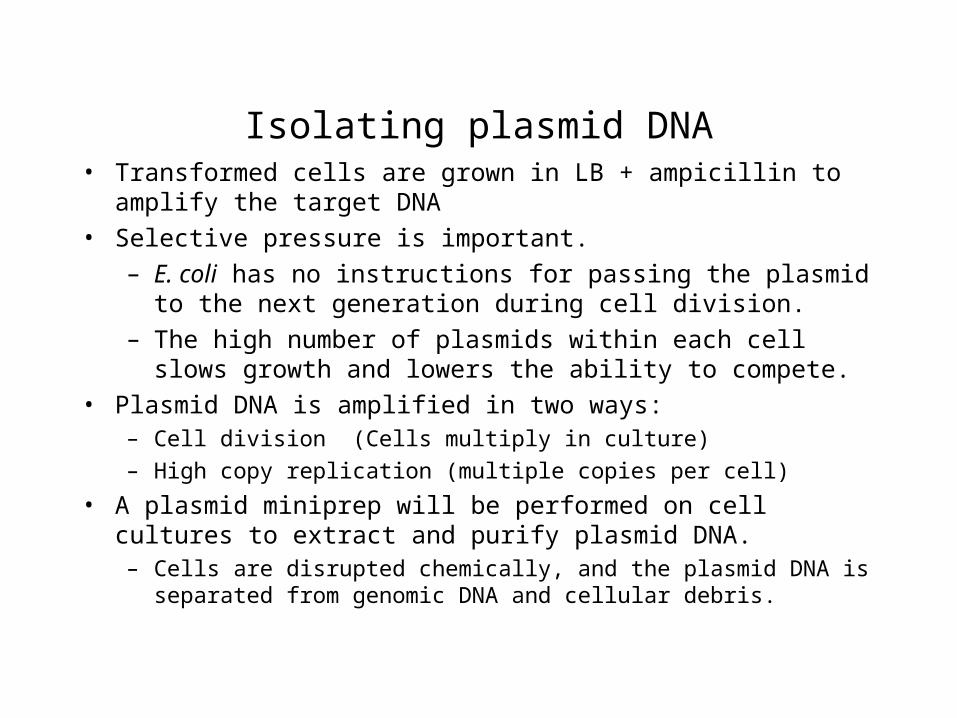
Isolating plasmid DNA• Transformed cells are grown in LB + ampicillin to amplify the target
DNA
• Selective pressure is important.
– E. coli has no instructions for passing the plasmid to the next generation during cell division.
– The high number of plasmids within each cell slows growth and lowers the ability to compete.
• Plasmid DNA is amplified in two ways:– Cell division (Cells multiply in culture)
– High copy replication (multiple copies per cell)
• A plasmid miniprep will be performed on cell cultures to extract and purify plasmid DNA.– Cells are disrupted chemically, and the plasmid DNA is separated from
genomic DNA and cellular debris.

Final restriction digest
• Plasmid DNA isolated from transformed cells will be digested with Hind III, and compared to a known • Hind III marker.
• Digests will be analyzed with gel electrophoresis for identification of cloned inserts.
• What should you load in each lane?
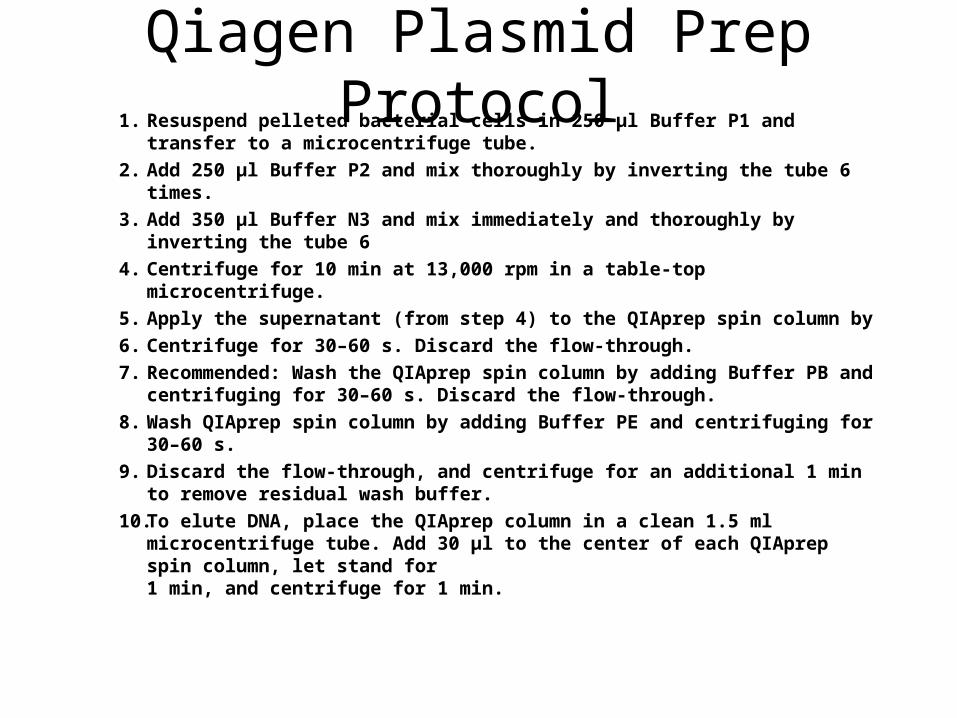
Qiagen Plasmid Prep Protocol1. Resuspend pelleted bacterial cells in 250 μl Buffer P1 and transfer to a
microcentrifuge tube.
2. Add 250 μl Buffer P2 and mix thoroughly by inverting the tube 6 times.
3. Add 350 μl Buffer N3 and mix immediately and thoroughly by inverting the tube 6
4. Centrifuge for 10 min at 13,000 rpm in a table-top microcentrifuge.
5. Apply the supernatant (from step 4) to the QIAprep spin column by
6. Centrifuge for 30–60 s. Discard the flow-through.
7. Recommended: Wash the QIAprep spin column by adding Buffer PB and centrifuging for 30–60 s. Discard the flow-through.
8. Wash QIAprep spin column by adding Buffer PE and centrifuging for 30–60 s.
9. Discard the flow-through, and centrifuge for an additional 1 min to remove residual wash buffer.
10. To elute DNA, place the QIAprep column in a clean 1.5 ml microcentrifuge tube. Add 30 μl to the center of each QIAprep spin column, let stand for1 min, and centrifuge for 1 min.