modules programming guide - bgsigurnost.com modules programming guide programming methods ......
TRANSCRIPT

Modules Programming Guide
Programming MethodsThe modules can be programmed using the following methods:
1) Through the WinLoad Security Management Software. The modules can be programmed at 19,200 baud (or 38,400 baud with DGP-NE96) by connecting locally using a 306USB adapter, remotely through a modem or locally using an ADP-1 adapter at 300 baud. Refer to the WinLoad Help for more information.
2) The module can also be programmed by using the Module Broadcast Feature of the control panel. Refer to the appropriate control panel’s Reference & Installation Manual for more information.
3) With a memory key (PMC-3; DNE-K07 and DGP2-641BL/RB only). Refer to Memory Key (PMC-3) on page 4 (DNE-K07) or page 9 (DGP2-641BL/RB) for more information.
4) If programming through a keypad, the following programming methods can be used after entering the module’s programming mode:• Feature Select Programming: Some of the modules’ sections are programmed by enabling or disabling options. Within the sections, numbers from
[1] to [8] represent a specific option. Press the button corresponding to the desired option. The selected digit will appear on the LCD screen. This means that the option is enabled. Press the key again to remove the digit from the display thereby disabling the option. Press the [ENTER] button when the desired options are set.
• Decimal Programming: Some module sections require that a decimal value be entered. Ex: A PGM Timer will require a 3-digit time to be entered. With this method, any 3-digit number from 000 to 255 can be entered.
• Level Programming: Some module sections are programmed using “Level Programming”. In this section only one option can be enabled. To enable the option, use the and buttons until the option you want is illuminated, then press the [ENTER] button to set the option.
How Do I Enter Module Programming Mode?Through any keypad connected to the combus:
1) Press and hold the [0] key.2) Enter your [INSTALLER CODE]. 3) Enter section [953] (DGP-848) or [4003] (DGP-NE96).4) Enter the 8-digit [SERIAL NUMBER] of the module you wish to program.5) Enter the 3-digit [SECTION] you wish to program.6) Enter the required [DATA].
The module’s serial number can be found on the module’s PC board. We recommend that you use this programming guide to keep track of what was programmed and how.
www.paradox.ca

Table of Contents
Grafica Graphic LCD Keypad Module................................................................................................. 3
Icon LCD Keypad Module .................................................................................................................... 5
LCD Keypad Module............................................................................................................................. 6
48-Zone LED Keypad Module ............................................................................................................ 10
Annunciator Module ........................................................................................................................... 12
Outdoor High-Security Digital Motion Detector Modules ............................................................... 13
Motion Detector Modules................................................................................................................... 14
Magellan Wireless Expansion Module.............................................................................................. 15
4-PGM Expansion Module.................................................................................................................. 17
8-zone Expansion Module.................................................................................................................. 18
4-zone Expansion Module.................................................................................................................. 19
1-zone Expansion Module.................................................................................................................. 20
Printer Module..................................................................................................................................... 21
InTouch Voice-Assisted Arm/Disarm Module .................................................................................. 25
Access Control Module...................................................................................................................... 26
Power Supply Module ........................................................................................................................ 29
Module Connection Drawings ........................................................................................................... 30Module Connection Overview.................................................................................................................. 30Grafica Graphic LCD Keypad Module (DNE-K07) ................................................................................... 31LCD Keypad Module (DGP2-641BL/RB/ DGP2-640))............................................................................. 3248-Zone LED Keypad Module (DGP2-648) ............................................................................................. 32DGP2-641RB Access Control Connections............................................................................................. 32Annunciator Module (DGP2-ANC1) ......................................................................................................... 33Outdoor High-Security Digital Motion Detector Module (DG85) .............................................................. 33Motion Detector Modules (DGP2-50/60/70)............................................................................................. 34Magellan Wireless Expansion Module (MG-RCV3) ................................................................................. 354-PGM Expansion Module (APR3-PGM4) .............................................................................................. 358-Zone Expansion Module (APR3-ZX8) ................................................................................................. 354-zone Expansion Module (APR3-ZX4)................................................................................................... 36One-zone Expansion Module (DGP2-ZX1).............................................................................................. 36Printer Module (APR3-PRT1) ................................................................................................................. 37InTouch Voice-Assisted Arm/Disarm Module (APR3-ADM2) .................................................................. 37Access Control Module (DGP2-ACM1P) ................................................................................................. 38Power Supply Module (DGP2-PS17) ...................................................................................................... 39Door Contact Module (DGP2-ZC1).......................................................................................................... 39Hub and Bus Isolator Module (APR3-HUB2) ........................................................................................... 40
Appendix 1: Programming PGMs...................................................................................................... 41

Grafica Graphic LCD Keypad Module
Grafica Keypads can be used with DGP-848 and DGP-NE96 control panels only. Grafica will not function with DGP-48 control panels.
The keypad’s serial number can be found on the keypad’s PC board. The keypad’s serial number can also be viewed by pressing and holding the [0] key, entering the [INSTALLER CODE] and then entering section [000].
= Default setting
Using the Memory Key
Download Contents of the Memory Key to the Grafica Keypad:1) Insert the Memory Key onto the keypad’s connector (refer to Memory Key Connector on page 4).2) To download the contents of the Memory Key, enter the keypad’s programming mode and enter section [100].3) Once the keypad emits a confirmation beep, wait for a second confirmation beep and then remove the Memory Key.
SECTION [001] : Keypad Partition Assignment SECTION [002] : System OptionsOption OFF ON Option OFF ON
[1] Partition 1 Disabled Enabled [1] Display Code Entry Disabled Enabled
[2] Partition 2 Disabled Enabled [2] Display Exit Delay Disabled Enabled[3] Partition 3 Disabled Enabled [3] Display Entry Delay Disabled Enabled[4] Partition 4 Disabled Enabled [4] Confidential Mode
(not for UL installations) Disabled Enabled
[5] Partition 5 (DGP-NE96 only) Disabled Enabled [5] To exit Confidential Mode Enter code Press Button
[6] Partition 6 (DGP-NE96 only) Disabled Enabled [6] Exit Delay Beep Disabled Enabled[7] Partition 7 (DGP-NE96 only) Disabled Enabled [7] Keypad Input Type Temp. input Zone input
[8] Partition 8 (DGP-NE96 only) Disabled Enabled [8] Keypad Tamper Disabled Enabled
SECTION [003] : Beep on TroubleOption OFF ON
[1] System & Clock Trouble Beep Disabled Enabled
[2] Communicator Trouble Beep Disabled Enabled
[3] Module & Combus Trouble Beep Disabled Enabled
[4] All Zone Trouble Beep Disabled Enabled
[5] to [8] Future Use N/A N/A
Section #
[004] Confidential Mode Timer___/___/___ (005 to 255 seconds; Default: 120 seconds)
[005] Outside Temperature Calibration___/___/___ (000 to 254; 000 and 128 = no calibration value)
[006] Inside Temperature Calibration___/___/___ (000 to 254; 000 and 128 = no calibration value)
[100] Download all from the Memory Key (Grafica keypad sections [001] to [004] and all user, zone, door and area labels) to the Grafica keypad.
[110] Copy the Grafica keypad sections [001] to [004] and all user, zone, door and area labels to the Memory Key.
DNE-K07 V1.4
Digiplex Modules Programming Guide - 3

Copy Contents of the Grafica Keypad to the Memory Key:1) Insert the Memory Key onto the keypad’s connector (refer to Memory Key Connector on page 4). Ensure that the write protect jumper is on (refer to
Memory Key (PMC-3) below).2) To copy the contents to the Memory Key, enter the keypad’s programming mode and enter section [110].3) Once the keypad emits a confirmation beep, wait for a second confirmation beep and then remove the Memory Key. Remove the Memory Key’s jumper
if you do not wish to accidentally overwrite its contents.
Memory Key Connector
Memory Key (PMC-3)
The memory key will only function with a keypad that has the DGP2 or DNE prefix in the model number. Only the PMC-3 memory key will function with DGP2 and DNE keypads.
Memory Key
PMC-3Jumper ON:Can copy and download contents.
Jumper OFF:Cannot override the contents of the memory key.
4 - Digiplex Modules Programming Guide

Icon LCD Keypad Module
The keypad’s serial number can be found on the keypad’s PC board. The keypad’s serial number can also be viewed by pressing and holding the [0] key, entering the [INSTALLER CODE] and then entering section [000].
= Default setting
* Enter the Data value 000 to disable the desired section(s).
Partitions are displayed by numerical digits that accompany the state of the system. The keypad will not allow you to assign the same display number to more than one section.
A maximum of 4 partitions can be assigned to the keypad.
= Default setting
SECTION Partition Display Data Default SECTION [009]: Keypad Options
[001] Partition 1 display __/__/__ (000 to 004)* 001 Option Description OFF ON[002] Partition 2 display __/__/__ (000 to 004)* 002 [1] Confidential Mode Disabled Enabled
[003] Partition 3 display __/__/__ (000 to 004)* 003 [2] Exit Confidential Mode Enter Code Press Key
[004] Partition 4 display __/__/__ (000 to 004)* 004 [3] Muting Disabled Enabled
[005] Partition 5 display (DGP-NE96 only) __/__/__ (000 to 004)* 000 [4] Beep on Exit Delay Disabled Enabled
[006] Partition 6 display (DGP-NE96 only) __/__/__ (000 to 004)* 000 [5] Chime on Zone Closure Disabled Enabled
[007] Partition 7 display (DGP-NE96 only) __/__/__ (000 to 004)* 000 [6] Time Format International U.S. (am/pm)
[008] Partition 8 display (DGP-NE96 only) __/__/__ (000 to 004)* 000
SECTION [010]: Beep on Trouble SECTION [011]: PGM & Keypad Tamper Options
Option Description OFF ON Option Description OFF ON
[1] Beep on System Troubles /Clock Loss Disabled Enabled [1] PGM State N.O. N.C.
[2] Beep on Communicator Troubles Disabled Enabled [2] PGM Deactivation
Mode Deactivation Event PGM Timer
[3] Beep on Module / Combus Troubles Disabled Enabled [3] PGM Base Time Seconds Minutes
[4] Beep on Zone Troubles) Disabled Enabled [5] Keypad Anti-Tamper Disabled Enabled
[5] to [8] Future Use) N/A N/A
SECTION Description Data Default SECTION Description Data Default[012] Confidential Mode Timer __/__/__ (005 to 255) 120s [013] PGM Timer __/__/__ (001 to 255) 005
Event Group Feature Group Start # End #Section Section Section Section
PGM Activation [014] __/__/__ [015] __/__/__ [016] __/__/__ [017] __/__/__PGM Deactivation [018] __/__/__ [019] __/__/__ [020] __/__/__ [021] __/__/__
SECTION Description [030] Test PGM: Activate PGM for 8 seconds to verify if the PGM is functioning properly
DGP2-640 V1.0
Digiplex Modules Programming Guide - 5

LCD Keypad Module
The keypad’s serial number can be found on the keypad’s PC board. The keypad’s serial number can also be viewed by pressing and holding the [0] key, entering the [INSTALLER CODE] and then entering section [000].
= Default setting
† Section/option is only available with DGP2-641RB‡ Section/option is only available with DGP2-641BL
SECTION [001] : Keypad Partition Assignment SECTION [002]: Assigning Doors to Partitions †
Option OFF ON Option OFF ON [1] Partition 1 Disabled Enabled [1] Door Assigned to Partition1 Disabled Enabled
[2] Partition 2 Disabled Enabled [2] Door Assigned to Partition 2 Disabled Enabled
[3] Partition 3 Disabled Enabled [3] Door Assigned to Partition 3 Disabled Enabled
[4] Partition 4 Disabled Enabled [4] Door Assigned to Partition 4 Disabled Enabled
[5] Partition 5 (DGP-NE96 only) Disabled Enabled [5] Door Assigned to Partition 5 (DGP-NE96 only) Disabled Enabled
[6] Partition 6 (DGP-NE96 only) Disabled Enabled [6] Door Assigned to Partition 6(DGP-NE96 only) Disabled Enabled
[7] Partition 7 (DGP-NE96 only) Disabled Enabled [7] Door Assigned to Partition 7 (DGP-NE96 only) Disabled Enabled
[8] Partition 8 (DGP-NE96 only) Disabled Enabled [8] Door Assigned to Partition 8 (DGP-NE96 only) Disabled Enabled
SECTION [003]: General Options 1 SECTION [004]: General Options 2
Option OFF ON Option OFF ON [1] Display code entry Disabled Enabled [1] Muting Disabled Enabled
[2] Display exit delay Disabled Enabled [2] Exit Delay Beep Disabled Enabled[3] Display entry delay Disabled Enabled [3] Door Left Open Pre-Alarm † Disabled Enabled[4] Confidential Mode
(not for UL installations) Disabled Enabled [4] Chime on Zone Closure Disabled Enabled
[5] To exit Confidential Mode Enter code Press Button [5] Door Left Open Alarm Feedback † Silent Audible[6] Future Use N/A N/A [6] Door Left Open Alarm Follows † Alarm
restore Beep Timer
[7] Future Use N/A N/A [7] Door Forced Alarm † Silent Audible[8] Time display option yy/mm/dd dd/mm/yy [8] Door Forced Alarm † Alarm
restore Beep Timer
SECTION [005] : Beep on Trouble SECTION [006]: PGM and Tamper Options ‡
Option OFF ON Option OFF ON [1] System & Clock Trouble Beep Disabled Enabled [1] PGM State N.O. N.C.
[2] Communicator Trouble Beep Disabled Enabled[2] PGM Deactivation Mode Deactivation
Event PGM Timer
[3] Module & Combus Trouble Beep Disabled Enabled [3] PGM Base Time 1 second 1 minute
[4] All Zone Trouble Beep Disabled Enabled [4] PGM Override Disabled Enabled
[5] to [6] Future Use N/A N/A [5] Keypad Tamper Disabled Enabled
[7] Time Format † 24Hr clock 12Hr clock [6] to [8] Future Use N/A N/A
[8] Future Use N/A N/A
DGP2-641BL V1.1DGP2-641RB V2.0
6 - Digiplex Modules Programming Guide

† Section/option is only available with DGP2-641RB.‡ Section/option is only available with DGP2-641BL
† Section/option is only available with DGP2-641RB.
Section [510]: Download from Memory Key (PMC-3) to DGP2-641RB.Section [520]: Upload from DGP2-641RB to Memory Key (PMC-3).
‡ Section/option is only available with DGP2-641BL.
Only Event Groups 000 to 055 and 070 can be used to program the module’s PGM. Refer to Appendix 1: Programming PGMs on page 41 for the PGM Table.
SECTION [006]: General Options 3 †
Option OFF ON † Section/option is only available with DGP2-641RB.
* This option cannot be turned ON and will always remain OFF.
[1] Card Activates Door Unlocked Schedule Disabled. 1 second[2] Door Left Open Alarm Disabled Enabled
[3] Door Forced Open Alarm Disabled Enabled
[4] PIN Entry on Keypad Enabled *
[5] Keypad Tamper Disabled Enabled
[6] Relock Door Disabled Enabled
[7] Future Use N/A N/A[8] Unlock on REX Disabled Enabled
Section Data Description Default
[007] __/__/__ (005 to 255 seconds) Confidential Mode Timer 120
[008] __/__/__ (000 to 255; see option [3] in section [006]) PGM Timer ‡ 005
[008] __/__/__ (000 to 255 seconds) Door Unlocked Period † 005
[009] __/__/__ (000 to 255 seconds added to section [008]) Door Unlocked Period Extension † 015
[010] __/__/__ (000 to 255 seconds) Door Left Open Interval † 060
[011] __/__/__ (000 to 25 seconds) Door Left Open Pre-Alarm Timer † 015
[012] __/__/__ (000 to 25 seconds) Beep Timer for Door Left Open Alarm † 005
[013] __/__/__ (000 to 25 seconds) Beep Timer for Door Forced Open Alarm † 005
Section [017] Door Unlocked Schedule †
Start Time End Time Days (turn ON or OFF)
S M T W T F S H
Schedule A: ___ ___ : ___ ___ ___ ___ : ___ ___ 1 2 3 4 5 6 7 8
Schedule B: ___ ___ : ___ ___ ___ ___ : ___ ___ 1 2 3 4 5 6 7 8
Event Group Feature Group Start # End #Section Section Section Section
PGM Activation [009]‡ __/__/__ [010]‡ __/__/__ [011]‡ __/__/__ [012]‡ __/__/__PGM Deactivation [013]‡ __/__/__ [014]‡ __/__/__ [015]‡ __/__/__ [016]‡ __/__/__
Message ProgrammingEach section from [101] to [148], [200] to [204] and [301] to [396] contains one message with a maximum of 16 characters. The sections contain the following messages:
Sections [101] to [148] = “Zone 01” to “Zone 48” respectivelySection [200] = “Paradox Security”Sections [201] to [204] = “First Area”, “Second Area”, “Third Area”, and “Fourth Area”Sections [301] to [396] = “Code 01” to “Code 96” respectively
After entering the section corresponding to the desired message, the message can be re-programmed to suit your installation needs as detailed in Table 1. For example, section [101] “Zone 01” can be changed to “FRONT DOOR”.
Digiplex Modules Programming Guide - 7

Table 1: Message Programming Special Function Keys
Table 2: Alphanumeric Keys
Table 3: Special Characters
Key Function Details
[STAY] Insert Space Press the [STAY] key to insert a blank space at the current cursor’s position.
[FORCE] Delete Press the [FORCE] key to delete the character or blank space found at the current cursor’s position.
[ARM] Delete Until the End Press the [ARM] key to delete all characters and spaces to the right of the cursor and at the cursor’s position.
[DISARM] Numeric/Alphanumeric Press the [DISARM] key to toggle the numeric keys to alphanumeric keys and vice versa. Numeric: Keys [0] to [9] represent numbers 0 to 9. Alphanumeric: refer to Table 2 below.
[BYP] Lower/Upper Case Press the [BYP] key to toggle from lower to upper case and vice versa.
[MEM] Special Characters After pressing the [MEM] key, the cursor will turn into a flashing black square. Using Table 3 below, enter the 3-digit number for the desired character.
Key Press Key Once Press Key Twice Press Key Three Times[1] A B C[2] D E F[3] G H I[4] J K L[5] M N O[6] P Q R[7] S T U[8] V W X[9] Y Z
8 - Digiplex Modules Programming Guide

Using the Memory Key
Download Contents of the Memory Key to the LCD Keypad1) Insert the Memory Key onto the keypad’s connector labelled “KEY”.2) To download the contents of the Memory Key, enter the keypad’s programming mode and enter section [510].3) Once the keypad emits a confirmation beep, wait for a second confirmation beep and then remove the Memory Key.
Copy Contents of the LCD Keypad to the Memory Key1) Insert Memory Key onto the keypad’s connector labelled “KEY”. Ensure that the write protect jumper is on (refer to Memory
Key (PMC-3) below).2) To copy the contents to the Memory Key, enter the keypad’s programming mode and enter section [520].3) Once the keypad emits a confirmation beep, wait for a second confirmation beep and then remove the Memory Key.
Remove the Memory Key’s jumper if you do not wish to accidentally overwrite its contents.
Memory Key (PMC-3)
The memory key will only function with a keypad that has the DGP2 or DNE prefix in the model number. Only the PMC-3 memory key will function with DGP2 and DNE keypads.
Combus VoltmeterTo verify if the combus is supplying sufficient power, press and hold the [0] key, enter the [INSTALLER CODE] and press the [ACC] button. A reading of 10.5V or lower indicates that the voltage is too low. The voltage may drop during the control panel battery test.
[510] Download all from the Memory Key (LCD keypad sections [001] to [396] and all labels and messages) to the LCD keypad.
[520] Copy the LCD keypad sections [001] to [396] and all labels and messages to the Memory Key.
PMC-3Jumper ON:Can copy and download contents.
Jumper OFF:Cannot override the contents of the memory key.
Digiplex Modules Programming Guide - 9

48-Zone LED Keypad Module
This model does not support installer programming capabilities, therefore you cannot program other modules or the panel on the combus using this unit.
*000=disabled; 001=A1; 002=A2; 003=A3; 004=A4.
Do not assign the same display number to more than one section. A maximum of 4 partitions can be displayed on the keypad.
= Default Settings
Section Data Description Default
[001] __/__/__ (000 to 004)* Partition 1 Display 001 = (LED A1)
[002] __/__/__ (000 to 004)* Partition 2 Display 002 = (LED A2)
[003] __/__/__ (000 to 004)* Partition 3 Display 003 = (LED A3)
[004] __/__/__ (000 to 004)* Partition 4 Display 004 = (LED A4)
[005] __/__/__ (000 to 004)* Partition 5 Display 000
[006] __/__/__ (000 to 004)* Partition 6 Display 000
[007] __/__/__ (000 to 004)* Partition 7 Display 000
[008] __/__/__ (000 to 004)* Partition 8 Display 000
SECTION [009] : Keypad Options SECTION [010] : Beep on TroubleOption OFF ON Option OFF ON
[1] Confidential Mode Disabled Enabled [1] Beep on System Trouble/Clock Loss Disabled Enabled
[2] Exit Confidential Mode Press key Enter code [2] Beep on Communicator Trouble Disabled Enabled
[3] Muting Disabled Enabled [3] Beep on Module/Combus Trouble Disabled Enabled
[4] Beep on Exit Delay Disabled Enabled [4] Beep on Zone Trouble Disabled Enabled
[5] Chime on Zone Closure Disabled Enabled [5] to [8] Future Use N/A N/A
[6] to [8] Future Use N/A N/A
SECTION [011] : PGM & Keypad Tamper OptionsOption OFF ON
[1] PGM State N.O. N.C.
[2] PGM Deactivation Mode Deactivation Event PGM Timer
[3] PGM Base Time 1 second 1 minute
[4] Future Use N/A N/A
[5] Keypad Tamper Disabled Enabled
[6] to [8] Future Use N/A N/A
Section Data Description Default[012] __/__/__ (005 to 255 seconds) Confidential Mode Timer 120[013] __/__/__ (001 to 255; see option [3] in section [011]) PGM Timer 005
DGP2-648 V1.0
10 - Digiplex Modules Programming Guide

Refer to Appendix 1: Programming PGMs on page 41 for the PGM Table. Only Event Groups 000 to 055 can be used to program the module’s PGM.
The keypad will display up to a total of 48 zones, however any zone from 1 to 96 can be selected. Do not assign more than one LED Number to a zone.
Event Group Feature Group Start # End #Section Section Section Section
PGM Activation [014] __/__/__ [015] __/__/__ [016] __/__/__ [017] __/__/__PGM Deactivation [018] __/__/__ [019] __/__/__ [020] __/__/__ [021] __/__/__
Section Description[030] Test PGM: Activates the PGM for 8 seconds to verify if the PGM is functioning properly.
[040] Zone Display Reset: Resets zone display sections [101] to [196] to default values.
Zone Display
Section LED Number
Zone Displayed Default Section LED
NumberZone
Displayed Default Section LED Number
Zone Displayed Default
[101] __/__/__ Zone 1 001 [133] __/__/__ Zone 33 033 [165] __/__/__ Zone 65 000[102] __/__/__ Zone 2 002 [134] __/__/__ Zone 34 034 [166] __/__/__ Zone 66 000[103] __/__/__ Zone 3 003 [135] __/__/__ Zone 35 035 [167] __/__/__ Zone 67 000[104] __/__/__ Zone 4 004 [136] __/__/__ Zone 36 036 [168] __/__/__ Zone 68 000[105] __/__/__ Zone 5 005 [137] __/__/__ Zone 37 037 [169] __/__/__ Zone 69 000[106] __/__/__ Zone 6 006 [138] __/__/__ Zone 38 038 [170] __/__/__ Zone 70 000[107] __/__/__ Zone 7 007 [139] __/__/__ Zone 39 039 [171] __/__/__ Zone 71 000[108] __/__/__ Zone 8 008 [140] __/__/__ Zone 40 040 [172] __/__/__ Zone 72 000[109] __/__/__ Zone 9 009 [141] __/__/__ Zone 41 041 [173] __/__/__ Zone 73 000[110] __/__/__ Zone 10 010 [142] __/__/__ Zone 42 042 [174] __/__/__ Zone 74 000[111] __/__/__ Zone 11 011 [143] __/__/__ Zone 43 043 [175] __/__/__ Zone 75 000[112] __/__/__ Zone 12 012 [144] __/__/__ Zone 44 044 [176] __/__/__ Zone 76 000[113] __/__/__ Zone 13 013 [145] __/__/__ Zone 45 045 [177] __/__/__ Zone 77 000[114] __/__/__ Zone 14 014 [146] __/__/__ Zone 46 046 [178] __/__/__ Zone 78 000[115] __/__/__ Zone 15 015 [147] __/__/__ Zone 47 047 [179] __/__/__ Zone 79 000[116] __/__/__ Zone 16 016 [148] __/__/__ Zone 48 048 [180] __/__/__ Zone 80 000[117] __/__/__ Zone 17 017 [149] __/__/__ Zone 49 000 [181] __/__/__ Zone 81 000[118] __/__/__ Zone 18 018 [150] __/__/__ Zone 50 000 [182] __/__/__ Zone 82 000[119] __/__/__ Zone 19 019 [151] __/__/__ Zone 51 000 [183] __/__/__ Zone 83 000[120] __/__/__ Zone 20 020 [152] __/__/__ Zone 52 000 [184] __/__/__ Zone 84 000[121] __/__/__ Zone 21 021 [153] __/__/__ Zone 53 000 [185] __/__/__ Zone 85 000[122] __/__/__ Zone 22 022 [154] __/__/__ Zone 54 000 [186] __/__/__ Zone 86 000[123] __/__/__ Zone 23 023 [155] __/__/__ Zone 55 000 [187] __/__/__ Zone 87 000[124] __/__/__ Zone 24 024 [156] __/__/__ Zone 56 000 [188] __/__/__ Zone 88 000[125] __/__/__ Zone 25 025 [157] __/__/__ Zone 57 000 [189] __/__/__ Zone 89 000[126] __/__/__ Zone 26 026 [158] __/__/__ Zone 58 000 [190] __/__/__ Zone 90 000[127] __/__/__ Zone 27 027 [159] __/__/__ Zone 59 000 [191] __/__/__ Zone 91 000[128] __/__/__ Zone 28 028 [160] __/__/__ Zone 60 000 [192] __/__/__ Zone 92 000[129] __/__/__ Zone 29 029 [161] __/__/__ Zone 61 000 [193] __/__/__ Zone 93 000[130] __/__/__ Zone 30 030 [162] __/__/__ Zone 62 000 [194] __/__/__ Zone 94 000[131] __/__/__ Zone 31 031 [163] __/__/__ Zone 63 000 [195] __/__/__ Zone 95 000[132] __/__/__ Zone 32 032 [164] __/__/__ Zone 64 000 [196] __/__/__ Zone 96 000
Digiplex Modules Programming Guide - 11

Annunciator Module
Program the DGP2-ANC1 using the Winload Software or the control panel’s Module Broadcast feature. Refer to the Digiplex (DGP-848 or DGP-NE96) Reference & Installation Manual for more details. The DGP2-ANC1’s serial number is located on the module’s PC board.
= Default SettingsSECTION [001] : Partition Assignment SECTION [002] : General Options 1Option OFF ON Option OFF ON
[1] Partition 1 Disabled Enabled [1] Beeper Mute Mode* Disabled Enabled
[2] Partition 2 Disabled Enabled [2] Beep on System Trouble Disabled Enabled
[3] Partition 3 Disabled Enabled [3] Beep on Communicator Trouble Disabled Enabled
[4] Partition 4 Disabled Enabled [4] Beep on Combus/Module Trouble Disabled Enabled
[5] Partition 5 (DGP-NE96 only) Disabled Enabled [5] Zone Trouble Disabled Enabled
[6] Partition 6 (DGP-NE96 only) Disabled Enabled [6] to [8] Future Use N/A N/A
[7] Partition 7 (DGP-NE96 only) Disabled Enabled* In order for options [2] to [5] to function, option [1] must be disabled.
[8] Partition 8 (DGP-NE96 only) Disabled Enabled
Section #
[003] Status Display Mode___/___/___ (Enter a value between 000 and 005 to set which status the Annunciator will display; Default: 000)000 = Partition Status, 001 - 003 = Future Use, 004 = Zones 01 to 48, 005 = Zones 49 to 96
DGP2-ANC1 V1.0
12 - Digiplex Modules Programming Guide

Outdoor High-Security Digital Motion Detector Modules
Operational ModeDigigard DG85 can function in two operational modes (see Table 4 below): DGP2 Mode or Relay Mode. When set to Relay Mode, DG85 functions like any standard motion detector by communicating its alarm and tamper signals via relays. When set to DGP2 Mode, DG85 functions like a DGP2 motion detector module by communicating alarm signals, tamper signals, data and detector settings via the combus. In DGP2 Mode, both section programming and manual programming can be used to program the settings. In Relay Mode, only manual programming can be used to program the settings (see Table 4 below). Refer to DG85’s connection drawing on page 33 for the location of the DIP switches.
DIP Switch 1: OFF = Relay Mode (default)ON = DGP2 Mode
SettingsRefer to DG85’s connection drawing on page 33 for the location of the DIP switches and Trimpot.
Table 4: DG85 Settings
Default Setting1 When in DGP2 Mode only (see Operational Mode above).2 When in DGP2 Mode or Relay Mode (see Operational Mode above).3 This feature is always enabled in Relay Mode.4 To set the sensitivity manually, remove the front cover and, using a screwdriver, turn the trimpot clockwise to increase the detector’s sensitivity or
counter-clockwise to decrease it. You can turn the trimpot 360° in both directions. To determine the sensitivity setting, remove the cover and view how many times the LED flashes. The number of times the LED flashes corresponds to the sensitivity setting. Thus if the sensitivity is set to 6, the LED will flash 6 times.
In instances where a particular setting can be set either manually or through section programming, a discrepancy may exist between the setting of the DIP switches and the setting in the appropriate sections. In such cases, the last change that is made will dictate the setting. For example, if you disable the LED from within section programming, the DIP switch will still show that it is enabled, however the LED is actually disabled.
Feature SettingProgramming
Section Programming1 Manual Settings2
Signal Processing ModeDual [001] [1] = OFF DIP switch 2 = OFF
Single [001] [1] = ON DIP switch 2 = ON
LEDDisabled [001] [2] = OFF DIP switch 3 = OFF
Enabled [001] [2] = ON DIP switch 3 = ON
Movement Signal IndicationDisabled [001] [3] = OFF Enabled when DIP
switch 3 = ONEnabled [001] [3] = ON
Tamper Recognition3Disabled [001] [5] = OFF N/A
Enabled [001] [5] = ON N/A
Sensitivity = 10 [002] 000(lowest sensitivity) - 010(highest) Trimpot 0-104
DG85 V1.1
Digiplex Modules Programming Guide - 13

Motion Detector Modules
= Default settingSECTION [001] : General OptionsOption OFF ON
[1] Single/Dual Edge Processing Dual Edge Single Edge[2] Alarm Indication
(red LED illuminates for 5 secs.) Disabled Enabled
[3] Movement Signal Indication(red LED will flash)
Disabled Enabled
[4] Non-movement Signal Indication(green LED will flash)
Disabled Enabled
[5] Tamper Recognition Disabled Enabled
[6] Future Use N/A N/A[7] Future Use N/A N/A[8] Future Use N/A N/A
Section #
[002] Digital Shield Setting___/___/___ (000 to 003 sensitivity; Default: 002)000 = Very Low Shield, 001 = Low Shield, 002 = Normal Shield, 003 = High Shield
DGP2-60 V2.0 DGP2-70 V2.0DGP2-50 V2.0
14 - Digiplex Modules Programming Guide

Magellan Wireless Expansion Module
The Module Broadcast feature of the Digiplex (DGP-848 and DGP-NE96) control panels is not supported by the Magellan Wireless Expansion Module.
*For UL installations, check-in supervision must be enabled (ON).‡ Magellan’s PGM outputs are always enabled and are activated through the Magellan Remote Control (MG-REM1). Remote control button (refer to page 16) controls PGM3 and remote control button controls PGM4 (if PGM4 is available). Press the appropriate button to activate the PGM that it controls. Options [6] and [7] determine how the respective PGM will deactivate. If the option is OFF, the activated PGM will automatically deactivate after 2 seconds. If the option is ON, each activated PGM can only be deactivated by pressing the appropriate button on a Magellan Remote Control that controls a PGM.
Assigning Wireless Detectors and Door Contacts to the Receiver
= Default settingSECTION [001] : SupervisionOption OFF ON
[1] Low battery supervision Disabled Enabled
[2] Check-in supervision* Disabled Enabled
[3] Check-in supervision time interval 24 hours 80 minutes
[4] Future Use N/A N/A
[5] On-board module tamper supervision Disabled Enabled
[6] PGM3 Deactivation‡ 2 sec. Timer Manually
[7] PGM4 Deactivation‡ 2 sec. Timer Manually
[8] Ignore transmitter tamper signal Ignore tampersignal
Report tampersignal
Section(s) Description[030] View unknown serial numbers of transmitters: By entering this section and by pressing the anti-tamper switch on the unknown
wireless detector or door contact, the module’s unknown serial number will be displayed.[040] View and/or delete remote controls assigned in sections [201] to [208].
[041] View and/or delete remote controls assigned in sections [209] to [216].
[601] to [616] View the actual signal strength of the assigned wireless detectors and door contacts.
[701] to [716] View the actual battery life of the assigned wireless detectors and door contacts.
[801] to [816] View the previous battery life of the assigned wireless detectors and door contacts.
Section Input Serial Number(Detectors & Door Contacts)
MotionDetector
DoorContact
Section Input Serial Number(Detectors & Door Contacts)
MotionDetector
DoorContact
[101] 001 __/__/__/__/__/__ [109] 009 __/__/__/__/__/__[102] 002 __/__/__/__/__/__ [110] 010 __/__/__/__/__/__[103] 003 __/__/__/__/__/__ [111] 011 __/__/__/__/__/__[104] 004 __/__/__/__/__/__ [112] 012 __/__/__/__/__/__[105] 005 __/__/__/__/__/__ [113] 013 __/__/__/__/__/__[106] 006 __/__/__/__/__/__ [114] 014 __/__/__/__/__/__[107] 007 __/__/__/__/__/__ [115] 015 __/__/__/__/__/__[108] 008 __/__/__/__/__/__ [116] 016 __/__/__/__/__/__
MG-RCV3 V1.0
Digiplex Modules Programming Guide - 15

Remote Control Programming
= These button combinations are not available with the MG-REM1 remote control and cannot be programmed.
Table 5: Remote Control Button Choice
*Since the Magellan PGMs are always enabled and are activated only with Magellan remote control buttons and respectively, the Utility Key options pertain only to PGMs on other modules connected to the system. For DGP-848 systems, refer to the PGM table (First Digit: 8) in the Digiplex DGP-848 Programming Guide. For DGP-NE96 systems, refer to the PGM table (Event Group: 048; Feature Group: 000; Start #001 to End #005) in the DGP-NE96 Programming Guide.
†The Panic feature must be enabled in the control panel.
Only arming and disarming functions were investigated by UL.
Table 6: Hexadecimal Programming
Remote Control Assignment to the Receiver Remote Control Assignment to a User Access Code
Remote Control Button Programming (refer to Tables 5 and 6 below)
Section & User Name Section User # Section ( / ) ( / ) ( + / + ) ( + / + )
[201] :____________________________________ [301] __/__/__ [401] ( __/__ ) ( __/__ ) ( __/__ ) ( __/__ )
[202] :____________________________________ [302] __/__/__ [402] ( __/__ ) ( __/__ ) ( __/__ ) ( __/__ )
[203] :____________________________________ [303] __/__/__ [403] ( __/__ ) ( __/__ ) ( __/__ ) ( __/__ )
[204] :____________________________________ [304] __/__/__ [404] ( __/__ ) ( __/__ ) ( __/__ ) ( __/__ )
[205] :____________________________________ [305] __/__/__ [405] ( __/__ ) ( __/__ ) ( __/__ ) ( __/__ )
[206] :____________________________________ [306] __/__/__ [406] ( __/__ ) ( __/__ ) ( __/__ ) ( __/__ )
[207] :____________________________________ [307] __/__/__ [407] ( __/__ ) ( __/__ ) ( __/__ ) ( __/__ )
[208] :____________________________________ [308] __/__/__ [408] ( __/__ ) ( __/__ ) ( __/__ ) ( __/__ )
[209] :____________________________________ [309] __/__/__ [409] ( __/__ ) ( __/__ ) ( __/__ ) ( __/__ )
[210] :____________________________________ [310] __/__/__ [410] ( __/__ ) ( __/__ ) ( __/__ ) ( __/__ )
[211] :____________________________________ [311] __/__/__ [411] ( __/__ ) ( __/__ ) ( __/__ ) ( __/__ )
[212] :____________________________________ [312] __/__/__ [412] ( __/__ ) ( __/__ ) ( __/__ ) ( __/__ )
[213] :____________________________________ [313] __/__/__ [413] ( __/__ ) ( __/__ ) ( __/__ ) ( __/__ )
[214] :____________________________________ [314] __/__/__ [414] ( __/__ ) ( __/__ ) ( __/__ ) ( __/__ )
[215] :____________________________________ [315] __/__/__ [415] ( __/__ ) ( __/__ ) ( __/__ ) ( __/__ )
[216] :____________________________________ [316] __/__/__ [416] ( __/__ ) ( __/__ ) ( __/__ ) ( __/__ )
[0] = Button disabled [8] = Panic 2†
[1] = Regular Arm [9] = Panic 3†
[2] = Stay Arm [A] = Smoke reset
[3] = Instant Arm [B] = Utility Key 1*[4] = Force Arm [C] = Utility Key 2*[5] = Disarm [D] = Utility Key 3*
[6] = Stay/Instant Disarm [E] = Utility Key 4*
[7] = Panic 1† [F] = Utility Key 5*
LCD keypads[0] to [9] = values 0 to 9 respectively [DISARM] = D[STAY] = A [BYP] = E[FORCE] = B [MEM] = F[ARM] = C [CLEAR] = Exit section without saving[ENTER] = Save current data and advance to next section
Grafica keypads[0] to [9] = values 0 to 9 respectively Right Action Key (Exit) = Exit section without saving
[#] = A to F (press the [#] key until the desired letter appears) Center Action Key (Save) = Save current data and
advance to next section
MG-REM1Four-button Remote Control
16 - Digiplex Modules Programming Guide

4-PGM Expansion Module
= Default setting
Refer to Appendix 1: Programming PGMs on page 41 for the PGM Table. All the Event Groups can be used to program the module’s PGM(s).
SECTION [001] : General Options SECTION [002] : PGM OptionsOption OFF ON Option OFF ON
[1] Future Use N/A N/A [1] PGM1 Deactivation After DeactivationEvent
PGM Timer
[2] Pulse Output for Fire Alarms Disabled Enabled [2] PGM1 Base Time 1 second 1 minute
[3] Future Use N/A N/A [3] PGM2 Deactivation After DeactivationEvent
PGM Timer
[4] Future Use N/A N/A [4] PGM2 Base Time 1 second 1 minute
[5] Future Use N/A N/A [5] PGM3 Deactivation After DeactivationEvent
PGM Timer
[6] Future Use N/A N/A [6] PGM3 Base Time 1 second 1 minute
[7] Future Use N/A N/A [7] PGM4 Deactivation After DeactivationEvent
PGM Timer
[8] Future Use N/A N/A [8] PGM4 Base Time 1 second 1 minute
Section Data Description Default
[003] __/__/__ (000 to 255; see option [2] in section [002]) PGM1 Timer 005
[012] __/__/__ (000 to 255; see option [4] in section [002]) PGM2 Timer 005
[021] __/__/__ (000 to 255; see option [6] in section [002]) PGM3 Timer 005
[030] __/__/__ (000 to 255; see option [8] in section [002]) PGM4 Timer 005
Event Group Feature Group Start # End #Section Section Section Section
PGM Activation
PGM1 [004] __/__/__ [005] __/__/__ [006] __/__/__ [007] __/__/__PGM2 [013] __/__/__ [014] __/__/__ [015] __/__/__ [016] __/__/__PGM3 [022] __/__/__ [023] __/__/__ [024] __/__/__ [025] __/__/__PGM4 [031] __/__/__ [032] __/__/__ [033] __/__/__ [034] __/__/__
PGM Deactivation
PGM1 [008] __/__/__ [009] __/__/__ [010] __/__/__ [011] __/__/__PGM2 [017] __/__/__ [018] __/__/__ [019] __/__/__ [020] __/__/__PGM3 [026] __/__/__ [027] __/__/__ [028] __/__/__ [029] __/__/__PGM4 [035] __/__/__ [036] __/__/__ [037] __/__/__ [038] __/__/__
APR3-PGM4 V2.0
Digiplex Modules Programming Guide - 17

8-zone Expansion Module
* For the Base Time, using Level Programming (refer to page 1), press the and buttons to select a value from 000 to 002 and then press [ENTER]. Base Time Multipliers: 000 = 15 ms, 001 = 1 second, 002 = 1 minute.
Refer to Appendix 1: Programming PGMs on page 41 for the PGM Table. Only Event Groups 000 to 055 can be used to program the module’s PGM.
= Default settingSECTION [001] : General OptionsOption OFF ON
[1] Tamper RecognitionON = Input 8 (Z8) becomes tamper input
Disabled Enabled
[2] PGM Deactivation After Deactiva-tion Event
PGM Timer
[3] PGM normal state N.O. N.C.
[4] PGM Base Time 1 second 1 minute
[5] to [8] Future Use N/A N/A
Input Speed Base Time (000-002)* Time Value (000-255) Default Input Speed Base Time (000-002)* Time Value (000-255) DefaultInput 001 / 009 [002] ___/___/___ [003] ___/___/___ 600ms Input 005 / 013 [010] ___/___/___ [011] ___/___/___ 600msInput 002 / 010 [004] ___/___/___ [005] ___/___/___ 600ms Input 006 / 014 [012] ___/___/___ [013] ___/___/___ 600msInput 003 / 011 [006] ___/___/___ [007] ___/___/___ 600ms Input 007 / 015 [014] ___/___/___ [015] ___/___/___ 600msInput 004 / 012 [008] ___/___/___ [009] ___/___/___ 600ms Input 008 / 016 [016] ___/___/___ [017] ___/___/___ 600ms
Section Data Description Default
[018] __/__/__ (000 to 255; see option [4] in section [001]) PGM Timer 005
Event Group Feature Group Start # End #Section Section Section Section
PGM Activation [019] __/__/__ [020] __/__/__ [021] __/__/__ [022] __/__/__PGM Deactivation [023] __/__/__ [024] __/__/__ [025] __/__/__ [026] __/__/__
Section Description
[030] Test PGM: Activates the PGM for 8 seconds to verify if the PGM is functioning properly.
APR3-ZX8 V2.0
18 - Digiplex Modules Programming Guide
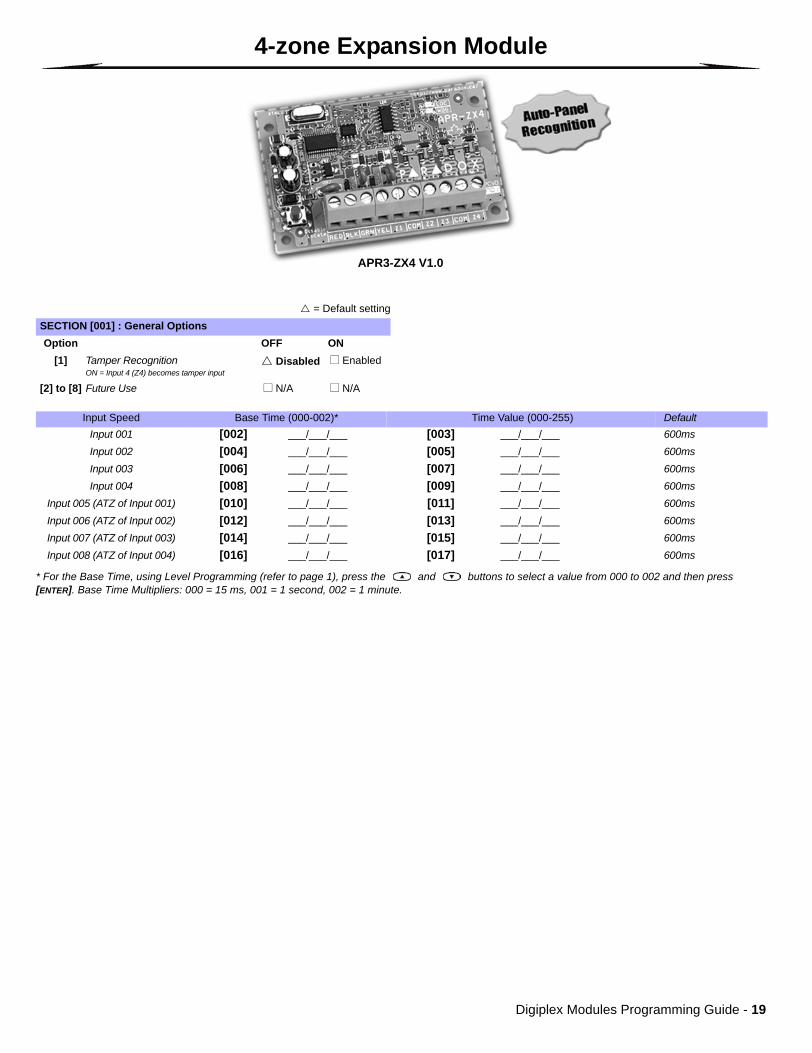
4-zone Expansion Module
* For the Base Time, using Level Programming (refer to page 1), press the and buttons to select a value from 000 to 002 and then press [ENTER]. Base Time Multipliers: 000 = 15 ms, 001 = 1 second, 002 = 1 minute.
= Default settingSECTION [001] : General OptionsOption OFF ON
[1] Tamper RecognitionON = Input 4 (Z4) becomes tamper input
Disabled Enabled
[2] to [8] Future Use N/A N/A
Input Speed Base Time (000-002)* Time Value (000-255) DefaultInput 001 [002] ___/___/___ [003] ___/___/___ 600msInput 002 [004] ___/___/___ [005] ___/___/___ 600msInput 003 [006] ___/___/___ [007] ___/___/___ 600msInput 004 [008] ___/___/___ [009] ___/___/___ 600ms
Input 005 (ATZ of Input 001) [010] ___/___/___ [011] ___/___/___ 600msInput 006 (ATZ of Input 002) [012] ___/___/___ [013] ___/___/___ 600msInput 007 (ATZ of Input 003) [014] ___/___/___ [015] ___/___/___ 600msInput 008 (ATZ of Input 004) [016] ___/___/___ [017] ___/___/___ 600ms
APR3-ZX4 V1.0
Digiplex Modules Programming Guide - 19

1-zone Expansion Module
INPUT SPEED = BASE TIME x TIME VALUE (Default: 600mS)
= Default settingSECTION [001] : General OptionsOption OFF ON
[1] Tamper Recognition Disabled Enabled
[2] to [8] Future Use N/A N/A
Base Time (000 to 002)*SECTION Data
[002] ___/___/___
*For the Base Time, using Level Programming (refer to page 1), press the and buttons to select a value from 000 to 002 and then press [ENTER]. Base Time Multipliers: 000 = 15 ms, 001 = 1 second, 002 = 1 minute.
Time Value (001 to 255)SECTION Data
[003] ___/___/___
DGP2-ZX1 V2.0
20 - Digiplex Modules Programming Guide

Printer Module
= Default settingSECTION [001] : Partition Assignment SECTION [002] : Automatic Printing of Zone Status (1 to 8)Option OFF ON Option OFF ON
[1] Partition 1 Disabled Enabled [1] Print Status of Zone 1 Disabled Enabled
[2] Partition 2 Disabled Enabled [2] Print Status of Zone 2 Disabled Enabled
[3] Partition 3 Disabled Enabled [3] Print Status of Zone 3 Disabled Enabled
[4] Partition 4 Disabled Enabled [4] Print Status of Zone 4 Disabled Enabled
[5] Partition 5 (DGP-NE96 only) Disabled Enabled [5] Print Status of Zone 5 Disabled Enabled
[6] Partition 6 (DGP-NE96 only) Disabled Enabled [6] Print Status of Zone 6 Disabled Enabled
[7] Partition 7 (DGP-NE96 only) Disabled Enabled [7] Print Status of Zone 7 Disabled Enabled
[8] Partition 8 (DGP-NE96 only) Disabled Enabled [8] Print Status of Zone 8 Disabled Enabled
SECTION [003] : Automatic Printing of Zone Status (9 to 16) SECTION [004] : Automatic Printing of Zone Status (17 to 24)Option OFF ON Option OFF ON
[1] Print Status of Zone 9 Disabled Enabled [1] Print Status of Zone 17 Disabled Enabled
[2] Print Status of Zone 10 Disabled Enabled [2] Print Status of Zone 18 Disabled Enabled
[3] Print Status of Zone 11 Disabled Enabled [3] Print Status of Zone 19 Disabled Enabled
[4] Print Status of Zone 12 Disabled Enabled [4] Print Status of Zone 20 Disabled Enabled
[5] Print Status of Zone 13 Disabled Enabled [5] Print Status of Zone 21 Disabled Enabled
[6] Print Status of Zone 14 Disabled Enabled [6] Print Status of Zone 22 Disabled Enabled
[7] Print Status of Zone 15 Disabled Enabled [7] Print Status of Zone 23 Disabled Enabled
[8] Print Status of Zone 16 Disabled Enabled [8] Print Status of Zone 24 Disabled Enabled
SECTION [005] : Automatic Printing of Zone Status (25 to 32) SECTION [006] : Automatic Printing of Zone Status (33 to 40)Option OFF ON Option OFF ON
[1] Print Status of Zone 25 Disabled Enabled [1] Print Status of Zone 33 Disabled Enabled
[2] Print Status of Zone 26 Disabled Enabled [2] Print Status of Zone 34 Disabled Enabled
[3] Print Status of Zone 27 Disabled Enabled [3] Print Status of Zone 35 Disabled Enabled
[4] Print Status of Zone 28 Disabled Enabled [4] Print Status of Zone 36 Disabled Enabled
[5] Print Status of Zone 29 Disabled Enabled [5] Print Status of Zone 37 Disabled Enabled
[6] Print Status of Zone 30 Disabled Enabled [6] Print Status of Zone 38 Disabled Enabled
[7] Print Status of Zone 31 Disabled Enabled [7] Print Status of Zone 39 Disabled Enabled
[8] Print Status of Zone 32 Disabled Enabled [8] Print Status of Zone 40 Disabled Enabled
APR3-PRT1 V2.2
Digiplex Modules Programming Guide - 21

= Default settingSECTION [007] : Automatic Printing of Zone Status (41 to 48) SECTION [008] : Automatic Printing of Zone Status (49 to 56)Option OFF ON Option OFF ON
[1] Print Status of Zone 41 Disabled Enabled [1] Print Status of Zone 49 (DGP-NE96 only) Disabled Enabled
[2] Print Status of Zone 42 Disabled Enabled [2] Print Status of Zone 50 (DGP-NE96 only) Disabled Enabled
[3] Print Status of Zone 43 Disabled Enabled [3] Print Status of Zone 51 (DGP-NE96 only) Disabled Enabled
[4] Print Status of Zone 44 Disabled Enabled [4] Print Status of Zone 52 (DGP-NE96 only) Disabled Enabled
[5] Print Status of Zone 45 Disabled Enabled [5] Print Status of Zone 53 (DGP-NE96 only) Disabled Enabled
[6] Print Status of Zone 46 Disabled Enabled [6] Print Status of Zone 54 (DGP-NE96 only) Disabled Enabled
[7] Print Status of Zone 47 Disabled Enabled [7] Print Status of Zone 55 (DGP-NE96 only) Disabled Enabled
[8] Print Status of Zone 48 Disabled Enabled [8] Print Status of Zone 56 (DGP-NE96 only) Disabled Enabled
SECTION [009] : Automatic Printing of Zone Status (57 to 64) SECTION [010] : Automatic Printing of Zone Status (65 to 72)Option OFF ON Option OFF ON
[1] Print Status of Zone 57 (DGP-NE96 only) Disabled Enabled [1] Print Status of Zone 65 (DGP-NE96 only) Disabled Enabled
[2] Print Status of Zone 58 (DGP-NE96 only) Disabled Enabled [2] Print Status of Zone 66 (DGP-NE96 only) Disabled Enabled
[3] Print Status of Zone 59 (DGP-NE96 only) Disabled Enabled [3] Print Status of Zone 67 (DGP-NE96 only) Disabled Enabled
[4] Print Status of Zone 60 (DGP-NE96 only) Disabled Enabled [4] Print Status of Zone 68 (DGP-NE96 only) Disabled Enabled
[5] Print Status of Zone 61 (DGP-NE96 only) Disabled Enabled [5] Print Status of Zone 69 (DGP-NE96 only) Disabled Enabled
[6] Print Status of Zone 62 (DGP-NE96 only) Disabled Enabled [6] Print Status of Zone 70 (DGP-NE96 only) Disabled Enabled
[7] Print Status of Zone 63 (DGP-NE96 only) Disabled Enabled [7] Print Status of Zone 71 (DGP-NE96 only) Disabled Enabled
[8] Print Status of Zone 64 (DGP-NE96 only) Disabled Enabled [8] Print Status of Zone 72 (DGP-NE96 only) Disabled Enabled
SECTION [011] : Automatic Printing of Zone Status (73 to 80) SECTION [012] : Automatic Printing of Zone Status (81 to 88)Option OFF ON Option OFF ON
[1] Print Status of Zone 73 (DGP-NE96 only) Disabled Enabled [1] Print Status of Zone 81 (DGP-NE96 only) Disabled Enabled
[2] Print Status of Zone 74 (DGP-NE96 only) Disabled Enabled [2] Print Status of Zone 82 (DGP-NE96 only) Disabled Enabled
[3] Print Status of Zone 75 (DGP-NE96 only) Disabled Enabled [3] Print Status of Zone 83 (DGP-NE96 only) Disabled Enabled
[4] Print Status of Zone 76 (DGP-NE96 only) Disabled Enabled [4] Print Status of Zone 84 (DGP-NE96 only) Disabled Enabled
[5] Print Status of Zone 77 (DGP-NE96 only) Disabled Enabled [5] Print Status of Zone 85 (DGP-NE96 only) Disabled Enabled
[6] Print Status of Zone 78 (DGP-NE96 only) Disabled Enabled [6] Print Status of Zone 86 (DGP-NE96 only) Disabled Enabled
[7] Print Status of Zone 79 (DGP-NE96 only) Disabled Enabled [7] Print Status of Zone 87 (DGP-NE96 only) Disabled Enabled
[8] Print Status of Zone 80 (DGP-NE96 only) Disabled Enabled [8] Print Status of Zone 88 (DGP-NE96 only) Disabled Enabled
SECTION [013] : Automatic Printing of Zone Status (89 to 96) SECTION [014] : Automatic Printing of Event GroupsOption OFF ON Option OFF ON
[1] Print Status of Zone 89 (DGP-NE96 only) Disabled Enabled [1] Print Miscellaneous Events Disabled Enabled
[2] Print Status of Zone 90 (DGP-NE96 only) Disabled Enabled [2] Print Arming/Disarming Events Disabled Enabled
[3] Print Status of Zone 91 (DGP-NE96 only) Disabled Enabled [3] Print Alarm/Alarm Restore Events Disabled Enabled
[4] Print Status of Zone 92 (DGP-NE96 only) Disabled Enabled [4] Print Tamper/Tamper Restore Events Disabled Enabled
[5] Print Status of Zone 93 (DGP-NE96 only) Disabled Enabled [5] Print Troubles/Troubles Restore Events
Disabled Enabled
[6] Print Status of Zone 94 (DGP-NE96 only) Disabled Enabled [6] Print Special Events Disabled Enabled
[7] Print Status of Zone 95 (DGP-NE96 only) Disabled Enabled [7] Print Access Events Disabled Enabled
[8] Print Status of Zone 96 (DGP-NE96 only) Disabled Enabled [8] Future Use N/A N/A
22 - Digiplex Modules Programming Guide

= Default setting
Refer to Appendix 1: Programming PGMs on page 41 for the PGM Table. Only Event Groups 000 to 055 can be used to program the module’s PGM.
Manual Printing Programming
SECTION [015] : Printer Setup Options SECTION [016] : Serial Port Setup OptionsOption OFF ON Option OFF ON
[1] Parallel Port Disabled Enabled [1] Serial Port Disabled Enabled
[2] Future Use N/A N/A [2] & [3] See Table See Table
See Table See Table[3] Off-line Status Ignored Disabled Enabled
[4] Paper Empty Status Ignored Disabled Enabled
[5] Printer Fault Status Ignored Disabled Enabled
[6] Printer Busy Status Ignored Disabled Enabled
[7] Future Use N/A N/A
[8] Future Use N/A N/A [4] to [8] Future Use N/A N/A
SECTION [017] : PGM OptionsOption OFF ON
[1] PGM Deactivation After Deactiva-tion Event
PGM Timer
[2] PGM Normal State N.O. N.C.
[3] PGM Base Time 1 second 1 minute
[4] Future Use N/A N/A[5] Tamper Recognition Disabled Enabled
[6] to [8] Future Use N/A N/A
Section Data Description Default
[018] __/__/__ (000 to 255; see option [3] in section [017]) PGM Timer 005
Event Group Feature Group Start # End #Section Section Section Section
PGM Activation [019] __/__/__ [020] __/__/__ [021] __/__/__ [022] __/__/__PGM Deactivation [023] __/__/__ [024] __/__/__ [025] __/__/__ [026] __/__/__
Section Data Description Default
[027] __/__/__ (000 to 255)** Miscellaneous Events (Event Group Selection) 000
[028] __/__/__ (000 to 255)** Miscellaneous Events (Feature Group Selection) 000
[029] __/__/__ (000 to 255)** Miscellaneous Events (Event Start # Selection) 000
[030] __/__/__ (000 to 255)** Miscellaneous Events (Event End # Selection) 000
[031] __/__/__ (000 to 255)** Arming/Disarming Events (Event Group Selection) 000
[032] __/__/__ (000 to 255)** Arming/Disarming Events (Feature Group Selection) 000
[033] __/__/__ (000 to 255)** Arming/Disarming Events (Event Start # Selection) 000
[034] __/__/__ (000 to 255)** Arming/Disarming Events (Event End # Selection) 000
[035] __/__/__ (000 to 255)** Alarm/Alarm Restore Events (Event Group Selection) 000
[036] __/__/__ (000 to 255)** Alarm/Alarm Restore Events (Feature Group Selection) 000
[037] __/__/__ (000 to 255)** Alarm/Alarm Restore Events (Event Start # Selection) 000
[038] __/__/__ (000 to 255)** Alarm/Alarm Restore Events (Event End # Selection) 000
[039] __/__/__ (000 to 255)** Tamper/Tamper Restore Events (Event Group Selection) 000
[040] __/__/__ (000 to 255)** Tamper/Tamper Restore Events (Feature Group Selection) 000
Digiplex Modules Programming Guide - 23

** Program the APR3-PRT1’s manual printing feature as you would a PGM. Refer to Appendix 1: Programming PGMs on page 41 for the PGM Table. Only Event Groups 000 to 055 can be used to program the module’s manual printing feature.
[041] __/__/__ (000 to 255)** Tamper/Tamper Restore Events (Event Start # Selection) 000
[042] __/__/__ (000 to 255)** Tamper/Tamper Restore Events (Event End # Selection) 000
[043] __/__/__ (000 to 255)** Trouble/Trouble Restore Events (Event Group Selection) 000
[044] __/__/__ (000 to 255)** Trouble/Trouble Restore Events (Feature Group Selection) 000
[045] __/__/__ (000 to 255)** Trouble/Trouble Restore Events (Event Start # Selection) 000
[046] __/__/__ (000 to 255)** Trouble/Trouble Restore Events (Event End # Selection) 000
[047] __/__/__ (000 to 255)** Special Events (Event Group Selection) 000
[048] __/__/__ (000 to 255)** Special Events (Feature Group Selection) 000
[049] __/__/__ (000 to 255)** Special Events (Event Start # Selection) 000
[050] __/__/__ (000 to 255)** Special Events (Event End # Selection) 000
[051] __/__/__ (000 to 255)** Access Events (Event Group Selection) 000
[052] __/__/__ (000 to 255)** Access Events (Feature Group Selection) 000
[053] __/__/__ (000 to 255)** Access Events (Event Start # Selection) 000
[054] __/__/__ (000 to 255)** Access Events (Event End # Selection) 000
[055] __/__/__ (000 to 255)** All Events (Event Group Selection) 000
[056] __/__/__ (000 to 255)** All Events (Feature Group Selection) 000
[057] __/__/__ (000 to 255)** All Events (Event Start # Selection) 000
[058] __/__/__ (000 to 255)** All Events (Event End # Selection) 000
Section Description
[060] Test PGM: Activates the PGM for 8 seconds to verify if the PGM is functioning properly.
24 - Digiplex Modules Programming Guide

InTouch Voice-Assisted Arm/Disarm Module
= Default setting
Section Data Description Default
[001] __/__/__ (000 to 255; Number of rings) Ring counter 8 rings
[002] __/__/__ (000 to 255 seconds) Answering machine override Disabled
[003] __/__/__ (000 to 255; refer to option [4] in section [004])(000 = follows manual activation/deactivation of PGM by first pressing [#] and then [0])
PGM timer 005
SECTION [004] : General Options SECTION [005] : Partition AssignmentOption OFF ON Option OFF ON
[1] Future Use N/A N/A [1] Partition 1 Disabled Enabled[2] Future Use N/A N/A [2] Partition 2 Disabled Enabled[3] PGM Output Disabled Enabled [3] Partition 3 Disabled Enabled[4] PGM Base Time Seconds Minutes [4] Partition 4 Disabled Enabled[5] Future Use N/A N/A [5] Partition 5 (DGP-NE96 only) Disabled Enabled[6] Future Use N/A N/A [6] Partition 6 (DGP-NE96 only) Disabled Enabled[7] Future Use N/A N/A [7] Partition 7 (DGP-NE96 only) Disabled Enabled[8] Future Use N/A N/A [8] Partition 8 (DGP-NE96 only) Disabled Enabled
APR3-ADM2 V2.0
Digiplex Modules Programming Guide - 25

Access Control Module
= Default setting* = V2.0 or higher
** = V1.1 or higher*** = V1.02 or higher
Enable option [8] in section [004] if the DGP2-ACM1P’s power supply is not being used. This disables AC and battery power supervision and prevents a trouble from being generated.
SECTION [001] : Partition Assignment SECTION [002] : General Options 1Option OFF ON Option OFF ON
[1] Partition 1 Disabled Enabled [1] Tamper Input Disabled Enabled
[2] Partition 2 Disabled Enabled [2] Battery Charging Current 350mA 700mA
[3] Partition 3 Disabled Enabled [3] Reader’s red LED to follow partition’s status
Disabled Enabled
[4] Partition 4 Disabled Enabled [4] Reader’s beeping to follow partition’s status when option [3] is ON
Disabled Enabled
[5] Partition 5 (DGP-NE96 only) Disabled Enabled [5] Card activates door unlocked schedule
Disabled Enabled
[6] Partition 6 (DGP-NE96 only) Disabled Enabled [6] Door will relock Imme-diately
Whenclosed
[7] Partition 7 (DGP-NE96 only) Disabled Enabled [7] Reader’s green LED for Access Granted
Disabled Enabled
[8] Partition 8 (DGP-NE96 only) Disabled Enabled [8] Unlock on Request for Exit (REX) Disabled Enabled
SECTION [003] : General Options 2 SECTION [004] : PGM OptionsOption OFF ON Option OFF ON
[1] Door Left Open Alarm Disabled Enabled [1] PGM Deactivation After Deactiva-tion Event
PGM Timer
[2] Door Left Open Pre-alarm Disabled Enabled [2] PGM Normal State N.O. N.C.
[3] Door Left Open Alarm Silent Audible [3] PGM Base Time 1 second 1 minute
[4] Door Left Open Alarm follows AlarmRestore
BeepTimer
[4] Future Use N/A N/A
[5] Door Forced Open Alarm Disabled Enabled [5] PIN entry on CR-R885-BL (Note 1 on page 28)
Disabled Enabled
[6] Door Forced Alarm Silent Audible [6] Reader Locate Feedback* Visual Visual &audible
[7] Door Forced Alarm follows AlarmRestore
BeepTimer
[7] Unlock Door on Fire Alarm* Disabled Enabled
[8] Reader Access Feedback Visual Visual &audible
[8] AC and Battery Supervision** Enabled Disabled
Section Data Description Default
[005] __/__/__ (000 to 255 x 1 minute; 000 = Instant) AC failure report delay 000
[006] __/__/__ (001 to 255 seconds) Door Unlocked Period 005
[007] __/__/__ (001 to 255 seconds added to section [006]) Door Unlocked Period extension 015
DGP2-ACM1P V2.0
26 - Digiplex Modules Programming Guide

For Access Control Modules version 2.0 or higher, the End Time can be set earlier than the Start Time. Please be advised that once unlocked, the door will remain unlocked until the next programmed End Time.
Refer to Appendix 1: Programming PGMs on page 41 for the PGM Table. Only Event Groups 000 to 055 can be used to program the module’s PGM.
When the DGP2-ACM1P is in access card display mode, the door connected to the module cannot be accessed.
To assign an access card, enter the desired section and then present the access card to the reader, which is connected to the DGP2-ACM1P, three times.
[008] __/__/__ (001 to 255 seconds) Door Left Open Interval 060
[009] __/__/__ (001 to 255 seconds)Time to start pre-alarm before alarm is triggered
Door Left Open Pre-Alarm Timer 015
[010] __/__/__ (001 to 255 seconds) Beep timer for Door Left Open Alarm 005
[011] __/__/__ (001 to 255 seconds) Beep timer for Door Forced Open alarm 005
[012] __/__/__ (000 to 255; refer to option [3] in section [004]) PGM timer 005
Section [013]: Door Unlocked Schedule
Start Time End Time Days (turn ON or OFF)
S M T W T F S H
Schedule A: ___ ___ : ___ ___ ___ ___ : ___ ___ 1 2 3 4 5 6 7 8
Schedule B: ___ ___ : ___ ___ ___ ___ : ___ ___ 1 2 3 4 5 6 7 8
Event Group Feature Group Start # End #Section Section Section Section
PGM Activation [014] __/__/__ [015] __/__/__ [016] __/__/__ [017] __/__/__PGM Deactivation [018] __/__/__ [019] __/__/__ [020] __/__/__ [021] __/__/__
SECTION [022] : Safe Mode OptionsOption OFF ON
[1] Safe Mode* Disabled Enabled[2] Safe Mode Access* Disabled Enabled[3] Reader Safe Mode Feedback* Visual Visual &
audible[4] to [8] Future Use N/A N/A
Section Data Description Default
[023] __/__/__ (001 to 024 hours; 000 = Disabled) Safe Mode Door Unlocked Period* 000
Section Description
[030] Test PGM: Activates the PGM for 8 seconds to verify if the PGM is functioning properly.
[040] Access Card Serial Number Display***: View an access card’s serial number displayed on any LCD or Grafica keypad on the combus.
Section Description
[061] Assign Safe Mode Access Card 1*
[062] Assign Safe Mode Access Card 2*
[063] Assign Safe Mode Access Card 3*
[064] Assign Safe Mode Access Card 4*
Digiplex Modules Programming Guide - 27

Enter the desired section to delete the corresponding access card(s).
Note 1: PIN Entry On CR-R885-BL Indoor/Outdoor Proximity Reader with 10cm (4in) Read Range (DGP-NE96 only)The PIN entry on CR-R885-BL feature (section [004] option [5], see page 26) pertains to the Card and Code Access option programmed in the DGP-NE96 control panel (refer to the Access Control section in the DGP-NE96 Reference & Installation Manual). With the Card and Code Access option enabled (ON), a user must present a valid access control card to the reader and then enter a valid PIN (user code) to enter an armed access control door. If the reader is connected to an Access Control Module and if there is no keypad nearby in which to enter a PIN, access will be denied. With section [004] option [5] enabled and by installing a CR-R885-BL Indoor/Outdoor Proximity Reader with 10cm (4in) Read Range, the user can present their card to the CR-R885-BL reader and then enter their PIN on the CR-R885-BL’s keypad to acquire access to the armed access control door.
If the access control door is using an ordinary proximity reader and is connected to an Access Control Module, disable the door’s Card and Code Access option in the DGP-NE96 control panel.
Configuring the CR-R885-BL’s Keypad to Function with the DGP-NE96In order for the “Pin Entry on CR-R885-BL” feature to work, the CR-R885-BL’s keypad communication format must be set to 8-bit Wiegand. To do so, from the CR-R885-BL, perform the following:
STEP 1: Press and hold the [CLEAR] key for 4 seconds (the reader emits a confirmation beep and the green LED illuminates).STEP 2: Enter the CR-R885-BL’s [INSTALLER CODE] (default: 000000) and press the [ENTER] key (reader emits a confirmation beep and the green LED flashes).STEP 3: Enter section [002] and press the [ENTER] key (reader emits a confirmation beep and the green LED stops flashing).STEP 4: Press the [0] key (8-bit Wiegand) and press the [ENTER] key (the reader emits a confirmation beep and the green LED flashes).STEP 5: Press and hold the [CLEAR] key for 4 seconds to exit programming mode (the reader emits a rejection beep and the green LED extinguishes).
For more information, please refer to the CR-R885-BL Indoor/Outdoor Proximity Reader with 10cm (4in) Read Range Installation and Operating Instructions.
Section Description
[070] Delete All Safe Mode Access Cards*
[071] Delete Safe Mode Access Card 1*
[072] Delete Safe Mode Access Card 2*
[073] Delete Safe Mode Access Card 3*
[074] Delete Safe Mode Access Card 4*
28 - Digiplex Modules Programming Guide

Power Supply Module
Refer to Appendix 1: Programming PGMs on page 41 for the PGM Table. Only Event Groups 000 to 055 can be used to program the module’s PGM.
= Default settingSECTION [001] : General OptionsOption OFF ON
A 40VA transformer is required when selecting the 850mA battery charge current. Using a 20VA transformer with a battery charge current of 850mA may damage the system.
[1] Tamper Recognition Disabled Enabled
[2] Battery Charge Current 350mA 850mA
[3] PGM Deactivation After Deactiva-tion Event
PGM Timer
[4] PGM Base Time 1 second 1 minute
[5] to [8] Future Use N/A N/A
Section Data Description Default
[002] __/__/__ (000 to 255 x 1 minute; 000 = Instant) AC failure report delay 000
[003] __/__/__ (000 to 255; refer to option [4] in section [001]) PGM Timer 005
Event Group Feature Group Start # End #Section Section Section Section
PGM Activation [004] __/__/__ [005] __/__/__ [006] __/__/__ [007] __/__/__PGM Deactivation [008] __/__/__ [009] __/__/__ [010] __/__/__ [011] __/__/__
Section Description
[020] Test PGM: Activates the PGM for 8 seconds to verify if the PGM is functioning properly.
DGP2-PS17 V1.0
Digiplex Modules Programming Guide - 29

Module Connection DrawingsModule Connection Overview
Module LED IndicationsGreen LOCATE LED (sometimes seen as LOC or LC):Power Up: Remains illuminated during power up.
Locate: If the LED flashes fast during normal operation, it is receiving a “locate” request from the control panel. Depending on the module, the “locate” request can be disabled by pressing on the tamper switch or on the “Disable Locate” switch.
Red WATCHDOG LED (sometimes seen as WDG, WTDG or WD):Status: Flashes to indicate proper operation.
Communication Failure:If both the LOCATE and WATCHDOG LEDs are alternately flashing, the module is experiencing a communication failure with the control panel.
Green BATT LED (DGP2-ACM1P and DGP2-PS17 only):Charging and battery test LED (every 60 seconds).
Green RX LED (MG-RCV3 only):Flashing: The printer module is transmitting data through the serial port.
Green PULSE LED (APR-ADM2 only):Will illuminate whenever the APR3-ADM2 is using its dialer. The PULSE LED will remain illuminated for the whole duration that the dialer is being used.
General Warnings
Remove AC and battery power from the control panel before connecting the module to the combus.
Refer to the appropriate control panel’s Reference & Installation Manual for the maximum allowable installation distance from the control panel.
Any device such as a garage door, light or siren.
External Power Supply
PGM 5A
Relay
Figure 2: Connecting a 5A PGM OutputSome modules’ PGM output(s) are comprised of one or more 5A relays. Connect the PGM output as shown below. For the external power supply, we recommend the DGP2-PS17 Power Supply Module.
Figure 3: Connecting a 50mA PGM OutputSome modules’ PGM output is comprised of one 50mA output. Connect the PGM output as shown below.
Figure 1: Connecting the Combus
Digiplex control panel (DGP-848/DGP-NE96)
Combus
ModuleModule
30 - Digiplex Modules Programming Guide

Grafica Graphic LCD Keypad Module (DNE-K07)
Please Note: The Grafica keypad is best viewed at an angle between 20° and -10°.
Mounting the Metal Wall Plate1) Place the wall plate to
desired position.2) Drill and insert screws into
holes labelled “A”.
Mounting Grafica to the Wall Plate
1) Place Grafica’s back plate flush against the mounted metal wall plate.
2) Slide Grafica’s open slots labelled “D” onto the metal wall plate’s tabs labelled “B”.
3) Gently apply downward pressure to snap Grafica onto the metal wall plate.
4) If necessary, insert an optional screw in the space provided on the metal wall plate’s left tab.
Please Note: Grafica’s keypad cover requires a minimum clearance of 9cm (3.5in).
A
B
Combus
To Digiplex control panel (DGP-848/DGP-NE96)
Grafica (partial view)
To other modules
Digiplex Modules Programming Guide - 31
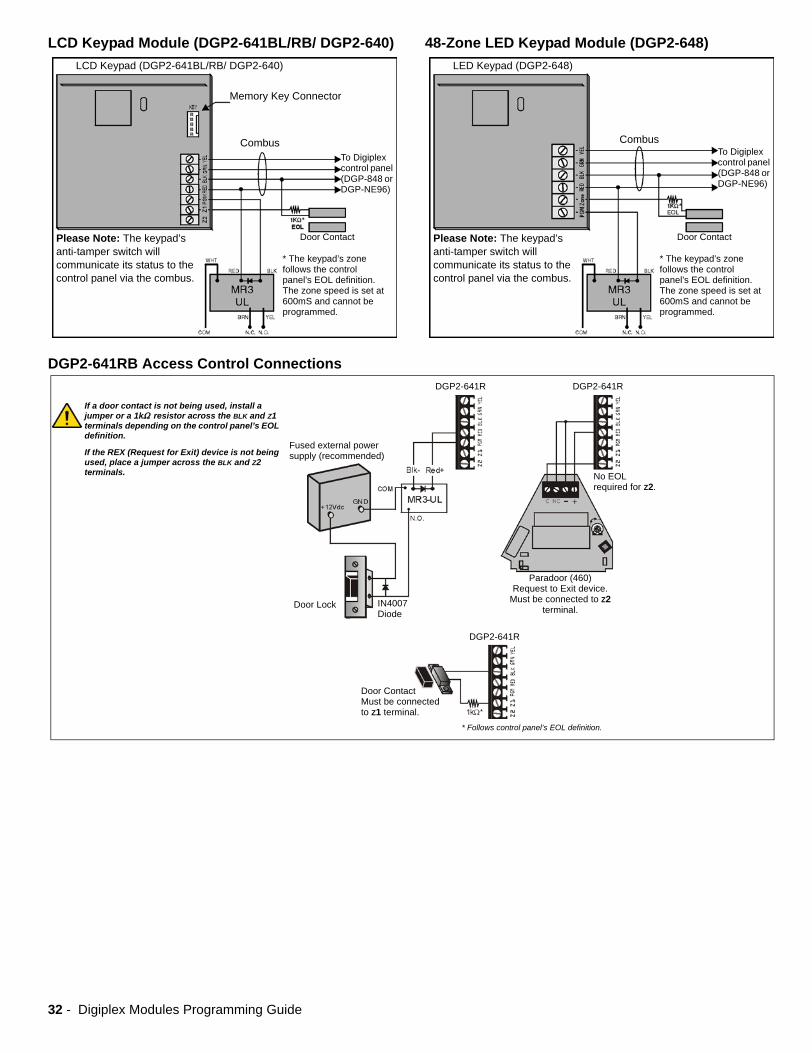
LCD Keypad Module (DGP2-641BL/RB/ DGP2-640) 48-Zone LED Keypad Module (DGP2-648)LCD Keypad (DGP2-641BL/RB/ DGP2-640)
Memory Key Connector
To Digiplex control panel (DGP-848 or DGP-NE96)
Please Note: The keypad’s anti-tamper switch will communicate its status to the control panel via the combus.
* The keypad’s zone follows the control panel’s EOL definition. The zone speed is set at 600mS and cannot be programmed.
Door Contact
CombusTo Digiplex control panel (DGP-848 or DGP-NE96)
LED Keypad (DGP2-648)
Please Note: The keypad’s anti-tamper switch will communicate its status to the control panel via the combus.
* The keypad’s zone follows the control panel’s EOL definition. The zone speed is set at 600mS and cannot be programmed.
Door Contact
Combus
DGP2-641RB Access Control ConnectionsDGP2-641R DGP2-641R
Fused external power supply (recommended)
Door Lock IN4007Diode
DGP2-641R
Paradoor (460)Request to Exit device.
Must be connected to Z2 terminal.
If a door contact is not being used, install a jumper or a 1k resistor across the BLK and Z1 terminals depending on the control panel’s EOL definition.
If the REX (Request for Exit) device is not being used, place a jumper across the BLK and Z2 terminals.
Door ContactMust be connected to Z1 terminal.
* Follows control panel’s EOL definition.
No EOL required for Z2.
32 - Digiplex Modules Programming Guide

Annunciator Module (DGP2-ANC1)
Outdoor High-Security Digital Motion Detector Module (DG85)
Remove B from any Annunciator that will have additional modules stacked on top of it as shown in Figure 3 (below). Uppermost Annunciators such as module 3 in Figure 3 or stand-alone modules do not require the removal of B.
Remove the plastic square from keypad’s top back plate E.
Use a knife to cut away two holes approximately 75mm from the Annunciator’s back plate. Cut a square in front of the guide clip (A) and at the top of the rim (B). Dotted lines indicate cutting lines.
Connect wires to keypad or combus terminals.
Connect wires using A, B and the guide clip on the Annunciator’s back plate as shown in Figure 1 (above).
When the control panel’s locate function is enabled, the first row of green LEDs will flash.
The DG85 is designed for optimal performance at a height of 2.1m (7ft), but can be installed lower or higher. After you have installed the detector, ensure that the PCB Height Markings match the installation height. The installation height is measured from the ground to the base of DG85's cover. For example, if the motion detector is installed at a height of 2.1m (7ft), the PCB should then be adjusted to 2.1m (7ft). To adjust the PCB height, remove the PCB screw and align the PCB Height Tab with the desired height marking on the PCB.WARNING: Ensure that the unit’s front and back cover are tightly joined together, without any spacing around the rim of the unit, before tightening the screw. Otherwise the weatherproof casing may be compromised and moisture may enter the unit.
PCB HEIGHT ADJUSTMENT
Digiplex Modules Programming Guide - 33
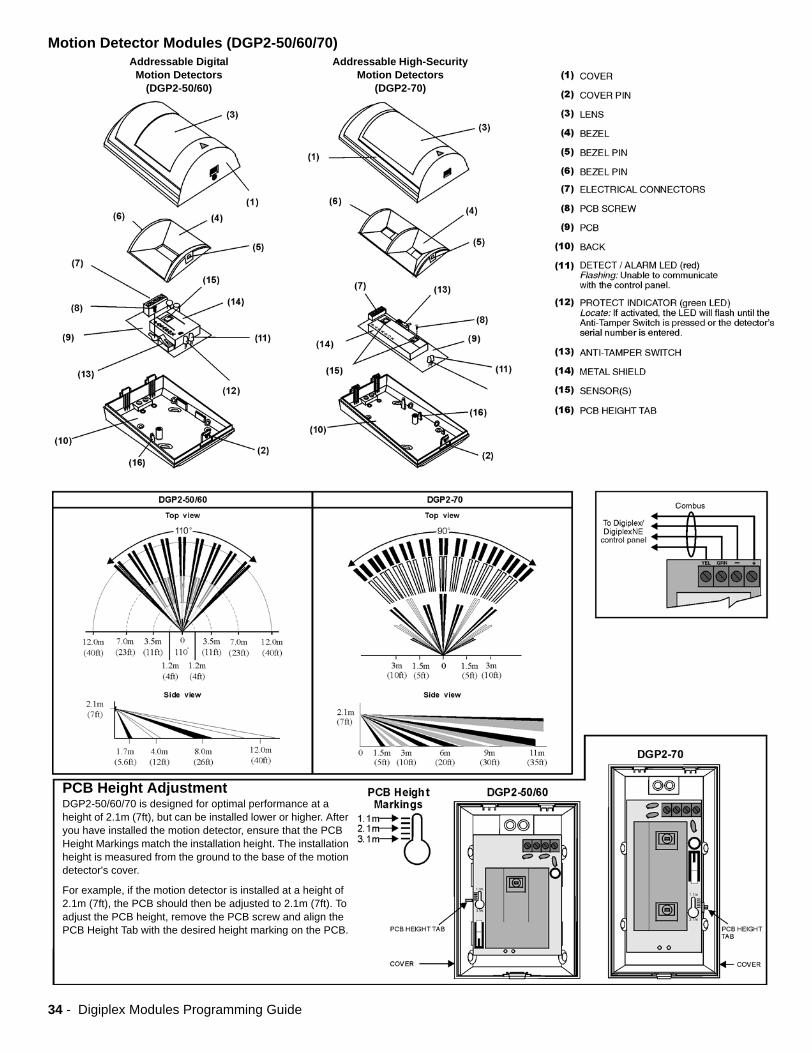
Motion Detector Modules (DGP2-50/60/70)
PCB Height AdjustmentDGP2-50/60/70 is designed for optimal performance at a height of 2.1m (7ft), but can be installed lower or higher. After you have installed the motion detector, ensure that the PCB Height Markings match the installation height. The installation height is measured from the ground to the base of the motion detector's cover.
For example, if the motion detector is installed at a height of 2.1m (7ft), the PCB should then be adjusted to 2.1m (7ft). To adjust the PCB height, remove the PCB screw and align the PCB Height Tab with the desired height marking on the PCB.
Addressable High-Security Motion Detectors
(DGP2-70)
Addressable Digital Motion Detectors
(DGP2-50/60)
34 - Digiplex Modules Programming Guide

Magellan Wireless Expansion Module (MG-RCV3)
4-PGM Expansion Module (APR3-PGM4)
8-Zone Expansion Module (APR3-ZX8)
Anti-Tamper SwitchThe anti-tamper switch can also be used to disable a "Locate" request coming from the control panel.
PGM4 is optional.
For information on the Magellan Wireless Receiver Module’s LEDs, refer to Module LED Indications on page 30.
Refer to Module Connection Overview on page 30 for information on how to connect the Magellan Wireless Receiver Module to the combus (Figure 1) and its PGM outputs (Figure 2). Before commencing with the connections, please read the General Warnings listed on page 30.
“PROGRAM” Button: Not used
Refer to Module Connection Overview on page 30 for information on how to connect the 4-PGM Output Module to the combus (Figure 1) and how to connect its PGM outputs (Figure 2). Before commencing with the connections, please read the General Warnings listed on page 30.
For information on the 4-PGM Output Module’s LEDs, refer to Module LED Indications on page 30.
Connect the detection devices to the APR3-ZX8 input terminals exactly as shown in the appropriate control panel Reference & Installation Manual.
Pressing the "Disable Locate" switch will disable a "Locate" request coming from the control panel.
Input terminal Z8 can be used as an anti-tamper switch input Option [1]: Section [001]
External Anti-Tamper Switch(N.C.)
For information on the 8-zone Hardwire Module’s LEDs, refer to Module LED Indications on page 30.
Refer to Module Connection Overview on page 30 for information on how to connect the 8-zone Hardwire Module to the combus (Figure 1) and how to connect its PGM output (Figure 3). Before commencing with the connections, please read the General Warnings listed on page 30.
Digiplex Modules Programming Guide - 35

4-zone Expansion Module (APR3-ZX4)
One-zone Expansion Module (DGP2-ZX1)
Connect the detection devices to the APR3-ZX4 input terminals exactly as shown in the appropriate control panel Reference & Installation Manual.
A "Locate" request coming from the control panel can be disabled by pressing the "Disable Locate" switch. External
Anti-Tamper Switch(N.C.)
Input terminal Z4 can be used as an anti-tamper switch input Option [1]: Section [001].
Refer to Module Connection Overview on page 30 for information on how to connect the 4-zone Hardwire Module to the combus (Figure 1). Before commencing with the connections, please read the General Warnings listed on page 30.
For information on the 4-zone Hardwire Module’s LEDs, refer to Module LED Indications on page 30.
Anti-Tamper SwitchPressing the anti-tamper switch can also be used to disengage “Locate”.
N.C., With EOLRefer to the appropriate control panel Reference & Installation Manual for additional configurations. The DGP2-ZX1 follows the ATZ and EOL definitions set in the control panel.
Standard Detector
For information on the One-zone Hardwire Module’s LEDs, refer to Module LED Indications on page 30.
Refer to Module Connection Overview on page 30 for information on how to connect the One-zone Hardwire Module to the combus (Figure 1). Before commencing with the connections, please read the General Warnings listed on page 30.
36 - Digiplex Modules Programming Guide

Printer Module (APR3-PRT1)
InTouch Voice-Assisted Arm/Disarm Module (APR3-ADM2)
Refer to Module Connection Overview on page 30 for information on how to connect the Printer Module to the combus (Figure 1) and its PGM output (Figure 3). Before commencing with the connections, please read the General Warnings listed on page 30.
For information on the Printer Module’s LEDs, refer to Module LED Indications on page 30.
Digiplex Dialer
For information on the InTouch Voice-assisted Arm/Disarm Module’s LEDs, refer to Module LED Indications on page 30.
Refer to Module Connection Overview on page 30 for information on how to connect the InTouch Voice-assisted Arm/Disarm Module to the combus (Figure 1) and its PGM output (Figure 2). Before commencing with the connections, please read the General Warnings listed on page 30.
Digiplex Modules Programming Guide - 37

Access Control Module (DGP2-ACM1P)
If you are not using the DGP2-ACM1P’s on-board power supply, connect the “red” of the combus to the “aux+” in order to power the module. Please note that in such cases, the DGP2-ACM1P is powered by the combus. Connect the devices to either the DGP2-ACM1P’s auxiliary output (aux) or to an external power supply. Also, if the on-board power supply is not being used, you must disable DGP2-ACM1P’s AC and Battery Supervision feature (refer to page 26).
Splice all cables here
See Inset 1
Connecting Access Control Devices to the DGP2-ACM1P
Caution: Disconnect battery before replacing fuse.
Digiplex Control Panel
Rechargeable BatteryYUASA model #NP7-12 UL/ULC 12Vdc/4Ah
12Vdc Power Supply Output To power REX, door contact and door lock (see Inset 1)
When using the on-board power supply, the 12Vdc power supply output will automatically shut down if the current exceeds 1.1A (see Inset 1).
Reader Cable
Routing CableDo not use twisted pairs or twisted cables for the routing cable.
CR-R880-BL Indoor/Outdoor Proximity Reader with 10cm (4in) Read RangeAlso supports the CR-R885-BL.
If a routing cable is required to connect the reader to the module, the routing cable must be shielded. Do not connect the shield wires together at the reader cable splice. With the shield wire already terminated at the reader, simply terminate the shield at the module. Do not connect the shield to the black wire at the reader cable splice.
Connecting a Routing Cable
Connecting the External Negative TriggerThe external negative trigger can be connected to either the PGM output of the control panel or module or to a push button. Once connected, either the programmed event or the pressing of the push button will send a signal to the external negative trigger and open the door lock.
PGM output from control panel or another module
Push Button
When connecting the diode to the door lock, be sure to connect the cathode of the diode to the positive (+) voltage and the anode to the negative (-) voltage.
Door Lock
See Inset 1.
Door Contact Must be connected to CT terminal**
Paradoor 460Request to Exit device must be connected to REX terminal***
Follows control panel’s EOL definition.
If the door contact is not used, install a jumper or a 1kW resistor across the AUX- and CT terminals depending on the control panel’s EOL definition.
If the Request for Exit device is not used, place a jumper across the AUX- and REX terminals.
* =
** =
*** =
For information on the Access Control Module’s LEDs, refer to Module LED Indications on page 30.
Refer to Module Connection Overview on page 30 for information on how to connect the Access Control Module’s PGM output (Figure 3). Before commencing with the connections, please read the General Warnings listed on page 30.
38 - Digiplex Modules Programming Guide

Power Supply Module (DGP2-PS17)
Door Contact Module (DGP2-ZC1)
Refer to Module Connection Overview on page 30 for information on how to connect the Power Supply Module’s PGM output (Figure 2). Before commencing with the connections, please read the General Warnings listed on page 30.
The 12Vdc power supply output will automatically shut down if the current exceeds 1.1A.
A 40VA transformer is required when selecting the 850mA battery charge current. Using a 20VA transformer with a battery charge current of 850mA may damage the system.
Improper connection of the transformer may result in damage to the system.
For information on the Power Supply Module’s LEDs, refer to Module LED Indications on page 30.
Control Panel(DGP-848/DGP-NE96)
Caution: Disconnect battery before replacing the fuse.
For information on the Addressable Door Contact’s LEDs, refer to Module LED Indications on page 30.
Digiplex Modules Programming Guide - 39

Hub and Bus Isolator Module (APR3-HUB2)
From other modules or a Spectra or Digiplex control panel
To other combus modules
To other combus modules
Power supply with dedicated transformer
Power supply with dedicated transformer
To other combus modules
To other combus modules
Power supply with dedicated transformer
Power supply with dedicated transformer
The APR3-HUB2 is non-addressable, therefore you can connect an unlimited amount of hubs to the combus without affecting the total number of modules supported by the control panel.
40 - Digiplex Modules Programming Guide

Appendix 1: Programming PGMS
A PGM is a programmable output that toggles to its opposite state (i.e. a normally open PGM will close) when a specific event occurs in the system. For example, a PGM can be used to reset smoke detectors, activate strobe lights, open/close garage doors and much more. When a PGM closes, the module supplies a ground to the PGM (transistor PGM), or the link between N.C. and COM is established (Relay PGM), which activates any device or relay connected to it. When a PGM opens, the circuit opens from ground (transistor PGM), or the link between N.O. and COM is established, therefore no power is provided to the devices connected to it.
PGM Activation EventThe PGM Activation Event determines which event from what source will activate the PGM. The Event Group specifies the event, the Feature Group identifies the source, and the Start # and End # sets the range within the Feature Group (see PGM Programming Table below).
For example, the APR3-PGM4 (See 4-PGM Expansion Module on page 17) can activate PGM1 when the partition is armed by User Access Codes 256 to 260. Therefore:Event Group section [004] = 010 “Arming with User Code”Feature Group section [005] = 001 “User Codes 256 to 511”Start # section [006] = 000 (representing user code 256)End # section [007] = 004 (representing user code 260)
Enter the sections that correspond to the Event Group, Feature Group, Start # and End # of the desired PGM and enter the data as required.
PGM Deactivation OptionOnce the PGMs are activated, they can deactivate when another event occurs or after a period of time. The PGM Deactivation Option determines which method is used, the PGM Deactivation Event or the PGM Timer. Enter the section that corresponds to the desired PGM and enable or disable the option.
PGM Deactivation EventWhen the PGM Deactivation Option (see above) is disabled, the PGM Deactivation Event determines which event from what source will return the PGM to its original state. The Event Group specifies the event, the Feature Group identifies the source, and the Start # and End # determine the range within the Feature Group. The complete PGM Programming Table appears below.
For example, the APR3-PGM4 (See 4-PGM Expansion Module on page 17) can deactivate PGM1 when zone 3 opens. Therefore:Event Group section [008] = 001 “Zone is Open”Feature Group section [009] = 000 “Zone Numbers”Start # section [010] = 003 End # section [011] = 003
Enter the sections that correspond to the Event Group, Feature Group, Start # and End # of the desired PGM and enter the data as required.
PGM Programming Table Event Group Feature Group Start # End #
PGM Activation Event PGM __/__/__ __/__/__ __/__/__ __/__/__PGM Deactivation Event PGM __/__/__ __/__/__ __/__/__ __/__/__
Event Group Event Feature Group Feature Start # End #000 Zone is OK
000255 = any Zone # Zone Numbers
001 to 096 001 to 096001 Zone is Open 001 to 096 001 to 096002 Zone is Tampered 001 to 096 001 to 096003 Zone is in Fire Loop Trouble 001 to 096 001 to 096
004 Non-reportable Event 000
TLM Trouble (see NOTE 3 on page 46) 000 000Smoke detector reset 001 001
Arm with no entry delay 002 002Arm in Stay mode 003 003Arm in Away mode 004 004
Full arm when in Stay mode 005 005Voice module access 006 006
Remote control access 007 007PC Fail to communicate 008 008
Midnight 009 009
Digiplex Modules Programming Guide - 41
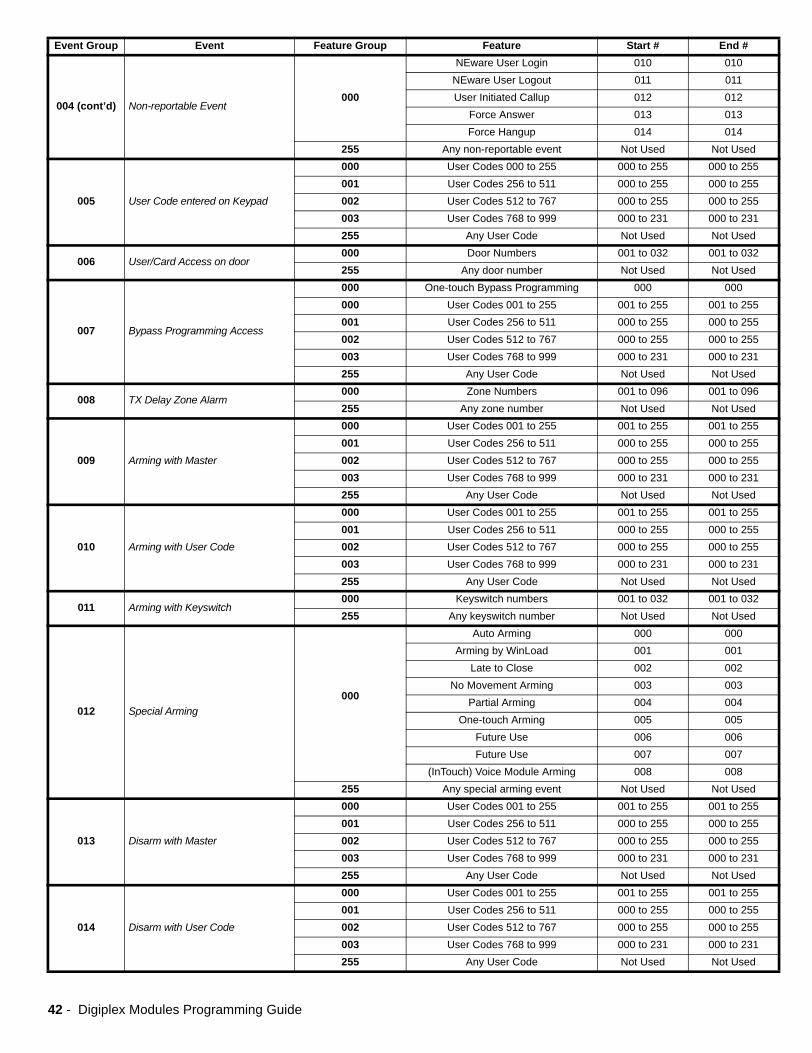
004 (cont’d) Non-reportable Event000
NEware User Login 010 010NEware User Logout 011 011User Initiated Callup 012 012
Force Answer 013 013Force Hangup 014 014
255 Any non-reportable event Not Used Not Used
005 User Code entered on Keypad
000 User Codes 000 to 255 000 to 255 000 to 255001 User Codes 256 to 511 000 to 255 000 to 255002 User Codes 512 to 767 000 to 255 000 to 255003 User Codes 768 to 999 000 to 231 000 to 231255 Any User Code Not Used Not Used
006 User/Card Access on door000 Door Numbers 001 to 032 001 to 032255 Any door number Not Used Not Used
007 Bypass Programming Access
000 One-touch Bypass Programming 000 000000 User Codes 001 to 255 001 to 255 001 to 255001 User Codes 256 to 511 000 to 255 000 to 255002 User Codes 512 to 767 000 to 255 000 to 255003 User Codes 768 to 999 000 to 231 000 to 231255 Any User Code Not Used Not Used
008 TX Delay Zone Alarm000 Zone Numbers 001 to 096 001 to 096255 Any zone number Not Used Not Used
009 Arming with Master
000 User Codes 001 to 255 001 to 255 001 to 255001 User Codes 256 to 511 000 to 255 000 to 255002 User Codes 512 to 767 000 to 255 000 to 255003 User Codes 768 to 999 000 to 231 000 to 231255 Any User Code Not Used Not Used
010 Arming with User Code
000 User Codes 001 to 255 001 to 255 001 to 255001 User Codes 256 to 511 000 to 255 000 to 255002 User Codes 512 to 767 000 to 255 000 to 255003 User Codes 768 to 999 000 to 231 000 to 231255 Any User Code Not Used Not Used
011 Arming with Keyswitch000 Keyswitch numbers 001 to 032 001 to 032255 Any keyswitch number Not Used Not Used
012 Special Arming000
Auto Arming 000 000Arming by WinLoad 001 001
Late to Close 002 002No Movement Arming 003 003
Partial Arming 004 004One-touch Arming 005 005
Future Use 006 006Future Use 007 007
(InTouch) Voice Module Arming 008 008255 Any special arming event Not Used Not Used
013 Disarm with Master
000 User Codes 001 to 255 001 to 255 001 to 255001 User Codes 256 to 511 000 to 255 000 to 255002 User Codes 512 to 767 000 to 255 000 to 255003 User Codes 768 to 999 000 to 231 000 to 231255 Any User Code Not Used Not Used
014 Disarm with User Code
000 User Codes 001 to 255 001 to 255 001 to 255001 User Codes 256 to 511 000 to 255 000 to 255002 User Codes 512 to 767 000 to 255 000 to 255003 User Codes 768 to 999 000 to 231 000 to 231255 Any User Code Not Used Not Used
Event Group Event Feature Group Feature Start # End #
42 - Digiplex Modules Programming Guide

015 Disarm with Keyswitch000 Keyswitch numbers 001 to 032 001 to 032255 Any keyswitch Not Used Not Used
016 Disarm after alarm with Master
000 User Codes 001 to 255 001 to 255 001 to 255001 User Codes 256 to 511 000 to 255 000 to 255002 User Codes 512 to 767 000 to 255 000 to 255003 User Codes 768 to 999 000 to 231 000 to 231255 Any User Code Not Used Not Used
017 Disarm after alarm with User Code
000 User Codes 001 to 255 001 to 255 001 to 255001 User Codes 256 to 511 000 to 255 000 to 255002 User Codes 512 to 767 000 to 255 000 to 255003 User Codes 768 to 999 000 to 231 000 to 231255 Any User Code Not Used Not Used
018 Disarm after alarm with Keyswitch000 Keyswitch numbers 001 to 032 001 to 032255 Any keyswitch Not Used Not Used
019 Alarm Cancelled with Master
000 User Codes 001 to 255 001 to 255 001 to 255001 User Codes 256 to 511 000 to 255 000 to 255002 User Codes 512 to 767 000 to 255 000 to 255003 User Codes 768 to 999 000 to 231 000 to 231255 Any User Code Not Used Not Used
020 Alarm Cancelled with User Code
000 User Codes 001 to 255 001 to 255 001 to 255001 User Codes 256 to 511 000 to 255 000 to 255002 User Codes 512 to 767 000 to 255 000 to 255003 User Codes 768 to 999 000 to 231 000 to 231255 Any User Code Not Used Not Used
021 Alarm Cancelled with Keyswitch000 Keyswitch numbers 001 to 032 001 to 032255 Any keyswitch Not Used Not Used
022 Special Disarm Events000
Auto Arm Cancelled 000 000One-touch Stay/Instant Disarm 001 001
Disarming with WinLoad 002 002Disarming with WinLoad after alarm 003 003
WinLoad cancelled alarm 004 004Future Use 005 005Future Use 006 006Future Use 007 007
(InTouch) Voice Module Disarming 008 008255 Any special disarm event Not Used Not Used
023 Zone Bypassed
000255 = any zone # Zone Numbers
001 to 096 001 to 096024 Zone in Alarm 001 to 096 001 to 096025 Fire Alarm 001 to 096 001 to 096026 Zone Alarm Restore 001 to 096 001 to 096027 Fire Alarm Restore 001 to 096 001 to 096
028 Early to Disarm by User
000 User Codes 001 to 255 001 to 255 001 to 255001 User Codes 256 to 511 000 to 255 000 to 255002 User Codes 512 to 767 000 to 255 000 to 255003 User Codes 768 to 999 000 to 231 000 to 231255 Any User Code Not Used Not Used
029 Late to Disarm by User
000 User Codes 001 to 255 001 to 255 001 to 255001 User Codes 256 to 511 000 to 255 000 to 255002 User Codes 512 to 767 000 to 255 000 to 255003 User Codes 768 to 999 000 to 231 000 to 231255 Any User Code Not Used Not Used
Event Group Event Feature Group Feature Start # End #
Digiplex Modules Programming Guide - 43

030 Special Alarm000
Emergency Panic (Keys 1 & 3) 000 000Medical Panic (Keys 4 & 6) 001 001
Fire Panic (Keys 7 & 9) 002 002Recent Closing 003 003
Police Code 004 004Global Shutdown 005 005
255 Any special alarm event Not Used Not Used
031 Duress Alarm by User
000 User Codes 001 to 255 001 to 255 001 to 255001 User Codes 256 to 511 001 to 255 001 to 255002 User Codes 512 to 767 001 to 255 001 to 255003 User Codes 768 to 999 001 to 231 001 to 231255 Any User Code Not Used Not Used
032 Zone Shutdown000
255 = any zone # Zone Numbers001 to 096 001 to 096
033 Zone Tamper 001 to 096 001 to 096034 Zone Tamper Restore 001 to 096 001 to 096035 Special Tamper 000 Keypad Lockout 000 000
036 Trouble Event000
TLM Trouble (see NOTE 2 on page 46) 000 000AC Failure 001 001
Battery Failure 002 002Auxiliary Current Limit 003 003
Bell Current Limit 004 004Bell Absent 005 005
Clock Trouble 006 006Global Fire Loop 007 007
255 Any trouble event Not Used Not Used
037 Trouble Restore000
TLM Trouble 000 000AC Failure 001 001
Battery Failure 002 002Auxiliary Current Limit 003 003
Bell Current Limit 004 004Bell Absent 005 005
Clock Trouble 006 006Global Fire Loop 007 007
255 Any trouble restore event Not Used Not Used
038 Module Trouble000
Combus Fault 000 000Module Tamper 001 001ROM/RAM error 002 002
TLM Trouble 003 003Fail to Communicate 004 004
Printer Fault 005 005AC Failure 006 006
Battery Failure 007 007Auxiliary Failure 008 008
255 Any module trouble Not Used Not Used
039 Module Trouble Restore000
Combus Fault 000 000Module Tamper 001 001ROM/RAM error 002 002
TLM Trouble 003 003Fail to Communicate 004 004
Printer Fault 005 005AC Failure 006 006
Battery Failure 007 007Auxiliary Failure 008 008
255 Any module trouble restore event Not Used Not Used
Event Group Event Feature Group Feature Start # End #
44 - Digiplex Modules Programming Guide

040 Fail to Communicate on telephone Number
000 Telephone Number 001 to 004 001 to 004255 Any telephone number Not Used Not Used
041 Low Battery on Zone
000255 = any Zone # Zone Numbers
001 to 096 001 to 096042 Zone Supervision Trouble 001 to 096 001 to 096043 Low Battery on Zone Restored 001 to 096 001 to 096044 Zone Supervision Trouble Restored 001 to 096 001 to 096
045 Special Events000
Power up after total power down 000 000Software reset (Watchdog) 001 001
Test Report 002 002Future Use 003 003
WinLoad In (connected) 004 004WinLoad Out (disconnected) 005 005
Installer in programming 006 006Installer out of programming 007 007
255 Any special event Not Used Not Used
046 Early to Arm by User
000 User Codes 001 to 255 001 to 255 001 to 255001 User Codes 256 to 511 000 to 255 000 to 255002 User Codes 512 to 767 000 to 255 000 to 255003 User Codes 768 to 999 000 to 231 000 to 231255 Any User Code Not Used Not Used
047 Late to Arm by User
000 User Codes 001 to 255 001 to 255 001 to 255001 User Codes 256 to 511 000 to 255 000 to 255002 User Codes 512 to 767 000 to 255 000 to 255003 User Codes 768 to 999 000 to 231 000 to 231255 Any User Code Not Used Not Used
048 Utility Key000 Utility Key 001 to 064†* 001 to 064 001 to 064
255 Any Utility Key†* Not Used Not Used
049 Request for Exit
000255 = any Door
NumberDoor Numbers
001 to 032 001 to 032050 Access Denied 001 to 032 001 to 032051 Door Left Open Alarm 001 to 032 001 to 032052 Door Forced Alarm 001 to 032 001 to 032053 Door Left Open Restore 001 to 032 001 to 032054 Door Forced Open Restore 001 to 032 001 to 032
055 Intellizone Triggered000 Zone Numbers 001 to 096 001 to 096255 Any zone number Not Used Not Used
056 to 061 Future Use Future Use Future Use Future Use Future Use
062 Access Granted to User
000 User Codes 001 to 255 001 to 255 001 to 255001 User Codes 256 to 511 000 to 255 000 to 255002 User Codes 512 to 767 000 to 255 000 to 255003 User Codes 768 to 999 000 to 231 000 to 231255 Any User Code Not Used Not Used
063 Access Denied to User
000 User Codes 001 to 255 001 to 255 001 to 255001 User Codes 256 to 511 000 to 255 000 to 255002 User Codes 512 to 767 000 to 255 000 to 255003 User Codes 768 to 999 000 to 231 000 to 231255 Any User Code Not Used Not Used
†: see page 46
*: see page 46
Event Group Event Feature Group Feature Start # End #
Digiplex Modules Programming Guide - 45

NOTE 1: 000 = Occurs in all partitions enabled in the system (refer to the appropriate control panel Programming Guide).001 = Partition 1 003 = Partition 3 005 = Partition 5 (DGP-NE96 only) 007 = Partition 7 (DGP-NE96 only)002 = Partition 2 004 = Partition 4 006 = Partition 6 (DGP-NE96 only) 008 = Partition 8 (DGP-NE96 only)255 = Occurs in at least one partition enabled in the system.
NOTE 2: This TLM trouble event can only be used with DGP-NE96 control panels that have two dialers.
NOTE 3: This TLM trouble event can only be used with DGP-848 control panels or DGP-NE96 control panels that have one dialer.
NOTE 4: This event cannot be used for a module’s PGM programming.
*: If a Keyswitch Input is used, the input must be defined as “Generates a Utility Key Event on Open” or “Generates a Utility Key Event on Openand Close”. If a remote control is used, the remote control button must be defined as a Utility Key button.
†: Actions that Activate a Utility Key Event:
064 Status 1 See Note 1on page 46
Armed 000 000Force Armed 001 001Stay Armed 002 002
Instant Armed 003 003Strobe Alarm 004 004Silent Alarm 005 005
Audible Alarm 006 006Fire Alarm 007 007
065 Status 2 See Note 1on page 46
Ready 000 000Exit Delay 001 001
Entry Delay 002 002System in Trouble 003 003Alarm in Memory 004 004Zones Bypassed 005 005
Bypass, Master, Installer Programming 006 006Keypad Lockout 007 007
066 Status 3 See Note 1on page 46
Intellizone Delay Engaged (see Note 4 on page 46) 000 000
Fire Delay Engaged 001 001Auto Arm 002 002
Arming with Voice Module (set until Exit Delay finishes) 003 003
Tamper 004 004Zone Low Battery 005 005Fire Loop Trouble 006 006
Zone Supervision Trouble 007 007067 Future Use Future Use Future Use Future Use Future Use070 Clock N/A Hour Minutes
Utility Key EventActions
Keypad Utility Keys Keyswitch Inputs (definition = [3])
Keyswitch Inputs (definition = [4]) Remote Control
Utility Key Event 1 [1] & [2] KS** Input 1 opens KS** Input 1 opens Utility Key 1 RC button‡
Utility Key Event 2 [4] & [5] KS** Input 2 opens KS** Input 1 closes Utility Key 2 RC button‡
Utility Key Event 3 [7] & [8] KS** Input 3 opens KS** Input 2 opens Utility Key 3 RC button‡
Utility Key Event 4 [CLEAR] & [0] or [*] & [0] KS** Input 4 opens KS** Input 2 closes Utility Key 4 RC button‡
Utility Key Event 5 [2] & [3] KS** Input 5 opens KS** Input 3 opens Utility Key 5 RC button‡
Utility Key Event 6 [5] & [6] KS** Input 6 opens KS** Input 3 closes N/AUtility Key Event 7 [8] & [9] KS** Input 7 opens KS** Input 4 opens N/AUtility Key Event 8 [0] & [ENTER] or [0] & [#] KS** Input 8 opens KS** Input 4 closes N/AUtility Key Event 9 N/A KS** Input 9 opens KS** Input 5 opens N/A
Utility Key Event 10 N/A KS** Input 10 opens KS** Input 5 closes N/AUtility Key Event 11 N/A KS** Input 11 opens KS** Input 6 opens N/AUtility Key Event 12 N/A KS** Input 12 opens KS** Input 6 closes N/A
Event Group Event Feature Group Feature Start # End #
46 - Digiplex Modules Programming Guide

** Keyswitch‡ Refer to the Magellan™ Reference and Installation Manual for remote control button programming instructions.
WarrantyParadox Security Systems Ltd. (“Seller”) warrants its products to be free from defects in materials and workmanship under normal use for a period of one year. Except as specifically stated herein, all express or implied warranties whatsoever, statutory or otherwise, including without limitation, any implied warranty of merchantability and fitness for a particular purpose, are expressly excluded. Because Seller does not install or connect the products and because the products may be used in conjunction with products not manufactured by Seller, Seller cannot guarantee the performance of the security system and shall not be responsible for circumstances resulting from the product’s inability to operate. Seller obligation and liability under this warranty is expressly limited to repairing or replacing, at Seller's option, any product not meeting the specifications. Returns must include proof of purchase and be within the warranty period. In no event shall the Seller be liable to the buyer or any other person for any loss or damages whether direct or indirect or consequential or incidental, including without limitation, any damages for lost profits stolen goods, or claims by any other party, caused by defective goods or otherwise arising from the improper, incorrect or otherwise faulty installation or use of the merchandise sold.
Notwithstanding the preceding paragraph, the Seller’s maximum liability will be strictly limited to the purchase price of the defective product. Your use of this product signifies your acceptance of this warranty.
BEWARE: Dealers, installers and/or others selling the product are not authorized to modify this warranty or make additional warranties that are binding on the Seller.
©2002-2005 Paradox Security Systems Ltd. All rights reserved. Specifications may change without prior notice. One or more of the following US patents may apply: 6215399, 6111256, 5751803, 5721542, 5287111, 5119069, 5077549, 5920259 and 5886632. Canadian and international patents may also apply. Digigard, Digiplex, Grafica, InTouch, Magellan, NEware, Paradoor, and WinLoad are trademarks or registered trademarks of Paradox Security Systems Ltd. or its affiliates in Canada, the United States and/or other countries.
Utility Key EventActions
Keypad Utility Keys Keyswitch Inputs (definition = [3])
Keyswitch Inputs (definition = [4]) Remote Control
Utility Key Event 13 N/A KS** Input 13 opens KS** Input 7 opens N/AUtility Key Event 14 N/A KS** Input 14 opens KS** Input 7 closes N/AUtility Key Event 15 N/A KS** Input 15 opens KS** Input 8 opens N/AUtility Key Event 16 N/A KS** Input 16 opens KS** Input 8 closes N/AUtility Key Event 17 N/A KS** Input 17 opens KS** Input 9 opens N/AUtility Key Event 18 N/A KS** Input 18 opens KS** Input 9 closes N/A
N/A N/AUtility Key Event 31 N/A KS** Input 31 opens KS** Input 16 opens N/AUtility Key Event 32 N/A KS** Input 32 opens KS** Input 16 closes N/AUtility Key Event 33 N/A N/A KS** Input 17 opens N/AUtility Key Event 34 N/A N/A KS** Input 17 closes N/A
N/A N/A N/AUtility Key Event 63 N/A N/A KS** Input 32 opens N/AUtility Key Event 64 N/A N/A KS** Input 32 closes N/A
Digiplex Modules Programming Guide - 47

Notes
48 - Digiplex Modules Programming Guide

Digiplex Modules Programming Guide - 49

50 - Digiplex Modules Programming Guide


780 Industriel Blvd., Saint-Eustache (Quebec) J7R 5V3 CANADATel.: (450)491-7444 Fax: (450) 491-2313
www.paradox.caPRINTED IN CANADA 09/2005 MODULES-EP11