module one lesson plan
TRANSCRIPT
™Music Completes the Child
Lesson Plans:Module One
Lesson Plans:
Stage 5 - Module One


Module One
Contents
Week One
Song Focus: Let’s Warm
Up
Literacy Focus: Let’s Talk
Rhythm
Subjective Listening:
Theme from Jaws, by John
Williams
Week Two
Song Focus: Little Sally
Walker
Literacy Focus: What’s it
Worth?
Composition: Dinner Time
Week ThreeSong Focus: Little Sally
Walker
Literacy Focus: Rhythm
Train Challenge
Objective Listening:
1950’s Rock ‘n’ Roll
1
5
6
7
9
10
12
12
14
Module One Contents
_______________________________________________________________________________________________________________________________________
Ceol Lesson Plans
Week Four
Song Focus: Feelin’
Groovy!
Literacy Focus: Rhythm
Worksheet
Composition: The Creepy
House
Week FiveSong Focus: Feelin’
Groovy!
Literacy Focus:
Introduction to the Stave,
the Treble Clef and the
Notes G, A and B
Stylistic Analysis:
Conducting in 2/4 time
Week SixSong Focus: Feelin’
Groovy!
Literacy Focus: The Stave
Worksheet
17
18
18
21
21
23
25
26

Stage 5
Week One
Module One
Song FocusLet’s Warm Up (Songs CD Track 1 & 2)
Week One Module One
_______________________________________________________________________________________________________________________________________
Ceol Lesson Plans
In the introduction book, we discussed the importance of warming up the three areas of your body
used in singing; the lungs/diaphragm, the face and finally, the vocal cords. We are going to explore
these three in a little more detail here before we begin explaining today’s activity.
Breathing - warming up the lungs and diaphragm
A major factor in achieving a good vocal sound stems from your ability to breath effectively and to
manage the flow of air from your lungs over your vocal cords. Most young children, and a lot of
adults too, do not breath in the correct way. When you ask young children to take a deep breath
they will, for the most part, lift their shoulders, ‘puff out‘ the top section of their chest and throw their
heads back. By doing this, they fail to get the maximum possible volume of air into their lungs and
may also experience tension or strain in the throat, neck, shoulders and face when trying to sing.
This shallow breathing also causes problems with the quality of the sound they produce, limits the
range of pitches they can sing and prevents them from holding notes for a significant period of time.
Therefore, any good vocal warm up must begin with the promotion of correct breathing, that allows
the whole of the lungs to be filled with air and avoids tension around the facial area by promoting
the use of the diaphragm. So, how do we breath properly?
• Stand with feet shoulder width apart, arms down by the sides and with shoulders down
and relaxed.
• When inhaling, the shoulders and upper chest should not move very much at all.
Instead, air should be inhaled through the nose and the top of the belly should ‘pop out’
as the lungs fill with air. You should be able to physically see the lungs filling and the
children’s tummies popping out.
• As the lungs fill, the diaphragm (the arc-shaped muscle at the bottom of the lungs)
becomes rigid, supporting the lungs and giving greater control over the flow of air as you
exhale. Air should be exhaled through the mouth in a controlled fashion and not blasted
out all at once.
Ceol Lesson Plans22
Hello‘So’, ‘Mi’ Echoes - Track 1
Curriculum Focus
Strand: Performing/song singing• Develop a sense of pitch – recognise and imitate short melodies in echo• Show, while singing, the movement of sounds from high to low or low to high• Develop aural memory and internal hearing• Introduce the notes ‘So’ and ‘Mi’
Strand: Listening and responding• Listen to and imitate patterns of long and short sounds – develop a sense of duration and rhythm
This programme is designed for all teachers but assumes no prior knowledge. It may be of particularassistance to the non-specialist music teacher. It is designed to allow you to learn and grow inconfidence as the children learn. For the first 4 weeks we will begin with 2 notes only. All thesongs, games and activities will use these notes. This is vital, as it allows pitch to become internal andeasily acquired rather than bombarding you, or your students, with long and complicated melodies.
The first two notes we will use are ‘So’ and ‘Mi’. We use these first because they are the most naturalpitches for children to sing. What notes are ‘So’ and‘Mi’? Well, for children’s voices the best note to usefor ‘So’ is a G and ‘Mi’ is the E. Alternatively, listen to Track 1 on the teacher’s CD. Practise singing‘Hel-lo every-one’using these notes so that you feel confident.
Hel-lo every-one,Hel-lo tea-cher
Week OneModule One
Week One Module One
So So SoMi So Mi So MiMi
Ceol_Module1_13.qxd:Layout 1 19/02/2008 11:52 Page 2
1

Week One Module One
_______________________________________________________________________________________________________________________________________
Ceol Lesson Plans
Face - relaxing the muscles of the neck, mouth and jaw and developing good diction
• It is very important that the muscles in the face and neck remain relaxed while singing. You
may see young children raising their heads and poking out their jaws as they try to sing higher
notes and then dropping their heads as the pitch gets lower. This means that they are using
their face and neck muscles to ‘force out’ notes, rather than using the lungs and diaphragm to
control air flow. This causes strain and poor vocal sound. To avoid this, it is essential to
promote good breathing, as good breathing eliminates many of these problems without you
having to say anything further. Furthermore, encourage children to keep their shoulders down
and their heads level, no matter how high or low in pitch the notes they are singing.
• Diction in singing is concerned with the clarity of the words being sung. Diction can be
developed using tongue twisters and rhymes which encourage good pronunciation of words
and the opening wide of mouth and jaw. The development of good diction is vital as it
prevents audiences from being unable to comprehend the words being sung.
Voice - warming up the vocal cords
Warming up the vocal cords is very important. The vocal cords are muscles and must be stretched
just like any other muscle in the body before they are exercised. In these parts of the warm up, we
will gently exercise the children’s ‘singing muscles’ through a series of singing games and scales
that will extend their vocal range. When just starting out, young children have quite a narrow vocal
range, with the ability to sing comfortably only notes that fall within the range of ‘Do’ to ‘So’.
Through good vocal warm up exercise, this narrow range can be gradually increased, extending the
height and depth, so to speak, of pitch that the children can sing comfortably, without straining their
voices.
Other advice
• Posture is very important in singing. Encourage children to stand with their feet shoulder
width apart, arms down by their sides, shoulders down and relaxed, to relax their neck and to
keep their heads level. Tension in the body can be easily released by asking children to:
! ‘shake-out’ their bodies - start with the feet, then legs, the hips, up to the arms, then
rolling the shoulders gently round and finally rolling the head (always opening mouth to
avoid neck strain).
! take a deep breath in, lifting your arms above your head while inhaling and then drop your
arms to the floor, bouncing at the waste, as you exhale. Do this 2-3 times.
• Please be aware that warming up should not only focus on developing the physical parts of
the body used when singing, but should also allow a child to open up and let go of their
inhibitions about singing. In other words, we must allow a child to develop their self-esteem
and performance confidence, which are just as vital as the physical elements in the
development of a performer.
2

Ceol Lesson Plans
Week One Module One
_______________________________________________________________________________________________________________________________________
How to
Before beginning the warm up activities, ask the children to relax their bodies, using the
shake out and bouncy breathing exercises, and then to stand in the posture outlined above.
Breathing Warm Up: Balloon Bellies
1. Ask the children to stand using the posture outlined above.
2. Say, ‘We are going to pretend that our bellies are big balloons. We are going to try
inflating the balloon as big as we can and then try letting the air out really slowly.’
3. Continue, ‘Put your hands on your balloon belly like this.’ Demonstrate as you
explain, placing your two hands, palms down, on your belly with thumbs at the top
and fingers facing towards each other. Hands should be placed roughly so that
middle fingers fall either side of your belly button with about half an inch of space
between your two middle fingers.
4. Say, ‘We are going to fill up our balloons with air. We will breath in through our
noses and keep our shoulders very still. While we breath in, we are going to let our
balloon bellies get really big, all filled up with air.’
5. Continue, ‘When our balloon is full, we are going to let the air out really slowly, just
like if we held the end of a real balloon open just enough to let the air hiss out little
by little. We will open our mouths just wide enough to let the air hiss out little by
little. We’ll have a competition to see who can let their air out the slowest.’
Demonstrate once you have explained, so that the children feel confident of what
their bodies will look like as they do this activity. You may even like to use a real
balloon to show the children this process as you explain.
6. Now you’re ready to go. Encourage the children to fill their balloon bellies and let
the air out slowly several times, seeing if they make their balloon get bigger and let
the air out more slowly, each time.
Facial Warm Up: Zap, Zoom!
1. Have the children stand in a circle, maintaining the posture outlined above and say,
‘Now we have got out balloon bellies working, let’s play a game. I am going to
inflate my balloon belly. Then I am going to say a silly sound with my mouth open
big and wide, like this.’ Demonstrate, using the word, ‘Zaaaaaaaaappppp’.
2. Continue, ‘When I have said this silly sound, I am going to pass it on to Conor
(child standing to your right), using my voice and my hand. He is then going to fill
his balloon belly and say the silly sound too.’
3

Ceol Lesson Plans
Week One Module One
_______________________________________________________________________________________________________________________________________
How to - continued
3. Say, ‘We will see if we can pass the sound all the way round the circle. Your silly
sound can be as long as you can make it, depending on how much air you fill your
balloon up with.’ Play the game, passing the ‘Zap’ sound around the circle.
4. Repeat the game, using other silly words such as zoom, crash and yippee. You
can also ask the children to suggest sounds encouraging them to make their
mouth big and wide as they say each sound.
Vocal Warm Up: Seven Silly Sailors
1. Say, ‘We are going to sing a very silly song that sounds like this.’ Play track 1 on
your songs CD and lead the children in listening to and then singing the line. Use
your hands as you sing along with the CD, placing your hand by your toes for the
Do notes and at eye level for the So notes (See introduction book for hand
positions).
2. Say, ‘We are going to try singing this line a few times. Each time we sing the line,
we are going to start on a higher and higher note. In-between each time we sing,
we will have time to fill up our balloon bellies and hear a ‘Rea-dy’ on the new note.’
Play track 2 to the children, listening only to begin with, and then singing along.
3. Repeat this activity and then applaud the children.
Sev-en
X X X X
sil-ly sail-ors sailed the
sev-en
X X X X
sal-ty seas (breathe)
Do Do Do Do Do Do Do Do
So So So So Do
4

Literacy FocusLet’s Talk Rhythm
How to
1. Say, ‘We are going to have a go at reading some rhythms today because your teacher
from last year told me that you are all very good at it.’
2. Bring out the first rhythm card and ask the children to identify each note, using its
rhythmic sound. Once the children have identified each note, you can then lead them in
saying the whole rhythmic pattern together, using the ‘Rea-dy’, which is explained in the
catch-up session within your introduction manual, to help the children start together.
3. Continue this process until the children have read several rhythm cards and recapped
each of the rhythmic sounds and symbols that they are already familiar with.
NB. Rhythmic sounds to accompany rhythmic symbols are shown in the catch-up section
of your introduction manual. There are also audio files demonstrating how each rhythm
should sound which can be found on your resource key.
4. Say, ‘Now we are getting older, I would like to teach you the real names for our rhythm
notes.’
5. Bring out the ‘Let’s Talk Rhythm’ chart, found on your resource key. Point to the Ta or
crotchet note and say, “We know that when we see this note we say, ‘Ta’. But, this note
has a proper name as well. It is called a crotchet. Can you say that?.”
6. Continue this process the children have been introduced to the real names for each of
the rhythms shown on the chart.
7. Finally, you can bring out a couple of the rhythm cards again, point to different notes
contained within them, and ask the children to tell you the rhythmic note name that goes
with that note.
8. Applaud the children
Ceol Lesson Plans
Before you begin this activity, you will need to have the selection of rhythm cards to hand, which
can be found on your resource key. These can simply be projected onto white board one at a time
or printed out, if you prefer.
Ceol Lesson Plans22
Hello‘So’, ‘Mi’ Echoes - Track 1
Curriculum Focus
Strand: Performing/song singing• Develop a sense of pitch – recognise and imitate short melodies in echo• Show, while singing, the movement of sounds from high to low or low to high• Develop aural memory and internal hearing• Introduce the notes ‘So’ and ‘Mi’
Strand: Listening and responding• Listen to and imitate patterns of long and short sounds – develop a sense of duration and rhythm
This programme is designed for all teachers but assumes no prior knowledge. It may be of particularassistance to the non-specialist music teacher. It is designed to allow you to learn and grow inconfidence as the children learn. For the first 4 weeks we will begin with 2 notes only. All thesongs, games and activities will use these notes. This is vital, as it allows pitch to become internal andeasily acquired rather than bombarding you, or your students, with long and complicated melodies.
The first two notes we will use are ‘So’ and ‘Mi’. We use these first because they are the most naturalpitches for children to sing. What notes are ‘So’ and‘Mi’? Well, for children’s voices the best note to usefor ‘So’ is a G and ‘Mi’ is the E. Alternatively, listen to Track 1 on the teacher’s CD. Practise singing‘Hel-lo every-one’using these notes so that you feel confident.
Hel-lo every-one,Hel-lo tea-cher
Week OneModule One
Week One Module One
So So SoMi So Mi So MiMi
Ceol_Module1_13.qxd:Layout 1 19/02/2008 11:52 Page 2
Week One Module One
_______________________________________________________________________________________________________________________________________
5
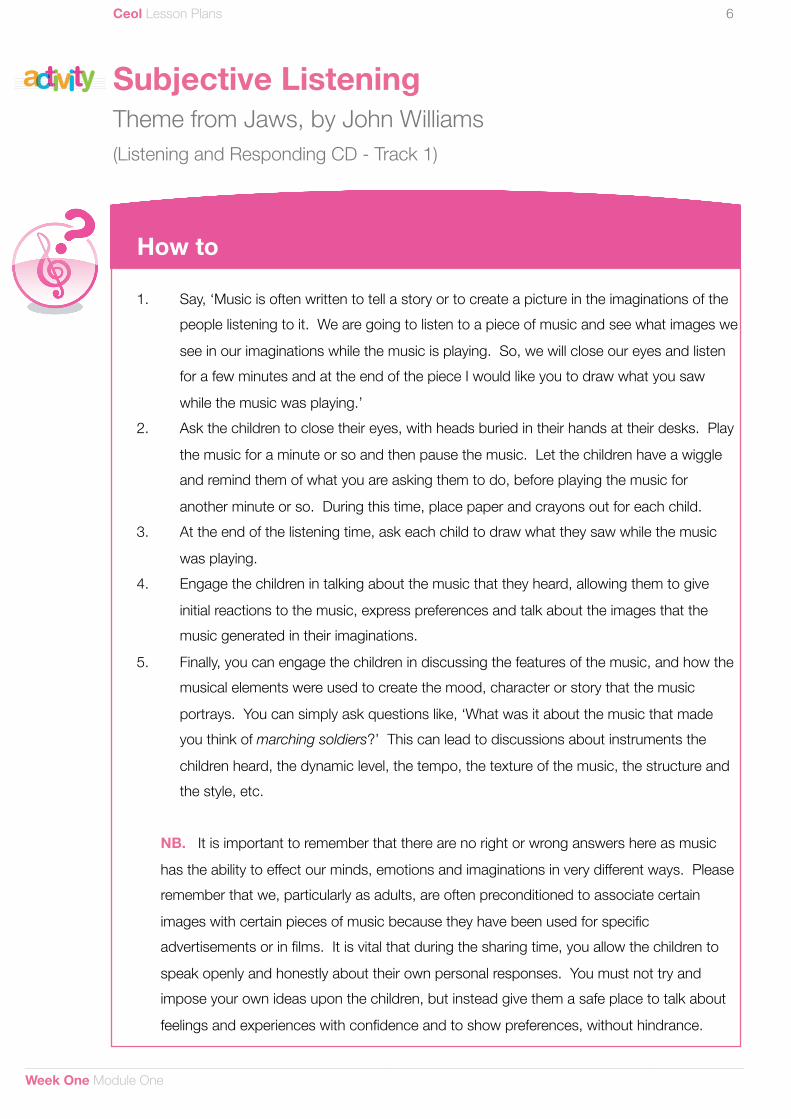
Subjective Listening
Theme from Jaws, by John Williams
(Listening and Responding CD - Track 1)
How to
1. Say, ‘Music is often written to tell a story or to create a picture in the imaginations of the
people listening to it. We are going to listen to a piece of music and see what images we
see in our imaginations while the music is playing. So, we will close our eyes and listen
for a few minutes and at the end of the piece I would like you to draw what you saw
while the music was playing.’
2. Ask the children to close their eyes, with heads buried in their hands at their desks. Play
the music for a minute or so and then pause the music. Let the children have a wiggle
and remind them of what you are asking them to do, before playing the music for
another minute or so. During this time, place paper and crayons out for each child.
3. At the end of the listening time, ask each child to draw what they saw while the music
was playing.
4. Engage the children in talking about the music that they heard, allowing them to give
initial reactions to the music, express preferences and talk about the images that the
music generated in their imaginations.
5. Finally, you can engage the children in discussing the features of the music, and how the
musical elements were used to create the mood, character or story that the music
portrays. You can simply ask questions like, ‘What was it about the music that made
you think of marching soldiers?’ This can lead to discussions about instruments the
children heard, the dynamic level, the tempo, the texture of the music, the structure and
the style, etc.
NB. It is important to remember that there are no right or wrong answers here as music
has the ability to effect our minds, emotions and imaginations in very different ways. Please
remember that we, particularly as adults, are often preconditioned to associate certain
images with certain pieces of music because they have been used for specific
advertisements or in films. It is vital that during the sharing time, you allow the children to
speak openly and honestly about their own personal responses. You must not try and
impose your own ideas upon the children, but instead give them a safe place to talk about
feelings and experiences with confidence and to show preferences, without hindrance.
Ceol Lesson Plans
Ceol Lesson Plans22
Hello‘So’, ‘Mi’ Echoes - Track 1
Curriculum Focus
Strand: Performing/song singing• Develop a sense of pitch – recognise and imitate short melodies in echo• Show, while singing, the movement of sounds from high to low or low to high• Develop aural memory and internal hearing• Introduce the notes ‘So’ and ‘Mi’
Strand: Listening and responding• Listen to and imitate patterns of long and short sounds – develop a sense of duration and rhythm
This programme is designed for all teachers but assumes no prior knowledge. It may be of particularassistance to the non-specialist music teacher. It is designed to allow you to learn and grow inconfidence as the children learn. For the first 4 weeks we will begin with 2 notes only. All thesongs, games and activities will use these notes. This is vital, as it allows pitch to become internal andeasily acquired rather than bombarding you, or your students, with long and complicated melodies.
The first two notes we will use are ‘So’ and ‘Mi’. We use these first because they are the most naturalpitches for children to sing. What notes are ‘So’ and‘Mi’? Well, for children’s voices the best note to usefor ‘So’ is a G and ‘Mi’ is the E. Alternatively, listen to Track 1 on the teacher’s CD. Practise singing‘Hel-lo every-one’using these notes so that you feel confident.
Hel-lo every-one,Hel-lo tea-cher
Week OneModule One
Week One Module One
So So SoMi So Mi So MiMi
Ceol_Module1_13.qxd:Layout 1 19/02/2008 11:52 Page 2
Week One Module One
_______________________________________________________________________________________________________________________________________
6

Stage 5
Week Two
Module One
Song FocusLittle Sally Walker1 (Songs CD Track 3 & 4)
How to
1. Begin this activity by recapping the warm-up activities introduced in last week’s lesson
plan. These warm-up activities will be used throughout Module One to prepare the
children for singing and it is very important to take five minutes or so to warm up before
you begin learning and singing this new song.
2. Having warmed up, say, ‘We are going to learn a new song today. I am going to put on
the CD and we will hear one line of the song at a time. When the lady on the CD has
sung a line, we will all have a turn to sing that line together. Let’s have a try.’ Put on
track 3 and lead the children in singing each line of the song, using your hand
movements as you sing.
3. Then sing the song together. Ask the children to get their hands ready by toes, put on
track 4 and lead the children in singing the song through together.
4. At the end of the song, pause the track and say, ‘We are going to sing the song again.
This time, we will march to the beat as we sing.’ Practise marching to the beat, saying,
‘Left, right, left, right’ as you march. Then un-pause track 4 and lead the children
marching to the beat as they sing.
NB. For further advice on keeping steady beat, see training DVD.
5. Applaud the children.
Ceol Lesson Plans
Week Two Module One
_______________________________________________________________________________________________________________________________________
Ceol Lesson Plans22
Hello‘So’, ‘Mi’ Echoes - Track 1
Curriculum Focus
Strand: Performing/song singing• Develop a sense of pitch – recognise and imitate short melodies in echo• Show, while singing, the movement of sounds from high to low or low to high• Develop aural memory and internal hearing• Introduce the notes ‘So’ and ‘Mi’
Strand: Listening and responding• Listen to and imitate patterns of long and short sounds – develop a sense of duration and rhythm
This programme is designed for all teachers but assumes no prior knowledge. It may be of particularassistance to the non-specialist music teacher. It is designed to allow you to learn and grow inconfidence as the children learn. For the first 4 weeks we will begin with 2 notes only. All thesongs, games and activities will use these notes. This is vital, as it allows pitch to become internal andeasily acquired rather than bombarding you, or your students, with long and complicated melodies.
The first two notes we will use are ‘So’ and ‘Mi’. We use these first because they are the most naturalpitches for children to sing. What notes are ‘So’ and‘Mi’? Well, for children’s voices the best note to usefor ‘So’ is a G and ‘Mi’ is the E. Alternatively, listen to Track 1 on the teacher’s CD. Practise singing‘Hel-lo every-one’using these notes so that you feel confident.
Hel-lo every-one,Hel-lo tea-cher
Week OneModule One
Week One Module One
So So SoMi So Mi So MiMi
Ceol_Module1_13.qxd:Layout 1 19/02/2008 11:52 Page 2
1 Little Sally
Walker, taken
from !Step it
Down - Games,
Songs and
Stories from the
Afro-American
Heritage", by
Bessie Jones
and Bess
Lomax-Hawes,
The University
of Georgia
Press, 1987
7

Ceol Lesson Plans
Week Two Module One
_______________________________________________________________________________________________________________________________________
Lit-tle Sal-ly
X X X X
Walk-er sau-cer
X X X X
all she’s done
Do Do Re Mi Do So (low)
So (low) Do
sit-ting in a
cry-ing and a weep-ing ov-er
rise Sal-ly
X X X X
rise eyes
X X X X
tells no lies
Do Re Mi Do Do
Mi Do La Do
wipe out your
run to the one that
Do Do Re Mi Do So (low)
Mi Mi Mi Re Mi Re Do La (low) Do
Do Re Mi
Mi Mi Re Do
8

Ceol Lesson Plans
Literacy Focus
How to
1. Begin this activity by recapping the real rhythmic note names learned last week. You can
some of the rhythm cards from last week to help you.
2. Continue, ‘All the rhythm patterns we have looked at are written on rhythm trains. You
have all seen the rhythm trains many times before, but I would like to see if you can
remember what all the different parts mean.’
3. Bring put the picture of the blank rhythm train and say, ‘At the beginning we see the
rhythm train. Just behind the rhythm train is the number 2. Can you tell me what that
means? That’s right, the number 2 means that there are two seats in each carriage for
passengers to sit on. But what about the note underneath? What type of note is that?
That’s right, it is a crotchet. Why is that note there? It tells us how big the seats are,
that’s right. So, in this train there are two, crotchet size seats in each carriage for
passengers to sit on. This note and number just behind the train is called the time
signature. Can you say that?’
4. Continue, ‘There is a single line in the middle of the train. What is it for? It shows the
end of a carriage, that’s right. It is called a bar line. What about the two lines at the end?
They show the end of the train, that’s right. These two lines are called a double bar line.’
5. Then say, ‘If this train has crotchet size seats in each carriage, then how many crotchet
notes will fit on one of the seats? That’s right, one crotchet note can fit on one crotchet
sized seat.’ Demonstrate by showing the first rhythm card from last week’s activity.
6. Continue, ‘Putting crotchet sized notes onto crotchet sized seats is pretty easy. But
what happens when we try putting different rhythm notes on the seats? Let’s start by
looking at these notes.’ Bring out a rhythmic pattern showing quaver notes. Say, ‘What
are these two notes called? Quavers, that’s right. And how many quaver notes do we
see on one seat? Two, that’s right. That means one crotchet note must last as long as,
or takes up the same amount of space as 2 quaver notes.‘
7. Bring out the ‘What’s it worth’ chart and fill in the first sentence, demonstrating that a
minim lasts as long as 2 crotchets.
8. You can then continue this process, asking the children to fill in the remaining sentences
concerning rhythmic equivalents.
9. Applaud the children.
What’s it Worth?
Ceol Lesson Plans22
Hello‘So’, ‘Mi’ Echoes - Track 1
Curriculum Focus
Strand: Performing/song singing• Develop a sense of pitch – recognise and imitate short melodies in echo• Show, while singing, the movement of sounds from high to low or low to high• Develop aural memory and internal hearing• Introduce the notes ‘So’ and ‘Mi’
Strand: Listening and responding• Listen to and imitate patterns of long and short sounds – develop a sense of duration and rhythm
This programme is designed for all teachers but assumes no prior knowledge. It may be of particularassistance to the non-specialist music teacher. It is designed to allow you to learn and grow inconfidence as the children learn. For the first 4 weeks we will begin with 2 notes only. All thesongs, games and activities will use these notes. This is vital, as it allows pitch to become internal andeasily acquired rather than bombarding you, or your students, with long and complicated melodies.
The first two notes we will use are ‘So’ and ‘Mi’. We use these first because they are the most naturalpitches for children to sing. What notes are ‘So’ and‘Mi’? Well, for children’s voices the best note to usefor ‘So’ is a G and ‘Mi’ is the E. Alternatively, listen to Track 1 on the teacher’s CD. Practise singing‘Hel-lo every-one’using these notes so that you feel confident.
Hel-lo every-one,Hel-lo tea-cher
Week OneModule One
Week One Module One
So So SoMi So Mi So MiMi
Ceol_Module1_13.qxd:Layout 1 19/02/2008 11:52 Page 2
Week Two Module One
_______________________________________________________________________________________________________________________________________
9

Ceol Lesson Plans
_______________________________________________________________________________________________________________________________________
How to
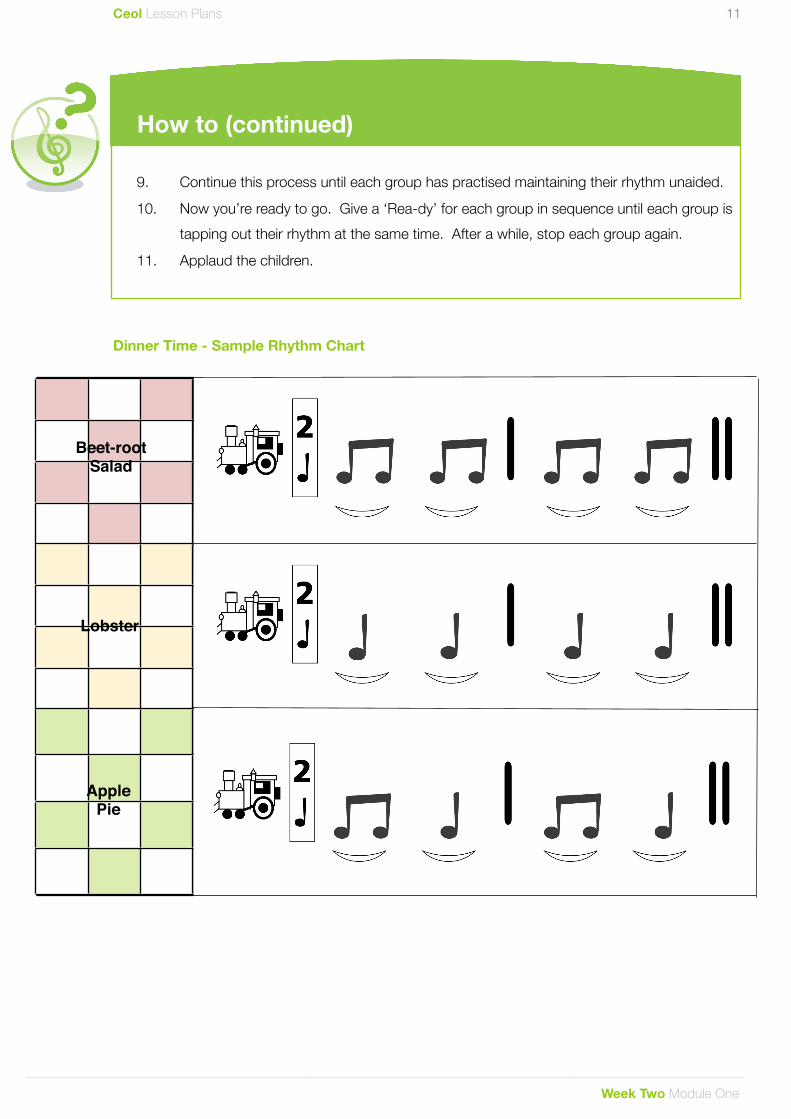
1. Say, ‘Last night I went to a lovely restaurant. I had lots of food to eat. In fact, I ate a
starter, a main course and a desert. I was very full when I got home.’
2. Bring out the dinner time grid, found on your resource key, and say, ‘On the left hand
side of the grid is the food I ate for my three different courses. For my starter, I ate beet-
root salad, for my main course, I ate lobster and for desert, I ate apple pie.’
3. Continue, ‘on the right side of the grid is are three blank rhythm trains. We are going to
compose a special rhythm to go with each of the three courses I ate at the restaurant.’
4. Then say, ‘Let’s begin with my starter, the beet-root salad. If I say those words and clap
at the same time it would sound like this.’ Clap out four quaver (or Ti-ti) notes as you
say, ‘Beet-root sa-lad’ (the rhythmic pattern can be seen below in the sample grid). You
will need to say the pattern twice through to fill the rhythm train.
5. Continue, ‘Which rhythm notes do you think I need to write into our first rhythm train so
that it gives us the rhythm I just clapped? I need to use Ti-ti or quaver notes? You’re
right.’ Draw in the quaver notes onto the first rhythm train, as shown below, give a ‘Rea-
dy’ and ask the children to clap the rhythm and say the words as they clap.
6. Continue this process until the children have composed and practised a rhythmic pattern
for each of the three courses.
7. Split the children into three groups. To Group One and say, ‘I will give you a ‘Rea-dy’
and we’ll start tapping out the rhythm and saying the food words as we play. When we
get to the end of the rhythm, we start back at the beginning again, saying the rhythm
over and over again. Once you’re confident of the rhythm, I am going to stop tapping
with you, and leave you to play the rhythm by yourselves, until I say ‘stop’. Let’s have a
practice.’ Practise the rhythm with Group One and ask them to carry on by themselves,
before continuing your explanation to the remaining groups.
8. Turn to Group Two and explain, ‘Group Two, I will come over to you and give you a ‘Rea-
dy’. We’ll tap our rhythm and say our food words, over and over again, at the same time
as Group One. Then you tap your rhythm by yourselves, until I say ‘stop’.’
Dinner Time
Composition
Ceol Lesson Plans22
Hello‘So’, ‘Mi’ Echoes - Track 1
Curriculum Focus
Strand: Performing/song singing• Develop a sense of pitch – recognise and imitate short melodies in echo• Show, while singing, the movement of sounds from high to low or low to high• Develop aural memory and internal hearing• Introduce the notes ‘So’ and ‘Mi’
Strand: Listening and responding• Listen to and imitate patterns of long and short sounds – develop a sense of duration and rhythm
This programme is designed for all teachers but assumes no prior knowledge. It may be of particularassistance to the non-specialist music teacher. It is designed to allow you to learn and grow inconfidence as the children learn. For the first 4 weeks we will begin with 2 notes only. All thesongs, games and activities will use these notes. This is vital, as it allows pitch to become internal andeasily acquired rather than bombarding you, or your students, with long and complicated melodies.
The first two notes we will use are ‘So’ and ‘Mi’. We use these first because they are the most naturalpitches for children to sing. What notes are ‘So’ and‘Mi’? Well, for children’s voices the best note to usefor ‘So’ is a G and ‘Mi’ is the E. Alternatively, listen to Track 1 on the teacher’s CD. Practise singing‘Hel-lo every-one’using these notes so that you feel confident.
Hel-lo every-one,Hel-lo tea-cher
Week OneModule One
Week One Module One
So So SoMi So Mi So MiMi
Ceol_Module1_13.qxd:Layout 1 19/02/2008 11:52 Page 2
Week Two Module One
_______________________________________________________________________________________________________________________________________
10
Ceol Lesson Plans
How to (continued)
9. Continue this process until each group has practised maintaining their rhythm unaided.
10. Now you’re ready to go. Give a ‘Rea-dy’ for each group in sequence until each group is
tapping out their rhythm at the same time. After a while, stop each group again.
11. Applaud the children.
Dinner Time - Sample Rhythm Chart
Beet-root Salad
Lobster
Apple Pie
Week Two Module One
_______________________________________________________________________________________________________________________________________
11