module for the encloud™ management system: establishing ... · page 2 module for the encloud™...
TRANSCRIPT

Go to Table of Contents
Establishing Users and Contacts for the enCloud™ Management System
ncore Networks’ cloud management system, enCloud™, provides management of your connected Encore devices via a web portal. Using a web browser, tablet, or smartphone,
you can gain access to enCloud from anywhere. The enCloud management system manages Encore Networks’ EN-1000™, EN-2000™, and EN-4000™ routers.
See the following documents for additional information to set up your enCloud account:
• Account Registration and Log-In for the enCloud™ Management System
• Developing Accounts in the enCloud™ Management System
• Use Cases and Groups in the enCloud™ Management System.
• Devices and Hardware Profiles in the enCloud™ Management System.
• Developing Rules for the enCloud™ Management System
5.1 Users and ContactsUsers may be added to distributor accounts or customer accounts in the enCloud system. Contacts are added to a customer account.
A user may function as a viewer of an entity (for example, to monitor devices in an account) or as an administrator of an entity (for example, to manage devices in an account). A distributor user with administrative permission and a customer user with administrative permission have the same capabilities, with different scopes.
A contact may receive notification when a rule is triggered. A contact can be used to store contact information for someone you may wish to notify of certain events, but who has no access to the enCloud system—for example, the manager of a customer location who might be wondering why his/her internet connection is no longer functioning (and needs to know that it is because a router is off line).
See the following:
• Section 5.1.1, Navigation to the Distributor Account, on page 2
• Section 5.1.2, Customer Users, on page 2
E
For information on trademarks, safety, limitations of liability, and similar topics, see http://www.encorenetworks.com/disclaimer.htm.
Module for the enCloud™ Management System, Document 5Version A, September 2016
© 2016 Encore Networks, Inc. All rights reserved.

Page 2 Module for the enCloud™ Management System, Document 5
• Section 5.1.3, Customer Contacts, on page 5
• Section 5.1.4, Distributor Users, on page 10
• Section 5.1.5, Assigning a User or a Contact, on page 11
• Section 5.1.6, Reviewing and Editing Settings for a User or Contact, on page 12
5.1.1 Navigation to the Distributor Account
1 Do one of the following:
a If you are at the distributor level in enCloud, select Distributors in the enCloud menu (along the left side of the screen).
b If you are at a customer level in enCloud, find the Account Navigation Button (Figure 5-1) near the top left of the screen, beside the logo for Encore Networks, Inc., and select Go Back to Distributor.
Figure 5-1. Account Navigation Button
» In either case, the Table of Distributor Accounts is displayed (Figure 5-2).
Figure 5-2. Table of Distributor Accounts
5.1.2 Customer Users
To add a customer user, do the following:
1 Follow the steps in Section 5.1.1, Navigation to the Distributor Account, on page 2, to display the Table of Distributor Accounts (recall Figure 5-2).
2 Select Customers in the enCloud menu (along the left side of the screen).
» The distributor’s Table of Customer Accounts is displayed (Figure 5-3).

Establishing Users and Contacts for the enCloud™ Management System Page 3
Figure 5-3. Table of Customer Accounts
3 Select a customer in the table.
» The customer account’s Table of Use Cases is displayed.
4 Select Users in the enCloud menu (along the left side of the screen).
» The customer account’s Table of Users is displayed (Figure 5-4).
Figure 5-4. Table of Users
Note: Make sure the Account Navigation Button is displayed (recall Figure 5-1), to verify that you are at the customer level.
5 Select the button to Add New User (above the right side of the table).
» The Panel to Add a Customer User is displayed (Figure 5-5).

Page 4 Module for the enCloud™ Management System, Document 5
Figure 5-5. Panel to Add a Customer User
6 In the Panel to Add a Customer User, do the following:
a Type a user Name for the customer user.
b Type an Email Address for the customer user.
c (Optional) Type a Phone Number for the customer user.
d Select the User Type field, and, in the dropdown list, assign the customer user Admin or Viewer permission for the customer account (Figure 5-6).
Figure 5-6. Panel to Add a Customer User: Set Customer User’s Permission Level
e Select the Use Cases field, and, in the dropdown list, select specific use cases (or leave All Use Cases in the field) so that the customer user has Viewer or Admin permission for the specified use cases in the customer account (Figure 5-7).

Establishing Users and Contacts for the enCloud™ Management System Page 5
Figure 5-7. Panel to Add a Customer User: Select Use Cases
f After you have finished configuring the new user, select the button to Add User.
» The user is created and is added to the redisplayed Table of Users (Figure 5-8).
Figure 5-8. Table of Users
5.1.3 Customer Contacts
To add a customer contact, do the following:
1 Follow the steps in Section 5.1.1, Navigation to the Distributor Account, on page 2, to display the Table of Distributor Accounts (recall Figure 5-2).
2 Select Customers in the enCloud menu (along the left side of the screen).
» The distributor’s Table of Customer Accounts is displayed (Figure 5-9).

Page 6 Module for the enCloud™ Management System, Document 5
Figure 5-9. Table of Customer Accounts
3 Select a customer in the table.
» The customer’s Table of Use Cases is displayed (Figure 5-10).
Figure 5-10. Table of Use Cases
4 Select Contacts in the enCloud menu (along the left side of the screen).
» The customer’s Table of Contacts is displayed (Figure 5-11).
Note: In Figure 5-11, no contacts have been added to the customer account.

Establishing Users and Contacts for the enCloud™ Management System Page 7
Figure 5-11. Table of Contacts
5 Select the button to Add New Contact (above the right side of the table).
» The Panel to Add a Customer Contact is displayed (Figure 5-12).
Figure 5-12. Panel to Add a Customer Contact
6 In the Panel to Add a Customer Contact, do the following:
a Type a user Name for the customer contact.
b Type a user Description for the customer contact.
Figure 5-13. Panel to Add a Customer Contact: User Name and Description

Page 8 Module for the enCloud™ Management System, Document 5
c Do one (or both) of the following:
i Click to select the box for Email Address for the customer contact.
» A field will open in the panel, to add an email address (Figure 5-14). Type an Email Address for the customer contact.
Figure 5-14. Panel to Add a Customer Contact: Email Address
ii Click to select the box for Phone Number for the customer contact.
» A field will open in the panel, to add a telephone number (Figure 5-15). Type a Phone Number for the customer contact.
Figure 5-15. Panel to Add a Customer Contact: Telephone Number
d After you have finished configuring the new user, select the button to Add Contact.
Warning: If you typed neither an email address nor a phone number for the contact, a message will be displayed, indicating that you must supply one or the other (Figure 5-16).

Establishing Users and Contacts for the enCloud™ Management System Page 9
Figure 5-16. Panel to Add a Customer Contact: Contact Method is Required
e Type an Email Address or a Phone Number in the appropriate field(s). Then select the button to Add Contact.
Warning: If the format for the contact information is incorrect, the panel will advise the correct format for the field.
Figure 5-17. Panel to Add a Customer Contact: Use Correct Format for Telephone Number
f Revise the Email Address or Phone Number to follow the prescribed format (Figure 5-18).
Figure 5-18. Panel to Add a Customer Contact: Corrected Telephone Number
g Then select the button to Add Contact.
» The contact is created and is added to the redisplayed Table of Contacts (Figure 5-19).

Page 10 Module for the enCloud™ Management System, Document 5
Figure 5-19. Table of Contacts
See Section 5.1.5, Assigning a User or a Contact, on page 11.
5.1.4 Distributor Users
To add a distributor user, do the following:
1 Follow the steps in Section 5.1.1, Navigation to the Distributor Account, on page 2, to display the Table of Distributor Accounts (recall Figure 5-2).
2 Select Users in the enCloud menu (along the left side of the screen).
» The distributor’s Table of Users is displayed (Figure 5-20).
Figure 5-20. Table of Users
3 Select the button to Add New User (above the right side of the table).
» The Panel to Add a Distributor User is displayed (Figure 5-21).

Establishing Users and Contacts for the enCloud™ Management System Page 11
Figure 5-21. Panel to Add a Distributor User
4 In the Panel to Add a Distributor User, do the following:
a Type a user Name for the distributor user.
b Type the user’s Email Address.
c (Optional) Type the user’s Phone Number.
d Select the User Type field, and, in the dropdown box, select Admin.
Note: Always give yourself administrative permission until you have assigned another distributor user administrative permission to manage an account, user, or other entity.
e Select the Distributor field, and, in the dropdown box, select the distributor accounts the new user will have access to.
f Select the Customer field, and, in the dropdown box, select the customer accounts the new user will manage, and the permission level (Admin or Viewer) for each customer account.
g When you have finished configuring the new distributor user, select the button to Add User.
» The distributor’s Table of Users is redisplayed.
5.1.5 Assigning a User or a Contact
Users can be assigned to accounts when the user is created. Contacts are assigned to rules; users can also be assigned to rules. The QuickStart Guide for the enCloud™ Management

Page 12 Module for the enCloud™ Management System, Document 5
System provides quick examples of user and contact assignment. For more detailed examples, see the following:
• To assign one or more users and contacts to a rule, see the document Developing Rules for the enCloud™ Management System.
• To assign one or more users to a use case, see Section 3.2, Use Cases, in the document Use Cases and Groups in the enCloud™ Management System.
5.1.6 Reviewing and Editing Settings for a User or Contact
You may wish to review or revise users in your account. See the following:
• Section 5.1.6.1, Reviewing a Customer User
• Section 5.1.6.2, Editing a Customer User
• Section 5.1.6.3, Reviewing or Editing a Customer Contact
• Section 5.1.6.4, Reviewing a Distributor User
• Section 5.1.6.5, Editing a Distributor User
5.1.6.1 Reviewing a Customer User
1 Follow the steps in Section 5.1.1, Navigation to the Distributor Account, on page 2, to display the Table of Distributor Accounts (recall Figure 5-2).
2 Select Customers in the enCloud menu (along the left side of the screen).
» The distributor’s Table of Customer Accounts is displayed (Figure 5-3).
3 Select a customer in the table.
» The customer’s Table of Use Cases is displayed (recall Figure 5-10).
4 Select Users in the enCloud menu (along the left side of the screen).
» The customer’s Table of Users is displayed (recall Figure 5-8).
5 Select a user in the table.
» The Overview of a Selected Customer User is displayed (Figure 5-22).
Figure 5-22. Overview of a Selected Customer User
Establishing Users and Contacts for the enCloud™ Management System Page 13
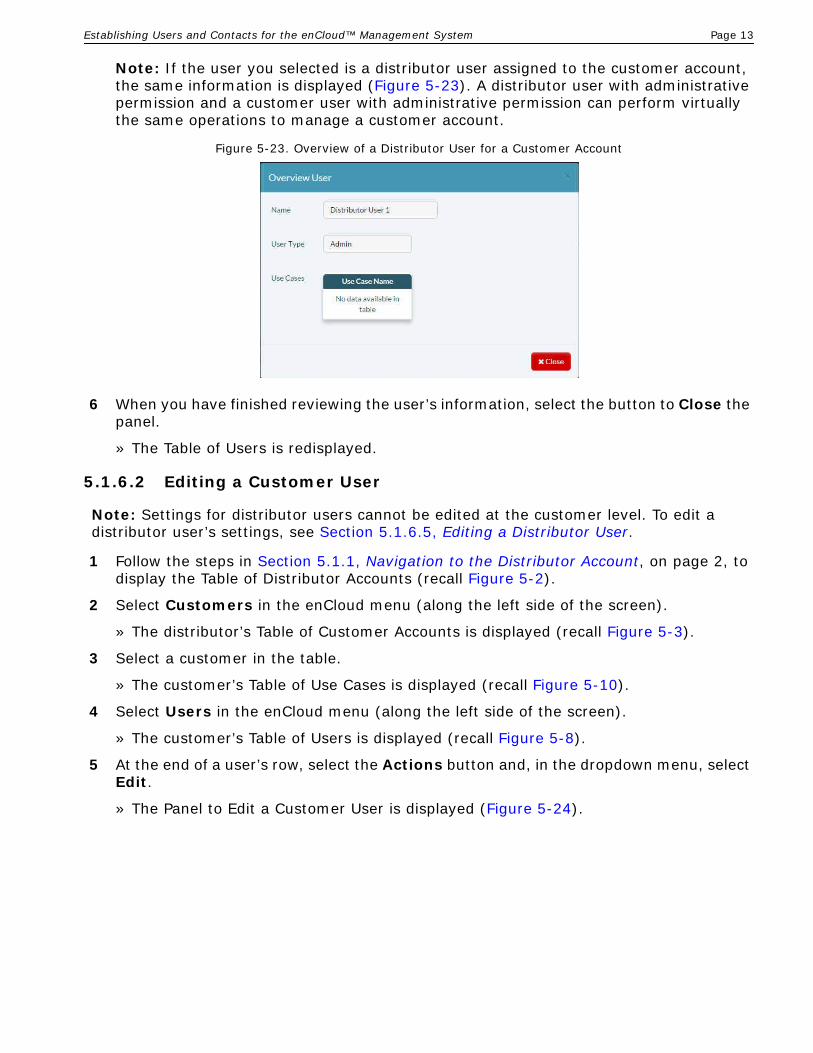
Note: If the user you selected is a distributor user assigned to the customer account, the same information is displayed (Figure 5-23). A distributor user with administrative permission and a customer user with administrative permission can perform virtually the same operations to manage a customer account.
Figure 5-23. Overview of a Distributor User for a Customer Account
6 When you have finished reviewing the user’s information, select the button to Close the panel.
» The Table of Users is redisplayed.
5.1.6.2 Editing a Customer User
Note: Settings for distributor users cannot be edited at the customer level. To edit a distributor user’s settings, see Section 5.1.6.5, Editing a Distributor User.
1 Follow the steps in Section 5.1.1, Navigation to the Distributor Account, on page 2, to display the Table of Distributor Accounts (recall Figure 5-2).
2 Select Customers in the enCloud menu (along the left side of the screen).
» The distributor’s Table of Customer Accounts is displayed (recall Figure 5-3).
3 Select a customer in the table.
» The customer’s Table of Use Cases is displayed (recall Figure 5-10).
4 Select Users in the enCloud menu (along the left side of the screen).
» The customer’s Table of Users is displayed (recall Figure 5-8).
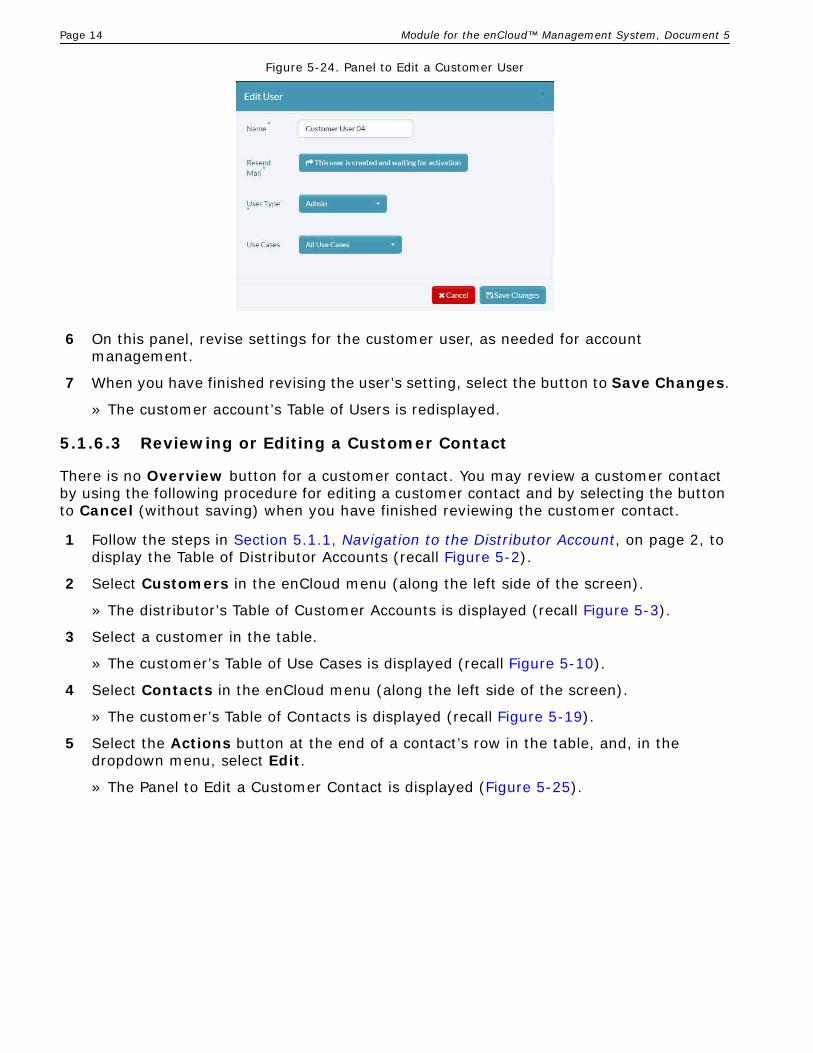
5 At the end of a user’s row, select the Actions button and, in the dropdown menu, select Edit.
» The Panel to Edit a Customer User is displayed (Figure 5-24).
Page 14 Module for the enCloud™ Management System, Document 5
Figure 5-24. Panel to Edit a Customer User
6 On this panel, revise settings for the customer user, as needed for account management.
7 When you have finished revising the user’s setting, select the button to Save Changes.
» The customer account’s Table of Users is redisplayed.
5.1.6.3 Reviewing or Editing a Customer Contact
There is no Overview button for a customer contact. You may review a customer contact by using the following procedure for editing a customer contact and by selecting the button to Cancel (without saving) when you have finished reviewing the customer contact.
1 Follow the steps in Section 5.1.1, Navigation to the Distributor Account, on page 2, to display the Table of Distributor Accounts (recall Figure 5-2).
2 Select Customers in the enCloud menu (along the left side of the screen).
» The distributor’s Table of Customer Accounts is displayed (recall Figure 5-3).
3 Select a customer in the table.
» The customer’s Table of Use Cases is displayed (recall Figure 5-10).
4 Select Contacts in the enCloud menu (along the left side of the screen).
» The customer’s Table of Contacts is displayed (recall Figure 5-19).
5 Select the Actions button at the end of a contact’s row in the table, and, in the dropdown menu, select Edit.
» The Panel to Edit a Customer Contact is displayed (Figure 5-25).

Establishing Users and Contacts for the enCloud™ Management System Page 15
Figure 5-25. Panel to Edit a Customer Contact
6 On this panel, revise settings for the customer contact, as needed for account management.
7 When you have finished revising the contact’s setting, do one of the following:
a If you were merely reviewing the contact’s information, and you do not need to edit the information, select the button to Cancel (without saving).
b To save the edits for the contact, select the button to Save Changes.
» In either case, the customer account’s Table of Contacts is redisplayed.
5.1.6.4 Reviewing a Distributor User
1 Follow the steps in Section 5.1.1, Navigation to the Distributor Account, on page 2, to display the Table of Distributor Accounts (recall Figure 5-2).
2 Select Users in the enCloud menu (along the left side of the screen).
» The distributor account’s Table of Users is displayed (recall Figure 5-20).
Note: Only distributor users are in this table. To view customer users, see Section 5.1.6.1, Reviewing a Customer User.
3 You may view any user’s information. To do so, select the Action button (at the end of the selected user’s row in the table), and, in the dropdown menu, select Overview.
Note: A quick way to see the overview of any item is to select that item’s row.
» The Overview of the Selected Distributor User is displayed (Figure 5-26).

Page 16 Module for the enCloud™ Management System, Document 5
Figure 5-26. Overview of the Selected Distributor User
4 Review the information in the overview.
5 After you have finished reviewing the information, select the button to Close the panel.
» The distributor account’s Table of Users is redisplayed.
5.1.6.5 Editing a Distributor User
Note: You cannot use this procedure to edit your own distributor user settings. To edit your own settings, see the document Settings for the enCloud™ Management System.
1 Follow the steps in Section 5.1.1, Navigation to the Distributor Account, on page 2, to display the Table of Distributor Accounts (recall Figure 5-2).
2 Select Users in the enCloud menu (along the left side of the screen).
» The distributor account’s Table of Users is displayed (recall Figure 5-20).
3 If you have administrative permission to edit another distributor user, you may select the Action button at the end of that distributor user’s row, and, in the dropdown list, select Edit.
» The Panel to Edit a Distributor User is displayed (Figure 5-27).

Establishing Users and Contacts for the enCloud™ Management System Page 17
Figure 5-27. Panel to Edit a Distributor User
4 On this panel, revise settings for the distributor user, as needed for account management.
5 When you have finished revising the user’s setting, select the button to Save Changes.
» The distributor account’s Table of Users is redisplayed.

Page 18 Module for the enCloud™ Management System, Document 5