module 5 - scratch 5... · module 5 revision with scratch cards lesson 1 scratch cards – easy...
TRANSCRIPT
Module 5
Revision with Scratch Cards
Lesson 1 Scratch Cards – EasyStudents revise some basic Scratch ideas using 5 Scratch Cards, including movement, changing colour of sprites and drawing basic shapes.
Computer Projector PrintableResource
Lesson 2 Scratch Cards - DifficultThese 5 Scratch Cards move to the next level. Students solve more difficult problems using Scratch. Problems include costume changes and using conditional statements and variables.
Computer Projector PrintableResource
Lesson 3 Scratch Cards - ExtremeThese 5 cards are the most challenging of Scratch Cards and involve a more complex use of variables, broadcast statements, nested loops as well as drawing more complex shapes.
Computer Projector PrintableResource
Group Work
© 2009 Lero, IT Tallaght, CIO Ireland
Module 5 – Scratch Cards
Lesson 1 – Easy Scratch Cards1
Resources:Scratch Cards Easy (Resource 1), Scratch Files with Solutions (Resource 2), Scratch Cards Progress Sheet (Resource 3)
Key Vocabulary:Costume, Sprite
Description: Students revise a number of topics in Scratch using Scratch Cards. There are 5 easy cards in this lesson (1 being the easiest and 5 being the most difficult). Scratch Cards are available with this pack. If there is a requirement for more cards the teacher should copy and cut out the Scratch Cards from resource 1 and keep the solution to check students’ work. Students attempt the problems on the Scratch Cards, using the images as guidance. The teacher can give hints to students if necessary but should not show the solution card.
Learning Objectives:1. To revise basic concepts in Scratch such as movement, costume
changes, colour changes, pick random command and using a repeat loop to draw a basic shape.
2. To ensure students are confident with basic concepts before moving on to Lesson 2 – Difficult Scratch Cards.
Lesson Introduction:• Tell students that they are going to revise some concepts in Scratch
such as animation, changing colour and drawing shapes by using Scratch Cards.
• Tell them that they will revise the basic concepts today, in preparation for moving on to more challenging cards in the next lesson.
Lesson Breakdown:1. Give students Scratch Card 1 and ask them to look at the instructions
and pictures.2. Ask students to attempt the problem in Scratch. Ask them to work
alone, but tell them that they may consult a friend if necessary, once they have attempted the problem themselves.
3. Use the ‘Sample Solution’ section on the teacher’s solution to give hints if necessary, but do not show the solution card to the students while they attempt to solve the problem.
1This lesson is based on Scratch Cards from the Scratch Websitehttp://scratch.mit.edu/cards
2
Module 5 – Scratch Cards
4. Once students have completed the problem they may receive Scratch Card 2.
5. Continue to hand out the Scratch Cards, until students have completed Card 5.
6. The Scratch Cards Progress Sheet (Resource 3) can be used to keep track of student progress.
Extension activity Students may add some other functionality of their choice to their solutions. For example they could make their sprites talk or add more shapes.
3

Module 5 – Scratch Cards
Resource 1
Scratch Cards Easy5 Scratch Cards at an easy level. Copy these, cut them out and give them to students. A
teacher’s solution card is also included.
4
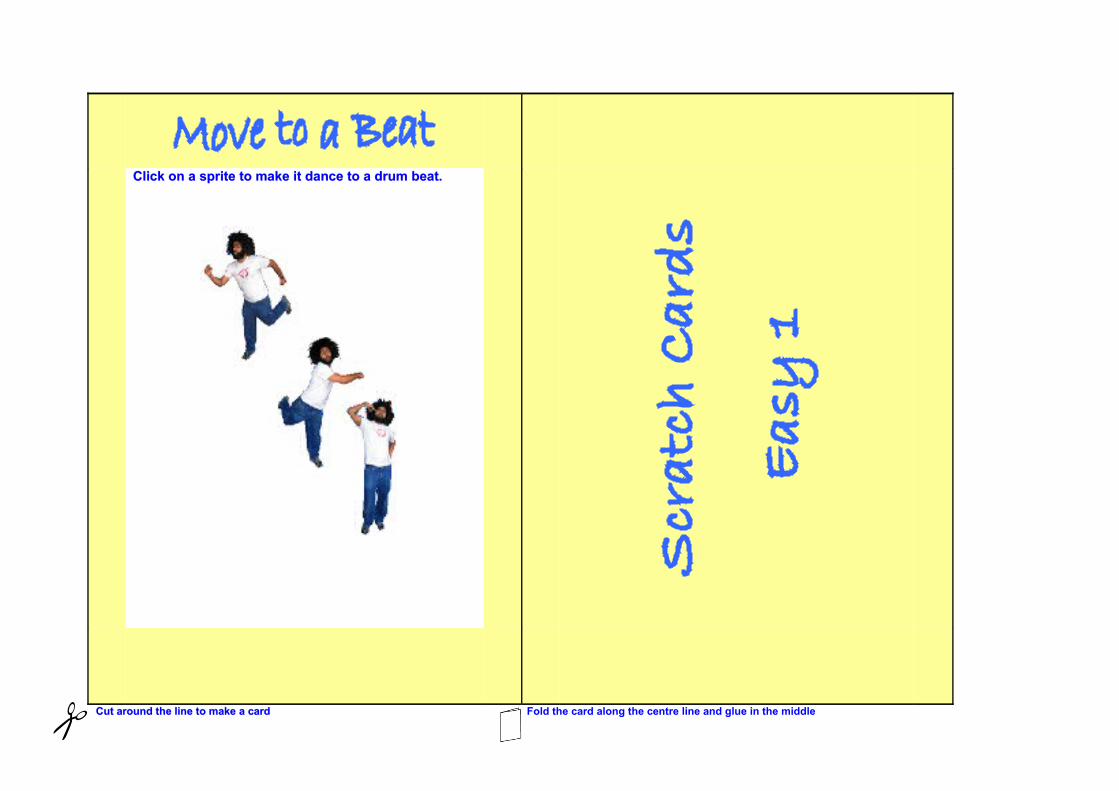
Click on a sprite to make it dance to a drum beat.Click on a sprite to make it dance to a drum beat.
Cut around the line to make a cardCut around the line to make a card Fold the card along the centre line and glue in the middle
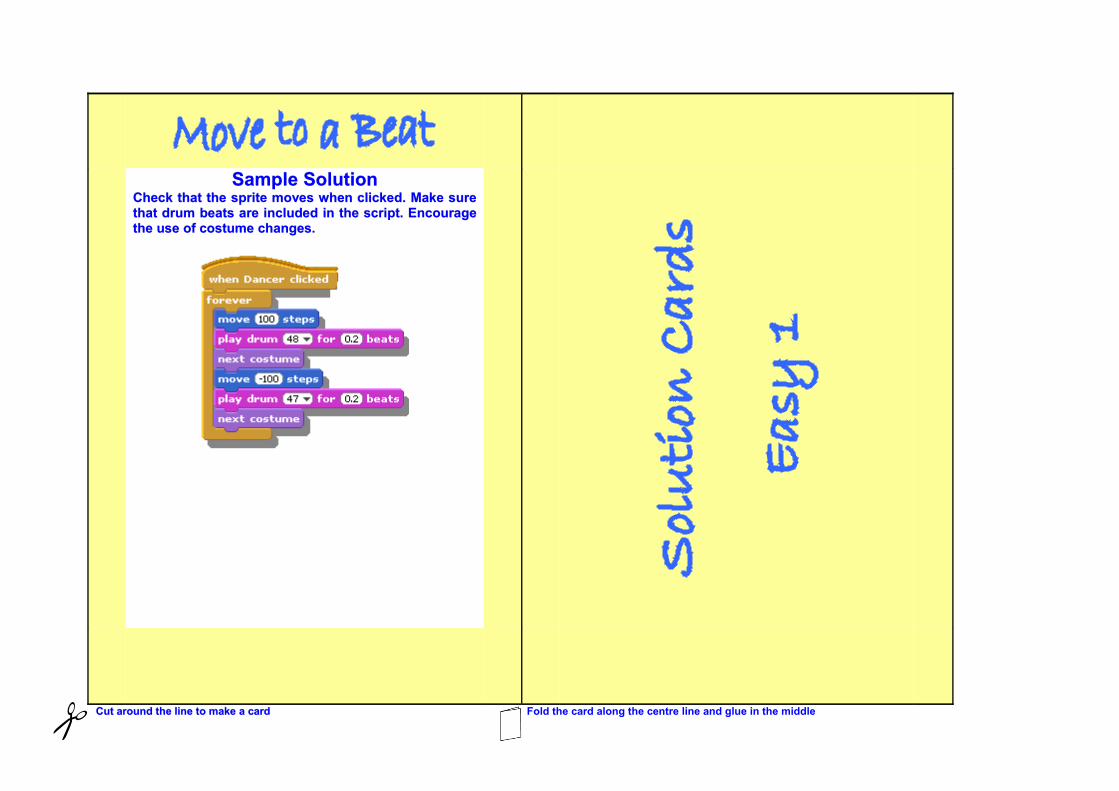
Sample SolutionSample SolutionCheck that the sprite moves when clicked. Make sureCheck that the sprite moves when clicked. Make sure that drum beats are included in the script. Encouragethat drum beats are included in the script. Encourage the use of costume changes. the use of costume changes.
Cut around the line to make a cardCut around the line to make a card Fold the card along the centre line and glue in the middle
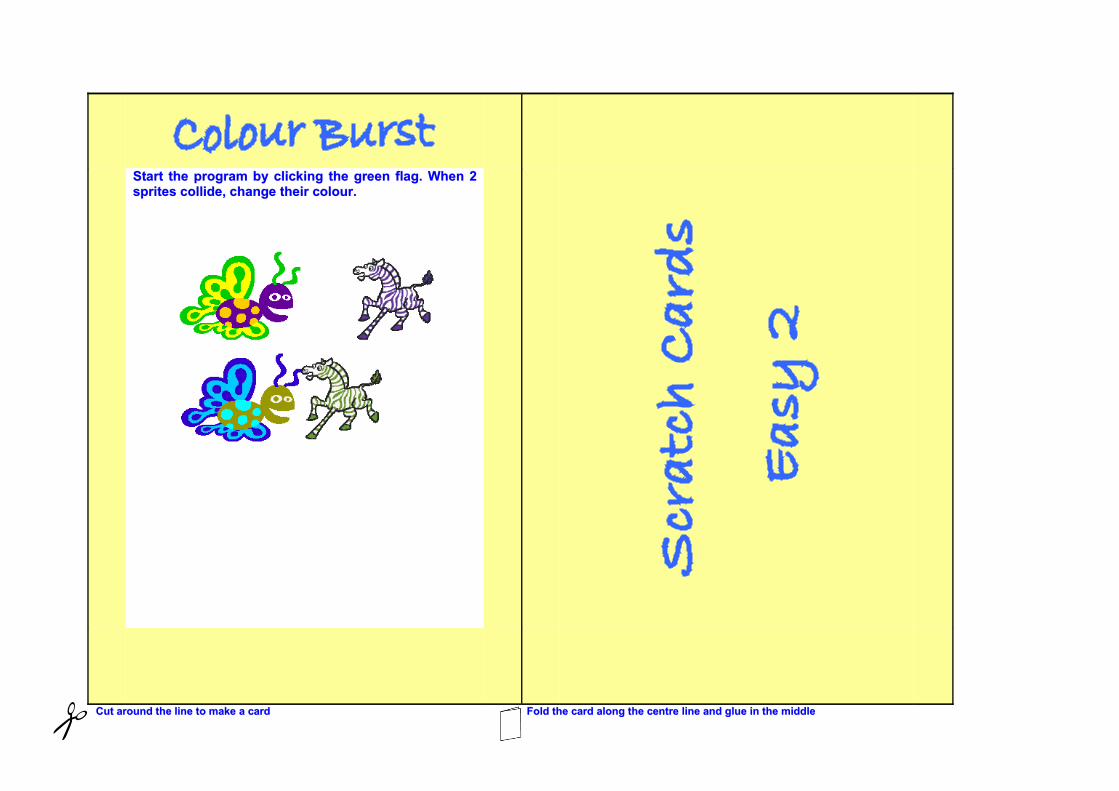
Start the program by clicking the green flag. When 2Start the program by clicking the green flag. When 2 sprites collide, change their colour.sprites collide, change their colour.
Cut around the line to make a cardCut around the line to make a card Fold the card along the centre line and glue in the middleFold the card along the centre line and glue in the middle
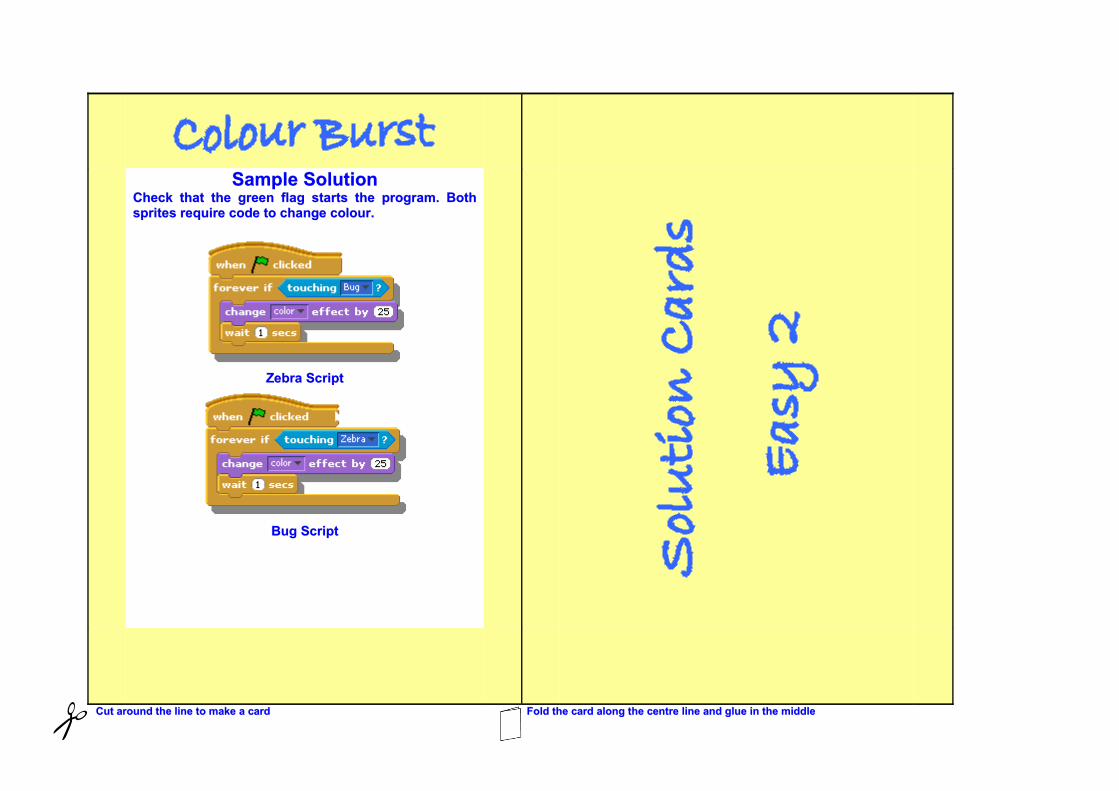
Sample SolutionSample SolutionCheck that the green flag starts the program. BothCheck that the green flag starts the program. Both sprites require code to change colour. sprites require code to change colour.
Zebra ScriptZebra Script
Bug ScriptBug Script
Cut around the line to make a cardCut around the line to make a card Fold the card along the centre line and glue in the middleFold the card along the centre line and glue in the middle

UsingUsing costume changes,, program the parrot to flap his wings and travel across the stage. The parrot should bounce when it touches the edge of the stage.
Cut around the line to make a cardCut around the line to make a card Fold the card along the centre line and glue in the middleFold the card along the centre line and glue in the middle
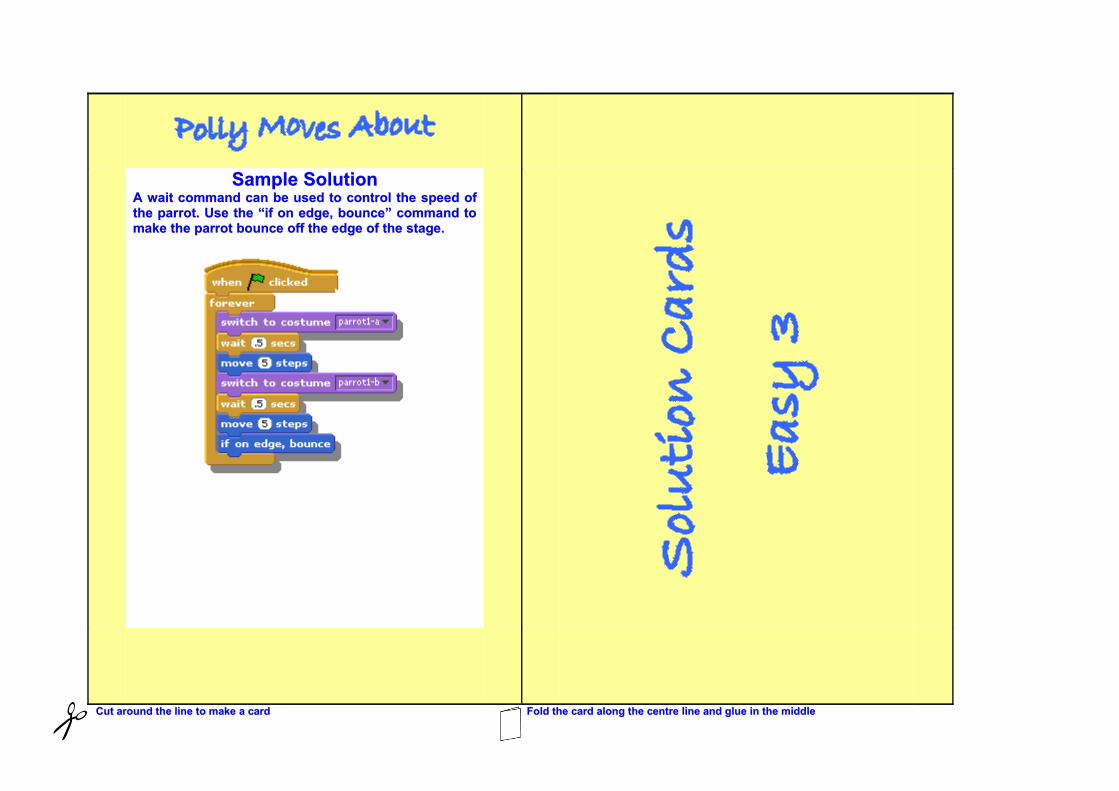
Sample SolutionSample SolutionA wait command can be used to control the speed ofA wait command can be used to control the speed of the parrot. Use the “if on edge, bounce” command tothe parrot. Use the “if on edge, bounce” command to make the parrot bounce off the edge of the stage. make the parrot bounce off the edge of the stage.
Cut around the line to make a cardCut around the line to make a card Fold the card along the centre line and glue in the middleFold the card along the centre line and glue in the middle
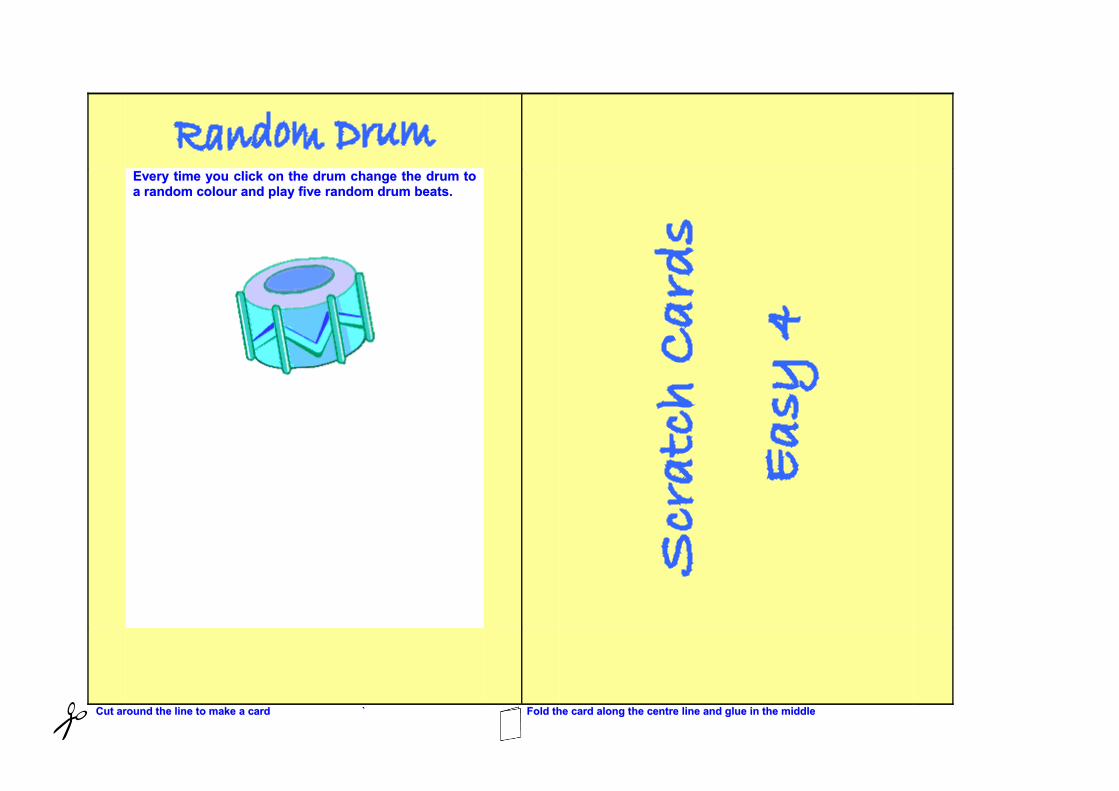
Every time you click on the drum change the drum toEvery time you click on the drum change the drum to a random colour and play five random drum beats.a random colour and play five random drum beats.
Cut around the line to make a cardCut around the line to make a card ` Fold the card along the centre line and glue in the middleFold the card along the centre line and glue in the middle
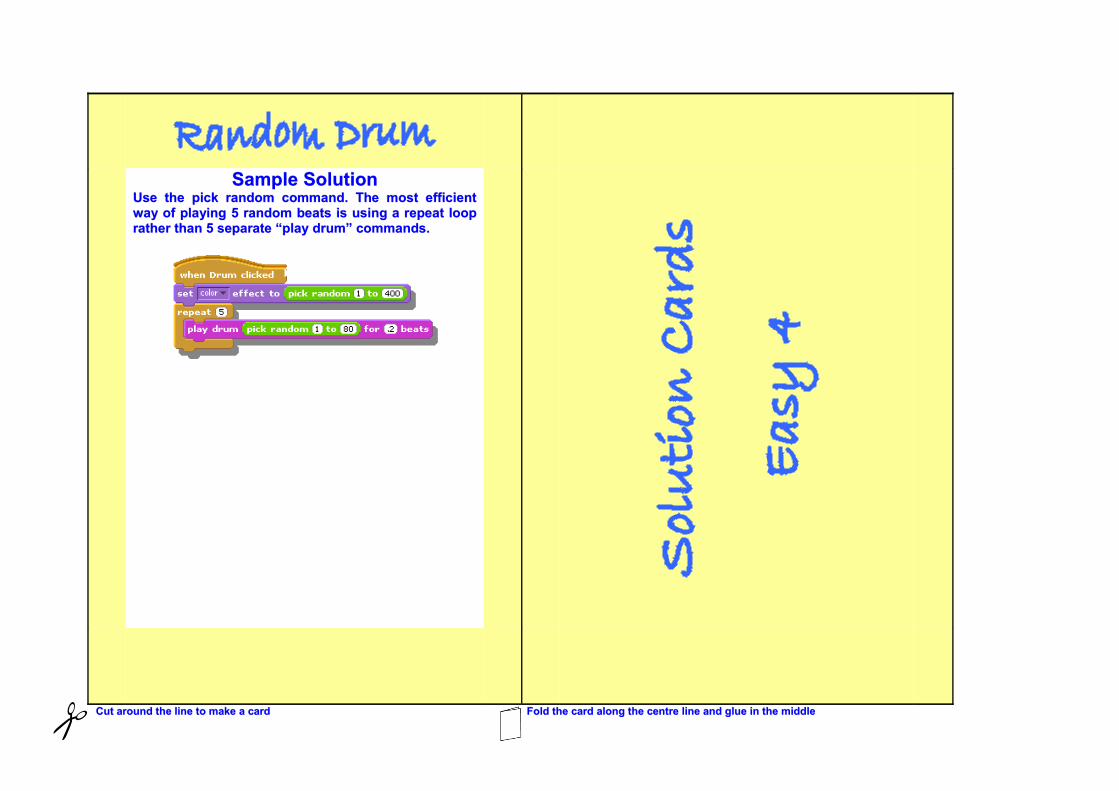
Sample SolutionSample SolutionUse the pick random command. The most efficientUse the pick random command. The most efficient way of playing 5 random beats is using a repeat loopway of playing 5 random beats is using a repeat loop rather than 5 separate “play drum” commands. rather than 5 separate “play drum” commands.
Cut around the line to make a cardCut around the line to make a card Fold the card along the centre line and glue in the middleFold the card along the centre line and glue in the middle
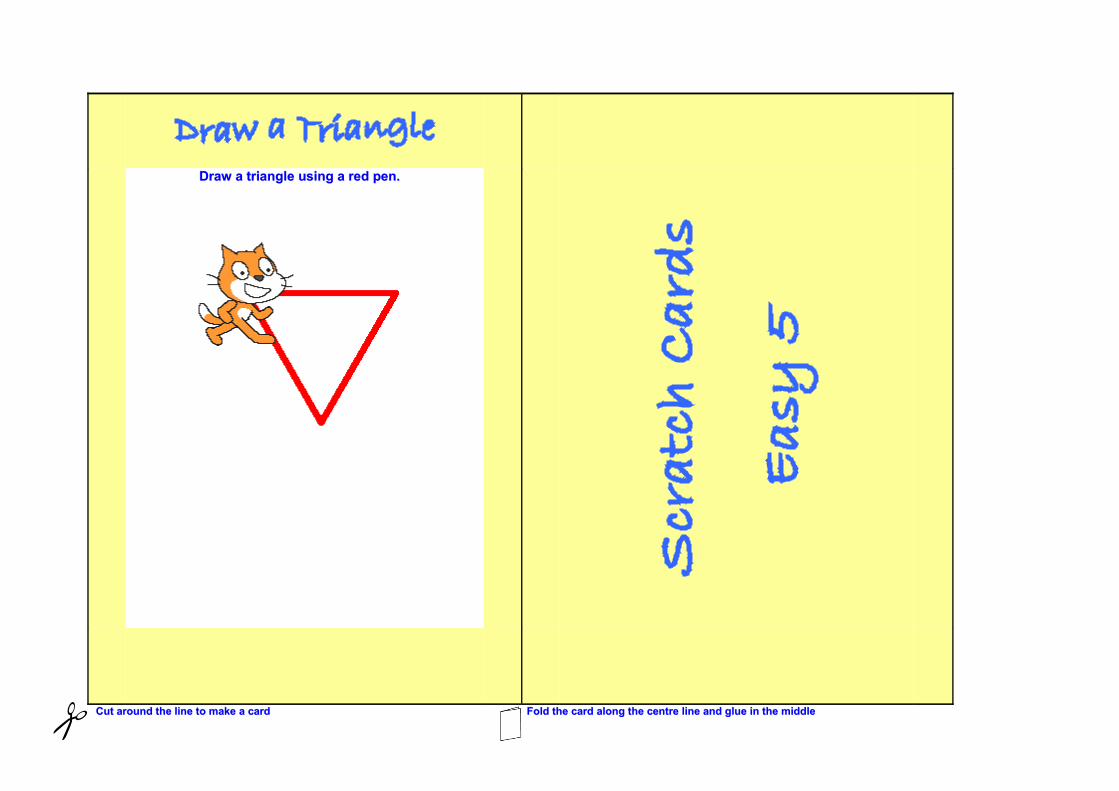
Draw a triangle using a red pen.Draw a triangle using a red pen.
Cut around the line to make a cardCut around the line to make a card Fold the card along the centre line and glue in the middleFold the card along the centre line and glue in the middle

Sample SolutionSample SolutionThe most effective way of drawing a triangle is byThe most effective way of drawing a triangle is by using a repeat loop to draw and rotate 3 times insteadusing a repeat loop to draw and rotate 3 times instead of 3 separate draw and 3 rotate commands. Don’tof 3 separate draw and 3 rotate commands. Don’t forget to put the pen down to start drawing!forget to put the pen down to start drawing!
Cut around the line to make a cardCut around the line to make a card Fold the card along the centre line and glue in the middleFold the card along the centre line and glue in the middle
Module 5 – Scratch Cards
Resource 2
Scratch Files with SolutionsFolder containing Solutions in Scratch for Easy Scratch Cards.
CD Resource “M5L1R2 Scratch Files with Easy Solutions”
15
Module 5 – Scratch Cards
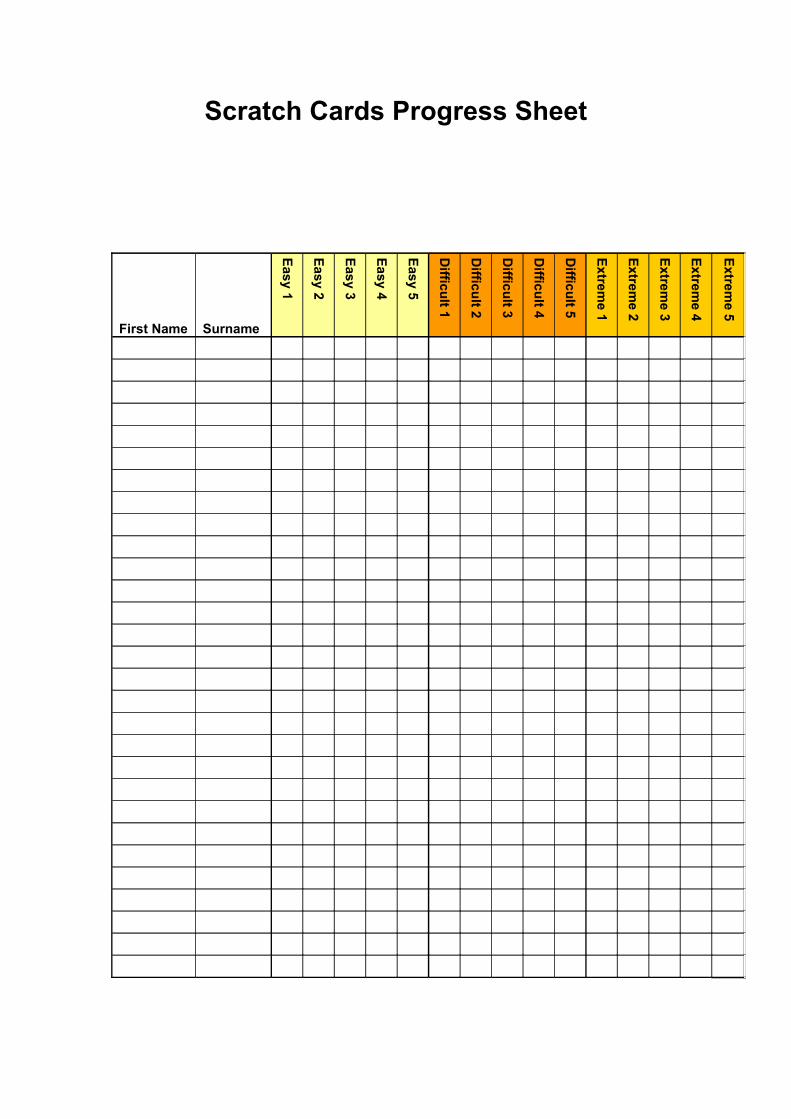
Resource 3
Scratch Cards Progress SheetTeachers can print out and use this sheet to track the progress of students when using
Scratch Cards.
16
Scratch Cards Progress Sheet
First Name Surname
Easy 1
Easy 2
Easy 3
Easy 4
Easy 5
Difficult 1
Difficult 2
Difficult 3
Difficult 4
Difficult 5
Extreme 1
Extreme 2
Extreme 3
Extreme 4
Extreme 5
Module 5 – Scratch Cards
Lesson 2 – Difficult Scratch Cards2
Resources:Scratch Cards Difficult (Resource 1), Scratch Files with Solutions (Resource 2), Scratch Cards Progress Sheet (Resource 3, Lesson 1)
Key Vocabulary:Costume, Conditional Statement, Sprite, Variable
Description: Students revise a number of topics in Scratch using Scratch Cards. There are 5 difficult cards in this lesson (1 being the least difficult and 5 being the most difficult). Scratch Cards are available with this pack. If there is a requirement for more cards the teacher should copy and cut out the Scratch Cards from resource 1 and keep the solution to check students’ work. Students attempt the problems on the Scratch Cards, using the images as guidance. The teacher can give hints to students if necessary but should not show the solution card. Students will encounter concepts such as drawing more complex shapes, editing a costume for animation, changing the whirl effect according to the x position of the mouse, conditional statements and variables.
Learning Objectives:1. To revise more difficult concepts in Scratch, building on Lesson 1 Easy
Scratch Cards. 2. To ensure students are comfortable with these concepts, before
moving on to Lesson 3 – Extreme Scratch cards.
Lesson Introduction:• Tell students that they are going to revise some more concepts in
Scratch using cards and that these will build on Lesson 1 Easy Scratch Cards.
• Tell them that they will revise more challenging concepts today, in preparation for moving on to the most challenging cards, the Extreme Cards, in the next lesson.
• Tell students that they will encounter concepts such as drawing more complex shapes, editing costumes to animate a sprite and keeping score.
2 This lesson is based on Scratch Cards from the Scratch Websitehttp://scratch.mit.edu/cards
18
Module 5 – Scratch Cards
Lesson Breakdown:1. Give students Scratch Card 1 and ask them to look at the instructions
and pictures.2. Ask students to attempt the problem in Scratch. Ask them to work
alone, but tell them that they may consult a friend if necessary, once they have attempted the problem themselves.
3. Use the Sample Solution section on the teacher’s solution to give hints if necessary, but do not show the solution card to the students while they attempt the problem.
4. Once students have completed the problem they may receive Scratch Card 2.
5. Continue to hand out the Scratch Cards, until students have completed Card 5.
6. The Scratch Cards Progress Sheet (Resource 3) can be used to keep track of student progress.
Extension activity Students may add some other functionality of their choice to their solutions. For example they could add a 3rd costume in Card 2 (Spooky Surprise) to change the animation or they could add a different effect to Card 3 (X-traordinary Whirl).
19

Module 5 – Scratch Cards
Resource 1
Scratch Cards Difficult5 Scratch Cards at a difficult level. Copy these, cut them out and give them to students. A
teacher’s solution card is also included.
20
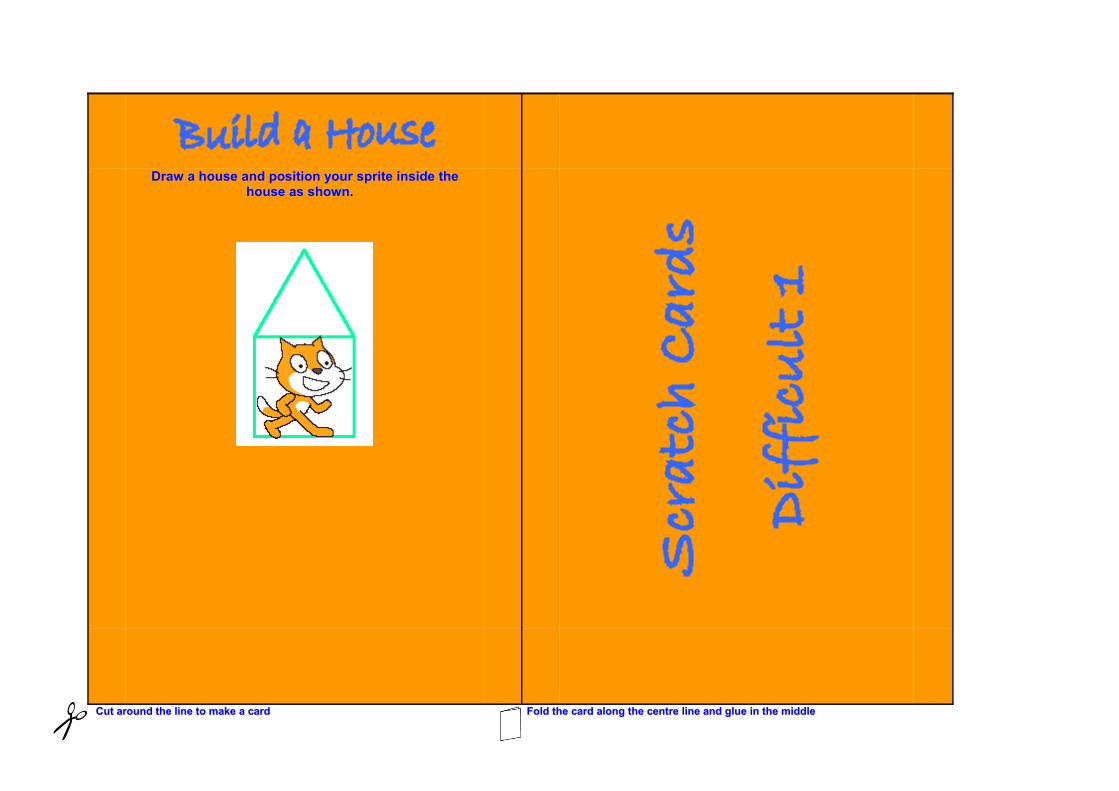
Draw a house and position your sprite inside theDraw a house and position your sprite inside the house as shown.house as shown.
Cut around the line to make a cardCut around the line to make a card Fold the card along the centre line and glue in the middleFold the card along the centre line and glue in the middle

Sample SolutionSample SolutionYou will need to use 2 repeat loops for the triangleYou will need to use 2 repeat loops for the triangle and square parts of the house. Make sure your spriteand square parts of the house. Make sure your sprite is pointing in the right direction and that you positionis pointing in the right direction and that you position the sprite correctly inside the house. the sprite correctly inside the house.
Cut around the line to make a cardCut around the line to make a card Fold the card along the centre line and glue in the middleFold the card along the centre line and glue in the middle

Copy and edit a costume to create the facialCopy and edit a costume to create the facial expression animation shown.expression animation shown.
Cut around the line to make a cardCut around the line to make a card Fold the card along the centre line and glue in the middleFold the card along the centre line and glue in the middle
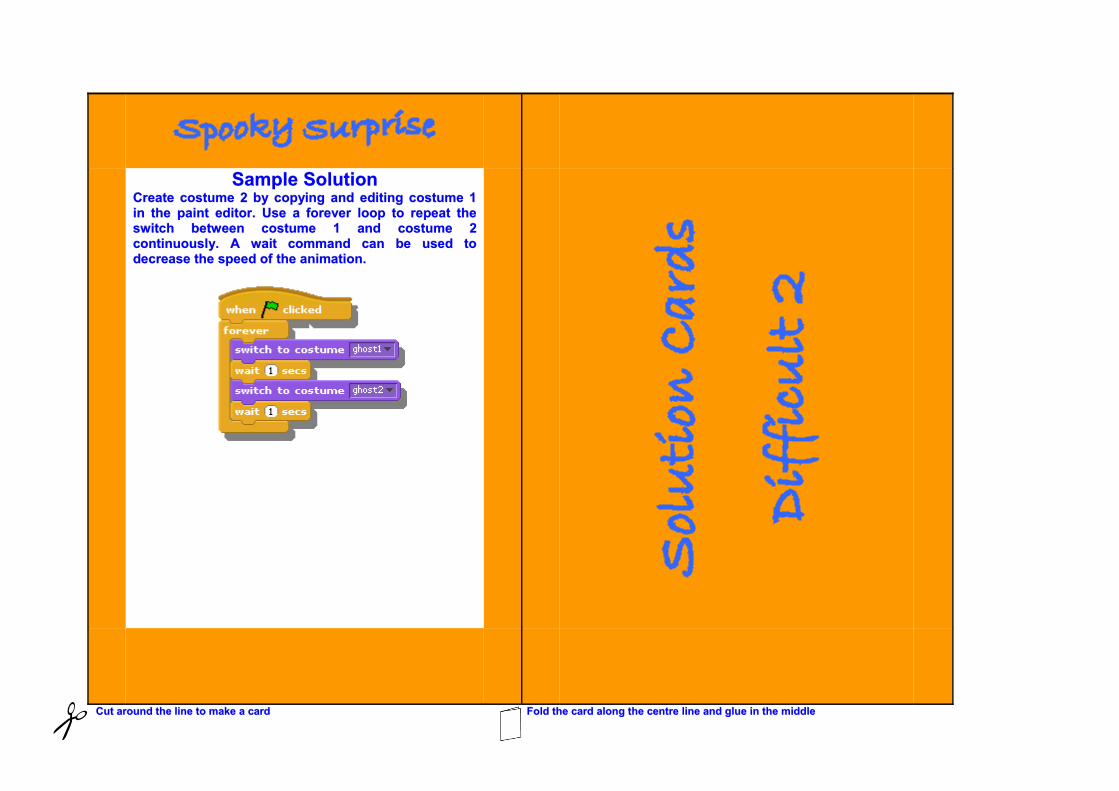
Sample SolutionSample SolutionCreate costume 2 by copying and editing costume 1Create costume 2 by copying and editing costume 1 in the paint editor. Use a forever loop to repeat thein the paint editor. Use a forever loop to repeat the switch between costume 1 and costume 2switch between costume 1 and costume 2 continuously. A wait command can be used tocontinuously. A wait command can be used to decrease the speed of the animation.decrease the speed of the animation.
Cut around the line to make a cardCut around the line to make a card Fold the card along the centre line and glue in the middleFold the card along the centre line and glue in the middle
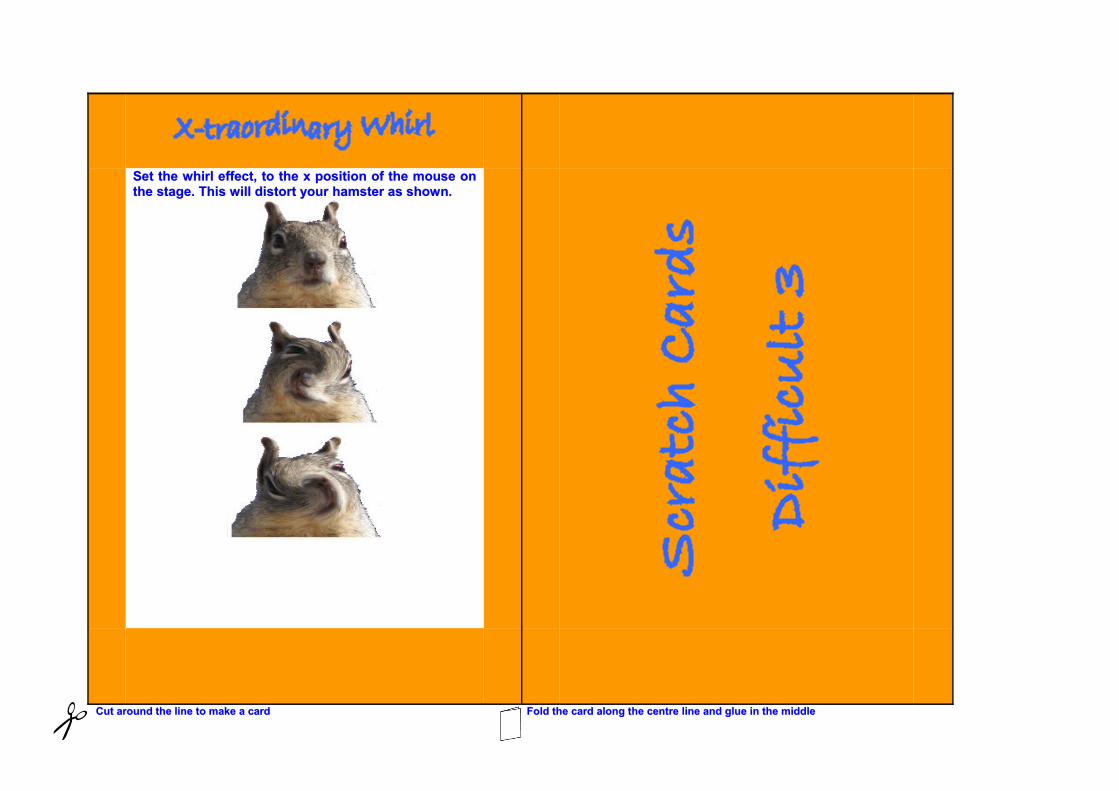
Set the whirl effect, to the x position of the mouse onSet the whirl effect, to the x position of the mouse on the stage. This will distort your hamster as shown.the stage. This will distort your hamster as shown.
Cut around the line to make a cardCut around the line to make a card Fold the card along the centre line and glue in the middleFold the card along the centre line and glue in the middle
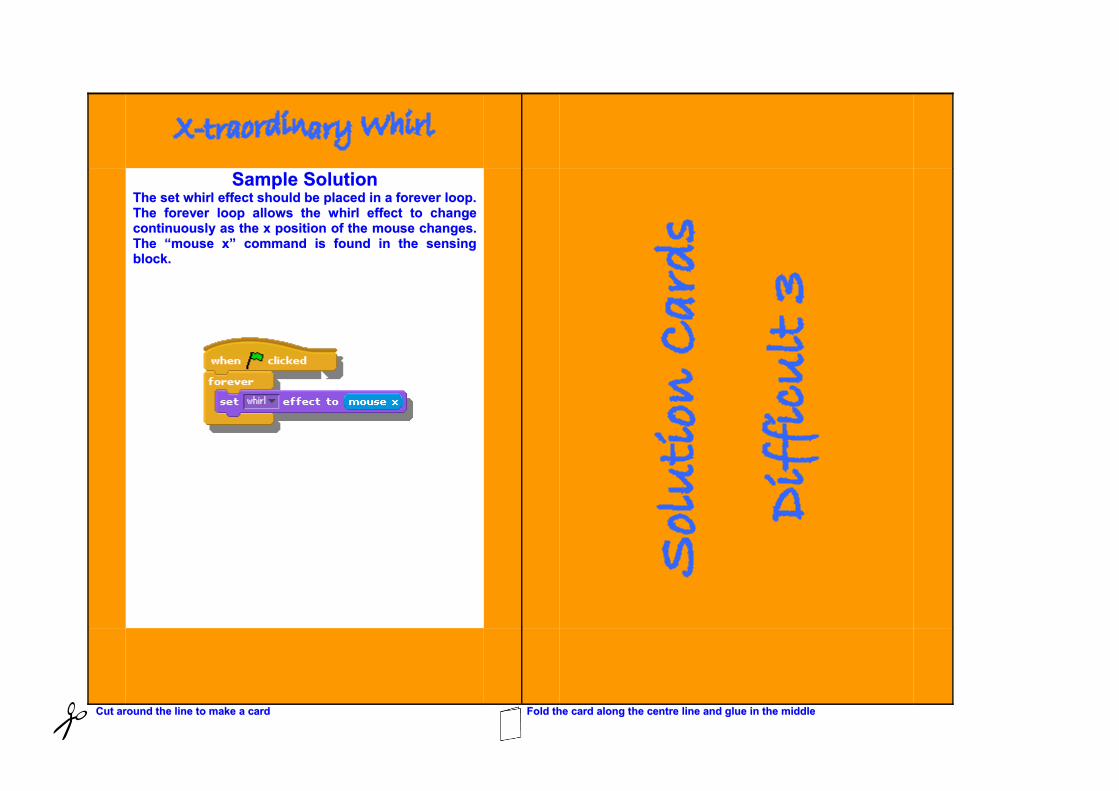
Sample SolutionSample SolutionThe set whirl effect should be placed in a forever loop.The set whirl effect should be placed in a forever loop. The forever loop allows the whirl effect to changeThe forever loop allows the whirl effect to change continuously as the x position of the mouse changes.continuously as the x position of the mouse changes. The “mouse x” command is found in the sensingThe “mouse x” command is found in the sensing block.block.
Cut around the line to make a cardCut around the line to make a card Fold the card along the centre line and glue in the middleFold the card along the centre line and glue in the middle
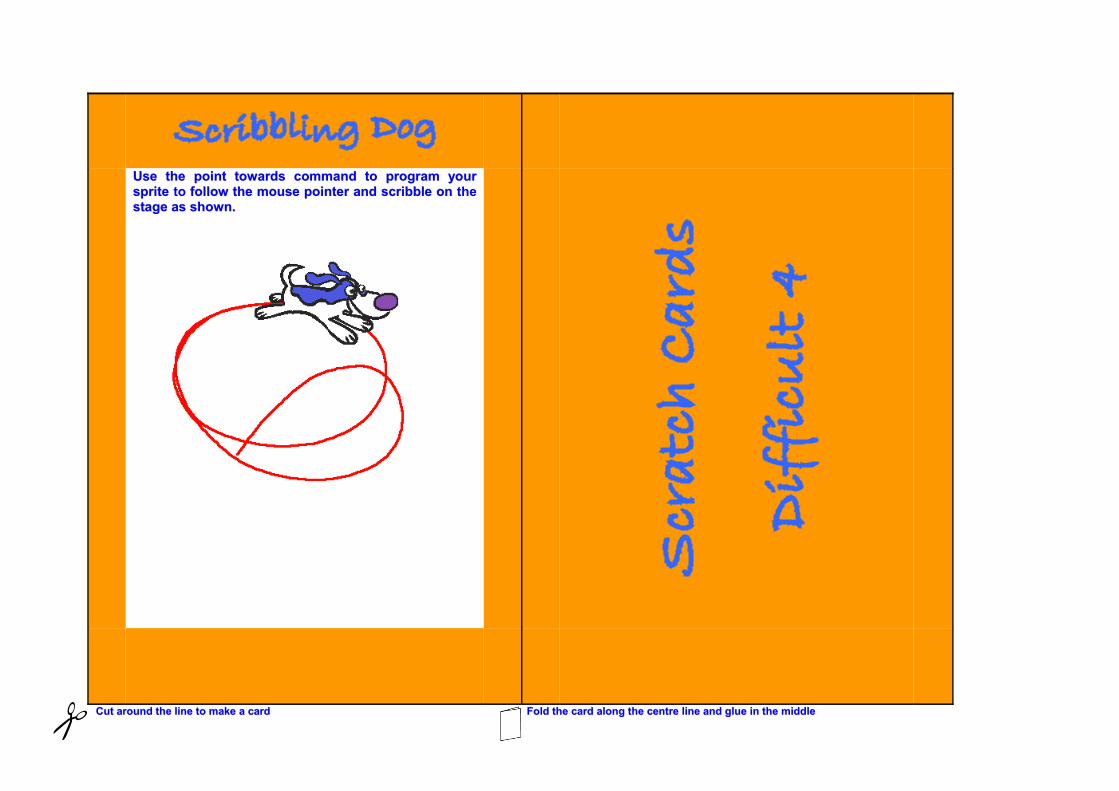
Use the point towards command to program yourUse the point towards command to program your sprite sprite to follow the mouse pointer and scribble onfollow the mouse pointer and scribble on the stage as shown.stage as shown.
Cut around the line to make a cardCut around the line to make a card Fold the card along the centre line and glue in the middleFold the card along the centre line and glue in the middle
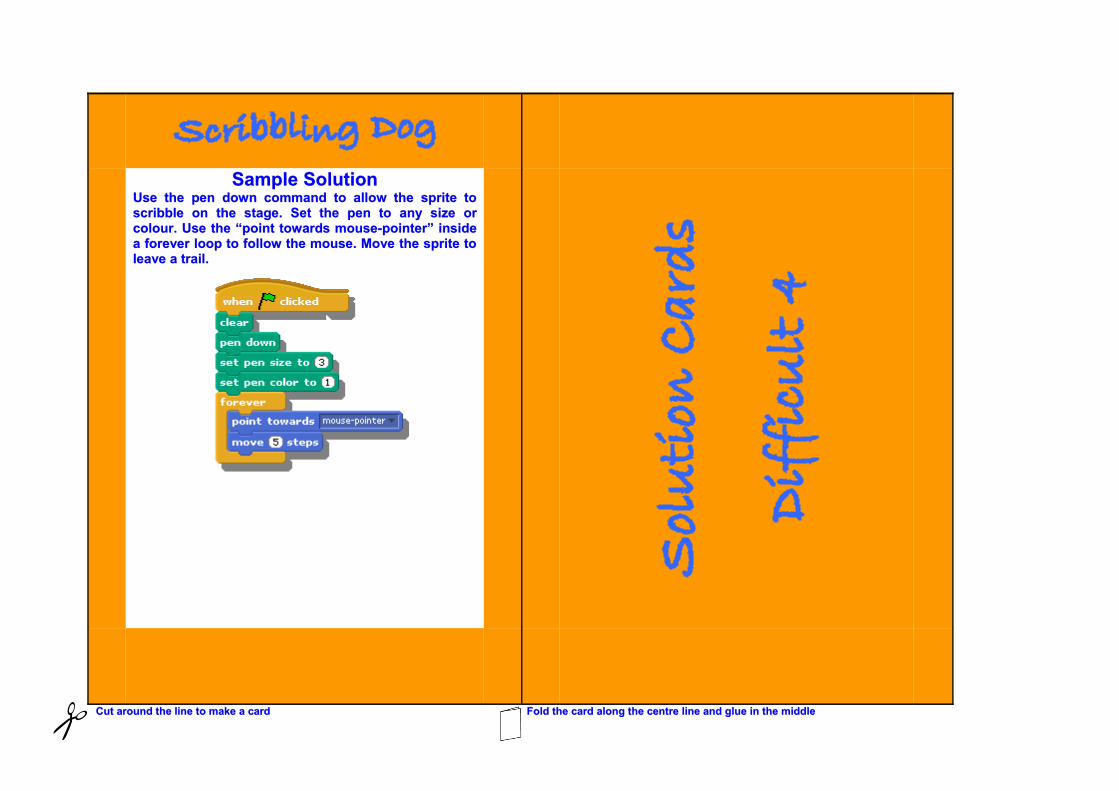
Sample SolutionSample SolutionUse the pen down command to allow the sprite toUse the pen down command to allow the sprite to scribble on the stage. Set the pen to any size orscribble on the stage. Set the pen to any size or colour. Use the “point towards mouse-pointer” insidecolour. Use the “point towards mouse-pointer” inside a forever loop to follow the mouse. Move the sprite toa forever loop to follow the mouse. Move the sprite to leave a trail.leave a trail.
Cut around the line to make a cardCut around the line to make a card Fold the card along the centre line and glue in the middleFold the card along the centre line and glue in the middle
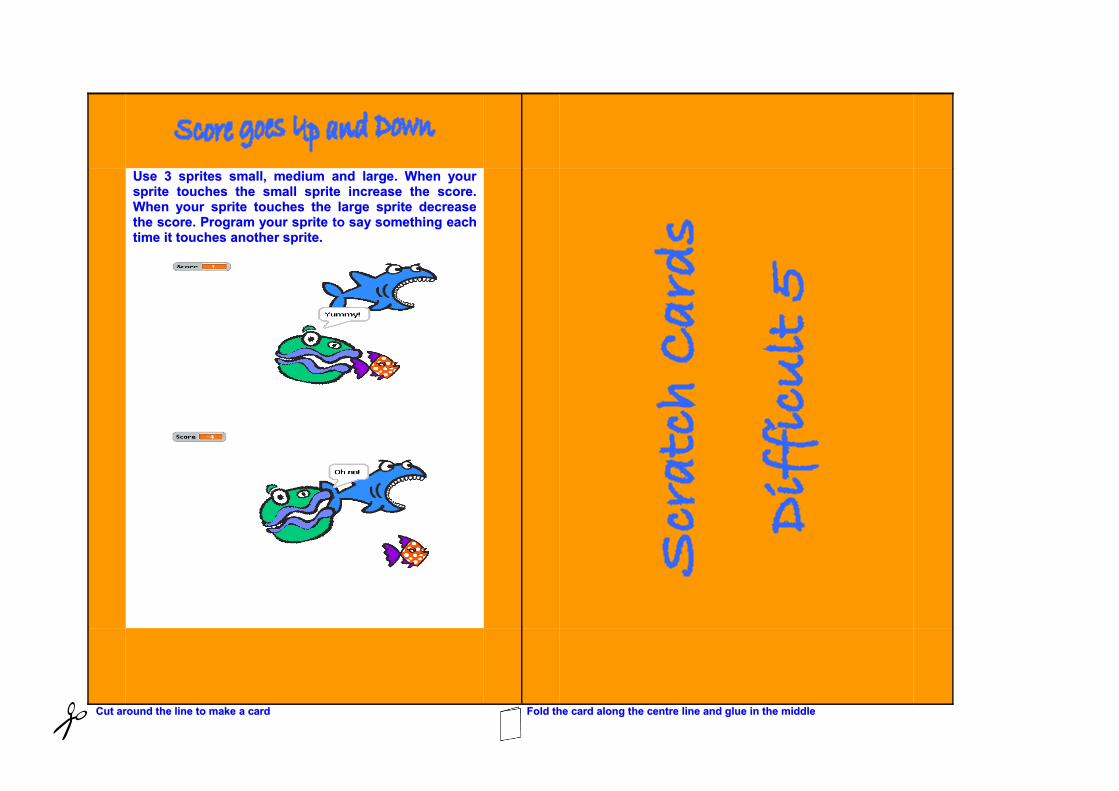
Use 3 sprites small, medium and large. When yourUse 3 sprites small, medium and large. When your sprite touches the small sprite increase the score.sprite touches the small sprite increase the score. When your sprite touches the large sprite decreaseWhen your sprite touches the large sprite decrease the score. Program your sprite the score. Program your sprite to say something eachsay something each time it touches another sprite.time it touches another sprite.
Cut around the line to make a cardCut around the line to make a card Fold the card along the centre line and glue in the middleFold the card along the centre line and glue in the middle
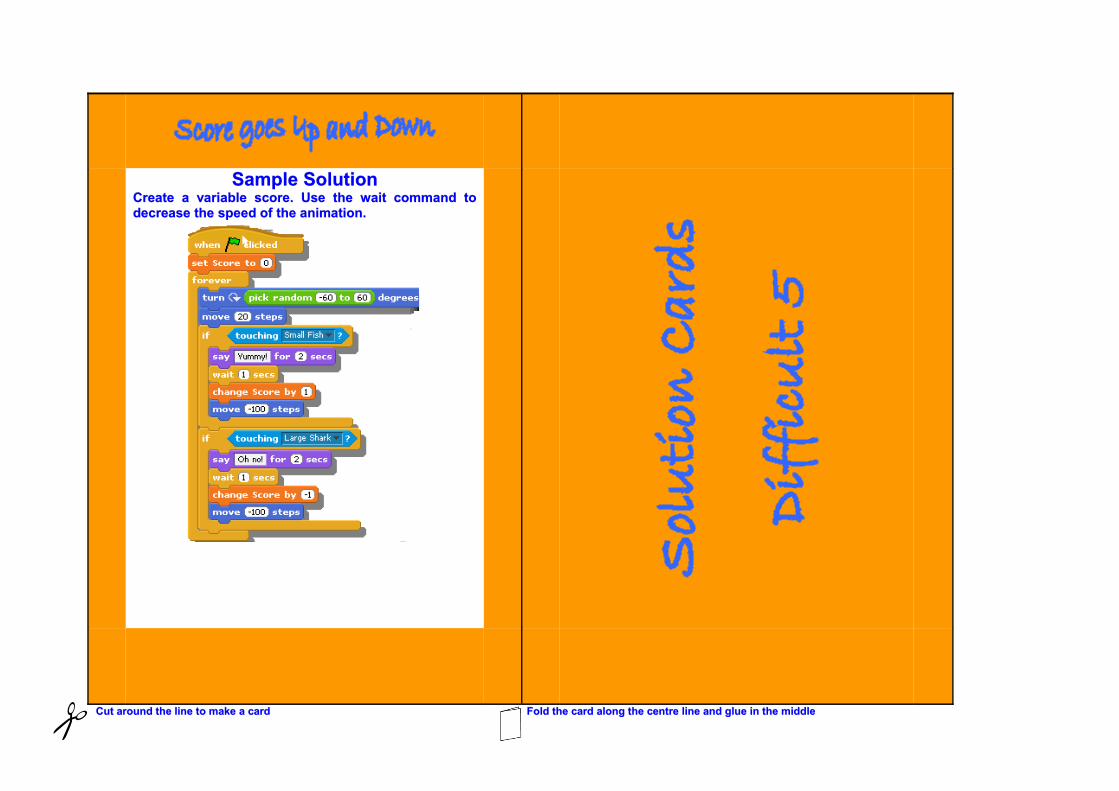
Sample SolutionSample SolutionCreate a variable score. Use the wait command toCreate a variable score. Use the wait command to decrease the speed of the animation. decrease the speed of the animation.
Cut around the line to make a cardCut around the line to make a card Fold the card along the centre line and glue in the middleFold the card along the centre line and glue in the middle
Module 5 – Scratch Cards
Resource 2
Scratch Files with SolutionsFolder containing Solutions in Scratch for Difficult Scratch Cards.
CD Resource “M5L2R2 Scratch Files with Difficult Solutions”
31
Module 5 – Scratch Cards
Lesson 3 – Extreme Scratch Cards3
Resources:Scratch Cards Extreme (Resource 1), Scratch Files with Solutions (Resource 2), Scratch Cards Progress Sheet (Resource 3, Lesson 1)
Key Vocabulary:Nested loops, Sprite, Variable
Description: Students revise a number of topics in Scratch using Scratch Cards. There are 5 Extreme cards in this lesson (1 being the least difficult and 5 being the most difficult). Scratch Cards are available with this pack. If there is a requirement for more cards the teacher should copy and cut out the Scratch Cards from resource 1 and keep the solution to check students’ work. Students attempt the problems on the Scratch Cards, using the images as guidance. The teacher can give hints to students if necessary but should not show the solution card. Students will encounter concepts such as drawing a very complex shape.
Learning Objectives:1. To build on the concepts in Scratch revised in Lesson 1 and 2 of this
module.2. To challenge students to use their knowledge of Scratch to solve more
difficult problems and to think creatively to solve these problems.
Lesson Introduction:• Tell students that they are going to revise some more ideas in Scratch
using cards and that these will build on Lesson 2 Difficult Scratch Cards.
• Tell them that these are the Extreme cards and that these are the most challenging but fun to figure out.
• Tell students that they will encounter cards such as counting down a rocket launch, making a sprite explode and drawing complex shapes.
• Tell them they may work with a partner.
Lesson Breakdown:1. Give students Scratch Card 1 and ask them to look at the instructions
and pictures. Students may need to work with a partner for these cards.
3 This lesson is based on Scratch Cards from the Scratch Websitehttp://scratch.mit.edu/cards
32
Module 5 – Scratch Cards
2. Ask students to attempt the problem in Scratch. 3. Use the Sample Solution section on the teacher’s solution to give hints
if necessary, but do not show the solution card to the students while they attempt the problem.
4. Once students have completed the problem they may receive Scratch Card 2.
5. Continue to hand out the Scratch Cards, until students have completed Card 5.
6. The Scratch Cards Progress Sheet (Resource 3) can be used to keep track of student progress.
Extension activity Students may add some other functionality of their choice to their solutions. For example they could decrease the size of the sprite in card 4 (Bigger and Bigger) or change the look of the shape in card 5 (Shape Sensation).
33
Module 5 – Scratch Cards
Resource 1
Scratch Cards Extreme5 Scratch Cards at an Extreme level. Copy these, cut them out and give them to students. A
teacher’s solution card is also included.
34
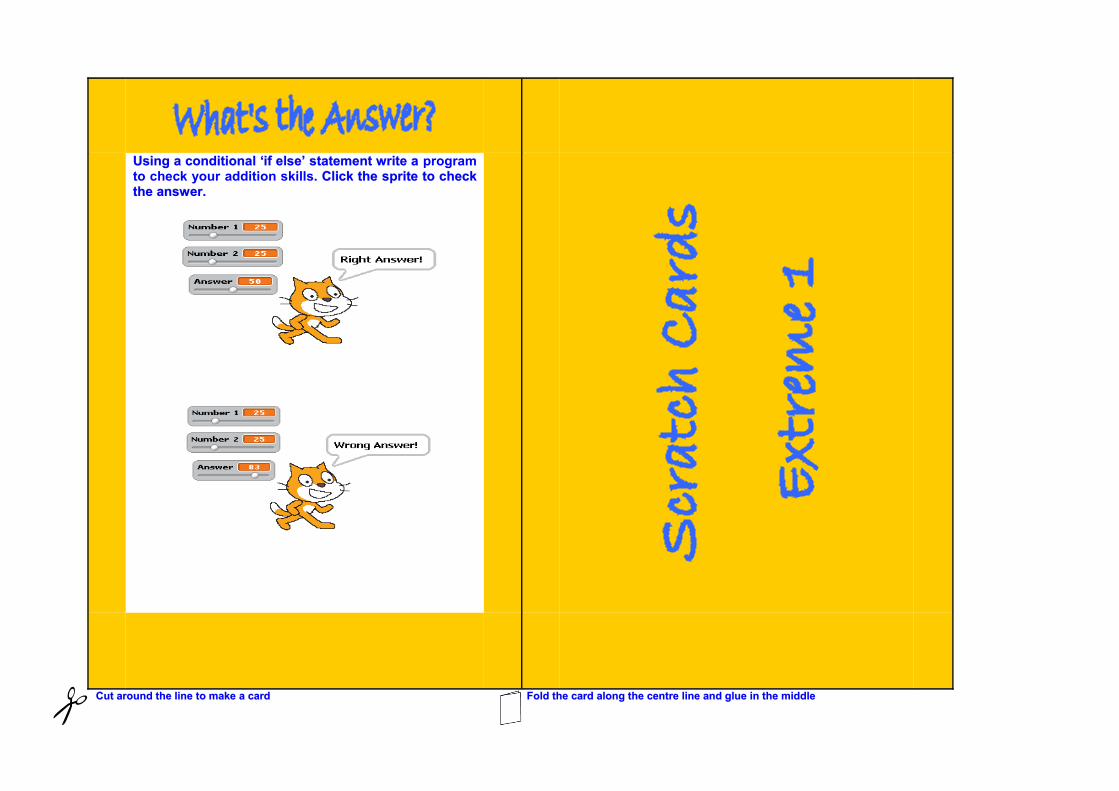
Using a conditional ‘if else’ statement write aUsing a conditional ‘if else’ statement write a program to check your addition skills. Click the sprite to check. Click the sprite to check the answer.the answer.
Cut around the line to make a cardCut around the line to make a card Fold the card along the centre line and glue in the middleFold the card along the centre line and glue in the middle
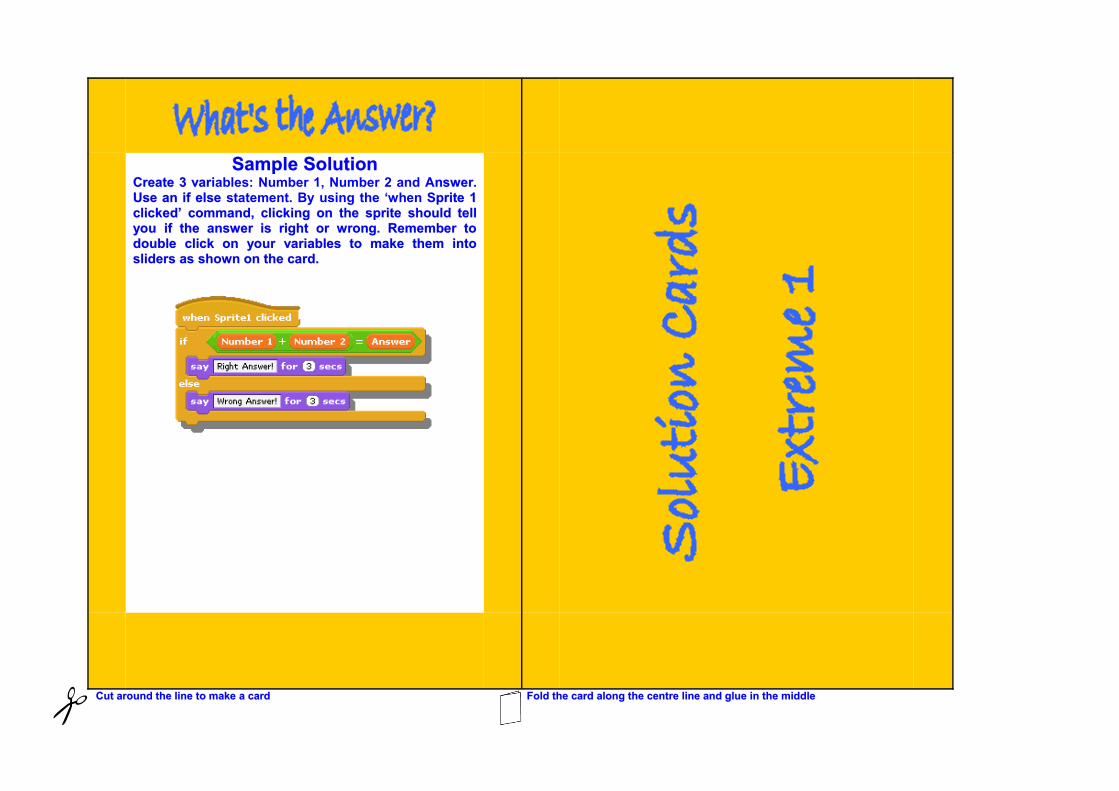
Sample SolutionSample SolutionCreate 3 varCreate 3 variables: Number 1, Number 2 and Answer.nswer. Use an if elseUse an if else statement. By using the ‘when Sprite 1prite 1 clicked’ command, clicking on the sprite should tellclicked’ command, clicking on the sprite should tell you if the answer is right or wrong. Remember toyou if the answer is right or wrong. Remember to double click on your variables to make them intodouble click on your variables to make them into sliders as shown on the card. sliders as shown on the card.
Cut around the line to make a cardCut around the line to make a card Fold the card along the centre line and glue in the middleFold the card along the centre line and glue in the middle
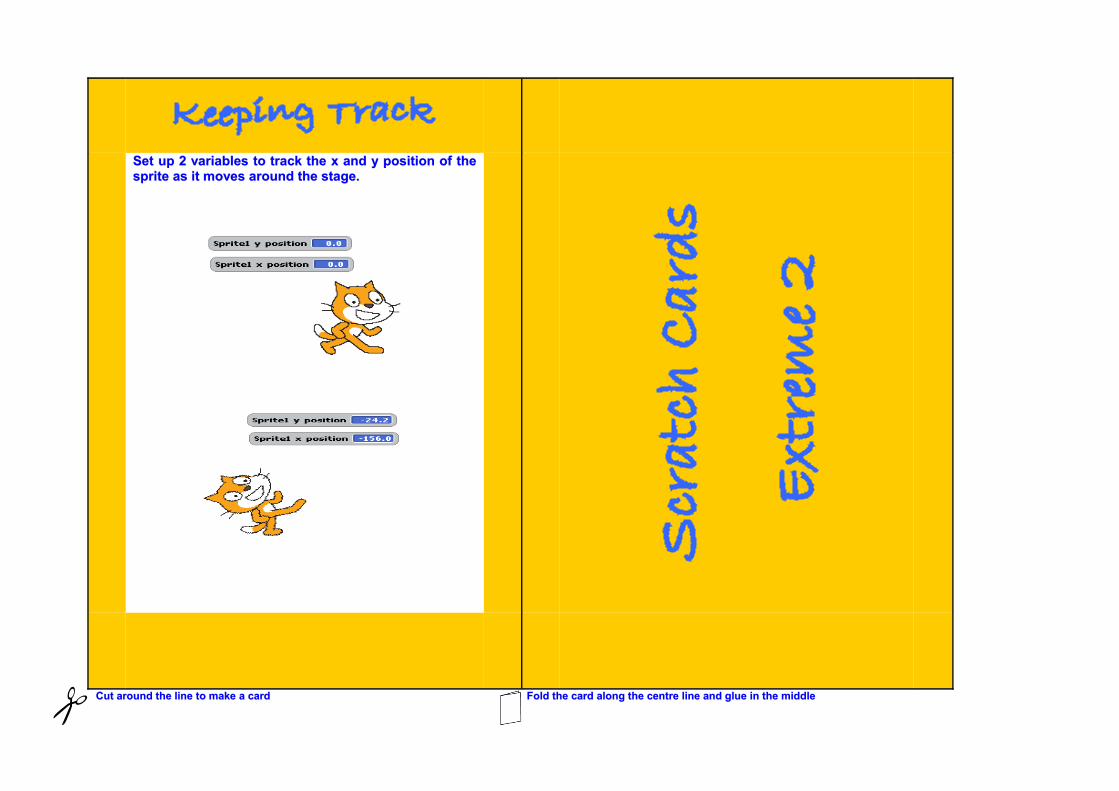
Set up 2 variables to track the x and y position of theSet up 2 variables to track the x and y position of the sprite as it moves around the stage.sprite as it moves around the stage.
Cut around the line to make a cardCut around the line to make a card Fold the card along the centre line and glue in the middleFold the card along the centre line and glue in the middle
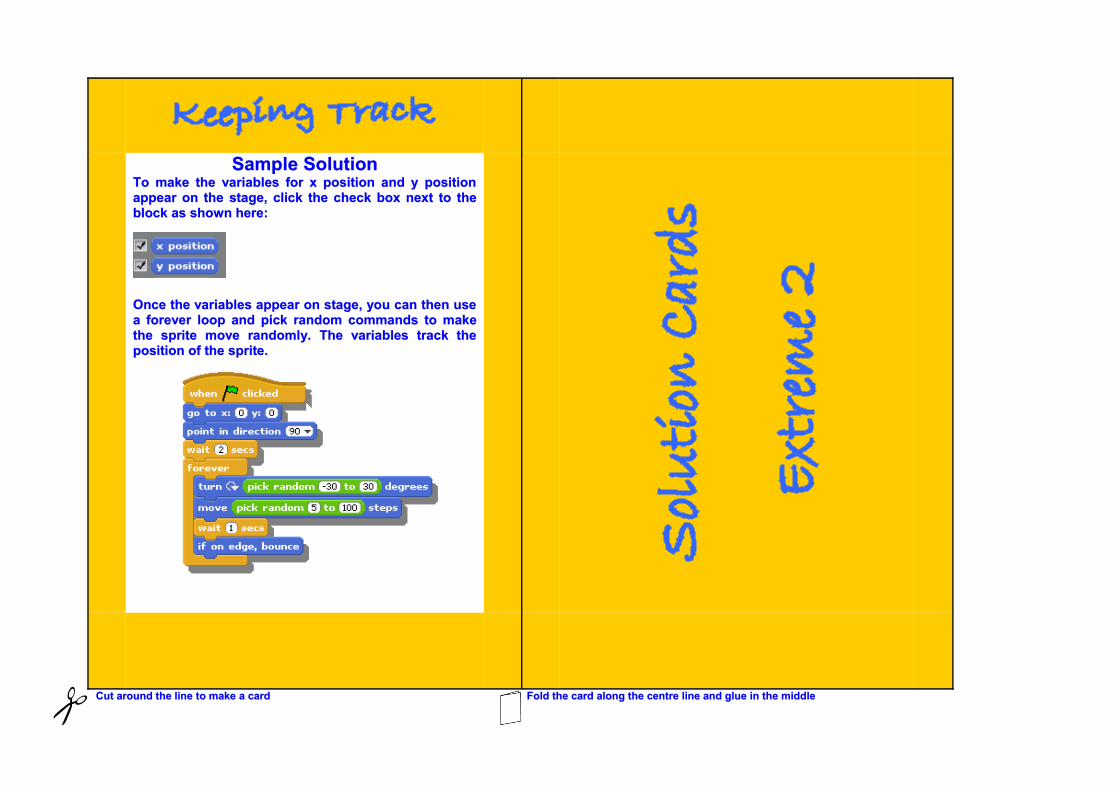
Sample SolutionSample SolutionTo make the variables for x position and y positionTo make the variables for x position and y position appear on the stage, click the check box next to theappear on the stage, click the check box next to the block as shown here:block as shown here:
Once the variables appear on stage, you can then useOnce the variables appear on stage, you can then use a forever loop and pick random commands to makea forever loop and pick random commands to make the sprite move randomly. The variables track thethe sprite move randomly. The variables track the position of the sprite.position of the sprite.
Cut around the line to make a cardCut around the line to make a card Fold the card along the centre line and glue in the middleFold the card along the centre line and glue in the middle
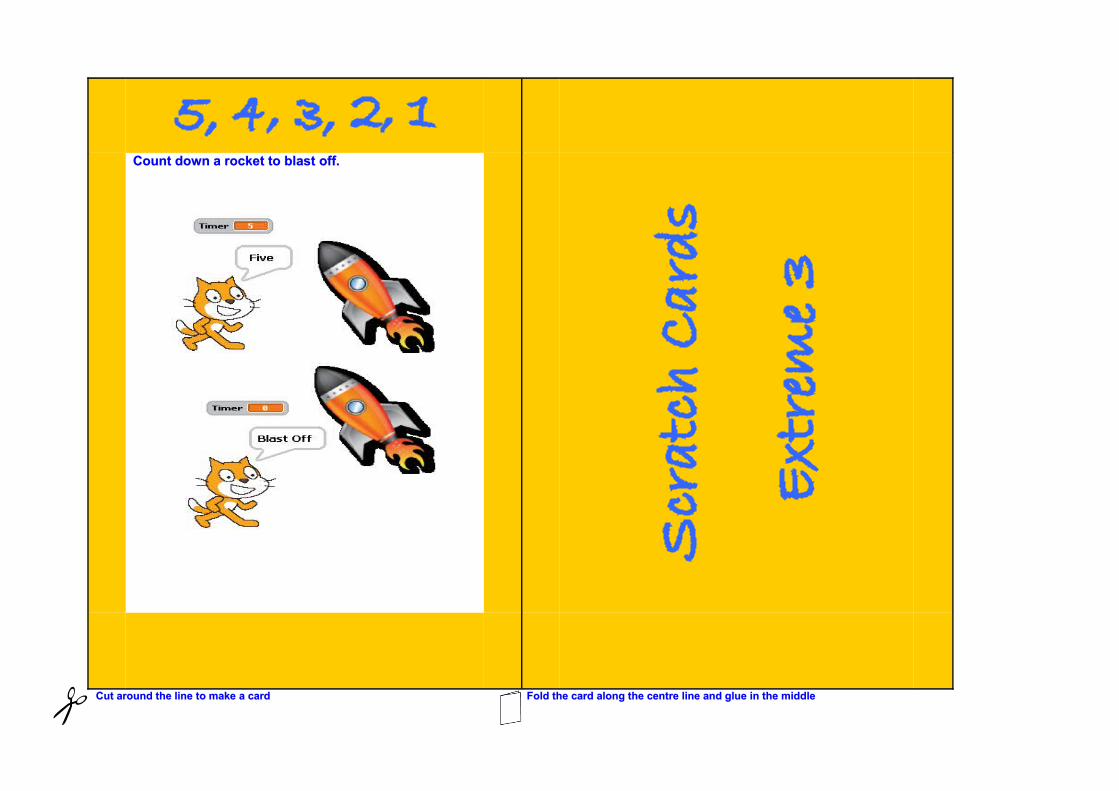
Count down a rocket to blast off.Count down a rocket to blast off.
Cut around the line to make a cardCut around the line to make a card Fold the card along the centre line and glue in the middleFold the card along the centre line and glue in the middle
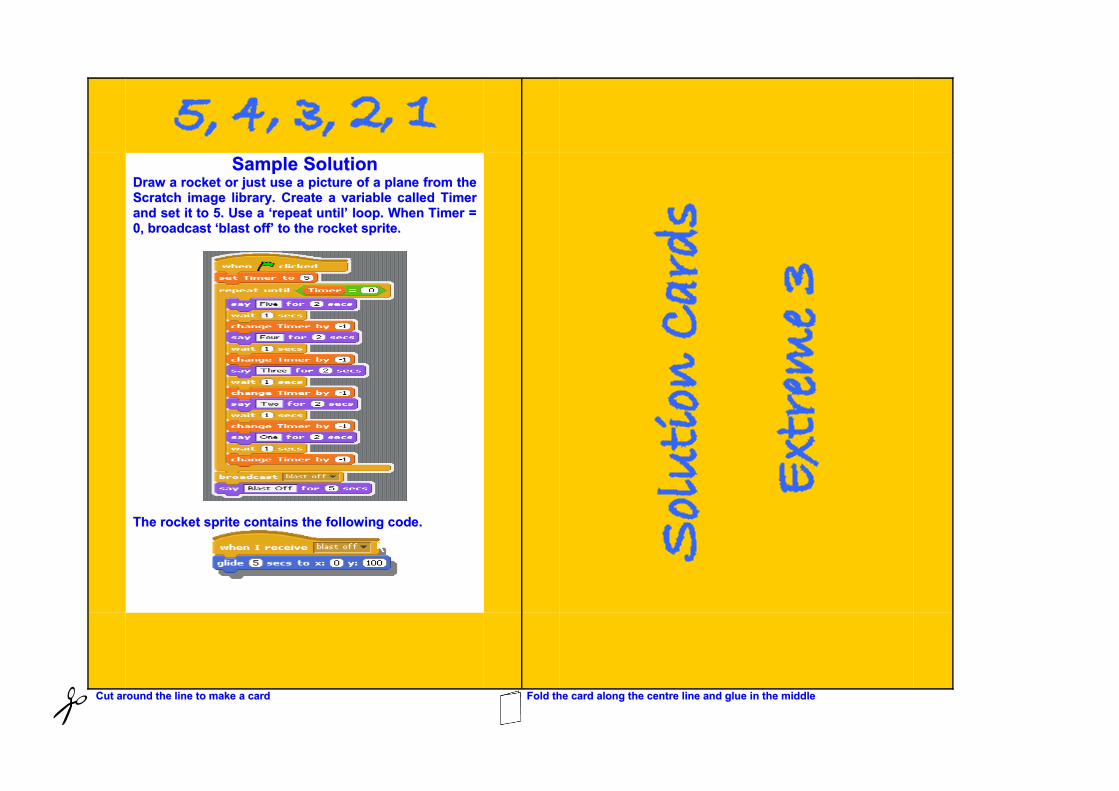
Sample SolutionSample SolutionDraw a rocket or just use a picture of a plane from theDraw a rocket or just use a picture of a plane from the Scratch image library.Scratch image library. Create a variable called TimerCreate a variable called Timer and set it to 5. Use a ‘repeat until’ loop. When Timer =and set it to 5. Use a ‘repeat until’ loop. When Timer = 0, broadcast ‘blast off’ to the rocket sprite.0, broadcast ‘blast off’ to the rocket sprite.
The rocket sprite contains the following code.The rocket sprite contains the following code.
Cut around the line to make a cardCut around the line to make a card Fold the card along the centre line and glue in the middleFold the card along the centre line and glue in the middle
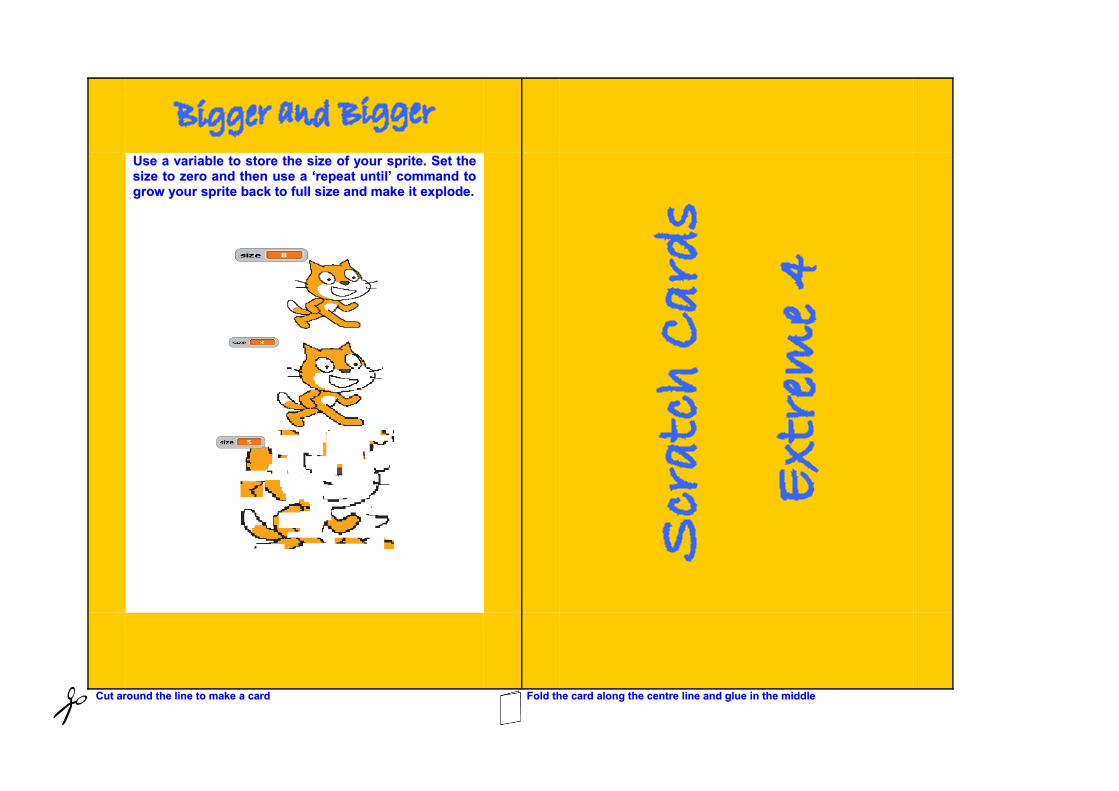
Use a variable to store the size of your sprite. Set theUse a variable to store the size of your sprite. Set the size to zero and then use a ‘repeat until’ command tosize to zero and then use a ‘repeat until’ command to grow your sprite back to full size and make it explode.grow your sprite back to full size and make it explode.
Cut around the line to make a cardCut around the line to make a card Fold the card along the centre line and glue in the middleFold the card along the centre line and glue in the middle
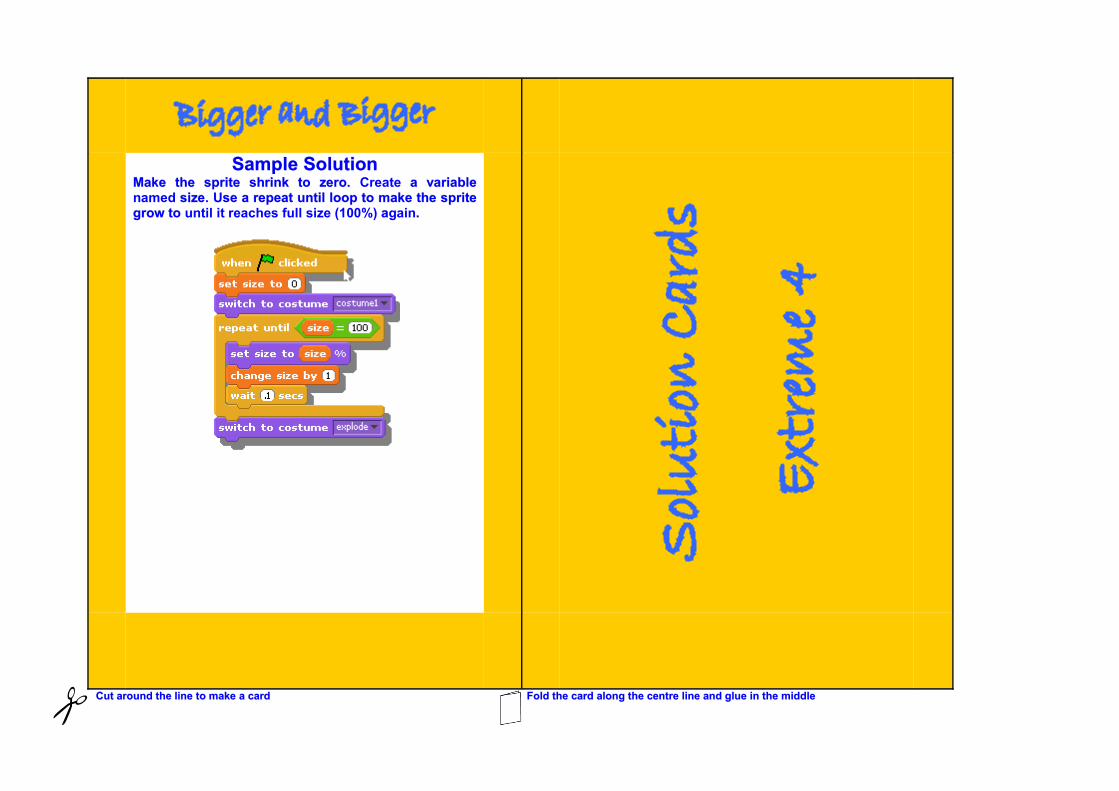
Sample SolutionSample SolutionMake the sprite shrink to zero. Make the sprite shrink to zero. Create a variable a variable named sizesize. Use a repeat until loop to make the spritese a repeat until loop to make the sprite grow to grow to until it reaches full size (100%) aagain. .
Cut around the line to make a cardCut around the line to make a card Fold the card along the centre line and glue in the middleFold the card along the centre line and glue in the middle
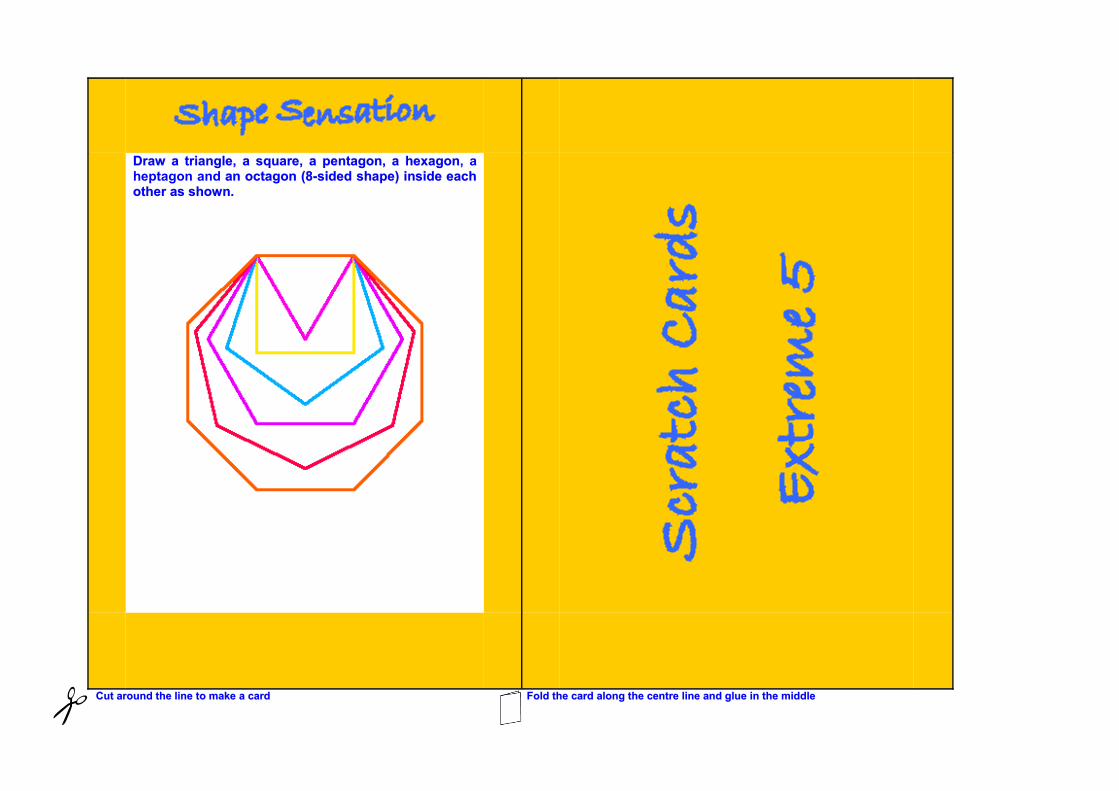
Draw a triangle, a square, a pentagon, a hexagonDraw a triangle, a square, a pentagon, a hexagon, a heptagon and an octagon (8-sided shape) inside eachan octagon (8-sided shape) inside each other as shown.other as shown.
Cut around the line to make a cardCut around the line to make a card Fold the card along the centre line and glue in the middleFold the card along the centre line and glue in the middle
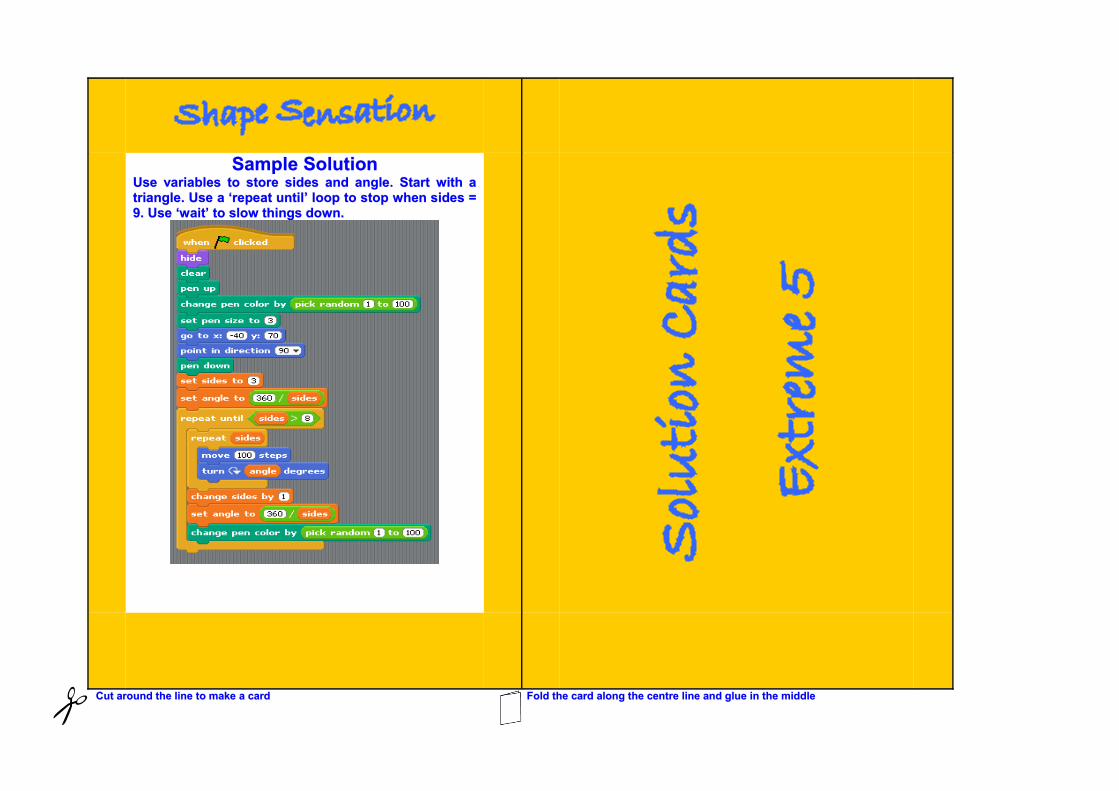
Sample SolutionSample SolutionUse variables to store sides and angle. Start with aUse variables to store sides and angle. Start with a triangle. Use a ‘repeat until’ loop to stop when sides =triangle. Use a ‘repeat until’ loop to stop when sides = 9. Use ‘wait’ to slow things down.9. Use ‘wait’ to slow things down.
Cut around the line to make a cardCut around the line to make a card Fold the card along the centre line and glue in the middleFold the card along the centre line and glue in the middle
Module 5 – Scratch Cards
Resource 2
Scratch files with SolutionsFolder containing Solutions in Scratch for Extreme Scratch Cards.
CD Resource “M5L3R2 Scratch Files with Extreme Solutions”
45