modifications at harlequin 128k, issue 1 - internet | sie .... 311 lines per frame: now you have 456...
TRANSCRIPT

Modifications at Harlequin 128k, issue 1
The follwing modifications relate to the issue 1 board of Harlequin 128k made by Don
Dindang alias Superfo.
The modifications base on a dialog with him and they base on a lot of tests with two different
hardware interfaces divIDE and MB02+ and a number of programs and demos.
The mods relating the number of lines and the number of pixels are suggested by Superfo and
base on information here: http://www.worldofspectrum.org/faq/reference/128kreference.htm
1. 456 pixels per line: Original Harlequin design uses crystal with 14
MHz. At 448 pixels per line the horizontal
frequency is 14 MHz / 2 / 448 = 15625 Hz. At
456 we would need 15625*2*456=14,25MHz.
As there is no crystal with 14.25 MHz I used
NTSC crystal with 14.31818 MHz. The relative
timing error is 100%*(14.31818-14.25)/14.25=
0.48%. CCIR norm allows 1% timing error – so
no problem (horizontal frequency is 15700 Hz).
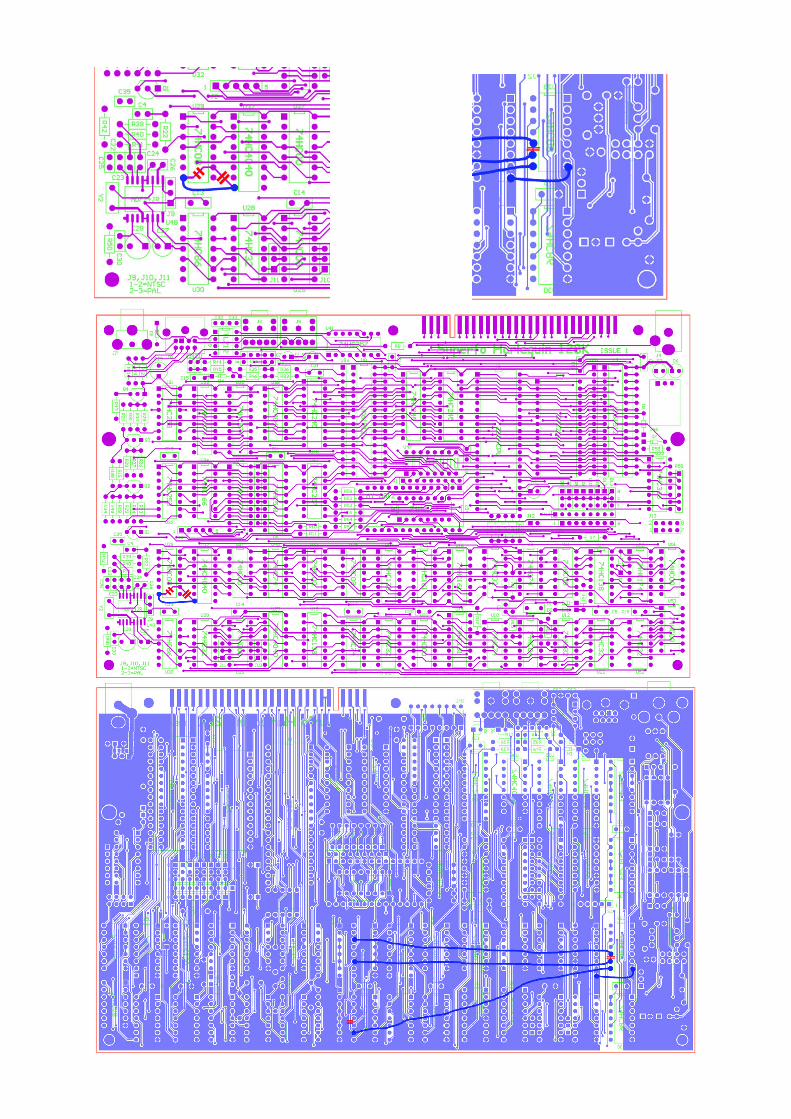
To realize 456 pixels per line, you have to cut two lines at the top side of the board, one is
between pin 7 and pin 9 of U29, the other one connects pin 9 of U29 with pin 8 of U32. After
that you have to cut the connection of pins 9 and 10 at the bottom side of the board. Next you
should cut at the bottom side the connection between pin 12 and pin 9 of U20.
Now you have to reconnect pin 7 of U29 with pin 8 of U32 using a wire that is not too thin
(ground line) – maybe on both sides of the board. Then there are 3 wires to solder: Connect
pin 9 of U20 with pin 8 of U29. Connect pin 11 of U15 with pin 9 of U29 and connect pin 14
of U15 with pin 10 of U29.
On the next page you see the cuts at the top (left picture) and bottom (right picture) side of
U29.

2. 311 lines per frame: Now you have 456 pixels per line but 312 lines per frame as in 48k Spectrum. To correct this
to 311 lines the simplest way is to solder 5 single diodes or a 5 diodes array with common
anode as I did. I used the (old) GDR type SAM-65 ( https://www-user.tu-
chemnitz.de/~heha/basteln/Konsumg%C3%BCter/DDR-Halbleiter/sam42.gif ) that you can
find at ebay or at some small distributors in the net as NOS parts.
I soldered this diode array onto U25. pins 2,3 and 6 of the diode array are soldered to pins 2,3
and 6 of U25. Pin 4 of the array goes to pin 9 of U25 and pin 5 of the array goes to pin 7 of
U25. Pin 1 of the diode (common cathode) is soldered to a 4,7 kOhm resistor that is soldered
with its second pin to pin 16 of U25. A thin wire from the common cathode of the diode array
is soldered to a 1-pin-jack that is plugged onto the centre pin of J11. As mentioned you can
use 5 diodes 1N4148 instead of the array that could also be placed on U25. This way you
have not to mod the board for the 311 line change. And you can simply unplug the mentioned
single pin jack from J11 and insert a jumper on J11 instead.
3. correct adressing the AY3-8912 sound chip: The following mod corrects the addressing of the sound chip. Without that mod some games
and demos do not run at all or show issues in sound and pictures.
First, cut the very short connection near pin 14 of U4 at the top side (connection between pin
14 of U4 and cathode of D4). Insert here a resistor of 470 Ohm.
Then cut the connection between pin 9 of U4 and pin 9 of U51. Insert here also a 470 Ohm
resistor and solder an additional diode 1N4148 from pin 9 of U51 (cathode) to pin 5 of U5
(anode) – signal /RD.

At the bottom side cut the connection that comes from pin 11 of U51. Insert a resistor of 470
in series to that line and insert a diode 1N4148 – cathode at the side of the new resistor that is
not on pin 11 of U51 (signal BDIR) and anode at pin 5 of U5 (signal /RD).
Now there are 3 additional resistors of 470 Ohm and 2 diodes 1N4148 inserted for the
addressing of the sound chip..
At the following page you find the mods in the schematic.


4. correct a timing problem at the lower RAM: Insert a 180 pF capacitor from pin 29 of U8 (/WR) to pin 16 of U8 (ground). I noted some
situations where switching the RAM access between the ULA circuitry and the CPU/DMA
there is undesired /WR low, /CE low for about 50 ns because /WR is enabled just before /CE
is disabled as desired. The additional capacitor shorts the small glitch and delays /WR a bit.
This way there is no undesired RAM write.
5. improving picture quality at composite output – PAL
I found that some switching regulators are producing together with the PAL coder undesired
moiré at the PAL signal. To avoid this it was usefull to cut the line between the output of the
switching regulator and to insert an inductance of 10µH or more with low DC resistance. I
myself used a 100µH inductor with R<0.2Ohm, that I had in my stock.
A further undesired effect is that there are vertical structures visible especially at magenta
paper similar to that at 48k Spectrum boards. To avoid this I substituted the electrolytic
capacitor C27 (initially 10µF) by a 1000µF/6V type. This way the structures disappeared.
6. improving the sound output: The last mod I recommend relates to the sound output and mixing of the AY-signal and the
beep, load and save tones.
Instead of R56 and R57 solder 2,2 nF capacitors. R52 and R55 change to be 9,1 kOhm and for
R53 and R54 use 15 kOhm.
From pin 1, 4 and 5 of U54 (AY3-8912) there have to be 1 kOhm resistors to ground (I used
SMD types at the bottom side of the board).
C37, C38 should be 0,47 µF ceramic capacitors
C31, C34, R46, R45 have to be removed or not be soldered. Instead the schematic shown on
the following page should be realized (only resistors and capacitors). Note that the numbers of
the capacitors and resistors in that schematic do not refer to the numbering in the schematic of
the harlequin 128k issue 1.
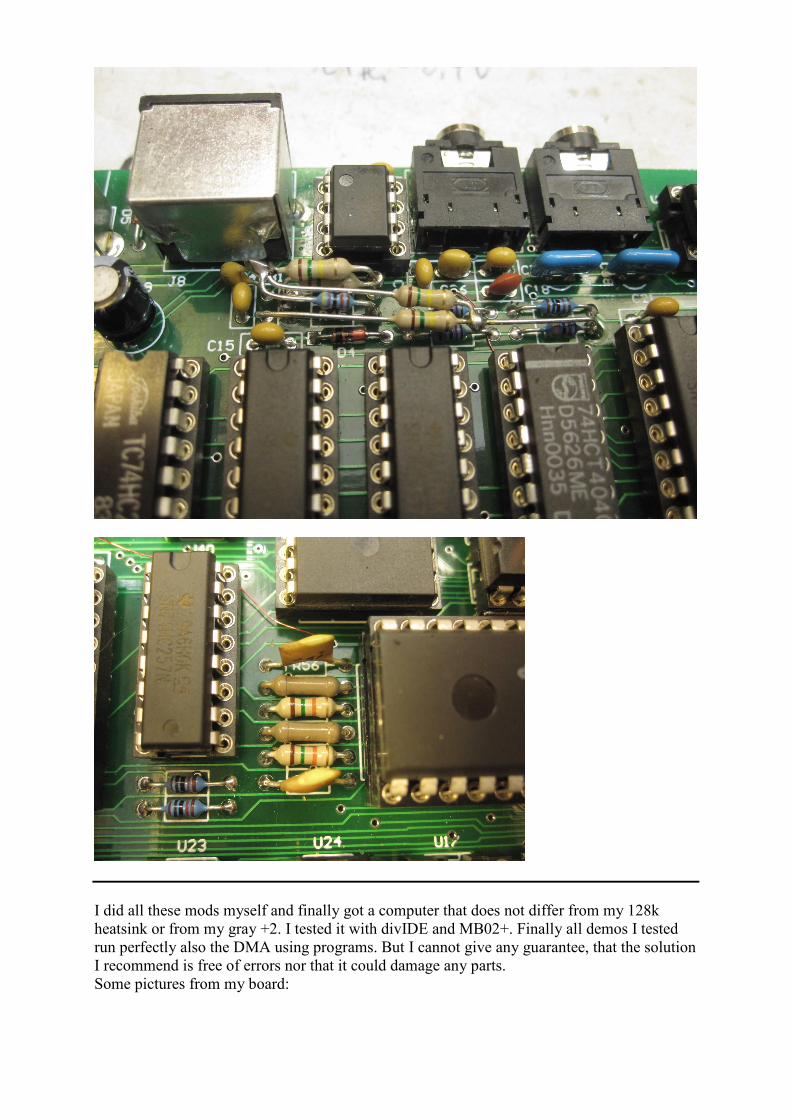
I did all these mods myself and finally got a computer that does not differ from my 128k
heatsink or from my gray +2. I tested it with divIDE and MB02+. Finally all demos I tested
run perfectly also the DMA using programs. But I cannot give any guarantee, that the solution
I recommend is free of errors nor that it could damage any parts.
Some pictures from my board:

