modern electrical machines - matrix tsl matlab... · electrical machines and matlab page 14...
TRANSCRIPT

Electrical machines
and MATLAB
Page 1
Copyright 2019 Matrix TSL Limited
Modern Electrical Machines

Electrical machines
and MATLAB
Page 2
Copyright 2019 Matrix TSL Limited
Contents
Health and safety 3
Worksheets 4
Worksheet 1 - Getting started 5
Worksheet 2 - Using MATLAB for graphing 6
Worksheet 3 - Closed loop control 7
Worksheet 4 - Speed control strategies 8
Machine information 10
Software information and MATLAB API 17
Instructor guide 22
Equipment checklist 25
Troubleshooting 26
Version control 27
Electrical machines
and MATLAB
Page 3
Copyright 2019 Matrix TSL Limited
Health and safety
Safety
During the design of this product we have paid
considerable attention to the potential risks of
studying electric motors. We believe that we
have come up with the safest possible design.
However there are still some risks that you
need to be aware of. This page shows how we
have considered each danger. You need to
read this and make sure that your students are
protected whilst using the equipment.
Electric shock
This is minimal: the output from the control
box is limited to 24V AC or DC
The dynamometer is capable of generating DC
voltages. At maximum speed, around 3,000
r.p.m., the generated voltage is less than
30VDC.
The control unit will not generate power until
a motor is plugged into the dynamometer. This
prevents the use of third party motors with
the system.
Physical shock
The equipment is heavy. As with other heavy
lab. equipment, if a student drops a device on
his foot, it could cause considerable damage.
You need to decide on the level of responsibil-
ity that students take here.
You can reduce risk by having a technician lay
the equipment out on benches and ensuring
that students are seated at desks whilst using
the equipment.
Exposed rotating parts create hazards as hair
and clothing can get caught in them. The use
of relatively low-power motors reduces the
risk. The plastic guard between dynamometer
and motor under test means that no rotating
parts are exposed.
Please:
Should an accident happen while the equip-
ment is being used, please report it to us,
at the address below, so that we can consider
how to make the equipment even safer.
Design team
Matrix TSL
33 Gibbet Street
HX1 5BA
England Caution:
Do not use a PC-based oscilloscope
with the equipment.
Earth loop currents may flow between
its earth connection and the control
box’s earth connection.

Electrical machines
and MATLAB
Page 4
Copyright 2019 Matrix TSL Limited
Worksheets

Electrical machines
and MATLAB
Page 5
Copyright 2019 Matrix TSL Limited
Worksheet 1 Getting started
1) Set up the DC motor and dynamometer as
shown in the diagram above.
2) Make sure that the unit is working properly:
disconnect the USB lead and use the manual
controls to operate the DC1 output voltage
to vary motor speed. Make sure that it turns
clockwise and puts pressure on the load cell.
Make sure that the dynamometer is connect-
ed properly and that increasing the dyna-
mometer load slows the motor down.
3) Make sure that you have the drivers for the
control unit installed on your computer. If
not follow the instructions in the MATLAB
software reference section below.
4) Reconnect the USB lead.
5) Refer to the MATLAB Software reference sec-
tion at the back of this document to under-
stand the MATLAB functions available to you.
6) Create a simple MATLAB program that con-
trols the speed of the DC motor.
7) Extend your program to allow you to control
the Dynamometer load.
Different types of motor have different
characteristics, such as top speed, torque
at different speeds , voltage and current
ratings, power output and efficiency.
Photo: these tiny DC motors are used in
small handheld devices like toys.

Electrical machines
and MATLAB
Page 6
Copyright 2019 Matrix TSL Limited
Worksheet 2 Using MATLAB for graphing
With the same set up as the previous work-
sheet:
1) Create a program that runs the DC motor at
50% of its max output power.
2) Modify the program so that it increases the
Dynamometer load from 0% to 100% in 4%
steps.
3) Create routines that measure the torque on
the load cell.
4) Create routines that measure the speed of
the motor in Revolutions Per Minute (RPM)
5) Plot the RPM against torque to a graph. This
is a speed-torque curve for the DC motor.
Speed torque curves are the most basic way
of characterising electrical machines.
6) Create additional routines that make plots
for speed vs current, and torque vs current.
Wound stator DC motors are often configured as
either shunt wound or series wound.
The separate connections for the field windings of
the stator and rotor / armature allow us to control
the current in both parts of the motor separately,
in order to examine the motor’s behaviour.
The photograph shows an old shunt wound motor.

Electrical machines
and MATLAB
Page 7
Copyright 2019 Matrix TSL Limited
Worksheet 3 Closed loop control
In an industrial context you will often need a
motor to be running at a constant speed. Inde-
pendent of the load that is put on it. Using the
same set up as before:
1) Create a closed loop system script to run the
motor at a defined speed.
2) Vary the load to the motor using the SetDy-
noLoad API function and confirm that the
speed remains consistent.
3) Can the speed be made consistent for all val-
ues of load?
Fairground ‘dodgem’ cars use simple DC electric
motors operating at between 12 and 48V.
The vehicles have two brushes - one touching
the metal floor ,for 0V, and the other touching
the metal ceiling, at a positive voltage.
For dodgems speed control is usually simple on-
off.

Electrical machines
and MATLAB
Page 8
Copyright 2019 Matrix TSL Limited
Worksheet 4 Speed control strategies
A motor cannot go from not moving to moving
at a certain speed in an instant. The techniques
of getting from zero speed to rated speed have
many implications in designing motor control
systems.
1) Create a script to allow the motor speed to
be ramped up and ramped down to achieve
the desired speed and reduce excess current
usage.
2) Investigate the use of Proportional, Integral
and Derivative measurements (PID) for con-
trolling the speed of motors.
3) Create a variation on your graph routine that
allows you to plot the motor speed for a cer-
tain time during starting a motor.
4) Use PID techniques to create a program in
MATLAB that optimally ramps the speed of
the system from standstill to 1500RPM with-
out going over this speed.
5) Modify your program so that it allows the
dynamometer to vary the load within 0% of
load and 70% of load and yet still maintain
the rated speed of 1500 RPM.
6) Use the plots from y our graph to prove the
system performance is within specification.
Speed control is an important element of
electromechanical system design.
Some motors are better than others at self-
regulating speed. The shunt motor is really
good at speed regulation and for this reason
they are often used in devices like lathes,
which need to run at a constant speed.

Electrical machines
and MATLAB
Page 9
Copyright 2019 Matrix TSL Limited
Package information
Reference

Electrical machines
and MATLAB
Page 10
Copyright 2019 Matrix TSL Limited
Reference Understanding the system
1
2 4 3
5 6
7
8
9
The system consists of a number of 24V electri-
cal machines, a control unit, software applica-
tions for driving the control unit and a set of
worksheets. The photograph above shows
these parts. They are:
) The dynamometer and cradle which con-
nects to the control unit using a 25way D-
type lead
) Balance
) Motor under test - in this case a shunt
wound motor
) The control unit which connects to a PC
using a USB lead.
) A series wound motor
) Single-phase AC induction motor
) Brushless DC motor
) DC motor
) Three-phase AC induction motor
) The software application running on a PC
10

Electrical machines
and MATLAB
Page 11
Copyright 2019 Matrix TSL Limited
Reference Understanding the control unit
) The dynamometer resistance: use this to
control the effective resistance placed
across the dynamometer: low electrical
resistance means a large mechanical re-
sistance, and high electrical resistance
means low mechanical resistance
) The dynamometer connections
) The speed of the motor in Revolutions Per
Minute - RPM.
) The power LED which shows the control
unit is powered up.
) The COMMS LED which is lit when the PC
software has communication with the
control unit.
) The ‘Motor In’ LED which indicates that a
machine is physically connected to the
dynamometer.
) The internal ammeter and voltmeter con-
nections
) The DC 1 Supply output control.
) The DC 1 connections.
) The DC 2 Supply output control.
) The DC2 connections.
) The AC frequency control
) The three-phase supply connections
) The single phase supply connections
) The capacitor mode selector switch: this
controls the internal value of capacitor
connected to the A and B terminals. There
are two values: START, RUN.
) Variable capacitance terminals.
Note - manual controls are overridden as soon as the unit is plugged into a computer.
1
2
4
3
5
6
7
8 10
9 11
12
13
14
15
16
Electrical machines
and MATLAB
Page 12
Copyright 2019 Matrix TSL Limited
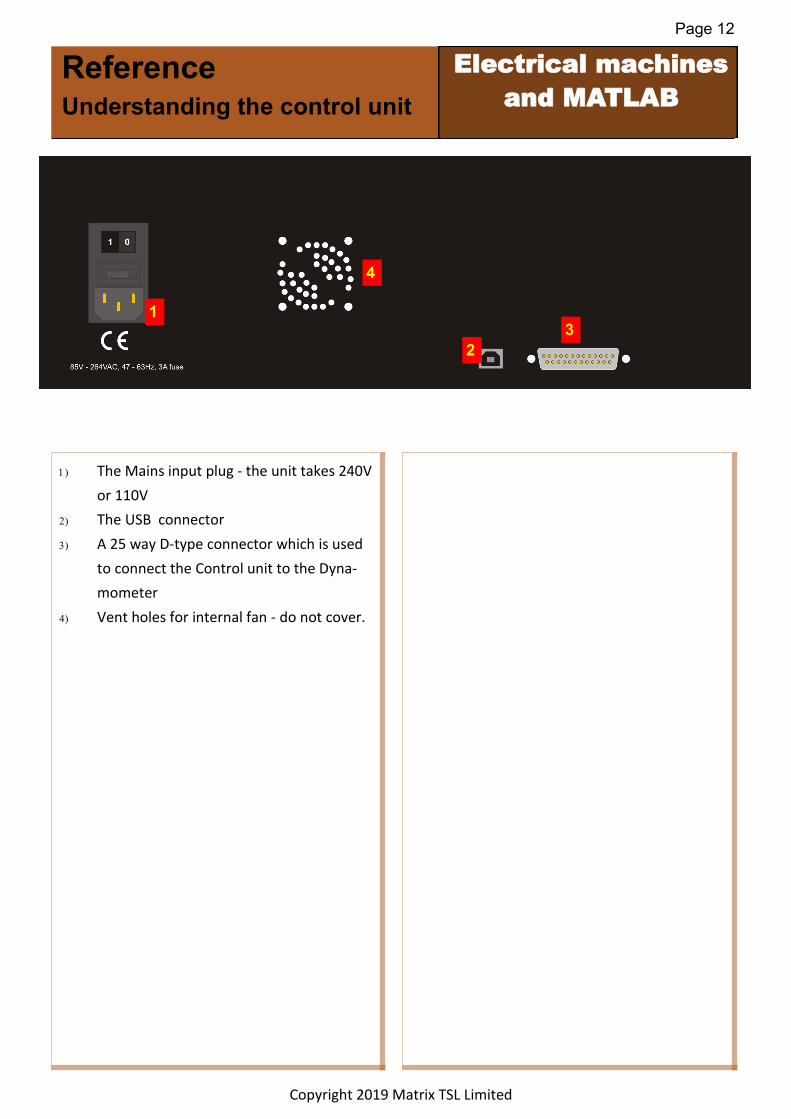
) The Mains input plug - the unit takes 240V
or 110V
) The USB connector
) A 25 way D-type connector which is used
to connect the Control unit to the Dyna-
mometer
) Vent holes for internal fan - do not cover.
1
2
3
4
Reference Understanding the control unit

Electrical machines
and MATLAB
Page 13
Copyright 2019 Matrix TSL Limited
Reference Control unit schematic

Electrical machines
and MATLAB
Page 14
Copyright 2019 Matrix TSL Limited
Reference Control unit description
Please refer to the block diagram on the previ-
ous page.
The control unit shipped with the Matrix Mod-
ern Electrical Machines system is one of the
most up to date in the World. Inside the unit
there are three separate processors: a main
processor handling all user interface and com-
munication tasks, a motor drive processor han-
dling all the high current outputs and dealing
with all waveform and timing systems, and a
measurement processor. These three proces-
sors use buses to communicate between
themselves and between the different elec-
tronic circuits in the unit.
A key feature of the control unit is that almost
every quantity in the unit can be measured. On
the schematic you can see that there are
around 13 separate ammeters and voltmeters
in the system. This gives the instrumentation
software and the user lots of options when dis-
playing what is happening in an electrical ma-
chine system. The measurement of each quan-
tity takes place thousands of times per second
and can be processed by PC software applica-
tions to display a quantity or a waveform.
The motor drive chips are all low voltage drop
FET based units. As you can see from the sche-
matic all the outputs are digital 24V outputs.
Simple pulse width modulation algorithms are
used to vary the effective output power on the
DC outputs. On the AC outputs Pulse width
modulation is again used but with a more ad-
vanced pseudo-sine wave algorithm which var-
ies the output power sinusoidally over the pe-
riod of the output waveform. This technique is
used by the more advanced motor controllers
in industry. Older, and perhaps cheaper, motor
driver systems sometimes use a simple digital
output waveform for driving three phase in-
duction motors where the three outputs are
simply digital outputs phase shifted by 120 de-
grees. This digital output is also available in
some software applications shipped with the
system so that students can investigate the
efficiency of each method.
The motor driver chip outputs can be placed in
one of three states: 24V, 0V and open circuit.
This allows for different drive strategies when
generating waveforms for driving motors. As
part of the learning package students investi-
gate PWM for driving DC motors, and Pseudo-
sine waves for driving single phase AC motors.
The unit also performs more complex six step
pseudo-sine wave generation for driving the
three phase motor and this can be examined
with the internal multi channel oscilloscope as
well as an external oscilloscope. To facilitate
this when in AC mode a small pulse is given on
the DC1 output which allows an external oscil-
loscope to be triggered to capture the various
waveforms.
The unit includes two values of capacitor with
a simple relay for start / run investigation for
single phase induction motors.
The unit also includes a FET based load for the
dynamometer whose effective resistance is
controlled by software.

Electrical machines
and MATLAB
Page 15
Copyright 2019 Matrix TSL Limited
Reference Understanding the dynamometer
A dynamometer is an instrument that directly
measures the force produced and speed of a
rotating machine (the motive force). Torque
and power can be calculated from the meas-
ured force and speed. In our case the mechan-
ical rotation is produced by one of the DC or
AC electrical motors. This Dynamometer is an
absorption type swing arm / balanced beam
dynamometer, where the motive force is used
to drive a DC generator with a variable re-
sistance load attached. The resulting force can
be measured in one of two ways:
• A digital scale (shown in the image above)
can be used to measure the effective ver-
tical force on the scale and it gives a read-
ing in Kilograms. This can be converted
into newtons and newton metres - see
below.
• A load cell (behind the dynamometer and
not shown in the image above) connected
to the control box gives the same infor-
mation - give or take a few percent.
Note that the rotation of the dynamometer
dictates whether the balance or the load cell is
used. Controlling the direction of motion of
each machine is discussed below.
The encoder on the shaft of the dynamometer
allows the control unit to detect the rotational
speed. This is displayed on the control unit in
revolutions per minute (rpm) and on the soft-
ware application.
Machines under test are coupled to the dyna-
mometer using a coupling which is housed in a
plastic tube to prevent clothes and hair getting
caught in the mechanism. Two microswitches
are provided on the dynamometer - unless a
machine under test is in place the control unit
will not activate.
Safety switch
DC generator
Digital scales
Machine under
test
En
co
de
r
Dynamometer
Swinging arm

Electrical machines
and MATLAB
Page 16
Copyright 2019 Matrix TSL Limited
Reference Measuring torque
The dynamometer rotates in the same direc-
tion as the machine under test. It provides a
mechanical resistance for the machine under
test. It also generates a voltage and - if a re-
sistance is placed across the Dynamometer ter-
minals - it produces a current.
If voltage and current flow then power is being
generated - work is being done. The more
power generated by the Dynamometer, the
more mechanical power has to be generated
by the machine under test.
We test electrical machines to understand
their properties so we know when to use the
various types of machine. The way we test
them is to vary their speed and the mechanical
power they need to generate. The dynamome-
ter and the Control unit allow us to do this.
The Dynamometer is made up of a DC motor
and a cradle. The DC motor also acts as a DC
generator. The cradle suspends the DC ma-
chine in two bearings that allow the body of
the machine to rotate. The force on the load
cell (or digital scale when the motor is running
anticlockwise) creates a weight on the load cell
or scale (which represents mass). If the swing
arm is perfectly balanced and horizontal when
it is at rest, the force produced on the load cell
or digital scale is Force = mass x 9.81m/s2. The
torque can be calculated from the formula
Torque = Force x Distance. In this case, the dis-
tance is from the centre of rotation of the gen-
erator to the centre line of action of the swing
arm. For the Matrix dynamometer, r =
38.12mm
More discussion on calculations is given below.
Motor must run clockwise for
load cell mode
Motor must run anti-clockwise
for digital scale mode
r
F=mg
Torque = mgr
Scales
Swinging arm

Electrical machines
and MATLAB
Page 17
Copyright 2019 Matrix TSL Limited
Software
Information and MATLAB API
Reference

Electrical machines
and MATLAB
Page 18
Copyright 2019 Matrix TSL Limited
Reference Software installation
Copying over the software
The software for Electrical Machines is available as a
download from the Matrix web site. When you un-
pack the zip file you will see the following files:
There are 6 applications that are used for the Electri-
cal Machines range. These are documented below.
Please copy these programs and directories into a
suitable location on your hard drive. You can make
short cuts to the *.BAT files if you wish.
Rin each program by clicking on the ‘*.BAT’ file.
Installing drivers
Go into the USB drivers folder and run the 32 bit or
64 bit as appropriate for y our computer. This should
install the driver for the control box.
You can check the driver is installed properly by look-
ing at Device Manager and checking that the Electri-
cal Machines controller appears under Ports - see op-
posite.

Electrical machines
and MATLAB
Page 19
Copyright 2019 Matrix TSL Limited
Reference Software: MATLAB integration
The MATLAB software is available as a down-
load from the Matrix web site.
The Modern Electrical Machines functionality is
controlled via a USB COM port connection to
the computer.
We have provided a library of functions to al-
low the various aspects of the Electrical Ma-
chines system to be investigated and con-
trolled. The various Machines function scripts
can be found inside the Primitives folder. The
scripts require a global variable to be declared
in your project to set the COM port number as
shown opposite:
global EM_USB;
% Find the COM port on your PC where the Matrix
EM control unit is plugged
% in and use it here instead of 'COM1'
EM_USB = serial
('COM1','Baudrate',115200,'Databits',8);
fopen(EM_USB);
% Main program resides here
fclose(EM_USB) % Close the COM port

Electrical machines
and MATLAB
Page 20
Copyright 2019 Matrix TSL Limited
Reference MATLAB functions
USB MCU Public Functions
Comp Code Cmd Code Function Param1 Param2 Param3 Return Return Size Description
0 0 GetAPIVersion VersionNumberByte
Gets firmware API version - Should be set to 1 on
release
0 1 SetMotorType Type (0-3)
Sets the motor drive type - 0=DC, 1=1 Phase, 2=3
Phase, 3=Angular Control
0 2 SetVoltage Channel (0-1) VoltageLSB VoltageMSB
Sets the voltage of one of the DC outputs (0-
3000)
0 3 SetFrequency FreqLSB FreqMSB Sets the AC drive frequency (10 - 100)
0 4 SetActive Run (0-1) Controls if the outputs are live or not
0 5 SetPhase Channel (0-2) PhaseLSB PhaseMSB
Allows one of the AC phases to be shifted from
the default 180 or 120
0 6 ZeroWeight Zeros the output of the load cell
0 7 SetACDriveMode Mode (0-1)
Sets the AC output waveform mode 0=Sine Wave
PWM 1=Trapezoidal
0 8 SetFanSpeed SpeedLSB SpeedMSB
Controls the fan speed, largely redundant now
and fan should be automatic (0-3000)
0 10 SetCapBank Value (0-3)
Controls the capacitors connected to the C
terminals - 0=0F, 1=200uF, 2=300uF, 3=500uF
0 11 SetDynoLoad Value (0-255)
Controls the dynomometer load resistance
(0=approx 145R, 255=approx 5R)
0 13 GetLogData Byte[64] Collects a 64-byte packet containing log data
0 14 LogDataReady Ready (0-1) Byte Checks to see if the log data is ready to send
0 15 IsBrushlessActive Bactive (0-1) Byte
Checks to see if the brushless feedback is
connected
0 20 GetRPM RPM Unsigned Int Returns RPM reading with resolution of 0.1 RPM
0 21 GetAngle Angle Unsigned Long
Returns the absolute encoder position with
resolution of 0.25 Degrees
0 22 GetVoltage Channel (0-5) Voltage Unsigned Int Returns Voltage reading with resolution of xxx V
0 23 GetCurrent Channel (0-6) Current Unsigned Int Returns Current reading with resolution of xxx V
0 24 GetErrorStatus ErrorStatus Byte Gets the current error status
0 25 GetSwitches Switch Byte
Returns the state of the saftey switches (0=Stop,
1=OK)
0 26 GetLoadCell Mode (0-1) Load Unsigned Int
Returns the weight on the load cell 0=Weight in G
1=Torque in mNM
0 27 GetPhaseAngle Channel
Returns the phase angle difference measured
using peaks in the waveform
0 28 GetMotorDir Direction Byte Returns the direction the motor is turning
0 29 ResetAbsPosition Resets the absolute angular position to 0
0 30 SetMotorDirection
Controls the direction of the motor when using
MotorType 3
The table above shows the public function calls
that are available in the MATLAB library and
their function.

Electrical machines
and MATLAB
Page 21
Copyright 2019 Matrix TSL Limited
Reference MATLAB example
The text opposite is a simple motor control
script written in Matlab. This and the sets of
API commands on previous pages should help
you to create your Electrical Machines test pro-
grams.
global EM_USB;
% Find the COM port on your PC where the Matrix
EM control unit is plugged
% in and use it here instead of 'COM1'
EM_USB = serial
('COM1','Baudrate',115200,'Databits',8);
fopen(EM_USB);
SetMotorType (0); % DC Motor
pause(0.1);
motor_voltage = 10; % 10V DC
% This just tests the comms to the control unit
before we start
api_version = GetAPIVersion();
disp(['api_version = ' , num2str(api_version)]);
% Check the Dynamometer 'motor located' switches
switch_state = GetSwitches ();
if switch_state >= 1
disp('==== DC MOTOR TEST START ====')
SetDynoLoad(0);
index = 1;
SetActive(1); % Motor ON
pause(0.3); % Wait for the motor to spin up
% Perform the sampled measurements in a loop
for loop = 0:255
load_cell_torque_range(index) = Get-
LoadCell(1);
encoder_speed_range(index) = GetRPM();
index = index + 1;
SetDynoLoad(loop);
pause(0.1);
end
% Sampling over, you can turn off the motor
and close the COM port
SetActive(0); % Motor OFF
fclose(EM_USB)
% Plot the RPM against Time
curent_torque_plot = figure;
figure(curent_torque_plot);
movegui(curent_torque_plot , 'northwest');
hold on
p2 = polyfit(encoder_speed_range,
load_cell_torque_range , 1); % line of best fit
y2 = polyval(p2, encoder_speed_range);
plot(encoder_speed_range,
load_cell_torque_range, 'ro', encod-
er_speed_range, y2, '-r' );
current_speed_polynomial = poly2sym(p2,sym
('T'));
current_speed_equation = sprintf('Speed = %
s',current_speed_polynomial);
disp(current_speed_equation);
grid on
legend('Samples','Best fit
line','Location','southeast');
xlabel('Speed, RPM');
ylabel('Torque, mNm');
title(['PM DC Motor Speed v Torque @ ',
num2str(motor_voltage) , 'V']);
hold off
else
disp('==== Motor not fitted in Dynomometer
====');
end

Electrical machines
and MATLAB
Page 22
Copyright 2019 Matrix TSL Limited
Instructor Guide

Electrical machines
and MATLAB
Page 23
Copyright 2019 Matrix TSL Limited
About this course
Introduction
The Electrical Machines and Matlab course is designed to both improve your Matlab skills and gain familiarity
with controlling modern electrical machines. The course covers basic motor operation through to advanced
closed loop control and beyond. The electrical machine equipment allows the exploration of various types of
motor without any risk of electrical shock or mechanical entanglement. The electrical machine control box ex-
poses it’s functionality via a command API that is accessible via the USB connection. Matlab can tap into this
API to allow the various features of the motor controller box to be controlled alongside Matlab’s powerful
mathematic engine.
Aim
The aim of the course is to teach the operation of motors, theory behind the motor drive electronics as well as
high level means of control using Matlab. Matlab then provides a series of tools which can be used to take
things further in terms of modelling the motor and increasing efficiency in existing machinery.
Prior Knowledge
It is recommended that student have prior knowledge in using Matlab, writing Matlab .m script files and using
Matlab to create chart plots. They should also have a basic understanding of the motors they are controlling as
well as how they are driven.
About these worksheets
It is expected that the series of experiments given in this course is integrated with teaching or
small group tutorials which introduce the theory behind the practical work, and reinforce it with
written examples, assignments and calculations. The worksheets should be printed / photocopied /
laminated, preferably in colour, for the students’ use. Students should be encouraged to make their
own notes, and copy the results tables and sections marked ’For your records’ for themselves. They
are unlikely to need their own permanent copy of each worksheet.
It is for the instructor to monitor that students’ understanding is keeping pace with their progress
through the worksheets. One way to do this is to ‘sign off’ each worksheet, as a student completes it,
and in the process have a brief chat with the student to assess grasp of the ideas involved in the exer-
cises it contains.
Time:
It will take students between 10 and 20 hours to complete the worksheets.
It is expected that a similar length of time will be needed to support the learning that takes place as
a result.
Instructor Guide

Electrical machines
and MATLAB
Page 24
Copyright 2019 Matrix TSL Limited
Learning Objectives
On successful completion of this course the pupil will have learned.
• How to connect and communicate via a COM port using Matlab
• Refer to existing .m script files as subroutines and call them in their programs
• Run and Control the various types of motor using the EM hardware
• Characterise a motor by taking a sweep of readings
• Generate a best fit line for a motor
• Create an open loop control system to control the speed of a motor
• Create a closed loop control system to more accurately control the speed of a motor
• Understand the difference between stable and unstable systems
Instructor Guide

Electrical machines
and MATLAB
Page 25
Copyright 2019 Matrix TSL Limited
Equipment checklist
To deliver this set of worksheets you will need:
If you intend to use an external meter, please note that it needs to be a true RMS meter. These are available from Matrix under product code HP1324 and two-per-set are required. It is also recommended that for waveform generation, the use of a digital oscilloscope is necessary. These are available from Matrix under product code HP8067.
Code Description Qty
COM7414 RS232 lead 1
EM1100 Red 100cm lead 3
EM1125 Black 100cm lead 3
EM1150 Green 100cm Lead 2
EM1175 Yellow 100cm lead 2
EM1190 Blue 100cm lead 2
EM2159 Dyno 1
EM2391 3 phase motor 1
EM5337 Brushless motor 1
EM6066 Control box 1
EM6574 DC motor assembly 1
EM7432 Series motor 1
EM8614 Single phase motor 1
EM9856 Shunt motor 1
HP2045 Shallow tray 2
HP3701 Mains lead 1
HP3844 Foam 5
HP4039 Lids 6
HP5540 Deep tray 3
HP6002 Cable for brushless motor 1
HP6529 Binding post 2
HP6640 Extra deep tray 1
HPUSB USB lead 1
LK2346 Bulb 3
LK5203 10Kohm resistor 3
LK5243 Diode 1A 3
LK5250 link 5
LK5291 Lampholder 3
LK5297 Lead - black 4mm to 4mm unshrouded 1
LK5298 Lead - red 4mm to 4mm unshrouded 3
LK8900 baseboard 1
Locktronics foam insert 1

Electrical machines
and MATLAB
Page 26
Copyright 2019 Matrix TSL Limited
Troubleshooting
Dynamometer arm sticking
Problem: On newer models the Dynamometer
arm can stick in the powder coating of the load
cell. This affects readings at low torque.
Remedy: put a little WD40 on the load cell so
that the arm does not stick
Problem: comms errors.
Solution: some lap tops seem to reduce the
USB response speed as a battery saving meas-
ure .In Task manager set the SCADA app as a
higher priority.

Electrical machines
and MATLAB
Page 27
Copyright 2019 Matrix TSL Limited
Version control
16 08 19 first release