model eq-99-fc ldls laser-driven light sourcerayscience.com/energetiq/eq-99fc manual...
TRANSCRIPT

Model EQ-99-FC LDLS™
Laser-Driven Light Source
Operation and Maintenance Manual
Revision 4 August 2011
Part Number DOC-5425

Copyright © 2011 Energetiq Technology Inc. All rights reserved.
Energetiq products are covered by US and foreign patents. All technical information, including drawings, schematics and specifications contained in this manual are the property of Energetiq and shall not be reproduced in whole or in part without the written consent of Energetiq. The content of this manual is subject to change without notice.
Energetiq Technology Inc. 7 Constitution Way, Woburn, MA 01801 USA Tel. +1 (781) 939-0763 Fax +1 (781) 939-0769 E-mail: [email protected] http://www.energetiq.com

Declaration of Conformity
We, the manufacturers
Energetiq Technology Inc. 7 Constitution Way Woburn, Massachusetts USA
hereby declare that the product family
LDLS™ Laser-Driven Light Source Model EQ-99 High Brightness Broadband Light Source
is in conformity with the requirements of the following standards
EN61010-1 (2001) Safety Requirements for Electrical Equipment for Measurement, Control and Laboratory Use: Part 1 – General Requirements
CISPR 11:2003 Industrial, scientific and medical equipment - Radio-frequency disturbance characteristics - Limits and methods of measurement
IEC61000-4-2:2001 Electrostatic Discharge Immunity IEC61000-4-3:2002 Radiated Electromagnetic Field Immunity IEC61000-4-6:2003 Radio Frequency Common Mode Immunity IEC61000-4-8:1994 Power Frequency Magnetic Field Immunity EN61326-1:2006 Electrical equipment for measurement, control and laboratory
use. EMC requirements. General requirements EN60825-1 (2007) Safety of laser products - Part 1: Equipment classification and
requirements in accordance with the provisions of
2006/95/EC EU Low Voltage Directive 2004/108/EC EU Electromagnetic Compatability Directive.
Signed, Paul Blackborow, CEO Date at Woburn, Massachusetts USA


TABLE OF CONTENTS
Chapter 1 ...................................................................................................................................................... 1 General Information........................................................................................................................... 1
Safety............................................................................................................................................... 1 Chapter 2...................................................................................................................................................... 7
Description ........................................................................................................................................... 7 General ........................................................................................................................................... 7 Specifications................................................................................................................................. 7 System Description ...................................................................................................................... 9 Power Supply Controller........................................................................................................... 10 Lamp House................................................................................................................................ 12
Chapter 3.................................................................................................................................................... 15 Installation........................................................................................................................................... 15
Unpacking.................................................................................................................................... 15 Connections................................................................................................................................. 15 Installation procedure................................................................................................................ 21
Chapter 4.................................................................................................................................................... 23 Operation............................................................................................................................................ 23
Starting.......................................................................................................................................... 23 Stopping ....................................................................................................................................... 23
Chapter 5.................................................................................................................................................... 25 Maintenance........................................................................................................................................ 25
Fiber Cleaning Process .............................................................................................................. 25 Troubleshooting ......................................................................................................................... 28 Lamp Replacement .................................................................................................................... 29

EQ-99-FC Operation Manual Rev. 4 1
C h a p t e r 1
GENERAL INFORMATION
Safety
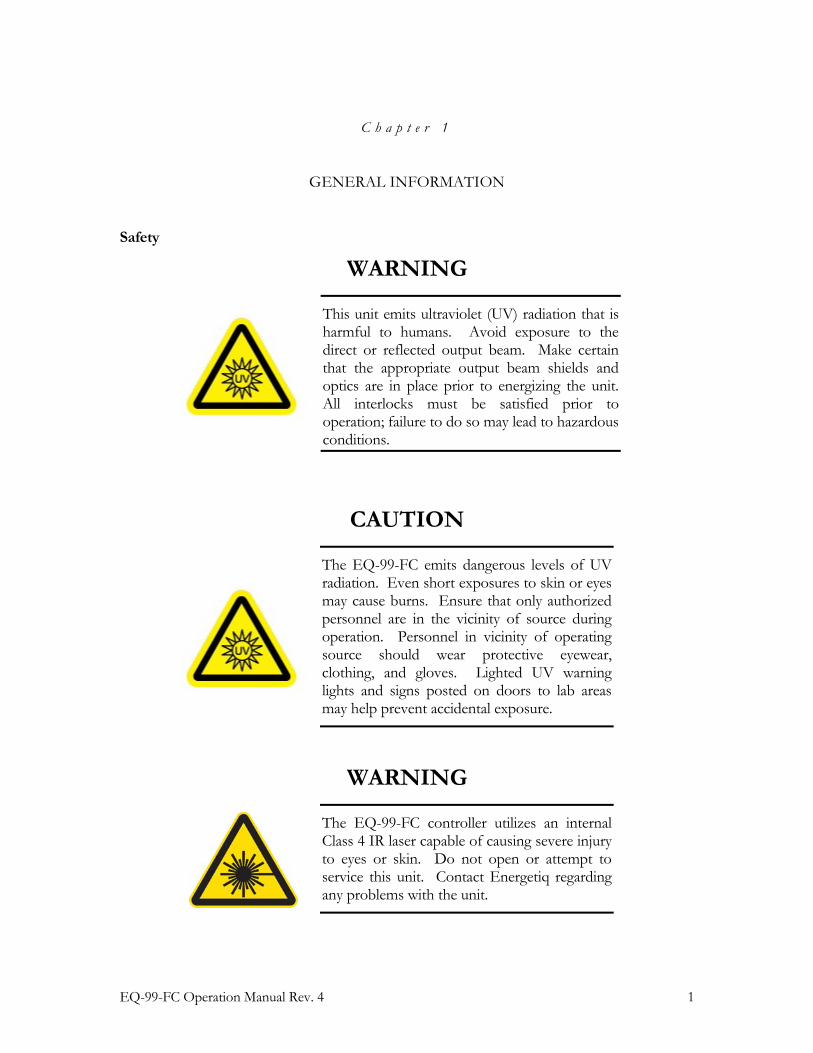
WARNING
CAUTION
WARNING
The EQ-99-FC controller utilizes an internal Class 4 IR laser capable of causing severe injury to eyes or skin. Do not open or attempt to service this unit. Contact Energetiq regarding any problems with the unit.
The EQ-99-FC emits dangerous levels of UV radiation. Even short exposures to skin or eyes may cause burns. Ensure that only authorized personnel are in the vicinity of source during operation. Personnel in vicinity of operating source should wear protective eyewear, clothing, and gloves. Lighted UV warning lights and signs posted on doors to lab areas may help prevent accidental exposure.
This unit emits ultraviolet (UV) radiation that is harmful to humans. Avoid exposure to the direct or reflected output beam. Make certain that the appropriate output beam shields and optics are in place prior to energizing the unit. All interlocks must be satisfied prior to operation; failure to do so may lead to hazardous conditions.

2 EQ-99-FC Operation Manual Rev. 4
General Precautions
The EQ-99-FC should only be operated with a fiber connected to the broadband output and connected using an SMA connector. Operation without an SMA terminated fiber in place will result in hazardous broadband radiation. The far end of the output fiber should be terminated into a closed beam tube. Due to the possibility of generating ozone when ambient oxygen is exposed to short wavelength light, the beam should always be enclosed in an appropriate beam pipe, tube, or enclosed space. We suggest purging any beam transport space with dry nitrogen gas.
The source must be purged with dry nitrogen gas via the nitrogen input 4mm push-lock connector on the Lamp House enclosure. The unit must be purged for a minimum of 10 minutes prior to operation in order to ensure that no ozone is created due to residual oxygen inside the unit. It is recommended that any beam transport be purged for a similar amount of time.
The EQ-99-FC source must also be cabled correctly and connected to a socket with a protective earth ground prior to operation.
Refer to the Installation section of this manual (Chapter 3) for details of the facilities connections.
Other than a bulb replacement, there are no user-serviceable parts inside the EQ-99-FC. For any problems encountered during operation, please contact Energetiq Technology for assistance. If there is a component failure, do not attempt to open the Power Supply Controller or Lamp House enclosure of the EQ-99-FC.
The EQ-99-FC utilizes a quartz lamp containing a high-pressure gas fill. Explosion of the lamp and possible injury from flying fragments can occur if the lamp is mishandled.
Do not open the enclosure of either the Lamp House enclosure or the Power Supply Controller. Dangerous invisible infrared laser beams and hazardous voltages exist inside the units. Opening the chassis both voids the warranty and exposes the user to dangerous radiation and hazardous voltages.
CAUTION
Use of controls or adjustments or performance of procedures other than those specified herein may result in hazardous radiation exposure.

EQ-99-FC Operation Manual Rev. 4 3
Laser Information
The EQ-99-FC uses a patented (U.S. Patent #7,435,982, others pending) laser drive system to excite a plasma that radiates in the UV as well as the visible bands. A class 4 laser is located in the Power Supply Controller enclosure. Laser energy is delivered via an armored fiber to the Lamp House enclosure and connected with an SMA-type connector. Safety interlocks shut down the laser power if the laser fiber SMA connector is removed from the Lamp House enclosure. The optical configuration of the Lamp House ensures that the direct laser beam can not exit the unit. The EQ-99-FC laser product is designated as Class 1 during all normal operation.
The parameters of the non-accessible internal laser are given below in Table 1.
Wavelength 974 nm
Emission Type CW
Laser Power for classification <8 mW via 7mm measurement aperture.
Beam Diameter ~29 mm at aperture.
Divergence >100 mRad.
Transverse Beam Mode Diffuse
Table 1: Embedded Laser Parameters
No regular service is required for the EQ-99-FC. Any service to the system must be performed only by factory authorized and trained technicians. To avoid injury, under no circumstances should the user open or modify the Lamp House or Power Supply Controller enclosure.
The unit must not be operated if the covers are removed or it is defective in any way. Contact Energetiq if any problems with the equipment are suspected.
Labels and Safety Notification
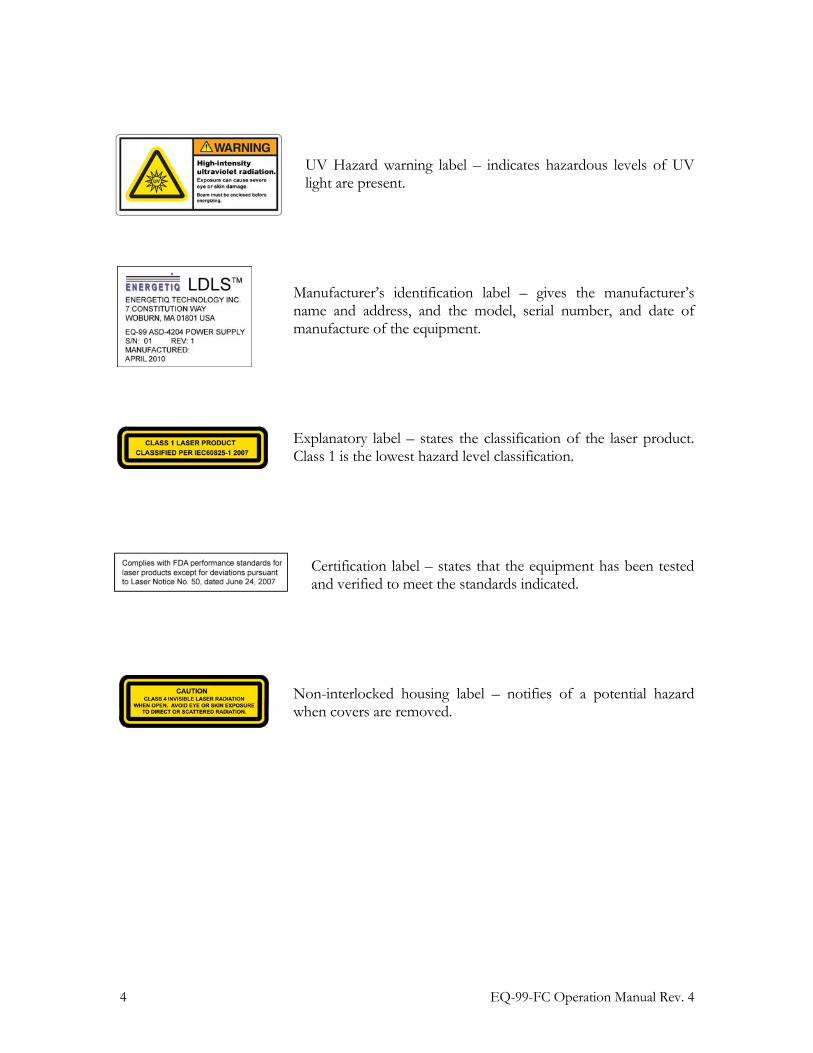
The following safety labels appear on the product. Figure 1 shows the location of each label on the EQ-99-FC system.
Output Connector Warning Label – indicates hazardous levels of broadband light are present. Unit should only be operated with an output fiber installed to the EQ-99-FC and the far end of the fiber terminated so that the output beam remains enclosed.
4 EQ-99-FC Operation Manual Rev. 4
UV Hazard warning label – indicates hazardous levels of UV light are present.
Manufacturer’s identification label – gives the manufacturer’s name and address, and the model, serial number, and date of manufacture of the equipment.
Explanatory label – states the classification of the laser product. Class 1 is the lowest hazard level classification.
Certification label – states that the equipment has been tested and verified to meet the standards indicated.
Non-interlocked housing label – notifies of a potential hazard when covers are removed.

EQ-99-FC Operation Manual Rev. 4 5
Figure 1: Safety label locations
Safety Interlocks
The EQ-99-FC is equipped with interlocks to prevent operation of the device when the following conditions are present
1. Bulb is not installed into the Lamp House enclosure
2. The laser fiber is not connected to the Lamp House enclosure
3. An external interlock is open
LASER DRIVEN LIGHT SOURCE
Manufacturer’s ID Label
Non-interlocked Housing Label
Certification Label
Explanatory Label
UV Hazard Warning Label
Output Connector Warning Label
Manufacturer’s ID Label
Non-Interlocked Housing Label

6 EQ-99-FC Operation Manual Rev. 4
External Interlock
External interlock pins are provided for the customer’s use (see Chapter 3 for connection details). Any suitable normally-open contact or solid-state switch can operate the interlock circuit.
The interlock circuit must be connected to enable the operation of the unit. Should the interlock connection open during operation or standby, the source is immediately disabled, and all light output from the aperture ceases.

EQ-99-FC Operation Manual Rev. 4 7
C h a p t e r 2
DESCRIPTION
General
The EQ-99-FC is a broad-band lamp system for use in a wide variety of applications. The lamp produces high brightness, broad-band light from DUV wavelengths through visible and beyond. The output is very stable, and has a long lifetime before any service is required. A simple control interface insures ease of use.
Some of the advantages of the EQ-99-FC include:
• Very high brightness across complete spectrum – 170nm through visible and beyond
• Eliminates need for multiple lamps (replaces D2/Tungsten/Xenon Arc) – Simplified optical system
• Excellent spatial stability – Repeatable measurements
• Superior short and long term power stability – Repeatable measurements
• Electrodeless operation for long life – Reduced consumable costs – Minimal recalibration of instrument
The EQ-99-FC system consists of a Power Supply Controller unit, Lamp House unit, and interconnecting cables. Connection to DC power are required for operation. Connection to nitrogen purge gas is optional, but recommended for best performance. See Chapter 3 for connection details.
Specifications
Optical Performance
• Typical output performance: see Figure 2.

8 EQ-99-FC Operation Manual Rev. 4
1
10
100
1000
170 270 370 470 570 670 770 870
Wavelength, nm
Spec
tral
Pow
er,
µW
/nm
EQ-99FC Typical Performance with 230µm diameter, 0.22NA, 1m long fiber
Fiber (µm) Estimated Multiplier
230 1.00
450 2.02
600 2.26
Power ratios
Figure 2: Typical output performance
Physical Specifications
Dimensions (H x W x D) • Lamp House: 82 x 86 x 76 mm (3.2 x 3.4 x 3.0 in) • Power Supply Controller: 140 x 108 x 254 mm (5.5 x 4.2 x 10.0 in)
Weight
• Lamp House: 0.7 kg (1.5 lbs) • Power Supply Controller: 2.2 kg (5.0 lbs)
Utility Requirements
• Electrical: 24VDC, 125W • Cooling: natural convection and internal fan, no auxiliary cooling necessary • Purge gas (optional): clean dry nitrogen, 20 psig (0.14 MPa) supply pressure

EQ-99-FC Operation Manual Rev. 4 9
Remote Interface
Digital Inputs • Type: Optocoupler LED • Logic: Active High • Input voltage: 5VDC • Input current: 8mA
Digital Outputs
• Type: Open collector to ground (digital common) • Logic: Active Low • Voltage: 30VDC max. • Sink current: 30mA max.
User Power
• Voltage: 5VDC, referenced to digital common • Current: 50mA maximum
Environmental Requirements
Operating • Ambient temperature: 15–35°C • Relative Humidity: non-condensing, 80% max. for temperatures up to 31°C,
decreasing linearly to 50% max. at 40°C. • Pollution Degree 2 (normally only non-conductive pollution; occasional,
temporary condensation possible) • Installation Category II • Indoor use only
Transport • Temperature: -5–95°C • Relative Humidity: non-condensing, 95% max.
System Description
As shown in Figure 3 the EQ-99-FC system consists of a Power Supply Controller unit, Lamp House, laser fiber optic cable, and Lamp House signal cable (not shown). Power and I/O interface connections (also not shown) are provided by the remote control unit or the user. The following sections provide descriptions of the system components and controls, and gives an overview of their functions. Refer to the “Installation” section of this manual (Chapter 3) for more detailed information.

10 EQ-99-FC Operation Manual Rev. 4
Figure 3: EQ-99-FC System
Power Supply Controller
The Power Supply Controller contains: • IR Diode Laser • Laser power supply • Thermo-electric cooler for laser • Permanently attached, armored laser fiber optic cable • Control electronics • Status indicator LEDs • Interface connectors
Power Input Connector
Lamp House Signal Connector
I/O Interface Connector
Status Indicators
Lamp House
Power Supply Controller
Optical Output
Armored Laser Fiber

EQ-99-FC Operation Manual Rev. 4 11
Rear panel features (refer to Figure 3):
Status Indicator LEDs
These five LEDs indicate the system status. The function of these indicators is shown below in Table 2.
LED Label Meaning (when lit)
POWER ON DC power is connected to the EQ-99-FC Power Supply Controller
LAMP ON UV Light is on
LASER ON Laser power is ON and laser light is being delivered to the Lamp House
CONTROLLER FAULT One of the following has occurred in the Power Supply Controller: 1. External interlock open 2. Controller internal temperature too high 3. Loose or missing cover 4. Laser power not reaching setpoint
LAMP MODULE FAULT One of the following has occurred in the Lamp House module: 1. Lamphouse internal termperature too high 2. Laser fiber not correctly connected 3. Bulb not correctly installed
Table 2: Status Indicator LED functions
Input/Output (I/O) Connector
Provides access to control and status signals. See Chapter 3 for pin assignments and functions.
This is the only operator interface to the EQ-99-FC – there are no local controls. Energetiq offers the EQ-99-RC Remote Control Module which connects to the Input/Output connector and provides a means of local control. Contact Energetiq for additional information.

12 EQ-99-FC Operation Manual Rev. 4
Power Input Connector
This is the input connector for 24 VDC power. Power can be provided using the optional EQ-99-PS001 (US and Japan) or EQ-99-PS002 (Europe). Alternatively, the EQ-99-FC can be powered directly from a customer provided 24VDC power supply. See Chapter 3 for detailed information.
Lamp House Signal Connector (mini D sub – 9-pin)
Provides various power and control signals to/from the Lamp House module. No other connector or cable may be used with the EQ-99-FC other than the one supplied.
Armored Laser Fiber
The laser light is delivered from the Power Supply Controller to the Lamp House via a fiber optic cable with armored protection. It is critical that this armored fiber be treated with care and inspected for any abnormalities prior to operation. The fiber is permanently attached to the Power Supply Controller, and connected to the Lamp House by an SMA-type connector.
Lamp House
The Lamp House assembly contains: • Lamp • Igniter • IR pumping optics • SMA Output connector • Laser ON indicator • Interface connectors

EQ-99-FC Operation Manual Rev. 4 13
Figure 4: Lamp House Assembly
External features (refer to Figure 4):
SMA Output Connector
Provides broadband optical output using a standard SMA connector. Energetiq recommends the use of an Energetiq-supplied fiber for the broadband output. These fibers are able to withstand the very high power density of deep UV radiation that is generated by the EQ-99-FC, thus giving best longevity and performance.
Nitrogen Purge Inlet
This is the inlet fitting for nitrogen purge gas. Purge gas is optional but is recommended for best performance. With no purge, ozone will form from atmospheric oxygen and attenuate
SMA Output Connector
Laser Input (SMA-type)
Laser ON Indicator
Purge Gas Port
Signal Connector (to Controller)
Lamp mounting flange
Optical fiber output cable

14 EQ-99-FC Operation Manual Rev. 4
the light output in the 220 – 280nm band. In addition, atmospheric oxygen and water vapor will attenuate the output below 200nm.
There is no return fitting for the purge nitrogen. The purge flow normally escapes within the Lamp House enclosure, and then to atmosphere.
Laser Input
This is the inlet connector for the armored fiber from the Power Supply Controller. It contains a set of interlock pins that disable the laser when the SMA connector is not properly in place.
Laser On Indicator
This LED is illuminated when the laser is ON.
J4 Signal Connector (mini D sub – 9-pin)
Provides various power and control signals to/from the Power Supply Controller. No other connector or cable may be used with the EQ-99-FC other than the one supplied.

EQ-99-FC Operation Manual Rev. 4 15
C h a p t e r 3
INSTALLATION
Unpacking
Upon arrival, start by inspecting all parts of the system for completeness and any damage incurred in shipping. The EQ-99-FC shipping box should contain:
1) EQ-99-FC Power Supply Controller unit 1) EQ-99-FC Lamp House unit 1) Black interconnecting cable from Lamp House to Power Supply Controller (9 pin mini D-sub). OPTIONAL 1) EQ-99-RC Remote Control Module with interlock connector 1) I/O cable with 15 pin D-sub connector at each end 1) 24 VDC Power Supply (universal input voltage) 1) 230um Output Fiber, 1m long 1) 450um Output Fiber, 1m long
If any part is missing or appears damaged, contact Energetiq immediately. Do not attempt to substitute any parts. There are no user-serviceable parts inside the EQ-99-FC Lamp House or Power Supply Controller unit.
Connections
Installation of the EQ-99-FC consists of connecting electrical and gas supplies, and connecting the Lamp House module to the user’s equipment.
Electrical Power
The EQ-99 requires 24VDC at 6.0A minimum (150W rating). Power consumption is approximately 100W during normal operation.
Power can be provided using the optional EQ-99-PS001 (US and Japan) or EQ-99-PS002 (Europe). Alternatively, power can be provided directly via a customer provided 24VDC power supply. Connect to a 24VDC source as follows:
Connector: Kycon KPPX-4P Pins 3 & 4 +24VDC Pins 1 & 2 24VDC return

16 EQ-99-FC Operation Manual Rev. 4
Purge Gas
Purge gas is optional but is recommended for best performance. With no purge, ozone will form from atmospheric oxygen and attenuate the light output in the 220 – 280nm band. In addition, atmospheric oxygen and water vapor will attenuate the output below 200nm.
If required, connect a source of nitrogen purge gas to the port on the Lamp House. The fitting is a push-to-connect type, sized for 4 mm tubing.
Clean and dry nitrogen from either a dewar or research-grade N2 bottle is recommended. Do not use any other purge gas. Grade 6 or better gas purity is recommended to maintain cleanliness of the optics. Supply pressure should be 20 psig (0.14 MPa). With a 20 psig inlet pressure, the EQ-99 will consume approximately 1 slm of flow.
There is no return fitting for the purge nitrogen. The purge flow normally escapes within the Lamp House enclosure, and then to atmosphere.
Optical Interface
The optical output interface is via a standard SMA connector. The EQ-99-FC output is 0.22NA. Energetiq strongly recommends the use of an Energetiq-supplied fiber for the broadband output. These fibers are able to withstand the very high power density of deep UV radiation that is generated by the EQ-99-FC, thus giving best longevity and performance.
See Figure 5 below for mechanical layout of the Lamp House.

EQ-99-FC Operation Manual Rev. 4 17
Figure 5: Lamp house mechanical layout

18 EQ-99-FC Operation Manual Rev. 4
Fig
ure
6: P
ower
Sup
ply
Cont
rolle
r mec
hani
cal l
ayou
t

EQ-99-FC Operation Manual Rev. 4 19
Signal Connections
The EQ-99-FC is controlled through the remote I/O connector.
Table 3 gives the pin assignments and functions for this interface. Connect to the user’s control system using a suitable cable. Mating connector is a standard high-density 15-pin d-sub male (for example, Amp part no. 748364-1 with contacts 1658670-2)
Optionally, connect a model EQ-99-RC remote control module to the I/O connector using the supplied cable.
User I/O can be powered either by the EQ-99 internal isolated power supply, or an external supply.
Figure 7 shows connection schematics for both configurations.
Description Pin # Details
Commands (Inputs)
LAMP ENABLE 11 LAMP ENABLE REQUEST, apply +5V (referenced to digital common) to enable lamp ignition
LAMP OPERATE 12 OPERATE REQUEST, apply +5V (referenced to digital common) to initiate ignition (must be after Lamp Enable Request)
EXTERNAL INTERLOCK 13 EXTERNAL INTERLOCK, apply +5V (referenced to digital common) to close interlock and allow operation
Status Indicators (Outputs) LAMP ON 1 Pulled to digital common when ON
LASER ON 2 Pulled to digital common when ON
LAMP MODULE FAULT 3 Pulled to digital common when OK, float on FAULT
CONTROLLER FAULT 4 Pulled to digital common when OK, float on FAULT
ISOLATED +5V SUPPLY 5 250mW capable, thru 100 ohms, referenced to digital common
DIGITAL COMMON 6,7,8,9 Galvanically isolated from system
RESERVED 10 Do not connect
RESERVED 14,15 Do not connect
Table 3: I/O Connector Pin Assignments

20 EQ-99-FC Operation Manual Rev. 4
0.1uF
100
Pins 1, 2, 3, 4
Pins 6, 7, 8, 9
Pin 5
499 Pins 11, 12, 13
Pins 6, 7, 8, 9
499
+-
0.1uF
0.1uF
Pins 11, 12, 13
Pin 5
+-
100
0.1uF
Pins 1, 2, 3, 4
+-
Inputs
Outputs
Isolated5VDC supply
5V Power
5V Return
Contact or
Load
solid-state switch
Outputs
Inputs
Isolated5VDC supply
5V Power
5V Return
Contact or
Load
solid-state switch
5VDC supplyUser
N/C
N/C
Figure 7: Remote Iinterface Schematic

EQ-99-FC Operation Manual Rev. 4 21
Installation procedure
1. Mount the Power Supply Controller unit rigidly to either an optical breadboard plate or another suitable mounting structure using the supplied tabs on the bottom of the chassis. The holes are sized to accept standard ¼-20 optical bench hardware, and spaced to be compatible with a standard 1” grid mounting hole pattern. See Figure 6 for dimensional and mounting details.
2. Connect the Lamp House unit output to the user equipment. The output should always be connected to a fiber optic cable. The output end of the fiber optic cable should always be either directly coupled to another fiber optic cable, or enclosed in an appropriate beam pipe, tube, or enclosed space and purged with nitrogen. Operating the source without any output target or beam transport is not recommended, and may lead to unsafe operating conditions. Consult Energetiq for applications information and suggested configurations.
The Lamp House should be mounted in the orientation shown in Figure 5, with the output connector on the top and the flat surface of the housing on the bottom. The lamp has been factory aligned in this position. Mounting the lamp in a different orientation will cause the plasma position inside the bulb to shift slightly. This will result in slight misalignment and a resulting drop in output power.
3. Setup the Lamp House unit with appropriate ultraviolet safety measures and laser light safety measures in place. It is recommended that any enclosure or aperture-blocking hardware utilize switches wired to the EQ-99-FC external interlock circuit.
4. Place the Power Supply Controller close to the Lamp House unit. Do not block the air vent of the Power Supply Controller.
5. Connect the black 9 pin mini D-sub interconnect cable from the Power Supply Controller (labeled TO LAMP) to the Lamp House (labeled J4).
6. The EQ-99-FC is delivered with the armored laser fiber connected to the lamp house. This is done to minimize the possibility of debris or particles contaminating the end of the laser fiber. Energetiq strongly recommends leaving the laser fiber connected, unless it is necessary to disconnect it for installation or routing of the laser fiber. If the laser fiber must be disconnected, apply SMA caps immediately to both ends, and follow directions on inspection and cleaning of the laser fiber described in Chapter 5.
7. If necessary, connect the SMA connector to the Lamp House laser input and tighten.
8. If required connect nitrogen purge gas to the Lamp House. Refer to “Facilities Requirements” above.
9. Connect user’s control system to the I/O interface connector per
10. Alternately, if using the EQ-99-RC Remote Control Module, place it on a clean rigid surface. Install the supplied 15-pin cable from the Power Supply Controller to the EQ-99-RC.
11. Connect 24VDC input power source to the Power Supply Controller.

22 EQ-99-FC Operation Manual Rev. 4
The system is now ready to operate.
EQ-99-FC Operation Manual Rev. 4 23
C h a p t e r 4
OPERATION
Starting
Once the lamp is set up properly, verify that all personnel that will be in contact with the lamp system are aware of the potential hazards involved. It is the responsibility of the user to verify that the lamp is being used safely.
This example assumes the use of the EQ-99-RC Remote Control Module to provide local control. If using a custom control system, substitute the appropriate digital input and output lines from Table 3 for the switches and LEDs described below.
1. With the EQ-99-RC Remote Control Module connected properly, review the status LEDs on the Power Supply Controller. The POWER ON LED should be lit, and neither the CONTROLLER FAULT nor LAMP MODULE FAULT LEDs should be lit.
2. Turn on the ENABLE switch (place switch in up position) and wait 2 seconds.
3. Turn on the OPERATE Switch (place switch in UP position).
4. Within several seconds the LASER ON LED will light. Laser light is now present in the Lamp House.
5. In approximately 20-90 seconds the igniter will be turned on automatically and the plasma will ignite. The LAMP ON LED will be lit. The duration of the warm up time (20-90 seconds) will depend on the temperature and previous operating condition of the EQ-99-FC. The EQ99 will automatically detect when the unit has reached the optimum conditions for ignition.
If the LAMP ON LED is not lit within 90 seconds maximum after step 4, the lamp failed to ignite (this is very unusual). However, if this occurs, turn both the ENABLE and OPERATE switches to the OFF position (down) and begin at Step 1 again.
Stopping
To turn the LAMP off, simply turn the OPERATE Switch to the OFF position. When finished using the lamp, turn the ENABLE switch to the OFF position and remove the 24VDC supply voltage.
To minimize wear on the ignition components, it is best to avoid frequently starting and stopping the lamp. It is recommended to run the lamp continuously if long off-periods are not required.

24 EQ-99-FC Operation Manual Rev. 4

EQ-99-FC Operation Manual Rev. 4 25
C h a p t e r 5
MAINTENANCE
Fiber Cleaning Process
Fiber Cleaning Basics:
• The LDLS laser fiber connector is carefully inspected and is clean prior to shipment. Energetiq strongly recommends leaving the laser fiber connected, unless necessary for installation or routing of the laser fiber.
• Leave Laser Fiber SMA connected whenever possible.
• If the SMA fiber must be disconnected, always use a cap on both ends.
• Store caps open side down when possible.
• Blow out caps with CDA (Clean Dry Air) prior to use.
• Never leave the fiber disconnected without a cap.
• Follow the fiber inspection and cleaning process (Figure 8) before making a laser fiber SMA connection.
• Operating the LDLS with a contaminated fiber introduces the risk of decreased performance or damage to the unit.
Fiber Inspection and Cleaning Process
CAUTION
Disconnect power from the EQ-99 Power Supply Controller unit before performing fiber inspection.

26 EQ-99-FC Operation Manual Rev. 4
Inspect Fiber end
Is fiber end contaminated?
Install Laser SMA Connector
Clean Fiber end with Clean Dry Air
Inspect Fiber end
Is fiber end contaminated?
Install Laser SMA Connector
Clean Fiber end with Cletop
Inspect Fiber end
Is fiber end contaminated?
Install Laser SMA Connector
Clean Fiber Lint Free Wipe and Isopropyl Alcohol
Yes
No
Yes
No
Yes
No
Start
Inspect Fiber end
Is fiber end contaminated?
Install Laser SMA Connector
Clean Fiber end with Clean Dry Air
Inspect Fiber end
Is fiber end contaminated?
Install Laser SMA Connector
Clean Fiber end with Cletop
Inspect Fiber end
Is fiber end contaminated?
Install Laser SMA Connector
Clean Fiber Lint Free Wipe and Isopropyl Alcohol
Yes
No
Yes
No
Yes
No
Start
Figure 8: Fiber Cleaning Process Flowchart
Fiber Inspection Tools
Figure 9: Thorlabs FS-200 Handheld Fiber Inspection Scope

EQ-99-FC Operation Manual Rev. 4 27
Figure 10: Westover FVD-2400 Benchtop USB/PC Operated Fiber Viewer
Examples of Fiber Images
Figure 11: Fiber End Images

28 EQ-99-FC Operation Manual Rev. 4
Fiber Cleaning Tools
1. Clean Dry Air 2. Dust Off (or similar clean, compressed air) 3. Cletop (www.cletop.com)
4. Lint Free Wipe with Isopropyl Alcohol
Troubleshooting
See below if any problems are encountered in operating the EQ-99-FC.
Condition:
Controller Fault and/or Lamp House Fault LED(s) are ON.
Action:
• Always begin operation of the source by verifying the interlocks.
• Confirm that the external interlock contact is closed (or that the black jumper plug is fully inserted into the back of the EQ-99-RC Remote Control Box)
• Check that the bulb and laser fiber are properly connected at the Lamp House unit.
• To reset or clear Fault condition, turn both the “Enable” and “Operate” switches to the OFF position. Wait 1 second, then turn the “Enable” switch to the on position
• If all of the interlocks are OK and either the lamp or controller interlock faults will not clear, please contact the factory.
Condition:
Lamp fails to ignite after several tries.
Action: Contact Energetiq.
Cletop Type A SMA cleaner with Blue tape
14100700
14100500
Box of 6 Replacement Blue Tape Reels

EQ-99-FC Operation Manual Rev. 4 29
Lamp Replacement
Contact Energetiq if a bad lamp is suspected.

30 EQ-99-FC Operation Manual Rev. 4


Copyright © 2011 Energetiq Technology Inc. All rights reserved.
Energetiq products are covered by US and foreign patents. All technical information, including drawings, schematics and specifications contained in this manual are the property of Energetiq and shall not be reproduced in whole or in part without the written consent of Energetiq. The content of this manual is subject to change without notice.
Energetiq Technology Inc. 7 Constitution Way, Woburn, MA 01801 USA Tel. +1 (781) 939-0763 Fax +1 (781) 939-0769 E-mail: [email protected] http://www.energetiq.com