model 42 (d) · alternatively, install optional blower assembly and ozone killer onto exhaust port...
TRANSCRIPT

0
Jelight Company, Inc. 2 Mason Irvine, CA 92618 U.S.A Tel: +1(949) 380-8774 Fax +1(949) 768-9457
UVO-CLEANER Model 42 SERIES
Instruction Manual
Original Instructions REV. D
®

1
Jelight Company, Inc. 2 Mason Irvine, CA 92618 U.S.A Tel: +1(949) 380-8774 Fax +1(949) 768-9457
Table of Contents
Safety Guide ........................................................................................ 2
TÜV Rheinland® Approval .................................................................... 3
Introduction ...........................................................................................
'UV + O' Cleaning Method .............................................................. 4
Specifications ....................................................................................... 5
Part Description ......................................................................................
Front Panel ................................................................................... 6
Rear Panel .................................................................................... 7
Part Assembly ...................................................................................... 8
System setup ……………………………………………………………………………………9
Lamp Installation ................................................................................ 10
System Operation ............................................................................... 11
Scheduled Maintenance ...................................................................... 12
Intensity Measurement ....................................................................... 13
Troubleshooting ................................................................................. 14
Limited Warranty ................................................................................ 15
Warranty Registration Form ................................................................ 17

2
Jelight Company, Inc. 2 Mason Irvine, CA 92618 U.S.A Tel: +1(949) 380-8774 Fax +1(949) 768-9457
Safety Guide
WARNING! Hazardous Voltage Do not remove the cover while the equipment is plugged to an electrical outlet; risk of electric shock.
WARNING! Inhalation Hazard Ozone is produced by this equipment during operation and appropriate ventilation must be provided for exhaust purposes. If ozone is detected in the area surrounding this equipment, immediately switch the machine off.
WARNING! Ultraviolet Light The low pressure mercury vapor grid lamp inside this equipment emits harmful UV radiation. Avoid exposure at all times! Protect eyes and skin. This equipment should be operated by qualified personnel.

3
Jelight Company, Inc. 2 Mason Irvine, CA 92618 U.S.A Tel: +1(949) 380-8774 Fax +1(949) 768-9457
TÜV Rheinland® Approval This UVO Cleaner is certified for cTÜVUS Cert# CU 72080216 with UL fulfillment standards UL 61010-1:2004 & CAN/CSA-C22.2 61010-1:2004.
Also certified for EC conformity in accordance with EC Council Directive 2004/108/EC Reg. # AE 720801320 0001
For more details, please log on to: www.jelight.com/certifications.php#UVO www.tuvdotcom.com
4
Jelight Company, Inc. 2 Mason Irvine, CA 92618 U.S.A Tel: +1(949) 380-8774 Fax +1(949) 768-9457
Introduction
UV+O (atomic oxygen) cleaning method is a photosensitized oxidation process in which the contaminant molecules of photo-resists, resins, human skin oils, cleaning solvent residues, silicone oils, and flux are excited and/or dissociated by the absorption of short-wavelength UV radiation. Atomic oxygen is simultaneously generated when molecular oxygen is dissociated by 184.9nm and ozone by 253.7nm. 253.7nm radiation is absorbed by most hydrocarbons and also by ozone. The products of this excitation of contaminant molecules react with atomic oxygen to form simpler, volatile molecules which desorb from the surface. Therefore, when both wavelengths are present, atomic oxygen is continuously generated, and ozone is continually formed and destroyed. By placing properly pre-cleaned samples within five millimeters of ozone producing UV source, such as the low pressure mercury vapor grid lamp inside the UVO-Cleaner®, near atomically clean surfaces can be achieved in less than one minute. In addition, this process does not damage any sensitive device structures of MOS gate oxide. The UVO-Cleaner® is the safest and most effective method of removing organic contaminants from silicon, gallium arsenide, quartz, sapphire, glass, mica, ceramics, metals, and conductive polyimide cements. It is built to last with low maintenance and trouble free service.
Applications: • Substrate cleaning prior to thin film deposition/descuming and stabilizing photo-resist • Cleaning of silicon wafers, lenses, mirrors, solar panels, cold rolled steel, inertial guidance
subcomponents, and GaAs wafers • Cleaning of flux, hybrid circuits, and flat panel LCD • Etching Teflon®, Viton®, and other organic materials • Enhancing oxide passivated surfaces of GaAs and Si • Reduce out-gassing of glass • Wafer tape removal • Improve adhesion of coatings on plastics • Ink removal from wafers after testing • Stripping photo-resist • Removing latent images from lithography plates • Cleaning lithography plates • Growing oxide layers on silicon wafers • Cleaning circuit boards prior to packaging/adhesion • Increase hydrophilic characteristics of surfaces • Cleaning and sterilization for bioscience applications • Cleaning electronic microscope probes/slides or optical fibers/lenses • Details of each application’s data/journal/article: www.jelight.com/applications.php

5
Jelight Company, Inc. 2 Mason Irvine, CA 92618 U.S.A Tel: +1(949) 380-8774 Fax +1(949) 768-9457
Specifications
Outer Dimensions Length Width Height Exhaust Port Media Inlet Port (2x)
13.70” [350 mm] 8.60” [220 mm] 8.80” [225 mm] Ø 2.0” [50.8 mm] Ø 0.375” [9.5 mm]
Tray Dimensions
Width Length Height (Adjustment Range) 6.50” [165 mm] 6.50” [165 mm] 0.25” ~ 1.50” [6 mm ~ 38 mm]
Grid Lamp
Type Average Intensity Distance Measured Away From Lamp Low Pressure Mercury (Hg) Vapor 28 ~ 32 mW/cm² @ 253.7 nm .12” ~ .20” [3 ~ 5 mm]
Electrical Characteristics Output Power
Voltage Current 6000 Vpeak-peak 30 mA
Available Input Power Requirements
Model Voltage Frequency Current 42 120 VAC 60 Hz 2.0 A
42-220 220 VAC 50 Hz 3.0 A 42-220-60 220 VAC 60 Hz 2.0 A
42-100 100 VAC 50/60 Hz 2.0 A 42 W/ ELAPSE TIMER 120 VAC, 220VAC 60 Hz, 50Hz 2.0 A, 3.0A
6
Jelight Company, Inc. 2 Mason Irvine, CA 92618 U.S.A Tel: +1(949) 380-8774 Fax +1(949) 768-9457
Part Description
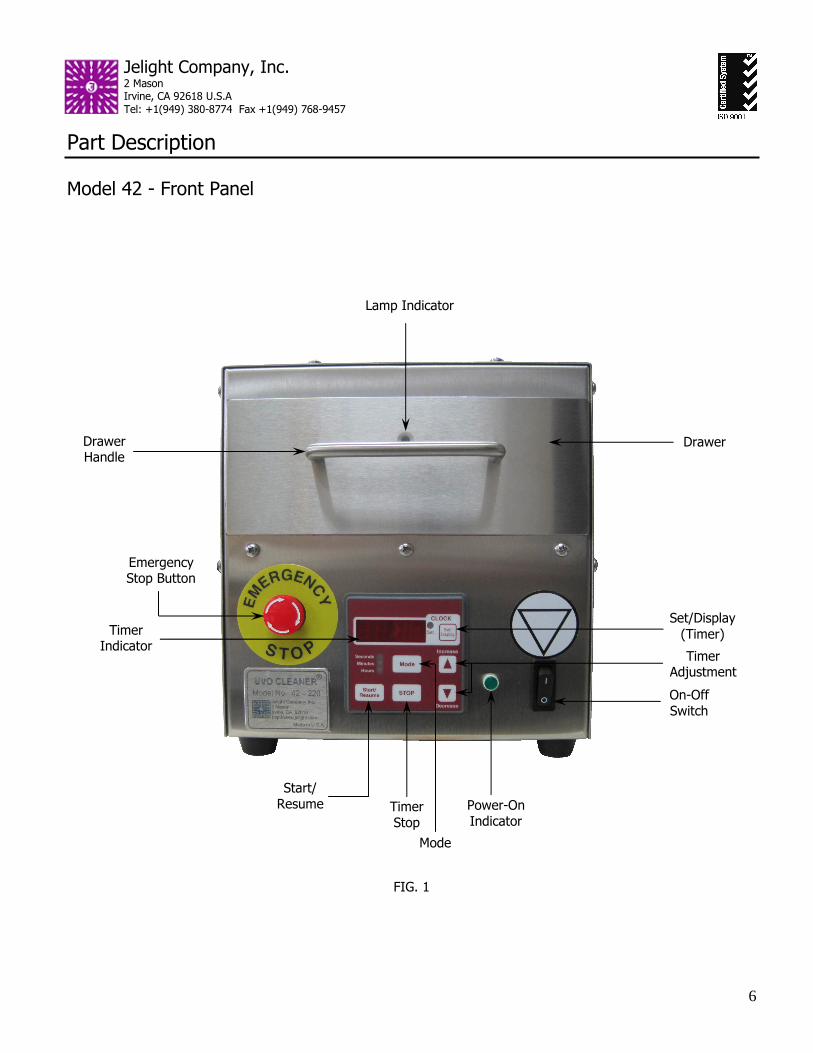
Model 42 - Front Panel
FIG. 1
On-Off Switch
Lamp Indicator
Timer Adjustment
Timer Indicator
Drawer Drawer Handle
Set/Display (Timer)
Power-On Indicator
Timer Stop
Start/ Resume
Mode
Emergency Stop Button

7
Jelight Company, Inc. 2 Mason Irvine, CA 92618 U.S.A Tel: +1(949) 380-8774 Fax +1(949) 768-9457
Part Description (Continued)
Model 42 - Rear Panel
Exhaust Port
Media Inlet Port
Fuse Holder
Media Inlet Port
AC Power Connector
Socket Outlet (Blower)

8
Jelight Company, Inc. 2 Mason Irvine, CA 92618 U.S.A Tel: +1(949) 380-8774 Fax +1(949) 768-9457
Parts Assembly
FIG. 3
1 Case Cover
2 Lamp Cover
3 Lamp Assembly
4 Drawer Interlock Switch
5 Ceramic Feed-Through
6 Exhaust Port
8
9 Base
10 Face Plate
Cleaning Tray
Carrier Guides Elapse Timer/Reset Switch
(Optional Equipment)
11
12 17
7 Support Shelf
Media Inlet Port
Drawer13
14 Cover Interlock Switch
Blower Assembly
(Optional Equipment)
15
Ozone Killer
(Optional Equipment)
16

9
Jelight Company, Inc. 2 Mason Irvine, CA 92618 U.S.A Tel: +1(949) 380-8774 Fax +1(949) 768-9457
System Setup
Refer To Figure 2 and 3 1
2
3 4
Connect Exhaust Port to a suitable exhaust system capable of maintaining negative 0.1 to negative 0.5 inches [2.5mm-12.7mm] of static water pressure while in operation. A 2-inch [50.8mm] diameter flexible metal duct or PVC pipe may be used to attach this unit to the exhaust system. The flow rate of the media should be equal to or less than that of the exhaust in order to maintain a positive flow of the media through the system. Using a greater flow rate of the input media will cause a backpressure in the system forcing the exhaust gases to leak into the operating environment. Alternatively, install optional Blower Assembly and Ozone Killer onto Exhaust Port and install the Blower plug into the Socket Outlet (Blower) at the rear of the machine. Remove the vinyl caps from the Media Inlet Ports located at the rear of the system. Optional: connect the Media Inlet Ports to a media supply. Install Lamp Assembly per Lamp Installation Procedure.
10
Jelight Company, Inc. 2 Mason Irvine, CA 92618 U.S.A Tel: +1(949) 380-8774 Fax +1(949) 768-9457
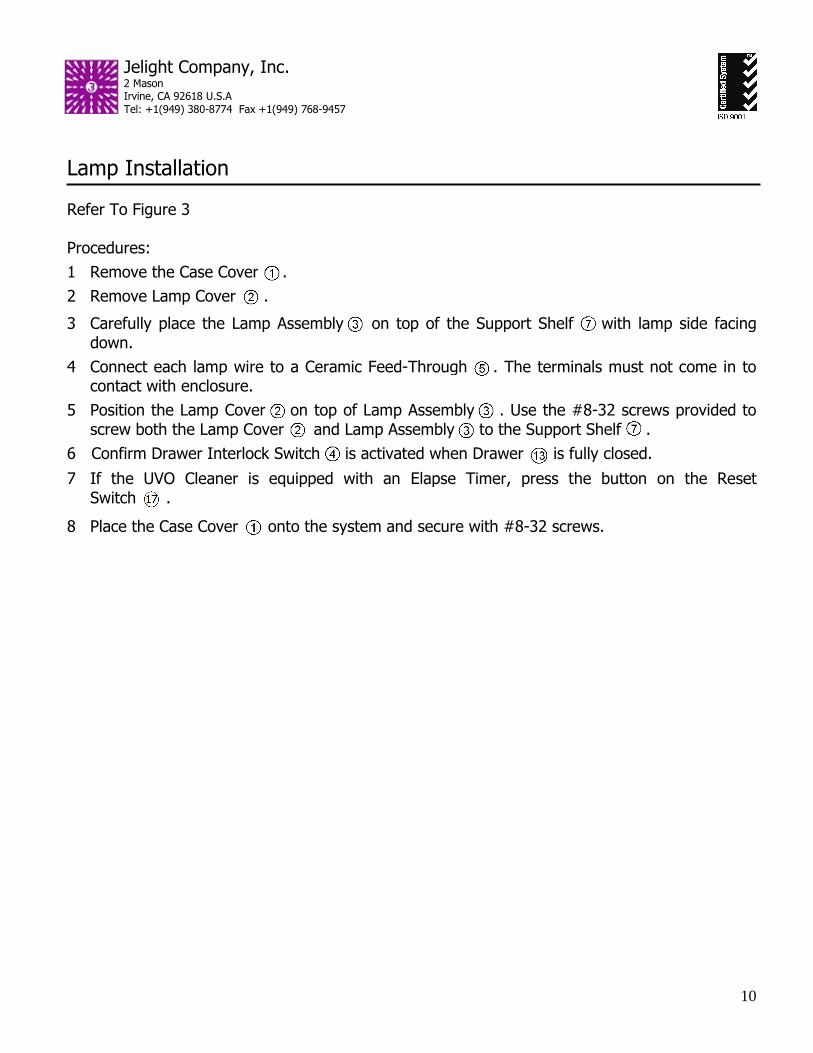
Lamp Installation Refer To Figure 3 Procedures:
1
2
Remove the Case Cover .
Remove Lamp Cover .
3 Carefully place the Lamp Assembly on top of the Support Shelf with lamp side facing down.
4 Connect each lamp wire to a Ceramic Feed-Through . The terminals must not come in to contact with enclosure.
5 Position the Lamp Cover on top of Lamp Assembly . Use the #8-32 screws provided to screw both the Lamp Cover and Lamp Assembly to the Support Shelf .
6 Confirm Drawer Interlock Switch is activated when Drawer is fully closed.
7 If the UVO Cleaner is equipped with an Elapse Timer, press the button on the Reset Switch .
8 Place the Case Cover onto the system and secure with #8-32 screws.

11
Jelight Company, Inc. 2 Mason Irvine, CA 92618 U.S.A Tel: +1(949) 380-8774 Fax +1(949) 768-9457
System Operation WARNING:
• Follow all instructions in System Setup before applying power to the UVO Cleaner®. • In case of emergency, push the emergency stop button on the front panel and unplug the
machine. Do not open the drawer. To restart, twist the emergency button clockwise to reset. Allow the blower to operate for 5 minutes before opening the drawer.
1 Connect the main power cord into the AC Power Connector at the rear of the UVO Cleaner® and to a socket outlet.
2 Switch the ON/OFF button to ON; the green power on indicator will illuminate.
3 Load the substrate on the removable Cleaning Tray. Substrates should be pre-cleaned before processing in the UVO Cleaner®. Removing large amounts of contamination will take long periods of time. Normal cleaning time should be determined through experimentation.
4 Adjust the side thumbscrews on the drawer to set the desired height. The actual height of the tray will vary according to the height of the substrate. For optimum results, the surface of the substrate should be situated approximately 0.20” [5 mm] below the grid lamp.
5 Once the Drawer is closed completely, the Drawer Interlock Switch will engage. If either the Drawer or the Case Cover is removed, the Drawer Interlock mechanism will automatically turn OFF the lamp. This feature prevents operator exposure to harmful UV radiation.
6 To set the cleaning time; press the up/down Timer Adjustment buttons until the desired time is indicated. Push the Start/Resume button to activate the Timer. The Power-On Indicator will illuminate and the UV light will operate.
7 The clock function is also available with this Timer unit. Press the Mode button once to adjust seconds by up/down buttons, press again for minutes and hours.
8 When the cleaning cycle is complete, the Timer will sound an audible signal and automatically turn OFF the UV lamp. Wait a minimum of 5 minutes for the remaining ozone to be removed before opening the Drawer to unload the substrate.
9 The Elapse Timer displays the number of hours the UV Lamp has been in service and should be reset every time the UV Lamp is replaced. To reset the Elapse Timer, refer to the Lamp Installation Procedure.

12
Jelight Company, Inc. 2 Mason Irvine, CA 92618 U.S.A Tel: +1(949) 380-8774 Fax +1(949) 768-9457
Scheduled Maintenance
WARNING:
• This equipment should be serviced by qualified personnel. • Lamps are fragile, handle with care. • Before performing maintenance, the power cord must be unplugged from system. • The low pressure mercury vapor grid lamp inside this equipment emits harmful UV
radiation; avoid exposure at all times. Protect eyes and skin.
UVO-Cleaner® requires minimal maintenance. After every 100 hours of operation, remove the lamp assembly and eliminate particles by applying deionized water, then dry with a clean cloth. Check the intensity of the lamp by using a radiometer and detector. The lamp assembly should be replaced when the intensity is measured at or less than 21 mW/cm² @ 254 nm, with a measuring distance of .12” - .20” [3 - 5 mm] between the lamp and the detector. The lamp assembly should be replaced after 5,000 to 10,000 hours of operation (for detailed instructions on lamp installation, please refer to page 9). Please contact Jelight Company Inc. for pricing and availability of replacement UV lamps, radiometer, detectors, and other components.

13
Jelight Company, Inc. 2 Mason Irvine, CA 92618 U.S.A Tel: +1(949) 380-8774 Fax +1(949) 768-9457
Intensity Measurement Procedure:
1 Allow current cleaning cycle to complete and wait a minimum of 5 minutes for ozone to be removed from the UVO-Cleaner® before proceeding.
2 Turn ON the UVO-Cleaner® and set the cleaning time to 15 minutes.
3 After 5 minutes, press the STOP button and open the Drawer.
4 Open the Drawer and place the Detector in the center of the Cleaning Tray. Set the distance between the top of Detector and the Lamp Assembly to approximately .12 - .20” [3 – 5mm]. Adjust the height of Cleaning Tray by turning the thumb screws on 4 sides.
5 Position the Detector wire against the rubber surrounding the Drawer face plate and carefully close the Drawer (see illustration below). The rubber will compress to allow the Drawer to fully close and engage the Drawer Interlock Switch.
6 Turn ON the Radiometer.
7 Press the START/RESUME button to continue the UVO cleaning cycle.
8 At this time, the intensity reading should continuously increase; wait 5 minutes for the reading to stabilize. Record this measurement.
9 Press the STOP button but continue blower operation for an additional 5 minutes to eliminate excessive ozone before opening the Drawer.
10 Open the Drawer and remove the Detector.
11 The UVO-Cleaner® may now be turned off. Illustration
A Lamp Assembly B Cleaning Tray C Detector D Radiometer E Distance =.12”-.20” (3-5 mm) F Emergency Stop Button
14
Jelight Company, Inc. 2 Mason Irvine, CA 92618 U.S.A Tel: +1(949) 380-8774 Fax +1(949) 768-9457
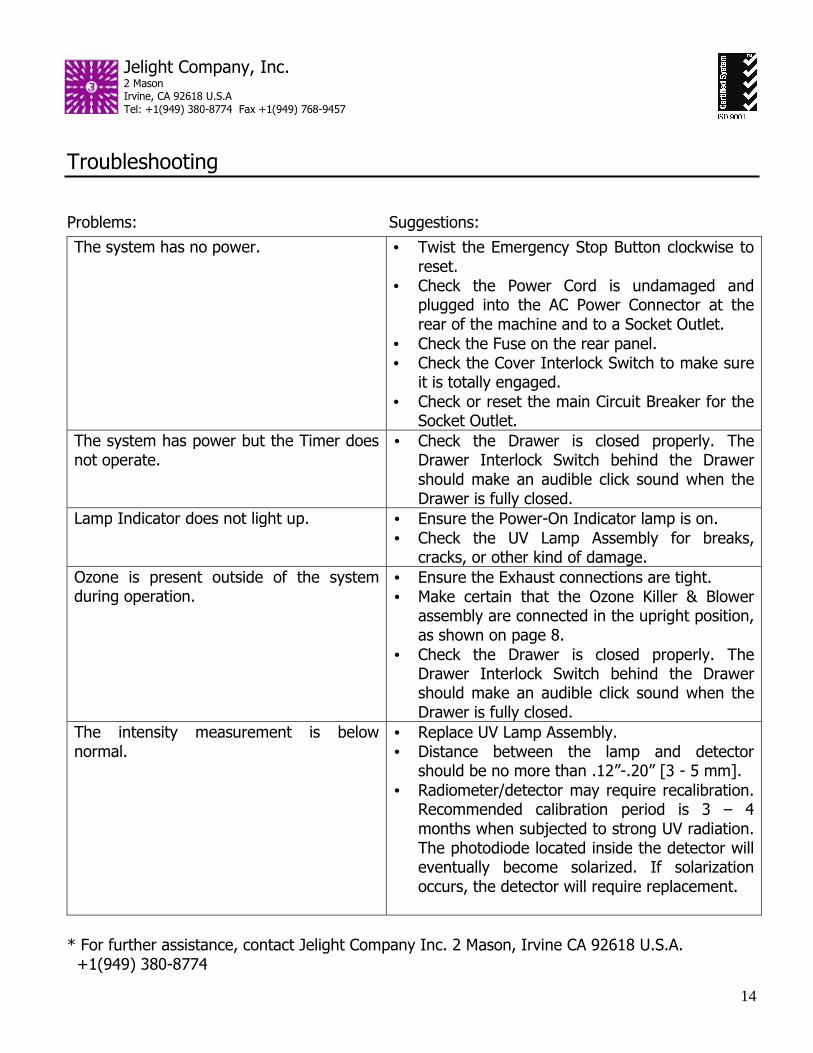
Troubleshooting Problems: Suggestions:
The system has no power. • Twist the Emergency Stop Button clockwise to reset.
• Check the Power Cord is undamaged and plugged into the AC Power Connector at the rear of the machine and to a Socket Outlet.
• Check the Fuse on the rear panel. • Check the Cover Interlock Switch to make sure
it is totally engaged. • Check or reset the main Circuit Breaker for the
Socket Outlet. The system has power but the Timer does not operate.
• Check the Drawer is closed properly. The Drawer Interlock Switch behind the Drawer should make an audible click sound when the Drawer is fully closed.
Lamp Indicator does not light up. • Ensure the Power-On Indicator lamp is on. • Check the UV Lamp Assembly for breaks,
cracks, or other kind of damage. Ozone is present outside of the system during operation.
• Ensure the Exhaust connections are tight. • Make certain that the Ozone Killer & Blower
assembly are connected in the upright position, as shown on page 8.
• Check the Drawer is closed properly. The Drawer Interlock Switch behind the Drawer should make an audible click sound when the Drawer is fully closed.
The intensity measurement is below normal.
• Replace UV Lamp Assembly. • Distance between the lamp and detector
should be no more than .12”-.20” [3 - 5 mm]. • Radiometer/detector may require recalibration.
Recommended calibration period is 3 – 4 months when subjected to strong UV radiation. The photodiode located inside the detector will eventually become solarized. If solarization occurs, the detector will require replacement.
* For further assistance, contact Jelight Company Inc. 2 Mason, Irvine CA 92618 U.S.A. +1(949) 380-8774

15
Jelight Company, Inc. 2 Mason Irvine, CA 92618 U.S.A Tel: +1(949) 380-8774 Fax +1(949) 768-9457
Limited Warranty What does this warranty cover? This warranty covers any defects in materials and workmanship to the original end-user purchaser of this product with the exceptions stated below, provided the Warranty Registration Form has been returned to Jelight Company, Inc. What does this warranty not cover? This warranty does not cover damage or loss of parts incurred in transit, by abuse, misuse or an act of God (such as a flood), modifications (such as the installation and use of non-approved UV Lamps or other components), damage incurred through contact with oils or chemicals other than those specified in this manual when used as directed, any component that has been subject to unusual physical or electrical stress and consumable items (such as fan filters and capacitors). Also, consequential and incidental damages are not recoverable under this warranty. This warranty is non-transferable. What is the period of coverage? This warranty covers non-consumable components for a period of 12 months following the date of purchase, with the following exception: the UV Grid Lamp is not covered within this warranty. What will Jelight Company, Inc. do to correct problems? We will inspect your product and contact you within three days of receipt to advise the results of our inspection. If the product qualifies for warranty repair, Jelight Company, Inc. will elect whether to provide replacement parts and labor free of charge or replace the unit. If the product does not qualify for warranty repair, Jelight Company, Inc. will provide an estimate of the parts, labor and shipping charges required to complete the repair and return the product. If you authorize repairs, Jelight Company, Inc. will fix the product and return it within 21 days. How can you get warranty service? Contact Jelight Company, Inc. at the telephone number above for technical support and provide contact details, product name, serial number and date of purchase. If field repair is not possible, a Return Material Authorization (RMA) Number will be issued. This RMA number must be indicated on all shipping labels, documentation and communications relating to this repair. Send the product to: Jelight Company, Inc. 2 Mason Irvine, CA 92618 How will state law affect your customer's rights under the warranty? This warranty gives you specific legal rights, and you may also have other rights which vary from state to state.

16
Jelight Company, Inc. 2 Mason Irvine, CA 92618 U.S.A Tel: +1(949) 380-8774 Fax +1(949) 768-9457
Record your product information Please record the information below and retain this for warranty service.
Date of Purchase
Model
Serial Number
Disclaimer: Jelight Company Inc. warrants only that a product will conform to its physical descriptions, makes no other warranties and expressly disclaims any implied warranty of fitness for a particular reason. It is the responsibility of the purchaser to determine the suitability of the product for any purpose. All information provided by Jelight Company, Inc. is in good faith and when offered by another manufacturer or source is done so in good faith. In the event a warranty is offered by another manufacturer of goods or services, such warranty will convey from that manufacturer. Jelight Company Inc. reserves the right to modify or discontinue this product at any time. All texts, graphics and logos in this manual are for guidance purposes and may be changed without notice. Jelight Company Inc. reserves the right to amend all or some of these terms and conditions at any time. Jelight Company Inc. declines all liability in the matter, as well as all responsibility for the accuracy, timeliness and/or completeness of the information contained, and for any use made of the information provided. Jelight Company Inc. assumes no obligation to update the data provided or to correct any errors. No rights may be relied from the information provided. Jelight Company Inc. and/or its rightful claimants, retains all rights (including copyright, trade mark and patent rights) in the material presented in this manual. No form of license is granted to the information. In particular, reproduction or making the content of this manual available to others in any form is strictly prohibited without prior written permission from Jelight Company Inc. Any unauthorized reproduction of art work is subject to legal action; and is protected by Federal, State and Local law. In no event shall Jelight Company Inc. be responsible for particular, minor or significant damage, directly or indirectly, whether the claim is in contract, negligence or otherwise (including but not limited to, any interruption of service, loss of business, anticipated profit, or other consequential damages arising out of the use or inability to use this product or from any defect or omission in the manual, or other related items). In no event shall the liability of Jelight Company, Inc. exceed the purchase price of the product. These terms and disclaimer shall be governed by and interpreted in accordance with the laws of the United States.
*UVO-Cleaner® is a registered trademark of Jelight Company, Inc.
© Copyright 2010 Jelight Company, Inc. 2 Mason Irvine, CA 92618 USA

17
Jelight Company, Inc. 2 Mason Irvine, CA 92618 U.S.A Tel: +1(949) 380-8774 Fax +1(949) 768-9457
Warranty Registration Form Registration entitles you to product support and notification of product upgrades and enhancements. We do not sell your name to third party mailing list companies. Information you provide is for the exclusive use of Jelight Company, Inc. Please complete and return this form by surface mail to Jelight Company Inc. Alternatively, you may e-mail this information to: [email protected]
Name
Title
Company
Telephone
Street Address
City
State / Province
Zip / Postal Code
Country
Date of Purchase
Model
Serial Number