mndrain on-line manual - university of...
TRANSCRIPT

Mndrain on-line manual
Purpose of Mndrain●
System requirements for Mndrain●
Security setting in Excel●
Downloading the Mndrain code●
Starting The Mndrian code●
The Main MnDrain Page●
Updating material properties●
Running the Mndrain codeOpening a Scenario Page❍
The Scenario Page❍
Close The Scenario Page❍
Reset base conditions❍
Setting up geometry❍
Choosing material properties❍
The run sequenceThe Run Page1. Preparing the input2. Looking at the mesh3. Running the drain calculation4. Working with the results5. Closing the Run Page6.
❍
●
Check Operation of Code●
Problems or Comments ContactV.R. Voller at [email protected]
mn-drian manual
file:///C|/WINDOWS/DESKTOP/DRAINPRO/MANUAL/index.html [2/12/2003 5:51:12 PM]

Mndrain Purpose
Purpose and ObjectiveMndrain is a suite of codes, embedded in a Microsoft Excel windows environment,directed at the evaluation of the effectiveness of edge drains.
The objective of Mndrain is to provide a user friendly environment in which theconsequences of an edge drain design decision can be investigated. Mndrain should beregarded primarily as tool for assessment of design decisions as opposed to a tool thatexplicitly provide design decisions.
BackgroundEdge drains consist of pipes that run along the length of a road. The pipes are placed in ahigh permeability gravel trench below the shoulder/road surface, see schematic
The objective of the edge drain is to remove moisture from the granular base of the roadsystem. The rate at which moisture is removed will depend on the geometry and materialsused in the base and soil type in the sub-grade. The FHWA defines the quality of drainageobtained based on how long an edge drain will take to reduce an initially saturated (100%moisture) base down to a moisture level of 85%, see Table
purpose
file:///C|/WINDOWS/DESKTOP/DRAINPRO/MANUAL/purpose.html (1 of 3) [2/12/2003 5:51:16 PM]

In the Mndrain code users canChoose from 3 basic scenarios
An initially saturated base, drain trench, and edge drain on a permeablesub-grade with an adjustable water table height.
.
An initially saturated base on a permeable sub-grade with an adjustable watertable height. NO drain or drain trench is present.
b.
An initially saturated base and fouled edge drain on a permeable sub-gradewith an adjustable water table height. This case accounts for the drain trenchBUT does not allow water to enter the drain pipe.
c.
1.
Select material types and adjust geometries for each scenario2. Calculate the moisture removal vs. time curve over a two-hour drainage time.3.
The numerical engine that sits at the heart of Mndrain is a Control Volume Finite Element(CVFE) solution of the Richard equation
for variably saturated flow in a porous media. It is noted that commercial codes areavailable for this type of calculation. In particular
Hydrus 2D goto http://www.ussl.ars.usda.gov/models/hydrus2d.htm and
SEEP/W goto http://www.geo-slope.com/products/seepw.asp
among others, have been successfully used to simulate edge drain performance.
There are however two distinct advantages offered by the development of the Mndraincode
The commercial codes are primarily intended as multi-purpose research tools andthey include many sophisticated features which are not required in an evaluation ofan edge drain performance. As a result there is a steep learning curve required tomaster the operation of these codes. Such codes are ideal for use in a centralresearch facility but are less than ideal for distribution among field engineers. Incontrast the Mndrain code only has one feature, the ability to solve unsaturatedflow in layered media. This lack of general utility allows for a well-focused user
1.
purpose
file:///C|/WINDOWS/DESKTOP/DRAINPRO/MANUAL/purpose.html (2 of 3) [2/12/2003 5:51:16 PM]

interface that promotes rapid acquisition of the skills required to run the code. Theability to learn the code operation rapidly is enhanced by the fact that the code isembedded in a Microsoft Excel interface, a tool that is well used and familiar to alarge section of the engineering community.The code in Mndrain is freeware. This means that all of the source software isfreely available. Hence can be readily reconfigured do that further applications canbe readily achieved
2.
BACK to help index
purpose
file:///C|/WINDOWS/DESKTOP/DRAINPRO/MANUAL/purpose.html (3 of 3) [2/12/2003 5:51:16 PM]

System RequirementsSystem Requirements
A windows based personal computer running windows 98 or higher●
A copy of Microsoft Excel 2000 or higher must be installed●
NOTE:A current installed copy of Netscape or Explorer is helpful BUT not required.
●
BACK to help Index
system requirments
file:///C|/WINDOWS/DESKTOP/DRAINPRO/MANUAL/system.html [2/12/2003 5:51:22 PM]

Security Setting in ExcelThe Excel software on the machine where Mndrain will run needs to be set up to allow theuser to enable macros. In some setups of Excel a high security setting is in place and allmacros embedded in a given Excel file are automatically disenabled. To run Mndrain theExcel security needs to be set to medium. This is done with the following 5 steps
Open Ecell on your machine1. Choose Tools-Macro-Security2.
security
file:///C|/WINDOWS/DESKTOP/DRAINPRO/MANUAL/security.html (1 of 2) [2/12/2003 5:51:26 PM]

Make sure security setting is Medium3.
Press the OK button in the above Dialog4. Exit from Excel5.
BACK to Help Index
security
file:///C|/WINDOWS/DESKTOP/DRAINPRO/MANUAL/security.html (2 of 2) [2/12/2003 5:51:26 PM]

Downloading MndrainThe Mndrain code is available as a self extracting executable file athttp://www.ce.umn.edu/~voller/voller_research/task5/mndrainrequest.html
To get this codeGo to http://www.ce.umn.edu/~voller/voller_research/task5/mndrainrequest.html1.
In this page find the link to the Mndrain executable code--2.
Double click on this link and save the file to the desktop of your windows basedcomputer
3.
After the save. Find the icon
on the desktop of your windows machine
4.
download
file:///C|/WINDOWS/DESKTOP/DRAINPRO/MANUAL/download.html (1 of 3) [2/12/2003 5:51:31 PM]

Double clicking on this icon will open up an un-zip dialog box
Unzip the files. DO NOT change the default drive from c:\The unzip operation will create the windows directory
c:\mndrain
This directory and its sub-directories will contain all the implementation anddocumentation files for using Mndrain.
5.
After completion of the unzip operation look for the icon
on your desktop.DOUBLE CLICKING THIS ICON WILL START THE MNDRAIN CODE
6.
download
file:///C|/WINDOWS/DESKTOP/DRAINPRO/MANUAL/download.html (2 of 3) [2/12/2003 5:51:31 PM]

NOTE
THERE IS NO NEED TO MODIFY ANY FILE IN THE DIRECTORY c:\mndrainThe running of the Mndrain code SHOULD ALWAYs be initiated by clicking thedesktop icon
1.
If you wish, after the files are unziped, you can delete the program
from your desktop OR move it to another directory in your computer.
2.
BACK to Help Index
download
file:///C|/WINDOWS/DESKTOP/DRAINPRO/MANUAL/download.html (3 of 3) [2/12/2003 5:51:31 PM]

Starting Mndrain
After completion of the unzip operation The icon
should be on your desktop.
1.
DOUBLE CLICKING THIS ICON WILL START THE MNDRAIN CODE2. This will open up a Microft Excel File--- master.xls--3.
You should see the following dailog box
You MUST HIT the Enable Macros Button to be able to run Mndrain
4.
If the above Enable Macro Dialog DOES NOT APPEAR then you need to change thesecurity setting in your copy of Excel
Exit from Excel by closing the window❍
Follow the security setting instructions in the Mndrain on-line help manual.❍
When a medium security level has been set in Excel repeat the above openinstructions.
❍
5.
BACK to Help Index
start Mndrain
file:///C|/WINDOWS/DESKTOP/DRAINPRO/MANUAL/open.html [2/12/2003 5:51:35 PM]

The Main Mndrain PageWhen the Mndrain code has been successfully opened the user will be located on the Main Mndrain Page.
On this page the user canIf a web connection is active update material data from a remote database1. Choose a particular simulation scenario to investigate.2. Close the application3.
These functions are examined in subsequent help pages.
BACK to Help Index
main page
file:///C|/WINDOWS/DESKTOP/DRAINPRO/MANUAL/start2.html [2/12/2003 5:51:40 PM]

Updating Material PropertiesAppropriate material properties are hard coded into the Mndrain software.These properties are stored in an Excel sheet that is hidden from the user. In addition amaster table of material properties is stored on the secure web sitehttp://www.ce.umn.edu/~voller/voller_research/task6/database_m.htmIt is expected that as more information become available the material data in this masterlist will be updated.If the user is running Mndrain on a computer connected to the world wide web thenclicking the button
found on the Main Mndrain Page, will update the data stored in the local Excel sheet.
Detailed Information on Material PropertiesTo carry out an unsaturated flow calculation (i) a relationship between the hydraulicconductivity and pressure or moisture content and (ii) a relationship between the pressureand the moisture content is required. In the current version of Mndrain the BrookesCorey relationships
are used, where
material update
file:///C|/WINDOWS/DESKTOP/DRAINPRO/MANUAL/update.html (1 of 2) [2/12/2003 5:51:52 PM]

The current (as of 25th October, 2002) material properties used in these equations are
NOTEIt would be possible to modify the Mndrain code so that other material relationshipsor tabular data can be used in place of Brookes Corey.
1.
The definition of the moisture-pressure relationship assumes a small compressibilityof the liquid in the saturated region, h > hd. This step allows for an accurate andsmooth transition between the saturated and unsaturated zones.
2.
The current data for the Granular materials is chosen to be representative of therange that might be expected. Specific values for a given granular base still need tobe defined.
3.
The current data for the sub-base is taken from the Hydrus-2D data base.4.
BACK to Help Index
material update
file:///C|/WINDOWS/DESKTOP/DRAINPRO/MANUAL/update.html (2 of 2) [2/12/2003 5:51:52 PM]
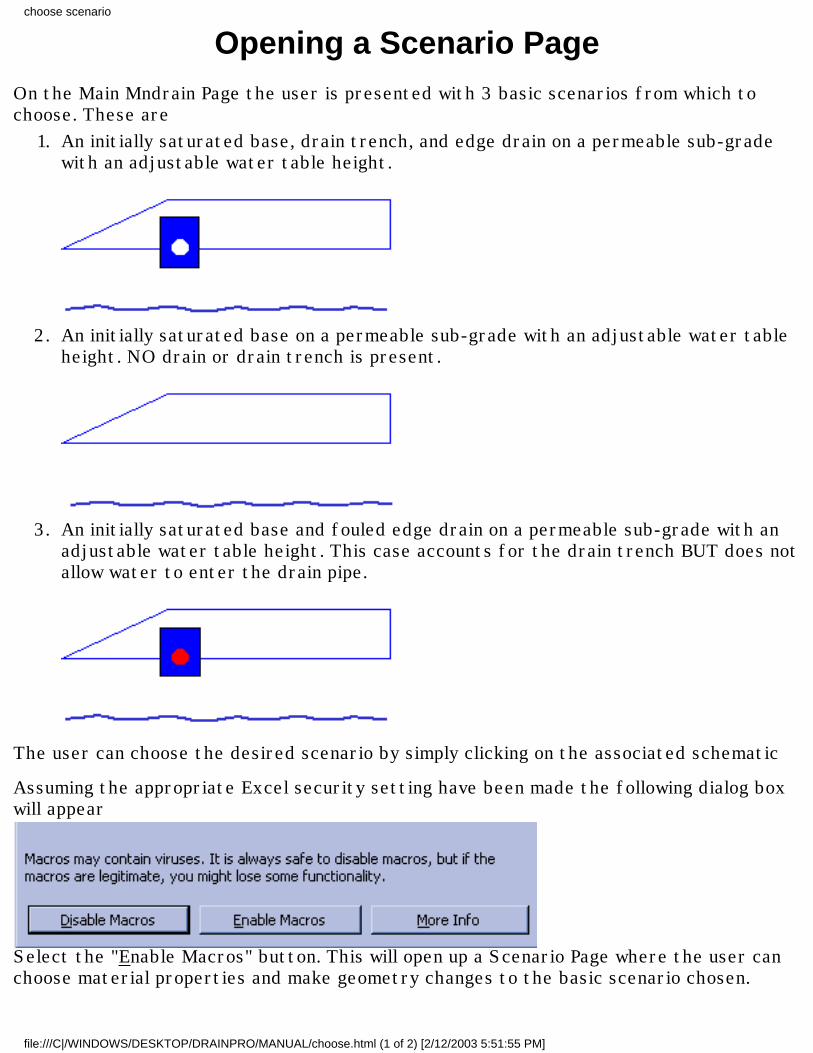
Opening a Scenario PageOn the Main Mndrain Page the user is presented with 3 basic scenarios from which tochoose. These are
An initially saturated base, drain trench, and edge drain on a permeable sub-gradewith an adjustable water table height.
1.
An initially saturated base on a permeable sub-grade with an adjustable water tableheight. NO drain or drain trench is present.
2.
An initially saturated base and fouled edge drain on a permeable sub-grade with anadjustable water table height. This case accounts for the drain trench BUT does notallow water to enter the drain pipe.
3.
The user can choose the desired scenario by simply clicking on the associated schematic
Assuming the appropriate Excel security setting have been made the following dialog boxwill appear
Select the "Enable Macros" button. This will open up a Scenario Page where the user canchoose material properties and make geometry changes to the basic scenario chosen.
choose scenario
file:///C|/WINDOWS/DESKTOP/DRAINPRO/MANUAL/choose.html (1 of 2) [2/12/2003 5:51:55 PM]

If the above Enable Macro Dialog DOES NOT APPEAR then you need to change thesecurity setting in your copy of Excel
Exit from Excel by closing the window●
Follow the security setting instructions in the Mndrain on-line help manual.●
When a medium security level has been set in Excel repeat the above choosescenario instructions.
●
BACK to Help Index
choose scenario
file:///C|/WINDOWS/DESKTOP/DRAINPRO/MANUAL/choose.html (2 of 2) [2/12/2003 5:51:55 PM]

The Scenario PageA successful open of the Scenario Page will give
On this page the user can set material properties and geometry.If a new run is to be undertaken the first task is to RESET the dataSee next help page for details.
BACK to Help Index
scenario page
file:///C|/WINDOWS/DESKTOP/DRAINPRO/MANUAL/scpage.html [2/12/2003 5:51:59 PM]
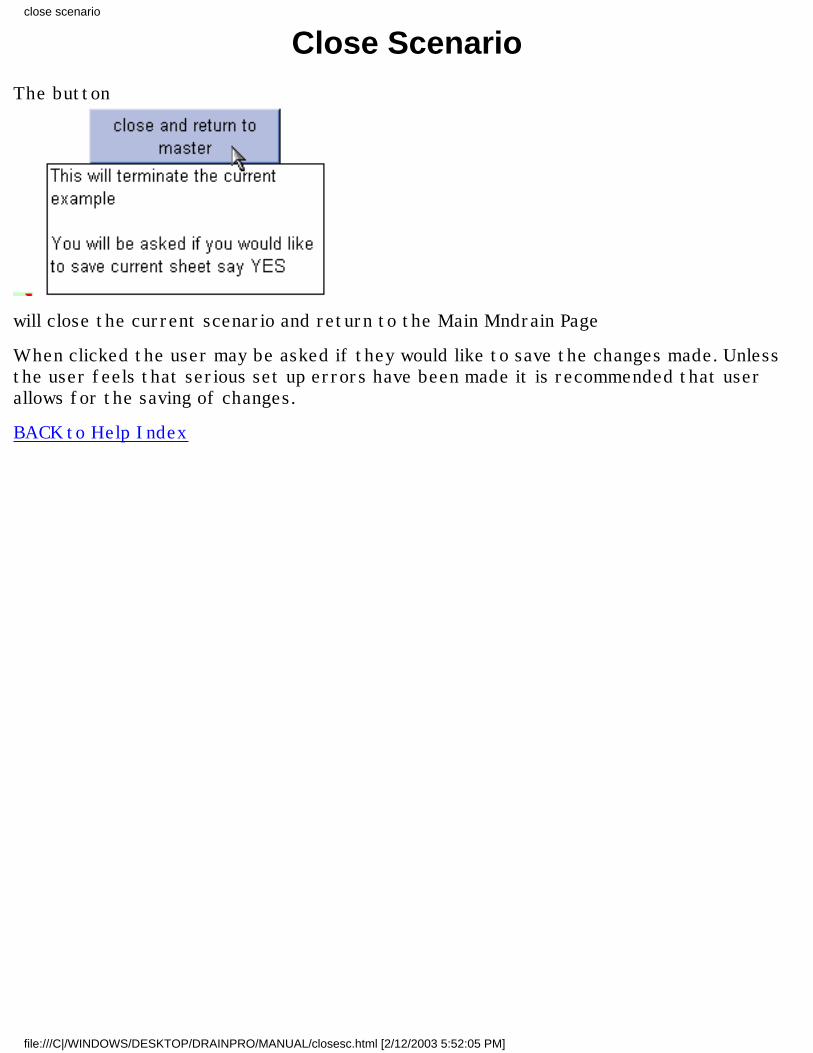
Close ScenarioThe button
will close the current scenario and return to the Main Mndrain Page
When clicked the user may be asked if they would like to save the changes made. Unlessthe user feels that serious set up errors have been made it is recommended that userallows for the saving of changes.
BACK to Help Index
close scenario
file:///C|/WINDOWS/DESKTOP/DRAINPRO/MANUAL/closesc.html [2/12/2003 5:52:05 PM]

Reset PropertiesWhen you arrive at the Scenario Page If you are starting a brand new run then it is a goodidea to reset the the material and geometry data to the base case setting. This is done byfinding and clicking the button
Failure to do this may mean that incorrect data will be used in subsequent runs.
In some cases you may be returning to a previously saved run and wish to continueinputting data. In such cases the "reset button" does not need to be activated.
Note: The "reset button" Can also be used as a "start over button" in cases where theuser is encountering errors in setting up a given run.
BACK to Help Index
reset
file:///C|/WINDOWS/DESKTOP/DRAINPRO/MANUAL/reset.html [2/12/2003 5:52:08 PM]

Setting up geometryThe opening page of a given scenario includes a representative image of the geometry and a table giving thex,z positions of key points on that geometry
The geometry is changed by overwriting the x,z coordinates in the table that correspond to the points in theimage identified by uppercase letters.The user can also change the simulation time.
NOTEThe first point should always be the origin (0,0). All other points are positioned relative to this location.●
Length measurements are in cm and time in seconds●
The onus is placed on the user to ensure that the revised geometry fits the morphology shown in theimage (i.e., The relative location of one point to another MUST remain the same). The image on the pagewill NOT update as the points are modified. There is, however, a place later on in the setup where theuser can get a visual check on the geometry.
●
It is also left to the user to ensure that the drain location is in the trench.●
The finite element gridding will break down if the drain is "too-close" (less that two radii distances)from the edge of the trench.
●
BACK to Help Index
set up geometry
file:///C|/WINDOWS/DESKTOP/DRAINPRO/MANUAL/setupgeo.html [2/12/2003 5:52:15 PM]

Choosing material propertiesThe opening page of a given scenario includes a representative image of the geometry.This image has up to three (3) material identified on it and may also include a water tableposition
The user can select the material type for each of the identified material regions and theposition of the water table by making a selection form the scrolling menus.
Note:The selection of a given material type will provide a pointer to the correspondingposition in the material property data base.
●
A selection of Impermeable for the sub-grade will effectively result in a no flowcondition along the bottom of the granular layer.
●
The selections for the water table height are "low" (1 meter below origin), "medium"(50cm below origin) and "high" (25 cm below origin).
●
In the case of "high" water table setting the user should ensure that there is atleast a 5 cm gap between the bottom of the trench and the water table.
●
BACK to Help Index
setup materials
file:///C|/WINDOWS/DESKTOP/DRAINPRO/MANUAL/setupmat.html [2/12/2003 5:52:19 PM]

The Run Page
After the geometry and materialproperties have been set in the ScenarioPage Clicking the button, on the right, willlead the user to the Run Page where theprograms that make up Mndrain are run.
This page consists of the following set ofbuttons
IN EVERYcase these buttonsMUST be clickedin the order shown to runthe Mndrain code.
The Function of these buttons isdescribed in the next set of help pages
BACK to Help Index
run page
file:///C|/WINDOWS/DESKTOP/DRAINPRO/MANUAL/runpage.html [2/12/2003 5:52:25 PM]

Preparing the InputThe First button on the Run Page
Is used toCreate the Finite Element Grid for the programs1. Set up the input data for the Mndrain programs2.
When this button is clicked Two Programs are run
The first program is an external DOS program for creating the finite element mesh based on thegeometry data provided by the user. This program is a compiled version of the public domainsoftware easymesh see the web sitehttp://www.dinma.univ.triests.it/~nirftc/research/easymeshfor deatils.
In order to run the easymesh code the user has to authorize the running of an external applicationfrom the open Excel page
This action will open up a DOS window on the computer----
see next page---
prepare input
file:///C|/WINDOWS/DESKTOP/DRAINPRO/MANUAL/prepare.html (1 of 2) [2/12/2003 5:52:28 PM]

This window will remain on the screen until the easymesh program has finished running ~ 1 minute.
When easymesh is finished the user will be asked to OK the external running of the program regrid
This program, written as part of Mndrain, reformats the output from easymesh in a form suitablefor the Mndrain programs. The program also runs in a Dos Window. On completion The user can takethe option of looking at the domain geometry and grid. See the next help page.
BACK to Help Index
prepare input
file:///C|/WINDOWS/DESKTOP/DRAINPRO/MANUAL/prepare.html (2 of 2) [2/12/2003 5:52:28 PM]

Looking at the MeshThe Second button on the Run Page
Is used to look at the mesh. Clicking this button. AFTER the first button on the Run Page has been clickedand the associated programs run, will provide a plot of the current drain geometry and mesh, e.g.,
It is always recommended that user looks at the mesh. This is an excellent place to check that a consistentgeometry has been applied.
If the geometry looks wrong the user has the option at this point to return to the Scenario Page
Note the "Return to User" Button in the mesh plot will return the user to the Run Page
BACK to Help Index
look at mesh
file:///C|/WINDOWS/DESKTOP/DRAINPRO/MANUAL/look.html [2/12/2003 5:52:32 PM]

Running the drain calculationThe Third button on the Run Page
Is used to run the drainage calculation. Clicking this button will request the user to authorize theexternal running of the drainage program
When authorised a DOS window will open in which the drain program will run
The columns in this output are explained on the next page
run drain
file:///C|/WINDOWS/DESKTOP/DRAINPRO/MANUAL/rundrain.html (1 of 2) [2/12/2003 5:52:38 PM]

Column 1: Is Time in seconds1. Column 2: Degree of Saturation(Volume of Moisture in Granualr Base/Pore Volume in Granular Base)
2.
Column 3:Total Moisture (cm^2) in the granular base at the given time.3. Column 4:Convergence. A measure of the mass error. A value of 10-4 is very good. Values of10-3 are acceptable provided they do not prevail for too many time steps.
4.
For a two hour simulation time the drain program will take about 2 minutes to run.At the end of the operation the program will signify successful completion and pause until the userhits a key
At this point the data has been stored and as detailed in the next help page the user caninterrogate this data using standard Excel methods.
BACK to Help Index
run drain
file:///C|/WINDOWS/DESKTOP/DRAINPRO/MANUAL/rundrain.html (2 of 2) [2/12/2003 5:52:38 PM]

Working with the resultsThe Fourth button on the Run Page
is used to look at the results. Clicking this button will take the user to an Excel page whichcontains a graph and output.
The graph of Saturation vs. time includes the 85% cut off.
The data for the graph and additionl data is also tabulated on this page.The three additional data columns are:
The amount (cm2) of moisture in the garnualr base at a given time1. The amount (cm2) of moisture entering the drain pipe in the current time step2. The amount (cm2) of moisture entering the subbase (subgrade) in the current timestep
3.
In a study to compare different designs it is recommended that, using basic MicrosoftExcel features, this data is "cut" and "pasted" into an Excel spread sheet under thecontrol of the user.The user is RESPONSIBLE for saving the data generated.
Note the results page contains button toTake the user back to the Run Page ("Return to User")●
Take the user back to the Scenario Setup Page ("Return to Data Input")●
BACK to Help Index
results
file:///C|/WINDOWS/DESKTOP/DRAINPRO/MANUAL/results.html [2/12/2003 5:52:44 PM]

Closing the Run Page
The Fifth and Sixth buttons on the Run Page
are used toReturn to the Scenario page("Return to Data Input")where the material properties and geometry for a new run can be set up
●
Or close the current Scenario and return to the Main Page("close and return to master")where a new scenario can be chosen. Note the user will be asked if they would like to save.
●
To close the entire program the user needs to return to the Main Page
and click the "Close Mndrain" ButtonThis will return the user to the desktop. It is recommended that the user OK's any save request that are madeduring this operation. ---------- BACK to Help Index
close run page
file:///C|/WINDOWS/DESKTOP/DRAINPRO/MANUAL/close2.html [2/12/2003 5:52:55 PM]

Checking ImplementationThe downloading and operation of Mndrain can be checked by running each one of thethree scenarios with its base settings and then comparing the drainage predicted(Saturation vs. Time) with the data given on the following pages.
REMEMBER: The Reset Button must be used before each run is set up
Check
file:///C|/WINDOWS/DESKTOP/DRAINPRO/MANUAL/basecase.html (1 of 5) [2/12/2003 5:53:00 PM]
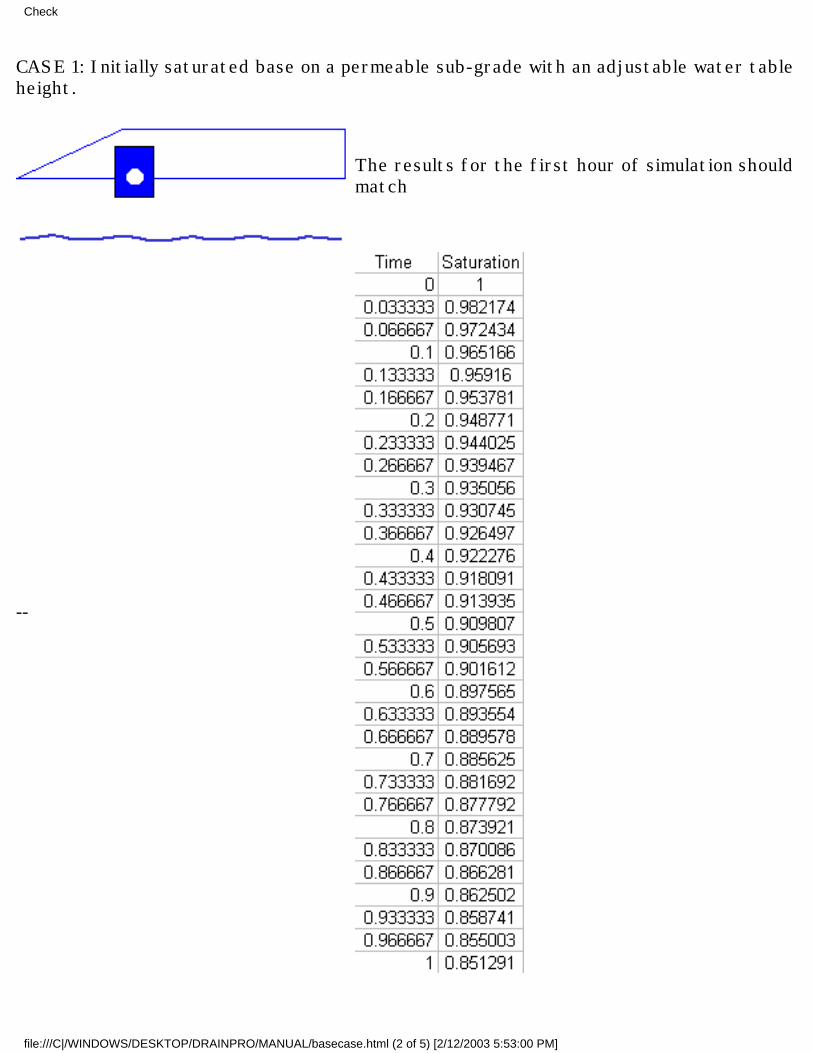
CASE 1: Initially saturated base on a permeable sub-grade with an adjustable water tableheight.
The results for the first hour of simulation shouldmatch
--
Check
file:///C|/WINDOWS/DESKTOP/DRAINPRO/MANUAL/basecase.html (2 of 5) [2/12/2003 5:53:00 PM]

CASE 2: Initially saturated base on a permeable sub-grade with an adjustable water tableheight. NO drain or drain trench is present.
The results for the first hour of simulation shouldmatch
--
Check
file:///C|/WINDOWS/DESKTOP/DRAINPRO/MANUAL/basecase.html (3 of 5) [2/12/2003 5:53:00 PM]

CASE 3: Initially saturated base and fouled edge drain on a permeable sub-grade with anadjustable water table height.
The results for the first hour of simulation shouldmatch
--
Check
file:///C|/WINDOWS/DESKTOP/DRAINPRO/MANUAL/basecase.html (4 of 5) [2/12/2003 5:53:00 PM]

A graph of the above three runs, through two hours, is
BACK to Help Index
Check
file:///C|/WINDOWS/DESKTOP/DRAINPRO/MANUAL/basecase.html (5 of 5) [2/12/2003 5:53:00 PM]