mirage cordlesscellular fabricshade - blindsaver · attach the handle to the bottom rail as...
TRANSCRIPT
owner's handbook
MirageCordlessCellular
FabricShade
español página 7

MirageCordlessCellular
FabricShade
3
INSTALLATION INSTRUCTIONS
Step 1. Check Package ContentsMissing part? Call 1-800-264-1190
Mounting hardware kit includes the following:
Part Quantity
Mounting Bracket 2 (for shades up to 38” wide) 3 (for shades 38” to 48” wide) 4 (for shades 49” – 72” wide) 6 (for shades 73” – 96” wide)
11/8” Screws 2 per bracket
Hold Down Brackets 2
3/8” Screws for Hold Downs 4
Handle for Bottom Rail 1 (for shades up to 59” wide) 2 (for shades 60” to 96” wide)
Note: one extra screw of each noted size is included for convenience
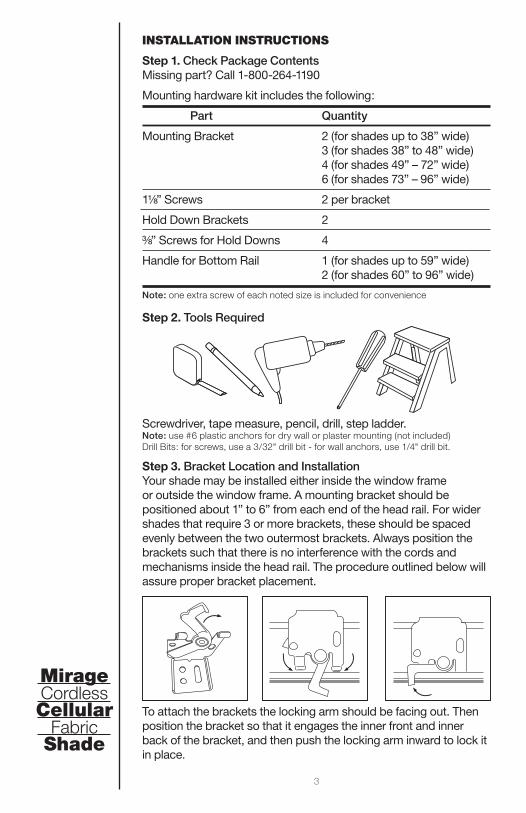
Step 2. Tools Required
Screwdriver, tape measure, pencil, drill, step ladder. Note: use #6 plastic anchors for dry wall or plaster mounting (not included)Drill Bits: for screws, use a 3/32" drill bit - for wall anchors, use 1/4" drill bit.
Step 3. Bracket Location and InstallationYour shade may be installed either inside the window frame or outside the window frame. A mounting bracket should be positioned about 1” to 6” from each end of the head rail. For wider shades that require 3 or more brackets, these should be spaced evenly between the two outermost brackets. Always position the brackets such that there is no interference with the cords and mechanisms inside the head rail. The procedure outlined below will assure proper bracket placement.
To attach the brackets the locking arm should be facing out. Then position the bracket so that it engages the inner front and inner back of the bracket, and then push the locking arm inward to lock it in place.

4
For Outside Mounting:Attach the brackets to the head rail as described above. Hold the shade level at the height desired and center it over the window opening. Mark the exact location of each bracket with a pencil. Remove the brackets from the head rail and position the top of each bracket at the marked location and screw each bracket into the wall or window molding using the 11/8” screws, pre-drill the screw holes using a 5/64” drill bit.
For Inside Mounting:Clip the brackets onto the head rail as described above. Hold the shade in place and make a pencil mark at the rear of each bracket where it contacts the inside of the window frame.
Remove the brackets from the head rail and align them with the marks. Attach each bracket using the 11/8” screws, pre-drill the screw holes using a 5/64” drill bit.
Step 4. Securing the Head RailPlace the head rail on the brackets as described in Step 3 above, and lock in place. Check carefully to assure that each bracket is properly secured.
Step 5. Attach Handle / How to OperateAttach the Handle to the bottom rail as illustrated. The handle is designed to minimize contact with the shade fabric. Always raise and lower the shade SLOWLY(!) to assure that the pleated fabric stacks neatly. Wider shades have (2) Handles – to precisely determine the correct position for each handle, divide the total width of the shade by 4, and then attach one handle that distance from each outside edge of the shade – always grasp both handles when lifting and lowering the shade
To lower the shade: grip the bottom-rail/handle(s) and slowly pull straight down. To raise the shade: put your hand(s) under the bottom rail (palm facing up) and lift slowly until the desired height is reached.
MirageCordlessCellular
FabricShade
5
To maintain optimal performance of the springs which make your cordless shade function, lift and lower your shade slowly through its full range of motion every day if possible.
If you have trouble lifting your cordless shade:If the shade is left in one position for a long period of time, it might be necessary to lift and lower the shade several times to reset the springs and restore normal function.
Cleaning your ShadesThe head rail and bottom rail can be wiped clean with a damp sponge.
To clean the shade fabric, use a feather duster or vacuum lightly using the soft brush attachment.
6
Replacement PartsIn the event that replacement parts are ever needed, you may call: 1-800-264-1190Please be sure to provide the following information, if possible:• The complete model or catalog number of your product• A description of the product• A description of the part needed
LIMITED LIFETIME WARRANTYThe enclosed product is warranted to the original residential retail purchaser as long as the product remains in the original windowCovered:Lifetime: Entire product against manufacturing defects (i.e. a flaw in the product design, materials, or workmanship that causes the product to no longer function) 5 years: All fabricNot Covered:Normal Wear and Tear Any product that fails due to: • abuse • exposure to salt air • improper installation • accident • extraordinary use • improper operation • alterations • improper cleaning • misapplication • damage from pests/insects/pets • improper handling • misuseCosts associated with: • product removal • transportation to and from the retailer • brand label removal • product re-measure • incidental or consequential damages • product reinstallation • shipping In the event there are multiple blinds/shades in the same room, only the defective blind/shade will be replaced.To Report Shipping Damage: If damage occurred during shipping, call place of purchase and report within 7 calendar days or else you may be denied credit for your damaged product.To Obtain Service: If you suspect this product has a manufacturing defect in materials or workmanship: 1. Locate the sales receipt 2. Call place of purchase. Any unauthorized returns will not be accepted.Warranty Remedy: THIS SHALL BE YOUR SOLE REMEDY UNDER THIS LIMITED WARRANTY. If this product is found to have a manufacturing defect in materials or workmanship, we will (at our discretion) do one of the following: • repair the product • replace the product • refund the cost of the product Colors vary from lot to lot and may not exactly match sample swatch or previous purchases. Discontinued items or color selections will be replaced with the closest equivalent current product.YOUR RIGHTS UNDER STATE LAW:This lifetime limited warranty gives you specific legal rights, and you may have other rights, which vary from state to state. Some states do not allow limitations on how long a warranty lasts, so the above limitations may not apply to you. No agent, representative, dealer, or unauthorized employee has the authority to increase or alter the obligation of this warranty. This lifetime limited warranty supersedes any previous versions.
For all questions, please call (800) 264-1190 Hours of operation are 8:00am to 5:00pm CST

manual del usuario
PersianaMirageInalámbricadeTelaCelular


CortinaMirageInalámbrica
deTelaCelular
9
INSTRUCCIONES DE INSTALACION
Paso 1. Cerciórese del Contenido del PaqueteSI falta alguna pieza, por favor comuníquese con el 1-800 264-1190
El kit de montaje incluye las siguientes piezas:
Parte Cantidad
Soportes de Montaje 2 (cortinas hasta 38”de ancho) 3 (cortinas de 38” a 48” de ancho) 4 (cortinas de 49” a 72” de ancho) 6 (cortinas de 73” a 96” de ancho)
Tornillos de 11/8” 2 por soporte
Soportes de Anclaje Inferior 2
Tornillos de 3/8” para Anclaje 4
Manija para Riel Inferior 1 (cortinas hasta 59” de ancho) 2 (cortinas de 60” a 96” de ancho)
Nota: para su conveniencia, se ha incluido un tornillo extra
Paso 2. Herramientas Requeridas
Destornillador, cinta métrica, lápiz, taladro y escalera. Nota: use tarugos de plástico #6 para paredes de drywall o yeso (no incluidos)Brocas: para tornillos use una broca de 3/32" - para tarugos use una broca de 1/4".
Paso 3. Ubicación e Instalación de SoportesSu cortina puede instalarse ya sea por dentro o por fuera del marco de la ventana. Un soporte de montaje deberá ubicarse entre 1" a 6" de cada extremo del riel principal. Para cortinas más anchas que requieren de 3 o más soportes, estos deben distribuirse equitativamente entre los soportes de los extremos. Acomode los soportes de manera que no interfieran con las cuerdas ni los mecanismos dentro del riel superior. El siguiente procedimiento le asegurará una ubicación apropiada de los soportes.
Para fijar los soportes, el brazo de bloqueo debe estar girado hacia afuera. Coloque los soportes en el riel de manera que enganchan la parte frontal primero y luego la parte posterior, luego gire el brazo de bloqueo hacia adentro para asegurar el soporte en su sitio.
10
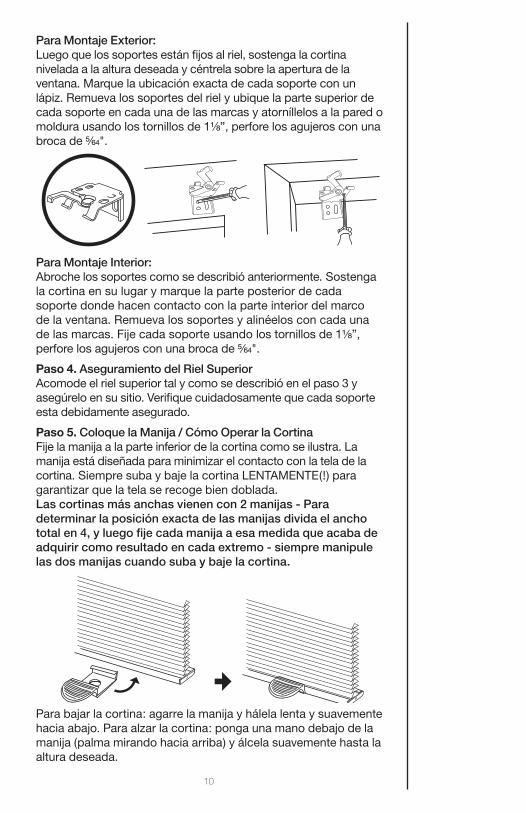
Para Montaje Exterior:Luego que los soportes están fijos al riel, sostenga la cortina nivelada a la altura deseada y céntrela sobre la apertura de la ventana. Marque la ubicación exacta de cada soporte con un lápiz. Remueva los soportes del riel y ubique la parte superior de cada soporte en cada una de las marcas y atorníllelos a la pared o moldura usando los tornillos de 11/8”, perfore los agujeros con una broca de 5/64".
Para Montaje Interior:Abroche los soportes como se describió anteriormente. Sostenga la cortina en su lugar y marque la parte posterior de cada soporte donde hacen contacto con la parte interior del marco de la ventana. Remueva los soportes y alinéelos con cada una de las marcas. Fije cada soporte usando los tornillos de 11/8”, perfore los agujeros con una broca de 5/64".
Paso 4. Aseguramiento del Riel SuperiorAcomode el riel superior tal y como se describió en el paso 3 y asegúrelo en su sitio. Verifique cuidadosamente que cada soporte esta debidamente asegurado.
Paso 5. Coloque la Manija / Cómo Operar la CortinaFije la manija a la parte inferior de la cortina como se ilustra. La manija está diseñada para minimizar el contacto con la tela de la cortina. Siempre suba y baje la cortina LENTAMENTE(!) para garantizar que la tela se recoge bien doblada. Las cortinas más anchas vienen con 2 manijas - Para determinar la posición exacta de las manijas divida el ancho total en 4, y luego fije cada manija a esa medida que acaba de adquirir como resultado en cada extremo - siempre manipule las dos manijas cuando suba y baje la cortina.
Para bajar la cortina: agarre la manija y hálela lenta y suavemente hacia abajo. Para alzar la cortina: ponga una mano debajo de la manija (palma mirando hacia arriba) y álcela suavemente hasta la altura deseada.

CortinaMirageInalámbrica
deTelaCelular
11
Para mantener un optimo desempeño de los resortes que hacen que su cortina funcione, alce y baje su cortina lentamente en toda su secuencia todos los días si es posible.
Si tiene problemas alzando su cortina:Si la cortina se deja en una sola posición durante un largo periodo de tiempo, podría ser necesario alzar y bajar la cortina varias veces para rehabilitar los resortes y restablecer el funcionamiento normal de la misma.
Limpieza de su CortinaEl riel principal y el riel inferior pueden limpiarse con una esponja húmeda.Para limpiar la tela de la cortina, use un plumero o use la aspiradora usando un cepillo suave.

12
REPUESTOSSi por algún motivo llegara a necesitar repuestosllame al 1-800-264-1190Asegúrese de tener a mano la siguiente información:• El modelo completo o el número del producto en el catálogo.• Descripción del producto.• Descripción de la parte que necesita
GARANTÍA DE POR VIDA - LIMITADAEste producto goza está garantizado al comprador original y mientras siga instalado en la misma ventana.Lo que cubre:De por Vida: El producto entero contra defectos de fabricación (ej.: falla en el diseño del producto, materiales o manufactura que causen que el producto no funcione más) 5 años: La telaLo que no cubre:Uso normal. Cualquier producto que falla debido a: • abuso • exposición a aire salino • instalación inapropiada • accidente • uso extra-ordinario • operación inapropiada • alteraciones • limpieza inapropiada • aplicación errónea • daño causado por pestes/insectos/mascotas • manipulación inapropiado • uso inadecuadoCostos asociados con: • remoción del producto • transporte de o hacia almacén • remoción de la marca • volver a medir el producto • daños incidentales o derivados • reinstalación del producto • envío En caso que se trate de múltiples cortinas/persianas en la misma habitación, solo la que esté defectuosa será reemplazada.Para reportar un daño en el envío: si el daño ha ocurrido durante el envío, llame al lugar donde la adquirió y reporte dentro de los siguientes 7 días calendario de recibido el producto o sino podría negarse el crédito por el daño.Para obtener servicio: si sospecha que este producto tiene defectos en materiales o manufactura: 1. localice el recibo de compra 2. llame al lugar donde adquirió el producto. No se aceptarán devoluciones que no hayan sido previamente autorizadas.Garantía de Reparación: ESTA SERA SU UNICA REPARACION BAJO LOS TERMINOS DE ESTA GARANTIA. Si se encontrase que este producto tiene un defecto de materiales o manufactura, haremos lo siguiente ( a nuestra discreción): • reparar el producto • reemplazar el producto • devolver el costo del producto. Los colores varían entre diferentes lotes de producción y podrían no coincidir con muestras o compras anteriores. Productos descontinuados o colores serán reemplazados con su equivalente más cercano.SUS DERECHOS SEGUN SU ESTADO:Esta garantía de por vida y limitada le da derechos legales específicos, pero usted también podría tener otros derechos que varían según el estado donde resida. Algunos estados no permiten limitaciones en cuanto a la duración de la garantía, de manera que las limitaciones especificadas anteriormente podrían no aplicar. Ningún agente, representante, distribuidor o empleado tiene la autoridad de incrementar o alterar las obligaciones de esta garantía. Esta garantía reemplaza cualquier versión anterior.
Para preguntas, llame al (800) 264-1190 Horas de Operación entre 8:00am a 5:00pm CST