ministry of education - gh students...i ministry of education republic of ghana teaching syllabus...
TRANSCRIPT

i
MINISTRY OF EDUCATION
REPUBLIC OF GHANA
TEACHING SYLLABUS FOR PICTURE MAKING
(SENIOR HIGH SCHOOL 1-3)
Enquiries and comments on this syllabus should be addressed to:
The Director Curriculum Research and Development Division (CRDD) P. O. Box 2739 Accra, Ghana
Tel: 0302-683668 0302-683651
September, 2010

ii
TEACHING SYLLABUS FOR PICTURE MAKING
RATIONALE Picture making embraces all art activities that result in two-dimensional and three-dimensional forms. A society achieves its significance through its production in the visual arts. We, as a people, are identified through our art works. To develop pride and patriotism in our young people, it is important that our young people acquire love for the cultural and aesthetic values in Ghanaian art. The impact of picture making is presently felt on education, health, and communication and in fact, on the total life styles of societies. Advances in art and technology depend largely on picture making. Consequently, picture making has made an impact on the socio-economic development of nations and improved the quality of life in most parts of the world. In Ghana, the combined energy of science and technology is critical for our development. To this end, it is important to help our young people to develop artistic skills and capability not only to contribute to the development and significance of Ghanaian art forms but also through their application to every sphere of our development effort. This requires education and training. GENERAL AIMS The syllabus is designed to help students to: 1. appreciate picture making as an integral part of industrial development and living. 2. develop pride, confidence and patriotism through appreciation of his/her own pictures. 3. develop the capacity for creativity using indigenous and contemporary tools and materials in picture-making. 4. develop efficient manipulative, aesthetic and technical skills using tools and materials to make pictures. 5. acquire perceptual and analytical skills through the processes of self-expression and communication. acquire artistic communication skills and attitudes for sound human relations. be aware of the variety of vocations available in the field of picture making and opt to choose a career in the field of art. SCOPE OF CONTENT The scope of picture making has been designed in such a way as to provide adequate foundation for students who will pursue further education in art. The course also offers enough knowledge and skills to students terminating their education at the end of Senior Secondary School who would practise the vocation. This course covers the history, principles and practice of picture making as a vocation. It also provides suggestions for art appreciation and evaluation of art work. PRE-REQUISITE SKILLS AND ALLIED SUBJECTS The study is based on course in the Basic Design and Technology offered at the Basic Education level. Students offering a course in Visual Art should have acquired satisfactory literacy and numeracy skills including basic skills in drawing and designing, as well as knowledge in social and environmental studies at the Junior High School level.

iii
ORGANISATION OF THE SYLLABUS Picture-making has been structured to cover three years of Senior High School. Each year‟s work consists of a number of units. The organization and structure of the Picture-making syllabus is as follows:
ORGANISATION AND STRUCTURE OF THE PICTURE MAKING SYLLABUS
SHS 1 SHS 2 SHS 3
SECTION 1: INTRODUCTION TO PICTURE MAKING: P1-P3 Unit 1 Importance of Picture Making Unit 2 Career Opportunities in Picture Making Unit 3 Some Picture Makers in Ghana
SECTION 1: PICTURE MAKING METHODS AND TECHNIQUES: P34-P42 Unit 1 Drawing Unit 2 Painting Unit 3 Pyrography Unit 4 Collage/Montage Unit 5 Mosaic/Marquetry Unit 6 Print Making
SECTION 1: MURALS: P53-P57 Unit 1 Importance of Murals Unit 2 Fresco Unit 3 Frieze Unit 4 Panel Work
SECTION 2: BASIC DESIGN: P4-P9 Unit 1 Visual Elements Unit 2 Principles of design Unit 3 Understanding colour
SECTION 2: COMPOSING A PICTURE:P43-P49 Unit 1 Composition Unit 2 Still-life Unit 3 Landscape Unit 4 Figure Drawing/ Imaginative Composition Unit 5 Portraiture
SECTION 2: HISTORY OF PAINTING: P58-P60 Unit 1 Cave Art Unit 2 Ancient Painting Unit 3 Renaissance Painting Unit 4 Modern/Post Modern Painting Unit 5 Indigenous ideas and Forms of Picture Making
SECTION 3: FORMS OF BASIC PICTURE MAKING AND ASSOCIATED TOOLS, MATERIALS AND EQUIPMENT: P10-P22 Unit 1 Drawing Unit 2 Painting Unit 3 Other forms of Picture Making Unit 4 Studio Maintenance
SECTION 3: ILLUSTRATION: P50-P51 Unit 1 Meaning and Scope of Illustration Unit 2 Purposes of Illustration Unit 3 Illustration Techniques
SECTION 3: ENTREPRENEURSHIP: P61-P68 Unit 1 Areas of Enterprise in Picture Making Unit 2 Setting up and Managing a Picture Making Enterprise Unit 3 Costing/Pricing of Works

iv
SHS 1 SHS 2 SHS 3
SECTION 4: BODY ART: P23-P25 Unit 1 Importance of Body Art Unit 2 Tools/Materials Unit 3 Types of Body Art
SECTION 4: DIGITAL PAINTING: P52 Unit 1 Computer as a Tool
LIST OF TOOLS MATERIALS AND EQUIPMENT P69 GLOSSARY P70-79
SECTION 5: ENTREPRENEUR SKILLS AND PROFESSIONAL PRACTICES P26-P33 Unit 1: Artist‟s Portfolio Unit 2: Business Plan Unit 3: Branding and Packaging Unit 4: Artist‟s Statement Unit 5: Business Brochure and Card Unit 5: Exhibition
TIME ALLOCATION Picture making has a total time allocation of six periods a week. It is suggested that three (3) periods be allocated to practical work, two (2) periods for theory and one (1) for School Base Assessment (SBA). DEFINITION OF PROFILE DIMENSIONS As already stated, profile dimensions describe the underlying behaviours for teaching, learning and assessment.
In Visual Art, the three profile dimensions that have been specified for teaching, learning and testing are:
Knowledge and Understanding 15% Application of Knowledge 25% Practical Skills 60% Each of the dimensions has been given a percentage weight that should be reflected in teaching, learning and testing. The weights indicated on the right of the dimensions show the relative emphases that the teacher should give in the teaching, learning and testing processes at the Senior High School level. Combining the three dimensions in the teaching and learning process will ensure that Basic Design and Technology is taught and studied not only at the cognitive level, but will also ensure practical skill development on the part of students. Note that “practical skills” has been given 40% of the teaching and learning time to emphasize

v
the point that the orientation in Vocational Skills is more toward the acquisition of practical vocational skills at the SSS level. Also added is the explanation and key words involved in each of the dimensions as follows:
Knowledge and Understanding (KU)
Knowledge The ability to:
remember, recall, identify, define, describe, list, name, match, state principles, facts and concepts. Knowledge is simply the ability to remember or recall material already learned and constitutes the lowest level of learning.
Understanding The ability to:
explain, summarise, translate, rewrite, paraphrase, give examples, generalise, estimate or predict consequences based upon a trend. Understanding is generally the ability to grasp the meaning of some material that may be verbal, pictorial, or symbolic.
Application of Knowledge (AK)
Ability to use knowledge or apply knowledge, as implied in this syllabus, has a number of learning/behaviour levels. These levels include application, analysis, synthesis, and evaluation. These may be considered and taught separately, paying attention to reflect each of them equally in your teaching. The dimension “Use of Knowledge” is a summary dimension for all four learning levels. Details of each of the four sub levels are as follows:
Application The ability to:
apply rules, methods, principles, theories, etc. to concrete situations that are new and unfamiliar. It also involves the ability to produce, solve, operate, plan, demonstrate, discover, etc.
Analysis The ability to:
break down material into its component parts; to differentiate, compare, distinguish, outline, separate, identify significant points, etc., recognise unstated assumptions and logical fallacies, recognise inferences from facts, etc.
Synthesis The ability to:
put parts together to form a new whole. It involves the ability to combine, compile, compose, devise, plan, revise, design, organise, create, generate, discuss etc.
Evaluation The ability to:
appraise, compare features of different things and make comments or judgment, contrast, criticise, justify, support, discuss, conclude, make recommendations, etc. Evaluation refers to the ability to judge the worth or value of some material based on some criteria.
You will note from the above that evaluation is the highest form of thinking and behaviour and is therefore the most difficult behaviour. This accounts for the generally poor performance of students and people generally on tasks that call for evaluation. Start to develop this important skill early in your students by giving them lots of chances to do evaluative thinking, that is judging, appraising and critiquing the quality or worth of products.

vi
Practical Skills (PS)
In every Unit, there is a related theory, which should be treated alongside the practical skills. Practical skills refer to the psychomotor domain. This involves the demonstration of manipulative skills using tools/equipment and materials to carry out practical operations, to solve practical problems and to create and produce items. The teaching and assessment of practical skills should involve projects, case studies and creative practical tasks.
Skills required for effective practical work are the following:
1. Tools/Equipment/Materials Handling 2. Observation 3. Craftsmanship/Artisanship 4. Perception 5. Creativity 6. Communication Tools/Equipment/Material Handling: Students should be able to handle and use tools/equipment/materials properly for practical vocational work. The teacher should ensure that students acquire a high level of proficiency in the use of tools, equipment and materials in their selected vocation(s). Observation: The student should be able to use his/her senses to make accurate observation of skills and techniques during demonstrations. The student in this case should be able to accurately imitate the techniques he/she has observed for performing other tasks. Craftsmanship/Artisanship: This involves the skilful and efficient handling of materials and tools for accomplishing specific tasks. Perception: The pupil should be able to respond to his/her environment using all the senses i.e. seeing, hearing, smelling, touching, tasting and kinaesthetics. The student should be encouraged to apply these senses to every project he/she undertakes. Originality/Creativity Students should be encouraged to be creative or original and be able to use new methods in carrying out projects. Encourage them to be original in making new items and not copy existing items/artefacts. You can help them to be creative and original by encouraging any little creative efforts, techniques and products they may develop. Communication: Students should be guided to develop effective oral and written communication skills necessary for group work, reporting and appreciation, etc. The action verbs provided under the various profile dimensions should help you to structure your teaching such as to achieve the set objectives. Select from the action verbs provided for your teaching, in evaluating learning before, during and after the instruction. Use the action verbs also in writing your test questions. This will ensure that you give your student the chance to develop good thinking skills, and the capacity for excellent productive work. Check the weights of the profile dimensions to ensure that you have given the required emphasis to each of the dimensions in your teaching and assessment.

vii
Assessing Practical Skills
The following criteria are recommended to be used for assessing items produced by students: Creativity (Originality) 20% Design/ Composition 30% Craftsmanship 40% Suitability 10% An item produced in practical classes should be marked using the four criteria. The percentages on the right indicate the proportion of marks to be allocated to each of the four criteria. If an item is marked out of 20, 20% or 4 marks should go to “Creativity” or “Originality”, 6 marks to “Design”, 8 marks to “Craftsmanship/Artisanship” and 2 marks for “Suitability”.
You will note that craftsmanship has been given greater weight in the four criteria above. While the teaching and learning of practical skills should stress originality or creativity and design, it will be important to put more emphasis on craftsmanship at this stage. At a level higher than SSS, one would want to weight “originality” or “creativity higher to emphasize that adult production should aim more at originality or creativity. Craftsmanship/Artisanship: This deals with the ability to use tools and materials skilfully to create artefacts. It is important to pay attention to good decoration and finishing. In doing so, the artist should have the ability to criticize, manipulate, organize, redesign, polish, varnish, burnish, paint, etc. and judge the quality of the craftsmanship of his/her product. Design: This is the ability to work with new ideas, materials, and tools in order to achieve a unique and attractive product through the appropriate organization of elements and principles of design. In doing so, the artist should plan, organize, sketch, outline, construct, paint, brainstorm, discuss, compare, follow directions, show awareness and sensitivity. Creativity: This is the ability to produce a unique piece of (visual) art based on an idea, philosophy, concept in either two or three-dimensional form. The idea that motivates creativity may be original or an improvement on an already existing piece of work. In doing so, the artist will observe, plan, produce, relate, reproduce, assemble, design, etc. Creativity in a number of cases is based upon attitudes and beliefs of the individual. Try to encourage creativity in your students as much as possible. Suitability: This is the ability to produce an artistic product to satisfy an intended purpose. In doing so, an attempt is made to work with new ideas, elements, principles of design, materials and tools appropriately in order to achieve a product that is of both utility and aesthetic value to the consumer.
Suggested Procedures for Art Appreciation: For each work produced by the student, appreciation should be conducted as follows:
identify the work (title, artist, date, size, medium used, and location); give inventory of items in the work (physical characteristics) analysis of technical qualities (kinds of materials used, how the work was made, its design and composition); interpretation of the work (its meaning, cultural and socio-economic significance) judgement (successful/unsuccessful); this is added if appreciation is extended to cover criticism.

viii
When students produce art works, attention should be paid to the following: a) identification, discussion, care and testing of tools and materials; b) preliminary sketches; c) translation of sketches into art works; d) finishing; e) appreciation of the works produced.
Bear in mind that the syllabus cannot be taken as a substitute for lesson plans. It is therefore necessary that you develop a scheme of work and lesson plans for teaching the units of this syllabus. SUGGESTIONS FOR TEACHING THE SYLLABUS While teaching one art subject, reference may be made to relevant ideas in the other subjects of the Vocational Skills Programme as a whole. The assistance of local experts, artists, artisans, and elders may be sought where necessary. Knowledge acquired in the „General Knowledge‟ section should be applied to activities in the other subjects. Consideration should be given each practical activity as a problem-solving venture i.e. identifying a problem, researching, analyzing, suggesting solutions, choosing appropriate solutions and producing an art work. The syllabus has been planned in five columns consisting of Units, Specific Objectives, Content, Teaching and Learning Activities and Evaluation. General Objectives: General objectives have been listed at the beginning of each section. The general objectives are a summary of the specific objectives of the units. Read the general objectives very carefully before you start teaching the units. After teaching all the units go back and read the general objectives again to be sure you have covered the general objectives adequately in your teaching.
Subjects/Units: Each of the subjects represents a vocation. A year‟s work is divided into units, where a unit consists of a body of knowledge and skills that form a logical aspect of the subject. Column 1 - Units: The Units in Column 1 provide the major topics. You are expected to follow the units/topics according to the linear order in which they have been presented. However, if you find at some point that teaching and learning of a unit will be more effective if you branched to another unit before coming back to the unit in the sequence, you are encouraged to do so. Column 2 - Specific Objectives: Column 2 shows the Specific Objectives for each unit. The specific objectives begin with numbers such as 1.3.5 or 2.2.1. These numbers are referred to as “Syllabus Reference Numbers”. The first digit in the syllabus reference number refers to the section, the second digit refers to the unit, while the third digit refers to the rank order of the specific objective. For instance, 1.3.5 means: Year 1, Unit 3 and Specific Objective 5. In other words, 1.3.5 refers to Specific Objective 5 of Unit 3 of section 1. Similarly, the syllabus reference number 2.2.1 simply means Specific Objective number 1 of Unit 2 of section 2. Using syllabus reference numbers provides an easy way for communication among teachers and other educators. It further provides an easy way for selecting objectives for test construction. Let‟s say for instance, that Unit 2 of 2 has section five specific objectives: 2.2.1 - 2.2.5. A teacher may want to base his/her test items/questions on objectives 2.2.3 and 2.2.4 and not use the other three objectives. In this way, a teacher would sample the objectives within the units of the section to be able to develop a test that accurately reflects the importance of the various objectives taught in class.

ix
You will note also that specific objectives have been stated in terms of the student i.e., what the student will be able to do after instruction and learning in the unit. Each specific objective hence starts with the following, “The student will be able to.” This in effect, means that you have to address the learning problems of each individual student. It means individualizing your instruction as much as possible such that the majority of students will be able to master the objectives of each unit of the syllabus. As has been said already, the order in which the unit topics appear should not necessarily be the teaching order. There should however, be a linkage in the order in which the units and specific objectives are treated. The teacher will have to study the syllabus carefully and plan ahead the activities the students will carry out during a particular lesson. Knowing the requirements of a lesson, the teacher should assemble the materials required for the activities well in advance. The collection of materials must be done by both the teacher and students. Other regular materials may be continually collected and stored to be used when needed. When materials are not available in the immediate environment, the teacher should try to contact persons in higher institutions and in the community for help. As students begin work on the activities of each lesson, the teacher should serve as a facilitator and motivate the students in various ways to sustain their interest. As much as possible, professional people working in each of the vocations should be invited as resource persons to make presentations and demonstrations to the class. Visits to the workshops of practitioners of the various vocations contained in the syllabus are also encouraged.
Profile Dimensions A central aspect of this syllabus is the concept of profile dimensions that should be the basis for instruction and assessment. Learning may be divided into a number of classes. A student may acquire some knowledge through learning. The student may also learn to apply the knowledge acquired in some new context. For instance, the principles for identifying design elements in the natural and man-made environment may be taught the student. If this is done well, the student will acquire the knowledge and understanding of design principles. Beyond this, the student may be required to apply the elements and principles of design in producing an item such a ceramics, picturemaking or a textile product. You will note from the sequence described, that the student has gone through acquisition of basic knowledge, has acquired practical skills, and has had the opportunity to apply the knowledge acquired in a particular problem situation. The four learning behaviours, “knowledge”, “understanding”, “application” and “practical skills” are referred to as “dimensions of knowledge”. “Knowledge” is a dimension; “application of knowledge” is also a dimension. More than one dimension form a profile of dimensions. A specific objective may be stated with an action verb as follows: The student will be able to describe......Being able to “describe” something after the instruction has been completed means that the student has acquired “knowledge”. Being able to explain, summarise, give examples, etc. means that the student has understood the lesson. Similarly, being able to develop, plan, construct, design, etc. means that the student can “apply” the knowledge acquired in some new context. You will note that each of the specific objectives in this syllabus contains an ”action verb” that describes the behaviour the student will be able to demonstrate after the instruction. “Knowledge”, “application”, etc. are dimensions that should be the prime focus of teaching and learning in schools. Instruction in schools, in most cases has tended to stress knowledge acquisition and memorization to the detriment of other higher-level behaviours such as application, analysis, etc. The focus of the new syllabus is to encourage students to apply their knowledge, develop analytical thinking skills, develop plans, design new products, generate new and creative ideas and solutions, and use their knowledge in a variety of ways to deal with problems and issues, solve problems and generally be productive. Each action verb indicates the underlying profile dimension of each particular specific objective. Read each objective carefully to know the profile dimension you have to teach. Column 3 - Content: The “content” in the third column of the syllabus presents a selected body of information that you will need to use in teaching the particular unit. In some cases, the content presented is quite exhaustive. In some other cases, you could add more information to the content presented. In any case, try to find more information through reading and personal investigations, to add to the content provided.
The use of resource persons who are practitioners of the vocations of this syllabus will in many cases, help to provide your class with more information on each of the vocations than can be obtained from books and journals.

x
Column 4 -Teaching and Learning Activities (T/LA): T/LA that will ensure maximum student participation in the lessons are presented in Column 4. Try to avoid rote learning and drill-oriented methods and rather emphasize participatory teaching and learning, and also emphasize the cognitive, affective and psychomotor domains of knowledge in your instructional system wherever appropriate. You are encouraged to re-order the suggested teaching and learning activities and also add to them where necessary in order to achieve optimum student learning. As we have implied already, the major purpose for teaching and learning is to make students able to apply their knowledge in dealing with issues both in and out of school. Students must be taught to be problem solvers. In this particular subject, students are expected to acquire valuable basic skills in selected vocations to serve as a foundation for further skill development. Column 5 - Evaluation: Suggestions and exercises for evaluating the lessons of each unit are indicated in Column 5. Evaluation exercises can be in the form of oral questions, quizzes, class assignments (e.g., designing and drawing), essays, structured questions, project work, etc. Try to ask questions and set tasks and assignments that will challenge your students to apply their knowledge to issues and problems, and that will engage them in creating new and original items, and developing positive attitudes as a result of having undergone instruction in this subject.
Evaluation should also include observation of processes pupils go through in performing various activities, and the products students make. Processes and products are both equally important and need observation, appreciation, appraisal and correction. The suggested evaluation tasks are not exhaustive. You are encouraged to develop other creative evaluation tasks to ensure that students have mastered the instruction and behaviours implied in the specific objectives of each unit.
What to look for in an Art work Evaluation:
The following may be used as a checklist of what to look for in an artwork evaluation:
a) creativity, originality, innovation;
b) Use of media, tools and materials
c) Design: composition of elements and principles
d) Technical competence: draughtsmanship and craftsmanship
e) Uses, relevance and suitability of artefact to society/community
FORM OF ASSESSMENT (INTERNAL AND EXTERNAL)
It is important that both instruction and assessment be based on the specified profile dimensions. In developing assessment procedures, try to select specific objectives in such a way that you will be able to assess a representative samples of the syllabus objectives. Each specific objective in the syllabus is considered a criterion to be achieved by the student. When you develop a test that consists of items or questions that are based on a representative sample of the specific objectives taught, the test is referred to as a “Criterion-Referenced Test”.
In many cases, a teacher cannot test all the objectives taught in a term, in a year, etc. The assessment procedure you use i.e. class tests, homework, projects, etc. must be developed in such a way that it will consist of a sample of the important objectives taught over a period.
The example in the next page shows an examination consisting of three papers, Paper 1A, Paper 1B, Paper 2 (Practical Work) and Continuous Assessment. Paper 1A will usually be an objective-type paper; Paper1B will consist of structured questions, essentially testing “Application of Knowledge”, but also consisting of some questions on “Knowledge and Understanding”.

xi
Paper 2 will be the practical test paper. School Based Assessment (SBA) will be 30% of a total of all tests taken in class.
The distribution of marks for the objective test items, structured questions, the practical questions paper, and in School Based Assessment should be in line with the weights of the profile dimensions and as shown in the last column of the table.
Paper 1: (2 hours 50 minutes). Will consist of two sections; „A‟ and „B‟ and candidates will be required to answer all of them at one sitting. Section A: There will be 30 multiple-choice items and candidates will be expected to answer all the questions within 40 minutes for 30 marks. Section B: Will consist of six (6) essay-type questions based on theory and practice from all areas of the subject. Candidates will be expected to choose and answer four (4) of them within 2 hours 10 minutes for 50 marks. One of the 4 questions chosen should be the compulsory question which will test knowledge and skills in perception, appreciation, criticism and judgement based on a photograph of an original art work in colour, a facsimile or real work (if possible). The compulsory question will be allocated 40 minutes and marked out of 20 and the remaining three answered within 90 minutes (30 minutes each) and marked out of 30 (10 marks each). Paper 2: Practical Test: Paper 2 to be marked out of 130, will be the “practical” test paper and will require a student to choose one question from a number of practical questions. The practical questions should be given to students/candidates two weeks before the practical examinations. The Preliminary Design and relevant notes will be tested on the first day of the Practical Examination. The preliminary design and notes, which should be attached to the finished work, will be marked out of 30, and the main practical test marked out of 100.
DISTRIBUTION OF EXAMINATION PAPER WEIGHTS AND MARKS
Dimensions Paper 1A (Objective
Test)
Paper 1B (Structured Question
Paper)
Paper 2 (Practical
Test Paper)
School Based
Assessment
Total Marks % Weight of Dimensions
Knowledge and Understanding
20
5
-
20
45
15
Application of Knowledge 10
45
-
25
80
25
Practical Skills
-
-
130
45
175
60
Total Marks
30
50
130
90
300
100.0
% Contribution of Papers
10
15
45
30
100
100
The total marks for the examination including 90 for the SBA will be 300 marks. You will note in the last row that Paper 1 A has a contribution of 10% to the total marks; Paper 1B has a contribution of 15% to the total marks; Paper 2 has a contribution of 45%, and School Based Assessment has a contribution of 30% to

xii
the total marks. The three test papers are weighted differently to reflect their individual importance in the total examination. The numbers in the cells indicate the marks to be allocated to the items/questions that test each of the dimensions within the respective test papers. The practical test paper is the most important paper at the SHS level and therefore has more weight and more marks.
Note that the numbers in the columns are additions of the numbers in the cells and they agree approximately with the profile dimension weights indicated in the last column and with the percentage contribution of each of the papers in the last row.
Of the total marks of 300, 45 total marks, equals the 15% weight of “Knowledge and Understanding”; 80 marks out of the total 300 is approximately equal to the 25% weight of “Application of Knowledge”; and the total marks of 175 is approximately equal to the profile dimension weight of 60 for “Practical Skills. The weight of each of the three dimensions is indicated in the last column. The ratio of theory to practice in Visual Art is 40:60
GRADING PROCEDURE To improve assessment and grading and introduce uniformity in schools, it is recommended that schools adopt the following grade boundaries for assigning grades on student test results.
Grade A: 80 - 100 - Excellent Grade B: 70 - 79 - Very Good Grace C: 60 - 69 - Good Grade D: 45 - 59 - Pass (Satisfactory) Grade E: 35 - 44 - Weak Grade F: 34 and Below - Very Weak In marking examination questions, it is very important that you develop a marking scheme. A marking scheme, as you are aware, consists of the points for the best answer you expect for each question, and the mark allocated for each point raised by the student as well as the total marks for the question. For instance, if a question carries 10 marks, and you expect 4 points in the best answer, you could allocate 2 marks or part of it, depending upon the quality of the point raised by the student to each of the 4 points, totalling 8 marks, and then give the remaining 2 marks or part of it for organisation of answer. For objective test papers you may develop an answer key to speed up the marking. In assigning grades to students‟ test results, you may apply the above grade boundaries and the descriptors, which indicate the meaning of each grade. The grade descriptor for Grade A, with a mark of 80% and above, is “Excellent”. The grade boundaries are also referred to as grade cut-off scores. For instance, the grade cut-off score for a B grade is 70% in the example. When you adopt a fixed cut-off score grading system as in this example, you are using the criterion-referenced grading system. By this system, a student must make a specified score to be awarded the requisite grade. This system of grading challenges pupils to study harder to earn better grades. It is hence more useful for achievement testing and grading than the norm-referenced testing system of grading in which the grades are based on the rank order of students‟ marks i.e. where the best score in a class, no matter its quality, gets an A etc.
GUIDELINES FOR SCHOOL BASED ASSESSMENT School Based Assessment will consist of written assignments, papers, essays, summaries, quizzes, tests, practical work/projects, appreciation, appraisal and will account for 30% of the total class work. The School Based assessment will comprise the following: 4 class exercises for 40 marks 1 class test for 20 marks 1 practical project work for 40 marks 1 end of term examination for 100 marks

xiii
School Based Assessment (SBA) will comprise both theory and practicals, and will start from first year to the end of the second term of the third year. In this regards, students should be taught how to keep portfolio/records or samples of works for presentation or seeking jobs.
1
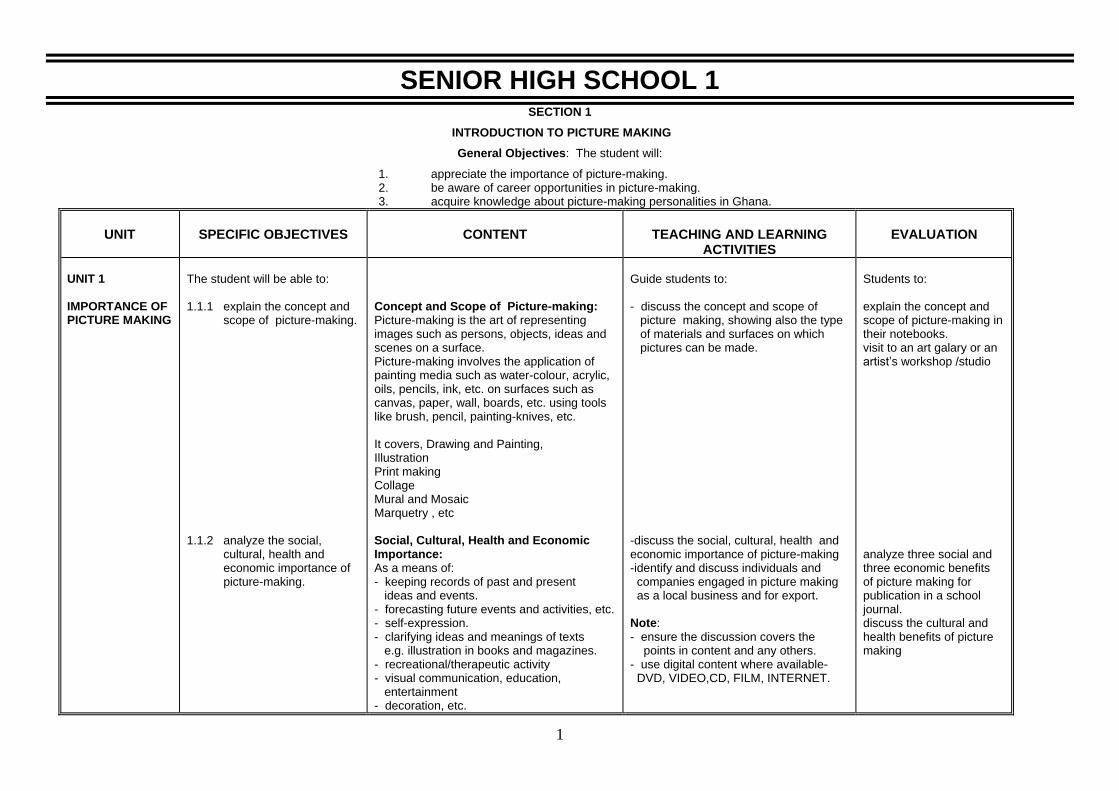
SENIOR HIGH SCHOOL 1 SECTION 1
INTRODUCTION TO PICTURE MAKING
General Objectives: The student will:
1. appreciate the importance of picture-making. 2. be aware of career opportunities in picture-making. 3. acquire knowledge about picture-making personalities in Ghana.
UNIT
SPECIFIC OBJECTIVES
CONTENT
TEACHING AND LEARNING
ACTIVITIES
EVALUATION
UNIT 1 IMPORTANCE OF PICTURE MAKING
The student will be able to: 1.1.1 explain the concept and scope of picture-making. 1.1.2 analyze the social, cultural, health and economic importance of picture-making.
Concept and Scope of Picture-making: Picture-making is the art of representing images such as persons, objects, ideas and scenes on a surface. Picture-making involves the application of painting media such as water-colour, acrylic, oils, pencils, ink, etc. on surfaces such as canvas, paper, wall, boards, etc. using tools like brush, pencil, painting-knives, etc. It covers, Drawing and Painting, Illustration Print making Collage Mural and Mosaic Marquetry , etc Social, Cultural, Health and Economic Importance: As a means of: - keeping records of past and present ideas and events. - forecasting future events and activities, etc. - self-expression. - clarifying ideas and meanings of texts e.g. illustration in books and magazines. - recreational/therapeutic activity - visual communication, education, entertainment - decoration, etc.
Guide students to: - discuss the concept and scope of picture making, showing also the type of materials and surfaces on which pictures can be made. -discuss the social, cultural, health and economic importance of picture-making -identify and discuss individuals and companies engaged in picture making as a local business and for export. Note: - ensure the discussion covers the points in content and any others. - use digital content where available- DVD, VIDEO,CD, FILM, INTERNET.
Students to: explain the concept and scope of picture-making in their notebooks. visit to an art galary or an artist‟s workshop /studio analyze three social and three economic benefits of picture making for publication in a school journal. discuss the cultural and health benefits of picture making
2
UNIT
SPECIFIC OBJECTIVES
CONTENT
TEACHING AND LEARNING
ACTIVITIES
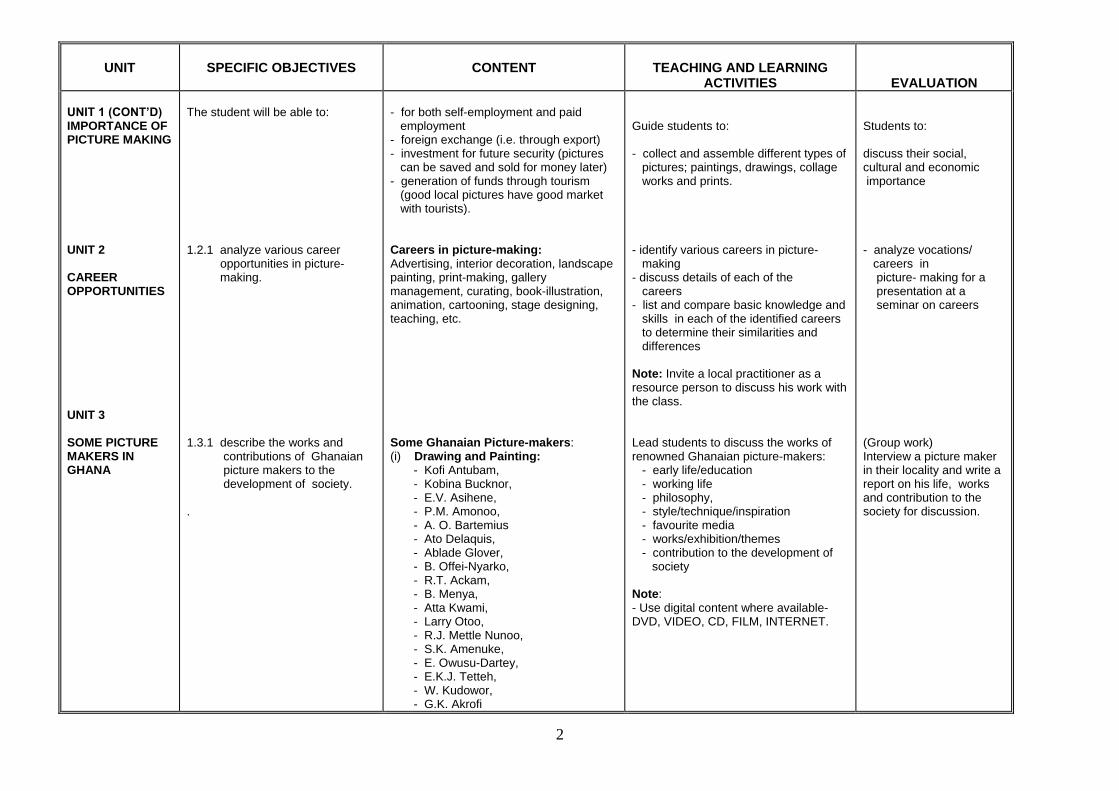
EVALUATION UNIT 1 (CONT’D) IMPORTANCE OF PICTURE MAKING UNIT 2 CAREER OPPORTUNITIES UNIT 3 SOME PICTURE MAKERS IN GHANA
The student will be able to: 1.2.1 analyze various career opportunities in picture- making. 1.3.1 describe the works and contributions of Ghanaian picture makers to the development of society. .
- for both self-employment and paid employment - foreign exchange (i.e. through export) - investment for future security (pictures can be saved and sold for money later) - generation of funds through tourism (good local pictures have good market with tourists). Careers in picture-making: Advertising, interior decoration, landscape painting, print-making, gallery management, curating, book-illustration, animation, cartooning, stage designing, teaching, etc. Some Ghanaian Picture-makers: (i) Drawing and Painting: - Kofi Antubam, - Kobina Bucknor, - E.V. Asihene, - P.M. Amonoo, - A. O. Bartemius - Ato Delaquis, - Ablade Glover, - B. Offei-Nyarko, - R.T. Ackam, - B. Menya, - Atta Kwami, - Larry Otoo, - R.J. Mettle Nunoo, - S.K. Amenuke, - E. Owusu-Dartey, - E.K.J. Tetteh, - W. Kudowor, - G.K. Akrofi
Guide students to: - collect and assemble different types of pictures; paintings, drawings, collage works and prints. - identify various careers in picture- making - discuss details of each of the careers - list and compare basic knowledge and skills in each of the identified careers to determine their similarities and differences Note: Invite a local practitioner as a resource person to discuss his work with the class. Lead students to discuss the works of renowned Ghanaian picture-makers: - early life/education - working life - philosophy, - style/technique/inspiration - favourite media - works/exhibition/themes - contribution to the development of society Note: - Use digital content where available- DVD, VIDEO, CD, FILM, INTERNET.
Students to: discuss their social, cultural and economic importance - analyze vocations/ careers in picture- making for a presentation at a seminar on careers (Group work) Interview a picture maker in their locality and write a report on his life, works and contribution to the society for discussion.

3
UNIT
SPECIFIC OBJECTIVES
CONTENT
TEACHING AND LEARNING
ACTIVITIES
EVALUATION
UNIT 3 (CONT’D) SOME PICTURE MAKERS IN GHANA
The student will be able to:
- Nyuieko Avotri - F. N. Hiengo - Dora Owusu (Obuobisa) - Margaret Asabea anakwa - Patience Cudjoe
(ii) Illustration: - Ato Delaquis,, - Addo-Osafo, - J. Kedjanyi, - Ato de Graft-Johnson, - F. D. K. Asare, - G. K. L. Gomez, - Amon Kotei, - Yaw Boakye (Ghanatta), - E. Opare, - Ben K Adipah - Ohene Kena - John M. Anang etc
(iii) Print-making: - F.T. Mate, - Sowatey Adjei, - G.D. Atta Kwami, etc.
(iv) Collage: - P.M. Amonoo, - E. Adiamah, - P.K. Kum-Essuon, - Ben Menyah, etc. - Edward Kwapong
(v) Mural: - E.V. Asihene, - V.K. Annan, - Ato Delaquis, - W.C. Owusu, - J.K. Amoah, - Kofi Antobam, etc. - Indigenous female mural artist in
the - Northern Ghana (Sirigu)
(vi) Marquetry: - K. Z. Adzraku, etc.
Guide students to discuss the life, style, philosophy and works of the Ghanaian picture makers according to their specialties.

4
SENIOR HIGH SCHOOL 1
SECTION 2
BASIC DESIGN
General Objective: The student will:
1. understand and apply concepts, principles and techniques in basic design in making pictures. 2. acquire the skills of observation, experimentation, differentiation, as they work with the various elements and principles of design. 3. develop skills in analyzing, appreciating and appraising own and works of others for improvement, using appropriate terms.
UNIT
SPECIFIC OBJECTIVES
CONTENT
TEACHING AND LEARNING
ACTIVITIES
EVALUATION
UNIT 1 VISUAL ELEMENTS UNIT 2 PRINCIPLES OF DESIGN
The student will be able to: 2.1.1 identify and create elements of design using picture making techniques. 2.2.1 create and organise the elements according to principles through exploration and experimentation.
Creating the elements of design: - The basic ingredients the artist uses separately, or in combination, to produce artistic imagery. They are used to produce the visual language in art. e.g. line, dot, texture colour, light (value), etc. - Creating the element using techniques such as drawing, scorching, cutting and pasting, print making, spraying, etc. Elements: line, dot, texture, shape, space. etc Creating and organising the elements according to principles: - Guidelines that govern the arrangement or organization of the visual elements into art forms e.g. unity, variety, balance, rhythm, contrast repetition, proportion, dominance, etc. - principles e.g. unity, variety, contrast, repetition, harmony, opposition, etc.
Guide students to: discuss the meaning of design and the elements. - identify and discuss the elements in the man-made and natural environment. - create the elements with picture making techniques. - display their works for appreciation and appraisal. NB: use demonstration and samples and digital content if possible. Types of lines,-thin, horizontal, oblique, wavy, zig-zag, spiral, vertical, etc. Discuss the meaning and importance of the elements and principles of design - visit, observe and identify the elements and how they are organised according to principles in the man- made and natural environment. - create and organise the elements according to principles using techniques, tools and materials for picture making.
Students to: create the elements using picture making techniques hand and power tools and equipment, etc. computer. Project: Investigate with reference to the internet, books and artists and prepare an illustrated paper on whether he or she agrees or disagrees with the idea that everything man-made or natural has been created by elements and principles of design.

5
UNIT
SPECIFIC OBJECTIVES
CONTENT
TEACHING AND LEARNING
ACTIVITIES
EVALUATION
UNIT 2 (CONT’D) THE DESIGN AND TECHNOLOGY PROCESS (DTP) UNIT 3 UNDERSTANDING COLOUR (a) Colour as pigment
2.2.2 analyse the procedure and importance of Design and Technology process for creative thinking and solving of problems through picture- making . 2.3.1 differentiate between pigment and spectrum colours.
The importance of the Design and Technology process: - The concept of “Technology” explained as coming from the Greek word “technos” meaning “art”. - The belief that it took a real artist to make items/products from natural materials. - the importance of DTP for critical thinking and solving problems of society through picture making socially, culturally, economically, religiously etc. for individual, the community and nation. The Summary of DTP 1. Identify a problem/need. 2. Define and specify the problem/need or what you want to do. 3. Investigate/research past solutions to similar problems. 4. Brainstorm, suggest possible solutions or ways and pick the best. 5. Pre-image-visualise and develop ideas, sketches, preliminary designs etc. Identification of coloursed pigment and spectrum. - crayon, poster colour, water colour, acrylic, gouache, oil paint, enamel, emulsion paint, etc.
Guide students to: Discuss the concept and importance of DTP. - discuss and describe the various steps in DTP in relation to picture-making. - use their own examples to explain, describe and analyse the DTP in relation to creativity and problem- solving in picture-making. . identify and discuss the pigment and spectrum colours and their characteristics. NB: seek the assistance from science personnel and the internet for the scientific interpretation of colour. Conduct simple experiment if possible.
The student to: - access the internet and books for more information on DTP and write an essay on its relevance or irrelevance to picture- making and justify it. compare the pigment colours with spectrum colours to identify similarities and differences.

6
UNIT
SPECIFIC OBJECTIVES
CONTENT
TEACHING AND LEARNING
ACTIVITIES
EVALUATION
UNIT 3 (CONT’D) UNDERSTANDING COLOUR (b) Colour wheel (c) Tonal values (d) Monochrome
The student will be able to: 2.3.2 draw and paint the 12-point colour wheel. 2.3.3 mix tints and shades of colours and identify their interactions. 2.3.4 paint a picture in monochrome using tints and shades.
Drawing and painting the 12-point colour wheel. - Primary, secondary, tertiary, intermediary Mixing tertiary colours. Mixing colours with: (i) white (ii) black colour (dark colour) to produce graded tones ranging from tints to shades. Painting a picture in monochrome. Monochrome is a picture in tints and shades of one colour. 1. Painting a picture from: - memory, imagination, direct observation (landscape/seascape) realistic or abstract. 2. Painting based on ideas, topical issues, problems of individuals, communities and nation.
Guide students to: . paint the 12-point colour wheel and discuss their relationship/colour schemes - opposite, analogous, triad, complimentary, etc. - discuss and demonstrate mixing and painting in at least three tones. - paint still-life using the three tones. Note: Review the unit on composition, colour sensation, colour interaction, harmony colour perspective and schemes as well as the elements and principles of design. - discuss the concept of monochrome. - discuss and develop ideas for composing and painting a picture in monochrome. - plan, compose and paint a picture in monochrome based on selected topics, ideas and using appropriate techniques, tools and materials.
Students to: (1) paint number of pictures in various colour schemes. display their works for appreciation. plan, compose and paint a realistic or abstract picture in monochrome based on chosen ideas or topics from memory, imagination, and direction observation

7
UNIT
SPECIFIC OBJECTIVES
CONTENT
TEACHING AND LEARNING
ACTIVITIES
EVALUATION
UNIT 3 (CONT’D) (d) Monochrome (e) Colour Perspective
The student will be able to: 2.3.5 paint in colours which correlate with sensation. 2.3.6 create distance/depth in a picture using the principles of aerial/colour perspective
Colour and Sensation Colour which correlate with feeling or sensation: - heat, warmth, e.g. orange, yellow, red. - coolness e.g. blue, green, violet, blue, Violet. Aerial/colour perspective The effect of space and distance on colour and tone: - colour of objects in a picture becomes pale as it recedes into the distance. - tones on objects become blur as they recede into the distance. - tones/colours of objects become stronger and more intense as they appear closer to the viewer. Responding to colour through perception eg. advancing and receding colours. Painting to differentiate between background, foreground, close and far object; changes in shape, form, colour intensity, value, etc.
Guide students to: - discuss the sensational effect of colour on people with the help of the 12-point colour wheel. E.g. cool, warm, peace, violence, etc. - discuss and demonstrate how to make an artwork or painting which is warm or cool. Students to paint picture of objects, forms, shapes, to show sensation e.g. heat, coolness, etc. Students to display their work and respond to them by expressing their sensational feelings about their colours. NB: organise a seminar on colour psychology and its impact and therapeutics use. - discuss the concept of aerial perspective as indicated in the content. observe and describe scenes in terms of the colour and tone of objects from their point of view as observers. draw the horizon, vanishing point, foreground, background, shapes and forms in succession in a picture to depict aerial colour perspective.
Students to: (2) paint a picture to express colour sensation using ideas, objects, forms, shapes and other elements of design. (3) display their works and respond to them by expressing their sensational feeling about their colours. - access the internet for Relevant bodies on colour psychology and therapy for class discussion and seminar. - paint a picture to depict colour perspective based on topical issues of society from: - memory - imagination - direct observation (landscape)

8
UNIT
SPECIFIC OBJECTIVES
CONTENT
TEACHING AND LEARNING
ACTIVITIES
EVALUATION
UNIT 3 (CONT’D) UNDERSTANDING COLOUR (f) Colour interaction (g) Colour harmony
The student will be able to: 2.3.7 through exploration and experimentation in colour mixing. 2.3.8 paint to achieve harmony through colour mixing, exploration and experimentation.
Determining colour interaction through exploration and experimentation. - exploring how colours interact by mixing and positioning (placing them side by side and applying them to paintings to achieve desirable effects. Painting to achieve harmony: 1. by painting with two opposing or contrasting colours placed side by side e.g. cool and warm, warm and neutral, cool and neutral. 2. by painting two analogous colours e.g. cool and cool, warm and warm, etc. 3. relating the concept and method of mixing and painting to achieve harmony with social behaviour, conflict, tension, black and white, green and red.
Guide students to: mix and paint various colours/colour schemes and place them side by side to illustrate their interaction. observe, analyse and determine how colours interact with each other. explore and experiment the mixing and painting of colours side by side to create desire effect. NB: Review the lesson on different colour schemes and interaction by emphasizing the emotional effect. Guide students to discuss and relate the effect of colour schemes and interactions, to human behaviour, society e.g. how to develop good human relation irrespective of race, colour, creed, belief, etc. Students to explore, mix, experiment and paint pictures in different schemes to achieve harmony. Students to: - draw, paint and observe colours that relate, contrast and mix them to achieve harmony. - display works for appreciation and appraisal.
Students to: - experiment mixing of different colours and present results for appreciation. - appreciate and appraise or do self-assessment of ones own works. - suggest ways in which the skills and concepts of painting with contrasting colours to achieve harmony can be used to: i. resolve conflict and tension in society. ii. develop good human relationship irrespective of colours, race, tribe, belief, etc. - appreciate and appraise the qualities of harmony, elements and principles of design in the painting of renowned painter for class presentation.

9
UNIT
SPECIFIC OBJECTIVES
CONTENT
TEACHING AND LEARNING
ACTIVITIES
EVALUATION
UNIT 3 (CONT’D) UNDERSTANDING COLOUR (h) Composition in colour (i) Preparation of colour
The student will be able to: 2.3.9 compose pictures in colour by applying elements and principles of design. 2.3.10 analyse the concepts, symbolism and significance of colours in indigenous and contemporary Ghanaian society. 2.3.11 prepare colour from local sources.
Using elements of design (colour, shapes, forms, etc) to compose a picture on a surface. - applying knowledge and skills in composition, colour mixing, sensation, interaction, harmony, perspective, elements and principles of design. - composition based on personal or community ideas, events, social, economic, educational, cultural and topical issues/problems. Eg. street children, sanitation, HIV/AIDS, immorality, stories, etc. - composing realistic or abstract pictures from memory, imagination, observation, etc. Ghanaian colour concepts, symbolism; social and cultural significance. Analyzing in terms of: source, association, symbolism, meaning. For example, - gold takes its source from chicken fat or mineral gold. Preparing colour from -vegetable sources, -rocks,etc
Guide students to: - discuss how to compose pictures and colour by applying elements and principles of design. - discuss how to compose and paint on a surface to achieve a pleasing effect. Students to: - compose and paint pictures based on ideas, topics, themes that are real, abstract or semi-abstract. - organize the display and evaluation of works. discuss the symbolic, social and cultural significance of colours to the Ghanaian society. Compare the Ghanaian symbolism with Western concepts. (Note; the Ghanaian concept does not have mixtures but rather deals with the pure colour – black, white and red). Discusss the various materials from which colour was extracted. Compare the types of colour obtained from each source.
Students to: compose a picture in colour based on: - real or abstract ideas. - the application of colour perspective, harmony, sensation, interaction and elements and principles of design. - find out and prepare a chart, based on colour symbolism in the locality. Use the colours obtained from local souce to produce a picture.

10
SENIOR HIGH SCHOOL 1
SECTION 3
FORMS OF PICTURE MAKING AND ASSOCIATED TOOLS, MATERIALS AND EQUIPMENT
General Objectives: The student will:
1. develop skills in making, maintaining and using basic tools, materials and equipment for picture making. 2. acquire skills in making pictures with the basic tools, materials and equipment.
UNIT
SPECIFIC OBJECTIVES
CONTENT
TEACHING AND LEARNING
ACTIVITIES
EVALUATION
UNIT 1 DRAWING Meaning of drawing
Purposes of drawing
Portfolio
The student will be able to: 3.1.1 explain the concept – drawing. 3.1.2 outline the purposes of drawing. 3.1.3 make porfollio to store their works;
Meaning of Drawing Drawing is the act of running an implement such as pencil, pen, charcoal, brushes, etc. to leave a mark over a surface as a means of creating visual images. Purposes of Drawing Recording:
- as a means of recording past and current events.
Communication Expression of ideas and feelings Idea development: - drawing objects critically to derive new shapes from the original shape - development of creative thinking through drawing. Drawing as a plan or a design for the
execution of a major project. Drawing for income, etc
Folding, cutting, glueing etc to form a portfollio
Guide students to: discuss the meaning of drawing using digital contents and other audio visual aids. outline and discuss the purposes of drawing relating them to current issues. construct paper portfolios to store their works
Students to: - explain with examples their understanding of drawing. - write notes on the purposes of drawing into their notebooks Compare and discuss the different styles of portfolio made in class
11
UNIT
SPECIFIC OBJECTIVES
CONTENT
TEACHING AND LEARNING
ACTIVITIES
EVALUATION
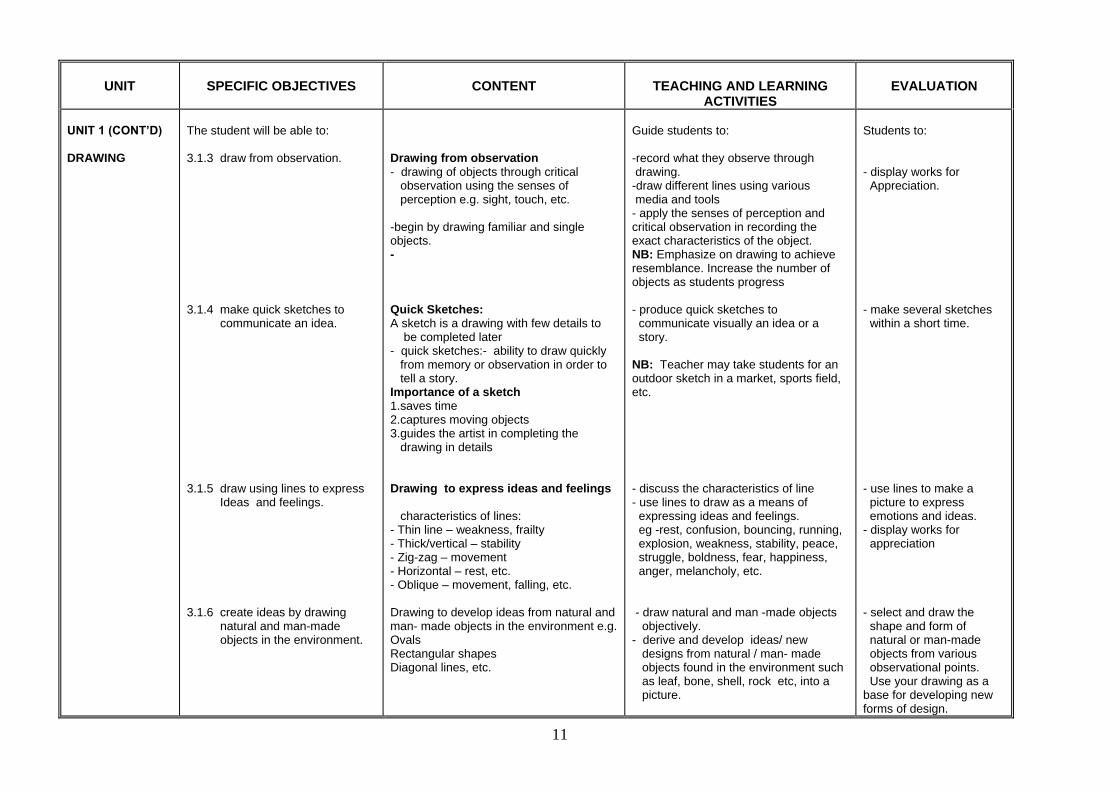
UNIT 1 (CONT’D) DRAWING
The student will be able to: 3.1.3 draw from observation. 3.1.4 make quick sketches to communicate an idea. 3.1.5 draw using lines to express Ideas and feelings. 3.1.6 create ideas by drawing natural and man-made objects in the environment.
Drawing from observation - drawing of objects through critical observation using the senses of perception e.g. sight, touch, etc. -begin by drawing familiar and single objects. - Quick Sketches: A sketch is a drawing with few details to be completed later - quick sketches:- ability to draw quickly from memory or observation in order to tell a story. Importance of a sketch 1.saves time 2.captures moving objects 3.guides the artist in completing the drawing in details Drawing to express ideas and feelings characteristics of lines: - Thin line – weakness, frailty - Thick/vertical – stability - Zig-zag – movement - Horizontal – rest, etc. - Oblique – movement, falling, etc. Drawing to develop ideas from natural and man- made objects in the environment e.g. Ovals Rectangular shapes Diagonal lines, etc.
Guide students to: -record what they observe through drawing. -draw different lines using various media and tools - apply the senses of perception and critical observation in recording the exact characteristics of the object. NB: Emphasize on drawing to achieve resemblance. Increase the number of objects as students progress - produce quick sketches to communicate visually an idea or a story. NB: Teacher may take students for an outdoor sketch in a market, sports field, etc. - discuss the characteristics of line - use lines to draw as a means of expressing ideas and feelings. eg -rest, confusion, bouncing, running, explosion, weakness, stability, peace, struggle, boldness, fear, happiness, anger, melancholy, etc. - draw natural and man -made objects objectively. - derive and develop ideas/ new designs from natural / man- made objects found in the environment such as leaf, bone, shell, rock etc, into a picture.
Students to: - display works for Appreciation. - make several sketches within a short time. - use lines to make a picture to express emotions and ideas. - display works for appreciation - select and draw the shape and form of natural or man-made objects from various observational points. Use your drawing as a base for developing new forms of design.

12
UNIT
SPECIFIC OBJECTIVES
CONTENT
TEACHING AND LEARNING
ACTIVITIES
EVALUATION
UNIT 1 (CONT’D) DRAWING Tools, materials and equipment
UNIT 2 PAINTING (a) Meaning
The student will be able to: 3.1.7 classify tools, materials and equipment for drawing according to their functions. 3.1.8 make tools, materials and equipment for drawing. 3.1.9 determine the effectiveness of tools, materials and equipment. 3.2.1 explain the concept and scope of painting.
Classification of tools, materials and equipment for drawing: - Tools for drawing: pencil, pen, charcoal, crayon, pastel, brush, eraser, putty rubber, quill, reed silver point, nibs markers, etc. - Materials for drawing: paper, cardboard, charcoal, crayon, pastels, pencil, ink, colour, etc. - Equipment for drawing: drawing-board, drawing pins, palette, spray diffuser, etc. Making tools, materials and equipment for drawing: e.g. charcoal, brushes, crayon, adhesive, drawing boards, etc Testing tools and materials for effectiveness through exploration and experimentation. The meaning and scope of painting The art of applying a pigment/ colour or other organic or synthetic substance to various surfaces to create a realistic or abstract picture or design. Scope Landscape/seascape, portraiture, Still life, etc.
Guide students to: - identify and discuss the meaning and uses of tools, materials and equipment for drawing - discuss and compare their characteristics NB: -show samples and pictures - visit studios of practitioners to familiarize with their use observe and practise how to prepare/make some tools, materials and equipment for picture making. NB: -demonstrate how to make some tools, materials and equipment with available resources. -explore, test and experiment with tools, materials and equipment to determine their effectiveness. -perform various tasks/assignments to gain mastery in their use. Discuss the meaning and scope of painting. Note: -Ensure the discussion covers the points in content and any others. - Use digital content where available- DVD, VIDEO,CD, FILM, INTERNET
Students to: -prepare a chart showing classification of the tools, materials and equipment according to uses and characteristics -exhibit / display the tools and materials produced -exhibit and present a report on the effectiveness of the tools, materials and equipment . - write an essay explaining with examples his or her understanding of painting and its scope.
13
UNIT
SPECIFIC OBJECTIVES
CONTENT
TEACHING AND LEARNING
ACTIVITIES
EVALUATION
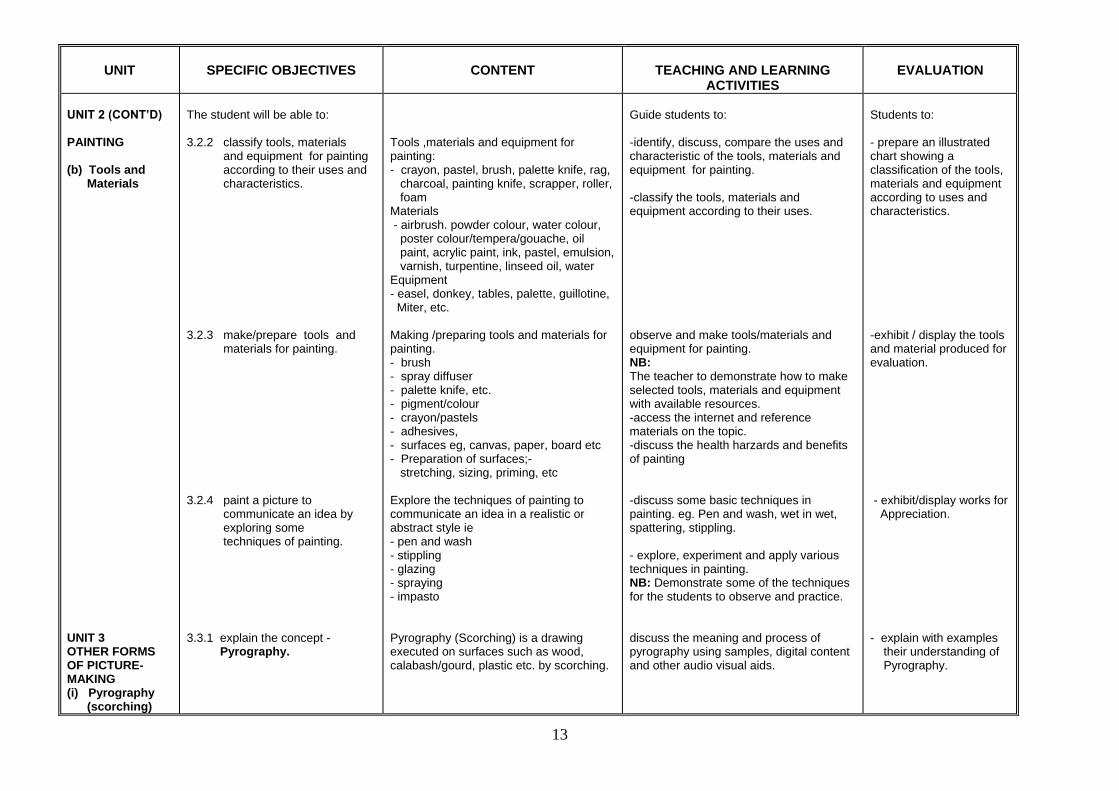
UNIT 2 (CONT’D) PAINTING (b) Tools and Materials UNIT 3 OTHER FORMS OF PICTURE-MAKING (i) Pyrography (scorching)
The student will be able to: 3.2.2 classify tools, materials and equipment for painting according to their uses and characteristics. 3.2.3 make/prepare tools and materials for painting. 3.2.4 paint a picture to communicate an idea by exploring some techniques of painting. 3.3.1 explain the concept - Pyrography.
Tools ,materials and equipment for painting: - crayon, pastel, brush, palette knife, rag, charcoal, painting knife, scrapper, roller, foam Materials - airbrush. powder colour, water colour, poster colour/tempera/gouache, oil paint, acrylic paint, ink, pastel, emulsion, varnish, turpentine, linseed oil, water Equipment - easel, donkey, tables, palette, guillotine, Miter, etc. Making /preparing tools and materials for painting. - brush - spray diffuser - palette knife, etc. - pigment/colour - crayon/pastels - adhesives, - surfaces eg, canvas, paper, board etc - Preparation of surfaces;- stretching, sizing, priming, etc Explore the techniques of painting to communicate an idea in a realistic or abstract style ie - pen and wash - stippling - glazing - spraying - impasto Pyrography (Scorching) is a drawing executed on surfaces such as wood, calabash/gourd, plastic etc. by scorching.
Guide students to: -identify, discuss, compare the uses and characteristic of the tools, materials and equipment for painting. -classify the tools, materials and equipment according to their uses. observe and make tools/materials and equipment for painting. NB: The teacher to demonstrate how to make selected tools, materials and equipment with available resources. -access the internet and reference materials on the topic. -discuss the health harzards and benefits of painting -discuss some basic techniques in painting. eg. Pen and wash, wet in wet, spattering, stippling. - explore, experiment and apply various techniques in painting. NB: Demonstrate some of the techniques for the students to observe and practice. discuss the meaning and process of pyrography using samples, digital content and other audio visual aids.
Students to: - prepare an illustrated chart showing a classification of the tools, materials and equipment according to uses and characteristics. -exhibit / display the tools and material produced for evaluation. - exhibit/display works for Appreciation. - explain with examples their understanding of Pyrography.

14
UNIT
SPECIFIC OBJECTIVES
CONTENT
TEACHING AND LEARNING
ACTIVITIES
EVALUATION
UNIT 3 cont. OTHER FORMS OF PICTURE-MAKING (i) Pyrography (scorching) ii) Collage
The student will be able to: 3.3.2 differentiate between the use of tools and materials for pyrography. 3.3.3 compose a picture using techniques in pyrography 3.3.4 determine the differences and similarities in the meaning and technique of collage from other picture making techniques. 3.3.5 classify tools and materials for collage according to uses, sources and characteristics.
Meaning of Pyrography: Tools and materials for pyrography: - Soldering iron, - metal rod, - fire, - chalk, - pencil, etc. Materials: - calabash/gourd, - wood, - plastic, - straw board, etc. Safety precautions; -follow safety guidelines provided by the manufacturers of safety gadgets - wear protective clothing. eg gloves Composition of a picture in pyrography. - composing a picture. - drawing - scorching Determining the meaning and techniques of collage and others: - a pictorial technique in which the artist creates an image by adhering objects as paper, cloth, wood or other odds and ends on a surface. Classification of tools and materials for making collage Tools: - scissors, chalk, pencil, tracing paper, etc.
Guide students to: -identify and describe tools and materials for pyrography -compare, discuss their uses and safety measures. NB: consult fire experts for advice on safety measures involved in the use of hot appliances on surfaces to create images.
- discuss the use of tools and materials for pyrography, - explore, experiment and apply various techniques in pyrography. - compose a picture based on - still-life, nature, human figure, etc). NB: Demonstrate various techniques in pyrography for students to observe and practise. - discuss the meaning and technique of collage using samples. - discuss and compare the differences between collage and other picture making techniques. - identify and discuss the uses, characteristics and sources of the various tools and materials for collage. - discuss the sources, uses and characteristics of these materials and tools for collage.
Students to: - prepare a chart stating - the differences and similarities between the tools and materials for pyrography. - safety precautions associated with the use of pyrography tools and materials. compose a picture using tools and materials for pyrography based on still life, nature, human and animal activities. write a short essay on the differences and similarities in the meaning of collage and other techniques such as pyrography and drawing. use the tools and materials to produce simple pictures in collage-eg single figure picture.
15
UNIT
SPECIFIC OBJECTIVES
CONTENT
TEACHING AND LEARNING
ACTIVITIES
EVALUATION
UNIT 3 (CONT’D) OTHER FORMS OF PICTURE MAKING (iii) Appliqué
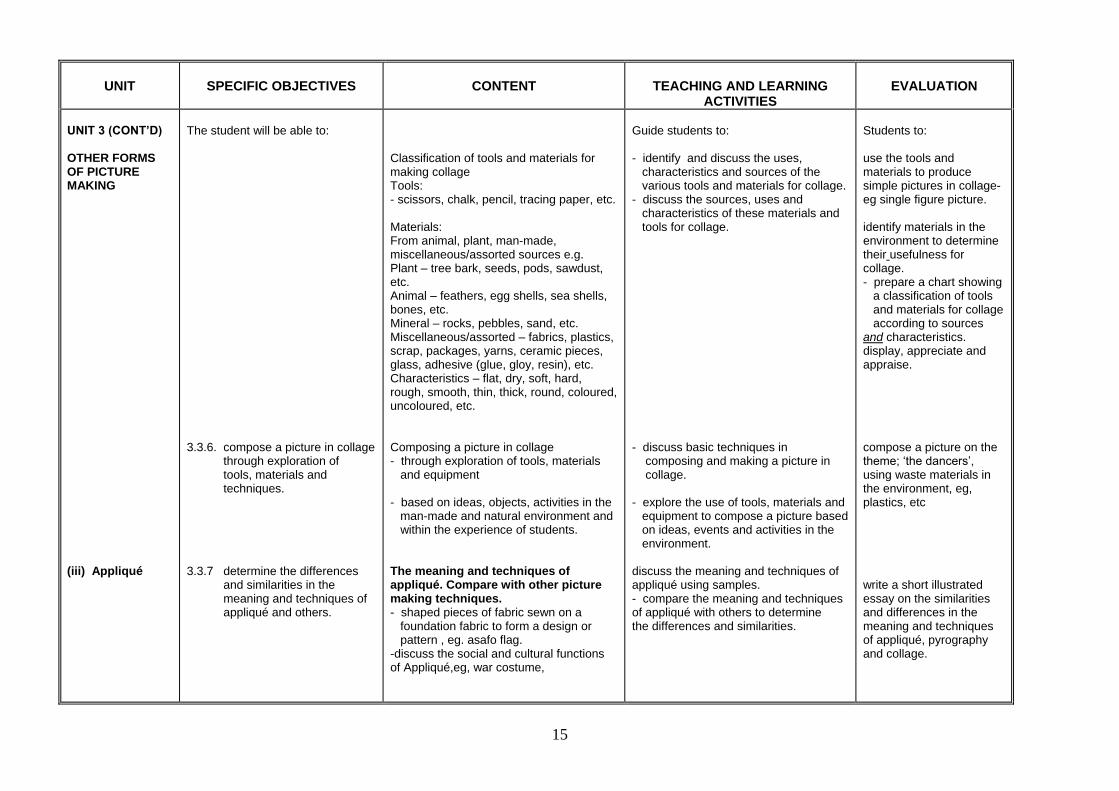
The student will be able to: 3.3.6. compose a picture in collage through exploration of tools, materials and techniques. 3.3.7 determine the differences and similarities in the meaning and techniques of appliqué and others.
Classification of tools and materials for making collage Tools: - scissors, chalk, pencil, tracing paper, etc. Materials: From animal, plant, man-made, miscellaneous/assorted sources e.g. Plant – tree bark, seeds, pods, sawdust, etc. Animal – feathers, egg shells, sea shells, bones, etc. Mineral – rocks, pebbles, sand, etc. Miscellaneous/assorted – fabrics, plastics, scrap, packages, yarns, ceramic pieces, glass, adhesive (glue, gloy, resin), etc. Characteristics – flat, dry, soft, hard, rough, smooth, thin, thick, round, coloured, uncoloured, etc. Composing a picture in collage - through exploration of tools, materials and equipment - based on ideas, objects, activities in the man-made and natural environment and within the experience of students. The meaning and techniques of appliqué. Compare with other picture making techniques. - shaped pieces of fabric sewn on a foundation fabric to form a design or pattern , eg. asafo flag. -discuss the social and cultural functions of Appliqué,eg, war costume,
Guide students to: - identify and discuss the uses, characteristics and sources of the various tools and materials for collage. - discuss the sources, uses and characteristics of these materials and tools for collage. - discuss basic techniques in composing and making a picture in collage. - explore the use of tools, materials and equipment to compose a picture based on ideas, events and activities in the environment. discuss the meaning and techniques of appliqué using samples. - compare the meaning and techniques of appliqué with others to determine the differences and similarities.
Students to: use the tools and materials to produce simple pictures in collage-eg single figure picture. identify materials in the environment to determine their usefulness for collage. - prepare a chart showing a classification of tools and materials for collage according to sources and characteristics. display, appreciate and appraise. compose a picture on the theme; „the dancers‟, using waste materials in the environment, eg, plastics, etc write a short illustrated essay on the similarities and differences in the meaning and techniques of appliqué, pyrography and collage.

16
UNIT
SPECIFIC OBJECTIVES
CONTENT
TEACHING AND LEARNING
ACTIVITIES
EVALUATION
UNIT 3 (CONT’D) OTHER FORMS OF PICTURE-MAKING (iii) Appliqué (iv) Mosaic
The student will be able to: 3.3.8 describe the uses of tools and materials for appliqué. 3.3.9 compose a picture in appliqué through exploration of tools, materials and techniques. 3.3.10 determine the difference and similarities in the meaning and techniques of mosaic and others.
Tools and materials for appliqué Tools: - scissors, needle, tracing wheel, sewing machine, seam ripper, etc. Materials: - cloth/fabric, thread, foam or stiff for padding, etc. Composition of a picture in appliqué. - through exploration and experimentation of tools, materials and techniques - themes e.g. ideas, events and activities within the experience of students in the man-made and natural environment, cultural and tropical issues eg. HIV/AIDS, child and drug abuse, indiscipline, proverbs, symbols, festivals, etc. Determining the meaning and technique of mosaic from others: - Picture or design made with small pieces of coloured materials as glass, stone, tile, etc. stuck onto a surface. NOTE: Pasting/gluing SHOULD NOT overlap in order to create a network of lines.
Guide students to: assemble samples of materials and tools for identification and discussion on their uses. Identify and discuss an appliqué work using samples, pictures, digital content (if possible). - discuss the techniques, symbolic, social and cultural significance of an appliqué item eg. Asafo flag. - discuss ideas, topics, themes and techniques for composing an appliqué item which is symbolic and communicates as well. - design and make a simple appliqué item through composing, exploration, experimentation of tools, techniques and materials. discuss the meaning and techniques of mosaic - compare the technique and meaning of mosaic with others to determine similarities and differences, eg. collage, appliqué, pyrography
Students to: find out the tools and materials in the locality for appliqué and write a report on their uses. Study, appreciate and appraise an item in terms of materials, techniques, composition, uses, meaning, ideas and report in class for discussion. - design and compose a picture in appliqué in groups through exploration and experimentation with tools, techniques and materials. (the item must be based on ideas, themes and topical issues of individual and society from imagination, memory, observation, etc.) write a brief essay on the similarities and differences in the meaning and techniques of mosaic and others eg. collage, appliqué, pyrography

17
UNIT
SPECIFIC OBJECTIVES
CONTENT
TEACHING AND LEARNING
ACTIVITIES
EVALUATION
UNIT 3 (CONT’D) OTHER FORMS OF PICTURE-MAKING (iv) Mosaic
The student will be able to: 3.3.11 describe the sources and characteristics of tools and materials for mosaic. 3.3.12 compose a picture in mosaic through exploration, experimentation of tools, materials and techniques.
Sources and characteristics of tools and materials Tools:- - Scissors, knife, pencil, chalk, hammer, etc. Materials: - from man – made and natural sources plant, animals and mineral e.g. ceramic and pottery ware, shells, seeds, tree bark, etc. Sources: - plant; tree bark, seeds, etc. - animal; feathers, egg and sea shells, etc. - minerals; pebbles, stones, sand, rocks, etc. - man-made and assorted eg. paper, card, plastics, rubber, fabric, leather, glass, metals, beads, tiles, tessarae, etc. - characteristics; hard, soft, dry, light, flat, geometric, solid, rough, smooth, etc. Composition of a picture in mosaic through exploration and experimentation. - Theme; ideas from natural and man- made environment, - Cultural, societal events, proverbs, symbols, stories and activities - topical issues concerning individuals and society, etc. HIV/AIDS, religion, etc.
Guide students to: identify and discuss the sources and characteristics and uses of tools and materials for mosaic. - examine, test and explore the uses of tools, materials and techniques for making mosaic. discuss and appreciate a mosaic item - discuss techniques and materials used for making mosaic. - discuss how to compose and make an item or picture in mosaic. - compose a picture mosaic based on an idea or topic from imagination, memory or observation. - display their pictures for appreciation and appraisal.
Students to: find out sources, types and uses of suitable materials in the locality for making collage and prepare a chart on them. identify a topic/idea/theme and compose a picture and express it through exploration and experimentation of tools, materials and techniques. (group or individual work)

18
UNIT
SPECIFIC OBJECTIVES
CONTENT
TEACHING AND LEARNING
ACTIVITIES
EVALUATION
UNIT 3 (CONT’D) OTHER FORMS OF PICTURE-MAKING (v) Print-making
3.3.12 explain the term print making and its importance. 3.3.13 categorise print making according to types, tools and materials.
Meaning and importance of print making Print making – a general term for a number of duplicating processes by which two dimensional images are produced from either pressing, hitting or stamping a block etc on a surface(as in etching, wood cut or lithography) or photo mechanically transfering images (as in newspaper and magazine illustrations) in order to produce a set of identical or nearly identical prints. Importance: print making is useful for all types of visual communication, decoration on surfaces in the form of printed literature, pictures, symbols, images, eg. books, textiles, packages and other manufactured products Categorization of print making The transferred image is called print. Print making processes are divided into four major categories; relief, intaglio, serigraphy, lithography.
i) Relief: (tools) knife, chisel, gouge, pencil. Roller,
(materials)- wood, lino, tubers (yam, cocoyam, etc.)
ii) Intaglio: (tools) needles, burin, burnishers, scrapers, and rockers
(materials)- ink, paper, wood, metal plate, acid, etc.
iii) Serigraphy; (tools) squeegee, wooden frame, stapler/ stapling pin, brush, emulsion, coating blade, through, etc
(materials)- organdie, printing past, lacquer, , photo emulsion – (potassium dichromate plus PVA glue), etc.
Guide students to: discuss with illustration the meaning and importance of print making. NB: use digital content and other audiovisual teaching and learning materials where available. identify, categorise and discuss the tools and materials for print making according to their types.
Students to: research with reference to internet and books and prepare an essay agreeing or disagreeing with the statement that; print making is the most important technique for visual communication. prepare a chart showing the categorisation of print making according to types, tools and materials. (students to visit and look for information from internet, practitioners and reference books).

19
UNIT
SPECIFIC OBJECTIVES
CONTENT
TEACHING AND LEARNING
ACTIVITIES
EVALUATION
UNIT 3 (CONT’D) OTHER FORMS OF PICTURE-MAKING (v) Print-making (Vi) Montage
3.3.14 compose a picture by print making through exploration and experimentation with tools, materials and techniques. 3.3.15 determine the differences and similarities in the meaning and techniques of montage and others. 3.3.16 identify the tools and materials for montage.
iv) Lithography; (tool)- metal plate, brush, etc
(materials)- greasy ink; such as touché, litho crayon, litho pencil, water, paper, etc. Composing a picture by print making. - through experimentation, exploration of materials, tools and techniques eg. stencil and block relief - Theme; ideas from natural and man- made environment, - Cultural, societal events, proverbs, symbols, stories and activities - topical issues concerning individuals and society, etc. HIV/AIDS, religion, etc. Determining the meaning and techniques of montage and others: - A picture composed by assembling, overlapping, overlaying and pasting of materials obtained from photographs, magazines and other sources Tools and Materials for Montage: - pencil, blade, scissors, etc. Materials: Magazines, photographs, board, carpenters, glue, etc.
Guide students to: identify and discuss techniques, ideas, themes and topical issues for composing a picture by print making. - explore, experiment and compose a picture based on an idea or topic by print making techniques NB: demonstrate the techniques for students to observe and practice. -explain the health harzards associated with Print Making discuss the meaning and techniques of montage. - compare them with other techniques to determine the differences in similarities eg. appliqué, mosaic, collage, pyrography and print making. identify and discuss tools and materials for montage.
Students to: compose a picture by print making techniques to express or communicate an idea or message. compare and contrast the differences/ similarities between montage and appliqué, mosaic and collage.

20
UNIT
SPECIFIC OBJECTIVES
CONTENT
TEACHING AND LEARNING
ACTIVITIES
EVALUATION
UNIT 3 (CONT’D) OTHER FORMS OF PICTURE-MAKING vi) Montage (vii) Marquetry
The student will be able to: 3.3.17 compose a picture in montage by exploring and experimenting with tools, materials and techniques. 3.3.18 compare the meaning and techniques of marquetry with others to determine differences and similarities. 3.3.19 describe the tools and materials for marquetry.
Composing a picture in montage. - Theme; ideas from natural and man- made environment, - Cultural, societal events, proverbs, symbols, stories and activities - topical issues concerning individuals and society, etc. HIV/AIDS, religion, etc. Comparing the meaning and technique of marquetry with others. - The art of combining different veneer pieces to form pictures or patterns. The decorative effects are produced by contrasting colours and shapes of veneer, which are then adhered to a base wood. Tools and materials for marquetry: - Knife, pencil, veneer saw, blade, carbon paper, steel ruler, adhesive tapes, etc. Materials: - Veneer, carpenters‟ glue, board, vanish, etc.
Guide students to: discuss and appreciate a montage item - discuss techniques and materials used for making montage. - discuss how to compose and make an item or picture in montage. - compose and make a picture in montage based on an idea or topic from memory imagination and observation. - display their pictures for appreciation and appraisal. discuss the meaning and techniques of marquetry - compare and contrast the meaning and techniques with others to determine the differences and similarities eg. collage, mosaic, appliqué, montage and pyrography. identify and discuss the uses of tools and materials for marquetry.
Students to: compose a real or abstract picture in montage to satisfy a personal or societal need. Compare and contrast the differences and similarities between marquetry, mosaic, collage, appliqué and pyrography. visit, observe and interview a practitioner in marquetry and report on the tools, materials and techniques being used. Project (a) by using the internet, textbooks and other publications determine the meaning of the various techniques in picture making eg. collage, mosaic, pyrography, montage and marquetry.

21
UNIT
SPECIFIC OBJECTIVES
CONTENT
TEACHING AND LEARNING
ACTIVITIES
EVALUATION
UNIT 3 (CONT’D) OTHER FORMS OF PICTURE-MAKING (vii) Marquetry UNIT 4 STUDIO MAINTENANCE
The student will be able to: 3.3.20 compose a picture in marquetry by exploring and experimenting with tools, materials and techniques. 3.4.1 care for picture making materials and equipment.
Composing a picture in marquetry: - Theme; ideas from natural and man- made environment, - Cultural, societal events, proverbs, symbols, stories and activities - topical issues concerning individuals and society, e.g. HIV/AIDS, religion, etc. Caring for tools, materials and equipment: - Cleaning brushes and palette after use with kerosene/turpentine and with soap. - Keeping hair of brushes upright - Keeping papers flat, rolled up or in folios, etc. - Keeping containers of paints, powdered pigment, solvent, well closed, etc.
Guide students to: discuss and appreciate a marquetry item - discuss techniques and materials used for making marquetry. - discuss how to compose and make an item or picture in marquetry. - compose and make a picture in marquetry based on an idea or topic from memory imagination and observation. - display their pictures for appreciation and appraisal. NB: demonstrate the techniques for students to observe and practise. discuss studio maintenance practices. NB: use digital content as well as teacher, learner, participatory method such as - case studies - features wheel - value clarification - role play - simulation
Students to: (b) use the understanding to prepare an illustrated paper on the similarities and differences in techniques, tools and materials. (c) explain their importance in picture making. describe some of the studio maintenance practices. NB: show by practical examples and behaviour the caring of tools, materials and equipment in class.

22
UNIT
SPECIFIC OBJECTIVES
CONTENT
TEACHING AND LEARNING
ACTIVITIES
EVALUATION
UNIT 4 CONT OTHER FORMS OF PICTURE-MAKING Studio Maintenance
The student will be able to: 3.4.2 demonstrate knowledge and skills in preventing health hazards associated with picture making. 3.4.3 demonstrate knowledge and skills, right conduct and precautions in studio/class work activities.
(i) Preventing health hazards in picture making: - eating with unwashed hands after work; chemicals such as turpentine, kerosene, etc. contaminates food, drinking water, etc. (ii) Body injuries: - sores, abrasions, burns, etc. resulting from sharp/hot tools and chemicals. (iii) Inhalation of dust and fumes; - creation of dusty procedures such as sanding, sprinkling of saw dust, etc; fumes from spray diffuser, air brush, turpentine, petrol, etc. . Safety precautions: - providing first aid in the studio - tidying up studio after work - washing hands thoroughly before eating, drinking or applying make-ups after work. - working in well ventilated studios. - avoid dusty procedures such as sanding, sprinkling of dry paint, saw dust, etc. or where necessary, wear protective gadgets as nose mask, gloves, goggles,etc. - painters should avoid using their lips to smoothen brushes after washing them.
Guide students to: discuss the health hazard and preventive measures associated with picture making. NB: Use digital content if possible . Organise a visit to or invite an expert to the school for a talk on health hazards in the use of tools, materials and equipment. - discuss the safety precaution in picture making - suggest ways of applying safety and precautionary measures into the classroom practices. - discuss and lay down rules and regulations and sanctions in maintenance and safety practices in class. NB: use digital content if possible and organise a visit to or by an expert to the school for a talk on safety precautions in the use of tools, materials and equipment. Use digital content if possible and participatory teaching and learning methods such as case studies, role play, features wheel, debate, educational trip and value clarification. Emphasise the role of moral and human values and attitude in studio maintenance eg. love, diligent, self- discipline, compassion and spirit of caring, etc.
Students to: describe some identified health hazards associated with picture making and their prevention. Project Students to visit a studio observe and find out and prepare a class debate paper which either support or refutes the statement that “studio maintenance and safety practises are meant for only professional practitioners.

23
SENIOR HIGH SCHOOL 1
SECTION 4
BODY ART
General Objectives: The student will:
1. recognise body art as a social or cultural need. 2. discover types of body art and their social, spiritual, and health implications. 3. acquire basic skills in body decoration.
UNIT
SPECIFIC OBJECTIVES
CONTENT
TEACHING AND LEARNING
ACTIVITIES
EVALUATION
UNIT 1 IMPORTANCE OF BODY ART
The student will be able to: 4.1.1 analyse the social, cultural, meaning and importance of body art. 4.1.2 explain the status of the body painter and the one being painted.
Body painting (art): Body art refers to tattoos, piercings, scarifications and painted marks done on the body as well as hair-styles, for personal and social identification, medicinal, magical, royal purposes or as a participant in a specific ceremony like the rite of passage, sports and drama. In recent times, body art is even employed in politics, advertisement of goods and services as well as sport and fashion. Status of the body painter and the one being painted.
Guide students to: discuss and explain the concept, scope, characteristics and significance of body painting (art). discuss the status of the body painter and the one being painted. - brainstorm and discuss the reason why people or cultures engage in body arts.
Students to: analyse the socio-economic and cultural import of body painting (art) with examples. investigate and report on the reasons why people do body painting/art.

24
UNIT
SPECIFIC OBJECTIVES
CONTENT
TEACHING AND LEARNING
ACTIVITIES
EVALUATION
UNIT 2 TYPES OF BODY ART UNIT 3 TOOLS/ MATERIALS AND TECHNIQUES FOR BODY ART
The student will be able to: 4.2.1 differentiate between types of body art . 4.2.2 explain possible health benefits associated with body painting/art. 4.3.1 explain possible health hazards associated with body painting/art. 4.3.2 identify tools/materials and techniques for body painting art.
Differences in types body art. Body art includes - tattooing - scarification - coiffure - cicatrisation, etc. -identification -healing -beauty -spiritual protection, etc Health hazards associated with body painting/art: - skin diseases; - body odour - tetanus - HIV/AIDS - unwanted permanent scars, etc. Appropriate tools, materials and techniques for body painting/art. Tools dabbing tools, painting tools, incising tools, smearing tools, tattooing tools, etc. Materials Tattooing dyes, special cleaning agents etc. (use of ordinary colours/paints, inks and other safe materials are recommended for demonstration lesson and activities). Techniques Painting, printing, dabbing, smearing incising, tattooing, plaiting, combing, coiffure, etc.
Guide students to: - discuss the various types of body art. - look for common types in the community. - compare and describe types of body art to identify their differences. - discuss possible health hazards and benefits associated with body painting/art. NOTE: Invite or visit a health worker to give talk on the topic. identify and discuss tools/materials for body painting. discuss safe and responsible use of tools, materials and techniques.
Students to: differentiate between the types of body art. investigate and report on the possible health hazards posed by the tools, materials and techniques associated with body painting/art.

25
UNIT
SPECIFIC OBJECTIVES
CONTENT
TEACHING AND LEARNING
ACTIVITIES
EVALUATION
UNIT 3 (CONT) TOOLS/ MATERIALS AND TECHNIQUES FOR BODY ART
4.3.3 design and paint the body using safe and appropriate tools, technique and materials.
Designing and painting the body. - painting the body to satisfy a personal social and cultural need. - painting to symbolize or communicate an idea.
Guide students to: discuss topics, symbols, and ideas to serve as inspiration for developing designs for body art. demonstrate and practise techniques in body painting/art using safe and appropriate techniques. Design and paint limited/exposed areas of the body individually and in pairs e.g. face, hand and legs.
Students to: - appreciate their body paintings they made.

26
SENIOR HIGH SCHOOL - YEAR 1
SECTION 6
ENTREPRENEUR SKILLS AND PROFESSIONAL PRACTICES
General objectives: The student will:
1. develop the right professional attitude and harness variety of ideas to launch a career. 2. develop a business plan and review it periodically. 3. be aware of the relevance of portfolio building and exhibition in the life of an artist.
UNIT SPECIFIC OBJECTIVES
CONTENT TEACHING AND LEARNING ACTIVITIES
EVALUATION
UNIT 1 BUILDING A PORTFOLIO
The student will be able to: 6.1.1 discuss the importance of an artist‟s portfolio. .
Artist’s Portfolio The artist‟s portfolio can be described as
i. A large flat case used especially for carrying pictures, documents etc.
ii. Set of pictures or other pieces of work that an artist, photographer etc. has done (hard or soft copies)
Types Photographs, slides, transparencies, CDs, VCDs, DVDs, EVDs, files, folders, albums, etc. Constructing portfolio with appropriate materials and using it to store or keep personal artworks for assessment, exhibition etc. Importance It serves as an evidence of practical knowledge, creative ability, skill, experience and achievement during an interview for future studies, education, training or employment.
Using samples lead students to discuss: an artist‟s portfolio the importance of a portfolio and types of a portfolio . Ask students to discuss the advantages and disadvantages of keeping a portfolio Guide students to develop a checklist for determining the qualities and requirements for a good portfolio.
Students to: explain the importance and functions of portfolio to the artist.
.

27
UNIT SPECIFIC OBJECTIVES
CONTENT TEACHING AND LEARNING ACTIVITIES
EVALUATION
UNIT 1 (CONT’D) PORTFOLIO BUILDING UNIT 2 DEVELOPING A BUSINESS PLAN
The student will be able to: 6.1.2 construct and build a portfolio with selected art works. 6.2.1 prepare a business plan for an art enterprise
Construction of a Portfolio Designing and making a container to keep art works Business Plan A business plan is a document that indicates what one intends doing, how and when. Purpose of a Business Plan
i. It controls the direction of the enterprise. ii. Is helps in monitoring and evaluating the
progress of the business iii. It serves as collateral or security to seek
a loan or financial assistance, etc. Things to Consider in Preparing a Business Plan
i. Executive summary ii. Name and address of business or
enterprise iii. Identification of a need to satisfy. iv. Establish what you want to achieve or
do. v. Find out or research from past solution
to similar problems. vi. Analyze the industry or market where
you can operate e.g. potential customers, competitors, etc.
Demonstrate the construction of a portfolio to students and ask every student to construct his/her own using any appropriate material, e.g. cardboard, strawboard, chip board, etc. Discuss how to select, mount and protect art works for storage. Guide the student to brainstorm and
i. discuss the meaning and purpose of a business plan.
ii. discuss with reference to an art enterprise, the key points in preparing a business plan
NB: Assist students to present their business plan with or without digital content in class for discussion. Consult a business person for assistance on the topic.
Students to: construct a portfolio for assessment with regards to quality of material, durability, capacity and aesthetic appeal describe how to develop a business plan using concrete examples. develop a business plan for his or her intended art enterprise for consideration by a local
i. bank ii. financier iii. non-governmental
organization
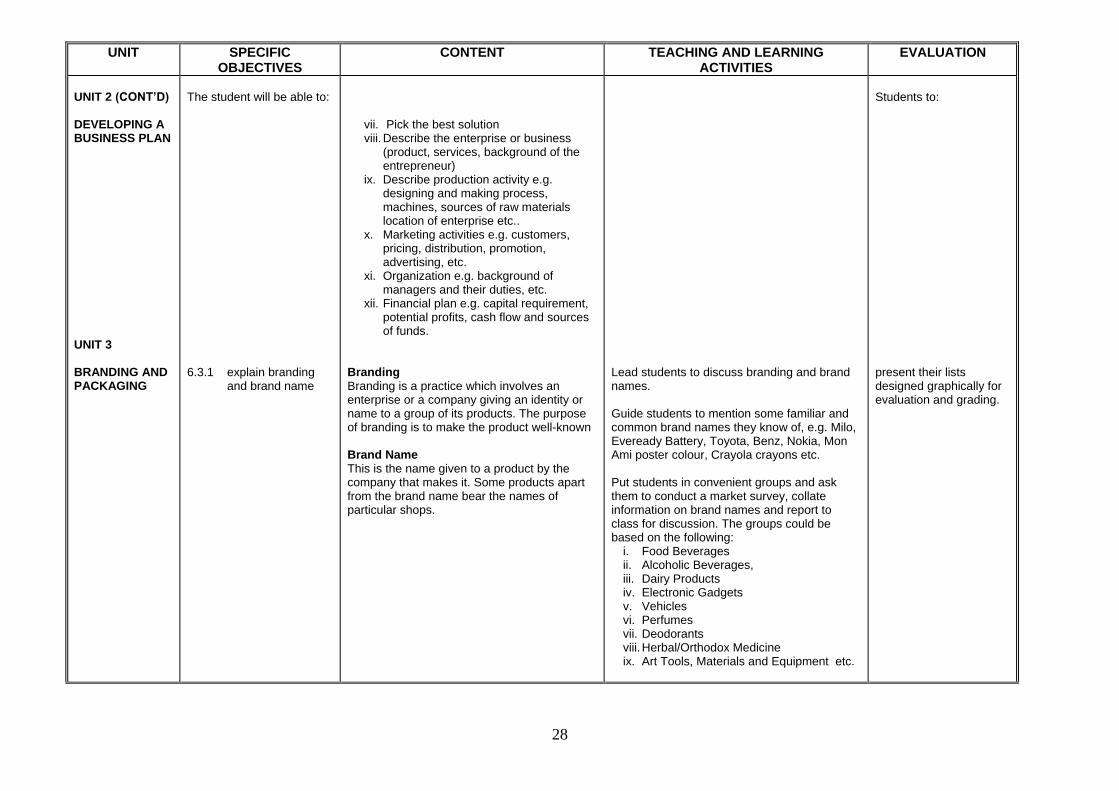
28
UNIT SPECIFIC OBJECTIVES
CONTENT TEACHING AND LEARNING ACTIVITIES
EVALUATION
UNIT 2 (CONT’D) DEVELOPING A BUSINESS PLAN UNIT 3 BRANDING AND PACKAGING
The student will be able to: 6.3.1 explain branding and brand name
vii. Pick the best solution viii. Describe the enterprise or business
(product, services, background of the entrepreneur)
ix. Describe production activity e.g. designing and making process, machines, sources of raw materials location of enterprise etc..
x. Marketing activities e.g. customers, pricing, distribution, promotion, advertising, etc.
xi. Organization e.g. background of managers and their duties, etc.
xii. Financial plan e.g. capital requirement, potential profits, cash flow and sources of funds.
Branding Branding is a practice which involves an enterprise or a company giving an identity or name to a group of its products. The purpose of branding is to make the product well-known Brand Name This is the name given to a product by the company that makes it. Some products apart from the brand name bear the names of particular shops.
Lead students to discuss branding and brand names. Guide students to mention some familiar and common brand names they know of, e.g. Milo, Eveready Battery, Toyota, Benz, Nokia, Mon Ami poster colour, Crayola crayons etc. Put students in convenient groups and ask them to conduct a market survey, collate information on brand names and report to class for discussion. The groups could be based on the following:
i. Food Beverages ii. Alcoholic Beverages, iii. Dairy Products iv. Electronic Gadgets v. Vehicles vi. Perfumes vii. Deodorants viii. Herbal/Orthodox Medicine ix. Art Tools, Materials and Equipment etc.
Students to: present their lists designed graphically for evaluation and grading.
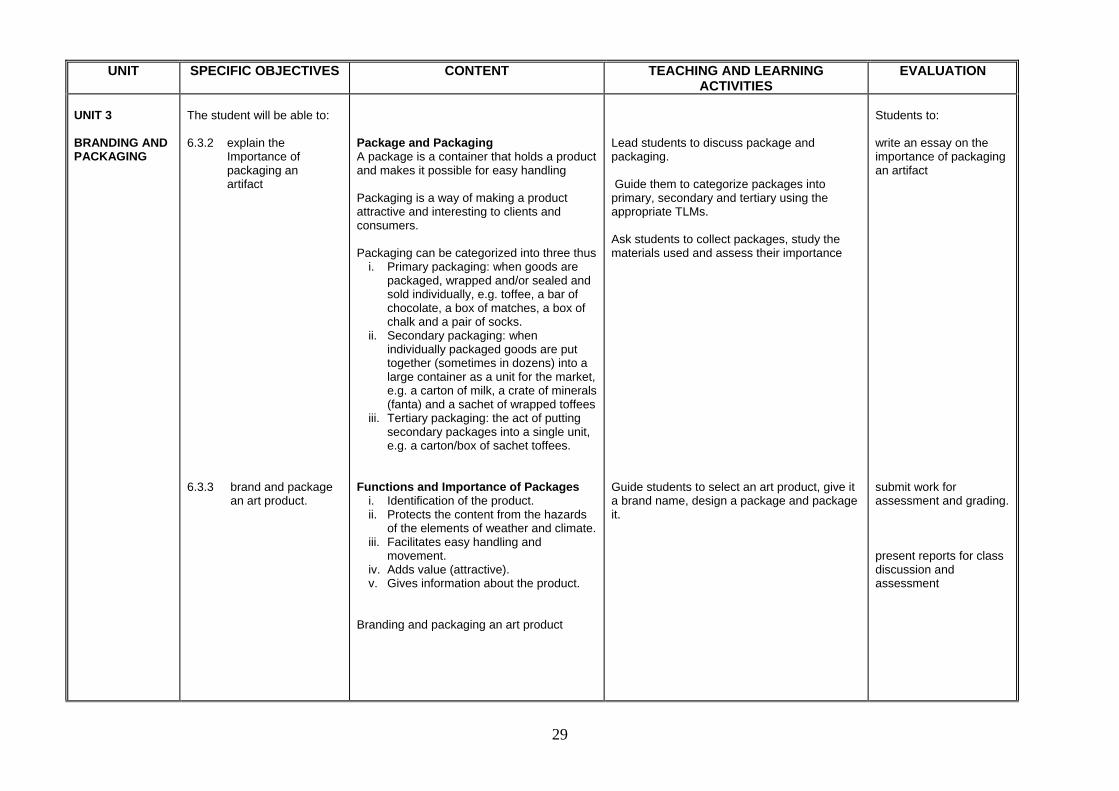
29
UNIT SPECIFIC OBJECTIVES CONTENT TEACHING AND LEARNING ACTIVITIES
EVALUATION
UNIT 3 BRANDING AND PACKAGING
The student will be able to: 6.3.2 explain the Importance of packaging an artifact 6.3.3 brand and package an art product.
Package and Packaging A package is a container that holds a product and makes it possible for easy handling Packaging is a way of making a product attractive and interesting to clients and consumers. Packaging can be categorized into three thus
i. Primary packaging: when goods are packaged, wrapped and/or sealed and sold individually, e.g. toffee, a bar of chocolate, a box of matches, a box of chalk and a pair of socks.
ii. Secondary packaging: when individually packaged goods are put together (sometimes in dozens) into a large container as a unit for the market, e.g. a carton of milk, a crate of minerals (fanta) and a sachet of wrapped toffees
iii. Tertiary packaging: the act of putting secondary packages into a single unit, e.g. a carton/box of sachet toffees.
Functions and Importance of Packages
i. Identification of the product. ii. Protects the content from the hazards
of the elements of weather and climate. iii. Facilitates easy handling and
movement. iv. Adds value (attractive). v. Gives information about the product.
Branding and packaging an art product
Lead students to discuss package and packaging. Guide them to categorize packages into primary, secondary and tertiary using the appropriate TLMs. Ask students to collect packages, study the materials used and assess their importance Guide students to select an art product, give it a brand name, design a package and package it.
Students to: write an essay on the importance of packaging an artifact submit work for assessment and grading. present reports for class discussion and assessment

30
UNIT SPECIFIC OBJECTIVES
CONTENT TEACHING AND LEARNING ACTIVITIES
EVALUATION
UNIT 4 ARTIST’S STATEMENT
The student will be able to: 6.4.1 explain and prepare own „Artist‟s Statement‟
Artist’ Statement: Many artists assume that everybody who sees their works will automatically understand their philosophy and concept. But this is not true. The artist must prepare and distribute his/her statement to guide his/her admirers have a clearer and better understanding of his/her works An Artist‟s Statement is an official statement by the artist to inform the public about his/her philosophy, style, technique, sources of inspiration and medium of artistic expression. Example of an Artist’s Statement: „I create photographs of assemblages constructed from pieces of ordinary paper. Twisting, tearing and crumpling paper into various shapes. I produce visual imagery that forms intriguing illusions and relationships between my objects when light, shadow and forms merge. At first glance, a photograph might appear as an exotic flower, but taking a closer look viewers will see the familiar scalloping and rippling of a paper plate‟ Leonard Morris Importance of an Artist’s Statement: An artist‟s statement
i. helps art consultants, dealers; retailers etc. promote and sell works of the artist.
ii. serves as background information in helping writers, critics and curators prepare articles, reviews and exhibition catalogues.
iii. can help the artist in sourcing for grants etc.
Lead students to discuss an artist‟s statement an its importance in the life of the practicing artist. Let every student
i. assemble the works he/she has produced over the years, study them and come out with a concept or philosophy to create an „Artist‟s Statement‟
ii. compare his/her statement with a friend‟s and collaborate to come out with a refined statement for class discussion and adoption.
Students to: Students to access information on how an artist‟s statement is prepared from the internet for class discussion.
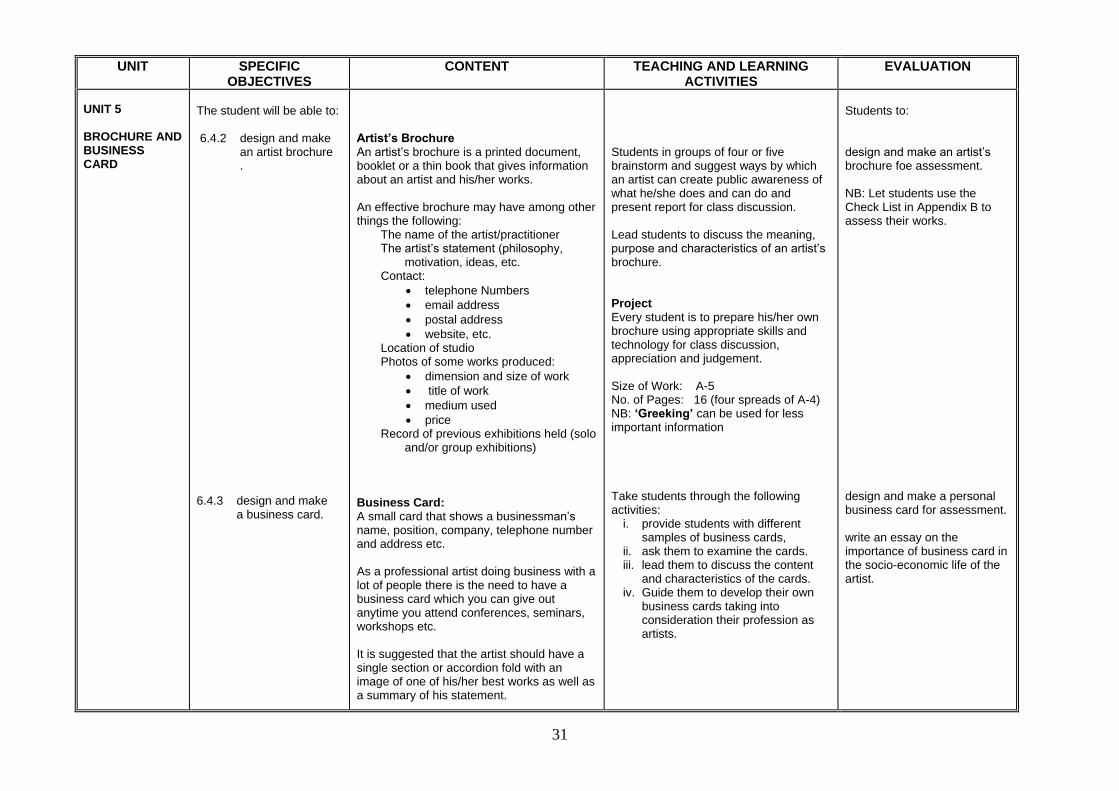
31
UNIT SPECIFIC OBJECTIVES
CONTENT TEACHING AND LEARNING ACTIVITIES
EVALUATION
UNIT 5 BROCHURE AND BUSINESS CARD
The student will be able to: 6.4.2 design and make an artist brochure .
6.4.3 design and make a business card.
Artist’s Brochure An artist‟s brochure is a printed document, booklet or a thin book that gives information about an artist and his/her works. An effective brochure may have among other things the following:
The name of the artist/practitioner The artist‟s statement (philosophy,
motivation, ideas, etc. Contact:
telephone Numbers
email address
postal address
website, etc. Location of studio Photos of some works produced:
dimension and size of work
title of work
medium used
price Record of previous exhibitions held (solo
and/or group exhibitions) Business Card: A small card that shows a businessman‟s name, position, company, telephone number and address etc. As a professional artist doing business with a lot of people there is the need to have a business card which you can give out anytime you attend conferences, seminars, workshops etc. It is suggested that the artist should have a single section or accordion fold with an image of one of his/her best works as well as a summary of his statement.
Students in groups of four or five brainstorm and suggest ways by which an artist can create public awareness of what he/she does and can do and present report for class discussion. Lead students to discuss the meaning, purpose and characteristics of an artist‟s brochure. Project Every student is to prepare his/her own brochure using appropriate skills and technology for class discussion, appreciation and judgement. Size of Work: A-5 No. of Pages: 16 (four spreads of A-4) NB: ‘Greeking’ can be used for less important information Take students through the following activities:
i. provide students with different samples of business cards,
ii. ask them to examine the cards. iii. lead them to discuss the content
and characteristics of the cards. iv. Guide them to develop their own
business cards taking into consideration their profession as artists.
Students to: design and make an artist‟s brochure foe assessment. NB: Let students use the Check List in Appendix B to assess their works. design and make a personal business card for assessment. write an essay on the importance of business card in the socio-economic life of the artist.

32
UNIT SPECIFIC OBJECTIVES CONTENT TEACHING AND LEARNING ACTIVITIES
EVALUATION
UNIT 6 EXHIBITION
The student will be able to: 6.5.1 explain and describe the types and purposes of exhibition
Exhibition: It is the public display of goods and services to attract viewers and buyers. Importance:
i. To promote sales ii. To advertize a new skill, technique,
style or product. iii. To attract customers iv. For public interaction and evaluation. v. For self advertisement and public
awareness. vi. To create business links. vii. To break new grounds etc
Types of Exhibition:
i. General Exhibition: this type of exhibition attracts different kinds of goods and services e.g. auto mobile, electronics, beverages, fine arts, books, woodwork, etc.
ii. Specialized Exhibition: this type of exhibition attracts specific products, e.g. an Art Exhibition.
iii. Solo or Individual Exhibition: this is
an exhibition undertaken by only one person.
iv. Group Exhibition: an exhibition by a
group of persons. Forms of Exhibition Exhibitions whether general, specific, solo or group can take any of the following form based on the intended objectives and purpose.
Bazaar Educational Fair Exposition Jury/Assessment (Closed)
Guide students to brainstorm and come out with an operational meaning of Exhibition. Lead students to discuss the importance of exhibitions in the life of an artist. Ask students to research and come out with the types of exhibitions and the various forms that exhibitions can take through interviews, library research, internet etc.
Students to: produce artworks for exhibition visit exhibition centers and write reports Assignment Students to visit an exhibition, gallery etc. for fact finding on the importance of exhibition on the socio-economic life of the artist.

33
UNIT SPECIFIC OBJECTIVES
CONTENT TEACHING AND LEARNING ACTIVITIES
EVALUATION
UNIT 5 (CONT’D) EXHIBITION
The student will be able to: 6.5.2 plan and mount an exhibition
.
Open Exhibition Invitational Exhibition Retrospective exhibition Trade Exhibition Consumer exhibition Travelling Exhibition ((On Wheels) Demonstration Fair Periodic exhibition
Planning an Exhibition
Consider types of exhibition What to exhibit? Where to exhibit? Cost involved for publicity. Publicity Expected number of guests/visitors Duration/time Mounting of exhibits General layout or space arrangements Security Visitors book Opening and closing ceremonies
Mounting of exhibits
Colour scheme and balance. Size, weight and height. Environment. Preparation of works – finishing,
polishing, packaging, framing, labeling etc.
Method of mounting – hanging, spreading, etc.
Guide students to discuss the stages involved in the planning and preparation for an exhibition. Student to plan and mount periodic exhibitions. .
Students to: write reports on their experiences in planning and mounting exhibitions for assessment

34
SENIOR HIGH SCHOOL 2
SECTION 1 PICTURE MAKING METHODS AND TECHNIQUES
General Objectives: The student will:
1. understand and compare techniques, procedures, and symbolisms in picture making. 2. develop proficiencies in drawing, painting and other picture making techniques. 3. develop the ability to apply systematic procedures and symbolisms to other areas of life.
UNIT
SPECIFIC OBJECTIVES
CONTENT
TEACHING AND LEARNING
ACTIVITIES
EVALUATION
UNIT 1 DRAWING TECHNIQUES
Students will be able to: 1.1.1 draw objects using basic drawing techniques. 1.1.2 draw rectangular and cylindrical objects with different techniques. 1.1.3 shade drawn objects using various techniques in drawing.
Drawing objects and drawing with basic drawing techniques Basic drawing techniques;
- Line - Contour - Block- in - Silhouette - Dot
Drawing of rectangular and cylindrical objects using different techniques to represent; -one object -two objects together -three or more objects together Shading of objects using the shading techniques -mass -dot (stippling) -hatching -cross hatching -doodling, etc.
Guide students to: -describe basic techniques in drawing. -draw objects using line, contour, block-in, silhouette, dot, etc. -draw simple objects using the drawing techniques -draw objects at various eye levels using various techniques. NOTE: Demonstrate the techniques of shading for students to follow. observe critically the behaviour of lines and space as they recede, and also ovals at various angles. -draw and use various techniques to shade them. -note the tonal gradation as they practise the various techniques. - display their works for appraisal of own and other works.
Students to: -describe and draw shapes using simple drawing techniques -draw different shapes using any of the techniques -draw and shade objects using different techniques

35
UNIT SPECIFIC OBJECTIVES CONTENT TEACHING AND LEARNING ACTIVITIES
EVALUATION
UNIT 2 PAINTING TECHNIQUES
The student will be able to: 3.2.1 determine the characteristics of the various painting media. 1.2.2 paint through Experimentation.
Types of media
a) Dry; pastel, pencil, charcoal, conté, etc.
b) Wet; ink, poster, gouache, marker, water colour, oils, acrylics, etc
Colour Solvents/ vehicle poster/ gouache---------water water colour--------------water acrylics---------------------water oils---------------------------turpentine/ linseed Characteristics;
i) poster/ gouache-opaque, water soluble and re-soluble, works better when light tones are painted first, dries relatively fast, etc
ii) water colour-transparent, fluid, suggestible, works better when worked from light to dark tones, dries relatively fast etc
iii) acrylics- water soluble, dries very fast, can be applied in both oil and water colour techniques, may not crack like oils, relatively permanent, etc
iv) oils- soluble in turpentine and linseed oil, dries very slowly, opaque, permanent, can be worked either from light to dark and vice-versa very versatile,e etc
Exploring and experimenting with painting Techniques. Techniques:
i) impasto ii) alla prima iii) scumbling iv) glazing v) stippling, etc
Guide students to: identify and discuss the types and characteristic of various painting media. compare, describe, and discuss the characteristic of various media. perform task by exploring, experimenting and mixing colours and media to determine their characteristics experiment with colour mixing to determine their characteristics paint pictures in at least two techniques and display them for appreciation.
Student to: display works for appreciation produce sample works using the dry and wet media.

36
UNIT
SPECIFIC OBJECTIVES
CONTENT
TEACHING AND LEARNING
ACTIVITIES
EVALUATION
UNIT 2 (CONT’D) PAINTING TECHNIQUES
1.2.3 paint pictures with different techniques and media. 1.2.4 make pictures that depict Ghanaian concept and colour symbolism.
Painting pictures with different techniques and media - based on topical issues, activities of cultural, social, personal and national importance - real or abstract pictures from imagination, memory or observation Pictures depicting Ghanaian colour symbolism Symbolic and socio-cultural significance. example: Yellow, gold – richness, royalty – (kings ornament) Blue, water – sky, peace, love (love charm, puberty) Red: blood – danger, aggression (funeral, violence) -Ghanaian colour symbolism in picture making. Applying their understanding of Ghanaian colour symbolism/concept to make pictures. Pictures based on issues of personal, social, cultural and educational importance from memory,imagination and observation.
Identify and discuss ideas, topics and issues to serve as source of inspiration for making pictures. design and paint pictures in different techniques, media and topics. NOTE: (teacher should demonstrate the use of the various techniques). discuss the symbolic use of colour in everyday life, Ghanaian artifacts etc. draw, compose, paint, make pictures showing Ghanaian colour symbolism
The student to identify a need of an individual or community and use the design and technology process to compose and paint a picture to satisfy it. e.g. a picture to decorate a home, office, hospital, library, palace and public place. Draw and paint realistic or abstract pictures to depict an understanding of Ghanaian colour symbolism based on any idea or topical issues of social, cultural and economic importance from memory, imagination or observation.

37
UNIT
SPECIFIC OBJECTIVES
CONTENT
TEACHING AND LEARNING ACTIVITIES
EVALUATION
UNIT 3 PYROGRAPHY
UNIT 4 COLLAGE AND MONTAGE
i. Collage
The student will be able to: 1.3.1 compose pictures in pyrography to satisfy a need of society using appropriate tools, materials and techniques. 1.4.1 design and make collage work based on the topic.
Applying basic drawing techniques in pyrography;
- Line - Contour - Block- in - Silhouette - Dot, etc.
Exploring various surfaces for pyrography. Making pictures in pyrography to satisfy societal and individual needs e.g. self-expression, communication, worship, show of love, compassion, appreciation, food, clothing shelter, poverty employment, celebration etc. Design and execute a collage work e.g. by using odds and ends - Designing of collage. - Cutting pieces of odds and ends and pasting on a support to form a picture. - lacquering the finished work. - framing the piece.
Students to: discuss the concept and techniques of making pictures in pyrography, (scorching) to satisfy individual or societal needs demonstrate various skills in scorching by using appropriate tools and materials: - Guide students to compose abstract and semi-abstract pictures of objects, figures, plants, scenes, etc. to satisfy a need using scorching technique. NOTE: Ensure that students use the knowledge and skills in design and technology, elements and principles of design to identify and solve problems in picture making including pyrography
design and execute collage work assemble tools and materials from the environment. discuss and guide students to design their works. cut and paste odds and ends to build the picture. lacquer and frame their finished works. NB: Ensure that students apply knowledge and skills in drawing, design and technology process, elements and principles of design, idea development, creativity, aesthetics evaluation and ICT to solve problems in collage and picture making
Students to: compose pictures in pyrography using simple drawing techniques as line, contour, hatching, etc.
design and execute a collage work based on a given topic.
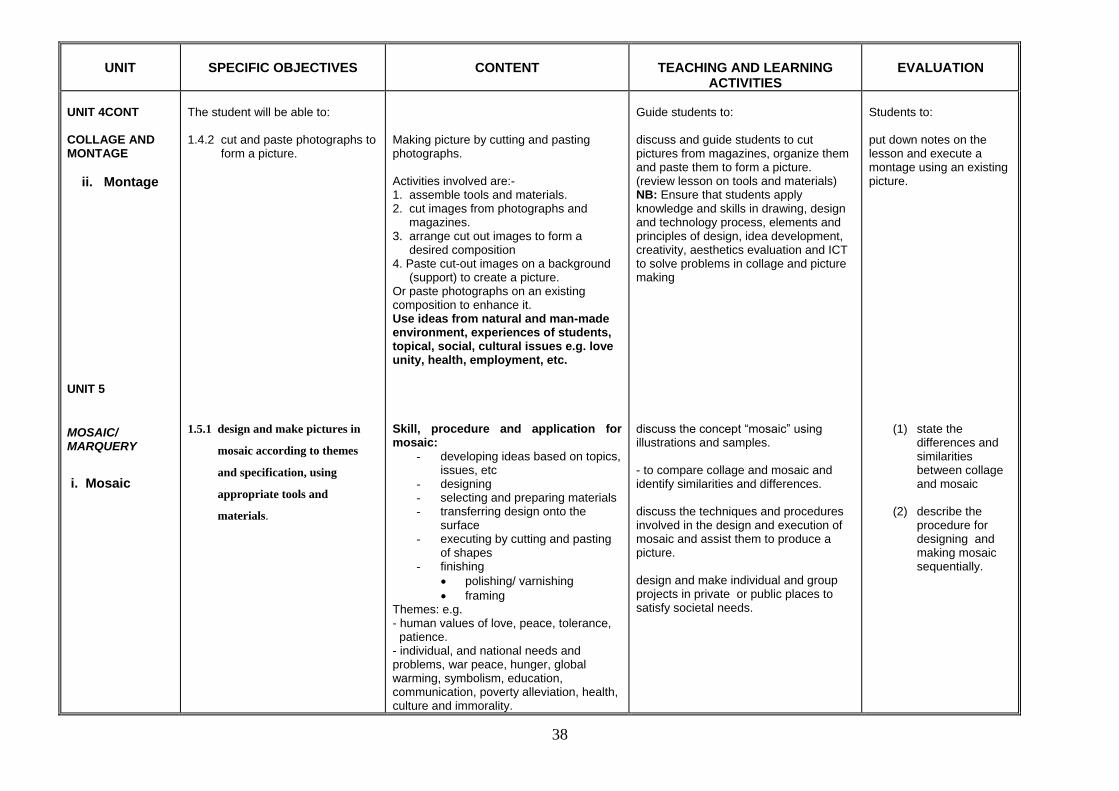
38
UNIT
SPECIFIC OBJECTIVES
CONTENT
TEACHING AND LEARNING
ACTIVITIES
EVALUATION
UNIT 4CONT COLLAGE AND MONTAGE
ii. Montage
UNIT 5
MOSAIC/ MARQUERY
i. Mosaic
The student will be able to: 1.4.2 cut and paste photographs to form a picture. 1.5.1 design and make pictures in
mosaic according to themes
and specification, using
appropriate tools and
materials.
Making picture by cutting and pasting photographs. Activities involved are:- 1. assemble tools and materials. 2. cut images from photographs and magazines. 3. arrange cut out images to form a desired composition 4. Paste cut-out images on a background (support) to create a picture. Or paste photographs on an existing composition to enhance it. Use ideas from natural and man-made environment, experiences of students, topical, social, cultural issues e.g. love unity, health, employment, etc. Skill, procedure and application for mosaic:
- developing ideas based on topics, issues, etc
- designing - selecting and preparing materials - transferring design onto the
surface - executing by cutting and pasting
of shapes - finishing
polishing/ varnishing
framing Themes: e.g. - human values of love, peace, tolerance, patience. - individual, and national needs and problems, war peace, hunger, global warming, symbolism, education, communication, poverty alleviation, health, culture and immorality.
Guide students to: discuss and guide students to cut pictures from magazines, organize them and paste them to form a picture. (review lesson on tools and materials) NB: Ensure that students apply knowledge and skills in drawing, design and technology process, elements and principles of design, idea development, creativity, aesthetics evaluation and ICT to solve problems in collage and picture making discuss the concept “mosaic” using illustrations and samples. - to compare collage and mosaic and identify similarities and differences. discuss the techniques and procedures involved in the design and execution of mosaic and assist them to produce a picture. design and make individual and group projects in private or public places to satisfy societal needs.
Students to: put down notes on the lesson and execute a montage using an existing picture.
(1) state the differences and similarities between collage and mosaic
(2) describe the procedure for designing and making mosaic sequentially.

39
UNIT
SPECIFIC OBJECTIVES
CONTENT
TEACHING AND LEARNING
ACTIVITIES
EVALUATION
UNIT 5
Mosaic ii. Marquetry
The student will be able to:
1.5.2 design and make pictures based on ideas and themes using veneer.
Making pictures with veneer. Skill, procedure and application:
i) sizing/preparation of support ii) drawing/preliminary sketches iii) tracing and transfering of design iv) cutting out of design on veneer v) application of glue to templates vi) pasting of templates on the
prepared surface. Theme: Refer to mosaic.
Guide students to: design and make real or abstract pictures in marquetry in a systematic way from observation, memory, or imagination. NB: Each piece of template should be pasted independently, no pasting over another
Students to:
(3) design and make pictures in mosaic to depict::
- aspects of Ghanaian culture
- an idea - an event - still life - figures in action - topical issues
Project Design and make a picture in mosaic as a project to satisfy a need of an area in the class, school or community e.g. wall, floor, pillars. Themes: Traditional e.g. festival -topical issues e.g. HIV/AIDS, indiscipline and domestic violence.
design and produce a picture in marquetry to be exhibited at a fair

40
UNIT
SPECIFIC OBJECTIVES
CONTENT
TEACHING AND LEARNING
ACTIVITIES
EVALUATION
UNIT 6 PRINT MAKING
The student will be able to: 1.6.1 design and make a pictorial print, using appropriate techniques, tools and materials in relief printing. 1.6.2 make a pictorial print using intaglio printing technique.
1.6.3 design and make a picture using serigraphic techniques.
Making pictures from relief printing a. Relief Printmaking using block from - yam, potatoes, cocoyam, cassava, wood, line, clay, collage, etc. Making Relief block e.g. 1) - make a design 2) - transfer the design onto a block in reverse 3) - cut off the non-printing area (or assemble by pasting patterns forming the printing area) 4) - apply colour/paint 5) - Print by pressing against the support Themes/Topics/Ideas: Refer to collage. Mosaic, painting, maquetry, etc. Pictorial print in intaglio b. Intaglio 1) follow 1 and 2 of relief printing 2) cut (incise) the printing area. (In this case, the non-printing area is the raised part of the block, while the printing areas is depressed or grooved) 3) apply paint/colour 4) clean off colour/paint from the non- printing area 5) print as in relief Making a picture from serigraphy c. serigraphy Two main process i) stenciling 1. follow 1 and 2 of relief 2. cut off the printing or the positive area
Guide Students to: discuss with samples and illustrations, the concept of printing using the various techniques, tools and materials. - Relief/block - intaglio - Serigraphy - Planography/lithography - Review lessons on the tools and materials for each printmaking process. NB: Use demonstration, observation, digital content, experiential and participatory teaching and learning methods Discuss, plan and make a picture using the intaglio printing method. discuss and apply knowledge and skills of the procedures for serigraphic printmaking to produce a picture.
Student to:
(1) design and make a one colour, pictorial print to communicate an idea on a topical issue.
(2) design and
execute a two- colour pictorial print on a given topic by using any of the print making processes.
design and print a picture in serigraphy to communicate an idea or message on topical issues of society

41
UNIT
SPECIFIC OBJECTIVES
CONTENT
TEACHING AND LEARNING
ACTIVITIES
EVALUATION
UNIT 6 (CONT’D) Print Making
1.6.4 design and print a picture using the planographic printing process.
1.6.5 design and print a picture using other print making processes.
Discuss and apply knowledge of the procedures for serigraphic printmaking to produce a picture. Theme/Topic/ Problems: Refer to collage, mosaic, pyrography.etc. 3) place stencil on support 4) apply colour/paint by dabbing using foam, brush, etc. ii. Screen printing 1. make a design on paper 2. transfer it onto a screen using the appropriate tracing techniques and tools 3. block out the non-printing area manually with lacquer or photographically using the appropriate light sensitive chemicals. 4. print using a squeegee and printing paste
Planography/Lithographic printing 1. make and transfer design to the metal plate using greasy ink. 2. bath the surface with water. 3. apply the printing ink. 4. print as in block. Other Printing processes, eg-
Digital prints-refers to editions of images
printed using a digital printer instead of a
traditional printing press. These images can
be printed to a variety of substrates
including paper and cloth or plastic canvas.
Guide Students to:
NB: Use demonstration, observation, digital content, experiential and participatory teaching and learning methods to ensure that students apply knowledge and skill in General Knowledge in Art e.g. creativity, drawing, the design and technology process, idea development, preliminary drawing, elements and principles of design, etc. to perform task and solve problems through picture making. NB: Cut out stencils can also be placed under the mesh for printing.
discuss and print a picture using a planographic printing process. NB: the non-printing area containing the water will resist the ink while the printing area with the greasy ink will accept the printing ink. - support would come out wet. Discuss other forms of print making
Student to: design and make a picture to satisfy an identified problem in society using skills in the various print making processes.

42
UNIT
SPECIFIC OBJECTIVES
CONTENT
TEACHING AND LEARNING
ACTIVITIES
EVALUATION
UNIT 6 (CONT’D) Print Making
1.6.6 make prints using various inks and dyes
Pigment-based vs. Dye-based inks Unlike pigment, dyes dissolve when mixed into a liquid. Dyes are organic (not mineral). Although most are synthetic, derived from petroleum, they can be made from vegetable or animal sources. Dyes are well suited for textiles where the liquid dye penetrates and chemically bonds to the fiber. Because of the deep penetration, more layers of material must lose their color before the fading is apparent. Dyes, however, are not suitable for the relatively thin layers of ink laid out on the surface of a print.
Pigment on the other hand is a finely ground, particulate substance which, when mixed or ground into a liquid to make ink or paint, does not dissolve, but remains dispersed or suspended in the liquid. Pigments are categorized as either inorganic (mineral) or organic (synthetic
Guide Students to:
. Discuss the various types of printing inks and dyes Discuss the various types of printing inks and dyes
Student to: Make a design and print using different printing media
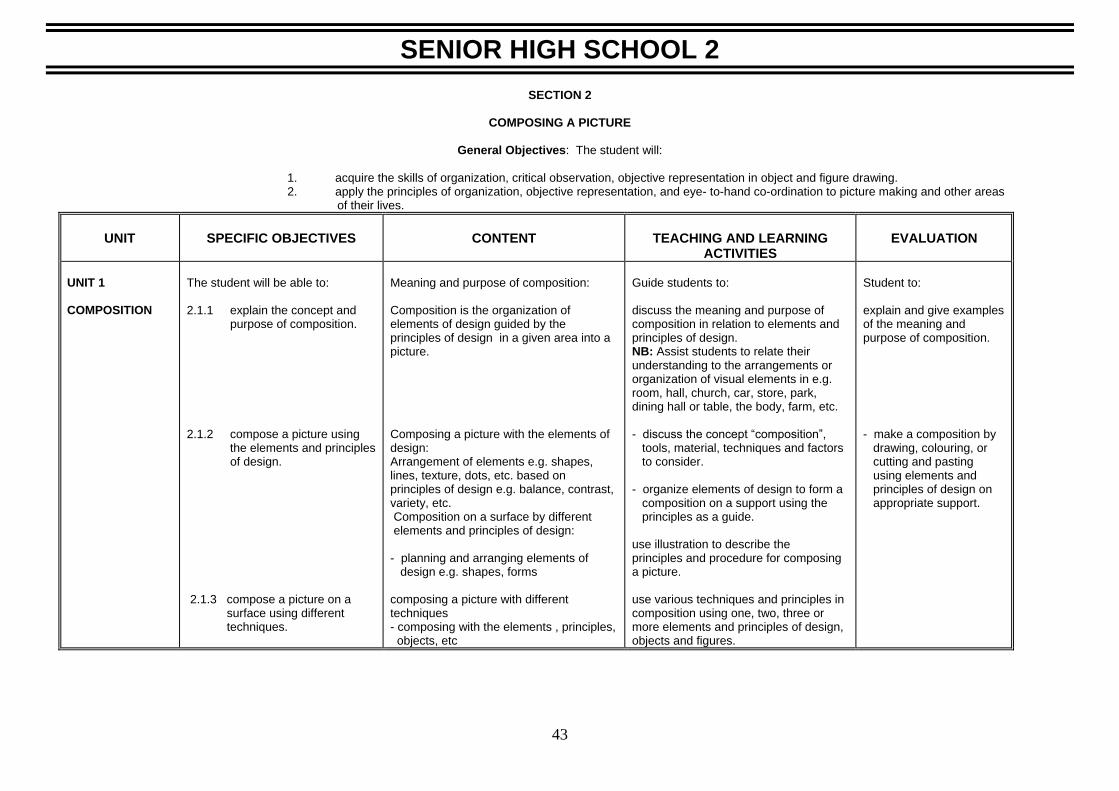
43
SENIOR HIGH SCHOOL 2
SECTION 2
COMPOSING A PICTURE
General Objectives: The student will:
1. acquire the skills of organization, critical observation, objective representation in object and figure drawing. 2. apply the principles of organization, objective representation, and eye- to-hand co-ordination to picture making and other areas of their lives.
UNIT
SPECIFIC OBJECTIVES
CONTENT
TEACHING AND LEARNING
ACTIVITIES
EVALUATION
UNIT 1 COMPOSITION
The student will be able to: 2.1.1 explain the concept and purpose of composition. 2.1.2 compose a picture using the elements and principles of design. 2.1.3 compose a picture on a surface using different techniques.
Meaning and purpose of composition: Composition is the organization of elements of design guided by the principles of design in a given area into a picture. Composing a picture with the elements of design: Arrangement of elements e.g. shapes, lines, texture, dots, etc. based on principles of design e.g. balance, contrast, variety, etc. Composition on a surface by different elements and principles of design: - planning and arranging elements of design e.g. shapes, forms composing a picture with different techniques - composing with the elements , principles, objects, etc
Guide students to: discuss the meaning and purpose of composition in relation to elements and principles of design. NB: Assist students to relate their understanding to the arrangements or organization of visual elements in e.g. room, hall, church, car, store, park, dining hall or table, the body, farm, etc. - discuss the concept “composition”, tools, material, techniques and factors to consider. - organize elements of design to form a composition on a support using the principles as a guide. use illustration to describe the principles and procedure for composing a picture. use various techniques and principles in composition using one, two, three or more elements and principles of design, objects and figures.
Student to: explain and give examples of the meaning and purpose of composition. - make a composition by drawing, colouring, or cutting and pasting using elements and principles of design on appropriate support.

44
UNIT
SPECIFIC OBJECTIVES
CONTENT
TEACHING AND LEARNING
ACTIVITIES
EVALUATION
UNIT 1 (cont’d COMPOSITION
UNIT 2 STILL LIFE
Drawing/ Painting Objects by using the senses
The student will be able to:
2.2.1 use the senses to observe and draw an object directly
and objectively.
- using appropriate tools, materials and techniques. Skills to be acquired: planning, designing, printing, drawing, cutting, pasting, scorching, etc. Considerations: Proportion, background, middle ground, foreground, negative and positive areas, etc. -composing with one, two or more elements and principles, based on topics, ideas, events, scenes, etc. Drawing of still life/plants directly using the senses Developing observational skills in drawing objectively: - using senses of seeing, hearing, touching, tasting, weighing, smelling, etc. - differentiate between shapes, sizes, etc. - physical eye-and-hand co-ordination - recording details and characteristics of
an object
Guide students to; compose realistic or abstract pictures based on ideas, events, topical issues, scenes etc. by using desired tools, materials and techniques. NB: Pay attention to skills to be acquired or developed e.g. drawing, creativity, planning, designing, composing, painting, scorching discuss and explain the role of the senses in developing perception and in drawing objectively. display an object and use their senses to observe and understand the characteristics of the object. - draw/paint and display works for appreciation and appraisal. NB: Emphasis should be laid on perception, objectivity and resemblance.
Student to: (1) compose a picture with
- objects - figures - plants and - animals
(2) make a composition by: - cutting and pasting. - drawing and shading. (3) compose a realistic or abstract picture to satisfy a need based on events, topical issues, scenes from memory, imagination or observation. - draw an object to satisfy an identified need eg, decoration of the classroom. display works for appreciation and appraisal (one‟s and other works).
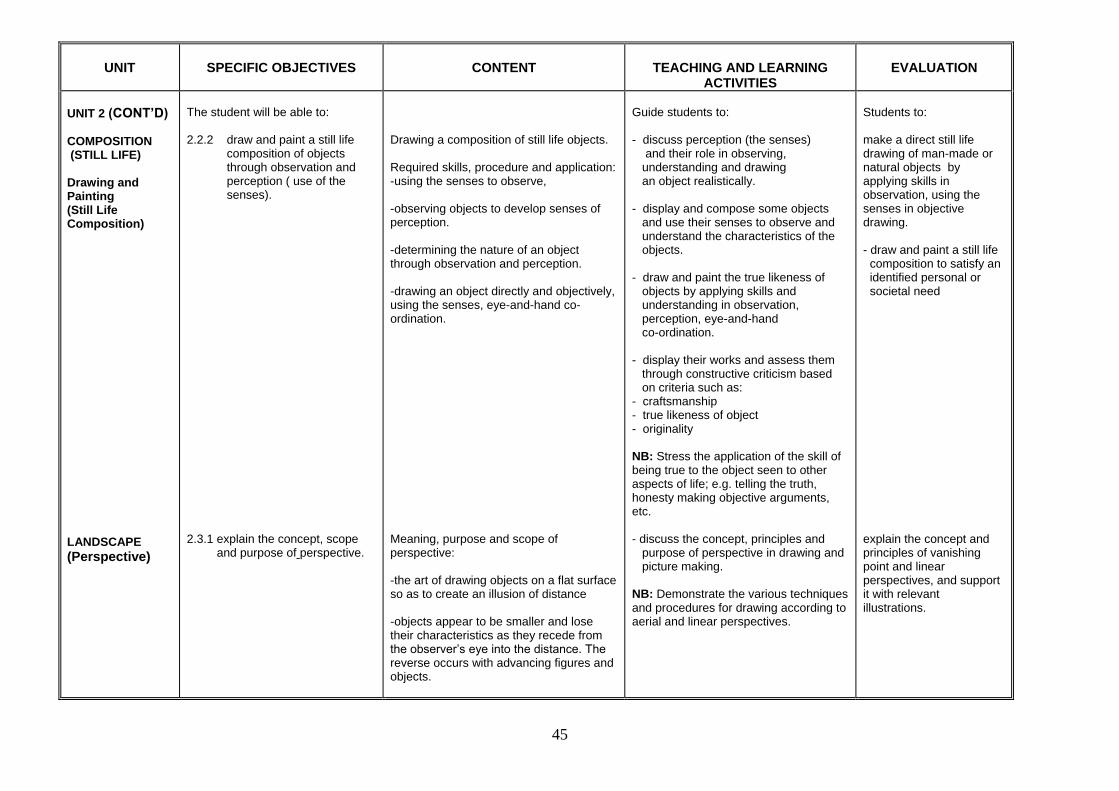
45
UNIT
SPECIFIC OBJECTIVES
CONTENT
TEACHING AND LEARNING
ACTIVITIES
EVALUATION
UNIT 2 (CONT’D) COMPOSITION (STILL LIFE) Drawing and Painting (Still Life Composition)
LANDSCAPE
(Perspective)
The student will be able to: 2.2.2 draw and paint a still life composition of objects through observation and perception ( use of the senses). 2.3.1 explain the concept, scope and purpose of perspective.
Drawing a composition of still life objects. Required skills, procedure and application: -using the senses to observe, -observing objects to develop senses of perception. -determining the nature of an object through observation and perception. -drawing an object directly and objectively, using the senses, eye-and-hand co-ordination. Meaning, purpose and scope of perspective: -the art of drawing objects on a flat surface so as to create an illusion of distance -objects appear to be smaller and lose their characteristics as they recede from the observer‟s eye into the distance. The reverse occurs with advancing figures and objects.
Guide students to: - discuss perception (the senses) and their role in observing, understanding and drawing an object realistically. - display and compose some objects and use their senses to observe and understand the characteristics of the objects. - draw and paint the true likeness of objects by applying skills and understanding in observation, perception, eye-and-hand co-ordination. - display their works and assess them through constructive criticism based on criteria such as: - craftsmanship - true likeness of object - originality NB: Stress the application of the skill of being true to the object seen to other aspects of life; e.g. telling the truth, honesty making objective arguments, etc. - discuss the concept, principles and purpose of perspective in drawing and picture making. NB: Demonstrate the various techniques and procedures for drawing according to aerial and linear perspectives.
Students to: make a direct still life drawing of man-made or natural objects by applying skills in observation, using the senses in objective drawing. - draw and paint a still life composition to satisfy an identified personal or societal need explain the concept and principles of vanishing point and linear perspectives, and support it with relevant illustrations.

46
UNIT
SPECIFIC OBJECTIVES
CONTENT
TEACHING AND LEARNING
ACTIVITIES
EVALUATION
UNIT 3 COMPOSITION LANDSCAPE
(Perspective)
Student will be able to:
Perspective facilitates the drawing and making of pictures, objects or figures exactly as they appear to the observer‟s eye e.g. in landscape Drawing according to the concept and principles of linear and aerial perspectives: -foreground, middle and background , -vanishing point. -picture frame and plan -drawing by composition using the elements and principles of design. -below, at or above eye level Types of perspective; 1. Linear: This is the behavior of lines in space
parallel/ one point,(all parallel lines converge at a point called the vanishing point-VP)
angular/ two point perspective, (all parallel lines that meet at right angle converge at separate vanishing points hence the two point perspective) etc
2. Aerial/colours/ tones/ perspective; This is the behaviour of colour/ tones over space. Nearer objects are brighter, clearer than those far away. - perspective helps to create an illusion of distance and depth in a picture, etc Applying the principle of perspective to drawing. - one-point perspective. - two-point perspectives.
Guide students to: - observe and describe objects and scenes which portray perspective.
Students to: -draw pictures from imagination, memory, observation depicting the principle of perspective, e.g. vanishing point, horizon, advancing and receding objects.

47
UNIT
SPECIFIC OBJECTIVES
CONTENT
TEACHING AND LEARNING
ACTIVITIES
EVALUATION
UNIT 3 (CONT’D) COMPOSITION
Perspective Drawing
Student will be able to: 2.3.2 draw an object in one-point, two-point and three-point perspectives.
2.3.3 draw and paint outdoor scenes(landscape or seascape) through observation. 2.3.4 draw and paint a picture from memory or imagination using the principles of perspective.
Applying the principle of perspective to drawing. - one-point perspective. - two-point perspectives. NB- objects which are nearer to the viewer appear bigger, taller, wider, etc. than those that are far away in the picture plane. One-point, two-point, three-point perspectives. Consideration: - Eye levels. (i.e. eye level, below eye level and above eye level) - Vanishing points. - Foreground and background, etc. Outdoor(landscape/seascape) drawing and painting - viewing/observing scenes and drawing and painting according to perspective. Pictorial drawing and painting from Memory or imagination according to principles of perspective. - Pictures based on themes, topics, issues to satisfy, individual, community and national needs.
Guide students to: - discuss the rules for drawing an object (box) in one-point and two-point perspectives using examples and observations from pictures and the environment. NB: Assist students in their discussions. - review the meaning of perspectives, and describe the principles and the types of perspectives using illustrations. - draw a box in one-point and two-point perspectives. demonstrate how to draw in one point and two point perspectives to students. - observe sceneries such as seascapes, landscapes, rivers, trees, mountains, village scenes, city scenes, etc to apply the concept of perspective. develop their outdoor sketches into landscape paintings. NB: Help students to see that parallel lines above the eye-level move down towards the eye-level line, while parallel line below the eye-level line move upwards to converge at the vanishing point .Assist students to prepare and use view finders to locate and select scenes. -discuss and review lessons on drawing and painting objects and scenes according to perspectives - draw and paint a picture from memory or imagination to satisfy a personal need.
Students to: - explain meaning, principles and types of perspective. - draw three open boxes/cylinders at eye level, above eye level, and below eye level in - one-point perspective - two-point perspective. Observe and paint a scene to satisfy a community need. Compose, draw and paint a picture according to the principles of perspectives to satisfy a need in the community using appropriate tools, materials and techniques.

48
UNIT
SPECIFIC OBJECTIVES
CONTENT
TEACHING AND LEARNING
ACTIVITIES
EVALUATION
UNIT 4 FIGURE AND IMAGINATIVE COMPOSITION COMPOSITION
Human and Animal figures
The student will be able to: 2.4.1 observe and draw figures proportionately. 2.4.2 draw figures and animals from observation study.
Drawing figure proportionately Drawing of the figure proportionately. - the head as a measure - head lengths in an adult‟s body. - head lengths in a child‟s body. - using the pencil as a measuring tool – for comparing the head and other parts of the figure e.g. arm, head, leg, chest, etc. Drawing figures and animals from observation study Drawing full figures in different views and postures. Drawing of parts of figure: - -the head, face and bust in relation to each other in different positions, views and postures, etc. Outline drawing of parts e.g. head, face from observational study etc.
Required skills and applications:
-observing and drawing parts of a figure proportionately drawing figures to portray postures, actions, views correctly.
Guide students to: - observe the human figure closely and discuss the proportion of the head to an adult body. identify the difference between the proportion of adult‟s head and that of a child in relation to their respective bodies through drawing. NOTE: The use of a model or manikin might be appropriate if available. - observe, identify and draw human and animal figures using the pencil to compare the head and other parts of the body to achieve proportion. observe figures and use head length to measure the parts. Determine how they relate to each other proportionately. -observe, study and draw -whole figures in outline showing different views, (postures and actions) -the head, face and parts from different views. Compare the length of the foot to the length of the lower and upper legs.
Student to; - measure and compare parts of the body to the head through practical exercises and present a report. -compare the heads of their friends in class to the respective bodies. - draw i. adult‟s figure ii. friend‟s figures. iii. domestic animals. (1) measure, compare and determine how many head lengths go into the full figure and parts of a: -nursery child -primary school pupil -friend at the JSS and -SHS -teacher / parent (2) observe and draw proportionately -head/face and bust in two different views -A full figure in two different postures.

49
UNIT
SPECIFIC OBJECTIVES
CONTENT
TEACHING AND LEARNING
ACTIVITIES
EVALUATION
UNIT 4 (CONT’D)
Imaginative Figure Composition UNIT 5 PORTRATURE
The student will be able to: 2.4.3 draw pictures from imagination and memory. 2.5.1 draw/paint portrait accurately.
Making pictures from imagination or memory by drawing/painting a human figure. -imaginative drawing/painting based on ideas, stories, issues that have not been experienced by the individual -memory drawing based on personal life experiences and things perceived e.g. visits, events (sports and games) NB: Required skills and application: -critical observation and use of the senses -imagining and retention -recalling and translating what is stored in memory (by perception, imagination, experience) into visual images Drawing and painting portrait; -consider the following: anatomy, feeling/ mood, character: -applying skills of perception and understanding in drawing, proportion, shapes, shading and anatomy of human face/figure Make a study of:
- infant - adult - aged
using soft and hard pencils, charcoal, pastels and other soft and liquid materials. -critical observation skills: drawing, shading or painting of full or parts of figures e.g. head, face, bust. -drawing to show facial expression and feeling i.e. translation of critical perceptional skills and feeling into drawing, shading and painting.
Guide students to: discuss the concept of memory and imaginative artwork and draw with regards to stories, events, visits, experiences etc. organise a trip/visit to a place to observe an event, etc. develop ideas and make pictures from scenes, events and issues through observation. -draw pictures from imagination based on stories and issues e.g. life in Ghana by 2020, -a world without trees, etc NB: Emphasize the application of knowledge and skills in figure drawing composition and perspectives. observe (careful study) and draw the head and face at different angles e.g. frontal, profile and ¾ views. draw, paint, shade (use lines or paint) figures in varying intensities to show mood/expression. NOTE: The use of models or pictures would be appropriate.
Students to: explain and differentiate between the concept of memory and imaginative drawings with relevant examples: make pictures based on memory and imaginative ideas, scenes and events, stories, personal experiences, etc draw, shade, or paint faces of e.g. infant, adult and aged appropriately applying principles of design. draw/shade/paint a portrait of infant, adolescent, adult and aged demonstrating skills in translation of feeling and in the use of other tools and materials.

50
SENIOR HIGH SCHOOL 2
SECTION 3
ILLUSTRATION
General Objectives: The student will: 1. acquire the skills of interpreting visually various ideas, stories, feelings, emotions etc. 2. develop proficiency in expressing and communicating ideas, topics, stories and feelings through illustration, that will promote
education towards the development of society.
UNIT
SPECIFIC OBJECTIVES
CONTENT
TEACHING AND LEARNING
ACTIVITIES
EVALUATION
UNIT 1 MEANING AND SCOPE OF ILLUSTRATION UNIT 2 PURPOSE AND QUALITIES OF ILLUSTRATION UNIT 3 ILLUSTRATION TECHNIQUES
The student will be able to: 3.1.1 explain the concept, scope and purpose of illustration. 3.1.2 explain the purpose and qualities of illustrations. 3.1.3 use and explore illustration Techniques appropriately.
Meaning and scope of illustration: - Definition, scope and purpose of illustration. - Illustration refers to any pictorial element that explains, enhances and adds meaning to the written part of a printed work such as a book. This may be a drawing, painting, photograph, maps, charts, diagrams, etc. Purpose and qualities. It must:
- educate - entertain - inform - be functional and aesthetic - relate to the text topic, theme,
issue, etc - be well composed in terms of the
elements and principles of design
Exploring techniques in illustration; - simple line drawing - detailed and shaded drawing in
black and white - detailed painted illustration - stippling - hatching - cross hatching - silhouette - pen and wash, etc
Guide students to: discuss the definition, purpose and scope of illustration with examples. -design and make suitable pictorial illustrations/compositions by drawing, painting, cutting, pasting or printmaking etc. discuss the purpose and qualities of illustrations as stated in the content. -discuss how illustration can be used to convey or communicate topical issues of society e.g. ignorance, disease, poverty, environmental degradation, conflict resolution, child and women abuse, HIV/AIDS, quality education, etc. Guide students to: - explore, experiment and make illustrations using the techniques in the content column.
Students to:
explain the importance of illustration by written test, drawing or painting. - use examples to explain by writing the purpose and qualities of illustrations. Students to: illustrate stories on social issues such as; - civic responsibility - child abuse, child labour
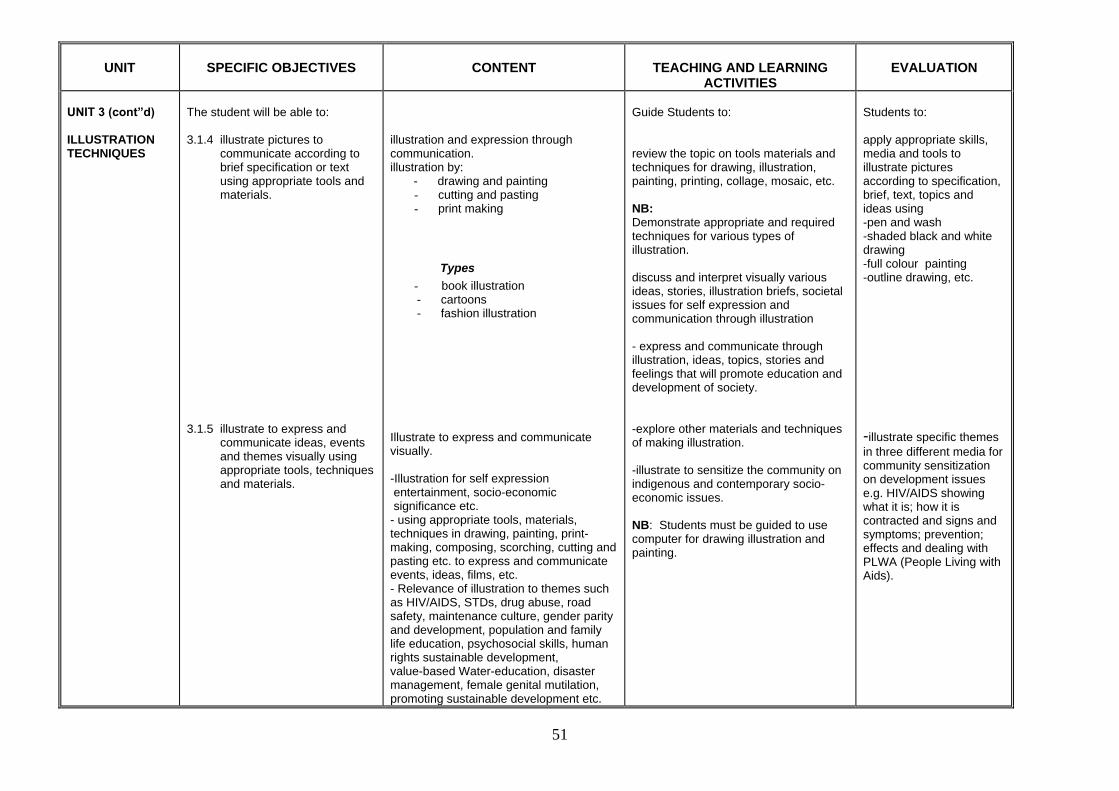
51
UNIT
SPECIFIC OBJECTIVES
CONTENT
TEACHING AND LEARNING
ACTIVITIES
EVALUATION
UNIT 3 (cont”d) ILLUSTRATION TECHNIQUES
The student will be able to: 3.1.4 illustrate pictures to communicate according to brief specification or text using appropriate tools and materials. 3.1.5 illustrate to express and communicate ideas, events and themes visually using appropriate tools, techniques and materials.
illustration and expression through communication. illustration by: - drawing and painting
- cutting and pasting - print making
Types
- book illustration - cartoons - fashion illustration Illustrate to express and communicate visually. -Illustration for self expression entertainment, socio-economic significance etc. - using appropriate tools, materials, techniques in drawing, painting, print-making, composing, scorching, cutting and pasting etc. to express and communicate events, ideas, films, etc. - Relevance of illustration to themes such as HIV/AIDS, STDs, drug abuse, road safety, maintenance culture, gender parity and development, population and family life education, psychosocial skills, human rights sustainable development, value-based Water-education, disaster management, female genital mutilation, promoting sustainable development etc.
Guide Students to: review the topic on tools materials and techniques for drawing, illustration, painting, printing, collage, mosaic, etc. NB: Demonstrate appropriate and required techniques for various types of illustration. discuss and interpret visually various ideas, stories, illustration briefs, societal issues for self expression and communication through illustration - express and communicate through illustration, ideas, topics, stories and feelings that will promote education and development of society. -explore other materials and techniques of making illustration. -illustrate to sensitize the community on indigenous and contemporary socio-economic issues. NB: Students must be guided to use computer for drawing illustration and painting.
Students to: apply appropriate skills, media and tools to illustrate pictures according to specification, brief, text, topics and ideas using -pen and wash -shaded black and white drawing -full colour painting -outline drawing, etc.
-illustrate specific themes
in three different media for community sensitization on development issues e.g. HIV/AIDS showing what it is; how it is contracted and signs and symptoms; prevention; effects and dealing with PLWA (People Living with Aids).

52
SENIOR HIGH SCHOOL 2
SECTION 4
COMPUTER AS A TOOL
General Objectives: The student will:
1. acquire and practice concepts and principles in digital painting. 2. appraise the software available in the sector. 3. compose pictures digitally .
UNIT
SPECIFIC OBJECTIVES
CONTENT
TEACHING AND LEARNING
ACTIVITIES
EVALUATION
UNIT 1 COMPUTER AS A TOOL
The student will be able to: 4.1.1 explain the concept of digital painting. 4.1.2 list the various software for painting and demonstrate skills in using the computer to make pictures. 4.1.3 use the various software for producing painting.
Meaning and purpose of : - The meaning and purpose of digital painting is the art in which computer technology is employed both as a tool and material for picture production. Computers and their relevant softwares can be used both to generate and manipulate images. Computer or digital art can be described as a “metamedium”, that is, a medium that transcends and transforms all other forms or media. Identifing of application software in use e.g.
- Corel draw, - Illustrator - Free hand - Real draw - Adobe photoshop - Corel Photoshop - Corel photopaint - Adobe fireworks - Paint box, etc
To draw and paint. Using computer and the relevant application software and other peripherals like printers, scanners, graphic tablets, etc for the production of a painting
Guide students to: discuss the meaning of digital painting using illustrations where necessary. Identify and discuss the various software for painting. NB: Invite or visit computer experts for more information on computer usage and visual art. - the use of the computer is necessary as a supplementary tool to enhance the task in designing, making pictures, accessing information presenting and communicating ideas. develop skills in handling relevant software and peripherals to produce art works.
Students to: Describe peripherals that can help in digital painting. design and paint a picture using the software.

53
SENIOR HIGH SCHOOL 3
SECTION 1
MURALS
General Objectives: The student will:
1. understand and apply the concepts, principles and techniques of mural painting. 2. study and appreciate murals of other artists. 3. produce mural for decoration and communication at public places using the principles and techniques acquired.
UNIT
SPECIFIC OBJECTIVES
CONTENT
TEACHING AND LEARNING
ACTIVITIES
EVALUATION
UNIT 1 IMPORTANCE OF MURALS
The student will be able to: 1.1.1 explain the concept and socio-economic significance of mural painting. 1.1.2 create a picture in murals by exploring a variety of media and ideas.
Meaning and socio-economic significance of murals. Mural is a painting on a wall. It is usually a large picture painted directly onto an interior or exterior of walls. Socio-economic significance of mural. -education -decoration -recording ideas (historical) -entertainment -self-employment -paid-employment -self-expression/creativity -visual communication -promotion of culture. Creating a picture in mural through exploration of : -various media from plant, minerals and animal sources. - ideas from natural man-made environment, topics, events of cultural, social and educational significance.
Guide students to: Brainstorm and discuss the meaning of mural painting. discuss the socio-economic significance of mural. -suggest and explain themes on social struggle, health, culture, education, agriculture, morality, industry e.g. mural should be in public places such as hospitals and shopping malls educating society on HIV/AIDS, dangers of pre-marital sex (teenage) or any other issues of relevance to the community. - discuss importance of mural. - techniques of creating mural. - discuss how Ghanaian artists can make a living by painting murals on public buildings, halls of residence, in hotels, schools, conference halls etc. - explore other sources of tools and materials for mural. - prepare surfaces for mural painting. - create mural paintings based on Ghanaian colour concepts.
Student to; Interview and prepare a short report for class discussion on the views of students, artists and some people in the community about the socio-economic importance of mural painting. Design and create a picture in murals, individually or in groups to satisfy the need of an area in the school or community.

54
UNIT
SPECIFIC OBJECTIVES
CONTENT
TEACHING AND LEARNING
ACTIVITIES
EVALUATION
UNIT 1 (CONT’D)
The student will be able to: 1.1.3 make a mural painting individually and as a group to reflect on themes, issues and the environment.
Mural painting in groups or individually
Scope and purpose of mural painting
- As a painting on walls at private and public places to: educate, advertise, inform and promote solidarity
Qualities: - Depicting themes, topics, issues, ideas, etc of the environment / society
- Theme/topics:
- issues of educational, social, economic, religious, political and cultural significance
Places: - public or private e.g. classroom,
library, church community center, hospital, palace etc.
Tools: and Materials
- brush, scraper, palette, oil measuring tool, water, proof paint, glue, turpentine etc
Preparation of surface
- sizing and priming of ground: - scraping, sand papering, coating
and sealing of cracks and holes on wall surface with glue.
- applying coats of emulsion paint,
Finishing
- should be finished matt (not glossy).
Guide students to: discuss the purpose and qualities of mural painting as a group or individual and places they could be executed. identify and discuss various issues, topics that can be developed and adopted to suit various mural paintings NB: Demonstrate and guide students through the procedure of planning, composing, priming executing and finishing a mural painting at a required place. generate and develop original ideas based on topical issues, compose and execute murals individually or in groups at the school community, hospital, library, etc. - discuss and develop criteria and procedure to appreciate their own and others work
Students to: (1) explain the purpose and qualities of mural painting. (2) design and make a
mural painting,
individually or in
groups to satisfy an
identifiable need.
(3) make mural painting at selected places to reflect the environment.

55
UNIT
SPECIFIC OBJECTIVES
CONTENT
TEACHING AND LEARNING
ACTIVITIES
EVALUATION
UNIT 2 FRESCO PAINTING
The student will be able to: 1.2.1 explain the concept, types and process of fresco painting. 1.2.2 describe fresco painting procedure.
Meaning, types and process of Fresco painting. Fresco (Italian- fresh), method, or art of painting with pigment on plaster, while the plaster is still wet or fresh. Two main types of fresco, -true fresco (buon fresco) -fresco secco Procedure for fresco painting. Buon Fresco - procedure (Pigment applied to the top layers of plaster); -painter transfers a sketch (cartoon) to the penultimate layer of plaster. -outlines of the figures and forms transferred are reinforced with dark water based pigment, -plaster is laid over the transferred sketch in small sections and colour applied to the wet plaster. This process is repeated until the whole painting is completed. -the lime in the plaster reacts chemically with the carbonate as the plaster dries. -the compound forms a film over the colours and the plaster, making them part of the wall surface and giving the colours an unusual clarity. -the colours are usually thin, translucent and light, often with a chalky look. -Fresco secco(dry Fresco)- painting executed on dry plaster.
Guide students to: Discuss the meaning, types and process of fresco painting:
- true fresco (buon fresco) - fresco secco
discuss and describe the various fresco painting procedures. NB: Demonstrate the fresco painting procedure and also use digital content (if possible) and other audio-visual aid to treat the topic.
Student to: describe systematically, the painting procedures of fresco painting. Library work; Research and list names and fresco paintings of some of the past masters. Project - Conduct a research (in groups or individually) with reference to the internet, experts and library materials and write a short essay on: (a) the meaning and types of fresco (b) the procedure, tools and materials for fresco painting. (c) differences and similarities between fresco, mural, mosaic, and panel painting. (d) plan, orgarnize, and paint a picture in fresco at place in the community

56
UNIT
SPECIFIC OBJECTIVES
CONTENT
TEACHING AND LEARNING
ACTIVITIES
EVALUATION
UNIT 3 FRIEZE
The student will be able to: 1.3.1 explain the concept – frieze. 1.3.2 plan and prepare surfaces for frieze works. 1.3.3 design and execute frieze work through exploration.
Meaning of frieze. Originally, a narrow band of relief sculpture that usually occupies the space above the columns of a classical building. In recent times, referred to paintings done on the narrow horizontal strip of wall between the window and the roof. Planning frieze work , collection of tools, materials and themes: - designing (preliminary designing) - developing themes and ideas. - preparation of surface with appropriate tools, materials and techniques for frieze work. Designing and executing frieze work through exploration: -designing, developing ideas and translating them into visual forms. Exploration and experimentation of alternative sources of tools, materials and techniques for frieze works.
Guide students to: discuss the meaning of frieze with examples identifying where they could be executed in their environment collect tools, materials and themes for frieze works. -discuss various ideas, themes etc. and make preliminary designs for frieze works. -prepare suitable surfaces with appropriate tools, materials and techniques. -draw and execute frieze work based on selected socio-economic themes through exploration. explore and experiment with other materials and techniques for making frieze works.
Student to: -describe the processes involved in planning and preparing frieze works. -design and create frieze works to educate/inform/entertain Ghanaians on any (important) socio-economic issue using variety of materials from the environment such as fabric, paper, tree bark, feather, shell, seeds, skin, etc. -make frieze work from other sources of material and technique through exploration.
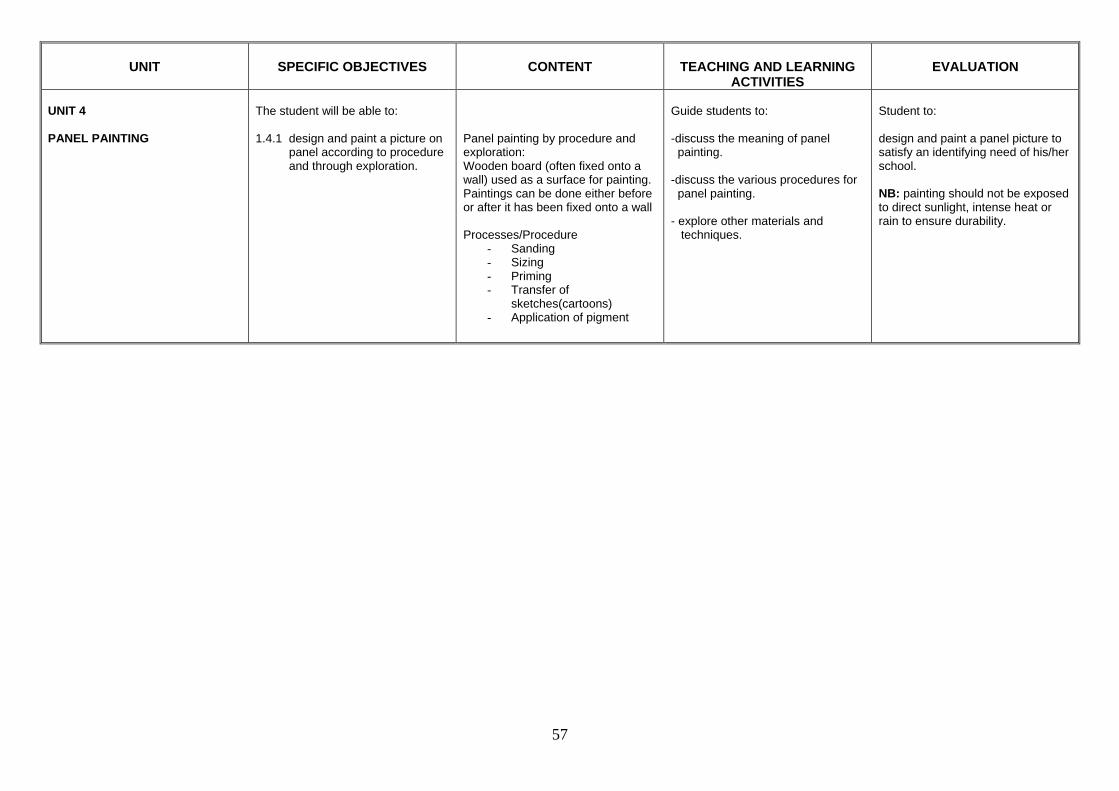
57
UNIT
SPECIFIC OBJECTIVES
CONTENT
TEACHING AND LEARNING ACTIVITIES
EVALUATION
UNIT 4 PANEL PAINTING
The student will be able to: 1.4.1 design and paint a picture on panel according to procedure and through exploration.
Panel painting by procedure and exploration: Wooden board (often fixed onto a wall) used as a surface for painting. Paintings can be done either before or after it has been fixed onto a wall Processes/Procedure
- Sanding - Sizing - Priming - Transfer of
sketches(cartoons) - Application of pigment
Guide students to: -discuss the meaning of panel painting. -discuss the various procedures for panel painting. - explore other materials and techniques.
Student to: design and paint a panel picture to satisfy an identifying need of his/her school. NB: painting should not be exposed to direct sunlight, intense heat or rain to ensure durability.
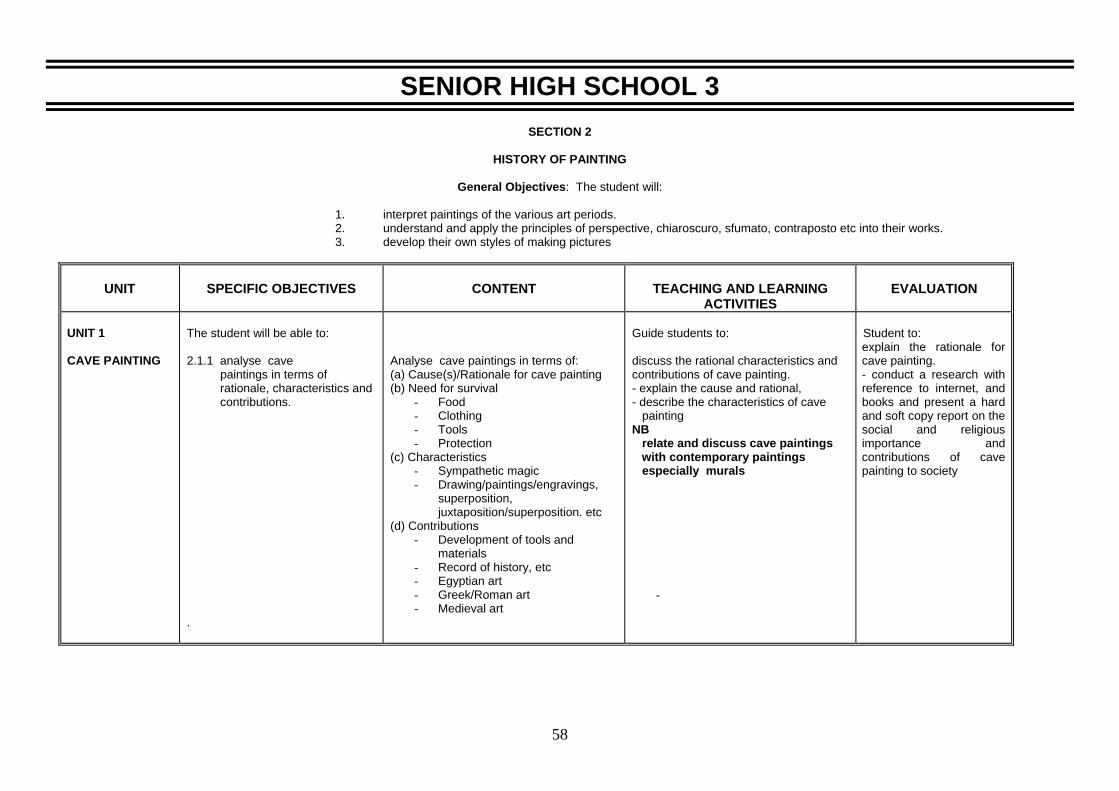
58
SENIOR HIGH SCHOOL 3
SECTION 2
HISTORY OF PAINTING
General Objectives: The student will:
1. interpret paintings of the various art periods. 2. understand and apply the principles of perspective, chiaroscuro, sfumato, contraposto etc into their works. 3. develop their own styles of making pictures
UNIT
SPECIFIC OBJECTIVES
CONTENT
TEACHING AND LEARNING
ACTIVITIES
EVALUATION
UNIT 1 CAVE PAINTING
The student will be able to: 2.1.1 analyse cave paintings in terms of rationale, characteristics and contributions. .
Analyse cave paintings in terms of: (a) Cause(s)/Rationale for cave painting (b) Need for survival
- Food - Clothing - Tools - Protection
(c) Characteristics - Sympathetic magic - Drawing/paintings/engravings,
superposition, juxtaposition/superposition. etc
(d) Contributions - Development of tools and
materials - Record of history, etc - Egyptian art - Greek/Roman art - Medieval art
Guide students to: discuss the rational characteristics and contributions of cave painting. - explain the cause and rational, - describe the characteristics of cave painting NB relate and discuss cave paintings with contemporary paintings especially murals
-
Student to: explain the rationale for cave painting. - conduct a research with reference to internet, and books and present a hard and soft copy report on the social and religious importance and contributions of cave painting to society
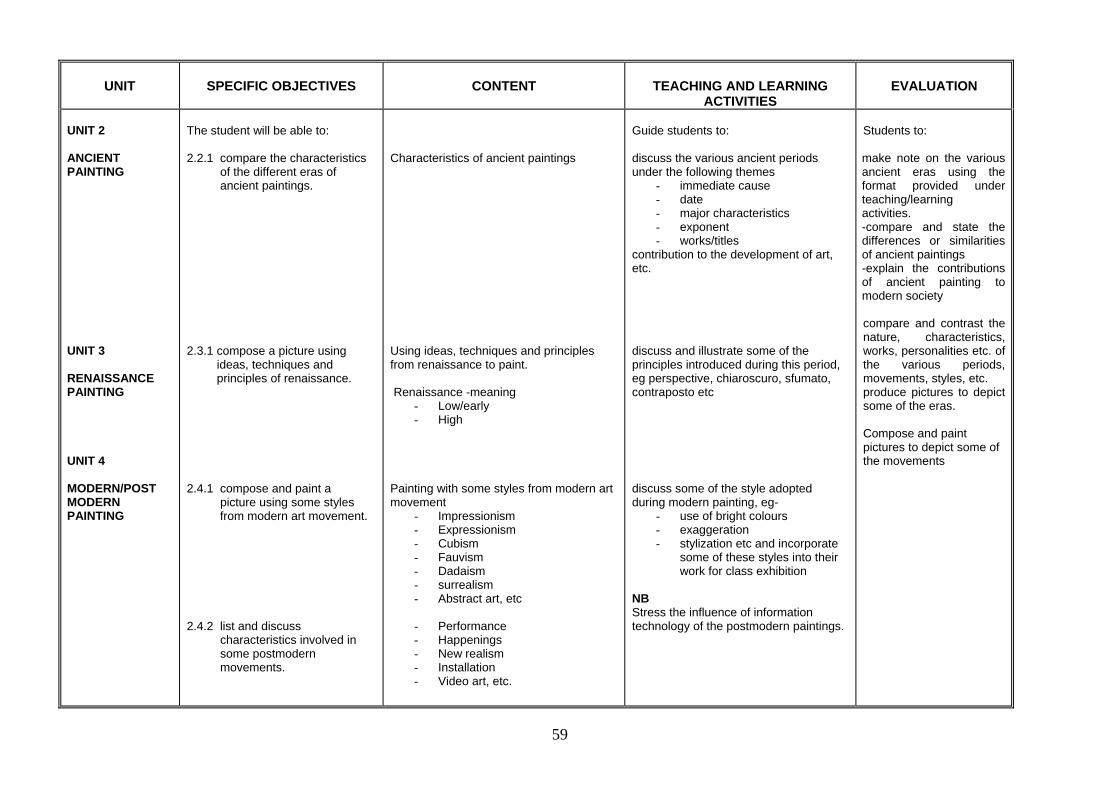
59
UNIT
SPECIFIC OBJECTIVES
CONTENT
TEACHING AND LEARNING
ACTIVITIES
EVALUATION
UNIT 2 ANCIENT PAINTING UNIT 3 RENAISSANCE PAINTING UNIT 4 MODERN/POST MODERN PAINTING
The student will be able to: 2.2.1 compare the characteristics of the different eras of ancient paintings. 2.3.1 compose a picture using ideas, techniques and principles of renaissance. 2.4.1 compose and paint a picture using some styles from modern art movement. 2.4.2 list and discuss characteristics involved in some postmodern movements.
Characteristics of ancient paintings Using ideas, techniques and principles from renaissance to paint. Renaissance -meaning
- Low/early - High
Painting with some styles from modern art movement
- Impressionism - Expressionism - Cubism - Fauvism - Dadaism - surrealism - Abstract art, etc
- Performance - Happenings - New realism - Installation - Video art, etc.
Guide students to: discuss the various ancient periods under the following themes
- immediate cause - date - major characteristics - exponent - works/titles
contribution to the development of art, etc. discuss and illustrate some of the principles introduced during this period, eg perspective, chiaroscuro, sfumato, contraposto etc discuss some of the style adopted during modern painting, eg-
- use of bright colours - exaggeration - stylization etc and incorporate
some of these styles into their work for class exhibition
NB Stress the influence of information technology of the postmodern paintings.
Students to: make note on the various ancient eras using the format provided under teaching/learning activities. -compare and state the differences or similarities of ancient paintings -explain the contributions of ancient painting to modern society compare and contrast the nature, characteristics, works, personalities etc. of the various periods, movements, styles, etc. produce pictures to depict some of the eras. Compose and paint pictures to depict some of the movements

60
UNIT
SPECIFIC OBJECTIVES
CONTENT
TEACHING AND LEARNING
ACTIVITIES
EVALUATION
UNIT 5 INDIGENOUS IDEAS AND FORMS OF PICTURE MAKING
The student will be able to: 2.5.1 Compose and make a picture using indigenous ideas, symbols, techniques and styles for a purpose.
Making pictures with indigenous ideas, symbols, techniques and styles e.g. - body art -asafo flag -murals on walls as is practised in Sirigu-Northern Ghana. -glass painting -mosaic e.g. Hall of Bank of Ghana and community centre in Accra. -painting pictures on boats, cars, offices, canoes, places of worship, etc -pictorial batik -calabash and ceramics painting .
Guide students to: discuss indigenous art in terms of ideas, symbols, types, styles, cultural and religious values. derive ideas from indigenous symbols and art forms to compose and make pictures using appropriate techniques, tools and materials. discuss and develop criteria or steps for appreciation and evaluation. display, appreciate and evaluate their own and others work according to criteria. NB: Assist students to apply knowledge and skills on African and Ghanaian art acquired from the General Knowledge in Art.
Students to: find out for more information about glass painting and decoration from the internet, practitioners and books for class discussion. plan and compose a picture for a purpose depicting indigenous ideas, symbolism, national and topical issues for a cultural exhibition.

61
SENIOR HIGH SCHOOL 3
SECTION 3
ENTREPRENEURSHIP
General Objectives: The student will:
1. understand and apply knowledge and skills in entrepreneurship and picture making to develop a business plan. 2. to develop the skills, attitude and the interest to build a personal portfolio of works. 3. to apply the knowledge and skills in exhibition to participate willingly in organizing and mounting one.
UNIT SPECIFIC OBJECTIVES CONTENT TEACHING AND LEARNING
ACTIVITIES EVALUATION
UNIT 1 AREAS OF ENTERPRISE IN PICTURE MAKING 1)Exploring the market
The student will be able to: 3.3.1 name some of the enterprises in Picture Making. 3.3.2 determine whether there is a market for the intended product before setting up the enterprise.
Examples of Picture Making enterprises:
Print Making
Maquetry
Painting
Collage
Mosaic, etc Conducting a market survey to determine the market niche for the product e.g. to determine whether there will be a market for the particular product planned.
Students to name some of the vocations/enterprises in the locality and in Ghana and describe how the vocations/enterprises operate. Through question and answer, let students discuss the first thing to do before one decides to set up an enterprise in a particular aspect of Picture Making . Discuss with students the concept of “market niche” and its importance in determining whether there will be a market for the particular product.
Students to: visit some local enterprises to acquaint themselves with their operations. Students to conduct market survey on any Picture Making product of their choice for class discussion.

62
UNIT SPECIFIC OBJECTIVES CONTENT TEACHING AND LEARNING
ACTIVITIES EVALUATION
UNIT 1 (CONT’D) AREAS OF ENTERPRISE IN PICTURE MAKING 2)Avenues for financial and technical support UNIT 4 SETTING UP AND MANAGING A PICTURE MAKING ENTERPRISE
The student will be able to: 3.3.3 identify agencies that provide financial assistance for Picture Making enterprise. 3.3.4 identify agencies which provide technical assistance to small scale business. 3.4.1 explain the main factors to consider in setting up a picture making enterprise.
. Agencies providing financial support to small scale Picture Making businesses: Eg, Board for Small Scale Industries (NBSSI), Export Promotion Council, Aid to Artisans, GETRADE, the Banks etc Agencies providing technical assistance to small scale business: GRATIS, Aid to Artisans, GETRADE, Department of Forestry, etc.
Factors to consider when setting up a picture making enterprise: Capital: Capital is of two types: start-up capital and working capital. Start-up capital is needed to purchase tools, equipment and materials to start the business operation. Working capital is needed to buy new materials to keep the business running, to pay for transportation, salaries etc. each month. Much of the operating costs are paid from the working capital. eg. Room or space for workshop Labour (skilled) Availability of raw materials Transport and Communication Nearness to market or customers Selecting a Business name Registration requirements.
Assist students to identify and discuss the work of agencies that provide financial assistance to small scale business. Invite a resource person to give a talk on the conditions under which financial assistance may be given to small scale business enterprises. Discuss with students the role of agencies listed in content and any others, in providing technical assistance to small business, indicating the types of technical assistance they offer. Put students into groups to discuss and present the important factors to consider when setting up a picture making enterprise. Students to discuss where and how to obtain capital for business. Students to explain the differences between start-up capital and working capital, and give reasons why working capital is an important factor in keeping a business running.
Students to: write proposals for financial assistance from one of the identified organizations that promotes small scale industry list four (4) organizations and establishments which offer assistance to small scale businesses. . Students to write the factors to consider when setting up a picture making enterprise.

63
UNIT SPECIFIC OBJECTIVES CONTENT TEACHING AND LEARNING
ACTIVITIES EVALUATION
UNIT 4 (CONT’D) SETTING UP AND MANAGING A PICTURE MAKING ENTERPRISE
The student will be able to: 3.4.2 explain the concept of management in the picture making enterprise. 3.4.3 describe the functions of the Manager.
Concept of management Management is the process of ensuring the efficient execution of all activities of an enterprise through working with other people. The Manager is the one who controls the operation of the enterprise. The functions of the management: Planning the enterprise: determining the
market niche to find out if the product will sell; location of workshop, labour, types of product(s), capital require etc.
Organising: putting together the capital, labour and other resources to start the business; setting up the business structure and the authority structure i.e. who reports to whom etc
Students to brainstorm to bring out reasons why skilled labour is important for the success of an enterprise. Organise a visit to a picture making studio /gallery for students to ask questions on how they started, initial and current problems/ challenges they faced and how they over came them. Students to name any managers they know of: Assist students to explain the concept of “management”. Assist students to discuss each of the steps in the management process and how each step helps in the management process. Students to make a chart showing the functions of the manager. Guide students to discuss the additional skills a manager needs to be able to manage a successful enterprise.
Students to: write a short essay on the importance of setting up and managing a small scale enterprise.
Students to write a short essay on the importance of establishing and managing a small scale enterprise.
Debate on the statement “The success of an enterprise depends on the Manager”. Students to write down the reasons why the Headmaster should also be considered as a manager.

64
UNIT SPECIFIC OBJECTIVES CONTENT TEACHING AND LEARNING
ACTIVITIES EVALUATION
UNIT 4 (cont’d) SETTING UP AND MANAGING A PICTURE MAKING ENTERPRISE UNIT 5 COSTING, PRICING AND MARKETING
The student will be able to: 3.4.4 explain the concept of management in the picture making enterprise. 3.4.5 describe the functions of the Manager. 3.4.6 explain the importance of Good customer relations to an enterprise. 3.5.1 identify the factors that constitute the cost of a product.
Concept of management Directing: Directing means the leadership
style adopted to get work done. It implies establishing policies, coordinating the work of staff, coaching staff, motivating staff, and assigning work to different staff as needed.
Controlling: Controlling means measuring performance against the standards of the enterprise. It involves setting standards, checking production on daily, weekly, and monthly basis to ensure the business is reaching its targets; monitoring expenses for production, transport and communication, checking expenses against revenue to ensure the enterprise is healthy, giving feedback to staff to improve work quality and work standards.
The total cost of a product consists of two components: Variable costs (Direct costs) and fixed costs (Indirect costs also called “overheads”). (i) Variable costs (i.e. direct costs or production costs) – consist of the cost of raw materials and wages. Variable costs are the direct costs for making the product. They are called “variable” because the cost of materials for producing ten items a day is different from the cost for producing twelve or twenty items a day. The costs vary. (ii) Fixed costs: consist of rent, lighting cost, taxes, cost of adverts, depreciation cost of tools and equipment, telephone costs, transportation, postage, salaries etc. Fixed costs are also known as “indirect costs” or “overheads”.
NOTE: The additional skills include budgeting and bookkeeping. Students to discuss how a picture making business should be managed, following the management steps outlined in content. Students to explain the meaning of “good customer relations”, and describe the principles for good customer relations, and discuss why good customer relations are important to a business. Explain the meaning of variable costs and fixed costs. Students to give examples of items with variable cost and items with fixed cost. Assist students to discuss the factors that contribute to the total cost of a product.
Students to: write a short essay on the importance of establishing and managing a small scale enterprise. Debate on the statement “The success of an enterprise depends on the Manager”. Students to write down the reasons why the Headmaster should also be considered as a manager. Students to conduct investigation into how certain establishments are patronised and others are not for class discussion. Students to determine the production cost of some other picture making items produced in class. Students to cost and price other items produced in class.

65
UNIT SPECIFIC OBJECTIVES CONTENT TEACHING AND LEARNING ACTIVITIES EVALUATION
UNIT 5 COSTING, PRICING AND MARKETING
The student will be able to: 3.5.2 explain the factors that determine the price of a picture making product.
Price is generally determined by the market forces of supply and demand. Factors to be taken into account in pricing a product generally consist of: Cost of the product (total production cost) Profit margin.
The two are combined in various price settings such as: Introductory Price (also called “market penetration
price” that is pricing below the actual market price to attract market share). This is only temporary pricing to get on to the market.
Using the “going price” system – that is charging the same price other suppliers of the same product are charging. Using the price discrimination system known as “what the market can bear” pricing system e.g. selling at a higher price in, say, Accra than in a smaller town, selling at different prices in different areas of a town depending upon the income levels of the different areas.
Using the “price differentiation” system, that is
selling the same thing, but using cheaper packaging for some. The same product may be packed differently or combined differently with other additives and priced differently.
In picture making, the popularity of the artist plays a
very vital role in the price of the product. For example a painting of the same size and perhaps quality of Prof Ablade Glover would sell far higher than that of another artist who is not as well known as he is.
Assist students to discuss each of the factors and explain the meaning of “overheads”. You may invite a manager or an accountant to help with this lesson. Guide students to discuss the various factors which determine the pricing of products. Let students in small groups discuss the factors that influence the pricing of picture making products. Through questions and answers, students to discuss how to determine the price for items produced in a village, and for items produced in a big town. Students to determine the price of picture making items they have made by using each of the following pricing systems described in the content (“Going price”, “cost price” “price discrimination” and “price differentiation”) Students to compare each of the prices to the cost of producing the picture making item and determine the actual profit margin.

66
UNIT SPECIFIC OBJECTIVES CONTENT TEACHING AND LEARNING
ACTIVITIES EVALUATION
UNIT 5 COSTING, PRICING AND MARKETING
The student will be able to: 3.5.3 explain the term of “marketing”. 3.5.4 describe the basic strategies for efficient marketing. 3.5.5 describe the strategies for selling products.
Pricing picture making items: Painting, collage, mosaic, etc. Estimating cost and determining selling price. Concept of marketing – the art of offering a product for sale by using the skills of advertising and supplying. Basic marketing strategies; - Advertising by posters, handbills, TV, radio, word of mouth etc. - Exhibitions - Bazaars - Fairs - Effective decoration and finishing - Packaging – attractive packaging - Transportation (if possible) Selling by: - Wholesale – selling by large quantities (with quantity discount). - Retailing items in smaller quantities - Door to Door selling - Mail order
Students to choose the best price system that will be suitable in their locality. Assist students to explain marketing and state purpose. Students to discuss the different ways of marketing products. (See content) Students to suggest other methods of marketing products. Students to role-play different ways of advertising and distributing products. Students to discuss the strategies for selling products. Students to discuss ways for selling picture making items produced in class.
Students to: cost and price other items produced in class. Students to write an essay explaining three basic strategies for efficient marketing. Students to describe other ways for marketing products. Students to design posters for marketing selected picture making items. (teacher to evaluate posters and other adverts and provide feedback).

67
UNIT SPECIFIC OBJECTIVES CONTENT TEACHING AND LEARNING
ACTIVITIES EVALUATION
UNIT 5 (CONT’D) COSTING, PRICING AND MARKETING
The student will be able to: 3.5.6 use the “Break Even Analysis” to determine when an enterprise is making profit. 3.5.7 analyse the risks a business may face.
Break Even Analysis: In most cases, a business does not start making profit as soon as it starts. Suppose one is making and selling Collages at Gh¢5.00 per one. Suppose also that the price of Gh¢5.00 consists of Gh¢4.00 as production cost and Gh¢1.00 as profit margin. Consider that the business has rent, transport, telephone bills and salaries of three assistants to pay each month. The total fixed cost comes to Gh¢ 40.00 a month. The entrepreneur will be able to cover his/her variable and fixed costs a
month if he/she is able to sell (Gh¢ 40.00 Gh¢ 5.00 per bag) 8 bags a month. Selling 8 bags a month does not make a business a profit; it only gives enough money to cover costs, and is the break-even point. The business can only make a profit for its owner, if it is able to sell more than 8 bags a month. The break-even point is hence the point where revenue (from sales) is equal to the cost of products sold. Business risks Business losses are NOT due to the work of witches, ghosts or gods. They are due to types of risks a business may face. These are Direct risks (pure risk) and Indirect risks. Direct risk involves theft (also known as larceny) fire misuse of capital and profit through
irresponsible expenses.
Using the example in content, and using realistic amounts of money, guide students to discuss the concept of “break-even analysis”. Students to explain the concept of break-even analysis”. NOTE: Use other examples to help strengthen students‟ understanding of the concept that profit for the businessman/woman starts only after the business has passed the break-even point. Students to explain what a businessman/woman means when he/she says that his/her business is just breaking even. Discuss the two types of risks a business faces. Students to explain why some businesses fail. Students to state the two types of business risks and explain their differences.
Students to do further exercises on break-even analysis. Students to investigate factors which lead to the collapse of enterprises in their locality and report for class discussion.

68
UNIT SPECIFIC OBJECTIVES CONTENT TEACHING AND LEARNING
ACTIVITIES EVALUATION
UNIT 5 (CONT’D) COSTING, PRICING AND MARKETING
The student will be able to: 3.5.8 develop a plan for controlling business risks.
Indirect risk involves the following lack of sales due to faulty or low quality
products, or due to wrong business location.
currency inflation introduction of new taxes
changes in labour laws. Indirect risks are more difficult to control and account for the greater portion of business losses. Controlling business risks: Theft: regular checks of stocks and finished products. assign an accountant/book-keeper to check
the business accounts every month. increase vigilance and security to minimize
theft. Fire: get qualified electrician to do the electrical connections to avoid likelihood of fire from faulty connections. Provision of fire extinguisher. Low sales (due to low quality product) undertake staff training. check and improve product quality. Low sales (due to wrong location) relocate the business to a more promising
area of the town. For minimising or controlling inflation, new labour laws etc. one has to be in constant touch with the relevant Ministries to know what new changes are planned that may affect one‟s business.
Students to discuss ways by which some businessmen/ women misuse their capital and profit. Students to describe ways for controlling theft, fire and low sales. Guide students to develop a plan for minimising some of the business risks discussed in class.
Students to write an essay on how to control business risks and minimise losses.
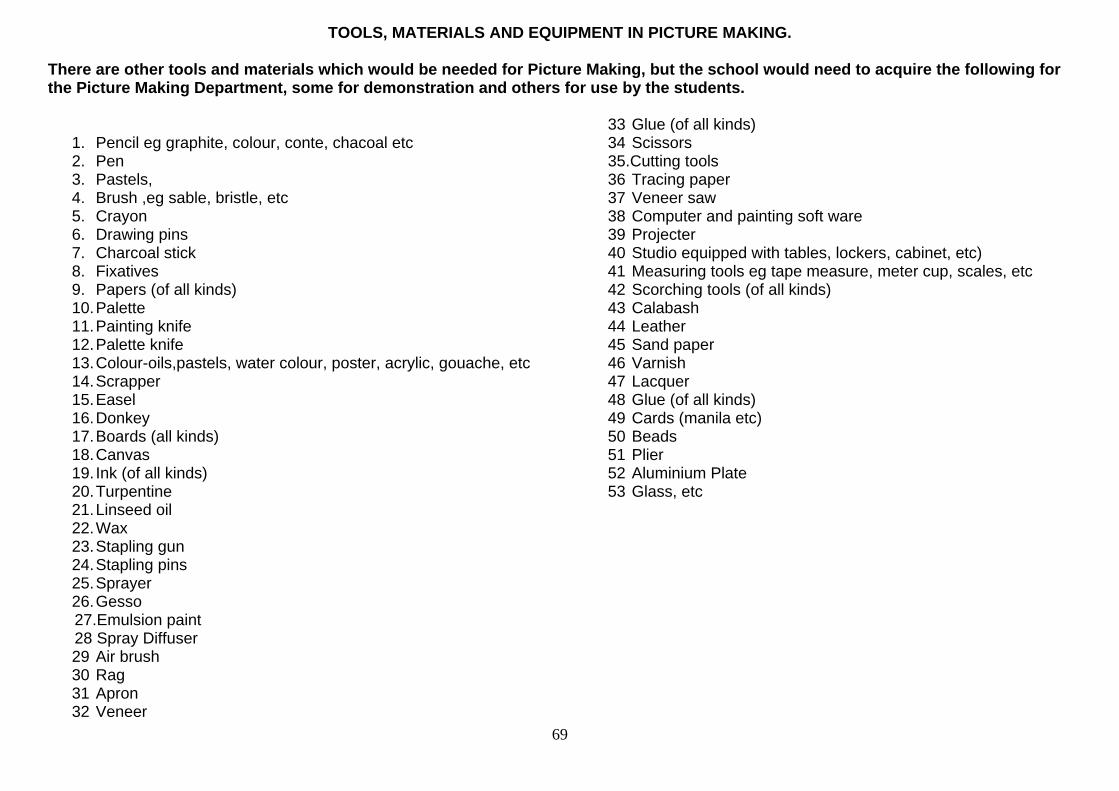
69
TOOLS, MATERIALS AND EQUIPMENT IN PICTURE MAKING. There are other tools and materials which would be needed for Picture Making, but the school would need to acquire the following for the Picture Making Department, some for demonstration and others for use by the students.
1. Pencil eg graphite, colour, conte, chacoal etc 2. Pen 3. Pastels, 4. Brush ,eg sable, bristle, etc 5. Crayon 6. Drawing pins 7. Charcoal stick 8. Fixatives 9. Papers (of all kinds) 10. Palette 11. Painting knife 12. Palette knife 13. Colour-oils,pastels, water colour, poster, acrylic, gouache, etc 14. Scrapper 15. Easel 16. Donkey 17. Boards (all kinds) 18. Canvas 19. Ink (of all kinds) 20. Turpentine 21. Linseed oil 22. Wax 23. Stapling gun 24. Stapling pins 25. Sprayer 26. Gesso
27.Emulsion paint 28 Spray Diffuser
29 Air brush 30 Rag 31 Apron 32 Veneer
33 Glue (of all kinds) 34 Scissors 35.Cutting tools 36 Tracing paper 37 Veneer saw 38 Computer and painting soft ware 39 Projecter 40 Studio equipped with tables, lockers, cabinet, etc) 41 Measuring tools eg tape measure, meter cup, scales, etc 42 Scorching tools (of all kinds) 43 Calabash 44 Leather 45 Sand paper 46 Varnish 47 Lacquer 48 Glue (of all kinds) 49 Cards (manila etc) 50 Beads 51 Plier 52 Aluminium Plate 53 Glass, etc

1
GLOSSARY
Abstact: Purposefully invented, distorted or arranged forms and colour presented in contrast to reality. It is also non-objective or non- Representational
Abstract Art : Art in which the subject matter has been simplified or distorted to the point that it may or may not be easily descended.
Acrylic: Resin that, when mixed with water and pigment, forms an inorganic and quick drying medium. Acrylic paint
therefore is a fast drying synthetic paint made from acrylic resin. Action Painting: The technique of dripping and splashing paint onto canvases stretched on the floor Aesthetic: Pertaining to the appreciation of the beautiful as opposed to the functional or utilitarian, and, by extention, to the
appreciation of any form of art.
Aesthetic value: The impact of a work of art on our senses, intellect, and emotions.
Analogous colours:Pairs of colour such as yellow and orange, that are adjudscent to each other on the colour wheel.
Acqatint : A print making process that includes etching and that permits broad areas of black and gray tones. Air brush: Atomizer operated by compressed air used for spraying on paint.
Art Deco: A popular art and design style of the 1920s and 30s, and characterized by its intergration of organic and geometric forms.
Art: The special expression of ideas, feelings and values in visual forms.
Art criticism: A special concentrated way of looking at a piece of art with a purpose to recieve maximum enjoyment and meaning from it.
Abstract Expressionism: A twentieth-century painting style in which artists applied paint freely to huge canvases in an effort to show feelings and emotions rather than realistic subject matter.

2
Aerial perspective: Aerial, or atmospheric, perspective is the behaviour of colour and tone with distance. The closer the colour is the brighter it is, while the furtherer it is the more pale it will become. This effect is achieved by using hue, value, and intensity to show distance in painting perspective. Asymmetrical: A type of balance where elements are arranged differently on each side of the composition. Binder: A liquid that holds together the grains of pigment in paint.
Baroque art: An art style characterized by movement, vivid contrast, and emotional intensity. Balance: A principle of art, it refers to a way of combining art elements to create a feeling of equilibrium or stability in a work. Burin: A steel engraving tool. Byzantine art: The art of the Eastern Roman Empire. Byzantine paintings and mosaics are characterized by a rich use of colour and figures that seem flat and stiff.These art works were influenced by the Christian religion at the time. Catacombs: Underground tunnels in which early Christians met and buried their dead. Some catacombs also contained chapels and
meeting rooms. In these catacombs the earliest forms of Christian paintings were found usually based on biblical themes.
Chiaroscuro: The arrangement of dramatic contrasts of light and shadow. It is the use of light to modle objects. It was introduced by renaissance artists in their desire to give a three dimensional feel to two dimensional forms. Collage: A technique that involves pasting materials such as straw, plantain bark, wood shavings, newspaper clippings,
wallpaper pieces, or photographs and other materials to the surface to form a picture. In collage objects could be pasted over another.
Colour : To the artist colour is pigment. It is the effect of light reflecting from an object onto the eye. It is an element of art
made up of three distinct qualities: hue, the colour name, e.g., red, yellow, blue; intensity, the purity and

3
brightness of a colour, e.g., bright red or dull red; and value, the lightness or darkness of a colour. There are tree basic groups of colour; primary, secondary and tertiary.
Complementary colours: Colours that are directly opposite each other on the colour wheel, such as red and green, blue and orange, and violet and yellow. When complements are mixed together in the right proportions, they form a neutral gray. Contour drawing: A drawing in which contour lines alone are used to represent subject matter. It is an outline drawing. Contour line: A line or lines that surround and define the edges of an object or figures. Contrapposto: A way of sculpting or drawing a human figure in a natural pose with the weight of the body balanced on one leg while the other is free and relaxed. This was introduced by Michellangelo in the renaissance priod to actualize the forms he desire to glamorise. Contrast: Closely related to emphasis, a principle of art, this term refers to a way of combining art elements to stress the
differences between those elements. Cool colours: Colours often associated with water, sky, spring, and foliage and suggest coolness. These are the colours that contain blue and green and appear on one side of the colour wheel, opposite the warm colours. Cornice: A horizontal element positioned across the top of the frieze. Cubism: A twentieth-century art movement in which artists tried to show all sides of three-dimensional objects on a flat
canvas. Led by Pablo Picasso (1881-1973) early cubists were inspired by African sculptures. They had two schools – namely, the analytical and synthetic cubism,
Curator : The museum employee responsible for securing and exhibiting artworks for the general public and scholars to view. Dada: An early twentieth-century art movement that ridiculed contemporary culture and traditional art forms. The "Dada" movement
started in Zurich, Switzerland by a group of loosely knit group made up of both visual and literal artists in 1916. This group and their activities were later christened neo-dada movement in the 1960s. Their "nonsensical" name

4
"dada" meaning "hobby horse" in French was chosen to symbolize their "nihilist" stance of defiling conventional western values and tradition. They argued that, the world had gone mad, and its art must equally follow.
Design: A skillful blend of the elements and principles of art. In simple language, it is the arrangement of the elements of
Art according to the Principles of Art Digital Painting: It is the use of the computer and its assesaries/ software to produce a painting. Dry media: Those media that are applied dry and include pencil, charcoal, crayon, and chalk or pastel. Early Medieval: A period that dates from A.D. 476 Eclectic style: A style composed of elements drawn from various sources. Elements of art: The basic components, or building blocks, used by the artist when producing works of art. The elements consist of colour, value, line, shape, form, texture, and space. Emotionalism: A theory of art that places emphasis on the expressive qualities. According to this theory, the most important thing about a work of art is the vivid communication of moods, feelings, and ideas. Engraving: A method of cutting or incising a design into a material, usually metal, with a sharp tool. A print can be made by
inking such an engraved surface. Etching: To engrave a metal plate with acid. A copper or zinc plate is first covered with a coating made of a mixture of
beeswax, asphalt, and resin known as a ground. The ground is incised with a sharp tool to produce a drawing. A print can be made by inking such an etched surface.
Expressionism : A twentieth-century art movement in which artists tried to communicate their strong emotional feelings through artworks. Expressive qualities:Those qualities having to do with the meaning, mood, or idea communicated to the viewer through a work of art. Art exhibiting this aesthetic quality is favoured by the emotionalists.

5
Fauves: Artists whose paintings were so simple in design, so brightly coloured, and so loose in brushwork that an enraged critic called the artists Fauves, or Wild Beasts. The Fauves were led by Henry Matisse and took inspiration from Vincent Van Gough
Fauvism: An early twentieth-century style of painting in France. The leader of the Fauves was Henri Matisse. Fine arts: Refers to painting, sculpture, and architecture, arts which generally have no practical function (architecture is the
exception), and are valued by their success in communicating ideas or feelings. Foreshortening: A way of drawing figures or objects according to the rules of perspective so that they appear to recede or protrude into three-
dimensional space. Form: An element of art, it describes an object with three-dimensions. Formalism: A theory of art that emphasizes design qualities. According to this theory, the most important thing about a work
of art is the effective organization of the elements of art through the use of the principles. Fresco: A method of painting in which pigments are applied to a thin layer of wet plaster so that they will be absorbed and
the painting becomes part of the wall. Frieze: A decorative horizontal band running across the upper part of a wall. Harmony: A principle of art, it refers to a way of combining similar elements in an artwork to accent their similarities. Hellenistic: A period of Mediterranean culture influenced by Greece following the conquests of Alexander the Great. The
expression of inner emotions was more important than beauty to the artists of this period. Hieroglyphics: The characters and picture-writing used by the ancient Egyptians. . Hue: A colour‟s name. It is the purest state of a particular colour Humanism: An interest in the art and literature of ancient Greece and Rome. In humanism, man was considered the central
theme ofcreation and was celebrated in the arts.

6
Illuminated manuscript: A manuscript, popular during the Medieval period, in which the pages are decorated with silver, gold, and rich colours. Often these manuscripts contain small pictures known as illuminations or miniatures. llluminations: Manuscript paintings, particularly those done during the Medieval period. Imitationalism: A theory of art that places emphasis on the literal qualities. According to this theory, the most important thing about a work of art is the realistic representation of subject matter. Impressionism: A style of painting in which artists captured an impression of what the eye sees at a given moment and the effect of sunlight on the subject. Intaglio: A process in which ink is forced to fill lines cut into a metal surface. Intensity: The quality of brightness and purity of a colour. Intermediate (or tertiary) colours: Colours produced by mixing unequal amounts of two primary colours. . Landscape: A painting, photograph, or other work of art that shows natural scenery such as mountains, valleys, trees, rivers, and lakes. Line: An element of art that refers to the continuous mark made on some surface by a moving point (pen, pencil, etc.). A painting technique in which importance is placed on contours or outlines. Linear perspective: A graphic system that showed artists how to create the illusion of depth and volume on a flat surface. Lithography: A printmaking method in which the image to be printed is drawn on a limestone, zinc, or surface with a special greasy crayon. It is based on the incompartibility of water and oil or grease. Mannerism: A European art style that rejected the calm balance of the High Renaissance in favor of emotion and distortion. Mastaba: A low, rectangular Egyptian tomb made of mud brick with sloping sides and a flat top, covering a burial chamber. Mixed media: The use of several different materials in one work of art. Medium: A material used by an artist to produce a work of art.

7
Movement: A principle of art used to create the look and feeling of action and to guide the viewer‟s eye throughout the work of art. Mural: A large design or picture, painted directly on the wall of a public building. Neoclassicism: A nineteenth-century French art style that sought to revive the ideals of ancient Greek and Roman art and was characterized by balanced compositions, flowing contour lines, and noble gestures and expressions. Nonobjective art: Any artwork that contains no apparent reference to reality. Oil paints: A mixture of dry pigments with oils, turpentine, and sometimes varnish. Old Stone Age: The historical period believed to have lasted from 30,000 B.C. until about 10,000 B.C. Also known as the Paleolithic period. Op art: A twentieth-century art style in which artists sought to create an impression of movement on the picture surface
by means of optical illusion. Paint program: A computer art application in which images are stored as bitmaps. Paint programs are capable of producing more
lifelike pictures than draw programs. Painterly: A painting technique in which forms are created with patches of colour rather than with hard, precise edges. Pastel: Pigments mixed with gum and pressed into a stick form for use as chalky crayons. Works of art done with such pigments are referred to as pastels. Perspective: A method for representing three dimensional objects on a two-dimensional surface. See also Aerial perspective and Linear perspective. Pharaoh: An Egyptian king or ruler, also considered to be a god in the eyes of the people. Photo-Realism: An art movement of the late twentieth century in which the style is so realistic that it looks photographic. Pigment: Finely ground powder that gives every paint its colour. Picture plane: A flat surface on which an artist creat a pictotial image. It refers to the various starters in a picture. They could be applied patches of colour placed side by side, in which case each one represented a separate plane.

8
Pop art: An art style that portrayed images of the popular culture such as comic strips and commercial products. Portrait: The image of a person, especially of the face. It can be made of any sculptural material or any two dimensional medium. Post-Impressionism:A French art movement that immediately followed Impressionism. The artists involved showed a greater concern for structure and form than did the Impressionist artists. Primary colours: The basic colours of red, yellow, and blue, from which it is possible to mix all the other colours of the spectrum. Principles of art: Refers to the different ways that the elements of art can be used in a work of art. The principles of art consist of balance, emphasis, harmony, variety, gradation, movement, rhythm, and proportion. Proportion: The principle of art concerned with the relationship of certain elements to the whole and to each other. Realism: A mid-nineteenth-century style of art representing everyday scenes and events as they actually looked. Regionalism: A popular style of art in which artists painted the American scenes and events that were typical of their regions of America. Relief printing: The image to be printed is raised from the background. Renaissance: A period of great awakening belived to be between1400-1600 BC. The word renaissance means rebirth and was largely the product of Italian city-states like Florence. It was the rebirth of Greek classical ideas motivated by the interest in humanity and the love of beauty. Renaissance marked a period in European civilization when the domination of society by the church was broken leading to the birth of secularism. The concept of Renaissance was developed around the philosophy of the „human‟, championed by the historian Burckhardt Repetition: A principle of art, this term refers to a way of combining art elements so that the same elements are used over and over. Rhythm: A principle of art, it refers to the careful placement of repeated elements in a work of art to cause a visual tempo or beat.

9
Rococo art: An eighteenth-century art style that placed emphasis on portraying the carefree life of the aristocracy rather than on grand
heroes or pious martyrs. Romanesque: An artistic style that, in most areas, took place during the eleventh and twelfth centuries. The style was most
apparent in architecture and was characterized by the round arch, a large size, and solid appearance. Romanticism: A style of art that portrayed dramatic and exotic subjects perceived with strong feelings. Salon: An annual exhibition of art held by the academies in Paris and London. Satire: The use of sarcasm or ridicule to expose and denounce vice or folly. Screen printing: Paint is forced through a screen onto paper or fabric. Scroll: A long roll of illustrated parchment or silk. Secondary colours: The colours obtained by mixing equal amounts of two primary colours. The secondary colours are orange,
green, and violet. Serigraph: A screen print that has been handmade by an artist. Shape: An element of art referring to a two-dimensional area clearly set off by one or more of the other visual elements
such as colour, value, line, texture, and space. Sketch: A quick drawing that captures the appearance or action of a place or situation. Sketches are often done in
preparation for larger, more detailed works of art. Solvent: The material used to thin the binder in paint. Space: An element of art that refers to the distance or area between, around, above, below, or within things. Stained glass: The art of cutting coloured glass into different shapes and joining them together with lead strips to create a
pictorial window design. Still life: A drawing or painting of an arrangement of inanimate objects, such as food, plants, pots, and other inanimate objects.

10
Surrealism: A twentieth-century art style in which dreams, fantasy, and the subconscious served as the inspiration for artists.
Surrealist manifesto issued in 1924 referred to it as "Pure psychic automatism", by which it is intended to express the real process of thought. In other words, Surrealist works were guided by the supernatural, the unconscious or the spiritual, devoid of formal conscious limitations.
Symbol: A form, image, or subject representing a meaning other than the one with which it is usually associated. Symmetrical balance: A way of organizing the parts of a design so that one side duplicates, or mirrors, the other. Also known as
formal balance. Tactile: Of, or relating to, the sense of touch. Technique: Any method of working with art materials to create an art object. The manner in which an artist uses the technical
skills of a particular art form. Tempera: A paint made of dry pigments, or colours, which are mixed with a binding material. Tensile strength: The capacity of a material to withstand bending. Tertiary colours: See Intermediate colours. Texture: The element of art that refers to the way things feel, or look as if they might feel if touched. Triptych: A painting on three hinged panels that can be folded together. Unity: The look and feel of wholeness or oneness in a work of art. Value: An element of art that describes the lightness or darkness of a hue. Vanishing point: In perspective drawing, the point at which receding parallel lines seem to converge. Variety: A principle of art that refers to a way of combining art elements in involved ways to create intricate and complex
relationships. Visual arts: Unique expressions of ideas, beliefs, experiences, and feelings presented in well-designed visual forms.

11
Volume: Refers to the space within a form. Warm colours: Colours suggesting warmth. These are colours that contain red and yellow. Watercolour: Transparent pigments mixed with water. Paintings done with this medium are known as watercolours. Wet media: Media in which the colouring agent is suspended in a liquid, such as ink and paints. Woodblock printing: A process that involves transferring and cutting pictures into wood blocks, inking the raised surface of these blocks, and printing.