mini mondrian plans/art... · mondrian’s . composition in red, blue, and yellow. discuss how he...
TRANSCRIPT

Standards
Materials
Instructions
VA:Cr1.1.KEngage in exploration and imagina-tive play with materials VA:Cn11.1.KIdentify a purpose of an artwork
• Square 1 Art paper
• Precut colored paper in varioussizes and widths
• Glue & scissors
• Primary color tempera paint
• Paintbrushes and water
• Black Sharpie marker
Phase 1
• Show students example of PietMondrian’s Composition in Red,Blue, and Yellow. Discuss how heused lines, vertical, horizontal, andhow they created shapes, squareand rectangle.
• Demonstrate how to arrange theblack paper lines on the squarepaper. Some can overlap but somewill need to be cut if they hang offthe page. Show students how tocut if they are too long.
• Once they are happy with theirarrangement of lines show themhow to glue the lines down. “A dotis a lot.”
Phase 2
• Review Mondrian’s Compositionin Red, Blue, and Yellow, from Day1.
• Introduce primary colors. Look atMondrian’s Composition Red, blueand Yellow. “What colors do yousee? Why do you think he chosethose colors? Would you choosethe same colors? Why or why not?”
• Demonstrate how to paint theline collage in the style of Mondri-an. Show students how to properlyclean a paintbrush before paintingwith another color.
• Sign name with Sharpie marker.
Square1art.com 888-332-3294
Mini MondrianKindergarten / 2 class periods

Square1art.com 888-332-3294

Standards
Materials
Instructions
VA:Cr1.1.KEngage in exploration and imagina-tive play with materials VA:Re7.2.KDescribe what an image represents
• Square 1 Art paper
• Pencil and eraser
• Oil Pastels
• Watercolor paint
• Paintbrushes and water
• Black Sharpie marker
Phase 1
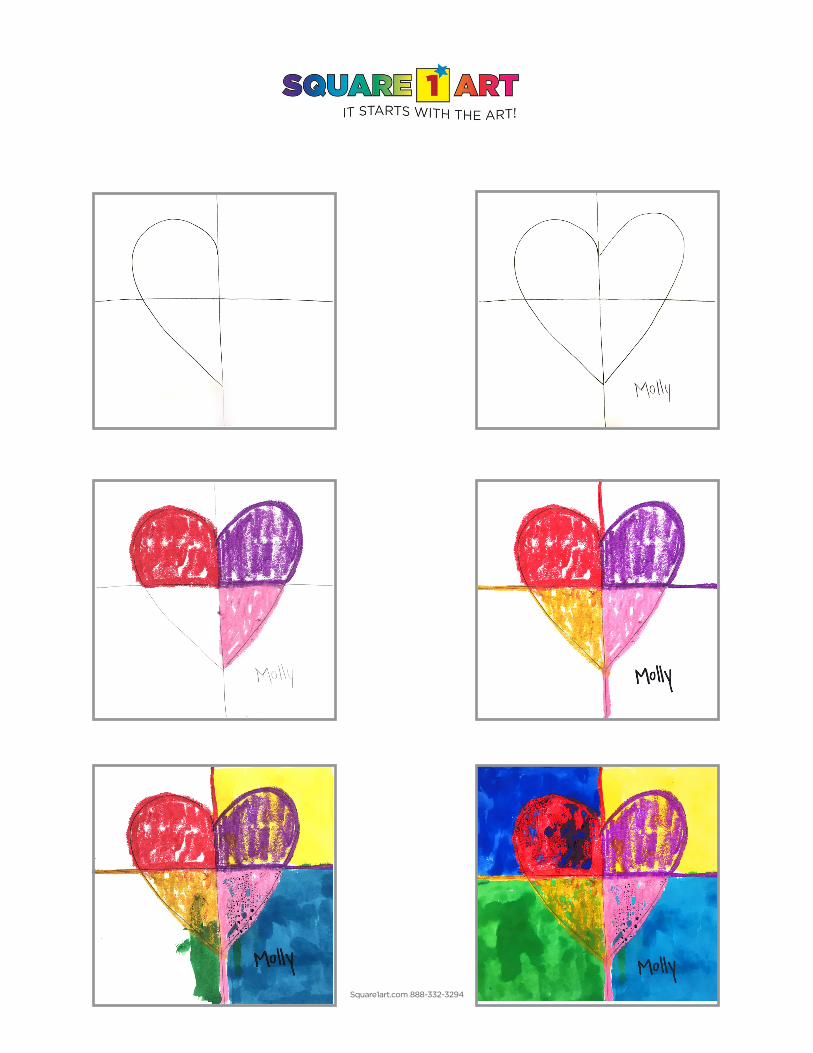
• Draw a vertical and horizontal linedivding the paper into four squares.
• Draw a heart - half on one side ofthe vertical line and half on the other.
• Trace the line with oil pastels.
• Color every portion of the heart us-ing a different color oil pastel.
Phase 2
• Demo how to paint directly on topof the oil pastels.
• Paint with the watercolor over everysquare including the heart portion.
• Once the painting is dry use aSharpie marker to write the studentsname and year.
Square1art.com 888-332-3294
Happy HeartsKindergarten / 2 class periods
Square1art.com 888-332-3294

Standards
Materials
Instructions
VA:Cr1.2.1Use observation and investigation in preparation for making a work of art.VA:Cn11.1.1Understand that people from different places and times have made art for a variety of reasons.
• Square 1 Art paper
• Watercolor paint
• Paintbrushes and water
• Pencil & eraser
• 9”x 6” black constructionpaper
• glue & scissors
• Black Sharpie marker
Phase 1
• Show students example of ClaudeMonet’s painting Impression Sunrise.Discuss how he used warm and coolcolors to give them impression of asunrise.
• Draw a horizon line across the pageusing a pencil.
• Paint warm colors above the hori-zon line.
• Paint cool colors below the horizonline.
Phase 2
• Review Claude Monet’s paintingImpression Sunrise.
• Discuss how the boats are inshadow or silhouette. You can stillmake out the shape of the boat eventhough you can’t see the details ofthe boat.
• Demonstrate how to draw basicshapes of the boat on black paper.(emphasize drawing large shapes andusing the paper wisely)
• Trapezoid, 1 long skinny rectangleand 2 triangles, 1 small and 1 big.
• Before students cut out theirshapes, check to make sure they havedrawn large shapes.
• Students cut out shapes and ar-range on paper.
• Once arrangement is satisfactoryglue shapes to center of paper.
• Sign name with Sharpie marker.
Square1art.com 888-332-3294
Sunset Silhouette1st Grade / 2 class periods

Square1art.com 888-332-3294

Standards
Materials
Instructions
VA:Cr1.2.2Make art or design with various ma-terials and tools to explore personal interests, questions, and curiosity.
• Salt
• Pencil & eraser
• Paintbrushes and water.
• Blue watercolor paint
• Oil pastels
• Black Sharpie marker
Phase 1
• Show students images of koi fish.
• Lead students in a teacher-directed drawing.
• Draw a sideways raindrop for the body of each of the fish.
• Draw half circles for each eye.
• Add two fins and a tail.
• Trace over the pencil drawing with a warm colored oil pastel.
• Color the body with warm colored oil pastels.
• Eyes should be colored black and white.
Phase 2
• Have students sign their artwork using a warm colored oil pastel.
• Demonstrate the watercolor and oil pastel technique.
• Demonstrate the watercolor salt resist technique.
• Paint a small area of the paper with plain water.
• Paint on top of the water with blue liquid watercolor.
• Quickly sprinkle salt on top.
• Continue the same steps doing a small portion at a time until all the paper has been painted and there are no white spots (students can paint on top of fish.)
• Sign name with Sharpie marker.
Square1art.com 888-332-3294
Koi Fish2nd Grade / 2 class periods

Square1art.com 888-332-3294

Standards
Materials
Instructions
VA:Cr2.2.2Demonstrate safe procedures for using and cleaning art tools, equipment, and studio spaces. VA:Re9.1.2Use learned art vocabulary.
• Square 1 Art paper
• Pencil and eraser
• Black Sharpie marker
• Oil Pastels
Phase 1
• Show students examples of the art of Wayne Thiebaud. Discuss how he loves to paint sweets. Ask students to express their prefer-ences about his art.
• Lead a teacher directed lesson of how to draw a cupcake. (there are lots of step-by-step instructions available online)
• Also add a horizon and line and pattern in the background to give a little more interest to the draw-ing.
• Emphasize drawing big and fill-ing the entire page.
• Trace the pencil drawing with a black sharpie marker.
Phase 2
• Review Thiebaud’s paintings of sweets.
• Demo to students how to color using oil pastels.
• Press hard.
• Don’t drag your hand across the coloring- it will smear.
• Leave no white spaces.
• Color the cupcake first, then the background.
• Students spend the rest of class coloring their sweet treat.
• Remember to sign name with Sharpie marker.
Square1art.com 888-332-3294
Sweet Treats2nd Grade / 2 class periods

Square1art.com 888-332-3294

Standards
Materials
Instructions
VA:Cr2.1.3Create personally satisfying artwork using a variety of artistic processes and materials
• Pencil & eraser
• Square 1 Art paper
• Markers
Phase 1
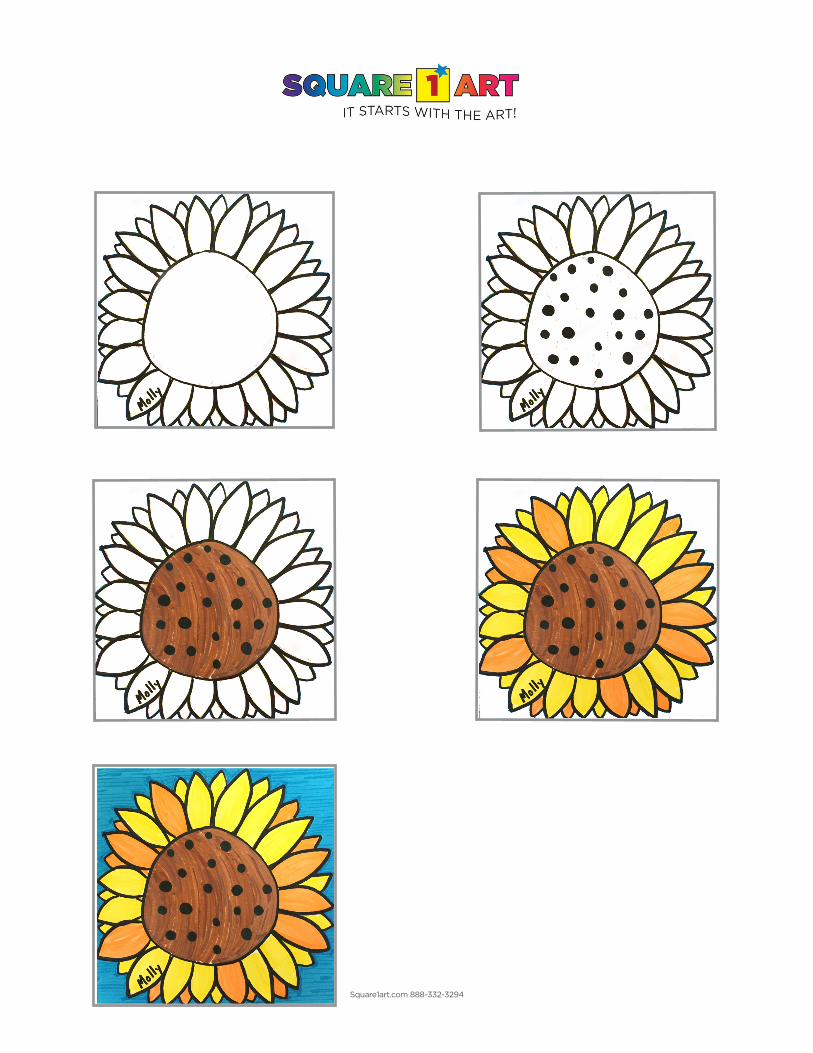
• Show students examples of Vincent Van Gogh’s sunflower paintings. Discuss shapes and colors in the paintings.
• Pass out close up photos of sunflowers. Discuss shapes and colors you see.
• Draw a large circle in the cen-ter of the page.
• Draw lots of petals all around the circle.
• Color the flower using warm colored markers.
Phase 2
• Review Van Gogh’s sunflower paintings.
• Finish coloring the flower.
• Choose a cool color marker for the background and color.
• Trace all original pencil lines with black marker.
• Sign name in one of the petals with Marker.
Square1art.com 888-332-3294
Sunflowers3rd grade / 2 class periods
Square1art.com 888-332-3294

Standards
Materials
Instructions
VA:Cr2.2.4When making works of art, utilize and care for materials, tools, and equipment in a manner that prevents danger to oneself and others.
• Square 1 Art paper
• Pencil & eraser
• Tissue paper in various colors
• Mod podge (glue & water mixed together also works)
• Scissors & glue
• Black paper 8 ½ x 8 ½
• Black Sharpie marker
Phase 1
• Landscapes.
• Draw a horizon line.
• Choose tissue paper colors that represent the ground and sky.
• Cut or tear tissue paper into various sizes and lay on paper. Rearrange until you are happy with the layout.
• Brush mod podge across pa-per, one area at a time. Lay tissue paper on top and press gently.
• Continue until all the tissue paper is adhered.
Phase 2
• Review previous day. Introduce silhouettes.
• Draw a tree on black paper filling the whole space (trunk should touch the bottom of the paper and the branches should reach the other three sides of the paper.)
• Cut out the tree.
• Glue on top of tissue paper.
• Sign name with Sharpie mark-er.
Square1art.com 888-332-3294
Tree Silhouette4th grade / 2 class periods

Square1art.com 888-332-3294