mini holter event ecg system - user manual - cardiac direct · mini holter event ecg system - user...
TRANSCRIPT

Mini Holter Event ECG System - User Manual
WACPW/MHO/ENG Rev. 02 Version 1.5.0
Welch Allyn Cardio Control BV Staalweg 50
2612 KK Delft The Netherlands
Welch Allyn, Inc 4341 State Street Road
Skaneateles Falls, NY 13153 -0220 USA www.welchallyn.com
0297

Mini Holter Event ECG System - User Manual
WACPW/MHO/ENG Rev. 02 Version 1.5.0 Page 2 of 42
Instructions for use
The information contained in this manual is subject to change without notice.
All changes will be in compliance with regulations governing manufacture of medical equipment.
Document WACPW/MHO/ENG Rev. 02
© Copyright Welch Allyn Cardio Control BV 2006.
No part of this publication may be reproduced, t ransmitted, transcribed, stored in a retrieval system or translated into any human or computer language in any form by any means
without the consent of the copyright holder.
Unauthorized copying of this publication may not only infringe copyright but also reduce the ability of Welch Allyn Cardio Control BV to provide accurate and up -to-date information to
users and operators alike.
User responsibility
This product is designed to perform in conformity with the description thereof contained in
this operation manual and accompanying labels and inserts, when assembled, operated, maintained and repaired in accordance with the instructions provided. A defective product
should not be used. Parts that are broken, plainly worn, missing or incomplete, distorted or contaminated should be replaced immediately. Should any repair or replacement become necessary, we recommend that service be performed at the nearest factory approved
service center. The user of the product shall have the sole responsibility for any malfunction which results from improper use, faulty maintenance, improper repair, damage or alteration by anyone other than WelchAllyn Cardio Control BV or their authorized service personnel.

Mini Holter Event ECG System - User Manual
WACPW/MHO/ENG Rev. 02 Version 1.5.0 Page 3 of 42
Warranty, Service, and Spare Parts
Warranty
All repairs on products un der warranty must be performed or approved by Welch Allyn. Unauthorized repairs will void the warranty. In addition, whether or not covered under
warranty, any product repair shall exclusively be performed by Welch Allyn certified service personnel.
Assistance and Parts If the product fails to function properly or if assistance, service, or spare parts are required, contact the nearest Welch Allyn Technical Support Center.
USA 1-800-535-6663 Canada 1-800-561-8797 Latin America (+1) 305-669-9591 South Af rica (+27) 11-777-7509 European Call Center (+353) 469-067-790 Australia (+61) 2-9638-3000
United Kingdom 0-207-365-6780 Singapore (+65) 6291-0882 France (+33) 1-60-09-33-66 Japan (+81) 3-5212-7391 Germany (+49) 7477-927-173 China (+86) 21-6327-9631
Before contacting Welch Allyn it is helpful to attempt to duplicate the problem and to check all accessories to ensure that they are not the cause of the problem.
When calling, please be prepared to provide:
• Product name and model number and complete description of the problem
• The serial number of your product (if applicable)
• The complete name, address and phone number of your facility
• For out-o f-warranty repairs or spare parts orders, a purchase order (or credit card) number
• For parts order, the required spare or replacement part number(s)
Repairs If your product requires warranty, extended warranty, or non-warranty repair service, please
call first the nearest Welch Allyn Technical Support Center. A representative will assist you troubleshooting the problem and will make every effort to solve it over the phone, avoiding
potential unnecessary return.
In case the return cannot be avoided, the representative will record all necessary information and will provide a Return Material Authorization (RMA) number, as well as the appropriate return address. A Return Material Authorization (RMA) number must be
obtained prior to any return.
Packing Instructions
If you have to return goods for service, follow these recommended packing instructions:
• Remove all hoses, cables, sensors, power cords, and ancillary products (as appropriate) before packing, unless you suspect they are associated with the problem.
• Wherever possible use the original shipping carton and packing materials.
• Include a packing list and the Welch Allyn Return Material Authorization (RMA) number. It is recommended that all returned goods be insured. Claims for loss or damage to the
product must be initiated by the sender.
Mini Holter Event ECG System - User Manual
WACPW/MHO/ENG Rev. 02 Version 1.5.0 Page 4 of 42
Table of Contents
1. GETTING STARTED......................................................................................... 7
1.1 The Event ECG System window.......................................................................... 7
1.2 The Event ECG System recorder......................................................................... 8
2. RECORDING A MINI HOLTER EVENT ECG TEST .................................10
2.1 About recording a test ........................................................................................ 10
2.2 Recording a retrospective test............................................................................ 11
2.3 Recording an event test...................................................................................... 20
2.4 Read back recordings......................................................................................... 20
3. VIEWING A EVENT ECG SYSTEM TEST..................................................22
3.1 View a Event ECG System test.......................................................................... 22
3.2 View information about a test ............................................................................. 27
3.3 View the test settings.......................................................................................... 27
4. INTERPRETING A TEST ...............................................................................28
4.1 Edit and confirm an interpretation ...................................................................... 28
5. PRINTING A TEST..........................................................................................29
5.1 About printing a test............................................................................................ 29
6. MAINTAINING THE RECORDER.................................................................30
6.1 About maintaining the recorder.......................................................................... 30
6.2 Clean the recorder case ..................................................................................... 30
7. CUSTOMIZING MINI HOLTER EVENT ECG SYSTEM ...........................31
7.1 About customizing Mini Holter Event ECG System........................................... 31
7.2 Event ECG System settings - General Tab ....................................................... 31
7.3 Event ECG System settings - Hookup tab ......................................................... 32
7.4 Event ECG System Settings - Printing tab......................................................... 33
7.5 Card overview..................................................................................................... 34
8. INSTALLING MINI HOLTER EVENT ECG SYSTEM ...............................35
8.1 Memory card reader........................................................................................... 35
8.2 Configure Welch Allyn Mini Holter Event ECG System..................................... 35
8.3 Formatting HeartCard memory cards................................................................. 35
9. TROUBLESHOOTING....................................................................................37

Mini Holter Event ECG System - User Manual
WACPW/MHO/ENG Rev. 02 Version 1.5.0 Page 5 of 42
APPENDIX: Using the Mini Holter Event ECG System recorder:
Instructions for the patient
1. Retrospective test
2. One channel event test
3. Two channel event test
Mini Holter Event ECG System - User Manual
WACPW/MHO/ENG Rev. 02 Version 1.5.0 Page 6 of 42
Welcome
Welcome to Mini Holter Event ECG System, a versatile ambulatory ECG recording and
analysis system. With this system, patients can be monitored over a weeks or longer. This allows you to capture ECG traces accompanying intermittent or infrequent symptoms not usually captured by conventional Holter systems.
Intended use
Mini Holter Event ECG monitoring is used to capture symptomatic episodes related to rhythm, rate, conduction, and ischemia. It may be useful as a diagnostic tool for patients with chest
pain, palpitations, neurologic symptoms, shortness of breath, or to monitor response to treatment of cardiac disorders.
Indications
The clinical indications for mini Holter Event electrocardiography include: • assessment of symptoms that may be related to arrhythmias
• assessment of risk in patients with or without symptoms of arrhythmia • assessment of efficacy of antiarrhythmic therapy
• detection of myocardial ischemia
Contraindications
There are no known contraindications for the recording of mini Holter Event ECG tests.
Operator knowledge
To use this device extensive Holter knowledge is required that allows proper identification of sinus and paced rhythms, abnormal rhythms, supraventricular and ventricular arrhythmias,
artifact, ST segment changes, and pacemaker failures. In addition, all instructions assume a working knowledge of computers and, specifically, Windows software.

Mini Holter Event ECG System - User Manual
WACPW/MHO/ENG Rev. 02 Version 1.5.0 Page 7 of 42
1. Getting started
1.1 The Event ECG System window
This section will guide you around the various parts of the Event ECG System software.
Title bar The title bar displays the name of the program. The title bar contains three buttons that you can use to maximize, minimize and close the mini Holter Event ECG System window.
Menu bar
Each menu in the menu bar contains a number of tasks that you can perform. Sometimes, menus are gray. This means that you cannot access that functionality at that particular point, either
because it is not available, or because you are not authorized to use it.
Tool bar
The tool bar contains buttons that give you easy access to the
most common tasks.
Search area
The search area on the left hand side contains search and display functionality that lets you easily retrieve patients and tests. In the
search area, you can find a patient, see which tests were recorded for that patient and see the kind of tests that were recorded. You can also create search patterns, an easy way of finding information
that you need frequently.
Workspace The workspace displays the test and the recordings of a test. This is where you do the actual recording, viewing and interpreting. The
workspace contains a viewing area with a number of tabs that let you see the test in different ways. The tabs that are available are: Recordings , Overview and Details.
Menu bar Title bar Toolbar Search area
Workspace
Status bar
Interpretation area Comments area
Mini Holter Event ECG System - User Manual
WACPW/MHO/ENG Rev. 02 Version 1.5.0 Page 8 of 42
Status bar
The status bar at the bottom of the window shows information about the patient and test that are currently selected, such as the test and patient name and recording date.
1.2 The Event ECG System recorder
This section describes the Event ECG recorder.
1. Memory Card
2. Slot for Memory Card
3. Warning bleeper
4. Display
5. Recording indicator
6. Patient cable connection
7. Record button
8. Patient cables
9. Chest electrodes
10. Wrist electrodes
Mini Holter Event ECG System - User Manual
WACPW/MHO/ENG Rev. 02 Version 1.5.0 Page 9 of 42
11. Battery compartment
12. Clock setting button
13. Bleep setting button
14. Instruction label *
15. Battery compartment label
* Note the meaning of the following symbols:
Attention, consult accompanying documents
Defibrillator -proof type BF electrocardiograph
Mini Holter Event ECG System - User Manual
WACPW/MHO/ENG Rev. 02 Version 1.5.0 Page 10 of 42
2. Recording a mini Holter Event ECG test
2.1 About recording a test
With Welch Allyn Mini Holter Event ECG System, you can easily record ambulatory ECG tests. You can choose between two test modes: retrospective or event. In both modes you
can record one or two channels of ECG.
A mini Holter Event ECG test consists of a number of ECG recordings, made by the patient. These recordings are stored on the Memory Card. To start a test, you place this card in the card reader that is connected to your computer. You create a new test and prepare the
recorder for use. After placing the Memory Card in the recorder, you connect the recorder to the patient, except when you record an event test with one channel of ECG. In that case, the patient carries the recorder with him and attaches the electrodes when he wants to make a
recording.
When the patient returns you take the Memory Card from the recorder, place it in the card reader again and read back the stored measurements.
Memory Card
A Memory Card is a removable card, which is used to store a patient's ECG recordings. The Memory Card is available in two capacities: 90 and 180 minutes. If a patient needs a very
large series of recordings, he can be supplied with more than one card.
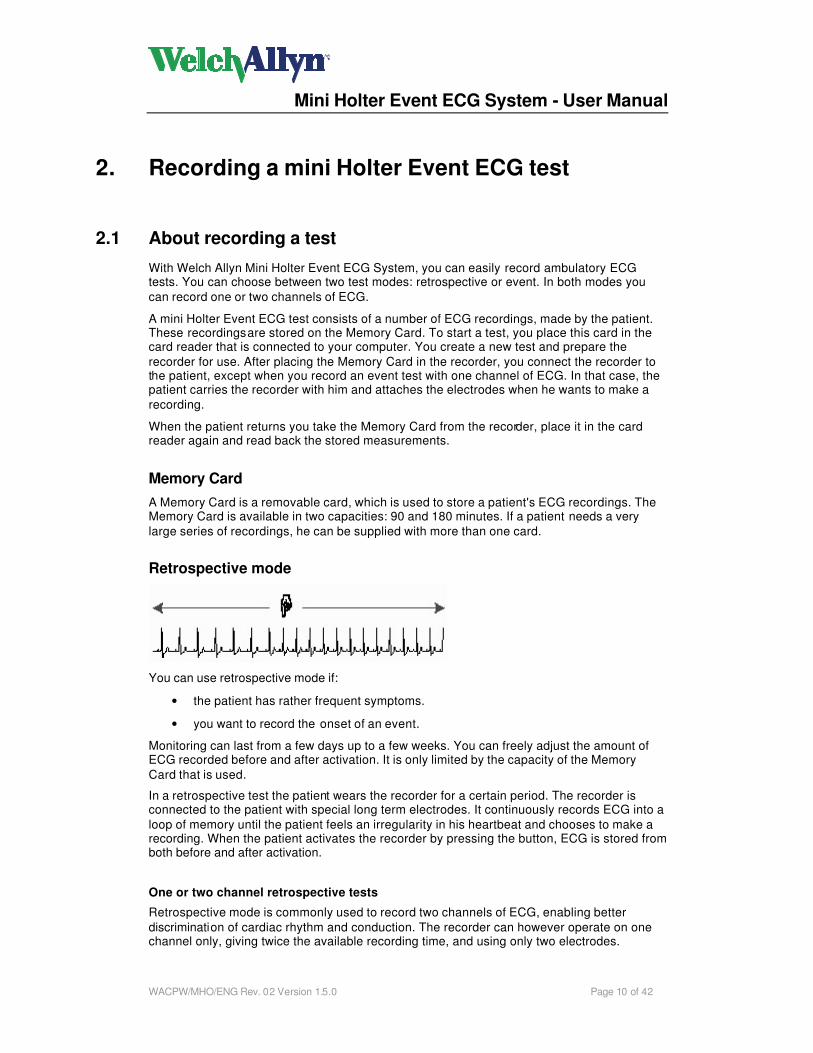
Retrospective mode
You can use retrospective mode if:
• the patient has rather frequent symptoms.
• you want to record the onset of an event.
Monitoring can last from a few days up to a few weeks. You can freely adjust the amount of ECG recorded before and after activation. It is only limited by the capacity of the Memory
Card that is used.
In a retrospective test the patient wears the recorder for a certain period. The recorder is connected to the patient with special long term electrodes. It continuously records ECG into a
loop of memory until the patient feels an irregularity in his heartbeat and chooses to make a recording. When the patient activates the recorder by pressing the button, ECG is stored from both before and after activation.
One or two channel retrospective tests
Retrospective mode is commonly used to record two channels of ECG, enabling better
discrimination of cardiac rhythm and conduction. The recorder can however operate on one channel only, giving twice the available recording time, and using only two electrodes.

Mini Holter Event ECG System - User Manual
WACPW/MHO/ENG Rev. 02 Version 1.5.0 Page 11 of 42
Recordings at specific times
In retrospective mode you can also set Event ECG System to make automatic recordings at specific times during day and night.
Event mode
You can use event mode if:
• the patient has rather infrequent and irregular symptoms.
• you do not need to record the onset of an event.
With an event test, patients can be monitored over several weeks or even months. Event
tests can be conducted with one or two channels. You can freely adjust the amount of ECG that is stored. It is only limited by the capacity of the Memory Card that is used.
One c hannel event test
In a one channel event test, the patient carries the recorder with him during the test period. If he feels an irregularity in his heartbeat, he attaches a pair of electrodes to the wrists and activates the recorder. After the ECG recording is made, the electrodes are removed and the
recorder is put away.
Two channel event test
In a two channel event test, the recorder is constantly connected to the patient. During the
whole test period, the electrodes are attached to the patient's chest. If the patient feels an irregularity, he activates the recorder and ECG is recorded.
2.2 Recording a retrospective test
To record a test in retrospective mode , you need to follow these global steps. Steps 2, 3, 4, 6 and 7 are explained in more detail on the following pages.
1. Select a Memory Card of appropriate duration and place it in the card reader that is connected to your computer.
2. Select a patient or create a new one.
3. Create a new test. Note: If the patient's symptoms require a large series of recordings, you can supply
him with more than one Memory Card. You then need to store the test settings on all cards, which means that you have to create the same test more than once, each time with a new card in the card reader.
4. Prepare the recorder before connecting it to the patient.
5. Place the Memory Card in the recorder (note the arrow). Push the card fully in.
6. Connect the recorder to the patient.
7. Start the recorder.
Mini Holter Event ECG System - User Manual
WACPW/MHO/ENG Rev. 02 Version 1.5.0 Page 12 of 42
8. The patient carries the recorder with him for some time. To ensure that the recorder will record properly, you need to give the patient a sheet with a few instructions (See the appendix; you can make a copy of it).
9. When the patient returns, place the Memory Card in the card reader again and read back the recordings.
Create a new retrospective test
Before you can record a retrospective test, you first need to create a new test. The test settings are stored on the Memory Card that you put in the card reader that is connected to
your computer.
Note: If the patient's symptoms require a large series of recordings, you can supply him with two Memory Cards. You then need to store the test settings on two cards, which means that
you have to create the same test twice.
To create a new retrospective test , you need to follow these global steps. Step 5, 6 and 7 are explained below in more detail.
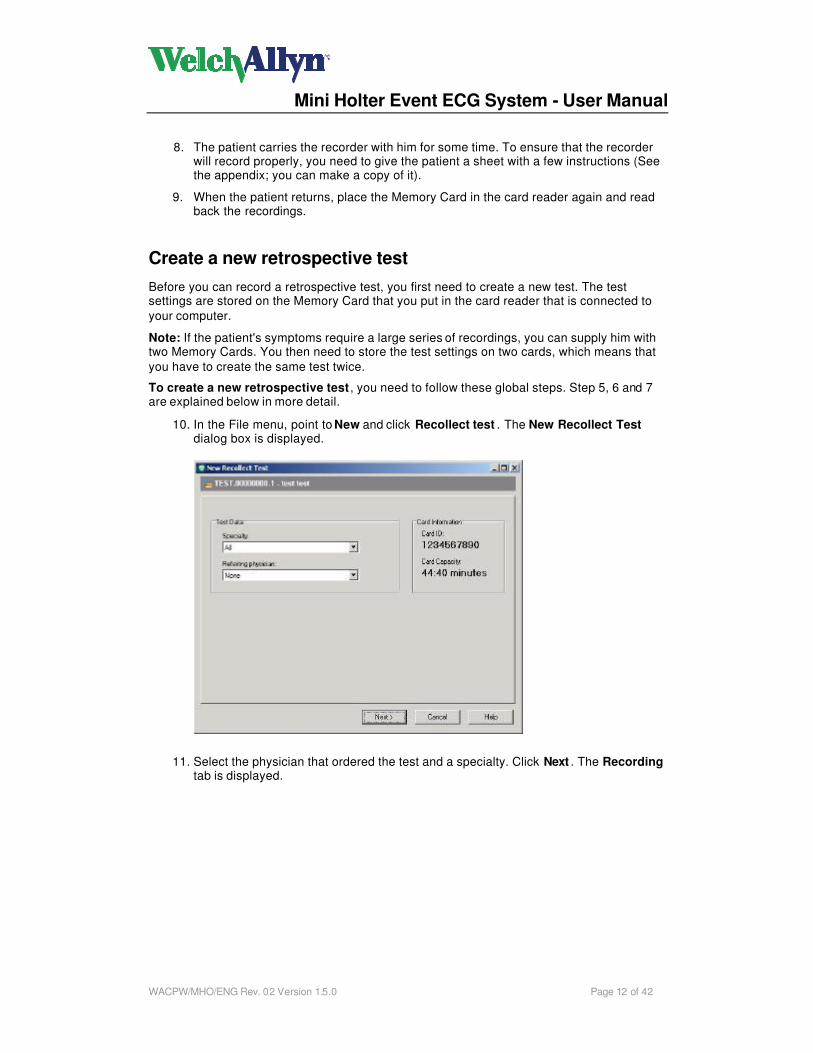
10. In the File menu, point to New and click Recollect test . The New Recollect Test dialog box is displayed.
11. Select the physician that ordered the test and a specialty. Click Next . The Recording tab is displayed.
Mini Holter Event ECG System - User Manual
WACPW/MHO/ENG Rev. 02 Version 1.5.0 Page 13 of 42
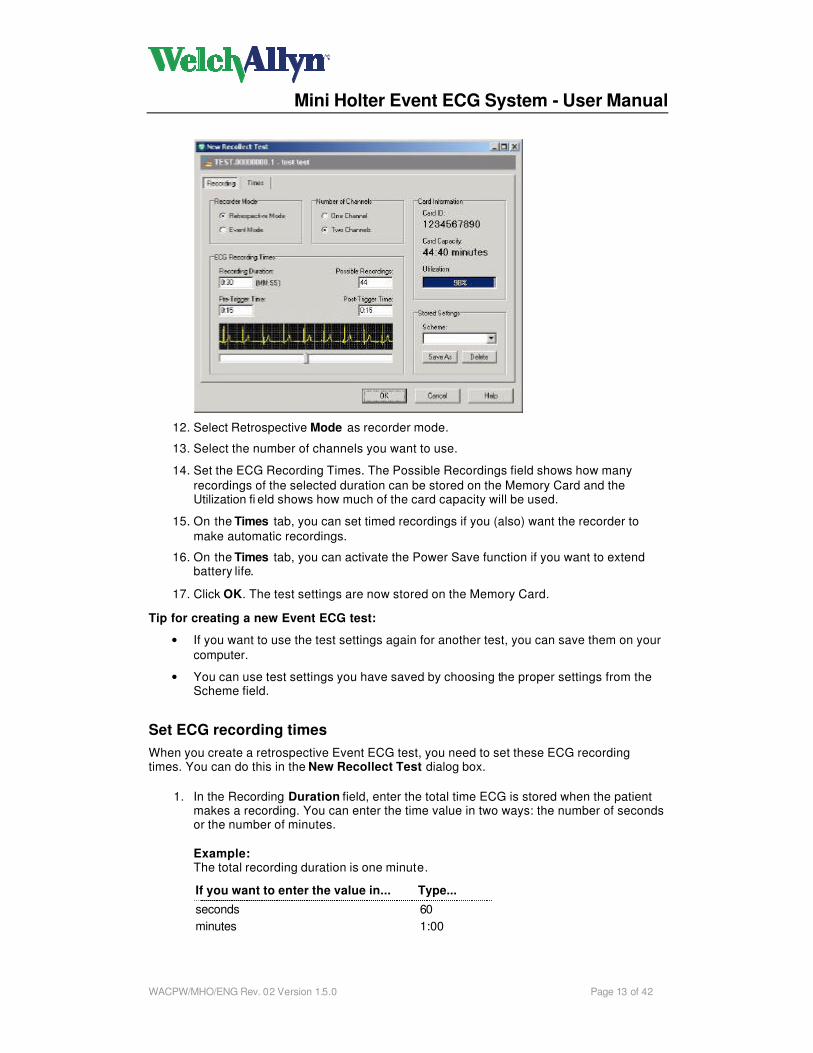
12. Select Retrospective Mode as recorder mode.
13. Select the number of channels you want to use.
14. Set the ECG Recording Times. The Possible Recordings field shows how many
recordings of the selected duration can be stored on the Memory Card and the Utilization fi eld shows how much of the card capacity will be used.
15. On the Times tab, you can set timed recordings if you (also) want the recorder to
make automatic recordings.
16. On the Times tab, you can activate the Power Save function if you want to extend battery life.
17. Click OK. The test settings are now stored on the Memory Card.
Tip for creating a new Event ECG test:
• If you want to use the test settings again for another test, you can save them on your
computer.
• You can use test settings you have saved by choosing the proper settings from the Scheme field.
Set ECG recording times
When you create a retrospective Event ECG test, you need to set these ECG recording times. You can do this in the New Recollect Test dialog box.
1. In the Recording Duration field, enter the total time ECG is stored when the patient makes a recording. You can enter the time value in two ways: the number of seconds or the number of minutes.
Example: The total recording duration is one minute.
If you want to enter the value in... Type...
seconds 60
minutes 1:00
Mini Holter Event ECG System - User Manual
WACPW/MHO/ENG Rev. 02 Version 1.5.0 Page 14 of 42
2. In the Pre-Trigger Time field, enter the time ECG is stored before the patient presses the record button. You can also set the pre- and post-trigger time by using the slide bar.
Note: The total amount of time before and after the button press always equals the total recording duration. When you have entered the pre-trigger time, the post-trigger
time is automatically determined.
Set timed recordings
Note: Unless you only want to record timed recordings, ensure that the ECG duration and timed recordings that you choose, will not fill the Memory Card prematurely. For example, if the ECG duration (single channel) is set to 3 minutes and 15 timed recordings per day are
selected, a 90 minute Memory Card will be filled in 48 hours. Either use a card with more capacity or shorter ECG duration.
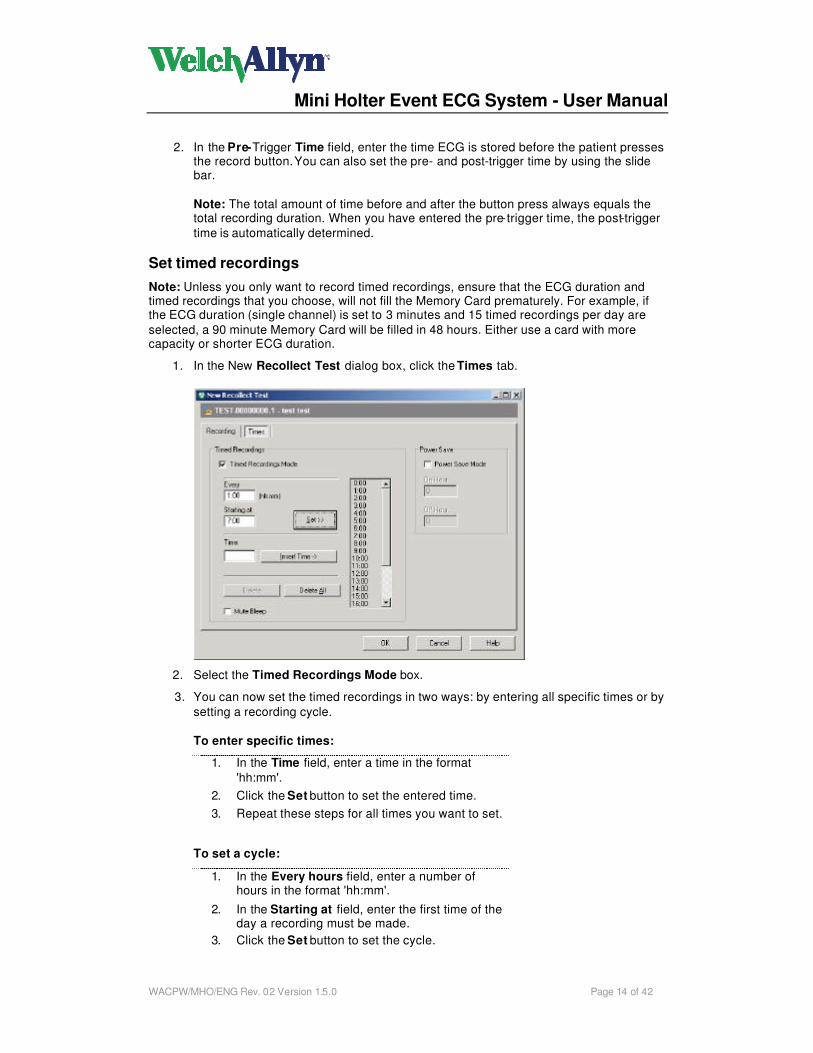
1. In the New Recollect Test dialog box, click the Times tab.
2. Select the Timed Recordings Mode box.
3. You can now set the timed recordings in two ways: by entering all specific times or by
setting a recording cycle.
To enter specific times:
1. In the Time field, enter a time in the format
'hh:mm'.
2. Click the Set button to set the entered time.
3. Repeat these steps for all times you want to set.
To set a cycle:
1. In the Every hours field, enter a number of hours in the format 'hh:mm'.
2. In the Starting at field, enter the first time of the day a recording must be made.
3. Click the Set button to set the cycle.
Mini Holter Event ECG System - User Manual
WACPW/MHO/ENG Rev. 02 Version 1.5.0 Page 15 of 42
4. The recorder will bleep when an automatic recording is made. To mute this bleep, select the Mute Bleep box.
Activate Power Save
You can extend battery life by switching off the loop recording and the display functions while
the patient is asleep.
1. In the New Recollect Test dialog box, click the Times tab.
2. Select the Power Save Mode box.
3. Enter the time you want the recorder to turn off and the time you want the recorder to
turn on again.
Save test settings
After setting the test settings, you can save them. The settings are saved on your computer,
so that you can use them again for another test.
To save the test settings:
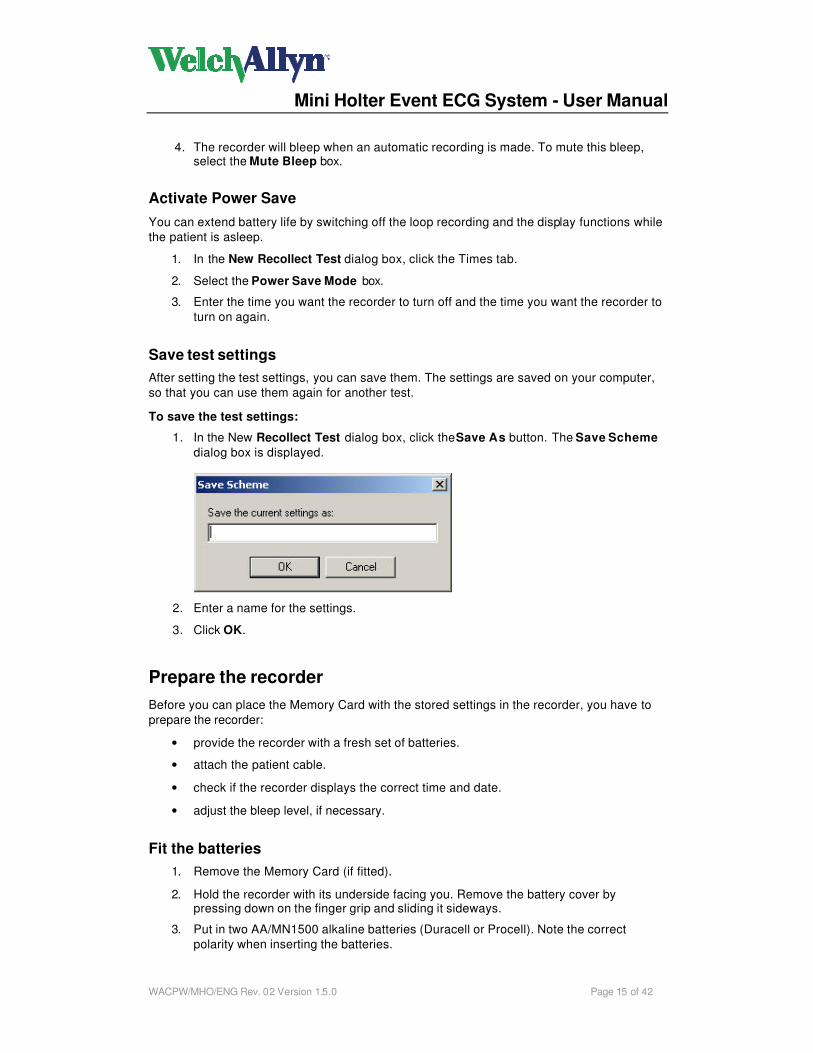
1. In the New Recollect Test dialog box, click the Save As button. The Save Scheme
dialog box is displayed.
2. Enter a name for the settings.
3. Click OK.
Prepare the recorder
Before you can place the Memory Card with the stored settings in the recorder, you have to
prepare the recorder:
• provide the recorder with a fresh set of batteries.
• attach the patient cable.
• check if the recorder displays the correct time and date.
• adjust the bleep level, if necessary.
Fit the batteries
1. Remove the Memory Card (if fitted).
2. Hold the recorder with its underside facing you. Remove the battery cover by pressing down on the finger grip and sliding it sideways.
3. Put in two AA/MN1500 alkaline batteries (Duracell or Procell). Note the correct
polarity when inserting the batteries.

Mini Holter Event ECG System - User Manual
WACPW/MHO/ENG Rev. 02 Version 1.5.0 Page 16 of 42
4. Replace the battery cover by sliding it until the catch engages.
Attach the patient cable
1. Select the appropriate chest cable and the neck cord. The cable you choose must match the number of channels you selected when you created the test.
2. Align the marks on the cable grip and recorder and push the plug firmly into the
recorder socket until it clicks into place. If the plug is difficult to insert, try rotating it slightly as you insert it.
The plug cannot be removed by pulling on the cable, only by pulling back the metal sleeve, so it is unlikely that the patient disconnects the cable accidentally.
Note:
• Do not attach any other type of cable to the recorder.
• Do not attach the patient cable electrodes to any other electrical device.
Check the time and date
The recorder has a built in calendar and clock that are used to record the time and date on the Memory Card each time a recording is made. Therefore, make sure the recorder is set at
the correct time and date.
1. Remove the Memory Card (if fitted).
2. Press the record button briefly and check the time. The display switches off
automatically after a few seconds.
3. Adjust the time if necessary.
Adjust the time and date
You can adjust the calendar and clock in two ways:
• by using the clock button located within the battery compartment.
• by storing the correct time and date on the Memory Card with the Event ECG System
software.
To adjust the time and date using the clock button:
1. Remove the Memory Card (if fitted).
2. Hold the recorder with its underside facing you.
3. Remove the battery compartment cover by pressing down on the finger grip and sliding it sideways. The clock set button is the triangular button next to the batteries.
4. Press the record button. The time is now displayed.
5. Press the clock set button to scroll to the parameter you want to change:
To change the... Press the clock set button...
minute once
hour twice
day three times
month four times
year five times

Mini Holter Event ECG System - User Manual
WACPW/MHO/ENG Rev. 02 Version 1.5.0 Page 17 of 42
6. Change the value of the selected parameter by pressing the record button.
7. Repeat this for all parameters you want to change.
Note: If you change the minute first, you can only change the hour directly after that, not the date. If you also want to change the date, you need to step through the
sequence twice.
8. Press the clock set button (repeatedly) until the time is displayed again. The changes you have made are now stored.
9. Replace the battery compartment cover.
Tips:
• The seconds’ value is automatically set to zero whenever the time or date is changed.
• The recorder switches off if more than ten seconds has elapsed since the last button press.
To adjust the time and date by using the Memory Card and the Event ECG System software:
1. Place the Memory Card in the card reader.
2. In the Tools menu, select Set recorder Date/time. The Configure the Recollect
recording device dialog box is displayed.
3. Insert an empty Memory Card into the reader. Click Next .
4. Set a date and a time in the near future. Click Next.
5. Put the card in the recorder. Click Next.
6. Start the recorder at the specified time (see section 0 Start the recorder ). The recorder now displays the correct time and date. Click Next .
7. Click OK.
Mini Holter Event ECG System - User Manual
WACPW/MHO/ENG Rev. 02 Version 1.5.0 Page 18 of 42
Adjust the bleep level
The recorder has a bleeper to indicate its function when the display is not visible, for instance
when the recorder is worn under clothing. It only operates in retrospective mode.
When a recording is initiated by the patient, a long bleep is emitted. If the recorder switches
off because of a fault (e.g. low battery level), a series of short bleeps is emitted. The bleeper
can be set to one of four levels. Level 0 is off, levels 1 to 3 are different types of sound.
To adjust the bleep level:
1. Remove the Memory Card.
2. Hold the recorder with its underside facing you.
3. Remove the battery compartment cover by pressing down on the finger grip and sliding it sideways. The bleep set button is the semicircular one next to the batteries.
4. Press the record button.
5. Press the bleep set button once. The display shows the current bleep level.
6. Press the record button repeatedly until the correct level is displayed. Each time the
record b utton is pressed, the recorder bleeps once at the new level (except at level 0).
7. Press the bleep set button. The time will be displayed.
8. Replace the battery compartment cover.
Note: The recorder switches off if more than ten seconds have elapsed since th e last button press.
Connect the recorder to the patient
In a retrospective test, the patient wears the recorder constantly during a certain period. Therefore, you have to connect the recorder to the patient.
To connect the recorder to the patient:
1. Put recorder into the carrying case. The record button should be visible through the cut-out in the case.
Note: Do not press the record button when inserting the recorder.
2. If the two channel cable is being used, fit the neck cord around the patient's neck to
support the cable yoke. This prevents signal artifact which can result from the leads pulling on the electrodes.
3. Prepare the patient's skin. Make sure it is thoroughly clean and dry so that the
electrodes will adhere well for a long period without causing irritation.
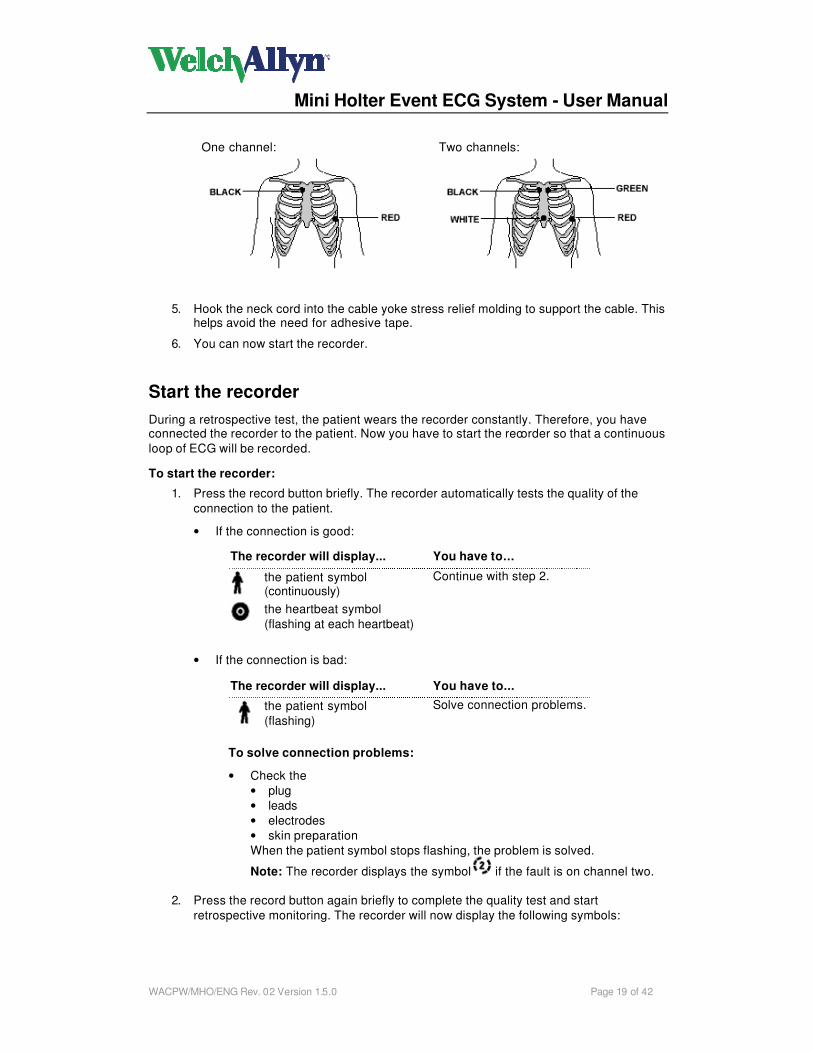
4. Place the electrodes and attach the snap connectors on the lead wires at the positions indicated by the illustrations.
Note: Use Medicotest VLC-00-S electrodes (and other soft gel types). These electrodes give good results, particularly when the patient is active.
Mini Holter Event ECG System - User Manual
WACPW/MHO/ENG Rev. 02 Version 1.5.0 Page 19 of 42
One channel: Two channels:
5. Hook the neck cord into the cable yoke stress relief molding to support the cable. This helps avoid the need for adhesive tape.
6. You can now start the recorder.
Start the recorder
During a retrospective test, the patient wears the recorder constantly. Therefore, you have connected the recorder to the patient. Now you have to start the recorder so that a continuous
loop of ECG will be recorded.
To start the recorder:
1. Press the record button briefly. The recorder automatically tests the quality of the
connection to the patient.
• If the connection is good:
The recorder will display... You have to...
the patient symbol (continuously)
the heartbeat symbol
(flashing at each heartbeat)
Continue with step 2.
• If the connection is bad:
The recorder will display... You have to...
the patient symbol
(flashing)
Solve connection problems.
To solve connection problems:
• Check the
• plug
• leads
• electrodes
• skin preparation
When the patient symbol stops flashing, the problem is solved.
Note: The recorder displays the symbol if the fault is on channel two.
2. Press the record button again briefly to complete the quality test and start
retrospective monitoring. The recorder will now display the following symbols:
Mini Holter Event ECG System - User Manual
WACPW/MHO/ENG Rev. 02 Version 1.5.0 Page 20 of 42
heartbeat symbol
or looping symbol (retrospective test with one or
two channels)
number of recordings available
2.3 Recording an event test
To record a test in event mode , you can follow the steps of recording a retrospective test. Please follow the instructions on page11 and further. Instead of selecting the Retrospective mode you select the Event mode.
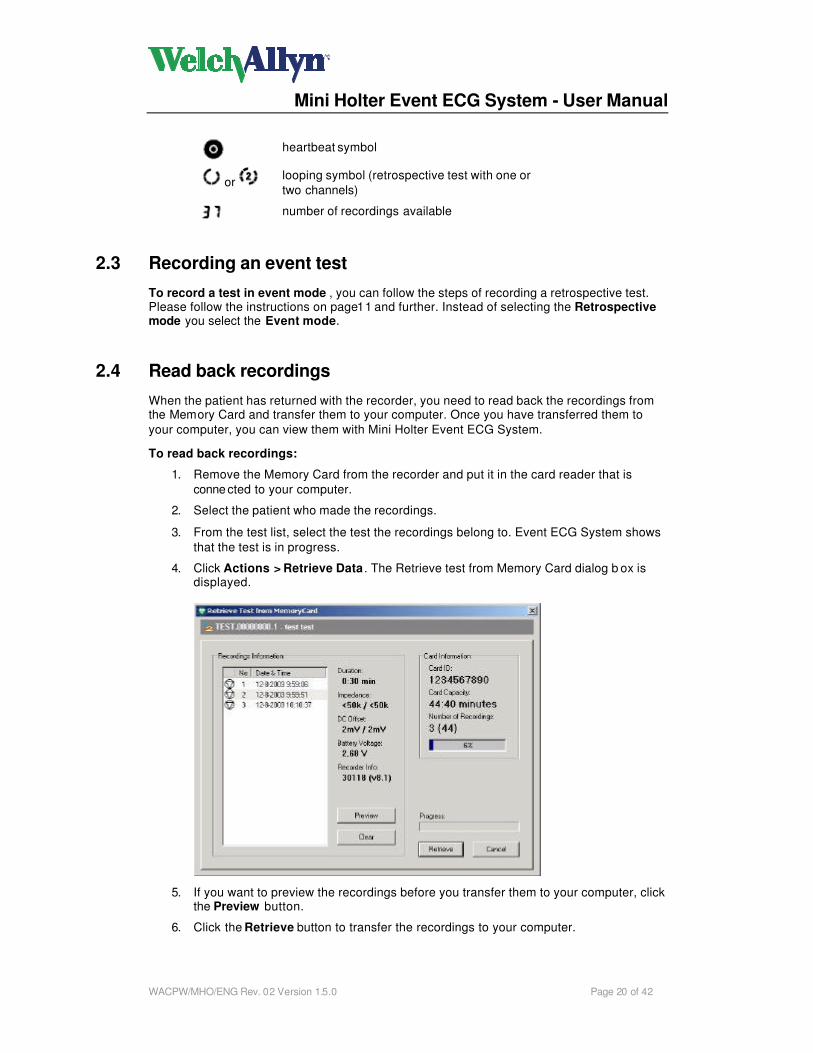
2.4 Read back recordings
When the patient has returned with the recorder, you need to read back the recordings from the Memory Card and transfer them to your computer. Once you have transferred them to
your computer, you can view them with Mini Holter Event ECG System.
To read back recordings:
1. Remove the Memory Card from the recorder and put it in the card reader that is
conne cted to your computer.
2. Select the patient who made the recordings.
3. From the test list, select the test the recordings belong to. Event ECG System shows
that the test is in progress.
4. Click Actions > Retrieve Data . The Retrieve test from Memory Card dialog b ox is displayed.
5. If you want to preview the recordings before you transfer them to your computer, click the Preview button.
6. Click the Retrieve button to transfer the recordings to your computer.

Mini Holter Event ECG System - User Manual
WACPW/MHO/ENG Rev. 02 Version 1.5.0 Page 21 of 42
Note:
• If you click Cancel, the recordings are not transferred, but left on the card.
• If you click Clear, the recordings (not the test settings) are deleted from the card.
The recordings are not transferred to the computer.
7. Now you can view the recordings.
Mini Holter Event ECG System - User Manual
WACPW/MHO/ENG Rev. 02 Version 1.5.0 Page 22 of 42
3. Viewing a Event ECG System test
3.1 View a Event ECG System test
To view an Event ECG System test:
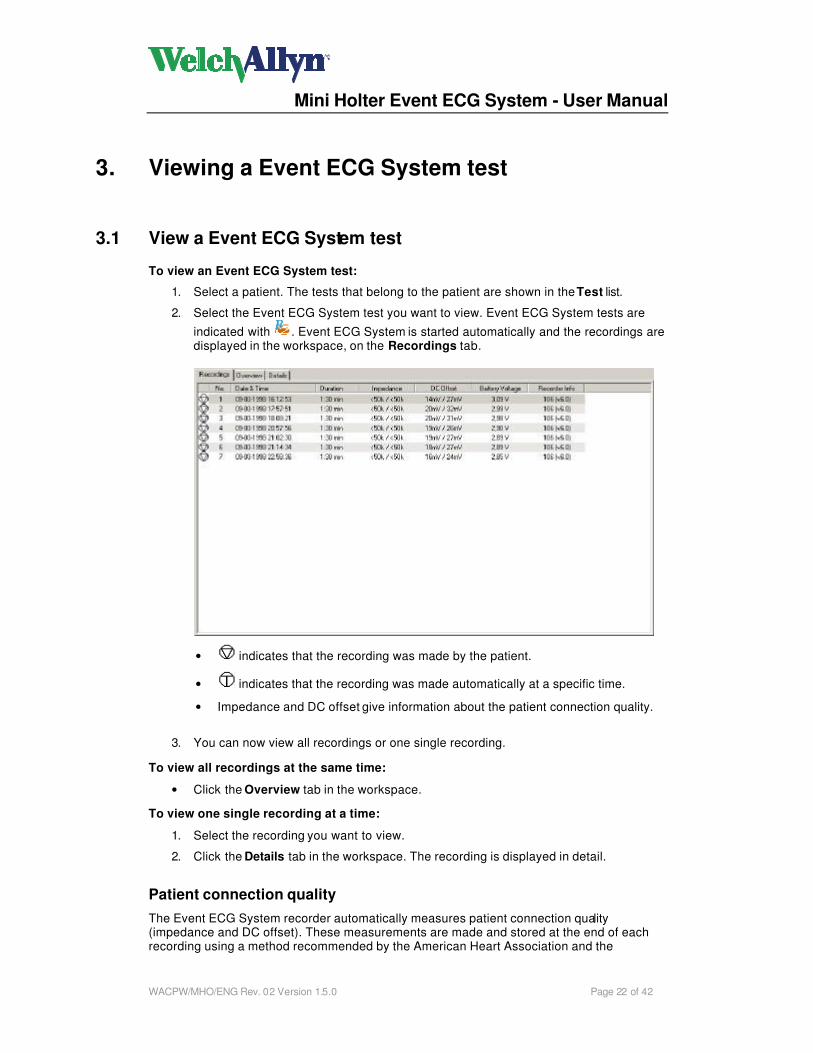
1. Select a patient. The tests that belong to the patient are shown in the Test list.
2. Select the Event ECG System test you want to view. Event ECG System tests are
indicated with . Event ECG System is started automatically and the recordings are displayed in the workspace, on the Recordings tab.
• indicates that the recording was made by the patient.
• indicates that the recording was made automatically at a specific time.
• Impedance and DC offset give information about the patient connection quality.
3. You can now view all recordings or one single recording.
To view all recordings at the same time:
• Click the Overview tab in the workspace.
To view one single recording at a time:
1. Select the recording you want to view.
2. Click the Details tab in the workspace. The recording is displayed in detail.
Patient connection quality
The Event ECG System recorder automatically measures patient connection quality (impedance and DC offset). These measurements are made and stored at the end of each recording using a method recommended by the American Heart Association and the
Mini Holter Event ECG System - User Manual
WACPW/MHO/ENG Rev. 02 Version 1.5.0 Page 23 of 42
Association for the Advancement of Medical Instrumentation.
When you read back recordings from the Memory Card, you can view connection quality for each recording in the Retrieve test from Memory Card dialog box. The impedance and DC
offset are shown also on printouts.
DC offset
This is the voltage between the two electrodes used to record each channel of ECG. It is
measured in millivolts (mV). Ideally DC offset should be zero, but small polarization effects due to the “half-cell potential” of each electrode are normal.
Impedance
This is the total impedance of the two skins to electrode interfaces (per channel) plus the
effect of any discontinuities in the wires or connectors. It is expressed in kilohms (k) and is measured using a 10Hz frequency.
Good connection quality depends on achieving both low impedance and a low DC offset:
• In the majority of patients, impedance should ideally be lower than 50k and DC offset lower than 10mV.
• It is impossible to achieve these low values in some patients.
• Impedance for females is about 50% higher than for males.
• High impedance, higher than 200k, indicates poor contact between the electrode and the skin.
• Both impedance and DC offset may improve during the first few minutes after
electrode application as the interface between the skin and the electrode stabilizes.
• Extremely high impedance, higher than 1450k, suggests an electrode has come off the skin or that the cable or connector has broken.
• High impedance does not necessarily result in bad ECGs. However, the poor
connection it implies will make the recordings more susceptible to interference due to external electrical sources or patient movement.
• Both impedance and DC offset may vary unpredictably over time, influenced by
temperature, humidity and patient activity.
Overview tab
On the Overview tab, you can view all recordings of one test. Use the horizontal and vertical
scrollbars to see all curves completely.

Mini Holter Event ECG System - User Manual
WACPW/MHO/ENG Rev. 02 Version 1.5.0 Page 24 of 42
To view one recording in detail:
• Double click the curve of that recording. The Details tab is displayed. It shows the recording in detail, starti ng at the point you double clicked.
Available actions on the Overview tab
• Zoom in or out on the recordings (see section 0 for details).
• Set chart speed and sensitivity (see section 0 for details).
• Apply anti-aliasing (see section 0 for details).
Details tab
On the Details tab, you can view one single recording in different ways. You can view a detail
of a recording or a whole recording. When you view a recording in detail, all used channels are shown. When you view a whole recording, you view the used channels separately.
Mini Holter Event ECG System - User Manual
WACPW/MHO/ENG Rev. 02 Version 1.5.0 Page 25 of 42
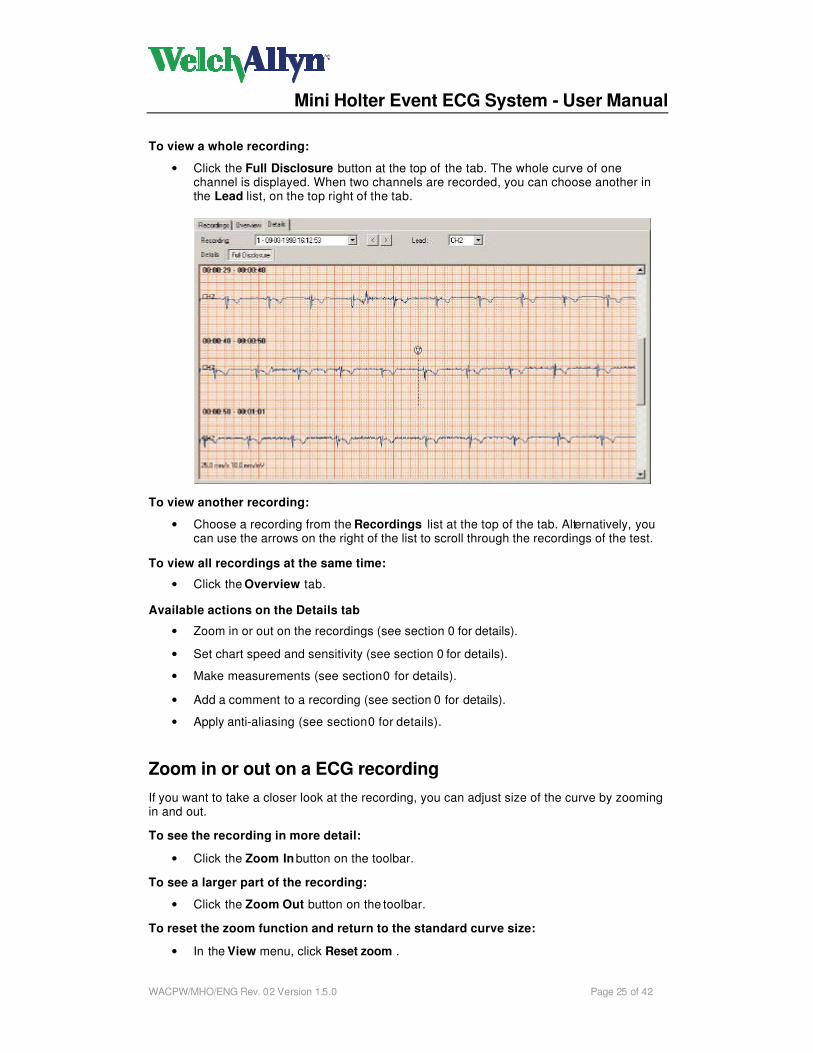
To view a whole recording:
• Click the Full Disclosure button at the top of the tab. The whole curve of one channel is displayed. When two channels are recorded, you can choose another in the Lead list, on the top right of the tab.
To view another recording:
• Choose a recording from the Recordings list at the top of the tab. Alternatively, you can use the arrows on the right of the list to scroll through the recordings of the test.
To view all recordings at the same time:
• Click the Overview tab.
Available actions on the Details tab
• Zoom in or out on the recordings (see section 0 for details).
• Set chart speed and sensitivity (see section 0 for details).
• Make measurements (see section 0 for details).
• Add a comment to a recording (see section 0 for details).
• Apply anti-aliasing (see section 0 for details).
Zoom in or out on a ECG recording
If you want to take a closer look at the recording, you can adjust size of the curve by zooming in and out.
To see the recording in more detail:
• Click the Zoom In button on the toolbar.
To see a larger part of the recording:
• Click the Zoom Out button on the toolbar.
To reset the zoom function and return to the standard curve size:
• In the View menu, click Reset zoom .
Mini Holter Event ECG System - User Manual
WACPW/MHO/ENG Rev. 02 Version 1.5.0 Page 26 of 42
Set chart speed and sensitivity
Mini Holter Event ECG System offers a wide range of speed and sensitivity. You can adjust
the scale of the ECG by adjusting the chart speed and the sensitivity.
To set chart speed:
1. In the View menu, point to Chart speed and select a value. The higher the chart
speed, the more curve will be visible. -or-
2. Choose the chart speed from the list (mm/sec) in the toolbar.
To set sensitivity:
1. In the View menu, point to Sensitivity and select a value. The lower the value, the
lower the peaks in the curve will be. -or-
2. Choose the chart speed from the list (mm/mV) in the toolbar.
Make measurements
When you view a single recording on the Details tab, you can make measurements between
two points.
To make a measurement between two points:
1. Move the crosshair pointer to the starting point of your measurement.
2. Double click on the starting point. Event ECG System inserts a mark.
3. Move the crosshair pointer to the end point of your measurement.
4. Double click on the end point. Event ECG System draws a line between the two
points and displays the measured values.
Add a comment to a recording
On the Details tab, you can enter a comment for a single recording.
To add a comment:
• Start typing in the Recording Comment area at the bottom of the workspace. Your comment is saved automatically.
Apply anti-aliasing
When you view an ECG on a monitor, the signal can look ragged, especially when you zoom
in on a complex. You can use anti -aliasing to make the signal look smoother. Anti -aliasing does not change the signal itself. It only affects how the signal is displayed on the monitor.
To apply anti-aliasing:
• In the View menu, click Anti-aliasing.

Mini Holter Event ECG System - User Manual
WACPW/MHO/ENG Rev. 02 Version 1.5.0 Page 27 of 42
3.2 View information about a test
The Information window gives you all kinds of information about the ECG that you are currently viewing. You can see the name of the referring physician, the name of the technician that recorded the ECG and any comments that were entered.
If you wish, you can add some comments to the test.
To view information about a test:
• Click the Info button on the toolbar. The Information dialog box is displayed.
To add a comment to a test:
1. Click the Info button on the toolbar. The Information dialog box is displayed.
2. Click in the Comment field and start typing.
3. Click OK to save you comment.
3.3 View the test settings
You can view the settings of the test which were entered when the test was created, such as
the type of test (retrospective or event), the number of channels and the duration of the recordings.
To view the test settings:
• In the View menu, click Card. The Card Settings window is displayed.

Mini Holter Event ECG System - User Manual
WACPW/MHO/ENG Rev. 02 Version 1.5.0 Page 28 of 42
4. Interpreting a test
4.1 Edit and confirm an interpretation
You can edit an interpretation in the Interpretation editor . In this editor, you can enter your own texts. Alternatively, you can use the statement tree to select and enter common
interpretation statements. Once you edit an interpretation, you must confirm it. Otherwise,
your changes will not be saved.
1. In the Tools menu, click Interpretation. The Interpretation editor is displayed.
2. In the right hand pane, at the pointer, start typing.
3. Click the Confirm button to save your comments and to return to the test.
To edit and confirm an interpretation with the statement tree:
1. In the Tools menu, click Interpretation . The Interpretation editor is displayed.
2. From the statement tree, click on one of the categories to display all possible
statements for that category.
3. From a category, click on the statement that you want to include in the interpretation. The statement is added.
4. To delete a statement from the interpretation, select the statement text and press BACKSPACE to delete it.
5. Click the Confirm button to save your comments and to return to the test.
Tips for editing and confirming an interpretation:
• You can automatically insert the current date and time by clicking the Date/time button.
• You can clear the interpretation editor by clicking the Clear button.
• The statements in the statement tree can be changed. Contact your system administrator or local dealer for new or changed statements.

Mini Holter Event ECG System - User Manual
WACPW/MHO/ENG Rev. 02 Version 1.5.0 Page 29 of 42
5. Printing a test
5.1 About printing a test
With Mini Holter Event ECG System, you can print the ECG recordings of a test on plain paper with a regular inkjet or laser printer.
Note: You can print one recording at a time, it is not possible to print the whole test at the same time.
Print formats
Mini Holter Event ECG System can print the following reports:
• Details
• Complete details
• Full disclosure 25 mm/s
• Full disclosure 10 mm/s
• Full disclosure 5 mm/s
• Recordings
• Overview
Each report contains the view and a header that displays additional information.
For more information about printing recordings please refer to the Workstation manual.
Mini Holter Event ECG System - User Manual
WACPW/MHO/ENG Rev. 02 Version 1.5.0 Page 30 of 42
6. Maintaining the recorder
6.1 About maintaining the recorder
To keep the recorder in good working condition, please observe the following:
• Remove the battery when the recorder is not used for a longer period of time.
• When the recorder is being used, it should not be exposed to temperatures below 0°C or above 45°C and to prolonged direct sunlight.
• When you store the recorder, make sure it is not exposed to temperatures below than -20°C or above 65°C.
• Protect the recorder against water.
• Do not attempt to remove the covers of the recorder. In the event of a malfunction,
refer servicing to the manufacturer or an approved distributor.
• Clean the recorder case regularly.
6.2 Clean the recorder case
To minimize the possibility of cross-infection, the case should be cleaned each time the recorder is returned by a patient.
To clean the recorder case:
• Clean the exterior surface of the recorder with a cloth dampened with a non-abrasive detergent.
Note: Do not immerse the instrument in any liquid.
Mini Holter Event ECG System - User Manual
WACPW/MHO/ENG Rev. 02 Version 1.5.0 Page 31 of 42
7. Customizing Mini Holter Event ECG System
7.1 About customizing Mini Holter Event ECG System
You can customize Event ECG System to your own preferences. The features that you can customize are located in File > Settings > Recollect.
Important: When you change the settings in the General tab, they are only changed on the
computer that you are currently working on. Other computers remain unchanged.
7.2 Event ECG System settings - General Tab
Use the General tab to customize general settings of Event ECG Sys tem.
Mini Holter Event ECG System - User Manual
WACPW/MHO/ENG Rev. 02 Version 1.5.0 Page 32 of 42
The General tab contains the following information:
PC Card Drive From this list, you can select the drive to which the Memory Card reader is connected.
Appearance Here, you can specify individual colors for the background, grid lines, grid dots, trace and the font that is used in displaying the ECG. Click on the color to select another color.
Color schemes This list lets you choose from a number of predefined color formats.
Gridstyle From this list you can select the style of the grid in which the ECG recordings are displayed. You can either leave out the grid, use lines to
represent the grid, or display a full grid.
Overview With this option you can determine how many rows of ECG trace are
shown on the Overview tab. The more rows are shown, the less you have
to scroll horizontally.
Details With this option you can determine how many rows of ECG trace are shown on the Details tab. The more rows are shown, the less you have to
scroll horizontally.
7.3 Event ECG System settings - Hookup tab
Use the Hookup tab to set the thresholds the recorder uses to test patient connection quality.
When the recorder is connected to the patient, it tests the quality of the connection. The recorder checks if the impedance and the DC offset are acceptable. To determine this, the
recorder needs a threshold. You can set this threshold on the Hookup tab. The threshold values are then stored on the Memory Card and rea d by the recorder when it checks the connection quality.
Mini Holter Event ECG System - User Manual
WACPW/MHO/ENG Rev. 02 Version 1.5.0 Page 33 of 42
As a default, the impedance threshold is 800 kOhm and the DC offset threshold 80 mV, for both retrospective and event mode. These are the recommended values. You can change these values by choosing other values from the lists. The next time a new test is created, the
changed settings are stored on the Memory Card.
7.4 Event ECG System Settings - Printing tab
Use the Printing tab to select the reports that you want to use for the Print selected formats function.
The Printing tab contains the following information:
Default report templates Here, you can select the formats that you want to print
when you use the Print selected formats function. You can select multiple formats.
Grid From the list, you can select the grid style in which the
selected templates should be printed.
Full Disclosure Lead From the list, you can select the default lead that appears in the Full disclosure view and print.
Print after retrieving test data from card
If this option is selected, the results are automatically printed when the test data is retrieved from the memory card. The software prints the templates that you selected in
the Default report template s area.
Print after interpretation confirmed
If this option is selected, the results are automatically printed when the interpretation of the test has been
confirmed. The software prints the templates that you selected in the Default report templates area.

Mini Holter Event ECG System - User Manual
WACPW/MHO/ENG Rev. 02 Version 1.5.0 Page 34 of 42
7.5 Card overview
The card overview displays the Memory Cards that are currently in use, the patients to whom
they are assigned and the times when recordings have started.
To view the card overview:
• In the Tools menu, click Card overview. The Card overview is displayed.
Mini Holter Event ECG System - User Manual
WACPW/MHO/ENG Rev. 02 Version 1.5.0 Page 35 of 42
8. Installing Mini Holter Event ECG System
Mini Holter Event ECG System is made up of four elements: the Event ECG System recorder, the software that runs on the computer, the SRAM memory card on which ECG data is
recorded and the memory card reader. Before you can start recording Recollect tests, you need to:
• Install the memory card reader if it is not a built-in part of the computer.
• Configure the software.
• Configure the memory card
• Insert the card into the Event ECG System recorder.
8.1 Memory card reader
On most laptop systems, the built-in PC-Card slots can be used for the Mini Holter Event ECG System HeartCard memory cards. If you are using a desktop machine, it may be necessary to install an external PC-Card reader. Welch Allyn Cardio Control BV actively
supports the OmniDrive external parallel port card reader and the OmniDrive PRO USB card reader. Please refer to the documentation that came with the drive for instructions on how to install.
After installing the card reader, please make a note of the drive letter that the operating system has assigned to this card drive. This information will be necessary for Event ECG System software configuration.
8.2 Configure Welch Allyn Mini Holter Event ECG System
After making sure the card reader is present, you need to configure Welch Allyn Mini Holter
Event ECG System.
To configure Welch Allyn Mini Holter Event ECG System for use with the card reader:
1. Start Welch Allyn Mini Holter Event ECG System.
2. In the File menu, click Settings and click Recollect .
3. Set the PC-Card drive letter to the letter assigned to the card reader by the operating system.
4. Click OK to save the settings.
8.3 Formatting HeartCard memory cards
In the following circumstances it might be necessary to format the HeartCard:
1. Card was used with Recollect software 2.03 or earlier
2. Card's back-up battery was replaced
Mini Holter Event ECG System - User Manual
WACPW/MHO/ENG Rev. 02 Version 1.5.0 Page 36 of 42
To format a HeartCard, proceed as follows:
1. Insert the card into the card reader
2. Start the Recollect format utility, which was installed in the Cardio Control group on
your Start menu. The program's caption will indicate at which drive letter it will expect the HeartCard.
3. Enter the card identifier to be programmed onto the card.
The identifier can be any text you like, just make sure the card can be easily recognized with the text used, and that all cards you use have a different card identifier.
4. Press Start to start the formatting process.
Mini Holter Event ECG System - User Manual
WACPW/MHO/ENG Rev. 02 Version 1.5.0 Page 37 of 42
9. Troubleshooting
When I use the Format utility I cannot set the recording time to correspond with the size of the Card
§ The actual size may differ slightly from the size as mentioned on the card, e.g. a 90 minute card may in reality be a 88:53 card or so.
§ Check if the header in the format utility displays the correct drive-letter.
The actual drive-letter of the card-reader can be found with the use of Windows Explorer, to set the correct drive-letter in the WACP settings menu,, go to the Recollect settings, General tab
Is formatting the card with the Recollect Format utility the same as formatting with the Windows formatting program?
§ The Windows formatting program really puts a new data structure on the card,
normally this is not required and should be avoided. In some cases (especially with
Windows XP), this can make the card unsuitable for use with the Recollect recorder
§ The Recollect Format utility creates a file called Recollect.bin on the card, in this file
the ECG recordings are stored. This allow s you to reserve a certain amount of space on the card.
The patient symbol flashes almost each time a measurement is performed (telling me
the electrode quality is not good), although at the initialization the connections were tested O.K.
§ If the electrodes are attached for a longer time, the connection may become poor due
to transpiration
§ If this happens often, check whether proper, long lasting electrodes are used, if the skin is prepared properly and if the threshold values for DC-offset and Impedance are
not set too low.
If the patient symbol flashes already at the initialization, check the following:
§ Was the skin well prepared
§ Is the patient cable in good condition (visible inspection)
§ Is the cable connector pushed into the recorder correctly (it has to “click” when inserting it)
§ Are the threshold values for DC-offset and Impedance not set too low?

Appendix: Using the Mini Holter Event ECG System recorder
Instructions for the patient
1. Retrospective test
2. One channel event test
3. Two channel event test

Using the Event ECG System recorder
retrospective test
Keep the recorder in good working condition
You will wear this recorder for some time. To ensure that the recorder stays in good
working condition, please observe the following:
• Do not expose the recorder to temperatures below 0°C or above 45°C.
• Do not expose the recorder to prolonged direct sunlight.
• Protect the recorder against water.
• Do not attempt to remove the covers of the recorder. When it is malfunctioning, refer to the hospital.
Make a recording
1. Press down and hold the record button.
2. Release the button when the green light comes on. If the bleeper is switched on, there will be a long bleep.
When the green light goes out the recording is finished. The recorder reverts to displaying the number of recordings available and continues as before, ready for the next recording.
Note:
• If the record button is pressed again too soon, the beginning of the next recording will be blank.
• When a card is full the bleeper sounds and the recorder switches off.
Replace the batteries
In this test, the recorder constantly records ECG. Because of that, the batteries do not last very long. You have to replace both batteries when the recorder displays this signal:
The recorder will switch off automatically approximately eight hours after the warning starts.
Do not remove the Memory Card!
1. Hold the recorder w ith its underside facing you. Remove the battery cover by pressing down
on the finger grip and sliding it sideways.
2. Lift out the old batteries. Replace with two AA/MN1500 alkaline batteries. Note the correct polarity when inserting them.
3. Replace the battery cover by sliding it until the catch engages.
4. Press the record button once when the bleep starts.
Replace the Memory Card
If you need a large series of recordings, you have received more than one Memory Card. When a card is full, you have to replace it.
Note: Do not remove the full Memory Card directly after the last recording is made. The recorder needs a few seconds to store the recording.
1. Grip the exposed part of the Memory Card and pull firmly.
2. Place the new card in the recorder (note the arrow). Push the card fully in.
Using the Event ECG System recorder
event test (one channel)
Keep the recorder in good working condition
You will wear this recorder for some time. To ensure that the recorder stays in good
working condition, please observe the following:
• Do not expose the recorder to temperatures below 0°C or above 45°C.
• Do not expose the recorder to prolonged direct sunlight.
• Protect the recorder against water.
• Do not attempt to remove the covers of the recorder. When it is malfunctioning, refer to the hospital.
Fit the batteries
In this test, you do not use the recorder very often. Therefore, it is better that you do not leave the batteries in the recorder. Take them out after a recording and put them in again when you want to make a recording.
Do not remove the Memory Card!
1. Hold the recorder with its underside facing you. Remove the battery cover by pressing down
on the finger grip and sliding it sideways.
2. Put in two AA/MN1500 alkaline batteries (Duracell or Procell). Note the correct polarity when inserting the batteries.
3. Replace the battery cover by sliding it until the catch engages.
4. Press the record button once when the bleep starts.
Make a recording
1. Remove the electrodes from the backing strip and firmly press an electrode onto the inside
of each wrist:
• black on the left
• white on the right
2. Press down and hold the record button.
3. Release the record button when the green light comes on. Try to relax, with your hands and the recorder resting on the lap.
4. When the green light goes out the recording is complete. Remove the electrodes and replace them onto the backing strip. Remove the batteries from the recorder.
Note:
• You do not have to unplug the cable from the recorder. However, do not wrap it around the recorder; this can cause the cable to break.
• A subsequent recording cannot be made until the recorder display goes blank.
• Replace the electrodes after 10 applications, or sooner if they do no stick well any longer.
Replace the Memory Card
If you need a large series of recordings , you have received more than one Memory Card. When a card is full, you have to replace it.
Note: Do not remove the full Memory Card directly after the last recording is made. The recorder needs a few seconds to store the recording.
1. Grip the exposed part of the Memory Card and pull firmly.
2. Place the new card in the recorder (note the arrow). Push the card fully in.

Using the Event ECG System recorder
event test (two channels)
Keep the recorder in good working condition
You will wear this recorder for some time. To ensure that the recorder stays in good
working condition, please observe the following:
• Do not expose the recorder to temperatures below 0°C or above 45°C.
• Do not expose the recorder to prolonged direct sunlight.
• Protect the recorder against water.
• Do not attempt to remove the covers of the recorder. When it is malfunctioning, refer to the hospital.
Fit the batteries
In this test, you do not use the recorder constantly. Therefore, it is better that you do not store the batteries in t he recorder. Take them out after a recording and fit them again when you want to make a recording.
Do not remove the Memory Card!
• Hold the recorder with its underside facing you. Remove the battery cover by pressing down on the finger grip and sliding it sideways.
• Put in two AA/MN1500 alkaline batteries (Duracell or Procell). Note the correct polarity when inserting the batteries.
• Replace the battery cover by sliding it until the catch engages.
• Press the record button once when the bleep starts.
Make a recording
1. Press down and hold the record button.
2. Release the button when the green light comes on. When the green light goes out the recording is finished.
Note:
• A subsequent recording cannot be made until the recorder display goes blank.
Replace the Memory Card
If you need a large series of recordings, you have received more than one Memory Card. When a card is full, you have to replace it.
Note: Do not remove a full Memory Card directly after the last recording is made. The recorder needs a few seconds to store the recording.
1. Grip the exposed part of the Memory Card and pull firmly.
2. Place the new card in the recorder (note the arrow). Push the card fully in.

Mini Holter Event ECG System User Manual
WACPW/MHO/ENG Rev. 01 Version 1.5.0 Page 42 of 42
Index
Add Comment to a recording...........................26 Comment to a test......................................27
Adjust Bleep level .....................................................18 Recorder time ..............................................16
Anti-aliased .......................................................26 Apply anti-aliasing...........................................26 Bleep level .........................................................18
Card overview ..................................................34 Chart speed......................................................26
Check recorder time.......................................16
Chest electrode placement..........................18 Clean recorder .................................................30 Comment...........................................................26
Configure...........................................................35 Connect recorder to patient.........................18 Connection quality...................................22, 32
Create new retrospective test .....................12 Customize Event ECG System ..................31 DC offset............................................................23
Details tab..........................................................24 Event ECG System recorder.........................8 Event ECG System settings ........................31
Event ECG System window ..........................7 Event test....................................................11, 20 Full disclosure ..................................................25
General tab .......................................................31 HeartCard formatting.....................................35 Hookup settings...............................................32
Impedance .........................................................23 Installing .............................................................35 Instructions for the patient............................12
Interpreting a test............................................28 Maintaining the recorder...............................30
Make measurements .....................................26
Measurements .................................................26 Memory Card Formatting .............................35 MemoryCard.....................................................10
Mini Holter Event ECG System ....................6 New test .............................................................12 OmniDrive installation ...................................35
One channel test.............................................12 Overview tab.....................................................23 Patient connection..........................................18
Patient connection quality.....................22, 32
Patient instructions.........................................12 Power Save ......................................................15 Prepare recorder.............................................15
Print settings ...........................................................33
Print a test.........................................................29
Printing tab........................................................33 Read back recordings ...................................20 Record
event test.......................................................20 retrospective test ........................................11
Recorder preparation ....................................15
Recorder time Adjust..............................................................16 Check .............................................................16
Recording duration.........................................13 Recordings at specific times .......................14 Reset zoom.......................................................25
Retrieve test.....................................................20 Retrospective test....................................10, 11 Save battery power ........................................15
Save recording times settings ....................15 Sensitivity..........................................................26 Set chart speed and sensitivity ..................26
Set ECG recording times .............................13 Settings
General ..........................................................31
Hookup...........................................................32 Printing ...........................................................33
Start recorder ...................................................19
Test Event...............................................................11 Interpreting....................................................28
Recording...............................................11, 20 Retrospective...............................................10
Test settings .....................................................27
Timed recordings ............................................14 Tools menu .......................................................28 Two channel test......................................11, 12
View Information about a test ...........................27 Test .................................................................22
Test settings .................................................27 View menu ........................................................25 Zoom ...................................................................25