midbass multi stand instructions
DESCRIPTION
Assembly instructions for Midbass Multi StandTRANSCRIPT
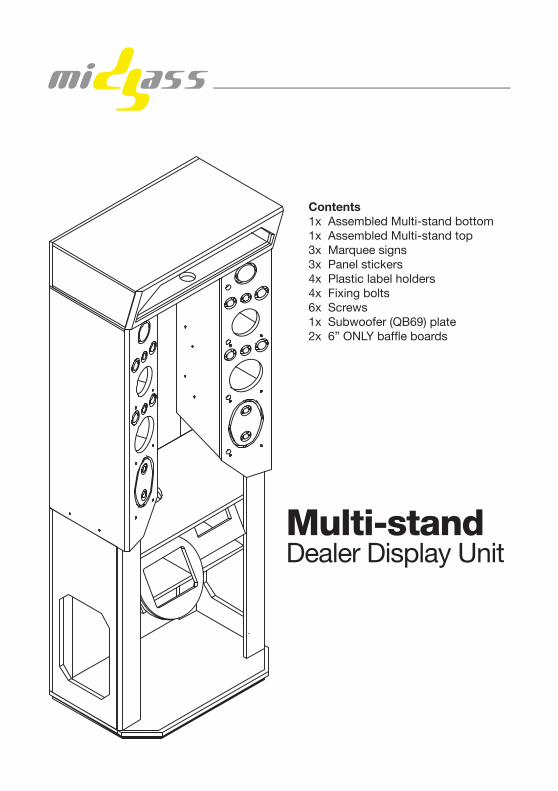
Multi-standDealer Display Unit
Contents1x Assembled Multi-stand bottom1x Assembled Multi-stand top3x Marquee signs3x Panel stickers4x Plastic label holders4x Fixing bolts6x Screws1x Subwoofer (QB69) plate2x 6” ONLY baffl e boards

1.
Multi-stand - Dealer Display Unit
2.
• Turn the top half of the cabinet upside down.• Fix the stand support brackets to the inside of the top half of the cabinet using 2x screws on each side.• Place the top half of the cabinet on top of the base.
• Insert 4x retaining bolts to secure the two parts of the stand.
Stand Assembly
Multi-stand - Dealer Display Unit
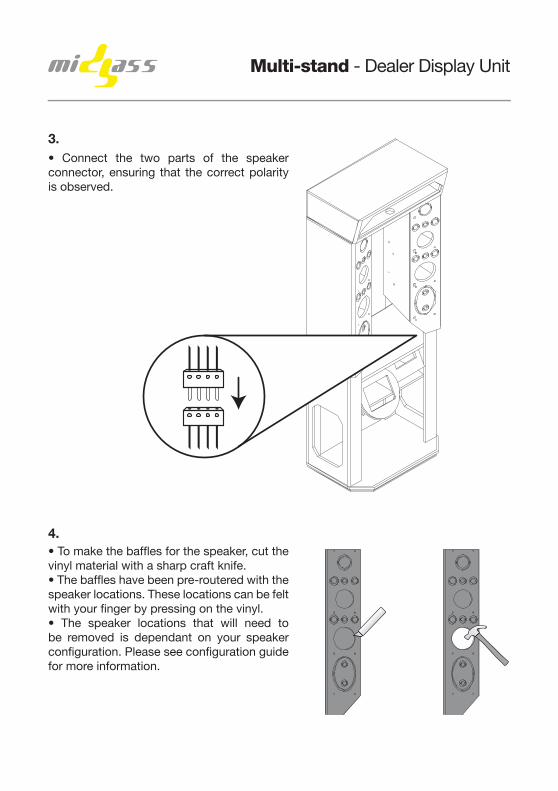
3.
4.
• Connect the two parts of the speaker connector, ensuring that the correct polarity is observed.
• To make the baffl es for the speaker, cut the vinyl material with a sharp craft knife.• The baffl es have been pre-routered with the speaker locations. These locations can be felt with your fi nger by pressing on the vinyl.• The speaker locations that will need to be removed is dependant on your speaker confi guration. Please see confi guration guide for more information.
Multi-stand - Dealer Display Unit
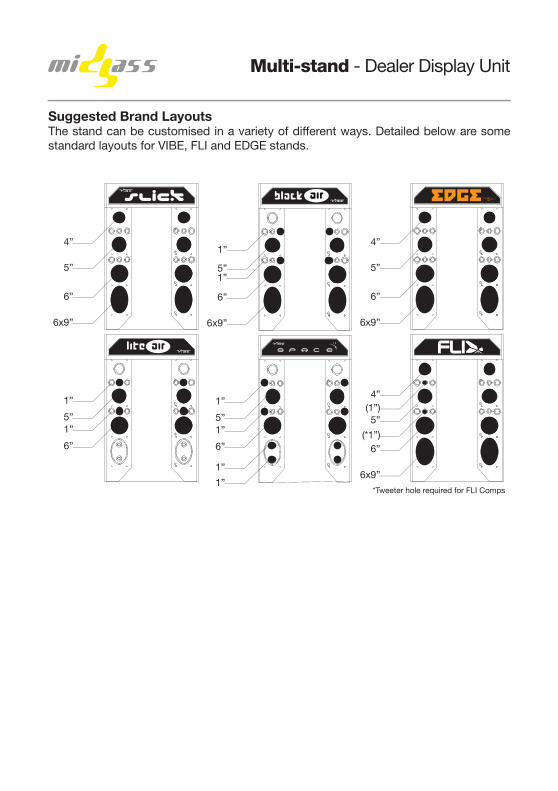
Suggested Brand LayoutsThe stand can be customised in a variety of different ways. Detailed below are some standard layouts for VIBE, FLI and EDGE stands.
4”
5”
6”
6x9”
1”
5”
6”
6x9”
1”
1”
5”
6”
1”
1”
5”
6”
1”
1”
1”
4”
5”
6”
6x9”
4”
5”
6”
6x9”
(1”)
(*1”)
*Tweeter hole required for FLI Comps
Multi-stand - Dealer Display Unit
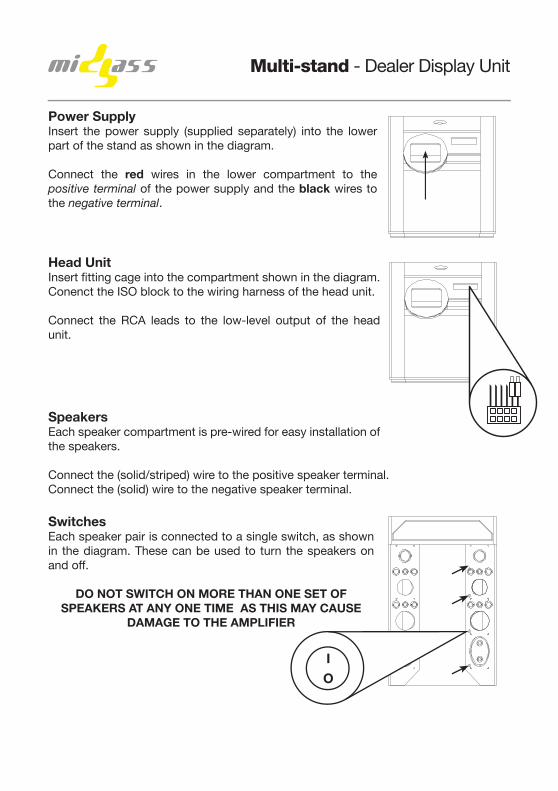
Power SupplyInsert the power supply (supplied separately) into the lower part of the stand as shown in the diagram.
Connect the red wires in the lower compartment to the positive terminal of the power supply and the black wires to the negative terminal.
Head UnitInsert fi tting cage into the compartment shown in the diagram. Conenct the ISO block to the wiring harness of the head unit.
Connect the RCA leads to the low-level output of the head unit.
SpeakersEach speaker compartment is pre-wired for easy installation of the speakers.
Connect the (solid/striped) wire to the positive speaker terminal.Connect the (solid) wire to the negative speaker terminal.
SwitchesEach speaker pair is connected to a single switch, as shown in the diagram. These can be used to turn the speakers on and off.
DO NOT SWITCH ON MORE THAN ONE SET OF SPEAKERS AT ANY ONE TIME AS THIS MAY CAUSE
DAMAGE TO THE AMPLIFIER
I
O

Multi-stand - Dealer Display Unit
Illuminated HeaderThe stand is equipped with an illuminated header sign.
The required header sign can be slid into position and is held at the sides with the wooden batons.
Amplifi er MountingIn addition to the board mounted amplifi er, two amplifi ers can be mounted to the bars between the speaker enclosures.
• Retract the screws on the support bars.• Position the support bars in-line with the amplifi er mounting holes.• Tighten the screws into the amplifi er mounting holes.
Amplifi er WiringThe lower, board mounted, amplifi er is used to drive the speakers and a subwoofer (if required). Typically this will be a four channel amplifi er.
• Connect RCA inputs from the head unit.• Connect positive power, ground and remote cables.• Connect speaker cables. Refer to the amplifi er manual for wiring confi gurations.
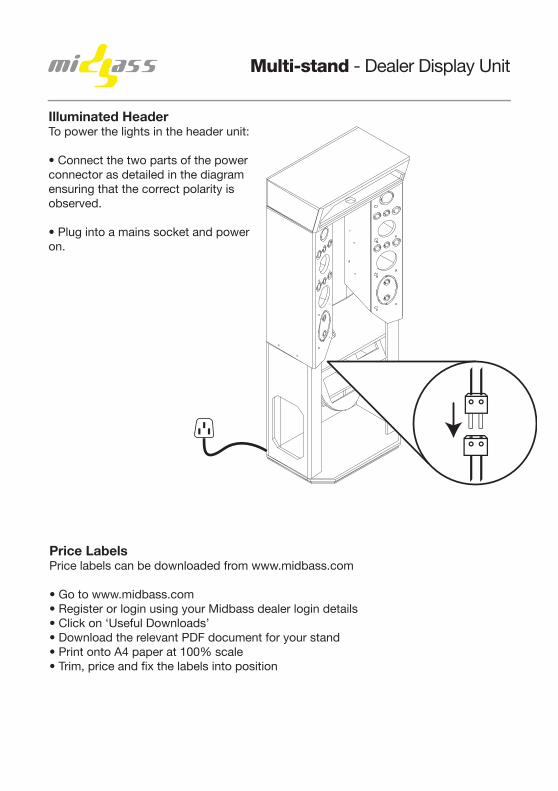
Illuminated HeaderTo power the lights in the header unit:
• Connect the two parts of the power connector as detailed in the diagram ensuring that the correct polarity is observed.
• Plug into a mains socket and power on.
Multi-stand - Dealer Display Unit
Price LabelsPrice labels can be downloaded from www.midbass.com
• Go to www.midbass.com• Register or login using your Midbass dealer login details• Click on ‘Useful Downloads’• Download the relevant PDF document for your stand• Print onto A4 paper at 100% scale• Trim, price and fi x the labels into position