microsoft word 2010 easter egg hunt flyer tutorial
DESCRIPTION
Learn how to create an Easter Egg Hunt Flyer using Microsoft Word 2010.TRANSCRIPT

Flyer Tutor
Page 1 of 33
Microsoft Word 2010 Tutorial – How To Make an Easter Egg Hunt Flyer
http://www.flyertutor.com
Microsoft Word Easter Egg Hunt Flyer Tutorial
This tutorial gives the illustrated step by step instructions to create an Easter Egg Hunt Flyer using the Business Application - Microsoft Word 2010.
Download Template
Steps 01: Document Setup
02: Insert Shape
03: Set Shape Dimensions
04: Edit Shape Points
05: Add Point
06: Create Duplicate
07: Flip Object Vertically
08: Format Shape Fill
09: Format Shape Outline
10: Royalty Free Clip Art
11: Insert Text Box
12: Insert Image
13: Text Box Transparency
14: Flip Image Horizontally
15: Duplicate Image
16: Recolor & Artistic Effects
17: Arrange Objects - Send Backward
18: Create Easter Eggs
19: Pattern Fills
20: Rotate Shapes
21: Free Fonts
22: Insert & Format Text
23: Text Effects - Transform
24: Text Outline Color & Weight
25: Drop Shadow
26: Add & Format Text
27: Save File

Flyer Tutor
Page 2 of 33
Microsoft Word 2010 Tutorial – How To Make an Easter Egg Hunt Flyer
http://www.flyertutor.com
Step 01: Document Setup
After you've opened Microsoft Word 2010, set up your document by selecting the Page Layout Tab from the Ribbon above. You will see the Themes, Page Setup, Page Background, Paragraph and Arrange Groups. From the Page Setup Group select Size.
This opens a drop down menu from which you should select the Paper Size Letter.
For a Portrait Layout select Orientation from the Page Setup Group and click Portrait.

Flyer Tutor
Page 3 of 33
Microsoft Word 2010 Tutorial – How To Make an Easter Egg Hunt Flyer
http://www.flyertutor.com
To set the Margin Size for the document select Margins > Narrow.
This sets the Top, Bottom, Left and Right Margins to 0.5 Inches each. Now that Document Setup is complete, you can start working on the flyer background.
Step 02: Insert Shape From the Ribbon select the Insert Tab.
This Tab has options for the Pages, Tables, Illustrations, Links, Header & Footer, Text and Symbols Groups.
Flyer Tutor
Page 4 of 33
Microsoft Word 2010 Tutorial – How To Make an Easter Egg Hunt Flyer
http://www.flyertutor.com
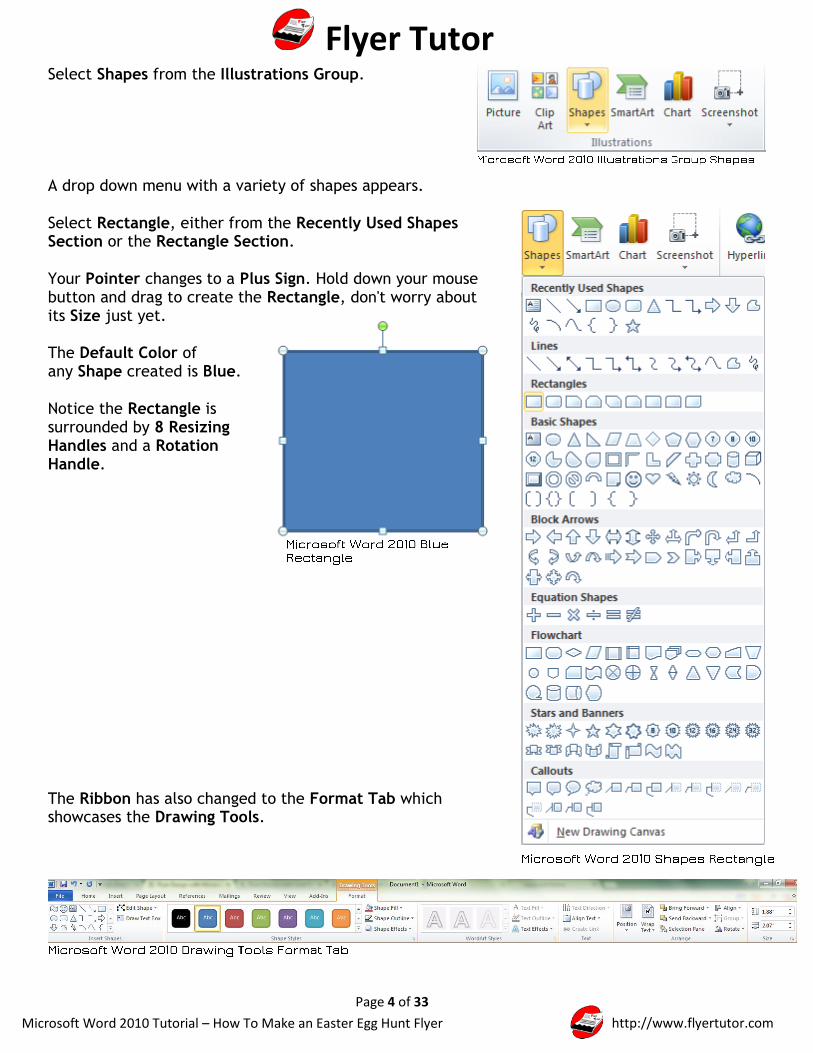
Select Shapes from the Illustrations Group.
A drop down menu with a variety of shapes appears.
Select Rectangle, either from the Recently Used Shapes Section or the Rectangle Section.
Your Pointer changes to a Plus Sign. Hold down your mouse button and drag to create the Rectangle, don't worry about its Size just yet.
The Default Color of any Shape created is Blue.
Notice the Rectangle is surrounded by 8 Resizing Handles and a Rotation Handle.
The Ribbon has also changed to the Format Tab which showcases the Drawing Tools.

Flyer Tutor
Page 5 of 33
Microsoft Word 2010 Tutorial – How To Make an Easter Egg Hunt Flyer
http://www.flyertutor.com
There are options for the Insert Shapes, Shape Styles, WordArt Styles, Text, Arrange, and Size Groups.
Step 03: Set Shape Dimensions To the far right of the Format Tab is the Size Group. Here you will see the Height and Width of the Rectangle. Set Height to 3.5 Inches and Width to 8.5 Inches.
Hit your Enter Key to see the change made to the Shape.
Drag the Rectangle to the top of the page.
Step 04: Edit Shape Points The next couple of steps are going to take a bit of patience, but you'll love the results.
On the same Format Tab, click on the Edit Shape Icon from the Insert Shapes Group.
From the drop down menu that appears select Edit Points.
Flyer Tutor
Page 6 of 33
Microsoft Word 2010 Tutorial – How To Make an Easter Egg Hunt Flyer
http://www.flyertutor.com
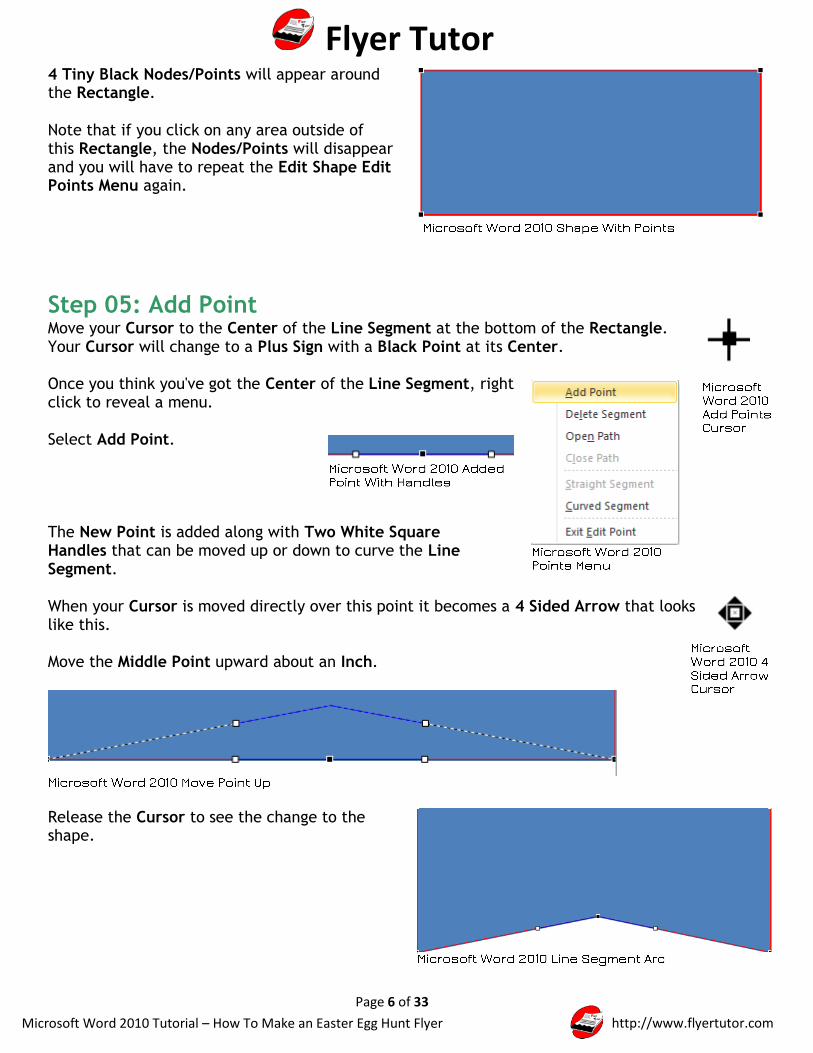
4 Tiny Black Nodes/Points will appear around the Rectangle.
Note that if you click on any area outside of this Rectangle, the Nodes/Points will disappear and you will have to repeat the Edit Shape Edit Points Menu again.
Step 05: Add Point Move your Cursor to the Center of the Line Segment at the bottom of the Rectangle. Your Cursor will change to a Plus Sign with a Black Point at its Center. Once you think you've got the Center of the Line Segment, right click to reveal a menu. Select Add Point. The New Point is added along with Two White Square Handles that can be moved up or down to curve the Line Segment. When your Cursor is moved directly over this point it becomes a 4 Sided Arrow that looks like this.
Move the Middle Point upward about an Inch.
Release the Cursor to see the change to the shape.

Flyer Tutor
Page 7 of 33
Microsoft Word 2010 Tutorial – How To Make an Easter Egg Hunt Flyer
http://www.flyertutor.com
Right click over this Point again and select Smooth Point from the menu.
This curves the Line Segment creating a new shape.
Step 06: Create Duplicate To create a Duplicate, select the Shape then hold down your Ctrl and D Keys together. This will create 1 Duplicate Shape. You could also go to the Clipboard Group of the Home Tab and select Copy. Then select the Paste Icon once to create 1 Duplicate.
The Duplicate Shape is placed above the Original.

Flyer Tutor
Page 8 of 33
Microsoft Word 2010 Tutorial – How To Make an Easter Egg Hunt Flyer
http://www.flyertutor.com
Step 07: Flip Object Vertically Going back to the Format Tab, select Rotate from the Arrange
Group.
This opens a drop down menu with options for Rotation.
Select Flip Vertical.
The Duplicate becomes Flipped Vertically or Upside Down.
Drag it to the bottom of the page.
OK, so now with two identical
shapes on the page, we want
to Decrease the Size of the
bottom shape, so that there is
some contrast between the two
shapes.
In the Size Group, set
its Height to 2.75 Inches.

Flyer Tutor
Page 9 of 33
Microsoft Word 2010 Tutorial – How To Make an Easter Egg Hunt Flyer
http://www.flyertutor.com
Step 08: Format Shape Fill Select the Top Shape. The Format Tab will become visible.
From the Shape Styles Group, select the Shape Fill Icon.
This opens a drop down menu with options for Color, Picture, Gradient and Texture Fills.
Select Blue from the Standard Colors section of the menu.
Selecting the bottom shape, set its Fill Color to Light Green which is also in Standard Colors.

Flyer Tutor
Page 10 of 33
Microsoft Word 2010 Tutorial – How To Make an Easter Egg Hunt Flyer
http://www.flyertutor.com
Step 09: Format Shape Outline This step is almost the same as the previous one, only you would select Shape Outline instead.
Give each shape the same Outline Color as their Fill.
And now, both Shapes have new Outline Colors.
So one layer of the flyer is complete. Next we'll move on to the Images.
Flyer Tutor
Page 11 of 33
Microsoft Word 2010 Tutorial – How To Make an Easter Egg Hunt Flyer
http://www.flyertutor.com
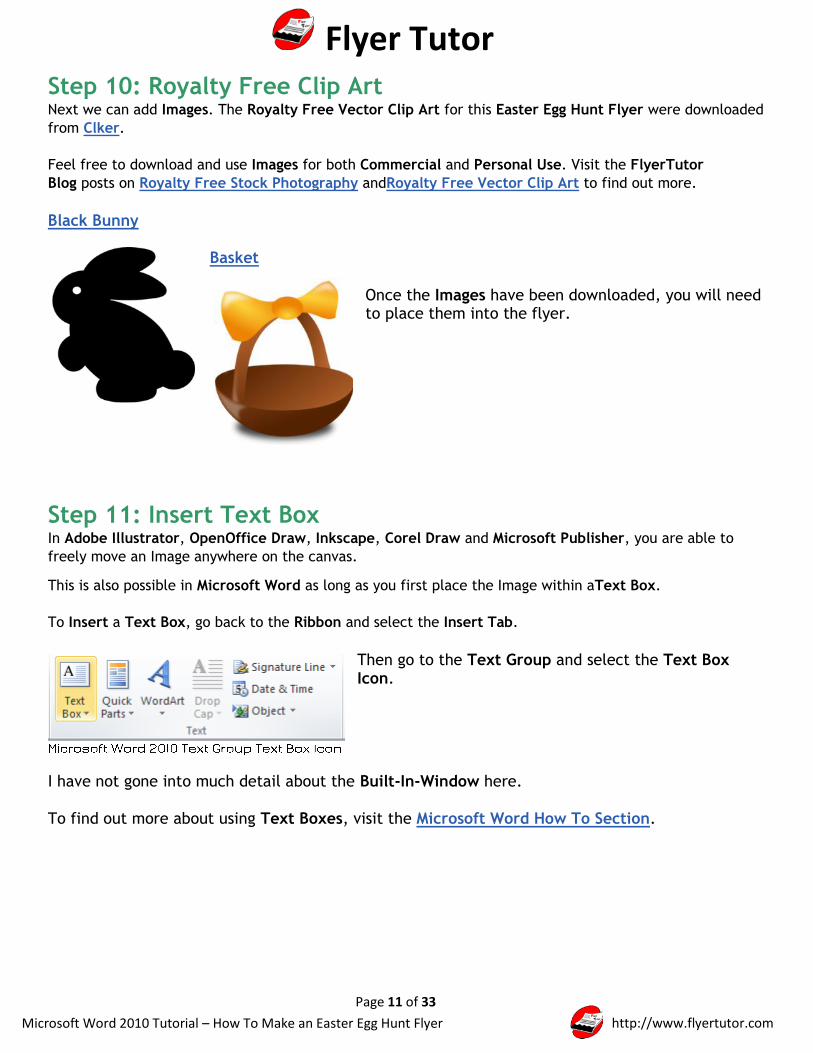
Step 10: Royalty Free Clip Art Next we can add Images. The Royalty Free Vector Clip Art for this Easter Egg Hunt Flyer were downloaded
from Clker.
Feel free to download and use Images for both Commercial and Personal Use. Visit the FlyerTutor
Blog posts on Royalty Free Stock Photography andRoyalty Free Vector Clip Art to find out more.
Black Bunny
Basket
Once the Images have been downloaded, you will need to place them into the flyer.
Step 11: Insert Text Box In Adobe Illustrator, OpenOffice Draw, Inkscape, Corel Draw and Microsoft Publisher, you are able to
freely move an Image anywhere on the canvas.
This is also possible in Microsoft Word as long as you first place the Image within aText Box.
To Insert a Text Box, go back to the Ribbon and select the Insert Tab.
Then go to the Text Group and select the Text Box Icon.
I have not gone into much detail about the Built-In-Window here.
To find out more about using Text Boxes, visit the Microsoft Word How To Section.

Flyer Tutor
Page 12 of 33
Microsoft Word 2010 Tutorial – How To Make an Easter Egg Hunt Flyer
http://www.flyertutor.com
At the bottom of the Built-In Window, select Draw Text Box.
Your Cursor will change to an X.
While holding down your mouse
button, drag and draw a Text Box on
the Flyer.
The Text Box will have 8 Handles around it for Resizing.
The Ribbon will also change to the Format Tab. There you can set the Text Box Size to a Height of 7.5 Inches and Width of 6 Inches.

Flyer Tutor
Page 13 of 33
Microsoft Word 2010 Tutorial – How To Make an Easter Egg Hunt Flyer
http://www.flyertutor.com
Step 12: Insert Image When the Text Box is active you will see a Flashing Cursor.
On the Insert Tab go to the Illustrations Group and select Picture.
This will open the Insert Picture Window.
Locate your file and click the Insert button at the bottom of the window.

Flyer Tutor
Page 14 of 33
Microsoft Word 2010 Tutorial – How To Make an Easter Egg Hunt Flyer
http://www.flyertutor.com
The Image will be placed inside the Text Box.
You'll see that the Image is quite small and there is also a Picture Tools Format Tab.
In the Size Group set Height to 6.5 Inches and Width to 5.94 Inches.
And now you have a much larger Image to work with.

Flyer Tutor
Page 15 of 33
Microsoft Word 2010 Tutorial – How To Make an Easter Egg Hunt Flyer
http://www.flyertutor.com
Step 13: Text Box Transparency The Black Outline of the Text Box shows around the Image. Let's get rid of this
by first selecting the Text Box and setting the Shape Outline to No Outline.
Next set the Shape Fill to No Fill.
The Text Box is still there but you can now see the background through it. Remember to move this Image, you will have to select its Invisible Border and not the Image itself.
You can tell if you have the right box selected by its Border.
The Text Box Border has Dashes while the Image Border is a Solid Line.

Flyer Tutor
Page 16 of 33
Microsoft Word 2010 Tutorial – How To Make an Easter Egg Hunt Flyer
http://www.flyertutor.com
Now have a look at the Transparent Text Box with Image.
Step 14: Flip Image Horizontally Next we need to Flip this Easter Bunny.
Select the Image and click the Rotate Icon from the Arrange Group of
the Picture Tools Format Tab.
The Image now faces the other direction.

Flyer Tutor
Page 17 of 33
Microsoft Word 2010 Tutorial – How To Make an Easter Egg Hunt Flyer
http://www.flyertutor.com
Step 15: Duplicate Image Let's create a Duplicate of the Easter Bunny. In this case
you must select the Text Box and not the Image itself.
Once you've selected the Text Box, click it again to make the Dashed Line a Solid one.
So when you Copy and Paste there will be a Duplicated Text Box that contains an Image.
Step 16: Recolor & Artistic Effects Select the Duplicated Image, then go to the Picture
Tools Format Tab.
In the Adjust Group, select Artistic Effects.
Flyer Tutor
Page 18 of 33
Microsoft Word 2010 Tutorial – How To Make an Easter Egg Hunt Flyer
http://www.flyertutor.com
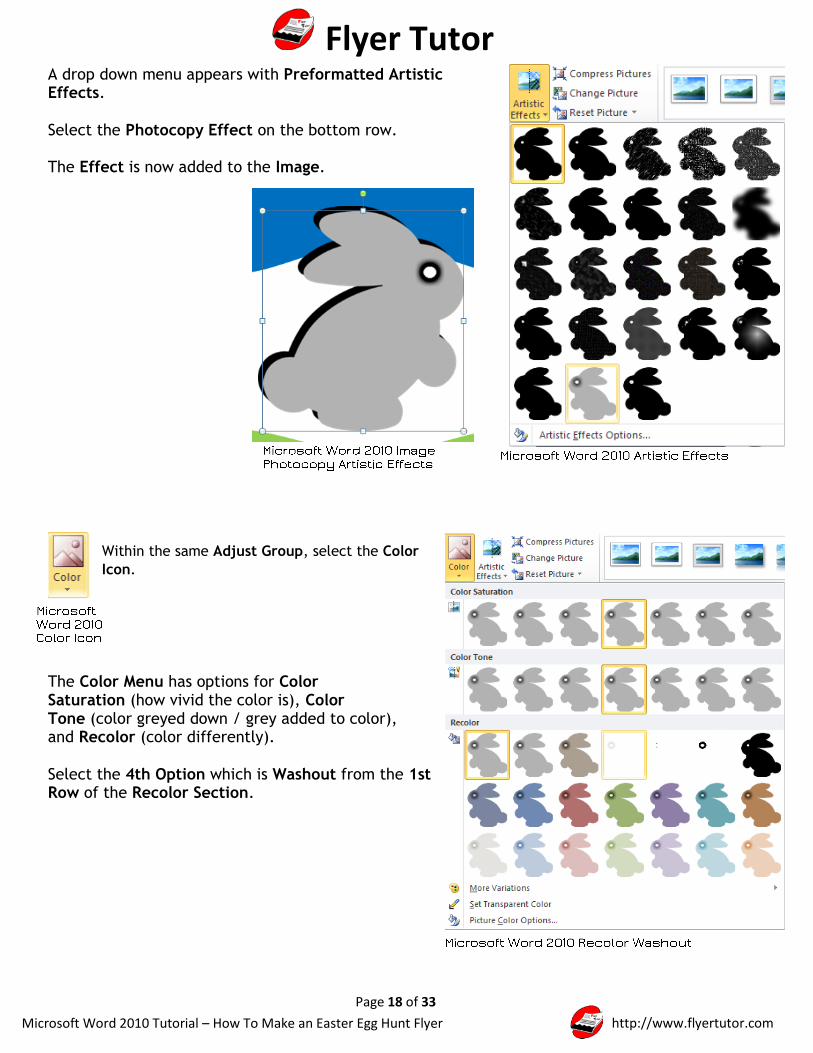
A drop down menu appears with Preformatted Artistic Effects.
Select the Photocopy Effect on the bottom row. The Effect is now added to the Image.
Within the same Adjust Group, select the Color
Icon.
The Color Menu has options for Color Saturation (how vivid the color is), Color Tone (color greyed down / grey added to color), and Recolor (color differently).
Select the 4th Option which is Washout from the 1st Row of the Recolor Section.

Flyer Tutor
Page 19 of 33
Microsoft Word 2010 Tutorial – How To Make an Easter Egg Hunt Flyer
http://www.flyertutor.com
This makes the Image appear White.
Step 17: Arrange Objects - Send Backward Now we need to select the Text Box that holds the Image. Click on the Drawing Tools Format Tab.
In the Arrange Group, select the Send Backward Icon.
This sends the Text Box with the White Image behind the Text Box with
the Black Image.
Move the White Bunny up so that it appears to be about 1/2 Inch higher than the Black Bunny.

Flyer Tutor
Page 20 of 33
Microsoft Word 2010 Tutorial – How To Make an Easter Egg Hunt Flyer
http://www.flyertutor.com
To add more White Space behind the ear of the Black Bunny, since we are unable to edit the Points for the Image, as we are able to do in programs like Inkscape and Adobe Illustrator, create another White Duplicate of the Bunny.
Drag it to the Left of the Black Bunny so that you can fill in this area.
It's in no way perfect but it is better than what was there. Repeat the Steps to insert the Easter Basket beside the Bunny.
Step 18: Create Easter Eggs Repeating the Step to Insert Shape, select the Oval Shape instead of the Rectangle.
While drawing the Oval hold down your Ctrl Key and drag downward or
upward to make an elongated shape that looks more like the shape of an Egg.

Flyer Tutor
Page 21 of 33
Microsoft Word 2010 Tutorial – How To Make an Easter Egg Hunt Flyer
http://www.flyertutor.com
Create a few Duplicates of this Shape and place them below the Black Bunny.
Color each shape a
specific Color.
You can get some
brighter Colors for
these Easter Eggs by
selecting More Fill
Colors from the Shape Fill
Menu.
This opens the Colors Window.
The Custom Tab (used for creating Custom Colors) will be active.
Select the Standard Tab.
Choose a Color and click OK to add it to the Shape.

Flyer Tutor
Page 22 of 33
Microsoft Word 2010 Tutorial – How To Make an Easter Egg Hunt Flyer
http://www.flyertutor.com
When setting the Shape Outline, instead of selecting More Outline Colors, just
choose your Color from the Recent Color Section of the Color Menu.
Now you have some beautiful Colors applied to the Easter Eggs.
Step 19: Pattern Fills Select an Egg, then right click over it to reveal a Menu.
Select Format Shape.
This opens the Format Shape Window for which the Fill Tab will be active.
Flyer Tutor
Page 23 of 33
Microsoft Word 2010 Tutorial – How To Make an Easter Egg Hunt Flyer
http://www.flyertutor.com
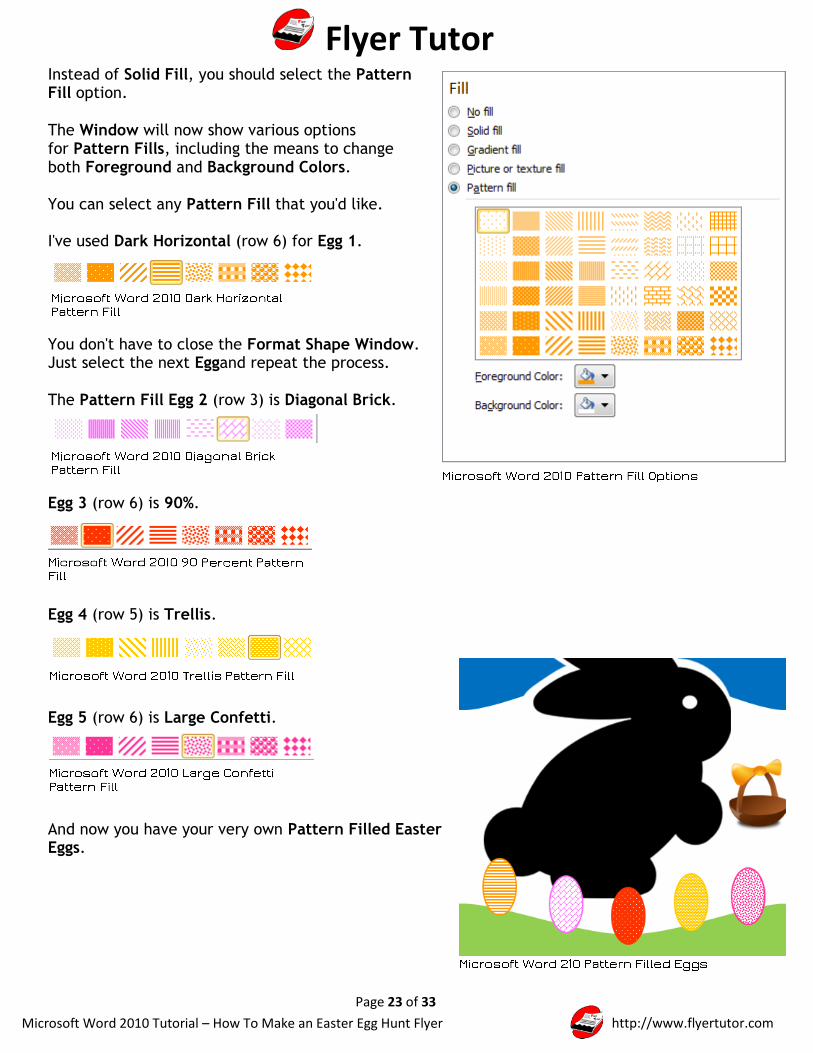
Instead of Solid Fill, you should select the Pattern Fill option.
The Window will now show various options for Pattern Fills, including the means to change both Foreground and Background Colors. You can select any Pattern Fill that you'd like. I've used Dark Horizontal (row 6) for Egg 1.
You don't have to close the Format Shape Window. Just select the next Eggand repeat the process.
The Pattern Fill Egg 2 (row 3) is Diagonal Brick.
Egg 3 (row 6) is 90%.
Egg 4 (row 5) is Trellis.
Egg 5 (row 6) is Large Confetti.
And now you have your very own Pattern Filled Easter Eggs.

Flyer Tutor
Page 24 of 33
Microsoft Word 2010 Tutorial – How To Make an Easter Egg Hunt Flyer
http://www.flyertutor.com
Step 20: Rotate Shapes When you select an Object, you'll see a Green Circle above it. This is a Rotation Handle that
allows you to Free Rotate the Object.
Move your Cursor over it, and when the Cursor changes to a Rotation Arrow,
hold down your mouse button and move to the Left or Right of the Object.
Duplicate a few of the Eggs to put in the Basket and in the Bunny's Paw. As these Objects are very small, the Rotation Handle does not show.
In this instance you would go to the Arrange Group of the Format Tab and select Rotate. From the drop down menu that appears select More Rotation Options.
This opens the Layout Window.
You'll see Tabs for Position, Text Wrapping and Size. In the Rotate Section of the Size Tab set Rotation to 10 Degrees and click OK. Repeat for the other 2 Eggs in the Basket.

Flyer Tutor
Page 25 of 33
Microsoft Word 2010 Tutorial – How To Make an Easter Egg Hunt Flyer
http://www.flyertutor.com
With that you've completed the Background for the Easter Egg Hunt Flyer and you can now move on to adding Text.
Step 21: Free Fonts
The Main Font used in this Easter Egg Hunt Flyer is Advert by Richard Mueller,
which was downloaded from FontFreak.
The remaining Text on the Flyer uses the Desyrel Font by Apostrophic
Labs.
You can download this Free Font from Fontsquirrel.
For a newly downloaded Font to be usable on your machine, you must first install it. Any Font installed
while Microsoft Word is open, will not be visible in the Font List.
To correct this, you must first restart the Microsoft Word program after Font(s) installation.
For more information on Fonts and how to properly install them, visit the FlyerTutor Blog.
Flyer Tutor
Page 26 of 33
Microsoft Word 2010 Tutorial – How To Make an Easter Egg Hunt Flyer
http://www.flyertutor.com
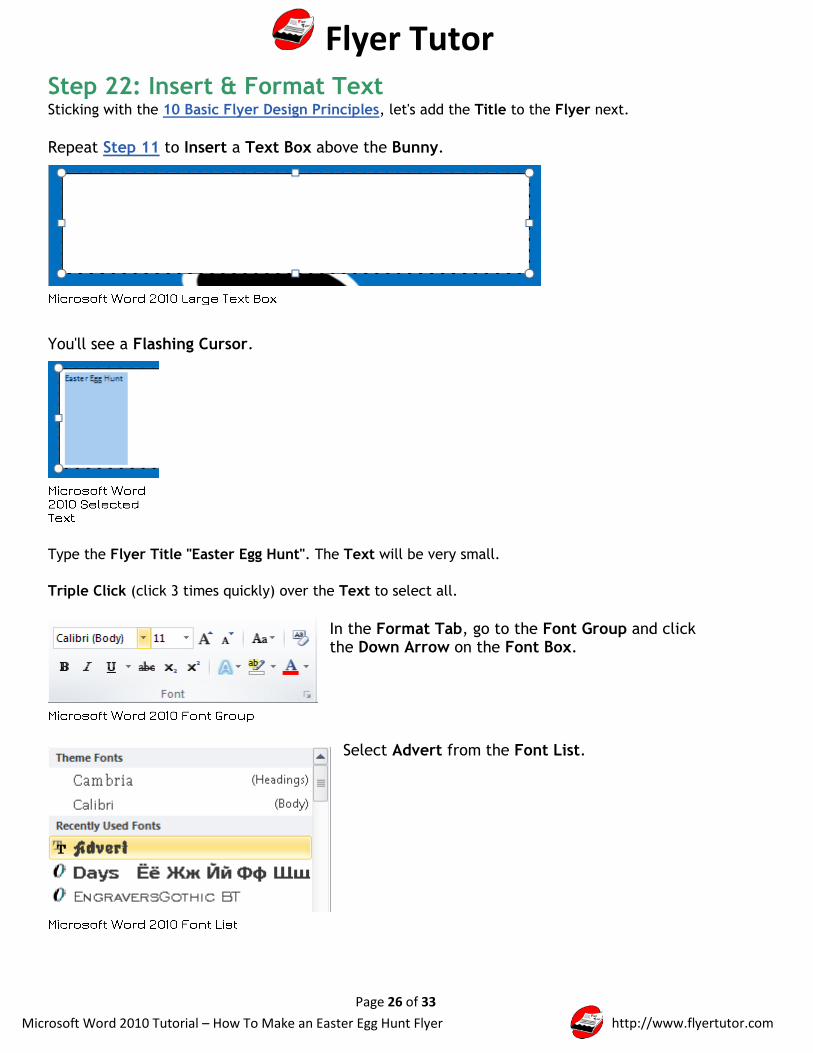
Step 22: Insert & Format Text Sticking with the 10 Basic Flyer Design Principles, let's add the Title to the Flyer next.
Repeat Step 11 to Insert a Text Box above the Bunny.
You'll see a Flashing Cursor.
Type the Flyer Title "Easter Egg Hunt". The Text will be very small.
Triple Click (click 3 times quickly) over the Text to select all.
In the Format Tab, go to the Font Group and click the Down Arrow on the Font Box.
Select Advert from the Font List.

Flyer Tutor
Page 27 of 33
Microsoft Word 2010 Tutorial – How To Make an Easter Egg Hunt Flyer
http://www.flyertutor.com
The Font has changed but the Text Size is still very small.
The Font Size is just to the right of the Font Box.
If you click the Down Arrow you can see a list of available Font Sizes.
However, the Font Size that we need is not on this list, so go ahead and type 60 into the Font Size Box and hit your Enter Key.
Step 23: Text Effects - Transform In the Format Tab select the Text Effects Icon from
the WordArt Styles Group.
This reveals a drop down menu with options for Shadow Reflection, Glow, Bevel, 3D
Rotation, and Transform.
Select Transform.

Flyer Tutor
Page 28 of 33
Microsoft Word 2010 Tutorial – How To Make an Easter Egg Hunt Flyer
http://www.flyertutor.com
This reveals a Transform Options Menu.
Select the Chevron Up options from the Warp Section.
You'll see the immediate change to the Text.
Notice also that a Pink Diamond Handle has appeared on the left side of the Text Box. You can drag this Handle up or down if you wish to adjust the Transform Effect.
Make the Text Box Transparent so that all of the Bunny will be visible.
Step 24: Text Outline Color & Weight
Reselect the Title Text and on the Format Tab select Text
Outline from the WordArt Styles Group.

Flyer Tutor
Page 29 of 33
Microsoft Word 2010 Tutorial – How To Make an Easter Egg Hunt Flyer
http://www.flyertutor.com
In the drop down Text Outline Color Menu select White from the Theme Colors Section.
The Title Text now has a White Outline that could be a bit more noticeable.
In the Text Outline Color Menu select Weight > 2 1/4 pt.
This tiny change makes the Title Text pop.

Flyer Tutor
Page 30 of 33
Microsoft Word 2010 Tutorial – How To Make an Easter Egg Hunt Flyer
http://www.flyertutor.com
Step 25: Drop Shadow Let's add a Drop Shadow to this Text as well. Reselect the Title Text.
After clicking the Text Effects Icon select Shadow from the list that appears.
A window with Preformatted Shadows appears.
From the Outer Section select Offset Diagonal Bottom Right. Here's the Text with the Shadow applied.
Let's make the Shadow more vivid. Reselect the Text and at the bottom of the Shadow Menu, select Shadow Options. This will open the Format Text Effects Window.
You will see that Transparency is set to 60%. Change that number to 30%. The change will be made immediately.

Flyer Tutor
Page 31 of 33
Microsoft Word 2010 Tutorial – How To Make an Easter Egg Hunt Flyer
http://www.flyertutor.com
Click the Close button at the bottom of the Window.
Here's the Title Text with an even Darker Shadow.
Step 26: Add & Format Text Now you need to add the remaining Text to the Flyer. For the Text within the Bunny Ears,
the Font is Desyrel, and the Font Size is 24.
Both Text Boxes will have to be Rotated. The Text needs to be given a White Fill. And the Text Boxes should be made Transparent.
Lastly, select the Text and on the Format Tab, click the Bold Icon from the Font Group.
The "Ages" Text is also set to Font Desyrel, with Font Size 24.
It uses the Transform Text Effect - Chevron Up and is also Rotated.
The "Spot the Bunny" Text is set to Font Advert, Font Size 40. Besides the obvious White Fill, the Text is Rotated and Aligned Center.
You'll find the Center Icon in the Paragraph Group of the Format Tab.

Flyer Tutor
Page 32 of 33
Microsoft Word 2010 Tutorial – How To Make an Easter Egg Hunt Flyer
http://www.flyertutor.com
At the bottom of the Flyer set
the "Music" Text to Font
Advert, Font Size 26.
The Space between
the Lines of Text is a bit wide.
To correct this, select the Text and in the Paragraph
Group of the Format Tab, select the Line Spacing Icon.
From the drop down menu
select 1.0 instead of 1.15.
Now the Lines of Text are a little closer to each other.
The "Easter Park" Text is Aligned Right using
the Align Right Icon.
And with that you would have completed an Easter Egg Hunt Flyer using Microsoft Word 2010.
Now the Flyer just needs to be Saved.
Flyer Tutor
Page 33 of 33
Microsoft Word 2010 Tutorial – How To Make an Easter Egg Hunt Flyer
http://www.flyertutor.com
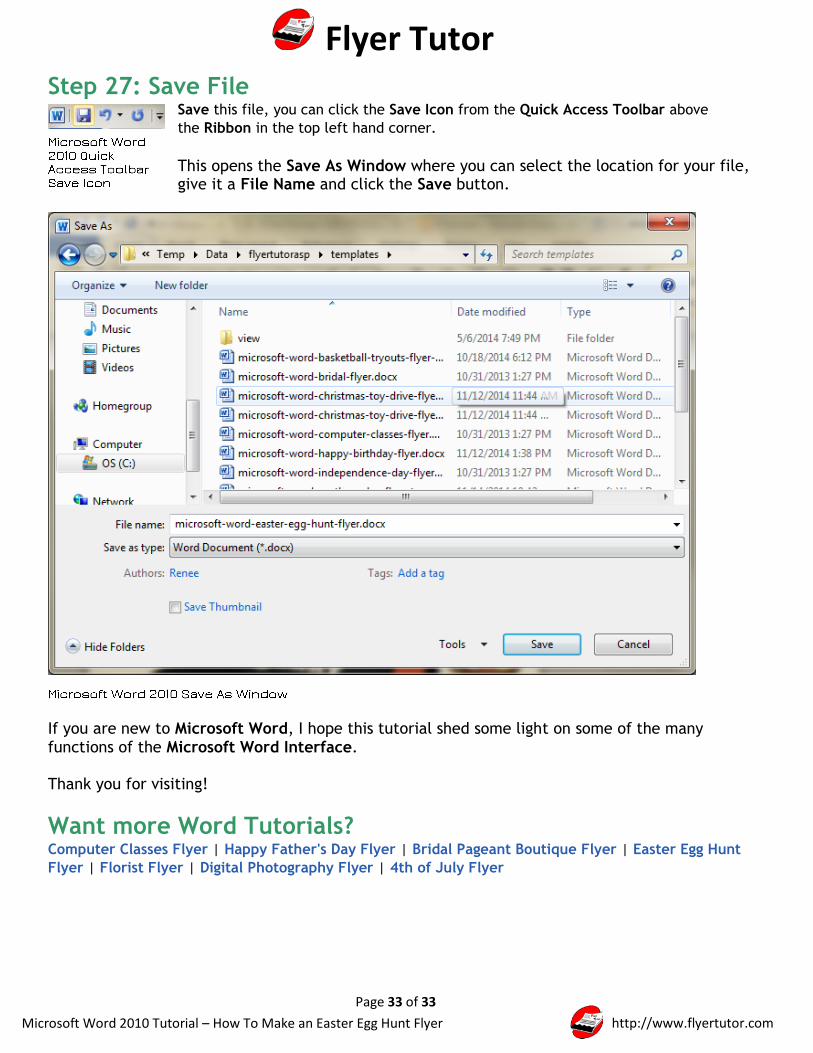
Step 27: Save File Save this file, you can click the Save Icon from the Quick Access Toolbar above
the Ribbon in the top left hand corner.
This opens the Save As Window where you can select the location for your file, give it a File Name and click the Save button.
If you are new to Microsoft Word, I hope this tutorial shed some light on some of the many functions of the Microsoft Word Interface. Thank you for visiting!
Want more Word Tutorials? Computer Classes Flyer | Happy Father's Day Flyer | Bridal Pageant Boutique Flyer | Easter Egg Hunt
Flyer | Florist Flyer | Digital Photography Flyer | 4th of July Flyer