microsoft project 2010 ii -...
TRANSCRIPT

MICROSOFT PROJECT 2010 - II
Course Material
This 2-day course is for intermediate and advanced users of the MS Project
scheduling application who want to increase their capabilities managing projects
in MS Project. Overall, the objective of the course is to give participants advanced
skills in resource assignment, tracking, and leveling; using custom fields and filters
to create various views of the schedule model; and managing multiple projects
and shared resource pools with Project 2010.

Table of Contents
Lesson 1: MS Project I Review ................................................................................................................ 1
Topic 1: Creating the Project .............................................................................................................. 2
Topic 2: Calendar Basics ..................................................................................................................... 7
Topic 3: Creating the WBS .................................................................................................................. 8
Topic 4: Entering Dependencies ......................................................................................................... 9
Topic 5: Resources and Assignments ............................................................................................... 10
Lesson 2: More on Resources ............................................................................................................... 12
Topic 1: Adding Custom Fields ......................................................................................................... 13
Topic 2: Resource Availability and Costs .......................................................................................... 15
Exercise 2.1: Defining Resource Availability and Costs .................................................................... 28
Topic 3: Resource Leveling ............................................................................................................... 29
Exercise 2.2: Resource Leveling ........................................................................................................ 33
Lesson 3: Progressing the Schedule ..................................................................................................... 35
Topic 1: Introduction to Schedule Progressing ................................................................................ 36
Topic 2: Baseline the Schedule ......................................................................................................... 39
Topic 3: Progressing the Schedule and Updating Tasks ................................................................... 41
Topic 4: Progressing the Schedule and Task Types .......................................................................... 47
Exercise 3.1: Updating the Schedule for the Relocation Project – First Update .............................. 50
Exercise 3.2: Updating the Schedule for the Relocation Project – Second Update ......................... 52
Exercise 3.3: Updating the Schedule for the Relocation Project – Third Update............................. 54
Lesson 4: Collaborating Project Information ........................................................................................ 57
Topic 1: Standard Views and Tables ................................................................................................. 58
Topic 2: Using Filters, Sorts, and Groups .......................................................................................... 60
Exercise 4.1: Using Filters, Sorts, and Groups .................................................................................. 61
Topic 3: Creating Custom Views ....................................................................................................... 62
Exercise 4.2: Reporting for the Relocation Project – Executive Overview ....................................... 65
Exercise 4.3: Reporting for the Relocation Project – Cost by Function ............................................ 66
Topic 5: Using the Organizer ............................................................................................................ 67
Lesson 5: Using Resource Pools to Manage Multiple Projects ............................................................. 70

Topic 1: Create a Resource Pool ....................................................................................................... 71
Exercise 5.1: Create a Resource Pool ............................................................................................... 72
Topic 2: Create a Master Schedule ................................................................................................... 73
Exercise 5.2: Create a Master Schedule ........................................................................................... 74
Topic 3: Create Task Dependencies Between Projects .................................................................... 75
Exercise 5.3: Create Task Dependencies Between Projects ............................................................. 76
APPENDIX 1 – Setting Options for MS Project ...................................................................................... 78
Set Options for MS Project ............................................................................................................... 79
APPENDIX 2 – Best Practices Checklist for MS Project ......................................................................... 83
Best Practices Checklist for MS Project ............................................................................................ 84
Course Agenda
Day 1 Day2
8:30 - 9:00 Personal Introductions 8:30 - 9:45 Progressing the Schedule
9:00 - 10:15 MS Project I Review 9:45 - 10:15 Collaborating Project Information
10:15 - 10:30 BREAK 10:15 - 10:30 BREAK
10:30 - 11:30 More on Resources & Assignments 10:30 - 11:30 Collaborating Project Information
11:30 - 12:30 LUNCH 11:30 - 12:30 LUNCH
12:30 - 2:00 More on Resources & Assignments 12:30 - 2:00 Using Resource Pools
2:00 - 2:15 BREAK 2:00 - 2:15 BREAK
2:15 - 4:00 Progressing the Schedule 2:15 - 3:30 Using Resource Pools
3:30 - 4:00 Evaluations

Page 1 of 87
LESSON 1: MS PROJECT I REVIEW
Topic 1: Creating the Project
Topic 2: Calendar Basics
Topic 3: Creating the WBS
Topic 4: Entering Dependencies
Topic 5: Resources and Assignments
Student Learning Objectives
After completing this lesson you should be able to
• Understand the basic functions covered in the MS Project I course
Approximate Presentation time: 1 hour 15 minutes

Page 2 of 87
Topic 1: Creating the Project
We recommend the following process when setting up a new project schedule. This topic will define
each step in detail.
• Creating a new schedule from the ground up or from a template, or an Excel Spreadsheet
using a map.
• Describing the project
• Setting the schedule options
• Setting the project calendar

Page 3 of 87
Demonstration: Setting Up a New Schedule – Using Excel and Maps
Open the MS Project application.
Click ribbon tab File and click New and the following screen appears.
In the New from existing section select the New from Excel workbook option.

Page 4 of 87
Select an Excel workbook from the Open dialog box, such as depicted in the view below.
The Import Wizard dialog box will appear. Click Next to continue. Select the map to use. It is
recommended to save the map after completing the insert. The first time through, select New map
and click next.
The import Mode dialog box will appear. Select the “As a new project” option and click Next.

Page 5 of 87
The Map Options dialog box now appears. Select the Tasks option and the Import includes headers
option. Click Next.
The Task Mapping dialog box appears. You will need to select the worksheet your schedule data is
on in the Source sheet name drop down box. The field names will appear in the verify table and a
sample of the data to import will display in the preview table. If the data looks correct click Next.

Page 6 of 87
Click Save Map. Click Save. Click Finish on the End of Map Definition dialog box
The following is a result of the Excel to Project import.
From this point you will want to:
• Describe the project (Project tab, Project Information dialog box)
• Set the schedule options (File tab, Options, Schedule section)
• Set the project calendar (Project tab, Change Working Time)

Page 7 of 87
Topic 2: Calendar Basics
The Change Working Time dialog (Project ribbon) allows you to set the project calendar. The default
project calendar is called Standard (Project Calendar). On the project calendar you indicate:
• Workweek
o The Working days (business days) and nonworking days.
o The Working times on the business days.
• National and corporate holidays are called Exceptions in MS Project.

Page 8 of 87
Topic 3: Creating the WBS
Categories of Tasks:
• Project Summary Task
• Summary Tasks
• Detail Tasks
• Milestones
• Recurring Tasks
Entering Tasks:
• Detail Tasks
• Summary Tasks
• Split Tasks
• Recurring Tasks
• Milestones
Changing the WBS
• Editing and Deleting Tasks
• Copying and Moving Tasks

Page 9 of 87
Topic 4: Entering Dependencies
Project 2010 offers a variety of ways to enter dependencies into the schedule. The Gantt Chart view
is the primary view used to accomplish this. You should understand the following methods for
entering a dependency:
• Using the Link tool
• Using the mouse
• Using the Task Information dialog
• Using the Task Form

Page 10 of 87
Topic 5: Resources and Assignments
You should understand the following topics related to resources:
• The three types of resources; Work, Material, and Cost
• How to enter a resource into the Resource Sheet
• Creating a resource calendar
• Understand an assignment; a combination of one task and one resource. Assignments
reflect who works on what task.
• Understand the methods to assign a resource to a task; the task sheet view, the assign
resources dialog box, or using the task form.

Page 11 of 87
Notes

Page 12 of 87
LESSON 2: MORE ON RESOURCES
Topic 1: Adding Custom Fields
Topic 2: Resource Availability and Costs
Topic 3: Resource Leveling
Student Learning Objectives
After completing this lesson you should be able to
• Understand how to view resource availability
• Understand how to assign a cost to a resource
• Understand how to resolve resource over allocation
• Understand how to use resource leveling
Approximate Presentation time: 2 hours 30 minutes

Page 13 of 87
Topic 1: Adding Custom Fields
How to add Custom Fields to the Resource Sheet
Project does not always provide you with the necessary data fields to capture organizational specific
information about a resource. This is why an ample number of customizable fields are provided to
you. An explanation of how to create and insert these fields into the Resource sheet is provided
below. A more detailed discussion on how to use custom fields will be handled in a later lesson.
Open the file Demo Lesson 2 Resource Sheet.mpp in the MSPII Demos folder.
Page 14 of 87
Set up the Resource Sheet for Custom Fields
1. Click ribbon Project, button Custom Fields; select the Resource radio button and select from
the list Type, the item Text to display extra text fields. Click the Rename button and rename
field Text1 to Position and Text2 to Function. Click OK to exit the Custom Fields dialog box.
2. Next, insert these new fields into the Resource Sheet.
3. Click ribbon View, button Resource Sheet. Right click on the Initials column and select Insert
Column. Type in Position and select that field. Repeat this step for the field Function.
4. Close the files and do not save.

Page 15 of 87
Topic 2: Resource Availability and Costs
The availability of resources varies from one resource to another and can vary from week to week.
The different types of availability beyond full-time are:
1. Temporary or varying availability
2. Part-time
3. Compressed work weeks
4. Overtime
5. Team resources or consolidated resources
6. Generic resources
Each of these types will be explained below.
Open the file Demo Lesson 2 Resource Costs.mpp in the MSPII Demos folder.

Page 16 of 87
Topic 2: Resource Availability and Costs – Temporary Resource
A temporary resource is a person who is available from a certain date or until a certain date. A
resource with varying availability is, for example, available full-time one month, but only half-time
the next month. You can set up an entire profile of availability, such as 80% in April, 50% in May,
100% in June, and so on. To enter the availability profile:

Page 17 of 87
1. Double-click a resource in the Resource Sheet, OR select the resource, click the Information
button on the Resource ribbon.
2. Click the General tab; the dialog should now look like:
3. In the fields Available From and Available To enter the dates when the resource is available;
in the field Units enter the maximum availability. If you leave one date set to NA, it means
the-start-of-time in the Available From field and the-end-of-time in the Available To field. If
you set the Units to 0 it means unavailable. For example, Available From set to NA and
Available To set to Sep 3, 2012 and Units set to 100% means temporarily full-time available
until Sep 3, 2012 inclusive, after that not available.
Note: In an availability profile, you only need to enter the Available To dates and MS Project will
automatically enter the corresponding Available From dates; it takes the next day.
MS Project stores the Units numbers you entered in the Max Units field. The Max Units filed can
only display one percentage of all percentages entered in the availability profile. The one number
displayed in the Max Units field will be the Units percentage as per the current date. As time goes
by, the field Max Units will display all the different values from the availability profile.

Page 18 of 87
Topic 2: Resource Availability and Costs – Part-time Resource
A part-time resource is a person who works fewer hours a day or fewer hours a week than a full-
time equivalent resource which is defined Options, section Schedule, setting Hours per day. To
enter the availability profile:
1. For someone working 4 hours
each workday. Set the working-
time hours in the resource
calendar to only 4 hours per day.
2. For people who work 4 out of 5
weekdays; enter this into the
schedule by changing a weekday
a nonworking day in their
resource calendar. Double-click
the resource, click on the
General tab, click the Change
Working Time button, click the
Work Weeks tab, click Details
and edit the workweek.

Page 19 of 87
Topic 2: Resource Availability and Costs – Compressed Workweek
Resources using compressed work weeks typically fall into one of two types:
� 4-40 workweek or every Friday off. A person works only 4 days per week, but 10 hours per day.
� 9-80 workweek or alternating Fridays off. This type of workweek means that a person works for
9 days a total of 80 hours and then takes 1 day off, normally Friday.
4-40 Workweek
1. Click ribbon Project, Change Working Time; the Change Working Time dialog appears.
2. Click Create New Calendar, the Create New Base Calendar dialog appears. Enter a Name for
the calendar, select the Create new base calendar button and click OK. You are now in the
Change Working Time dialog, but with the new calendar active.
3. Click tab Work Weeks, select [Default] and click Details, the dialog will appear.
4. Select the working days Monday through Thursday by dragging over them.
5. Select the Set day(s) to these specific times button.
6. Enter the longer working hours that correspond to a 10-hour workday in the From and To
fields, i.e. 7AM-12PM and 12:30PM-17:30PM. Click OK.
7. The 4-40 workweek calendar is now created.
8. To use it for a resource, switch to the Resource Sheet, click in the Base Calendar, click the
drop down arrow and select the 4-40 workweek calendar.
The steps to create the 9-80 workweek calendar are similar, notice below.

Page 20 of 87
9-80 Workweek
1. Click ribbon Project, Change Working Time; the Change Working Time dialog appears.
2. Click Create New Calendar, the Create New Base Calendar dialog appears. Enter a Name for
the calendar, select the Create new base calendar button and click OK. You are now in the
Change Working Time dialog, but with the new calendar active.
3. Click tab Work Weeks, select [Default] and click Details, the dialog will appear.
4. Select the working days Monday through Friday by dragging over them.
5. Select the Set day(s) to these specific times button.
6. Enter the longer working hours that correspond to a 9-hour workday in the From and To
fields, i.e. 7AM-12PM and 12:30PM-17:30PM. Click OK. You will be returned to the Change
Working Time dialog.
7. Click the Exceptions tab and enter a descriptive name like Every other Friday off, click
Details.
8. Select the Non-working button, the Weekly button, enter 2 in Recur every 2 weeks on,
select Friday; enter the date range. Click OK. Every other Friday is now marked as non-
working.
9. The 9-80 workweek calendar is now created.
10. To use it for a resource, switch to the Resource Sheet, click in the Base Calendar, click the
drop down arrow and select the 9-80 workweek calendar.

Page 21 of 87
Topic 2: Resource Availability and Costs – Overtime Availability
Overtime is work done outside the regular work hours as indicated in the resource or project
calendars. Typically, the overtime feature is used only during project execution, when you need to
compensate for slippages. Overtime is entered in several ways depending on whether you pay and
what rate you pay for it:
� If the resource is paid for overtime hours at the regular rate, you only need to check whether
you kept the overallocations reasonable. All regular and overallocated hours worked are
charged at the same standard rate.
� If the resource is paid for overtime hours at a higher rate, you must separately enter all hours
worked in overtime. You enter them on the Task Form in the Gantt Chart or in the Resource
Usage view.
Entering Overtime Hours at the Overtime Rate: 1. Click ribbon View, Resource Sheet and enter the overtime rate in the field Ovt. Rate.
2. Click the top part of Gantt Chart on the View ribbon – the Gantt Chart view appears.
3. Set the Task Mode field to Auto Scheduled – the Ovt. Work field will now be enabled.
4. Select Details on the View ribbon to display the Task Form view in the bottom.
5. Right-click anywhere in the gray area one the Task Form and select Work from the popup
menu.
6. Select the task first in the top view, the Gantt Chart, then indicate in the bottom view Task
Form in the field Ovt. Work how many of the hours shown in the field Work will be worked
in overtime.

Page 22 of 87
7. Upon making changes in the Task Form, the Previous button transforms to OK and when
you click it, the data are entered into the schedule. The overtime hours will be charged at
the overtime rate.
Page 23 of 87
Topic 2: Resource Availability and Costs – Team (Consolidated) Resources
A Team resource or consolidated resource is a group of individuals that can replace each other. You
enter the group of people as one resource on one line item in the Resource Sheet instead of as
separate individuals.
To ensure that you do not assign more workload than there is availability, it is recommended that
you set the maximum units (Max Units) to the number of full-time equivalent individuals who are
part of the team resource. Full-time equivalency is defined in the Hours per day setting (ribbon File,
Options button, tab Schedule). For example, if you have 2 full-timers and 2 half-timers on a team,
the maximum units for that team resource should be set to (2*1) + (2*0.5) = 3 or 300%. MS Project
will mark any workload that exceeds the availability red and overallocations will be easy to find.

Page 24 of 87
Topic 2: Resource Availability and Costs – Generic Resources
Generic resources represent a particular skill, for example Business Analyst. Generic resources have
unlimited availability, unlike team resources. Project managers can always assign generic resources
when they do not know what named resources (individuals) they will get. Generic resources have
the field Generic set to Yes.
1. To create a generic resource, enter the name in the column Resource Name (field Name). The
name should reflect the skill or role.
2. Insert the column Generic and enter Yes, or double-click on the resource – the Resource
Information dialog appears, click the General tab and select Generic.

Page 25 of 87
Topic 2: Resource Availability and Costs – Entering Resource Costs
To manage the cost of the project you have to define, in the resource sheet, all the people, facilities,
machines, and materials that have a significant cost associated with them. We will now discuss how
to enter the different cost scenarios.
Entering Human Resource Costs
You hire a programmer at $600/day, you can enter this in the resource sheet with the following
steps:
1. Click the ribbon View and click Resource Sheet.
2. Enter the name of the resource in the field Resource Name.
3. Leave the Type of resource set to the default setting of Work.
4. Enter the rate in column Std. Rate (Standard Rate field); for the programmer you would enter
$600/d.
5. Enter the other cost rates in the Ovt. Rate column (Overtime Rate field) and Cost/Use (Cost per
Use field), if applicable.
6. Select an Accrue At option; select Start, Prorated, or End. The accrual determines when the cost
will be incurred in the schedule and is important for cash flow reports.
7. Assign the human resource to the tasks.

Page 26 of 87
Entering Material Costs for Consumable Materials
Enter Material Costs this way:
1. Click the ribbon View and click Resource Sheet.
2. Enter the name of the resource in the field Resource Name.
3. Click in the Type field for the resource and select Material from the drop down list.
4. Enter a Material Label, which will show up in the other views.
5. In column Std. Rate (Standard Rate field); enter the cost per unit for this resource. You cannot
enter time units.
6. You can fill in the Cost/Use column as well. This could be a transportation cost let’s say. This
cost is always accrued at the start of the task.
7. Select an Accrue At option; select Start, Prorated, or End. The accrual determines when the cost
will be incurred in the schedule and is important for cash flow reports.
This screen shot of the Resource Usage view shows how the accrual for material costs works. The
1,000 bricks cost $2 each and accrue at the start of the task: 1,000 * 2 = $2,000. The mortar costs $5
per cubic foot and accrues evenly with the hours worked on the task. The 4 trowels at $20 each
accrue at the end of the task.

Page 27 of 87
Entering Varying Cost Rates for Labor or Materials
Cost rates can vary over time which creates a rate profile. You can enter varying cost rates in the
cost rate table in the Resource Information dialog:
1. Click the ribbon View and click Resource Sheet.
2. Double-click a resource and the Resource Information dialog appears. Click the Costs tab and
the dialog will look like:
3. Enter the Effective Date..
4. Enter the rates that will apply after that date, OR enter the percentage that you want to
increase or decrease the rate by, i.e. +10% or -10%
5. Repeat steps 3 and 4 as many times as the rate will change over time.
6. Click OK. MS Project will calculate cost using the applicable rate.
Close Demo Lesson 2 Resource Costs but do not save the file.

Page 28 of 87
Exercise 2.1: Defining Resource Availability and Costs
The purpose of this exercise is to create a rate profile for selected labor resources for the relocation
project.
Open the Exercise 2.mpp file.
1. Click the ribbon View and click Resource Sheet.
2. Enter availability information for the following resource:
3. Enter cost rates in Table A for the following resource:
4. Click OK.
5. Close the file but do not save.
Resource Name Avail From Avail To Units
John Falgon NA
8/13/12
9/3/12
8/10/12
8/31/12
NA
50%
75%
100%
Resource Name Effective Date Standard Rate Ovt. Rate
Nancy Hilcrest - $35.00/h $55.00/h
1/1/13 +10% +10%
7/1/13 $45.00/h $65.00/h

Page 29 of 87
Topic 3: Resource Leveling
When a schedule is complete, you should review the allocation of resources. Leveling can help
optimize overallocated and underallocated resources to more evenly distribute the workload.
Leveling may reschedule tasks by splitting tasks and by adding delay to tasks until the assigned
resources are allocated properly. Leveling may extend the project’s completion date. Day by day
leveling looks for overallocation on a daily basis (more than 8 hours per day), whereas week by week
leveling looks for overallocation on a weekly basis (more than 40 hours per week).
If your project is deadline oriented, you may choose to add resources in order to resolve over
allocations.
Leveling Options
Page 30 of 87
Level Selection
Use this to level only the tasks that are selected. To select multiple tasks that are next to each other,
select the first task in the selection, then press SHIFT while selecting the last task in the selection. To
select multiple tasks that are not next to each other, select each task by pressing CTRL while
selecting the task.
Level Resource
Use this to level only those tasks with specific resources assigned. Click Level Resource, and then
select the resource to which tasks are assigned. Use CTRL to select multiple resources. If the
selected resource is working on tasks that have multiple resources, the other assignments will not
get moved.
Level All
Use this to level all resources in all tasks within the project schedule.
Leveling Options
Use this to modify the settings that Project uses for leveling.
Clear Leveling
Use this to undo the effects of the previous leveling.
Next Overallocation
Use this to go to the next task with overallocated resources and to more easily see the effects of
leveling on individual tasks.

Page 31 of 87
Topic 4: Demonstration – Resource Leveling
The purpose of this exercise is to level overallocated resources for the relocation project.
Open the Demo Lesson 2 Resource Leveling A.mpp file.
1. Click Task, Gantt Chart.
2. Click the ribbon Resource and select Leveling Options.
Examine these options and accept the following default selection:
a. Leveling Calculations: Automatic
b. Look for overallocations on a: Day by
Day basis
c. Check: Clear Leveling values before
leveling
d. Leveling Range: Level the entire project
e. Leveling Order: Standard
f. (Un)select the options at the bottom as
per the below screen shot

Page 32 of 87
3. Click OK.
4. Examine the changes in the Gantt Chart view and the Resource Usage view.
5. Close the file.

Page 33 of 87
Exercise 2.2: Resource Leveling
The purpose of this exercise is to level overallocated resources for the relocation project.
Open the Exercise 2A.mpp file.
1. Click Task, Gantt Chart.
2. Click the ribbon Resource and select Leveling Options.
Examine these options and accept the following default selection:
a. Leveling Calculations: Automatic
b. Look for overallocations on a: Day by Day basis
c. Check: Clear Leveling values before leveling
d. Leveling Range: Level the entire project
e. Leveling Order: Standard
f. (Un)select the options at the bottom as per the below screen shot
3. Click OK.
4. Examine the changes in the Gantt Chart view and the Resource Usage view.
5. Click Task, Gantt Chart.
6. Which tasks had date changes?
7. Close the file and compare your results to Exercise 2B.mpp

Page 34 of 87
Notes

Page 35 of 87
LESSON 3: PROGRESSING THE SCHEDULE
Topic 1: Introduction to Schedule Progressing
Topic 2: Baseline the Schedule
Topic 3: Progressing the Schedule and Updating Tasks
Topic 4: Progressing the Schedule and Task Types
Student Learning Objectives
After completing this lesson you should be able to
• Understand how to prepare your schedule for updating
• Understand how to set and maintain the project baseline
• Understand how to update task using actual and remaining duration
Approximate Presentation time: 3 hours

Page 36 of 87
Topic 1: Introduction to Schedule Progressing
When the schedule is approved, you capture that version of the baseline. You can then start the first
tasks in your project. As team members make progress, you will be updating your schedule regularly
to maintain an up-to-date schedule. In this lesson we will discuss how you can approach the ideal
situation where you keep your schedule alive and up-to-date during project execution in order to
continuously forecast the project.
The process steps we will discuss for updating a schedule are:
• Switching to Auto Scheduled Tasks
• Baseline the schedule
• Update tasks

Page 37 of 87
Topic 1: Setting the Options for Updating Tasks
Click the ribbon File, Options and click on the tab indicated in the table below where you want to
change settings. These are the recommended options when using Actual and Remaining Duration
for updating tasks.
Tab Option
Schedule Section Scheduling options for this project:
Split in-progress tasks: Checked
Allows moving the uncompleted portion of a task to after the Status Date by splitting
the task bar. With this option cleared, the options on the Advanced tab cannot split
any task bars and will behave differently as a result. It is recommended selecting it.
Section Calculation options for this project:
Updating task status updates resource status: Checked
Updating the tasks will update the actual work of the assignments. It is
recommended you keep this option checked for task updates. Only clear it if you
want to update the tasks and the assignments.
Section Calculation options for this project:
Actual costs are always calculated by Microsoft Project: either checked or
unchecked
Updating the tasks will update the actual cost. It is up to you whether you want MS
Project to do that. If you clear this option, you can enter the actual cost.
Advanced Section Calculation options for this project:
Move end of completed parts after status date back to status date: Checked
This moves the actual duration bar to before the status date; actual work done is

Page 38 of 87
Tab Option
moved into the past. It is recommended you turn this on; it will help you keep the
forecasts accurate.
And move start of remaining parts back to status date: Checked
The remaining duration bar will cuddle up to the status date (unless there are
dependencies that keep it where it is). The choice is up to you.
Move start of remaining parts before status date forward to status date: Checked
This moves the remaining duration bar to after the status date; work still to be
completed is moved to the future. It is recommended you turn this on; it will help
you keep the forecasts accurate. It has no effect on tasks that have not started yet,
but should have started as per the status date. These tasks will still have to be
rescheduled to after the status date to put them into the future where they belong.
And move end of completed parts forward to status date: Checked or Unchecked
This moves the actual duration bar to cuddle up to the status date. The choice is
yours.
Edits to total task % complete will be spread to the status date: Unchecked
If a task is falling behind, the progress entered will be evenly spread to the status
date. This option is only relevant if you enter % Complete, which is not
recommended.
Section General options for this project:
Automatically add new resources and tasks: Unchecked
This prevents a typo in a resource name from accidentally adding a new resource,
and works similarly for tasks. It is recommended clearing it.
Section Edit:
Allow cell drag and drop: Unchecked
This prevents accidentally dragging data on top of other data in your baselined
schedule. It is recommended to clear this option.
It is recommended that you switch all tasks in your schedule to Auto Scheduled at this point. You
will not see the impacts of your updating if you continue to use manually scheduled tasks. They are
not rescheduled by the network logic.

Page 39 of 87
Topic 2: Baseline the Schedule
The baseline schedule is a frozen copy of the approved schedule. It is the target you work towards
and compare progress against.
Open the demonstration file Demo Lesson 3 Updating 1.
Setting the First Baseline Schedule
1. Click ribbon Project, , item Set Baseline – the next dialog appears:

Page 40 of 87
2. Select .
3. To set the baseline for all tasks, select .
4. Click OK – the current schedule is copied to the Baseline fields.
5. If you suspect that you will receive change requests that will result in multiple baselines, it is a
good idea to preserve the current baseline by copying it also into Baseline1.
Preserving a Baseline Schedule
Change requests will necessitate changing the baseline. It is a good idea to preserve every steady-
state baseline that was in effect at some time. You can preserve up to 10 baselines.
1. Click ribbon Project, , item Set baseline; the Set Baseline dialog box appears.
2. Check what the next available baseline is in the list; baselines that are currently
in use have a date behind their name in the pull-down list.
3. Select and, from the list Copy, select the current Baseline and, from the list
Into, select the next available baseline schedule.
4. Click OK – that day’s date is captured in the name of the baseline schedule you used. This will
help you manage multiple baselines.
Updating the Baseline of Impacted Tasks
The baseline data of completed tasks should never be changed. Only tasks that have not been
started yet and that are affected by change requests through dependencies can be re-baselined.
1. Click ribbon Project, , item Set baseline; the Set Baseline dialog box appears.
2. Select the option For: .
3. Roll up baselines options should look like:
4. Click OK
5. Preserve the new Baseline.

Page 41 of 87
Topic 3: Progressing the Schedule and Updating Tasks
The progress of the schedule can best be seen in the Tracking Gantt view. This view shows the task
bars as shown in the illustration. The scheduled task will slowly but surely fill in with solid dark
blue/red (Actual) to indicate how much progress has
been made: field Actual Duration. Notice that the
actual duration represents the number of days a
team member has worked on the task so far – even
though many people only think of it as the number
of days the task took once it is completed.
Ideally, the actual duration runs up to the status
date, indicating that the task is progressing as
scheduled. In the illustration you can see that the
progress (Actual Dur.) has fallen behind. The rest of
the bar represents the Remaining Duration. The
remaining duration is how many days the task will
take from the current status date to completion. Actual Duration plus Remaining Duration equals
Duration.
The black Baseline allows us to analyze slippages. In the illustration, you can see that:
1. The task started 1 week later (Actual Start) than scheduled (Baseline Start).
2. The task duration was already revised from 3.5 (Baseline Duration) to 4 weeks (current
Duration); this is a 0.5-week increase in duration.
3. The progress is still behind; the task is also progressing 0.5 weeks more slowly, because the
Actual Duration (progress) is 0.5 weeks behind the status date. This 0.5 week of work to be

Page 42 of 87
done should be rescheduled to the future. It is likely the slippage will further increase; since
the rate of progress was about half of the expected rate in the last update period, the
remaining duration may need to be increased again.

Page 43 of 87
Topic 3: Progressing the Schedule and Updating Tasks
What Data Should Be Collected?
Keep the following formulas in the back of your mind as you collect the data. They explain how
MS Project calculates and displays when you enter your updates.
It is recommended that you collect at least the Remaining Duration (or Remaining Work) from
your team, and at most the following four data points. To dos, ask the following questions:
1. On what date did you start the task? (Actual Start)
2. How many business days have you worked on the task as per the status date? (Actual
Duration)
3. How many business days do you still need to finish the task after the status date?
(Remaining Duration)
4. On what date was the task finished? (Actual Finish)

Page 44 of 87
Topic 3: Progressing the Schedule and Updating Tasks
Preparing the Tracking Gantt View for Updating
1. Open the demonstration file Demo Lesson 3 Updating 2.
2. Click ribbon View, click the bottom part of and select Tracking Gantt – the Tracking
Gantt view appears. The current schedule is shown in the top half of the task bars (colored blue
or red). The baseline is shown as the gray bottom half of the task bars.
3. Keep the critical task visible (ribbon Format, Critical Tasks checked).
4. Click ribbon View, and Tracking – the tracking table appears.
5. The tracking table has all the fields in which to enter data for task updates. It is recommended
that you modify the table to make it look like the table in the following screenshot.

Page 45 of 87
6. Display the Task ribbon. The Task ribbon contains several useful tools for updating schedules.
Setting the Status Date for Updating
If you do not enter the Status Date, Project 2010 will use the Current Date (that day’s date) for the
update. The Current Date is maintained by the clock in your computer.
1. Click the ribbon Project and click the bottom half of - the Status Date dialog appears.
2. Change the status date to the date you want to update tasks and compare the schedule against
the baseline.
3. The status date does not yet appear as a vertical line in the timescale. Click ribbon Format,
, item Gridlines and select Status Date in the list as the line to change. Choose a dashed
line in Type and a bright Color. The dashed line makes it different from dependency lines
(arrows). Click OK.

Page 46 of 87
4. The status line in now visible in the timescale, similar to:
Page 47 of 87
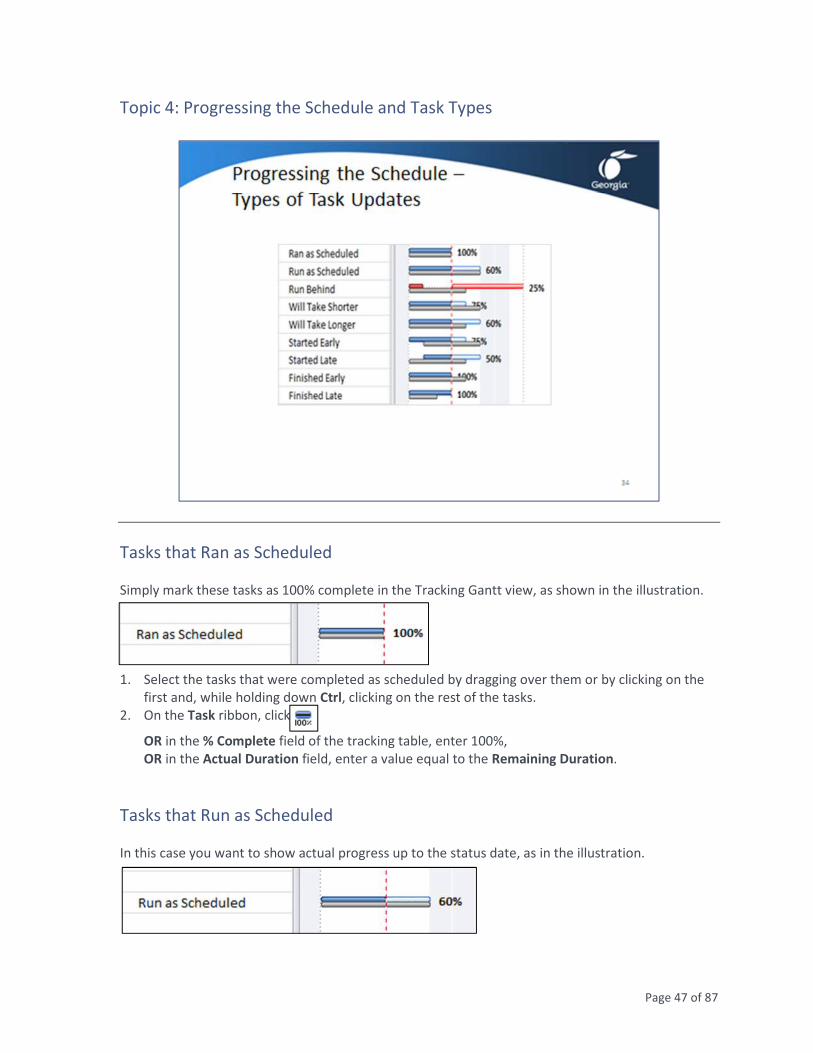
Topic 4: Progressing the Schedule and Task Types
Tasks that Ran as Scheduled
Simply mark these tasks as 100% complete in the Tracking Gantt view, as shown in the illustration.
1. Select the tasks that were completed as scheduled by dragging over them or by clicking on the
first and, while holding down Ctrl, clicking on the rest of the tasks.
2. On the Task ribbon, click
OR in the % Complete field of the tracking table, enter 100%,
OR in the Actual Duration field, enter a value equal to the Remaining Duration.
Tasks that Run as Scheduled
In this case you want to show actual progress up to the status date, as in the illustration.

Page 48 of 87
1. Select the tasks that are on schedule by dragging over them or by clicking on the first and, while
holding down Ctrl, clicking on the rest of the tasks.
2. On the Task ribbon, click - this updates all selected tasks as if they progress
on schedule as per the status date.
Tasks that Run Behind
This situation will require more updating effort. Observe the first Run Behind task in the illustration.
You can see that the progress is falling behind because the solid color denoting actual progress does
not run up to the status date in the task bar. You will need to capture the actual number of days the
resource worked on the task (Actual Duration), but because the task is behind, you will also have to
bring forward the incomplete portion of the task bar (Remaining Duration) to after the status date,
as is done in the second Run Behind task.
1. In the Tracking Gantt view, enter the Actual Duration of the task; MS Project will calculate the
new remaining duration.
2. Revise this calculated Remaining Duration and MS Project will calculate the % Complete.
3. The remaining durations are automatically moved to the future if you selected Move start of
remaining parts before status date forward to status date (in ribbon File, Options, tab
Advanced). You can also accomplish this by:
a. Selecting the task and clicking the Task ribbon, , and selecting Incomplete Parts
to Status Date (This will split the task bar if the option Split in-progress tasks is in effect
in ribbon File, Options, tab Schedule, section Scheduling options for this project).
Tasks that Will Take Longer or Shorter
In this situation, the resource(s) worked all the days on the task as planned, but the realization sinks
in that the remaining duration will not suffice; the task was either overestimated or underestimated.
You will need to increase or decrease the Remaining Duration.
Since you are going to change the duration, you will trigger a recalculation through the formula
Duration * Peak Units = Work. You should not leave the task type set to Fixed Duration. It is
recommended that you change the task type to Fixed Units before you start to update.

Page 49 of 87
1. If needed, set the Type of task to Fixed Units.
2. Click the button on the Task ribbon
OR
Enter an Actual Duration for the task equal to the number of working days between the start of
the task and the status date. As a result, the status bar now runs up to the status date.
3. Revise the Remaining Duration for the task.
Tasks that Started Late or Early
In this situation, the task did not start on the day that was planned. The illustration below reveals
that the bottom task started late, whereas the top task started early. In the Late situation, the actual
start date (left side of the top bar) is later than the baseline start date (the left side of its gray
bottom bar).
1. In the Tracking Gantt view, point to the middle of the blue task bar; when you see a four-headed
arrow mouse pointer, drag the task bar to its new start date.
OR
In the Actual Start field of the tracking table, enter the date.
2. Click the button on the Task ribbon – progress now runs up to the status
date.
Tasks that Finished Late or Early
In this situation, you need to enter the finish dates. In the illustration below, you can see that the
bottom task finished late relative to the gray baseline bar. The top task finished early.
1. In the Tracking Gantt view, point to the right side of the blue or red task bar and when you see a
single-headed arrow mouse pointer, drag the finish to its new date. Set the task to 100%
complete; click on the Task ribbon.
OR
In the Actual Finish field of the tracking table, enter the date.

Page 50 of 87
Exercise 3.1: Updating the Schedule for the Relocation Project – First Update
Instructions:
The goal of this exercise is to be able to update a schedule and to get accurate forecasts.
Open Exercise 3A.mpp. We will manage our project with this schedule and update it as we go along.
Change to the Tracking Gantt view.
1. Click ribbon View, button Table, item Tracking to apply the Tracking table. Remove the
column % Comp. and the Phys. % Comp. Move the column Act. Finish to after Rem. Dur. The
order of the columns is the order in which to enter update information and is a memory bridge
for updating.
2. Using ribbon Project, button Set baseline, item Set baseline… - set the baseline for the entire
project.
3. Click ribbon Project and set the Status Date to August 28, 2012 12:00 a.m. and create a gridline
for the status date in the Tracking Gantt timescale using ribbon Format, button Gridlines, item
Gridlines…
4. Set the following options in ribbon File, Options, tab Schedule:
a. Split in-progress tasks is unchecked
b. Updating task status updates resource status is checked
c. Actual costs are always calculated by Project is checked
5. Set the following options in ribbon File, Options, tab Advanced:
a. Move end of completed parts after status date back to status date is checked
b. Move start of remaining parts before status date forward to status date is checked
6. Switch the task type to Fixed Units and not Effort-Driven for all tasks.
7. Update the tasks in the project schedule. As of the status date the situation is:
a. All the tasks until Contractor Contracted ran as scheduled.
b. The contractor started early because he finished his previous contract early. He supplied
the following update on the first and only task he started: relocate walls:
Task Started Actual
Duration
Remaining
Duration
Relocate walls August 20, 2012 7 days 3 days
8. Check whether the schedule is updated correctly:
a. Check whether there are any remaining durations scheduled before the status date.
Reschedule these after the status date.
b. Check if there are actual durations after the status date and reschedule these before the
status date.
9. Describe the status of project in your own words.
10. Do you need to take corrective actions?
11. Save all start and finish dates by setting an interim plan before entering any update information:
click ribbon Project, button Set Baseline, item Set Baseline – the dialog appears. Select Set
interim plan and Entire project. Click OK.
12. Save your file and compare it with the solution Exercise 3B.mpp.

Page 51 of 87
Re-optimizing After First Update
Instructions:
The goal of this exercise is to be able to improve a schedule so that it is closer to its baseline
schedule again.
Continue to work with your file Relocation.mpp or open Exercise 3B.mpp. You find that your project
may run late relative to the baseline. You want to take corrective action by making the following
changes in your schedule.
Task name Action
Relocate walls Change the task type back to Fixed Work, then change the
number of units to 15 for the balance of the activity: add 5
resources to help complete the activity. The result is a gain of 1
day.
Install electrical
wiring
Enter an Ovt. Rate for the Contractor of $45 per hour (150%).
Change the task type back to Fixed Work, then change the
number of units to 8 for the activity. Have the resources work
overtime to a total of 32 overtime hours. The duration shortens
to almost 2.6 days.
Install cabinetry Delete the dependency from drying of paint to install cabinetry
and replace it with a dependency from paint to install cabinetry.
Install cabinetry should be on schedule.
Install LAN cables Change the dependency from relocate walls to install LAN cables
to Finish-to-Finish with a 1.5 day lag. The Install the LAN
activities should be on schedule.
Save your file and compare it with the solution Exercise 3C.mpp.

Page 52 of 87
Exercise 3.2: Updating the Schedule for the Relocation Project – Second
Update
Instructions:
The goal of this exercise is to be able to update a schedule and to get accurate forecasts.
Open Exercise 3C.mpp.
1. If needed, do the following:
a. Display the Tracking Gantt view.
b. Apply the Tracking table. Remove the columns % Comp. and the Phys. % Comp. Move
the column Act. Finish to after Rem. Dur.
2. On the Project ribbon, set the Status Date to September 4, 2012 and, if needed, create a gridline
(ribbon Format, button Gridlines, item Gridlines…) for the status date in the Tracking Gantt
timescale.
3. Verify if the following options are set:
In ribbon File, Options, tab Schedule:
Updating Task status updates resource status (checked)
Actual costs are always calculated by Microsoft Project (checked)
In ribbon File, Options, tab Advanced:
Move end of completed parts after status date back to status date (checked)
Move start of remaining parts before status date forward to status date (checked)
4. Switch the task type to Fixed Units and not Effort-Driven for the tasks needing update.
5. Update the tasks in the project schedule. The contractor supplied the following table with
update data for the status of the project as of the status date. Tasks that are not listed in the
table have not started yet.
Task Name Actual Start Act. Duration Rem. Duration
Relocate walls Aug 20, 2012 9 days 0 days
Install electric wiring Aug 31, 2012 2.6 days 0 days
Paint Sep 2, 2012 2 days 0 days
Drying of paint Sep 2, 2012 2 elapsed days 0 elapsed days
Install cabinetry Sep 4, 2012 1 day 4 days
Install LAN cables Sep 1, 2012 2.5 days 0 days
Install LAN hardware Sep 3, 2012 1.5 days 1 day
Select mover Aug 31, 2012 2 days 0 days
6. Check whether the schedule is updated correctly:
a. Check whether there are any remaining durations scheduled before the status date.
Reschedule these after the status date.
b. Check if there are actual durations after the status date and reschedule these before the
status date.
7. Describe the status of project in your own words.
8. Do you need to take corrective actions?

Page 53 of 87
9. Save all start and finish dates by setting an interim plan before entering any update information:
click ribbon Project, button Set Baseline, item Set Baseline – the dialog appears. Select Set
interim plan and Entire project. Click OK.
10. Save your file and compare it with the solution Exercise 3D.mpp.
Re-optimizing After Second Update
Instructions:
The goal of this exercise is to be able to improve a schedule so that it meets its baseline finish date.
Open Exercise 3D.mpp. You find this current schedule too risky; there is little buffer left. You decide
to explore whether working overtime offers solutions. Enter the following overtime rates in the
Resource Sheet:
Name Std. Rate Overtime Rate
employees $25/h $50/h
contractor $30/h $50/h
LAN consultants $75/h $100/h
realtor $35/h $45/h
1. What is the cost of the project currently? The cost is ……………………………
2. You will enter overtime on the task lay carpet. You promised to pay the contractor the overtime
rate. The contractor has agreed to work overtime for the balance of the activity. Schedule 90
hours of overtime on this task as overtime.
3. How much does your project cost if you pay the overtime rate for the contractor?
The cost is …………………………….. The extra cost of the overtime is: …………………………….
Save your file and compare it with the solution Exercise 3E.mpp.
Page 54 of 87
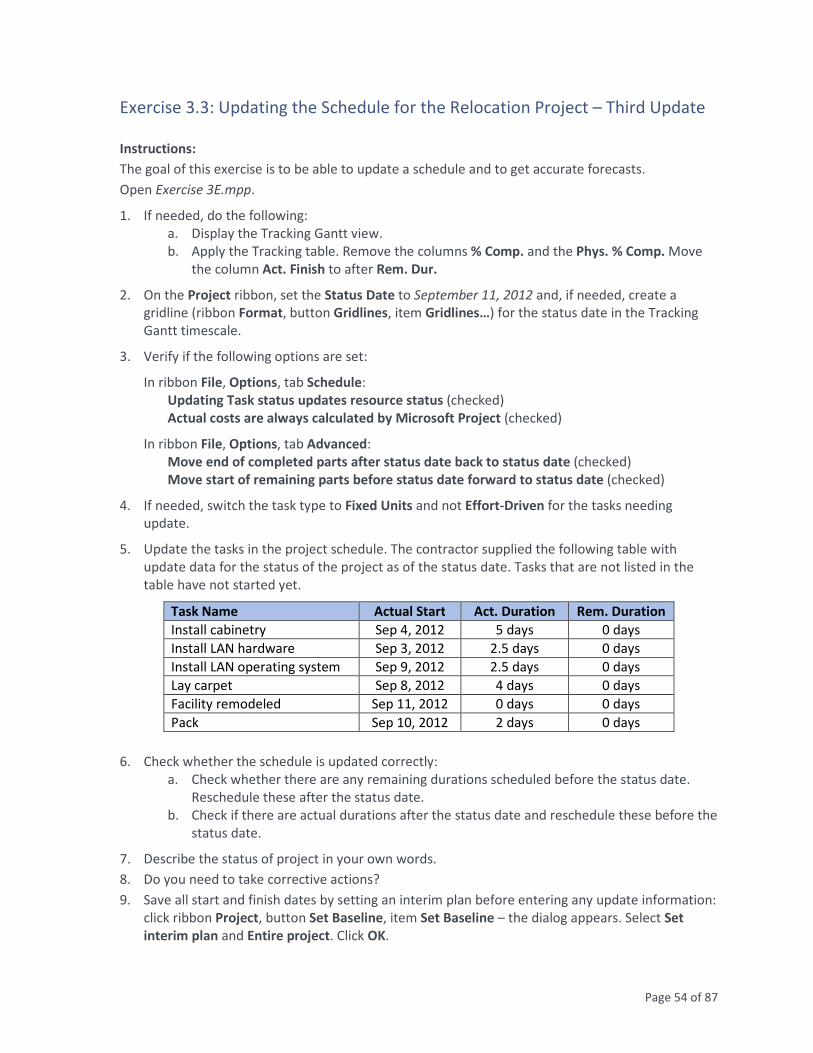
Exercise 3.3: Updating the Schedule for the Relocation Project – Third Update
Instructions:
The goal of this exercise is to be able to update a schedule and to get accurate forecasts.
Open Exercise 3E.mpp.
1. If needed, do the following:
a. Display the Tracking Gantt view.
b. Apply the Tracking table. Remove the columns % Comp. and the Phys. % Comp. Move
the column Act. Finish to after Rem. Dur.
2. On the Project ribbon, set the Status Date to September 11, 2012 and, if needed, create a
gridline (ribbon Format, button Gridlines, item Gridlines…) for the status date in the Tracking
Gantt timescale.
3. Verify if the following options are set:
In ribbon File, Options, tab Schedule:
Updating Task status updates resource status (checked)
Actual costs are always calculated by Microsoft Project (checked)
In ribbon File, Options, tab Advanced:
Move end of completed parts after status date back to status date (checked)
Move start of remaining parts before status date forward to status date (checked)
4. If needed, switch the task type to Fixed Units and not Effort-Driven for the tasks needing
update.
5. Update the tasks in the project schedule. The contractor supplied the following table with
update data for the status of the project as of the status date. Tasks that are not listed in the
table have not started yet.
Task Name Actual Start Act. Duration Rem. Duration
Install cabinetry Sep 4, 2012 5 days 0 days
Install LAN hardware Sep 3, 2012 2.5 days 0 days
Install LAN operating system Sep 9, 2012 2.5 days 0 days
Lay carpet Sep 8, 2012 4 days 0 days
Facility remodeled Sep 11, 2012 0 days 0 days
Pack Sep 10, 2012 2 days 0 days
6. Check whether the schedule is updated correctly:
a. Check whether there are any remaining durations scheduled before the status date.
Reschedule these after the status date.
b. Check if there are actual durations after the status date and reschedule these before the
status date.
7. Describe the status of project in your own words.
8. Do you need to take corrective actions?
9. Save all start and finish dates by setting an interim plan before entering any update information:
click ribbon Project, button Set Baseline, item Set Baseline – the dialog appears. Select Set
interim plan and Entire project. Click OK.

Page 55 of 87
10. Save your file and compare it with the solution Exercise 3F.mpp.

Page 56 of 87
Notes

Page 57 of 87
LESSON 4: COLLABORATING PROJECT INFORMATION
Topic 1: Standard Views and Tables
Topic 2: Using Filters, Sorts, and Groups
Topic 3: Creating Custom Views
Topic 4: Using the Organizer
Student Learning Objectives
After completing this lesson you should be able to
• Understand the standard views and tables
• Understand the how to use sorts, filters and groups
• Understand how to use custom fields and create custom tables and views
• Understand how to use the organizer to copy custom report objects between projects
Approximate Presentation time: 1 hour 30 minutes

Page 58 of 87
Topic 1: Standard Views and Tables
MS Project has many different views and tables that come standard with the application. You will
find yourself using many of these views and tables for various reasons as you look at different
aspects of your project schedule.
You can access these views and tables view the View ribbon and see Task Views, Resource Views, or
various Tables.

Page 59 of 87
Topic 1: Standard Views and Tables - Components
Views are composed of three components within MS Project as depicted below.

Page 60 of 87
Topic 2: Using Filters, Sorts, and Groups
You can also sort, filter, or group any column easily by clicking on the down arrow at the right of the
column name.

Page 61 of 87
Exercise 4.1: Using Filters, Sorts, and Groups
Instructions:
The goal of this exercise is to be able to use filters, sorts, and groups.
Open the project file Exercise 4a.mpp.
Using Sort
1. Click on the Format ribbon tab, unselect Project Summary Task and Summary Task.
2. Click on the View ribbon tab, in the Data section select the Sort drop down list.
3. Select the Sort by… option, the Sort dialog box will appear.
4. In the Sort by drop down list select Cost, and select the Descending option.
5. Unselect the box labeled Permanently renumber tasks.
6. Click the Sort button.
7. This will sort the task list by cost from largest cost to smallest cost.
8. Which task has the largest cost and how much is it?
Using Filters
1. Now filter out tasks with Effort Driven equal to “No”.
2. Select the drop down arrow on the Effort Driven column.
3. Click “Yes” so that only “No” is selected.
4. Click the OK button.
5. Now remove the filter.
6. Select the drop down arrow on the Effort Driven column.
7. Click “Select All”.
8. Click the OK button.
Using Groups
1. Now group the tasks by Type.
2. Select the drop down arrow on the Type column.
3. Click on “Group on this field”.
4. The task list will now be grouped by the task type.
5. Now remove the grouping.
6. Select the drop down arrow on the Type column.
7. Click on “Group on this field” to remove the grouping.
Close and do not save the file.

Page 62 of 87
Topic 3: Creating Custom Views
This topic will demonstrate how a view is created.
The steps we’ll take to create this view are:
1. Design a new Table
2. Create a new View that displays the newly created Table.
Creating a Custom Table and View
1. Open the demonstration file Demo Lesson 4.
2. Click ribbon View, in section Data click Tables, click More Tables. In the More Tables dialog
select the Tracking table and click the New button. The dialog box will appear.

Page 63 of 87
Enter the Field Names and Title data as follows:
Field Name Title
ID
Name Task Name
Baseline Start
Start 1 Start before
Scheduled Start Start after
Baseline Finish
Finish 1 Finish before
Schedule Finish Finish after
3. Your box should look like this:
4. Click OK. Click Close on the More Tables dialog.
5. Click ribbon View, in section Task Views click Other Views, click More Views. In the More Views
dialog select the Tracking Gantt view and click New. Select the Single View option and click OK.
The dialog for View Definition will appear:

Page 64 of 87
Enter the data to resemble the illustration above. Click OK. Click Close on the More Views
dialog.
6. To display this view click ribbon View, click the bottom of Gantt Chart button, select item
Tracking delta.

Page 65 of 87
Exercise 4.2: Reporting for the Relocation Project – Executive Overview
Instructions:
The goal of this exercise is to be able to create custom, one-page reports targeted at executives.
Continue to work with your file Relocation.mpp or open Exercise 4a.mpp.
1. Click ribbon View, button Tables, item More Tables… and create a new task table named
Executive Overview. Use the columns ID, Name, Duration, and Cost.
2. Click ribbon View, list Filter, item More Filters… and create a new filter, Executive Overview, to
display milestones plus summary tasks.
3. Click ribbon View, list Other Views, item More Views… and create a new view, Executive
Overview, which is based on a Tracking Gantt view. Select Show in menu to display it as an item
in the list of Gantt Charts on the View ribbon. Make sure when you apply the view Executive
Overview, the corresponding table and filter that you created are both applied.
4. Hide the question marks in the Duration column by clicking ribbon File, Options, tab Schedule
and clearing the options Show that scheduled tasks have estimated durations and New
scheduled tasks have estimated durations.
5. Click ribbon View, find its section Zoom and click the down arrow of the list Timescale, and
select Timescale: Apply the following settings in the Timescale dialog:
Middle Tier Bottom Tier
Field Units Months Days
Label Jan, Feb, … 1, 2, …
Count 1 7
Align Center Center
Size 100% 100%
6. In the Page Setup dialog (ribbon File, tab Print, hyperlink Page Setup), format the Header,
Footer, and Legend as follows:
Section Set to Font
Tab Header Center &[View] &[Project Title] Arial, Bold, 20
Footer Left &[Manager] &[Company] Arial, Regular, 8
Right &[Date] Arial, Regular, 8
Legend Legend on select None
7. Save your file and compare the view you created to the view called Executive Overview in
Exercise 4b.mpp.

Page 66 of 87
Exercise 4.3: Reporting for the Relocation Project – Cost by Function
Instructions:
The goal of this exercise is to be able to create a custom cost report.
Continue to work with your file Relocation.mpp or open Exercise 4b.mpp.
1. Switch to the Resource Sheet view.
2. Click ribbon View, button Tables, item More Tables… and create a new resource-related table
named Cost by Function that shows the fields ID, Name (the title of this column will appear as
Resource Name), Position, Function, and Cost.
Click ribbon Project, list Group by, item More Groups… and create a grouping Cost by Function
so that you can easily read the total cost by resource function of the project.
3. Click ribbon View, button Other Views and select item More Views… and create a new view
based on the resource sheet that is named Cost by Function (select Show in menu). The view
should apply the corresponding table and grouping that you created.
4. Best fit the column widths (Right-click the column headings and click Field Settings; the dialog
shows up. Click Best Fit).
5. In the Page Setup dialog, enter the following settings:
Tab Section Set to
Page Orientation Portrait
Scaling Fit to: 1 page wide by 1 tall
Margins Top, bottom, left, right 1 inch or 2.5 cm
Borders Around Every page
Header Center
Arial, Bold, 20
&[View] &[Project Title]
Footer Left &[Manager] &[Company]
Center None; delete the default entry
Right &[Date]
6. Save your file and compare the view you created to the view called Cost by Function in Exercise
4c.mpp.

Page 67 of 87
Topic 5: Using the Organizer
This topic will cover how to use the Organizer to move MS Project objects between projects. Open
the demonstration file Demo Lesson 4 Moving and Copying.
Copying Objects between Projects (the Organizer)
Objects are views, reports, calendars and other things that change the appearance of the data or
affect the scheduling. Copy objects between projects using the Organizer.
1. Click ribbon File, tab Info, button Organizer – the Organizer dialog appears:

Page 68 of 87
2. Click on the tab of the type of objects to transfer.
3. From the lists at the bottom of the dialog select the schedule from which to copy the object;
in the other list, select the schedule to copy to. Only the files currently open will be in the
list.
4. Select the object and click to copy from the list to the right or to copy
from right to left.
5. Click when done.
Copy Views to the Organizer
Once you have changed an existing view or created a new view object and formatted it, you can use
it in all your other projects by putting it in your Global.MPT file. You can even share it with other
people by giving them an MPP file containing the view object and all its components: fields, table,
filter, and group objects.
1. Open the schedule that contains the object, and open the schedule into which you want to
copy. You do not need to open the Global.MPT, as it is always open when MS Project is running.
2. Click the ribbon File, tab Info, button Organizer… - the Organizer dialog appears:
3. Activate the tab Views as the type of object to copy.
4. In the list Views available in on the left at the bottom of the dialog, select the schedule from
which to copy the object; in a similar list on the right, select the schedule to which to copy.
5. Then select the view object to copy and click Copy>>.
6. Click the tab Tables and copy the table that the view uses.
7. Click the tab Filters and copy the filter objects that the view uses.
8. Click the tab Groups and copy the group object that the view uses.
9. Click Close when done or Cancel.

Page 69 of 87
Notes

Page 70 of 87
LESSON 5: USING RESOURCE POOLS TO MANAGE MULTIPLE PROJECTS
Topic 1: Create a Resource Pool
Topic 2: Create a Master Schedule
Topic 3: Create Task Dependencies Between Projects
Student Learning Objectives
After completing this lesson you should be able to
• Understand how to manage multiple project (program)
• Understand how to create and use Resource Pools
• Understand how to use Earned Value fields in Views and reports
Approximate Presentation time: 2 hours 15 minutes

Page 71 of 87
Topic 1: Create a Resource Pool
A shared resource pool project can be used to share resources across multiple projects. This may be
helpful to see:
• Overallocated resources – can result in missed deadlines or unhappy team members.
• Underallocated resources – can result in missed opportunities to finish earlier or increased
cost due to idle resources.
• To-do Lists – all tasks assigned to an individual resource or to a set of resources.
• Analytics – see how an individual or team performs across multiple projects and pinpoint
areas of improvement or concern.

Page 72 of 87
Exercise 5.1: Create a Resource Pool
Instructions:
The goal of this exercise is to be able to create a shared resource pool to be used by multiple
projects.
1. Open the file Exercise 5 Resource Pool.mpp
2. Open the file Exercise 5 Project A.mpp
3. On the Resource ribbon tab, click Resource Pool | Share Resources
4. In the Share Resources dialog box select Use resources
5. Choose the project from the drop down
6. Under On conflict with calendar or resource information, choose which project file should
take precedence if there is conflicting resource information, such as calendars, rates,
availability, and custom fields
7. Click OK
8. Validate the shared resources, click View, Resource Sheet
9. Close the file
10. Repeat steps 2 – 8 for file Exercise 5 Project B.mpp
11. When finished close the resource pool.

Page 73 of 87
Topic 2: Create a Master Schedule
Managing multiple projects is a juggling act; managing multiple projects with intertwined
dependencies can be a nightmare.
Project 2010 provides tools to help you manage cross-project dependencies, even tasks in one
project that are dependent on the completion of another project.
When you link one project to another by creating dependencies between tasks in those projects,
you aren't necessarily combining two projects into one. You are making it possible to manage or
monitor two separate projects from one location.
For example, your main project is the construction of an airplane. Your facility cannot attach the
wings (a task in the main project) until another facility builds the wings (an entire project). Other
tasks in the other project might also be beyond your control.
You can link the “wing building” project to your main project as a task that updates as new
information is available. Or you can make “wing building” into a subproject of your master project.
The choice depends on whether you simply want updates on the progress of the other project or
you need to manage it directly.

Page 74 of 87
Exercise 5.2: Create a Master Schedule
Instructions:
The goal of this exercise is to create a Master schedule to manage multiple projects.
1. Open the file Exercise 5 Master Plan.mpp
2. In the Gantt Chart view of the Master Plan, click on the Project ribbon tab, and click
Subproject.
3. Select Exercise 5 Project A and click Insert
4. Click on the next blank row below the inserted project and click on Subproject again
5. Select Exercise 5 Project B and click Insert
6. Expand Project A
7. In the Open Resource Pool Information dialog box, ensure Open resource pool to see
assignments across sharer files is selected and click OK. This dialog box is a feature of the
shared resource pool, not the master plan.
8. Expand Project B
9. Click on File and Save
10. In the Microsoft Project dialog box, click Yes to All
11. In the next Microsoft Project dialog box, click OK to update the resource pool

Page 75 of 87
Topic 3: Create Task Dependencies Between Projects
There will be occasions when a project is dependent upon the completion of a task from another
project. This can be accomplished with two individual projects or projects that have been inserted
into a master plan.
Page 76 of 87
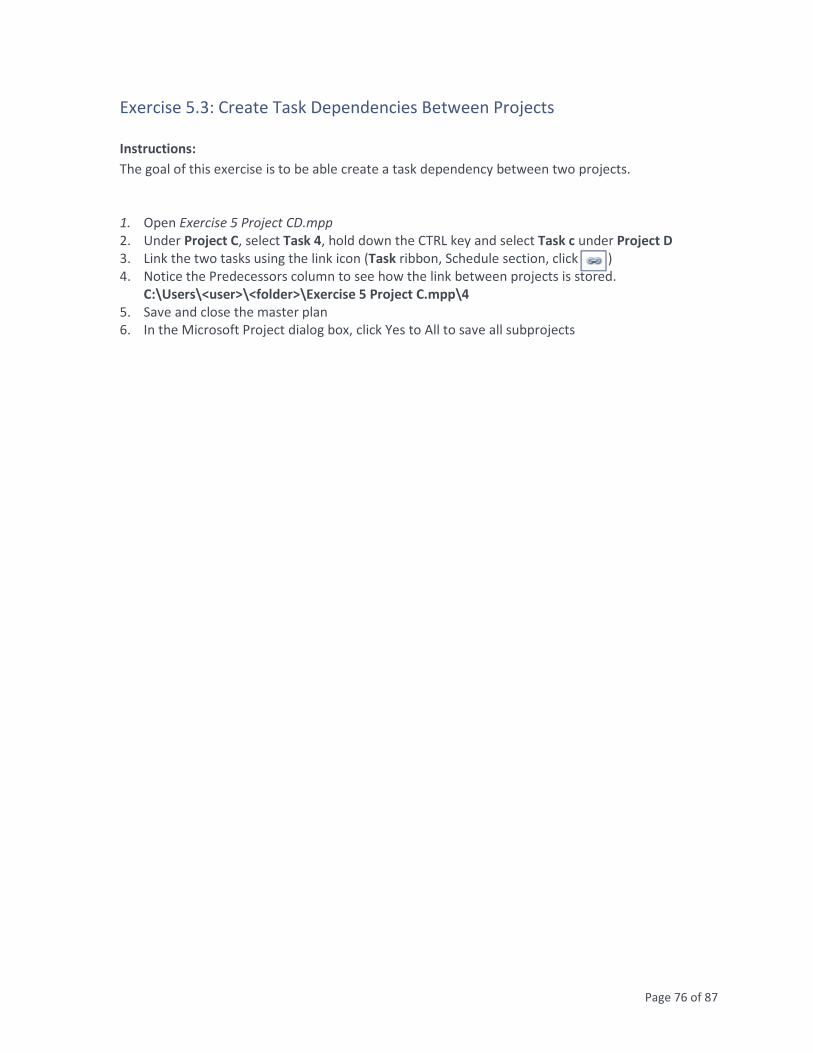
Exercise 5.3: Create Task Dependencies Between Projects
Instructions:
The goal of this exercise is to be able create a task dependency between two projects.
1. Open Exercise 5 Project CD.mpp
2. Under Project C, select Task 4, hold down the CTRL key and select Task c under Project D
3. Link the two tasks using the link icon (Task ribbon, Schedule section, click )
4. Notice the Predecessors column to see how the link between projects is stored.
C:\Users\<user>\<folder>\Exercise 5 Project C.mpp\4
5. Save and close the master plan
6. In the Microsoft Project dialog box, click Yes to All to save all subprojects

Page 77 of 87
Notes

Page 78 of 87
APPENDIX 1 – SETTING OPTIONS FOR MS PROJECT

Page 79 of 87
Set Options for MS Project
It is recommended that the following options be set when using MS Project. Access by clicking the
ribbon File, click the Options button, and the Options dialog appears.
Tab Applies To Set to
General Setup Date format: Jan 28 ‘09
Schedule Setup Hours per day : 7.5 (enter by typing)
Hours per week: 37.5
Days per month: 20
Show assignment units as a : Decimal
Duration is entered in: Days
Work is entered in: Days
Default Task type: Fixed Duration
Calculate project after each edit:
WBS Section Scheduling options for this project:
New tasks created: Manually Scheduled or Auto Scheduled. Use
Manually Scheduled if you create a draft or high-level schedule. If you
create a detailed schedule use Auto Scheduled.
Default task type
Many people enter the duration immediately. If you do this we
recommend setting this option to Fixed Duration. If you normally
enter Work estimates, we recommend Fixed Work as the default task
type. In this way you protect the estimates you enter. It is the default
task type for new tasks you create. On a task-by-task basis you can
still decide what type serves you best and switch the task Type to it.
New tasks are effort driven (un-checked)
This option changes the number of resources assigned (assignment
units); we recommend you turn it off for Fixed Duration and Fixed
Units tasks. It functions like Fixed Work tasks and we recommend you
use the task type instead. Fixed Work tasks are by definition effort-
driven and have this option always on.
Estimates Section Scheduling options for this project:
Duration is entered in:
MS Project will use the setting as the default time unit for the field
Duration. With the default duration time unit set to days, you can
type in 5 instead of 5d to get 5 days. You do not need to type a ‘d’ in
the duration fields. Choose the unit that fits the majority of your
inputs to save some keystrokes. The Duration field will display
whatever time unit you entered.
Work is entered in:
Explanation is the same as for previous Duration field. Unlike the
Duration field, the Work field will convert all entries to its default time

Page 80 of 87
Tab Applies To Set to
unit. If you switch the time unit, MS Project will convert all values.
Show that scheduled tasks have estimated durations (checked) will
add a question mark to the durations that you did not enter yourself.
New scheduled tasks have estimated durations (checked) will add a
question mark to durations of new tasks you may create.
Dependencies Autolink inserted or moved tasks should be on. This allows MS
Project to set or break dependencies inside a waterfall chain of Finish-
to-Start dependencies.
If Update Manually Scheduled tasks when editing links is selected,
MS Project will reschedule Manually Scheduled tasks. Three reasons
linking Manually Scheduled tasks does not make sense:
1. A default duration of 1 day? is entered for the task that does
not yet have a duration. This removes the flexibility of
Manually Scheduled tasks.
2. Links between Manually Scheduled tasks are static
dependencies and only work when they are created. If
changes happen the links no longer work.
3. If you do not switch to Auto Scheduled tasks you will receive
many warnings that beg your attention.
Resources Section Schedule:
Show assignment units as a: Percentage or Decimal
Units of resources can be expressed as a percentage or in decimals in
the resource-related Max Units field (availability) and in the
assignment –related field Units field (workload). This is a global
option and applies to all your projects, existing or new.
For example, you have a resource that is available half-time to your
project. This option
Assignments Section Schedule:
Show assignment units as a: Percentage
Percentage is the best choice when you have part-time resources. If
there are mostly team resources (consolidated), Decimal is better,
since “5 carpenters” is easier to understand than “500% carpenters”.
This option is a global option; if you change it to Decimal in one
project, all your projects will use decimal numbers.
In the Scheduling options for this project section:
Default task type: Fixed Units
Choose the type of task for any new tasks you create.
New tasks are effort driven (unchecked):
Using this option may result in MS Project changing assignment units.
For now, turn it off.
Updating Section Scheduling options for this project:
Split in-progress tasks: Checked
Allows moving the uncompleted portion of a task to after the Status
Date by splitting the task bar. With this option cleared, the options on
the Advanced tab cannot split any task bars and will behave
differently as a result. It is recommended selecting it.

Page 81 of 87
Tab Applies To Set to
Section Scheduling options for this project:
Updating task status updates resource status: Checked
Updating the tasks will update the actual work of the assignments. It
is recommended you keep this option checked for task updates. Only
clear it if you want to update the tasks and the assignments.
Section Scheduling options for this project:
Actual costs are always calculated by Microsoft Project: either
checked or unchecked
Updating the tasks will update the actual cost. It is up to you whether
you want MS Project to do that. If you clear this option, you can enter
the actual cost.
Reports Section Scheduling options for this project:
Show that scheduled tasks have estimated durations: Unchecked
Clear this if you want to hide the question marks in the duration field.
Section Scheduling options for this project:
New scheduled tasks have estimated durations: Unchecked
Clear this if you want to hide the question marks in the duration field.
Advanced WBS Section Edit:
Allow cell drag and drop (checked)
This allows you to move or copy the selected cells by dragging the
selected area by its border. With this option on, you can quickly
rearrange your WBS by dragging tasks. This option is global across all
your schedules.
Estimates Section Display options for this project
Minutes, Hours, Days, Weeks, Months, and Years
This allows you to change the way time units are shown in your
project. The shorter you make the time unit, the more space you save.
Select All New Projects first from the list if you want the short labels
to be used from then on.
Resources Section General Options for this Project:
Default standard rate:
By entering a rate you can reduce the amount of typing you have to
do. If the standard rate is set to $50/hr, you do not need to enter a
rate for any resource that is $50/hr.
Default overtime rate:
By entering a rate you can reduce the amount of typing you have to
do.
Updating Section Calculation options for this project:
Move end of completed parts after status date back to status date:
Checked
This moves the actual duration bar to before the status date; actual
work done is moved into the past. It is recommended you turn this
on; it will help you keep the forecasts accurate.
And move start of remaining parts back to status date: Checked
The remaining duration bar will cuddle up to the status date (unless
there are dependencies that keep it where it is). The choice is up to

Page 82 of 87
Tab Applies To Set to
you.
Move start of remaining parts before status date forward to status
date: Checked
This moves the remaining duration bar to after the status date; work
still to be completed is moved to the future. It is recommended you
turn this on; it will help you keep the forecasts accurate. It has no
effect on tasks that have not started yet, but should have started as
per the status date. These tasks will still have to be rescheduled to
after the status date to put them into the future where they belong.
And move end of completed parts forward to status date: Checked
or Unchecked
This moves the actual duration bar to cuddle up to the status date.
The choice is yours.
Edits to total task % complete will be spread to the status date:
Unchecked
If a task is falling behind, the progress entered will be evenly spread
to the status date. This option is only relevant if you enter %
Complete, which is not recommended.
Section General options for this project:
Automatically add new resources and tasks: Unchecked
This prevents a typo in a resource name from accidentally adding a
new resource, and works similarly for tasks. It is recommended
clearing it.
Section Edit:
Allow cell drag and drop: Unchecked
This prevents accidentally dragging data on top of other data in your
baselined schedule. It is recommended to clear this option.
Reports Section Display options for this project:
You can change the time units for Minutes, Hours, Days, Weeks,
Months, and Years to one character to save space on the screen.

Page 83 of 87
APPENDIX 2 – BEST PRACTICES CHECKLIST FOR MS PROJECT

Page 84 of 87
Best Practices Checklist for MS Project
Applies to Checklist
Setup Does the schedule contain a succinct description of the objectives or final product
of the project?
Use the field Comments (ribbon File, tab Info, button Project Information on the
right side of the screen, Advanced Properties, Summary tab) which makes it a
visible note on the project summary task.
Do the business days, the working hours and holidays on the project calendar
align with a typical, full-time resource on the project?
Do the working hours on the Standard (Project Calendar) (ribbon Project, button
Change Working Time) correspond to the Hours per day option (ribbon File,
Options, tab Schedule)?
WBS Are there deliverables in the task list?
If there are not, the schedule does not have a WBS. Deliverables should be
captured using nouns (maybe with adjectives, but without verbs).
Is the list of deliverables complete, but lean?
Are all expected deliverables explicitly included in the WBS?
Are the project management deliverables, like schedule and budget included in
the WBS?
Are there only deliverables in the WBS that were explicitly agreed upon by the
client or project sponsor?
Does the WBS have a logical hierarchy?
Is there one milestone for each deliverable?
Estimates Do all tasks have an estimate?
Manually Scheduled tasks: If one of the essential pieces of data is missing i.e.
duration, start, or finish, the task is called unscheduled and is just a
placeholder with its Placeholder field set to Yes. By filtering on this field you
can easily check if you have entered all estimates.
Auto Scheduled tasks: these tasks always have the three pieces of
information, because MS Project will enter default durations of 1 day, if
needed, and dates (the project start date as the default start date).
Are the estimates that you collected consistent with the working hours entered in
the Standard (Project Calendar)?
If they are not consistent the schedule will be too long or too short.
Gross working time estimates should be entered in a schedule with gross
working hours on the project calendar (typically 8:00 AM – 5:00 PM).
Pure working time estimates should be entered in a schedule with the pure
working hours on the project calendar – a shorter working day. If you estimate
that the productive hours are 70% of the time spent at work, the working
hours should be 70% * 8h = 5.6 hours, rounded to 5.5 hours. Working hours
correspond to this are, for example, 9:00 AM – 12:00 PM and 1:00 PM – 3:30
PM. It is recommended that you set the working hours like these on the
project calendar if you want to work with pure work time estimates.

Page 85 of 87
Applies to Checklist
Are the estimates reasonable given the work that needs to be performed?
Some types of tasks are easily underestimated; for example, writing
documents takes a lot of time, at least 2 hours per page. For other tasks, you
will need some subject matter expertise to verify the estimates.
Sometimes estimates are overestimated. Some project managers incorporate
waiting time into duration estimates. Waiting time is more appropriately
modeled as a lag on the dependency. Reviews or approval cycles include
waiting times.
Is the amount of effort on overhead tasks reasonable compared to the total
amount of effort (Work)?
The percent of overhead effort needs to be between 10% and 30% of the total
effort in the project.
Dependencies Have you turned the Task Mode of all tasks to Auto Scheduled?
Is the network of dependencies complete?
Is the network of dependencies correct?
Is the network logic simple enough?
Does the resulting high-level schedule make sense?
Have you turned off Autolink after checking the network?
Deadlines Is the project deadline date captured in the schedule?
The deadline or constraint date for this should be set on the project finish
milestone. A constraint date should only be used if the project target finish
date is a very hard date.
Are deadlines used to capture target dates on milestones that are promised to
clients? Are deadlines used to capture agreed upon dates?
Does the schedule have as few constraint dates as possible?
Resources Are all the resources identified in the Resource Sheet?
Are all resources named consistently using a naming convention?
Is the availability of the resource appropriately modeled?
Do all resources have their Type field set right?
Are the rates entered in the appropriate fields?
Assignments Are you using the task-related field Type for Auto-Scheduled detail tasks?
Is Effort-Driven off for Fixed Duration and Fixed Units tasks (Auto-Scheduled)?
Are there no assignments on the summary tasks?
Do all detail tasks have a human resource assigned?
Updating Is the baseline schedule present, complete, correct, relevant, and challenging?
Are the appropriate options selected in ribbon File, Options for the chosen
updating strategy?
Is the Status Date set to an appropriate date?
Is the task type for soon-to-be-updated tasks set to Fixed Units and not Effort-
Driven?

Page 86 of 87
Applies to Checklist
Are all actual durations scheduled in the past when they actually happened?
Are all remaining durations scheduled in the future when they will happen?
Reporting Is there a one-page status report for the schedule that is readily available as a
separate View object? This can be one of the following:
• A view that supports Earned Value Management
• A view that displays only major milestones with their forecast dates relative to
their baseline dates
Does the one-page report give an appropriate impression of the health of the
project?
• If using Earned Value, verify that the schedule supports the Earned Value
values. For example, if the Schedule Variance is positive, the schedule should
show that the deadlines are easily met.
• If using a milestone view, ask this question: are the right milestones chosen to
represent the health of a large project?

Page 87 of 87
This Page Intentionally Left Blank