microsoft powerpoint 2013 - brooklyn collegenikolas/cisc1050/slides/pp_ch01.pdf · microsoft...
TRANSCRIPT

Chapter 1
Crea*ng and Edi*ng a Presenta*on with Pictures
Microsoft PowerPoint 2013

• Select and change a document theme and variant • Create a *tle slide and a text slide with a mul*level bulleted list
• Add new slides and change slide layouts • Insert photos and illustra*ons into slides with and without content placeholders
• Move and resize photos and illustra*ons
© 2016 Cengage Learning®. May not be scanned, copied or duplicated, or posted to a publicly accessible website, in whole or in part.
2
Objectives

• Change font size and color • Bold and italicize text • Duplicate a slide • Arrange slides • Select slide transi*ons • View a presenta*on in Slide Show view
© 2016 Cengage Learning®. May not be scanned, copied or duplicated, or posted to a publicly accessible website, in whole or in part.
3
Objectives

© 2016 Cengage Learning®. May not be scanned, copied or duplicated, or posted to a publicly accessible website, in whole or in part.
4
Project – Presentation with a Bulleted List, Photos, and an Illustration

• Insert the four presenta*on slides, using various layouts.
• Enter the text for the slides. • Format the text on each slide. • Insert graphical elements, including photos and an illustra*on.
• Size and posi*on the graphical elements. • Enhance the slide show by adding a closing slide and transi*on.
• Display and print the slides and a handout © 2016 Cengage Learning®. May not be scanned, copied or duplicated, or posted to a publicly accessible website, in whole or in part.
5
Roadmap
• Press and hold or point to the desired theme on the New screen
• Tap or click the desired theme to display a theme preview dialog box with a thumbnail view of the theme and its variants
• Tap or click the desired variant to view previews of that style applied to the thumbnail
• Tap or click the Create buTon to apply the theme and variant to the presenta*on and display Slide 1
© 2016 Cengage Learning®. May not be scanned, copied or duplicated, or posted to a publicly accessible website, in whole or in part.
6
Choosing a Document Theme and Variant

© 2016 Cengage Learning®. May not be scanned, copied or duplicated, or posted to a publicly accessible website, in whole or in part.
7
Choosing a Document Theme and Variant

• Tap or click the label, ‘Tap to add *tle’, or, ‘Click to add *tle’, located inside the *tle text placeholder to select the placeholder
• Type the desired *tle in the *tle text placeholder. Do not press the ENTER key
© 2016 Cengage Learning®. May not be scanned, copied or duplicated, or posted to a publicly accessible website, in whole or in part.
8
Entering the Presentation Title

• Tap or click the label, ‘Tap to add sub*tle’, or, ‘Click to add sub*tle’, located inside the sub*tle text placeholder to select the placeholder
• Type the desired placeholder but do not press the ENTER Key
© 2016 Cengage Learning®. May not be scanned, copied or duplicated, or posted to a publicly accessible website, in whole or in part.
9
Entering the Presentation Subtitle Paragraph

• Tap or click the Zoom In or Zoom Out buTon as many *mes as necessary un*l the Zoom buTon on the status bar displays the desired percentage
© 2016 Cengage Learning®. May not be scanned, copied or duplicated, or posted to a publicly accessible website, in whole or in part.
10
Zooming a Slide

• If you are using a touch screen, tap to posi*on the inser*on point in the text to select, and then drag the selec*on handles as necessary to select the en*re paragraph; if you are using a mouse, triple-‐click the paragraph
© 2016 Cengage Learning®. May not be scanned, copied or duplicated, or posted to a publicly accessible website, in whole or in part.
11
Selecting a Paragraph

• With the text to italicize selected, tap or click the Italic buTon on the mini toolbar to italicize that text on the slide
© 2016 Cengage Learning®. May not be scanned, copied or duplicated, or posted to a publicly accessible website, in whole or in part.
12
Italicizing Text

• With the text selected, tap or click the Increase Font Size buTon on the mini toolbar the desired number of *mes to increase the font size of the selected text
© 2016 Cengage Learning®. May not be scanned, copied or duplicated, or posted to a publicly accessible website, in whole or in part.
13
Increasing Font Size

• Double-‐tap or double-‐click the word to select it
© 2016 Cengage Learning®. May not be scanned, copied or duplicated, or posted to a publicly accessible website, in whole or in part.
14
Selecting a Word

• Select the text, and tap or click the Font Color arrow on the mini toolbar to display the gallery of Theme Colors and Standard Colors
• Tap or click the desired color to change the font color • Tap or click outside the selected text to deselect the word
© 2016 Cengage Learning®. May not be scanned, copied or duplicated, or posted to a publicly accessible website, in whole or in part.
15
Changing the Text Color

• Tap or click the New Slide buTon (HOME tab | Slides group) to insert a new slide with the Title and Content layout
© 2016 Cengage Learning®. May not be scanned, copied or duplicated, or posted to a publicly accessible website, in whole or in part.
16
Adding a New Text Slide with a Bulleted List

• Tap or click the label, ‘Tap to add *tle’, or, ‘Click to add *tle’, to select it and then type the desired *tle. Do not press the ENTER key
© 2016 Cengage Learning®. May not be scanned, copied or duplicated, or posted to a publicly accessible website, in whole or in part.
17
Entering a Slide Title

• Tap or click the label, ‘Tap to add text’, or ‘Click to add text’, to select the content placeholder
© 2016 Cengage Learning®. May not be scanned, copied or duplicated, or posted to a publicly accessible website, in whole or in part.
18
Selecting a Text Placeholder

• Type the first item in the bulleted list, and then press the ENTER key to type the second item
• To create a second-‐level paragraph, tap or click the ‘Increase List Level’ buTon (HOME tab | Paragraph group)
• Click the ‘Decrease List Level’ buTon (HOME tab | Paragraph group) to promote a paragraph
© 2016 Cengage Learning®. May not be scanned, copied or duplicated, or posted to a publicly accessible website, in whole or in part.
19
Typing a Multi-Level Bulleted List

© 2016 Cengage Learning®. May not be scanned, copied or duplicated, or posted to a publicly accessible website, in whole or in part.
20
Typing a Multi-Level Bulleted List

• Posi*on the mouse pointer immediately to the lef of the first character of the text to be selected
• Drag the mouse pointer through the last character of the text to be selected
© 2016 Cengage Learning®. May not be scanned, copied or duplicated, or posted to a publicly accessible website, in whole or in part.
21
Selecting a Group of Words
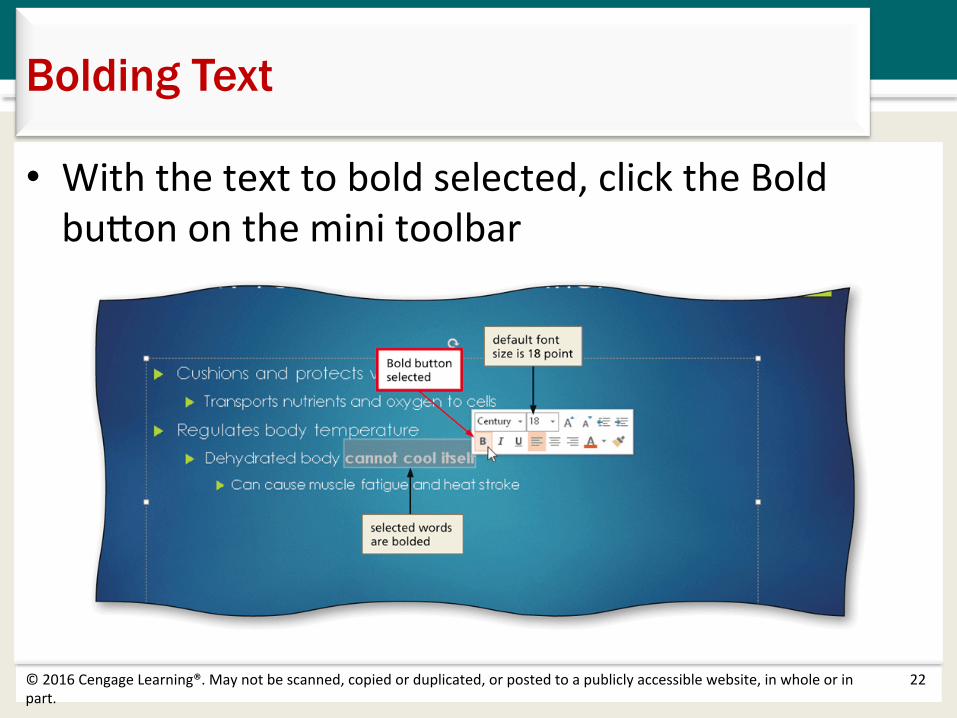
• With the text to bold selected, click the Bold buTon on the mini toolbar
© 2016 Cengage Learning®. May not be scanned, copied or duplicated, or posted to a publicly accessible website, in whole or in part.
22
Bolding Text

• Tap or click the New Slide arrow (HOME tab | Slides group) to display the layout gallery
• Tap or click Title Only to add a new slide and apply that layout
© 2016 Cengage Learning®. May not be scanned, copied or duplicated, or posted to a publicly accessible website, in whole or in part.
23
Adding a Slide with the Title Only Layout

• Tap or click the New Slide arrow in the Slides group to display the layout gallery
• Tap or click Comparison • Type the desired headings in the appropriate placeholders
© 2016 Cengage Learning®. May not be scanned, copied or duplicated, or posted to a publicly accessible website, in whole or in part.
24
Adding a New Slide and Entering a Slide Title and Headings

• Tap or click design on the ribbon to display the DESIGN tab
• Tap or click the More buTon (DESIGN tab | Themes group) to expand the gallery, which shows more theme gallery op*ons
• Tap or click the desired theme to apply this theme to all slides
© 2016 Cengage Learning®. May not be scanned, copied or duplicated, or posted to a publicly accessible website, in whole or in part.
25
Changing the Theme

© 2016 Cengage Learning®. May not be scanned, copied or duplicated, or posted to a publicly accessible website, in whole or in part.
26
Changing the Theme

• If you are using a mouse, point to the desired varia*on (DESIGN tab | Variants group) to see a preview of the varia*on
• Tap or click the desired variant to apply it to all slides
© 2016 Cengage Learning®. May not be scanned, copied or duplicated, or posted to a publicly accessible website, in whole or in part.
27
Changing the Variant

• Posi*on the pointer on the scroll box • Press and hold down the mouse buTon and drag the scroll box up or down the ver*cal scroll bar to view the different slides
• When you are finished, release so that the desired slide appears in the Slide pane
© 2016 Cengage Learning®. May not be scanned, copied or duplicated, or posted to a publicly accessible website, in whole or in part.
28
Moving to Another Slide in Normal View

© 2016 Cengage Learning®. May not be scanned, copied or duplicated, or posted to a publicly accessible website, in whole or in part.
29
Moving to Another Slide in Normal View

• Tap or click INSERT on the ribbon to display the INSERT tab
• Tap or click the Online Pictures buTon (INSERT tab | Images group) to display the Insert Pictures dialog box
• With the inser*on point in the Office.com Clip Art area, type the desired search text in the search box
• Tap or click the Search buTon (the magnifying glass) or press the enter key so that Office.com will search for and display all clips having the keywords
© 2016 Cengage Learning®. May not be scanned, copied or duplicated, or posted to a publicly accessible website, in whole or in part.
30
Inserting a Picture from Office.com into the Title Slide

• If necessary, slide or scroll down the list to display the desired photo
• Tap or click the photo to select it • Tap or click the Insert buTon to download the photo and insert it into the slide
© 2016 Cengage Learning®. May not be scanned, copied or duplicated, or posted to a publicly accessible website, in whole or in part.
31
Inserting a Picture from Office.com into the Title Slide

© 2016 Cengage Learning®. May not be scanned, copied or duplicated, or posted to a publicly accessible website, in whole or in part.
32
Inserting a Picture from Office.com into the Title Slide

• Display the INSERT tab, tap or click the Online Pictures buTon, type the desired search text, and then tap or click the Search buTon
• Slide or scroll to the desired picture
© 2016 Cengage Learning®. May not be scanned, copied or duplicated, or posted to a publicly accessible website, in whole or in part.
33
Inserting an Illustration from Office.com into a Slide without a Content Placeholder

© 2016 Cengage Learning®. May not be scanned, copied or duplicated, or posted to a publicly accessible website, in whole or in part.
34
Inserting a Picture from Office.com into a Content Placeholder

• Tap or click the photo to select it and display the selec*on rectangle
• Point to the desired sizing handle on the illustra*on so that the pointer changes to a two-‐headed arrow
• Drag the sizing handle diagonally un*l the illustra*on is the desired size
• Release the mouse buTon
© 2016 Cengage Learning®. May not be scanned, copied or duplicated, or posted to a publicly accessible website, in whole or in part.
35
Proportionally Resizing Pictures

© 2016 Cengage Learning®. May not be scanned, copied or duplicated, or posted to a publicly accessible website, in whole or in part.
36
Proportionally Resizing Pictures

• Tap or click the photo to select it and display the selec*on rectangle
• Press or point to the sizing handle on the top, boTom, lef, or right side of the photo so that the pointer changes to a two-‐headed arrow
• Drag the sizing handle inward or outward un*l the photo is the desired size
• Release to resize the photo
© 2016 Cengage Learning®. May not be scanned, copied or duplicated, or posted to a publicly accessible website, in whole or in part.
37
Nonproportionally Resizing a Photograph

© 2016 Cengage Learning®. May not be scanned, copied or duplicated, or posted to a publicly accessible website, in whole or in part.
38
Nonproportionally Resizing a Photograph

• Tap or click the picture to select it • Drag the picture to the desired loca*on • Select the photo and then use the arrow keys to posi*on it precisely
© 2016 Cengage Learning®. May not be scanned, copied or duplicated, or posted to a publicly accessible website, in whole or in part.
39
Moving Pictures

• With the slide to duplicate selected, tap or click the New Slide arrow (HOME tab | Slides group) to display the layout gallery
• Tap or click ‘Duplicate Selected Slides’ in the layout gallery to create a duplicate of the slide
© 2016 Cengage Learning®. May not be scanned, copied or duplicated, or posted to a publicly accessible website, in whole or in part.
40
Duplicating a Slide

© 2016 Cengage Learning®. May not be scanned, copied or duplicated, or posted to a publicly accessible website, in whole or in part.
41
Duplicating a Slide

• Drag the slide thumbnail to the desired loca*on in the Thumbnail pane
© 2016 Cengage Learning®. May not be scanned, copied or duplicated, or posted to a publicly accessible website, in whole or in part.
42
Arranging a Slide

• Posi*on the pointer immediately to the lef of the first character of the text to be selected
• Drag the mouse pointer through the last character of the text to be selected
• Click the Cut buTon (HOME tab | Clipboard group) to delete all the selected text
© 2016 Cengage Learning®. May not be scanned, copied or duplicated, or posted to a publicly accessible website, in whole or in part.
43
Deleting Text in a Placeholder

© 2016 Cengage Learning®. May not be scanned, copied or duplicated, or posted to a publicly accessible website, in whole or in part.
44
Deleting Text in a Placeholder

• Tap or click the TRANSITIONS tab on the ribbon and then point to the More buTon (TRANSITIONS tab | Transi*on to This Slide group)
• Tap or click the More buTon to expand the Transi*ons gallery
• Tap or click the desired transi*on in the Transi*ons gallery to apply the transi*on
• Tap or click the Dura*on up arrow (TRANSITIONS tab | Timing group) to increase the transi*on speed
• Tap or click the Preview Transi*ons buTon (TRANSITIONS tab | Preview area) to view the transi*on and the new transi*on *me
© 2016 Cengage Learning®. May not be scanned, copied or duplicated, or posted to a publicly accessible website, in whole or in part.
45
Adding a Transition between Slides

• Click the ‘Apply To All’ buTon (TRANSITIONS tab | Timing group) to apply the transi*on and the increased transi*on *me to all slides in the presenta*on
© 2016 Cengage Learning®. May not be scanned, copied or duplicated, or posted to a publicly accessible website, in whole or in part.
46
Adding a Transition between Slides

• If you are using a touch screen, proceed to the next step. If you are using a mouse, point to the Start From Beginning buTon
• Tap or click the Start From Beginning buTon to display the *tle slide
© 2016 Cengage Learning®. May not be scanned, copied or duplicated, or posted to a publicly accessible website, in whole or in part.
47
Starting Slide Show View

• Swipe forward on or click each slide to move through the slide show
• When the black slide appears with a message announcing the end of the slide show, swipe forward on or click the black slide
© 2016 Cengage Learning®. May not be scanned, copied or duplicated, or posted to a publicly accessible website, in whole or in part.
48
Moving Manually through Slides in a Slide Show

© 2016 Cengage Learning®. May not be scanned, copied or duplicated, or posted to a publicly accessible website, in whole or in part.
49
Moving Manually through Slides in a Slide Show

• Select and change a document theme and variant • Create a *tle slide and a text slide with a mul*level bulleted list
• Add new slides and change slide layouts • Insert photos and illustra*ons into slides with and without content placeholders
• Move and resize photos and illustra*ons
© 2016 Cengage Learning®. May not be scanned, copied or duplicated, or posted to a publicly accessible website, in whole or in part.
50
Chapter Summary

• Change font size and color • Bold and italicize text • Duplicate a slide • Arrange slides • Select slide transi*ons • View a presenta*on in Slide Show view
© 2016 Cengage Learning®. May not be scanned, copied or duplicated, or posted to a publicly accessible website, in whole or in part.
51
Chapter Summary

Chapter 1 Complete
Microsoft PowerPoint 2013