microsoft powerpoint 2010 - level 1 · microsoft office 2010 contains a help system designed to...
TRANSCRIPT

T r a i n i n g G u i d e
10 – Getting help
Microsoft PowerPoint 2010
- Level 1

Microsoft PowerPoint 2010 - Level 1
© Learning and Development Service Page 2 Getting help
GETTING HELP
There will be times when you need to know how to use a particular feature or tool and you may not have the resources, such as experts or reference materials, available to help you. PowerPoint’s Help system is essentially a how-to of the available features and tools in PowerPoint, which is easy to use.
In this booklet we will show you how to:
gain an understanding of PowerPoint's Help system
access Help
browse for help
navigate the Help system
use the Help Table of Contents
search in Help using keywords
disconnect online help
print a help topic
work with screen tips
use dialog box help
gain an understanding of other sources of help.
INFOCUS

Microsoft PowerPoint 2010 - Level 1
© Learning and Development Service Page 3 Getting help
UNDERSTANDING HELP
Microsoft Office 2010 contains a Help system designed to show you how to use Office 2010. When using Help to locate information, Help will refer to online
resources at Office.com, as well as local
resources (on your computer). It is preferable to be connected to the internet when seeking help so you can take advantage of Microsoft’s complete database
of resources.
1 Help toolbar Use these tools to navigate Help. Tools include Back and
Forward for navigating to the last or most recent help page or topic that you viewed, as well as Home to return to the home (main) page. Other tools include Print and Zoom.
2 Search box Search for specific information by typing a keyword or phrase into the search box. If you are connected to the internet, you will notice two search boxes: the main (upper) search box and the Office.com (lower) search box. You can type keywords into
either box when connected to the internet and you will return the same results. However, if you are offline, only the main search box will be available.
3 Getting Started Provides a range of general help topics that you can browse for more information. Will generally include information about new and improved features.
4 Browse PowerPoint 2010 Support
If you’re not exactly sure what you’re looking for, you might use this section to browse for the help that you need. Click on a topic that is most relevant to the information that you’re searching for, and then follow the relevant links to locate more specific information.
5 Status bar The Status bar indicates whether you are connected to Office.com or are only using local (that is, on your computer) help resources. By default, the Help system is connected to Office.com and it is recommended that you leave this setting as is, as you will automatically have access to Microsoft’s entire Help database.
1
5
4
2
3

Microsoft PowerPoint 2010 - Level 1
© Learning and Development Service Page 4 Getting help
ACCESSING HELP
For Your Reference…
To access Help: Click on Help , or Open a dialog box and click on Help
, or
Point to a command and press
Handy to Know…
At the time of writing, Microsoft’s Help search engine was under development. This means that command- and dialog box-specific help may not be available when you click on Help. If this is the
case, you will be taken to the main PowerPoint Help window, and you can then conduct a specific search.
1
4
You can open the main PowerPoint Help window by clicking on the Help icon located just above the Ribbon on the right side of the window. You can also press to open the Help window. You’ll also find
that dialog boxes contain a Help tool which will generally provide information specific to the features and tools of the dialog box that you working with.
Try This Yourself:
Op
en
Fil
e Before starting this exercise ensure
that you have a new, blank presentation open...
1 Click on Help just above the
Ribbon to open the PowerPoint Help window
This window is your starting point when searching or browsing Help...
2 Click on close to close the
PowerPoint Help window
3 Click on the Design tab, then click on the dialog box launcher in
the Background group to open the Format Background dialog box
You can also access help relevant to the tools in the dialog box you are working with…
4 Click on Help
The Help window will display help information relating to tools in the Format Background dialog box…
5 Click on Close and then click on [Close]
6 Point to Format Painter in the Clipboard group, then press
This gives you specific help about the Format Painter...
7 Click on close to close the PowerPoint Help window
Microsoft PowerPoint 2010 - Level 1
© Learning and Development Service Page 5 Getting help
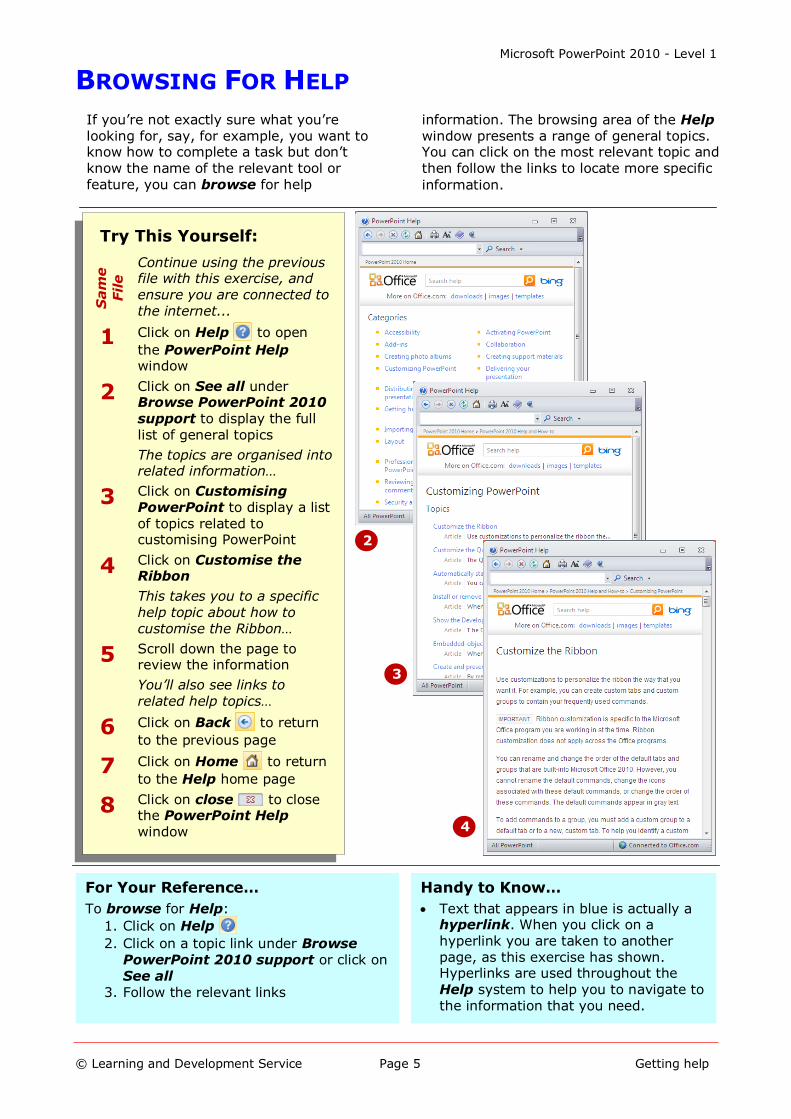
BROWSING FOR HELP
Try This Yourself:
Sam
e
File
Continue using the previous file with this exercise, and
ensure you are connected to the internet...
1 Click on Help to open
the PowerPoint Help window
2 Click on See all under Browse PowerPoint 2010
support to display the full list of general topics
The topics are organised into related information…
3 Click on Customising PowerPoint to display a list
of topics related to customising PowerPoint
4 Click on Customise the Ribbon
This takes you to a specific help topic about how to customise the Ribbon…
5 Scroll down the page to review the information
You’ll also see links to related help topics…
6 Click on Back to return
to the previous page
7 Click on Home to return
to the Help home page
8 Click on close to close the PowerPoint Help window
For Your Reference…
To browse for Help:
1. Click on Help
2. Click on a topic link under Browse PowerPoint 2010 support or click on See all
3. Follow the relevant links
Handy to Know…
Text that appears in blue is actually a hyperlink. When you click on a hyperlink you are taken to another page, as this exercise has shown. Hyperlinks are used throughout the
Help system to help you to navigate to the information that you need.
2
3
If you’re not exactly sure what you’re looking for, say, for example, you want to know how to complete a task but don’t know the name of the relevant tool or
feature, you can browse for help
information. The browsing area of the Help window presents a range of general topics. You can click on the most relevant topic and then follow the links to locate more specific
information.
4
Microsoft PowerPoint 2010 - Level 1
© Learning and Development Service Page 6 Getting help
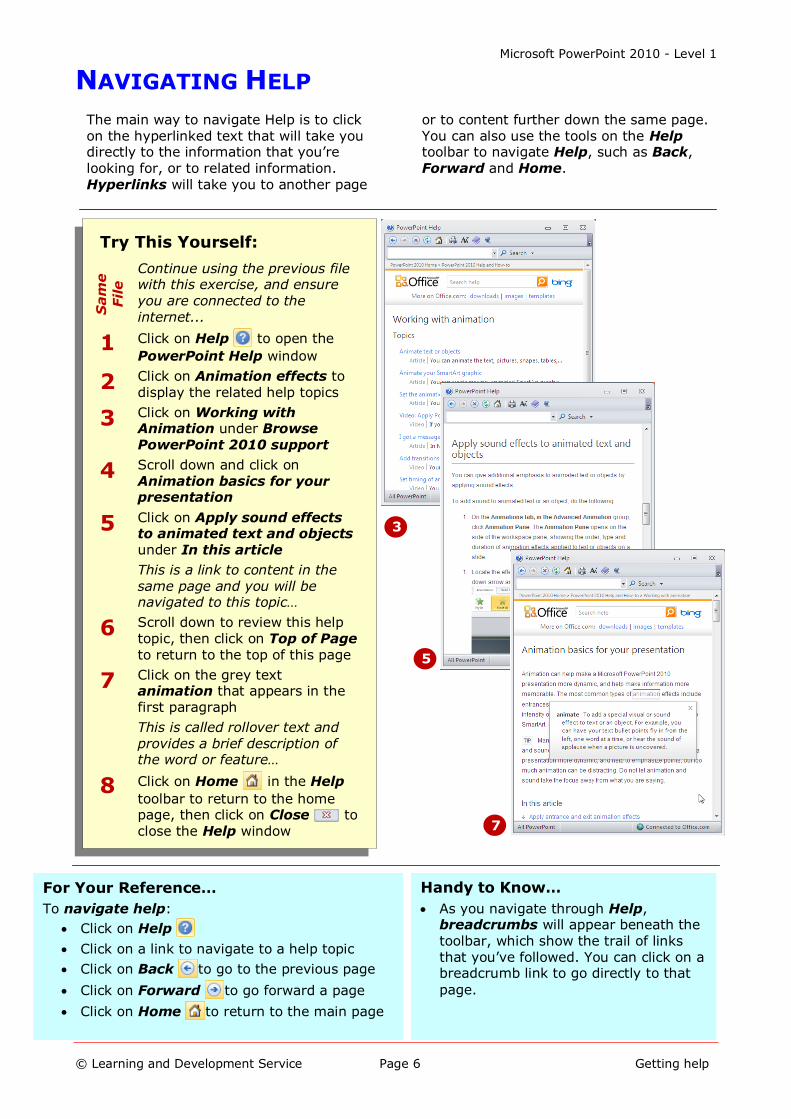
NAVIGATING HELP
Try This Yourself:
Sam
e
File
Continue using the previous file with this exercise, and ensure
you are connected to the internet...
1 Click on Help to open the
PowerPoint Help window
2 Click on Animation effects to display the related help topics
3 Click on Working with Animation under Browse PowerPoint 2010 support
4 Scroll down and click on Animation basics for your presentation
5 Click on Apply sound effects to animated text and objects under In this article
This is a link to content in the same page and you will be navigated to this topic…
6 Scroll down to review this help
topic, then click on Top of Page to return to the top of this page
7 Click on the grey text animation that appears in the first paragraph
This is called rollover text and provides a brief description of the word or feature…
8 Click on Home in the Help
toolbar to return to the home page, then click on Close to close the Help window
For Your Reference…
To navigate help:
Click on Help
Click on a link to navigate to a help topic
Click on Back to go to the previous page
Click on Forward to go forward a page
Click on Home to return to the main page
Handy to Know…
As you navigate through Help, breadcrumbs will appear beneath the toolbar, which show the trail of links that you’ve followed. You can click on a breadcrumb link to go directly to that
page.
5
3
The main way to navigate Help is to click on the hyperlinked text that will take you directly to the information that you’re looking for, or to related information.
Hyperlinks will take you to another page
or to content further down the same page. You can also use the tools on the Help toolbar to navigate Help, such as Back, Forward and Home.
7

Microsoft PowerPoint 2010 - Level 1
© Learning and Development Service Page 7 Getting help
USING THE TABLE OF CONTENTS
For Your Reference…
To use the Table of Contents:
1. Click on Help
2. Click on Show Table of Contents
3. Click on a topic
4. Click on a sub-topic
Handy to Know…
Click on Maximise at the top of the Help window to maximise the Help window to full screen. This can make it easier to browse and read information. Click on Restore to restore the
window to its original size.
2
3
Another way to browse for help information, particularly if you’re not sure exactly what you’re looking for is to use the Table of Contents feature. The Table
of Contents is a complete reference of all
available help topics, presented as a list of general help topics that you can click on to expand and list a range of sub-topics for that particular topic.
7
Try This Yourself:
Sam
e
Fil
e Continue using the previous file with
this exercise, and ensure you are connected to the internet...
1 Click on Help to display the
PowerPoint Help window
2 Click on Show Table of Contents
to expand the PowerPoint Help
window and display the Table of Contents
3 Click on Getting Started with PowerPoint in the Table of Contents pane
The topic will expand to display the sub-topics...
4 Click on Tips for creating and
delivering an effective presentation
The help information will appear on the right...
5 Click on Getting Started with PowerPoint in the Table of Contents pane to collapse the list of
sub-topics
6 Scroll down the topics in the Table of Contents pane to view the topics listed, then click on another topic of your choice
7 Click on Hide Table of Contents
to close the Table of Contents
pane
8 Click on Close to close the Help window

Microsoft PowerPoint 2010 - Level 1
© Learning and Development Service Page 8 Getting help
SEARCHING USING KEYWORDS
For Your Reference…
To search using keywords:
1. Click on Help
2. Click in the keyword text box 3. Type the keyword and press
Handy to Know…
Although the Help window contains two search boxes, they perform the same function. The lower search box is used to search only online on Office.com. The upper search box can
be used in the same way, but is also
used specifically when you are offline.
2
5
If you know exactly what information you’re looking for, you may find it quicker to perform a search using keywords rather than browsing the Table of
Contents or the main Help window.
The Help window includes a search box, in which you type the relevant keywords or phrases. The search will return relevant help topics, articles, templates and links to other
sites.
Try This Yourself:
Sam
e
Fil
e Continue using the previous file
with this exercise, and ensure that
you are connected to the internet...
1 Click on Help to open the
PowerPoint Help window
The search box will be outlined in yellow, which means it is active and you can start typing your keyword/s…
2 Type format text and press
The first 25 results will be listed. You will also notice that the keywords you entered have appeared in the Office.com search box also…
3 Scroll down the list and examine the topics that have been returned
4 Click on Next in the results header or footer to display the next page of results
5 Click on format text in the search box to select the text, then type video and press
The search results will be listed…
6 Click on the drop arrow next to the search box to display a list of recent keyword searches
7 Click on Close to close the Help window

Microsoft PowerPoint 2010 - Level 1
© Learning and Development Service Page 9 Getting help
DISCONNECTING ONLINE HELP
For Your Reference…
To disconnect online help: 1. Click on Connected to Office Online
in the Status bar and select Show content only from this computer
To connect to online help:
1. Click on Offline in the Status bar and select Show content from Office.com
Handy to Know…
When you disconnect online Help in one Microsoft Office program, the change will be applied to all Microsoft Office programs, such as Word and Excel. So, if you were to open the Help
window in Word, you would be
disconnected from Office.com.
2
3
When you use Help to search for information, you are connected to Office.com by default. This means that you have access to all of Microsoft’s help
resources. While it is preferable to be
connected to the internet when searching Help, there may be times when you don’t have internet access and must rely on local resources. In these situations, you can easily
disconnect online Help.
Try This Yourself:
Sam
e
Fil
e
Continue using the previous file with this exercise, and
ensure you are connected to the internet...
1 Click on Help to display the
PowerPoint Help window
The Status bar indicates that you are connected to Office.com...
2 Click on Connected to Office.com in the Status bar to display a menu
3 Select Show content only from this computer
The word Offline will appear in
the Status bar and the window content will look different. You can still browse or search using the same methods, but you may not always return the same number of results, or the most up-to-date information…
4 Click on Offline in the Status bar to display the menu and select Show content from Office.com to reconnect to Office.com
5 Click on close to close the PowerPoint Help window

Microsoft PowerPoint 2010 - Level 1
© Learning and Development Service Page 10 Getting help
PRINTING A HELP TOPIC
Try This Yourself:
Sam
e
Fil
e
Continue using the previous file
with this exercise, and ensure you are connected to the internet...
1 Click on Help to display the
PowerPoint Help window
2 Type printing and press
3 Click on Print your slides or handouts to display the help page
We don’t want to print the entire page, just the first section, so we’ll need to select the required
text first…
4 Position the cursor just before the word Print in the topic title, then click and drag down to select the text, as shown
5 Click on Print to display the
Print dialog box
6 Click on Selection under Page Range so that only the selected text will be printed
7 Click on [Print]
The selection will be reformatted to fit your paper and then
printed...
8 Click on close to close the PowerPoint Help window
For Your Reference…
To print a help topic: 1. Display the help information in the
PowerPoint Help window 2. Select the text to be printed, then click
on Print
3. Click on Selection, then click on
[Print]
Handy to Know…
To print a specific page within the help topic, you can specify the page number. To do this, display the help topic, click on Print then click on Pages under Page Range and type the page number. If
you’re not sure of the page number, click on [Preview] to preview the page to identify the correct page number.
4
5
When you’re working with a help topic, like when you’re following the steps to complete a specific task, it is often easier to print the topic and work from a hard
copy. Microsoft have provided a basic print
functionality, as Help is designed to be read on-screen, and you’ll need to specify which areas of the page to print, otherwise the entire page will print, including topics you
don’t need.
Microsoft PowerPoint 2010 - Level 1
© Learning and Development Service Page 11 Getting help
WORKING WITH SCREEN TIPS
For Your Reference…
To access help via screen tips: 1. Point to the tool 2. Press for further help if the option is
available
Handy to Know…
If you point to a formatting option in a gallery such as Styles, the tool tip will display the name of the style. It will also temporarily reformat your text using Live Preview, so don’t be
alarmed. The text will change back to its original format when you move the mouse away from the gallery.
1
2
One way of finding out more information about commands on the ribbon is to use the screen tips. These are small windows of information that appear when you point
to a command. In some cases, they just
tell you the name of the tool and describe its purpose. In others, they provide direct access to additional help information. Screen tips are also referred to as tool tips.
4
Try This Yourself:
Sam
e
Fil
e
Continue using the previous file with this exercise, and ensure you are connected to the internet...
1 Click in a text placeholder, then click on the Drawing Tools: Format tab, then point to
Rotate in the Arrange
group
The screen tip for the Rotate tool will be displayed, which includes the name of the tool, a brief description of the tool’s function, and the text Press F1 for more help...
2 Press
The help topic for using the Rotate tool will be displayed in the Help window...
3 Click on close to close the PowerPoint Help window
4 Click on the Slide Show tab,
then point to Record Slide
Show in the Set Up group
5 Read the description, then press to display information in the
Help window about how to record a slide show
6 Click on close to close the
PowerPoint Help window

Microsoft PowerPoint 2010 - Level 1
© Learning and Development Service Page 12 Getting help
USING DIALOG BOX HELP
Try This Yourself:
Sam
e F
ile Continue using the
previous file with this exercise, and ensure you are connected to the internet...
1 Click anywhere in a text placeholder, then click on the Home tab, then click on the dialog box launcher in the Drawing group to display the Format Shape dialog box
2 Click on Help to
display the PowerPoint Help window
Help will list recommended articles related to the tools and features in the Format Shape dialog box…
3 Click on close to close the PowerPoint Help window
4 Click on [Close] in the Format Shape dialog box to close this dialog box
5 Close the presentation without saving
For Your Reference…
To access help via a dialog box: 1. Display the dialog box
2. Click on Help
Handy to Know…
You can also press in a dialog box to
access help specific to that dialog box.
1
2
Another way that you can access help is via dialog boxes. This is known as command-specific help, which means that the Help window will display information
relevant to the tools and commands in the dialog box you are working with. You can click on these links to find more information or to perform a keyword search if necessary.
Microsoft PowerPoint 2010 - Level 1
© Learning and Development Service Page 13 Getting help
OTHER SOURCES OF HELP
Microsoft Office 2010 programs are extremely sophisticated. They allow you to perform everyday tasks with relative ease, but also have the power and grunt for very
specialised and advanced functions. No
matter how much you know, you’ll still get stuck from time to time. Fortunately, there is a wealth of information out there for you to call upon.
Friends And Colleagues
Never underestimate the value of friends and colleagues. If they have been using the
software long enough, there is a fair chance that they will know a way around a problem or at least know where to find help.
Reference Manuals
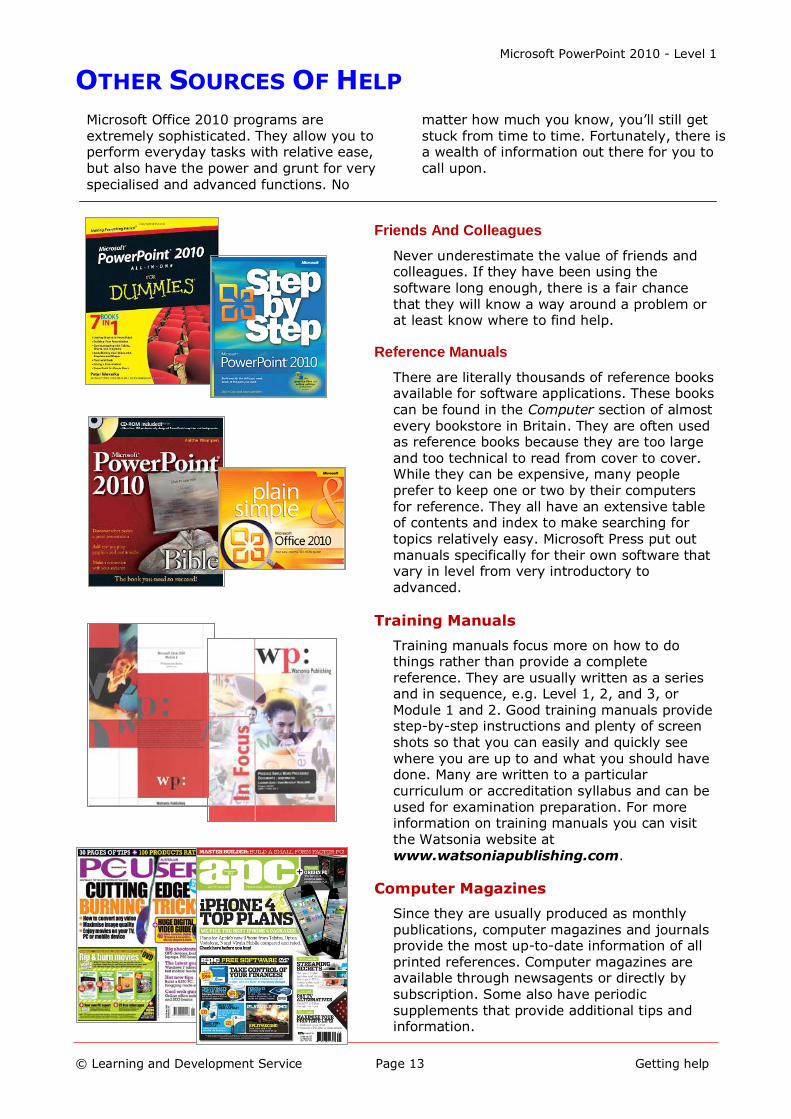
There are literally thousands of reference books available for software applications. These books
can be found in the Computer section of almost every bookstore in Britain. They are often used as reference books because they are too large and too technical to read from cover to cover. While they can be expensive, many people prefer to keep one or two by their computers for reference. They all have an extensive table of contents and index to make searching for topics relatively easy. Microsoft Press put out manuals specifically for their own software that vary in level from very introductory to advanced.
Training Manuals
Training manuals focus more on how to do things rather than provide a complete reference. They are usually written as a series and in sequence, e.g. Level 1, 2, and 3, or Module 1 and 2. Good training manuals provide step-by-step instructions and plenty of screen shots so that you can easily and quickly see
where you are up to and what you should have done. Many are written to a particular curriculum or accreditation syllabus and can be used for examination preparation. For more information on training manuals you can visit the Watsonia website at www.watsoniapublishing.com.
Computer Magazines
Since they are usually produced as monthly publications, computer magazines and journals provide the most up-to-date information of all printed references. Computer magazines are available through newsagents or directly by
subscription. Some also have periodic supplements that provide additional tips and information.

Microsoft PowerPoint 2010 - Level 1
© Learning and Development Service Page 14 Getting help
CONCLUDING REMARKS
Congratulations!
You have now completed the Getting help booklet. This booklet was designed to get you to the point where you can competently perform a variety of operations as outlined in the task list on page 2.
We have tried to build up your skills and knowledge by having you work through specific tasks. The step by step approach will serve as a reference for you when you need to repeat a task.
Where To From Here…
The following is a little advice about what to do next:
Spend some time playing with what you have learnt. You should reinforce the skills that you have acquired and use some of the application's commands. This will test just how much of the concepts and features have stuck! Don't try a big task just yet if you can avoid it - small is a good way to start.
Some aspects of the course may now be a little vague. Go over some of the points that you may be unclear about. Use the examples and exercises in these notes and have another go - these step-by-step notes were designed to help you in the
classroom and in the work place!
Here are a few techniques and strategies that we've found handy for learning more about technology:
visit CLD’s e-learning zone on the Intranet
read computer magazines - there are often useful articles about specific techniques
if you have the skills and facilities, browse the Internet, specifically the technical
pages of the application that you have just learnt
take an interest in what your work colleagues have done and how they did it - we don't suggest that you plagiarise but you can certainly learn from the techniques of others
if your software came with a manual (which is rare nowadays) spend a bit of time each day reading a few pages. Then try the techniques out straight away - over a period of time you'll learn a lot this way
and of course, there are also more courses and booklets for you to work through
finally, don’t forget to contact CLD’s IT Training Helpdesk on 01243-752100