microsoft outlook 2010 - cci...
TRANSCRIPT
Microsoft®
Outlook® 2010
Microsoft® Office Specialist 2010 SeriesCOURSEWARE 3242–1 EXAM 77– 884
Achieve more
For Evaluation Only

For E
valu
atio
n Onl
y
3242-1 v1.00 © CCI Learning Solutions Inc. 35
Microsoft® Office Specialist 2010 Series
Microsoft®
Outlook 2010 Core Certification
Lesson 2: Managing E-mail Lesson Objectives In this lesson, you will learn how to manage and store e-mail messages. Upon completion of this lesson, you should be able to:
apply themes and stationery
work with signatures
work with styles
work with attachments
work with conversations
work with the folder list
create folders
organize messages
use Quick Steps
print messages
For E
valu
atio
n Onl
y
Lesson 2 Managing E-mail
36 3242-1 v1.00 © CCI Learning Solutions Inc.
2.1
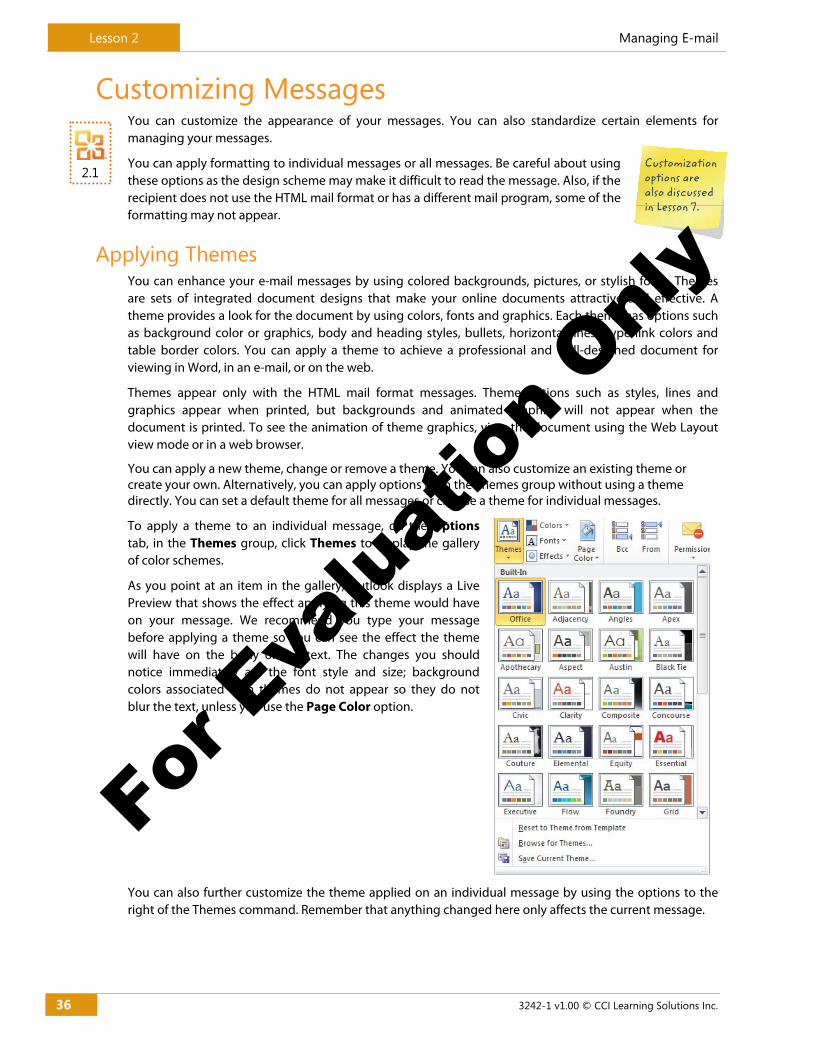
Customizing Messages You can customize the appearance of your messages. You can also standardize certain elements for managing your messages.
You can apply formatting to individual messages or all messages. Be careful about using these options as the design scheme may make it difficult to read the message. Also, if the recipient does not use the HTML mail format or has a different mail program, some of the formatting may not appear.
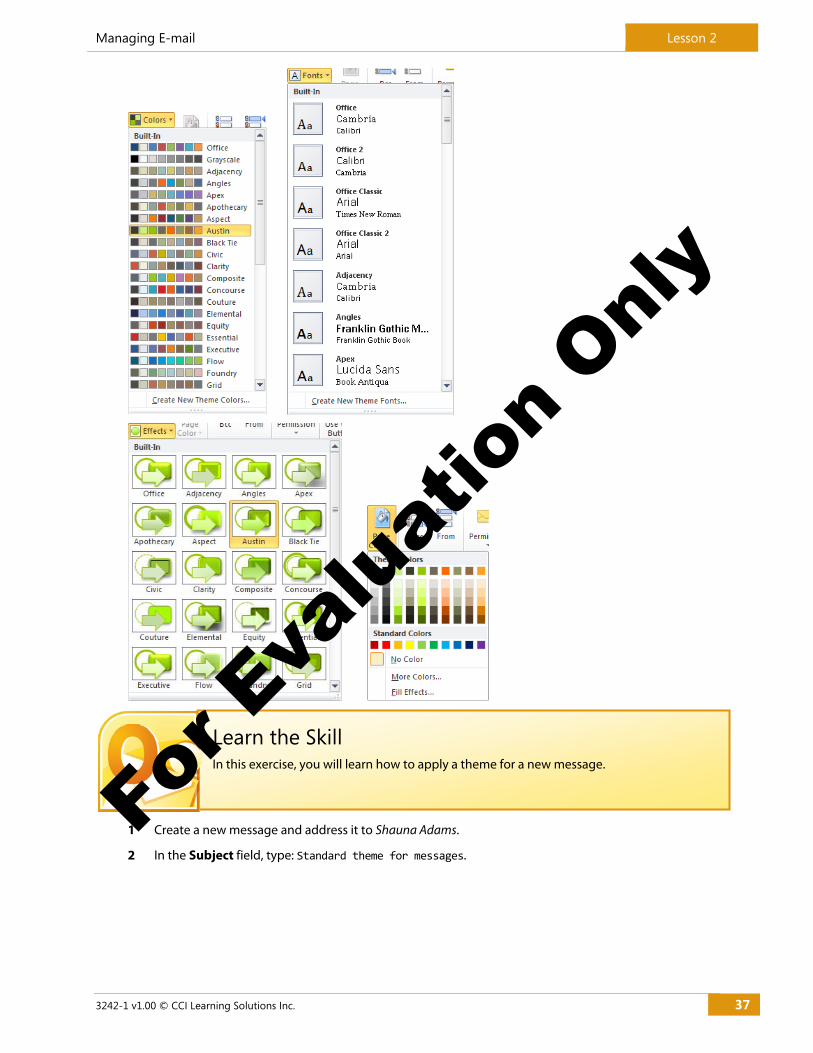
Applying Themes You can enhance your e-mail messages by using colored backgrounds, pictures, or stylish fonts. Themes are sets of integrated document designs that make your online documents attractive and effective. A theme provides a look for the document by using colors, fonts and graphics. Each theme has options such as background color or graphics, body and heading styles, bullets, horizontal lines, hyperlink colors and table border colors. You can apply a theme to achieve a professional and well-designed document for viewing in Word, in an e-mail, or on the web.
Themes appear only with the HTML mail format messages. Theme options such as styles, lines and graphics appear when printed, but backgrounds and animated graphics will not appear when the document is printed. To see the animation of theme graphics, view the document using the Web Layout view mode or in a web browser.
You can apply a new theme, change or remove a theme. You can also customize an existing theme or create your own. Alternatively, you can apply options from the Themes group without using a theme directly. You can set a default theme for all messages or choose a theme for individual messages.
To apply a theme to an individual message, on the Options tab, in the Themes group, click Themes to display the gallery of color schemes.
As you point at an item in the gallery, Outlook displays a Live Preview that shows the effect applying this theme would have on your message. We recommend you type your message before applying a theme so you can see the effect the theme will have on the body of the text. The changes you should notice immediately are the font style and size; background colors associated with themes do not appear so they do not blur the text, unless you use the Page Color option.
You can also further customize the theme applied on an individual message by using the options to the right of the Themes command. Remember that anything changed here only affects the current message.
Customization options are also discussed in Lesson 7.
For E
valu
atio
n Onl
y
Managing E-mail Lesson 2
3242-1 v1.00 © CCI Learning Solutions Inc. 37
1 Create a new message and address it to Shauna Adams.
2 In the Subject field, type: Standard theme for messages.
Learn the Skill In this exercise, you will learn how to apply a theme for a new message.
For E
valu
atio
n Onl
y
Lesson 2 Managing E-mail
38 3242-1 v1.00 © CCI Learning Solutions Inc.
3.4
3 In the body text, type the following: Hi Shauna,
Further to our discussion last week, I like the Austin theme. I have applied this theme in this message for you to view it.
Let us know which themes make the short list so I can then poll the Travel Directors.
Thanks!
Nick
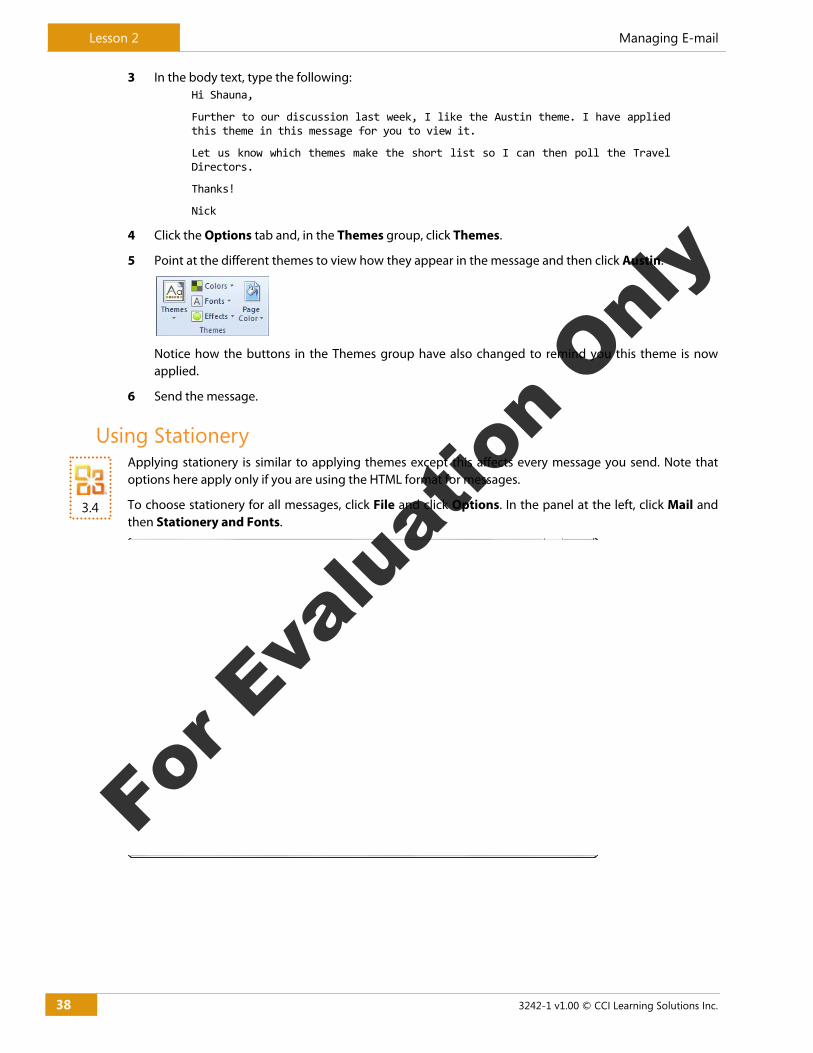
4 Click the Options tab and, in the Themes group, click Themes.
5 Point at the different themes to view how they appear in the message and then click Austin.
Notice how the buttons in the Themes group have also changed to remind you this theme is now applied.
6 Send the message.
Using Stationery Applying stationery is similar to applying themes except this affects every message you send. Note that options here apply only if you are using the HTML format for messages.
To choose stationery for all messages, click File and click Options. In the panel at the left, click Mail and then Stationery and Fonts.
For E
valu
atio
n Onl
y
Managing E-mail Lesson 2
3242-1 v1.00 © CCI Learning Solutions Inc. 39
To set up stationery for every message, click Theme.
As you select a theme in the left panel, Outlook previews this in the right panel so you can see the effect when applied to all messages.
Notice how you can also set the default font for different types of messages in the Signatures and Stationery dialog box. You can do this for new or response messages only, but not in combination with stationery.
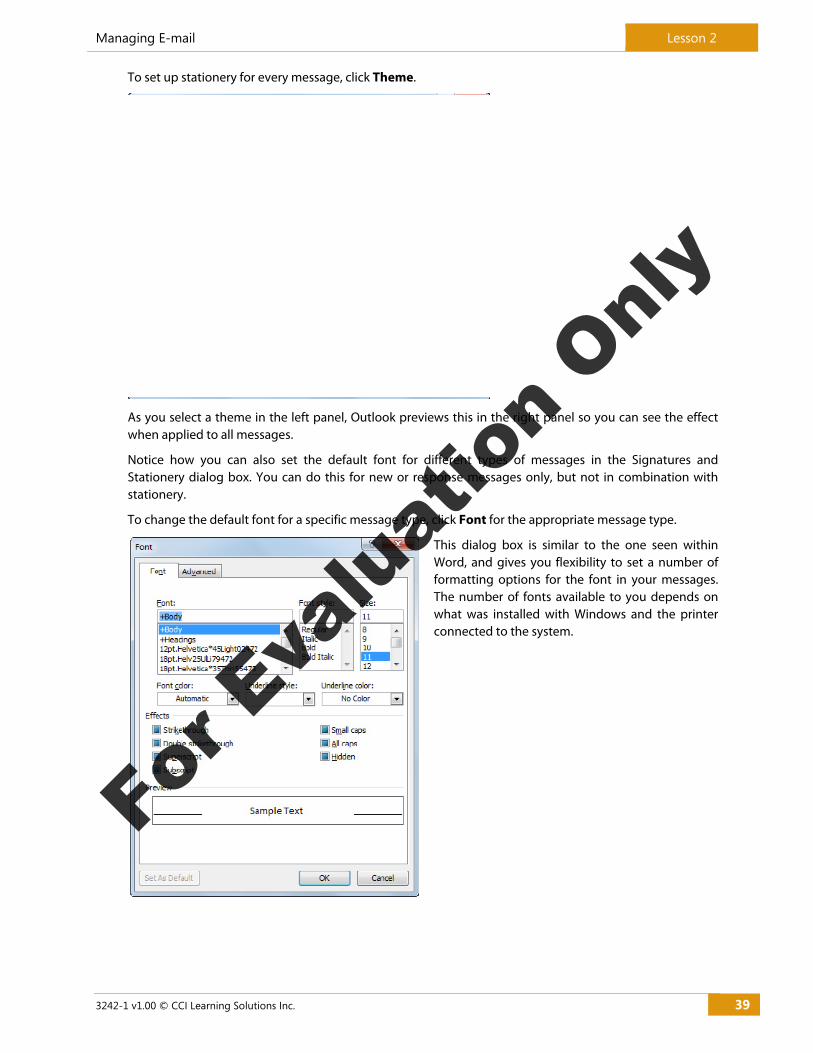
To change the default font for a specific message type, click Font for the appropriate message type.
This dialog box is similar to the one seen within Word, and gives you flexibility to set a number of formatting options for the font in your messages. The number of fonts available to you depends on what was installed with Windows and the printer connected to the system.
For E
valu
atio
n Onl
y
Lesson 2 Managing E-mail
40 3242-1 v1.00 © CCI Learning Solutions Inc.
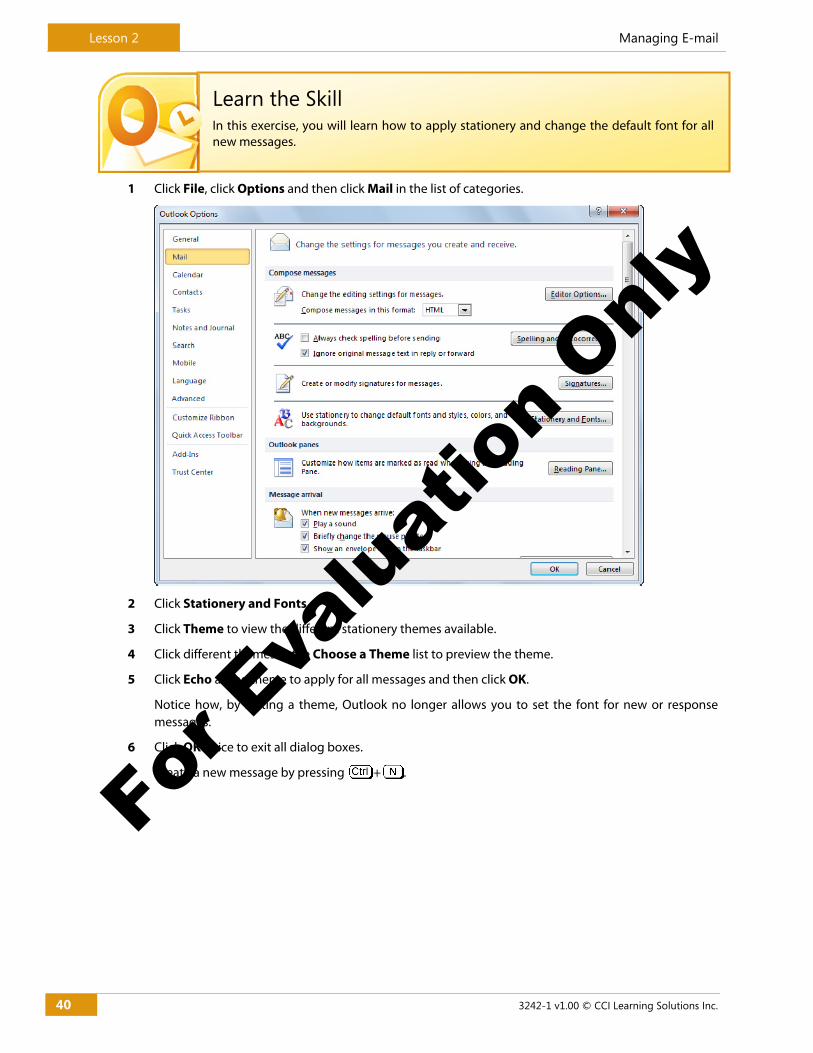
1 Click File, click Options and then click Mail in the list of categories.
2 Click Stationery and Fonts.
3 Click Theme to view the different stationery themes available.
4 Click different themes in the Choose a Theme list to preview the theme.
5 Click Echo as the theme to apply for all messages and then click OK.
Notice how, by setting a theme, Outlook no longer allows you to set the font for new or response messages.
6 Click OK twice to exit all dialog boxes.
7 Create a new message by pressing + .
Learn the Skill In this exercise, you will learn how to apply stationery and change the default font for all new messages.
For E
valu
atio
n Onl
y
Managing E-mail Lesson 2
3242-1 v1.00 © CCI Learning Solutions Inc. 41
You should have the theme applied to the new message.
8 Close the new message.
Now remove the theme and try changing the font to use when replying to messages.
9 Click File, click Options, click Mail and then click Stationery and Fonts.
10 Click Theme and then click (No Theme) in the list. Click OK.
11 Click Font in the New mail messages area.
12 In the Font list, click Arial. In the Size list, click 10. Click the arrow for Font color and the click Blue. Click OK.
13 Click Font for the Replying or forwarding messages area. In the list of fonts, choose Times New Roman. In the Size list, click 12. Click the arrow for Font color and choose Green. Then click OK.
14 Click OK twice to exit all dialog boxes.
15 Create a new message and then click in the message box area. Type: We are planning.
Notice how the text now appears with the formatting selected in step 12.
16 Close this message without saving it.
17 On the Home tab, in the Respond group, click Reply for any message in the list.
18 Click in the message box area and type: We are planning.
Notice this text also reflects the formatting options selected in step 13.
19 Close this message without saving it.
For E
valu
atio
n Onl
y
Lesson 2 Managing E-mail
42 3242-1 v1.00 © CCI Learning Solutions Inc.
Working with Styles If you send many messages with similar formatting, you can use styles to keep the look of your messages consistent. Styles can assist in identifying a particular theme or document design such as newsletters, product announcements, etc.
Styles can be applied to text in individual messages, or you can create your own and save them in the Quick Styles gallery for future use.
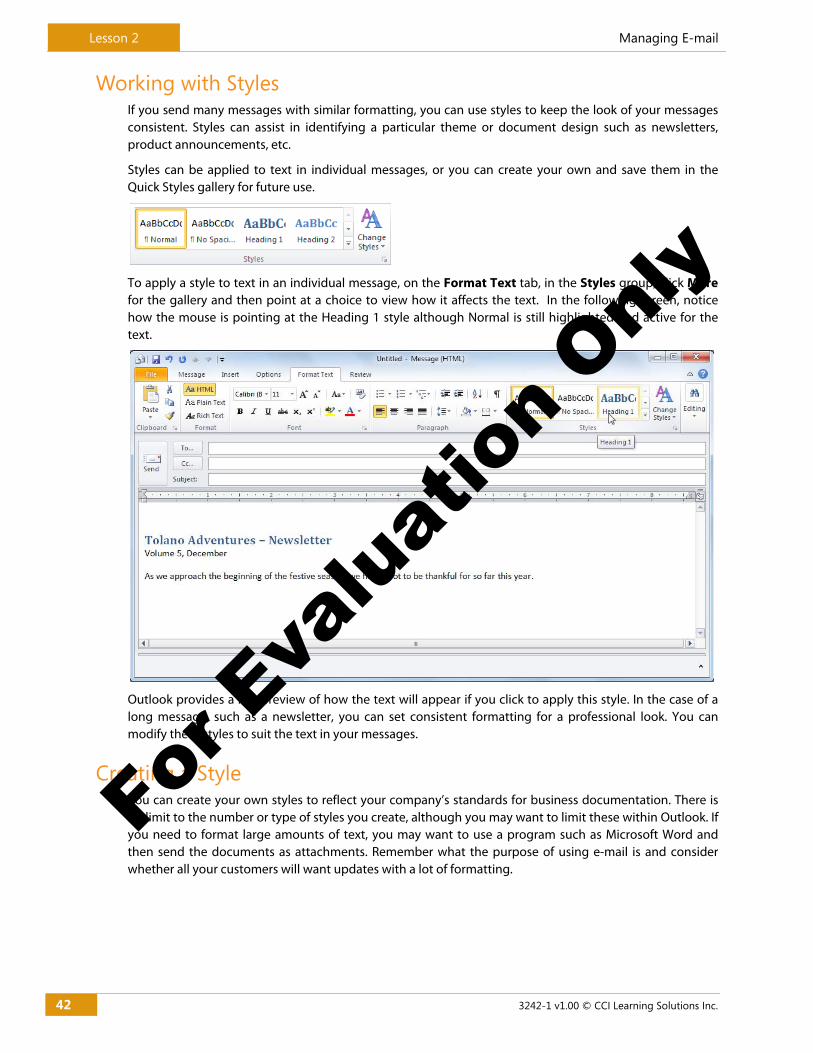
To apply a style to text in an individual message, on the Format Text tab, in the Styles group, click More for the gallery and then point at a choice to view how it affects the text. In the following screen, notice how the mouse is pointing at the Heading 1 style although Normal is still highlighted and active for the text.
Outlook provides a live preview of how the text will appear if you click to apply this style. In the case of a long message, such as a newsletter, you can set consistent formatting for a professional look. You can modify these styles to suit the text in your messages.
Creating a Style You can create your own styles to reflect your company’s standards for business documentation. There is no limit to the number or type of styles you create, although you may want to limit these within Outlook. If you need to format large amounts of text, you may want to use a program such as Microsoft Word and then send the documents as attachments. Remember what the purpose of using e-mail is and consider whether all your customers will want updates with a lot of formatting.
For E
valu
atio
n Onl
y

Managing E-mail Lesson 2
3242-1 v1.00 © CCI Learning Solutions Inc. 43
To create a style, on the Format Text tab, in the Styles group, click the Styles Dialog box launcher.
At the bottom of the Styles window, click the New Style button.
You can now specify the formatting attributes for this style. The most common formatting features are available above the Preview box, but you can also use the Format button to set up more options.
For E
valu
atio
n Onl
y
Lesson 2 Managing E-mail
44 3242-1 v1.00 © CCI Learning Solutions Inc.
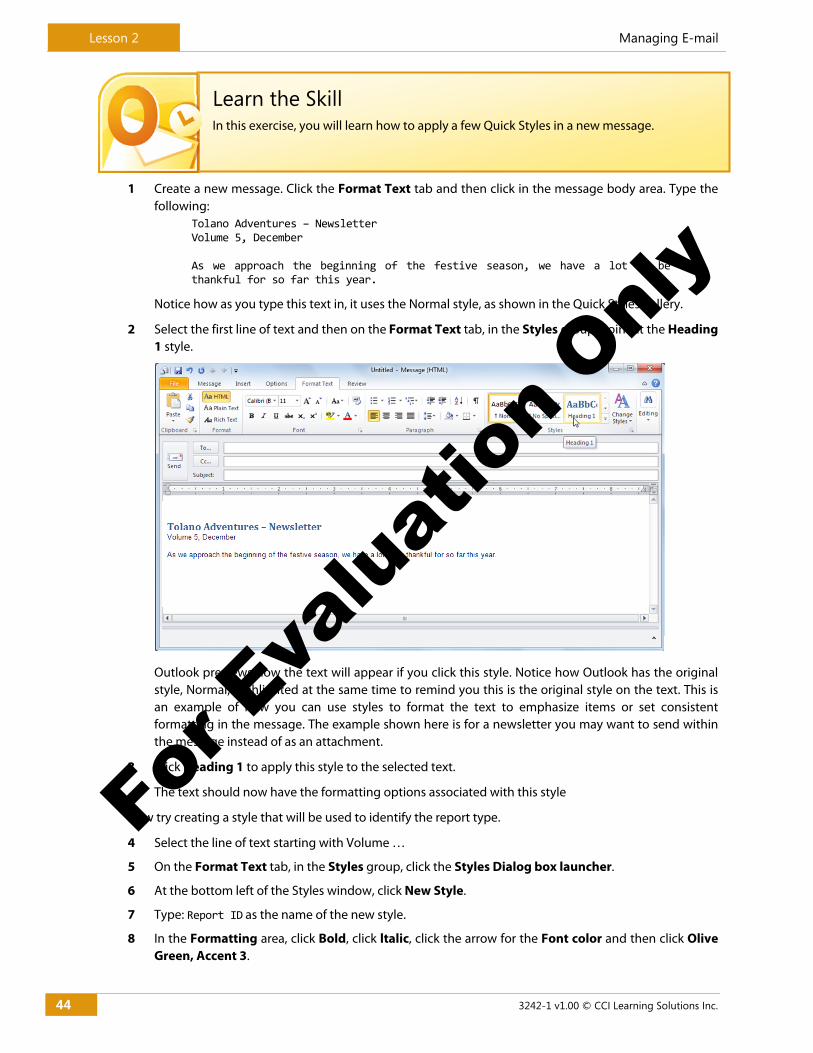
1 Create a new message. Click the Format Text tab and then click in the message body area. Type the following:
Tolano Adventures – Newsletter Volume 5, December As we approach the beginning of the festive season, we have a lot to be thankful for so far this year.
Notice how as you type this text in, it uses the Normal style, as shown in the Quick Styles gallery.
2 Select the first line of text and then on the Format Text tab, in the Styles group, point at the Heading 1 style.
Outlook previews how the text will appear if you click this style. Notice how Outlook has the original style, Normal, highlighted at the same time to remind you this is the original style on the text. This is an example of how you can use styles to format the text to emphasize items or set consistent formatting in the message. The example shown here is for a newsletter you may want to send within the message instead of as an attachment.
3 Click Heading 1 to apply this style to the selected text.
The text should now have the formatting options associated with this style
Now try creating a style that will be used to identify the report type.
4 Select the line of text starting with Volume …
5 On the Format Text tab, in the Styles group, click the Styles Dialog box launcher.
6 At the bottom left of the Styles window, click New Style.
7 Type: Report ID as the name of the new style.
8 In the Formatting area, click Bold, click ltalic, click the arrow for the Font color and then click Olive Green, Accent 3.
Learn the Skill In this exercise, you will learn how to apply a few Quick Styles in a new message.
For E
valu
atio
n Onl
y
Managing E-mail Lesson 2
3242-1 v1.00 © CCI Learning Solutions Inc. 45
3.4
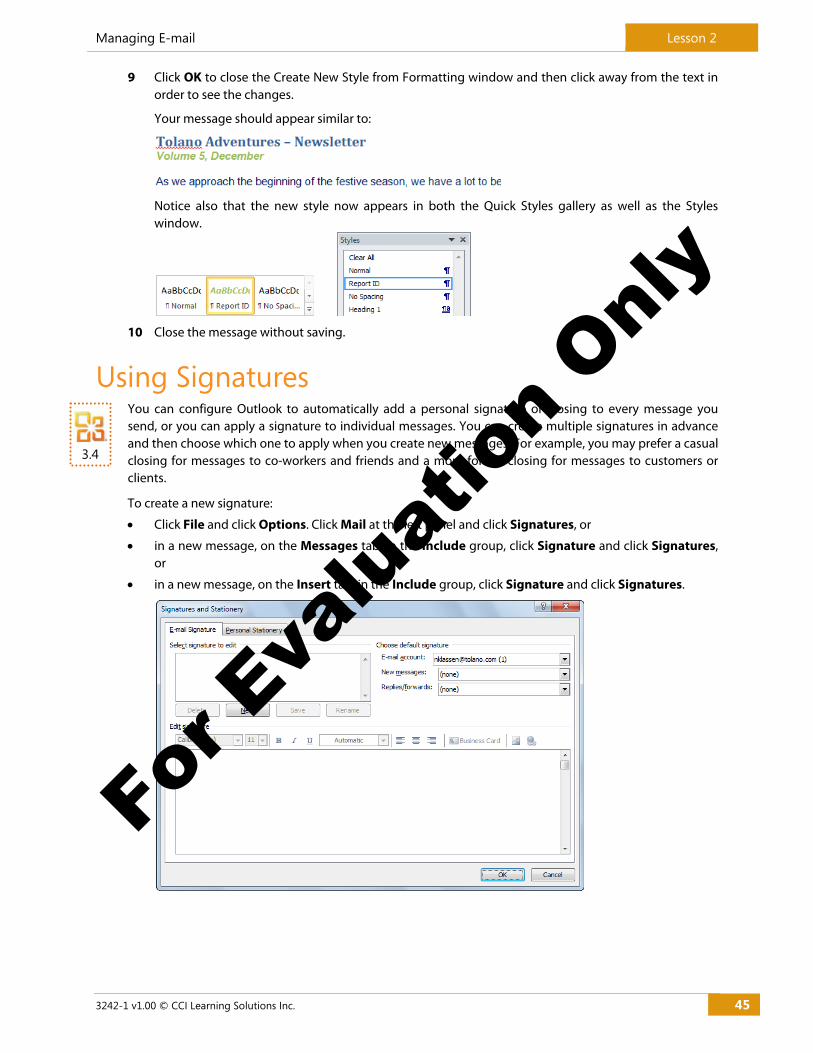
9 Click OK to close the Create New Style from Formatting window and then click away from the text in order to see the changes.
Your message should appear similar to:
Notice also that the new style now appears in both the Quick Styles gallery as well as the Styles window.
10 Close the message without saving.
Using Signatures You can configure Outlook to automatically add a personal signature or closing to every message you send, or you can apply a signature to individual messages. You can create multiple signatures in advance and then choose which one to apply when you create new messages. For example, you may prefer a casual closing for messages to co-workers and friends and a more formal closing for messages to customers or clients.
To create a new signature:
Click File and click Options. Click Mail at the left panel and click Signatures, or
in a new message, on the Messages tab, in the Include group, click Signature and click Signatures, or
in a new message, on the Insert tab, in the Include group, click Signature and click Signatures.
For E
valu
atio
n Onl
y
Lesson 2 Managing E-mail
46 3242-1 v1.00 © CCI Learning Solutions Inc.
1 Click File, click Options, click Mail, and then click Signatures.
2 Click New, type: nk as the name of this signature and then click OK.
3 In the Edit signature text box, type the following: Nick Klassen
Vice President
Tolano Adventures
300 171st Street, New York, NY 98032
540 555 4321
www.tolanoadventures.com
4 Select the entire text and then apply the following formatting to the text:
Font: Arial Size: 10 Font Color: Dark Blue, Text 2
5 Click Save.
Notice how Outlook now applies this signature as the default one to use with all new messages. As this is the main one that Nick will use for business messages, this is correct.
6 Click New, then type: nk‐r for the name and then click OK.
7 In the Edit signature text box, create the following:
Nick Klassen
540 555 4321
8 Format this text using the same options as in step 4 except change the color to Olive Green, Accent 3, Darker 50%. Then click Save.
You should now have two signatures in the list. To view these, click the signature in the list and its contents will appear in the Edit signature box to view or edit.
9 In the Select signature to edit list box, click nk.
10 Click New, type: nk‐p as the name and then click OK.
11 In the Edit signature text box, create the following:
Nick Klassen
B: 540 555 4321
H: 540 555 8787
M: 540 663 8787
12 Format this text with your own preferences and then save it.
13 Click the arrow for Replies/forwards and then click nk-r to set this signature as the default for any responses Nick makes to messages.
Learn the Skill In this exercise, you will create several signatures, set some as defaults and use others as needed.
For E
valu
atio
n Onl
y
Managing E-mail Lesson 2
3242-1 v1.00 © CCI Learning Solutions Inc. 47
14 Click OK twice to leave the Outlook options.
15 Press + to create a new message.
Notice how the signature set for all new messages now appears in the body text and, in fact, is two lines below where you can enter the text for your message.
Suppose Nick wants to send this message to a friend – the signature shown here is not the one that should appear for this personal message.
16 Select the text for the current signature and press .
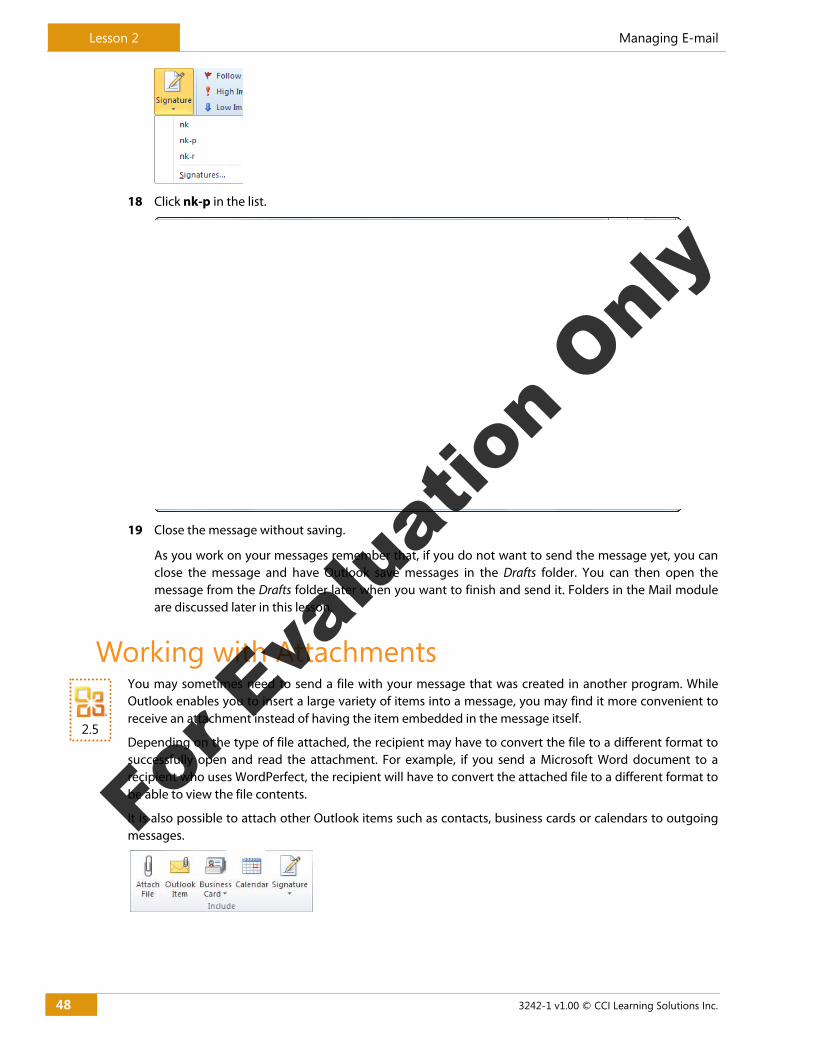
17 Click the Message tab and, in the Include group, click Signature.
For E
valu
atio
n Onl
y
Lesson 2 Managing E-mail
48 3242-1 v1.00 © CCI Learning Solutions Inc.
2.5
18 Click nk-p in the list.
19 Close the message without saving.
As you work on your messages remember that, if you do not want to send the message yet, you can close the message and have Outlook save messages in the Drafts folder. You can then open the message from the Drafts folder later when you want to finish and send it. Folders in the Mail module are discussed later in this lesson.
Working with Attachments You may sometimes need to send a file with your message that was created in another program. While Outlook enables you to insert a large variety of items into a message, you may find it more convenient to receive an attachment instead of having the item embedded in the message itself.
Depending on the type of file attached, the recipient may have to convert the file to a different format to successfully open and read the attachment. For example, if you send a Microsoft Word document to a recipient who uses WordPerfect, the recipient will have to convert the attached file to a different format to be able to view the file contents.
It is also possible to attach other Outlook items such as contacts, business cards or calendars to outgoing messages.
For E
valu
atio
n Onl
y
Managing E-mail Lesson 2
3242-1 v1.00 © CCI Learning Solutions Inc. 49
Sending Attachments You can attach files to a new message, to a reply, or to a message you are forwarding before or after you type the main body of the message. Note that Outlook blocks some attachments as part of its internal security (e.g. files with .exe, .bat or .com extensions). You can either reduce the security level or use different file formats, e.g. use zip compression software to send such files.
Attachments can be from within Outlook such as a contact card or a message, or an external data file such as a Word or Excel file, graphics image, etc.
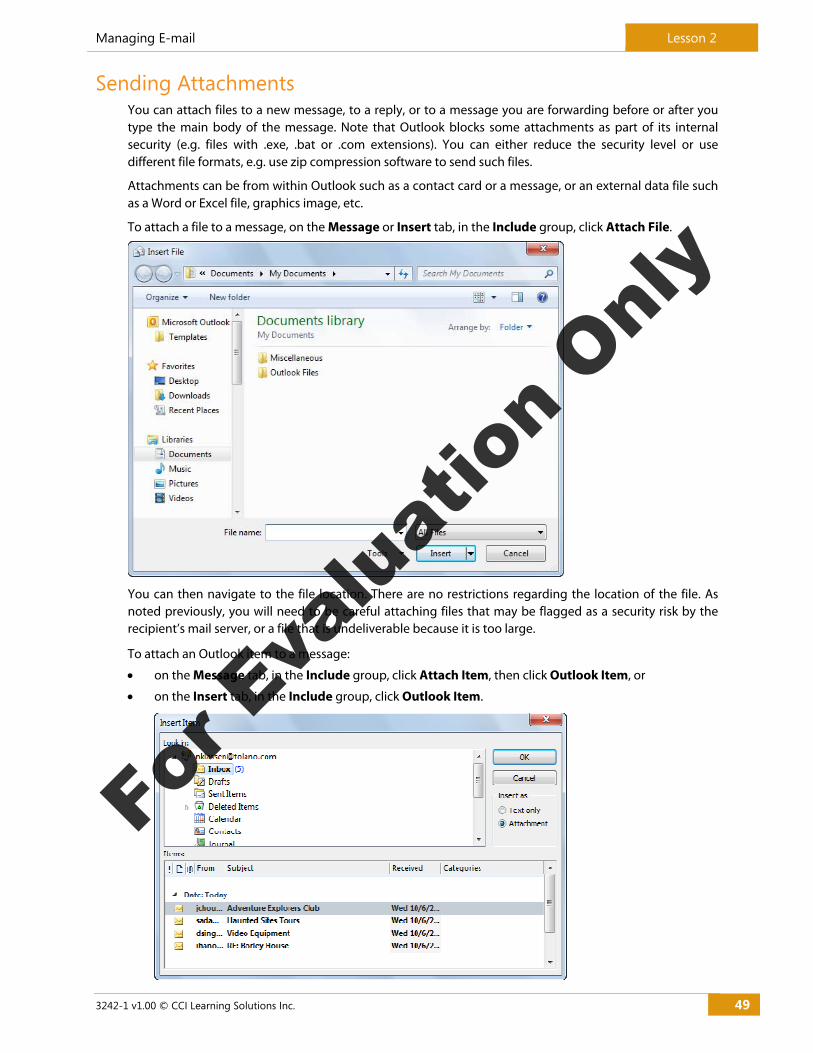
To attach a file to a message, on the Message or Insert tab, in the Include group, click Attach File.
You can then navigate to the file location. There are no restrictions regarding the location of the file. As noted previously, you will need to be careful attaching files that may be flagged as a security risk by the recipient’s mail server, or a file that is undeliverable because it is too large.
To attach an Outlook item to a message:
on the Message tab, in the Include group, click Attach Item, then click Outlook Item, or
on the Insert tab, in the Include group, click Outlook Item.
For E
valu
atio
n Onl
y
Lesson 2 Managing E-mail
50 3242-1 v1.00 © CCI Learning Solutions Inc.
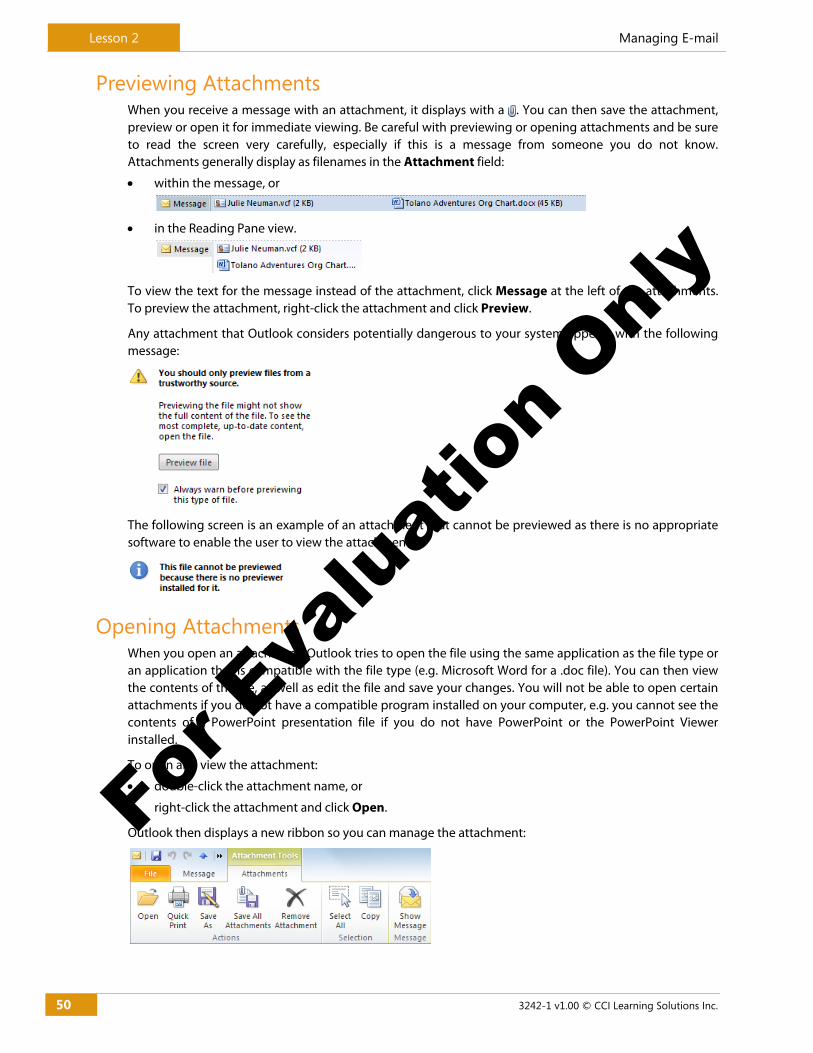
Previewing Attachments When you receive a message with an attachment, it displays with a . You can then save the attachment, preview or open it for immediate viewing. Be careful with previewing or opening attachments and be sure to read the screen very carefully, especially if this is a message from someone you do not know. Attachments generally display as filenames in the Attachment field:
within the message, or
in the Reading Pane view.
To view the text for the message instead of the attachment, click Message at the left of the attachments. To preview the attachment, right-click the attachment and click Preview.
Any attachment that Outlook considers potentially dangerous to your system appears with the following message:
The following screen is an example of an attachment that cannot be previewed as there is no appropriate software to enable the user to view the attachment:
Opening Attachments When you open an attachment, Outlook tries to open the file using the same application as the file type or an application that is compatible with the file type (e.g. Microsoft Word for a .doc file). You can then view the contents of the file, as well as edit the file and save your changes. You will not be able to open certain attachments if you do not have a compatible program installed on your computer, e.g. you cannot see the contents of a PowerPoint presentation file if you do not have PowerPoint or the PowerPoint Viewer installed.
To open and view the attachment:
double-click the attachment name, or
right-click the attachment and click Open.
Outlook then displays a new ribbon so you can manage the attachment:
For E
valu
atio
n Onl
y
Managing E-mail Lesson 2
3242-1 v1.00 © CCI Learning Solutions Inc. 51
3.1
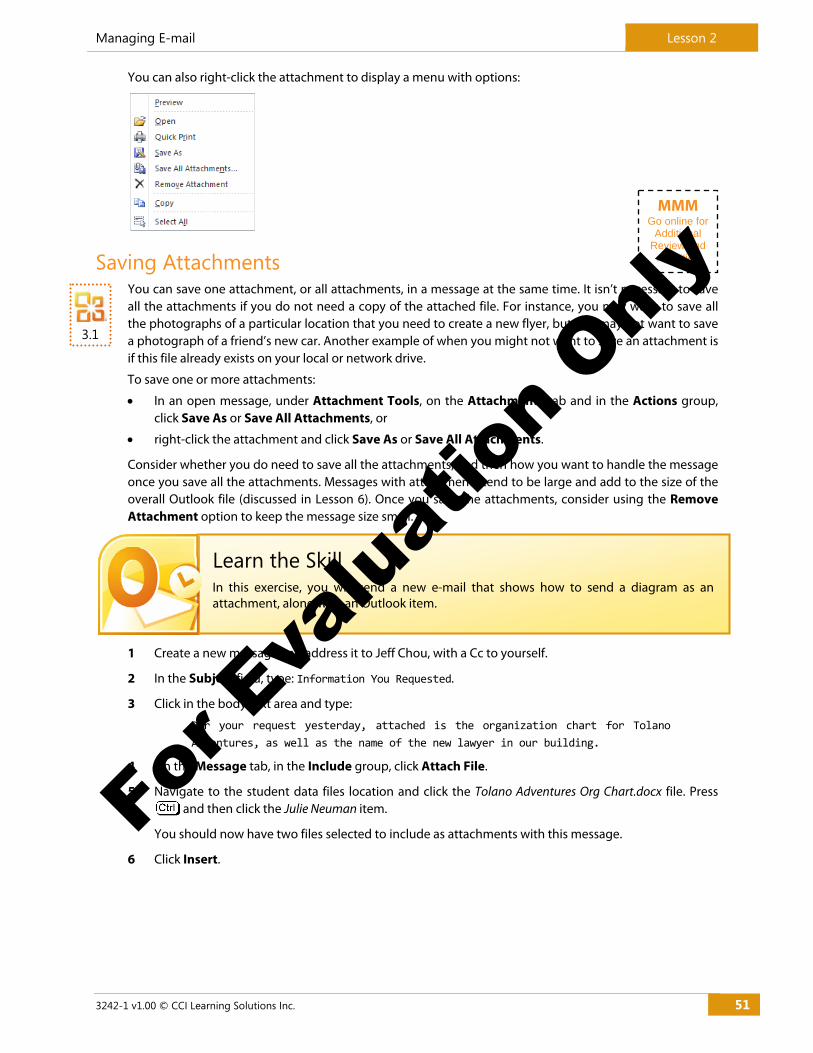
You can also right-click the attachment to display a menu with options:
Saving Attachments You can save one attachment, or all attachments, in a message at the same time. It isn’t necessary to save all the attachments if you do not need a copy of the attached file. For instance, you may want to save all the photographs of a particular location that you need to create a new flyer, but you may not want to save a photograph of a friend’s new car. Another example of when you might not want to save an attachment is if this file already exists on your local or network drive.
To save one or more attachments:
In an open message, under Attachment Tools, on the Attachments tab and in the Actions group, click Save As or Save All Attachments, or
right-click the attachment and click Save As or Save All Attachments.
Consider whether you do need to save all the attachments, and then how you want to handle the message once you save all the attachments. Messages with attachments tend to be large and add to the size of the overall Outlook file (discussed in Lesson 6). Once you save the attachments, consider using the Remove Attachment option to keep the message size small.
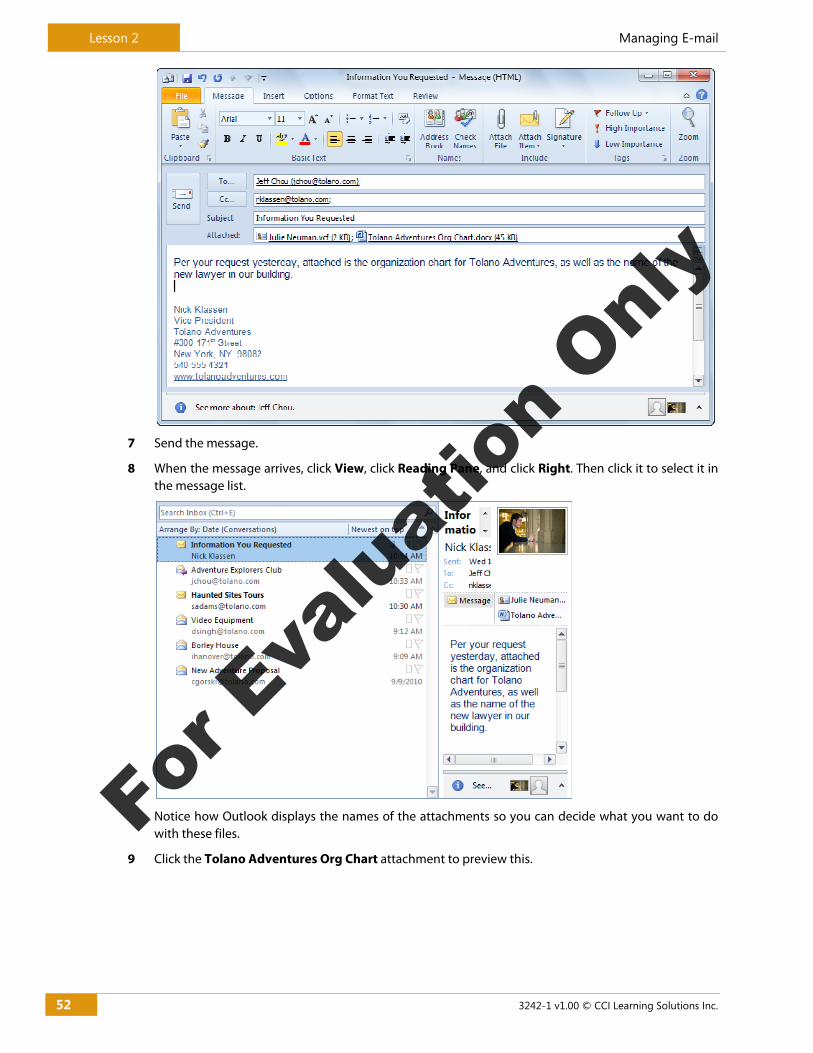
1 Create a new message and address it to Jeff Chou, with a Cc to yourself.
2 In the Subject field, type: Information You Requested.
3 Click in the body text area and type:
Per your request yesterday, attached is the organization chart for Tolano
Adventures, as well as the name of the new lawyer in our building.
4 On the Message tab, in the Include group, click Attach File.
5 Navigate to the student data files location and click the Tolano Adventures Org Chart.docx file. Press and then click the Julie Neuman item.
You should now have two files selected to include as attachments with this message.
6 Click Insert.
Learn the Skill In this exercise, you will send a new e-mail that shows how to send a diagram as an attachment, along with an Outlook item.
MMM Go online for
Additional Review and
Activities
For E
valu
atio
n Onl
y
Lesson 2 Managing E-mail
52 3242-1 v1.00 © CCI Learning Solutions Inc.
7 Send the message.
8 When the message arrives, click View, click Reading Pane, and click Right. Then click it to select it in the message list.
Notice how Outlook displays the names of the attachments so you can decide what you want to do with these files.
9 Click the Tolano Adventures Org Chart attachment to preview this.
For E
valu
atio
n Onl
y
Managing E-mail Lesson 2
3242-1 v1.00 © CCI Learning Solutions Inc. 53
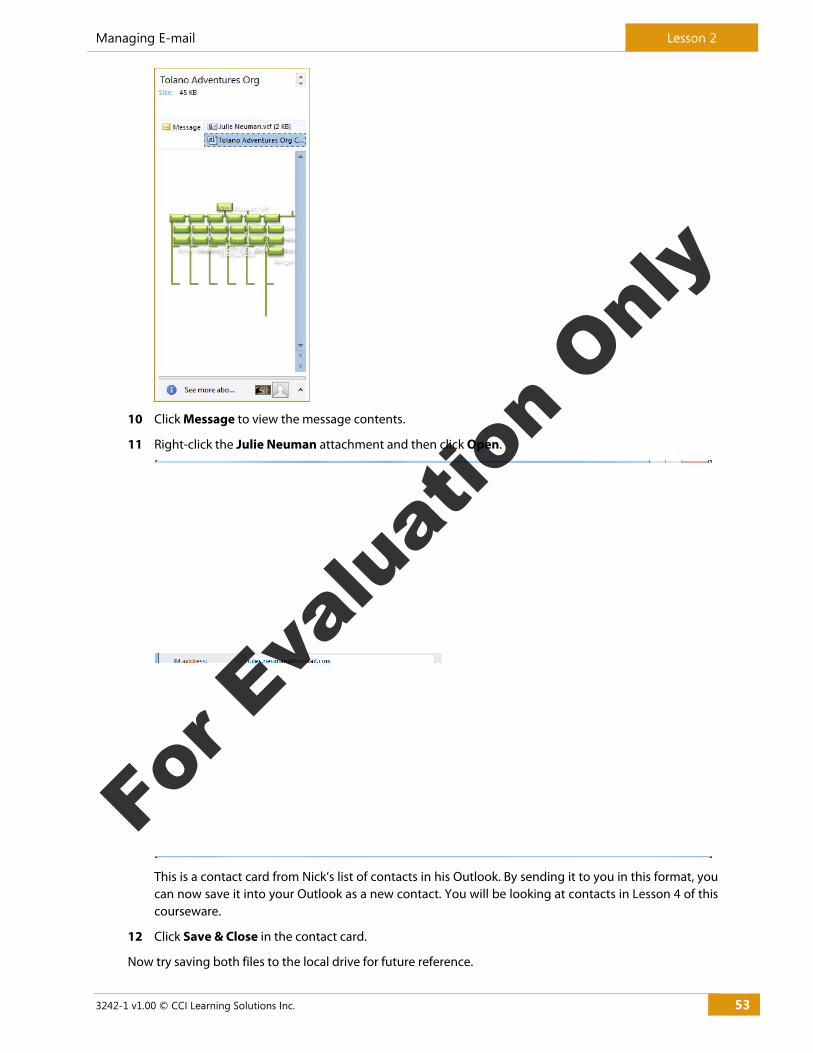
10 Click Message to view the message contents.
11 Right-click the Julie Neuman attachment and then click Open.
This is a contact card from Nick’s list of contacts in his Outlook. By sending it to you in this format, you can now save it into your Outlook as a new contact. You will be looking at contacts in Lesson 4 of this courseware.
12 Click Save & Close in the contact card.
Now try saving both files to the local drive for future reference.
For E
valu
atio
n Onl
y
Lesson 2 Managing E-mail
54 3242-1 v1.00 © CCI Learning Solutions Inc.
3.1
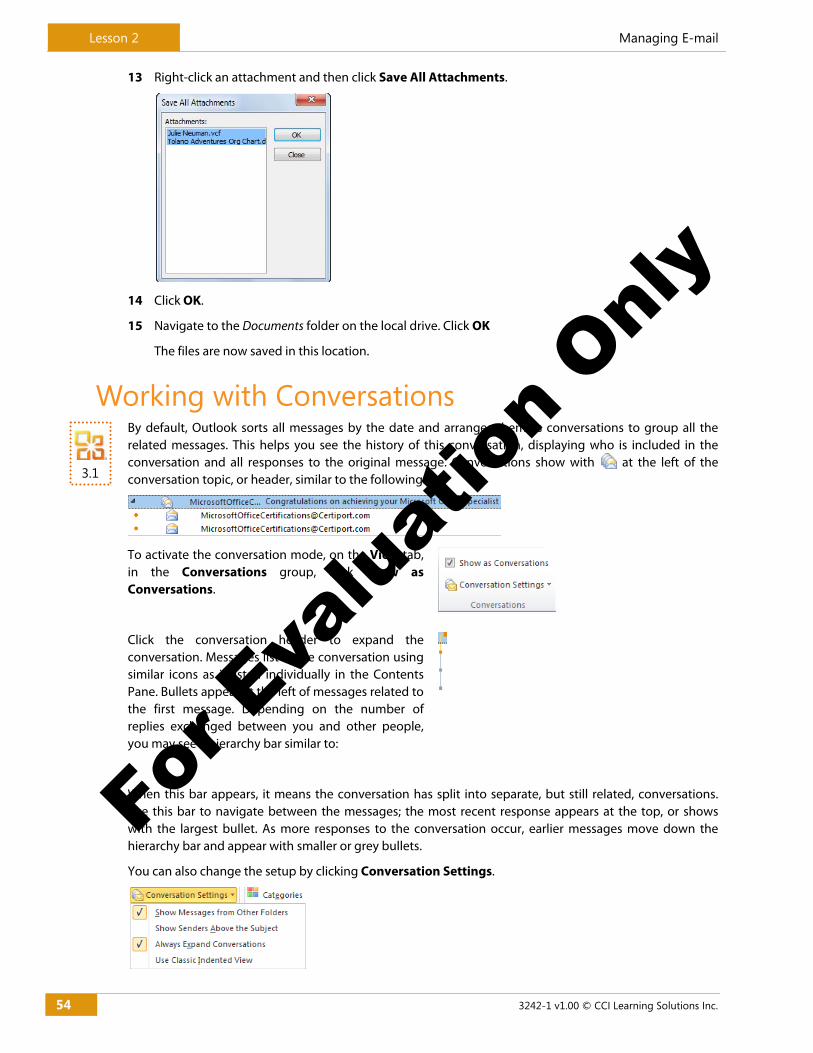
13 Right-click an attachment and then click Save All Attachments.
14 Click OK.
15 Navigate to the Documents folder on the local drive. Click OK
The files are now saved in this location.
Working with Conversations By default, Outlook sorts all messages by the date and arranges them as conversations to group all the related messages. This helps you see the history of this conversation, displaying who is included in the conversation and all responses to the original message. Conversations show with at the left of the conversation topic, or header, similar to the following:
To activate the conversation mode, on the View tab, in the Conversations group, click Show as Conversations.
Click the conversation header to expand the conversation. Messages list in the conversation using similar icons as if listed individually in the Contents Pane. Bullets appear at the left of messages related to the first message. Depending on the number of replies exchanged between you and other people, you may see a hierarchy bar similar to:
When this bar appears, it means the conversation has split into separate, but still related, conversations. Use this bar to navigate between the messages; the most recent response appears at the top, or shows with the largest bullet. As more responses to the conversation occur, earlier messages move down the hierarchy bar and appear with smaller or grey bullets.
You can also change the setup by clicking Conversation Settings.
For E
valu
atio
n Onl
y
Managing E-mail Lesson 2
3242-1 v1.00 © CCI Learning Solutions Inc. 55
Ignoring Conversations You can also choose to ignore a conversation that is not important to track. For instance, you receive a message sent to a number of people that needs no action from you. By ignoring this conversation, it does not appear in the message list, and all responses for this conversation automatically move to the Deleted Items folder.
To ignore a conversation, on the Home tab, in the Delete group, click Ignore.
Be careful with this option as, although the first message may not require action on your part, you also will miss the rest of the conversation. If you are unsure whether to ignore the conversation, you may want to leave the conversation active in the message list, but not expand the conversation header any further after reading the first few responses. This will give you the benefit of knowing what occurred in the conversation, but does not take up display space in the message list.
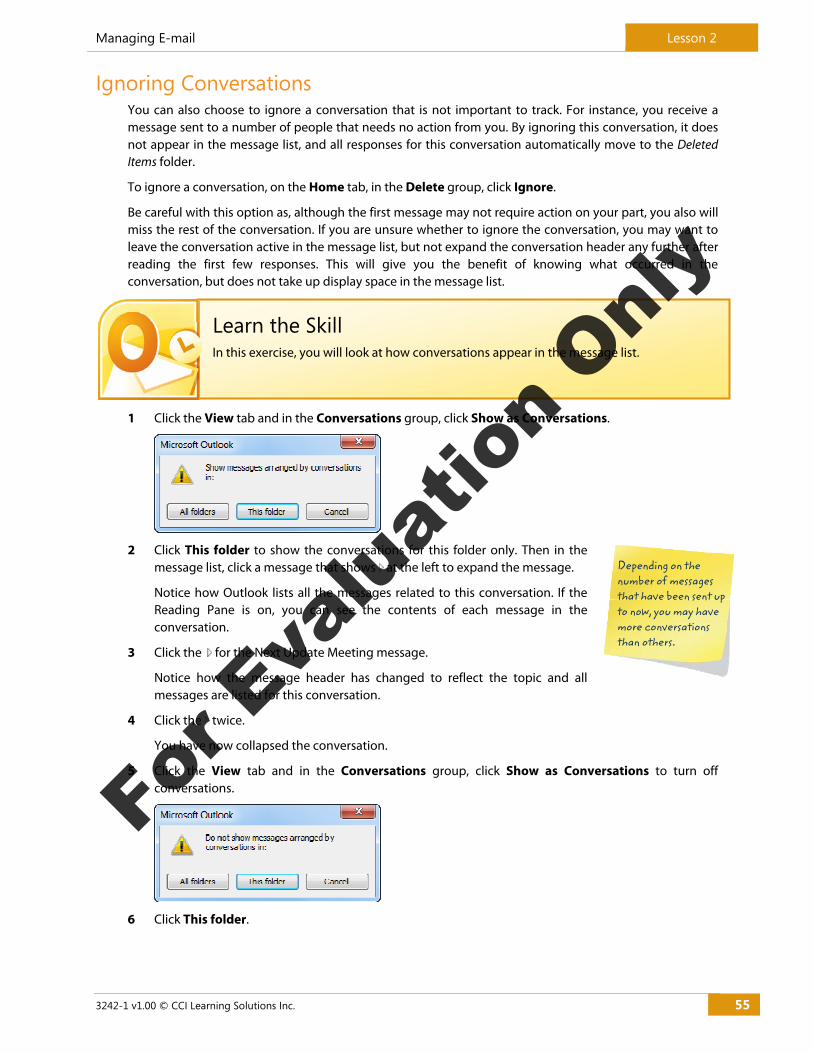
1 Click the View tab and in the Conversations group, click Show as Conversations.
2 Click This folder to show the conversations for this folder only. Then in the message list, click a message that shows at the left to expand the message.
Notice how Outlook lists all the messages related to this conversation. If the Reading Pane is on, you can see the contents of each message in the conversation.
3 Click the for the Next Update Meeting message.
Notice how the message header has changed to reflect the topic and all messages are listed for this conversation.
4 Click the twice.
You have now collapsed the conversation.
5 Click the View tab and in the Conversations group, click Show as Conversations to turn off conversations.
6 Click This folder.
Learn the Skill In this exercise, you will look at how conversations appear in the message list.
Depending on the number of messages that have been sent up to now, you may have more conversations than others.
For E
valu
atio
n Onl
y
Lesson 2 Managing E-mail
56 3242-1 v1.00 © CCI Learning Solutions Inc.
Managing the Mailbox As you begin to receive more and more messages, you will want a way to keep them organized. Whenever possible, delete messages you no longer need. However, you may want to keep some messages for a time and then delete them when you no longer need them.
One way of organizing messages in the Inbox folder is to create additional folders for specific subjects or projects and to move messages into the designated folders.
If you use Windows Explorer, you will find the Outlook folders are similar to the folders in Windows Explorer. It is important to note that the folders you create in Outlook are internal to Outlook. They are not part of the Windows folder system (i.e. folders that you create with Windows Explorer).
Outlook folders display in a hierarchical listing. Received messages are stored in the Inbox folder; sent messages are stored in the Sent Items folder, etc. The default view of the Mail module shows the folder list in the Navigation Pane.
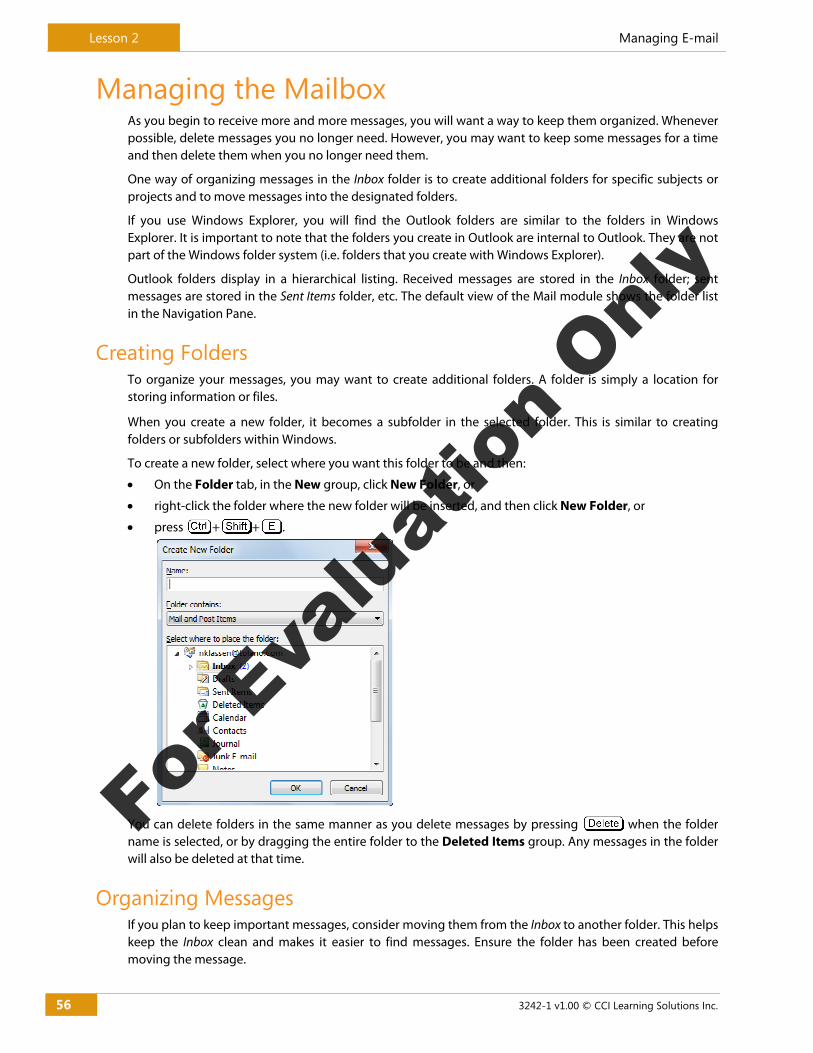
Creating Folders To organize your messages, you may want to create additional folders. A folder is simply a location for storing information or files.
When you create a new folder, it becomes a subfolder in the selected folder. This is similar to creating folders or subfolders within Windows.
To create a new folder, select where you want this folder to be and then:
On the Folder tab, in the New group, click New Folder, or
right-click the folder where the new folder will be inserted, and then click New Folder, or
press + + .
You can delete folders in the same manner as you delete messages by pressing when the folder name is selected, or by dragging the entire folder to the Deleted Items group. Any messages in the folder will also be deleted at that time.
Organizing Messages If you plan to keep important messages, consider moving them from the Inbox to another folder. This helps keep the Inbox clean and makes it easier to find messages. Ensure the folder has been created before moving the message.
For E
valu
atio
n Onl
y
Managing E-mail Lesson 2
3242-1 v1.00 © CCI Learning Solutions Inc. 57
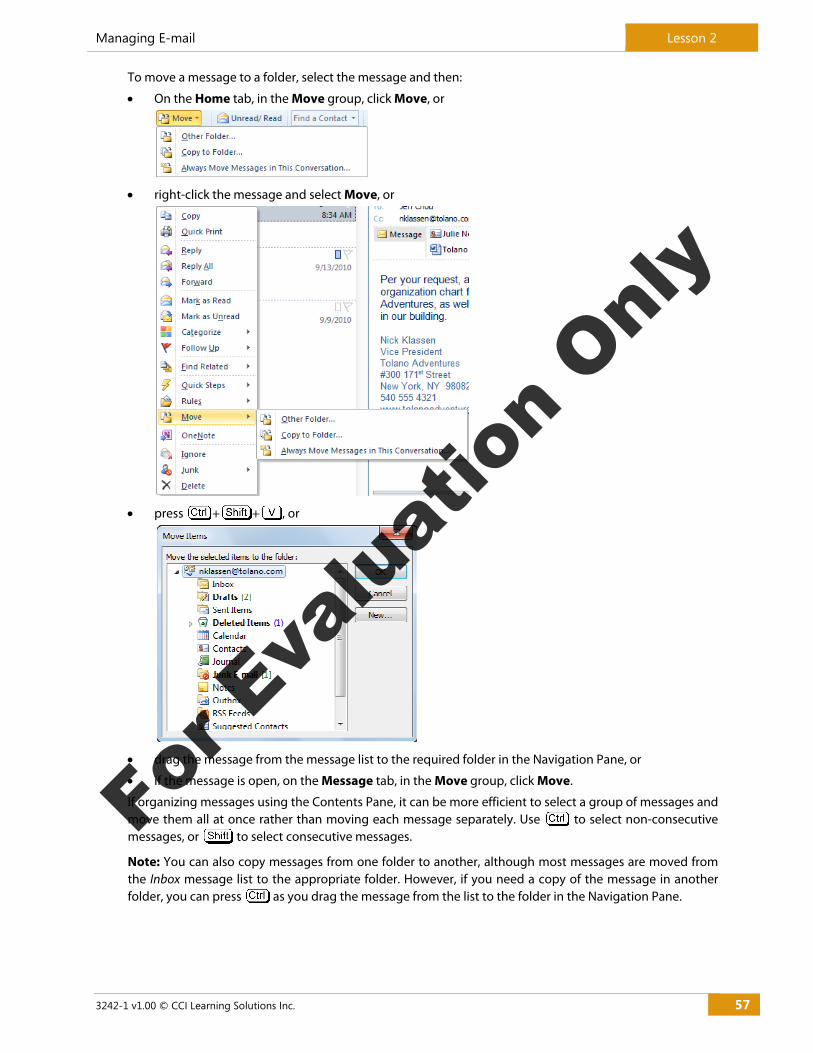
To move a message to a folder, select the message and then:
On the Home tab, in the Move group, click Move, or
right-click the message and select Move, or
press + + , or
drag the message from the message list to the required folder in the Navigation Pane, or
if the message is open, on the Message tab, in the Move group, click Move.
If organizing messages using the Contents Pane, it can be more efficient to select a group of messages and move them all at once rather than moving each message separately. Use to select non-consecutive messages, or to select consecutive messages.
Note: You can also copy messages from one folder to another, although most messages are moved from the Inbox message list to the appropriate folder. However, if you need a copy of the message in another folder, you can press as you drag the message from the list to the folder in the Navigation Pane.
For E
valu
atio
n Onl
y
Lesson 2 Managing E-mail
58 3242-1 v1.00 © CCI Learning Solutions Inc.
2.4 3.1
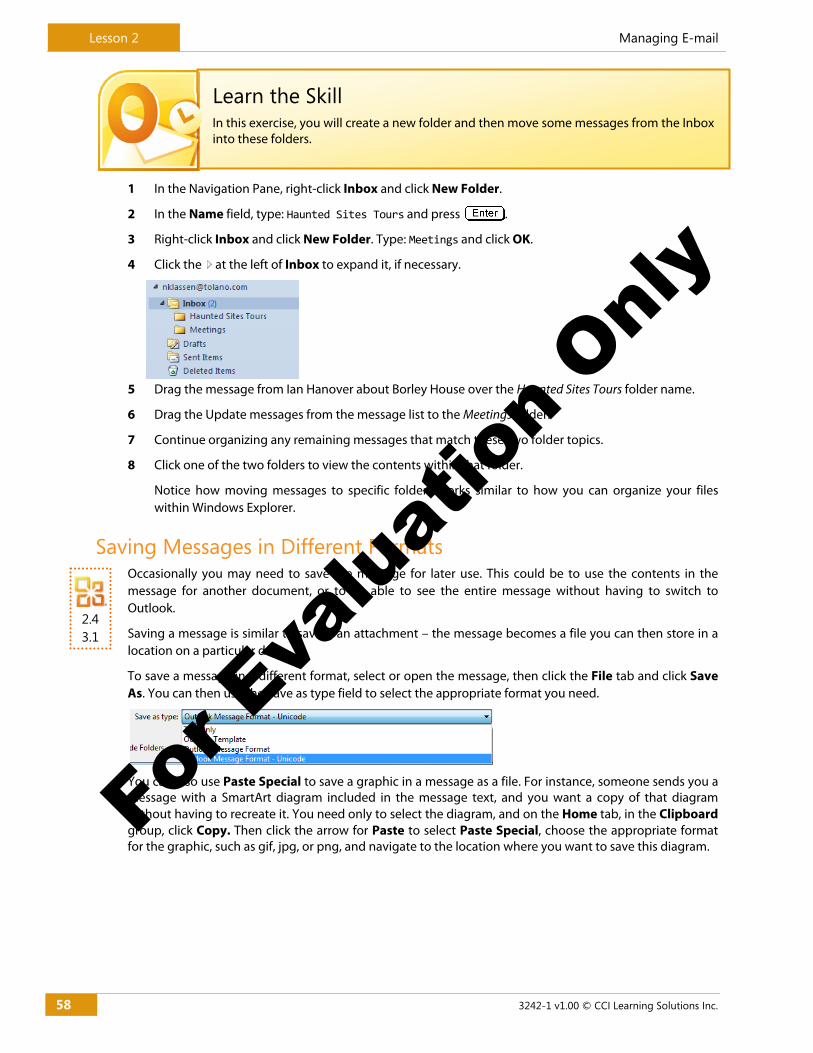
1 In the Navigation Pane, right-click Inbox and click New Folder.
2 In the Name field, type: Haunted Sites Tours and press .
3 Right-click Inbox and click New Folder. Type: Meetings and click OK.
4 Click the at the left of Inbox to expand it, if necessary.
5 Drag the message from Ian Hanover about Borley House over the Haunted Sites Tours folder name.
6 Drag the Update messages from the message list to the Meetings folder.
7 Continue organizing any remaining messages that match these two folder topics.
8 Click one of the two folders to view the contents within that folder.
Notice how moving messages to specific folders works similar to how you can organize your files within Windows Explorer.
Saving Messages in Different Formats Occasionally you may need to save the message for later use. This could be to use the contents in the message for another document, or to be able to see the entire message without having to switch to Outlook.
Saving a message is similar to saving an attachment – the message becomes a file you can then store in a location on a particular drive.
To save a message in a different format, select or open the message, then click the File tab and click Save As. You can then use the Save as type field to select the appropriate format you need.
You can also use Paste Special to save a graphic in a message as a file. For instance, someone sends you a message with a SmartArt diagram included in the message text, and you want a copy of that diagram without having to recreate it. You need only to select the diagram, and on the Home tab, in the Clipboard group, click Copy. Then click the arrow for Paste to select Paste Special, choose the appropriate format for the graphic, such as gif, jpg, or png, and navigate to the location where you want to save this diagram.
Learn the Skill In this exercise, you will create a new folder and then move some messages from the Inbox into these folders.
For E
valu
atio
n Onl
y
Managing E-mail Lesson 2
3242-1 v1.00 © CCI Learning Solutions Inc. 59
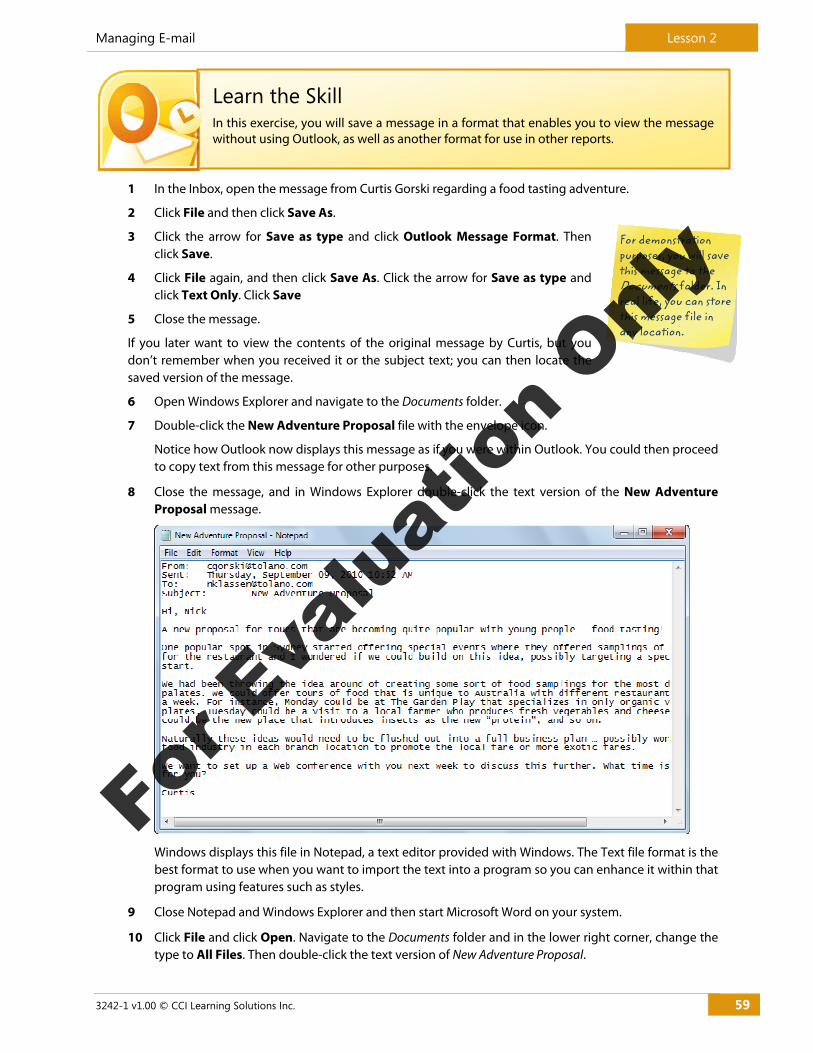
1 In the Inbox, open the message from Curtis Gorski regarding a food tasting adventure.
2 Click File and then click Save As.
3 Click the arrow for Save as type and click Outlook Message Format. Then click Save.
4 Click File again, and then click Save As. Click the arrow for Save as type and click Text Only. Click Save
5 Close the message.
If you later want to view the contents of the original message by Curtis, but you don’t remember when you received it or the subject text; you can then locate the saved version of the message.
6 Open Windows Explorer and navigate to the Documents folder.
7 Double-click the New Adventure Proposal file with the envelope icon.
Notice how Outlook now displays this message as if you were within Outlook. You could then proceed to copy text from this message for other purposes.
8 Close the message, and in Windows Explorer double-click the text version of the New Adventure Proposal message.
Windows displays this file in Notepad, a text editor provided with Windows. The Text file format is the best format to use when you want to import the text into a program so you can enhance it within that program using features such as styles.
9 Close Notepad and Windows Explorer and then start Microsoft Word on your system.
10 Click File and click Open. Navigate to the Documents folder and in the lower right corner, change the type to All Files. Then double-click the text version of New Adventure Proposal.
Learn the Skill In this exercise, you will save a message in a format that enables you to view the message without using Outlook, as well as another format for use in other reports.
For demonstration purposes, you will save this message to the Documents folder. In real life, you can store this message file in any location.
For E
valu
atio
n Onl
y
Lesson 2 Managing E-mail
60 3242-1 v1.00 © CCI Learning Solutions Inc.
2.2
11 Click OK for the message on converting the file.
Notice how Word opened the file on the screen. You could now format or enhance the contents to comply with standards for reports on the company intranet.
12 Close Word without saving the file. Also close Windows Explorer.
Using Quick Steps Quick Steps enable you to accomplish a task with one click instead of several. Microsoft has created a number of Quick Steps you can use for common or repetitive tasks in Outlook, such as move a message to a specific folder, reply to a message and then delete it, send the message to a group of people, etc. You can also create your own Quick Steps for repetitive actions you perform in Outlook; alternatively, you can customize the ones that Outlook provides.
Outlook comes with some default Quick Steps:
Move to Moves the message to a specific folder and, if new, also marks the message as read.
To Manager Forwards this message to a manager you specify. If you have a Microsoft Exchange server,this is set up automatically with your manager’s name in the Global Address List.
Team E-mail Sends the message to others specified in this team. If you have a Microsoft Exchange server, this is set up automatically with the names of the Team members in the GlobalAddress List.
Done Moves the message to a specific folder, and then marks the message as read andcomplete.
Reply & Delete
Reply to the selected message and once you click Send, sends the message and deletes the original message.
Create New Create a new Quick Step.
For E
valu
atio
n Onl
y
Managing E-mail Lesson 2
3242-1 v1.00 © CCI Learning Solutions Inc. 61
To set up or change an existing Quick Step, on the Home tab, in the Quick Steps group, click More and then Manage Quick Steps.
Notice how you can duplicate a Quick Step, if required. This could be a time saver if the Quick Step performs most of the steps you want to occur, but you also want to add or remove an action for the duplicated step. Be sure to rename the duplicate Quick Step appropriately.
You can also use Reset to Defaults to set any of the Quick Steps to the default actions, as provided when Outlook was installed on the system.
Do not confuse Quick Steps with Rules, which are discussed in Lesson 7. While similar in concept, Rules is a powerful tool you can use to handle specific actions that Quick Steps cannot.
Creating a Quick Step If there is an action you perform frequently, you can create your own Quick Step to handle this action. To create a new Quick Step:
On the Home tab, in the Quick Steps group, click Create New in the Quick Steps gallery, or
For E
valu
atio
n Onl
y
Lesson 2 Managing E-mail
62 3242-1 v1.00 © CCI Learning Solutions Inc.
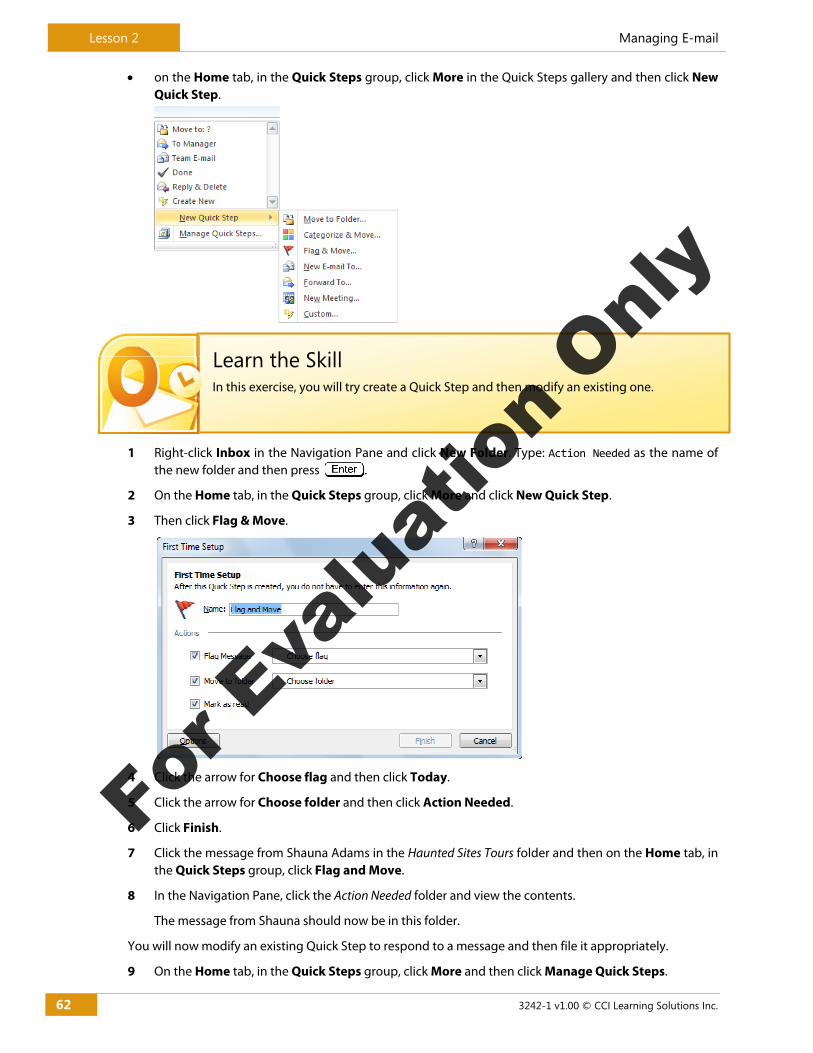
on the Home tab, in the Quick Steps group, click More in the Quick Steps gallery and then click New Quick Step.
1 Right-click Inbox in the Navigation Pane and click New Folder. Type: Action Needed as the name of the new folder and then press .
2 On the Home tab, in the Quick Steps group, click More and click New Quick Step.
3 Then click Flag & Move.
4 Click the arrow for Choose flag and then click Today.
5 Click the arrow for Choose folder and then click Action Needed.
6 Click Finish.
7 Click the message from Shauna Adams in the Haunted Sites Tours folder and then on the Home tab, in the Quick Steps group, click Flag and Move.
8 In the Navigation Pane, click the Action Needed folder and view the contents.
The message from Shauna should now be in this folder.
You will now modify an existing Quick Step to respond to a message and then file it appropriately.
9 On the Home tab, in the Quick Steps group, click More and then click Manage Quick Steps.
Learn the Skill In this exercise, you will try create a Quick Step and then modify an existing one.
For E
valu
atio
n Onl
y
Managing E-mail Lesson 2
3242-1 v1.00 © CCI Learning Solutions Inc. 63
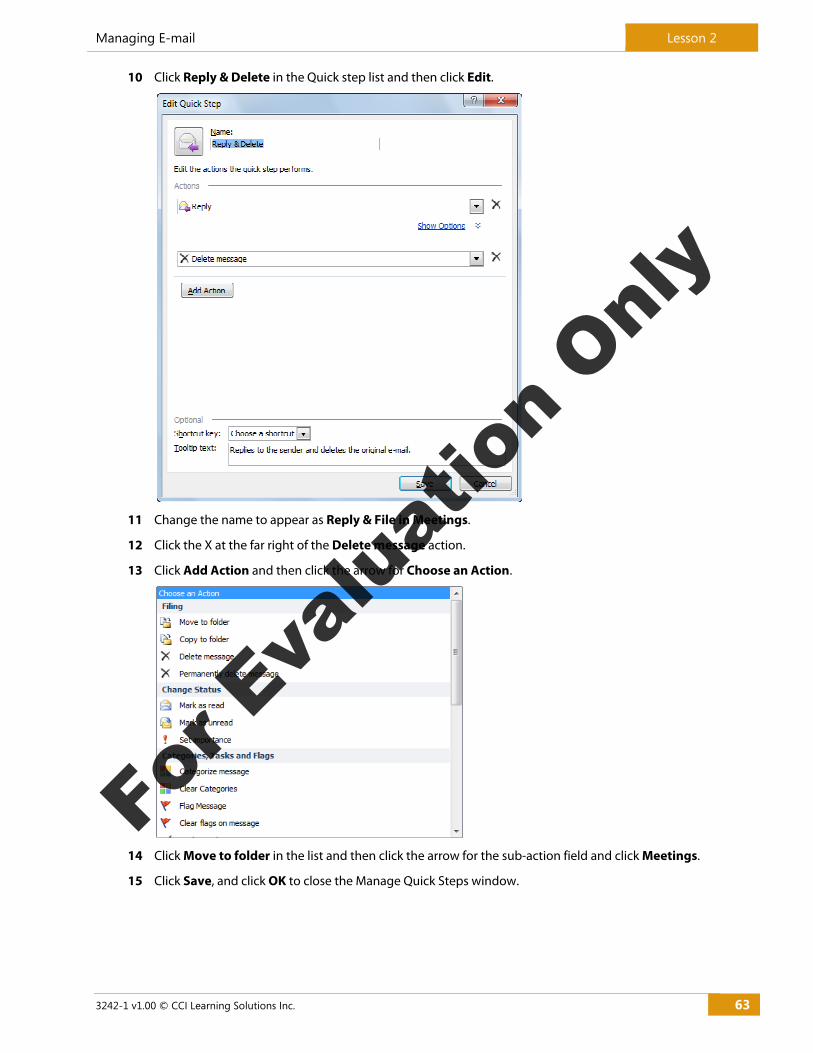
10 Click Reply & Delete in the Quick step list and then click Edit.
11 Change the name to appear as Reply & File in Meetings.
12 Click the X at the far right of the Delete message action.
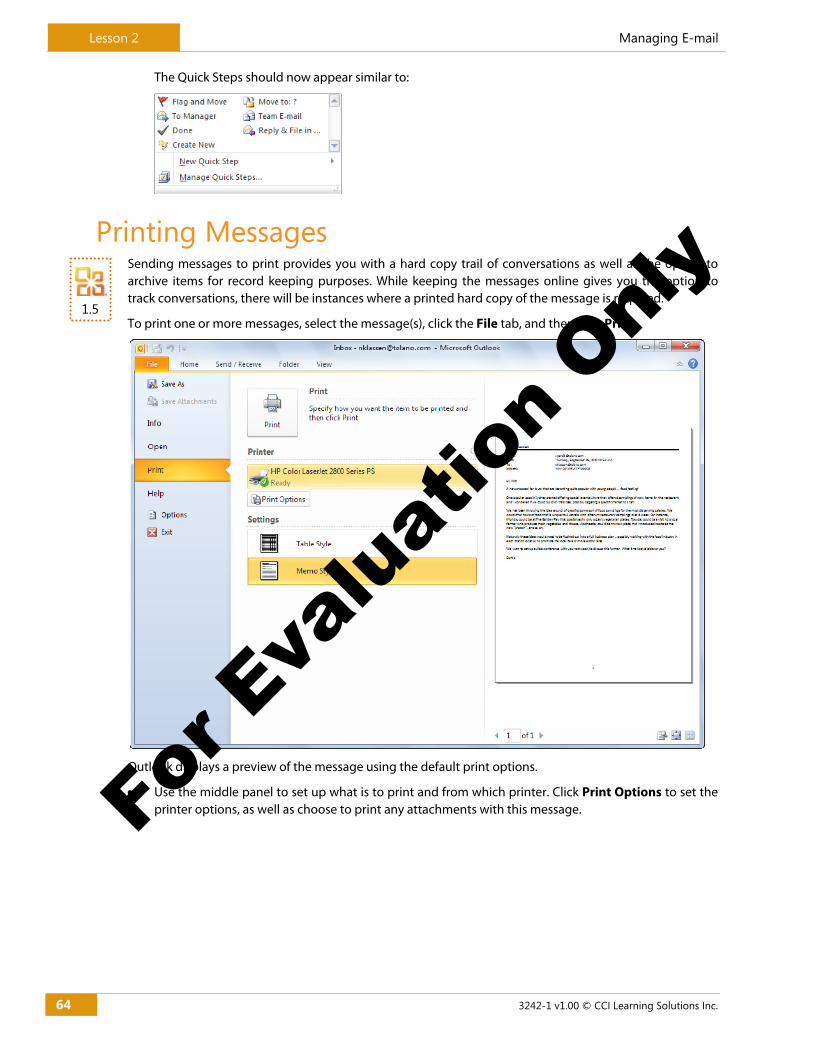
13 Click Add Action and then click the arrow for Choose an Action.
14 Click Move to folder in the list and then click the arrow for the sub-action field and click Meetings.
15 Click Save, and click OK to close the Manage Quick Steps window.
For E
valu
atio
n Onl
y
Lesson 2 Managing E-mail
64 3242-1 v1.00 © CCI Learning Solutions Inc.
1.5
The Quick Steps should now appear similar to:
Printing Messages Sending messages to print provides you with a hard copy trail of conversations as well as the option to archive items for record keeping purposes. While keeping the messages online gives you the option to track conversations, there will be instances where a printed hard copy of the message is required.
To print one or more messages, select the message(s), click the File tab, and then click Print.
Outlook displays a preview of the message using the default print options.
Use the middle panel to set up what is to print and from which printer. Click Print Options to set the printer options, as well as choose to print any attachments with this message. Fo
r Eva
luat
ion
Only
Managing E-mail Lesson 2
3242-1 v1.00 © CCI Learning Solutions Inc. 65
Use the panel at the right to preview how the message will print – use the three buttons at the lower right to change the view.
Use Settings to select the print style for your messages. Use Memo Style to print the actual contents of the message whereas the Table Style is beneficial when you want a printed list of all the messages in the Inbox.
You can also print an open message using the File tab.
1 Click the copy of the message you sent to Jeff Chou.
2 Click the File tab and then click Print.
3 In the Settings area, click Table Style to see how the messages appear in the Preview area.
4 Click the Actual Size button at the lower right corner to view the list.
Notice how the messages in the Inbox appear in this view.
5 In the Settings area, click Memo Style to view the contents of the actual message.
6 Click the Print Options button.
7 At the lower left corner, click to turn on the Print attached files feature.
Learn the Skill In this exercise, you will print some messages, including one that has an attachment.
One Page
Actual Size Multiple Pages
For E
valu
atio
n Onl
y
Lesson 2 Managing E-mail
66 3242-1 v1.00 © CCI Learning Solutions Inc.
8 Click Print.
The email message is immediately sent to the printer and the following dialog box appears:
As this is a contact card, you may prefer to save it to your Contacts list and then print it. For the purpose of this exercise, you will assume this action and have Outlook print the organization chart only.
9 Click Cancel.
10 Ensure Microsoft Outlook is selected in the Open with window and click OK.
The contact attachment is immediately sent to the printer.
11 Click OK again and then click Open for the Tolano Adventures Org Chart attachment.
The document is immediately sent to the printer.
For E
valu
atio
n Onl
y
Managing E-mail Lesson 2
3242-1 v1.00 © CCI Learning Solutions Inc. 67
Review Questions 1. Explain why you might want to create more than one signature.
2. List a reason why sending a high-resolution digital photograph that is 6.2Mb in size with an e-mail message is not recommended.
3. How does Outlook let you know that a message includes an attachment before you open the message?
4. Why would you want to turn the conversations feature on?
5. Provide a reason why you should set up folders for messages.
6. Explain what a Quick Step is and how you might use one.
7. Give an example of when you might want to create a Quick Step.
8. How can you have Outlook print an attachment in a message?
Lesson Summary In this lesson, you learned how to manage and store e-mail messages. You should now be able to:
apply themes and stationery
work with signatures
work with styles
work with attachments
work with conversations
work with the folder list
create folders
organize messages
use Quick Steps
print messages
MMM Go online for
Additional Review and
Activities
For E
valu
atio
n Onl
y
Lesson 2 Managing E-mail
68 3242-1 v1.00 © CCI Learning Solutions Inc.
For E
valu
atio
n Onl
y

For E
valu
atio
n Onl
y
www.ccilearning.com
INTRODUCING MICROSOFT OFFICE SPECIALIST 2010The new Microsoft Office Specialist (MOS) 2010 certification features a series of certification levels, providing a continuum for skills qualification and validation. They include core credentials in any one of the most popular Microsoft Office 2010 products, and Expert and Master credentialing for advanced users.
Microsoft Office Specialist (Core Certification)The Microsoft Office Specialist Core certification validates skills with the Microsoft Office 2010 suite. Exams are available on these Office products: Word 2010, Excel® 2010, PowerPoint® 2010, Access® 2010, Outlook® 2010, SharePoint® 2010.
Microsoft Office ExpertThe Microsoft Office Expert certification validates advanced skills in specific Microsoft Office applications. Gaining the credential requires that a candidate pass either of these exams: Word 2010 Expert or Excel® 2010 Expert.
Microsoft Office MasterThe Microsoft Office Master Certification denotes fluency in several important Microsoft Office applications. To achieve this designation, a candidate must pass four exams: Word 2010 Expert, Excel® 2010 Expert and PowerPoint® 2010, and either Outlook 2010 or Access® 2010.
Become Certified in Microsoft Office Specialist 2010The Microsoft Office Specialist 2010 certification is Microsoft‘s only certification program for the Microsoft Office suite of products. The Microsoft Office Specialist certification is a valuable credential that recognizes the skills needed to use the full features and functionality of Office 2010 applications while improving and validating desktop computing skills. This credential provides students, information workers and job seekers with the knowledge and expertise that pave the pathway to success.
Why certification is important:There is an increasing demand for Microsoft Office skills as more and more businesses begin to embrace newer technologies. Microsoft Office Specialist certification allows users to prove their skill sets while effectively preparing them for academic, professional and personal success.
This distinguished credential helps individuals differentiate themselves in a competitive job market and enables hiring managers to simplify and shorten the hiring process. It allows teachers to prepare their students with desktop computing skills and expertise. Corporations get the most out of their technology investment by ensuring their employees have the desktop computing skills to tackle the toughest tasks and projects. Most importantly — people who are certified are able to do their jobs better and faster than ever before. Research shows that a comprehensive level of skill proficiency, proven by certification, is directly linked to an immediate increase in “on-the-job” performance.
Based on global industry standards, Microsoft Office Specialist 2010 certification is an important and prominent credential for all individuals.
Proven results:In a recent survey on digital skills, 93% of respondents in one study reported becoming more skilled in the Microsoft® Office applications they certified in—with 71% claiming “moderate” or “great” increases. In addition, six out of 10 MOS-certified respondents said they take on more complex or difficult assignments since passing their exams.1
Learn more
CCI Learning Solutions Inc
Word 2010 Exam 77‑881Excel 2010 Exam 77‑882PowerPoint 2010 Exam 77‑883Outlook 2010 Exam 77‑884Access 2010 Exam 77‑885SharePoint 2010 Exam 77‑886
Expert Word 2010 Exam 77‑887Expert Excel 2010 Exam 77‑888
For E
valu
atio
n Onl
y