microsoft office word 2007 - tarleton state university new microsoft office word 2007 (and for that...
TRANSCRIPT

Microsoft Office Word 2007
Rev. 060707-001-A

The Center for Instructional Technology and Distributed Education
Productivity Applications 2 Microsoft Word 2007
Rev 060707-001-A

The Center for Instructional Technology and Distributed Education
Productivity Applications 3 Microsoft Word 2007
Rev 060707-001-A
Contents
Topics ................................................................................................................................. 4
Learning Outcomes ............................................................................................................. 4
Getting Started: Navigating MS Word 2007 ............................................................... 6
Introducing the Ribbon ........................................................................................................ 6
Tips for Using the Ribbon ................................................................................................... 6
The Microsoft Office Button ................................................................................................ 8
Using the New MS Word 2007: Creating a Syllabus ................................................ 11
Step 1: Initiating and Preparing a New Document ............................................................ 12
Step 2: Setting Up Your Page Layout Parameters ........................................................... 14
Step 3: Adding Text, Using Text Styles and Paragraph Settings ...................................... 16
Step 4: Inserting Tables .................................................................................................... 17
Save as a PDF file using the Add-Ins option .................................................................... 23
Save as a HTML Web file using the Save-As Dialog ........................................................ 25
Appendix .................................................................................................................. 29
A: File Extensions ............................................................................................................. 30
B: Sample Syllabus ........................................................................................................... 34
C: Completed Syllabus Work Sample ............................................................................... 44

The Center for Instructional Technology and Distributed Education
Productivity Applications 4 Microsoft Word 2007
Rev 060707-001-A
Workshop Overview
In this workshop, participants will gain hands-on experience with Microsoft Word 2007. Participants will first learn to use the new Ribbon to quickly locate commands. You will then customize the Quick Access Toolbar to set up common tools that are independent of the Ribbon Tabs. Participants will learn to use the new MS Office Button (formerly the ―File Menu‖, set up headers and footers, create and format tables and prepare text. You will learn about the new file name extensions and file formats in MS Office and their purpose. Finally, after you have created a sample syllabus you will convert it to both HTML and PDF formats.
Topics
Ribbon
MS Office Button
Quick Access Toolbar
Headers and Footers
File Extensions
Learning Outcomes
After completing this workshop, participants will be able to create a Syllabus using MS Word 2007 by:
• Navigating MS Word 2007 and gaining experiences using the new tabbed Ribbon.
• Setting up and customizing the Quick Access Toolbar.
• Initializing a new Document, Setting up Page Layout, Colors, and Watermarks
• Formatting Text and Paragraphs
• Creating Headers and Footers
• Inserting Tables
• Inserting Graphics and setting Text Wrap parameters
• Explaining the purpose of the new File Name Extension and Office XML Formats
• Installing Ad-Ins and converting to a PDF file format using the new Add-In feature

The Center for Instructional Technology and Distributed Education
Productivity Applications 5 Microsoft Word 2007
Rev 060707-001-A

The Center for Instructional Technology and Distributed Education
Productivity Applications 6 Microsoft Word 2007
Rev 060707-001-A
Getting Started: Navigating MS Word 2007
Introducing the Ribbon
The new Microsoft Office Word 2007 (and for that matter, all of the New Office 2007 applications) looks very different to the Office 2003 suite of applications you may be familiar with. Keep in mind that the functionality and purpose of each of these applications has not changed. Microsoft has redesigned its Office suite to make your work easier, faster, and more efficient. The Office suite has also been updated to be more user-friendly, better integration and interoperability with other productivity applications and seamless integration and adaptability with Internet technologies.
Let’s begin by taking a look at this new interface and Ribbon….
The first thing you may notice is the new look of the toolbar across the top. The old pop-down menu has been redesigned as a series of tabs (Home, Insert, References, etc) in what is now called the ―Ribbon‖. You will see this ribbon scheme in most all new 2007 applications including MS Word, PowerPoint, Excel, Outlook and Access.
Tips for Using the Ribbon
The Ribbon is designed to help you quickly find the commands that you need to complete a task. Commands are organized in logical groups that are collected together under tabs. Each tab relates to a type of activity, such as writing or laying out a page. To reduce screen clutter, some tabs are shown only when they are needed.
There is no way to delete or replace the Ribbon with the toolbars and menus from the earlier versions of Microsoft Office. However, you can minimize the Ribbon to make more space available on your screen.
The Center for Instructional Technology and Distributed Education
Productivity Applications 7 Microsoft Word 2007
Rev 060707-001-A
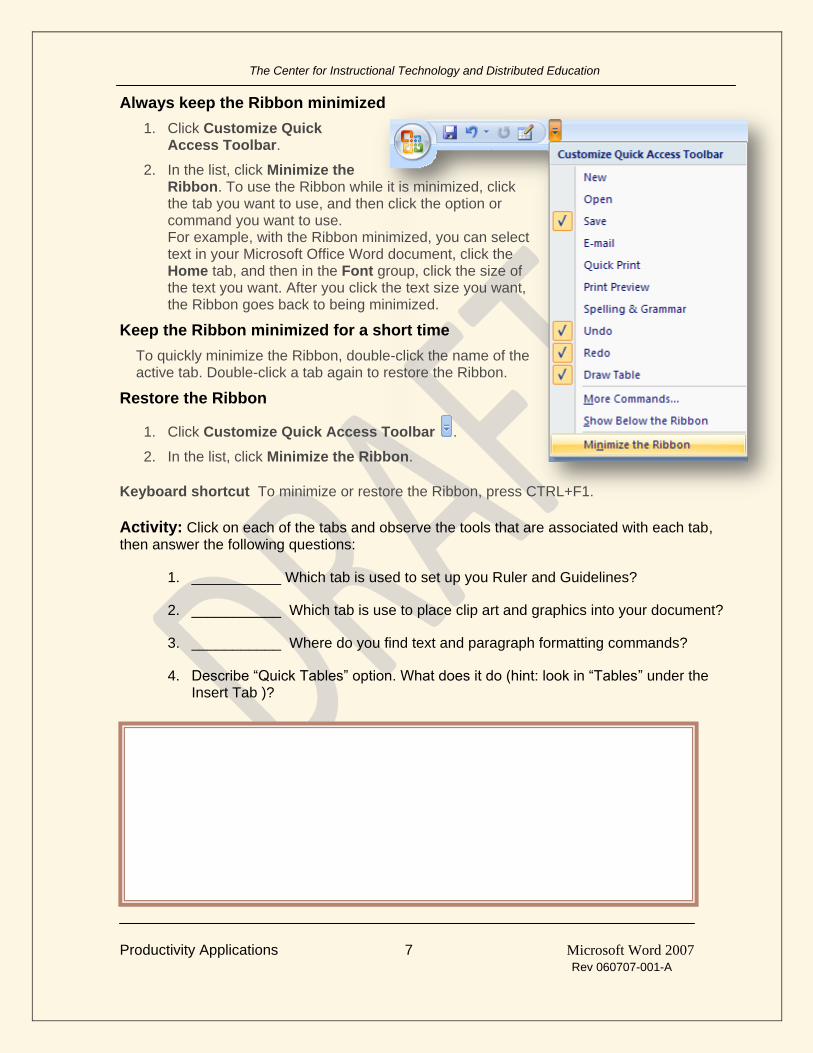
Always keep the Ribbon minimized
1. Click Customize Quick Access Toolbar.
2. In the list, click Minimize the Ribbon. To use the Ribbon while it is minimized, click the tab you want to use, and then click the option or command you want to use. For example, with the Ribbon minimized, you can select text in your Microsoft Office Word document, click the Home tab, and then in the Font group, click the size of the text you want. After you click the text size you want, the Ribbon goes back to being minimized.
Keep the Ribbon minimized for a short time
To quickly minimize the Ribbon, double-click the name of the active tab. Double-click a tab again to restore the Ribbon.
Restore the Ribbon
1. Click Customize Quick Access Toolbar .
2. In the list, click Minimize the Ribbon.
Keyboard shortcut To minimize or restore the Ribbon, press CTRL+F1.
Activity: Click on each of the tabs and observe the tools that are associated with each tab, then answer the following questions:
1. ___________ Which tab is used to set up you Ruler and Guidelines?
2. ___________ Which tab is use to place clip art and graphics into your document?
3. ___________ Where do you find text and paragraph formatting commands?
4. Describe ―Quick Tables‖ option. What does it do (hint: look in ―Tables‖ under the Insert Tab )?

The Center for Instructional Technology and Distributed Education
Productivity Applications 8 Microsoft Word 2007
Rev 060707-001-A
The Microsoft Office Button
What happened to the File menu?
The File menu where you originally open, save, print, page format or begin a new document has been replaced with the new Microsoft Office Button
All of the same functionality still exists but some new options are also available now. When you open the MS Office Button, the first two options, ―New‖ and ―Open‖ functions the same as before. The next option, ―Convert‖ is new to 2007.
This option will convert your older MS Word document into the newest version. It will also reduce the actual file size. When the document is converted to the new format, the new document’s file name extension will be ―docx‖. The DOCX represents an XML format that

The Center for Instructional Technology and Distributed Education
Productivity Applications 9 Microsoft Word 2007
Rev 060707-001-A
contains no macros. The Office XML format allow for several enhancements and advantages than the old binary file format of Office 2003. For example, the XML format has more compact (smaller) file sizes, improved damage-file recovery, better privacy, better integration and interoperability of software, and easier detection of documents that contain Visual Basic snd XLM macros.
Read Appendix A: Introduction to New File Name Extensions and Office XML Formats to learn about the new formats and extension names.
“Save” option will save your document in the native format that it was originally opened in. For example, if you opened an older MS 2003 Word document, it would be saved back in its original format. A 2007 formatted document is saved in the new docx or docm format.
The ―Save As‖ option provides several choices for saving your document. Note the ―Add Ins‖ option.
The Add-Ins option gives you the choice of converting to a portable file format (PDF) document or the new Microsoft XML Paper Specification (XPS) format. Add-ins allow the designer/author to create a document that looks exactly like the original document whether on screen or printed on paper. PDF and XPS also provides for better document security by creating a document that cannot be easily changed or edited.
―Prepare‖ option is used for setting document properties
and security settings.
You can inspect the document for embedded macros – a common source for virus or other malicious codes.
Another feature here is to restrict permissions so that you can grant people to access the document but restrict their ability to edit, copy or print.
Marking as final lets the reader know the document is final and makes it a read-only document so that no more editing of the original is permitted.
Finally, a compatibility checker verifies features that

The Center for Instructional Technology and Distributed Education
Productivity Applications 10 Microsoft Word 2007
Rev 060707-001-A
may not be compatible with older versions of Word. Use this if you plan to save as Word 2003 document.
The Publish option is new and gives the author the ability to publish the document’s content to an Internet Blog (Web Log) or a Document Management Server. New Vista Serves have a document workspace for collaboration.
When several people in your organization work together on files, sometimes the versions, comments, and e-mail messages become scattered in different places. You can help people work together more efficiently with a Document Workspace site.
NOTE To create a Document Workspace
site, you must have permission to create workspace sites on the Microsoft Windows SharePoint Services site where the Document Workspace site is located. For more information, see your administrator.
Activity:
#1 Locate the Add-Ins feature and check for new Add-ins downloads. Name three of the types of Add-Ins current offered for download by Microsoft 3rd Party Solutions?
________________________________________
________________________________________
________________________________________
#2 What is a ―Digital Signature‖? (Hint: look under ―Prepare” and hit the F1 key while the cursor is hovered over the option.

The Center for Instructional Technology and Distributed Education
Productivity Applications 11 Microsoft Word 2007
Rev 060707-001-A
Using the New MS Word 2007: Creating a Syllabus
Now that you have had an opportunity to become familiar with the new look and some of the new navigation and document preparation features of MS Word 2007, it’s time to create a syllabus. This activity will include the most common tools and formatting options used in creating documents. We will also generate HTML and PDF versions of your final document.
First, take a moment to peruse the sample syllabus in Appendix B. This syllabus was designed to meet SACs requirements for best practices of electronically delivered course instruction. Your department may have a standard syllabus format that you will adapt and use for your actual course syllabus.
We will design a 5-part syllabus using common Word tools. Here are the following ―parts‖ to our practice syllabus:
1. Course Title, Number, Section, Term
2. Instructor contact information
3. Instructor personal Information
4. Course Description
5. Grading Information
These are common pieces that are placed in all syllabi. After completing this exercise, you should be able to create/modify your own actual course syllabus using MS Word 2007
Activity Objectives:
After you complete this exercise, you will be able to demonstrate how to do the following:
Set up page layout
Insert a Header and Footer
Create and use text styles and paragraph parameters.
Insert and modify tables
Insert and format clipart
Save as a PDF file using the Add-Ins option
Save as an HTML web page.

The Center for Instructional Technology and Distributed Education
Productivity Applications 12 Microsoft Word 2007
Rev 060707-001-A
Step 1: Initiating and Preparing a New Document
Open MS Word 2007 if you have not done so. Chose New Document. If you already have Word open, then simply choose ―New‖ under the MS Office Button:
Note: that when you select ―New‖ a dialog will open with several options. The Blank document button is what we want but before selecting it, look at some of the other options for selecting pre-formatted document styles.
Simply click on the links below Microsoft Office Online to see the many pre-formatting options and styles you can choose from.

The Center for Instructional Technology and Distributed Education
Productivity Applications 13 Microsoft Word 2007
Rev 060707-001-A
When you have finished looking at some of the style options, select the very top link ―Blank and Recent‖, make sure the ―Blank Document‖ is highlighted (selected) in the center of the dialog and then click ―Create‖ button at the lower right corner of the New dialog.
Next, choose the MS button again and select the ―Save‖ option
Save your new blank document to your ―H-Drive‖ as ―Workshop Syllabus.docx‖.
Note: you do not need to actually type ―.docx‖ at the end of the file name. It is automatically placed there when the file is saved.
Proceed to Step 2: Setting up the Page Layout Parameters.
The Center for Instructional Technology and Distributed Education
Productivity Applications 14 Microsoft Word 2007
Rev 060707-001-A
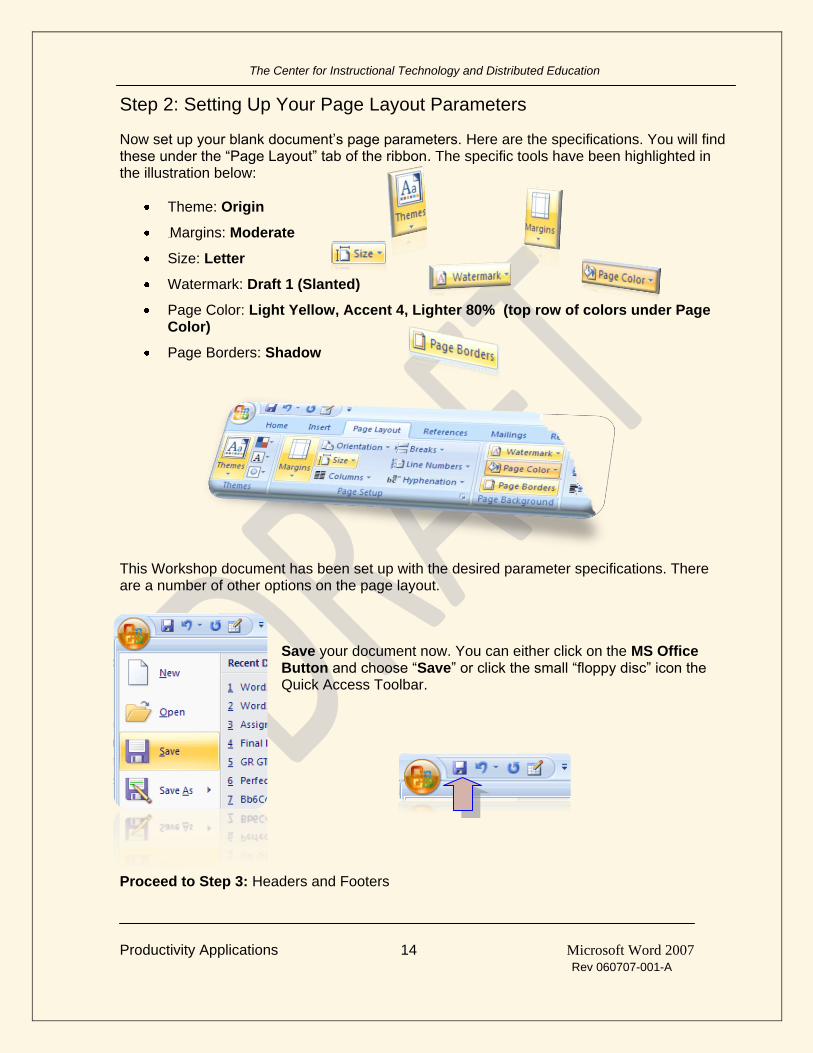
Step 2: Setting Up Your Page Layout Parameters
Now set up your blank document’s page parameters. Here are the specifications. You will find these under the ―Page Layout‖ tab of the ribbon. The specific tools have been highlighted in the illustration below:
Theme: Origin
Margins: Moderate
Size: Letter
Watermark: Draft 1 (Slanted)
Page Color: Light Yellow, Accent 4, Lighter 80% (top row of colors under Page Color)
Page Borders: Shadow
This Workshop document has been set up with the desired parameter specifications. There are a number of other options on the page layout.
Save your document now. You can either click on the MS Office Button and choose ―Save‖ or click the small ―floppy disc‖ icon the Quick Access Toolbar.
Proceed to Step 3: Headers and Footers

The Center for Instructional Technology and Distributed Education
Productivity Applications 15 Microsoft Word 2007
Rev 060707-001-A
Step 3: Inserting Headers and Footers
Select the Insert tab and choose ―Header‖ button.
Choose from a list of optional pre-formatted headers. There are a number to select from. Choose a header style that you like and enter some information into the text areas. To leave the Header / Footer edit mode, just double-click in the content area of your document (between header and footer) Notice the Headers & Footers Design tools on the Ribbon. Try a few options to see what they do. When you are ready, add a Footer to your document.
The Center for Instructional Technology and Distributed Education
Productivity Applications 16 Microsoft Word 2007
Rev 060707-001-A
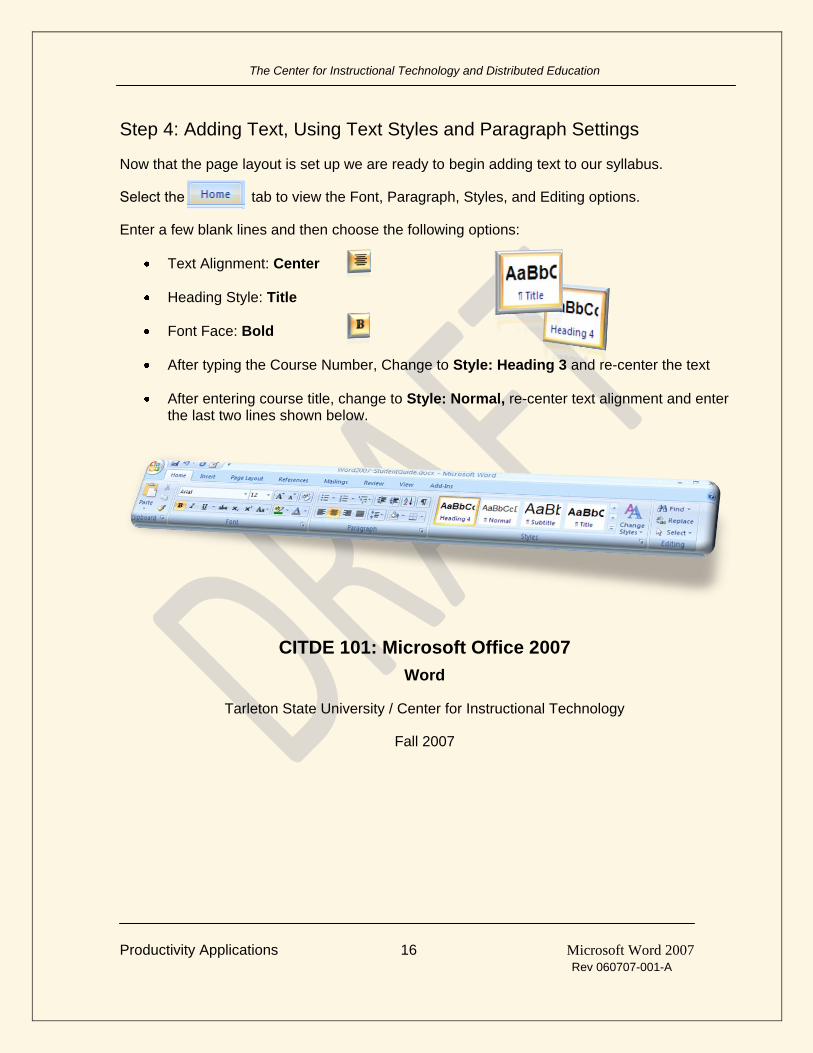
Step 4: Adding Text, Using Text Styles and Paragraph Settings
Now that the page layout is set up we are ready to begin adding text to our syllabus.
Select the ―Home‖ tab to view the Font, Paragraph, Styles, and Editing options.
Enter a few blank lines and then choose the following options:
Text Alignment: Center
Heading Style: Title
Font Face: Bold
After typing the Course Number, Change to Style: Heading 3 and re-center the text
After entering course title, change to Style: Normal, re-center text alignment and enter the last two lines shown below.
CITDE 101: Microsoft Office 2007
Word
Tarleton State University / Center for Instructional Technology
Fall 2007

The Center for Instructional Technology and Distributed Education
Productivity Applications 17 Microsoft Word 2007
Rev 060707-001-A
Step 5: Inserting Tables
Using tables is a far more efficient way to set up columns of text. If your document is to be converted to an HTML formatted web page, tables will retain the original ―look‖ as opposed to using tabs and spaces which may not, depending on what browser is being used at the time. Enter a couple of blank lines and select the Insert tab.
When you select the Table button, an interactive pop-down menu will appear. Roll your mouse over the squares as shown. These squares represent table cells.
You can see a preview of your table as you move your mouse over the table cells. Once you have the desired number of cells highlighted, simply click the mouse button.
Choose 2 columns and 6 rows for this activity as shown below:
Once you have created your table, notice that the Table Tools Tab appears and some design options are now available for you to use.

The Center for Instructional Technology and Distributed Education
Productivity Applications 18 Microsoft Word 2007
Rev 060707-001-A
Experiment with the different Table Styles and choose one you like. You can click on the small arrow to the right of the six table styles shown to view more choices:
We have chosen the top-right style for this activity. You can adjust the cell widths by clicking the mouse cursor over a vertical cell line and dragging it to a desired width. By selecting the Table Layout ribbon, you can add and merge cells and rows and set precise widths and heights:
Enter text and set justify-right in left cells as shown. Place your own contact information in each of the cells.
Contact Information
Instructor: Dr. Melissa Becker
Phone: 254-968-9307
Fax: 254-968-9540
Email: [email protected]
Office: Tarleton Center, Room 130

The Center for Instructional Technology and Distributed Education
Productivity Applications 19 Microsoft Word 2007
Rev 060707-001-A
You can change the cell width by selecting the Table, Home tab and Paragraph dialog and changing the Spacing before and after to 6 point:
Now that you have completed your Syllabus’ title and contact information, it’s time to add some general text about your course.
Course Description:
In this workshop, participants will gain hands-on experience with Microsoft Word 2007. Participants will first learn to use the new Ribbon to quickly locate commands and. You will then customize the Quick Access Toolbar to set up common tools that are independent of the Ribbon Tabs. Participants will learn to use the new MS Office Button (formerly the ―File Menu‖, set up headers and footers. Finally, you will learn about the new file name extensions and file formats in MS Office and their purpose.

The Center for Instructional Technology and Distributed Education
Productivity Applications 20 Microsoft Word 2007
Rev 060707-001-A
Your Instructor:
Insert a Clip Art graphic. Select the Graphic and Right-Click your mouse. In the pop-up menu, choose ―Text Wrapping‖ and set to ―Tight‖. In this example we performed a search of Microsoft Online Clipart for all media containing a label of ―professor.‖ Then we used the ―Edit Wrap Points‖ under Text Wrapping to wrap the text around an unusual graphic shape. Now add some general information about yourself. You may also want to add a link to your personal web page.

The Center for Instructional Technology and Distributed Education
Productivity Applications 21 Microsoft Word 2007
Rev 060707-001-A
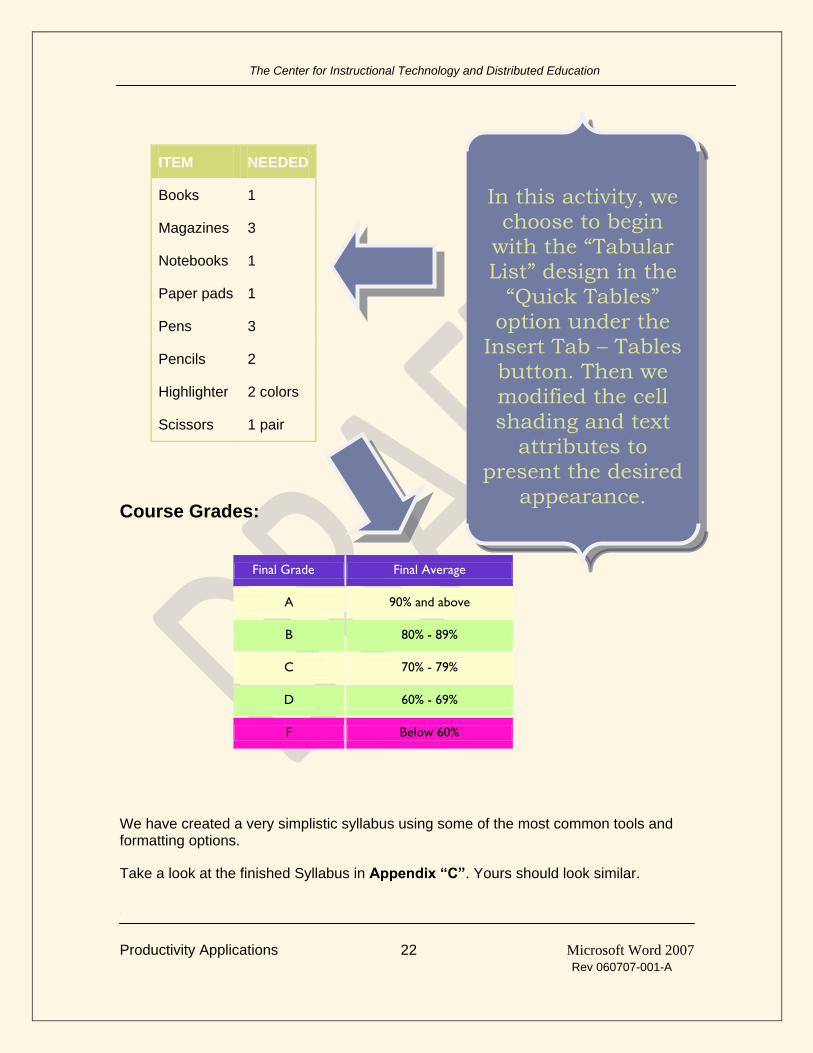
Finally, let’s add some grade information in a table. You can select a pre-formatted table or choose to use an Excel spreadsheet and format to desired appearance.
The Center for Instructional Technology and Distributed Education
Productivity Applications 22 Microsoft Word 2007
Rev 060707-001-A
Course Grades:
We have created a very simplistic syllabus using some of the most common tools and formatting options.
Take a look at the finished Syllabus in Appendix “C”. Yours should look similar.
ITEM NEEDED
Books 1
Magazines 3
Notebooks 1
Paper pads 1
Pens 3
Pencils 2
Highlighter 2 colors
Scissors 1 pair
Final Grade Final Average
A 90% and above
B 80% - 89%
C 70% - 79%
D 60% - 69%
F Below 60%
In this activity, we choose to begin
with the “Tabular List” design in the
“Quick Tables” option under the
Insert Tab – Tables button. Then we modified the cell shading and text
attributes to present the desired
appearance.

The Center for Instructional Technology and Distributed Education
Productivity Applications 23 Microsoft Word 2007
Rev 060707-001-A
Save as a PDF file using the Add-Ins option
PDF is a fixed-layout electronic file format that preserves document formatting and enables file sharing. The PDF format ensures that when the file is viewed online or printed, it retains exactly the format that you intended, and that data in the file cannot easily be changed. The PDF format is also useful for documents that will be reproduced by using commercial printing methods.
To view a PDF file, you must have a PDF reader installed on your computer. One reader is the Acrobat Reader, available from Adobe Systems.
After you save a file as PDF, you cannot use your 2007 Office release program to make changes directly to the PDF file. You must make changes to the original 2007 Office release file in the 2007 Office release program in which you created it and save the file as PDF again.
What are they?
Portable Document Format (PDF) PDF is a fixed-layout electronic file format that preserves document formatting and enables file sharing. The PDF format ensures that when the file is viewed online or printed, it retains exactly the format that you intended, and that data in the file cannot be easily changed. The PDF format is also useful for documents that will be reproduced by using commercial printing methods.
XML Paper Specification (XPS) XPS is a fixed-layout electronic file format that preserves document formatting and enables file sharing. The XPS format ensures that when the file is viewed online or printed, it retains exactly the format that you intended, and that data in the file cannot be easily changed.
Install and use the Save as PDF or XPS add-in from Microsoft
To save or export a file to PDF or XPS, you must first install the Save as PDF or XPS add-in
for the 2007 Microsoft Office system.
1. Go to the Microsoft Save as PDF or XPS Add-in for 2007 Microsoft Office programs
(http://r.office.microsoft.com/r/rlidMSAddinPDFXPS) and follow the instructions on that
page.
2. After you install the Save as PDF or XPS add-in, you can export your file to PDF or
XPS.

The Center for Instructional Technology and Distributed Education
Productivity Applications 24 Microsoft Word 2007
Rev 060707-001-A
Save a file in PDF format
1. Click the Microsoft Office Button ,
point to the arrow next to Save As, and then
click PDF or XPS.
2. In the File Name list, type or select a name
for the document.
3. In the Save as type list, click PDF.
4. If you want to open the file immediately after
saving it, select the Open file after
publishing check box. This check box is
available only if you have a PDF reader
installed on your computer.
5. Next to Optimize for, do one of the
following, depending on whether file size or
print quality is more important to you:
If the document requires high print quality, click Standard (publishing online and printing).
If the print quality is less important than file size, click Minimum size (publishing online).
6. Click Options to set the page range to be printed, to choose whether markup should be
printed, and to select the output options. (Find links to more information on these
options in the See Also section.) Click OK.
7. Click Publish.
The Center for Instructional Technology and Distributed Education
Productivity Applications 25 Microsoft Word 2007
Rev 060707-001-A
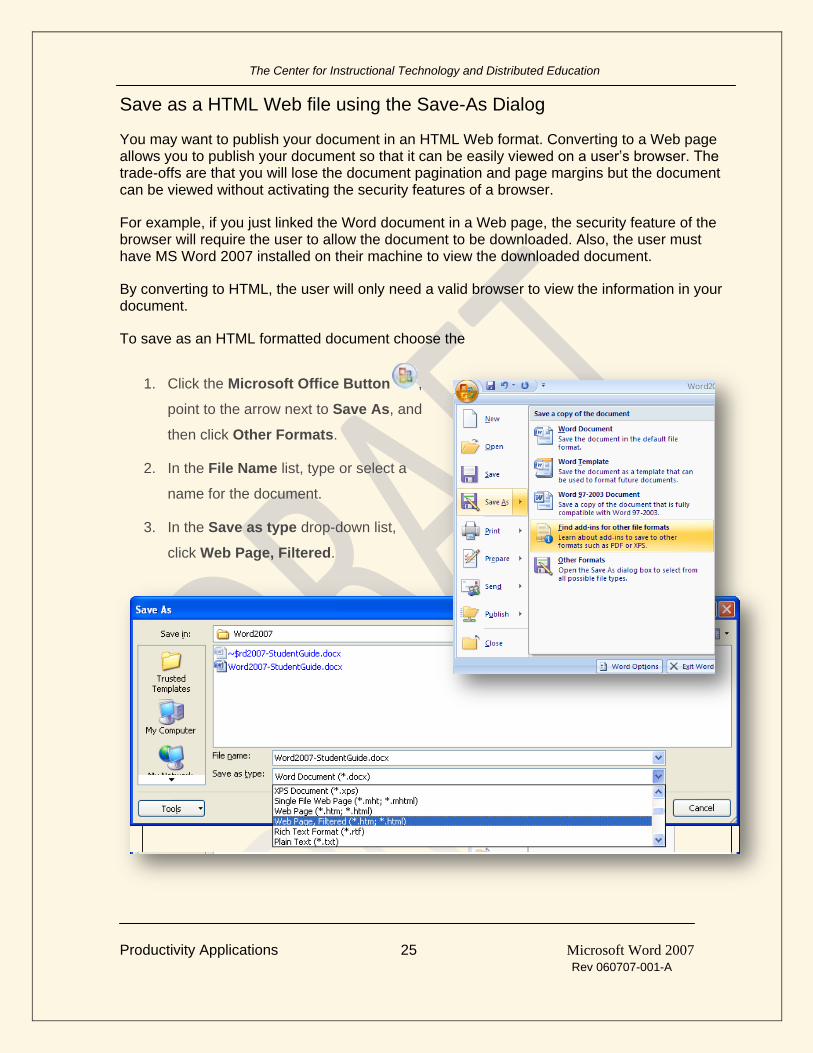
Save as a HTML Web file using the Save-As Dialog
You may want to publish your document in an HTML Web format. Converting to a Web page allows you to publish your document so that it can be easily viewed on a user’s browser. The trade-offs are that you will lose the document pagination and page margins but the document can be viewed without activating the security features of a browser.
For example, if you just linked the Word document in a Web page, the security feature of the browser will require the user to allow the document to be downloaded. Also, the user must have MS Word 2007 installed on their machine to view the downloaded document.
By converting to HTML, the user will only need a valid browser to view the information in your document.
To save as an HTML formatted document choose the
1. Click the Microsoft Office Button ,
point to the arrow next to Save As, and
then click Other Formats.
2. In the File Name list, type or select a
name for the document.
3. In the Save as type drop-down list,
click Web Page, Filtered.

The Center for Instructional Technology and Distributed Education
Productivity Applications 26 Microsoft Word 2007
Rev 060707-001-A
On Your Own: Create a flyer to the following specifications:
Document:
Theme: Verve
Margins: Moderate
Size: Letter
Watermark: Custom (Diagonal Text: Announcing)
Page Color: Blue, Accent 5, Lighter 80% (second row under Page Color)
Page Borders: Shadow
Text and Paragraph:
Text Alignment: Center
Heading Style: Title
Font: CHARLEMANGE STD
Font Face: Bold, Italic
Graphic: Search All Collections and Media Types for “Announcing”
Content:
The Center for Instructional Technology and Distributed Education
Productivity Applications 27 Microsoft Word 2007
Rev 060707-001-A
You have now successfully completed the Workshop: Microsoft Office Word 2007. You should now be able to navigate the new interface using the Ribbon and Quick Access toolbar, create and customize you own Word documents by using some common tools like tables and text formats, and insert graphics. You should also be able to save them in PDF, XPS and HTML formats.
If you are not able to do the following, please contact your instructor for assistance:
• Navigating MS Word 2007 and gaining experiences using the new tabbed Ribbon.
• Setting up and customizing the Quick Access Toolbar.
• Initializing a new Document, Setting up Page Layout, Colors, and Watermarks
• Formatting Text and Paragraphs
• Creating Headers and Footers
• Inserting Tables
• Inserting Graphics and setting Text Wrap parameters
• Explaining the purpose of the new File Name Extension and Office XML Formats
• Installing Ad-Ins and converting to a PDF file format using the new Add-In feature
Look for other MS Office 2007 Training opportunities on our Web Site. Select Office 2007 from the main Men:
http://online.tarleton.edu/faculty/index.htm
Comments about this or other training offerings are welcome.
CITDE Training Center Contact Information
CITDE is located in the Tarleton Center Room 131 at the main campus Box T-0810 - Main Office: 254.968.9060 Dr. Melissa Becker, Faculty Training Coordinator
Training Office: 254.968.9307 [email protected]

The Center for Instructional Technology and Distributed Education
Productivity Applications 28 Microsoft Word 2007
Rev 060707-001-A

The Center for Instructional Technology and Distributed Education
Productivity Applications 29 Microsoft Word 2007
Rev 060707-001-A
Appendix
A: Introduction to New File Name Extensions and Office XML Formats B: Sample Syllabus C: Completed Syllabus Work Sample
The Center for Instructional Technology and Distributed Education
Productivity Applications 30 Microsoft Word 2007
Rev 060707-001-A
A: File Extensions
Introduction to new file name extensions and Office XML Formats
Applies to: Microsoft Office Excel 2007, PowerPoint 2007, Word 2007
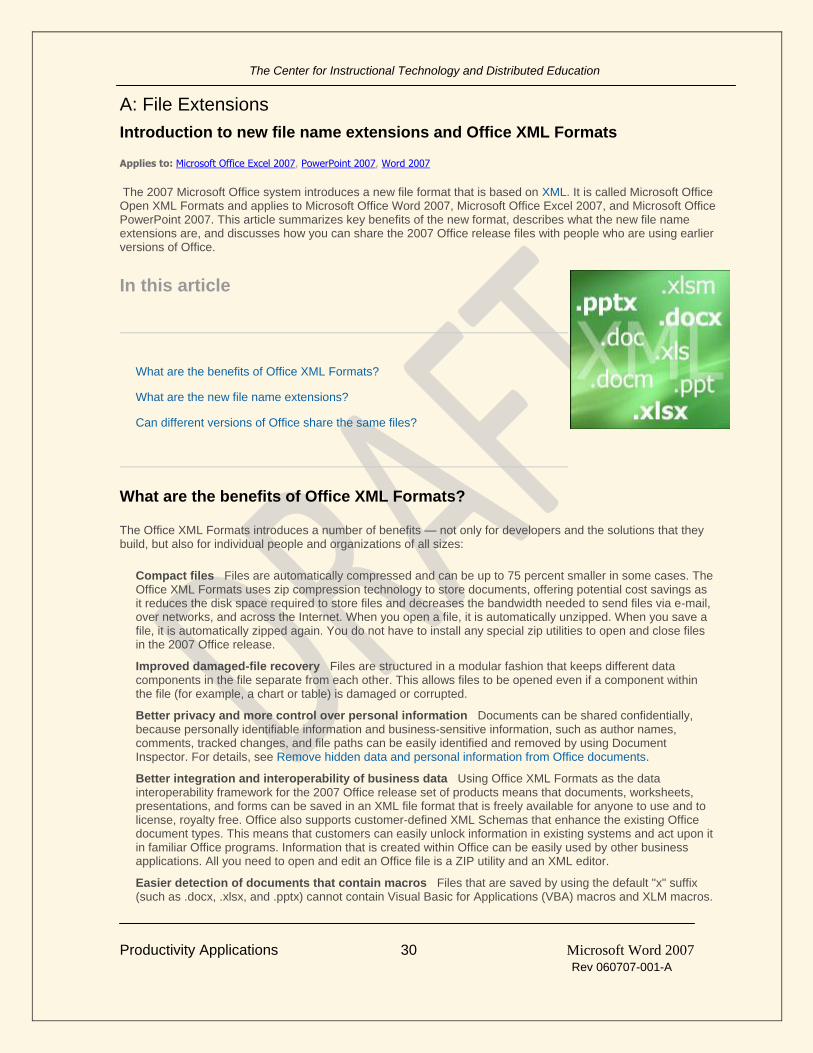
The 2007 Microsoft Office system introduces a new file format that is based on XML. It is called Microsoft Office Open XML Formats and applies to Microsoft Office Word 2007, Microsoft Office Excel 2007, and Microsoft Office PowerPoint 2007. This article summarizes key benefits of the new format, describes what the new file name extensions are, and discusses how you can share the 2007 Office release files with people who are using earlier versions of Office.
In this article
What are the benefits of Office XML Formats?
What are the new file name extensions?
Can different versions of Office share the same files?
What are the benefits of Office XML Formats?
The Office XML Formats introduces a number of benefits — not only for developers and the solutions that they build, but also for individual people and organizations of all sizes:
Compact files Files are automatically compressed and can be up to 75 percent smaller in some cases. The Office XML Formats uses zip compression technology to store documents, offering potential cost savings as it reduces the disk space required to store files and decreases the bandwidth needed to send files via e-mail, over networks, and across the Internet. When you open a file, it is automatically unzipped. When you save a file, it is automatically zipped again. You do not have to install any special zip utilities to open and close files in the 2007 Office release.
Improved damaged-file recovery Files are structured in a modular fashion that keeps different data components in the file separate from each other. This allows files to be opened even if a component within the file (for example, a chart or table) is damaged or corrupted.
Better privacy and more control over personal information Documents can be shared confidentially, because personally identifiable information and business-sensitive information, such as author names, comments, tracked changes, and file paths can be easily identified and removed by using Document Inspector. For details, see Remove hidden data and personal information from Office documents.
Better integration and interoperability of business data Using Office XML Formats as the data interoperability framework for the 2007 Office release set of products means that documents, worksheets, presentations, and forms can be saved in an XML file format that is freely available for anyone to use and to license, royalty free. Office also supports customer-defined XML Schemas that enhance the existing Office document types. This means that customers can easily unlock information in existing systems and act upon it in familiar Office programs. Information that is created within Office can be easily used by other business applications. All you need to open and edit an Office file is a ZIP utility and an XML editor.
Easier detection of documents that contain macros Files that are saved by using the default "x" suffix (such as .docx, .xlsx, and .pptx) cannot contain Visual Basic for Applications (VBA) macros and XLM macros.

The Center for Instructional Technology and Distributed Education
Productivity Applications 31 Microsoft Word 2007
Rev 060707-001-A
Only files whose file name extension ends with an "m" (such as .docm, .xlsm, and .pptm) can contain macros.
NOTE You might sometimes need to save your files in the binary file format that was used in earlier versions of
Office. For example, you might be working on a document with someone who has an earlier version of Office. For this reason, the 2007 Office release still allows you to save files in in binary format.
Before you decide to save your file in a binary format, read the Can different versions of Office share the same files? section of this article.
What are the new file name extensions?
By default, documents, worksheets, and presentations that you create in the 2007 Office release are saved in XML format with new file name extensions that add an "x" or an "m" to the file name extensions that you are already familiar with. The "x" signifies an XML file that has no macros, and the "m" signifies an XML file that does contain macros. For example, when you save a document in Word, the file now uses the .docx file name extension by default, rather than the .doc file name extension.
When you save a file as a template, you see the same sort of change. The template extension used in earlier versions is there, but it now has an "x" or an "m" on the end. If your file contains code or macros, you must save it by using the new macro-enabled XML file format, which adds an "m" for macro to the file extension.
The following tables list all of the default file extensions in Office Word 2007, Office Excel 2007, and Office PowerPoint 2007.
Word
XML file type Extension
Document .docx
Macro-enabled document .docm
Template .dotx
Macro-enabled template .dotm
The Center for Instructional Technology and Distributed Education
Productivity Applications 32 Microsoft Word 2007
Rev 060707-001-A
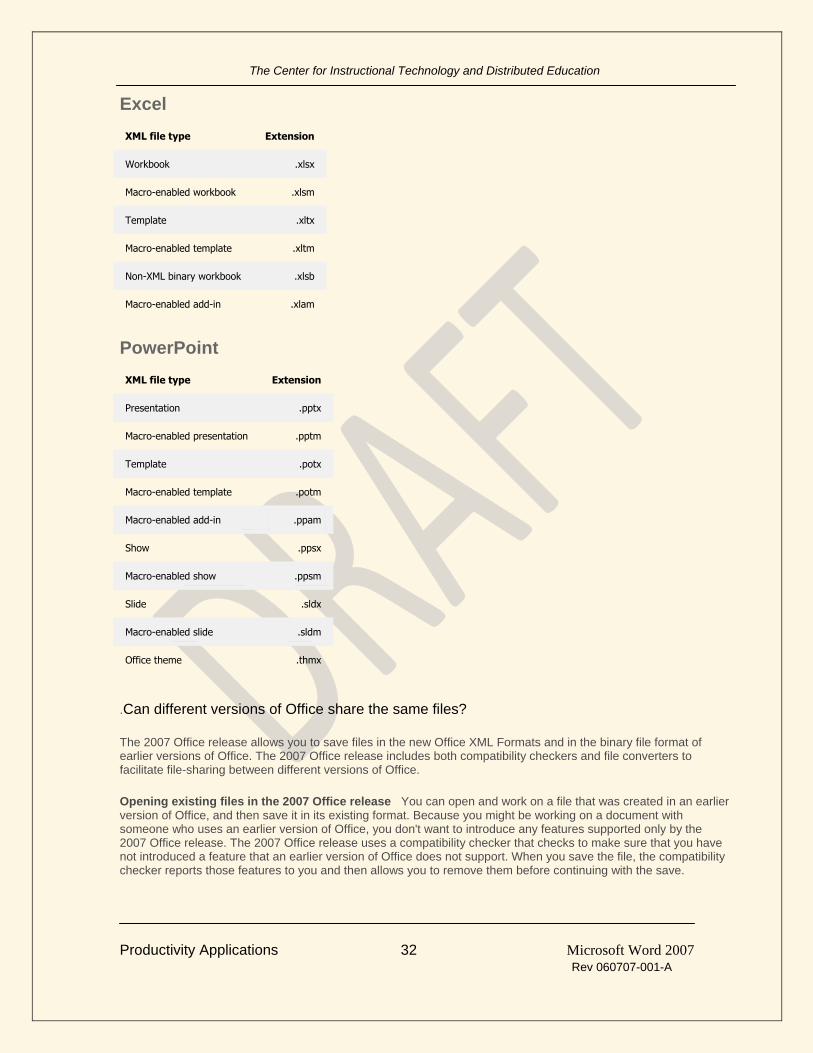
Excel
XML file type Extension
Workbook .xlsx
Macro-enabled workbook .xlsm
Template .xltx
Macro-enabled template .xltm
Non-XML binary workbook .xlsb
Macro-enabled add-in .xlam
PowerPoint
XML file type Extension
Presentation .pptx
Macro-enabled presentation .pptm
Template .potx
Macro-enabled template .potm
Macro-enabled add-in .ppam
Show .ppsx
Macro-enabled show .ppsm
Slide .sldx
Macro-enabled slide .sldm
Office theme .thmx
.Can different versions of Office share the same files?
The 2007 Office release allows you to save files in the new Office XML Formats and in the binary file format of earlier versions of Office. The 2007 Office release includes both compatibility checkers and file converters to facilitate file-sharing between different versions of Office.
Opening existing files in the 2007 Office release You can open and work on a file that was created in an earlier version of Office, and then save it in its existing format. Because you might be working on a document with someone who uses an earlier version of Office, you don't want to introduce any features supported only by the 2007 Office release. The 2007 Office release uses a compatibility checker that checks to make sure that you have not introduced a feature that an earlier version of Office does not support. When you save the file, the compatibility checker reports those features to you and then allows you to remove them before continuing with the save.
The Center for Instructional Technology and Distributed Education
Productivity Applications 33 Microsoft Word 2007
Rev 060707-001-A
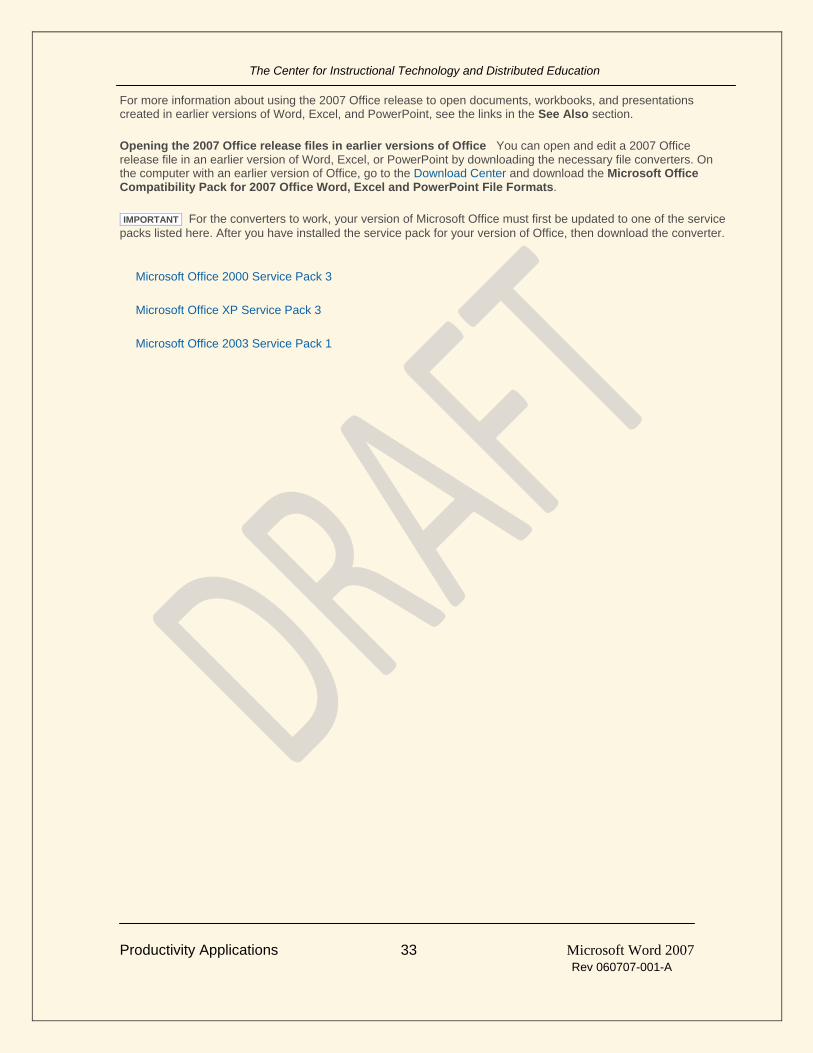
For more information about using the 2007 Office release to open documents, workbooks, and presentations created in earlier versions of Word, Excel, and PowerPoint, see the links in the See Also section.
Opening the 2007 Office release files in earlier versions of Office You can open and edit a 2007 Office release file in an earlier version of Word, Excel, or PowerPoint by downloading the necessary file converters. On the computer with an earlier version of Office, go to the Download Center and download the Microsoft Office Compatibility Pack for 2007 Office Word, Excel and PowerPoint File Formats.
IMPORTANT For the converters to work, your version of Microsoft Office must first be updated to one of the service
packs listed here. After you have installed the service pack for your version of Office, then download the converter.
Microsoft Office 2000 Service Pack 3
Microsoft Office XP Service Pack 3
Microsoft Office 2003 Service Pack 1
The Center for Instructional Technology and Distributed Education
Productivity Applications 34 Microsoft Word 2007
Rev 060707-001-A
B: Sample Syllabus
(The following page contains a sample syllabus designed to meet SACS and THECB best practices for electronically-delivered courses)
The Center for Instructional Technology and Distributed Education
Productivity Applications 35 Microsoft Word 2007
Rev 060707-001-A
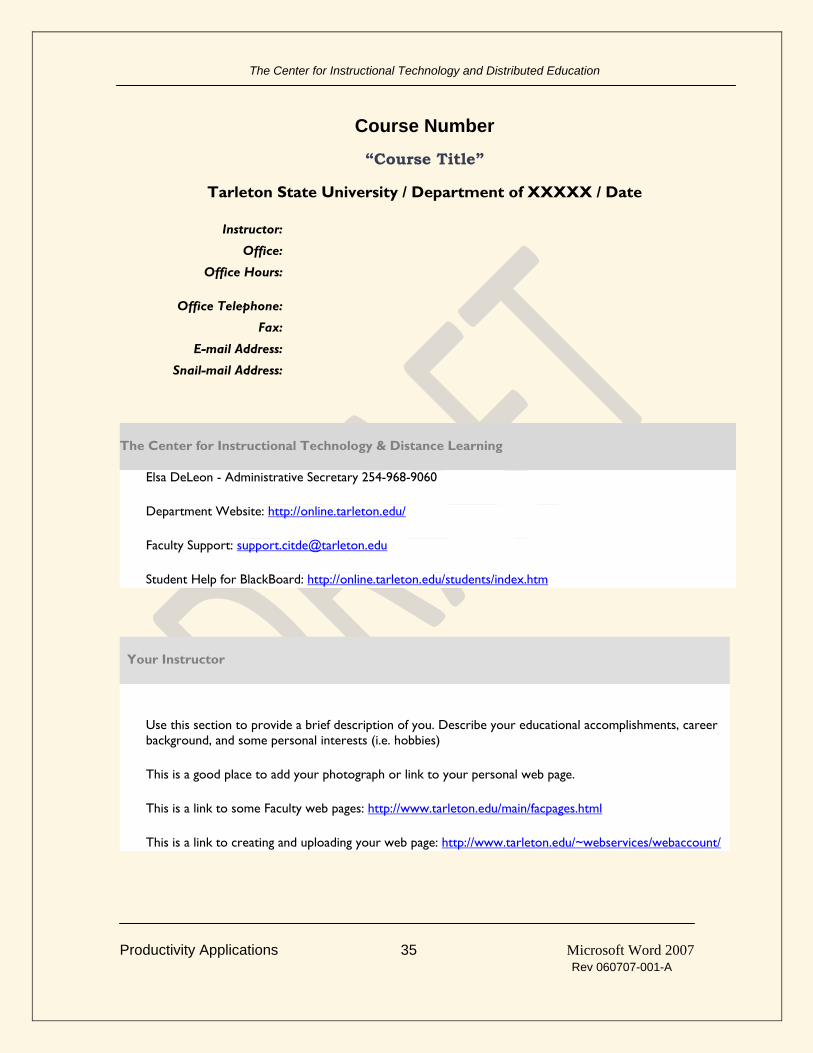
Course Number
“Course Title”
Tarleton State University / Department of XXXXX / Date
Instructor:
Office:
Office Hours:
Office Telephone:
Fax:
E-mail Address:
Snail-mail Address:
Your Instructor
Use this section to provide a brief description of you. Describe your educational accomplishments, career
background, and some personal interests (i.e. hobbies)
This is a good place to add your photograph or link to your personal web page.
This is a link to some Faculty web pages: http://www.tarleton.edu/main/facpages.html
This is a link to creating and uploading your web page: http://www.tarleton.edu/~webservices/webaccount/
The Center for Instructional Technology & Distance Learning
Elsa DeLeon - Administrative Secretary 254-968-9060
Department Website: http://online.tarleton.edu/
Faculty Support: [email protected]
Student Help for BlackBoard: http://online.tarleton.edu/students/index.htm

The Center for Instructional Technology and Distributed Education
Productivity Applications 36 Microsoft Word 2007
Rev 060707-001-A
Course Description
The verbatim description of the course contained in Tarleton State Course Catalog
Course Prerequisites, Co-requisites and Fees
Entrance Competencies and Skills:
A description of the knowledge and skills the typical student is assumed to have upon entry to the course. This is
not the same as course prerequisites. This paragraph is intended to identify differing student populations to assist
in providing for students' learning needs. Students just out of high school will have differing needs than adults in
the workforce that may have experience in the subject of the course. See note #4 (Important Notes section
below): Is an Internet-based Course Right for You?
Prerequisites:
Co-requisites:
Fees / Misc. Expenses:
Course Learning Goals
Describe your course as a whole, its purpose, and desired learning outcomes. Describe what your expectations
are for your students and define your overall course objectives.
Spend some time developing this and the next section. They are very important to meeting the "Best Practices"
requirements for on-line courses.

The Center for Instructional Technology and Distributed Education
Productivity Applications 37 Microsoft Word 2007
Rev 060707-001-A
Course Objectives
Briefly describe each module/lesson here and provide the terminal (chapter/unit) objectives for each unit of
study. See this site for a quick reference on writing performance objectives:
http://www.adprima.com/objectives.htm Example:
Module 1: The History of Money
The use of money to facilitate economic transactions can be traced to the origins or recorded history. In this
module, we trace the development of exchange systems from barter to the general acceptance of a specific
commodity as currency to the reliance on token monies currently in general use. We shall also entertain the
question of why societies voluntarily move from more tangible to less tangible media of exchange as they advance.
At the conclusion of this module, you should be able to . . .
1.1. Recognize the definition of barter and identify key weaknesses of this exchange system.
1.2. Define commodity money, list desirable characteristics of commodity money, and explain why gold and silver
came to be accepted as major commodity monies.
1.3. Describe key historical developments to the evolution from commodity to token money.
1.4. Explain why societies voluntarily move from more tangible to less tangible media of exchange as they
advance.
Required Text Information
Author(s) Frederick S. Mishkin
Title The Economics of Money, Banking and Financial Markets, 6th Ed
ISBN 0-201-77427-5
Publisher Name Addison-Wesley Publishing Company
Web Address http://www.aw.com/
Alt Purchase Address http://www.amazon.com, http://www.rothers.com/rst/
University Bookstore http://direct.mbsbooks.com/tarleton.htm
Estimated Cost: $70-105

The Center for Instructional Technology and Distributed Education
Productivity Applications 38 Microsoft Word 2007
Rev 060707-001-A
Required Readings
A listing of required reading references, other than the textbook, that the student is responsible for to complete the
course.
Recommended Additional Readings and Support Materials
Recommended Readings: Provide a listing of recommended reading references that will enhance the instruction.
This may also include publisher's study guides and workbooks that are helpful but not necessary for course
completion.
Support Materials: Describe any additional materials that are available in support of the student's learning activities.
This can include such items as software installed in the computer labs, books on reserve in the library, audio and/or
video tapes available, and Internet URLs.
Research Components
Add this section if you are including a research component which will require students to use library resources.
Teaching and Learning Strategies
How the course is to be presented -- lectures, lab assignments, student projects, videotapes, audiotapes, interactive
Internet sessions,multimedia presentations, Two-way Interactive Television, etc. For totally Web-based and/or ITV
courses, include those items that apply to your course, such as time schedules for online workgroups.
Distance learning courses require the faculty and students to interact. Outline how you plan to accomplish this. Some
methods available are telephone conversations, personal meetings where possible, Email correspondence, and
Threaded Discussion/Chat participation.
Also, describe how this course is to be presented and describe the media and other delivery methods that will be
used in the course (i.e. Interactive TV, Learning/History/Biography Channels) Some examples are provided below:
A. Lecture
B. Discussion
C. Audiovisual Materials
D. Printed Materials
E. Demonstration
F. Role Playing
G. Computer Assisted Instruction
The Center for Instructional Technology and Distributed Education
Productivity Applications 39 Microsoft Word 2007
Rev 060707-001-A
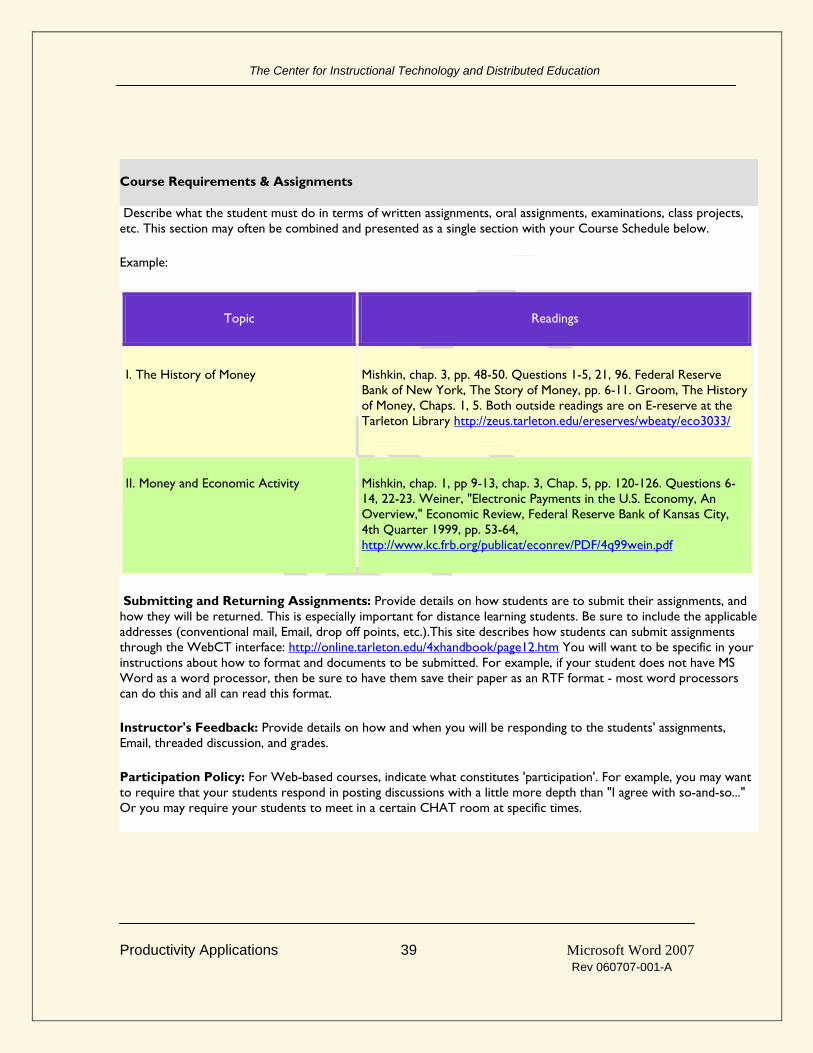
Course Requirements & Assignments
Describe what the student must do in terms of written assignments, oral assignments, examinations, class projects,
etc. This section may often be combined and presented as a single section with your Course Schedule below.
Example:
Topic Readings
I. The History of Money Mishkin, chap. 3, pp. 48-50. Questions 1-5, 21, 96. Federal Reserve
Bank of New York, The Story of Money, pp. 6-11. Groom, The History
of Money, Chaps. 1, 5. Both outside readings are on E-reserve at the
Tarleton Library http://zeus.tarleton.edu/ereserves/wbeaty/eco3033/
II. Money and Economic Activity Mishkin, chap. 1, pp 9-13, chap. 3, Chap. 5, pp. 120-126. Questions 6-
14, 22-23. Weiner, "Electronic Payments in the U.S. Economy, An
Overview," Economic Review, Federal Reserve Bank of Kansas City,
4th Quarter 1999, pp. 53-64,
http://www.kc.frb.org/publicat/econrev/PDF/4q99wein.pdf
Submitting and Returning Assignments: Provide details on how students are to submit their assignments, and
how they will be returned. This is especially important for distance learning students. Be sure to include the applicable
addresses (conventional mail, Email, drop off points, etc.).This site describes how students can submit assignments
through the WebCT interface: http://online.tarleton.edu/4xhandbook/page12.htm You will want to be specific in your
instructions about how to format and documents to be submitted. For example, if your student does not have MS
Word as a word processor, then be sure to have them save their paper as an RTF format - most word processors
can do this and all can read this format.
Instructor's Feedback: Provide details on how and when you will be responding to the students' assignments,
Email, threaded discussion, and grades.
Participation Policy: For Web-based courses, indicate what constitutes 'participation'. For example, you may want
to require that your students respond in posting discussions with a little more depth than "I agree with so-and-so..."
Or you may require your students to meet in a certain CHAT room at specific times.
The Center for Instructional Technology and Distributed Education
Productivity Applications 40 Microsoft Word 2007
Rev 060707-001-A
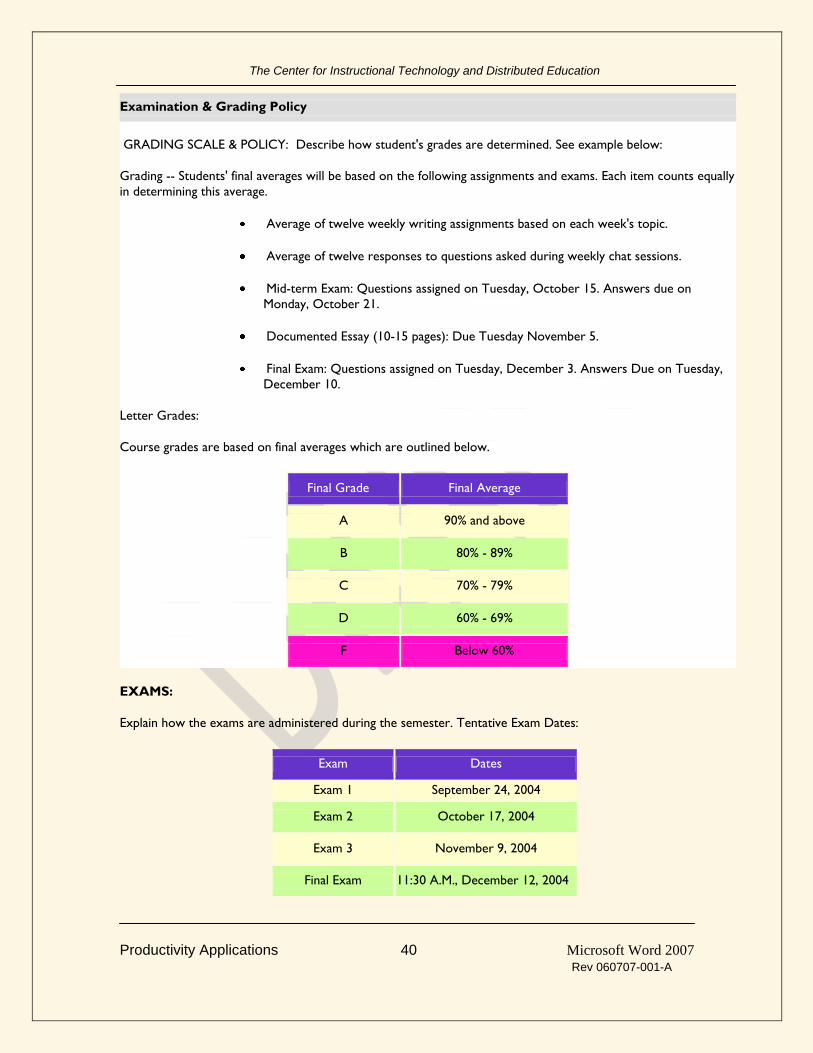
Examination & Grading Policy
GRADING SCALE & POLICY: Describe how student's grades are determined. See example below:
Grading -- Students' final averages will be based on the following assignments and exams. Each item counts equally
in determining this average.
Average of twelve weekly writing assignments based on each week's topic.
Average of twelve responses to questions asked during weekly chat sessions.
Mid-term Exam: Questions assigned on Tuesday, October 15. Answers due on
Monday, October 21.
Documented Essay (10-15 pages): Due Tuesday November 5.
Final Exam: Questions assigned on Tuesday, December 3. Answers Due on Tuesday,
December 10.
Letter Grades:
Course grades are based on final averages which are outlined below.
Final Grade Final Average
A 90% and above
B 80% - 89%
C 70% - 79%
D 60% - 69%
F Below 60%
EXAMS:
Explain how the exams are administered during the semester. Tentative Exam Dates:
Exam Dates
Exam 1 September 24, 2004
Exam 2 October 17, 2004
Exam 3 November 9, 2004
Final Exam 11:30 A.M., December 12, 2004

The Center for Instructional Technology and Distributed Education
Productivity Applications 41 Microsoft Word 2007
Rev 060707-001-A
WRITING ASSIGNMENTS:
Describe how writing assignments will be assigned and how they should be submitted.
ATTENDANCE POLICY:
Describe how attendance at Chats and other course virtual meetings will be determined and its effect on a
student's overall grade.
Academic Honesty Policy< tr>
Cheating, plagiarism (submitting another person’s material as one’s own), or doing work for another person who
will receive academic credit are all impermissible. This includes the use of unauthorized books, notebooks, or
other sources in order to secure or give help during an examination, the unauthorized copying of examinations,
assignments, reports, or term papers, or the presentation of unacknowledged material as if it were the student’s
own work. Disciplinary action may be taken beyond the academic discipline administered by the faculty member
who teaches the course in which the cheating took place.
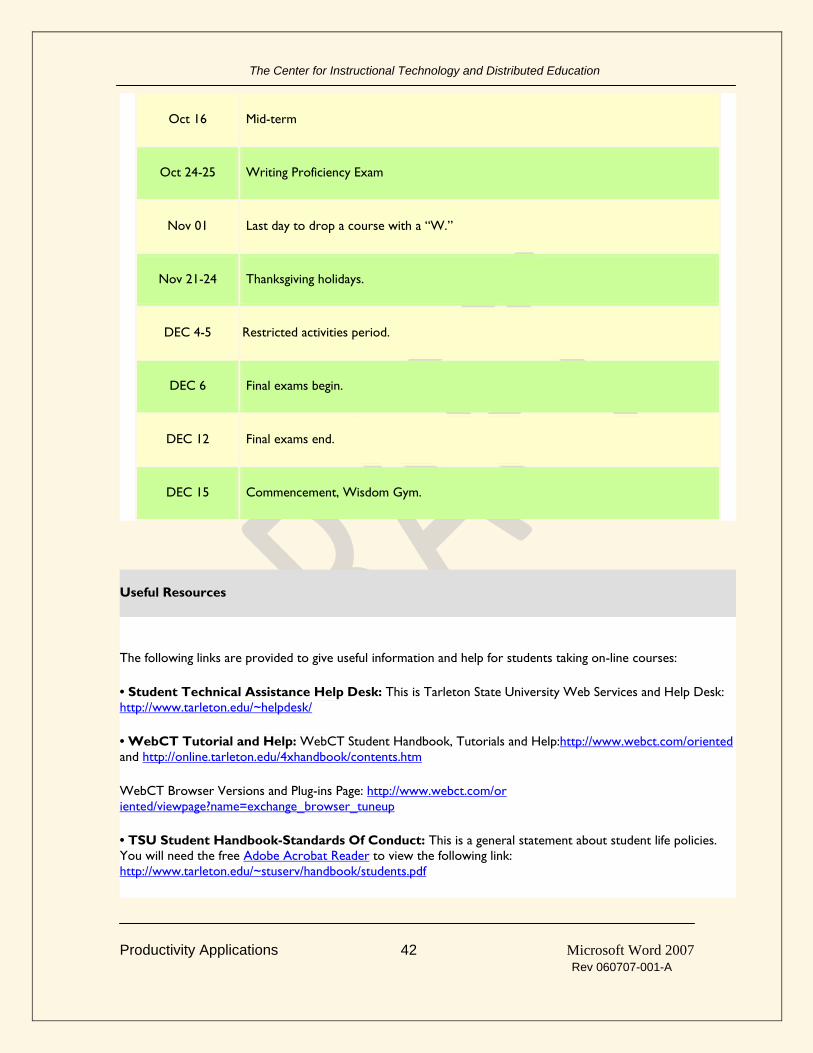
Course Schedule & Important Dates to Remember
Important Dates:
For important dates you may want to place dates of activities located in the general Tarleton Calendar such
as the Writing Proficiency Exam dates, Certification exams, final exam dates, etc.
Important Dates Events
Aug 27 Classes begin.
Aug 29 Last day to register for university credit.
Sep 03 Labor day – no classes.
Sep 07 Last day to file for December graduation.
Sep 12 Last day to drop a course with no record.
Oct 7-13 Homecoming week.
The Center for Instructional Technology and Distributed Education
Productivity Applications 42 Microsoft Word 2007
Rev 060707-001-A
Oct 16 Mid-term
Oct 24-25 Writing Proficiency Exam
Nov 01 Last day to drop a course with a “W.”
Nov 21-24 Thanksgiving holidays.
DEC 4-5 Restricted activities period.
DEC 6 Final exams begin.
DEC 12 Final exams end.
DEC 15 Commencement, Wisdom Gym.
Useful Resources
The following links are provided to give useful information and help for students taking on-line courses:
• Student Technical Assistance Help Desk: This is Tarleton State University Web Services and Help Desk:
http://www.tarleton.edu/~helpdesk/
• WebCT Tutorial and Help: WebCT Student Handbook, Tutorials and Help:http://www.webct.com/oriented
and http://online.tarleton.edu/4xhandbook/contents.htm
WebCT Browser Versions and Plug-ins Page: http://www.webct.com/or
iented/viewpage?name=exchange_browser_tuneup
• TSU Student Handbook-Standards Of Conduct: This is a general statement about student life policies.
You will need the free Adobe Acrobat Reader to view the following link:
http://www.tarleton.edu/~stuserv/handbook/students.pdf

The Center for Instructional Technology and Distributed Education
Productivity Applications 43 Microsoft Word 2007
Rev 060707-001-A
• TSU Student Catalog: http://www.tarleton.edu/~catalog/
• Americans With Disabilities Act: It is the policy of Tarleton State University to comply with the Americans
with Disabilities Act (ADA) and other federal, state, and local laws relative to the provision of disability services.
Students with disabilities may contact the Tarleton State University, Disability Services Office at (254) 968-9480
to request appropriate accommodation. Furthermore, formal accommodation requests cannot be made until the
student has been officially admitted to Tarleton State University. If you have special needs due to a learning
disability or other disability, please contact Dr. Mary Ann Lipford, Director of Student Disability Services for
Tarleton State University, Room #15, Teaching and Learning Center (located in the Student Development
Center), http://www.tarleton.edu/~tlc/adaptive.htm
Use the following link to view the Americans With Disabilities Act Faculty Modification & Accommodation
Guidelines: http://www.tarleton.edu/~TLC/accom.htm
• Computer Usage Policy: The University reserves the right to limit, restrict or deny access to its technology
resources, as well as to take disciplinary and/or legal action against anyone in violation of these regulations or
applicable law. Use the following link to view the computer usage policy.
http://www.tarleton.edu/~tiic/networkpolicy.htm
If you do not have the necessary computer hardware and software (i.e., browser, Email) setup at home, you can
find every resource you need in the University computer labs.
• Library Support: The Mission of theTarleton Libraries is to supplement and enrich classroom teaching and
learning; to support individual study and research; and to reinforce all curricular and recreational programs of the
University. Use the following link to view the library support available. http://www.tarleton.edu/~library/
Important Notes
1. Add Web Links and any other information that enhances your course or helpful sites (i.e. example sites of APA
or MLA Style and Referencing guides)
Here is an example site on Citing references in APA format:http://www.bedfordstmartins.com/online/cite6.html
Here is an example site in writing research papers based on MLA
Documentation:http://webster.commnet.edu/mla.htm
2. Add some cool links related to your course
3. Is an Internet-Based Course Right for You? Because the course is a web-based course, you need intermediate
to advanced Internet-skills. For a good assessment or needs assessment, take the Prentice Hall's online "test" to
see if this kind of course is for you. You can find that test at
http://webct.prenhall.com/public/dist_learn_hand/Is_DL_4_Me.htm
The Center for Instructional Technology and Distributed Education
Productivity Applications 44 Microsoft Word 2007
Rev 060707-001-A
C: Completed Syllabus Work Sample
(The following page contains a completed syllabus used in the workshop activity)
The Center for Instructional Technology and Distributed Education
Productivity Applications 45 Microsoft Word 2007
Rev 060707-001-A
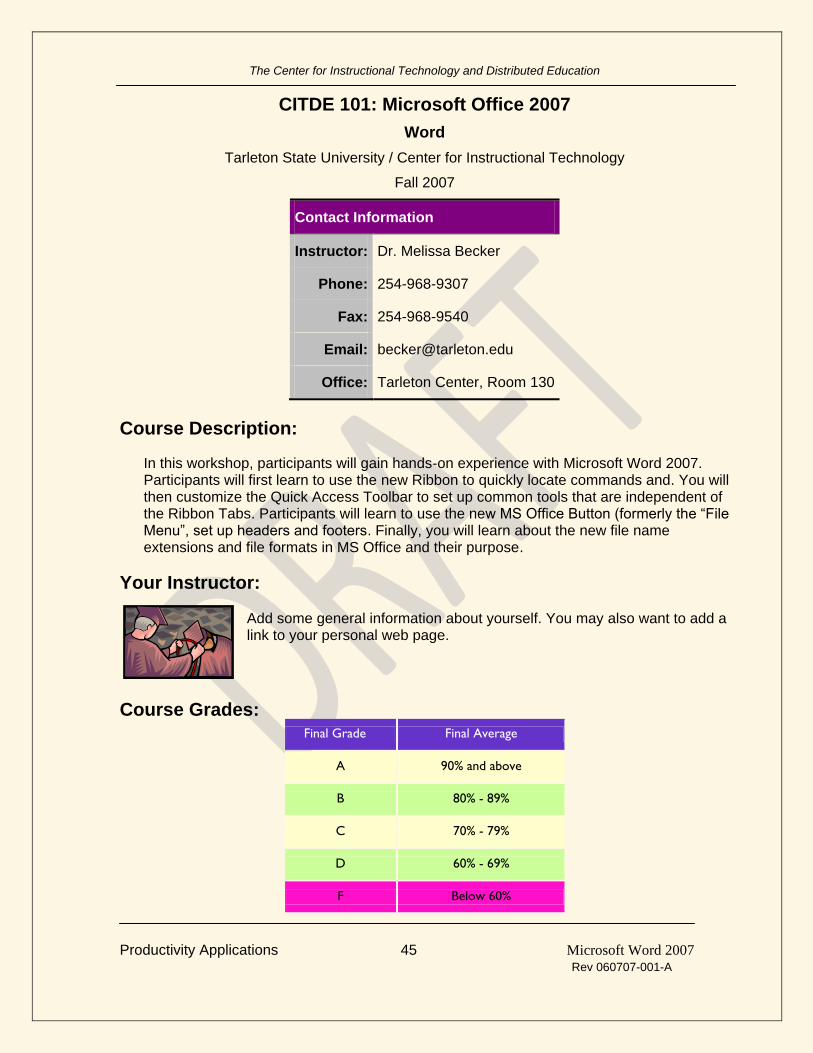
CITDE 101: Microsoft Office 2007
Word
Tarleton State University / Center for Instructional Technology
Fall 2007
Contact Information
Instructor: Dr. Melissa Becker
Phone: 254-968-9307
Fax: 254-968-9540
Email: [email protected]
Office: Tarleton Center, Room 130
Course Description:
In this workshop, participants will gain hands-on experience with Microsoft Word 2007. Participants will first learn to use the new Ribbon to quickly locate commands and. You will then customize the Quick Access Toolbar to set up common tools that are independent of the Ribbon Tabs. Participants will learn to use the new MS Office Button (formerly the ―File Menu‖, set up headers and footers. Finally, you will learn about the new file name extensions and file formats in MS Office and their purpose.
Your Instructor: Add some general information about yourself. You may also want to add a link to your personal web page.
Course Grades:
Final Grade Final Average
A 90% and above
B 80% - 89%
C 70% - 79%
D 60% - 69%
F Below 60%
The Center for Instructional Technology and Distributed Education
Productivity Applications 46 Microsoft Word 2007
Rev 060707-001-A

The Center for Instructional Technology and Distributed Education
Productivity Applications 47 Microsoft Word 2007
Rev 060707-001-A
Notes:

The Center for Instructional Technology and Distributed Education
Productivity Applications 48 Microsoft Word 2007
Rev 060707-001-A

Tarleton State University
Center for Instructional Technology & Distributed Education
1333 W. Washington
Box T- 0810
Stephenville, Texas 76402
Ph: 254-968-9060
Fax: 254-968-9540
Rev. 111506-001a