microsoft flight simulator fundamentals - grand computers · the learning center includes a set of...
TRANSCRIPT

Microsoft®
Flight Simulator
Fundamentals© 2006 BruceAir, LLC
www.BruceAir.com

A Companion to:Microsoft Flight Simulator as a Training Aid:
A Guide for Pilots, Instructors, and Virtual
Aviators

The following information applies to
Microsoft® Flight Simulator X and Flight Simulator 2004

Contents Useful Sources of Information The Kneeboard Basic Flight Simulator Setup Joystick and Mouse Controls Using the Mouse Wheel Cockpit Orientation Displaying the Flight Simulator Menu Bar Using the Practice Flights Key Flight Simulator Views Flight Simulator X Views Map View Flight Analysis Using Slew Mode Pausing a Flight Resetting a Flight Exiting Flight Simulator Flight Simulator Menus More Sources of Information

Useful Sources of Information
As you fly, remember that Flight Simulator includes many useful
sources of information. Don’t worry about memorizing commands
or features. Help is always just a click or key press away.
Flight Simulator 2004 Flight Simulator X

Useful Sources of Information
The Learning Center is the on-board Help for
Flight Simulator. It’s like a Web site on your
computer that includes videos, pictures,
procedures, and reference text.
Flight Simulator 2004 Flight Simulator X

The Learning Center includes a set of
Key Topics, a Site Map that guides you
to all available topics, and an Index to
make it easy to find specific information.
To see the main pages of the Learning
Center, click the Key Topics, Site Map,
or Index tab labels.
The topics in the Learning Center
include text, pictures, and videos to help
you learn how to use all the features in
Flight Simulator.
To visit the Learning Center,
press the ALT key to display the
Flight Simulator menu bar and
then click Learning Center on
the Help menu.
To see more information in the Learning
Center window, use the vertical scroll bar.
Flight Simulator 2004

The Learning Center includes a set of
Key Topics, a Site Map that guides you
to all available topics, and an Index to
make it easy to find specific information.
To see the main pages of the Learning
Center, click the Key Topics, Site Map,
Index, or Lessons tab labels.
The topics in the Learning Center
include text, pictures, and videos to help
you learn how to use all the features in
Flight Simulator.
To visit the Learning Center,
press the ALT key to display the
Flight Simulator menu bar and
then click Learning Center on
the Help menu.
To see more information in the Learning
Center window, use the vertical scroll bars.
Flight Simulator X

Topics in the Learning Center
include links to detailed
information, just like a Web page.

The Kneeboard
The Kneeboard is a handy pop-up
reference that you can use as you fly.
Flight Simulator XFlight Simulator 2004

The Kneeboard
To display or hide the Kneeboard, press the F10
key or click the Kneeboard icon () on the
instrument panel.
Kneeboard Icon
Flight Simulator 2004 Flight Simulator 2004
Kneeboard Icon

Basic Flight Simulator Setup
Although you can create an
elaborate virtual cockpit, you
can use Flight Simulator
effectively with just a basic
setup: joystick or yoke and
mouse.

Throttle
Rudder
(twist)
Switches
for trim,
view, etc.
Buttons for
flaps, landing
gear, etc.
Roll mouse wheel
to tune radios,
adjust power, etc.
Typical Joystick Controls

Using the Mouse Wheel
Think of the mouse as an electronic
extension of your hand.
To operate many of the controls in
the cockpit, use the mouse to point
at a knob, button, or control, and:
Roll the mouse wheel slowly forward or
backward
Click a button
Drag the mouse
Roll mouse wheel
to tune radios,
adjust power, etc.

Controlling the Airplane
with the MouseYou can use the mouse to:
Operate the throttle, propeller, mixture controls
Change heading (when the autopilot is ON and in HDG mode)
Extend and retract the flaps
Adjust elevator, rudder, and aileron trim
Change altitude and rate of climb or descent with the autopilot controls (when the autopilot is ON and ALT mode is selected)
Tune communication and navigation radios
Select courses on the VOR/ILS indicators and HSI
Turn lights on and off
Display and hide the Avionics panel, Kneeboard, Map View, GPS, and aircraft control sub-panels

Cockpit Orientation
The following slides point out controls that you can operate by using the mouse as an electronic extension of your hand.
In most cases, you can operate important controls much as you would in an airplane. Instead of pushing buttons and twisting knobs, however, point to an item and click the left mouse button or roll the mouse wheel forward and backward.
The positions of some controls vary in different aircraft, just as they do in real cockpits, but the same basic actions apply regardless of which aircraft you’re flying.

This is the normal (2D) Cockpit view for the Cessna 172S in
FS2004. All aircraft have similar 2D cockpit views.
All 2D cockpits include a row of
special icons. This row is in a
different location on each aircraft’s
instrument panel.
Click the appropriate icon to
display/hide the Kneeboard, ATC
window, Map view, Avionics Stack,
GPS, or Compass pop-up
windows.3
You can also
operate the throttle,
mixture, flaps, etc.
with the mouse
You can operate
electrical switches
with the mouse

This is the normal (2D) Cockpit view for the Cessna 172S in
Flight Simulator X.
All 2D cockpits include a
row of special icons. This
row is in a different
location on each aircraft’s
instrument panel.
Click the appropriate icon
to display/hide the
Kneeboard, ATC window,
the Map, GPS, etc.
You can also operate the
throttle, mixture, flaps,
trim, and avionics with
the mouse wheel.
You can operate
electrical switches
with the mouse

With the autopilot ON and in HDG
mode, you can change heading
with the mouse. Point here and
roll the mouse wheel forward or
backward to move the heading
bug on the heading indicator.
With the autopilot ON and in ALT mode,
you can change altitude with the
mouse. Point to the digits in the
altitude window and roll the mouse
wheel forward or backward.
Change the rate of climb/descent by
pointing to the digits in the VS window
and rolling the mouse wheel.
To increase or reduce power,
point at the throttle and roll
the mouse wheel forward or
backward.
This screen shows a special IFR Training Panel in
Flight Simulator 2004. IFR Training Panels are
available for the C172S, C182S, and Mooney Bravo.
These IFR panels reduce the space devoted to the
outside view so that the flight instruments, avionics
stack, and other important controls are all visible in
the main window.

With the autopilot ON and in HDG
mode, you can change heading
with the mouse. Point here and
roll the mouse wheel forward or
backward to move the heading
bug on the heading indicator.
With the autopilot ON and in ALT mode,
you can change altitude with the
mouse. Point to the digits in the
altitude window and roll the mouse
wheel forward or backward.
Change the rate of climb/descent by
pointing to the digits in the VS window
and rolling the mouse wheel.
To increase or reduce power,
point at the throttle and roll
the mouse wheel forward or
backward.
The Cessna 172S in Flight Simulator X includes the
avionics stack in the main window.
You can use the mouse to operate controls just as in
Flight Simulator 2004.

To adjust the elevator trim with the
mouse, point to the trim wheel and
roll the mouse wheel forward or
backward.
To extend or retract the flaps,
point at the flap lever and roll the
mouse wheel forward or
backward.
To select a course on a VOR or ILS
indicator, point to the appropriate OBS
knob and roll the mouse wheel
backward or forward.

To activate a frequency, click the
appropriate flip-flop (STBY) button
with the left mouse button.
To change a communications or navigation
frequency, point to the digits in the
appropriate standby frequency window and
roll the mouse wheel backward or forward.
Point separately at the digits to the left (MHz)
and right (KHz) of the decimal point.
Change the ADF frequency and
transponder squawk code much as you
change communication and navigation
frequencies.
Point separately at each digit in the ADF
and transponder displays and roll the
mouse wheel.

To adjust the wings of the airplane in
the attitude indicator, point to the
adjustment knob and roll the mouse
button forward or backward.
To select the DME source, point to the
selector button and click next to R1 or R2.
To monitor the Morse Code ID for a
navigation radio or marker beacon, point to
the appropriate button on the audio panel
and click the left mouse button.
Or click the Pull Ident button on the
appropriate radio.
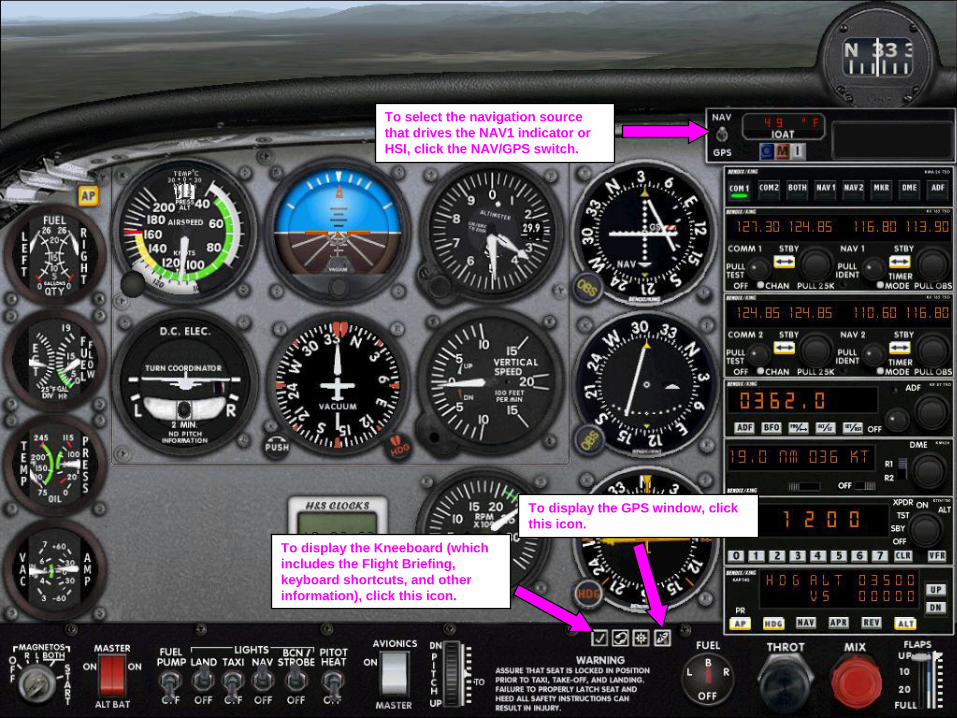
To display the Kneeboard (which
includes the Flight Briefing,
keyboard shortcuts, and other
information), click this icon.
To display the GPS window, click
this icon.
To select the navigation source
that drives the NAV1 indicator or
HSI, click the NAV/GPS switch.

To turn the autopilot on and off
and to select autopilot functions,
click the appropriate button(s) on
the autopilot panel.
To turn the master switches,
lights, Pitot heat, etc. on and off,
click the appropriate switches.

NAV/GPS switch,
which drives the
number 1 nav
indicator
Control panel icons
Note the location of several key items in
the Cessna cockpit in Flight Simulator X
Autopilot ON/OFF

This is the normal cockpit view for the Baron. You can operate the
main controls just as you do in any Flight Simulator cockpit, by
pointing with the mouse and rolling the wheel forward or backward,
dragging the mouse, or clicking the left mouse button.
You can adjust the pitch, aileron, and
rudder trim by pointing to the
appropriate trim wheel and rolling the
mouse wheel forward or backward.
You can extend and retract the
landing gear and flaps by
pointing to the appropriate
control and rolling the mouse
wheel forward or backward.
To display the Kneeboard, engine
controls, map, avionics stack, GPS,
and other information, click one of the
icons in this row.

To display the avionics stack while in normal cockpit
view, click the Avionics icon on the instrument panel.
The avionics stack appears in a pop-up window.
To hide the avionics stack, click the Avionics icon again.
To display or hide the avionics
stack, click the Avionics icon.
You can change frequencies,
control the autopilot, identify
navaids, etc. with the mouse.
Point to the item you want to
change, and roll the mouse wheel
forward or backward. Or click a
button or control.

To display the GPS in any aircraft, click the GPS
icon on the instrument panel. The GPS appears
in a pop-up window.
To hide the GPS, click the GPS icon again.
To display or hide the
GPS, click the GPS icon.
You can operate the GPS with the
mouse by pointing and clicking
buttons on the GPS.
You can use the mouse to drag the
GPS window anywhere on the
screen.
To learn more about how to use the
GPS in Flight Simulator, see the GPS
topics in the Learning Center.

Some aircraft, like the Baron, have a separate pop-up window for
engine controls.
You can drag the pop-up window anywhere on the screen.
If you prefer not to display the engine controls, you can use the
throttle on the joystick or keyboard shortcuts to increase and
decrease power and adjust RPM.
To increase power incrementally, press the F3 key. To decrease
power, press the F2 key.
To adjust RPM, press CTRL+F3 (increase) or CTRL+F2 (decrease)
To display or hide the engine controls,
click the Engine Controls icon.
You can operate the engine controls in the pop-up window with
the mouse by pointing at the appropriate control and dragging
the mouse pointer up and down.
To use the fuel selector, point to the position you want to select
(not the lever itself) and click.

To display the Flight Simulator menu bar, press the
ALT key.
Use the mouse or the left and right arrow keys (←
and →) to highlight a top-level command and the
mouse or the up and down arrow keys (↑and ↓) to
select commands on the drop-down menus, just as
you do in any Windows application.
Flight Simulator 2004
Flight Simulator X
For more information about
all of the menus in Flight
Simulator, see the slides
later in this presentation.

Using the Practice Flights
The following screens show to choose and start the
Practice Flights provided with Microsoft Flight Simulator
as a Training Aid, published by ASA.
For more information about the book, visit the ASA Web
site and www.BruceAir.com.

Copying the Practice Flights
To use the Practice Flights, copy the
contents of the appropriate folder from the
CD that accompanies the book to the
correct folder on your hard drive.
For more information, see
InstallingPracticeFlights.pdf on the CD that
accompanies the book.


When you start Flight Simulator 2004, this dialog box
appears. To start one of the Practice Flights, click Select
a Flight in the left column.
To start one of the Practice Flights, click
Select a Flight.

Flight Simulator 2004: In the Select a
Flight dialog box, click My Saved Flights.
The BruceAir Practice Flights appear in
the list under Choose a Flight.
A detailed description of the selected
Flight appears in this box.
When you’re ready to begin, click Fly Now.
The titles of the Practice Flights appear in this
list. Click the one you want to fly.

To start a Practice Flight in Flight Simulator X, click Free Flight.
Click Free Flight.
And then click Load.

When the Load Flight dialog box appears,
click the title of the Practice Flight that you
want to fly. A description of the selected
Practice Flight appears in the box.
When you’re ready to fly, click Fly Now!

Key Flight Simulator Views
2D Cockpit
Virtual Cockpit (3D)
Spot Plane
Maximize (W)

This is the normal (2D) Cockpit view for the Cessna 172S in Flight Simulator
2004. All aircraft have similar 2D cockpit views.
All of the basic controls you need to fly the airplane are available in this
view, except the avionics stack, which pops up in a small window when you
click the Avionics icon. Some aircraft also have pop-up windows for engine
controls and sub-panels.
The GPS also appears in a pop-up window when you click GPS icon.
You can return to this view by pressing the large black Button 2 on the top of
the joystick to cycle through the views until this cockpit appears.
Click this icon to display the GPS
Click this icon to display
the avionics stack
While in Cockpit view, you can use the
mouse to move the heading bug, set
courses with the OBS knobs, tune radios,
and operate the autopilot, flaps, throttle,
mixture, lights, and other controls.

In Virtual Cockpit (3D) view, you see more of the outside view while keeping the
instrument panel in view.
To switch to Virtual Cockpit view, press the large black Button 2 on the top of
the joystick until the Virtual Cockpit view appears. To switch back to normal
cockpit view, press Button 2 until the normal cockpit cycles back into view.
While in the Virtual Cockpit, you can zoom in and out by pressing the + and –
keys on the keyboard.
To look around as if you were moving your head while in Virtual Cockpit view,
move the silver ―hat‖ switch at the top of the joystick in the direction that you
want to look. Moving the ―hat‖ switch pans (moves the view smoothly) in the
direction you choose.
While in Virtual Cockpit view, you can use the mouse to move the heading bug,
tune radios, and operate the autopilot, flaps, throttle, mixture, and other
controls just as you do in normal Cockpit view.

In exterior, or Spot Plane view, you see your airplane as if you were flying in
formation.
To switch to Spot Plane view, press the large black Button 2 on the top of
the joystick until the Spot Plane view appears. Note that you may have to
cycle through the Tower view, which shows your airplane from the
perspective of the control tower or airport reference point at the last airport
you visited.
If you don’t appear to be in close formation as you switch views, press
joystick Button 2 again to continue cycling views to Spot Plane view.
To switch back to normal cockpit view, press Button 2 until that the normal
cockpit cycles back into view.
While in Spot Plane view, you can zoom in and out by
pressing the + and –keys on the keyboard.
To look around as if your chase plane were changing
its position in formation, move the silver ―hat‖ switch
at the top of the joystick in the direction that you want
the chase plane to move. You can move around, above,
and below your airplane.

Maximum, or ―W‖ view, de-clutters the main screen. In Maximum view, you see
only a set of basic flight and navigation instruments along the bottom of the
screen. The instruments you see depend on the type of aircraft you’re flying.
Maximum view is particularly useful during the last stages of an instrument
approach or landing. Think of it as ―taking a peek‖ over the instrument panel—
just as you do in real flying—as you approach the decision altitude or MDA or
transition into the flare prior to touchdown.
This view is available only when you are flying in the main 2D Cockpit view.
To switch to and from Maximum view, press the W key on the keyboard (this
view is not available by pressing a button on the joystick).
Pressing the W key once displays the view you see here. Pressing the W key
again removes the instruments at the bottom of the screen. Pressing the W key
once more cycles back to the 2D Cockpit view.

Flight Simulator X Views
Most of the views in Flight Simulator X
work just like those in Flight Simulator
2004.
The following slides point out a few key
differences. For more information about
the new views in Flight Simulator X, see
the topic “Using Views and Windows” in
the Learning Center.

In Flight Simulator X, the
Views menu includes
commands display the new
Landing View and IFR Panels,
where appropriate.
In some aircraft, you
can also click icons to
switch to Landing View
or the IFR Panel.

Flight Simulator X introduces the
Right Seat view, which puts you
in the copilot position.

Right Seat view is especially
useful when flying together
with another pilot in a
Shared Cockpit.

Map View
Flight Simulator includes a Map view that
shows the location of your airplane and
other information—e.g., airports and
navaids.
You can also use the Map view to
reposition your aircraft and to view a trail
of your flight path.

In Flight Simulator 2004, to
display the Map, click this icon
In Flight Simulator X, to display
the Map, click this icon

In Map view, you can see your
aircraft’s position, the location
of airports and navaids,
airspace boundaries, etc.
A red trail also marks your
flight path.
The black aircraft icon
shows your position.
You can use the mouse to
drag the airplane icon to a
new position
You can change your
aircraft’s altitude,
heading, speed and
LAT/LONG by clicking in
these boxes and typing.
Click these buttons to change the map scale and to
hide/display map elements such as airports, VORs,
NDBs, intersections, and airways.
To return to the cockpit, click OK
Flight Simulator 2004

In Map view, you can see your aircraft’s
position, the location of airports and
navaids, airspace boundaries, etc.
A red trail also marks your flight path,
and a magenta line shows the GPS
course to your next waypoint.
The black aircraft icon
shows your position.
You can use the mouse to
drag the airplane icon to a
new position
You can change your
aircraft’s altitude,
heading, speed and
LAT/LONG by clicking in
these boxes and typing.
Click these buttons to change the map scale and to
hide/display map elements such as airports, VORs,
NDBs, intersections, airways, and weather.
To return to the cockpit, click OK
Flight Simulator X

Flight Analysis
Flight Simulator includes Flight Analysis so
you can review a flight. Flight Analysis
works like a basic flight data recorder
(“black box”).
The Flight Analysis screen looks like the
Map view, but you can use controls like
those on TV remote to replay a flight on
top of the map and to review heading,
airspeed, altitude readouts.

To view the Flight Analysis screen, in either
Flight Simulator 2004 or Flight Simulator X, press
the ALT key to display the menu bar, and then, on
the Options menu, click Flight Analysis.

You can see your flight track on the
map and your vertical profile below
Click these buttons to control the
playback of your flight. Drag the slider along this bar to set the
starting point for the review of your flight.
Click these buttons to zoom in and out
and control what appears on the map.
Flight Simulator 2004

You can see your flight track on the
map and your vertical profile below
Click these
buttons to control
the playback of
your flight.
Drag the slider along this bar to set the starting point
for the review of your flight.
Click these buttons to zoom in and out and control what
appears on the map.
Flight Simulator X
Using Slew Mode
If you want to move your airplane rapidly
to a new location without using the Map
view, you can use Slew mode.
While in Slew mode you can use the
joystick to “zoom” the airplane in any
direction—left, right, forward, or backward.
You can also use keyboard shortcuts to
change altitude rapidly.

Keyboard Shortcuts for Slew Mode
To switch in and out of Slew mode, press the Y key on the keyboard.
While you are in Slew mode, the word Slew appears in red in the lower-right corner of the screen.
To increase altitude while in Slew mode, press and hold the Q key.
To decrease altitude while in Slew mode, press and hold the A key.

Controlling Direction in Slew Mode
While in Slew mode, use the joystick to
move your aircraft.
Push the joystick in the direction you want
to travel (forward, left, right, or backward).
To stop, center the joystick.
To change heading (rotate the aircraft
about its vertical axis), twist the joystick
left or right.

Joystick Controls in Slew Mode
To change heading (i.e.,
rotate about the vertical
axis) in Slew mode, twist
the stick left or right.
To move the aircraft left or right,
move the joystick in the direction
you want to travel.
To move the aircraft forward or
backward, move the joystick in
the direction you want to travel.
Pausing a Flight
You can pause the simulation at any time
to review the situation, look up information,
or review any points of confusion
To pause a flight at any time, press the P key.
To resume flying, press the P key again.

Resetting a Flight
You can reset the current flight to start
flying again from the beginning of the
situation.
To reset (restart) a flight, press CTRL+;
(semicolon), or
Press the ALT key to display the Flight
Simulator menu bar and on the Flights menu,
choose Reset Flight.

To reset (restart) a flight, press the ALT key to
display the Flight Simulator menu bar, and then on
the Flights menu, choose Reset Flight or Reset.
Or press CTRL+; (semicolon).
Flight Simulator 2004
Flight Simulator X

Flight Simulator X
Flight Simulator 2004
To exit Flight Simulator, on
the Flights menu, choose
Exit, or press CTRL+C.

Flight Simulator Menus
The following screens show the menus first in Flight Simulator 2004 and then in Flight Simulator X.
The menus give you an idea of the depth of features (e.g., realism settings, system failures, etc.) available in Flight Simulator.
To learn about these features, see the articles in the Learning Center, which is available on the Help menu.
To display the menu bar, press the ALT key (just as in any Windows application), and then use the arrow keys (→ ↑ ← ↓) or the mouse to choose commands.
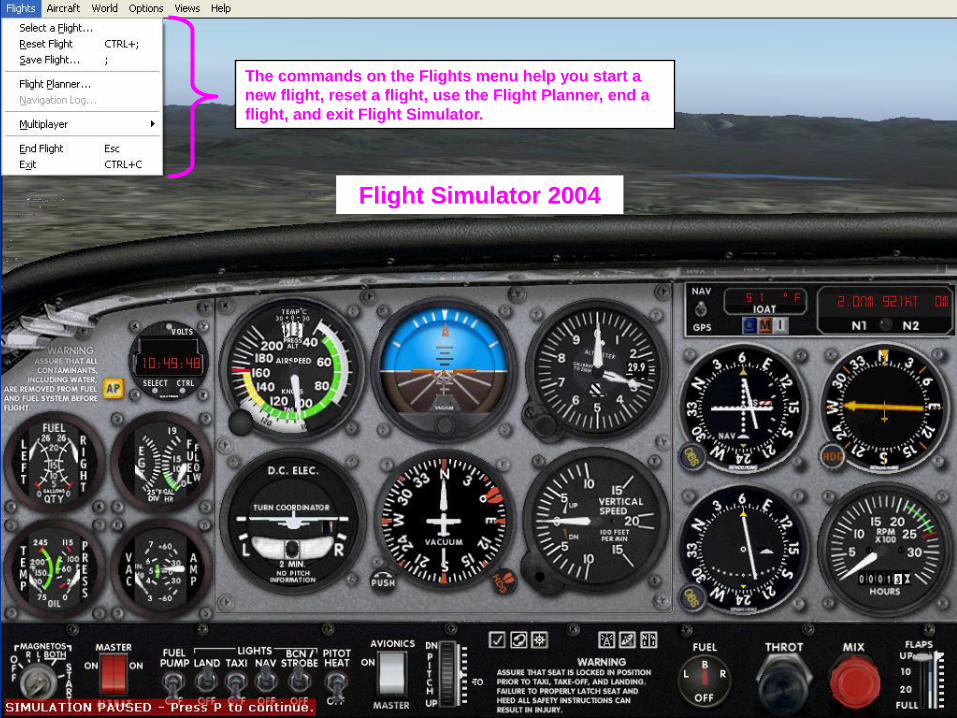
The commands on the Flights menu help you start a
new flight, reset a flight, use the Flight Planner, end a
flight, and exit Flight Simulator.
Flight Simulator 2004

On the Aircraft menu, you can choose commands to
select a new aircraft, display the Kneeboard, change
the fuel and payload, adjust realism settings, and set
up system, instrument, and engine failures.
Flight Simulator 2004

The World menu includes commands to change the
time of day and season of the year and commands for
repositioning your aircraft at a new airport, displaying
the Map, and changing the weather.
Flight Simulator 2004
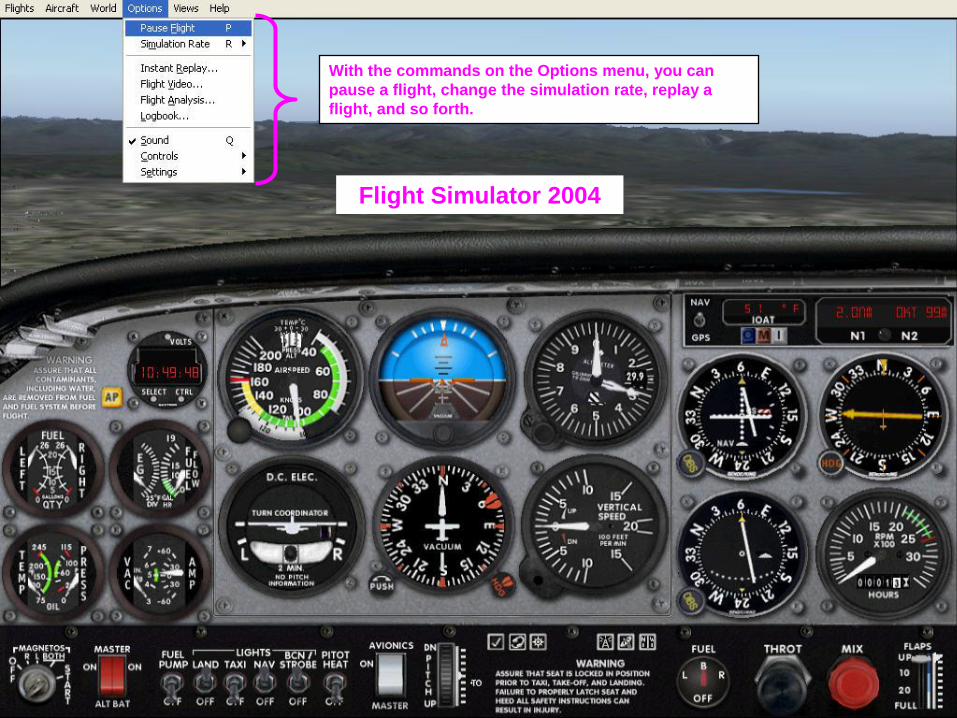
With the commands on the Options menu, you can
pause a flight, change the simulation rate, replay a
flight, and so forth.
Flight Simulator 2004

The Views menu includes commands to change the
display and to control ATC features.
Flight Simulator 2004

The commands on the Flights menu help you start a
new flight, reset a flight, use the Flight Planner, end a
flight, and exit Flight Simulator.
Flight Simulator X

On the Aircraft menu, you can choose commands to select a
new aircraft, display the Kneeboard, display a visual flight
path, change the fuel and payload, adjust realism settings, and
set up system, instrument, and engine failures.
Flight Simulator X

The World menu includes commands to change the
time of day and season of the year and commands for
repositioning your aircraft at a new airport, displaying
the Map, and changing the weather.
Flight Simulator X

With the commands on the Options menu, you can
pause a flight, change the simulation rate, replay a
flight, view Flight Analysis, and so forth.
Flight Simulator X

The Views menu includes
commands to change the display
and to control ATC features.
Flight Simulator X

In Flight Simulator X, the
Views menu includes
commands display the new
Landing View and IFR Panels,
where appropriate.
In some aircraft, you
can also click icons to
switch to Landing View
or the IFR Panel.

More Sources of Information
For more information about Microsoft Flight Simulator, visit the official Web site at www.fsinsider.com.
You can also find more information about Flight Simulator and Microsoft Flight Simulator as a Training Aid at www.BruceAir.com.